

Hellwig 7446 User Manual
559-734-7451 800-367-5480 FAX 559-734-7460
INSTALLATION INSTRUCTIONS
REAR STABILIZER BAR
Thank you for purchasing a quality Hellwig Product.
PLEASE READ THIS INSTRUCTION SHEET COMPLETELY BEFORE STARTING YOUR INSTALLATION
2A
1
3
1A
2
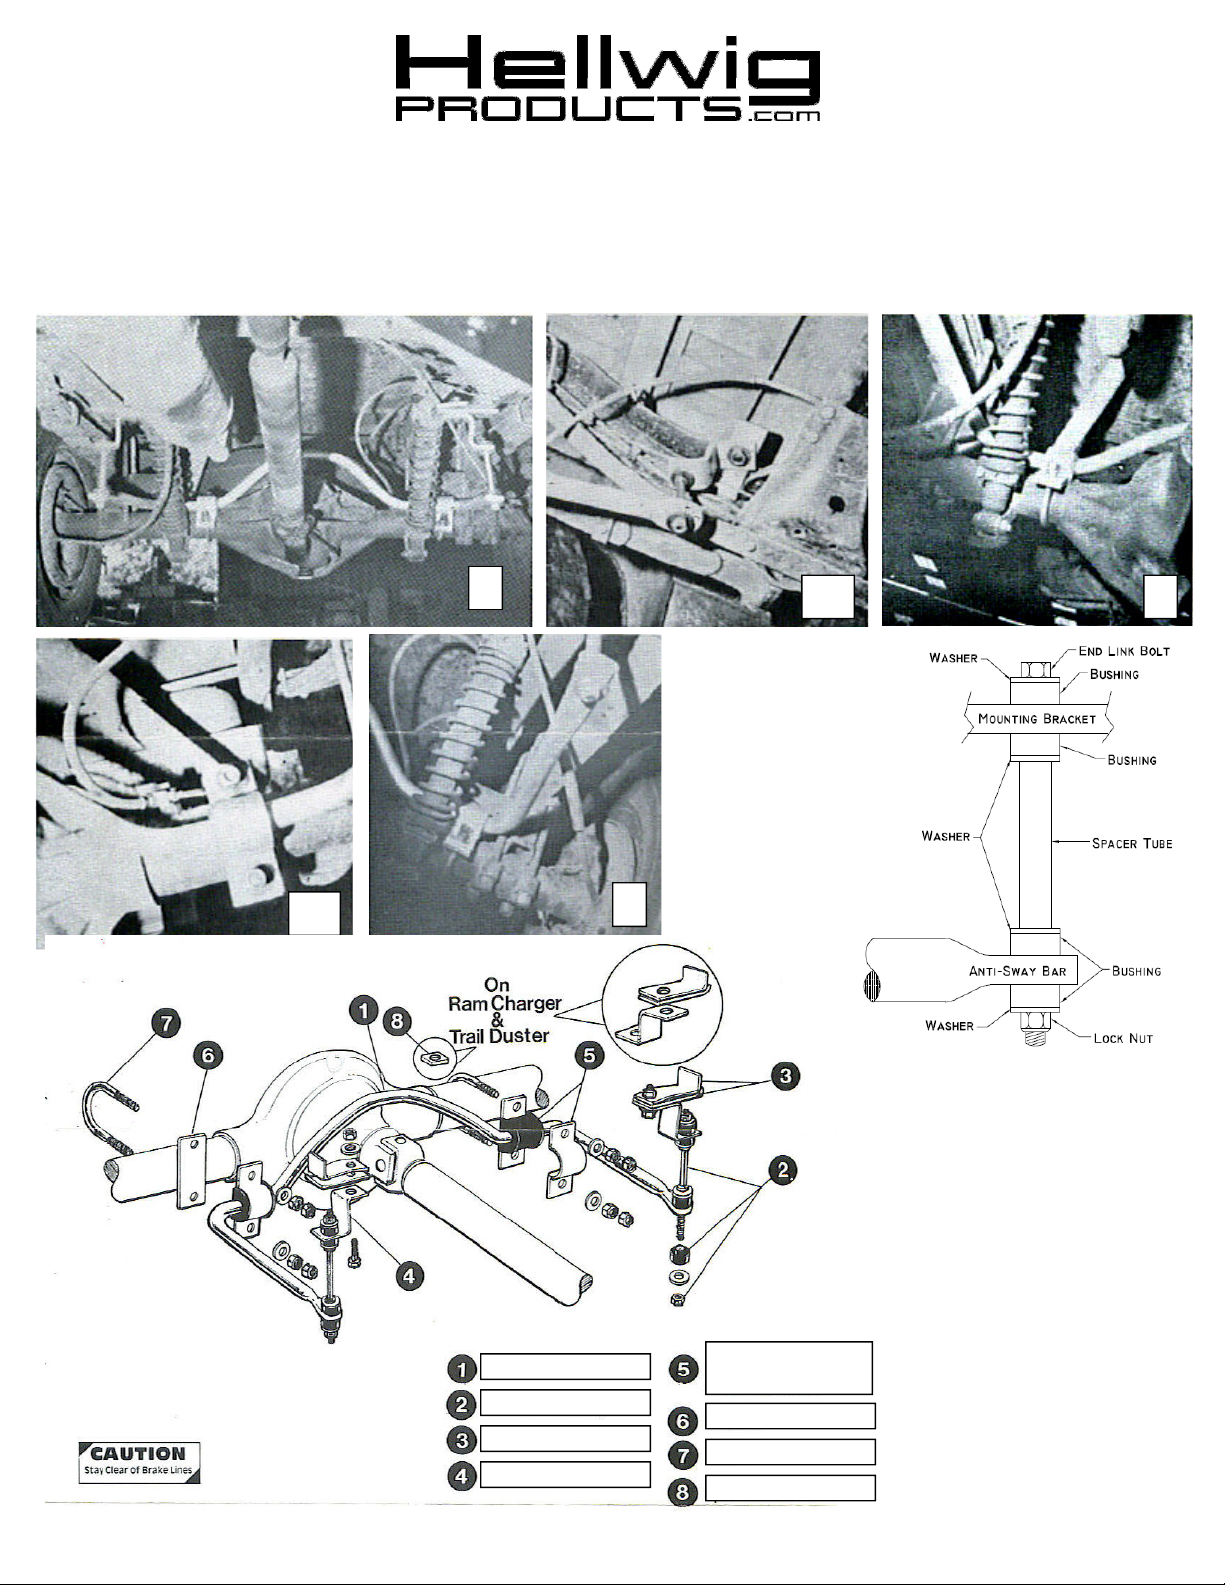
Sway Bar
End Link Assembly
Scarf Plates
Z-Brackets
( R-149 ) 11/29/2012
D-Bushing and
Mounting Bracket
Cross Bar
U-Bolt
Sway Bar

559-734-7451 800-367-5480 FAX 559-734-7460
SAFETY: BEFORE STARTING YOUR INSTALLATION, BE SURE TO SET PARKING BRAKE AND CHOCK TIRES.
NOTE: TO EASE INSTALLATION AND TO PROPERLY ADJUST THE BAR, THE WEIGHT OF THE VEHICLE MUST BE
ON THE SUSPENSION, AS IF DRIVING DOWN THE ROAD. DO NOT RAISE VEHICLE BY THE FRAME.
NOTE: THIS KIT MAY INCLUDE LOCK NUTS WHICH REQUIRES TIGHTENING WITH A WRENCH AFTER BEING
STARTED BY HAND.
NOTE: ON 1/2 TON INSTALLATIONS, THE AXLE BRACKET MOUNTS INSIDE OF SHOCKS.
TORQUE TABLE
BOLT SIZE: 3/8” = 20-30 ft. lbs. – 7/16” = 35-45 ft. lbs. – 1/2” = 50-70 ft. lbs. – 9/16” = 70-90 ft. lbs.-5/8”=120 ft. lbs.
1. On Ram Charger and Trail Duster install the frame hanger bracket mount as shown in Photo 1A.
A
2. Install spacer block and longer bolt on brake terminal block, Photo 2A.
1. Place sway bar over the driveshaft of the truck forward of the differential as shown in Photo 1.
2. Install axle mounting brackets as shown in Photos 2 and 3. Lubricate the insides and install D-bushings
around the sway bar to accommodate the steel mounting brackets. Install U-bolts, nuts and washers.
Make sure the U-bolt is under the brake line. Do not tighten at this point.
3. Install the frame mounting brackets shown in Photo 4. Leave bolts and nuts loose.
4. Refer to line drawing for proper installation of the end link component parts. Line up as square as possible. Tighten all nuts and bolts securely.
5. Bounce the vehicle and check for clearance on all undercarriage components. Be sure all nuts and bolts
are securely fastened and double nuts used where necessary or provided.
6. Recheck your installation, look for clearance between gas lines, exhaust pipes, brake lines, wiring, etc.
After one week of driving check your installation and periodically thereafter.
ATTENTION INSTALLER: BE SURE THE CUSTOMER RECEIVES THIS INSTRUCTION
SHEET, ALL IMPORTANT NOTE CARDS, WARNING CARDS AND THE WARRANTY FORM.
( R-149 ) 11/29/2012
 Loading...