

Page 1
559-734-7451 800-367-5480 FAX 559-734-7460
INSTALLATION INSTRUCTIONS
Thank you for purchasing a quality Hellwig Product.
PLEASE READ THIS INSTRUCTION SHEET COMPLETELY BEFORE STARTING
YOUR INSTALLATION
IMPORTANT NOTES
DO NOT INSTALL THIS UNIT ON CAB AND CHASSIS TRUCKS. THIS UNIT WILL
INTERFERE WITH THE REAR TIRES ON CAB AND CHASSIS TRUCKS CAUSING
DAMAGE TO THE AIR SPRING OR TIRES, OR TO BOTH. THIS KIT IS DESIGNED
FOR USE ON PICKUP TRUCKS ONLY
DO NOT ATTEMPT ANY MODIFICATIONS TO THE VEHICLE OTHER THAN
THOSE OUTLINED IN THIS INSTRUCTION AND WARNING SHEET. IF ANY
INTERFERENCE WITH THE GAS TANK , FUEL OR BRAKE LINES, EXHAUST
PIPE ETC.. STOP YOUR INST ALLATION AND CALL HELLWIG PRODUCTS FOR
TECHNICAL HELP OR INSTRUCTIONS.
NEVER LOAD THE VEHICLE THIS UNIT IS INSTALLED ON BEYOND THE
VEHICLES MANUFACTURER’S MAXIMUM GROSS WEIGHT RATING.
TORQUE TABLE BOLT SIZE:
3/8” = 20-30 ft. lbs. – 7/16” = 35-45 ft. lbs.
½” = 50-70 ft. lbs. – 9/16” = 70-90 ft. lbs.-5/8”=120 ft. lbs.
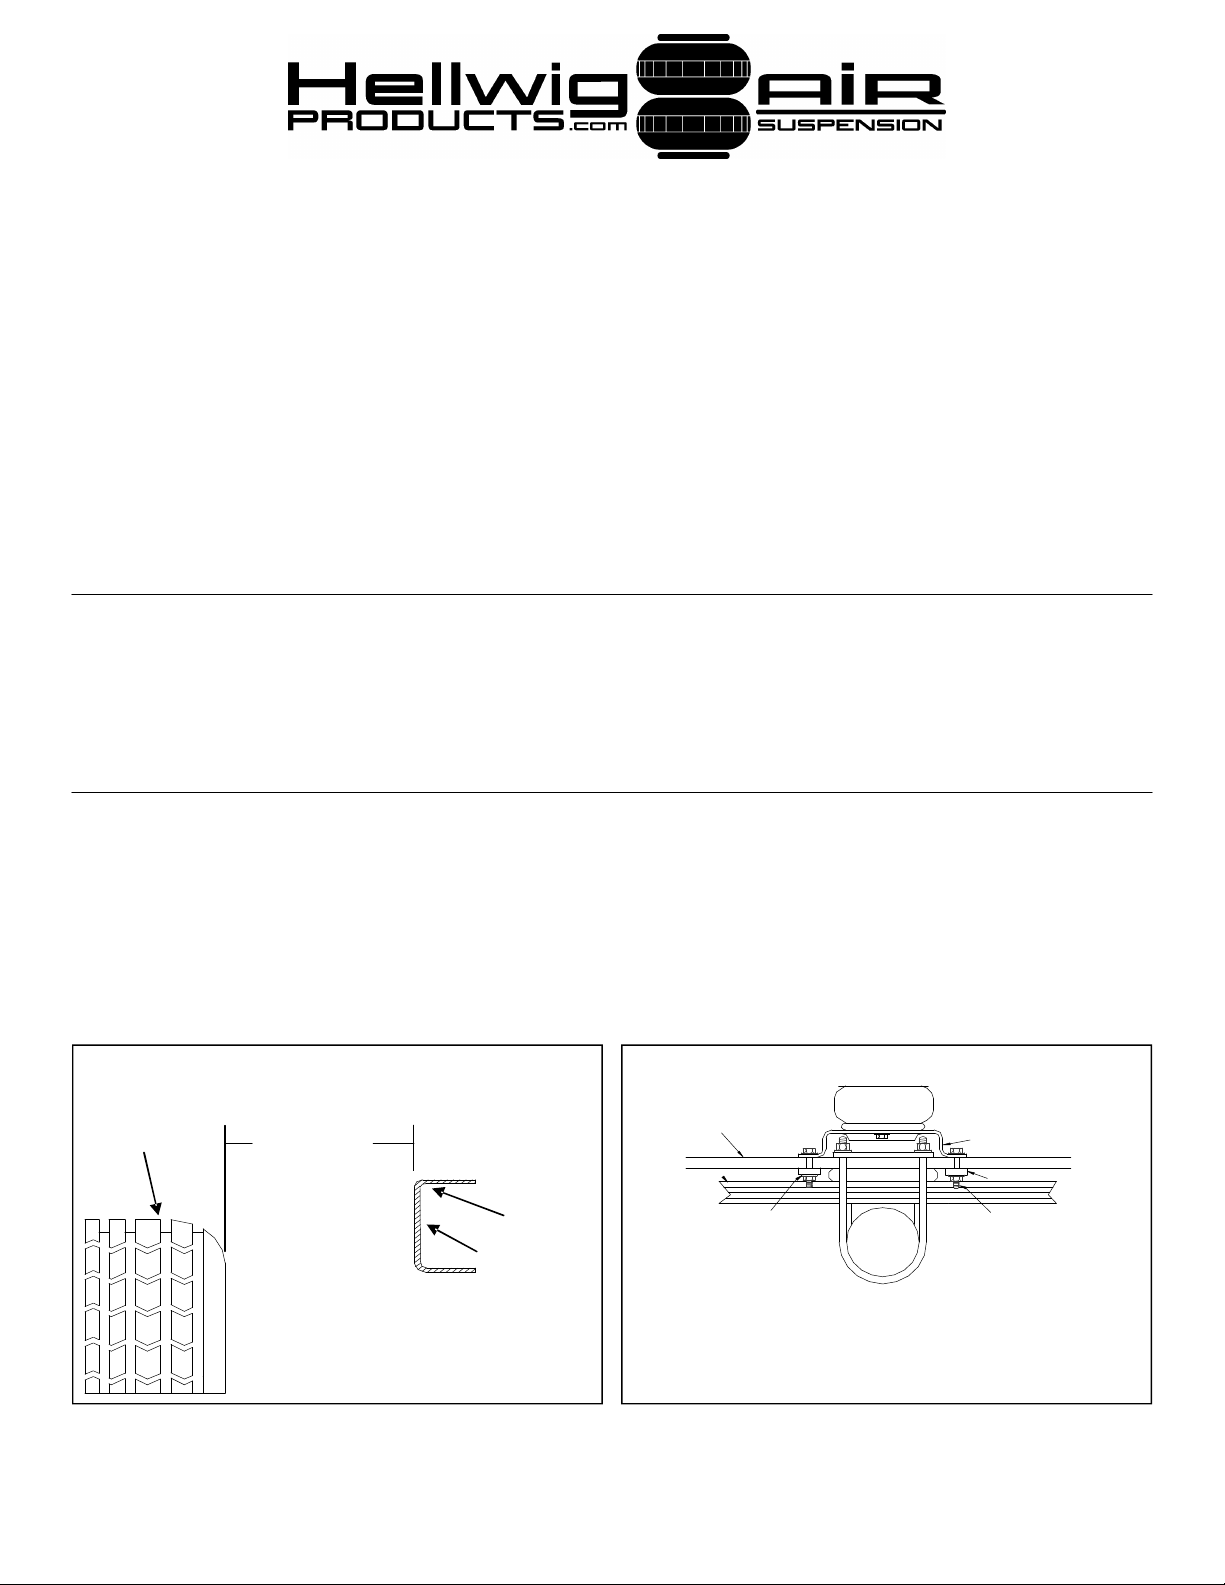
IMPORTANT WARN-
TIRE (7) SEVEN INCHES
MINIMUM CLEARANCE
REQUIRED BETWEEN
OUTSIDE OF FRAME
AND INSIDE OF TIRE
SEVERE TIRE AND AIR SPRING
DAMAGE WILL OCCUR IF THIS
DISTANCE IS NOT PRESENT
FRAME
MOVE ANY
WIRES,
LINES OR
HOSES
PRIOR TO
FIG # 1 TIRE TO WHEEL CLEARANCE FIG # 2 CONTACT OVERLAOD INSTALLATION
AIR SPRING
CONTACT OVERLOAD ASSY LOWER STEP
BRACKET
(REVERSE FOR CLEAR-
LEAF SPRING ASSY CROSSBAR
WASHER AND LOCKNUTS LONG BOLTS AND
LOCKNUTS
( TRIM TO LENGTH AS
NEEDED )
AXLE ASSY
ON VEHICLES WITH CONTACT OVERLOAD LEAVES, MOUNT THIS UNIT TO
THE TOP OF THE CONTACT LEAF, IF YOUR VEHICLE DOES NOT HAVE
ENOUGH SPACE
FOR THE AIR SPRING ASSY,REMOVAL OF THE CONTACT OVERLOAD
6400 ( R-6400 ) 12/20/06
Page 2

559-734-7451 800-367-5480 FAX 559-734-7460
NOTE: THIS UNIT IS DESIGNED TO MOUNT TO THE SIDE OF THE FRAME AND TO THE LEAF
SPRING ABOVE THE AXLE. DRILLING HOLES IN THE SIDE OF THE FRAME WILL BE
NECESSARY. IT WILL BE NECESSARY TO REMOVE THE TIRES, SUPPORT THE VEHICLE
BY THE AXLE WITH SAFETY STANDS AND BLOCK THE FRONT TIRES.
IMPORTANT: BEFORE BEGINNING THE INSTALLATION, CHECK TO BE SURE THERE IS ENOUGH
CLEARANCE BETWEEN THE FRAME AND THE TIRE FOR THIS ASSEMBLY. 1994
AND NEWER DODGE 4-WHEEL DRIVE PICKUPS MINIMUM CLEARNACE DISTANCE
IS (7) INCHES. SEE DIAGRAM DETAILING FENDER WELL MODIFICATIONS NECES SARY FOR THIS INSTALLATION. ( SEE FIG # 7 )
1. This unit is designed to be fully adjustable, the upper frame brackets and top air spring plate are
made up from three different brackets. Attach the air spring to the top plate with the 3/8” lock-
nuts provided. Be sure the air line fitting hole aligns with the large hole on the plate, the bent
lips on the upper plate go upwards away from the air spring. Tighten to 20 ft. lbs. max.. Install
the air line fitting into the large hole in the top of the air spring. Tighten completely so that
some of the red sealant is down inside the threaded hole. Align the hose port on the fitting to
point towards the expected air line route. Be careful not to damage the hose nut or the inner
hose sleeve when tightening the fittings. ( SEE FIG # 3 OR # 5 )
2. Attach the lower step bracket to the bottom of the air spring. Use the small bolt and lock washer
provided. A variety of slots are provided to assure proper air spring alignment. Tighten to be
snug. 20 ft lbs. max.. Reverse direction or switch holes or positions as to best fit your particular
vehicle. ( SEE FIG # 3 OR # 5 )
3. Place the assembly onto the leaf springs above the axle. The frame mount brackets are reversible above or below the top plate, however, there is a right and a left side. The left side below the
plate is the right side above the plate. Position the mount brackets to attach to the top of the upper air spring plate and so the frame mounting holes are against the side of the frame rail. Attach the frame mount brackets to the upper plate with the shortest 3/8” bolts provided. Be sure
to place the heads of the bolts on the air spring side of the bracket. Adjust the frame brackets to
compensate for any contours on your particular frame. Snug these bolts, DO NOT TIGHTEN.
( SEE FIG # 4 OR # 6 )
4. Adjust the upper brackets on the frame so the air spring is as straight up and down as possible.
Set the air spring to be between 5 and 6-1/2 inches between the brackets. The air springs come
shipped at approximately 6”, this is a good set up height. Use the (4) extra crossbars provided
as spacers to elevate one end of the step brackets on the leaf springs to make the assembly as
level as possible. ( SEE FIG # 3 )
5. With the air spring straight and at the desired setup height, use the holes in the frame brackets
and mark the locations to drill the holes, make the mark in the center of the slots to allow for
adjustment. Be sure to double check all dimensions. ( SEE FIG # 3 OR # 5 )
6. Being sure to move any lines or wires inside the frame to avoid damaging with the drill. Drill
the (4) mount holes with a 7/16” drill bit. Repeat this process for the other side.
7. Place the remaining short 3/8” bolts provided through the frame brackets and frame so the
threads are under the vehicle. Place the flat plates inside the frame on the bolts and attach with
the locknuts provided. Tighten only to be snug. Be sure not to pinch any lines, hoses or wires
inside the frame with the flat plates. ( SEE FIGURE # 4 OR # 6 )
6400 ( R-6400 ) 12/20/06
Page 3

leaf springs to help level the step bracket to the frame bracket as needed. Be sure to run the long
559-734-7451 800-367-5480 FAX 559-734-7460
8. Move the lower step bracket front to rear and side to side to adjust the air spring to be as straight
as possible. Once the upper bracket location is established, torque the frame brackets to the
specified rate. Use the extra crossbars provided as shims between the lower step bracket and the
bolts through all the holes in the brackets and crossbars to secure completely. ( SEE FIG # 3
OR # 5 )
9. Place the long bolts into the slots in the step bracket so the threads hang down below the leaf
springs. Attach to the leaf springs with the crossbars, washers and locknuts provided. Make nec essary adjustments and torque. Double check all nuts and bolts to assure proper torque. Do not
add any air pressure to the system without double checking torque. At this point all of the
air spring mounting hardware should be torqued.
10. Unroll the air hose and cut into (2) even lengths, roll the ends of the hose on a hard surface to
make the ends as round as possible.
11. Install one end of the hose into the elbow at the top of the air spring. See the hose end diagram
for details on the particular style of hose connections used. ( SEE FIG # 8 )
12. Route the air hose to the desired fill area, this is usually the rear bumper or a minimum 5/16”
hole in the frame. If an on board compressor is being used, follow the hose route instructions
included with the compressor. Route the air hose inside the frame and tie to the frame with the
plastic tie straps provided. Keep the air hose away from the exhaust and the shocks or other areas
where the hose can rub or become chafed on any sharp objects.
13. If needed slide the black hose insulators onto the hose and position near the exhaust. DO NOT
allow the insulator to contact the exhaust, minimum 1-1/2” clearance. Use one inflator valve for
each air spring.
14. Inflate the air spring to approximately 40 PSI and check for clearance on the frame brackets,
tires, brake lines etc.. Check the air spring for proper alignment from top to bottom between the
brackets. Deflate and make adjustments as needed. With the system inflated, squirt soapy water
over all of the hose and fitting connections to check for leaks. Deflate the system and repair as
needed. RETEST
15. KEEP A MINIMUM OF 10 PSI IN THE SYSTEM AT ALL TIMES, YOU MAY SELECT
THE IDEAL INFLATION PRESSURE FOR RIDE CONFORT AND LOAD CARRYING
UP TO 100 PSI MAXIMUM.
ATTENTION INSTALLER: BE SURE CUSTOMER RECIEVES THIS INSTRUC TION SHEET, WARNING CARDS AND THE WAR
RANTY FORM.
6400 ( R-6400 ) 12/20/06
Page 4
559-734-7451 800-367-5480 FAX 559-734-7460
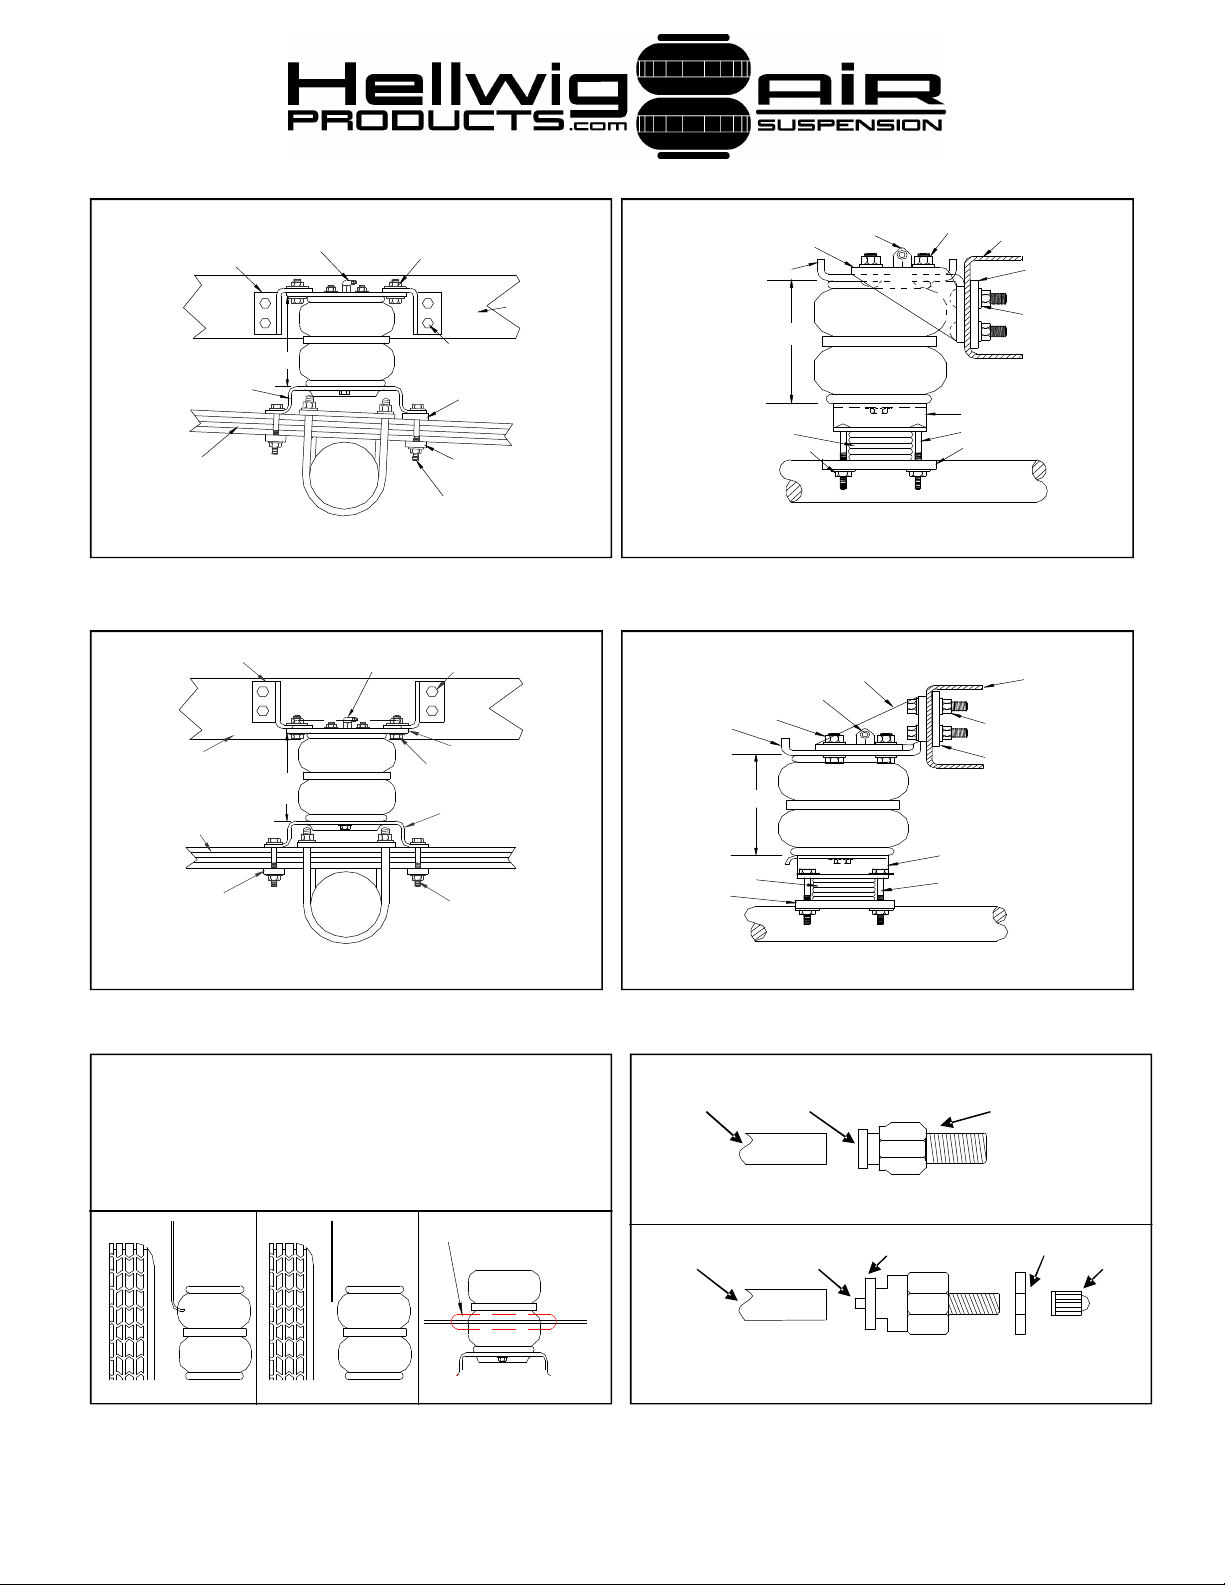
UPPER AIR SPRI NG PLATE
AIR LINE FITTING BOLTS AND LOCKNUTS
FRAME BRACKET
VEHICLES
FRAME
.5
MAKE THIS DISTANCE FRAME MOUNTING
BETWEEN 5 TO 6-1/2 BOLTS AND LOCKNUTS
INCHES USE EXTRA
CROSSBARS AS
LOWER STEP BRACKET SPACER SHIMS
TO LEVEL
( REVERSE AS NEEDED ) STEP BRACKET
TO AIR SPRING
AS REQUIRED BY
YOUR
VEHICLE
LEAF SPRING ASSY CROSSBARS
SHORT UPPER BRACKET
BOLTS AND LOCKNUTS
AIR LINE FITING VEHIICLES
FRAME
FRAME BRACKET
UPPER AIR SPRING PLATE INNER
FRAME PLATE
FRAME
BRACKET
MAKE THIS DISTANCE BOLTS
AND
BETWEEN 5 TO 6-1/2 LOCK-
LOWER STEP
BRACKET
( REVERSE AS
NEEDED )
LONG BOLTS AND
LOCKNUT
LEAF SPRING ASSY (TRIM TO LENG TH
AS NEEDED)
WASHER AND LOCKNUTS CROSSBAR
FIG # 3 STANDARD MOUNTING STYLE
VIEW FROM TIRE SIDE
FRAME BRACKET FRAME MOUNTIN G
BOLTS
AIR LINE FIITTING AND LOCKNUT S
VEHICLES FRAME AIR SPRING UPPER AIR
SPRING PLATE
UPPER AIR SPRING
PLATE
MAKE THIS DISTANCE BOLTS AND LOCKNUTS
BETWEEN 5 TO 6-1/2
INCHES
CROSSBAR
AXLE ASSY LONG BOLTS AND
LOCKNUTS
(TRIM TO LENGTH
AS NEEDED)
FIG # 5 OPTIONAL MOUNTING STYLE
VIEW FROM TIRE SIDE
1994 — 2002 DODGE PICKUPS
REMOVAL OF THE RUBBER INNER FENDER IS REQUIRED TO DRILL THE MOUNTING
HOLES
IN THE FRAME. PUSH IN AT THE CENTER OF THE PLASTIC RIVET TO LOOSEN. REMOVE FROM OPPOSITE SIDE.
TO ORDER REPLACEMENT PLASTIC RIVETS, CALL HELLWIG PRODUCTS CO. AND
ORDER PART NUMBER 50640, THESE WILL BE SENT AT NO EXTRA CHARGE.
IT WILL BE NECESSARY TO TRIM OFF THE INNER LIP ON THE RUBBER FENDER
WELL AT THE AIR SPRING, AS PER DIAGRAMS. ONLY TRIM OFF THE AREA INDI-
BEFORE AFTER THIS AREA ONLY
IS
NEEDED TO BE TRIMMED
FIG # 4 STANDARD MOUNTING STYLE
VIEW FROM REAR
FRAME BARCKET VEHICLES FRAME
AIR LINE FITTING
UPPER AIR SPRING MOUNTING
BOLTS AND LOCKNUTS FRAME
BOLTS
UPPER AIR SPRING PLATE AND LOCKNUTS
INNER FRAME
PLATE
LOWER STEP BRACKET
( REV ERSE AS NEEDED )
LEAF SPRING ASSY LONG BOLTS AND LOCKNUTS
CROSSBAR ( TRIM TO LENGTH AS NEEDED )
AXLE VIEW
FROM REAR
FIG # 6 OPTIONAL MOUNTING STYLE
VIEW FROM REAR
QUICK DISCONNECT STYLE AIR FITTING
AIR LINE COLLET AIR FITTING
TO INSTALL AIR LINE, PRESS AIR LINE INTO THE COLLET ON THE AIR LINE FITTING UNTIL THE AIR
LINE BOTTOMS IN THE FITTING THIS WILL LOCK THE AIR LINE INTO PLACE.TO REMOVE, PUSH THE
COLLET IN, HOLD AND PULL ON THE AIR LINE THIS WILL RELEASE THE AIR LINE.
SCHRADER AIR FILL VALVE
COLLET MOUNTING NUT
AIR LINE INNER SLEEVE
DUST CAP
TO INSTALL AIR LINE ONTO THE SCHRADER VALVE FOLLOW INSTRUCTIONS AS STATED ABOVE. BE
CAREFUL NOT TO DAMAGE THE AIR LIINE WITH THE INNER SLEEVE.
NOTE: SOME AIR FITTINGS MAY OR MAY NOT HAVE THE INNER SLEEVE.
NOTE: MAKE SURE AIR LINE IS CUT STRAIGHT AND IS AS ROUND AS POSSIBLE TO MAKE A GOOD
FIG # 7 FENDER WELL DETAIL
FIG # 8 HOSE END CONNECTION DETAIL
6400 ( R-6400 ) 12/20/06
Page 5
559-734-7451 800-367-5480 FAX 559-734-7460
IMPORTANT NOTE
READ THIS INSTRUCTION AND WARNING
SHEET COMPLETELY BEFORE STARTING
YOUR INSTALLATION
A CLEARANCE OF SEVEN ( 7 ) INCHES IS REQUIRED BEWTEEN THE
OUTSIDE OF THE VEHICLES FRAME AND THE INSIDE OF THE REAR
TIRE, TO AVOID DAMAGE TO THE AIR SPRING AND TO THE TIRE
DOUBLE CHECK THIS CLEARANCE NEEDED.
BEFORE INSTALLING SNOW CHAINS BE SURE TO CHECK FOR
CLEARANCE AROUND THE AIR SPRING TO AVOID ANY DAMAGE.
WHEN LIFTING THE VEHICLE WITH A JACK, BE SURE TO SET THE
PARKING BRAKE AND USE SAFETY STANDS, SUPPORT THE VEHICLE BY THE AXLE TO KEEP THE SUSPENSION LOADED.
WHEN REINSTALLING THE TIRES, CHECK THE MANUFACTURERS
SPECIFICATIONS FOR PROPE R LUG NUT TORQUE.
MOVE A NY ELECTRICAL WIRES, FUEL LINES, BRAKE HOSES, OR
OTHER OBJECTS INSIDE THE FRAME TO AVOID DAMAGE BEFORE
DRILLING ANY HOLES ON THE FRAME.
THIS UNIT MUST BE SECURELY MOUNTED AT THE TOP AND BOTTOM OF THE AIR SPRING PRIOR TO INFLATION OR DAMAGE TO
THE AIR SPRING WILL RESUL T.
BE SURE THE FLAT PLATES INSIDE THE FRAME ARE PLACED BEHIND ANY LINES, WIRES, OR HOSES TO AVOID CRUSHING.
PROPER AIR SPRING SETUP HEIGHT IS BETWEEN FIVE (5) AND SIX
AND A HALF (6-1/2) INCHES, TOP AND BOTTOM OF AIR SPRING.
6400 ( R-6400 ) 12/20/06
Page 6

559-734-7451 800-367-5480 FAX 559-734-7460
PARTS LIST
KIT # 6400
PART # QTY DESCRIPTION
60102500 2 AIR BAG W/ 1/4”NPT PORT
20800269 2 SEE R&D BEFORE ORDERING
20801866 2 STEP BRACKET
20801867 2 RIGHT FRAME BRACKET
208001868 2 LEFT FRAME BRACKET
20801865 4 PLATE
20801863 8 CROSSBAR
125000999 1 AIR LINE BAG # 999
121900001 1 18’ AIR BRAKE TUBING
121091879 2 AIR INFLATION VALVE
121901001 2 1/4” X 8’ AIR LOOM
121500002 2 #4-1/4” MPT ELBOW
121050221 8 7” BLACK TIE STRAPS
125020399 1 SMALL PARTS BAG # BG-399
135006400 1 INSTRUCTIONS SHEET ( R -6400 )
6400 ( R-6400 ) 12/20/06
 Loading...