

Page 1
HARMAN KARDON® AVR 255/AVR 355
SOFTWARE UPGRADE INSTRUCTIONS
This Harman Kardon® software upgrade
will improve the performance of your AVR
255 or AVR 355 by updating its internal
operating system, DSP firmware and videoprocessing software. Unlike many consumer
products, which are designed with “fixed”
memory, these Harman Kardon products
feature flash memory that is upgradeable
through a standard RS-232 serial port. To
install the software, please follow these
instructions. If you have any questions,
consult the Harman Kardon Web site at
www.harmankardon.com.
Important Note:
This software is specially designed for use with
Harman Kardon AVR 255 and AVR 355 receivers.
Use with any other models or brands may cause
damage to the product. DO NOT USE THIS
SOFTWARE WITH ANY OTHER PRODUCTS.
System Requirements
To install the software upgrade, you will need to
purchase a standard RS-232 connection cable. Do
not use a “null modem” cable, as it uses connection
links that are not compatible with your AVR. If your
computer is not equipped with a serial port, you may
use one of the USB-to-serial-port adapters shown
below that have been tested for interoperability with
the AVRs. Most brand-name adapters will also work,
but due to the wide variety of computers, operating
systems and adapters, we cannot guarantee that other
adapters will work in all situations.
Gigaware Model 26-949•
StarTech.com Model ICUSB232•
IOGEAR Model Z-GUC232A•
You will also need to have access to a computer that
is close enough to be connected to the AVR being
upgraded. The minimum system requirements for the
computer are:
®
Processor: Intel•
equivalent, or higher
Operating system: Windows•
(for Windows 2000 or Windows XP, your system
may require you to have “administrator” user rights)
Hard-drive space: 10MB available•
System RAM: 128MB •
CD-ROM drive (when using the CD-ROM version of •
the program)
RS-232 serial port•
Pentium® II processor or
®
2000 SP4 or higher
Installation Instructions
Upgrading your receiver is easy, but for the upgrade
to work properly, it is important to precisely follow
the instructions below. The upgrade will take about
45 minutes, and once it begins you must complete
the entire process in one session. Please allow sufficient time to run through all the steps. PLEASE
READ THESE INSTRUCTIONS CAREFULLY BEFORE
PROCEEDING.
Upgrading your unit will erase all system memories. •
This means that any configuration settings or
tuner presets that you have entered will be lost.
To make it easier to reestablish the settings after
completing the upgrade, you may wish to write
down your current system configurations using the
worksheets that are part of this software package.
To print those worksheets, use Windows Explorer
or another file-management program to locate the
Worksheets.pdf file in the directory where the
upgrade files have been saved. Click on the file to
open it with the Adobe
print copies as needed.
Press in the • Main Power button on your AVR, but
leave the receiver in the Standby mode.
If you are using files downloaded from the Harman •
Kardon Web site to upgrade the AVR, use Windows
Explorer, or any other file-management program,
to locate the folder where you have downloaded
the upgrade file. Click on the file named
HKAVRupgrade.exe. The file will then automatically
unpack all of the files needed to upgrade your AVR.
®
Reader® tool, and then
If you are loading the upgrade from a CD-ROM, •
insert the disc in your computer’s drive.
Locate the directory for the CD-ROM or the •
downloaded files and click on the file named HK_
Upgrader.exe. It is easy to recognize; depending
on the display mode for your file manager, the icon
will be a stylized version of the volume control knob
on your AVR.
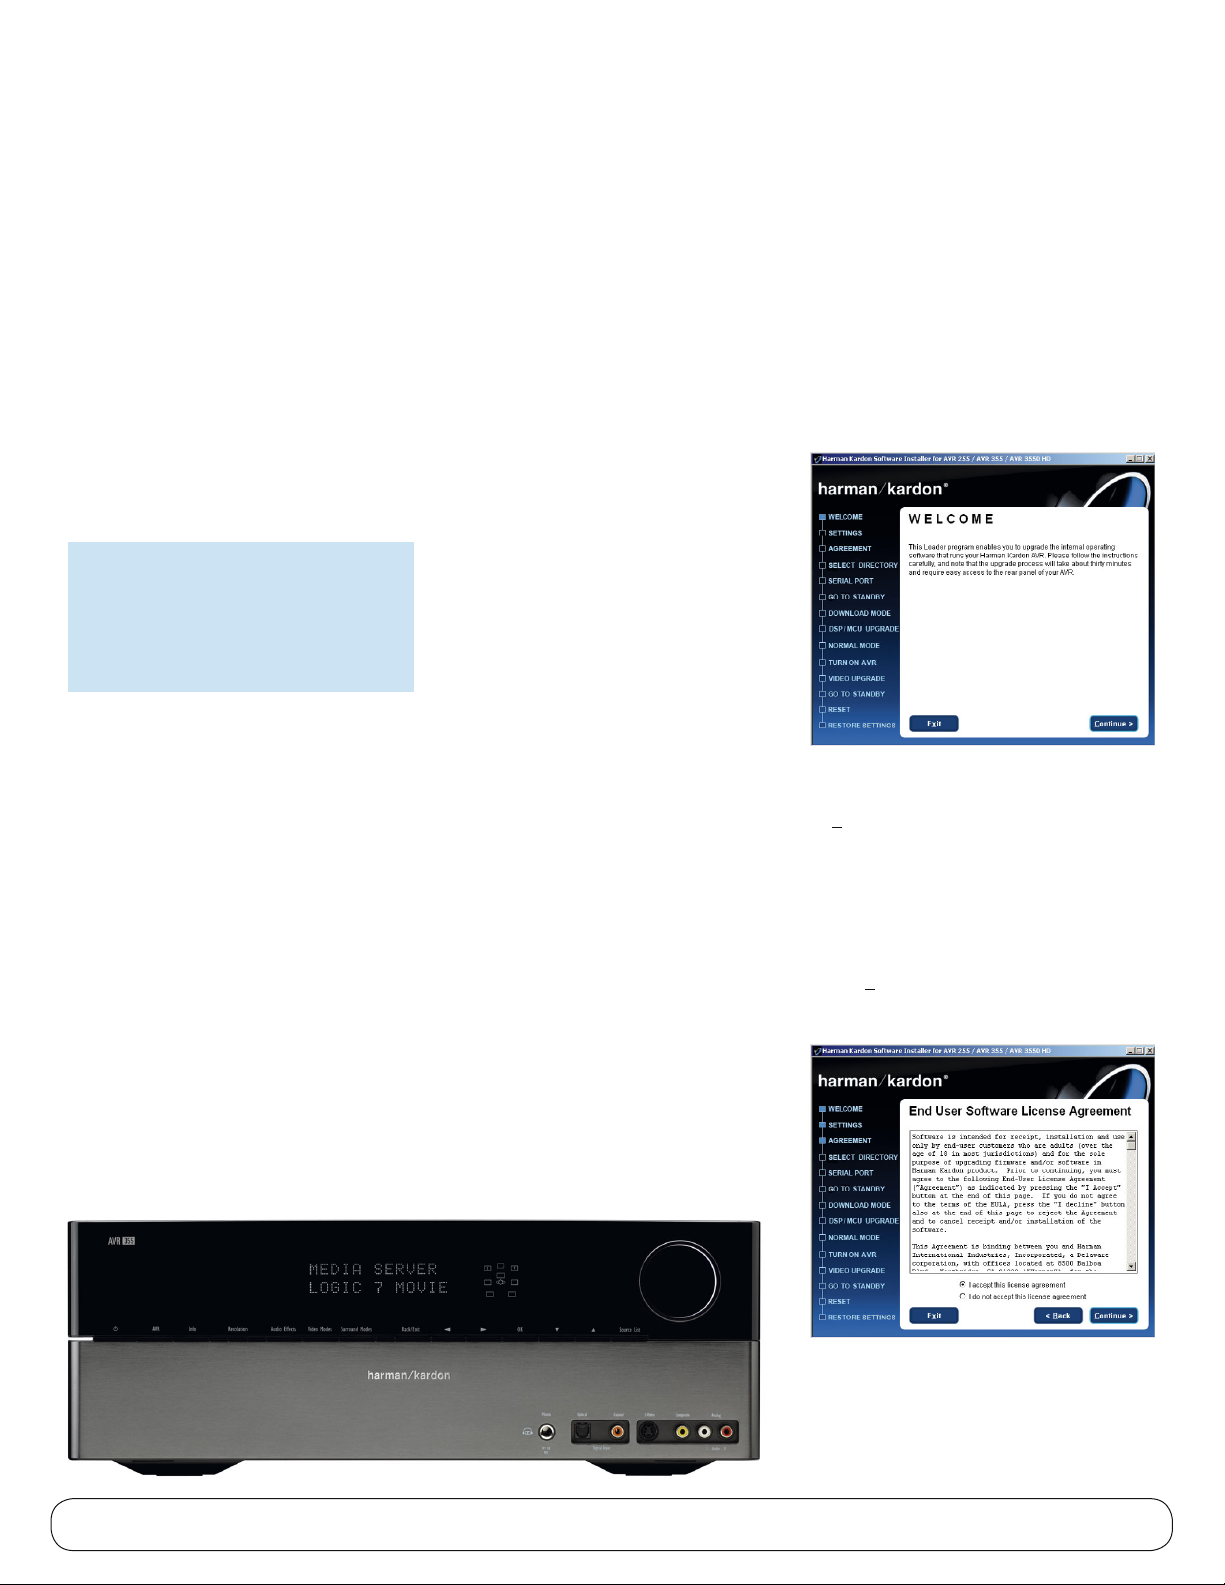
A new window with the “Welcome” screen will open •
when the Loader program starts. Click “Continue”
to proceed.
You will be reminded to record your receiver’s •
settings if you have not already done so. Click
“Continue” to proceed.
The next screen contains the End-User License •
Agreement for this software upgrade. Please read
this important document, using the scroll bar on the
right side of the window to move down through the
copy. If you agree to the terms of the agreement,
click “I accept this license agreement” and then
click “Continue” to proceed. Otherwise, click on “I
do not accept this license agreement” to cancel
the upgrade and exit the Loader program.
1
Page 2
HARMAN KARDON® AVR 255/AVR 355
SOFTWARE UPGRADE INSTRUCTIONS
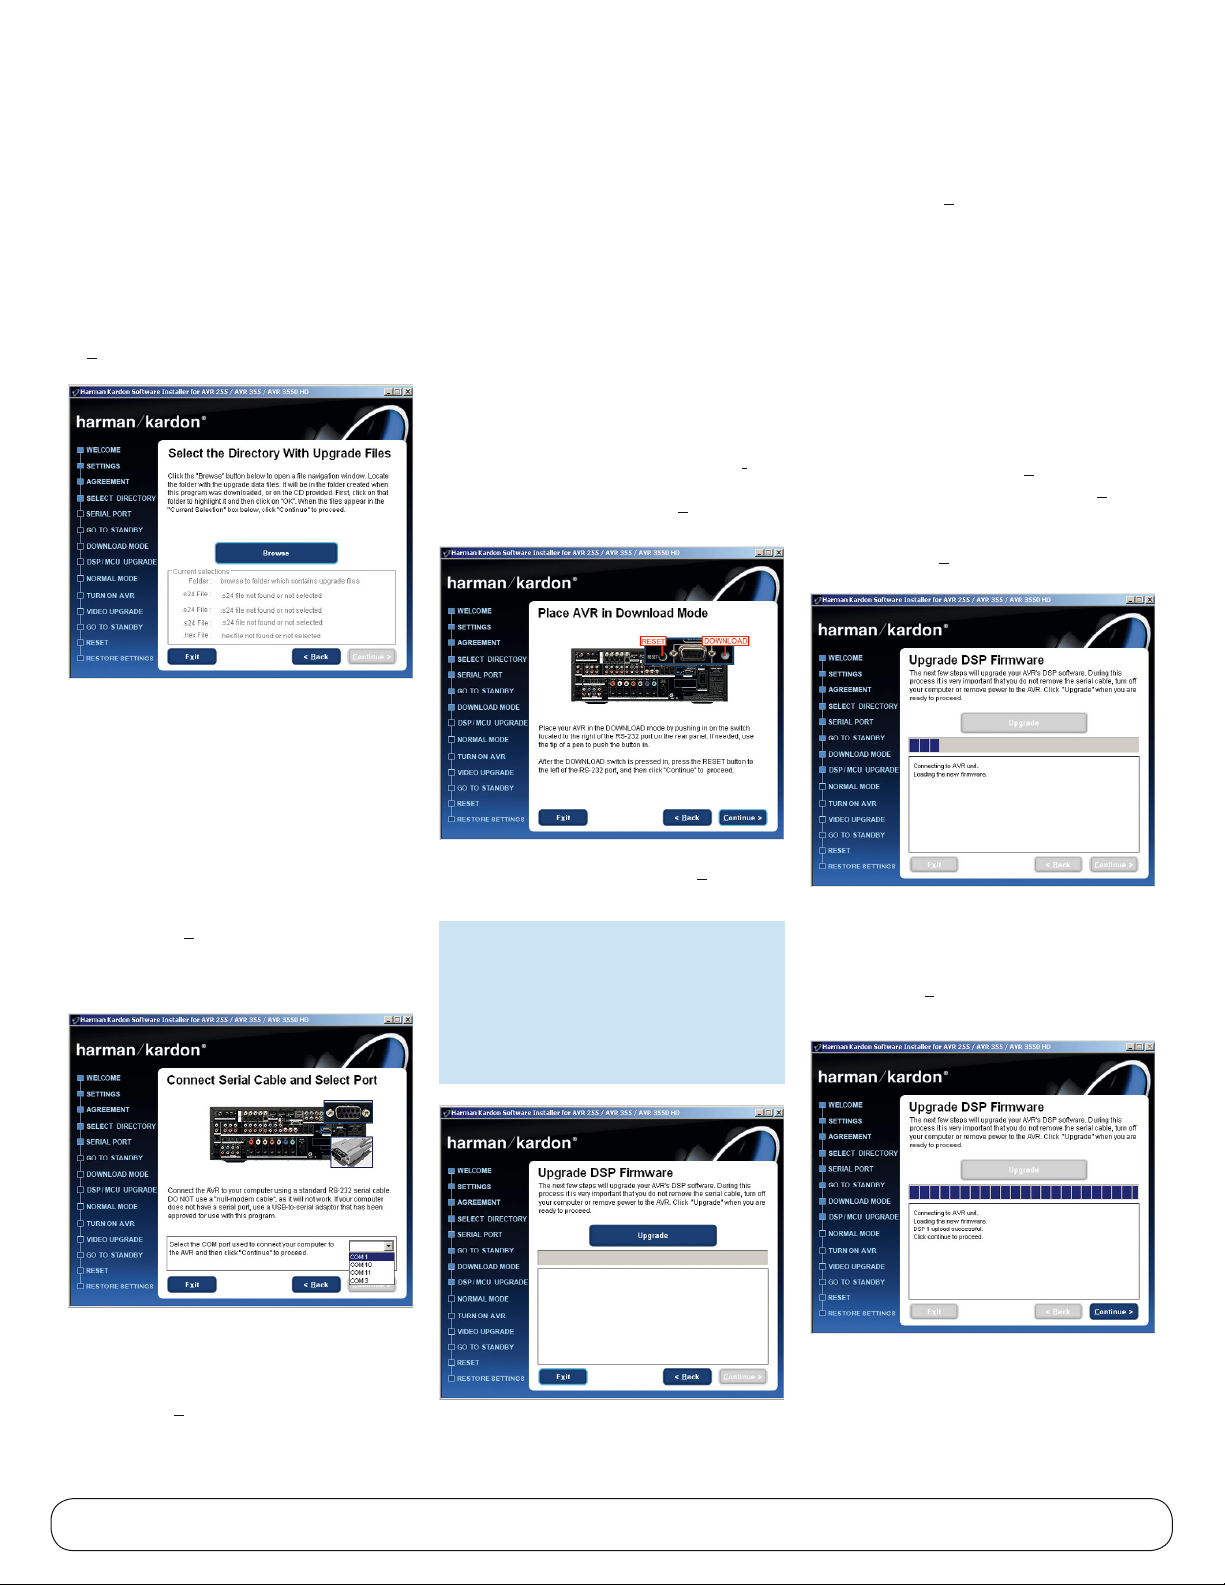
When the screen changes, you will be prompted
to enter the location where the files for this
upgrade are located. Click “Browse” to open
a file-finder window, and then navigate to the
correct folder. Click on that folder and then click
“Open”. Note that the file names will automatically
appear in the “Current Selections” window. Click
“Continue” to proceed.
Following the instructions on the next screen, •
connect the serial cable to both the AVR and your
computer (or the USB-to-serial-port adapter, if
used). Next, use the pulldown tab to select the
serial port used for the connection between your
computer and the AVR. If there is only one serial
port, the most common setting is “COM 1,” but if
there are multiple ports or if you are using a USBto-serial-port adapter, you may have to select a
different COM port. When a COM port has been
selected, click “Continue” to proceed. You may
have to return to this screen and choose a different
port if the one originally selected does not connect
properly.
The final step before the system upgrade begins •
is to place your AVR in Download mode and reset
it. Using the tip of a pen or an unbent paper clip,
press in on the Operate/Download button behind
the small hole to the right of the RS-232 connector
on the rear panel of the AVR. The button does not
protrude from the back panel; if you are in doubt
as to whether the button is in the correct position,
try pressing it two or three times until you get the
feel for whether it is “in” or “out.” After placing the
AVR in Download mode, press the Reset button
on the left side of the RS-232 connector. The
Reset button is deeply recessed. Press it by “feel”
using the pen or paper clip. When both of these
steps have been completed, click “Continue” to
proceed.
When the next screen appears, click • “Upgrade” to
start the process.
Important Note:
Once the upgrade starts, do not interrupt it by
turning your AVR off or exiting the upgrade
program on your computer. Doing so may cause
the upgrade to fail and possibly damage your
receiver.
Once you click • “Upgrade,” it will take 10 to
15 seconds for your computer to establish a
communications link with the AVR. After that,
the first part of the new DSP firmware will begin
to load, as indicated by the movement of the
progress bar.
If the upgrade does not begin within 30 seconds,
°
or if an error message appears inside the loader’s
dialog box, the problem is either an incorrect
COM-port selection or the position of the
Operate/Download button. First, check to make
sure that it is in the Download position, press the
Reset button and then click “Upgrade” again. If
the error message appears again, click “Back”
until you are at the “Connect Serial Cable and
Select Port” screen. Select a different COM port
and then click “Continue,” making certain that
you reset the AVR when prompted.
A message inside the loader window will let you •
know when the first section of the DSP firmware
has successfully been loaded into your AVR. As
directed, click “Continue” to proceed to the next
step.
If your AVR is not already in Standby mode with •
amber-colored lighting around the Standby/On
and Main Power buttons, press the Standby/On
button. Click “Continue” when you are ready to
proceed.
2
Page 3

HARMAN KARDON® AVR 255/AVR 355
SOFTWARE UPGRADE INSTRUCTIONS
As instructed on the next screen, return your AVR to •
Normal mode by pressing the Operate/Download
button so that it is in the out position or Operate
mode. Press the Reset button. Next, press the
Standby/On button on the front panel to turn the
unit back on.
Once the AVR is turned on, the AVR will •
automatically begin to transfer the new firmware into
its flash memory. During this process, messages
will appear in the AVR’s front-panel display as the
current firmware is erased, and the new data is read
and then written into the memory, followed by some
additional internal processing steps. When a WRITE
COMPLETE message appears on the bottom line
of the front-panel display, this part of the process
is complete. Press the Standby/On button to put
the AVR back in Standby mode and then click
“Continue” to proceed.
As directed, place the AVR back in Download •
mode by once again pressing in on the rear-panel
Operate/Download button. Press the Reset button
and then click “Continue” to proceed.
The next screen initiates the loading of the second •
part of the new DSP firmware. Click “Upgrade”
to start the data transfer. As with the first part of
the DSP firmware, you will see the progress bar
move until the message in the loader box indicates
that the upload is successful. Click “Continue” to
proceed when instructed.
Press in on the • Operate/Download button to place
it in Operate mode and press the Reset button.
Next, press the Standby/On button to turn the AVR
back on.
When the AVR is turned on, the AVR will again •
transfer the new firmware into its flash memory.
During this process, you will see the same series
of messages in the AVR’s front-panel display that
appeared while the first part of the DSP software
was loading. When the WRITE COMPLETE message
appears, the DSP is completely updated. Press
the Standby/On button to place the AVR back
in Standby mode and then click “Continue” to
proceed.
Place the unit back in the Download mode by •
once again pressing in on the rear panel Operate/
Download switch. Press the Reset button and then
click Continue to proceed.
When the • “MCU Upgrade” screen appears, click
“Upgrade” to load the new software. When the
progress bar moves all the way to the right side of
the window and the MCU UPLOAD SUCCESSFUL
message appears, click “Continue” to proceed.
At the next screen, turn the AVR on by pressing the •
front-panel Standby/On button. Wait 30 seconds
for the unit to reach normal operating status and
then click “Continue” to proceed.
The final data transfer is the new video software. •
Click “Upgrade” to proceed. During this process,
you will see a series of messages in the loader
window as the old software is erased and the new
software is written to the AVR’s flash memory.
When the message indicates that the update is
complete, click “Continue” to proceed.
Put the AVR in Standby mode by pressing the front-•
panel Standby/On button. Click “Continue” to
proceed.
The last step in the upgrade process is to do a •
system reset by pressing the OK button on the
front panel. Press and hold the button for five to 10
seconds; release it when the AVR turns on and the
word “RESET” appears in the front-panel display.
Click “Continue” to go to the final screen.
As shown on the next screen, return the AVR to •
normal operating mode by pressing the Operate/
Download button so that it pops out to Operate
mode. Next, press the Reset button and then click
“Continue” to proceed.
3
Page 4

HARMAN KARDON® AVR 255/AVR 355
SOFTWARE UPGRADE INSTRUCTIONS
The final screen will remind you that, because •
the upgrade and reset process erases any of the
system configuration data and tuner presets stored
in your receiver, it is important that you reenter
that data. Follow the instructions shown in your
owner’s manual to reenter the data copied to the
worksheet files supplied with this upgrade package,
or enter new settings. You should also recalibrate
the system’s speaker and room-equalization settings
using the EzSet/EQ
™
process.
To check if the upgrade was successful, turn on your
AVR and press 1-2-3-0-OK on the remote control to
display the version number in the front-panel display.
If it reads as shown below, your unit is now loaded
with the proper software. If a different number
appears, please repeat the upgrade process.
07-10-2008 03
AFW V0.95.1.1
Write this upgrade information in your owner’s
manual so that you’ll have it available for reference.
When new software is made available through
www.harmankardon.com, it will show the number of
the latest version. You will need this information to
see if an additional upgrade is required.
CONGRATULATIONS! With the completion of the
upgrade process, your Harman Kardon AVR is now
not only as good as new – it will perform even better
than it did when you first bought it. We wish you many
years of happy listening!
250 Crossways Park Drive, Woodbury, NY 11797
www.harmankardon.com
©2008 Harman International Industries, Incorporated. All rights reserved.
Part No. 255/355V0710200803
Harman Kardon is a trademark of Harman International Industries,
Incorporated, registered in the United States and/or other countries.
EzSet/EQ is a trademark of Harman International Industries, Incorporated.
Adobe and Reader are either registered trademarks or trademarks of
Adobe Systems Incorporated in the United States and/or other countries.
Intel and Pentium are trademarks of Intel Corporation.
Windows is a registered trademark of Microsoft Corporation in the
United States and/or other countries.
4
 Loading...