


STEREO RADIO RECORDER WITH CD
RR316300/CDRR 316 L
NOTES
©Important notes for users in the U.K.
Mains plug
This apparatus is fitted with an approved moulded 13 Amp plug. To change a fuse in this type of plug proceed as follows:
•Remove fuse cover and fuse.
•Fix new fuse which should be a BS1362 5 Amp, A.S.T.A. or BSI approved type.
•Refit the fuse cover.
If the fitted plug is not suitable for your socket outlets, it should be cut off and an appropriate plug fitted in its place.
If the mains plug contains a fuse, this should have a value of 5 Amp. If a plug without a fuse is used, the fuse at the distribution board should not be greater than 5 Amp.
Note: The severed plug must be disposed to avoid a possible shock hazard should it be inserted into a 13 Amp socket elsewhere.
How to connect a plug
The wires in the mains lead are coloured with the following code: blue = neutral (N), brown = live (L).
As these colours may not correspond with the colour markings identifying the terminals in your plug, proceed as follows:
•Connect the blue wire to the terminal marked N or coloured black.
•Connect the brown wire to the terminal marked L or coloured red.
•Do not connect either wire to the earth terminal in the plug, marked E (or e) or coloured green (or green and yellow).
Before replacing the plug cover, make certain that the cord grip is clamped over the sheath of the lead – not simply over the two wires.
i
Dichiarazione di conformità ai sensi del D.M. 28.08.95, n. 548
Si dichiara che gli apparecchi illustrati nel presente libretto di istruzioni per l'uso rispondono alle prescrizioni dell'articolo 2, comma 1, del Decreto Ministeriale 28 Agosto 1995, n. 548.
Fatto a Fürth il 01/06/1999
GRUNDIG Fernseh-Video Produkte und Systeme GmbH
Kurgartenstraße 37 D-90762 FUERTH
GRUNDIG A.G. Kurgartenstraße, 37 90762 FUERTH GERMANIA
2

Deutsch |
Seite |
Wartung ................................................... |
4 |
Stromversorgung......................................... |
4 |
Bedienelemente ...................................... |
4–5 |
Radio ....................................................... |
5 |
Cassettendeck............................................ |
6 |
Technische Daten........................................ |
7 |
Fehlersuche................................................ |
7 |
English |
Page |
Maintenance ............................................. |
8 |
Power supply ............................................. |
8 |
Controls ................................................ |
8–9 |
Radio ....................................................... |
9 |
Cassette deck .......................................... |
10 |
Technical specifications.............................. |
11 |
Troubleshooting ........................................ |
11 |
Français |
Page |
Entretien.................................................. |
12 |
Alimentation............................................. |
12 |
Contrôles........................................... |
12–13 |
Radio ..................................................... |
13 |
Platine cassette......................................... |
14 |
Caractéristiques techniques......................... |
15 |
Dépistage des pannes ............................... |
15 |
Italiano |
Pagina |
Manutenzione.......................................... |
16 |
Alimentazione .......................................... |
16 |
Controlli ............................................ |
16–17 |
Radio ..................................................... |
17 |
Deck a cassette........................................ |
18 |
Dati tecnici .............................................. |
19 |
Elenco ricerca guasti ................................. |
19 |
INDEX |
|
Português |
Página |
Manutenção ............................................ |
20 |
Alimentação ............................................ |
20 |
Controlos........................................... |
20–21 |
Rádio ..................................................... |
21 |
Leitor de cassetes ..................................... |
22 |
Dados técnicos ........................................ |
23 |
Resolução de problemas............................ |
23 |
Español |
Página |
Mantenimiento ......................................... |
24 |
Alimentación............................................ |
24 |
Controles........................................... |
24–25 |
Radio ..................................................... |
25 |
Deck a casete.......................................... |
26 |
Datos técnicos ......................................... |
27 |
Localizacíon de averías ............................. |
27 |
Nederlands |
Pagina |
Onderhoud ............................................. |
28 |
Stroomvoorziening .................................... |
28 |
Knoppen ........................................... |
28–29 |
Radio ..................................................... |
29 |
Cassettedeck ........................................... |
30 |
Technische gegevens................................. |
31 |
Foutzoeklijst ............................................. |
31 |
Dansk |
Side |
|
D |
Vedligeholdelse |
........................................32 |
|
|
Forsyning ................................................ |
32 |
|
|
...........................................Kontroller |
32–33 |
|
|
|
|
||
Radio ..................................................... |
33 |
|
GB |
Kassette-deck ........................................... |
34 |
|
|
Tekniske data ........................................... |
35 |
|
|
...............................................Fejlfinding |
35 |
|
|
|
F |
||
Svenska |
Sida |
|
|
Underhåll ................................................ |
36 |
|
|
Strömförjning |
36 |
|
|
|
I |
||
Kontroller ........................................... |
36–38 |
|
|
Radio ..................................................... |
37 |
|
|
Kassettspelaren......................................... |
38 |
|
|
Tekniska data |
39 |
|
|
|
|
||
Felsökning ............................................... |
39 |
|
P |
Suomi |
Sivu |
|
|
|
|
|
|
......................................................Hoito |
40 |
|
E |
Käyttöjännite............................................ |
40 |
|
|
Säätimet............................................ |
40–41 |
|
|
Radio ..................................................... |
41 |
|
|
|
|
||
.............................................Kasettidekki |
42 |
|
NL |
Tekniset tiedot .......................................... |
43 |
|
|
Tarkistusluettelo ......................................... |
43 |
|
|
|
|
|
|
DK
S
FIN
3
WARTUNG
Aufstellen des Gerätes
D Bitte beachten Sie beim Aufstellen des Gerätes, daß Oberflächen von Möbeln mit den verschiedensten Lacken und Kunststoffen beschichtet sind, welche meistens chemische Zusätze enthalten.
Diese Zusätze können u.a. das Material der Gerätefüße angreifen, wodurch Rückstände auf der Möbeloberfläche entstehen, die sich nur schwer oder gar nicht entfernen lassen.
Pflege und Wartung
•Gehäuse nur mit weichem, staubbindendem Lappen reinigen. Keine scharfen Polieroder Reinigungsmittel verwenden.
•Bei Störungen wenden Sie sich bitte an Ihren Fachhändler.
•Schützen Sie das Gerät vor jeder Feuchtigkeit (z.B. Tropfund Spritzwasser) und vor höheren Temperaturen als 70˚C.
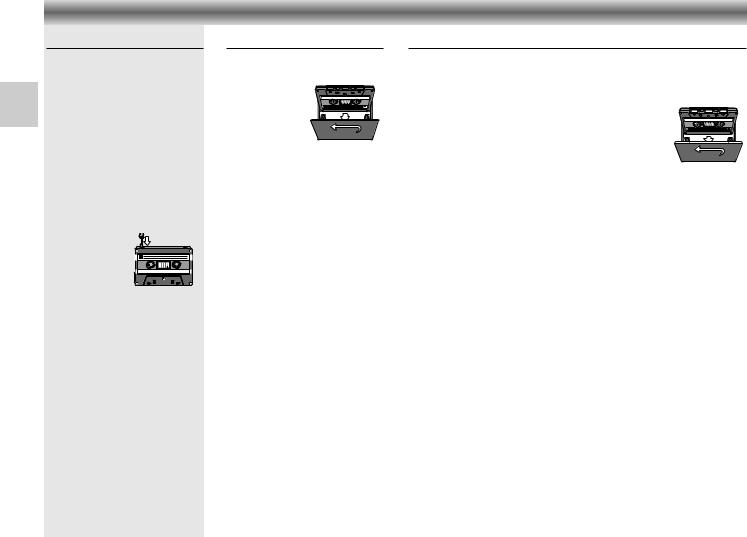
Wartung der Cassettendecks
Um eine gute Aufnahmeund Wiedergabequalität zu gewährleisten, reinigen Sie die angegebenen Teile A B C D nach jeweils 50 Betriebsstunden oder sonst monatlich.
•Das Cassettenfach öffnen mit STOP/EJECT 9//.
•Einen Wattebausch leicht mit Alkohol oder einer speziellen Kopfreinigungsflüssigkeit anfeuchten.
• Auf PLAY A drücken |
C |
B A |
A |
|
und die Gummiandruck- |
||||
|
|
|
||
rolle D reinigen. |
|
|
|
|
• Auf PAUSE ; drücken |
|
|
|
|
und die Tonachse C und |
|
|
|
|
die Magnetköpfe A und |
|
|
|
B reinigen.
•Nach der Reinigung auf STOP/EJECT 9// drücken.
•Zur Reinigung der Magnetköpfe A und B können Sie auch eine Reinigungscassette einmal abspielen.
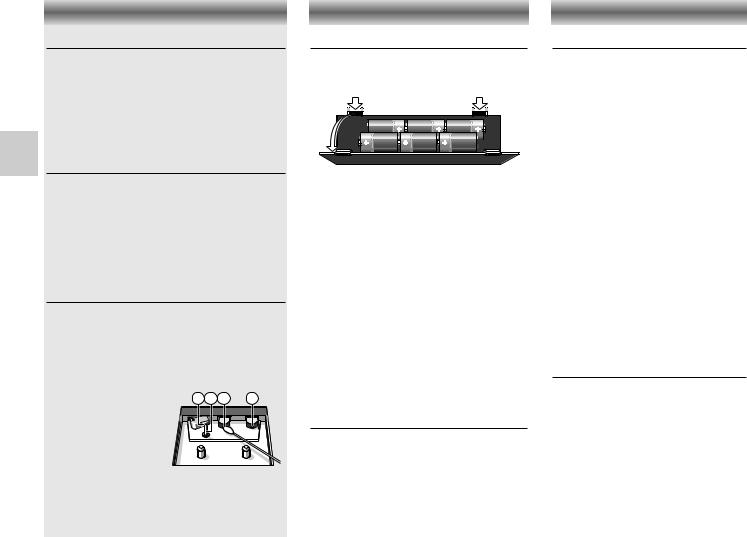
STROMVERSORGUNG
Stromversorgung
Batterien
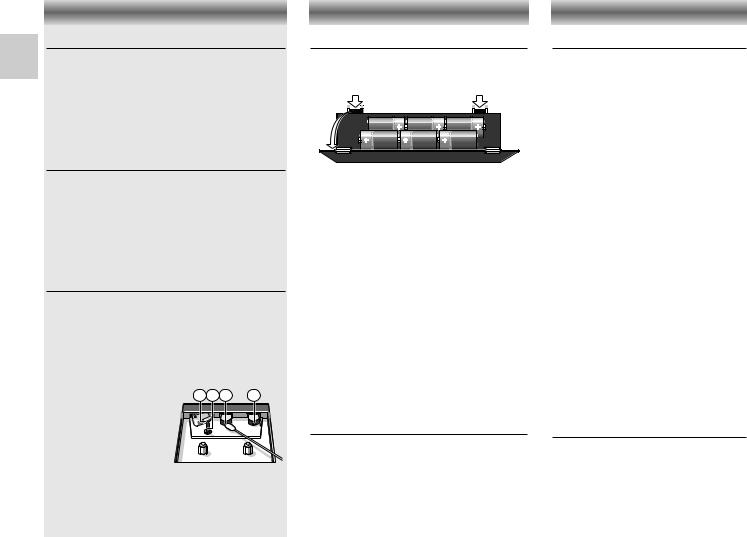
•Das Batteriefach öffnen und 6 Monozellen, Typ R20, UM1 oder D, einsetzen.
6 x D-cells - R20 - UM1
•Entfernen Sie die Batterien, wenn sie verbraucht sind oder längere Zeit nicht benutzt werden.
–Die Batterien werden bei Netzbetrieb abgeschaltet. Zum Umschalten auf Batteriebetrieb den Stecker aus der Netzbuchse MAINS V~ herausziehen.
Netzbetrieb
•Prüfen Sie, ob die auf dem Typenschild (auf der Rückseite des Gerätes) angegebene Netzspannung mit der örtlichen Netzspannung übereinstimmt. Wenn nicht, wenden Sie sich bitte an Ihren Fachhändler oder Ihre ServiceWerkstatt.
•Das Netzkabel mit MAINS V~ und der Netzsteckdose verbinden. Das Gerät ist jetzt betriebsbereit.
•Zur vollständigen Trennung vom Netz, den Netzstecker aus der Steckdose ziehen.
Umwelt-Hinweis
•Verbrauchte Batterien nicht in den Hausmüll werfen!
•Geben Sie bei Neukauf die alten Batterien bei Ihrem Händler oder an den öffentlichen Sammelstellen ab.
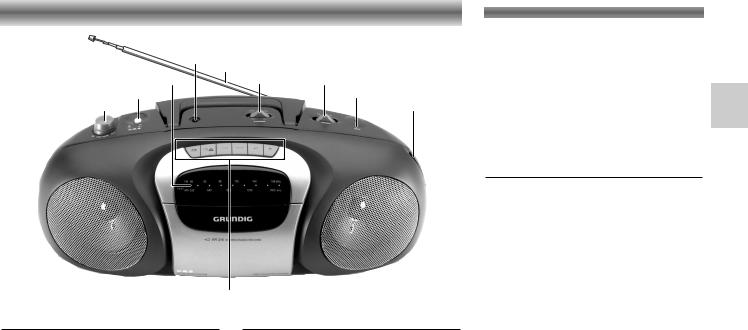
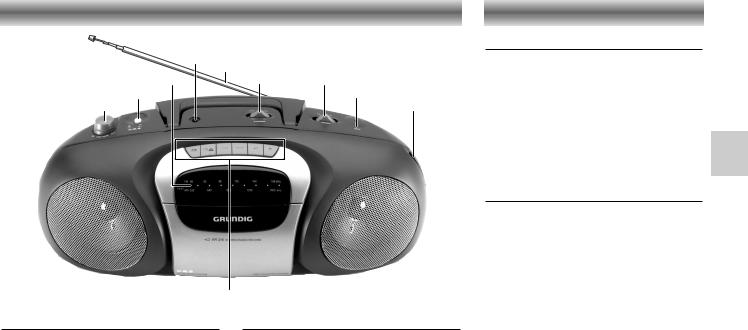
BEDIENELEMENTE
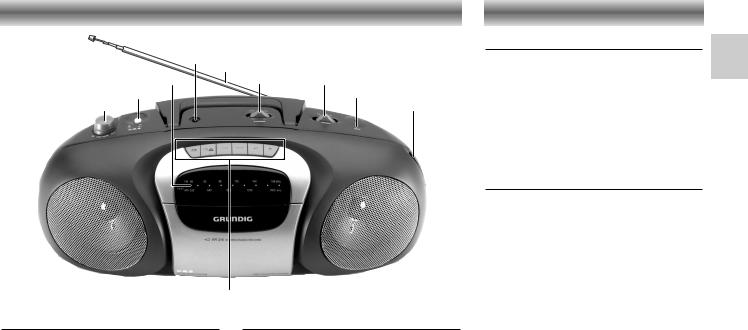
Oberseite und Vorderseite
VOLUME – zum Einstellen der Lautstärke
UBS – (Ultra Bass System) – zum Anheben der Bässe
FM STEREO 6– leuchtet auf, wenn ein UKW- Stereo-Sender empfangen wird
p– Buchse für Stereo-Kopfhörer
ANTENNA – für UKW-Empfang
MODE:
– TAPE: zum Umschalten auf Cassettenbetrieb / Ausschalten
– RADIO: zum Umschalten auf Radiowiedergabe / Einschalten
–Das Gerät ist ausgeschaltet, wenn sich der MODE-Schalter in der Position TAPE befindet und keine Tasten gedrückt sind.
BAND – zum Wählen zwischen FM und AM (MW) (und LW bei Ausf. RR 316 L)
MIC |
– eingebautes Mikrofon |
TUNING – zum Abstimmen auf einen Radiosender
Kopfhörerbuchse p
•Sie können einen Stereo-Kopfhörer mit 3,5 mm Stecker an die Buchse p anschließen.
–Die Lautsprecher werden damit abgeschaltet.
4
BEDIENELEMENTE
p
|
ANTENNA |
|
FM STEREO 6 |
MODE |
BAND |
UBS |
|
MIC |
VOLUME |
|
TUNING |
CASSETTE CONTROL
Cassette Control
PAUSE ; |
.............unterbricht den Bandlauf bei |
|
Aufnahme und Wiedergabe |
STOP/EJECT 9//...beendet alle Bandlauffunktionen oder öffnet das Cassetenfach
F.FWD Q |
........zum schnellen Vorspulen des |
|
Bandes |
REW R........... |
zum schnellen Rückspulen des |
|
Bandes |
PLAY A.............. |
startet den Bandlauf bei |
|
Wiedergabe |
OTR 0 ............... |
(One Touch Recording) – startet |
|
den Bandlauf bei Aufnahme |
Rückseite
MAINS V~ – Netzanschlußbuchse
Batteriefach – zum Einlegen von 6 R20, UM1 oder D Batterien
BEAT CUT – zum Unterdrücken eventueller Pfeifgeräusche bei MW/LW-Aufnahmen
RADIO
Radio-Antennen
– Bei UKW-Empfang (FM) die Teleskopantenne D herausziehen und durch Neigen und Drehen ausrichten. Bei zu starkem UKW-Signal (in Sendernähe) empfiehlt es sich die Antenne einzuschieben.
–Für MW (LW)-Empfang hat das Gerät eine eingebaute Antenne. Die Teleskopantenne kann also eingeschoben bleiben. Zum Ausrichten der Antenne das ganze Gerät drehen.
Rundfunk-Empfang
•Den MODE-Schalter auf RADIO stellen.
•Den Ton mit den Reglern VOLUME und UBS einstellen.
•Den Wellenbereich mit dem BAND-Schalter wählen.
FM: 87,5 – 108 MHz
AM (MW): 526,5 – 1606,5 KHz
LW (bei Ausf. RR 316 L): 148,5 – 283,5 kHz
•Wenn die Anzeige FM STEREO 6 erscheint, empfangen Sie einen UKW-Stereo-Sender.
–Bei zu schwachem UKW-Stereosignal erlischt die Anzeige FM STEREO 6 und wird der UKW-Sender in Mono wiedergegeben.
•Das Gerät ist ausgeschaltet wenn der MODE Schalter sich in Stellung TAPE befindet und die Laufwerkstasten entriegelt sind.
5
Compact Cassetten
D • Verwenden Sie für die Aufnahme nur NORMAL Cassetten (IEC I), bei denen die Laschen nicht herausgebrochen sind. Das Gerät ist nicht geeignet zum Aufnehmen auf CHROME (IEC II) oder METAL (IEC IV) Cassetten.
•Für die Wiedergabe können Sie jedoch jeden Cassettentyp einsetzen.
•Direkt am Anfang des Bandes erfolgt während der ersten 7 Sekunden, wenn der transparente Bandanfang vorbeiläuft, keine Aufnahme.
•Sie können eine Aufnahme vor
unbeabsichtigtem Löschen schützen.
1
Halten Sie die Cassettenseite welche Sie
schützen wollen auf sich zugerichtet und brechen Sie die Lasche links oben heraus. Jetzt läßt sich diese Seite nicht mehr bespielen.
•Zum Aufheben dieser Löschsperre decken Sie die Öffnung mit einem Stück Klebeband ab.
•Schützen Sie die Cassetten vor Regen und Feuchtigkeit, vor Sand und vor Hitze z.B. von Heizgeräten oder im Innenraum von in der Sonne geparkten Autos.
CASSETTENDECK
Cassettenwiedergabe
•Den MODE-Schalter auf TAPE stellen.
•Drücken Sie auf STOP/EJECT 9//
und legen Sie eine bespielte Cassette ein.
• Zum schnellen Vorund
Rücklauf auf REW R oder F.FWD Q drücken. Zum Stoppen auf STOP/EJECT 9// drücken.
•Zum Starten des Abspielens auf PLAY A drücken.
•Den Ton mit den Reglern VOLUME und UBS einstellen.
•Sie können einen Stereo-Kopf- hörer mit 3,5 mm Steckser an
die Buchse p anschließen.
–Die Lautsprecher werden damit abgeschaltet.
•Für kurze Unterbrechungen auf PAUSE ; drücken.
•Zum Fortsetzen der Wiedergabe diese Taste nochmals drücken.
–Am Bandende werden die Recordertasten entriegelt.
•Die Taste STOP/EJECT 9// drücken, wenn die Wiedergabe vor Erreichen des Bandendes gestoppt werden soll.
•Das Gerät ist ausgeschaltet, wenn sich der MODE-Schalter in der Position TAPE befindet und keine Tasten gedrückt sind.
Aufnahme
Copyright: Die Aufnahme ist nur im Rahmen der Urheberrechte oder anderer Rechte Dritter zulässig.
• Öffnen Sie dasn Cassettenfach mit STOP/EJECT 9//.
• Legen Sie eine Cassette ein.
• Beim Mithören der Aufnahme den Ton mit den Reglern  VOLUME und UBS einstellen. Die Stellung dieser Regler


 hat keinen Einfluß auf die Aufnahme.
Aufnahme vom Radio
•Den MODE-Schalter auf RADIO stellen.
•Mit dem BAND-Schalter den Wellenbereich wählen.
•Mit dem TUNING-Einsteller auf den gewünschten Radiosender abstimmen.
•Wenn während der Aufnahme eines MW/LW-Senders Pfeifgeräusche zu hören sind, können diese unterdrückt werden, indem der Schalter
BEAT CUT auf die andere Position gestellt wird.
Mono-Aufnahme vom eingebauten Mikrofon
•Den MODE-Schalter auf TAPE stellen.
•Den VOLUME-Regler auf Null stellen (ein Mithören während Mikrofonaufnahmen ist nicht möglich).
Starten und Stoppen der Aufnahme
•Zum Aufnahmestart auf OTR 0 drücken (die Taste PLAY A rastet automatisch mit ein).
•Für kurze Unterbrechungen auf PAUSE ; drücken.
Zum Fortsetzen der Aufnahme diese Taste nochmals drücken.
– Am Bandende werden die Laufwerkstasten entriegelt.
•Die Taste STOP/EJECT 9// drücken, wenn die Aufnahme vor Erreichen des Bandendes gestoppt werden soll. Durch erneutes Drücken dieser Taste öffnet sich das Cassettenfach.
•Das Gerät ist ausgeschaltet, wenn sich der MODE-Schalter in der Position TAPE befindet und keine Tasten gedrückt sind.
6

TECHNISCHE DATEN
Technische Daten
Spannungsversorgung |
|
|
Netzbetrieb .................... |
230 Volt, 50/60 Hz |
|
Batteriebetrieb............... |
6 x 1,5 V (R20, UM1) |
|
Ausgangsleistung DIN 45324, 10% THD |
||
Musikleistung: ................... |
AC: 2 x 1500 mW |
|
Sinusleistung: ..................... |
DC 2 x 1000 mW |
|
...................................... |
AC: 2 x 1000 mW |
|
Stereo-Kopfhörer-Klinkenbuchse: ........ |
3,5 mm ø |
|
Rundfunkteil |
|
|
Wellenbereiche:............. |
FM 87,5 – 108 MHz |
|
........................... |
MW 526,5 – 1606,5 kHz |
|
...LW 148,5 – 283,5 kHz (bei Ausf. RR 316 L) |
||
Antennen: .................... |
Teleskopantenne für FM |
|
.........eingebaute Ferritstab-Antenne für MW (LW)
Cassettenteil
Tonträger: ...Compact-Cassette nach DIN 45516
Spurlage: ..................... |
Viertelspur international |
|
Bandgeschwindigkeit: ................ |
|
4,76 cm/sek. |
Motor:........................................... |
|
DC motor |
Frequenzübertragungsbereich:..... |
125 Hz – 6,3 kHz |
|
Geräuschspannungsabstand: ................. |
45 dB |
|
Wow and flutter:................................ |
|
0,35% |
Automatik:..Aussteuerungsautomatik bei Aufnahme
..Automatisch Auslösen der Tasten am Bandende
Technische und optische Änderungen vorbehalten!
FEHLERSUCHE
Wenn ein Fehler auftritt, lesen Sie zuerst diese Hinweise bevor Sie das Gerät reparieren lassen.
Wenn Sie ein Problem trotz dieser Hinweise nicht lösen können, wenden Sie sich an den Händler D oder die Service-Stelle.
WARNUNG
Versuchen Sie unter keinen Umständen das Gerät selber zu reparieren, da die Garantie dadurch ihre Gültigkeit verliert.
PROBLEM |
MÖGLICHE URSACHE |
LÖSUNG |
Kein Ton |
VOLUME-Regler nicht aufgedreht |
VOLUME-Regler aufdrehen |
|
Kopfhörer ist angeschlossen |
Kopfhörer abziehen |
|
Batterien sind erschöpft |
Neue Batterien einsetzen |
|
Batterien sind falsch eingesetzt |
Batterien richtig einsetzen |
|
Netzkabel ist nicht richtig angeschlossen |
Das Netzkabel richtig anschließen |
Mangelhafter |
Schwaches Radio-Antennensignal |
Die Antenne auf besten Empfang |
Radioempfang |
|
ausrichten: |
|
|
UKW (FM): Die Teleskopantenne |
|
|
neigen und drehen |
|
|
MW (LW): Das gesamte Gerät drehen |
|
Störeinstreuungen von elektrischen |
Das Radio von elektrischen Geräten |
|
Geräten wie Fernseher, Video- |
fernhalten |
|
recorder, Computer, Thermostate, |
|
|
Leuchtstofflampen (TL), Motoren usw. |
|
Schlechte Tonqualität bei |
Staub und Schmutz auf Köpfen, |
Köpfe, Tonwelle und Andruckrollen |
Cassettenwiedergabe |
Tonwellen oder Andruckrollen |
reinigen, siehe Wartung |
Keine |
Cassettenlasche ist herausgebrochen |
Die Öffnung mit einem Stück Klebeband |
Cassettenaufnahme |
|
schließen |
Dieses Gerät entspricht der Sicherheitsbestimmung VDE 0860 und somit der internationalen Sicherheitsvorschrift IEC 65.
Dieses Produkt erfüllt die europäischen Richtlinien 89/336/EEC, 73/23/EEC und 93/68/EEC.
Der 'Regulierungsbehörde für Telekommunikation und Post' wurde angezeigt, daß das Gerät in Verkehr gebracht wurde. Ihr wurde auch die Berechtigung eingeräumt, die Serie auf Einhaltung der Bestimmungen zu überprüfen.
Das Typenschild befindet sich an der Rückseite des Geräts.
7

MAINTENANCE
Placement of the set
Caution should be exercised if the set is placed on furniture as surfaces are often coated with lacquers and plastic finishes containing additives which attack the material of which the feet of the set are
GB made, leaving stains which can only be removed with difficulty or not at all.
Care and maintenance
•Only a soft cloth which picks up dust should be used to clean the cabinet. Do not use aggressive polishes or cleaning agents.
•If your set develops a fault, contact your dealer.
•Do not expose the unit to moisture (e.g. dripping or splashing) or to temperatures exceeding 70˚C
Cassette deck maintenance
To ensure a good recording and playback quality, clean the indicated parts ABCD after every 50 hours of operation or, on average, once a month.
•Open the cassette compartment with STOP/EJECT
9//.
•Use a cotton bud slightly moistened with alcohol or a special head cleaning fluid.
•Press PLAY A and clean the rubber pressure rollers D.
•Then press PAUSE ; and clean the capstans C and the heads A and
B.
C B A A
•After cleaning, press STOP/EJECT 9//.
•Cleaning of the heads A and B can also be done by playing a cleaning cassette through once.
POWER SUPPLY
Power supply
Battery supply
•Open the battery compartment and insert as shown 6 batteries, type R20, UM1 or D-cells.
6 x D-cells - R20 - UM1
•Remove the batteries if exhausted or if they will not be used again for a long period.
–The battery supply is switched off when the set is connected to the mains. To change over to battery supply, pull out the plug from the
MAINS V~ socket.
Mains supply
•Check if the mains voltage as shown on the type plate (on the rear of the set) corresponds to your local mains voltage. If it does not, consult your dealer or service organisation.
•Connect the mains lead to the MAINS V~ socket and the wall socket. The mains supply is switched on.
•To disconnect the set from the mains completely, pull the mains plug from the wall socket.
Note on Environmental Protection
•Do not throw exhausted batteries in the household refuse.
•Hand over the old batteries to your dealer or public collecting points when buying new ones.
Important note for users in the U.K.
When fitting a mains plug, follow the instructions on page 2.
CONTROLS
Top and front panel
VOLUME – to adjust the volume level
UBS – (Ultra Bass System) – to boost the bass response
FM STEREO 6– lights up when receiving on FM stereo stations
p– stereo headphone socket
ANTENNA – for FM reception
MODE:
– TAPE: to switch to Tape mode and power off
–RADIO: to switch to Radio mode
–The set is switched off if the MODE selector is in position TAPE and no buttons are pressed.
BAND – to select between FM and AM (MW) (and LW for RR 316 L)
MIC |
– built-in microphone |
TUNING – to tune to radio stations
Stereo headphone socket p
•You can connect stereo headphones having a 3.5 mm plug to the socket p.
–Inserting the plug will disconnect the speakers.
8
CONTROLS
p
|
ANTENNA |
|
FM STEREO 6 |
MODE |
BAND |
UBS |
|
MIC |
VOLUME |
|
TUNING |
CASSETTE CONTROL
Cassette control
PAUSE ; |
.............interrupts cassette playback or |
|
recording |
STOP/EJECT 9//...stops the tape or opens the cassette compartment
F.FWD Q |
........starts fast winding forward |
REW R........... |
starts fast winding backward |
PLAY A.............. |
starts cassette playback |
OTR 0 ............... |
for starting One Touch |
|
Recording |
Back panel
MAINS V~ – socket for mains lead
Batteries Compartment – for inserting 6 batteries type R20, UM1 or D-cells
BEAT CUT Switch – For eliminating possible whistle tones during AM/MW (LW) recordings
|
|
|
|
|
|
RADIO |
|
|
Radio aerials |
|
|
|
– |
For FM, pull out the telescopic aerial. To im- |
|
|
|
prove FM-reception, incline and turn the |
|
|
|
aerial. Reduce its length if the FM-signal is too |
|
|
|
strong (very close to a transmitter). |
GB |
|
– |
For AM/MW (LW), the set is provided with a |
|
built-in aerial, so the telescopic aerial is not needed. Direct the aerial by turning the whole set.
Radio reception
•Set the MODE switch to RADIO.
•Adjust the sound using the controls VOLUME and UBS.
•Select the wave band using the BAND selector.
FM: 87.5 – 108 MHz
AM (MW): 526.5 – 1606.5 KHz
LW: 148,5 – 283.5 kHz (for RR 316 L)
•When FM STEREO 6 appears, you are receiving a FM-stereo transmitter.
–If the FM stereo signal gets weak, the
FM STEREO indication 6 goes out and you will hear the FM station in mono.
•The set is switched off when the MODE switch is in the TAPE position and no buttons are pressed.
9
Compact Cassettes
• For recording, use a NORMAL cassette (IEC type I) on wich the tabs are not broken out.
This deck is not suited for
GB recording on CHROME (IEC II) or METAL (IEC IV) cassettes.
•For playback, any cassette type may be inserted.
•At the very beginning and end of the tape, no recording will take place during the 7 seconds when the leader tape passes the recorder heads.
•To prevent the accidental erasure
of a recording,
keep the
1
cassette side to be safeguarded in front of you
and break out the left tab. Now, recording on this side is no longer possible.
•To render this safeguard ineffective, cover the aperture with a piece of adhesive tape.
•Do not expose the cassettes to rain, moisture, sand, or to excessive heat e.g. from heating equipment or in motor cars parked in the sun.
CASSETTE DECK
Cassette playback
•Set the MODE selector to TAPE.
•Press STOP/EJECT 9// to open
the cassette compartment.
• Insert a recorded cassette.
•For fast winding, press
F.FWD Q or REW R.
•To stop, press STOP/EJECT 9//.
•Press PLAY A and playback will start.
•Adjust the sound using the controls VOLUME and UBS.
•You may connect stereo headphones with 3.5 mm plug to socket p.
– The loudspeakers are then muted.
•To interrupt playback press
PAUSE ;.
•To continue playback, press PAUSE ; again.
–When the end of the tape is reached, the recorder buttons are released.
•Press STOP/EJECT 9// if you want to stop playback before the end of the tape.
On pressing again, the cassette compartment will open.
•The set is switched off if the MODE selector is in TAPE position and no buttons are pressed.
Cassette recording
Copyright: Recording is permissible insofar as copyright or other rights of third parties are not infringed.
• Press STOP/EJECT 9// to open the cassette compartment.
• Insert the cassette.
• When monitoring during recording, adjust the sound using the controls VOLUME and UBS. These controls do not affect the recording.
Recording from the radio
•Set the MODE selector to RADIO.
•Select the wave band using the BAND switch.
•Tune to desired radio station using the TUNING control.
•If during the recording of a AM/MW (LW) station, a whistling sound is heard, this sound can be suppressed by setting the BEAT CUT switch to another position.
Mono recording from the built-in microphone
•Set the MODE selector to TAPE.
•Set the VOLUME control to the minimum volume level (during microphone recording , monitoring is not possible).
Starting and stopping the recording
•Start recording by pressing OTR 0 (the PLAY A button is automatically also pressed).
•For brief interruptions, press PAUSE ;.
To restart recording, press this button once more.
– When the end of the tape is reached, the recorder buttons are released.
•Press STOP/EJECT 9// if you want to stop recording before the end of the tape.
On pressing again, the cassette compartment will open.
•The set is switched off if the MODE selector is in position TAPE and no buttons are pressed.
10
TECHNICAL DATA
Technical specifications
Power Supply |
|
Mains operation .............. |
230 Volt, 50/60 Hz |
Battery operation ........... |
6 x 1.5 V (R20, UM1) |
Output power DIN 45324, 10% THD |
|
Music power: ................... |
AC: 2 x 1500 mW |
Nominal power ................. |
DC 2 x 1000 mW |
...................................... |
AC: 2 x 1000 mW |
Jack socket for stereo headphones:....3.5 mm ø
Radio section |
|
|
Wavebands: ................. |
|
FM 87.5 – 108 MHz |
........................... |
MW 526.5 – 1606.5 kHz |
|
............LW 148.5 – 283.5 kHz (for RR 316 L) |
||
Antennas: ................... |
|
Telescopic aerial for FM |
.......Built in ferrite rod aerial for AM/MW (LW) |
||
Cassette section |
|
|
Cassette:........ |
Compact cassette to DIN 45516 |
|
Track system: .............. |
|
International quartertrack |
Tape speed:............................. |
|
4.76 cm/sec. |
Motor:........................................... |
|
DC motor |
Frequency range: ............... |
125 Hz – 6.3 kHz |
|
S/N ratio, weighted ............................ |
45 dB |
|
Wow and flutter:................................ |
0.35% |
|
Automatic functions: |
|
|
..................... |
Automatic recording level control |
|
...............Automatic button release at tape end
Subject to technical alterations and alterations in styling E. and O.E.
TROUBLESHOOTING
If a fault occurs, first check the points listed below before taking the set for repair.
If you are unable to remedy a problem by following these hints, consult your dealer or service centre.
WARNING: Under no circumstances should you try to repair the set yourself, as this would invalidate the guarantee.
PROBLEM |
|
POSSIBLE CAUSE |
|
REMEDY |
GB |
|
|
||||
|
|
|
|||
No sound |
|
VOLUME is not adjusted |
|
Adjust the VOLUME |
|
|
|
Headphones are connected |
|
Disconnect headphones |
|
|
|
Batteries are exhausted |
|
Insert fresh batteries |
|
|
|
Batteries are incorrectly inserted |
|
Insert the batteries correctly |
|
|
|
Mains lead is not securely connected |
|
Connect the mains lead properly |
|
Poor radio |
|
Weak radio aerial signal |
|
Aim the aerial for best reception: |
|
reception |
|
|
|
FM: incline and rotate telescopic aerial |
|
|
|
|
|
AM/MW (LW): rotate the entire set |
|
|
|
Interference caused by the vicinity of |
|
Keep the radio away from electrical |
|
|
|
electrical equipment like TVs, video |
|
equipment |
|
|
|
recorders, computers, thermostats, |
|
|
|
|
|
fluorescent lamps (TL), engines etc. |
|
|
|
Poor cassette |
|
Dust and dirt on the heads, capstan |
|
Clean the heads etc., see Maintenance |
|
sound quality |
|
or pressure roller |
|
|
|
Recording does |
|
Cassette tab(s) may be broken out |
|
Apply a piece of adhesive tape over the |
|
not work |
|
|
|
missing tab space |
|
This unit meets the CEE regulations concerning interference radiation.
This product fulfills European directives 89/336/EEC, 73/23/EEC and 93/68/EEC.
This unit complies with the safety regulations according to VDE 0860 / BS 415 and thus with the international safety regulation according to IEC 65.
The type plate is located on the back of the set
11
ENTRETIEN
Installation de l'appareil
Il est à observer que la plupart des meubles possèdent une surface recouverte de laques ou de matières synthétiques contenant certains produits chimiques. Tenez compte, pour la mise en place de votre appareil, du fait que ces substances sont capable d'attaquer les pieds de votre radio, ce qui peut avoir pour conséquence de laisser des traces
F difficiles à éliminer sur la surface du meuble.
Entretien
•Le nettoyage de votre appareil doit être pratiqué avec un chiffon à pousière doux. N'utilisez pas de produits nettoyants ou à polir agressifs.
•En cas de perturbations, veuillez-vous adresser à votre revendeur.
•Protégez votre appareil contre l'humidité (gouttes et vaporisation d'eau) et contre températures supérieures à 70˚C.
Entretien de la platine cassette
Afin de maintenir une bonne qualité d’enregistrement et de lecture, nettoyer les pièces ABCD toutes les 50 heures environ ou, en moyenne, une fois par mois.
•Ouvrir le portecassette avec STOP/EJECT 9//.
•Utiliser un coton tige imbibé légèrement d’alcool, ou d’un produit prévu à cet effet.
•Presser PLAY A et nettoyer les galets presseurs D.
•Presser PAUSE ; et nettoyer les cabestans C et les têtes magnétiques A et B.
C B A A
•Après le nettoyage, presser STOP/EJECT 9//.
•Pour le nettoyage des têtes A et B, on peut également passer une cassette de nettoyage.
ALIMENTATION
Alimentation
Alimentation par piles
•Ouvrir le compartiment à piles et introduire 6 piles, type R20, UM1 ou D, selon le croquis.
6 x D-cells - R20 - UM1
•Enlever les piles dès qu’elles sont usées ou si elles ne serviront pas pendant une longue période.
–L’alimentation par piles est coupée quand l’appareil est branché sur le secteur.
Pour revenir à l’alimentation par piles, il faut retirer la fiche de la prise MAINS V~.
Alimentation par le secteur
•Vérifier si la tension indiquée sur la plaque signalétique (à l’arrière de l’appareil) correspond au secteur local. Si ceci n’est pas le cas, consulter le revendeur ou le service après-vente.
•Brancher le cordon secteur sur la prise MAINS V~ et la prise murale. L’alimentation secteur est alors en service.
•Pour séparer complètement l’appareil du secteur, il faut retirer la fiche de la prise murale.
Indication pour l'environnement
•Ne jetez pas vos batteries usagées dans votre poubelle!
•Rapportez-les chez votre revendeur lors de l'achat de batteries neuves ou encore portezles dans un dépôt public prévu à cet usage.
CONTRÔLES
Face avant et supérieure
VOLUME – pour régler le niveau sonore
UBS – (Ultra Bass System) – pour amplifier les basses
FM STEREO 6– s’allume lors de la réception de stations FM stéréo
p– prise du casque stéréo
ANTENNA – pour la réception FM
MODE :
– TAPE : pour passer en mode Cassette et Power off (hors tension)
–RADIO : pour passer en mode Radio
–L’appareil est mis hors circuit si le sélecteur MODE est sur la position TAPE et si tous les boutons sont relâchés.
BAND – pour sélectionner FM ou MW (plus LW sur RR 316 L)
MIC |
– microphone intégré |
TUNING – pour régler une station radio
Prise pour casque stéréo p
•Vous pouvez brancher un casque stéréo muni d’une fiche de 3,5 mm à la prise p.
–Dès que vous insérez la fiche, vous déconnectez les haut-parleurs.
12
CONTRÔLES
p
|
ANTENNA |
|
FM STEREO 6 |
MODE |
BAND |
UBS |
|
MIC |
VOLUME |
|
TUNING |
CASSETTE CONTROL
Cassette Contrôle
PAUSE ; |
.............pour interrompre l'enregistre- |
|
ment ou la lecture |
STOP/EJECT 9//...termine le défilement de la bande ou ouvre le portecassette
F.FWD Q |
........pour l'avance rapide de la |
|
bande |
REW R........... |
pour le retour rapide de la |
|
bande |
PLAY A.............. |
démarre la lecture d'une |
|
cassette |
OTR 0 ............... |
(One Touch Recording) – |
|
démarre la fonction |
|
d'enregistrement |
Face arrière
MAINS V~ – prise pour cordon secteur
Compartiment à piles – pour introduire 6 piles, type R20, UM1 ou D
BEAT CUT – pour éliminer les sifflements éventuels pendant les enregistrements AM (MW)/LW.
RADIO
Antennes Radio
–Pour la FM, sortir l’antenne télescopique, puis l’incliner et l’orienter convenablement. Si l’intensité du signal FM reçu est trop fort (proximité d’un émetteur), réduire la longueur de l’antenne.
–Pour la AM (MW) et LW, l’appareil est équipé d’une antenne incorporée, de sorte
qu’il n’est pas nécessaire d’utiliser l’antenne |
F |
télescopique. Orienter l’ensemble de |
|
l’appareil. |
|
Réception Radio
•Placer le sélecteur MODE sur RADIO.
•Ajuster le son avec les réglages VOLUME et
UBS.
•Choisir la gamme d’ondes à l’aide du sélecteur BAND.
FM : 87,5 – 108 MHz
AM (MW) : 526,5 – 1606,5 KHz
LW : 148,5 – 283,5 kHz (sur RR 316 L)
•Lorsque FM STEREO 6 apparaît, vous recevez un émetteur FM en stéréo.
–Si le signal FM stéréo devient faible,
FM STEREO 6 s'éteint et vous entendez la station FM en mode monophonique.
•L’appareil est mis hors circuit si le sélecteur MODE se trouve en position TAPE et les touches des platines cassette sont relâchées.
13

Cassettes
|
• |
Pour un enregistrement, utiliser une |
|
|
cassette NORMAL (CEI type I) |
|
|
dont les ergots ne sont pas |
|
|
cassés. Cet appareil n’est pas |
|
|
apte à enregistrer sur des |
|
|
cassettes CHROME (CEI type II) |
|
|
ou METAL (CEI type IV). |
F |
• Pour la lecture, on peut utiliser |
|
|
chaque type de cassette. |
|
•La bande de la cassette est fixée à ses deux extrémités par une bande amorce. De ce fait, aucun enregistrement ne sera effectué pendant 7 secondes au début et à la fin de la cassette.
•On peut éviter l’effacement accidentel d'un 

enregistrement
1
en cassant l’ergot qui se trouve à gauche. On ne
peut alors plus enregistrer sur la face correspondante.
•Cette protection peut être supprimée en appliquant un petit morceau de ruban adhésif sur l’ouverture.
•Ne pas exposez la cassette à la pluie, à l’humidité, au sable, à de fortes chaleurs ou au soleil, p.ex. dans une voiture stationnée en soleil.
PLATINE CASSETTE
Lecture de cassettes
•Placer le sélecteur MODE sur
TAPE.
•Presser STOP/EJECT 9//
• Introduire une cassette enregistrée.
•Pour le bobinage  rapide, presser
REW R ou F.FWD Q. Pour arrêter, presser STOP/EJECT 9//.
•Presser PLAY A et la lecture commence.
•Ajuster le son avec les réglages
VOLUME et UBS.
•Vous pouvez brancher un casque stéréo muni d’une fiche de 3,5 mm à la prise p.
–Dès que vous insérez la fiche, vous déconnectez les haut-parleurs.
•Pour interrompre la lecture, appuyer sur PAUSE ;.
•Pour continuer la lecture, appuyer de nouveau sur PAUSE ;.
–Quand la bande est entièrement déroulée, les touches sont relâchées.
•Appuyer sur STOP/EJECT 9// pour interrompre la lecture avant la fin de la cassette.
En appuyant de nouveau, le porte-cassette s’ouvrira.
•L’appareil est mis hors circuit si le sélecteur MODE est en position TAPE et si tous les boutons sont relâchés.
Enregistrement
Copyright : L’enregistrement n’est autorisé que dans la mesure ou les droits d’auteurs ne sont pas enfreints.
• Ouvrir le portecassette en pressant STOP/EJECT 9//.
• Introduire une cassette.
• Si l’on écoute pendant l’enregistrement, ajuster le son avec les réglages VOLUME et UBS. Ces réglages n’influencent pas l’enregistrement.
Enregistrement de la radio
•Placer le sélecteur MODE sur RADIO.
•Sélectionner la gamme d’ondes à l’aide du sélecteur BAND.
•Régler la station radio recherchée à l’aide du bouton TUNING.
•Si un sifflement est perçu pendant l’enregistrement d’une station AM (MW) ou LW, il peut être supprimé en changeant la position du sélecteur
BEAT CUT.
Enregistrement avec un microphone intégré
•Placer le sélecteur MODE sur TAPE.
•Placer le réglage de VOLUME sur zéro (l’écoute pendant un enregistrement microphonique n’est pas possible).
Démarrer et arrêter l’enregistrement
•Commencer l’enregistrement en pressant OTR 0 (la touche PLAY A s'enclenche automatiquement).
•Pour une interruption de courte durée, presser PAUSE ;.
Pour reprendre l’enregistrement, presser cette touche de nouveau.
– Quand la bande est entièrement déroulée, les touches sont relâchées.
•Appuyer sur STOP/EJECT 9// pour interrompre l’enregistrement avant la fin de la cassette.
En appuyant de nouveau, le porte-cassette s’ouvrira.
•L’appareil est mis hors circuit si le sélecteur MODE est en position TAPE et si tous les boutons sont relâchés.
14
 Loading...