

Page 1
02040 - 12
ROTAVATOR
MOTOZAPPA
MOTOBINEUSE
MOTORHACKE
MOTOAZADA
MOTOENXADA
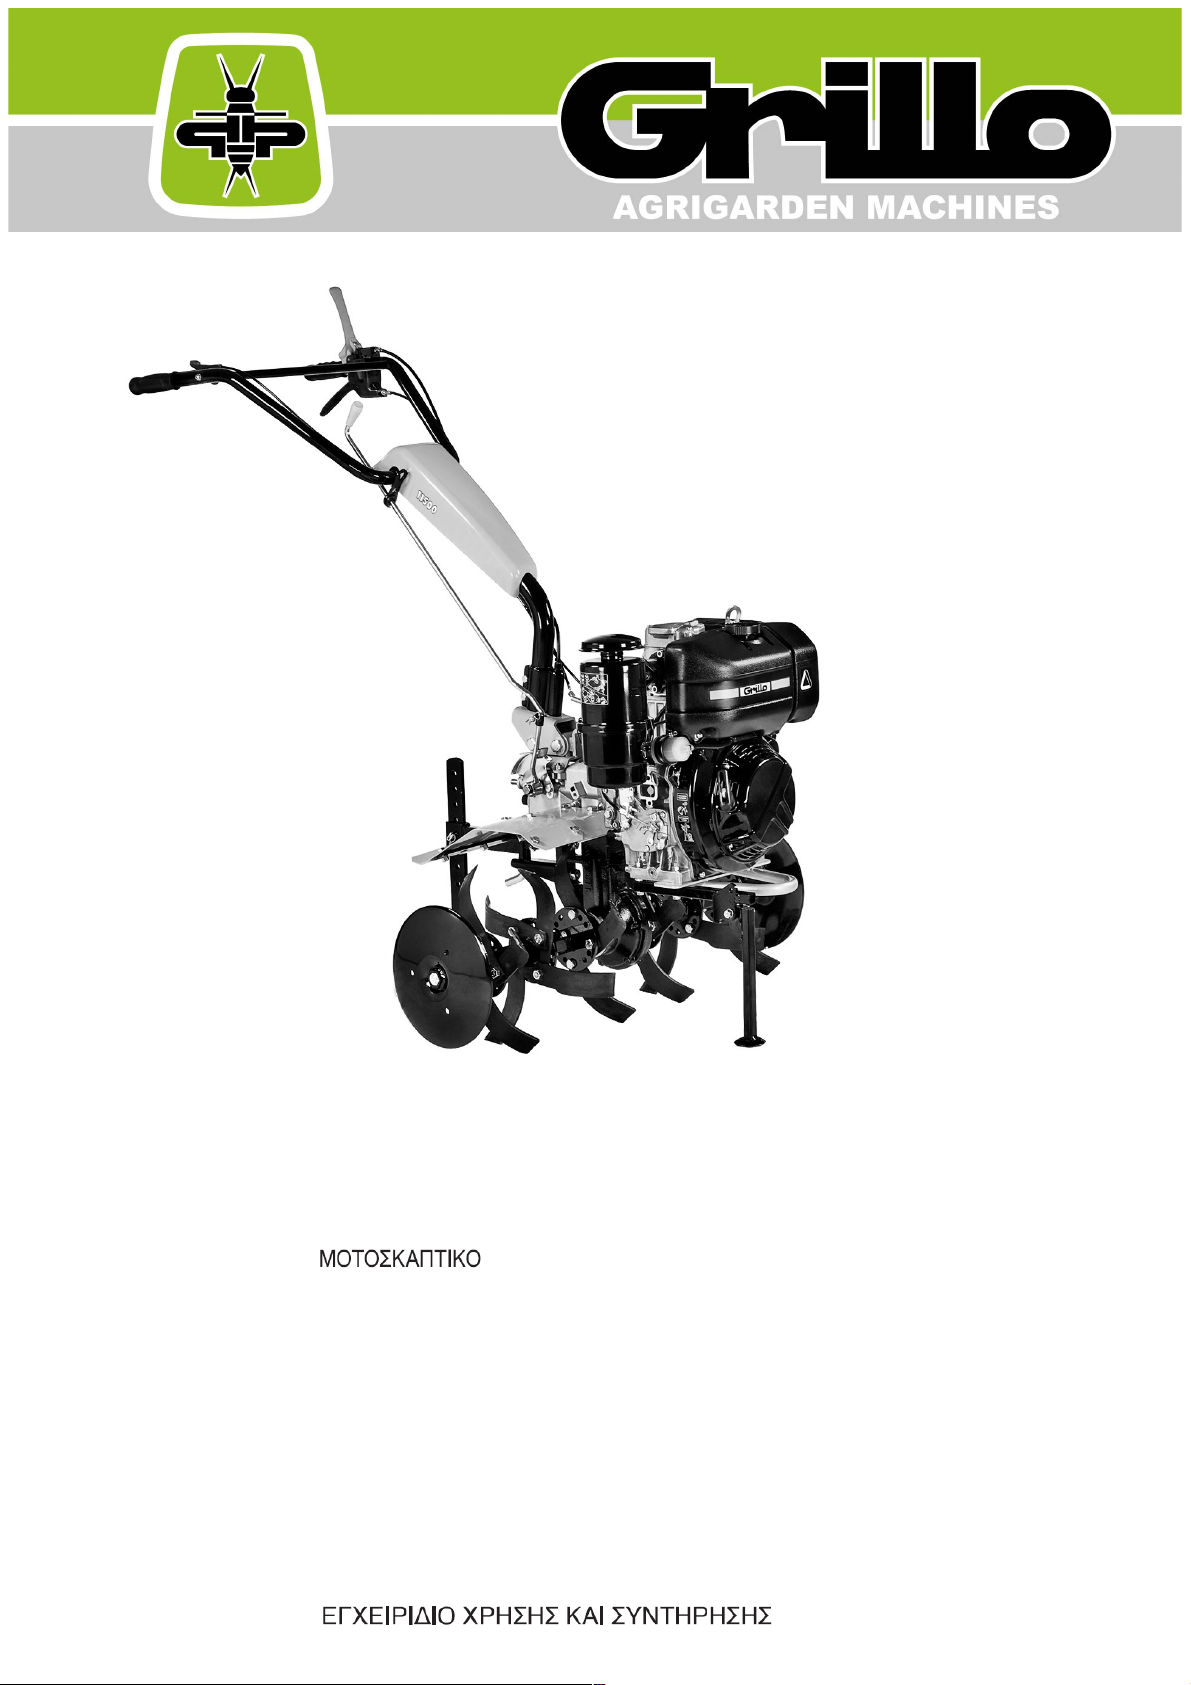
GRILLO 11500
OPERATOR'S MANUAL
MANUALE DELL'OPERATORE
MANUEL D'UTILISATION
BEDIENUNGSANLEITUNG
MANUAL DE INSTRUCCIONES
MANUAL DE INSTRUÇÕES
Page 2

SUMMARY
Safety rules
Instructions :
Warnings 4
Identification and servicing 5
Technical specifications 6
Putting the machine into service 6
Instructions for use 7
Maintenance and lubrication 7
Implements 10
Illustrations 57
EC Declaration of conformity - Noise and vibrations levels 62
INDICE
Norme antinfortunistiche
Istruzioni :
Avvertenze 11
Identificazione e assistenza 12
Caratteristiche tecniche 13
Messa in opera della macchina 13
Istruzioni d’uso 14
Manutenzione e lubrificazione 14
Accessori 17
Figure 57
Certificato di conformità CE - Rumorosità e livelli di vibrazione 62
INDEX
Règles de sécurité
Instructions :
Mises en garde 18
Identification et assistance 19
Caractéristiques techniques 20
Mise en service de la machine 21
Mode d’emploi 21
Maintenance et lubrification 22
Outils 24
Illustrations 57
Certificat de conformité CE - Niveaux sonores et de vibration 62
INHALTSÜBERSICHT
Sicherheitsvorschriften
Anleitung:
Sicherheitsrelevante Hinweise 25
Identifikation der Maschine und Kundendienst 26
Technische Daten 27
Inbetriebnahme der Maschine 28
Betriebsanleitung 28
Wartung und Schmierung 29
Zubehöre 31
Abbildungsverzeichnis 57
EG-Konformitätserklärung - Geräuschemission und Vibrationspegel 62
ÍNDICE
Normas de seguridad
Instrucciones:
Advertencias 33
Identificación y asistencia 34
Características técnicas 35
Puesta en servicio de la máquina 36
Instrucciones de uso 36
Mantenimiento y lubricación 37
Equipos 39
Indice de ilustraciones 57
Certificado de conformidad CE - Niveles de ruido y vibración 62
INDICE
Normas de segurança
Instruções:
Recomendações de precaução de acidentes 41
Identificação e assistência 42
Características técnicas 43
Activação da máquina 44
Instruções de uso 44
Manutenção e Lubrificação 45
Alfaias 47
Índice de ilustrações 57
Certificado de conformidade CE - Nível de Ruído – Vibração 62
Προειδοποιήσεις...............................................................................................................................................................................................................................
Κανονισμοί πρόληψης ατυχημάτων……… ………………………………………………………………...................................................................................σελ. 49
Μοτοσκαπτικό……………………………………………………………………………..............................................................................................................σελ. 50
Τεχνικά χαρακτηριστικά ………………………………………………………………….............................................................................................................σελ. 51
Θέση σε λειτουργία του μηχανήματος…………………………………………….......................................................………………….................................…σελ. 52
Οδηγίες χρήσης……………………………………………………………………………....................................................................................................……σελ. 52
Συντήρηση και λίπανση……………………………………………….………………................................................................................................................σελ. 53
Παρελκόμενα………………………………………………………………………………………............................................................................................….σελ. 55
Περιγραφή χειριστηρίων…………………………………….………………………………...................................................................................................….σελ. 57
Θόρυβος – κραδασμοί……………………………………………………………………........................................................................................................…σελ. 62
- i -
Page 3
SAFETY RULES
This symbol alongside messages and instructions in this manual and on the machine indicates a potential
danger; care must be taken so ensure your own safety and that of anyone within the machine’s range of
operation.
BEWARE! This machine has been manufactured to European standards and carries the mark.
NORME ANTINFORTUNISTICHE
Sulla macchina ed all’interno di questo manuale sono presenti scritte ed indicazioni accompagnate da questo
segnale, stanno ad indicare la presenza di un potenziale pericolo per cui è opportuno utilizzare una particolare
prudenza per la propria sicurezza e di quanti si possono trovare nel raggio di azione della macchina.
ATTENZIONE! Questa macchina è costruita secondo le normative europee ed è certificata col marchio .
RÈGLES DE SÉCURITÉ GÉNERALE
Sur la machine et sur les pages de ce manuel se trouvent des mises en garde et des indications accompagnées de ce
signal; elles indiquent la présence d’un danger potentiel qui explique la nécessité d’être particulièrement prudent pour
sauvegarder sa propre sécurité et la sécurité de tous ceux qui peuvent se trouver dans le rayon d’action de la
machine.
ATTENTION! Cette machine est fabriquée selon les directives européennes et est certifiée par le label
SICHERHEITSVORSCHRIFTEN
Auf der Maschine und in diesem Handbuch finden Sie Beschriftungen und Hinweise mit dem hier abgebildeten
Symbol. Sie weisen auf eine potentielle Gefahr hin, und Sie sollten besonders gefahrenbewusst vorgehen, um
unnötige Risiken für sich selbst und andere Personen, die sich im Aktionsbereich der Maschine befinden,
auszuschließen.
ACHTUNG! Diese Maschine entspricht den europäischen Richtlinien und ist mit dem Zeichen zertifiziert.
NORMAS DE SEGURIDAD
En la máquina y dentro de este manual hay leyendas e indicaciones acompañadas por esta señal que indican la
presencia de un peligro potencial o la necesidad de adoptar una prudencia mayor para la seguridad propria y de
los que se encuentran en el radio de acción de la máquina.
¡ATENCIÓN! Esta máquina es fabricada según las normas europeas y es certificada con la marca .
NORMAS DE PRECAUÇAÕ CONTRA ACIDENTES
Na máquina e neste manual, estão presentes escritas e indicações acompanhadas por este sinal. Estas
chamam a atenção do Operador para a presença de um risco petencial. Portanto, recomenda-se a máxima
atenção para garantir a própria segurança e a de terceiros, que possam estar no raio de acção da máquina.
ATENÇÃO! Esta máquina foi construída em conformidade com as normas europeas e está certificada com a marca
.
GENERAL SECURITY RULES
NORME DI CARATTERE GENERALE SULLA SICUREZZA
SICHERHEITSHINWEISE
RÈGLES GÉNÉRALES DE SÉCURITÉ
NORMAS DE CARÁCTER GENERAL SOBRE LA SEGURIDAD
NORMAS DE CARÁCTER GENERAL ACERCA DA SEGURANÇA
Pay attention to symbol DANGER! It points out all m
ost dangerous operations according to the situation. All safety rules are important and therefore must be strictly observed. Always keep this handbook within the reach,
read it carefully and learn how to use the equipment in a safe way. Let nobody, unprovided with necessary information, work with the equipment.
Fare attenzione al simbolo PERICOLO! Esso indica la presenza delle principali situazioni di pericolo. Tutte le norme antinfortunistiche contente sono importanti e
vanno rispettate. Tenere sempre questo manuale a portata di mano, leggerlo attentamente ed imparare ad usare l’attrezzatura in modo sicuro. Non permettere che
qualcuno operi con questa attrezzatura senza aver ricevuto istruzioni esaurienti.
Attention au symbole DANGER! Il indique la présence des principales situations de danger. Toutes les normes contenues pour la prévention des accidents sont
importantes et doivent être respectées scrupuleusement. Garder toujours ce manuel à la portée de la main, le lire attentivement et apprendre à utiliser ce matériel en
toute sécurité. Ne pas permettre que d’autres personnes utilisent ce matériel sans avoir reçus des instructions exhaustives.
Achtung - die mit dem Symbol GEFAHR! gekennzeichneten Hinweise weisen auf potentielle Gefahrensituationen hin. Alle sicherheitsrelevanten Hinweise in diesem
Handbuch sind sehr wichtig und müssen unbedingt befolgt werden. Bewahren Sie dieses Handbuch stets griffbereit auf, lesen Sie es aufmerksam durch, und lernen
Sie, die Maschine und die gesamte Ausrüstung sicher zu benutzen. Die Maschine darf nur von Personen benutzt werden, die vorher entsprechend unterwiesen
wurden.
Preste atención al símbolo ¡PELIGRO! Indica la presencia de situaciones importantes de peligro. Todas las normas de prevención de accidentes detalladas son
importantes y deben respetarse strictamente. Conserve este manual al alcance de la mano, léalo atentamente y aprenda a utilizar el equipamiento de modo seguro.
No permita que otras personas operen con este equipamiento sin haber recibido instrucciones exhaustivas.
Page 4

Take special care not to touch hot parts of the engine.
Prestate particolare attenzione a non entrare in contatto con parti surriscaldate del motore.
Veiller tout particulièrement à ne pas toucher des éléments surchauffés du moteur.
Achtung – keine heißen Motorteile berühren!
No tocar partes recalentadas del motor.
Tome muito cuidado para não entrar em contacto com as partes aquecidas do motor.
Sharp component. Keep hands and feet away. Do not clean the attachment when the
engine is turning.
Organo tagliente. Tenere lontano piedi e mani. Non pulire l’attrezzo con il motore in moto.
Organe tranchant. Ne pas approcher mains et pieds. Ne pas nettoyer l’outil quand le moteur
est en marche.
Scharfe Klinge. Hände und Füße fernhalten. Niemals bei laufendem Motor reinigen.
¡Peligro! Órgano cortante. Mantener lejos los pies y las manos. No limpiar la herramienta
con el motor en marcha.
Perigo! Órgão afiado. Mantenha as mãos e os pés afastados. Não limpe o equipamiento
com o motor em movimento.
Engine exhaust fumes can cause sickness or death. If it is necessary to run an engine in an
enclosed area, use an exhaust pipe extension to remove the fumes. Always try to work in a
well ventilated area.
I gas di scarico possono causare malanni o morte. Se è necessario mettere in moto un
motore in uno spazio chiuso, usare una prolunga tubo di scarico per far uscire il fumo.
Lavorare in una zona ben ventilata.
L’exhalation des gaz d’échappement peut être cause d’intoxication ou de mort. S’il est
vraiment nécessaire d’allumer le moteur à l’interieur, appliquer au tuyau d’échappement un
autre tuyau extensible pour permettre la sortie des gaz. Il est toujours mieux de travailler en
plein air.
Auspuffgase können Übelkeit oder Tod verursachen. Wenn es notwendig ist, einen Motor in
einem geschlossenen Raum laufen zu lassen, benützen Sie eine Verlängerung, um das
Auspuffgas abzuleiten. Versuchen Sie immer in einem gut belüfteten Raum zu arbeiten.
Los gases de escape pueden provocar enfermedades o muerte. De tener que poner en
marcha un motor en un espacio cerrado, usar una prolongación del tubo de escape para
que salga el humo. Trabajar en una zona bien ventilada.
Os gases de escape podem causar danos ou morte. Caso seja ncessário fazer com que o
motor funcione num espaço fechado, utilize uma extensão para o tubo de escape que os
fumos sejam espulso para o exterior. Trabalhe numa área bem ventilada.
Caution! Never touch moving pulleys or belts. They can be very dangerous. Never do
maintenance with engine running.
Attenzione! Non toccare mai pulegge o cinghie in movimento, creano gravi danni alla
persona. Non fare manutenzione col motore in moto.
Attention! Ne jamais toucher ni poulies ni courroies en mouvement, elles peuvent provoquer
des accidents aux personnes. Ne pas faire l’entretien quand le moteur est en marche.
Vorsicht! Nie laufende Riemenscheiben oder Treibriemen anfassen, da es gefährlich ist. Nie
bei laufendem Motor Instandhaltung machen.
¡Atención! No tocar jamás poleas o correas en movimiento, porque pueden crear graves
daños a la persona. No efectuar el mantenimiento con el motor en marcha.
Atenção! Nunca toque nas polias ou correias em movimento devido ao alto risco de
ferimentos. Nunca faça a manutenção da máquina com o motor ligado.
A burst which separates the tyre from the rim parts can cause serious injury or death.
La separazione fra pneumatico e cerchione, causata dall’esplosione del pneumatico, può
provocare serie ferite o addirittura la morte.
La séparation entre le pneu et la jante, provoquée par l’explosion d’une roue peut causer
des dommages, blessures ou la mort.
Die Trennung der Räder von den Felgen durch Explosion kann schwere Verletzungen oder
den Tod verursachen.
La separación entre el neumático y la llanta producida por la explosión del neumático
puede provocar graves herida e incluso la muerte.
A separação entre o pneumático e o aro, provocada pela explosão do pneumático, pode
causar graves ferimentos ou até mesmo a morte.
Prevent battery explosions: keep sparks, lighted matches and open flames away from the
top of the battery. Battery gas can explode.
Per prevenire l’esplosione della batteria, tenete scintille, fiammiferi accesi e fiamme lontani
dalla stessa. Il gas della batteria può esplodere.
Prévenir l’explosion de la batterie: tenir les étincelles, les allumettes et le feu loin de la
batterie. Le gaz de la batterie peut exploser.
Vorbeugung der Batterie-Explosion. Entfernen Sie Funken, Zündhölzer und Flammen von
der Batterie. Das Batteriegas kann explodieren.
Para prevenir la explosión de la batería, mantener chispas, cerillas encendidas y llamas
lejos de la misma. El gas de la batería puede explotar.
Para prevenir explosão da bateria ter centelhas, fósforos acendido e chamas longe da
mesma. O gás da bateria poderia explodir.
Page 5
Handle fuel with care, it is highly flammable: Do not refuel machine while smoking, when
machine is near an open flame or sparks, or when the engine is running. Stop the engine.
Maneggiare il carburante con cura, è altamente infiammabile; non fate rifornimento mentre
fumate, o vicino a fiamme o scintille, o quando il motore è acceso.
Manier avec soin le carburant car c’est très inflammable. Ne pas remplir le réservoir si vous
êtes en train de fumer ou pendant que la machine est près du feu ou d’étincelles ou encore
pendant que la machine travaille. Arrêter le moteur.
Treibstoff vorsichtig handhaben, da er sehr entzündbar ist: beim Tanken nicht rauchen.
Nicht tanken, wenn die Maschine in der Nähe von Flammen oder Funken ist oder wenn der
Motor läuft. Immer den Motor abschalten.
Manejar el combustible con cuidado porque es sumamente inflamable; no repostar mientras
se fuma o cerca de llamas o chispas, o cuando el motor está encendido.
Manuseie o carburante com cuidado, pois este è altamente inflamável; não fume durante o
abastecimento da máquina ou enquanto o motor estiver ligado, não o aproximado de
chama ou de faíscas.
Warning! Turning gears, keep your hands and feet away. Do not clean the
attachment when the engine is running.
Attenzione! Organo in rotazione, tenere lontano piedi e mani. Non pulire
l'attrezzo col motore in moto.
Attention! Organ en rotation, ne pas approcher main et pieds. Ne pas nettoyer le
moteur quand le moteur est en marche.
Achtung! Rotierende Klinge, Hände und Füße fernhalten. Niemals bei laufendem
Motor reinigen.
¡Peligro! Órgano cortante. Mantener lejos los pies y las manos. No limpiar la
herramienta con el motor en marcha.
Atenção! Órgão em rotação. Mantenha as mãos e os pés afastados. Não limpe
o equipamento com o motor em movimento.
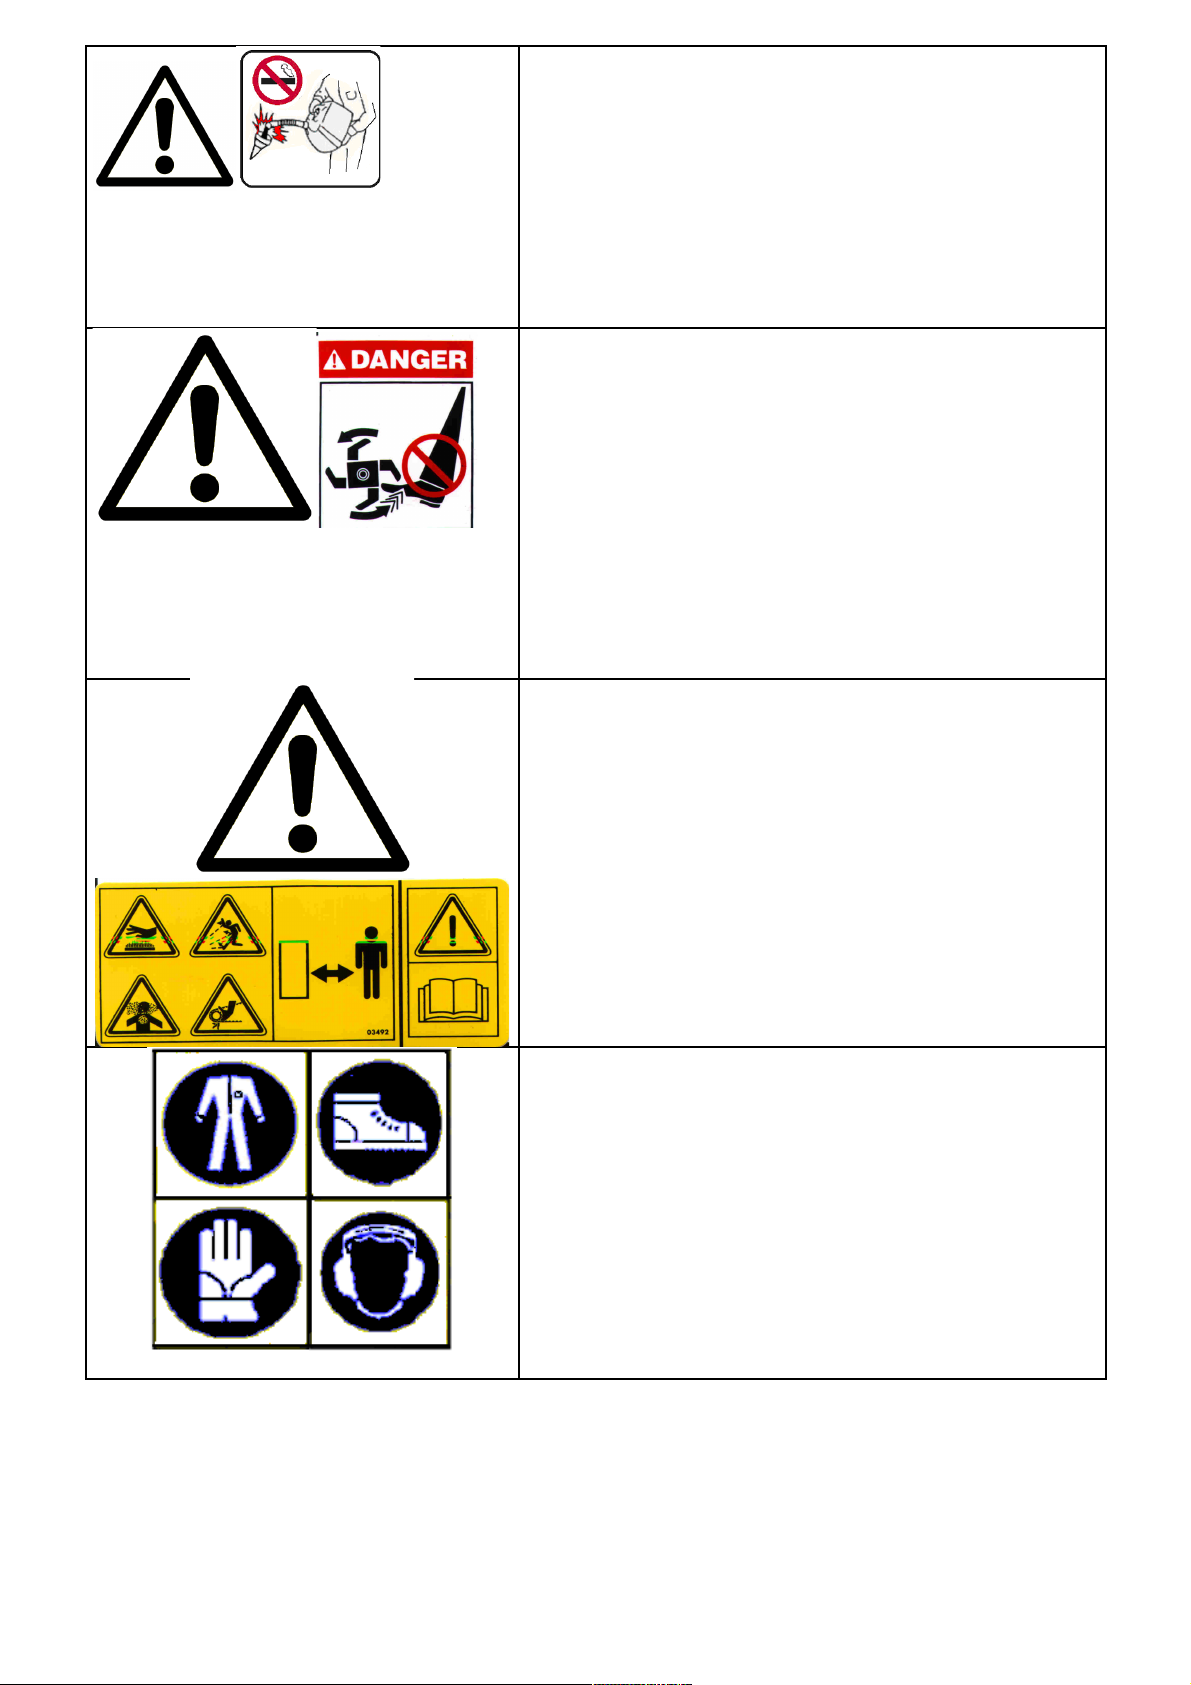
DANGER! READ THE INSTRUCTION MANUAL. KEEP SAFETY DISTANCES.
PERICOLO! LEGGERE IL MANUALE D’ISTRUZIONE. TENERE LONTANO LE
PERSONE.
DANGER! LIRE LE MANUEL D’INSTRUCTIONS. RESPECTER LES
DISTANCES DE SÉCURITÉ
GEFAHR! DIE GEBRAUCHS ANLEITUNG DURCHLESEN. NICHT IN DER
NÄHE VON ANDEREN PERSONEN MÄHEN.
PELIGRO! LEER LAS INSTRUCCIONES. MANTENER ALEJADAS LAS
PERSONAS.
PERIGO! LER O MANUAL DE INSTRUÇÕES. MANTER AS PESSOAS
AFASTADAS.
Before using the machine, it is mandatory to put on the appropriate individual
safety devices: body protection, protection gloves, security shoes, ear protection.
Prima di utilizzare la macchina, è obbligatorio indossare gli appositi dispositivi di
sicurezza individuali: protezione del corpo, guanti di protezione, calzature di
sicurezza, protezione dell’udito.
Avant d’utiliser la machine, il est obligatoire de mettre les dispositifs individuels
de sécurité appropriés: protection du corps, gants de protection, chaussures de
sécurité, protection de l’ouïe.
Vor dem Gebrauch der Maschine ist es vorgeschrieben, die geeignete
persönlichen Schutzkleidung anzuziehen: Körperschutz, Schutzhandschuhe,
Sicherheitsschuhe, Gehörschutz.
Antes de utilizar la máquina es obligatorio ponerse los dispositivos individuales
de seguridad apropiados: protección del cuerpo, guantes de protección, calzado
de seguridad, protección del oído.
Page 6

11500/ Translation of the original instructions
ROTAVATOR 11500
Dear Customer,
thank you for choosing a Grillo motor hoe. We are sure that our machine’s performance will satisfy you
in all respects. For the best results and maintenance over time, read this handbook carefully and follow
the instructions to the letter; this will also avoid unnecessary expense.
Keep this handbook with the machine at all times.
GENERAL DESCRIPTION AND INTENDED USE
The rotavator is a single-axle self-propelled machine usually equipped with a rotary tiller for tilling soil.
These machines are used primarily to prepare the soil (elimination of weed, tilling of the soil) and used in
gardening, for small ground work, refinement work and orchard inter-rows.
The machine is constructed on a chassis and fitted with either a petrol or diesel engine that drives a
rotary tiller. The Grillo rotavator is a pedestrian-controlled machine, the operator steers the machine via
the handle-bar where the controls are mounted.
CAUTION! Before starting the engine, read this carefully. The following warnings are very important in ensuring safety!
WARNINGS
Caution is the main safeguard in preventing accidents!
Improper use of the rotavator and its equipment can be dangerous; to reduce the risks to the minimum,
observe the necessary precautions set out below:
1) Read the whole of this manual before starting the machine or putting it in motion.
2) Pay special attention to the safety warnings and labels.
3) Rotation of the tiller is extremely dangerous; Never place your hands or feet under the tiller!
4) Before other people are allowed to use the machine they must first be informed about the safety
regulations and how to use the vehicle.
5) Before starting the engine, make sure that there is no-one nearby, particularly children.
6) Never use the machine when tired and do not drink alcohol.
7) Check the ground before tilling for stones, sticks or foreign bodies which might damage the machine
or be flung dangerously to some distance during operation.
8) Before starting work, put on suitable working clothes, gloves, heavy footwear and goggles.
9) Never use the rotavator on steep slopes; it might tip over (max. 35%).
10) Never allow the machine to be used by anyone under 16 years of age.
11) Never reverse with the engine at high throttle.
12) It is dangerous to operate the levers sharply with the engine at maximum r.p.m.
13) Never keep the engine running indoors; you may inhale poisonous gases.
14) Always switch off the engine before filling up with fuel, keep away from sparks or flames and do not
smoke!
15) Avoid fuel spills and after filling the tank clean all spills before starting the engine.
16) Store fuel in containers specially constructed for this purpose.
17) Work only in sunlight or with good artificial light.
IMPROPER USES TO BE AVOIDED
18) Any improper uses causes the machine to become null and void and the constructor will decline all
liability.
19) Never use the machine to transport people, animals or objects.
FURTHER SAFETY ADVICES
20) Never tamper with or deactivate the safety devices.
21) Never make any adjustments or do any cleaning with the engine running.
22) Never have anyone check the machine while you are driving with the engine running.
23) The user is always responsible for injury or damage to third parties.
4
Page 7

11500/ Translation of the original instructions
24) Misshapen or damaged hoes must always be replaced and never repaired.
25) Always use original Grillo spare parts.
26) Before starting any work with the machine, check that all the accident prevention systems with
which it is equipped are in perfect working order. They must never be disabled or tampered with.
27) Before starting work, check that the nuts and bolts securing the tiller and hoes are perfectly tight.
28) All protective fittings (hoods, mudguards, etc.) must be kept in place during operation.
29) Never clean the tiller with the engine running.
30) Never use the machine barefoot.
31) Never change the engine settings, especially the maximum r.p.m.
32) Allow the engine to cool before placing the machine indoors.
33) CAUTION: to reduce the risk of fire, keep the engine, the exhaust pipe and the exhaust manifolds
free from grass, leaves, dust, etc…
34) If you have to empty the fuel tank, do this outdoors.
35) Rotavator must be driven by only one operator.
IDENTIFICATION AND AFTER-SALES SERVICE
The rotavator is fitted with a nameplate on the
frame with the serial number of the machine. This
number must be stated when requesting service or
ordering spare parts.
AFTER-SALES SERVICE
This handbook provides instructions for use of the motor hoe and for correct basic servicing which the
user can carry out himself. For all procedures not described in this handbook, contact your local dealer.
SPARE PARTS
Always use original spare parts, as they are the only ones to offer complete safety and
interchangeability. Always state the serial number of the machine and the code number or the part to be
replaced when ordering. For engine parts, refer to the specific handbook.
GUARANTEE
The guarantee is given in compliance with the current law. The dealer will have to give the client a copy
of the registration card of the machine, which they will print up from the Grillo website.
For the engine the guarantee of the relative manufacturers apply.
ORDERING SPARE PARTS
Always state the machine serial number and the code number of the part to be replaced.
Contact your local dealer. For further information, our address is:
GRILLO S.p.A.
Via Cervese 1701 - 47521 CESENA (FC) - ITALY
Tel. 0039 / 0547 / 633111 - Fax 0039 / 0547 / 632011
Web site: www.grillospa.it - E-mail: grillo@grillospa.it
THE FOLLOWING SPARE PARTS SHOULD ALWAYS BE KEPT TO HAND
– 1 gas cable
– 1 clutch cable
– 1 throttle lever
– 2 right tines with screws
– 2 left tines with screws
5
Page 8

11500/ Translation of the original instructions
TECHNICAL SPECIFICATIONS
ENGINE:
- ROBIN SUBARU EX27 265 cm³, 8,3HP, 6,1 kW (@ 3600 r.p.m.), one cylinder petrol.
- LOMBARDINI 15LD350 349 cm³, 7,5HP, 5,5 kW (@ 3600 r.p.m.), one cylinder diesel.
STARTER: recoil starter (electric starter available for diesel engines only)
FUEL TANK: 6,1 litres (EX27) – 4,3 litres (15LD350)
HOURLY CONSUMPTION: 2,4 litres (EX27) – 1,5 litres (15LD350)
CLUTCH: conic and active
TRANSMISSION: with gears in oil bath
GEARBOX: three forward gears and one reverse gear
P.T.O: one running at the engine r.p.m. in anti-clockwise rotation 11 UNI 221 + one synchronized P.T.O
with gearbox speeds in clockwise rotation 13 UNI 221.
HANDLEBAR: height-and side adjustable and fitted on anti-vibration blocks.
STANDARD ROTARY TILLER: with 4 tines and side discs for a total width of 990 mm
HOES DIAMETRE: 340 mm
WORKING AREA without side discs: adjustable at 590 – 860 – 1120 mm (with enlargement kit)
WORKING AREA DEPTH: 330 mm
ROTARY TILLER RPM: I 53 r.p.m.; II 123 r.p.m. III 162 r.p.m.; I REVERSE 53 r.p.m.
ATTACHMENTS: plough, furrower, wheel extensions, rubber wheels, transfer wheels.
WEIGHT: with EX27 kg 90 – with 15LD350 recoil starter kg 110 – with 15LD350 electric starter kg 121
PUTTING THE MACHINE INTO SERVICE
- Check that the machine has not been damaged during transport.
- Fix the drag stake (fig. 8).
- Fix the bonnet and the tines (fig. 9). Attention: before fixing the tines assembly to the tines shaft,
check that the shaft and the inner part of the tines assembly are perfectly clean. After having
fixed the tines assembly to the shaft, pull the screws tight.
- Fix the engine pin where necessary (fig. 10).
- Fill in the engine oil (see engine handbook).
Checks to be made before starting, with the machine in horizontal position:
- Check that the gearbox oil level can be seen through the gauge (fig. 4).
- To check engine oil, remove the level check cap, following the instructions in the engine
handbook (fig. 2 and 3).
- In the versions with air filter in oil bath (fig. 6) fill in the oil using the same as for the engine.
- Check that there is a little free play on the clutch cable between the adjuster and the lever (fig. 7).
- Fill the tank with fuel, using a funnel with very fine filter to remove any impurities.
- Ensure that the gear lever is in “neutral” position.
6
Page 9

11500/ Translation of the original instructions
INSTRUCTIONS FOR USE
STARTING THE ENGINE
To start the engine, carry out the following steps:
- Half- open the throttle (fig. 1 no. 3).
- In the petrol engine versions, open the petrol cock and shut the starter, then position the ignition
knob on ON (fig. 12).
- In the versions with recoil starter, pull hard on the pull starter handle (fig. 11): the engine starts.
- In the petrol engine versions, once the engine has started, open the starter and slowly return the
throttle (fig. 1 no. 3) almost back to the minimum.
- Let the engine warm up for a few minutes before starting work and to ensure good running-in do
not strain the machine excessively during the first 50 working hours.
STARTING THE MACHINE
The machine will start by depressing the lever A and then subsequently on the red lever 2 (fig. 7) until it
comes into position 1 (fig. 7) . By releasing the red lever, the machine will stop but the engine will keep
running and the lever returns back to position 2 (fig. 7). To turn the engine off, turn the switch positioned
on the handle 3 position OFF (fig. 7) for petrol engines. For Diesel engine use the lever on the right side
of the engine.
Note: To avoid problems to the clutch during the functioning of the machine, please keep the red lever
firmly depressed. Attention! Do not use the machine whilst only partially depressing the red lever or
damage to the clutch may result!
The operator’s pressure on the steering-wheel determines the tilling depth; it can be increased or
reduced also by raising or lowering the rear drag stake. It is advisable to turn the tip of the drag stake
forward when working on hard and dense ground, or to turn it backwards when the soil is not very firm
(fig. 8). On particularly hard ground it is advisable to remove the tiller disc in order to improve the
penetration of the tines into the ground.
FINISHING WORK
After finishing work, carry out the following steps to stop the engine: act on the throttle lever (petrol
engines), act on the lever placed on the right side of the engine (diesel engine); place the gear lever in
neutral position. For petrol engines, turn off the fuel tap. Always refer to the engine manual.
MAINTENANCE AND LUBRICATION
CAUTION!
- Disconnect the plug before performing any cleaning, maintenance or repair operation. Always
wear suitable clothing and working gloves.
- When the machine or part of it is lifted to carry out maintenance operations, always remember
to use suitable fixing tools such as holders and safety locks.
- When carrying out maintenance operations and/or when the machine is tilted without safety
locks or supports, never leave it unguarded in places where inexperienced people and children
could have easy access to it.
- Protect the environment: carefully dispose of used oils, petrol and any other pollutant product!
- Effective maintenance and correct lubrication help to keep the machine fully efficient.
The 11500 motor hoe is designed to require very little servicing, although to keep it at top efficiency the
following procedures are recommended:
- Check that all screws and nuts are always well tightened, especially those holding the tines
assembly to the shaft, the engine, the tines and the rear drag stake support.
- Oil the throttle and clutch cables.
- Do not use mineral oil on rubber parts as this would damage them.
- Check that there is always a little slack in the clutch cable between the adjuster and the lever.
- Always check the oil levels and clean the air filter often.
7
Page 10

11500/ Translation of the original instructions
IMPORTANT: Always carry out the following operations with the machine in horizontal position. All oil
changes must be made when the machine is warm to facilitate the complete drainage of all the old oil.
Do not unscrew the oil cap when the engine is running, as this would cause the loss of the oil in the
circuit.
ENGINE OIL
Follow the instructions in the engine handbook carefully.
The oil level must be checked every 4 working hours and the oil changed every 50 hours approximately.
AIR FILTER
Check that the air filter is clean every 8 hours and even more often if working in very dusty conditions. In
the versions with dry air filter (fig. 5) check that the filter is clean. Attention: if the filter is blocked, do not
blow the cartridge with compressed air, but replace it. In the oil bath version (fig. 6), check that the filter
is clean and the oil is at the right level. Use the same oil as for the engine.
GEARBOX OIL
Check the level every 50 working hours approximately and if necessary, add 85W90 gearbox oil.
Change the oil once a year (quantity 1.350 kg).
To drain the old oil out of the gearbox casing, unscrew the screws on the cover around the tiller shaft
(fig. 1A no. 8).
TINE SHAFT
Remove the dust guards periodically (fib. 1A no. 8), clean the underlying area thoroughly, then replace.
USEFUL HINTS FOR PROPER USE
- Never leave the machine out in the rain.
- Never force the gearbox if the gear does not engage; give light touches on the clutch when
changing.
- Remove grass and leaves that may be deposited around the recoil starter.
- Under no circumstances must the machine be used without safety devices.
END OF SEASON MAINTENANCE
- Clean the machine carefully.
- Change engine and gearbox oil.
- Check and clean the air filter.
- Sharpen the tines and replace them if worn.
- Grease the accelerator and the clutch cables.
- If the machine operates intensively in dry and dusty environment, clean the cylinder cooling fins
(see engine handbook).
8
Page 11

11500/ Translation of the original instructions
MAINTENANCE SUMMARY TABLE
PROCEDURE EVERY 8
HOURS
AFTER
20
HOURS
EVERY
50
HOURS
EVERY
100
HOURS
ONCE A YEAR
OR EVERY 200
HOURS
Engine oil
check the level ●
change ● ●
Air filter
check ●
replace ٭
Spark plug
check/adjust ●
replace ●
Gearbox oil
Check the level ● ●
replace ●
Check that the engine intake grid is
clean
●
Check that tines are well-sharpened
and well-fixed
● ●
Lubricate with grease
●
Check clutch clearance (free play)
● ●
● recommended procedure
٭ procedure to be carried out if necessary
LONG PERIODS OF STORAGE
If the machine is to be out of use for more than 30 days (models with petrol engine), drain the fuel from
the engine to prevent sticky deposits from forming in the fuel intake system or in vital parts of carburettor.
To avoid this procedure, it is possible to save fuel in storage up to 12 months by using an appropriate
fuel stabilizer. Add this additive to the fuel in the tank or in the fuel container. Run the engine for a while
to let the stabilizer get into the fuel system. Caution: if the engine is fed with petrol containing alcohol,
drain the fuel tank and run the engine until there is no fuel left.
TRANSPORTING THE MACHINE
If the Rotavator has to be transported on a lorry or a trailer, fasten it to the vehicle using ropes or cables.
9
Page 12

11500/ Translation of the original instructions
IMPLEMENTS
CAUTION: Before fitting the tines assembly, ratchet hubs or wheel extensions to the tiller shaft (fig. 1 no.
5), check that the shaft and the inside of the accessory to be mounted are perfectly clean. After having
fitted the accessory to the shaft, tighten the fixing screws thoroughly.
PLOUGHS
The ploughs designed for the motor hoe Grillo 11500 have been especially developed to obtain good
ploughing without over-straining the operator. There are two models available: single furrow plough and
180° roll-over plough. The latter is especially suitable when working forwards and backwards, such as
along rows of vines or fruit-trees. The depth of the furrow may vary from 10 to 15 cm depending on the
soil.
The plough must be fitted behind the tiller on the adjustable implement-holder (fig. 14). Remove the drag
stake support, the split pin and the pin (fig. 8), then fit the implement-holder. It is also necessary to
remove the two tines assembly. Fit the wheel extensions with the screws (fig. 19) and then the rubber
wheels type 5.00x10.
In order to increase the wheel adherence it is recommended to fit weighs on the wheels.
ADJUSTABLE FURROWER
The adjustable furrower is an implement especially designed and manufactured for tracing furrows for
sowing or irrigation (fig. 15).
The possibility of adjusting the position of the two wings enables furrow width to be regulated from
minimum of 10 to maximum of 30 cm. Furrow depth can vary from 10 to 20 cm.
When working particularly hard ground, it is recommended to till before using the furrower. It is very easy
to mount; just remove the drag stake and fit the furrower (fig. 15).
It may be used in combination with the tiller or fitting the rubber wheels.
IRRIGATION PUMP
This pump is fitted directly to the flanges of the motor hoe top shaft (fig. 16) and secured by screwing two
nuts onto the stud-bolts. Since it does not have a release clutch, it must be fitted immediately before use
and removed immediately afterwards.
SPRAYER PUMP
This pump is fitted directly to the flanges of the motor hoe top shaft (fig. 17).
RATCHET HUBS
Ratchet hubs are special wheel attachments, as the ratchets act as differentials. The ratchets are fitted
to the tiller shafts, locked with the screws supplied, and then the rubber wheels are fitted (fig. 18).
WHEEL EXTENSIONS
The wheel extensions are fitted onto the tiller axle and they are necessary to fit the rubber wheels (fig.
19). They have no differential function.
FRONT TRANSPORT WHEEL
The front wheel is needed to move the machine on roads, squares or garages. It has two positions, one
for work and one for transport which are adjustable without key (fig. 20).
10
Page 13

11500/ Original instructions – Istruzioni originali – Instructions originales – Original-Anleitungen – Instrucciones originales
MOTOZAPPA 11500
Gentile Cliente,
nel ringraziarLa per la fiducia e la preferenza accordata alla nostra motozappa, confidiamo che l’uso di
questa nuova macchina risponda pienamente alle sue esigenze. Per l’impiego ottimale e per la sua
manutenzione nel tempo, la preghiamo di leggere attentamente e seguire scrupolosamente le indicazioni
di questo libretto; ciò le consentirà di ottenere i massimi risultati e salvaguardare la sua spesa.
La preghiamo di conservare questo libretto, che dovrà sempre accompagnare la macchina.
DESCRIZIONE GENERALE E USO PREVISTO
La motozappa è una macchina agricola semovente ad un solo asse, normalmente equipaggiata con una
fresa per la lavorazione del terreno.
Queste macchine sono impiegate per effettuare lavori di preparazione del terreno (eliminazione di
infestanti, fresatura) e impiegate per piccole superfici, lavori di rifinitura, nell'interfila dei frutteti e
nell'orticoltura. La macchina è costituita da un telaio portante, sul quale è installato un motore a scoppio
che aziona una fresa. La macchina è comandata da un operatore a terra che segue il movimento della
stessa guidandola mediante un manubrio, su cui sono dislocati i comandi.
ATTENZIONE! Leggere attentamente prima di avviare il motore.
Le seguenti avvertenze sono importanti per l'incolumità dell'operatore!
NORME ANTINFORTUNISTICHE
La prudenza è l’arma principale nella prevenzione degli incidenti!
L’uso improprio della motozappa e del suo equipaggiamento può risultare dannoso. Per ridurre questa
possibilità di pericolo, osservare le precauzioni necessarie di seguito riportate:
1) Leggere questo manuale interamente, prima di accendere e mettere in movimento la motozappa.
2) Dare particolare attenzione alle ammonizioni e alle etichette di sicurezza attorno alla macchina.
3) La rotazione della fresa è altamente pericolosa, non mettere mai le mani o i piedi sotto alla fresa.
4) Prima di far lavorare con la motozappa altre persone, bisogna metterle al corrente delle norme di
sicurezza e di come si usa la macchina.
5) Prima di accendere la motozappa verificare che non ci siano persone intorno; specialmente bambini
6) Non usare la motozappa quando si è affaticati e non bere alcolici.
7) Controllare il terreno prima di procedere alla fresatura, che non vi siano sassi, bastoni o corpi
estranei, che potrebbero danneggiare la macchina o essere scagliati lontano, e quindi risultare
molto pericolosi.
8) Prima di iniziare il lavoro, indossare indumenti appropriati da lavoro, guanti, scarponi,
occhiali.
9) Non usare la motozappa su forti pendenze, si potrebbe ribaltare.
10) Non far lavorare ragazzi troppo giovani; è vietato l’uso ai minori di 16 anni.
11) Non fare retromarcia con il motore accelerato.
12) È pericoloso azionare le leve bruscamente, con il motore a massimo regime.
13) Per evitare il pericolo di esalazioni velenose, non adoperare il motore acceso in un locale chiuso.
14) Spegnere sempre il motore prima di fare rifornimento di combustibile, stare lontano da scintille o
fiamme, non fumare!
15) Evitare fuoriuscite di combustibile e, dopo aver riempito il serbatoio, pulire ogni fuoriuscita sulla
motozappa prima di avviare il motore.
16) Non manomettere o disattivare i dispositivi di sicurezza.
17) Non fare nessun tipo di regolazione o pulizia col motore in moto.
18) Non fare controllare la macchina da nessuno mentre siete alla guida col motore in moto.
19) L’utilizzatore è sempre responsabile dei danni arrecati a terzi.
20) Ogni utilizzo improprio comporta il decadimento della garanzia ed il declino di ogni responsabilità del
costruttore.
21) Le zappe deformate o danneggiate devono essere sempre sostituite, mai riparate.
22) Usare sempre ricambi originali.
11
Page 14

11500/ Original instructions – Istruzioni originali – Instructions originales – Original-Anleitungen – Instrucciones originales
23) Prima di cominciare qualsiasi lavoro con la macchina, verificare che tutti i sistemi antinfortunistici, di
cui essa è dotata, siano perfettamente funzionanti. È severamente vietato escluderli o manometterli.
24) Prima di iniziare il lavoro, controllare che le viti e i dadi di bloccaggio della fresa e delle zappette
siano perfettamente serrati.
25) L’attrezzatura protettiva (cofani, parafanghi, ecc.), va assolutamente mantenuta durante i lavori di
zappatura.
26) Non pulire la fresa con il motore acceso.
IDENTIFICAZIONE E ASSISTENZA
SERVIZIO ASSISTENZA
Questo manuale fornisce le indicazioni per l’uso della motozappa e per una corretta manutenzione di
base, eseguibile dall’utilizzatore. Per gli interventi non descritti in questo libretto, interpellare il rivenditore
di zona.
RICAMBI
Si raccomanda di impiegare esclusivamente ricambi originali, gli unici che offrono caratteristiche di
sicurezza e intercambiabilità. Ogni richiesta deve essere corredata dal numero di matricola della
macchina e dal codice del pezzo da sostituire.
Per i ricambi del motore, attenersi a quanto indicato nel libretto specifico.
GARANZIA
La garanzia è fornita nei modi e nei limiti indicati dalla legge vigente. Il rivenditore dovrà
obbligatoriamente consegnare il certificato di garanzia della macchina al cliente finale, stampando una
copia della registrazione dal sito Grillo.
Per quanto riguarda il motore, valgono le condizioni previste dai rispettivi Produttori.
COME ORDINARE I RICAMBI
Indicare sempre il numero di matricola della macchina e il codice del pezzo da sostituire. Rivolgersi ai
nostri centri presenti in ogni provincia. Il nostro indirizzo è:
GRILLO S.p.A.
Via Cervese 1701 – 47521 CESENA (FC)
Tel. 0547 – 633111 / Fax 0547 – 632011
Web site: www.grillospa.it / e-mail: grillo@grillospa.it
RICAMBI CHE CONSIGLIAMO DI TENERE A SCORTA
- 1 filo acceleratore
- 1 filo frizione
- 1 manettino acceleratore
- 2 zappe destre con viti
- 2 zappe sinistre con viti.
12
IDENTIFICAZIONE
La motozappa è fornita di una targhetta posta sul telaio con
il numero di matricola della macchina.
Questo numero è indispensabile per ogni richiesta di
intervento tecnico e per ordinare i ricambi.
Page 15

11500/ Original instructions – Istruzioni originali – Instructions originales – Original-Anleitungen – Instrucciones originales
CARATTERISTICHE TECNICHE
MOTORE:
- ROBIN SUBARU EX27 OHC 265 cm³, 8,3 HP 6,1 kW a 3600 giri/min., monocilindrico a benzina.
- LOMBARDINI 15LD350 349 cm³, 7,5 HP 5,5 kW a 3600 giri/min., monocilindrico diesel.
AVVIAMENTO: a strappo con autoavvolgente (possibilità di avviamento elettrico sulla versione diesel)
SERBATOIO CARBURANTE: 6,1 litri (EX27) – 4,3 litri (15LD350)
CONSUMO ORARIO: 2,4 litri (EX27) – 1,5 litri (15LD350)
FRIZIONE: conica attiva
TRASMISSIONE: ad ingranaggi a bagno d'olio
CAMBIO: 3 marce avanti + 1 retromarcia
PRESE DI FORZA: una superiore ai regimi del motore in senso antiorario 11 UNI 221 + una inferiore
comandata dal cambio in senso orario 13 UNI 221.
STEGOLA: regolabile sia in altezza che lateralmente e montata su anti-vibranti.
FRESA STANDARD: a 6 stelle più dischi laterali per una larghezza totale di 990 mm.
DIAMETRO ZAPPE: 340 mm
LARGHEZZA DI LAVORO senza piattello: registrabile 590 – 860 – 1120 mm (con kit allargamenti)
PROFONDITA' DI LAVORO: 330 mm
GIRI FRESA AL MINUTO: I 53 giri – II 123 giri – III a 162 giri; RM a 53 giri.
ACCESSORI: aratro, assolcatore, ruote in gomma, prolunghe ruote, ruotine di trasferimento.
PESO con fresa: 90 kg (EX27) 110 kg (15LD350 AV) 121 kg (15LD350 AE)
MESSA IN OPERA DELLA MACCHINA
- Verificare l’integrità della macchina e che non abbia subito danni durante il trasporto.
- Montare lo sperone (fig. 8).
- Montare i cofani e le zappe (fig. 9). Attenzione: prima di montare i gruppi zappe, sull’albero zappe,
verificare che quest’ultimo e la parte interna del gruppo zappe, siano perfettamente puliti. Inserito il
gruppo zappe sull’albero, stringere con cura le viti di fissaggio.
- Montare il piedino motore, ove previsto (fig. 10).
- Inserire l’olio motore (vedi libretto motore).
Controlli da eseguire prima dell’avviamento con la macchina in posizione orizzontale:
- Verificare che l’olio cambio sia visibile attraverso l’indicatore livello (fig. 4).
- Per controllare l’olio motore, sfilare il tappo livello attenendosi alla istruzioni del libretto motore (fig. 2 e
3).
- Nelle versioni con filtro aria a bagno d’olio (fig. 6), inserire l’olio utilizzando lo stesso olio del motore.
- Controllare che il filo frizione abbia un po’ di gioco fra il registro e la leva (fig. 7).
- Riempire il serbatoio di carburante con un imbuto munito di filtro molto fine per trattenere eventuali
impurità.
- Accertarsi che la leva marce sia in posizione “folle”.
13
Page 16

11500/ Original instructions – Istruzioni originali – Instructions originales – Original-Anleitungen – Instrucciones originales
ISTRUZIONI D'USO
AVVIAMENTO DEL MOTORE
Per avviare il motore, eseguire le seguenti operazioni:
- Portare il manettino acceleratore a metà corsa (fig. 1 n.3).
- Nelle versioni benzina, aprire il rubinetto della benzina e chiudere lo starter, poi posizionare la
manopola di accensione su ON (fig. 12)
- Nelle versioni con avviamento a strappo, tirare energicamente la manopola dell’avviamento
autoavvolgente (fig. 11): il motore si avvia.
- Nelle versioni benzina, ad avviamento avvenuto, riaprire lo starter e riportare lentamente il manettino
acceleratore (fig. 1 n.3) vicino alla posizione di minimo.
- Lasciare scaldare il motore per qualche minuto, prima di iniziare il lavoro e per favorire un buon
rodaggio non forzare eccessivamente la macchina durante le prime 50 ore di utilizzo.
AVVIAMENTO DELLA MACCHINA
La macchina si mette in movimento premendo sulla levetta A e successivamente sulla leva rossa n. 2
(fig. 7) fino alla posizione n.1 (fig. 7). Abbandonando la presa della leva rossa la macchina si ferma ma il
motore rimane acceso, la leva ritorna nella posizione n.2 (fig. 7). Per spegnere il motore agire
sull'interruttore posto sul manettino acceleratore n. 3 posizione OFF (fig. 7) per motori a benzina. Per
motori Diesel agire sulla leva posta sul lato destro del motore.
NOTA: Per evitare problemi alla frizione durante il lavoro la leva rossa va tenuta ben premuta.
Attenzione! Non lavorare con la leva parzialmente premuta!
La pressione dell’operatore sul manubrio di guida determina la profondità di fresatura; si può ottenere
una maggiore o minore profondità di zappatura anche abbassando o sollevando il piedino posteriore. Si
consiglia, inoltre, di girare la punta del piedino in avanti quando si lavora in terreni duri e compatti;
oppure di girarla all’indietro quando il terreno non ha un’eccessiva consistenza (fig. 8).
Su terreni particolarmente duri, è consigliabile smontare i dischi fresa, al fine di agevolare la
penetrazione delle zappe nel terreno.
FINE LAVORO
Terminato il lavoro, per arrestare il motore procedere come segue: per i motori a benzina agire sul
manettino acceleratore; per i motori diesel agire sulla levetta sul lato destro del motore; mettere il cambio
in folle. Per motori a scoppio chiudere il rubinetto della benzina. Consultare sempre il libretto istruzioni
del motore.
MANUTENZIONE E LUBRIFICAZIONE
ATTENZIONE!
- Scollegare la candela prima di iniziare qualsiasi intervento di pulizia, manutenzione o
riparazione. Indossare indumenti adeguati e guanti da lavoro.
- Qualora si sollevi la macchina o parte di essa, usare sempre strumenti idonei quali supporti o
fermi di sicurezza.
- Non lasciare la macchina in manutenzione, priva di sicurezze o sollevata, in luoghi accessibili
a persone inesperte, specialmente bambini.
- Non disperdere mai nell’ambiente olii esausti, benzina, gasolio ogni altro prodotto
inquinante!
- Un’efficiente manutenzione e una corretta lubrificazione contribuiscono a mantenere la
macchina in perfetta efficienza.
La motozappa 11500 è progettata in modo da richiedere pochissima manutenzione. Tuttavia, per
mantenere la macchina al massimo del rendimento è opportuno eseguire le seguenti operazioni:
- Controllare che tutte le viti ed i dadi siano sempre ben serrati; in modo particolare i dadi che fissano i
gruppi zappe sull’albero, il motore, le zappe ed il supporto del piedino posteriore.
- Oliare i cavi dell’acceleratore e della frizione.
- Non usare olio minerale per le parti in gomma perché si rovinano.
14
Page 17

11500/ Original instructions – Istruzioni originali – Instructions originales – Original-Anleitungen – Instrucciones originales
- Controllare che il filo frizione abbia sempre un po’ di gioco nel tratto fra il registro e la leva.
- Controllare sempre i livelli olio e pulire frequentemente il filtro aria.
IMPORTANTE: Eseguire le seguenti operazioni tenendo la macchina in posizione orizzontale. La
sostituzione olio va effettuata a macchina calda per favorire la fuoriuscita totale dell’olio vecchio. Non
sfilare i tappi livello olio con la macchina in moto onde evitare la fuoriuscita dell’olio in circolo.
OLIO MOTORE
Attenersi scrupolosamente alle norme contenute nel libretto motore. È comunque indispensabile
controllare il livello ogni 4 ore di lavoro e sostituirlo ogni 50 ore circa.
FILTRO ARIA
Controllare la pulizia del filtro ogni 8 ore, ed anche più frequentemente se l’ambiente è molto polveroso.
Nelle versioni con filtro aria a secco (fig. 5), controllare che il filtro sia ben pulito. Attenzione: se il filtro
risulta molto intasato, non soffiare la cartuccia con l’aria compressa, ma sostituirla. Nelle versioni a
bagno d’olio (fig. 6), controllare che il filtro sia ben pulito e l’olio a livello. Utilizzare lo stesso olio del
motore.
OLIO CAMBIO
Controllare il livello ogni 50 ore circa di lavoro e se occorre, aggiungere olio per cambio 85W/90.
Sostituire l’olio una volta all’anno (quantità Kg 1,350). Per togliere l’olio vecchio dal carter cambio,
allentare le viti situate sul coperchio attorno all’albero zappe (fig. 1A n.8).
ALBERO ZAPPE
Periodicamente estrarre i parapolvere (fig. 1A n.8) e pulire accuratamente la zona sottostante, quindi
rimontarli.
L’osservanza di queste norme contribuisce a mantenere in perfetta efficienza tutti gli organi
meccanici della vostra macchina.
REGOLE UTILI PER UN BUON USO
- Non lasciare mai la macchina sotto la pioggia.
- Non forzare mai il cambio se la marcia non si inserisce: mentre si innesta la marcia dare dei piccoli
colpi di frizione.
- Non forzare mai troppo il motore, quando fuma eccessivamente dallo scarico significa che è sotto
sforzo ed occorre rallentare.
- Togliere le eventuali foglie ed erbe che si depositano attorno all’avviamento autoavvolgente.
- È assolutamente vietato usare la macchina senza i dispositivi di sicurezza.
MANUTENZIONE DI FINE STAGIONE
- Lavare la macchina con cura.
- Sostituire l’olio sia nel motore sia nel carter cambio.
- Controllare e pulire il filtro aria.
- Affilare le zappe e sostituirle se risultano consumate.
- Lubrificare i cavi acceleratore e frizione.
- Se la macchina lavora in modo intensivo in ambienti secchi e polverosi, eseguire la pulizia delle
alette di raffreddamento del cilindro (si veda il libretto del motore).
15
Page 18

11500/ Original instructions – Istruzioni originali – Instructions originales – Original-Anleitungen – Instrucciones originales
TABELLA RIASSUNTIVA MANUTENZIONE
OPERAZIONE OGNI 8
ORE
PRIME
20 ORE
OGNI 50
ORE
OGNI 100
ORE
OGNI ANNO
O 200 ORE
Olio motore
Controllare il livello ●
Cambiare ● ●
Filtro aria
Controllare ●
Sostituire ٭
Candela
Controllare/registrare ●
Sostituire ●
Olio cambio
Controllare il livello ●
Sostituire ●
Controllare che la griglia di aspirazione
del motore sia ben pulita
●
Controllare affilatura e fissaggio lame
● ● ٭
Lubrificare con grasso
●
Controllo gioco frizione
● ●
● operazione raccomandata
٭ operazione da eseguire se necessario
RIMESSAGGIO E INATTIVITA' PROLUNGATA
Se la macchina non viene utilizzata per più di 30 giorni (motori a benzina) occorre svuotare del
carburante il motore onde prevenire la formazione di depositi gommosi nel sistema di alimentazione o in
parti vitali del carburatore. Nel caso si volesse evitare questa operazione, è possibile prolungare la
conservazione del carburante in rimessaggio fino a 12 mesi aggiungendo uno stabilizzante per benzina
adatto allo scopo. Miscelare l'additivo al carburante nel serbatoio o nel recipiente del carburante.
Accendere il motore per far circolare l'additivo nel sistema di alimentazione. Nota: se il motore utilizza
benzina contenente alcol, svuotare il serbatoio facendo funzionare il motore fino ad esaurire il
carburante.
AVVERTENZE PER IL TRASPORTO
Se la macchina viene trasportata a bordo di un camion o un rimorchio, assicurarla al mezzo di trasporto
mediante funi o cavi.
16
Page 19

11500/ Original instructions – Istruzioni originali – Instructions originales – Original-Anleitungen – Instrucciones originales
ACCESSORI
Attenzione: Prima di montare i gruppi zappe, i mozzi a cricchetto o le prolunghe ruote sull’albero zappe
(fig.1 n.5), verificare che quest’ultimo e la parte interna dell’accessorio da montare, siano perfettamente
puliti. Inserito l’accessorio sull’albero, stringere con cura le viti di fissaggio.
ARATRI
Gli aratri della motozappa Grillo 11500 sono stati appositamente studiati per ottenere dei buoni lavori di
aratura, senza affaticare eccessivamente l’operatore. Sono disponibili in 2 tipi: monovomere e
voltaorecchio a 180°. Quest’ultimo è particolarmente indicato ove si debbano eseguire lavorazioni nei
due sensi, come rincalzature in filari, vigneti o frutteti. La profondità del solco ottenibile può variare dai
10 ai 15 cm a seconda del terreno.
Per montare l’aratro, occorre applicare posteriormente alla fresa il portattrezzi registrabile (fig. 14); per
fare ciò, smontare il supporto del piedino, togliere la coppiglia e il perno (fig. 8) e montare il portattrezzi.
Infine occorre smontare i due gruppi zappe, e montare le prolunghe ruote fissandole con le viti (fig. 19),
quindi montare le ruote gomma del tipo 5.00 x 10.
Per aumentare l’aderenza, è consigliabile montare le zavorre sulle ruote.
ASSOLCATORE REGISTRABILE
L’assolcatore registrabile è un attrezzo particolarmente studiato per eseguire solchi di semina o di
irrigazione (fig. 15).
La possibilità di variare la posizione delle due ali permette la regolazione della larghezza del solco da un
minimo di 10 cm ad un massimo di 30 cm. La profondità ottenibile può variare da 10 a 20 cm. Nel caso
si debba operare in terreni particolarmente duri, è opportuno eseguire prima un’operazione di fresatura e
quindi procedere al lavoro con l’assolcatore. Il montaggio di questo attrezzo sulla macchina è
semplicissimo, è sufficiente infatti togliere il piedino e montare l’assolcatore (fig. 15).
Può essere utilizzato in combinazione con la fresa oppure montando le ruote in gomma.
POMPA IRRIGAZIONE
Questa pompa va applicata direttamente alla flangiatura della motozappa, sull’albero superiore (fig. 16)
e fissata con due dadi ai due prigionieri. Non essendo provvista di disinnesto, va montata prima dell’uso
e smontata subito dopo.
POMPA IRRORAZIONE
Questa pompa va applicata direttamente alla flangiatura della motozappa, sull’albero superiore (fig. 17).
MOZZI A CRICCHETTO
Il mozzo a cricchetto è un attacco ruota particolare, in quanto i cricchetti funzionano come un
differenziale. I cricchetti si applicano sull’albero zappe, si fissano con le viti in dotazione e si montano
quindi le ruote gomma (fig. 18).
PROLUNGHE RUOTE
Le prolunghe ruote si montano sull’asse fresa e sono necessarie per poter applicare le ruote in gomma
(fig. 19). Non hanno la funzione differenziale.
RUOTINA ANTERIORE DI TRASFERIMENTO
La ruotina anteriore serve per spostare la macchina su viali, piazzali o garage. Essa è dotata di due
posizioni di trasferimento e lavoro regolabili senza l’ausilio di chiavi (fig. 20).
17
Page 20

11500/ Traduction des instructions originales
MOTOBINEUSE 11500
Cher Client,
Nous vous remercions de la confiance et de la préférence que vous avez bien voulu accorder à notre
motobineuse. Nous sommes certains que l’utilisation de votre nouvelle machine répondra entièrement à
vos exigences. Pour un emploi optimal et pour son entretien, nous vous demandons de lire
attentivement et de suivre scrupuleusement les indications de cette brochure; cela vous permettra
d’obtenir d’excellents résultats et de sauvegarder votre investissement.
Nous vous prions également de conserver ce manuel qui doit toujours accompagner la machine.
DESCRIPTION GENERAL ET USAGE PREVU
La motobineuse est une machine automotrice à essieu unique, normalement équipée avec une fraise
pour travailler le terrain. Ces machines sont généralement utilisées pour la préparation du sol
(élimination des mauvaises herbes ou fraisage) et pour le travail dans de petites surfaces et la finition,
dans les ouillère et dans l'horticulture.
La machine est composé par un châssis porteur où le moteur est installé. Celui-ci actionne la fraise. Il
s'agit d'une machine à conducteur marchand où l'utilisateur la conduit grâce à un mancheron où les
commandes sont placés.
ATTENTION! Lire attentivement les instructions avant de mettre le moteur en
marche. Les précautions suivantes sont importantes pour votre sécurité!
MISES EN GARDE
La prudence est la meilleure arme pour la prévention des accidents!
L’utilisation inadéquate du motoculteur et de son équipement peut être dangereuse. Pour réduire ces
éventualités de danger, veuillez respecter les précautions nécessaires décrites ci après:
1) Lire entièrement ce manuel avant d’allumer et de mettre en mouvement la machine.
2) Suivre avec une attention particulière les mises en garde et les étiquettes de sécurité placées autour
de la machine.
3) La rotation de la fraise est extrêmement dangereuse, ne jamais mettre les mains ou les pieds sous
la fraise.
4) Avant de confier votre motobineuse à d’autres personnes, il faut leur illustrer aussi bien les normes de
sécurité que le mode d’emploi.
5) Avant d’allumer la motobineuse, vérifier qu’il n’y a personne aux alentours et, en particulier, qu’il n’y a
pas d’enfants.
6) Ne pas utiliser la motobineuse en cas de fatigue et ne pas boire d’alcools.
7) Contrôler le terrain avant d’effectuer le fraisage, vérifier qu’il n’y a pas de pierres, de bâtons ou de
corps étrangers qui pourraient endommager la machine ou être lancés au loin et donc être très
dangereux.
8) Avant de commencer le travail, revêtir des vêtements de travail appropriés, des gants, des
bottes et des lunettes.
9) Ne pas utiliser la motobineuse sur des pentes abruptes car il pourrait se renverser (max. 35%).
10) Ne pas faire travailler des personnes trop jeunes; l’utilisation de la machine est interdite aux mineurs
de moins de 16 ans.
11) Ne pas faire marche arrière avec le moteur accéléré.
12) Il est dangereux d’actionner brusquement les leviers, avec le moteur à plein régime.
13) Pour éviter le danger d’exhalaisons toxiques, ne pas faire tourner le moteur dans un local fermé.
14) Éteindre toujours le moteur avant de faire le plein de combustible; s’éloigner des étincelles ou des
flammes et ne pas fumer!
15) Éviter les fuites de combustible; après avoir rempli le réservoir, nettoyer soigneusement les fuites
avant d’activer le moteur.
16) Stocker le carburant dans des contenants spécifiquement prévus à cet effet.
17) Utiliser la motobineuse uniquement en plein jour ou avec un bon éclairage artificiel.
18
Page 21

11500/ Traduction des instructions originales
USAGES IMPROPRES A EVITER
18) Toute utilisation impropre annule la garantie et supprime la responsabilité du constructeur.
19) Ne pas utiliser la machine pour transporter personnes, animaux ou objets.
PRECAUTIONS DE SECURITE SUPPLEMENTAIRES
20) Ne pas altérer ou désactiver les dispositifs de sécurité.
21) N’effectuer aucun réglage ou nettoyage avec le moteur en marche.
22) Ne pas faire contrôler la machine lorsque le conducteur est au volant avec le moteur en
marche.
23) L’utilisateur est toujours responsable des dommages occasionnés aux tiers.
24) Les houes déformées ou endommagées doivent être remplacées, jamais réparées.
25) Utiliser toujours des pièces de rechange Grillo d’origine.
26) Avant de commencer tout travail avec la machine, vérifier que tous les systèmes contre les
accidents dont la machine est équipée fonctionnent parfaitement. Il est formellement interdit de les
exclure ou de les modifier.
27) Avant de commencer le travail, contrôler que les vis et écrous de blocage de la fraise et des houes
sont bien serrés.
28) Les équipements de protection (capots, garde-boue, etc) doivent être maintenus durant le travail.
29) Ne pas nettoyer la fraise lorsque le moteur est allumé.
30) Ne pas utiliser la machine nu-pieds.
31) Ne pas modifier les réglages du moteur, en particulier le nombre de tours maximal.
32) Laisser refroidir le moteur avant d’entreposer la machine dans des locaux fermés.
33) ATTENTION: pour réduire tout danger d’incendie, éliminer les herbes, les feuilles et la poussière qui
pourraient obstruer le moteur, le pot et les collecteurs d’échappement.
34) Effectuer l’éventuelle vidange du réservoir du carburant en plein air.
35) La machine doit être conduite par un seul opérateur.
IDENTIFICATION ET ASSISTANCE
La motobineuse est muni d'une plaque
signalétique placée sur le châssis, qui indique le
numéro de matricule de la machine. Ce numéro
est indispensable pour toute demande
d'intervention technique et pour commander les
pièces détachées.
SERVICE ASSISTANCE
Cette brochure fournit les indications pour l’usage du motoculteur et pour un entretien correct de base,
réalisable par l’utilisateur.
Pour les interventions non décrites dans ce Manuel, contacter le Revendeur de Zone.
PIECES DE RECHANGE
Nous recommandons d’utiliser exclusivement des pièces détachées d’origine, les seules qui offrent des
caractéristiques de sécurité et d’interchangeabilité.
Toutes les demandes doivent indiquer le numéro de matricule.
Pour les pièces de rechange relatives au moteur, respecter les indications contenues dans la brochure
spécifique.
GARANTIE
La garantie est assurée selon les modes et les limites indiquées par la loi en vigueur. Le revendeur
devra remettre au client final une copie de la carte de garantie de la machine, qui pourra être
téléchargée du site Grillo après avoir enregistré la machine même.
En ce qui concerne le moteur, seulement les conditions prévues par le Fabricant concerné sont valables.
19
Page 22

11500/ Traduction des instructions originales
COMMENT COMMANDER LES PIECES DE RECHANGE
Indiquer toujours le numéro de série de la machine et la référence de la pièce à remplacer. S’adresser à
nos Centres de pièces de rechange qui se trouvent dans chaque département. Voici notre adresse:
GRILLO S.p.A.
Via Cervese 1701 - 47521 CESENA (FC) - ITALIE
Tél. 0039 / 0547 / 633111 - Fax 0039 / 0547 / 632011
Web site: www.grillospa.it - E-mail: grillo@grillospa.it
PIECES DETACHEES QUE NOUS CONSEILLONS AVOIR A DISPOSITION
- 1 câble accélérateur
- 1 câble embrayage
- 1 manette accélérateur
- 2 houes droites avec vis
- 2 houes gauches avec vis
CARACTERISTIQUES TECHNIQUES
MOTEUR
- ROBIN SUBARU EX27 OHC, 265 cm³, 8,3 CV à 3600 tours/min, 6,1 kW, un cylindre à essence
- LOMBARDINI 15LD350 349 cm³, 7,5 CV à 3600 tours/min, 5,5 kW, un cylindre à diesel.
DEMARRAGE: à rappel automatique (démarrage électrique disponible seulement pour moteurs diesel).
CAPACITE RESERVOIR: 6,1 litres (EX27) – 4,3 litres (15LD350)
CONSOMMATION HORAIRE: 2,4 litres (EX27) – 1,5 litres (15LD350)
TRANSMISSION: à engrenages en bain d'huile.
BOITE DE VITESSES: à trois vitesses avant et une arrière.
EMBRAYAGE: conique et actif.
PRISE DE FORCE: une prise de force supérieure au régime du moteur avec rotation gauche 11 UNI
221; l'autre synchronisée et actionnée par la boite de vitesses avec rotation droite 13 UNI 221.
FRAISE STANDARD: à 6 étoiles et disques latérales pour une largeur totale de 990 mm.
DIAMETRE DES HOUES: 340 mm
LARGEUR DE TRAVAIL sans disques latérales: réglable à 590 – 860 – 1120 mm (avec kit
élargisseurs)
PROFONDEUR DE TRAVAIL: 330 mm
TOURS FRAISE PAR MINUTE: I° 53 tours ; II° 123 tours ; III° 162 tours – ARRIERE 53 tours.
MANCHERON: réglable en hauteur et latéralement et installé sur système anti-vibration.
ACCESSOIRES: charrue, buttoir, roues pneumatiques et élargisseurs de roues, roues de transport pour
fraise.
POIDS: kg 90 avec EX27 – kg 110 avec 15LD350 (à rappel automatique) – kg 121 avec 15LD350 (à
démarrage électrique)
20
Page 23

11500/ Traduction des instructions originales
MISE EN SERVICE DE LA MACHINE
- Contrôler que la machine est en bon état et qu’elle n’a pas été endommagée pendant le transport.
- Monter l’éperon (fig. 8).
- Monter les capots et les houes (fig. 9). Attention: avant de monter les groupes houes sur l’arbre
houes, contrôler que ce dernier et la partie intérieure du groupe houes sont parfaitement propres.
Après avoir introduit le groupe houes sur l’arbre serrer bien les vis.
- Monter le support moteur, si prévu (fig. 10).
- Ajouter l’huile moteur (voir le manuel respectif).
Contrôles à effectuer avant le démarrage avec la machine en position horizontale:
- Vérifier que l’huile de la boîte de vitesses est visible à travers l’indicateur de niveau (fig. 4).
- Pour contrôler l’huile du moteur, enlever le bouchon niveau, suivant les instructions du manuel
moteur (fig. 2 et 3).
- Sur les versions avec filtre à air en bain d’huile (fig. 6), verser l’huile en utilisant la même huile du
moteur. Contrôler que le câble de l’embrayage a un faible jeu entre le régleur et le levier (fig. 7).
- Remplir le réservoir de carburant en se servant d’un entonnoir muni d’un tamis très fin pour
retenir les impuretés éventuelles.
- S’assurer que le levier des vitesses est au point mort.
MODE D'EMPLOI
DEMARRAGE DU MOTEUR
Pour démarrer le moteur, effectuer les opérations suivantes:
- Pousser jusqu’à la mi-course la manette de l’accélérateur (fig. 1 n. 3).
- Sur les versions essence, ouvrir le robinet de l’essence et fermer le starter, ensuite positionner la
poignée d’allumage sur ON (fig. 12).
- Sur les versions avec démarrage par lanceur, tirer très fort la poignée de l’enrouleur (fig. 11): le
moteur démarre.
- Sur les versions à essence, après le démarrage ouvrir à nouveau le starter et reporter lentement
la manette de l’accélérateur (fig. 1 n. 3) près de la position du minimum.
- Laisser chauffer le moteur pendant quelques minutes avant de commencer le travail et, pour
favoriser un bon rodage, ne pas forcer excessivement la machine pendant les 50 premières heures
d’utilisation.
DEMARRAGE DE LA MACHINE
La machine avance en appuyant sur le levier A et après le levier rouge 2 jusqu’à la position 1 (fig. 7). En
levant la main sur le levier rouge la machine s’arrête mais le moteur est encore en fonction et le levier
revient à la position 2 (fig. 7). Pour arrêter les moteurs à essence il faut agir sur l’interrupteur monté sur
le levier accélérateur 3 position «off» (fig. 7). Pour les moteurs diesel utiliser le levier placé sur la coté
droite du moteur.
ATTENTION: Pour éviter tous problèmes à l’embrayage pendant le travail, le levier rouge doit être bien
maintenu. Ne travaillez pas avec le levier à moitié course!
La pression de l’opérateur sur le guidon détermine la profondeur du fraisage; on peut obtenir une
profondeur de fraisage majeure ou mineure aussi en soulevant ou en abaissant le pied arrière. Il est
recommandé aussi de tourner la pointe du pied en avant quand on travail sur des terrains durs et
compacts, ou de la tourner en arrière lorsque la consistance du terrain n’est pas excessive (fig. 8).
Sur des terrains particulièrement durs, il est recommandé de démonter les disques houes pour faciliter la
pénétration des houes dans le sol.
ARRET DU TRAVAIL
Au terme du travail, arrêter le moteur: pour les moteurs à explosion utiliser la manette de l'accélérateur,
pour les moteurs diesel intervenir sur le levier placé sur la coté droite moteur: engager la vitesse au point
mort.
21
Page 24

11500/ Traduction des instructions originales
MAINTENANCE ET LUBRICATION
ATTENTION!
- Débrancher la bougie d'allumage avant de procéder à toute opération de nettoyage, de
maintenance ou de réparation. Porter des vêtements appropriés et des gants de travail.
- Quand on relève la machine ou une partie de la machine, utiliser toujours des instruments
appropriés comme des support des sécurité.
- Ne pas laisser la machine relevée et sans supports de sécurité non gardée, surtout dans des
lieux où personnes inexpertes et enfants peuvent avoir accès à la machine.
- Ne jamais jeter dans la nature les huiles usées, l’essence et tout autre produit polluant!
- Une maintenance fiable et une lubrification correcte contribuent à maintenir la tondeuse en
parfait état de marche.
De par sa conception la motobineuse 11500 requiert une maintenance limitée. Toutefois, pour maintenir
la machine à un rendement maximal, nous conseillons d’effectuer les opérations suivantes:
- Contrôler que toutes les vis et tous les écrous sont toujours bien serrés et, plus particulièrement, les
écrous qui fixent les groupes houes sur l’arbre, le moteur, les houes et le support du pied arrière.
- Lubrifier les câbles de l’accélérateur et de l’embrayage.
- Ne pas utiliser d’huile minérale pour les éléments caoutchoutés car ils pourraient s’endommager.
- Contrôler que le câble de l’embrayage a toujours un peu de jeu dans la partie située entre le régleur
et le levier.
- Contrôler toujours les niveaux d’huile et nettoyer fréquemment le filtre à air.
LUBRICATION
Effectuer les opérations suivantes après avoir placé la machine en position horizontale. IMPORTANT:
Vidanger l’huile lorsque la machine est chaude pour favoriser l’évacuation total de l’huile usée. Ne pas
extraire les bouchons du niveau d’huile lorsque la machine fonctionne pour éviter la fuite de l’huile en
circulation.
HUILE MOTEUR
Respecter scrupuleusement les normes contenues dans le livret du moteur. Par ailleurs il est
indispensable de contrôler le niveau toutes les 4 heures de travail et de vidanger toutes les 50 heures
environ.
FILTRE A AIR
Contrôler le nettoyage du filtre toutes les 8 heures et même plus fréquemment si le milieu est très
poussiéreux. Sur les versions avec filtre à air sec (fig. 5), contrôler que le filtre est bien propre. Attention:
si le filtre est très bouché, ne pas souffler la cartouche avec de l’air comprimée, mais la remplacer. Sur
les versions à bain d’huile (fig. 6), contrôler que le filtre est bien propre et l’huile est au niveau. Utiliser la
même huile moteur.
HUILE BOITE DE VITESSES
Contrôler le niveau environ toutes les 50 heures de travail et, s’il le faut, ajouter de l’huile pour boîte de
vitesses 85W/90. Remplacer l’huile une foi par an (quantité: 1,350 Kg). Pour vidanger l’huile usée du
carter de la boîte de vitesses, desserrer les vis situées sur le couvercle autour de l’arbre des houes (fig.
1A n. 8).
ARBRE HOUES
Extraire périodiquement les pare-poussière (fig. 1A n. 8) et nettoyer soigneusement la zone sousjacente, ensuite les remonter.
REGLES UTILES POUR UN BON USAGE
- Ne jamais laisser la machine sous la pluie.
- Ne pas forcer la boîte de vitesses si la vitesse ne passe pas: pendant que la vitesse s’enclenche,
donner de petits coups sur l’embrayage.
- Ne jamais trop forcer le moteur; lorsqu’il fume excessivement par le tuyau d’échappement, il est
sous effort et il faut ralentir.
22
Page 25

11500/ Traduction des instructions originales
- Enlever les feuilles et les herbes éventuelles qui se déposent tout autour du lanceur.
- Il est absolument interdit d’utiliser la machine sans les dispositifs de sécurité.
MAINTENANCE DE FIN DE SAISON
- Nettoyer soigneusement la machine.
- Vidanger l’huile du moteur et du carter de la boîte de vitesses.
- Contrôler et nettoyer le filtre à air.
- Affûter les houes; les remplacer si elles sont usées.
- Lubrifier les câbles accélérateur et embrayage.
Si la machine travaille intensément dans des entourages secs et poussiéreux, nettoyer les ailettes de
refroidissement du cylindre (voir manuel moteur).
TABLEAU RECAPITULATIF DE MAINTENANCE
OPERATION TOUTES
LES 8
HEURES
APRES LES
PREMIERES
20 HEURES
TOUTES
LES 50
HEURES
TOUTES
LES 100
HEURES
UNE FOIS PAR
AN/ TOUTES
LES 200
HEURES
Huile moteur contrôler le
niveau
●
remplacer ● ●
Filtre à air
contrôler ●
remplacer ٭
Bougie
d'allumage
contrôler/régler ●
remplacer ●
Huile boite de
vitesses
Contrôler le
niveau
● ●
remplacer ●
Contrôler que la grille
d'aspiration du moteur soit
propre
●
Contrôler fixation et affutage des
houes
● ●
Lubrifier avec graisse
●
Contrôler le jeu de l'embrayage
● ●
● opération recommandée
٭ à effectuer si nécessaire
PERIODES DE LONGUE INACTIVITE
Si la machine ne sera pas utilisé pour plus de 30 jours (modèles avec moteur à essence) il faut vidanger
l’ essence pour prévenir les dépôts de gomme dans le système d’alimentation ou sur des pièces vitales
du carburateur. Afin d'éviter cette opération, il est possible de prolonger le temps du stockage du
carburant dans le réservoir jusqu'à 12 mois en utilisant un additif pour essence approprié. Ajouter l'additif
au réservoir de carburant ou dans un réservoir de stockage. Faire tourner quelques instants le moteur
pour faire circuler l'additif dans le carburateur.
Note: Si Vous utilisez de l'essence à l'alcool, vidanger toute l’essence du réservoir et faire tourner le
moteur jusqu’à ce qu’il s’arrête, en panne de carburant.
23
Page 26

11500/ Traduction des instructions originales
MISE EN GARDE POUR LE TRANSPORT
Si la motobineuse doit être transportée avec un camion ou remorque, la fixer au véhicule avec des
câbles ou cordes.
ACCESSOIRES
ATTENTION!
Avant de monter les groupes des houes, moyeux à cliquets ou rallonges des roues sur l’arbre des houes
(fig. 1 n. 5) vérifier que cet arbre et la partie intérieure de l’accessoire à monter sont parfaitement
propres. Une fois accouplé l'accessoire sur l'arbre, serrer soigneusement les vis de fixation.
CHARRUES
Les charrues destinées à la motobineuse Grillo 11500 ont été spécialement étudiées pour obtenir de
bons labours sans fatiguer excessivement l’opérateur. Deux versions sont disponibles: la charrue
monosoc et le brabant demi-tour à 180°. Ce dernier est particulièrement indiqué lorsque l’on doit
travailler dans les deux sens, par exemple pour les buttages de rangées de vignes ou d’arbres fruitiers.
La profondeur du sillon peut varier de 10 à 15 cm, en fonction du terrain.
Pour monter la charrue, il faut appliquer à l’arrière de la fraise un porte-outils réglable (fig. 14); pour cela
faire, démonter le support du pied et enlever la goupille et le pivot (fig. 8), ensuite monter le porte-outils.
Finalement, il faut démonter les deux groupes de houes et monter les rallonges des roues en les fixant
avec les vis (fig. 19), ensuite monter les roues pneumatiques type 5.00 x 10. Pour augmenter
l’adhérence, il est recommandé de monter les masses sur les roues.
BUTTOIR REGLABLE
Le buttoir réglable est un outil tout spécialement étudié pour réaliser des sillons de semence ou
d’irrigation (fig. 15).
La possibilité de varier la position des deux ailes permet le réglage de la largeur du sillon d’un minimum
de 10 cm à un maximum de 30 cm. La profondeur obtenue varie de 10 à 20 cm.
Si les terrains sont particulièrement durs, effectuer d’abord un fraisage, puis utiliser le buttoir.
Le montage de cet outil sur la machine est très simple: il suffit d'enlever le pied et appliquer le buttoir (fig.
15).
Le buttoir peut être utilisé en combinaison avec la fraise ou avec les roues pneumatiques.
POMPE D’IRRIGATION
Cette pompe doit être appliquée directement au flasque de la motobineuse sur l’arbre supérieur (fig. 16)
et fixée avec deux écrous aux deux goujons. Compte tenu de l’absence de désactivation, il faut la
monter lors de l’utilisation et la démonter immédiatement après.
POMPE DE PULVERISATION
Cette pompe doit être appliquée directement au flasque de la motobineuse sur l’arbre supérieur (fig. 17).
MOYEUX A CLIQUETS
Le moyeu à cliquet est un attelage-roue particulier, car les cliquets fonctionnent comme un différentiel.
Les cliquets s’appliquent sur l’arbre à houes, se fixent avec les vis livrées; on monte alors les roues
pneumatiques (fig. 18).
RALLONGES ROUES
Les rallonges roues se montent sur l’essieu fraise et sont nécessaires pour pouvoir appliquer les roues
pneumatiques (fig. 19). Elles n’ont pas de fonction différentielle.
ROUE AVANT DE TRANSFERT
La petite roue avant est utilisée pour déplacer la machine sur les routes, les places ou les garages. Elle
a deux positions, une de transfert et une de travail, réglables sans clés (fig. 20).
24
Page 27

11500 Übersetzung der Original-Anleitungen
MOTORHACKE 11500
Sehr geehrter Kunde,
wir bedanken uns für Ihr Vertrauen und die Auswahl dieser Motorhacke, und sind sicher, dass Ihre
auf diese Maschine gesetzten Erwartungen vollkommen in Erfüllung gehen. Aus diesem Handbuch
entnehmen Sie alles, was Sie für den Gebrauch und die Wartung Ihrer Maschine wissen müssen.
Lesen Sie es daher aufmerksam durch und halten Sie sich genau an die Anleitungen, damit Sie
auch wirklich immer optimale Resultate erzielen und dauernde und volle Befriedigung in Ihren Kauf
finden werden. Bewahren Sie bitte dieses Handbuch immer zusammen mit der Maschine auf.
ALLGEMEINE BESCHREIBUNG UND VORGESEHENER GEBRAUCH
Die Grillo Motorhacke ist eine selbstfahrende Maschine mit nur einer Achse, der normalerweise mit
einer Fräse zur Bodenbearbeitung ausgestattet ist.
Diese Maschine wird benutzt, um den Boden vorzubereiten (Entfernen von Unkraut und Fräsen)
und gedacht für kleine Feldstücke, Gartenbau und Verbesserungsarbeiten im Garten sowie auch in
Obstanlage zwischen den Reihen geeignet.
Die Maschine besteht aus einem Trägerrahmen, wo der Verbrennungsmotor aufgebaut ist. Der
Motor setzt die Fräse in Gang. Es handelt sich um eine Maschine, die von dem Benutzer zu Fuß
durch einem Lenkholm geführt wird, mit der Schaltung am Lenkholm.
ACHTUNG! Vor dem Anlassen des Motors die folgenden sicherheitstechnischen Hinweise genau durchlesen.
SICHERHEITSTECHNISCHE HINWEISE
Vorsicht ist immer die beste Maßnahme, um Unfälle zu vermeiden!
Ein unsachgemäßer Gebrauch der Maschine und ihrer Ausrüstung kann Personen- oder
Sachschäden zur Folge haben. Um alle eventuellen Risiken auf ein Minimum zu reduzieren, sind
die folgenden Hinweise genauestens zu beachten:
1) Lesen Sie dieses Handbuch vor der ersten Benutzung der Maschine sorgfältig und ganz durch.
2) Die auf der Maschine angebrachten Hinweise bzw. Plaketten beachten.
3) Hände und Füße von der rotierenden Fräse fernhalten - Verletzungsgefahr!
4) Soll die Maschine von einer anderen Person benutzt werden, ist diese vorher genauestens im
Gebrauch und über die Unfallverhütungsmaßnahmen zu unterweisen.
5) Vergewissern Sie sich vor dem Einschalten der Maschine, dass sich keine anderen Personen
und vor allem keine Kinder in der Nähe befinden.
6) Das Gerät auf keinen Fall benutzen, wenn Sie unter Alkoholeinfluss stehen und/oder müde sind.
7) Vor dem Fräsen den Boden kontrollieren; Steine, Stöcke oder andere Gegenstände können von
der Fräse weggeschleudert werden oder die Maschine beschädigen, und müssen daher entfernt
werden.
8) Beim Arbeiten immer geeignete Arbeitskleidung, Handschuhe, Arbeitsschuhe und
Schutzbrillen tragen.
9) Die Maschine nicht auf steilen Hängen einsetzen; sie könnte sich überschlagen (max. 35%).
10) Das vorgeschriebene Mindestalter für die Benutzung der Maschine beträgt 16 (sechzehn)
Jahre.
11) Im Rückwärtsgang nur langsam fahren.
12) Bei hohen Motordrehzahlen müssen die Bedienungshebel “mit Gefühl” benutzt werden.
13) Den Motor nicht in geschlossenen Räumen laufen lassen (Vergiftungsgefahr - gefährliche
Abgase).
14) Beim Nachtanken den Motor immer abschalten, nicht rauchen, und offene Flammen bzw.
Funken aus dem Gefahrenbereich entfernen.
15) Keinen Treibstoff verschütten, und beim Tanken ausgetretenen/verschütteten Treibstoff vor
dem Anlassen des Motors entfernen.
16) Den Treibstoff in speziell zu diesem Zweck hergestellten Behältern aufbewahren.
25
Page 28

11500 Übersetzung der Original-Anleitungen
17) Nur bei Tageslicht oder guter Beleuchtung arbeiten.
FOLGENDES IST ZU VERMEIDEN
18) Jeder unsachgemäße Gebrauch hat den Verfall des Garantieanspruches und der Haftung des
Herstellers zur Folge.
19) Die Maschine nicht benutzen, um Personen, Tieren oder Dinge zu befördern.
WEITERE SICHERHEITSRELEVANTE HINWEISE
20) Die Sicherheitsvorrichtungen auf der Maschine niemals außer Funktion setzen bzw.
entfernen!
21) Niemals mit laufendem Motor Reinigungsarbeiten bzw. Einstellungen durchführen.
22) Die Maschine niemals von einer anderen Person kontrollieren lassen, während Sie
selbst auf dieser sitzen und der Motor läuft.
23) Der Benutzer ist immer für anderen Personen zugefügte Schäden verantwortlich!
24) Beschädigte bzw. verformte Hacken nicht reparieren, sondern immer auswechseln.
25) Ausschließlich Original-Grillo-Ersatzteile verwenden.
26) Vor jeder Benutzung der Maschine sicherstellen, dass alle Sicherheitseinrichtungen
funktionieren. Es ist strengstens untersagt, die Sicherheitseinrichtungen außer Funktion zu setzen
oder zu entfernen.
27) Vor jeder Benutzung der Maschine sicherstellen, dass alle Schrauben und Feststellmuttern der
Fräs- bzw. der Hackeinrichtung gut angezogen sind.
28) Die Schutzverkleidung (Gehäuse, Kot-bleche, usw.) dürfen nicht abmontiert werden.
29) Die Fräseinrichtung niemals mit laufendem Motor reinigen.
30) Niemals barfuß arbeiten.
31) Die Einstellung des Motors, im Besonderen die maximale Drehzahl, nicht verstellen.
32) Bevor die Maschine in einem eingeschlossenen Raum abgestellt wird, muss der Motor
abgekühlt sein.
33) ACHTUNG: Um die Brandgefahr zu reduzieren, müssen der Motor, der Auspufftopf, die
Auspuffkrümmer immer frei von Gras, Blättern, Staub usw. gehalten werden.
34) Den Treibstofftank immer nur im Freien entleeren.
35) Keine Passagiere befördern.
IDENTIFIKATION UND KUNDENDIENST
Auf dem Rahmen der Motorhacke befindet
sich eine Plakette mit der Seriennummer der
Maschine, die für die Bestellung von
Ersatzteilen und bei allen die Maschine
betreffenden Anfragen an den Kundendienst
anzugeben ist.
KUNDENDIENST
In diesem Handbuch finden Sie Anleitungen für den korrekten Gebrauch Ihrer Maschine und die
vom Benutzer allein durchführbaren Wartungseingriffe. Für alle nicht in diesem Handbuch
beschriebenen Eingriffe und Arbeiten wenden Sie sich bitte an Ihren Grillo-Händler.
ERSATZTEILE
Verwenden Sie ausschließlich Original-Ersatzteile, die unter sicherheits- und montagetechnischem
Standpunkt keine Probleme bereiten können. Bei der Ersatzteilebestellung immer die
Seriennummer der Maschine angeben.
Für die Ersatzteile des Motors die Hinweise im Handbuch des Motors beachten.
26
Page 29

11500 Übersetzung der Original-Anleitungen
GARANTIE
Es gelten die gesetzlichen Garantiebedingungen. Der Händler muss eine Kopie der Garantie-Karte
der Maschine dem Kunden geben. Die Kopie kann von der Grillo Webseite heruntergeladen
werden.
Für den Motor gelten die vom jeweiligen Hersteller vorgesehenen Garantiebedingungen.
ERSATZTEILE-BESTELLUNG
Immer die Seriennummer der Maschine und die Artikelnummer des gewünschten Ersatzteils
angeben.
Wenden Sie sich bitte an unsere Ersatzteilelager. Unsere Adresse ist:
GRILLO S.p.A.
Via Cervese 1701 - 47521 CESENA (FC) - ITALIEN
Tel. 0039 / 0547 / 633111 - Fax 0039 / 0547 / 632011
Web site: www.grillospa.it - E-mail: grillo@grillospa.it
ERSATZTEILE, DIE SIE IMMER ZUR VERFÜGUNG HABEN SOLLTEN
1 Gasseil
1 Kupplungsseil
1 Gashebel
2 rechte Hackmesser plus Schrauben
2 linke Hackmesser plus Schrauben
TECHNISCHE DATEN
MOTOR
- ROBIN SUBARU EX27 OHC, 265 cm³, 8,3 PS, 6,1 kW mit 3600 U.p.M, Einzelzylinder, Benzin
- LOMBARDINI 15LD350 349 cm³, 7,5 PS, 5,5 kW mit 3600 U.p.M, Einzelzylinder, Diesel
ANLASSER: mit Reversierstarter (elektrischer Starter nur bei Diesel-Motoren verfügbar).
KRAFTSTOFFBEHÄLTER: 6,1 Liter (EX27) – 4,3 Liter (15LD350)
VERBRAUCH PRO STUNDE: 2,4 Liter (EX27) – 1,5 Liter (15LD350)
ANTRIEB: Zahnradgetriebe im Ölbad
GETRIEBE: 3 Vorwärtsgängen und 1 Rückwärtsgang
KUPPLUNG: konisch und aktiv
ZAPFWELLE: eine Zapfwelle erreicht die Motordrehzahl und läuft gegen den Uhrzeigersinn 11
UNI 221. Eine synchronisierte durch Getriebe betätigte Zapfwelle, die im Uhrzeigersinn läuft 13
UNI 221.
STANDARD FRÄSE: mit 6 Sternen und Seitenscheiben für eine gesamte Breite von 990 mm.
HACKEN DURCHMESSER: 340 mm.
ARBEITSBREITE ohne Seitenscheiben: verstellbar auf 590 – 860 – 1120 mm (mit Umrüstsatz)
ARBEITSTIEFE: 330 mm.
FRÄSE-UMDREHUNGEN PRO MINUTE: I° 53 U.p.M; II° 123 U.p.M; III° 162 U.p.M – RG 53
U.p.M
LENKHOLM: höhen-und seitenverstellbar und auf Schwingungsdämpfern eingestellt.
ZUBEHÖRE: Häufelkörper, Einscharpflug, Gummiräder, Welle-Radflansch, Transporträder
GEWICHT: kg 72 mit GX160 – kg 74 mit EX17 – kg 75 mit SH265
27
Page 30

11500 Übersetzung der Original-Anleitungen
INBETRIEBNAHME DER MASCHINE
- Überprüfen Sie, dass die Maschine intakt ist und dass beim Transport keine Schäden
entstanden sind.
- Montieren Sie den Sporn (Abb. 8).
- Montieren Sie die Verkleidungen und die Hacken (Abb. 9). Achtung: bevor Sie die
Hakengruppe auf die Hakenwelle montieren, überprüfen Sie bitte letztere und den innere Teil
der Hakengruppe, sie müssen vollständig sauber sein. Die Hakengruppe auf die Welle
einstecken und die Schrauben sorgfältig anziehen.
- Den Motorstellstift, wo vorgesehen, montieren (Abb. 10).
- Motoröl einfüllen (siehe Motorhandbuch).
Vor dem Anlassen des Motors bringen Sie die Maschine in waagerechte Stellung, und führen Sie
folgende Übeprüfungen durch:
- Mit Hilfe des Ölstandmessers kontrollieren Sie, dass das Öl im Getriebegehäuse sichtbar ist
(Abb. 4).
- Um das Motoröl zu kontrollieren, den Verschluss abnehmen. Bitte beachten Sie die
Anweisungen im Motorhandbuch (Abb. 2 und 3).
- Bei den Versionen mit Luftfilter im Ölbad (Abb. 6), Öl einfüllen. Das gleiche Öl wie für den
Motor verwenden.
- Kontrollieren, dass der Kupplungszug etwas Spielraum zwischen Regler und Hebel hat (Abb.
7).
- Den Treibstofftank mit einem Trichter mit sehr feinem Filter füllen, um mögliche
Verunreinigungen zu vermeiden.
- Stellen Sie sicher, dass sich der Schaltknüppel in der Position „Leerlauf“ befindet.
BETRIEBSANLEITUNG
ANLASSEN DES MOTORS
Um den Motor anzulassen, wie folgt vorgehen:
- Den Gashebel bis zur Hälfte drücken (Abb. 1 Nr. 3).
- Bei der Version mit Benzinmotor den Treibstoffhahn öffnen und den Starter ausschalten, dann
den Drehgriff zum Anlassen auf ON stellen (Abb. 12).
- Bei der Version mit Reversierstarter den Griff des Reversierstarters stark anziehen (Abb. 11):
der Motor springt an.
- Sobald der Motor bei der Benzinversion angesprungen ist, den Starter wieder einschalten und
den Gashebel (Abb. 1/A Nr. 3) langsam bis beinahe auf das Minimum zurückstellen.
- Den Motor einige Minuten warmlaufen lassen, bevor mit der Arbeit begonnen wird.
Während der ersten 50 Betriebsstunden die Maschine nicht zu stark in Anspruch nehmen,
damit sie sich optimal einläuft.
ANLASSEN DER MASCHINE FÜR ARBEIT UND FRÄSEN
Die Maschine setzt sich in Gang indem man den Hebel A drückt und darauf folgend den roten
Hebel 2 (Abb. 7) bis zur Position 1(Abb. 7). Beim loslassen des roten Hebels bleibt die Maschine
stehen aber der Motor läuft weiter und der Hebel kehrt zur Position 2 zurück (Abb. 7). Um den
Motor auszuschalten ist der Schalter auf dem Gashebel 3 auf “Position OFF”(Abb. 7) zu stellen
(bei Benzinmotoren). Für Dieselmotoren benutzen Sie den Hebel auf der rechten Seite des Motors.
WICHTIG: Um Probleme der Kupplung während der Arbeit zu vermeiden muss der rote Hebel gut
gedrückt bleiben. Nicht mit nur teilweise gedrücktem Hebel arbeiten!
Der Druck des Fahrers auf das Lenkrad bestimmt die Tiefe der Fräsung; man kann auch eine
größere oder geringere Frästiefe erhalten, indem man den hinteren Stellstift höher oder tiefer stellt.
Es wird außerdem empfohlen, die Spitze des Stellstifts nach vorne zu drehen, wenn man auf
hartem und dichtem Boden arbeitet; oder sie nach hinten zu drehen, wenn der Boden eher weich
28
Page 31

11500 Übersetzung der Original-Anleitungen
ist (Abb. 8). Bei besonders hartem Boden ist es ratsam, die Frässcheiben zu entfernen, damit die
Hacken leichter in den Boden eindringen können.
ARBEITSENDE
Wenn die Arbeit fertig ist, um den Motor abzustellen: bei Benzinmotoren auf den Gashebel
einwirken, bei Dieselmotoren auf den Motorhebel auf der rechten Seite einwirken; Getriebe in den
Leerlauf setzen.
Bei Benzinmotoren den Benzinhahn schließen. Immer im Handbuch des Motors nachschauen.
WARTUNG UND SCHMIERUNG
ACHTUNG!
- Vor jedem Reinigungs-, Wartungs- oder Reparatureingriff den Zündkerzenkabel aus
Zündspule entfernen. Zweckmäßige Arbeitskleidung und Arbeitshandschuhe tragen.
- Wenn die Maschine oder ein Teil der Maschine angehoben wird, benutzen Sie immer
geeignete Arbeitsmittel wie z.B Hubtische oder Radkeile.
- Wenn Sie Wartungsoperationen an der Maschine durchführen, lassen Sie die angehobene
Maschine nie in ungesicherten Zustand (ohne Radkeile) und unbewacht, vor allem an einem
Ort, wo unerfahrene Personen oder Kinder leichten Zugang zur Maschine haben können.
- Altöl, Benzin und andere umweltverschmutzende Produkte ordnungsgemäß entsorgen! -
Eine gute Wartung und eine korrekte Schmierung halten den Mäher stets funktionstüchtig
und einsatzbereit.
Die Motorhacke 11500 ist so gebaut, dass sie nur ein Minimum an Wartung benötigt. Um einen
einwandfreien Betrieb zu gewährleisten, sind jedoch die folgenden Maßnahmen erforderlich:
- Sicherstellen, dass alle Schrauben und Muttern fest angezogen sind; dies gilt vor allem für die
Muttern zur Befestigung der Hakensätze an der Zapfwelle, des Motors, der Hacken und des
Trägers des hinteren Stellstifts.
- Gas- und Kupplungsseile ölen.
- Für die Maschinenteile aus Gummi kein Mineralöl verwenden, da sie sonst verschleißen.
- Sicherstellen, dass das Kupplungsseil zwischen Hebel und Einstellvorrichtung genügend
Spielraum hat.
- Den Ölstand immer kontrollieren und den Luftfilter oft reinigen.
SCHMIERUNG
Bei waagerecht stehender Maschine folgende Hinweise befolgen. Der Ölwechsel muss bei
warmem Motor vorgenommen werden, um das Standöl ausströmen zu lassen. Niemals beim
laufenden Motor den Verschluss mit dem Ölstandmesser abschrauben, um das laufende Öl nicht
heraus fließen zu lassen.
MOTORÖL
Die im Motorhandbuch enthaltenen Hinweise sorgfältig befolgen. Der Ölstand muss alle vier
Betriebsstunden kontrolliert werden und ca. alle fünfzig Betriebsstunden muss ein Ölwechsel
vorgenommen werden.
LUFTFILTER
Alle acht Betriebsstunden – bei besonders staubiger Umgebung häufiger – den Luftfilter
überprüfen. Bei den Versionen mit Trockenluftfilter (Abb. 5) kontrollieren, dass der Filter sauber ist.
Achtung: Sollte der Filter verstopft sein, die Kartusche mit der Druckluft nicht nachfüllen, sondern
austauschen. Bei den Versionen im Ölbad (Abb. 6) kontrollieren, dass der Filter sauber ist und das
Öl auf dem richtigen Niveau ist. Das gleiche Öl wie für den Motor verwenden.
GETRIEBEÖL
Ungefähr alle fünfzig Betriebsstunden den Ölstand überprüfen. Gegebenenfalls das Getriebeöl 85
W/90 nachfüllen. Einmal im Jahr einen Ölwechsel vornehmen (Menge 1,350 kg). Um das Altöl aus
29
Page 32

11500 Übersetzung der Original-Anleitungen
dem Getriebegehäuse ausströmen zu lassen, die Schrauben lockern, die sich auf dem Deckel um
die Hakenverbindungswelle (Abb. 1 Nr. 8) befinden.
HACKENVERBINDUNGSWELLE
Den Staubschutz regelmäßig abnehmen (Abb. 1 Nr. 8) und nach sorgfältiger Reinigung der
darunterliegenden Maschinenteile wieder montieren.
EINIGE NÜTZLICHE HINWEISE
- Die Maschine niemals im Regen stehen lassen.
- Den Gang nicht ruckartig einlegen; ggf. mit kurzem Kupplungsdrücken nachhelfen.
- Den Motor niemals zu sehr beanspruchen; tritt viel Rauch aus dem Auspuff, langsamer fahren.
- Gras und Blätter, die sich um den Reversierstarter ansammeln, entfernen.
Es ist streng verboten, die Maschine ohne die Sicherheitsvorrichtung zu benutzen.
WARTUNG AM SAISONENDE
- Die Maschine sorgfältig waschen.
- Motor- und Getriebeöl wechseln.
- Die Hacken schleifen und sie ggf. durch neue Hacken ersetzen.
- Die Gas- und Kupplungsseile schmieren.
- Falls die Maschine in trockener und staubiger Umgebung eingesetzt wird, die
Zylinderkühlrippen reinigen (siehe Motorhandbuch).
ZUSAMMENFASSENDE TABELLE DER WARTUNG
OPERATION JEDE 8
STUNDEN
NACH DEN
ERSTEN 20
STUNDEN
JEDE 50
STUNDEN
JEDE 100
STUNDEN
JEDES JAHR
ODER JEDE
200 STUNDEN
Motoröl das Niveau
überprüfen
●
wechseln ● ●
Luftfilter
überprüfen ●
wechseln ٭
Zündkerze
überprüfen/e
instellen
●
wechseln ●
Getriebeöl Das Niveau
überprüfen
●
wechseln ●
Überprüfen Sie, dass das
Ansauggitter des Motors
sauber ist
●
Überprüfen Sie, dass die
Hacken gut geschärft
und befestigt sind.
● ●
Mit Fett einschmieren
●
Kupplungsspiel
überprüfen
● ●
● empfohlene Operation
٭ nur wenn notwendig durchführen
30
Page 33

11500 Übersetzung der Original-Anleitungen
EINSTELLEN DES MÄHERS FÜR DEN WINTER ODER LÄNGERE NICHTBENUTZUNG
Sollte die Maschine für länger als 30 Tage nicht benutzt werden (Versionen mit Benzinmotor),
entleeren Sie den Kraftstoffbehälter, um die Bildung von Ölrückständen in der Kraftstoffanlage
oder im Vergaser zu vermeiden. Wenn Sie diese Operation vermeiden möchten, es ist möglich den
Kraftstoff im Tank bis zum 12 Monaten aufzubewahren, indem Sie einen geeigneten KraftstoffStabilisator benutzen. Fügen Sie den Kraftstoff-Stabilisator im Benzintank hinzu. Den Motor eine
Weile laufen lassen, damit der Stabilisator in die Kraftstoffanlage fließen kann.
Wenn die Benzin Alkohol enthält, lassen Sie den Motor laufen, bis den Kraftstoff aufgebraucht ist.
HINWEISE ZUM TRANSPORT DER MASCHINE
Wenn die Maschine auf einem LKW oder Anhänger transportiert wird, befestigen Sie die Maschine
am Fahrzeug durch Kabeln oder Seile.
ZUBEHÖR
ACHTUNG!
Bevor Sie die Hacksätze, die Sperrzahnnaben und die Radverlängerungen an die
Hakenverbindungswelle (Abb. 1 Nr. 5) montieren, stellen Sie bitte sicher, dass letztere und die
jeweiligen inneren Anbaugeräteteile vollkommen sauber sind. Nach dem Einsetzen des jeweiligen
Zubehörs die Schrauben wieder gut anziehen.
PFLÜGE
Die speziell für die Motorhacke 11500 entworfenen Pflüge haben sich ohne übermäßige
Kraftanstrengung für den Benutzer als hochleistungsfähig erwiesen. Es stehen zwei Pflugtypen zur
Verfügung: Einscharpflug und 180°-Drehpflug. Letzterer eignet sich besonders für Arbeiten, die in
beide Richtungen ausgeführt werden müssen, wie z.B. das jahreszeitliche Anhäufeln der Erde um
Weinreben oder Obstbäumen, die in Reihen angeordnet sind. Die Furchentiefe kann je nach
Bodenbeschaffenheit von 10 bis 15 cm schwanken.
Um den Pflug anzuschließen, muss man nach der Fräse die verstellbare Gerätekupplung (Abb. 14)
montieren; dazu einfach den Träger des Hacksporns abmontieren, Splint und Zapfen (Abb. 8)
abziehen und die Gerätekupplung montieren. Danach die beiden Hacksätze abnehmen, die
Radverlängerungen einbauen und sie mit den Schrauben (Abb. 19) befestigen. Danach die
Gummiräder 5.00 x 100 anbringen.
Um die Bodenhaftung zu erhöhen, wird empfohlen, Gewichte auf die Räder zu montieren.
VERSTELLBARER HÄUFELKÖRPER
Der verstellbare Häufelkörper ist als Gerät zum Ziehen von Saat- oder Bewässerungsfurchen
(Abb. 15) bestimmt.
Durch Umstellung der beiden Flügel ist eine Furchenbreite von mindestens 10 bis maximal 30 cm
zu erhalten. Die zu erreichende Tiefe reicht von 10 bis 20 cm. Bei besonders harten Böden
empfiehlt es sich, den Boden vorher mit der Fräse aufzulockern und erst danach den Häufelkörper
einzusetzen. Die Montage dieses Anbaugeräts an die Maschine ist sehr einfach: man ersetzt
einfach den Stellstift durch den Häufelkörper (Abb. 15).
Er kann in Verbindung mit der Fräse oder mit den Gummirädern verwendet werden.
BEWÄSSERUNGSPUMPE
Diese Pumpe wird unmittelbar an den Maschinenflansch auf der oberen Welle (Abb. 16)
angeschlossen und an den zwei Stiftschrauben mit zwei Muttern befestigt. Da man sie nicht
abschalten kann, wird sie vor Gebrauch angeschlossen und direkt danach wieder abmontiert.
SPRITZPUMPE
Diese Pumpe wird unmittelbar an den Maschinenflansch auf der oberen Welle (Abb. 17)
angeschlossen.
31
Page 34

11500 Übersetzung der Original-Anleitungen
SPERRZAHNNABEN
Die Sperrzahnnabe ist eine speziell entworfene Radverbindungsstelle, da die Sperrzähne wie ein
Differenzial funktionieren. Die Naben werden an die Hackenverbindungswelle mit den beigefügten
Schrauben befestigt. Danach werden die Gummiräder montiert (Abb. 18).
RADVERLÄNGERUNGEN
Die Radverlängerungen werden auf die Fräsachse montiert und sind notwendig, damit man die
Gummiräder (Abb. 19) anbauen kann. Sie haben keine Differenzial-Funktion.
VORDERES TRANSPORTRAD
Das vordere kleine Rad benutzt man, um die Maschine auf Straßen, Plätzen oder in Garagen zu
bewegen. Es verfügt über zwei Positionen, eine für die Arbeit und eine für den Transport, die ohne
Schlüssel einstellbar sind (Abb. 20).
32
Page 35

11500 Traducción de las instrucciones originales
MOTOAZADA 11500
Estimado Cliente
le agradecemos la confianza y la preferencia que ha demostrado por nuestro producto y
confiamos en que su nueva máquina responda completamente a sus exigencias.
Para un buen empleo y un perfecto mantenimiento, le rogamos que lea atentamente las
instrucciones de este manual y las respete escrupulosamente, ello le permitirá obtener los
máximos resultados y salvaguardar su inversión. Conserve este manual que tiene que acompañar
a la máquina siempre.
DESCRIPCIÓN GENERAL Y USO PREVISTO
La motoazada es una máquina agrícola autopropulsada con un solo eje, normalmente equipada
de fresa para la elaboración del terreno. Estas máquinas se utilizan para preparar el suelo
(limpieza de las malezas, fresado) y para pequeñas obras de acabado, entre los arboles y en la
horticultura en general.
La máquina está constituida por un chasis portante sobre el que se encuentra posicionado el
motor de explosión que acciona la toma de fuerza. La máquina es conducida por un operador que
sigue los movimientos de la motoazada a través de un manillar donde se encuentran los mandos.
¡ATENCIÓN! Antes de arrancar el motor leer atentamente.
¡Las siguientes advertencias son importantes para su integridad física!
ADVERTENCIAS CONTRA ACCIDENTES
La prudencia es el arma principal en la prevención de los accidentes.
El uso incorrecto de la motoazada y de su equipamiento puede ser perjudicial; para reducir estas
posibilidades adoptar las precauciones necesarias que se indican a continuación:
1) Lea este manual en su totalidad, antes de encender y poner en marcha la motoazada.
2) Preste una atención especial a las prohibiciones y a las etiquetas de seguridad alrededor de la
máquina.
3) La rotación de la fresa es muy peligrosa, no poner nunca las manos o los pies debajo de la
fresa.
4) Antes de permitir que otras personas trabajen con la máquina, es preciso ponerlas al corriente
de las normas de seguridad y de cómo se usa la máquina.
5) Antes de encender la máquina comprobar que no hay personas alrededor; especialmente
niños.
6) No usar la máquina cuando se esté cansado y no beber alcohol.
7) Controlar el terreno antes de realizar el fresado, viendo que no hay piedras, palos o cuerpos
extraños, que pudieran dañar la máquina o ser lanzados lejos, y por lo tanto muy peligrosos.
8) Antes de comenzar el trabajo, ponerse prendas apropiadas de trabajo, guantes, botas y
gafas.
9) No usar la máquina en fuertes pendientes (máx. 35%).
10) No dejar trabajar a muchachos demasiado jóvenes; está prohibido el uso de la máquina a los
menores de 16 años.
11) No hacer marcha atrás con el motor acelerado.
12) Es peligroso accionar las palancas bruscamente, con el motor al régimen máximo.
13) Para evitar el peligro de exhalaciones venenosas, no utilizar el motor encendido en un local
cerrado.
14) Apagar siempre el motor antes de repostar combustible, mantenerse alejado de chispas o
llamas y ¡no fumar!
15) Evitar derrames de combustible y tras haber llenado el depósito limpiar cualquier derrame
antes de arrancar el motor.
16) Almacenar el combustible en recipientes fabricados específicamente con dicha finalidad.
17) Trabaje sólo con la luz natural o con luz artificial muy buena.
33
Page 36

11500 Traducción de las instrucciones originales
EVITAR LOS USOS INCORRECTOS
18) Cualquier uso impropio supone la anulación de la garantía y la exoneración de cualquier
responsabilidad del fabricante.
19) Nunca utilizar la máquina para transportar personas, animales o cosas.
MEDIDAS PREVENTIVAS COMPLEMENTARIAS
20) No manipular sin autorización o desactivar los dispositivos de seguridad.
21) No hacer ningún tipo de regulación o limpieza con el motor en marcha.
22) No hacer controlar la máquina por nadie mientras esté conduciendo con el motor en
marcha.
23) El usuario siempre es responsable de los daños originados a terceros.
24) Las azadas deformadas o dañadas deberán sustituirse siempre, no repararlas nunca.
25) Usar siempre recambios originales Grillo.
26) Antes de comenzar cualquier trabajo con la máquina, comprobar que todos los sistemas
contra accidentes, de los cuales la máquina va dotada, funcionan perfectamente. Está
rigurosamente prohibido desactivarlos o manipularlos sin autorización.
27) Antes de comenzar a trabajar, controlar que los tornillos y las tuercas de bloqueo de la fresa y
de las azadas están bien apretados.
28) El equipamiento de protección (capós, guardabarros, etc.), se mantiene siempre durante el
trabajo.
29) No limpiar la fresa con el motor encendido.
30) No usar la máquina con los pies descalzos.
31) No modificar las regulaciones del motor, especialmente la cantidad máxima de revoluciones.
32) Dejar enfriar el motor antes de guardar la máquina en ambientes cerrados.
33) ATENCION: Para reducir el peligro de incendio, mantener el motor, el silenciador del escape
y los tubos de escape libres de hierba, hojas, polvo, etc..
34) Si fuera necesario vaciar el tanque de combustible, efectuar la operación al aire libre.
35) Trabajar sólo a la luz del sol o con buena iluminación artificial.
IDENTIFICACION Y ASISTENCIA
La motoazada está dotada de una placa con
el número de bastidor de la máquina que se
encuentra sobre el chasis, bajo la caja, y es
indispensable para todas las solicitudes de
intervención técnica y el pedido de los
repuestos.
SERVICIO DE ASISTENCIA
Este manual da las indicaciones para usar la motoazada y para efectuar un mantenimiento básico
correcto, que puede realizar el mismo usuario.
Para las operaciones que no se describen en este libro, consultarse con el Revendedor de la
Zona.
RECAMBIOS
Se aconseja emplear exclusivamente recambios originales, los únicos que ofrecen características
de seguridad e intercambiabilidad. Cualquier pedido ha de llevar el número de matrícula.
Para los recambios del motor, atenerse a las indicaciones del libro específico.
34
Page 37

11500 Traducción de las instrucciones originales
GARANTÍA
La garantía es ofrecida en los modos y dentro de los límites previstos por la ley en vigor. El
revendedor tiene que entregar el certificado de garantía de la máquina al cliente final, imprimiendo
una copia de la registración del sitio Internet Grillo.
Por lo que respecta el motor, valen las condiciones previstas por los respectivos fabricantes.
COMO SOLICITAR LOS RECAMBIOS
Indicar siempre el número de matrícula de la máquina y la referencia de la pieza que se ha de
sustituir.
Dirigirse a nuestros centros de recambios que se encuentran en todas las provincias.
Nuestras señas son:
GRILLO S.p.A.
Via Cervese 1701 - 47023 CESENA (FC) - ITALIA
Tel. 0039 / 0547 / 381333 - Fax 0039 / 0547 / 632011
Web site: www.grillospa.it - E-mail: grillo@grillospa.it
REPUESTOS QUE SE ACONSEJA TENER DE RESERVA
N. 1 cable del acelerador,
N. 1 cable del embrague,
N. 1 empuñadura del acelerador,
N. 2 azadas derechas con tornillos,
N. 2 azadas izquierdas con tornillos.
CARACTERÍSTICAS TECNICAS
MOTOR
- ROBIN SUBARU EX27 OHC, 265 cm³, 8,3 HP a 3600 r.p.m., monocilindrico a gasolina.
- LOMBARDINI 15LD350 349 cm³, 7,5 HP, 5,5 kW a 3600 r.p.m., monocilindrico a diésel.
ARRANQUE: de tiro con autoenvolvente (arranque eléctrico en la versión diésel)
DEPOSITO CARBURANTE: 6,1 litros (EX27) – 4,3 litros (15LD350)
CONSUMO HORARIO: 1,4 litros (GX160) – 1,5 litros (EX17) – 1,7 litros (SH265)
TRANSMISION: engranajes en baño de aceite.
CAJA DE CAMBIOS: 3 velocidades de avance + 1 de retroceso.
EMBRAGUE: cónico y activo.
TOMA DE FUERZA: una superior directa al régimen del motor en sentido antihorario 11 UNI 221
+ una inferior sincronizada con el cambio en sentido horario 13 UNI 221.
FRESA: 6 estrellas de cuchillas con discos laterales por un largo total de 990 mm.
DIÁMETRO CUCHILLAS: 340 mm.
LARGO DE TRABAJO sin discos laterales: regulable a 590 – 860 – 1120 mm (con juego
alargamiento).
PROFUNDIDAD DE TRABAJO: 330 mm.
REVOLUCIONES FRESA/MINUTO: I° 53 rev.; II° 123 rev.; III° 162 rev. - atrás 53 rev.
MANCERA: regulable en altura y lateralmente, montada con antivibrantes.
35
Page 38

11500 Traducción de las instrucciones originales
ACCESORIOS: asurcador, arado, juego de prolongadores de rueda, ruedas neumáticas, rueda de
traslado.
PESO: kg 90 con EX27 – kg 110 con 15LD350 AV – kg 121 con 15LD350 AE
PUESTA EN MARCHA DE LA MAQUINA
- Controle que la máquina esté intacta y que no haya sufrido daños durante el transporte.
- Monte el espolón (fig. 8).
- Monte el capó y las azadas (fig. 9). Atención: antes de montar los grupos de azadas en el
eje azadas, controle que el eje y la parte interior del grupo azadas estén perfectamente
limpios. Luego, monte el grupo azadas en el eje y apriete los tornillos de fijación.
- Aplique el soporte motor, si previsto (fig. 10).
- Añada el aceite motor (véase el manual correspondiente).
Controles para efectuar antes del arranque con la máquina en posición horizontal:
- Controle que el aceite del cambio sea visible a través del indicador de nivel (fig. 4).
- Para controlar el aceite del motor, quite el tapón nivel ateniéndose a las instrucciones del
manual del motor (fig. 2 y 3).
- En las versiones con filtro de aire en baño de aceite (fig. 6), añada el aceite utilizando el
mismo aceite del motor.
- Controle que el cable del embrague tenga un poco de juego entre el registro y la palanca
(fig. 7).
- Llene el tanque de carburante con un embudo dotado de un filtro muy fino para retener
eventuales impurezas.
- Asegúrese de que la palanca de cambio esté en punto muerto.
INSTRUCCIONES DE USO
ARRANQUE DEL MOTOR
Para arrancar el motor, efectúe los siguientes controles:
- Lleve la manija del acelerador (fig.1 n. 3) hasta mitad recorrido.
- En las versiones gasolina, abra la llave de paso de la gasolina y cierre el arrancador, luego
posicione el mando de encendido en ON (fig. 12).
- En las versiones con arranque manual, tire fuerte la correa del arranque autoenvolviente
(fig. 11): el motor arranca.
- En las versiones Diesel, una vez encendido el motor, abra nuevamente el arrancador y
lleve lentamente la manija del acelerador (fig. 1 n.3) casi al mínimo.
- Deje calentar el motor algunos minutos antes de empezar el trabajo; para favorecer un
buen rodaje es necesario no esforzar excesivamente la máquina durante las 50 primeras
horas de trabajo.
ARRANQUE DE LA MÁQUINA
La máquina se pone en movimiento presionando sobre el pestillo A (fig. 7) y a continuación
llevando la palanca roja desde la posición 2 (fig. 7) hasta la 1 (fig. 7). Abandonando la presa de la
palanca roja, la máquina se detiene pero el motor permanece encendido y la palanca retorna en la
posición 2 (fig. 7). Para apagar el motor, actúe sobre el interruptor sobre el mando del acelerador
3 en posición OFF (fig. 7) para motores a gasolina. Para motores a diesel, utilizar la palanca sobre
el motor a la derecha.
Nota: para evitar problemas en el embrague durante el trabajo la palanca roja debe mantenerse
bien presionada. ¡Atención! No trabajar con la palanca parcialmente presionada.
La presión del operador en el manillar determina la profundidad de fresado; se puede obtener una
profundidad de fresado mayor o minor también alzando o bajando el soporte trasero.
Le recomendamos además de girar la punta del soporte trasero hacia adelante cuando se trabaja
en terrenos duros o compactos, o de girarla hacia atrás cuando el terreno no presenta una
36
Page 39

11500 Traducción de las instrucciones originales
excesiva consistencia (fig. 8). En los terrenos particularmente duros le recomendamos desmontar
los discos fresa para facilitar la penetración de las azadas en el terreno.
TRABAJO TERMINADO
Una vez terminado el trabajo, para apagar el motor: para motores de explosión mueva la palanca
del acelerador, para motores diésel mueva la palanca a la derecha sobre el motor; y ponga el
cambio en punto muerto. Para motor explosión cerrar la válvula de la gasolina. Consulte siempre
el manual de instrucciones del motor.
MANUTENCIÓN Y LUBRICACIÓN
¡ATENCIÓN!
- Desconectar la bujía antes de iniciar cualquier operación de limpieza, mantenimiento o
reparación. Llevar indumentaria apropiada y guantes de trabajo.
- Si fuera necesario levantar la máquina o parte de esa, utilizar siempre herramienta
adecuada como soportes o ganchos de seguridad.
- No dejar la máquina en mantenimiento, sin dispositivos de seguridad o levantada en
lugares accesibles a personas inexpertas, especialmente niños.
- Nunca desechar en el medio ambiente el aceite usado, la gasolina o cualquier otro
producto contaminante.
- Un mantenimiento eficaz y una correcta lubricación contribuyen a mantener la máquina en
perfectas condiciones.
La motoazada ha sido diseñada para que necesite muy poca manutención, igualmente, para
mantener la máquina en buen estado es oportuno respetar las siguientes condiciones:
- Controle que todos los tornillos y las tuercas estén bien apretados, sobre todo las tuercas que
fijan los grupos azadas al eje, el motor, las azadas y el soporte trasero.
- Engrase los cables del acelerador y del embrague.
- No use aceites minerales para las partes de goma porque se deterioran.
- Controle que el cable del embrague tenga siempre un poco de juego en el trecho entre el
regulador y la palanca.
- Controle siempre el nivel de aceite y limpie frecuentemente el filtro del aire.
LUBRICACIÓN
Efectúe las siguientes operaciones con la máquina en posición horizontal. IMPORTANTE: La
substitución del aceite se efectúa con la máquina caliente para favorecer la salida total del aceite
usado. No extraiga los tapones del nivel de aceite cuando la máquina está en movimiento, para
evitar que el aceite en circulación salga.
ACEITE DEL MOTOR
Respete escrupulosamente las reglas del manual de instrucciones del motor.
Es indispensable controlar el nivel cada 4 horas y cambiarlo cada 50 horas aproximadamente.
FILTRO DE AIRE
Controle el nivel del aceite cada 8 horas y aún más frecuentemente si el ambiente es muy
polvoriento. En las versiones con filtro de aire en seco (fig. 5), controle que el filtro esté limpio.
Atención: si el filtro está obstruido, no sople el cartucho con aire comprimido, sino cámbielo. En las
versiones en baño de aceite (fig. 6), controle que el filtro esté limpio y el aceite a nivel. Utilice el
mismo aceite del motor.
ACEITE DEL CAMBIO
Controle el nivel cada 50 horas de trabajo aproximadamente y, si necesario, añada aceite para
cambio 85W/90. Cambie el aceite una vez al año (cantidad kg 1,350). Para eliminar el aceite viejo
del cárter cambio, afloje los tornillos situados en la tapa alrededor del eje motor azadas (fig. 1A n. 8).
37
Page 40

11500 Traducción de las instrucciones originales
EJE DE LAS AZADAS
Extraiga periódicamente el guardapolvos (fig. 1A n. 8) y limpie con cuidado la zona de abajo.
Luego vuelva a montarlo.
REGLAS UTILES PARA EL BUEN FUNCIONAMIENTO
- No deje nunca la máquina bajo la lluvia.
- No esfuerce la palanca de cambio si la marcha no engrana: es suficiente dar unos
pequeños golpes de embrague.
- No esfuerze demasiado el motor, cuando sale demasiado humo del tubo de escape es
necesario disminuir la velocidad.
- Quitar las hojas y hierbas que puedan haberse depositado alrededor del arranque
autoenvolviente.
- Está terminantemente prohibido usar la máquina sin los dispositivos de seguridad.
MANUTENCIÓN DE FIN DE ESTACIÓN
- Limpie la máquina con cuidado.
- Cambie el aceite del motor y del cárter del cambio.
- Controle y limpie el filtro de aire.
- Afile las azadas; si están gastadas, cámbielas.
- Lubrique los cables del acelerador y del embrague.
- Si la máquina trabaja de manera intensiva en ambientes secos y polvorientos, limpie las
aletas de enfriamiento del cilindro (véase manual del motor).
TABLA RECAPITULATIVA DE MANTENIMIENTO
INTERVENTOS CADA 8
HORAS
PRIMERAS
20 HORAS
CADA
50
HORAS
CADA
100
HORAS
CADA
AÑO O
CADA
200
HORAS
Aceite motor
Controlar el nivel ●
Sustituir ● ●
Filtro aire
Controlar ●
Sustituir ٭
Bujía
Controlar/registrar ●
Sustituir ●
Aceite caja
de cambios
Controlar el nivel
●
Sustituir
●
Controlen que la rejilla de aspiración
motor sea limpia
●
Controlar afilado y fijación cuchillas
● ●
Lubricar con grasa
●
Controlar juego del embrague
● ●
● intervención recomendada
٭ intervenir si necesario
38
Page 41

11500 Traducción de las instrucciones originales
ALMACENAMIENTO Y INACTIVIDAD PROLONGADA
Si se prevé un periodo prolongado de inactividad (superior a un mes), es necesario vaciar el motor
del combustible para prevenir la formación de depósitos gomosos en el sistema de alimentación o
en partes vitales del carburador. Si se quiere evitar esta operación, es posible prolongar la
conservación del combustible en almacenamiento hasta 12 meses añadiendo el aditivo
estabilizante para gasolina Mezcle el aditivo al carburante en el depósito o en el recipiente del
carburante. Ponga en marcha el motor por un tiempo para hacer circular el aditivo en el sistema
de alimentación.
Nota: si el motor lleva gasolina con alcohol, vacíe el depósito haciendo funcionar el motor hasta
que se vacíe por completo.
ADVERTENCIAS POR EL TRANSPORTE
Si la máquina es transportada con un camión o un remolque, amárrela al medio de transporte con
cables o cadenas.
ACCESORIOS
ATENCIÓN
Antes de montar los grupos azadas, los bujes trinquete o los prolongadores de rueda en el eje de
las azadas (fig. 1 n. 5), verifique que éste último y la parte interna del accesorio que se monta
estén perfectamente limpios. Una vez montado el accesorio en el eje, ajuste con atención los
tornillos de fijación.
ARADOS
Los arados para la motoazada Grillo 11500 han sido estudiados especialmente para obtener un
buen trabajo de arado sin cansar excesivamente al operador. Se pueden elegir dos tipos:
monosurco y giratorio a 180°. Este último es muy indicado para efectuar trabajos en los dos
sentidos, como calzadas para hileras, viñedos y plantaciones frutales. La profundidad del surco
que se puede obtener varia entre unos 10 y unos 15 cm según el terreno.
Para montar el arado, detrás de la fresa poner un porta-accesorios ajustable (fig. 14); para hacerlo
es suficiente desmontar el soporte del pie, quitar el pasador y el perno (fig. 8) y montar el portaaccesorios. Después es necesario desmontar los dos grupos azadas y montar los prolongadores
de rueda fijándolos con los tornillos (fig. 19), entonces montar las ruedas de goma del tipo 5.00 x
10. Para aumentar la adherencia recomendamos montar las masas sobre las ruedas.
SURCADOR REGULABLE
El surcador regulable es un accesorio estudiado especialmente para realizar surcos de sembrado
o de riego (fig. 15).
La posibilidad de variar la posición de las dos alas permite regular el ancho del surco desde un
mínimo de 10 cm a un máximo de 30 cm. La profundidad que se obtiene puede variar de 10 a 20
cm.
Si el terreno es particularmente duro es oportuno realizar antes un buen fresado y luego trabajar
con el surcador. Montar este accesorio en la máquina es muy simple: es suficiente desmontare el
soporte trasero y montar el surcador (fig. 15).
Se puede utilizar en combinación con la fresa o montando las ruedas de goma.
BOMBA IRRIGACIÓN
Esta bomba se aplica directamente a la brida de la motoazada en el eje superior (fig. 16) y se fija
con dos tuercas a los dos prisioneros. Como ne tiene desacoplamiento, se monta al utilizarla y se
desmonta inmediatamente después.
BOMBA DE ROCIADO
Esta bomba se aplica directamente a la brida de la motoazada en el eje superior (fig. 17).
39
Page 42

11500 Traducción de las instrucciones originales
BUJES DE TRINQUETE
El buje de trinquete es un empalme de la rueda especial, porque los trinquetes funcionan como un
diferencial. Los trinquetes se aplican en el eje de las azadas, se fijan con los tornillos del
equipamiento base y luego se montan las ruedas de goma (fig. 18).
PROLONGADORES RUEDAS
Los prolongadores ruedas se montan en el eje de las azadas y son necesarios para poder aplicar
las ruedas de goma (fig. 19). No tienen función diferencial.
RUEDA ANTERIOR DE TRASFERENCIA
La rueda anterior sirve para desplazar la máquina en avenidas, plazas o garajes. Tiene dos
posiciones, una de trasferencia y una de trabajo, ajustables sin llaves (fig. 20).
40
Page 43

11500-Tradução das instruções originais
MOTOENXADA 11500
Prezado Cliente,
agradecemos a sua confiança e preferência pela nossa enxada mecânica. Temos a certeza de
que a utilização desta sua máquina satisfará plenamente as suas exigências. Para que a máquina
seja utilizada de maneira ideal e para a sua manutenção durante a sua vida útil, pedimos que leia
atentamente e que siga à risca as indicações fornecidas neste manual; elas permitir-lhe-ão obter
os melhores resultados e proteger o seu investimento. Pedimos que conserve este manual com
cuidado. Ele deverá acompanhar sempre a máquina.
DESCRIÇÃO GERAL E USO PREVISTO
A motoenxada é uma máquina agrícola autopropulsada com um eixo, normalmente equipada com
fresa para a preparação do terreno. Estas máquinas utilizam-se para preparar o solo (limpeza ,
fresado) e para pequenos trabalhos, entre as árvores e na horticultura em geral.
A máquina está constituída por um chassis resistente sobre o qual se encontra posicionado o
motor de explosão que acciona a tomada de força. A máquina é conduzida por um operador que
segue os movimentos da motoenxada através de uma maneta onde se encentram os comandos.
ATENÇÃO! Antes de ligar o motor, leia atentamente as seguintes
recomendações: elas são importantes para a sua integridade física!
RECOMENDAÇÕES DE PRECAUÇÃO DE ACIDENTES
A prudência é a melhor arma na prevenção dos acidentes!
A utilização imprópria da motoenxada e do respectivo equipamento pode ser perigoso; a fim de
reduzir estes riscos, observe as precauções necessárias indicadas a seguir:
1) Leia este manual inteiramente antes de ligar a motoenxada e de o colocar em movimento.
2) Preste atenção especial às indicações e aos autocolantes de segurança aplicados na máquina.
3) A rotação da fresa é altamente perigosa: nunca coloque as mãos ou os pés por baixo da
fresa.
4) Antes deixar que outras pessoas trabalhem com a motoebxada, informe-as a respeito das
normas de segurança e de como utilizar a máquina.
5) Antes de arrancar a motoenxada, verifique se não existem pessoas à volta da máquina,
principalmente crianças.
6) Não utilize a motoenxada se estiver cansado e não beba substâncias alcoólicas.
7) Controle o terreno antes de iniciar a fresagem. Verifique se não existem pedras, paus ou
objectos estranhos que possam estragar a máquina ou serem lançados para longe, tornando-se
muito perigosos.
8) Antes de começar o trabalho, vista roupas de trabalho apropriadas, luvas, sapatos e
óculos de segurança.
9) Não utilize a motoenxada em terrenos muito inclinados, pois este pode virar.
10) Não deixe que rapazes muito jovens utilizem a máquina: a sua utilização é proibida a pessoas
menores de 16 anos.
11) Não accione a marcha-atrás com o motor acelerado.
12) É perigoso accionar as alavancas bruscamente, com o motor em regime máximo.
13) A fim de evitar o risco de exalações de substâncias venenosas, não deixe o motor ligado
enquanto estiver num ambiente fechado.
14) Desligue sempre o motor antes de abastecer a máquina com o combustível. Fique afastado de
faíscas ou de chamas. Não fume!
15) Evite fugas de combustível e, depois de ter enchido o depósito, limpe todos os resíduos de
combustível presentes na máquina antes de arrancar o motor.
16) Armazene o carburante em de recipientes próprios, que tenham sido fabricados
expressamente para tal efeito.
17) Trabalhar somente durante o dia ou com boa luz artificial.
41
Page 44

11500-Tradução das instruções originais
EVITAR O USO INDEVIDO
18) Qualquer utilização imprópria comporta a perda de validade da garantia e alivia o fabricante de
qualquer responsabilidade.
19) Nunca utilizar a maquina para transportar pessoas, animais ou coisas.
PRECAUÇÕES ADICIONAIS PARA A SEGURANÇA
20) Não altere nem desmonte os dispositivos de segurança.
21) Não faça nenhum tipo de regulação ou limpeza com o motor em movimento.
22) Não deixe que ninguém controle a máquina enquanto a estiver a conduzir com o motor
em movimento.
23) O utente é sempre responsável pelos danos causados a terceiros.
24) As enxadas deformadas ou estragadas devem sempre ser substituídas e nunca consertadas.
25) Só utilize peças sobressalentes fornecidas pela Grillo.
26) Antes de iniciar qualquer trabalho com a máquina, verifique se todos os sistemas de
prevenção de acidentes presentes na máquina estão perfeitamente eficientes. É expressamente
proibido desactivá-los ou alterá-los.
27) Antes de começar o trabalho, verifique se os parafusos e as porcas de fixação da fresa e das
enxadas estão bem apertados.
28) O equipamento de protecção (capota, guarda-lamas, etc.) deve estar sempre montado durante
os trabalhos.
29) Nunca limpe a fresa com o motor ligado.
30) Não utilize a máquina se estiver descalço.
31) Não altere as regulações do motor, sobretudo a do número máximo de rotações.
32) Deixe o motor arrefecer antes de colocar a máquina em qualquer local fechado.
33) ATENÇÃO! Para diminuir o risco de incêndio, mantenha sempre o motor, o silenciador e os
colectores de escape livres de ervas, folhas, pó, etc..
34) Se tiver de esvaziar o depósito de carburante, faça-o ao ar livre.
35) A motoenxada deve ser conduzido por um só operador.
IDENTIFICAÇÃO E ASSISTÊNCIA
IDENTIFICAÇÃO
A máquina é dotada com uma chapa de
identificação colocada no chassis, onde está
indicado o seu número de série.
Este número é indispensável para qualquer
pedido de intervenção técnica e para os
pedidos de peças.
SERVIÇO DE ASSISTÊNCIA
Este manual fornece as indicações para a utilização da enxada mecânica e para uma manutenção
básica correcta, a qual pode ser executada pelo utente.
Para as intervenções não descritas neste manual, dirija-se ao Revendedor da sua Zona.
PEÇAS SOBRESSALENTES
Recomenda-se a utilização exclusiva de peças sobressalentes originais por serem as únicas que
oferecem-características de segurança e possibilidade de substituição.
Todos os pedidos de peças sobressalentes deverão ser acompanhados pelo número de matrícula
da máquina. Para as peças sobressalentes do motor, sigas as indicações fornecidas no manual
específico.
42
Page 45

11500-Tradução das instruções originais
GARANTÍA
A garantia é oferecida dentro dos modos e limites previstos pela lei em vigor. O revendedor tem
que entregar o certificado de garantia da máquina ao cliente final, imprimindo uma cópia do registo
do site Internet da Grillo.
No que respeita ao motor, valem as condições previstas pelos respectivos fabricantes.
COMO PEDIR AS PEÇAS SOBRESSALENTES
Sempre indique o número de matrícula da máquina e o número de código da peça sobressalente.
Dirija-se aos nossos centros de distribuição de peças presentes em todas as províncias; ou então
às nossas oficinas. Nosso endereço é:
GRILLO S.p.A.
Via Cervese 1701 - 47023 CESENA (FC) - ITALIA
Tel. 0039 / 0547 / 381333 - Fax 0039 / 0547 / 632011
Web site: www.grillospa.it - E-mail: grillo@grillospa.it
PEÇAS DE SUBSTITUIÇÃO QUE ACONSELHAMOS TER SEMPRE EM ARMAZÉM
– 1 cabo de acelerador
– 1 cabo de embraiagem
– 1 alavanca de acelerador
– 2 enxadas direitas e respectivos parafusos
– 2 enxadas esquerdas e respectivos parafusos
CARACTERÍSTICAS TECNICAS
MOTOR:
- ROBIN SUBARU EX27 OHC, 265 cm³, 8,3 HP, 6,1 kW a 3600 r.p.m., monocilindrico a gasolina.
- LOMBARDINI 15LD350 349 cm³, 7,5 HP, 5,5 kW a 3600 r.p.m., monocilindrico diesel.
ARRANQUE: manual com auto-enrolador (o eléctrico em motor diesel).
DEPOSITO COMBUSTIVEL: 6,1 litros (EX27) – 4,3 litros (15LD350)
CONSUMO HORARIO: 2,4 litros (EX27) – 1,5 litros (15LD350)
TRANSMISSÃO: carretos em banho de óleo.
CAIXA DE VELOCIDADES: 3 velocidades p/ frente e e 1 p/ trás
EMBRAIAGEM: cónica e activa.
TOMADA DE FORÇA: uma superior, directa ás rotações do motor em sentido anti-horário 11 UNI
221 + uma inferior sincronizada com a caixa no sentido dos ponteiros do relógio 13 UNI 221.
FRESA: 6 estrelas com discos laterais, largura total 990 mm.
DIÁMETRO FACAS: 340 mm.
LARGURA DE TRABALHO sem discos laterais: regulável a 590 – 860 – 1120 mm (com jogo de
alargamento).
PROFUNDIDADE DE TRABAJO: 330 mm
ROTAÇÕES FRESA/MINUTO: I° 53 rot.; II° 123 rot.; III° 162 rot.; MARCHA ATRAS 53 rot.
MANETES: reguláveis em altura e lateralmente e montados em suportes anti-vibração.
43
Page 46

11500-Tradução das instruções originais
ACCESSÓRIOS: abre-regos, arado, jogo de alargadores de roda, rodas pneumáticas, roda de
transporte dianteira.
PESO: kg 90 com EX27 – kg 110 com 15LD350 AV – kg 121 com 15LD350 AE
ACTIVAÇÃO DA MÁQUINA
- Verifique se a máquina está intacta e que não sofreu danos durante o transporte.
- Monte el espolón (fig. 8).
- Monte o capot e as facas (fig. 9). Atenção: antes de montar os grupos de facas no veio,
verifique se o veio e a parte inferior do grupo de facs estão perfeitamente limpos. De
seguida, monte o grupo de facas no veio e aperte os parafusos de fixação.
- Aplique o suporte do motor, se necessário (fig. 10).
- Acrescente o óleo de motor (veja o manual correspondente).
Controles para efectuar antes do arranque com a máquina na posição horizontal:
- Verifique se o nível do óleo da caixa está visível através do indicador de nível (fig. 4).
- Para controlar o óleo do motor, retire o tampão do nível e siga as instruções do manual do
motor (fig. 2 y 3).
- Nas versões com filtro de ar a banho de óleo (fig. 6), acrescente o óleo utilizando o mesmo
óleo do motor.
- Verique se o cabo de embreagem tenha pouca folga entre o registro e a alavanca (fig. 7).
- Encha o tanque de combustible utilizando um funil dotado de un filtro muito fino para reter
eventuais impurezas.
- Certifique-se que a alavanca de velocidades está em ponto morto.
INSTRUÇÕES DE USO
ARRANQUE DO MOTOR
Para arrancar o motor, efectúe os seguintes controles:
- Leve a manete do acelerador (fig.1 n. 3) até metade.
- Nas versões a gasolina, abra a chave de passagem da gasolina y feche o arrancador,
depois posicione o comando em ON (fig. 12).
- Nas versões com arranque manual, puxe a corda do arranque autoenvolvente com
força(fig. 11): o motor arranca.
- Nas versões Diesel, uma vez ligado o motor, abra novamente o arrancador e mova
lentamente a manete do acelerador (fig. 1/A n.3) quase ao mínimo.
- Deixe aquecer o motor algunos minutos antes de começar o trabalho; para favorecer uma
boa rodagem é necessário não esforçar excessivamente a máquina durante as primeiras
50 horas de trabalho.
ARRANQUE DA MÁQUINA
A máquina põe-se em movimento pressionando o interruptor A (fig. 7) e de seguida posicionar a
alavanca vermelha desde a posição 2 até a posição 1(fig. 7). Abandonando a pressão da
alavanca vermelha, a máquina pára mas o motor permanece ligado e a alavanca retorna a
Posição 2 (fig. 7). Para desligar o motor, posicione interruptor sobre o comando do acelerador 3
na posición OFF (fig. 7) para motores a gasolina. Para motores a diesel, utilizar a alavanca sobre
o motor.
Nota: para evitar problemas na embraiagem durante o trabalho a alavanca vermelha deve manterse bem pressionada. ¡Atenção! Não trabalhar com a alavanca parcialmente pressionada.
A pressão do operador no manejo determina a profundidade de fresagem; pode-se também obter
una profundidade de fresagem maior ou menor levantando ou baixando o suporte traseiro.
Recomendamos também, girar a ponta do suporte traseiro para a frente quando se trabalha em
terrenos duros ou compactos, ou girar para trás quando o terreno não apresenta uma excessiva
44
Page 47

11500-Tradução das instruções originais
consistência (fig. 8). Em terrenos particularmente duros recomendamos desmontar os discos da
fresa para facilitar a penetração das facas no terreno.
FIM DO TRABALHO
Concluído o trabalho, e para desligar o motor: para o motores de explosão usar alavanca do
acelerador, para motores diesel usar alavanca sobre o motor; e por a caixa de velocidades em
ponto morto.
Para motores de explosão, fechar a torneira da gasolina. Consultar sempre o manual de
instruções do motor.
MANUTENÇÃO E LUBRIFICAÇÃO
ATENÇÃO!
- Desligar a vela antes de iniciar qualquer operação de limpeza, manutenção ou reparação.
Usar roupa apropriada e luvas de trabalho.
- Si for necessário levantar a máquina ou parte dela, utilizar sempre as ferramentas
adequadas, como suportes ou ganchos de segurança.
- Não deixar a máquina em manutenção, sem dispositivos de segurança ou levantada em
locais acessíveis a pessoas inexperientes, mas em especial, nunca deixar ao alcance das
crianças.
- Nunca deitar fora o óleo usado, a gasolina ou qualquer outro produto contaminante.
- Uma manutenção eficaz e uma correcta lubrificação contribuem para manter a máquina
em perfeitas condições.
A motoenxada foi desenhada para necessitar de pouca manutenção, igualmente, para manter a
máquina bom estado é oportuno respeitar as seguintes condições:
- Verifique se todos os parafusos e as porcas estão bem ajustados, sobretudo as porcas que
fixam os grupos de facas ao veio, o motor, as facas e o suporte traseiro.
- Lubrifique os cabos do acelerador e da embraiagem.
- Não use óleos minerais nas partes de borracha porque se deterioram.
- Verifique se o cabo de embraiagem tem um pouco de folga entre o regulador e a alavanca.
- Verifique sempre o nível do óleo e limpe frequentemente o filtro de ar.
LUBRIFICAÇÃO
Mantendo a máquina em posição horizontal, efectuar os trabalhos que se seguem.
IMPORTANTE: A substituição do óleo deve ser feita com a máquina quente para facilitar a saída
total do óleo usado. Não retirar as tampas do nível de óleo enquanto a máquina estiver a
funcionar, a fim de evitar a saída de óleo em círculo.
ÓLEO DO MOTOR
Respeite escrupulosamente as regras do manual de instruções do motor.
É indispensável controlar o nível a cada 4 horas de trabalho e mudar a cada 50 horas
aproximadamente.
FILTRO DE AR
Verifique o nível de óleo a cada 8 horas e com mais frequência se o ambiente é muito poeirento.
Nas versões com filtro de ar a seco (fig. 5), verifique se o filtro está limpo. Atenção: se o filtro está
obstruído, não sopre o cartucho com ar comprimido, simplesmente mude-o. Nas versões a banho
de óleo (fig. 6), verifique se o filtro está limpo e o óleo ao nível. Utilize o mesmo tipo de óleo do
motor.
ÓLEO DA CAIXA
Verifique o nível a cada 50 horas de trabalho aproximadamente e, se necessário, acrescente óleo
para caixa 85W/90. Mude o óleo uma vez por ano (quantidade kg 1,350). Para eliminar o óleo
45
46
Page 48

11500-Tradução das instruções originais
usado do carter da caixa, desaperte os parafusos situados na tampa á volta do veio das facas (fig.
1 n. 8).
VEIO DAS FACAS
Retire periodicamente os guarda-pós (fig. 1 n. 8) e limpe com cuidado a zona de baixo. De
seguida volte a monta-lo.
REGRAS ÚTEIS PARA O BOM FUNCIONAMENTO
- Nunca deixe a máquina a chuva.
- Não esforce a alavanca de velocidades se la mudança não engrena: é suficiente dar uns
pequenos golpes de embraiagem.
- Não esforce demasiado o motor, quando sai demasiado fumo do tubo de escape é
necessário diminuir a velocidade.
- Retirar as folhas e ervas que possam ter depositado em volta do arranque.
- Está terminantemente proibido usar a máquina sem o dispositivo de segurança.
MANUTENÇÃO DE FIM DE ESTAÇÃO
- Lave a máquina com cuidado.
- Mude o óleo do motor e do carter da caixa.
- Verifique e limpe o filtro de ar.
- Afie as facas; se estam gastas, mude-as.
- Lubrifique os cabos do acelerador e da embreagem.
- Se a máquina trabalha de maneira intensiva em ambientes secos e poeirentos, limpe as
palhetas de refrigeração do cilindro (veja o manual do motor).
TABELA RECAPITULATIVA DE MANUTENÇÃO
INTERVENÇÕES CADA 8
HORAS
PRIMEIRAS
20 HORAS
CADA 50
HORAS
CADA 100
HORAS
CADA
ANO OU
CADA 200
HORAS
Óleo motor
Controlar o nivel ●
Substituir ● ●
Filtro ar
Controlar ●
Substituir ٭
Vela
Controlar/registrar ●
Substituir ●
Óleo caixa de
velocidades
Controlar o nivel ●
Substituir ●
Certifiquem-se que a grelha de
aspiração do motor soa limpa
●
Controlar gume e fixação facas
● ●
Lubrificação com óleo
Verificar folga embraiagem
● ●
Page 49

11500-Tradução das instruções originais
● intervenção recomendada
٭ intervir se necessário
ARMAZENAMENTO E PARAGEM PROLONGADA
Se prevê um período prolongado de inatividade (superior a um mês), é necessário retirar o
combustível do motor para prevenir a formação de depósitos pegajosos no sistema de
alimentação ou nas partes vitais do carburador. Se quer evitar esta operação, é possível prolongar
a conservação do combustível em armazenamento até 12 meses acrescentando o aditivo
estabilizante para gasolina Misture o aditivo ao combustível no el depósito ou no recipiente do
combustível. Ligue o motor por algum tempo para fazer circular o aditivo no sistema de
alimentação.
Nota: se o motor levar gasolina com álcool, esvazie o depósito fazendo funcionar o motor até que
esvazie por completo.
ADVERTÊNCIAS PARA O TRANSPORTE
Se a máquina é transportada por um camião ou um reboque, amarre-a ao meio de transporte com
cabos ou correntes.
EQUIPAMENTOS
ATENÇÃO
Antes de montar os grupos de facas, ou os prolongadores de roda no veio das facas (fig. 1 n. 5),
verifique se o veio e a parte interna do acessório que se monta estejam perfeitamente limpos.
Uma vez montado o acessório no veio, ajuste com atenção os parafusos de fixação.
CHARRUAS
As charruas para a motoenxada Grillo 11500 foram estudadas especialmente para obter um bom
trabalho de charrua sem cansar excessivamente o operador. Podem elegir-se dois tipos:
monosulco e giratório a 180°. Este último é indicado para efectuar trabalhos nos dois sentidos,
como terrenos para sementeiras, vinhas e pomares. A profundidade do sulco que se pode obter
varia entre os 10 e os 15 cm dependendo do terreno.
Para montar a charrua, depois da fresa colocar um porta-acessórios regulável (fig. 14); para o
fazer é suficiente desmontar o suporte do pé, retirar o passador e o perno (fig. 8) e montar o portaacessórios. Depois é necessário desmontar os dois grupos de facas e montar os prolongadores
de roda fixando-os com os parafusos (fig. 19), depois montar as rodas de borracha do tipo 5.00 x
10. Para aumentar la aderência recomendamos montar os pesos das rodas.
ABRE-REGOS REGULÁVEL
O abre-regos regulável é um acessório estudado especialmente para realizar sulcos de
sementeira ou de rega (fig. 15).
A possibilidade de variar a posição das duas asas permite regular a largura do sulco desde 10 cm
a 30 cm. A profundidade que se obtém pode variar de 10 a 20 cm.
Se o terreno é particularmente duro será melhor fresar a terra e de seguida trabalhar com o abreregos. Montar este acessório na máquina é muito simples: é suficiente desmontar o suporte
traseiro e montar o abre-regos (fig. 15).
Pode utilizar-se en combinação com a fresa ou montando as rodas de borracha.
BOMBA DE REGA
Esta bomba aplica-se diretamente na correia da motoenxada no eixo superior (fig. 16) e fixa-se
com duas porcas. Como não tem desacoplamento, monta-se ao utilizá-la
desmonta-se imediatamente depois.
BOMBA DE PULVERIZAR
Esta bomba aplica-se diretamente na correia da motoenxada no eixo superior (fig. 17).
47
Page 50

11500-Tradução das instruções originais
EXTENSIVOS DE TRINCO
O Extensivo de trinco é um acessório da roda especial, porque os trincos funcionam como um
diferencial. Os trincos aplicam-se no eixo das facas, fixam-se com os parafusos do equipamento
base e de seguida montam-se as rodas de borracha (fig. 18).
PROLONGADORES DE RODAS
Os prolongadores de rodas montam-se no eixo das facas e são necessários para poder aplicar as
rodas de borracha (fig. 19). Não tem função de diferencial.
RODA DE TRANSFERÊNCIA
A roda de transferência serve para deslocar la máquina em ruas ou garagens. Tem duas posições
de transferência e de trabalho ajustáveis sem chaves (fig. 20).
48
Page 51

11500/ Translation of the original instructions
ΜΟΤΟΣΚΑΠΤΙΚΟ 11500
Αξιότιμε πελάτη,
Θα θέλαμε να σε ευχαριστήσουμε για την επιλογή σας με ένα Grillo μοτοσταπτικό. Είμαστε βέβαιοι
ότι η απόδοση του μηχανήματός μας θα σας ικανοποιήσει από όλες τις απόψεις. Για τα καλύτερα
αποτελέσματα και το χρόνο συντήρησης, παρακαλούμε να διαβάσετε προσεκτικά αυτό το
εγχειρίδιο και να ακολουθήσετε τις οδηγίες κατά γράμμα. Αυτό θα σας αποτρέψει από περιττά
έξοδα. Διαφυλάξτε αυτό το εγχειρίδιο συνεχώς, μαζί με το μηχάνημα.
ΓΕΝΙΚΗ ΠΕΡΙΓΡΑΦΗ ΚΑΙ ΠΡΟΒΛΕΠΟΜΕΝΗ ΧΡΗΣΗ
Το Grillo μοτοσκαπτικό είναι ένα αυτό-προωθούμενο μηχάνημα μονού άξονα το οποίο συνήθως
είναι εξοπλισμένο με περιστρεφόμενη φρέζα για όργωμα του εδάφους. Αυτά τα μηχανήματα
χρησιμοποιούνται κυρίως για την προετοιμασία του εδάφους (εξάλειψη των ζιζανίων, όργωμα του
εδάφους) και χρησιμοποιούνται στην κηπουρική για μικρές εργασίες του εδάφους, εργασίες
βελτίωσης και περιβόλια με εσωτερικές γραμμές.
Το μηχάνημα είναι κατασκευασμένο σε πλαίσιο και εξοπλίζεται είτε με κινητήρα βενζίνης είτε με
κινητήρα πετρελαίου ο οποίος οδηγεί την περιστρεφόμενη φρέζα.
Το Grillo rotavator είναι μηχάνημα για χρήση από πεζό χειριστή, ο οποίος οδηγεί το μηχάνημα
μέσω τιμονιού, επάνω στο οποίο βρίσκονται τα χειριστήρια.
ΠΡΟΣΟΧΗ! Πριν την εκκίνηση του κινητήρα, διαβάστε αυτό προσεκτικά.
Οι παρακάτω προειδοποιήσεις είναι πολύ σημαντικές για τη διασφάλιση
της ασφάλειας!
ΠΡΟΕΙΔΟΠΟΙΗΣΕΣ
Η προσοχή είναι ο κύριος τρόπος διασφάλισης αποφυγής ατυχημάτων!
Η ακατάλληλη χρήση του μοτοσκαπτικού και των εξαρτημάτων του μπορεί να είναι επικίνδυνη. Για
την ελαχιστοποίηση του ρίσκου, ελέγξτε τις απαραίτητες προφυλάξεις που αναφέρονται
παρακάτω:
1) Διαβάστε ολόκληρο το εγχειρίδιο προτού εκκινήσετε τον κινητήρα ή θέσετε το μηχάνημα σε
κίνηση.
2) Δώστε ιδιαίτερη προσοχή στις προειδοποιήσεις ασφαλείας και στις ετικέτες.
3) Η περιστροφή της φρέζας είναι πολύ επικίνδυνη. Ποτέ μη τοποθετείτε χέρια ή πόδια κάτω
από τη φρέζα!
4) Πριν χρησιμοποιήσουν το μηχάνημα άλλοι χειριστές, πρέπει να έχουν πρώτα ενημερωθεί
σχετικά με τους κανόνες ασφαλείας και τον τρόπο χρήσης του μηχανήματος.
5) Πριν από την εκκίνηση του κινητήρα, βεβαιωθείτε ότι δε βρίσκεται κανείς σε κοντινή απόσταση,
κυρίως παιδιά.
6) Ποτέ μη χρησιμοποιείτε το μηχάνημα όταν είστε κουρασμένος και μη πίνετε αλκοόλ.
7) Ελέγξτε το έδαφος πριν φρεζάρετε, για πέτρες, ράβδοι ή ξένα αντικείμενα τα οποία μπορεί να
προκαλέσουν ζημιά στο μηχάνημα ή να πεταχθούν επικίνδυνα σε απόσταση κατά τη λειτουργία
του.
8) Πριν ξεκινήσετε την εργασία, φορέστε τα κατάλληλα ρούχα εργασίας, γάντια, μπότες και
γυαλιά.
9) Ποτέ μη χρησιμοποιείτε το μοτοσκαπτικό σε απότομες πλαγιές, μπορεί να ανατραπεί (μεγ. 35%)
10) Ποτέ μην επιτρέπετε τη χρήση του μηχανήματος σε κανέναν με ηλικία κάτω των 16 ετών.
11) Ποτέ μην οδηγείτε με όπισθεν όταν ο κινητήρας έχει τέρμα το γκάζι.
12) Είναι επικίνδυνο να χειρίζεστε τους λεβιέδες απότομα με τον κινητήρα στις μέγιστες στροφές.
13) Ποτέ μην αφήνετε τον κινητήρα να δουλεύει σε κλειστό χώρο, μπορεί να εισπνεύσετε
δηλητηριώδη αέρια.
14) Πάντα να απενεργοποιείτε τον κινητήρα πριν την πλήρωσή του με καύσιμο. Να τον κρατάτε
μακριά από σπίθες ή φλόγες και να μη καπνίζετε!
15) Να αποφεύγετε το πιτσίλισμα του καυσίμου και μετά την πλήρωση του δοχείου καυσίμου
καθαρίστε όλο το καύσιμο που χύθηκε πριν εκκινήσετε τον κινητήρα.
49
Page 52

11500/ Translation of the original instructions
16) Αποθηκεύστε το καύσιμο σε δοχεία και κυρίως σε δοχεία κατασκευασμένα γι’ αυτό το σκοπό.
17) Να δουλεύετε μόνο κατά την ημέρα ή κάτω από καλό φωτισμό.
ΑΚΑΤΑΛΛΗΛΗ ΧΡΗΣΗ ΠΟΥ ΠΡΕΠΕΙ ΝΑ ΑΠΟΦΕΥΧΘΕΙ
18) Κάθε ακατάλληλη χρήση του μηχανήματος καθιστά το μηχάνημα επικίνδυνο και ο
κατασκευαστής δε φέρει καμία ευθύνη.
19) Ποτέ μη χρησιμοποιείτε το μηχάνημα για μεταφορά ατόμων, ζώων ή αντικειμένων.
ΕΠΙΠΛΕΟΝ ΠΛΗΡΟΦΟΡΙΕΣ ΑΣΦΑΛΕΙΑΣ
20) Ποτέ μη παραβιάσετε η απενεργοποιήσετε τις συσκευές ασφαλείας.
21) Ποτέ μη πραγματοποιείτε ρυθμίσεις ή καθαρισμούς όταν ο κινητήρας δουλεύει.
22) Ποτέ να μην είναι δίπλα σας κάποιος που παρατηρεί το μηχάνημα εφόσον εσείς το
οδηγείτε.
23) Ο χρήστης είναι πάντα υπεύθυνος για ζημιές και τραυματισμούς τρίτων. Παραμορφωμένες ή
κατεστραμμένες τσάπες πρέπει να αντικατασταθούν και ποτέ να μην επισκευαστούν.
24) Πάντα να χρησιμοποιείτε αυθεντικά ανταλλακτικά της Grillo.
25) Πριν ξεκινήσετε οποιαδήποτε εργασία με το μηχάνημα, ελέγξτε όλα τα συστήματα αποφυγής
ατυχημάτων με τα οποία είναι εξοπλισμένο το μηχάνημα. Ποτέ δεν πρέπει να είναι
απενεργοποιημένα η παραβιασμένα.
26) Πριν ξεκινήσετε την εργασία σας, ελέγξτε ότι οι βίδες και τα παξιμάδια και μπουλόνια
ασφαλίζουν τη φρέζα και ότι τα μαχαίρια είναι τέλεια σφιγμένα.
27) Όλα τα επιπρόσθετα προστατευτικά (καλύμματα, λασπωτήρες, κτλ) πρέπει να διατηρούνται
στη θέση τους κατά τη διάρκεια της λειτουργίας.
28) Ποτέ μη καθαρίζετε τη φρέζα ενώ ο κινητήρας είναι σε λειτουργία.
29) Ποτέ μη χρησιμοποιείτε το μηχάνημα ξυπόλητοι.
30) Ποτέ μην αλλάζετε τις ρυθμίσεις του κινητήρα, κυρίως τις μέγιστες στροφές r.p.m.
31) Αφήστε τον κινητήρα να κρυώσει πριν τοποθετήσετε το μηχάνημα σε κλειστό χώρο.
32) ΠΡΟΣΟΧΗ: για τη μείωση του ρίσκου πρόκλησης φωτιάς, διατηρείτε τον κινητήρα και την
εξάτμιση μακριά από γρασίδι, φύλλα, σκόνη κτλ.
33) Εάν πρέπει να αδειάσετε το δοχείο καυσίμου, να το κάνετε σε ανοικτό χώρο.
34) Τα μοτοσκαπτικά πρέπει να οδηγούνται μόνο από ένα χειριστή.
ΑΝΑΓΝΩΡΙΣΗ ΚΑΙ ΤΕΧΝΙΚΗ ΥΠΟΣΤΗΡΙΞΗ
Στο μοτοσκαπτικό υπάρχει ταμπέλα με την
ονομασία του επάνω στο πλαίσιο, με τον
σειριακό αριθμό του μηχανήματος. Αυτός ο
αριθμός πρέπει να δηλώνεται όταν αιτείστε
την επισκευή του ή για την παραγγελία
ανταλλακτικών.
ΤΕΧΝΙΚΗ ΥΠΟΣΤΗΡΙΞΗ
Αυτό το εγχειρίδιο παρέχει πληροφορίες για χρήση του μοτοσκαπτικού και για τη σωστή βασική
συντήρησή του, όπου ο χρήστης μπορεί να υλοποιήσει μόνος του. Για όλες τις διαδικασίες που δεν
περιγράφονται σε αυτό το εγχειρίδιο, επικοινωνήστε με τον τοπικό αντιπρόσωπό.
ΑΝΤΑΛΛΑΚΤΙΚΑ
Πάντα να χρησιμοποιείτε αυθεντικά ανταλλακτικά, εφόσον είναι τα μόνα που μπορούν να
παρέχουν πλήρη ασφάλεια και ικανότητα αντικατάστασης. Πάντα να αναφέρετε τον σειριακό
αριθμό του μηχανήματος και τον κωδικό αριθμό που πρέπει να αντικατασταθεί, όταν παραγγέλνετε
ανταλλακτικά. Για εξαρτήματα του κινητήρα, ανατρέξτε στο αντίστοιχο εγχειρίδιο.
50
Page 53

11500/ Translation of the original instructions
ΕΓΓΥΗΣΗ
Η εγγύηση δίνεται με συμμόρφωση με τον υπάρχοντα νόμο. Ο πωλητής πρέπει να δώσει στον
πελάτη ένα αντίγραφο της κάρτας εγγύησης του μηχανήματος, η οποία εκτυπώνεται μέσα από την
ιστοσελίδα της Grillo.
Για τον κινητήρα ισχύει η εγγύηση του αντίστοιχου κατασκευαστή.
ΠΑΡΑΓΓΕΛΝΟΝΤΑΣ ΑΝΤΑΛΛΑΚΤΙΚΑ
Πάντα να αναφέρετε το σειριακό και κωδικό αριθμό του εξαρτήματος που πρέπει να
αντικατασταθεί.
Επικοινωνήστε με τον κοντινό σας πωλητή.
Για περισσότερες πληροφορίες η διεύθυνσή μας είναι:
GRILLO S.p.A.
Via Cervese 1701 - 47521 CESENA (FC) - ITALY
Tel. 0039 / 0547 / 633111 - Fax 0039 / 0547 / 632011
Web site: www.grillospa.it - E-mail: grillo@grillospa.it
ΠΡΟΤΕΙΝΟΜΕΝΑ ΑΝΤΑΛΛΑΚΤΙΚΑ ΠΟΥ ΠΡΕΠΕΙ ΝΑ ΕΧΕΤΕ ΣΤΗ ΔΙΑΘΕΣΗ ΣΑΣ
1 ντίζα γκαζιού1 clutch cable
1 λεβιές γκαζιού
2 δεξιά μαχαίρια φρέζας με τις βίδες
2 αριστερά μαχαίρια φρέζας με τις βίδες
ΤΕΧΝΙΚΕΣ ΠΡΟΔΙΑΓΡΑΦΕΣ
ΚΙΝΗΤΗΡΑΣ:
- ROBIN SUBARU EX27, 265 cm³, 8,3HP, 6,1 kW @ 3600 r.p.m., μονοκύλινδρος, βενζίνης.
- LOMBARDINI 15LD350, 349 cm³, 7,5 HP, 5,5 kW @ 3600 r.p.m., μονοκύλινδρος, πετρελαίου.
ΕΚΚΙΝΗΣΗ: Σύστημα εκκίνησης με επαναφορά (Η μίζα είναι διαθέσιμη μόνο σε κινητήρες
πετρελαίου).
ΔΟΧΕΙΟ ΚΑΥΣΙΜΟΥ: 6,1 lt (EX27) – 4,3 (15LD350)
ωριαία κατανάλωση: 2,4 lt (EX27) – 1,5 lt (15LD350)
ΣΥΜΠΛΕΚΤΗΣ: κωνικός και ενεργός συμπλέκτης
ΜΕΤΑΔΟΣΗ ΚΙΝΗΣΗΣ: με γρανάζια σε δοχείο ελαίου
ΚΙΒΩΤΙΟ ΤΑΧΥΤΗΤΩΝ: Τρείς εμπρόσθιες ταχύτητες και μια ταχύτητα όπισθεν.
PTO: ένα περιστρέφεται με τις στροφές του κινητήρα σε ανάστροφη φορά από αυτή
των δεικτών του ρολογιού 11 UNI 221 + και ένα συγχρονισμένο με τις ταχύτητες του
κιβωτίου ταχυτήτων με φορά αυτή των δεικτών του ρολογιού 13 UNI 221.
ΧΕΙΡΟΛΑΒΗ: Είναι ρυθμιζόμενη καθ ύψος και στο πλάι. Τοποθετείται σε αντιδονητική μονάδα.
ΠΕΡΙΣΤΡΕΦΟΜΕΝΑ ΜΑΧΑΙΡΙΑ: με 6 μαχαίρια και πλαϊνούς δίσκους για συνολικό πλάτος 990
mm
ΔΙΑΜΕΤΡΟΣ ΦΡΕΖΑΣ: 340 mm
ΠΕΡΙΟΧΗ ΕΡΓΑΣΙΑΣ χωρίς πλαϊνούς δίσκους: ρυθμιζόμενη στα 590 – 860 – 1120 mm (με ΚΙΤ
μεγέθυνσης)
ΒΑΘΟΣ ΕΡΓΑΣΙΑΣ: 330 mm
51
Page 54

11500/ Translation of the original instructions
ΣΤΡΟΦΕΣ (RPM) ΠΕΡΙΣΤΡΕΦΟΜΕΝΩΝ ΜΑΧΑΙΡΙΩΝ: I 53 r.p.m.; II 123 r.p.m.; II 162 r.p.m.; -
I ΟΠΙΣΘΕΝ 53 r.p.m.
ΕΠΙΠΡΟΣΘΕΤΑ: επεκτάσεις τροχών, τροχοί από καουτσούκ, τροχός μεταφοράς, άροτρο.
ΒΑΡΟΣ: με EX27 kg 90 – με 15LD350 AV kg 110 – με 15LD350 AE kg 121
ΘΕΤΟΝΤΑΣ ΤΟ ΜΗΧΑΝΗΜΑ ΣΕ ΧΡΗΣΗ
- Βεβαιωθείτε για την ακεραιότητα του μηχανήματος και ότι δεν έχει πάθει ζημιά κατά τη
μεταφορά.
- Τοποθετήστε το σπιρούνι (εικ. 8).
- Τοποθετήστε τα καλύμματα των σκαλιστηριών (εικ. 9). Προσοχή: προτού
συναρμολογήσετε τα πτερύγια σκαπάνες, πάνω στον άξονα σκαπανών, ελέγξτε ότι
αυτός ο τελευταίος και το εσωτερικό μέρος των πτερυγίων σκαπάνες, είναι τελείως
καθαρά. Αφού τοποθετήσετε τα πτερύγια σκαπάνες πάνω στον άξονα, σφίξτε καλά τις
βίδες στερέωσης.
- Τοποθετήστε το πόδι του κινητήρα, όπου προβλέπεται (εικ. 10).
- Προσθέστε το λάδι μηχανής (βλ. εγχειρίδιο κινητήρα).
Έλεγχοι που πρέπει να γίνουν πριν την εκκίνηση με το μηχάνημα σε οριζόντια θέση:
- Βεβαιωθείτε ότι το λάδι είναι ορατό από το δείκτη στάθμης (εικ. 4).
- Για να ελέγξετε το λάδι κινητήρα, αφαιρέστε το πώμα στάθμης ακολουθώντας τις
οδηγίες του εγχειρίδιου του κινητήρα (εικ. 2 και 3).
- Στις εκδόσεις με φίλτρο αέρα με μπάνιο λαδιού (εικ. 6), τοποθετήστε το λάδι
χρησιμοποιώντας το ίδιο λάδι του κινητήρα.
- Βεβαιωθείτε ότι η ντίζα του συμπλέκτη έχει λίγο τζόγο μεταξύ του ρυθμιστή και του
μοχλού (εικ. 7).
- Γεμίστε το ρεζερβουάρ βενζίνης με ένα χωνί εφοδιασμένο με πολύ ψιλό φίλτρο για την
κατακράτηση των ακαθαρσιών.
- Βεβαιωθείτε ότι ο μοχλός ταχυτήτων είναι στο “νεκρό”.
ΟΔΗΓΙΕΣ ΧΡΗΣΗΣ
ΕΚΚΙΝΩΝΤΑΣ ΤΟΝ ΚΙΝΗΤΗΡΑ
Εφόσον έχουν προηγηθεί οι παραπάνω έλεγχοι, ακολουθήστε τα παρακάτω βήματα:
- Πιέστε το λεβιέ του γκαζιού (εικ. 2 ν. 3) στο μέσο της διαδρομής του.
- Για βενζινοκινητήρες, ανοίξτε την παροχή βενζίνης και κλείστε το τσοκ.
- Εκκινήστε τον κινητήρα τραβώντας τη χειρόμιζα δυνατά (εικ. 7).
- Όταν εκκινήσει ο κινητήρας, ξανανοίξτε το τσόκ (για βενζινοκινητήρες) και σταδιακά κινήστε το
λεβιέ του γκαζιού κοντά στο χαμηλότερο σημείο (εικ. 2 ν. 3).
Αφήστε τον κινητήρα να ζεσταθεί για λίγα λεπτά προτού ξεκινήσετε την εργασία και μη ζορίζετε το
μηχάνημα πολύ για τις πρώτες 50 ώρες λειτουργίας του, έτσι ώστε να διασφαλιστεί η καλή
λειτουργία του μηχανήματος.
ΕΚΚΙΝΩΝΤΑΣ ΤΟ ΜΗΧΑΝΗΜΑ
Το μηχάνημα θα εκκινήσει πατώντας το λεβιέ Α (εικ. 7) και εν συνεχεία τον κόκκινο λεβιέ 2 έως
ότου έρθει στη θέση 1 (εικ. 7). Αφήνοντας τον κόκκινο λεβιέ, το μηχάνημα θα σταματήσει αλλά ο
κινητήρας θα εξακολουθήσει να δουλεύει και ο μοχλός θα επιστρέψει στη θέση 2 (εικ. 7). Για να
θέσετε τον κινητήρα εκτός λειτουργίας, στρέψτε το διακόπτη που βρίσκεται στη χειρολαβή 3, στη
θέση OFF (εικ. 7), για κινητήρες βενζίνης. Για κινητήρες πετρελαίου χρσιμοποιήστε το λεβιέ.
Σημείωση: Για την αποφυγή προβλημάτων στο συμπλέκτη κατά τη διάρκεια λειτουργίας του
μηχανήματος, παρακαλούμε κρατήστε τον κόκκινο λεβιέ σταθερά πατημένο. Προσοχή! Μη
52
Page 55

11500/ Translation of the original instructions
χρησιμοποιείτε το μηχάνημα με τον κόκκινο λεβιέ εν μέρει πατημένο, μπορεί να προκληθεί ζημιά
στο συμπλέκτη.
ΤΕΛΕΙΩΝΟΝΤΑΣ ΤΗΝ ΕΡΓΑΣΙΑ
Μετά την ολοκλήρωση της εργασίας, ακολουθήστε τα παρακάτω βήματα για τη σβέση του
κινητήρα: ενεργήστε στο λεβιέ του γκαζιού (βενζινοκινητήρες), ενεργήστε στο μοχλό που βρίσκεται
επάνω στον κινητήρα (πετρελαιοκινητήρες). Τοποθετήστε το λεβιέ ταχυτήτων στη νεκρά. Για
βενζινοκινητήρες, κλέιστε την παροχή βενζίνης. Πάντα να ανατρέχετε στο εγχειρίδιο του κινητήρα.
ΣΥΝΤΗΡΗΣΗ ΚΑΙ ΛΙΠΑΝΣΗ
ΠΡΟΣΟΧΗ!
- Αποσυνδέστε το βύσμα πριν πραγματοποιήσετε οποιοδήποτε καθαρισμό, συντήρηση ή
εργασία επισκευής. Πάντα να φοράτε κατάλληλο ρουχισμό και γάντια εργασίας.
- Όταν το μηχάνημα ή μέρος αυτού ανυψώνεται για τη διενέργεια εργασιών συντήρησης,
πάντα να θυμάστε να χρησιμοποιείτε κατάλληλα εργαλεία επισκευής, όπως συγκρατητές
και κλειδιά ασφαλείας.
- Κατά την εκτέλεση εργασιών συντήρησης και/ή όταν το μηχάνημα βρίσκεται σε κλίση
χωρίς κλειδαριές ασφαλείας, ποτέ μη το αφήνετε απροστάτευτο σε μέρη όπου άπειροι
άνθρωποι και παιδιά θα μπορούσαν να έχουν εύκολη πρόσβαση σε αυτό.
- Προστατεύστε το περιβάλλον: με προσοχή να απορρίπτετε το χρησιμοποιημένο λάδι,
καύσιμα και κάθε άλλο επιβλαβές προϊόν!
- Η αποτελεσματική συντήρηση και σωστή λίπανση βοηθούν στη διατήρηση της
πλήρους αποδοτικότητας του μηχανήματος.
Το μοτοσκαπτικό 11500 έχει μελετηθεί ώστε να χρειάζεται ελάχιστη συντήρηση. Παρόλα
αυτά για να διατηρήσετε τη μέγιστη απόδοση του μηχανήματος είναι καλό να
εκτελέσετε τα εξής:
- Βεβαιωθείτε ότι όλες οι βίδες και τα παξιμάδια είναι πάντα καλοσφιγμένα, ειδικά τα
παξιμάδια που στηρίζουν τα πτερύγια σκαπάνες πάνω στον άξονα, τον κινητήρα, τα
πτερύγια σκαπάνες και το πίσω στήριγμα.
- Λαδώστε τις ντίζες γκαζιού και συμπλέκτη.
- Μη χρησιμοποιείτε ορυκτέλαιο για τα λαστιχένια εξαρτήματα γιατί θα υποστούν ζημιά.
- Βεβαιωθείτε ότι η ντίζα του συμπλέκτη έχει λίγο τζόγο μεταξύ ρυθμιστή και μοχλού.
- Ελέγχετε πάντα τη στάθμη λαδιού και καθαρίζετε συχνά το φίλτρο αέρος.
ΛΙΠΑΝΣΗ
Οι λειτουργίες που περιγράφονται παρακάτω πρέπει να πραγματοποιούνται εφόσον το
μηχάνημα βρίσκεται σε οριζόντια θέση.
ΛΑΔΙΑ ΚΙΝΗΤΗΡΑ
Ακολουθήστε με προσοχή τις οδηγίες που περιλαμβάνονται στο εγχειρίδιο του κινητήρα.
Είναι απαραίτητο ωστόσο να ελέγχετε τη στάθμη του λαδιού κάθε 4 ώρες εργασίας και να
το αντικαταστείτε κάθε 50 ώρες περίπου.
ΦΙΛΤΡΟ ΑΕΡΟΣ
Ελέγχετε την καθαριότητα του φίλτρου κάθε 8 ώρες ή συχνότερα αν το περιβάλλον
είναι πολύ σκονισμένο. Στις εκδόσεις με φίλτρο αέρος ξηρού τύπου (εικ. 5), να
ελέγχετε ότι το φίλτρο είναι πολύ καθαρό. Προσοχή: εάν το φίλτρο είναι πολύ
βουλωμένο, να μη φυσάτε τη φύσιγγα με πεπιεσμένο αέρα αλλά να την
αντικαταστείτε. Στις εκδόσεις με μπάνιο λαδιού (εικ. 6) να ελέγχετε ότι το φίλτρο είναι
πολύ καθαρό και το λάδι στη στάθμη. Χρησιμοποιήστε το ίδιο λάδι με εκείνο για τον
κινητήρα.
53
Page 56

11500/ Translation of the original instructions
ΛΑΔΙΑ ΚΙΒΩΤΙΟΥ ΤΑΧΥΤΗΤΩΝ
Ελέγχετε τη στάθμη του λαδιού περίπου κάθε 50 ώρες εργασίας και αν χρειαστεί,
προσθέστε λάδι για κιβώτια ταχυτήτων 85 W/90. Αλλάζετε τα λάδια μια φορά το χρόνο
(ποσότητα Kg 1,350). Για να αδειάσετε τα παλιά λάδια από το κάρτερ του κιβωτίου
ταχυτήτων, χαλαρώστε τις βίδες που βρίσκονται πάνω στο καπάκι γύρω από τον άξονα
των πτερυγίων σκαπάνες (εικ. 1 αρ.8).
ΑΞΟΝΑΣ ΠΤΕΡΥΓΙΩΝ ΣΚΑΠΑΝΕΣ
Περιοδικά να αφαιρείτε τις προστασίες κατά της σκόνης (εικ. 1 αρ.8) και να καθαρίζετε
προσεκτικά την αποκάτω περιοχή, μετά να τις ξανατοποθετείτε.
Η τήρηση αυτών των κανονισμών συνεισφέρει στη διατήρηση της άριστης
απόδοσης όλων των μηχανικών οργάνων του μηχανήματός σας.
ΧΡΗΣΙΜΟΙ ΚΑΝΟΝΕΣ ΓΙΑ ΜΙΑ ΚΑΛΗ ΧΡΗΣΗ:
- Ποτέ μην αφήνετε το μηχάνημα κάτω από τη βροχή.
- Μη ζορίζετε ποτέ το κιβώτιο ταχυτήτων σε περίπτωση που η ταχύτητα δεν μπαίνει : ενώ
βάζετε την ταχύτητα αφήστε ταυτόχρονα λίγο το συμπλέκτη.
- Ποτέ μη ζορίζετε πολύ τον κινητήρα, όταν καπνίζει υπερβολικά από την εξάτμιση
σημαίνει ότι ζορίζεται και χρειάζεται να χαμηλώσετε το γκάζι.
- Αφαιρείτε τα φύλλα και τα χόρτα που πιάνονται πάνω στο πλέγμα εκκίνησης με
αυτόματη περιέλιξη.
- Απαγορεύεται αυστηρά η χρήση του μηχανήματος χωρίς τη διάταξη ασφαλείας.
ΣΥΝΤΗΡΗΣΗ ΣΤΟ ΤΕΛΟΣ ΤΗΣ ΣΑΙΖΟΝ
- Πλύντε καλά το μηχάνημα.
- Αντικαταστήστε το λάδι στον κινητήρα καθώς και στο κάρτερ κιβωτίου ταχυτήτων.
- Ελέγξτε και καθαρίστε το φίλτρο αέρα.
- Ακονίστε τα πτερύγια σκαπάνες και σε περίπτωση που έχουν φθαρεί αντικαταστήστε
τα.
- Λαδώστε τη ντίζα γκαζιού και συμπλέκτη.
- Εάν το μηχάνημα δουλεύει εντατικά σε ξηρά ή γεμάτα σκόνη περιβάλλοντα, εκτελέστε
την καθαριότητα των πτερυγίων ψύξης του κυλίνδρου (βλέπετε το εγχειρίδιο του
κινητήρα).
54
Page 57

11500/ Translation of the original instructions
ΣΥΓΚΕΝΤΡΩΤΙΚΟ ΠΛΑΝΟ ΣΥΝΤΗΡΗΣΗΣ
ΔΙΑΔΙΚΑΣΙΑ ΚΑΘΕ 8 ΩΡΕΣ ΚΑΘΕ 20
ΩΡΕΣ
ΚΑΘΕ 50
ΩΡΕΣ
ΚΑΘΕ 100
ΩΡΕΣ
ΚΑΘΕ
ΧΡΟΝΟ Ή
200 ΩΡΕΣ
Λάδι κινητήρα
Ελέγξτε το δείκτη ●
αντικατάσταση ● ●
Φίλτρο αέρα
Ελέγξτε ●
Αντικαταστήστε ٭
Μπουζί
Ελέγξτε/ρυθμίστε ●
Αντικαταστήστε ●
Λάδι κιβωτίου
ταχυτήτων
Ελέγξτε το δείκτη ● ●
αντικαταστήστε ●
Ελέγξτε το πλέγμα εισαγωγής του
κινητήρα ότι είναι καθαρό
●
Ελέγξτε ότι τα μαχαίρια είναι καλά
ακονισμένα και καλά τοποθετημένα
● ●
Λιπάνετε με γράσο
●
Ελέγξτε την καθαρότητα του
συμπλέκτη (ελεύθερο παίξιμο)
● ●
● Συνιστώμενη διαδικασία
٭ Διαδικασία που πρέπει να ακολουθείται εάν είναι απαραίτητο
ΑΠΟΘΗΚΕΥΣΗ ΜΑΚΡΑΣ ΔΙΑΡΚΕΙΑΣ
Εάν το μηχάνημα παραμείνει εκτός λειτουργίας για περισσότερες από 30 ημέρες (μοντέλα με
κινητήρα βενζίνης), αδειάστε το καύσιμο από τον κινητήρα για την αποφυγή διαμόρφωσης
επικαθήσεων στο σύστημα εισαγωγής ή σε ζωτικά μέρη του καρμπυρατέρ.
Για να αποφύγετε αυτή τη διαδικασία, είναι πιθανό να εξοικονομήσετε καύσιμα στην αποθήκευση
μέχρι 12 μήνες, χρησιμοποιώντας τον απαραίτητο σταθεροποιητή καυσίμου. Προσθέστε το
απαραίτητο προσθετικό στο δοχείο καυσίμου. Δουλέψτε τον κινητήρα για λίγο έτσι ώστε να
εισέλθει το προσθετικό καυσίμου στο σύστημα καυσίμου. Προσοχή: εάν ο κινητήρας
τροφοδοτείται με βενζίνη που περιέχει αλκοόλη, αδειάστε το δοχείο καυσίμου και δουλέψτε τον
κινητήρα έως ότου αδειάσει τελείως.
ΜΕΤΑΦΟΡΑ ΜΗΧΑΝΗΜΑΤΟΣ
Εάν το rotavator πρέπει να μεταφερθεί σε φορτηγό ή τρέιλερ, δέστε το στο όχημα με σχοινιά ή
καλώδια.
ΕΦΑΡΜΟΓΕΣ
Προσοχή: Πριν τοποθετήσετε τα πτερύγια σκαπάνες, τους ομφαλούς ή τις προεκτάσεις
των τροχών πάνω στον άξονα των πτερυγίων σκαπάνες (εικ.1 αρ.5), ελέγξτε αν ο άξονας
και το εσωτερικό του εξαρτήματος προς τοποθέτηση είναι τελείως καθαρά. Αφού
τοποθετήσετε το εξάρτημα πάνω στον άξονα, σφίξτε καλά τις βίδες.
55
Page 58

11500/ Translation of the original instructions
ΑΡΟΤΡΑ
Τα άροτρα που είναι μελετημένα για το μοτοσκαπτικό Grillo 11500 έχουν ρυθμιστεί για να
επιτυγχάνουν ένα καλό όργωμα χωρίς να κουράζουν υπερβολικά το χειριστή. Είναι
διαθέσιμοι δύο τύποι: μονόυνο και αναστρεπτήρας στις 1800. Αυτός ο τελευταίος
ενδείκνυται ειδικά εκεί όπου πρέπει να γίνουν εργασίες και προς τις δύο κατευθύνσεις,
όπως ανάχωση σε γραμμικές καλλιέργειες, αμπελώνες ή χωράφια με οπωροφόρα
δέντρα. Το βάθος του αυλακιού που επιτυγχάνεται μπορεί να κυμαίνεται από 10 έως 15
cm ανάλογα με το έδαφος.
Για να συναρμολογήσετε το άροτρο, χρειάζεται να τοποθετήσετε πίσω στη φρέζα τη
ρυθμιζόμενη βάση εργαλείων (εικ. 14). Για να το κάνετε αυτό, αποσυναρμολογήστε το
στήριγμα του ποδιού, αφαιρέστε την κοπίλια και τον πείρο (εικ. 8) και συναρμολογήστε τη
βάση εργαλείων. Στο τέλος χρειάζεται να αποσυναρμολογήσετε τις δύο μονάδες
πτερύγια σκαπάνες και να τοποθετήσετε ξανά τις προεκτάσεις τροχών στερεώνοντάς τες
με τις βίδες (εικ. 19), έπειτα συναρμολογήστε τους τροχούς ελαστικών τύπου 5.00 x 10.
Για να αυξήσετε την πρόσφυση, συστήνεται να μοντάρετε έρματα στους τροχούς.
ΡΥΘΜΙΖΟΜΕΝΟΣ ΑΥΛΑΚΩΤΗΡΑΣ
Ο ρυθμιζόμενος αυλακωτήρας είναι ένα παρελκόμενο ειδικά μελετημένο για να κάνει
αυλάκια σποράς ή άρδευσης (εικ. 15).
Η δυνατότητα αλλαγής της θέσης των δύο πτερυγίων επιτρέπει τη ρύθμιση του πλάτους
του αυλακιού από 10 cm (ελάχιστο) έως 30 cm (μέγιστο). Το βάθος που επιτυγχάνεται
κυμαίνεται από 10 έως 20 cm. Σε περίπτωση που εργάζεστε σε ιδιαίτερα σκληρά εδάφη
θα ήταν καλό να κάνετε πρώτα ένα φρεζάρισμα και ύστερα να χρησιμοποιήσετε τον
αυλακωτήρα. Η εφαρμογή αυτού του εργαλείου στο μηχάνημα είναι πολύ απλή, αρκεί να
αφαιρέσετε την μπάρα και να συναρμολογήσετε τον αυλακωτήρα (εικ. 15).
Μπορεί να χρησιμοποιηθεί σε συνδυασμό με τη φρέζα ή συναρμολογώντας λαστιχένιους
τροχούς.
ΑΝΤΛΙΑ ΑΡΔΕΥΣΗΣ
Αυτή η αντλία εφαρμόζεται απευθείας στη φλάντζα του μοτοσκαπτικού, πάνω στον άνω
άξονα (εικ. 16) και στερεώνεται με τα δύο παξιμάδια στους 2 φυτευτούς κοχλίες. Επειδή
δεν έχει αποσύμπλεξη, τοποθετείται πριν τη χρήση και αφαιρείται αμέσως μετά.
ΑΝΤΛΙΑ ΡΑΝΤΙΣΜΑΤΟΣ
Αυτή η αντλία εφαρμόζεται απευθείας στη φλάντζα του μοτοσκαπτικού, πάνω στον άνω
άξονα (εικ. 17).
ΟΜΦΑΛΟΙ ΜΕ ΔΙΑΦΟΡΙΚΟ
Ο ομφαλός είναι ένας ειδικός σύνδεσμος τροχού, εφόσον λειτουργεί σαν διαφορικό. Τα
διαφορικά εφαρμόζονται πάνω στον άξονα πτερυγίων, στερεώνονται με τις βίδες που
παρέχονται στον εξοπλισμό και μετά τοποθετούνται οι τροχοί με τα ελαστικά (εικ. 18).
ΠΡΟΕΚΤΑΣΕΙΣ ΤΡΟΧΩΝ
Οι προεκτάσεις τροχών συναρμολογούνται στον άξονα φρέζας και είναι απαραίτητες για
την εφαρμογή των λαστιχένιων τροχών (εικ. 19). Δεν έχουν τη λειτουργία διαφορικού.
ΜΙΚΡΗ ΜΠΡΟΣΤΙΝΗ ΡΟΔΑ ΜΕΤΑΔΟΣΗΣ
Η μικρή μπροστινή ρόδα χρειάζεται για τη μετακίνηση του μηχανήματος σε μικρούς
δρόμους, ανοικτούς χώρους ή γκαράζ. Αυτή είναι εφοδιασμένη με δύο θέσεις μετάδοσης
και εργασίας ρυθμιζόμενες χωρίς τη βοήθεια των κλειδιών (εικ. 20).
56
5756
Page 59

ACTIVE CLUTCH – FRIZIONE ATTIVA – EMBRAYAGE ACTIF – AKTIV-KUPPLUNG –
EMBRAGUE ACTIVO – EMBRAIAGEM ACTIVO - ΔΡΑΣΤΙΚΗ ΣΥΜΠΛΕΚΤΗ
5
2
4
5
6
7
Fig. 1A
57
9
8
1
10
Fig. 1B
3
Fig. 1
Page 60

DESCRIPTION OF CONTROLS (FIG. 1 – FIG. 1A-1B)
1- Gear selector lever
2- Clutch lever
3- Throttle lever
4- Spur support
5- Tiller shaft (hexag. 27 mm)
6- Starter handle
7- Air filter
8- Tiller shaft dust seal
9- Handlebar side-adjustment lever
10- Handlebar height-adjustment lever
BESCHREIBUNG DER STEUERVORRICHTUNGEN
(ABB. 1 – ABB. 1A-1B)
1- Gangschaltungshebel
2- Kupplungshebel
3- Gashebel
4- Spornhalter
5- Hakenverbindungswelle (Inbusschraube 27 mm)
6- Reversierstartergriff
7- Luftfilter
8- Staubschutz der Hakenverbindungswelle
9- Hebel zur seitlichen Einstellung des Lenkholmss
10- Hebel zur Höheneinstellung des Lenkholms
DESCRIZIONE COMANDI (FIG. 1 – FIG. 1A-1B)
1- Leva marce
2- Leva frizione
3- Manettino acceleratore
4- Supporto sperone
5- Albero zappe (esagono 27 mm)
6- Manettino avviamento
7- Filtro aria
8- Parapolvere albero zappe
9- Leva posizionamento laterale stegola
10- Leva regolazione altezza manubrio
DESCRIPCIÓN MANDOS (FIG. 1 – FIG. 1A-1B)
1- Palanca marchas
2- Palanca embrague
3- Empuñadura acelerador
4- Soporte del espolón
5- Eje azadas (hexágono 27 mm)
6- Empuñadura arranque
7- Filtro del aire
8- Protecciones polvo eje azadas
9- Palanca posicionamiento lateral manillar
10- Palanca posicionamiento en altura manillar
DESCRIPTION COMMANDES (FIG. 1 – FIG. 1A-1B)
1- Levier de vitesses
2- Levier embrayage
3- Manette de l'accélérateur
4- Support de l'éperon
5- Arbre des houes (hexagone 27 mm)
6- Manette de démarrage
7- Filtre à air
8- Pare-poussière arbre des houes
9- Levier réglage latérale du mancheron
10- Levier réglage hauteur du mancheron
DESCRICAO DOS MANDOS (FIG. 1 – FIG. 1A-1B)
1- Alavanca das velocidades
2- Alavanca de embraiagem
3- Alavanca do acelerador
4- Suporte espora
5- Eixo das enxadas (hexágono 27 mm)
6- Alavanca de arranque
7- Filtro do ar
8- Aparador do pó' do eixo das enxadas
9- Alavanca de regulação lateral das rabiças
10- Alavanca de regulação em altura de haste
ΠΕΡΙΓΡΑΦΗ ΤΩΝ ΕΛΕΓΧΩΝ (εικ. 1 – εικ. 1A-1B)
1- Λεβιές επιλογέα ταχυτήτων
2- Λεβιές συμπλέκτη
3- Λεβιές γκαζιού
4- Υποστήριξη γραναζιού
5- Άξονας φρέζας (εξάγωνο 27mm)
6- Χερούλι εκκινητή
7- Φίλτρο αέρος
8- Μόνωση από σκόνη άξονα φρέζας
9- Λεβιές πλαϊνού ρυθμιστή χειρολαβής
10- Λεβιές ρυθμιστή ύψους χειρολαβής
58
Page 61

Fig. 2
Fig. 3
Fig. 4
Fig. 5
Fig. 6
Fig. 7
DIESEL
DIESEL
OIL
PETROL
BENZINA
DIESEL
3
A
1
2
59
PETROL
BENZINA
Page 62

Fig. 8 Fig. 9
Fig. 10
Fig. 11
Fig. 12
Fig. 13
60
Page 63

Fig. 14
Fig. 15
Fig. 16
Fig. 17
Fig. 18
Fig. 19
Fig. 20
61
Page 64

 Loading...