


 Loading...

G R E A T P L A N E S
RealFlight Generation 4 and the InterLink Elite Controller
©Great Planes Model Manufacturing Company
P.O. BOX 788, Urbana, IL 61801
Table of Contents
Introduction |
1 |
Channel Mapping… |
139 |
|
Joystick Mode vs. Transmitter Mode |
142 |
|||
RealFlight G4 Feature Highlights |
2 |
|||
InterLink Elite Controller (Joystick Mode) |
||||
How to read this manual |
6 |
|||
|
142 |
|||
Before You Begin |
7 |
|
||
InterLink Elite Controller (Transmitter |
|
|||
System Requirements |
7 |
Mode) |
143 |
|
Video and Sound Cards |
8 |
Transmitter Mode: Joystick Emulation |
|
|
Getting the Most out of RealFlight |
9 |
Interface |
145 |
|
Getting Started |
11 |
Transmitter Mode: Pass Through Interface |
||
|
146 |
|||
Installing RealFlight G4 |
11 |
|
||
InterLink Elite Controller Tips |
147 |
|||
Using Your Own R/C Radio |
15 |
|||
Events Menu |
149 |
|||
Exploring RealFlight G4 |
17 |
|||
Where to Go From Here |
31 |
Autorotation/Deadstick |
151 |
|
The InterLink Elite Controller |
33 |
Autorotation/Deadstick Instructions |
154 |
|
Freestyle |
156 |
|||
Start Flying! |
34 |
|||
Freestyle Instructions |
159 |
|||
The Simulation Menu |
37 |
|||
Limbo |
160 |
|||
Select Airport… |
38 |
Limbo Instructions |
164 |
|
Edit Current Airport… |
40 |
Pylon Racing |
165 |
|
Utilizing the Editor |
52 |
Pylon Racing Instructions |
168 |
|
Create New Airport |
58 |
Spot Landing |
170 |
|
Capture Screenshot |
60 |
Spot Landing Instructions |
173 |
|
Mute/Unmute Audio |
61 |
Options |
175 |
|
Environment |
62 |
End Current Event |
176 |
|
Flight Failures |
66 |
Forfeit Turn |
176 |
|
Import |
69 |
Multiplayer Menu |
179 |
|
Export |
72 |
Chatting |
181 |
|
Manage User Files |
74 |
|||
Host |
181 |
|||
Settings |
76 |
|||
Join |
184 |
|||
Exit |
107 |
|||
Disconnect… |
187 |
|||
Airport MRU |
108 |
|||
Boot Player… |
188 |
|||
The Aircraft Menu |
109 |
|||
Publish Hosting Information |
188 |
|||
Aircraft Selection… |
111 |
Enter MultiMode |
189 |
|
Edit Current Aircraft |
113 |
Recordings Menu |
193 |
|
Select Color Scheme |
125 |
Start Recording |
194 |
|
Save Color Scheme As… |
126 |
|||
Stop Recording |
195 |
|||
Remember Aircraft Position |
129 |
|||
Open Recording… |
195 |
|||
Clear Aircraft Position |
130 |
|||
Record Microphone Input |
199 |
|||
Reset Position |
131 |
|||
Recordings MRU |
200 |
|||
Kill Engine |
132 |
|||
Training Menu |
201 |
|||
Aircraft MRU |
133 |
|||
Controller Menu |
135 |
Takeoff Trainer |
202 |
|
Landing Trainer |
207 |
|||
Select Controller |
136 |
|||
Heli Hover Trainer |
211 |
|||
Controller Calibration |
137 |
|||
Airplane Hover Trainer |
218 |
|||
|
|
|||
|
|
|
|
|

Heli Orientation Trainer |
224 |
Virtual Flight Instruction |
226 |
View Menu |
231 |
Show |
232 |
Camera Type |
233 |
Camera Position |
234 |
Look At |
235 |
Quick Look |
236 |
Zoom Type |
237 |
Zoom In |
239 |
Zoom Out |
239 |
Zoom Reset |
240 |
Head Tracking |
241 |
Window Menu |
243 |
Show Title Bar |
244 |
Gadgets |
245 |
Arrange |
256 |
Close All |
257 |
Viewport List |
258 |
Help Menu |
261 |
Contents |
262 |
Keyboard Commands |
263 |
About |
264 |
License |
265 |
Websites |
266 |
Basics of Flying |
269 |
Airplane Basics |
269 |
Helicopter Basics |
272 |
Helicopter Flight |
278 |
RealFlight G4 Launcher |
279 |
Run RealFlight |
280 |
Additional Options |
280 |
If You Experience Difficulties289
How to Get Help and Information |
289 |
Before You Do Anything Else |
290 |
If You Need Additional Assistance |
292 |
Examples of Common Problems and |
|
Solutions |
293 |
Glossary |
295 |
Index |
313 |
License |
319 |
Credits |
323 |

1Chapter
Introduction
Welcome to the RealFlight Generation 4 R/C Flight Simulator (also known as RealFlight G4, or simply G4).
RealFlight G4 is, without question, the most advanced R/C aircraft simulation available. RealFlight G4 is so technologically advanced and so realistic, you’ll find it hard to believe that it’s only a simulation. The culmination of many years of development and design, G4 offers advancements that will serve to
fine-tune the flying skills of even the most seasoned R/C veteran. If you’re an entrylevel R/C-er, RealFlight G4 is the ideal way to learn to fly, practice maneuvers, feel the effects of design modifications, or just have an incredible amount of fun.
RealFlight G4 includes over 80 models that look and fly like the real thing, plus a multitude of flying sites—each with their own unique ‘feel’ and distinctive characteristics. In addition, G4 offers its users the most powerful and flexible aircraft and flying site editors ever unveiled to the modeling community, allowing modelers to experiment with a virtually unlimited number of parameters. G4 enables you to change the look and feel of a flying site with nothing more than a few keystrokes, the click of the mouse and a little imagination. The integrated AccuModel™ aircraft editor makes modifying aircraft just as easy.
RealFlight G4 also offers a wide array of tools to help you understand how to use the program and how to improve your R/C piloting skills. This extensive manual file explains every feature and option as well as how to use them. Our Virtual Flight Instruction feature, Heli Hover Trainer, Airplane Hover Trainer, Takeoff and Landing Trainer and Heli Orientation Trainer provide on-the-fly learning opportunities, and our trained and dedicated Product Support staff is ready to provide help when you need it. No other R/C simulator goes further to enrich your R/C experience.
The following section briefly outlines some of the exciting features in RealFlight G4. We strongly suggest that you peruse this manual in its entirety before running the software. Subsequent chapters will describe all RealFlight features in complete detail.
1

Finally, we’d like to express our gratitude to you for purchasing RealFlight G4. We think you will be enormously pleased with G4. Have fun flying!
RealFlight G4 Feature Highlights
This section briefly outlines some of the new features included in RealFlight G4 with the USB InterLink Elite Controller. RealFlight G4 and the multi-patented InterLink Elite Controller incorporate a significant number of enhancements and improvements over previous RealFlight systems.
USB InterLink Elite Controller
The InterLink Elite Controller by Futaba is a revolutionary device that offers you:
•A high quality USB compatible plug and play controller for RealFlight G4.
•A built-in interface for (optionally) using your own R/C transmitter to control RealFlight G4.
•QuickSelect™ Buttons—take control of RealFlight’s menus and options from the InterLink Elite without touching the keyboard or mouse.
•The InterLink Elite Controller is fully hot swappable—you can connect and disconnect the InterLink or your own transmitter without rebooting your computer (or even shutting down RealFlight).
•High-speed response to control inputs.
•Digitally precise inputs with digital trims for unmatched control precision.
•MultiMode™ split screen capability allows you to use the InterLink Elite as a controller and an interface simultaneously.
•A keyboard-free push button reset of the simulation.
•Hand-launch gliders and other aircraft that do not incorporate landing gear.
Menu-Driven Interface
RealFlight G4 utilizes a drop-down menu-driven interface system. Created for ease of use and maximum flexibility, the menu system provides an interface familiar to even a casual computer user.
Additional Features
•RealPhysics 3D™ - One of the most ambitious models of flight in the world, RealPhysics 3D is untouched in its ability to re-create the lifelike characteristics of model flying. RealFlight G4’s physics engine has been tried and approved by world-class competition pilots like Todd Bennett, John Glezellis, Pete Niotis, Frank Noll, and Jason Shulman. Furthermore, aircraft in G4 behave
2

with real-world predictability because they are carefully modeled using advanced methods and extensive real-world data. If it happens at the field or in the air, it’s re-created with exacting detail in G4!
•Float Fly- RealFlight G4 offers a number of flying sites with water along with a variety of float fly aircraft. Practice your takeoffs and landings on water and admire the view at the same time.
•InterLink Elite QuickSelect-With RealFlight G4’s InterLink Elite, you’re able to make quick changes such as selecting a different aircraft or airport without touching the keyboard or mouse.
•Variable Pitch Prop-Take 3D flight to 4D with the variable pitch prop. Select the popular FlatOuts™ Extra 300S with V-Pitch and try amazing maneuvers you didn’t think were possible with an airplane—like flying backwards.
•Hovering Training Aids- Learn to torque roll or hover a heli with RealFlight’s Heli and Airplane Hover Trainer. For more excitement, try the Heli Orientation Trainer. Both are great training aids for anyone new to radio control.
•Takeoff and Landing Training Aids-The RealFlight G4 simulator is a great way for new pilots to learn the art of R/C flying. And the best places to start are training aids designed to teach you the basics of Takeoffs and Landings.
•Night Flying- Just because the sun is down doesn’t mean that you can’t fly. The same is true with RealFlight night flying. Pick a nighttime airport and watch as your aircraft lights up the sky.
•PhotoFields™- G4 also includes ultra-realistic PhotoField airports. Using incredible high resolution digital images, RealFlight PhotoField airports are as real as it gets. And the Import feature allows you to use your own panoramic photos to create new flying sites.
•“Full Coverage” collision detection- Instead of using sensors at only a few points, “Full Coverage” blankets the entire aircraft with points ensuring that every part of an aircraft will not only register a strike but will react authentically. Contact can result in damage ranging from minor handling problems to spectacular crashes complete with realistic sound effects.
•TruFlo Wind Dynamics™- RealFlight G4 introduces modelers to R/C’s most realistic wind model. The five components of TruFlo Wind Dynamics work together to create the single most accurate wind field in any simulation. Wind impacts every facet of your flight, just as it would at the local field.
•AccuModel™ Aircraft Editor- G4’s new aircraft editor is the most powerful and most flexible editor ever introduced in an R/C simulator. AccuModel allows you to change virtually every aspect of your model with ease—it places
3

over 1,500 airfoils at your disposal, a multitude of propellers, and much, much more! AccuModel brings up a wire-frame model for easy reference and highlights the editing area. Make a change and it’s immediately reflected onscreen, ready for review and revision.
•Sierra Nevada’s Flying Sites and over 5,000 square miles to explore-
RealFlight’s TrueLife Terrain™ goes beyond the limitations of traditional simulator flight. Created and mapped from satellite imagery, G4’s landscape looks as “right” and richly varied as the view from your front door. Digital elevation data brings it all into accurate perspective.
•A living, breathing environment- Everything in G4’s 3D world is as realistic as possible, complete with depth and details that transcend the traditional “billboard” look of other simulators. You’ll see leaves and branches that dance in a passing breeze and clouds that roll by with the prevailing winds.
•FlexiField™ flying site editor- Takes you beyond 2D scenes into a 3D environment rich in new objects and editing options. Customize an existing field with new foliage, different objects or both -- or create a new field with nothing more than a mouse, imagination and a few simple keystrokes.
•InterLink™ Elite Controller- G4’s InterLink Elite controller functions as a controller, as an interface, or both. Its push-button is capable of resetting the aircraft or hand-launching a sailplane.
•Fly Split Screen- G4’s MultiMode™ option allows two modelers to fly simultaneously on one PC. It’s perfect for practicing formation flight, a game of tag or personalized flight instruction.
•Uses VirtualRevolution™sound technology-- Doppler-correct stereo sounds heighten the realistic effect with true sound recordings of 2-stroke, 4-stroke, turbine, electric, ducted fan and gasoline engines. As the aircraft crosses the field, the engine sound follows, just like its R/C counterpart.
•RotoSonics™ technology-- recreating distinctive engine/blade sounds with startling accuracy. Sounds so lifelike, you’ll swear you are at the field!
•VFI (Virtual Flight Instruction) -- VFI gives you personal flight lessons from R/C’s leading experts. Using VFI, you can select a maneuver (loop, roll, etc.) from an extensive list of options. VFI then demonstrates the maneuver on-screen, performed by an expert. While you watch, the voice of the pilot/instructor will explain how to perform the maneuver.
•AFR (Advanced Flight Recorder) -- This feature allows the pilot to not only view prerecorded maneuvers, but also to record maneuvers of his/her own as well. G4 even allows you to record your own audio for personalized flight instruction. Much like a VCR, this feature also allows you to pause, speed up, slow down, and loop the performance. You can also play multiple recordings
4

at the same time. The pilot has the option to activate the digitized transmitter display so that he/she can view the radio input while flying.
•NavGuides™- Using the NavGuides, you can display a variety of heads-up on-screen informational displays. Options range from altitude and airspeed to aircraft heading and engine RPM. This feature improves your ability to “see” what is going on in your virtual world.
•Viewport- You can open up a picture-in-picture display and treat it as an independent “window on the world”. You can individually adjust each the viewport’s vantage point, zoom level, and direction of view.
•Multiplayer-You can fly with up to seven additional RealFlight G4 owners in competitions, or just for the thrill of flying with one another. This feature can also be used to learn new maneuvers from pilots across the street or around the world.
•Events- Compete solo, or fly with up to seven additional RealFlight G4 owners in a variety of Events such as: Limbo, Spot Landing, Free Style, Auto rotation and Pylon Racing.
•Launcher- RealFlight G4’s Launcher allows for easy one-click access to program upgrades, online registration, and technical support.
•Animated control surfaces and retracts—Control surfaces, retracts, propellers, and rotor blades move for added realism.
•Aircraft exhaust/smoke-You can control the color, density, ‘hang time’, and other parameters related to airplane and helicopter smoke and exhaust.
•Streamers- Add streamers to any aircraft, to any location, in any color. Watch as they corkscrew behind the airplane during a roll, or react to the wind and the propwash.
•Flight Failures- RealFlight can simulate many common flight failures (radio interference, stuck servos, engine failures, etc.). Use this feature to prepare for emergencies at the field.
•Fully editable aircraft paint/decal schemes- Create customize trim schemes for your aircraft. (To design your own paint scheme, you must use a third-party program that edits TGA files.)
•Extensive Help materials- RealFlight G4 features extensive online tool tips and diagrams, a detailed manual and technical support to enhance your enjoyment of the program.
5
How to read this manual
RealFlight G4 is a menu driven simulator which allows you to make quick changes without having to reload the simulator each time. This manual will break out each main menu to its own chapter. This allows you to quickly find information on features and functions by the related menus.
Along with this manual, a large RealFlight community is available online to help and discuss with each RealFlight fan. This online support, in the form of a forum, can be found at:
http://www.knifeedge.com/forums/
6

2Chapter
Before You Begin
Toget the most out of RealFlight G4, it helps to understand how toget the most outof yourcomputer first.
RealFlight Generation 4 is designed to work on a large variety of computer hardware. Similar to a car, if you want to go faster, you need a bigger engine. The same holds true with RealFlight. You’ll be able to enjoy the simulator on most modern computers, but having the most up to date hardware for your
computer will greatly increase your enjoyment.
System Requirements
You will find the suggested system requirements for the RealFlight G4 R/C Flight Simulator listed below. The minimum system requirements below are the bare minimum PC configuration for installing RealFlight G4. Meeting the minimum requirements will allow you to enjoy G4. However, in order to take complete advantage of the many features and functions offered by G4, you should have a computer at, or near, the specifications as specified in the optimum system requirements.
Minimum Recommended System-
-Some graphical features may be disabled
-Aerodynamic Calculations will still be high-quality Windows* 98SE, ME, 2000, XP or Vista™
Intel Pentium 1.0GHz or equivalent 512 MB RAM
7

3 GB Hard Drive Space
3D Accelerated Video with:
-32 MB Dedicated Video Memory
-Full DirectX 9 compliant (Pixel Shader 1.4 support)
Optimal System
-For best graphical performance Dual Core 2.4GHz CPU
2 GB RAM
3D Accelerated Video with:
-256 MB dedicated video memory
-Pixel Shader 2.0 support
Multiplayer Requirements
•56.6 Kbps (or faster) modem or LAN connection
Video and Sound Cards
In order to achieve optimum performance and the best flying experience in RealFlight, there are two important components of your computer that deserve special attention: the video and sound cards.
RealFlight G4 has undergone countless hours of compatibility testing and evaluation. As such, this software will adequately function with a variety of video cards—ranging from yesterday’s favorites to tomorrow’s hits.
While RealFlight works well on a wide variety of hardware configurations, it offers many features and functions that are designed to take particular advantage of the latest video technology. If you have an older computer, or a newer computer with a lowerend video card, you may want to consider purchasing a new video card to take advantage of these features and functions. This moderately priced upgrade can vastly
8

enhance your enjoyment of RealFlight. Aside from increasing your satisfaction with G4, a new video card will also work with many other games or simulators, improving their performance as well.
For a list of the video cards that have been tested by our staff, please visit:
http://www.gpsoftware.com/
While not as important as the video card, upgrading your sound card may also improve your satisfaction with RealFlight. This is especially true if your computer uses an onboard sound card (a sound card affixed to the motherboard).
Getting the Most out of RealFlight
We think you’ll agree that RealFlight offers the finest set of instructions and practice tools of any R/C simulator suited for both beginners and experienced pilots. Great Planes and Knife Edge Software are committed to the continual improvement of our products. When using the software, you should keep two things in mind.
First, similar to other pursuits, what you get out of RealFlight depends upon what you put in. Mastering radio control requires a great deal of patience and practice. If you crash an aircraft in the simulation, take it very seriously. Crashing an actual R/C aircraft can cost you a lot of time and money. Try to examine what you did incorrectly, using the experience to avoid making the same mistake again.
Secondly, while the simulator is quite realistic and will assist you in learning many of the skills necessary to become a proficient pilot, there is no substitute for actual flying time at the field. A simulation can be a wonderful practice tool. However, no simulator, no matter how realistic, can completely replace a qualified, experienced, human flight instructor. If you are new to R/C, you should never attempt to fly a real aircraft without the supervision of a qualified instructor, no matter how accomplished you are on the simulator.
9

3Chapter
Getting Started
A brief overview and assistance tohelp start you onyour R/C adventure.
This chapter covers the installation procedure for RealFlight G4, describes the basics of running the program, and introduces you to some of RealFlight’s frequently used features.
The first section, Installing RealFlight G4, offers a step-by-step approach to the installation procedure for both the program software and the controller.
The second section, Exploring RealFlight G4, offers a brief tour of the RealFlight G4 program. You'll learn how to perform some basic functions, such as selecting the aircraft you wish to fly, performing simple edits to the flying field, manipulating viewports, and using RealFlight’s Virtual Flight Instruction feature.
This chapter only touches briefly on some of RealFlight G4’s features. We strongly suggest that you also read the subsequent chapters, which describe the various features in comprehensive detail.
Installing RealFlight G4
The RealFlight G4 InterLink Elite controller has several different modes of operation. By itself, it serves as a realistic ‘stand alone’ controller or joystick. Alternatively, it has a built-in interface that lets you use your own R/C transmitter to control RealFlight G4. The final mode of operation combines the InterLink Elite’s ability to serve as a controller and an interface simultaneously.
11

The USB InterLink Elite Controller-
To install RealFlight G4 using the InterLink Elite controller, follow the instructions in this chapter.
Regardless of whether you plan to use the InterLink Elite controller by itself, or with your own R/C radio to control RealFlight, follow the instructions on Program Installation in the next section.
Program Installation-
RealFlight Generation 4 features a simple, one-step installation process. There are, however, further steps that must be followed prior to running the program for the first time. This section will explain how to install the RealFlight G4 software and hardware. Upon completion of this section, you should be able to fly the aircraft on your PC.
The InterLink Elite’s built-in transmitter interface also allows you to use your own R/C transmitter to control RealFlight G4 should you opt to do so. To activate the interface adapter, you will first need to follow the instructions in the section below. This section, will explain the methodology of using the transmitter interface option in the InterLink Elite controller.
Update Drivers-
Before you begin installation, we strongly suggest that you update the drivers for both the sound and video cards on your PC. A driver is a software program that your computer uses to control hardware devices. Each card has its own respective driver. Most problems with installing and using RealFlight, as well as many other programs that use DirectX, arise from using outdated video and/or sound card drivers.
If you are not sure how to update your drivers, you can find instructions in
article |
Q01-1038, |
Locating |
and |
installing |
drivers, |
at |
|
|
|
|
|
|
|
|
|
12 |
|
|
|
|

http://www.gpsoftware.com/kb/q01-1038.htm. This support article will take you through the process step-by-step, and has links to driver download sites for most manufacturers.
Installing the Software-
After you have completed installation of the new video and sound card drivers, you are now ready to install RealFlight G4.
1.Before installing the software, make sure to close any applications that you are running. This includes virus scanning software and other similar applications.
2.Insert Disc 1 (One) into the appropriate CD-ROM drive.
3.If Auto-Play is active, setup will begin automatically when the CDROM drive is closed. Simply click the Install button when prompted. If Auto-Play is not active, click Start on the task bar. Next, click Run. In the dialog box that appears, type ‘d:\setup’ (assuming that ‘d’ is your CD-ROM drive) and click OK.
Follow the on-screen instructions to complete the setup procedure. When prompted, remove Disc 1 (One) and insert Disc 2 (Two). Following the onscreen prompt, remove Disc 2 (Two) and insert Disc 3 (Three). Following the on-screen prompt once again, remove Disc 3 (Three) and insert Disc 4 (Four). Upon completion of the installation, click OK.
Installing or Updating DirectX-
1.RealFlight will ask if you wish to install DirectX 9 on your PC. It is important that your PC utilizes DirectX 9.0c or later. Click OK to proceed to the DirectX License Agreement.
2.Click "I accept the license agreement" to install DirectX 9.0c. Alternatively, if you do not wish to update DirectX at this time, click
Cancel.
3.If you have opted to accept the license agreement, click Next to proceed with the installation. DirectX will install the necessary files to update your PC.
4.When prompted, click Finish. Your PC will power down and then restart once again.
Connect the InterLink Elite Controller-
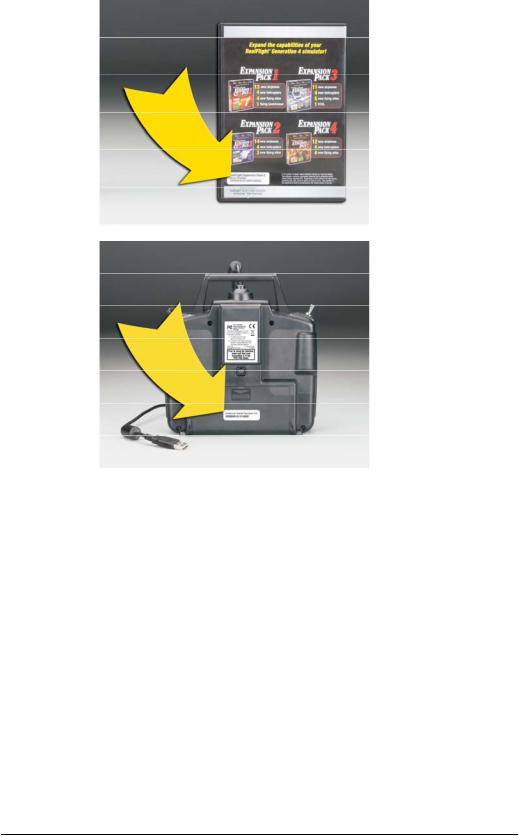
The InterLink Elite controller uses the USB (Universal Serial Bus) port, so there is little to do in the way of setup.
13
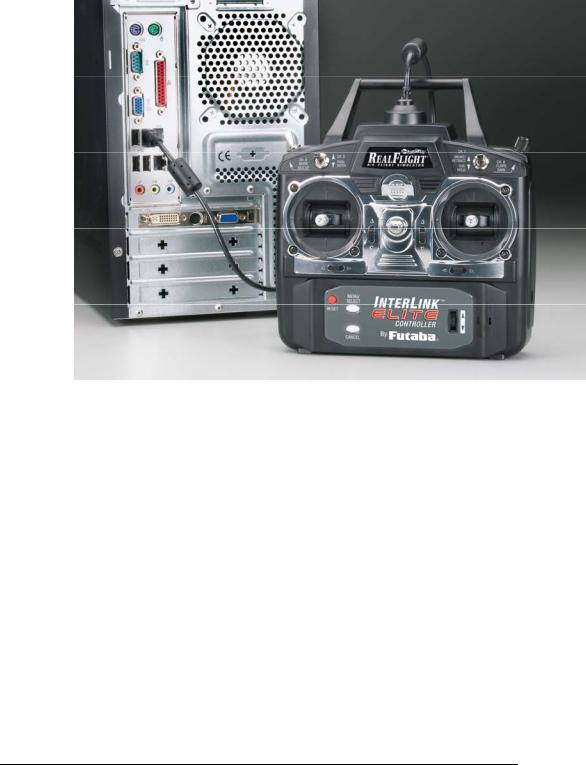
1.With the software installation procedure complete, firmly plug the InterLink Elite controller into one of the unused USB ports on the PC. Because the controller is hot swappable, you do not have to shut the PC down to plug the controller in.
2.Shortly after plugging in the InterLink Elite controller, a dialog box should appear on the screen indicating that Windows has located a new device and will then automatically install the necessary drivers.
Note: It is possible that Windows will need to install the appropriate files for the InterLink Elite controller to function properly. Please have your Windows CD-ROM available in case it is required.
Starting RealFlight Generation 4-
1.Double-click the RealFlight G4 Launcher located on your desktop.
2.Type in your name, software serial number and the InterLink Elite controller serial number in the appropriate location. Please be sure to enter the numbers exactly as they appear. Failure to enter the serial numbers correctly will not allow you to proceed to the next step. If the serial numbers are entered properly, the OK button will become active.
14
3.Click OK. The RealFlight G4 Launcher will appear. Click Run RealFlight. RealFlight G4 will start with a default aircraft and default flying site.
Note: The procedure above will allow you to pilot the RealFlight aircraft using the InterLink Elite controller. The InterLink Elite controller may also be used as an interface unit, allowing you to pilot the aircraft with your actual R/C transmitter. For information on how to do so, please refer to the section entitled Using Your Own R/C Radio which follows.
Using Your Own R/C Radio
Follow these instructions if you intend to use your own R/C transmitter to control RealFlight G4. If you do not want to use your own transmitter, skip this section.
15
Connecting Your Transmitter-
You can use your R/C transmitter to control RealFlight G4 by connecting it to the InterLink Elite controller, ‘buddy box’ style (see diagrams). RealFlight G4 includes several adapter cables used to make the connection to many popular R/C transmitters.
Locate the cable input port on the rear of the InterLink Elite Controller. Plug one end of the included connector cable into this port. Next, plug the other end of the adapter cable into the buddy box port (a.k.a. trainer jack) of your transmitter. The procedure for doing so depends on your transmitter:
•If your transmitter’s buddy box port directly accepts the 1/8” stereo plug, insert this end directly into the radio. This works for most JR® radios.
•If your transmitter’s buddy box port requires the micro (square) connector, use the squared adapter cord included with the simulator.
16

•Some radios (e.g., Airtronics®, Hitec® and older Futaba® transmitters) require the purchase of an optional adapter cable. This adapter cable is available wherever you purchased your copy of RealFlight G4.
Setup-
After you have connected your transmitter to the InterLink Elite controller, you will need to perform a brief setup procedure before utilizing it with the simulation.
1.First, make sure that the transmitter is in FM or PPM mode rather than PCM mode. Refer to the manual for your transmitter if you are unsure how to do this.
2.If the transmitter did not power up when the interface cord was plugged into it, turn the power switch on at this time.
3.Next, click the Controller menu and then highlight the Select Controller… menu item. After a brief delay an option for the InterLink Elite Transmitter x channel should appear. Choose the InterLink Elite Transmitter X Channel option.
Exploring RealFlight G4
Now that you have completed the installation of RealFlight G4, it’s time to begin exploring the program. The following sections will take you on a quick tour of RealFlight G4’s most popular features, such as selecting an aircraft, choosing alternate flying locations, customizing the flying sites, and using the training aids instruction. Along the way, we will show you where to go for help and how to obtain additional information.
Even if you are familiar with previous versions of the RealFlight software, you should read this section thoroughly. The features described here are either new or have been completely revised for G4.
Start the Program-
1.Close all open applications. This includes virus scanning software and other similar programs.
2.Double-click the RealFlight G4 Launcher located on your desktop.
3.To start the simulation, click the Run RealFlight button.
The program will start using the pre-set defaults—including pilot perspective, flying location, and aircraft.
17
The Main RealFlight Display-
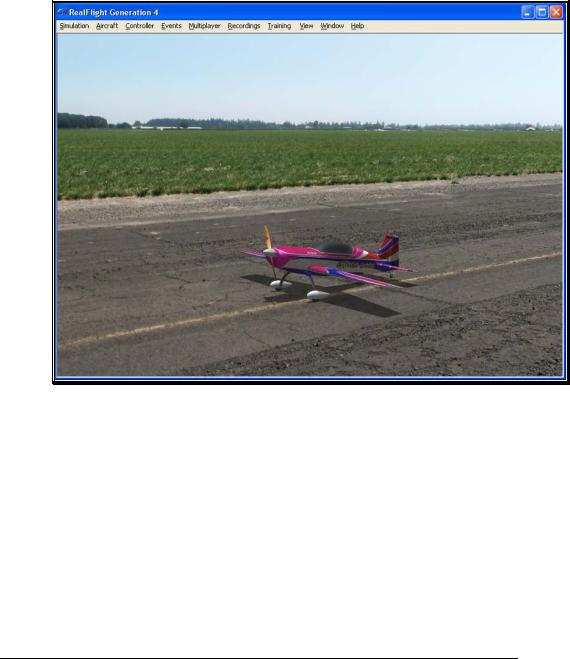
RealFlight G4 is a menu-driven program. As seen in the picture below, a menu bar appears across the top of the RealFlight screen. The menus contain additional menu items and pull-down lists for the related options of the respective menu. These menus allow access to the command and control functions for the RealFlight G4 simulation.
Navigating the Menus-
To access the various menu items, simply highlight and click the mouse on the menu that you would like to view. For example, clicking on the Aircraft menu activates the sub-menu items for that menu.
The top-level menus found in G4 are as follows:
•Simulation
•Aircraft
•Controller
•Events
•Multiplayer
18

•Recordings
•Training
•View
•Window
•Help
This manual includes a separate chapter for each menu title. Later chapters describe in detail all of the menu items, sub-menus and options.
Please note that it is also possible to access many of the features and functions of RealFlight Generation 4 using hot keys. Pressing the H key on the keyboard activates the Keyboard Commands dialog, which summarizes the available hot keys.
Aircraft Selection-
When you start G4 for the first time, you will be piloting an Extra 300L. This is the default aircraft for RealFlight G4.
To select a different aircraft, click the Aircraft menu title in the main menu bar. Next, click the Select Aircraft… menu item found in the drop-down menu. This activates the Select Aircraft dialog (as shown below), which displays a list of available aircraft.
19
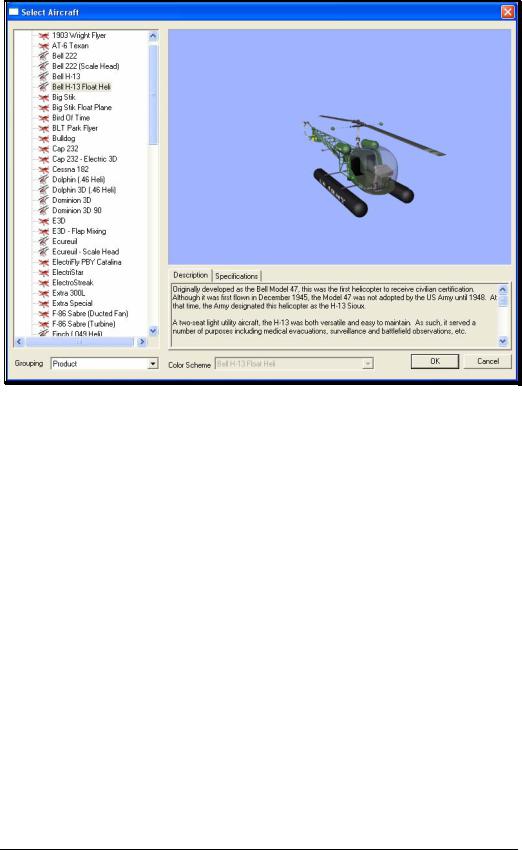
Each aircraft available in G4 is listed along the left-hand side. The icon next to each name differs depending on whether the model is an airplane or a helicopter. To select an aircraft from the list, click on the desired aircraft. The selected model will now appear in the ReadySelect™ preview box. Additionally, an aircraft description and information data will appear in the aircraft information pane, which appears just below the ReadySelect™ preview window.
When you are satisfied with your selection, click OK to return to the simulator using the new aircraft selection.
Complete information pertaining to the Select Aircraft… menu item is available in chapter 6 of this manual, The Aircraft Menu.
Alternatively, you may use the InterLink Elite controller to change aircraft selections. Simply press the Menu/Select button located on the front of the InterLink Elite controller. This will bring forth the QuickSelect tabs on the left side of the computer screen and the aircraft selection tab, represented as an airplane icon, should be the highlighted tab. Press the Menu/Select button once again to bring up the Aircraft Selection dialog box. Move the Data Lever, found on the lower right side of the InterLink Elite controller, up or down to view the available aircraft. The [+] (plus) indicates that there is another expansion level (selection) available to you, press the Menu/Select button to access the items located within this folder.
20
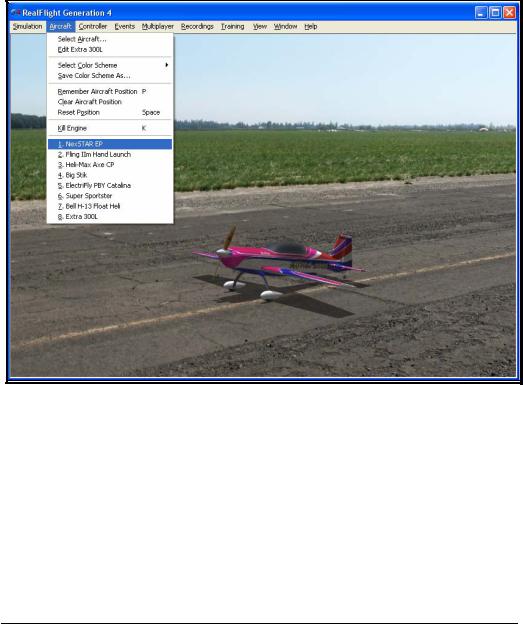
To select an aircraft, simply highlight the name and press the Menu/Select button. You will return to the simulation using the newly selected aircraft.
If you wish to exit the Aircraft Selection screen without making any changes, simply press the Reset button on the InterLink Elite.
Aircraft Most Recently Used List (MRU)-
If you have selected alternative aircraft previously, you will note that these aircraft appear on a list in the Aircraft menu, as shown below. This list is at the very bottom of the menu. This list is commonly referred to as a Most Recently Used, or MRU list. It is limited to the eight most recently used aircraft. If you wish to fly one of the aircraft from this list, simply click on the name of the aircraft in the MRU list.
Airport Selection-
Changing flying sites uses a process similar to the process used to select an aircraft. To select a new flying location, click the Simulation menu located in the header. Next, click the Select Airport… menu item found in the drop-down menu. This opens the Select Airport dialog, which lists the available flying locations. Select either the Archipelago, PhotoFields, or Sierra Nevada location.
21

Each scene is preceded by a [+] (plus) and an icon. The [+] (plus) indicates that another expansion level (selection) is available to you. To access the complete list of airports for a particular scene, either click the [+] (plus) or double-click on the desired airport. For example, clicking the [+] (plus) on the PhotoFields folder reveals all of the PhotoFields flying sites available to you.
To select an airport from the list, click on the desired airport. The selected airport will now appear in the preview box. Additionally, an airport description will appear in the information pane, which appears just below the preview window.
When you are satisfied with your selection, click OK to return to the simulator using the new airport selection. Navigating the Airport Selection menu using the QuickSelect feature is almost identical to the process mentioned above for selecting an alternative aircraft. Only this time, you will select the airport selection menu, which is represented by a runway icon. With the QuickSelect tabs visible on the computer screen, move the Data Lever down one time. This should highlight the runway icon. Press the Menu/Select button to bring forth the available flying sites. Using the same method, as described previously for aircraft, select the new airport and press the Menu/Select button to return to the simulation using this new flying site.
Airport Most Recently Used List (MRU)-
If you have previously selected an alternative flying location, it will appear on a list in the Simulation menu. This list is at the very bottom of the menu and is commonly referred to as a Most Recently Used, or MRU list. It is limited to the eight most recently selected locations. If you wish to fly at one of these locations simply click on the respective location in the MRU list to load it into the simulation.
22

QuickSelect Tabs-
RealFlight G4 offers a revolutionary methodology in which to access many features and functions quickly and easily without ever touching the keyboard or mouse. There are seven main areas of access available through the QuickSelect tabs. They are as follows: Airplane Selection, Flying Site Selection, NavGuides, On-Screen Radio, Binocular view, Viewports and Variometer.
To access any of the QuickSelect tabs, press the Menu/Select button on the InterLink Elite controller. This will bring forth the available options on the left side of the computer screen. Move the Data Lever up or down to cycle through the QuickSelect tabs. The highlighted tab is the item that is active. To access the active tab, press the Menu/Select button.
23

For additional information on how to use the QuickSelect tabs, please refer to the information contained in the section entitled QuickSelecton page 35.
Some Common Tasks-
•The easiest method of resetting your aircraft to its original takeoff position is to press the reset button located on the front of the InterLink Elite controller. Alternatively, you can reset the aircraft by pressing the space bar on the keyboard, or by selecting the Reset Position menu item, which is located in the Aircraft menu.
•If your aircraft is equipped with smoke, the two-position switch located on the right side of your InterLink Elite controller will generally be utilized to activate this feature.
•To magnify the view or zoom in on an aircraft, press the [+] (plus) key on the number pad of the keyboard. Alternatively, you may use menu commands to zoom in. To do so, click on the View menu and then click on the Zoom In menu item. Each time the [+] (plus) key or the Zoom In menu item are pressed or selected, the view will increase incrementally.
•To reduce the magnification, or zoom out of the current view press the [–] (minus) key on the number pad of the keyboard. Alternatively, you may use
24
menu commands to zoom out. To do so, click on the View menu and then click on the Zoom Out menu item. Every time you press [-] (minus) key or select and press the Zoom Out menu item, the view will decrease incrementally.
•To reset the view to the default magnification, press the Backspace on the keyboard.
Creating a Viewport-
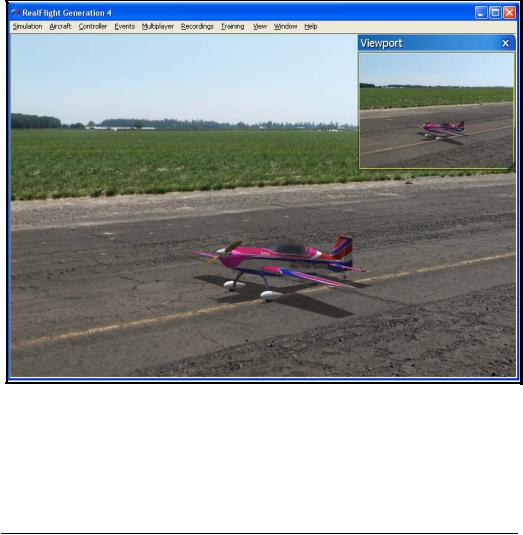
RealFlight allows you to create an additional picture-in-picture viewport. Once you create a new viewport, you may resize or reposition it by dragging with the mouse. You can also fully adjust all of the viewport’s properties independently of the main window. The viewports may be utilized for a variety of applications, such as changing the viewing perspective of your simulation.
To create a new viewport, click the Window menu title followed by the Create New View menu item. Alternatively, you may also press the ‘4’ key on the keyboard to create an additional viewport.
To change the vantage point within the viewport, press the ‘C’ key on the keyboard. The ‘C’ toggles through the various camera modes; the first of which is the cockpit or pilot’s perspective. The second is chase view, and the last mode is the fixed viewpoint, or what you would see if you were standing at the side of the runway. Please note:
25
Loading...