


Join the GoPro Movement
facebook.com/GoPro |
youtube.com/GoPro |
twitter.com/GoPro |
instagram.com/GoPro |

Contents
Meet Your HERO7 Black |
6 |
|
|
Setting Up Your Camera |
8 |
|
|
Getting to Know Your GoPro |
13 |
|
|
Using QuikCapture |
22 |
|
|
Adding HiLight Tags |
56 |
|
|
Recording Video |
25 |
|
|
Video Settings |
29 |
|
|
Taking Photos |
32 |
|
|
Photo Settings |
36 |
|
|
Capturing Time Lapse |
38 |
|
|
Time Lapse Settings |
39 |
|
|
Live Streaming |
41 |
|
|
Capturing the Action |
42 |
|
|
Exposure Control |
44 |
|
|
Connecting to an External Microphone |
47 |
|
|
Controlling Your GoPro with Your Voice |
48 |
|
|
Playing Back Your Media |
52 |
|
|
Using Your Camera with an HDTV |
56 |
|
|
Connecting to Other Devices |
58 |
|
|
Transferring Your Media |
60 |
|
|
Contents
Customizing Your GoPro |
65 |
|
|
Important Messages |
71 |
|
|
Resetting Your Camera |
73 |
|
|
Mounting Your GoPro |
75 |
|
|
Removing the Side Door |
81 |
|
|
Maintenance |
83 |
|
|
Battery Information |
84 |
|
|
Troubleshooting |
87 |
|
|
Tech Specs: Video |
88 |
|
|
Tech Specs: Photo |
102 |
|
|
Tech Specs: Time Lapse |
107 |
|
|
Tech Specs: Protune |
112 |
|
|
Customer Support |
120 |
|
|
Trademarks |
120 |
|
|
HEVC Advance Notice |
121 |
|
|
Regulatory Information |
121 |
|
|
HERO7 Black - Regulatory Model Number SPCH1

Meet Your HERO7 Black |
|
Meet Your HERO7 Black |
|
|
|
1
2
3
4
1.Shutter Button 
2.Status Light
3.Status Screen
4.Microphone
5.Side Door
4
2
|
5 |
9 |
|
|
|
|
6 |
|
|
7 |
|
|
8 |
|
|
|
10 |
|
|
2 |
6. Latch Release Button |
|
10. Speaker |
7. USB-C Port |
|
11. Mode Button |
8. Micro HDMI Port |
|
12. Battery |
(cable not included) |
|
13. microSD Card Slot |
|
|
9. Touch Screen |
14. Battery Door |
|
|
|
Learn how to use the accessories that came with your GoPro. |
|
See Mounting Your GoPro (page 75). |
4
11
12
13
14
6
6 |
7 |

Setting Up Your Camera
MICROSD CARDS
You’ll need a microSD™ card (sold separately) to save your videos and photos. Use a brand name card that fits these requirements:
•microSD, microSDHC™, or microSDXC™
•Class 10 or UHS-I rating
•Capacity up to 256GB
For a list of recommended microSD cards, visit gopro.com/microsdcards.
Heads Up: Be sure your hands are clean and dry before handling your SD card. Check the manufacturer’s guidelines to see your card’s acceptable temperature range and other important information.
PRO TIP: Keep your SD card in good condition by reformatting it regularly. This will erase all of your media, so be sure to save it first.
1.Swipe down to access the Dashboard.
2.Tap Preferences > Reset > Format SD Card.
To learn how to save your videos and photos, see Transferring Your Media (page 60).
Setting Up Your Camera
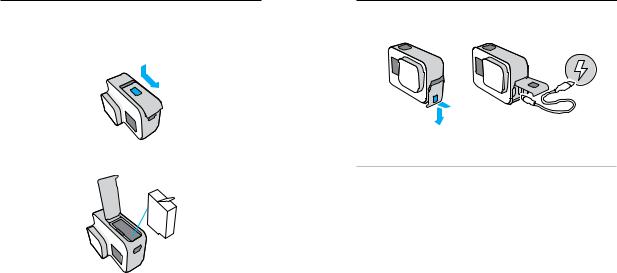
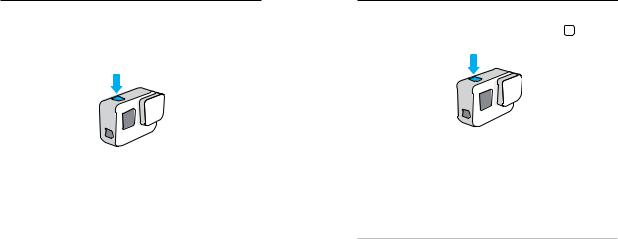
INSTALLING YOUR MICROSD CARD
1.Hold down the Latch Release button on the battery door, then slide the door open.
2.With your camera off, insert the SD card into the card slot with the label facing the battery compartment.
You can eject the card by pressing it into the slot with your fingernail.
8 |
9 |
Setting Up Your Camera
INSTALLING + CHARGING THE BATTERY
Make sure your battery is fully charged before heading out.
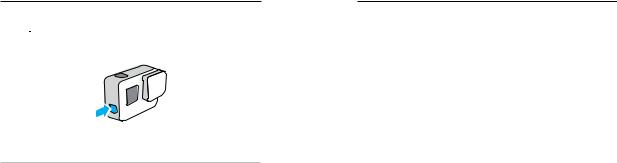
1.Hold down the Latch Release button on the battery door, then slide the door open.
2. Insert the battery, then close the door.
Setting Up Your Camera
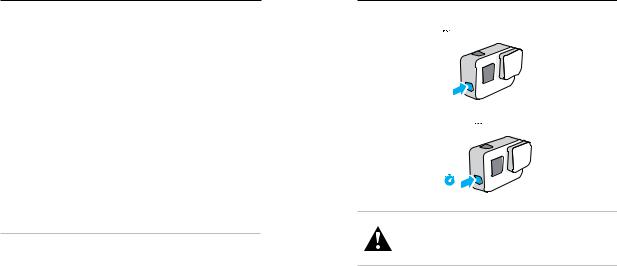
3.Open the side door and connect your camera to a USB charger or computer using the included USB-C cable.
It takes about 2 hours for the battery to fully charge. The camera status light will turn off when it’s done. To learn more, see Battery Information (page 84).
PRO TIP: For the fastest charging, use the GoPro Supercharger (sold separately).
10 |
11 |
Setting Up Your Camera
UPDATING YOUR CAMERA’S SOFTWARE
To get the latest features and best performance from your GoPro, make sure it’s using the most current software.
Updating With the GoPro App
1.Download the app from the Apple© App Store© or Google Play™.
2.Follow the app’s on-screen instructions to connect your camera to your mobile device. If new camera software is available, the app will tell you how to install it.
Updating With the Quik Desktop App
1.Download the app from gopro.com/apps.
2.Connect your camera to your computer using the included USB-C cable. If new camera software is available, the app will tell you how to install it.
Updating Manually
1.Visit gopro.com/update.
2.Choose HERO7 Black from the list of cameras.
3.Select Update your camera manually and follow the instructions.
PRO TIP: Want to know what software version you’re using? Here’s where you can find out.
1.Swipe down to access the Dashboard.
2.Tap Preferences > About > Camera Info.
Getting to Know Your GoPro
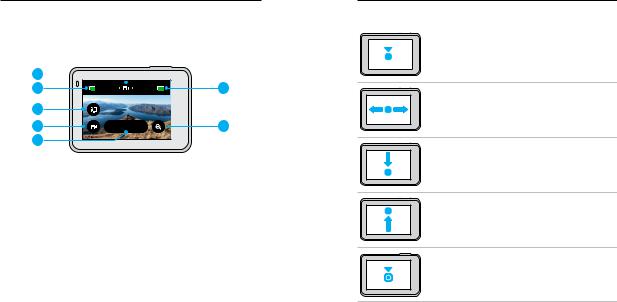
POWERING ON
Press the Mode button  to turn on your HERO7 Black.
POWERING OFF
Press and hold the Mode button  to turn it off.
3s
WARNING: Use caution when using your GoPro and related mounts and accessories. Always be aware of your surroundings to avoid injuring yourself and others.
Be sure to follow all local laws including all privacy laws, which may restrict recording in certain areas.
12 |
13 |

Getting to Know Your GoPro
CAPTURE MODES
Your GoPro has three main capture modes.
VIDEO
Change modes by swiping left or right to the one you want.
Video
Includes Video and Looping video.
To learn more, see Recording Video (page 25).
Photo
Includes Photo, Burst, and Night.
To learn more, see Taking Photos (page 32).
Time Lapse
Includes TimeWarp Video, Time Lapse Video, Time Lapse Photo, and Night Lapse Photo. To learn more, see Capturing Time Lapse (page 38).
PRO TIP: With the camera on, you can press the Mode button  to switch modes.
Getting to Know Your GoPro
CAMERA ORIENTATION
Your GoPro can easily switch between landscape and portrait shots. It also captures videos and photos right-side up even if it’s mounted upside down. The touch screen menu will automatically adjust and your media will play back right-side up.
The orientation is locked in when you press the Shutter button  . If your camera tilts during recording, like on a roller coaster, your footage will tilt with it. You’ll capture every twist and turn.
Landscape Lock
This locks your camera into landscape orientation. Your on-screen camera menu won’t change if you rotate your camera to portrait orientation.
1.Swipe down to access the Dashboard.
2.Tap Preferences > Touch Screen > Landscape Lock.
Heads Up: Videos and photos shot in portrait orientation with Landscape Lock on will play back sideways.
PRO TIP: Use Landscape Lock to keep from accidentally starting a video in portrait orientation. It’s perfect when you’re using body and handheld mounts.
14 |
15 |
Getting to Know Your GoPro
CAPTURE MODES
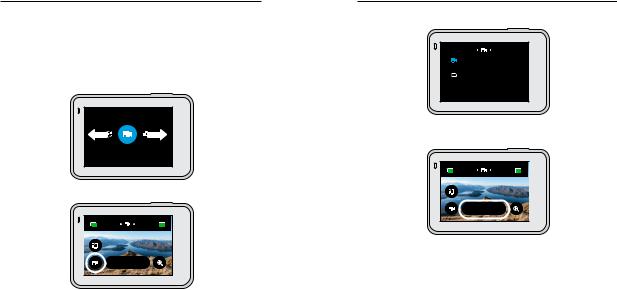
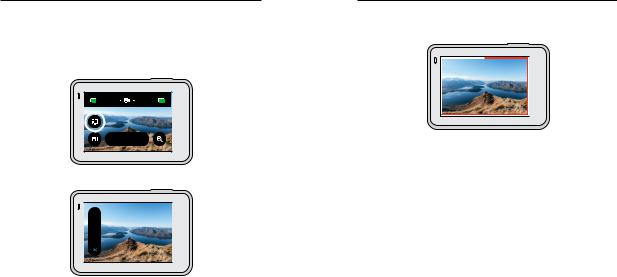
This screen gives you total access to your camera’s capture settings and provides information about your GoPro. The settings shown vary by mode.
1 
2 |
1H:55 |
100% |
6 |
3 |
|
|
|
4 |
|
1440 | 60 | W |
7 |
5 |
|
|
|
1.Current Mode (Video, Photo, or Time Lapse)
2.Recording Time/Photos Remaining
3.Short Clips
4.Capture Mode
5.Capture Settings
6.Battery Status
7.Touch Zoom
Heads Up: The settings menu is not available when you turn your GoPro to take portrait shots. Adjust those settings before rotating your camera.
Getting to Know Your GoPro
USING THE TOUCH SCREEN
Tap
Selects an item, turns a setting on or off.
Swipe Left or Right
Switches between Video, Photo, and Time Lapse modes.
Swipe Down From the Edge of the Screen
Open the Dashboard when your camera is in a landscape orientation.
Swipe Up From the Edge of the Screen
See your videos and photos in the Media Gallery.
Press and Hold
Turn on and adjust Exposure Control.
16 |
17 |
Getting to Know Your GoPro
USING THE SHUTTER BUTTON
1.Press the Shutter button  to start recording.
2.Press the Shutter button  again to stop recording (Video, Time Lapse, and Live Streaming only).
CHANGING MODES + SETTINGS
1. Swipe left or right to the mode you want.
VIDEO
2. Tap the capture mode icon to see all available capture modes.
1H:55 |
100% |
1440 | 60 | W
Getting to Know Your GoPro
3. Choose a capture mode from the list.
Video
Looping
4.Tap the settings if you want to change the resolution or make other adjustments.
1H:55 |
100% |
1440 | 60 | W
18 |
19 |
Getting to Know Your GoPro
5. Tap the setting you want to change.
|
VIDEO SETTINGS |
|
RES | FPS |
FOV |
Low Light |
1440 | 60 |
Wide |
Auto |
Stabilization |
Protune |
|
Auto |
O |
|
Your choices will appear in white. Options that are not compatible with other settings you’ve chosen will be in gray.
RESOLUTION 4:3
Standard Stabilization
1440 60
4K |
2.7K |
1440 |
960 |
Heads Up: The settings menu is not available when you turn your GoPro for portrait shots. Adjust the settings before rotating your camera.
Getting to Know Your GoPro
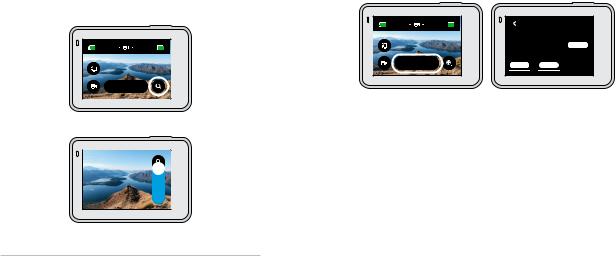
NAVIGATING WITH THE BUTTONS
Though your GoPro is waterproof, the touch screen won’t work under water. Use the buttons and front screen to change modes and settings.
1.With your camera on, hold down the Mode button  and press the Shutter button
  . A menu will appear on the front screen.
2.Press the Mode button to scroll through the modes and settings.
3.Use the Shutter button to select and adjust settings.
To exit: Press and hold the Shutter button or scroll until you reach Done, then press the Shutter button.
Heads Up: The Dashboard and Media Gallery are not available when navigating with the buttons.
20 |
21 |
Using QuikCapture
QuikCapture is the fastest and easiest way to power on your GoPro and get the shot. All it takes is the push of a single button.
RECORDING VIDEO WITH QUIKCAPTURE
1. With your camera off, press the Shutter button  .
.
2.Press the Shutter button  again to stop recording and turn off your camera.
Heads Up: When using QuikCapture, your camera will start recording with the settings that you used last.
For more Video options, see Recording Video (page 25).
Using QuikCapture
TAKING TIME LAPSE PHOTOS WITH QUIKCAPTURE
1.With your camera off, press and hold the Shutter button  until your camera turns on (about 3 seconds).
2.Press the Shutter button  again to stop Time Lapse and turn off your camera.
For more Time Lapse options, see Capturing Time Lapse (page 38).
TURNING QUIKCAPTURE OFF
QuikCapture is on by default, but you can turn it off.
1.Swipe down to access the Dashboard.
2.Tap  .
.
PRO TIP: Since it only turns the camera on when it’s recording, QuikCapture is a great way to maximize battery life.
22 |
23 |
Adding HiLight Tags
Mark favorite moments in your videos and photos by pressing the Mode button  during recording or playback. This adds a HiLight Tag
 that makes those moments easier to find when you’re watching your footage, creating a video, or looking for a certain shot.
You can also add HiLight Tags using the GoPro app or saying “GoPro HiLight” when Voice Control is on.
PRO TIP: QuikStories looks for HiLight Tags when it creates videos. This helps ensure that favorite moments are included in your stories.
Recording Video
Your GoPro has two Video capture modes: Video and Looping. Each has its own settings.
VIDEO
This mode shoots traditional video in resolutions up to 4K. The default settings are 1440p60 video with a 4:3 aspect ratio and Wide field of view, with Video Stabilization and Auto Low Light both set to Auto.
LOOPING VIDEO
Looping lets you record continuously, but only save the moments you want. Use it when you’re waiting for something to happen (like fishing) or when nothing may happen (like a dashcam).
Here’s how it works:
•If you select 5-minute intervals, only the previous 5 minutes are saved when you press the Shutter button  to stop recording.
•If you record for 5 minutes and don’t press the Shutter button  , your camera will loop back and record over the start of the video.
The default settings for Looping are 1440p60 video with a 4:3 aspect ratio and Wide field of view with a 5 minute duration.
To learn more, see Looping Interval (page 101).
24 |
25 |
Recording Video
RECORDING SHORT CLIPS
HERO7 Black can shoot short video clips that are quick and easy to save on your phone and share on social media. They’re also perfect for creating QuikStories with the GoPro app.
1. From the Video screen, tap  .
.
1H:55 |
100% |
1440 | 60 | W
2. Choose to record a 15 or 30 second clip.
30s
15s
Recording Video
3.Press the Shutter button  to start recording. A border will start circling your screen to show you how much time is left in your clip.
Your camera will automatically stop recording at the end of the clip. You can also stop recording by pressing the Shutter button  before the clip is finished.
|
|
|
26 |
27 |
|
Recording Video |
|
Video Settings |
|
|
|
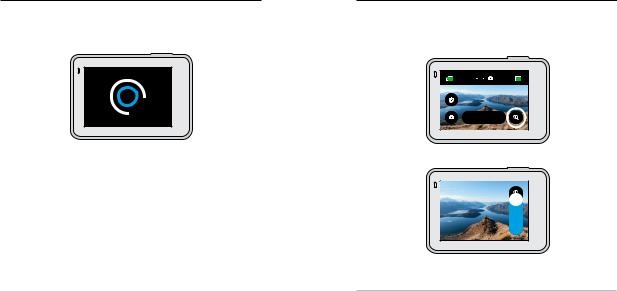
USING TOUCH ZOOM |
|
Tap the settings to adjust the video resolution, frame rate, and more. |
Touch Zoom helps you capture a closer view of the action. |
|
|
1. From the Video screen, tap  .
.
1H:55 |
100% |
VIDEO SETTINGS |
|
|
RES | FPS |
FOV |
Low Light |
1H:55 |
100% |
1440 | 60 |
Wide |
O |
|
|
|
1440 | 60 | W |
Stabilization |
Protune |
|
O |
O |
||
|
1440 | 60 | W
2. Use the slider to choose how much you want to zoom.
3.Tap anywhere to exit. The zoom level is locked until you re-adjust it, switch capture modes, or turn off your camera.
PRO TIP: You can set up your shot using any combination of Clip, Zoom and settings you want.
RES | FPS
Resolutions (RES) are grouped by aspect ratio. Tap the aspect ratio in the upper right corner of the RES | FPS screen to toggle between tall 4:3 (great for selfies and point-of-view shots) or widescreen 16:9 (great for cinematic shots).
Choose your resolution and frames per second (fps). Use higher frame rates to capture fast action or create slo-mo videos. All of the frame rates for the resolution you selected are shown in white. Unavailable settings are in gray.
To learn more, see:
•Video Resolution (RES) (page 88)
•Frames per Second (FPS) (page 91)
•Aspect Ratio (page 92)
28 |
29 |

Video Settings
FOV (VIDEO)
Choose your field of view (FOV)—SuperView, Wide, or Linear. Scroll through the options on the right side of the FOV screen to see a live preview of each option, then tap the one that you want.
Heads Up: Available fields of view will vary based on the resolution and frame rate you select.
To learn more, see Field of View (Video) (page 93).
LOW LIGHT
Your GoPro uses Auto Low Light to automatically adjust to darker settings when you’re shooting video at 50 or 60 frames per second. It’s set to Auto by default, but can be turned off here.
To learn more, see Auto Low Light (page 101).
STABILIZATION
Perfect for biking, skating, skiing, handheld shots, and more, HyperSmooth video stabilization delivers insanely smooth gimbal-like footage without the gimbal. Stabilization is set to Auto by default.
Your GoPro will let you know whether it will use HyperSmooth stabilization, standard stabilization, or shoot unstabilized footage when you choose your resolution and frame rate.
To learn more, see Video Stabilization (page 97).
Video Settings
PROTUNE
Turn on Protune to take manual control of Color, ISO Limit, Exposure, microphone settings, and more.
To learn more, see Protune (page 112).
INTERVAL (LOOPING)
Choose how long your GoPro records before looping back to record over the start of the video.
To learn more, see Looping Interval (page 101).
30 |
31 |

Taking Photos
Your GoPro has three Photo capture modes: Photo, Burst, and Night. All photos are captured at 12MP. Each mode has its own settings.
PHOTO
Use this mode to capture a single photo or a series of continuous photos. A single press of the Shutter button  will capture a single photo.
Press and hold the Shutter button  to take continuous photos at a rate of 3 or 30 per second (depending on lighting conditions). The default field of view for Photos is Wide with SuperPhoto turned off.
BURST
Burst captures photos at blistering rates of up to 30 per second. This makes it great for action shots. The default field of view for Burst is Wide with a rate of 30 photos in 1 second.
NIGHT
In Night mode your camera’s shutter stays open longer to let in more light. It’s perfect for dim or dark scenes, but not recommended for handheld
or mounted shots when the camera is moving. The default field of view for Night is Wide with the Shutter set to Auto.
Taking Photos
SETTING UP THE PHOTO TIMER
Use the Timer to set up a selfie, group shot, and more. 1. From the Photo screen, tap  .
.
999+ |
100% |
Wide
2.Choose 3 seconds (great for selfies) or 10 seconds (great for group shots).
10s
3s
|
|
|
32 |
33 |
|
Taking Photos
3.Press the Shutter button  . Your camera will start the countdown. It will also beep and the front status light will blink. Both will speed up as the time winds down before snapping the photo.
3
Heads Up: To help prevent blurry low-light shots, the timer is automatically set to 3 seconds when you switch to Night photo mode.
Taking Photos
USING TOUCH ZOOM
Touch Zoom helps you capture a closer view of the action. 1. From the Photo screen, tap  .
.
999+ |
100% |
Wide
2. Use the slider to choose how much you want to zoom.
3.Tap anywhere to exit. The zoom level is locked until you re-adjust it, switch capture modes, or turn off your camera.
PRO TIP: You can set up your shot using any combination of Burst, Photo Timer and Zoom you want.
34 |
35 |

Photo Settings
Tap the settings to adjust the field of view, turn SuperPhoto on, and more.
999+ |
|
100% |
PHOTO SETTINGS |
|
|
|
FOV |
SuperPhoto |
RAW |
|
|
Wide |
O |
O |
|
Wide |
Protune |
|
|
|
O |
|
|
|
|
|
|
|
FOV
Choose your field of view (FOV)—Wide or Linear. Scroll through them on the right side of the FOV screen to see a live preview of each, then tap the one you want.
To learn more, see Field of View (Photo) (page 105).
SUPERPHOTO
SuperPhoto automatically uses advanced image processing to give you the most brilliant photos possible in any lighting, but it may take longer to process each shot. SuperPhoto is off by default. Select Auto to turn it on or choose HDR On to use High Dynamic Range processing in every shot.
To learn more, see SuperPhoto (page 102).
RAW
Turn on to save your photos as both .jpg and .gpr files. To learn more, see RAW Format (page 105).
Photo Settings
PROTUNE
Manually control the settings in all three Photo capture modes—Photo, Burst, and Night.
To learn more, see Protune (page 112).
RATE (BURST)
Choose how many photos your camera will take in a 1, 2, 3, or 6 second burst.
To learn more, see Burst Rate (page 104).
SHUTTER (NIGHT)
Set how long your camera’s shutter stays open for night shots. Choose longer exposures for darker shots.
To learn more, see Shutter Speed (page 104).
36 |
37 |
 Loading...