


 Loading...
Gigabyte GA-EP45-DS3R, GA-EP45-UD3P, GA-EP45T-DS3R, GA-P55-UD6, GA-EP45-DS5 Manual
...Smart TPM
User's Manual
Rev. 1001
12MD-STPM-1001R

 • We recommend that you download the latest version of the Smart TPM utility from GIGABYTE's
  website.
•If you have installed Ultra TPM earlier, you can install the Smart TPM utility directly without uninstalling Ultra TPM first. The original settings in Ultra TPM will be kept.

|
Table of Contents |
|
TPM Configuration Procedure.......................................................................................... |
3 |
|
1. |
Configuring the System BIOS........................................................................... |
3 |
2. |
Installing the Infineon TPM Driver and the Smart TPM Utility........................... |
4 |
2.1. |
Installing the Infineon TPM Driver............................................................................. |
4 |
2.2. |
Installing the Smart TPM Utility................................................................................. |
4 |
3. |
Initializing the TPM chip.................................................................................... |
5 |
3.1. |
Initializing the TPM Chip with the Smart TPM Utility................................................. |
5 |
3.2. |
Advanced Mode........................................................................................................ |
8 |
4. |
Configuring the Smart TPM Utility.................................................................. |
18 |
4.1. |
Creating a USB Key................................................................................................ |
18 |
4.2. |
Creating a Bluetooth Cell Phone Key...................................................................... |
19 |
4.3. |
Other Bluetooth Settings......................................................................................... |
21 |
4.4. |
Other Features........................................................................................................ |
21 |
- 2 -
TPM Configuration Procedure
To enable the TPM, follow the steps below in sequence:
1.Configuring the system BIOS
2.Installing the Infineon TPM driver and the Smart TPM utility
3.Initializing the TPM chip
4.Configuring the Smart TPM utility
1.Configuring the System BIOS
To use the TPM functionality, first enter the system BIOS Setup to activate the TPM chip.
Step 1:
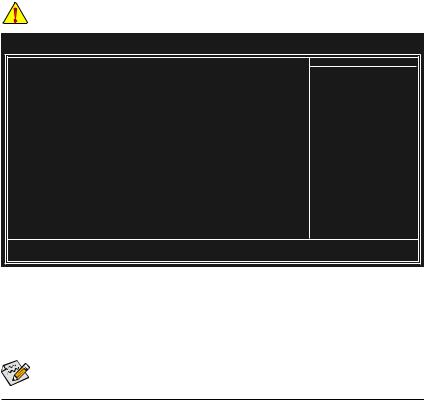
As the computer starts, enter the BIOS Setup program. Go to the Security Chip Configuration menu and the following screen will appear. To activate the TPM chip, set Security Chip to Enabled/Activate. It's recommended that you use the Clear Security Chip setting (press <Ctrl> + <F1> in the BIOS main menu to display this setting) to clear the TPM chip.
Previously encrypted files will become inaccessible after the TPM chip is cleared. Be sure to back up the encrypted files first.
CMOS Setup Utility-Copyright (C) 1984-2009 Award Software
Security Chip Configuration
Security Chip |
|
[Enabled/Activate] |
|
Item Help |
|
Clear Security Chip |
[Enter] |
|
Menu Level |
||
Security Chip State |
Enabled/Activated |
|
|
||
: Move |
Enter: Select |
+/-/PU/PD: Value |
F10: Save |
ESC: Exit |
F1: General Help |
F5: Previous Values |
F6: Fail-Safe Defaults |
|
F7: Optimized Defaults |
||
Step 2:
After completing the settings, press <F10> to save changes and then exit the BIOS Setup program.
 To prevent the TPM settings being cleared by other users, we recommend that you set the User Password in the BIOS Setup program.
- 3 -

2.Installing the Infineon TPM Driver and the Smart TPM Utility
Before you use the Smart TPM utility, ensure that the Infineon TPM driver and the Smart TPM utility have been installed.
2.1.Installing the Infineon TPM Driver
Insert the GIGABYTE motherboard driver disk. "Xpress Install" will automatically scan your system and list all of the drivers that are recommended to install. Click the Install All button and "Xpress Install" will install all of the selected drivers, including the Infineon TPM driver.
2.2.Installing the Smart TPM Utility
Click the tab at the bottom of the left pane of the autorun screen and you'll be directed to the Install New Utilities menu. Click the Install button on the right of Smart TPM to install it.

 Some motherboard driver disks include the Smart TPM utility in "Xpress Install." Click the "Install All" button
  on the "Xpress Install" main menu to install the Infineon TPM driver and the Smart TPM utility altogether.
- 4 -
3.Initializing the TPM chip
After configuring the system BIOS and installing the driver software, the Infineon Security Platform icon  , which indicates that the Infineon Security Platform is not yet initialized, will appear in the notification area.
Double-click the icon or right-click the Smart TPM icon and select Initialization Wizard to access Smart TPM. With the Smart TPM utility, you can initialize the TPM chip, set up a TPM User Password, configure a Personal Secure Drive (PSD), and create a portable user key (refer to the instructions in Section 3.1). Or you can select Advanced mode (refer to the instructions in Section 3.2) to launch the Infineon Security Platform Initialization Wizard to configure advanced settings in the Infineon Security Platform.
3.1.Initializing the TPM Chip with the Smart TPM Utility
The easy-to-use Smart TPM interface allows you to easily initialize the TPM chip, set up a TPM User Password, and configure a Personal Secure Drive.

 • Smart TPM simplifies the configuration procedure of the Infineon Security Platform initialization and its
  functions. To make further settings, please select "Advanced mode."
•Smart TPM provides the "File and folder encryption - Personal Secure Drive (PSD)" settings only. To use the "Secure e-mail" or "File and folder encryption - Encrypting File System (EFS)" functions, please select "Advanced mode."
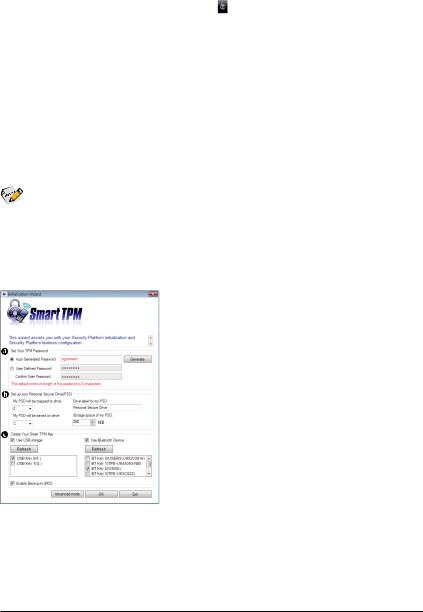
3.1.1.The Smart TPM Interface
 Set Your TPM Password
A password is automatically provided. You can change it to your own password. Be sure to memorize this password because it allows you to create a portable user key using your Bluetooth cell phone or USB flash drive.
 Set up your Personal Secure Drive(PSD)
Configure a Personal Secure Drive (PSD) here. Specify the
PSD drive letter, drive label, size, and a local drive on which your PSD will be saved.
 Create Your Smart TPM Key
Set your Bluetooth cell phone/USB flash drive as the Smart TPM user key. You will be able to access/close your PSD data when connecting to the Bluetooth cell phone or when plugging in the USB flash drive that is configured as the Smart TPM user key.
- 5 -
3.1.2.Initialization Procedure of Smart TPM
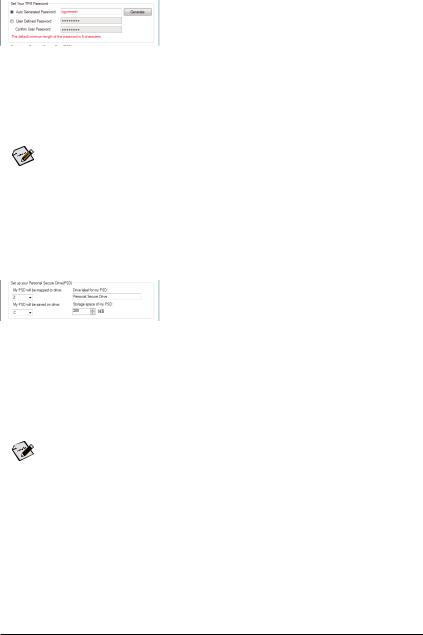
Step 1: Set Your TPM User Password
1. Auto Generated Password
A password will be automatically provided after Smart TPM is launched. To generate a new password, click Generate.
2. User Defined Password/Confirm User Password
You can define your own password in the User Defined Password box (the maximum length is 16 characters). Enter the password in the Confirm User Password box again to confirm.

 • To prevent the TPM settings being cleared by other users, we recommend that you set the User Pass-
  word in the BIOS Setup program.
•This password incorporates the functionalities of the "Owner Password," "User Password," "Emergency Recovery Token Password," and "Password Reset Token Password" of the Infineon Security Platform. Be sure to memorize this password to administrate and use the Security Platform in the future. For details on the rules of the Infineon Security Platform passwords and their usage, please refer to the Infineon Security Platform accompanying documentation.
Step 2: Set up Your Personal Secure Drive (PSD)
1. Specify a drive letter and label for your Personal Secure Drive
To specify the drive letter for your Personal Secure Drive, select an unused letter from the My PSD will be mapped to drive drop-down list of available letters. To specify the drive label, enter the label in the Drive label for my PSD box. The label should be no more than 32 characters in length.
2.SpecifyyourPersonalSecureDrivesizeandalocaldriveonwhichyourPersonalSecureDrivewillbesaved
Select a local drive from the My PSD will be saved on drive drop-down list for saving your Personal Secure Drive and enter the Personal Secure Drive size in the Storage space of my PSD box.

 Your Personal Secure Drive size cannot be changed after setup, so please ensure that the size you
specify is large enough to meet your needs. Please note that you cannot use the full drive size, since the file system allocates some space. This depends on the operating system and may be significant for small drive sizes. Please also note that the maximum PSD drive size is limited:
The maximum PSD drive size on FAT16 volumes is 2 GB. The maximum PSD drive size on FAT32 volumes is 4 GB.
- 6 -

Step 3: Create Your Smart TPM Key
1. Create a USB key:
Select the Use USB storage check box and click Refresh to search for the USB flash drive(s) that you plug in. Then select the USB flash drive that you want to use as the portable Smart TPM user key. You can select more than one USB flash drive at the same time. Selecting the Enable Backup to BIOS check box will store the encrypted TPM User Password in the system BIOS.
If more than one user stores their encrypted TPM User Passwords in the BIOS, the latter will overwrite the former.
2. Create a Bluetooth cell phone key:
Select the Use Bluetooth Device check box and click Refresh to search for the Bluetooth enabled cell phone(s). Then select the cell phone that you want to use as the portable Smart TPM user key and a screen similar to that on the left will appear. Enter a passkey (8~16 digits recommended) in Passkey which will be used for pairing with your cell phone. Then enter the same passkey on your cell phone for pairing.

 Before creating a Bluetooth cell phone key, make sure your motherboard includes a Bluetooth receiver
  and turn on the search and Bluetooth functions on your phone.
Upon completing the steps above, click OK to begin the initialization of the TPM chip and the setups of the TPM User Password, your PSD, and the Smart TPM user key(s).
- 7 -
Loading...