


Table of Contents
ENGLISH |
…………………………………………….. |
1 |
Русский |
............................................................... |
3 |
DEUTSCH |
…………………………………………….. |
5 |
FRANÇAIS |
............................................................... |
7 |
ITALIANO |
............................................................... |
9 |
ESPAÑOL |
............................................................... |
11 |
NEDERLANDS |
............................................................... |
13 |
BRASIL ............................................................... |
|
15 |
PORTUGUÊS ............................................................... |
|
17 |
ČESKY ............................................................... |
|
19 |
MAGYAR ............................................................... |
|
21 |
POLSKI ............................................................... |
|
23 |
SRPSKI ............................................................... |
|
25 |
ΕΛΛΗΝΙΚΑ ............................................................... |
|
27 |
ROMÂNĂ ............................................................... |
|
29 |
TÜRKÇE ............................................................... |
|
31 |
ﻲﺑﺮﻋ |
…………………………………………….. |
33 |
1
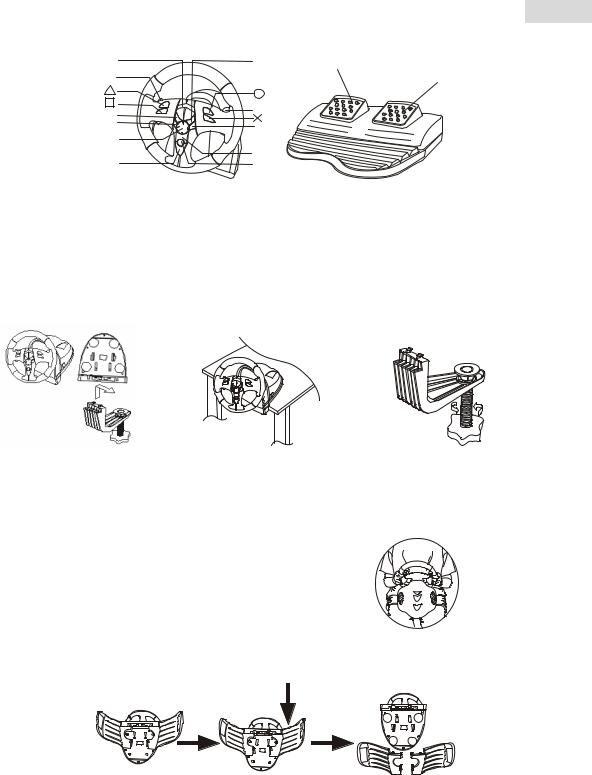
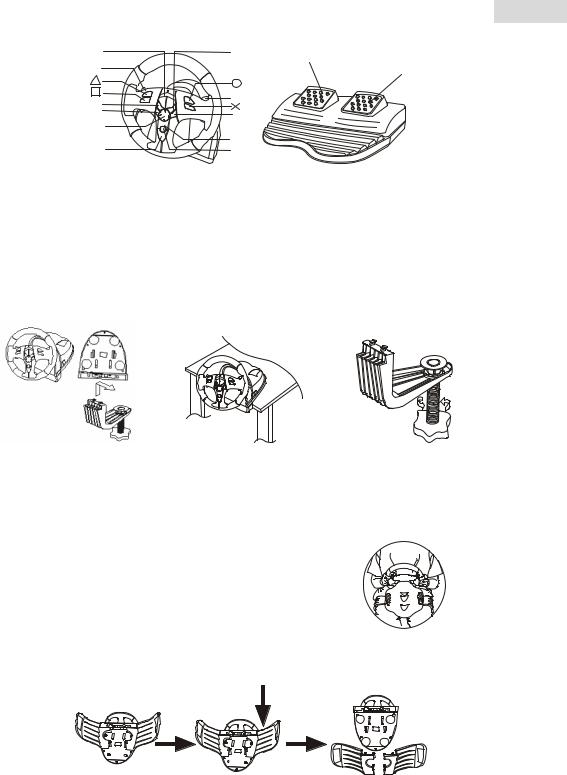
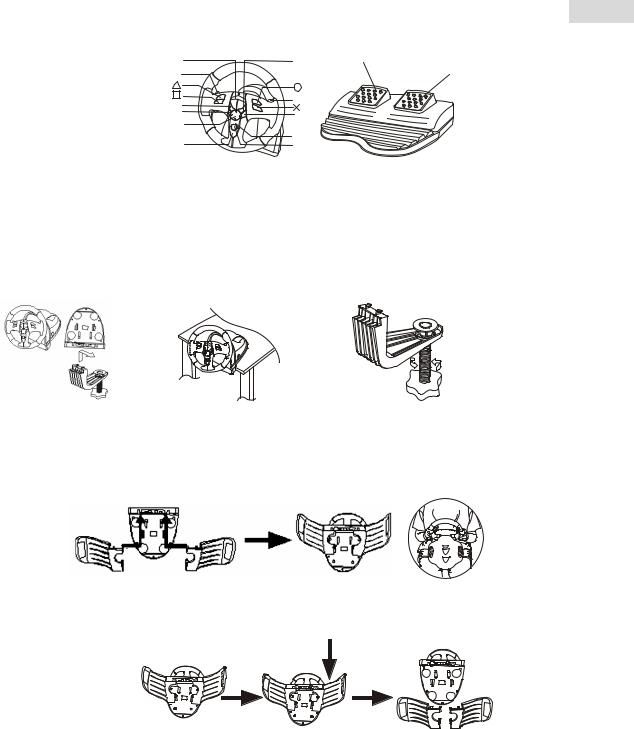
A. Button Assignment:
LED |
R1 |
L2 |
|
L1 |
R2 |
|
|
L2 |
R2 |
|
Dire ct ional
Pad
MODE |
SELECT |
S TART |
English
Brake
Gas
B.Assembly
You have two methods to install the steering wheel. Please choose one and follow the directions.
1.Play on desk or table
. Connect the clamp to the base of the steering wheel as shown in Figure 1 below.
. Place the TrioRacer Wheel in a comfortable driving position (on a desk or table) and press the base unit down firmly on the surface. (See Figure 2)
. Turn the clamp screw until the base is firmly connected. (See Figure 3)
Figure 1 Figure 2 Figure 3
2. Play on your thighs
. Unpack the thigh attachments.
. Turn the Wheel upside down and locate the assembly pinholes.
. Insert the thigh attachments into the assembly holder on the bottom side then put the wheel on your thighs as shown in figure 4.
 Figure.4 How to take apart the attachments:
Slip out the thigh attachments as shown below.
C. Installation
1. For PC
Hardware installation
. Connect the pedals to the steering column.
. Connect the power adapter cable to the steering column.. Connect the USB plug to the USB port of the PC.
Note: Do not connect the steering wheel to a USB hub. It only works when it is connected directly to the USB port of the PC.
Driver installation
. The wheel has to be connected to the PC first. Then insert the driver CD into your CD-ROM drive.. If the installation program does not start automatically, click on “Start/Run/Browse” and select your
CD-ROM drive.
. Double click on the file “setup.exe”
1

English
. If a request for a “digital signature” in Windows appears, acknowledge the message to continue with the installation anyway.
. After the installation is completed, restart the PC.
After Installation
-After the installation is completed, select “Start/Settings/Control Panel”. Double click on “Game Controllers” or “Gaming options” (depends on operating system). In the window that opens, your steering wheel should be listed with status “OK”.
-Click on “Properties” to test the steering wheel.
-It is not necessary to calibrate the steering wheel. The steering wheel supports dynamic calibration, which is carried out automatically when plugging in the device.
2.For Console systems
. Connect wheel and pedal first.
. Connect the power adapter to a wall outlet and put the output plug into the DC jack on the unit base of the wheel.
. Put wheel connecter into the console of port.. Turn on TV set and PS 2 or XBOX console.
. Wheel will turn left and right to the end for Auto Maximum Wheel operating angle detection and then back to center position for Auto Centering detective.
Note:
-Do not touch the wheel and or press the pedals at this time.
-In XBOX and PC platform, after the connection is successful, the red LED will always be lit.
. Put the game disc into the console.. Start your game play and have fun.
D.Different LED indicates different mode
To choose between different modes, press the MODE button, the red LED will light up to indicate you are in analog mode. To switch to the next mode, press the MODE button again.
LEDs Illustration
Gree n LED Yellow LED Red LED
*Digital mode: all LEDs are off if power off, this is the default mode at start-up. *Analog mode: Red LED, with analog control.
NOTE: For some games like GT3, the only mode locked by the game is Analog, so it cannot be switched to Digital mode.
E. Features
¾Auto Centering
Auto centering detects the steering wheel center point when the console is powered off and on instead of scrolling through complex settings in the game “OPTION” menu.
¾Auto Maximum Wheel operating angle detection
This function can auto detect the player’s maximum wheel operating angle in playing games instead of scrolling through complex settings in the game “OPTION” menu.
¾Negative force Feedback
You will feel more realistic negative force feedback when power adapter is disconnected.
¾Six levels of sensitivity adjustment for wheel
Level 3 is default, the sensitivity of the direction is common.
Application: Press SELECT+RIGHT to go to level 4, the sensitivity is more than level 3; press SELECT+RIGHT again for level 5, the sensitivity is more than level 4; press SELECT+RIGHT again for level 6, which is the highest sensitivity level. Press SELECT+RIGHT the forth time to return to level 1, which is the smallest sensitivity; press SELECT+RIGHT again to go to level 2. Press SELECT+RIGHT to return to default.
LED Indicator: In level 1, Green LED flashes rapidly for about 6 seconds. In level 2, Yellow LED flashes rapidly for 6 seconds. In level 3, Red LED flashes rapidly for about 6 seconds. In level 4, both Green and Yellow LED flash rapidly for 6 seconds. For level 5, both Yellow and Red LED flash rapidly for 6 seconds. In level 6, both Green and Red LED flash rapidly for 6 seconds.
Purpose: This lets you find a convenient sensitivity level when playing different games requiring different sensitivity of the wheel.
Note: Level 6 is special sensitivity for Gaming GT4.
2

A. Расположение кнопок
LED |
R 1 |
L2 |
|
L1 |
R2 |
|
|
L2 |
R 2 |
|
Dire ct ional
Pad
MODE |
SELECT |
S TART |
Русский
Brake
Gas
B.Монтаж
Возможны два варианта установки рулевого колеса. Выберите один из них и следуйте дальнейшим указаниям.
1. На столе
. Присоедините зажим к основанию рулевого колеса, как показано на рис. 1.
. Установите рулевое колесо TrioRacer на столе в удобное для игры положение и плотно прижмите основание рулевого колеса к поверхности стола (см. рис. 2).
. Закрепите рулевое колесо на столе, поворачивая винт зажима (см. рис. 3).
Рис. 1 |
Рис. 2 |
Рис. 3 |
2. На бедрах
. Распакуйте крепления для бедер.
. Переверните рулевое колесо и найдите с нижней стороны места установки креплений.. Вставьте крепления и установите рулевое колесо на бедрах, как показано на рис. 4.
 Рис.4 Разборка креплений.
Снимите крепления для бедер как показано на рисунке ниже.
C. Установка
1. Для ПК Установка оборудования
. Подключите педали к рулевой колонке.
. Подключите блок питания к рулевой колонке.
. Подключите разъем USB к гнезду USB на компьютере.
Примечание. Не подключайте рулевое колесо к концентратору USB. Устройство работает только при прямом подключении к порту USB компьютера.
Установка драйвера
. Подключите рулевое колесо к компьютеру. Вставьте компакт-диск с драйвером в дисковод компакт-дисков компьютера.
. Если программа установки не запускается автоматически, выберите в меню «Пуск» пункт «Выполнить», нажмите на кнопку «Обзор» и выберите дисковод для компакт-дисков.
3

Русский
. Щелкните дважды по файлу «setup.exe».
. Если появится сообщение о необходимости цифровой подписи, подтвердите прием сообщения и продолжайте установку.
. После завершения установки перезагрузите компьютер.
После установки
-После завершения установки нажмите на кнопку «Пуск», выберите пункт «Настройка», а затем «Панель управления». Щелкните дважды по значку «Игровые устройства». В открывшемся окне рулевое колесо должно отображаться в списке устройств со статусом «OK».
-Для тестирования колеса нажмите на кнопку «Свойства».
-Калибровка рулевого колеса не требуется. Динамическая калибровка рулевого колеса выполняется автоматически при подключении устройства.
2. Для консольных систем
. Подключите рулевое колесо и педали.
. Подключите блок питания к розетке и вставьте выходной разъем в гнездо постоянного тока, расположенное на основании рулевого колеса.
. Присоедините рулевое колесо к консоли.
. Включите телевизор и консоль PS 2 или XBOX.
. Колесо повернется влево и вправо для автоматического определения максимального угла поворота, а затем вернется в центральное положение для автоматического центрирования.
Примечания:
-В это время запрещается поворачивать рулевое колесо или нажимать на педали.
-При успешном подключении на устройствах XBOX и PS загорается красный индикатор.. Вставьте в консоль игровой диск.
. Играйте и получайте удовольствие.
D.Различные индикаторы обозначают различные режимы
Для выбора режима нажмите на кнопку MODE (РЕЖИМ). Загорится красный индикатор, что указывает на аналоговый режим. Для переключения режима нажмите на кнопку MODE еще раз.
Green LED Yellow LED Red LED
Схема расположения индикаторов:
*Цифровой режим: при выключенном питании все индикаторы не горят. Режим используется по умолчанию при загрузке.
*Аналоговый режим: красный индикатор. Режим с аналоговым управлением.
Примечание. Для некоторых игр, например, для GT3, аналоговый режим является единственно возможным. Тогда в цифровой режим переключиться нельзя.
E. Функции
¾Автоматическое центрирование
Благодаря функции автоцентрирования центральное положение рулевого колеса определяется автоматически как при включенном, так и при выключенном питании, а не выбором параметров в меню игры «Параметры».
¾Автоматическое определение максимального угла поворота рулевого колеса
Благодаря этой функции максимально допустимый угол поворота руля во время игры определяется автоматически, а не выбором параметров в меню игры «Параметры».
¾Силовая обратная связь (отдача)
Для более реалистичного ощущения отдачи отключите блок питания.
¾Шесть уровней настройки чувствительности рулевого колеса
По умолчанию устанавливается уровень 3. Такая чувствительность является общепринятой. Настройка. Нажмите одновременно на кнопки SELECT (ВЫБОР) + RIGHT (ВПРАВО) и перейдите к уровню 4 (чувствительность выше, чем на уровне 3). Для перехода к уровню 5 второй раз нажмите на кнопки SELECT+RIGHT (чувствительность выше, чем на уровне 4). Снова нажмите на кнопки SELECT+RIGHT и перейдите на уровень 6 – уровень наибольшей чувствительности. Нажмите одновременно на кнопки SELECT+RIGHT в четвертый раз и перейдите к уровню 1, уровню наименьшей чувствительности. Еще раз нажмите на кнопки SELECT+RIGHT и перейдите к уровню 2. Нажмите на кнопки SELECT+RIGHT и перейдите к настройкам по умолчанию.
Светодиодный индикатор. На уровне 1 в течение 6 секунд часто мигает зеленый индикатор. На уровне 2 в течение 6 секунд часто мигает желтый индикатор. На уровне 3 в течение 6 секунд часто мигает красный индикатор. На уровне 4 в течение 6 секунд часто мигают зеленый и желтый индикаторы. На уровне 5 в течение 6 секунд часто мигают желтый и красный индикаторы. На уровне 6 в течение 6 секунд часто мигают зеленый и красный индикаторы.
Цель. Индикаторы позволяют найти нужный уровень чувствительности во время игры, если разные игры требуют разной чувствительности рулевого колеса.
Примечание. Чувствительность уровня 6 рассчитана на игру GT4.
4
A. Anordnung der Tasten
LED |
R 1 |
L2 |
|
L1 |
R2 |
|
|
L2 |
R 2 |
|
Dire ct ional
Pad
MODE |
SELECT |
S TART |
Deutsch
Brake
Gas
B.Vorbereitung
Sie können das Lenkrad auf zwei Arten verwenden. Wählen Sie eine Art und befolgen Sie die Anleitung.
1.Befestigung an einem Tisch
. Verbinden Sie die Schraubzwinge mit der Bodenplatte des Lenkrads wie in Figur 1 gezeigt.
. Platzieren Sie das TrioRacer Lenkrad in einer bequemen Position (am Tisch) und drücken Sie das Gehäuse fest auf die Tischoberfläche, wie in Figur 2 gezeigt.
. Drehen Sire die Schraube der Schraubzwinge, bis das Gehäuse fest mit dem Tisch verbunden ist, wie in Figur 3 gezeigt.
Abb. 1 |
Abb. 2 |
Abb. 3 |
2.Befestigung an Ihren Beinen
. Packen Sie die Beinbefestigungen aus.
. Drehen Sie das Lenkrad um und suchen Sie die Befestigungslöcher.
. Stecken Sie die Beinbefestigungen in die Befestigungslöcher an der Unterseite, stellen Sie dann das Lenkrad auf Ihre Oberschenkel, wie in Figur 4 gezeigt.
 Abb. 4 Abnehmen der Beinbefestigungen:
Ziehen Sie die Beinbefestigungen heraus, wie unten gezeigt.
C.Installation
1.Auf einem PC
Hardwareinstallation
. Verbinden Sie die Pedalen mit der Lenkradsäule.. Verbinden Sie das Netzgerät mit der Lenkradsäule.
. Verbinden Sie das USB-Kabel mit dem USB-Port Ihres PC.
Hinweis: Schließen Sie dieses Gerät nicht an ein USB-Hub an. Es arbeitet nur, wenn es direkt mit einem USB-Port des PC verbunden ist.
Treiberinstallation
. Das Lenkrad muss zuerst mit dem PC verbunden werden. Legen Sie die Installations-CD-ROM in das CD-ROM Laufwerk ein.
5

Deutsch
. Wenn das Installationsprogramm nicht automatisch startet, gehen Sie zu „Mein Computer“ und wählen Sie das CD-ROM-Laufwerk.
. Doppelklicken Sie auf das Programm setup.exe.
. Falls Windows auf die digitale Signatur hinweist, klicken Sie auf „Weiter“.. Wenn die Installation beendet ist, starten Sie Ihren Computer neu.
Nach der Installation:
-Wenn die Installation abgeschlossen ist, gehen Sie zur Systemsteuerung. Doppelklicken Sie auf das Symbol „Gamecontroller“ (das bei verschiedenen Versionen einen etwas anderen Namen haben kann). In dem Fenster, das sich öffnet, sollte Ihr Lenkrad mit dem Status „OK” erscheinen.
-Klicken Sie auf „Eigenschaften“, um die Installation zu prüfen.
-Es ist nicht nötig, das Lenkrad zu kalibrieren. Das Lenkrad führt eine dynamische Kalibrierung automatisch aus, wenn das Gerät angeschlossen wird.
2.Für Spielkonsolen
. Zuerst schließen Sie Lenkrad und Pedalen an.
. Verbinden Sie das Netzgerät mit einer Steckdose und stecken Sie den Ausgang-Stecker in die DC-Buchse am Lenkradgehäuse.
. Verbinden Sie das Lenkrad in die Eingangs-Buchse der Konsole.. Schalten Sie den Fernseher und PS 2 ein oder die XBOX.
. Das Lenkrad dreht sich nach rechts und links bis zum Ende und dann zur Mitte, um die Endpunkte und die Mittelposition zu speichern.
Hinweis:
Berühren Sie das Lenkrad und die Pedalen nicht in dieser Testphase.
Das System ist jetzt betriebsbereit. Die rote LED-Anzeige leuchtet.. Stecken Sie die CD-ROM in die Konsole.
. Starten Sie Ihr Spiel. Viel Vergnügen!
D.LED Modusanzeigen
Zur Umschaltung in einen anderen Modus drücken Sie die MODE-Taste. die rote LED leuchtet auf, um den
Analogmodus anzuzeigen. Zum Moduswechsel drücken Sie nochmals die MODE-Taste.
Gree n LED Yello w LED Red LED
Die 3 LEDs:
Digitalmodus: Alle LEDs sind ausgeschaltet. Das ist der normale Zustand beim Start. Analogmodus: Rote LED leuchtet, zeigt analoge Steuerung an.
HINWEIS: Bei einigen Spielen, z. B. GT3, ist der Analogmodus der einzig mögliche. Umschaltung in den Digitalmodus ist nicht möglich.
E. Merkmale
¾Automatische Zentrierung
Das Gerät ermittelt die mittlere Lenkradposition beim Einschalten, was ein komplexes Einstellungsmenü überflüssig macht.
¾Automatische des rechten und linken Anschlagpunkts
Das Gerät ermittelt den maximalen Drehwinkel beim Einschalten, was ein komplexes Einstellungsmenü überflüssig macht.
¾Umschaltung auf „mechanische Lenkung“ und „Servolenkung“
Wenn Sie die Servolenkung nicht eingeschaltet haben, haben Sie das Gefühl einer mechanischen Lenkung.
¾Sechs verschiedene Lenkrad-Empfindlichkeitseinstellungen
Empfindlichkeitsstufe 3 ist die Normaleinstellung (mittlere Empfindlichkeit).
So schalten Sie um: In der Mitte des Lenkrads ist die 4-Wege-Richtungstaste (Directional Pad). Darunter ist die START-Taste. Drücken Sie die SELECT-Taste und die 4-Wege-Richtungstaste rechts. Das schaltet um auf Stufe 4 (Empfindlichkeit höher als Stufe 3). Wiederholen Sie den Vorgang. Das schaltet um auf Stufe 5. Wiederholen Sie den Vorgang. Das schaltet um auf Stufe 6, die höchste Empfindlichkeitsstufe.
Wiederholen Sie den Vorgang. Das schaltet um auf Stufe 1, die niedrigste Empfindlichkeitsstufe. Wiederholen Sie den Vorgang. Das schaltet um auf Stufe 2. Wiederholen Sie den Vorgang. Das schaltet um auf Stufe 3, die mittlere Empfindlichkeit.
LED-Anzeige: In Stufe 1 blinkt die grüne LED schnell etwa 6 Sekunden lang. In Stufe 2 blinkt die gelbe LED schnell etwa 6 Sekunden lang. In Stufe 3 blinkt die rote LED schnell etwa 6 Sekunden lang. In Stufe 4 blinken die grüne und die gelbe LED schnell etwa 6 Sekunden lang. In Stufe 5 blinken die gelbe und die rote LED schnell etwa 6 Sekunden lang. In Stufe 6 blinken die grüne und die rote LED schnell, etwa 6 Sekunden. Der Zweck: Verschiedene Spiele erfordern unterschiedliche Empfindlichkeitsstufen. Die Anzeige hilft Ihnen, die günstigste Stufe für das jeweilige Spiel herauszufinden.
Hinweis: Stufe 6 ist die günstigste Stufe für das Spiel GT4.
6

A. Configuration des touches :
LED
L2
L1
L2
Dire ct ional
Pad
MODE
FranÇais
R 1
Brake
Gas
R2
R 2
SELEC T
S TART
B.Installation
Vous pouvez installer votre volant de deux façons ; sélectionnez l’une ou l’autre et suivez les instructions.
1.Installation sur un bureau ou une table
. Fixez l’attache à la base du volant comme illustré Figure 1 ci-dessous.
. Positionnez votre volant TrioRacer sur un bureau ou une table de façon à pouvoir le tenir confortablement et appuyez fermement sur la base pour la fixer à la surface. (Voire Figure 2)
. Resserrez la vis de l’attache jusqu’à ce que le volant soit fermement maintenu en place. (Voire Figure 3)
Figure 1 |
Figure 2 |
Figure 3 |
2.Installation sur vos cuisses
. Déballez le dispositif de fixation pour cuisses.
. Retournez le volant et repérez les orifices de fixation.
. Insérez les deux parties du dispositif de fixation pour cuisses dans la base du volant, puis placez l’ensemble sur vos cuisses comme illustré Figure 4.
Figure.4
Comment retirer le dispositif de fixation pour cuisses :
Faites glisser les deux parties du dispositif comme illustré ci-dessous :
C. Installation
1. Pour PC
Installation du Matériel
. Reliez le pédalier à la colonne de direction.
. Insérez le câble de l’adaptateur d’alimentation dans la colonne de direction.. Insérez le connecteur USB dans un port USB de votre PC.
Note : ne branchez pas votre volant sur un concentrateur USB. Votre appareil ne peut fonctionner que s’il est directement branché sur un port USB du PC.
Installation du pilote
. En premier lieu, reliez votre volant au PC. Insérez ensuite le CD du pilote dans votre lecteur CD-ROM.
. Si le programme d’installation ne démarre pas automatiquement, cliquez sur “Démarrer/Exécuter/Naviguer” et sélectionnez votre lecteur CD-ROM.
. Double cliquez sur le fichier “setup.exe”
. Si Windows affiche une requête de “Signature numérique” acceptez le message pour pouvoir
7

FranÇais
poursuivre l’installation quoi qu’il en soit.
. Une fois l’installation terminée, redémarrez votre PC.
Après l’installation
-Une fois l’installation terminée et l’ordinateur redémarré, cliquez sur “Démarrer/Paramètres/Panneau de configuration”. Double cliquez sur “Contrôleurs de jeu” ou “Options de jeu” (en fonction de votre système d’exploitation). Dans la fenêtre qui s’ouvre, votre volant devrait apparaître avec le statut “OK”.
-Cliquez sur “Propriétés” pour tester le volant.
-Il n’est pas nécessaire de calibrer votre volant, celui-ci supporte la calibration dynamique qui s’effectue automatiquement dès le branchement de l’appareil.
2.Pour console de jeu
. Connectez le volant et le pédalier.
. Reliez l’adaptateur d’alimentation à une prise secteur et insérez le connecteur de sortie dans la prise DC se trouvant à la base du volant.
. Insérez le connecteur du volant dans le port de la console.. Allumez votre téléviseur et votre console PS 2 ou XBOX.
. Le volant tournera à fond vers la gauche et la droite pour la Détection automatique de l’angle de braquage maximal avant de revenir en position centrale pour le Centrage automatique.
Note :
-Ne touchez pas au volant ou au pédalier lors de cette opération.
-Sous une plateforme XBOX ou PC, une fois le branchement réussi, le voyant LED rouge s’allumera.. Insérez le disque du jeu dans la console.
. Lancez la partie et amusez-vous !
D.Voyant LED indicateur du mode sélectionné
Pour choisir un mode de jeu, appuyez sur le bouton MODE ; le voyant LED rouge s’allume pour vous indiquer que vous êtes en mode analogique. Pour passer au mode suivant, appuyez une nouvelle fois sur le bouton MODE.
Gree n LED Yello w LED Red LED
Illustration des voyants LED
*Mode numérique : tous les voyants LED sont éteints lorsque l’appareil est éteint. Par défaut, c’est le mode numérique qui est sélectionné au démarrage.
*Mode analogique : le voyant LED rouge s’allume en mode analogique.
NOTE : dans le cas de certains jeux, comme GT3, le mode analogique est automatiquement sélectionné et verrouillé - vous ne pourrez pas basculer en mode numérique.
E. Caractéristiques
¾Centrage automatique
Grâce à cette fonction, le point central du volant est automatiquement détecté lorsque la console est éteinte - plus besoin d’effectuer des paramétrages complexes depuis le menu “OPTIONS” du jeu.
¾Détection automatique de l’angle de braquage maximal
Grâce à cette fonction, l’angle de braquage maximal du volant est automatiquement détecté pour la partie - plus besoin d’effectuer des paramétrages complexes depuis le menu “OPTIONS” du jeu.
¾Retour de force négatif
Le retour de force négatif sera plus réaliste si l’adaptateur d’alimentation est débranché.
¾Six niveaux de réglage de sensibilité du volant
Le niveau 3 est le réglage par défaut ; la sensibilité est alors standard.
Utilisation : appuyez sur SELECT+DROITE pour passer au niveau 4, la sensibilité est alors supérieure à celle du niveau 3 ; appuyez sur SELECT+DROITE pour passer au niveau 5, la sensibilité est alors supérieure à celle du niveau 4 ; appuyez encore une fois sur SELECT+DROITE pour passer au niveau 6 qui est le niveau le plus élevé. Appuyez une quatrième fois sur SELECT+DROITE pour atteindre le niveau de sensibilité 1, qui le niveau le plus bas ; appuyez de nouveau sur SELECT+DROITE pour passer au niveau 2. Appuyez de nouveau sur SELECT+DROITE pour revenir au niveau par défaut.
Voyant LED : au niveau 1, le voyant LED vert clignote rapidement pendant environ 6 secondes. Au niveau 2, le voyant LED jaune clignote rapidement pendant environ 6 secondes. Au niveau 3, le voyant LED rouge clignote rapidement pendant environ 6 secondes. Au niveau 4, les voyants LED vert et jaune clignotent rapidement pendant environ 6 secondes. Au niveau 5, les voyants LED jaune et rouge clignotent rapidement pendant environ 6 secondes. Au niveau 6, les voyants LED vert et rouge clignotent rapidement pendant environ 6 secondes.
Objectif : vous permettre de trouver la sensibilité du volant la plus adaptée au jeu en cours. Note : le niveau 6 est particulièrement adapté au jeu GT4.
8
A. Assegnazione pulsanti:
LED |
R1 |
L2 |
|
L1 |
R2 |
|
|
L2 |
R 2 |
|
Dire ct ional
Pad
MODE |
SELEC T |
S TART |
Italiano
Brake
Gas
B.Montaggio
Ci sono due metodi per installare il volante. Si prega di scegliere e seguire le indicazioni.
1.Per giocare sulla scrivania o sul tavolo
. Collegare la morsa alla base del volante come illustrato nella Figura 1 qui sotto.
. Collocare la TrioRacer Wheel in una posizione comoda per la guida (su una scrivania o su un tavolo) e premere l’unità base saldamente sulla superficie. (Vedere figura 2)
. Avvitare la vite della morsa fino a quando la base è saldamente attaccata. (Vedere figura 3)
Figura 1 Figura 2 Figura 3
2. Giocare sulle proprie gambe
. Aprire gli attacchi per le gambe.
. Capovolgere il volante e individuare i fori di montaggio.
. Inserire gli attacchi per le gambe nelle fessure sulla parte inferiore, quindi collocare il volante sulle gambe come illustrato nella figura 4.
Figura.4
Come sganciare gli attacchi:
Sfilare gli attacchi per le gambe come illustrato sotto.
C. Installazione
1. Per PC
Installazione hardware
. Collegare i pedali al piantone dello sterzo.
. Collegare il cavo di alimentazione al piantone dello sterzo.. Collegare lo spinotto USB alla porta USB del PC.
Nota: Non collegare il volante a un hub USB. Funziona solo se collegato direttamente alla porta USB del PC..
Installazione driver
. Innanzitutto il volante deve essere collegato al PC. Quindi inserire in CD driver nel lettore di CD-ROM.
. Se il programma di installazione non parte automaticamente, fare clic su “Start/Esegui/Sfoglia” e selezionare il lettore di CD-ROM.
. Fare doppio clic sul file “setup.exe”
. Nel caso venga richiesta da Windows la “firma digitale”, continuare comunque con l’installazione.. Una volta completata l’installazione, riavviare il PC.
Dopo l’installazione
1
Italiano
-Dopo aver completato l’installazione, selezionare “Start/Pannello di controllo”. Fare doppio clic su “Periferiche di gioco” o “Opzioni di gioco” (secondo il sistema operativo). Nella finestra che si apre, il volante dovrebbe essere indicato con lo status “OK”.
-Fare clic su “Proprietà” per testare il volante.
-Non è necessario calibrare il volante. Il volante supporta la calibrazione dinamica, che viene effettuata automaticamente quando si collega l’apparecchio.
2.Per i sistemi console
. Collegare innanzitutto il volante e il pedale.
. Collegare l’alimentazione a una presa nel muso e inserire lo spinotto di uscita nella presa DC sulla base del volante.
. Inserire lo spinotto del volante nella porta della console.. Accendere la tv e impostare su console PS2 o XBOX.
. Il volante girerà a sinistra e a destra fino alla fine per determinare automaticamente l’angolo massimo di operatività dello sterzo quindi di nuovo in posizione centrale per Determinare automaticamente il centro.
Nota:
-Non toccare il volante o premere i pedali a questo punto.
-Nella XBOX e nella piattaforma PC, dopo aver completato con successo il collegamento, si accende un LED rosso a luce fissa.
. Inserire il disco di gioco nella console.. Iniziate a giocare e buon divertimento.
D.LED diversi indicano diverse modalità
Per scegliere fra diverse modalità, premere il pulsante MODE, il LED rosso si illuminerà per indicare che si è
in modalità analogica. Per passare alla modalità successiva premere di nuovo il pulsante MODE.
Green LED Yellow LED Red LED
Illustrazione dei LED
*Modalità digitale: tutti i LED sono spenti, questa è la modalità di default all’accensione. *Modalità analogica: LED rosso, con controllo analogico.
NOTA: Per alcuni giochi come GT3, l’unica modalità collegata al gioco è Analogica, quindi non può essere cambiata in Digitale.
E. Caratteristiche
¾Centratura automatica
La centratura automatica rileva il punto di centro del volante quando la console è spenta e accesa invece di dover scorrere attraverso impostazioni complesse nel menu “OPZIONI”.
¾Determinazione automatica dell’angolo massimo di operatività dello sterzo
Questa funzione è in grado di individuare il massimo angolo di azione dello sterzo per il giocatore durante il gioco invece di scorrere attraverso impostazioni complesse nel menu “OPZIONI” del gioco.
¾Feedback forza negativa
Il giocatore percepisce un feedback di forza negativa più realistica quando l’alimentazione non è collegata.
¾Sei livelli di regolazione sensibilità per il volante
Il livello 3 è quello preimpostato, la sensibilità della direzione è quella comune.
Applicazione: Premere SELECT+DESTRA per passare al livello 4, il livello di sensibilità superiore al 3; premere nuovamente SELECT+DESTRA per il livello 5, il livello di sensibilità superiore al 4; premere SELECT+DESTRA ancora una volta per il livello 6, che è il livello massimo di sensibilità. Premere SELECT+DESTRA una quarta volta per tornare al livello 1, ovvero il livello di sensibilità inferiore; premere SELECT+DESTRA ancora per andare al livello 2. Premere SELECT+DESTRA per tornare al livello predefinito..
Indicatore LED: Nel livello 1, il LED verde lampeggia rapidamente per circa 6 secondi. Nel livello 2, il LED giallo lampeggia rapidamente per circa 6 secondi. Nel livello 3, il LED rosso lampeggia rapidamente per circa 6 secondi. Nel livello 4, il LED verde e quello giallo lampeggiano rapidamente per circa 6 secondi. Nel livello 5, il LED giallo e quello rosso lampeggiano rapidamente per circa 6 secondi. Nel livello 6, il LED verde e quello rosso lampeggiano rapidamente per circa 6 secondi.
Scopo: Questa funzione permette di trovare un livello di sensibilità adatto quando si affrontano giochi diversi che richiedono una diversa sensibilità dello schermo.
Nota: il livello 6 è la sensibilità specifica per giocare a GT4.
2
 Loading...