


Table of Contents
ENGLISH …………………………………………….. 1
Русский ............................................................... 2
DEUTSCH …………………………………………….. 3
FRANÇAIS ............................................................... 4
ITALIANO ............................................................... 5
ESPAÑOL ............................................................... 6
NEDERLANDS ............................................................... 7
BRASIL ............................................................... 8
PORTUGUÊS ............................................................... 9
ČESKY ............................................................... 10
MAGYAR ............................................................... 11
POLSKI ............................................................... 12
SRPSKI ............................................................... 13
ΕΛΛΗΝΙΚΑ ............................................................... 14
ROMÂNĂ ............................................................... 15
TÜRKÇE ............................................................... 16
ﻲﺑﺮﻋ …………………………………………….. 17
ENGLISH
1. System Requirement
IBM PC Pentium 166MHz compatibles or higher
Available USB port
CD/DVD-ROM Drive for driver installation
Microsoft Windows XP/ME/2000/98
2. Setting-up your Speed Wheel 3 MT
Please follow up these steps below to install your Speed Wheel 3 MT:
(1). Use four strong suction cups built-in under the bottom of the wheel’s chassis﹐so you can firmly position the wheel
by just pushing it hard to the smooth surface on the table.
3. Installation for PC system
(1). Make sure your computer on.
(2). Insert the driver disc into the CD-ROM drive, and the setup program will start automatically. If not, start the setup
program manually by selecting Start/Run and type in “E:\setup” (Where “E” represents the location of the CD-ROM
drive), then press the Enter key.
(3). Please follow the instructions on the screen to finish the driver installation.
(4). After the soft installation is completed, you can plug the USB connector of the cable to the USB port on your
computer.
(5). Connect the AC Adapter power with the steering wheel chassis. At this moment the wheel will turn right and left for
regulation and testing, so don’t touch the wheel.
(6). Click Start / Setting / Control Panel and double click on “Game controller” or “Gaming Options” icon.
(7). Make sure the wheelbase is positioned firmly and place the pedals on the floor in a convenient-to-reach location.
Note: Do not place on an easy-to-slip surface
(8). Plug the pedal’s connector to the steering wheel.
(9). You can calibrate and test your game controller in the “Game controller” or “Gaming Options” screen.
(10).When you finish the calibration and test﹐you can play any game.
Important
-The driver will work with the DirectX 7.0a or newer version in PC system. Please check the DirectX version on your
-The Vibration effect occurs according to game software.
:
system﹐and upgrade if necessary.
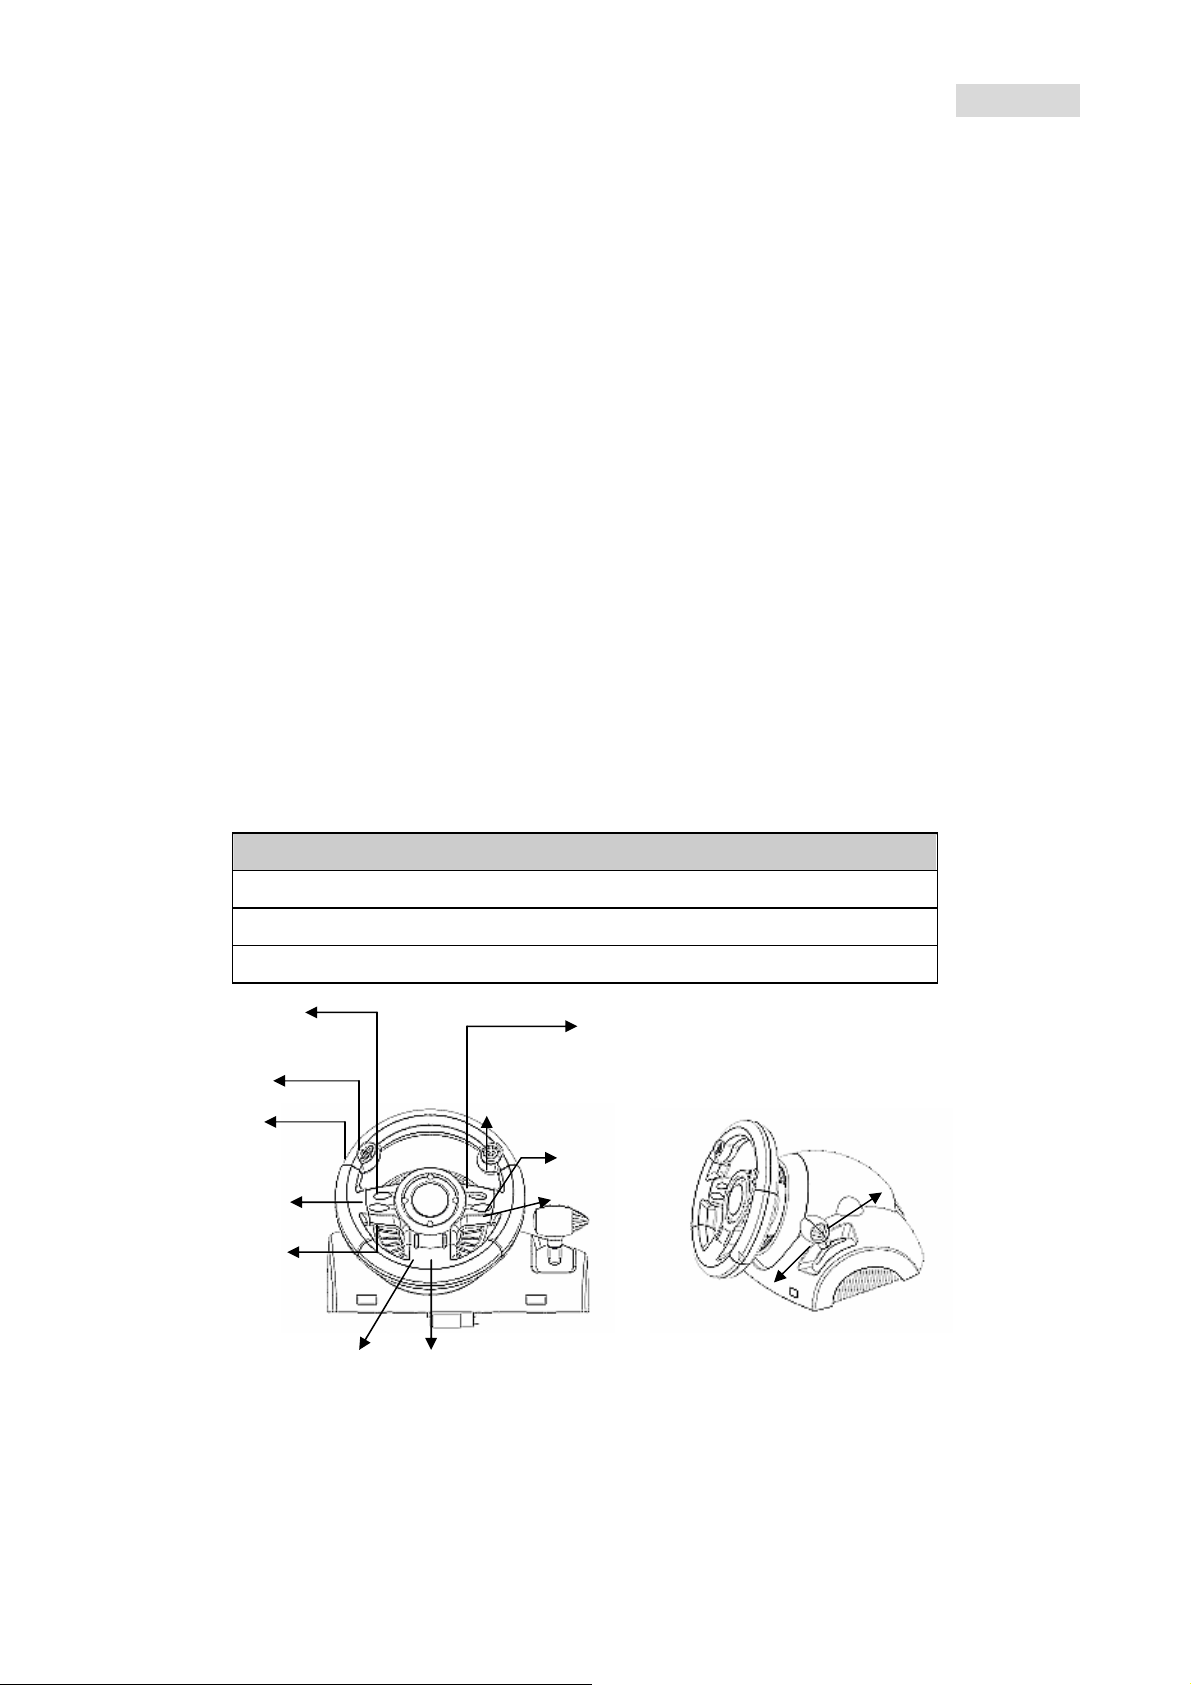
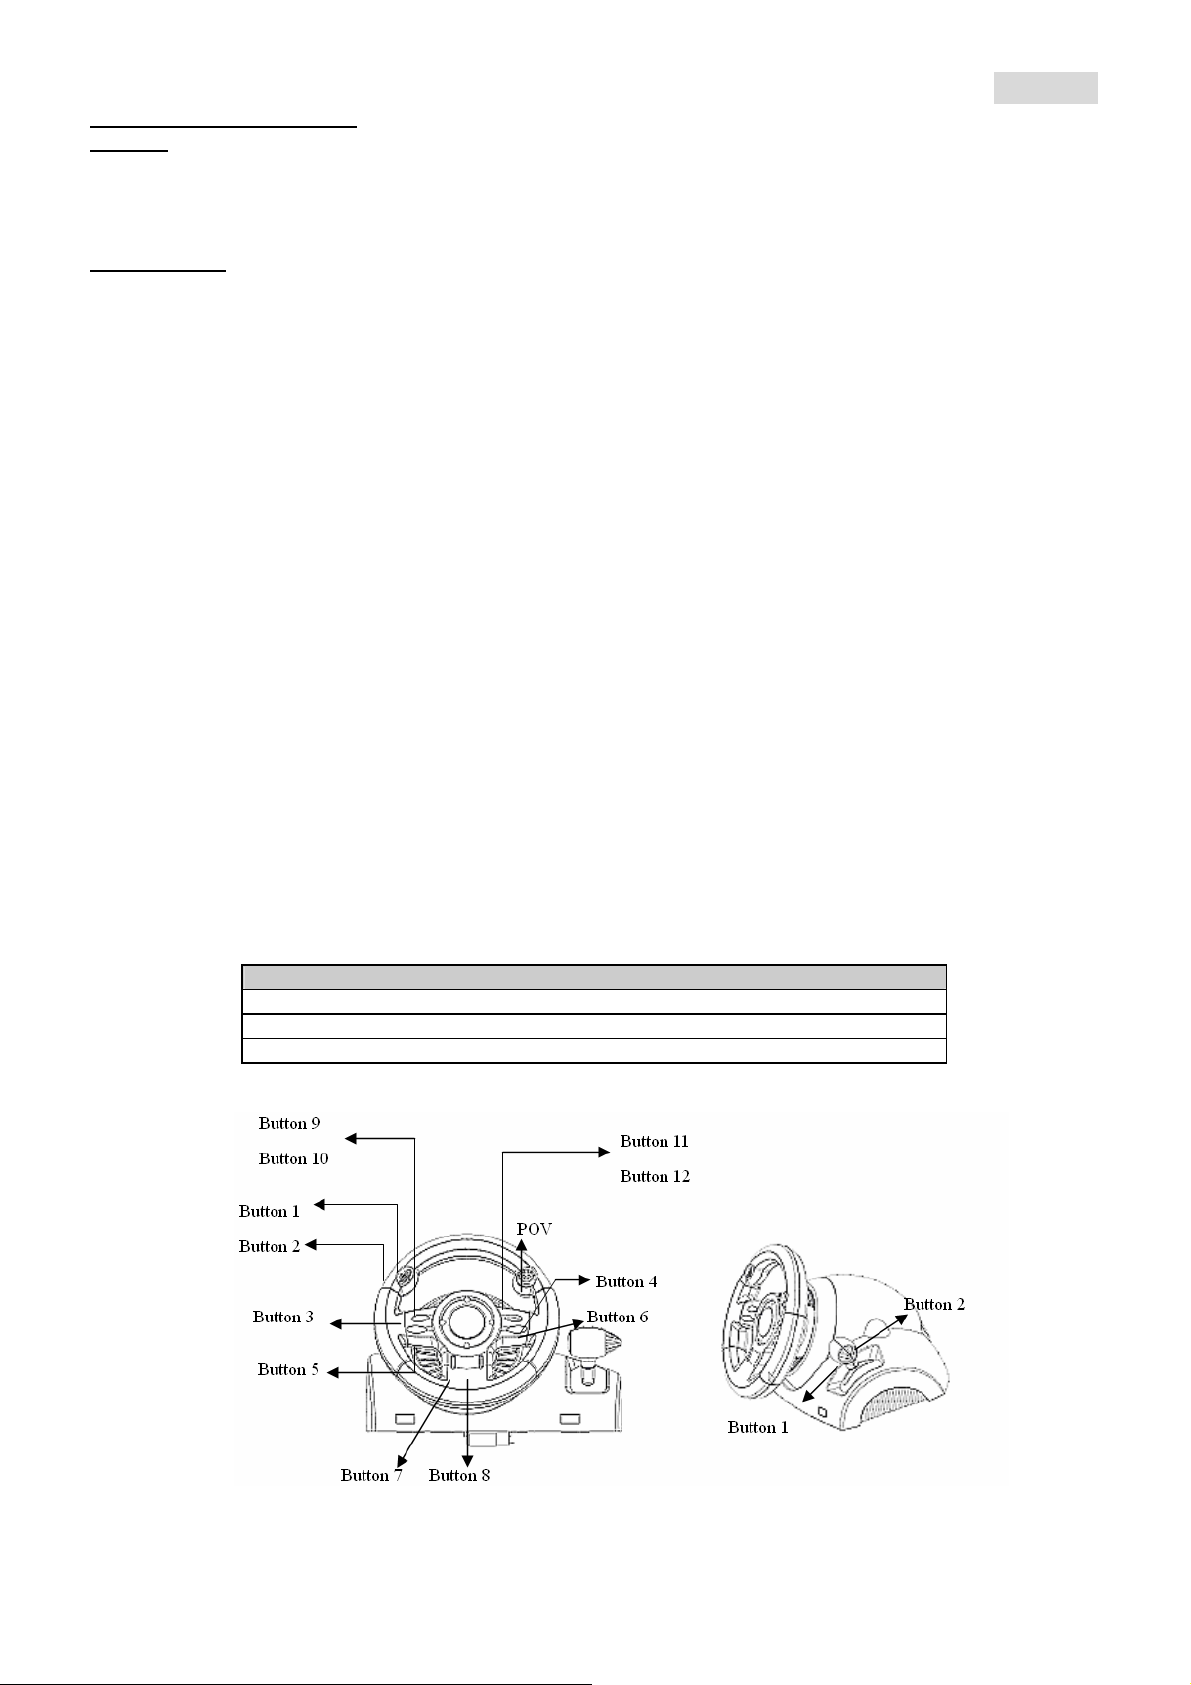
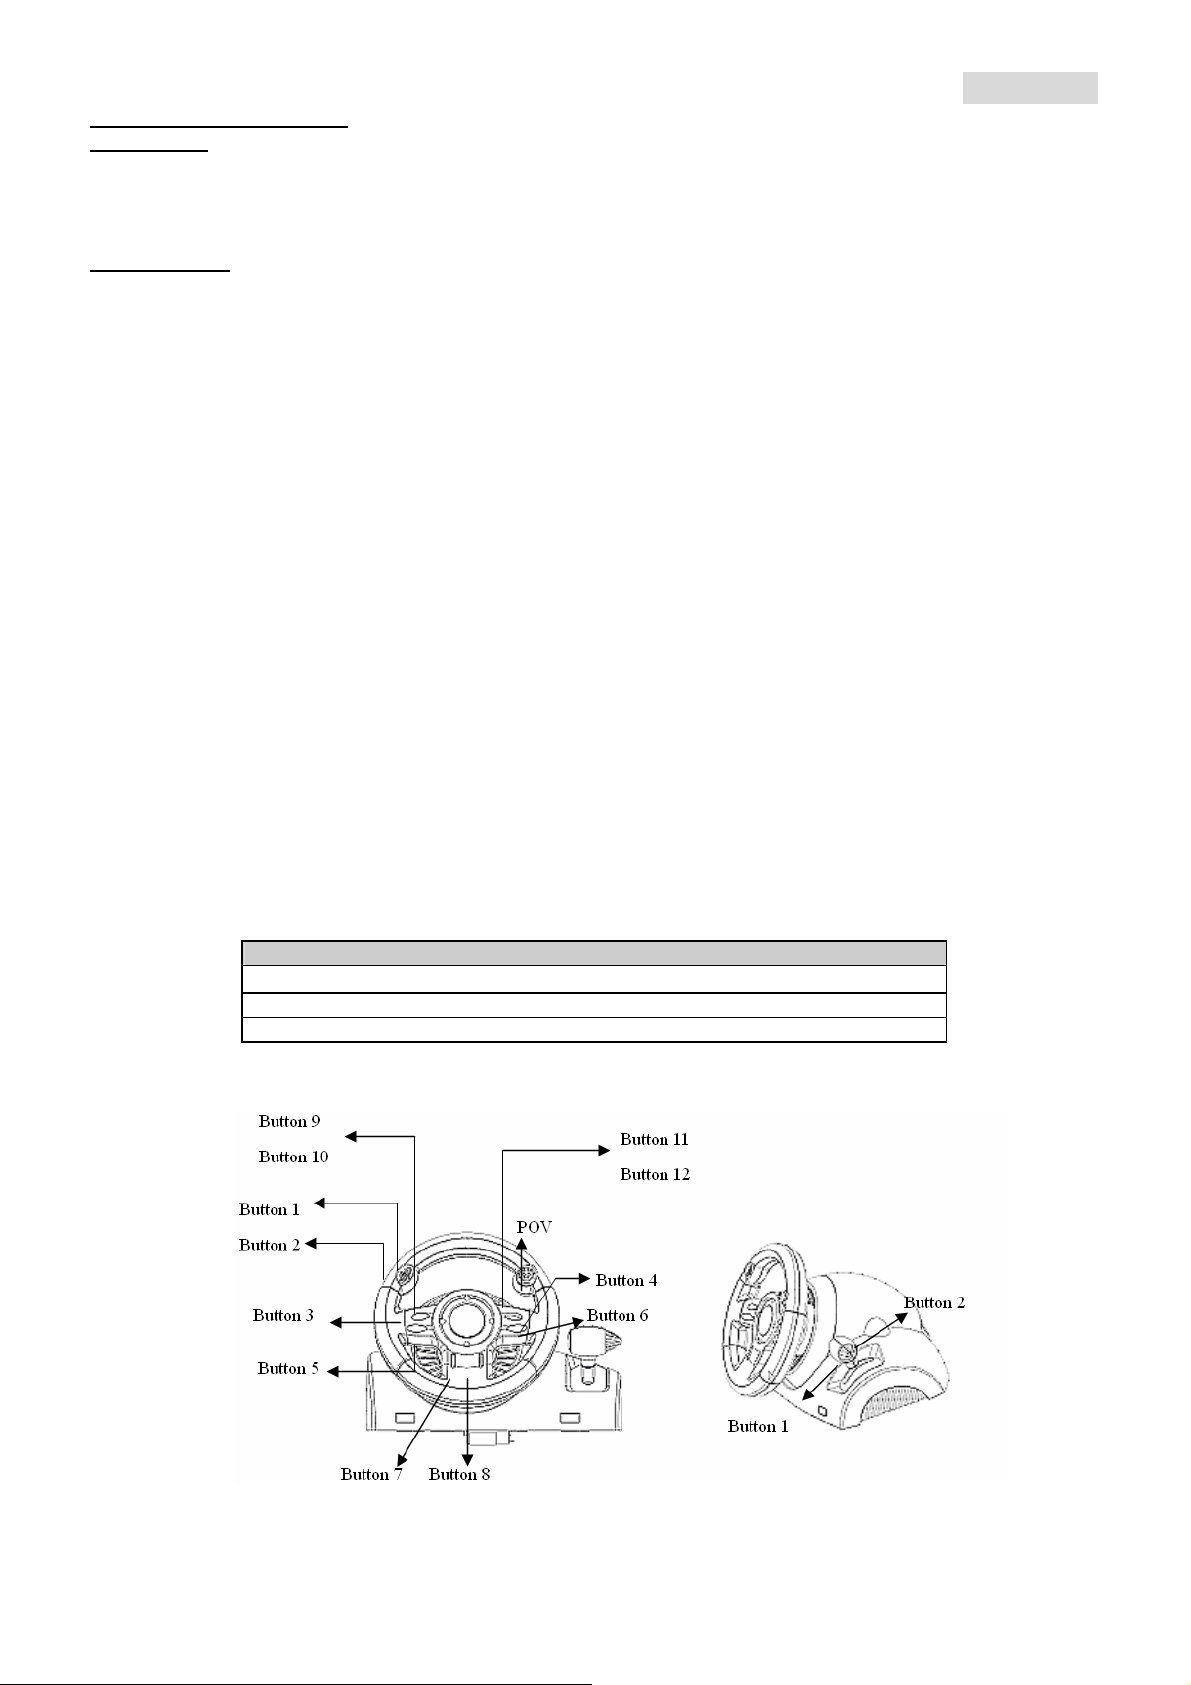
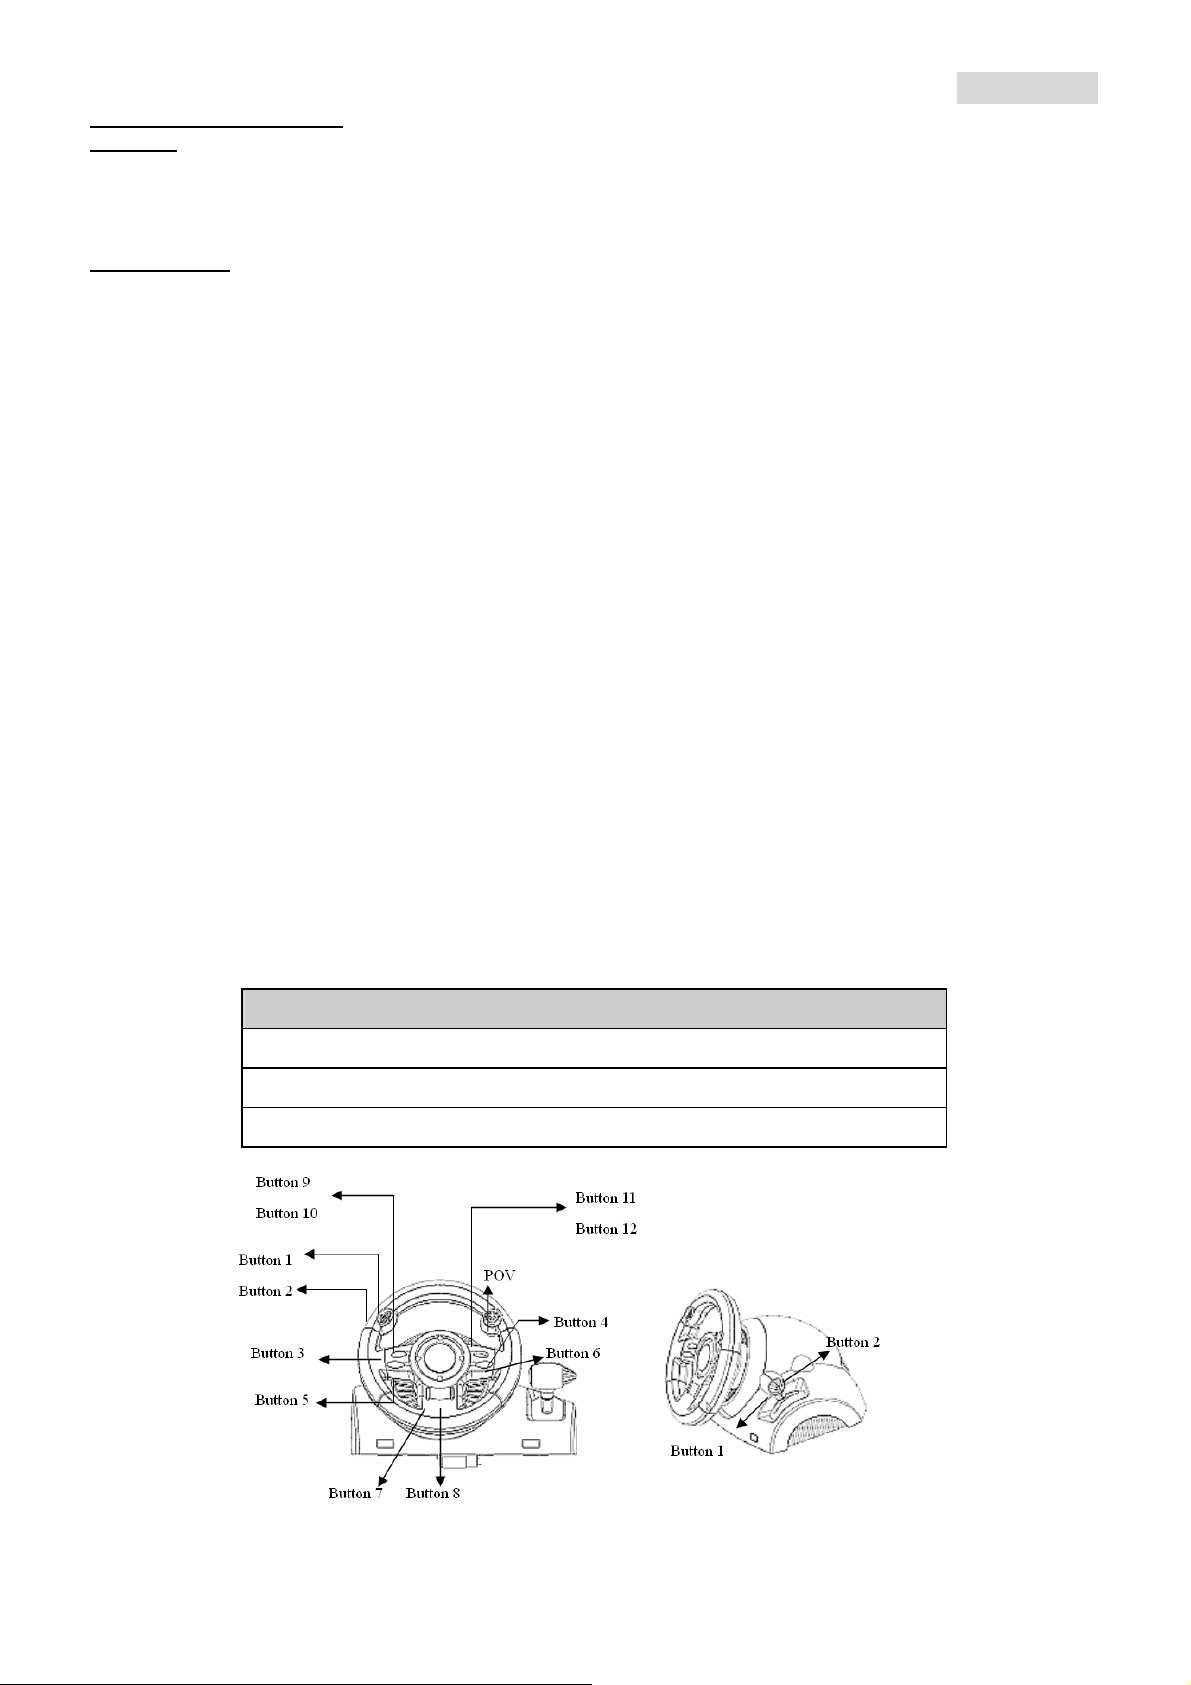
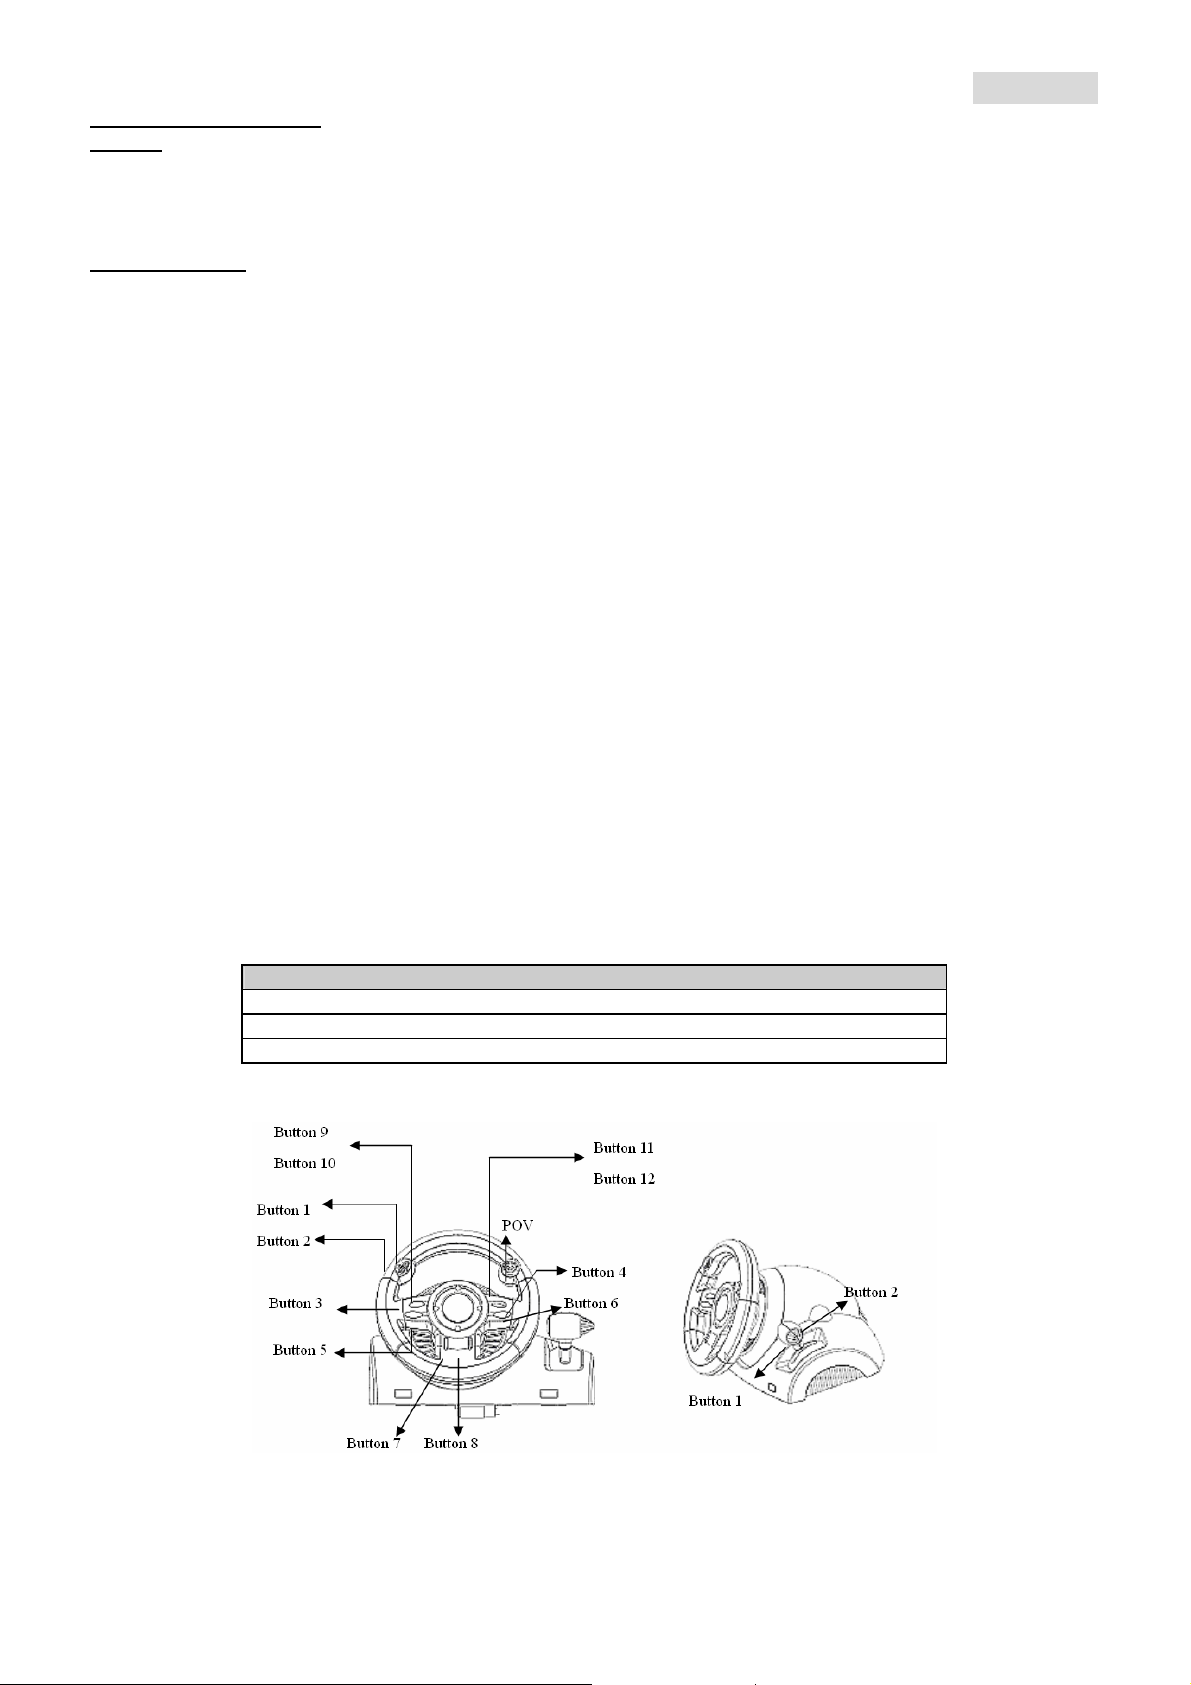
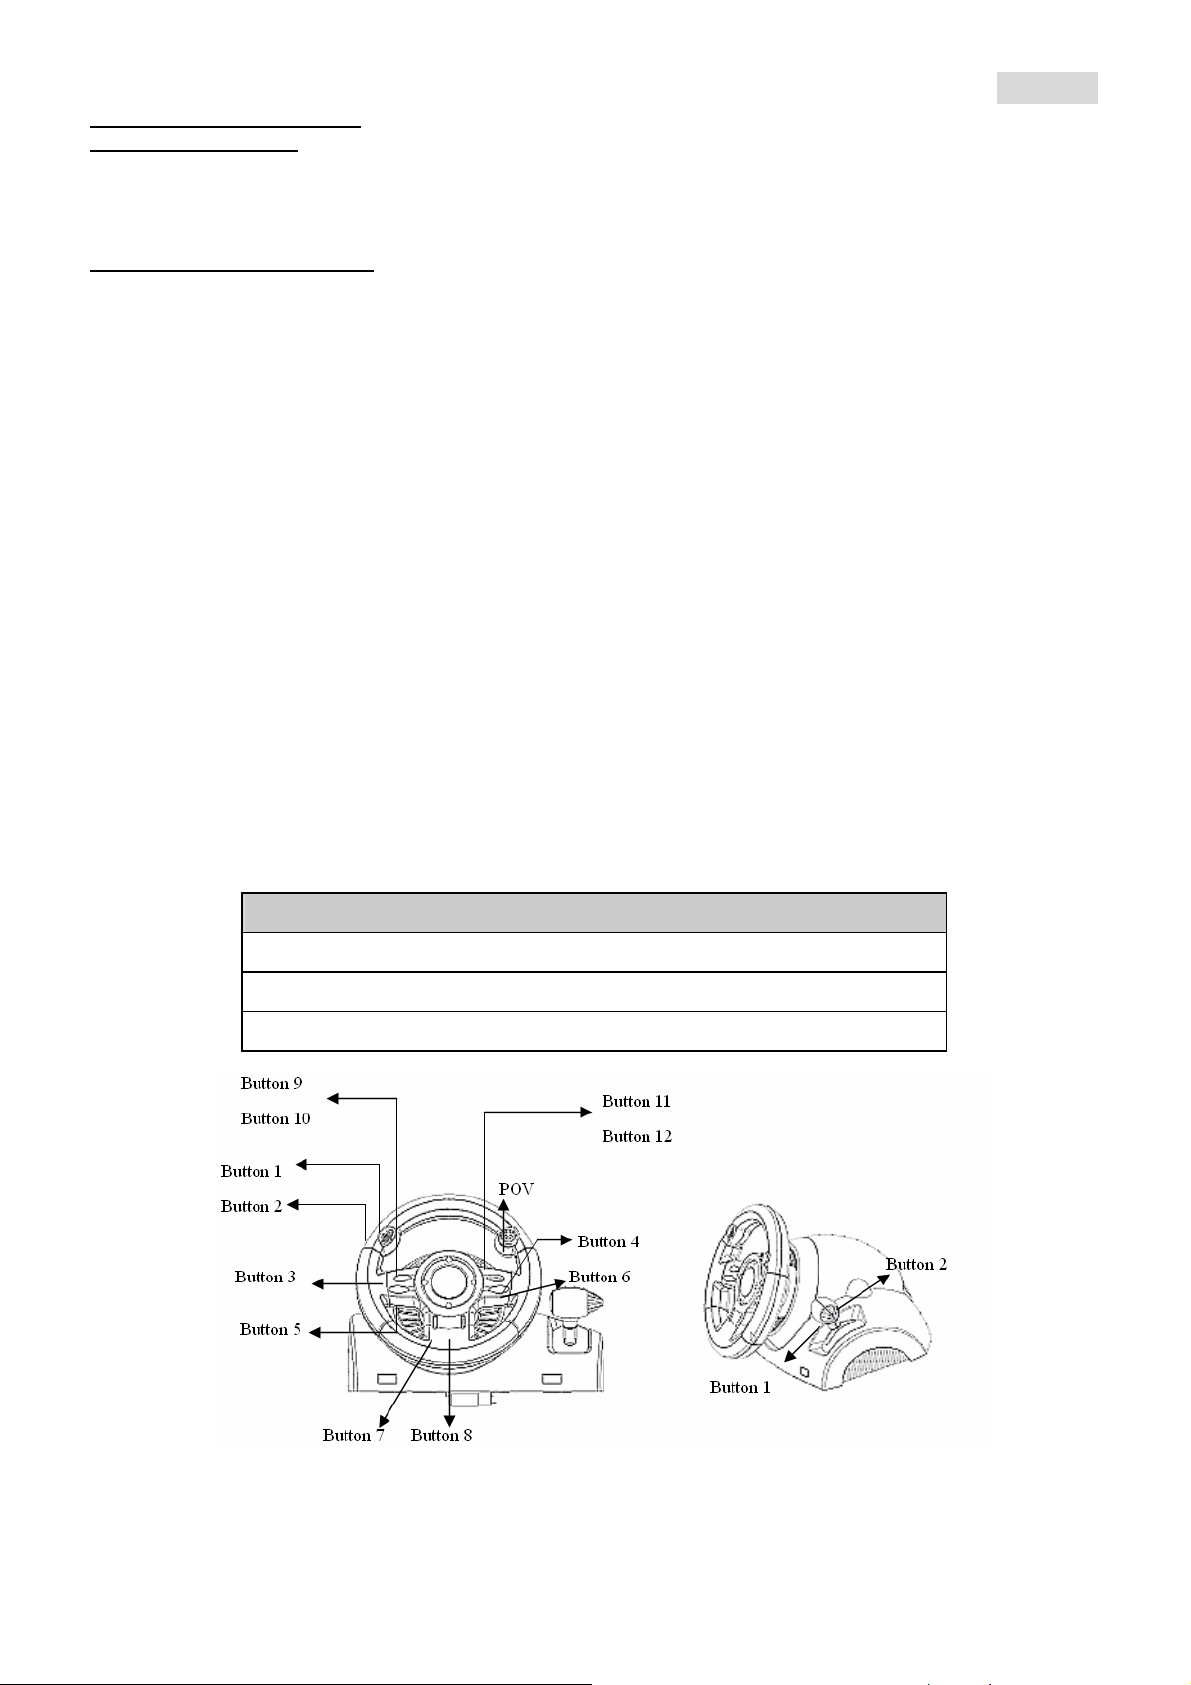
4. Operating and function
There are 12 function buttons built in to Speed Wheel 3 MT and each has different function depending on your
game software.
Function button
8-Direction V iew Finder(POV)
Button 1, 2, 3, 4 , 5, 6 , 7 , 8 , 9 , 10 , 11 , 12
Gear Shifter(Function Button 1 & 2 )
Button 9
Button 10
Button 1
Button 2
Button 3
Button 5
POV
Button 11
Button 12
Button 4
Button 6
Button 2
Button 1
5. Care Of the Unit
The Speed Wheel 3 MT is a well-designed mechanical device. However, it still requires a degree of care in its use and
storage. Please follow these guidelines when using, connecting or storing the Speed Wheel 3 MT:
(1). Do not expose the unit to direct sunlight for long periods of time, as this will cause the plastic to fade and become
brittle.
(2). Do not spill liquids on the unit. If you accidentally spill anything on the Speed Wheel 3 MT, use a damp cloth
immediately to clean it.
(3). Do not use any detergents or cleaners on the Speed Wheel 3 MT.
Button 7 Button 8
1
РРууссссккиийй
1. Требования к системе
Для ПК
z IBM PC Pentium 166 МГц и выше
z Свободный порт USB
z Дисковод CD/DVD-дисков для установки драйвера
z Microsoft Windows XP/ME/2000/98
2. Установка
Этот игровой контроллер совместим с компьютером типа PC, а также системами PlayStation2 и
PlayStation. См. раздел с описанием вашей системы.
А. Установка на компьютере
1. Включите компьютер.
2. Вставьте диск с драйвером в дисковод компакт-дисков. Программа установки запустится
3. Завершите установку, следуя инструкциям на экране.
4. После установки программного обеспечения можно подключить разъем USB кабеля к гнезду
Примечание. При подключении к концентратору USB включайте питание после подключения.
5. Подключите блок
6. Выберите меню «Пуск» / «Настройка» / «Панель управления», дважды щелкните по значку
7. Проверьте прочность крепления основания руля, расположите педали на полу.
8. Подключите разъем
9. Экран «Игровые устройства» позволяет откалибровать и протестировать игровое
10. Закончив калибровку и тестирование, можно начинать игру.
Важно
1. Для работы драйвера в компьютерной системе необходимо наличие DirectX 7.0a или более
2. Вибрация контролируется игровым программным обеспечением
автоматически. Если же программа не запускается, выберите в меню «Пуск»/«Выполнить» и
введите «
E:\setup» (где «E:» обозначение дисковода компакт-дисков). Затем нажмите на
клавишу Enter.
USB на компьютере.
Для работы функции вибрации необходим ток не менее 500 мА.
питания к корпусу руля. Для регулировки и настройки руль повернется вправо
и влево, не трогайте его.
«Игровые устройства».
Примечание. Не устанавливайте педали на скользкой поверхности
педалей к рулю.
устройство.
новой версии. Проверьте версию DirectX в своей системе и при необходимости обновите эту
программу.
.
ФФууннккццииооннааллььнныыее ккннооппккии
ВВииддооииссккааттеелльь сс 88 ссттееппеенняяммии ссввооббоодды
ККннооппккии 11,, 22,, 33,, 44,, 55,, 66,, 77,, 88,, 99,, 1100,, 1111,, 1122
ППееррееккллююччееннииее ппееррееддаач
(
ы
(
ч
(
ФФууннккццииооннааллььннааяя ккннооппккаа 11
(
PPOOV
V
)
)
&
)
22
)
&
2
2
DDEEUUTTSSCCHH
1. Systemanforderungen
Für den PC
z PC Pentium 166 MHz oder schneller
z Freie USB-Schnittstelle
z CD-ROM/DVD-Laufwerk für die Treiberinstallation
Microsoft Windows XP/ME/2000/98
2. Installation
Die Steuerung ist kompatibel mit den Systemen PC﹐ PlayStation2 und PlayStation. Lesen Sie das
Kapitel, das Ihr System betrifft.
A. Installation auf PC
1. Schalten Sie Ihren Computer ein.
2. Legen Sie die Software-CD in das CD-ROM-Laufwerk ein. Das Installationsprogramm startet
automatisch. Sollte dies nicht der Fall sein, starten Sie das Treiberinstallationsprogramm manuell,
indem Sie im Startmenü „Ausführen“ auswählen und „D:\setup“ eingeben (wobei „D“ den
Laufwerksbuchstaben Ihres CD-ROM-Laufwerks darstellt) und die Eingabetaste drücken.
3. Folgen Sie den Bildschirmanleitungen, um die Treiberinstallation fertig zu stellen.
4. Nach abgeschlossener Software-Installation können Sie den USB-Stecker des USB-Kabels in die
USB-Buchse Ihres Computers stecken.
Hinweis: Wenn Sie einen USB-Hub verwenden, schaltet sich das Gerät nach dem Anschließen ein, da
es ein Minimum von 500 mA zum Betrieb des Vibrationsmotors benötigt.
5. Verbinden Sie das Netzgerät mit dem Lenkradgehäuse. In diesem Moment bewegt sich das Lenkrad
nach rechts und links. Das ist ein Selbsttest Berühren Sie das Lenkrad nicht.
Klicken Sie auf Start - Systemsteuerung und doppelklicken Sie auf das Gamecontroller-Symbol.
6. Das Lenkradgehäuse muss sicher am Tisch befestigt sein. Legen Sie den Pedalenträger auf den
Fußboden, so, dass er leicht zu erreichen ist.
Hinweis: Stellen Sie den Pedalenträger nicht auf eine rutschige Fläche:
7. Stecken Sie den Stecker des Pedalenträgers in das Lenkradgehäuse.
8. Im Gamecontroller-Fenster können Sie das Lenkrad testen und einrichten.
9. Wenn alle Einstellungen und Tests beendet sind, sind Sie zum Spielen bereit.
Wichtig:
1. Der Treiber arbeitet mit DirectX 7.0a oderhöher. Prüfen Sie die DirectX-Version auf Ihrem System.
Führen Sie, wenn nötig, ein Upgrade aus.
Der Vibrationseffekt wird vom Spielprogramm ausgelöst.
n
FFuunnkkttiioonnssttaasstteen
88--RRiicchhttuunnggss--SSuucchheer
TTaasstteenn 11,, 22,, 33,, 44,, 55,, 66,, 77,, 88,, 99,, 1100,, 1111,, 112
SScchhaallttkknnüüppppeell ((FFuunnkkttiioonnssttaasstteenn 11 uunndd 22)
r
(
(
PPooiinntt--ddooff--VViieeww)
)
2
)
3
3
FFRRAANNÇÇAAIISS
1. Configuration requise
Pour PC
z Compatibles PC Pentium IBM 166MHz ou supérieur
z Port USB disponible
z Lecteur CD/DVD-ROM pour l’installation du pilote
z Microsoft Windows XP/ME/2000/98
2. Installation
Ce contrôleur de jeu est compatible avec les systèmes PC, PlayStation2 et PlayStation. Veuillez
consulter la section correspondant à votre système.
A. Installation sur système PC
1. Assurez-vous que l’ordinateur est allumé.
2. Insérez le CD du pilote dans le lecteur CD-ROM et le programme d’installation démarre
3. Suivez les instructions qui s’affichent pour parachever l’installation.
4. Une fois l’installation terminée, vous pouvez insérer le câble USB du volant dans un port USB de
Note : si vous branchez le volant sur un concentrateur USB, n’allumez celui-ci qu’après le
branchement, car il requiert au minimum 500mA pour faire fonctionner l’option Turbo.
5. Insérez l’adaptateur d’alimentation AC dans le châssis du volant. Celui-ci peut maintenant bouger à
6. Cliquez sur Démarrer / Paramètres / Panneau de configuration et double-cliquez sur l’icône
7. Assurez-vous que la base du volant est fermement en place et que le pédalier se trouve au sol,
8. Insérez le connecteur des pédales dans le volant.
9. Vous pouvez maintenant calibrer et tester votre volant depuis l’écran “Contrôleur de jeu” ou
10. Une fois la calibration et les tests terminés, vous êtes fin prêt à démarrer une partie.
Important :
1. Sur un système PC, le pilote fonctionne avec une version DirectX 7.0a ou supérieur. Vérifiez la
2. L’effet de vibration est disponible en fonction du jeu en cours.
automatiquement. Si tel n’était pas le cas, exécutez-le manuellement en cliquant sur
Démarrer/Exécuter et saisissez “E:\setup” (“E” représentant l’emplacement de votre lecteur
CD-ROM), appuyez ensuite sur la touche Entrée.
l’ordinateur.
droite et à gauche pour les opérations de paramétrage et de test﹐ ne touchez pas encore le
volant.
“Contrôleur de jeu” ou Options de jeu”.
facilement accessible.
Note : ne placez pas le pédalier sur une surface glissante.
“Options de jeu”.
version DirectX utilisée par votre système et mettez-la à niveau si nécessaire.
BBoouuttoonn ddee ffoonnccttiioonn
s
VViisseeuurr àà 88 ddiirreeccttiioonns
BBoouuttoonn 11,, 22,, 33,, 44,, 55,, 66,, 77,, 88,, 99,, 1100,, 1111,, 1122
LLeevviieerr ddee vviitteesssse
(
(
CCrrooiixx ddiirreeccttiioonnnneelllle
e
(
(
BBoouuttoonn ddee ffoonnccttiioonn 11
e
)
)
&
)
22
)
&
4
4
IITTAALLIIAANNOO
1. Requisiti di sistema
Per PC
z PC IBM-compatibile Pentium a 166 MHz o superiore
z Porta USB disponibile
z Unità CD/DVD-ROM per l'installazione dei driver
z Microsoft Windows XP/ME/2000/98
2. Installazione
Questo game controller è compatibile con i sistemi PC﹐ PlayS tation2 e PlayS t ation. Fate riferimento alla
sezione che descrive il vostro sistema.
A. Installazione per PC
1. Accertarsi che il computer sia acceso.
2. Inserire il disco dei driver nell'unità CD-ROM; il programma di installazione partirà automaticamente.
3. Per completare l'installazione dei driver, seguire le istruzioni fornite a schermo.
4. Al termine dell'installazione è possibile inserire il connettore USB del cavo nella porta USB del
Nota: Se si effettua la connessione a un Hub USB, bisogna accenderlo dopo la connessione dal
5. Connettere l'alimentatore AC al telaio del volante. In questa fase, il volante ruoterà verso destra e
6. Fare clic su Start / Settings / Control Panel e fare doppio clic sull'icona “Game Controller” o
7. Accertarsi che la base del volante sia fissata saldamente e installare la pedaliera sul pavimento in una
8. Inserire nel volante il connettore della pedaliera.
9. È possibile calibrare e sottoporre a test il game controller usando la schermata “Game controller” o
10. Al termine del test e della calibrazione è possibile lanciare qualsiasi gioco.
Importante:
1. Nel PC, il driver utilizza DirectX 7.0a o una versione più recente. Controllare la versione di DirectX
2. L'effetto di vibrazione viene attivato dal software del gioco.
In caso contrario, avviare manualmente il programma di installazione selezionando Start/Run e
digitando “E:\setup” (dove “E” rappresenta la posizione del drive CD-ROM); successivamente
premere il tasto Enter.
computer.
momento che occorrono almeno 500 mA per il funzionamento della funzione di vibrazione.
sinistra per regolazione e testing. Non toccare il volante.
“Gaming Options”.
posizione facile da raggiungere.
Nota: Non posizionare la pedaliera su una superficie scivolosa.
“Gaming Options”.
presente nel sistema e aggiornarla se necessario.
PPuullssaannttee ffuunnzziioonnee
MMiirriinnoo aa 88 ddiirreezziioonnii (( PPOOVV ))
PPuullssaannttee 11,, 22,, 33,, 44,, 55,, 66,, 77,, 88,, 99,, 1100,, 1111,, 1122
CCaammbbiioo mmaarrccee ((PPuullssaannttee ffuunnzziioonnee 11 ee 22 ))
5
5

EESSPPAANNOOLL
1. Requisitos del sistema
Para PC
z PC compatible con IBM Pentium 166MHz o superior
z Puerto USB disponible
z Bandeja de CD/DVD-ROM para instalar el controlador
Windows XP/ME/2000/98 de Microsoft
2. Instalación
Este mando es compatible con PC y con las consolas PlayStation2 y PlayStation. Consulte la sección
relativa a su sistema.
A. Instalación en PC
1. Encienda el ordenador.
2. Introduzca el disco del controlador en la bandeja de CD-ROM y el programa de configuración se
3. Siga las instrucciones que aparecen en pantalla para completar la instalación del controlador.
4. Una vez completada la instalación, puede conectar el cable USB al puerto USB de su ordenador.
Nota: si lo conecta a un hub de USB, póngalo en marcha después de la conexión, porque necesita al
menos 500mA para operar la función de vibración.
5. Conecte el adaptador de CA a la carcasa del volante. En este momento el volante girará a derecha e
6. Haga clic en Inicio / Configuración / Panel de control y haga doble clic en el icono de “Mando del
7. Asegúrese de que la base del volante esté bien colocada y ponga los pedales en el suelo, en una
8. Conecte el conector del pedal al volante.
9. Puede calibrar y probar el mando en la pantalla “Mando del juego” o “Opciones de juego”.
10. Cuando acabe la calibración y la prueba, podrá jugar cualquier juego.
Importante:
1. El controlador no funcionará con DirectX 7.0a o superior en el PC. Compruebe la versión de DirectX
2. El efecto de vibración depende del juego de software.
pondrá en marcha inmediatamente. Si no, inicie manualmente el programa de configuración
seleccionando Start/Run e introduciendo “E:\setup” (“E” representa la ubicación del CD-ROM del
controlador) y pulsando Intro a continuación.
izquierda para regularse y hacer pruebas; no lo toque.
juego” o “Opciones de juego”.
ubicación que le resulte fácil de alcanzar.
Nota: No coloque los pedales en una superficie resbaladiza.
de su sistema, y actualícelo si es necesario.
s
FFuunncciióónn ddee llooss bboottoonnees
s
88--BBuussccaavviissttaass ddee ddiirreecccciioonnees
BBoottóónn 11,, 22,, 33,, 44,, 55,, 66,, 77,, 88,, 99,, 1100,, 1111,, 112
CCaammbbiioo ddee mmaarrcchhaass ((BBoottóónn ddee ffuunncciioonneess 11 yy 2
(
(
PPOOV
V
)
)
2
2
)
)
6
6

PPOORRTTUUGGUUÊÊSS
1. Requisitos do sistema
Para PC
z IBM PC Pentium 166MHz compatível ou superior
z Porta USB disponível
z Unidade de CD/DVD-ROM para a instalação do controlador
z Microsoft Windows XP/ME/2000/98
2. Instalação para sistema PC
1. Certifique-se que o seu PC está ligado.
2. Insira o disco do controlador na unidade de CD-ROM e o programa de configuração irá iniciar
3. Para concluir a instalação do controlador siga as instruções que aparecem no ecrã.
4. Depois da instalação estar concluída, pode conectar o conector USB do cabo à porta USB do seu
5. Nota: Se o conectar a um Hub USB deve ligá-lo após a conexão uma vez que este necessita de,
6. Conecte o adaptador AC ao chassis do volante. Neste momento o volante irá rodar para a direita e
7. Clique em Iniciar / Definições / Painel de controlo e clique duas vezes no ícone “Controladores de
8. Certifique-se que a base do volante está posicionada firmemente e coloque os pedais no chão num
9. Ligue o conector dos pedais ao volante.
10. Pode calibrar e testar o seu controlador de jogos no ecrã “Controladores de jogos” ou “Opções de
11. Quando terminar a calibração e os testes pode iniciar qualquer jogo.
Importante:
1. O controlador irá funcionar com o DirectX 7.0a ou uma versão mais recente no PC. Verifique a
2. O efeito de vibração ocorre de acordo com o software do jogo.
automaticamente. Se tal não acontecer, inicie o programa de configuração manualmente
seleccionando Iniciar/Executar, insira “E:\setup” (onde “E” representa a localização da unidade de
CD-ROM) e, de seguida, prima a tecla Enter.
computador.
pelo menos, 500mA para operar a função de vibração.
esquerda para re
gular e testar não toque no volante.
﹐
jogos” ou “Opções de jogos”.
local de fácil acesso.
Nota: Não coloque os pedais numa superfície escorregadia.
jogos”
versão do DirectX no seu sistema e, se necessário, actualize a mesma.
o
BBoottõõeess ddee ffuunnççãão
o
(
V
)
88 ddiirreeccççõõeess ddee vviissuuaalliizzaaççãão
BBoottããoo 11,, 22,, 33,, 44,, 55,, 66,, 77,, 88,, 99,, 1100,, 1111,, 112
AAllaavvaannccaa ddee vveelloocciiddaaddees
(
PPOOV
s
(
(
BBoottããoo ddee ffuunnççããoo 11
)
2
&
)
22
)
&
7
7

BBRRAASSIILL
1. Requisitos do Sistema
Para PC
z IBM PC Pentium 166MHz compatíveis ou superiores
z Porta USB disponível
z Drive CD/DVD-ROM para instalação do driver
z Microsoft Windows XP/ME/2000/98
2. Instalação para sistema PC
1. Assegure-se de que o computador está ligado.
2. Insira o disco do driver no drive do CD-ROM ﹐ e o programa de ajuste iniciará automaticamente.
3. Siga as instruções da tela para finalizar a instalação do driver.
4. Após completar a instalação﹐ você pode conectar o conector USB do cabo na porta USB do seu
Nota: Se você conectá-lo a um hub USB, energize-o após a conexão, pois ele necessita pelo menos
500mA para operar a função vibração.
5. Conecte o adaptador de energia AC com o chassi do volante. Neste momento, o volante vai girar
6. Clique Start / Setting / Control Panel (Iniciar/Ajustando/Painel de Controle no ícone “Game
7. Assegure-se de que a base do volante esteja firmemente posicionada e coloque os pedais no chão,
8. Conecte o conector do pedal no volante.
9. Você pode calibrar e testar seus game controller na tela “Game controller” ou “Gaming Options”.
10. Quando você concluir a calibragem e testes ﹐ você pode jogar qualquer game.
Importante:
1. O driver irá funcionar com o DirectX 7.0a ou uma versão mais recente no sistema PC. Verifique a
2. O efeito de vibração ocorre de acordo com o software do game.
Se não﹐ inicie o programa de ajuste manualmente selecionando Start/Run e digite “E:\setup”
(onde “E” representa o local no dirve do CD-ROM), e então pressione a tecla Enter.
computador.
para a direita e para a esquerda para regulagens e testes﹐ Não toque no volante.
controller” ou “Gaming Options”.
num local de fácil alcance.
Nota: Não coloque os pedais numa superfície escorregadia
versão DirectX do seu sistema﹐ e atualize se necessário.
BBoottõõeess ddee FFuunnççããoo
o
(
V
)
88 VViissoorreess ddee DDiirreeççãão
BBoottõõeess 11,, 22,, 33,, 44,, 55,, 66,, 77,, 88,, 99,, 1100,, 1111,, 1122
TTrrooccaa ddee MMaarrcchhaass ((CCââmmbbiioo)
(
PPOOV
)
)
(
(
BBoottõõeess ddee FFuunnççããoo 11
22
)
)
&
&
8
8

NNEEDDEERRLLAANNDDSS
1. Systeemvereisten
Voor pc
z IBM pc Pentium 166MHz compatible of hoger
z Vrije USB-poort
z CD/DVD-ROM station voor het installeren van het stuurprogramma
z Microsoft Windows XP/ME/2000/98
2. Installatie op pc-systeem
1. Zorg er voor dat de computer in ingeschakeld.
2. Stop de cd met het stuurprogramma in het cd rom-station; het installatieprogramma start
3. Volg de instructies op het scherm om de installatie van het stuurprogramma te voltooien.
4. Nadat de installatie klaar is kunt u de USB-connector van de kabel in de USB-poort van de computer
Opmerking: indien u het apparaat aansluit op een USB-hub, dit apparaat na het aansluiten voeden:
5. Sluit de netadapter aan op het stuurwielchassis. Op dat ogenblik zal het stuurwiel naar rechts en
6. Klok op Start / Instellingen / Configuratiescherm en dubbelklik op het pictogram “Spelbesturing”
7. Zorg er voor dat de stuurwielvoet stevig is geïnstalleerd en plaats de pedalen op de v loer in een voor
8. Stop de connector van de pedaal in het stuurwiel.
9. U kunt uw game controller kalibreren en testen op het scherm “Game controller” of “Gaming
10. Zodra u klaar bent met het kalibreren en de test, kunt u gaan spelen.
Belangrijk:
1. Het stuurprogramma werkt met DirectX 7.0a of een nieuwere versie. Controleer de DirectX-versie
2. Het trileffect treedt op naargelang de spelsoftware.
automatisch. Start als dat niet het geval zou de installatie handmatig door Start/Uitvoeren te
selecteren, en “E:\setup” (waarin “E” staat voor de stationsletter van het cd rom-station) in te tikken.
Druk daarna op de Enter-toets.
pluggen.
het apparaat heeft minstens 500mA nodig voor de trilfunctie.
naar links draaien om af te regelen en te testen﹐ Raak het stuurwiel niet aan.
of “Spelbesturing”.
u comfortabele positie.
Opmerking: plaats de pedalen niet op een glad oppervlak
Options”.
van uw systeem, en upgrade desnoods.
FFuunnccttiieekknnoopp
n
(
V
)
ZZooeekkeerr iinn 88--rriicchhttiinnggeen
KKnnoopp 11,, 22,, 33,, 44,, 55,, 66,, 77,, 88,, 99,, 1100,, 1111,, 1122
SScchhaakkeelleenn
(
(
FFuunnccttiieekknnoopp 11
(
PPOOV
)
&
)
22
)
&
9
9

ČČEESSKKYY
1. Požadavky na systém
Stolní počítač
z Počítač standardu IBM s procesorem Pentium 166 MHz nebo rychlejším
z Volný port USB
z Jednotka CD/DVD-ROM pro instalaci ovladačů
z Operační systém Microsoft Windows XP/ME/2000/98
2. Instalace pro systém PC
1. Zapněte počítač.
2. Po vložení disku s ovladači do jednotky CD-ROM se automaticky spustí instalační program. V
opačném případě spusťte instalační program ručně: klepněte na tlačítko Start/Spustit, zadejte
umístění “E:\setup” (kde písmeno “E” označuje jednotku CD-ROM v počítači) a potom stiskněte
klávesu Enter.
3. Podle zobrazených pokynů nainstalujte ovladač.
4. Po dokončení instalace můžete připojit konektor USB kabelu k portu USB v počítači.
Poznámka: Připojíte-li ovladač k rozbočovači USB, po připojení jej zapněte, protože pro funkci vibrací
vyžaduje ovladač alespoň 500mA.
5. Připojte napájecí adaptér k podstavci volantu. V tomto okamžiku se bude volant v rámci regulace a
testování sám natáčet doleva a doprava - nedotýkejte se volantu.
6. Klepněte na tlačítko Start / Nastavení / Ovládací panely a poklepejte na ikonu “Herní zař
nebo “Možnosti herního zařízení”.
7. Podstavec volantu musí být pevně připevněn a pedály musí být umístěny na podlaze v pohodlně
dostupné poloze.
Poznámka: Neumísťujte pedály na kluzký povrch.
8. Připojte konektor pedálů k volantu.
9. V části “Herní zařízení” nebo “Možnosti herního zařízení” můžete kalibrovat a testovat toto herní
zařízení.
10. Po dokončení kalibrace a testování můžete začít hrát.
Důležité:
1. V počítačovém systému bude tento ovladač spolupracovat s rozhraním DirectX 7.0a nebo novější
verzi. Zkontrolujte verzi rozhraní DirectX ve vašem počítači a podle potřeby jej zaktualizujte.
2. Efekt vibrací se používá podle herního softwaru.
o
FFuunnkkččnníí ttllaaččííttkko
88ssmměěrrnnýý hhlleeddááččeekk((PPOOVV)
TTllaaččííttkkoo 11,, 22,, 33,, 44,, 55,, 66,, 77,, 88,, 99,, 1100,, 1111,, 112
ŘŘaaddííccíí ppáákkaa((ffuunnkkččnníí ttllaaččííttkkoo 11 aa 22 )
)
)
ízení”
2
0
110

MMAAGGYYAARR
1. Rendszerkövetelmények
PC
z IBM PC Pentium 166 MHz kompatíbilis vagy gyorsabb
z Szabad USB port
z CD/DVD meghajtó a driver telepítéséhez
z Windows XP/ME/2000/98
2. Telepítés PC alapú rendszerre
1. Győződjön meg róla, hogy a számítógép be van kapcsolva.
2. Helyezze a drivert tartalmazó lemezt a CD-ROM meghajtóba, ezután a telepítő program
automatikusan elindul. Ha nem, indítsa el azt manuálisan a Start/Futtatás parancs kiválasztásával,
gépelje be: „E:\setup” (az „E:” a CD-ROM meghajtó helyét jelöli), majd nyomja meg az Enter
billentyűt.
3. Kövesse a képernyőn megjelenő utasításokat a driver telepítésének befejezéséhez.
4. Miután befejezte a telepítést, csatlakoztassa az USB csatlakozót a számítógép USB portjára.
Megjegyzés: Ha USB hubhoz csatlakoztatja, akkor csatlakoztatás után kapcsolja be, mivel legalább
500mA szükséges a rezgő funkcióhoz.
5. Csatlakoztassa a hálózati adaptert a kormánykerék alsó részéhez. Ekkor a kerék a tesztelés
érdekében balra és jobbra mozgatható, ekkor még ne nyúljon az eszközhöz.
6. Válassza a Start/Beállítások/Vezérlőpult parancsot, majd kattintson duplán a Játékvezérlők vagy
Játékbeállítások ikonra.
7. Győződjön meg róla, hogy a kormány talpa megfelelően van rögzítve, majd helyezze a pedálokat a
padlóra egy könnyen elérhető helyre.
Megjegyzés: Ne helyezze a pedálokat csúszós felületre
8. Csatlakoztassa a pedál vezetékét a kormánykerékhez.
9. Beállíthatja és tesztelheti a játékvezérlőt a képernyő Játékvezérlő vagy Játékbeállítások részében.
10. Miután befejezte a beállítást és tesztelést, akár egyből ki is próbálhatja azt játék közben.
Fontos:
1. A driver DirectX 7.0a vagy újabb verzióval fog működni a PC alapú rendszereken. Ellenőrizze a
DirectX verzióját, és frissítsen, ha szükséges.
2. A rezgő hatás a játékszoftvernek megfelelően fog működni.
FFuunnkkcciióóggoommb
88 iirráánnyyúú kkeerreessőő ((PPOOVV)
GGoommbb 11,, 22,, 33,, 44,, 55,, 66,, 77,, 88,, 99,, 1100,, 1111,, 112
SSeebbeessssééggvváállttóó ((ffuunnkkcciióóggoommbb 11 ééss 22)
b
)
2
)
1
111
PPOOLLSSKKII
1. Wymagania systemowe
Dla komputerów PC
z Zgodny z IBM PC Pentium 166 MHz lub lepszy
z Dostępny port USB
z Napęd CD/DVD-ROM do instalacji sterownika
z Microsoft Windows XP/ME/2000/98
2. Instalacja w systemie PC
1. Upewnić się, że komputer został włączony.
2. Założyć płytę ze sterownikami do napędu CD-ROM﹐ program konfiguracyjny uruchomi się
automatycznie. Jeżeli tak się nie stanie﹐ należy manualnie uruchomić program konfiguracyjny
wybierając Start/Uruchom i wpisując „E:\setup” (gdzie litera „E” odpowiada lokalizacji napędu
CD-ROM), następnie nacisnąć klawisz Enter.
3. W celu przeprowadzenia instalacji sterownika, należy postępować zgodnie z instrukcjami
pojawiającymi się na ekranie.
4. Po zakończeniu instalacji﹐ można wetknąć złącze kabla USB do portu USB komputera.
Uwaga: Jeżeli przyłącza się złącze do koncentratora USB, należy włączyć zasilanie dopiero po
przyłączeniu, ponieważ urz
5. Przyłączyć zasilacz AC do podstawy kierownicy. W tym momencie kierownica obróci się w prawo i w
lewo w celu wyregulowania i sprawdzenia﹐ nie należy dotykać kierownicy.
6. Kliknąć Start / Ustawienia / Panel sterowania i dwukrotnie kliknąć na ikonę „Kontroler gier” lub
„Opcje gier”.
7. Należy się upewnić, że podstawa kierownicy została mocno osadzona i umieścić pedały na
podłodze w miejscu dogodnym do sięgania do nich.
Uwaga: Nie umieszczać pedałów na śliskich powierzchniach.
8. Wetknąć złącze pedałów do kierownicy.
9. Użytkownik może skalibrować i przetestować kontroler gry za pomocą ekranu „Kontroler gier” lub
„Opcje gier”.
10. Po zakończeniu kalibracji i testowania﹐ można zagrać w dowolną grę.
Ważne:
1. Sterownik działa z DirectX 7.0a lub jego nowszą wersją w systemie PC. Sprawdzić wersję DirectX w
swoim systemie﹐ i uaktualnić, jeśli trzeba.
2. Zgodnie z oprogramowaniem gry pojawia się efekt wibracji.
ądzenie potrzebuje co najmniej 500 mA do obsługiwania funkcji wibracji.
PPrrzzyycciisskk ffuunnkkccyyjjnnyy
88--kkiieerruunnkkoowwyy cceelloowwnniikk((PPOOVV ((ppuunnkktt wwiiddzzeenniiaa))))
PPrrzzyycciisskk 11,, 22,, 33,, 44,, 55,, 66,, 77,, 88,, 99,, 1100,, 1111,, 1122
DDźźwwiiggnniiaa zzmmiiaannyy bbiieeggóóww((PPrrzzyycciisskk ffuunnkkccyyjjnnyy 11 && 22 ))
2
112

SSRRPPSSKKII
1. Sistemski zahtevi
Za lični računar
z IBM PC Pentium 166 MHz ili noviji
z Slobodni USB port
z CD/DVD-ROM pogonska jedinica za instalaciju upravljačkog programa
z Microsoft Windows XP/ME/2000/98
2. Instalacija na lični računar
1. Proverite da li je Vaš računar uključen.
2. Postavite CD sa upravljačkim programom u CD-ROM pogonsku jedinicu i program za instalaciju će
se automatski pokrenuti. Ukoliko se to ne dogodi, pokrenite instalacioni program ručno klikom na
Start / Run i ukucavanjem “E:\setup” (gde “E” predstavlja lokaciju Vaše CD-ROM pogonske
jedinice), a zatim pritisnite taster “Enter”.
3. Pratite uputstva na ekranu kako biste dovršili instalaciju upravljačkog programa.
4. Po završetku instalacije možete priključiti USB konektor na kraju kabla u USB port na Vašem
računaru.
Napomena: Ako konektor priključujete na USB čvorište, uključite ga nakon priključenja, jer zahteva
napajanje od najmanje 500mA kako bi funkcija vibriranja radila.
5. Priključite strujni adapter na kućište volana. U tom trenutku volan će se okrenuti udesno i ulevo radi
regulisanja i testiranja. Ne dodirujte volan.
6. Kliknite na Start / Setting / Control Panel i dva puta kliknite na ikonicu “Game controller” ili
“Gaming Options”.
7. Proverite da li je osnova volana čvrsto postavljena na sto i postavite pedale na pod u položaj koji
možete lako dosegnuti.
Napomena: Ne postavljajte pedale na klizavu površinu.
8. Priključite konektor sa pedala u kućište volana.
9. Svoj upravljač možete podesiti i isprobati otvaranjem prozora “Game controller” ili “Gaming
Options”.
10. Kada završite podešavanje i isprobavanje, možete igrati bilo koju igru.
Važno:
1. Upravljački program će funkcionisati ako imate DirectX 7.0 ili noviju verziju na svom ličnom računaru.
Proverite koju verziju DirectX imate i zamenite je novijom ukoliko je to potrebno.
2. Efekat vibriranja će postojati zavisno od softvera igre.
FFuunnkkcciijjaa ttaasstteerraa
88--ssmmeerrnnii vviizziirr((PPOOVV))
TTaasstteerrii 11,, 22,, 33,, 44,, 55,, 66,, 77,, 88,, 99,, 1100,, 1111,, 1122
MMeennjjaačč bbrrzziinnaa((FFuunnkkcciioonnaallnnii ttaasstteerrii 11 ii 22 ))
3
113

ΕΕΛΛΛΛΗΗΝΝΙΙΚΚΑΑ
1. Απαιτήσεις συστήματος
Για
z Υπολογιστές IBM συμβατοί με επεξεργαστή Pentium 166MHz ή ανώτερο
z Διαθέσιμη θύρα USB
z Μονάδα CD/DVD-ROM για εγκατάσταση του προγράμματος οδήγησης
z Microsoft Windows XP/ME/2000/98
2. Εγκατάσταση για σύστημα PC
1. Βεβαιωθείτε ότι ο υπολογιστής σας είναι ανοιχτός.
2. Τοποθετήστε το δίσκο με το πρόγραμμα οδήγησης στη μονάδα CD-ROM και το πρόγραμμα αρχικής
ρύθμισης θα αρχίσει αυτόματα. Αν δεν αρχίσει αυτόματα, κάντε χειροκίνητη έναρξη του
προγράμματος αρχικής ρύθμισης επιλέγοντας Start (Έναρξη)/Run (Εκτέλεση) και πληκτρολογήστε
“E:\setup” (όπου το “E” εκφράζει τη θέση της μονάδας CD-ROM) και μετά πιέστε το πλήκτρο Enter.
3. Ακολουθήστε τις οδηγίες στην οθόνη για να ολοκληρωθεί η εγκατάσταση του προγράμματος
οδήγησης.
4. Αφού ολοκληρωθεί η εγκατάσταση, μπορείτε να συνδέσετε το σύνδεσμο USB του καλώδιου στη
θύρα USB του υπολογιστή σας. Σημείωση: Αν το συνδέσετε σε διανομέα USB, ενεργοποιήστε το
μετά τη σύνδεση, επειδή χρειάζεται τουλάχιστον 500mA για να εκτελέσει τη λειτουργία δόνησης.
5. Συνδέστε τον προσαρμογέα AC με το πλαίσιο του πηδάλιου. Εκείνη τη στιγμή το πηδάλιο θα γυρίσει
δεξιά και αριστερά για ρύθμιση και δοκιμή, οπότε μην αγγίξετε το πηδάλιο.
6. Κάντε κλικ στις επιλογές Start (Έναρξη) / Setting (Ρύθμιση)/ Control Panel (Πίνακας ελέγχου) και
διπλό κλικ στο εικονίδιο “Game controller” (Ελεγκτής παιχνιδιών) ή “Gaming Options”
(Δυνατότητες παιχνιδιών).
7. Βεβαιωθείτε ότι η βάση του πηδάλιου είναι στερεωμένη και τοποθετήστε τα πεντάλ στο δάπεδο, σε
σημείο που μπορείτε να τα φτάσετε εύκολα. Σημείωση: Μην τοποθετείτε τα πεντάλ σε ολισθηρή
επιφάνεια
8. Συνδέστε το σύνδεσμο του πεντάλ στο πηδάλιο.
9. Μπορείτε να ρυθμίσετε και να δοκιμάσετε τον ελεγκτή παιχνιδιών στην οθόνη “Game controller”
(Ελεγκτής παιχνιδιών) ή “Gaming Options” (Δυνατότητες παιχνιδιών).
10. Όταν τελειώσετε με τις ρυθμίσεις και τη δοκιμή, θα μπορείτε να παίξετε οποιοδήποτε παιχνίδι.
Σημαντικό:
1. Το πρόγραμμα οδήγησης θα λειτουργήσει με DirectX 7.0a ή νεότερη έκδοση στο σύστημα PC.
Ελέγξτε την έκδοση του DirectX στο σύστημά σας και, αν χρειαστεί, αναβαθμίστε το.
2. Το εφέ δόνησης λειτουργεί ανάλογα με το λογισμικό του παιχνιδιού.
ΚΚοουυμμππίί λλεειιττοουυρργγιιώών
ΕΕυυρρέέττηηςς θθέέαασσηηςς 88 κκααττεευυθθύύννσσεεωωνν((PPOOVV)
ΚΚοουυμμππίί 11,, 22,, 33,, 44,, 55,, 66,, 77,, 88,, 99,, 1100,, 1111,, 112
ΣΣύύσσττηημμαα ααλλλλααγγήήςς ττααχχυυττήήττωωνν((ΚΚοουυμμππιιάά λλεειιττοουυρργγιιώώνν 11 && 2
ν
)
2
2 ))
4
114

RROOMMÂÂNNĂĂ
1. Cerinţe de sistem
Pentru PC
z PC compatibil IBM Pentium 166MHz sau mai performant
z Port USB liber
z Unitate CD/DVD-ROM pentru instalarea driverului
Microsoft Windows XP/ME/2000/98
2. Instalarea pentru sisteme PC
1. Asiguraţi-vă că computerul este pornit.
2. Introduceţi discul cu driverul în unitatea CD-ROM; programul de instalare va porni automat. În caz
contrar, porniţi manual programul de instalare selectând Start/Run (Start/Executare) şi tastaţi
„E:\setup” (unde „E” reprezintă locaţia unităţii CD-ROM), apoi apăsaţi tasta Enter.
3. Urmaţi instrucţiunile afişate pe ecran pentru a încheia instalarea driverului.
4. După finalizarea instalării, puteţi introduce conectorul USB al cablului în portul USB al computerului.
Notă: Dacă îl conectaţi la un hub USB, alimentaţi-l după conectare, deoarece funcţia de vibraţii necesită
cel puţin 500mA pentru a funcţiona.
5. Conectaţi adaptorul CA de alimentare la şasiul volanului. În momentul conectării, volanul se va roti la
dreapta şi la stânga pentru calibrare şi testare, nu atingeţi volanul.
6. Faceţi clic pe Start / Setting / Control Panel (Start / Setări / Panou de control) şi faceţi dublu clic
pe pictograma „Game controller
jocuri).
7. Asiguraţi-vă că baza volanului este bine fixată şi amplasaţi pedalele pe podea astfel încât să fie uşor
accesibile.
Notă: Nu amplasaţi pedalele pe suprafeţe lunecoase.
8. Conectaţi conectorul pedalelor la volan.
9. Puteţi calibra şi testa dispozitivul de control al jocului în ecranul „Game controller” (Dispozitiv de
control joc) sau „Gaming Options” (Opţiuni jocuri).
10. După ce terminaţi calibrarea şi testarea, puteţi juca orice joc.
Important:
1. În cazul sistemelor PC, driverul va funcţiona cu DirectX 7.0a sau mai recent. Verificaţi versiunea
DirectX instalată pe sistemul dumneavoastră şi actualizaţi-o dacă este necesar.
2. Efectele de vibraţii sunt controlate de jocuri.
” (Dispozitiv de control jocuri) sau „Gaming Options” (Opţiuni
FFuunnccţţiiiillee bbuuttooaanneelloorr
VViizzoorr ccuu 88 ddiirreeccţţiiii ((PPOOVV))
BBuuttoonn 11,, 22,, 33,, 44,, 55,, 66,, 77,, 88,, 99,, 1100,, 1111,, 1122
SScchhiimmbbăăttoorr ddee vviitteezzee ((bbuuttooaanneellee ccuu ffuunnccţţiiii 11 şşii 22))
5
115

TTÜÜRRKKÇÇEE
1. Sistem Gereklilikleri
PC için
z IBM PC Pentium 166MHz uyumlular veya daha yükseği
z Mevcut USB yuvası
z Sürücü kurulumu için CD/DVD-ROM Sürücüsü
z Microsoft Windows XP/ME/2000/98
2. PC sistemi için kurulum
1. Bilgisayarınızı açınız.
2. CD-ROM sürücüsüne sürücü diskini takınız, kurulum programı otomatik olarak başlayacaktır. Eğer
3. Sürücü kurulumunu bitirmek için ekran talimatlarını takip ediniz.
4. Kurulum tamamlandıktan sonra, USB konektörünü bilgisayarınızdaki USB yuvasına takabilirsiniz.
Not: Eğer bir USB Hub’ına bağlarsanız, bağlantıdan sonra bunu açınız, çünkü titreşim işlevinin
5. AC güç adaptörünü direksiyon gövdesine bağlayınız. Bu anda, düzenleme ve test amaçlı olarak
6. Start / Setting / Control Panel tıklayınız ve “Game controller” veya “Gaming Options” simgesini
7. Direksiyon tabanının sıkıca sabitlenmiş olduğundan ve pedalların zeminde ulaşılması uygun olan bir
8. Pedalın konektörünü direksiyona takınız.
9. “Game controller” veya “Gaming Options” ekranında oyun konsolunuzu kalibre ve test
10. Kalibrasyon ve ve testi bitirdiğinizde, oyun oynamaya hazır durumdasınız.
Önemli:
1. Sürücü, PC sisteminde DirectX 7.0a veya daha yeni bir sürümü ile çalışacakt
2. Titreşim efektleri oyun yazılımına bağlı olarak oluşur.
başlamazsa, Start/Run seçerek ve “E:\setup” yazarak kurulum programını manuel olarak başlatınız
(“E”, CD-ROM sürücüsünü temsil etmektedir), sonrasında Enter tuşuna basınız.
çalıştırılması için en azından 500mA gereksinimi vardı
r.
direksiyon sağa ve sola dönecektir, direksiyona dokunmayınız.
çift-tıklayınız.
konuma yerleştirilmiş olduğundan emin olunuz.
Not: Pedalları kaygan bir zemin üzerine yerleştirmeyiniz
edebilirsiniz.
ır. Sisteminizdeki
DirectX sürümünü kontrol ediniz ve gerekli ise bunu güncelleyiniz.
FFoonnkkssiiyyoonn ddüüğğmmeessii
88--YYöönn GGöörrüünnttüü BBuulluuccuu((PPOOVV))
11,, 22,, 33,, 44,, 55,, 66,, 77,, 88,, 99,, 1100,, 1111,, 1122 ddüüğğmmeelleerrii
GGeeaarr SShhiifftteerr((FFoonnkkssiiyyoonn DDüüğğmmeessii 11 && 22 ))
6
116

ﺔﻴﺑﺮﻌﻟا
ﺔﻴﺑﺮﻌﻟا
GGaammee
وأ
"Gaming
"
بﺎﻌﻟﻷا ﻲﻓ ﻢﻜﺤﺘﻟا ةﺪﺣو
بﺎﻌﻟﻷا ﻲﻓ ﻢﻜﺤﺘﻟا ةﺪﺣو
( ( وأ
1.
ﻣمﺎﻈﻨﻟا تﺎﺒﻠﻄﺘ
ﺮﺗﻮﻴﺒﻤﻜﻟا زﺎﻬﺠﻟ
z ﺮﺗﻮﻴﺒﻤآ زﺎﻬﺟﻊﻣ ﻖﻓاﻮﺘﻣ IBM ﺞﻟﺎﻌﻤﺑPentium ﺔﻋﺮﺴﺑ166ﻰﻠﻋأ وأ ﺰﺗﺮه ﺎﺠﻴﻣ
z ﺬﻔﻨﻣUSB ﺮﻓﻮﺘﻣ
z ﺔﻃﻮﻐﻀﻣ صاﺮﻗأ كﺮﺤﻣ / ﺖﻴﺒﺜﺘﻟ ﺔﻴﻤﻗر ﻮﻳﺪﻴﻓ صاﺮﻗأﻞﻴﻐﺸﺘﻟا ﺞﻣﺎﻧﺮﺑ
ﻧﻞﻴﻐﺸﺘﻟا مﺎﻈ
2 .ﺖﻴﺒﺜﺘﻟا
ﻜﻟا ﺔﻤﻈﻧأ ﻊﻣ ﺎﻬﻘﻓاﻮﺘﺑ ﻩﺬه بﺎﻌﻟﻷا ﻲﻓ ﻢﻜﺤﺘﻟا ةﺪﺣو ﺰﻴﻤﺘﺗو ،ﺮﺗﻮﻴﺒﻤPlayStation2و ،PlayStation. ﻒﺼﻳ يﺬﻟا ﻢﺴﻘﻟا ﻰﻟإ عﻮﺟﺮﻟا ءﺎﺟﺮﺑ
ﻚﺑ صﺎﺨﻟا مﺎﻈﻨﻟا.
أ .اﺮﺗﻮﻴﺒﻤﻜﻟا مﺎﻈﻨﺑ صﺎﺨﻟا ﺖﻴﺒﺜﺘﻟ
1. ﺗﻚﺑ صﺎﺨﻟا ﺮﺗﻮﻴﺒﻤﻜﻟا زﺎﻬﺟ ﻞﻴﻐﺸﺗ ﻦﻣ ﺪآﺄ.
،ﺔﻃﻮﻐﻀﻤﻟا صاﺮﻗﻷا كﺮﺤﻣ ﻲﻓ .ﻟ اذإ ﺞﻣﺎﻧﺮﺑ ﻞﻴﻐﺸﺗ أﺪﺑا ،ﻚﻟذ ثﺪﺤﻳ ﻢ
2. أ صﺮﻗ جردﻞﻴﻐﺸﺘﻟا ﺞﻣﺎﻧﺮﺑﺎًﻴﺋﺎﻘﻠﺗ ﻞﻴﻐﺸﺘﻟا ﻲﻓ داﺪﻋﻹا ﺞﻣﺎﻧﺮﺑ أﺪﺒﻴﺳو
ﺪﻳﺪﺤﺗ ﻖﻳﺮﻃ ﻦﻋ ﺎًﻳوﺪﻳ داﺪﻋﻹاStart/Run) ءﺪﺑ /ﻞﻴﻐﺸﺗ ( رﺎﺴﻤﻟا ﺔﺑﺎﺘآو“E:\setup”) ﺚﻴﺣ"E " صاﺮﻗﻷا كﺮﺤﻣ ﻊﻗﻮﻣ ﻞﺜﻤﻳ
ﺔﻃﻮﻐﻀﻤﻟا( حﺎﺘﻔﻣ ﻰﻠﻋ ﻂﻐﺿا ﻢﺛ ،Enter.
ﻞﻴﻐﺸﺘﻟا ﺞﻣﺎﻧﺮﺑ.
ﻞﻴﻐﺸﺘﻟا ﺞﻣﺎﻧﺮﺑ
Bﺮﺗﻮﻴﺒﻤﻜﻟا زﺎﻬﺠﺑ دﻮﺟﻮﻤﻟا .
UUSSB
ﻰﻟإ جﺎﺘﺤﻳ ﺮﻣﻷا نﻷ اًﺮﻈﻧ ،ﻞﻴﺻﻮﺘﻟا ﺪﻌﺑ ﻪﻠﻴﻐﺸﺘﺑ مﻮﻘﺗ نأ ﻚﻴﻠﻋ ،500 ﻞﻗﻷا ﻰﻠﻋ ﺮﻴﺒﻣأ ﻲﻠﻠﻣ
UUSSB
B ﺬﻔﻨﻤﺑ ﻞﺑﺎﻜﻟﺎﺑ صﺎﺨﻟا
USB
3. ﺖﻴﺒﺜﺗ ءﺎﻬﻧﻹ ﺔﺷﺎﺸﻟا ﻰﻠﻋ ﺔﺤﺿﻮﻤﻟا تﺎﻤﻴﻠﻌﺘﻟا ﻊﺒﺗا
4. ﻟا ﻦﻣ ءﺎﻬﺘﻧﻻا ﺪﻌﺑ ﻞﺻﻮﻣ ﻞﻴﺻﻮﺗ ﻚﻨﻜﻤﻳ ،ﺖﻴﺒﺜﺘ
ﻣﺔﻈﺣﻼ : رﻮﺤﻤﺑ ﻞﺻﻮﻤﻟا ﻞﻴﺻﻮﺘﺑ ﺖﻤﻗ اذإ
زاﺰﺘهﻻا ﺔﻔﻴﻇو ﻞﻴﻐﺸﺘﻟ.
5. ﻗدﻮﺟﻮﻤﻟا ﺔﻗﺎﻄﻟا ﻞﺑﺎآ ﻞﻴﺻﻮﺘﺑ ﻢﻪﻴﺟﻮﺘﻟا ﺔﻠﺠﻋ ﻞﻜﻴﻬﺑ ددﺮﺘﻤﻟا رﺎﻴﺘﻟا لﻮﺤﻤﺑ . ﺎﻬﺘآﺮﺣ مﺎﻈﺘﻧا ﻦﻣ ﺪآﺄﺘﻠﻟ اًرﺎﺴﻳو ﺎًﻨﻴﻤﻳ ﺔﻠﺠﻌﻟا ةرادإ ﻢﺘﺗ فﻮﺳ ﺎﻨهو
،ﺎهرﺎﺒﺘﺧاوﺎًﻘﻠﻄﻣ ﺔﻠﺠﻌﻟا ﺲﻤﻠﺗ ﻼﻓ.
ءﺪﺑ
/(
ﻢﻜﺤﺘﻟا ﺔﺣﻮﻟ
( قﻮﻓ ﺎًﺟودﺰﻣ اًﺮﻘﻧ ﺮﻘﻧا ﻢﺛﺰﻣر"
بﺎﻌﻟﻷا تارﺎﻴﺧ
(.
CCoonnttrrooll PPaanneel
GGaammiinngg OOppttiioonns
داﺪﻋﻹا
/(
l)
s) "
SSeettttiinng
بﺎﻌﻟﻷا ﻲﻓ ﻢﻜﺤﺘﻟا ةﺪﺣو
( وأ"
g)
SSttaarrt
t)
ccoonnttrroolllleer
6. قﻮﻓ ﺮﻘﻧا
r) "
7.
ﺗﻪﻴﻟإ لﻮﺻﻮﻟا ﻞﻬﺴﻳ ﻊﻗﻮﻣ ﻲﻓ ضرﻷا ﻰﻠﻋ تﺎﺳاوﺪﻟا ﻊﺿو اًﺪﻴﺟ ﺔﻠﺠﻌﻟا ةﺪﻋﺎﻗ ﺖﻴﺒﺜﺗ ﻦﻣ ﺪآﺄ.
ﻣﺔﻈﺣﻼ :ﻖﻟﺰﻨﻣ ﺢﻄﺳ يأ قﻮﻓ تﺎﺳاوﺪﻟا ﻊﻀﺗ ﻻ.
8. ﻗﻪﻴﺟﻮﺘﻟا ﺔﻠﺠﻌﺑ ﺔﺳاوﺪﻟا ﻞﺻﻮﻣ ﻞﻴﺻﻮﺘﺑ ﻢ.
) "
GGaammee ccoonnttrroolllleer
) "
"
r
"
بﺎﻌﻟﻷا تارﺎﻴﺧ
.(
بﺎﻌﻟﻷا تارﺎﻴﺧ
.(
Options
) "
) "
9. ﻲﻓ ﻢﻜﺤﺘﻟا ةﺪﺣو ةﺮﻳﺎﻌﻣ ﻚﻨﻜﻤﻳ ﺔﺷﺎﺷ لﻼﺧ ﻦﻣ ﺎهرﺎﺒﺘﺧاو ﻚﻳﺪﻟ بﺎﻌﻟﻷا
10. ﻋبﺎﻌﻟﻷا ﻦﻣ ﺔﺒﻌﻟ ﺔﻳأ ﻞﻴﻐﺸﺗ ﻚﻨﻜﻤﻳ ،رﺎﺒﺘﺧﻻاو ةﺮﻳﺎﻌﻤﻟا ﺔﻴﻠﻤﻋ ﻦﻣ ءﺎﻬﺘﻧﻻا ﺪﻨ.
همﺎ:
1. ﻳﻞﻤﻌ ﻞﻴﻐﺸﺘﻟا ﺞﻣﺎﻧﺮﺑ ﺞﻣﺎﻧﺮﺑ ﻊﻣ DirectX 7.0a ﻣ ثﺪﺣأ راﺪﺻإ وأﻚﻳﺪﻟ ﺮﺗﻮﻴﺒﻤﻜﻟا زﺎﻬﺟ ﻰﻠﻋ ﻪﻨ .ﻋ ﺞﻣﺎﻧﺮﺑ راﺪﺻإ ﻦﻣ ﻖﻘﺤﺘﺗ نأ نذإ ﻚﻴﻠ
.
DirectXﻴﻗﺮﺘﺑ مﻮﻘﺗو ،مﺎﻈﻨﻟﺎﺑ دﻮﺟﻮﻤﻟا ،ﻪﺘﺮﻣﻷا مﺰﻟ اذإ
2. بﺎﻌﻟﻷا ﺞﻣاﺮﺑ ﺐﺴﺣ ﻰﻠﻋ زاﺰﺘهﻻا ﺮﻴﺛﺄﺗ ثﺪﺤﻳ.
ﻒﺋﺎﻇﻮﻟا رز
ﻒﺋﺎﻇﻮﻟا رز
يذ ﺮﻈﻨﻣ دﺪﺤﻣ
( (
PPOOV
تﺎهﺎﺠﺗا
)
ﻒﺋﺎﻇﻮﻟا رز
11و و 22((
تﺎهﺎﺠﺗا
)
V
8
8
ﻒﺋﺎﻇﻮﻟا رز
يذ ﺮﻈﻨﻣ دﺪﺤﻣ
رﺰﻟا
رﺰﻟا
11 ، ،22 ، ،33 ، ،44 ، ،55 ، ،66 ، ،77 ، ،88 ، ،99 ، ،1010 ، ،1111 ، ،1212
ا ﻞﻗﺎﻧ
ﺔﻋﺮﺴﻟ
)
ا ﻞﻗﺎﻧ
ﺔﻋﺮﺴﻟ
)
7
117
 Loading...