

Page 1

Gateway 610
Media Center PC
User’s Guide
Page 2

2
Page 3

Table of Contents
Chapter One: Setting Up Gateway 610 Media Center PC 7
About your Gateway 610 Media Center PC 8
Planning your Media Center setup 9
Locating connections 9
Setting up the hardware 10
Connecting the audio and video source 12
Connecting the IR control cable 13
Setting up the software 14
Chapter Two: Setting Up Gateway 610 Media Center PC
Optional Connections 15
Setting up optional connections 16
Connecting a TV (optional) 16
Connecting the Media Center PC to an existing stereo
or home theater (optional) 18
Chapter Three: Getting Started 21
Checking out your Gateway 610 Media Center PC 22
Starting the Media Center 28
Using the Media Center 29
Learning about the remote control 30
Using the remote control 31
Learning about the keyboard 32
3
Page 4

Chapter Four: Using My TV 33
Watching TV 34
Using the remote to play TV recordings 35
Using the Guide 37
Manually updating the Guide 38
Recording TV programs 39
Using Recorded TV 41
Changing My TV Settings 42
Burning recorded TV programs to DVD 43
Chapter Five: Using My Music 45
Getting started with My Music 46
Adding music files to the Media Library 46
Adding music CDs to the Media Library 47
Playing My Music 49
Chapter Six: Using My Pictures 53
Getting started with My Pictures 54
Table of Contents
Organizing picture files 55
Viewing My Pictures 56
Using More Info 57
Playing audio during a slide show 58
Chapter Seven: Using My Videos 59
Getting started with My Videos 60
Organizing video files 61
4
Page 5

Viewing My Videos 62
Using More Info 63
Chapter Eight: Using Play DVD 65
Playing a DVD 66
Chapter Nine: Using Radio 69
Playing the Radio 70
Using the remote to play Radio recordings 72
Changing Radio Settings 73
Chapter Ten: Using Other Features 75
Setting up the external video input 76
Changing Media Center Settings 77
Using More Programs 78
Using Online Spotlight 79
Chapter Eleven: Getting Help 81
Media Center FAQs 82
Getting more help 85
Table of Contents
Using Help and Support 86
Other Media Center resources 87
Documentation 87
Windows Update 87
Web site 87
Contacting Gateway 88
Appendix A: Safety, Regulatory, and Legal Information 89
5
Page 6

6
Page 7

• Plan your Media Center PC setup
• Set up hardware and software
SettingUp
Gateway 610
Media Center PC
ChapterOne
7
Page 8
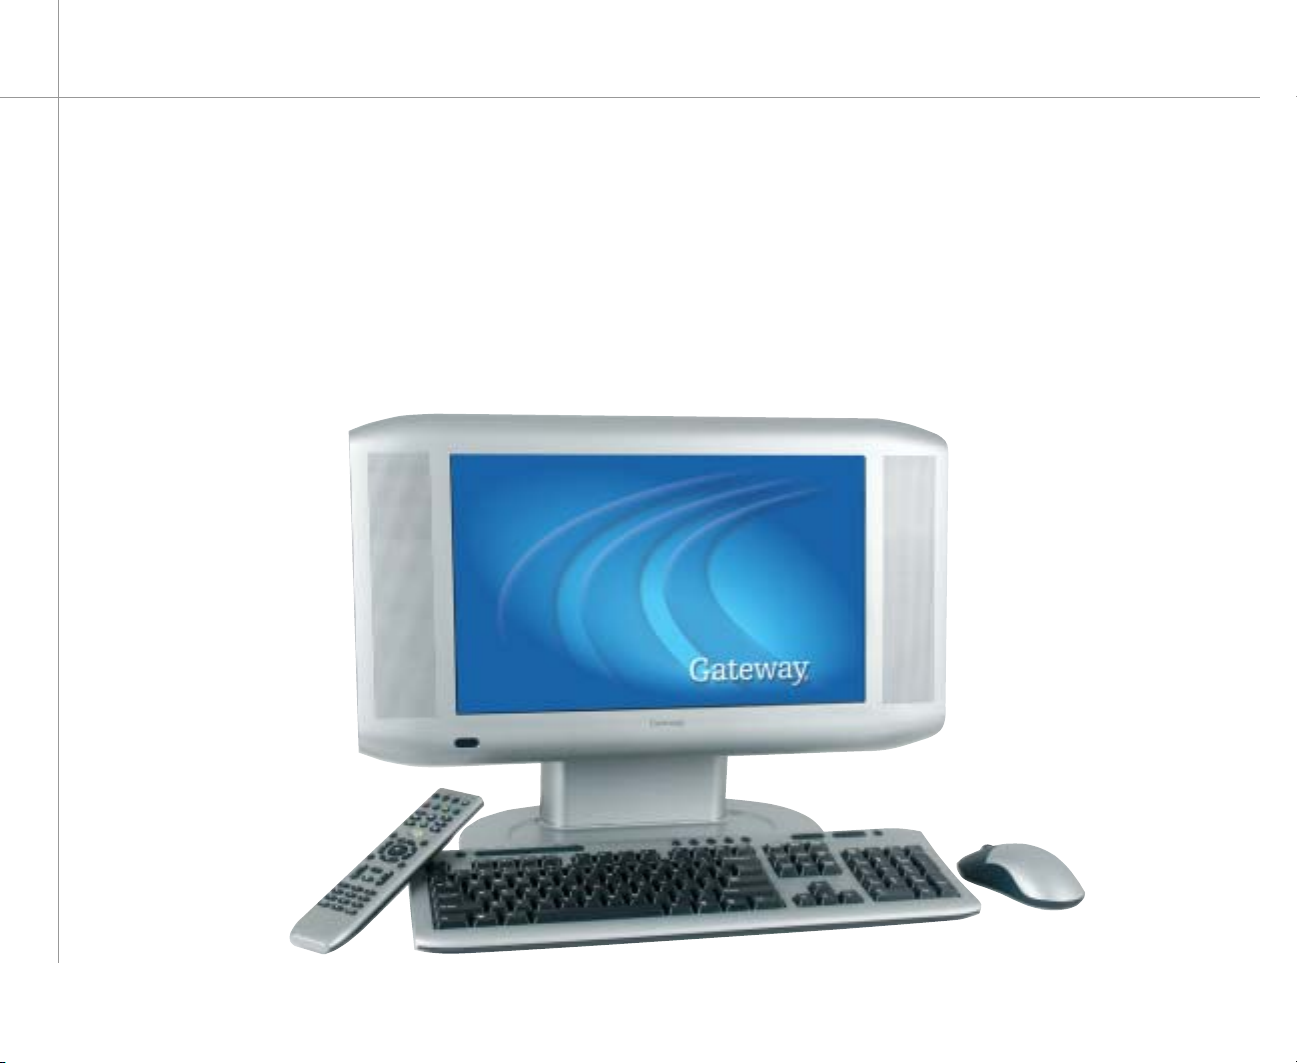
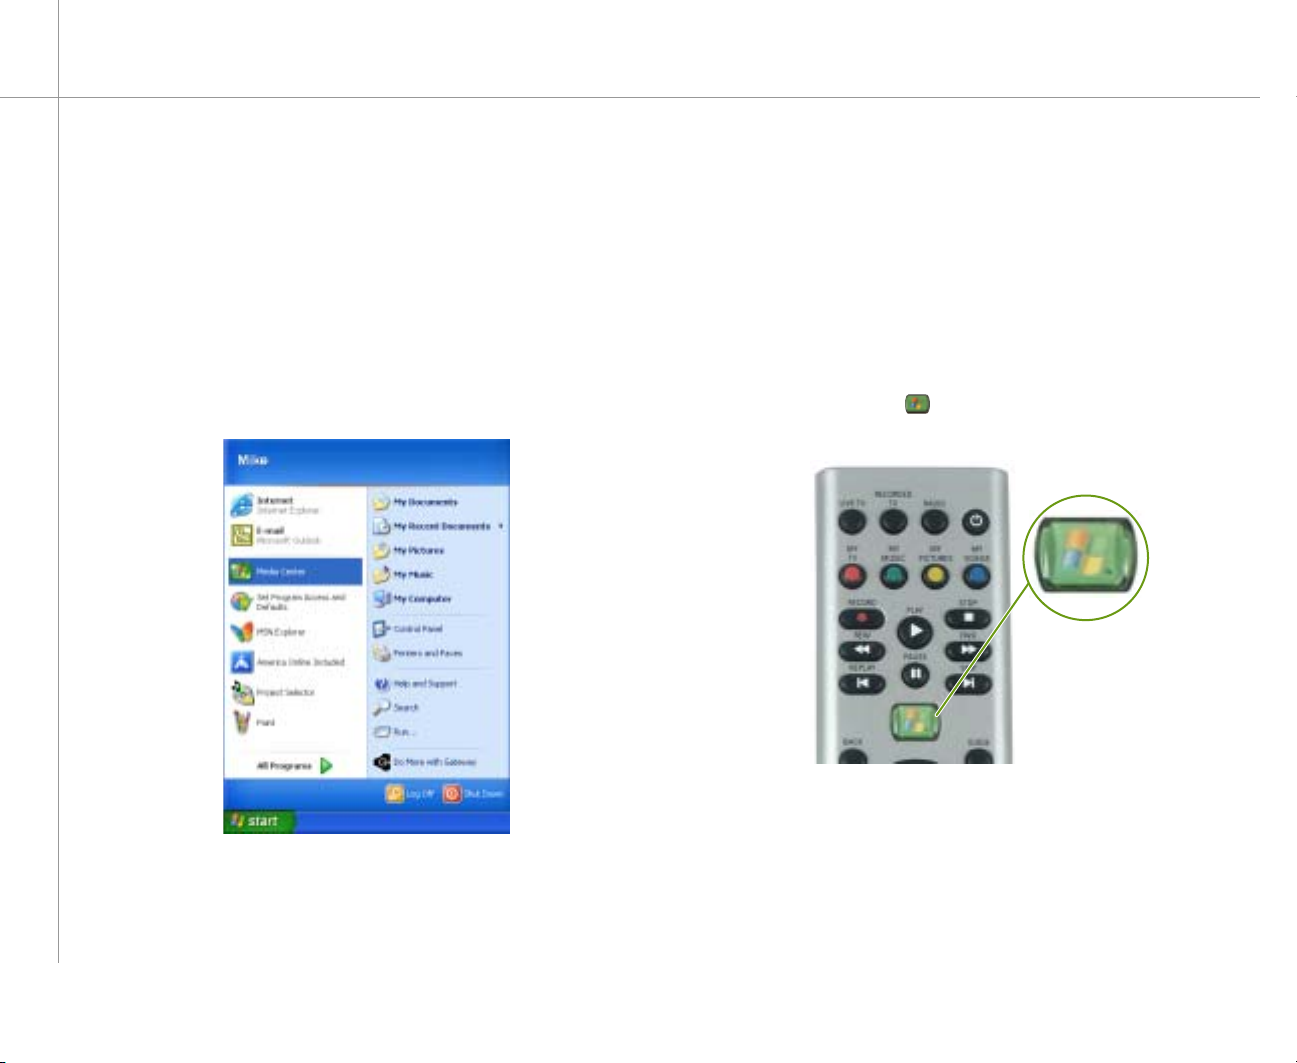
About your Gateway 610 Media Center PC
The Gateway 610 Media Center
PC provides powerful computing
and rich entertainment capabilities.
You can run the Media Center while
using other Microsoft Windows
programs or just enjoy the Media
Center in full-screen mode without
using other programs.
Use the Media Center remote
control the same way you
use the remote for your home
entertainment system. You can use
the remote and Media Center to
watch and record TV, play videos
and music, and view pictures.
Use the wireless keyboard and
mouse to run the Media Center and
your Microsoft Windows programs.
8
Page 9
Planning your Media Center setup
Locating connections
You’ve probably already decided where you want to
locate your Media Center PC, but before you start setting
up the Media Center, take a few minutes to make sure
that all of these connections are available in the location
you’ve selected.
Internet connection — Your computer needs an
Internet connection to update the program guide
and to access the Internet. Make sure that you have
access to a dial-up or broadband Internet connection
before starting your Media Center software setup.
Contact your Internet service provider for more
information about setting up your Internet connection.
In addition to the modem and Ethernet jacks on the
back of your Media Center PC, your Media Center PC
may also include wireless Ethernet capabilities. For
more information about connecting to a network with
your wireless Ethernet hardware, see the networking
user’s guide included on the hard drive. To open the
document click Start, Gateway Documentation,
then click Networking User’s Guide.
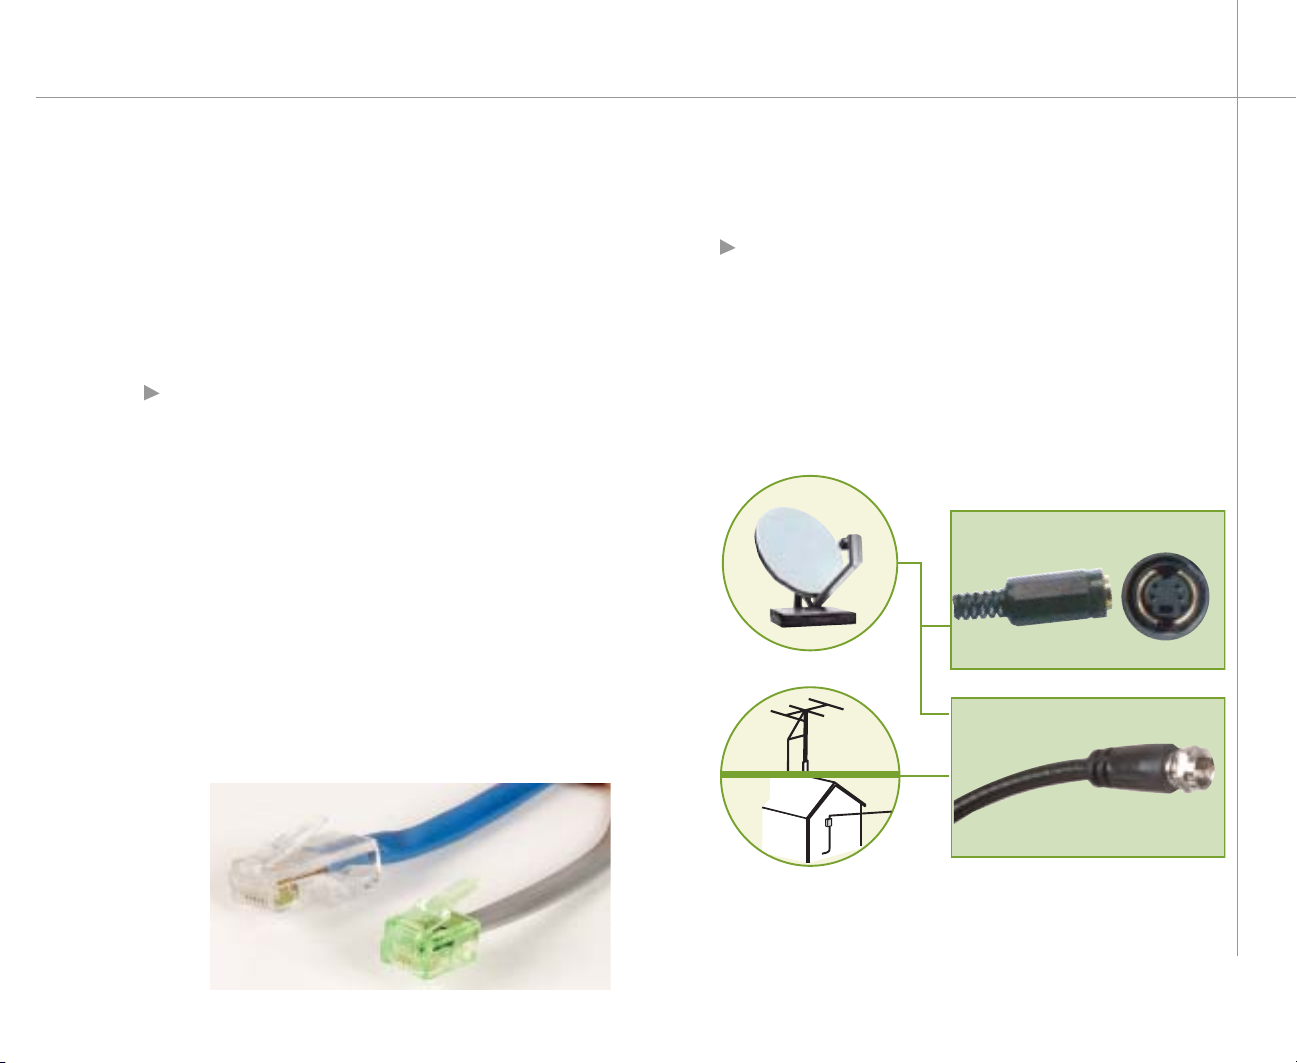
Video source — Make sure that you have access
to a video source before starting your Media Center
setup. Your computer receives video input from
a coaxial or an S-Video cable. The video source
usually comes from an antenna, a direct cable TV
connection, a cable box, or a satellite receiver.
Cable boxes and satellite receivers are also called
set-top boxes.
9
Page 10
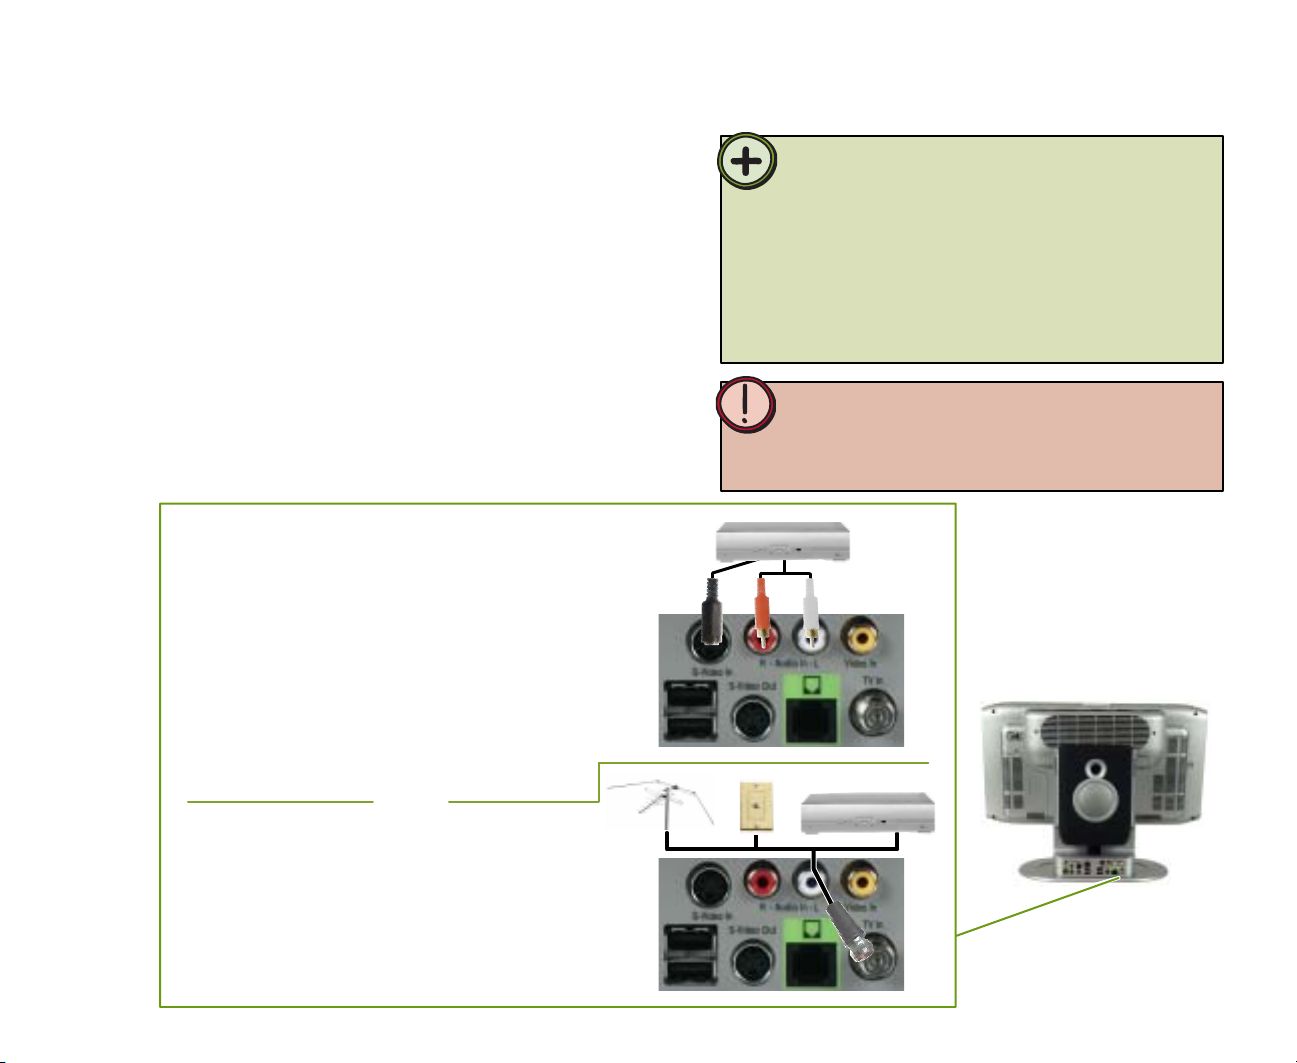
Setting up the hardware
2
4
3
10
1
Connect the modem (optional)
3
Connect the audio/video source
A coaxial (TV in) connection carries both the audio
and video signals.
If you use an S-Video connection,
then also connect audio using
RCA stereo plugs.
For detailed instructions about connecting the audio/video
source (step 3), see page 12.
1
3
Connect your broadband
2
Internet (optional)
4
Connect the IR control cable (optional)
Plug one end of the IR control cable into your
computer, then adhere the other end to the set-top box
sensor window.
Remove the adhesive
paper from the back of
the IR control.
For detailed instructions about connecting the IR control
cable (step 4), see page 13.
Page 11
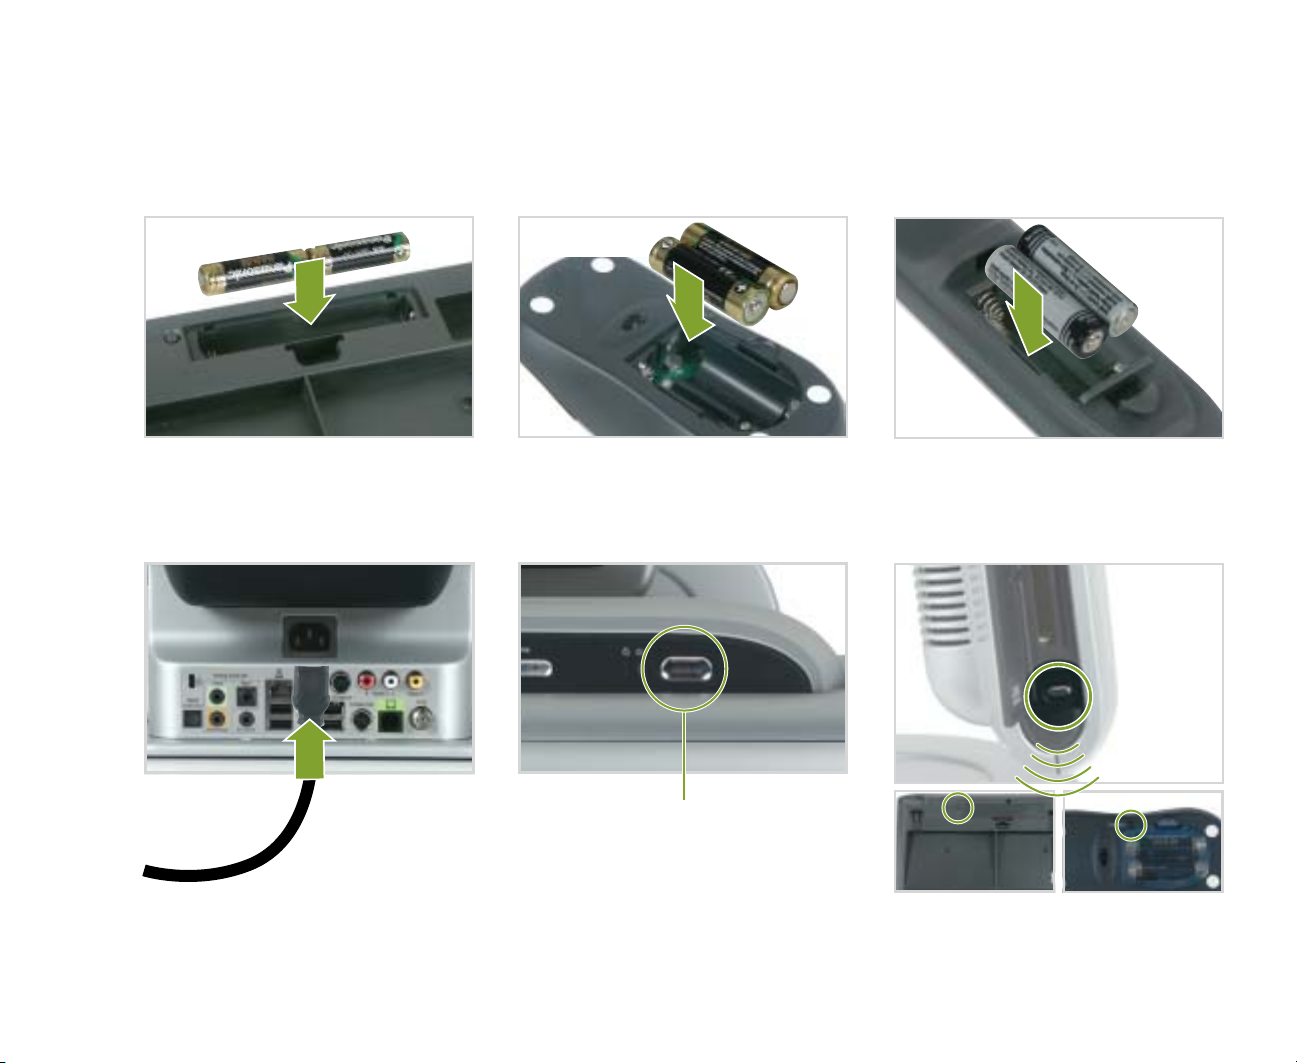
5 Install the keyboard, mouse, and remote control batteries.
6 Plug in your computer 7 Turn on your computer
Press the power button on the
top of your computer to turn it on.
8 Sync up wireless devices
keyboard sensor mouse sensor
Press the Media Center PC connect button,
then press the keyboard connect button.
Repeat the process with the mouse.
11
Page 12
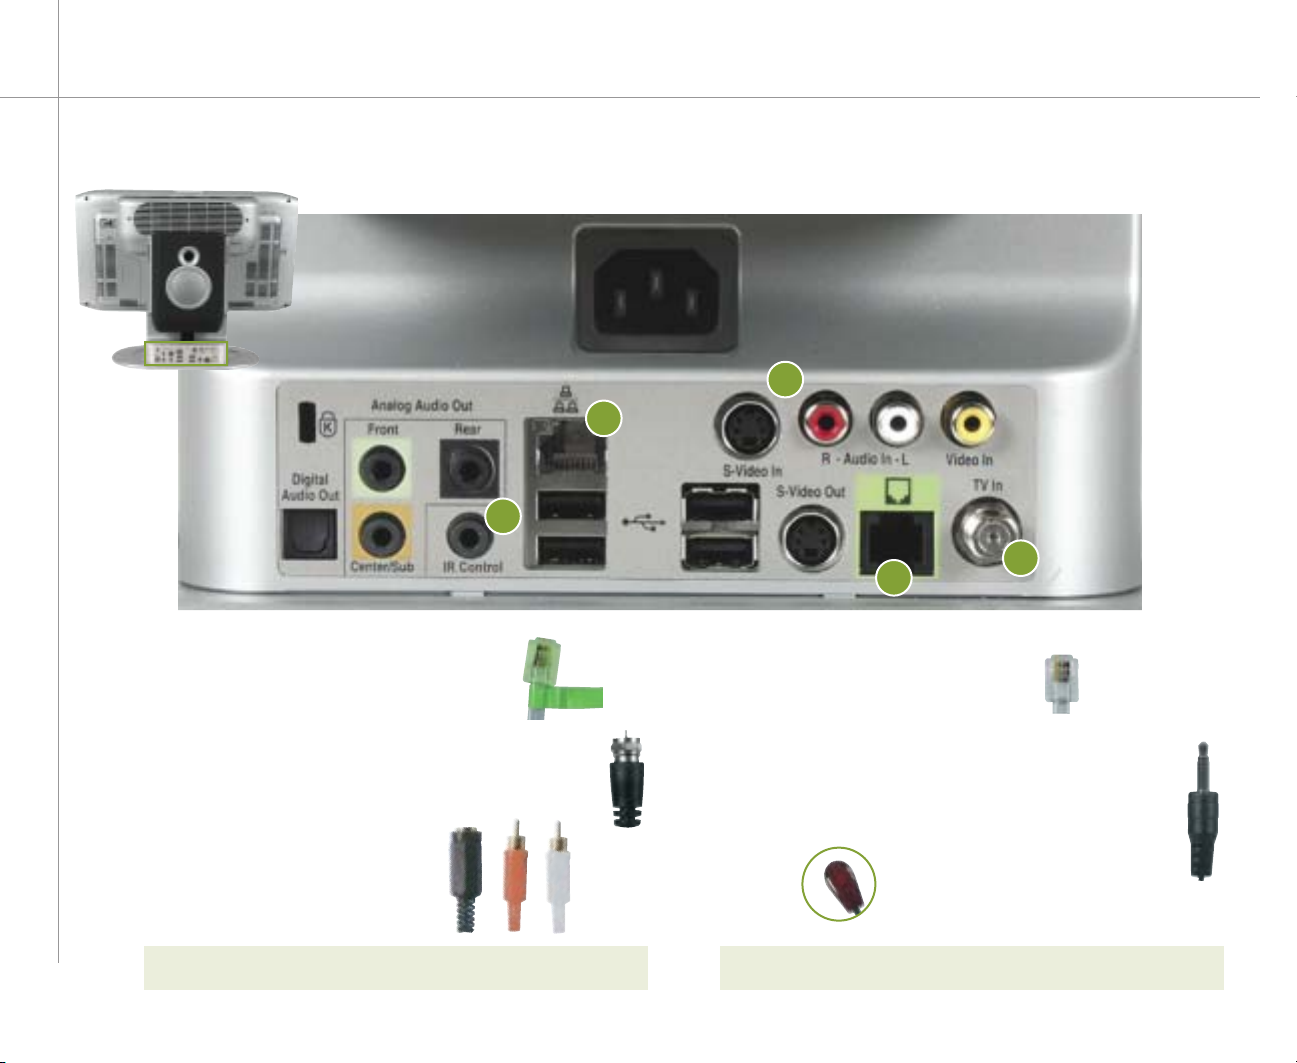
Connecting the audio and video source
Your Media Center PC has connectors for S-Video or
coaxial (TV). Select the connector that your video source
supports:
• S-Video — The video signal provides the highest
quality video for the Media Center PC. If you use
S-Video, you also need to connect the audio using RCA
stereo plugs.
• Coaxial (TV) — The video and audio signals are both
carried on one cable. The coaxial cable is the way to
connect a direct cable or an antenna video source to
the Media Center.
S-Video
Connect an S-Video cable (not included) from
1
a video source such as a cable set-top box,
a satellite set-top box, or other video source
device, to the S-Video In port on the back of
your Media Center PC.
Connect an RCA cable (not included) from
2
the Audio Out jacks on the video device to
the Audio In RCA jack on the back of your
Media Center PC.
- OR -
Coaxial (TV)
Tip:
The quality of the video coming into the Media Center PC determines
the quality of the video output to the Media Center display device.
A direct cable connection, cable set-top box, or satellite set-top box
usually provides a better quality signal than an antenna. Use the
highest quality video source available for best video display results.
The quality of cable used to connect the video source to the Media
Center PC has an affect on the video output quality from the
computer. Use high quality video cables to connect the video source
to the computer.
Caution:
If the video devices connected to your computer are not grounded
correctly, your computer could be damaged. For more information
about correct grounding, see the safety and regulatory information
on page 90.
12
Connect a coaxial cable (not included) from a
•
video device, such as a direct cable connection,
a cable set-top box, a satellite set-top box, or an
antenna, to the Coaxial In (TV) port on the back
of your computer.
Page 13
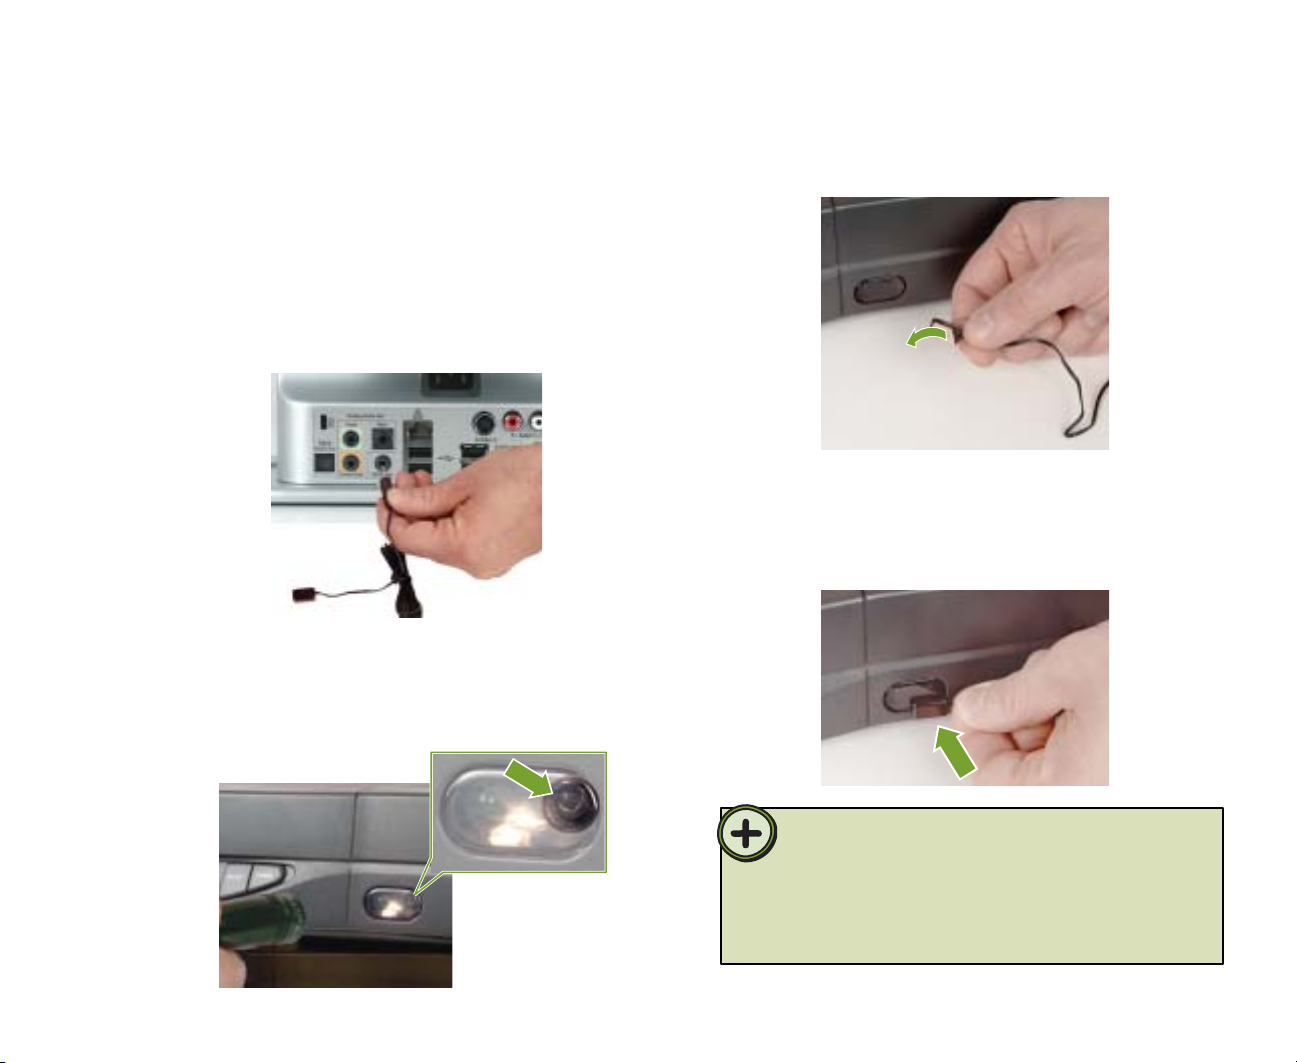
Connecting the IR control cable
If your Media Center configuration uses a set-top box for
the Media Center video source, connect the infrared (IR)
control cable from the Media Center PC to the set-top
box IR sensor window. The IR control cable sends input
from the remote sensor to your set-top box to change
channels.
Plug the IR control cable into the IR control port
1
on the back of the Media Center PC.
Locate the IR sensor by shining a flashlight
2
through the set-top box IR sensor window. Look
for a 1/2 to 3/8 inch metallic rectangle with a 1/8
inch dark circle in the middle. This is the IR sensor.
Remove the adhesive paper from the back of the
3
IR control.
Place the sticky side of the IR control on the
4
set-top box sensor window. Make sure that the IR
control is placed directly in front of the IR sensor
that you located in step 2.
Tip:
The Media Center IR control cable sends infrared signals to your
set-top box or satellite receiver. However, some set-top boxes are
set to receive radio frequency (RF) signals from the remote control.
Before using the Media Center remote control, make sure that the
set-top box is set to accept infrared signals. See your set-top box
guide for information about remote settings.
13
Page 14
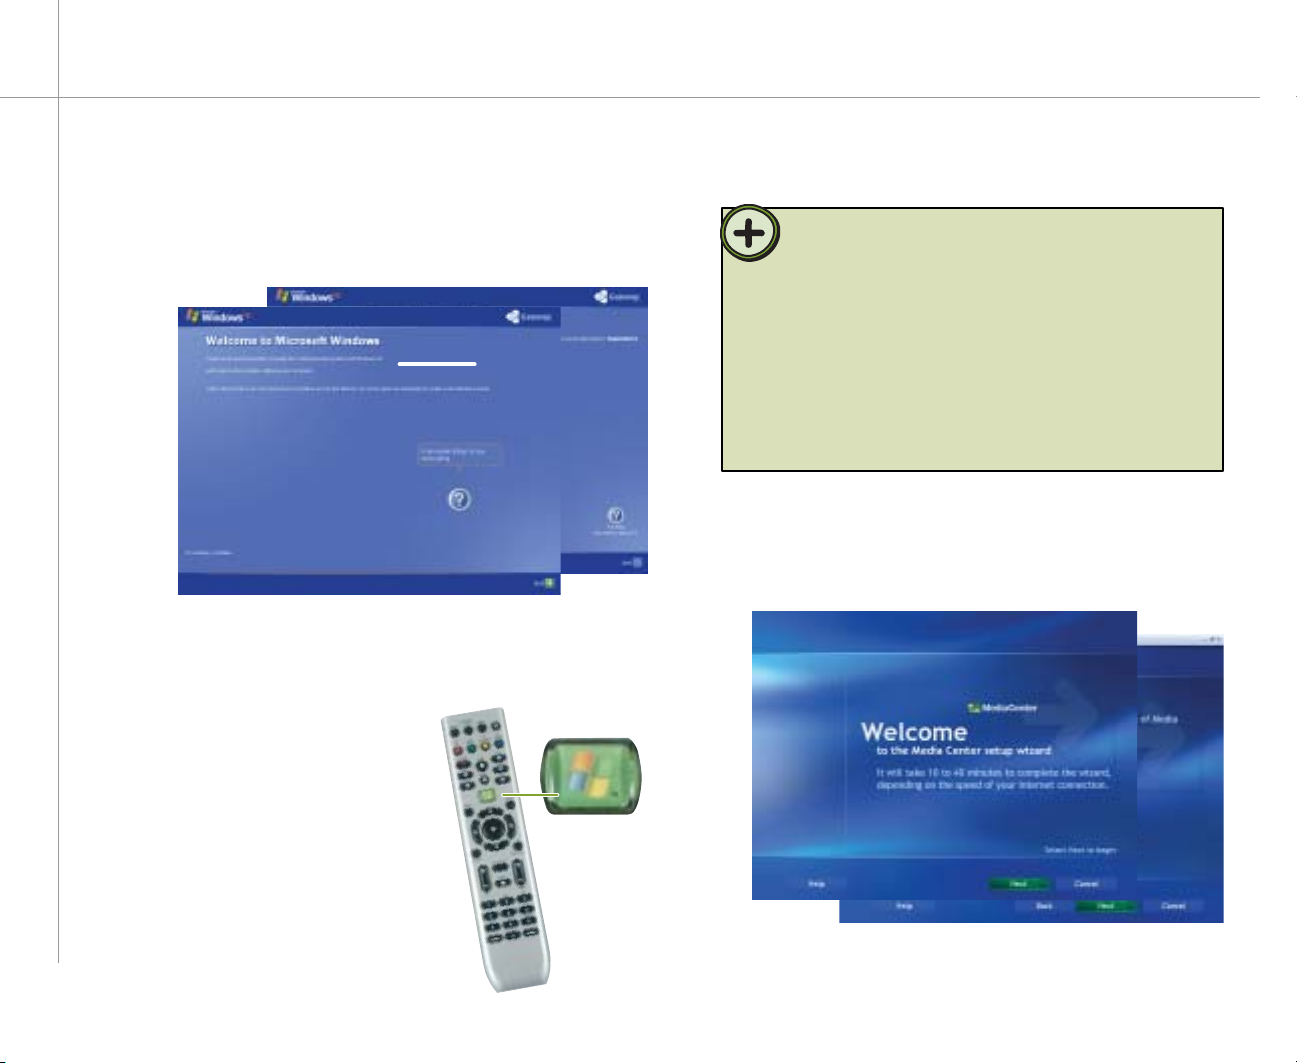
Setting up the software
1 Complete the Windows XP setup
After you’ve turned on your computer, wait for it to start up,
then follow the on-screen instructions.
2 Complete peripheral devices setup
Connect devices, such as a printer or scanner, after you
complete the Windows setup. Follow the instructions that
came with the device.
3 Start the Media Center
setup wizard
After you’ve completed the initial
Windows setup, press the Start
button on your remote control.
Tip:
The Media Center setup wizard requires Internet access to
complete the Media Center software configuration. Before
starting the Media Center setup wizard in step 4, make sure that
your Internet connection is set up. Contact your Internet service
provider for more information about setting up your Internet
connection.
Before starting the Media Center setup wizard, check for
Windows Updates to make sure that Media Center has the most
recent software releases and security updates installed. For more
information, see “Windows Update” on page 87.
4 Confi gure the Media Center software for
your specifi c requirements
Follow the on-screen instructions.
14
Page 15

SettingUp
Media Center PC
Optional Connections
•
Connect an optional TV
•
Connect to an existing sound system
ChapterTwo
15
Page 16

Setting up optional connections
Connecting a TV (optional)
You can use a TV as an external display device.
However, some older TVs provide a lower quality display
than computer monitors or flat-panel TVs that are
optimized for the Media Center.
The Gateway 610 Media Center PC provides a display
output from the S-Video Out port. Connect the S-Video
cable from the Media Center’s S-Video Out port to the
TV’s S-Video In port. S-Video display quality is usually
good for TV images. The display quality for computer
functions, however, is not as good as the Gateway 610
Media Center PC’s display. S-Video display output is not
optimized for computer video display.
Tip:
If you want the audio to play from the external TV you connected
to, connect the Audio out ports (analog or digital) to your TV Audio
in ports. If you do not connect the Audio out ports to your TV, then
the sound will continue to play from the Media Center PC and other
sound system connected to the Media Center PC.
16
Tip:
Many TVs use interlaced video. Interlaced video displays a video
frame with two passes of alternating scan lines. The TV screen
first displays the video image odd lines one at a time, sequentially
from top to bottom, then it fills in the other half of the video image
with the even lines. Because most TVs use this interlaced method
to display the picture on the screen, a standard interlaced analog
television will most likely flicker when displaying thin lines and
small text. An interlaced video display device will produce a lower
quality display, especially when viewing and using the Media Center
computer functions.
Progressive scan video displays a video frame with one pass of
sequential scan lines. A progressive scan TV displays the entire
picture, drawn sequentially from top to bottom, without the odd/
even interlacing. This results in a fuller, sharper picture, and better
display quality for viewing and using the Media Center computer
functions. The progressive scan picture is also brighter and easier
on your eyes.
Help:
By default, the Gateway 610 Media Center PC uses a screen
resolution of 1280 x 768. Many TVs cannot display this high
resolution and may shift, scramble, or scroll the picture. For a
better picture on a TV display, you may need to lower the Media
Center screen resolution to 800 x 600 or 640 x 480. For more
information about adjusting display settings, click Start, then click
Help and Support. Type the keyword changing display settings
in the Search box, then press Enter.
Page 17
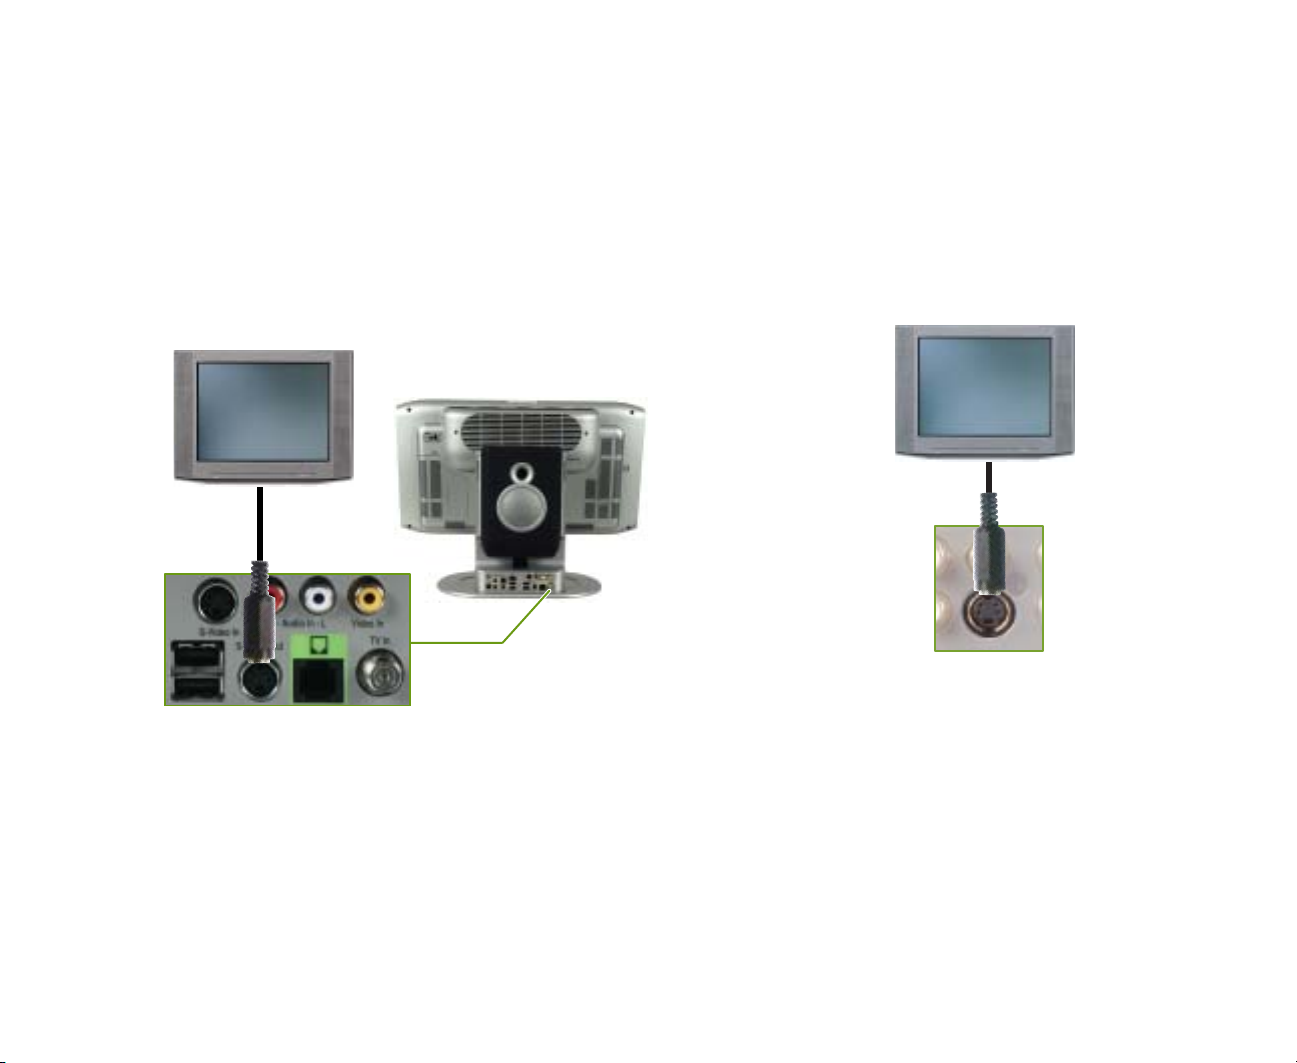
Connect an S-Video cable (not included) to the
1
S-Video Out port on the back of your Media
Center PC.
Connect the other end of the cable to the S-Video
2
In port on the back of your TV.
Turn the TV on and select the TV In video source.
3
For more information about selecting the TV In
video source, see your TV’s documentation.
17
Page 18
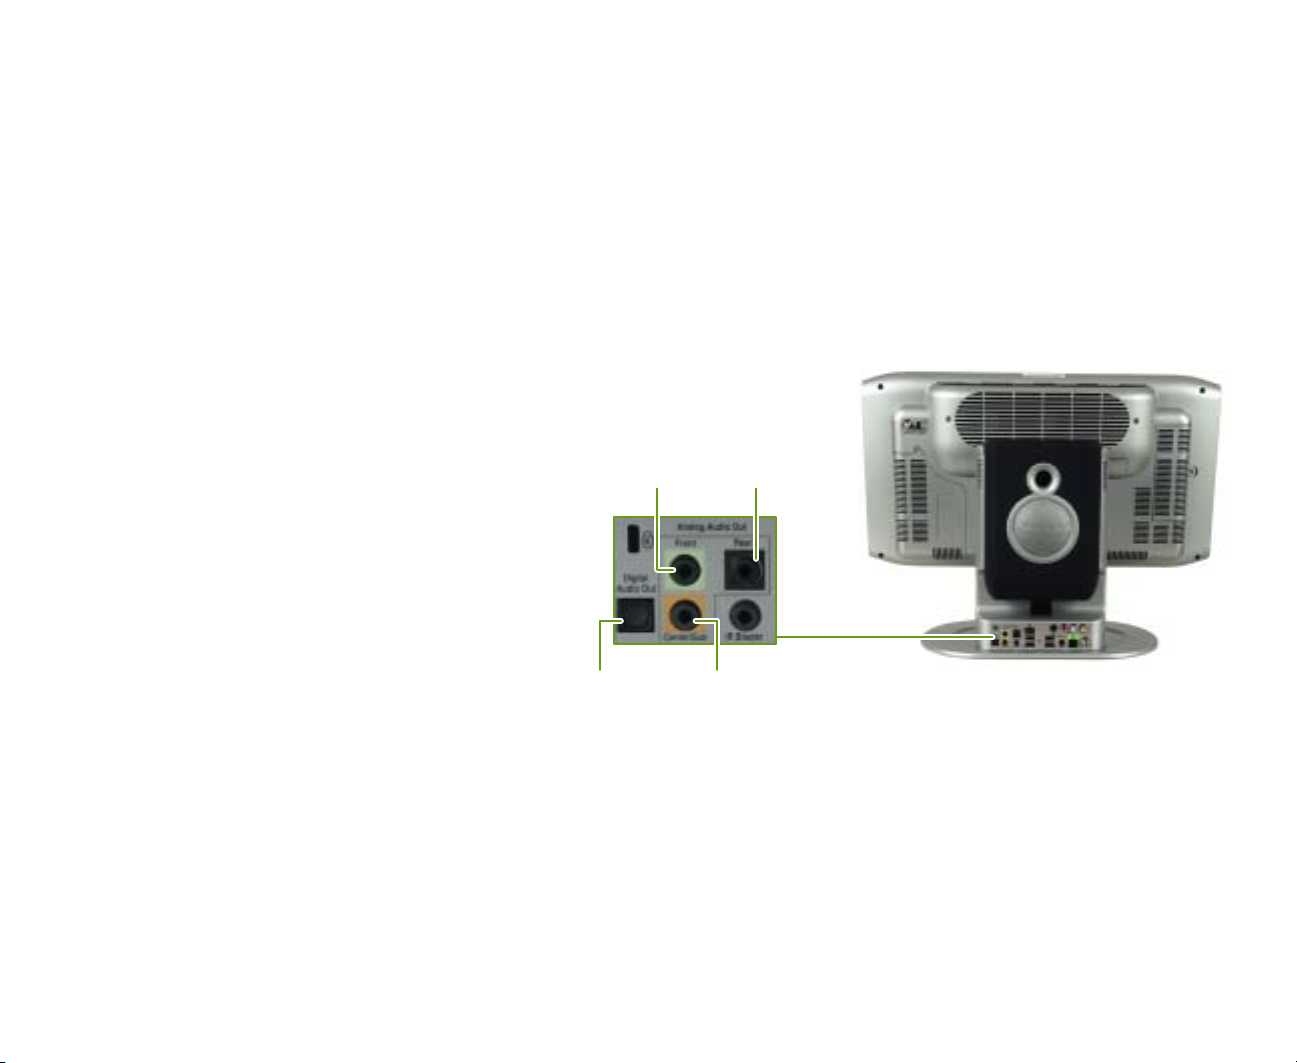
Connecting the Media Center PC to an
existing stereo or home theater (optional)
The Media Center PC includes a
built-in sound system. However, if
you purchased an add-on sound
system, use the setup poster and
other documentation that was
included with the sound system to
set it up.
If you have an existing stereo or
home theater, you can connect the
Media Center PC to an existing
sound system. Use 1/8” stereo
to RCA plug Y-cables to connect
the computer to an analog sound
system or use a Toslink digital cable
to connect your computer to digital
audio outputs (S/PDIF). The setup
varies, depending on your sound
system audio inputs. See your
sound system’s user guide for more
information about connecting
audio inputs.
Connect front
analog speakers
Connect digital
(S/PDIF) audio
Connect rear
analog speakers
Connect center/subwoofer
analog speakers
18
Page 19
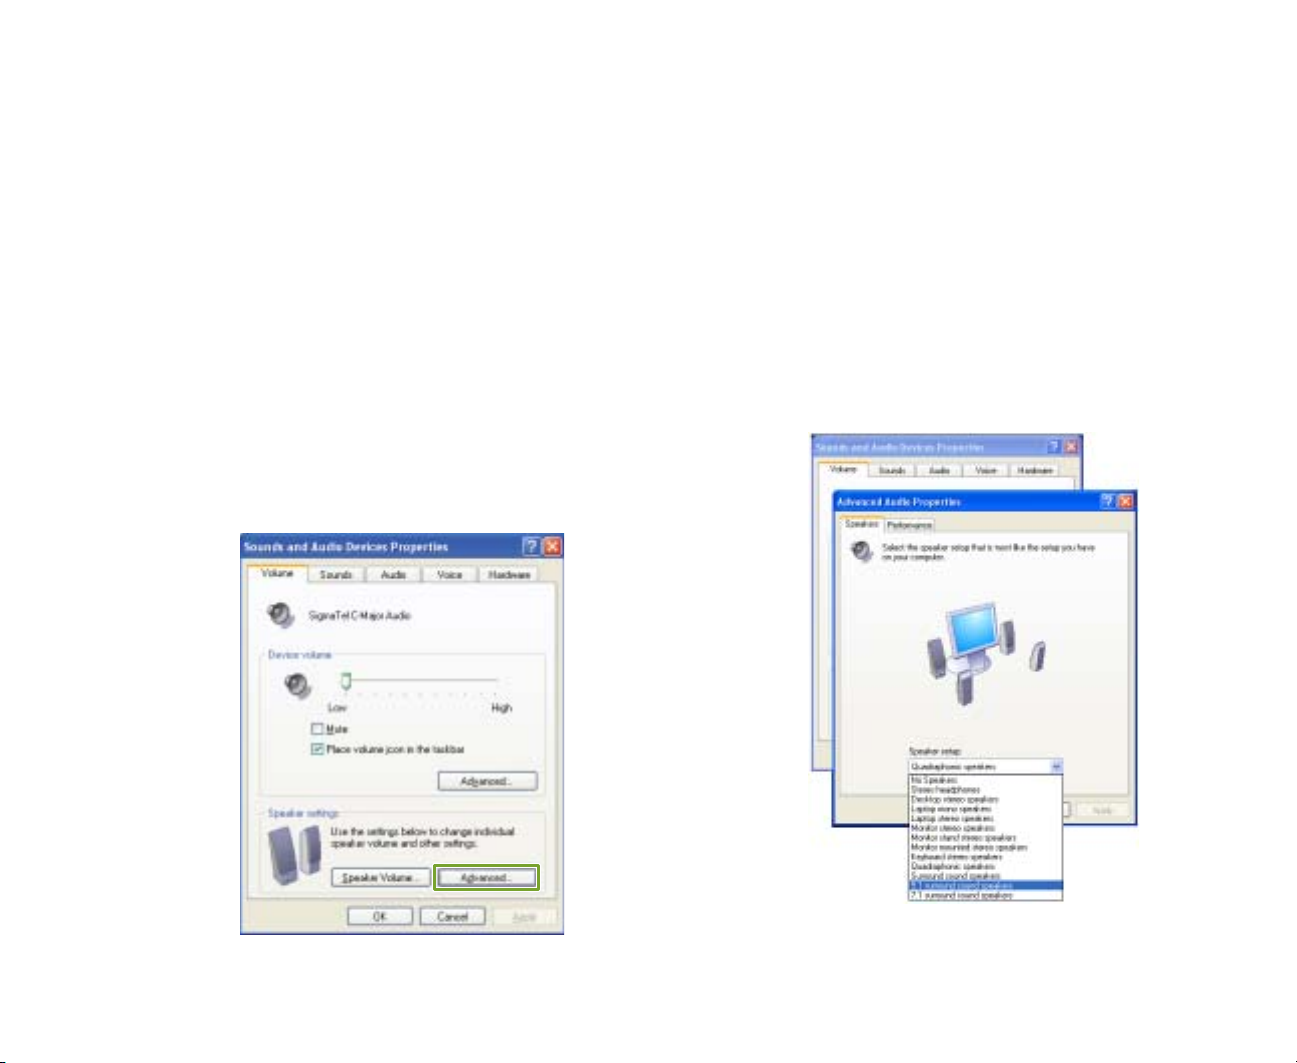
After you have connected your add-on sound system,
use the sound and audio properties to select speaker
setup options.
Click Start, Control Panel, Sounds, Speech,
1
and Audio Devices, then click Sounds and
Audio Devices. The Sounds and Audio Devices
Properties dialog box opens.
Click the Volume tab, then click the Advanced
2
button in the Speaker Settings section. The
Advanced Audio Properties dialog box opens.
Click the Speakers tab, click the arrow button
3
to open the Speaker setup list, then click the
speaker setup that most closely matches your
sound system type.
Click OK to save your speaker setup.
4
19
Page 20

20
Page 21

GettingStarted
• Learn about your
Gateway 610 Media Center PC
• Start the Media Center
• Use the Media Center
• Learn about the remote control
• Learn about the wireless
keyboard
ChapterThree
21
Page 22
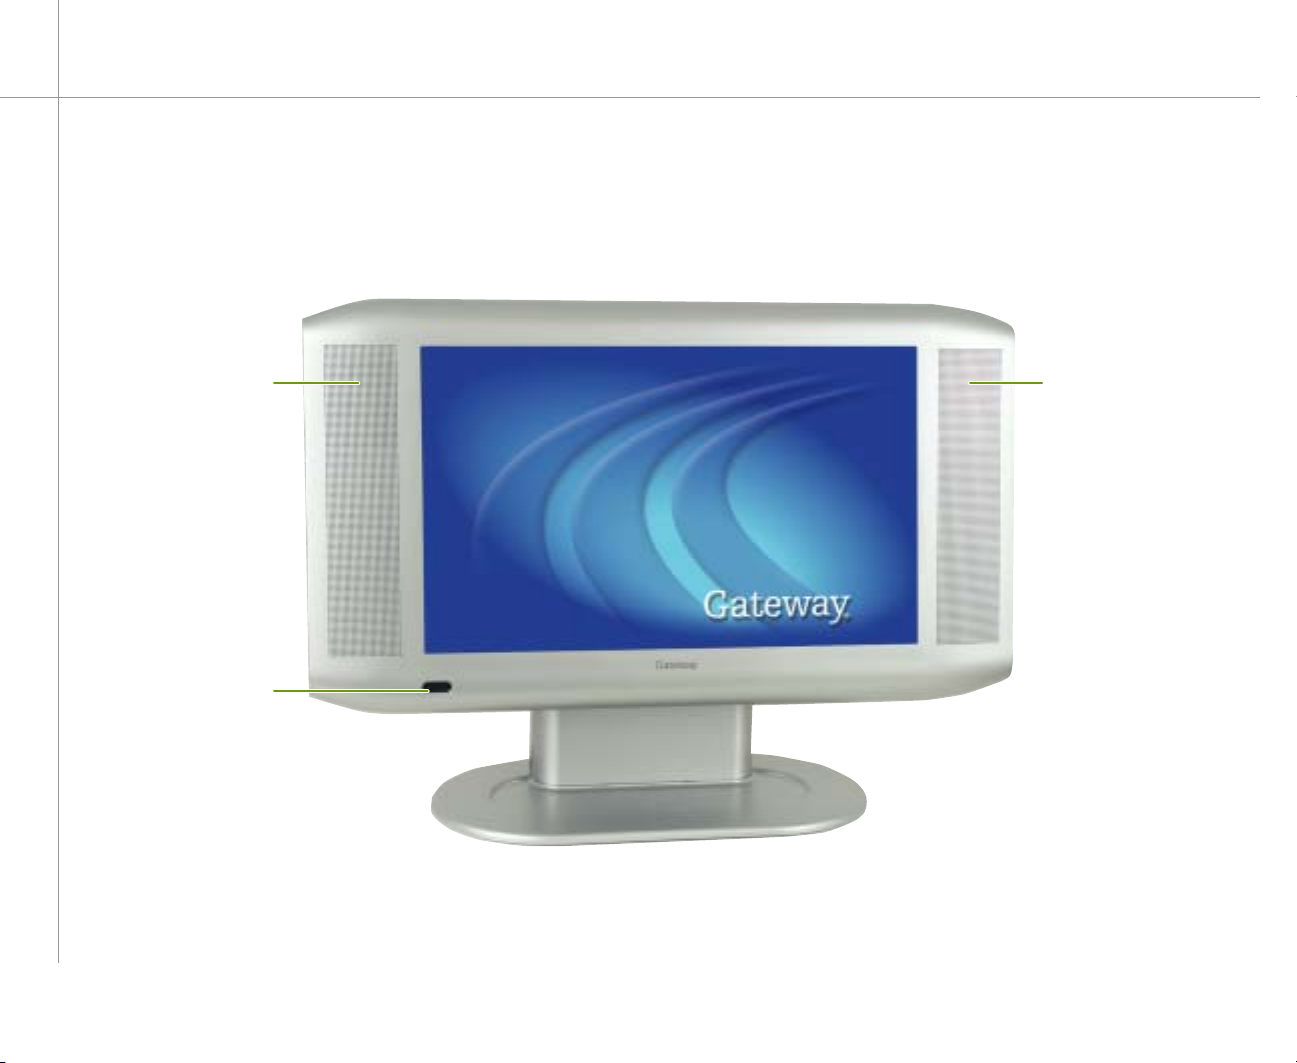
Checking out your Media Center PC
Front
A
B
A
22
Page 23
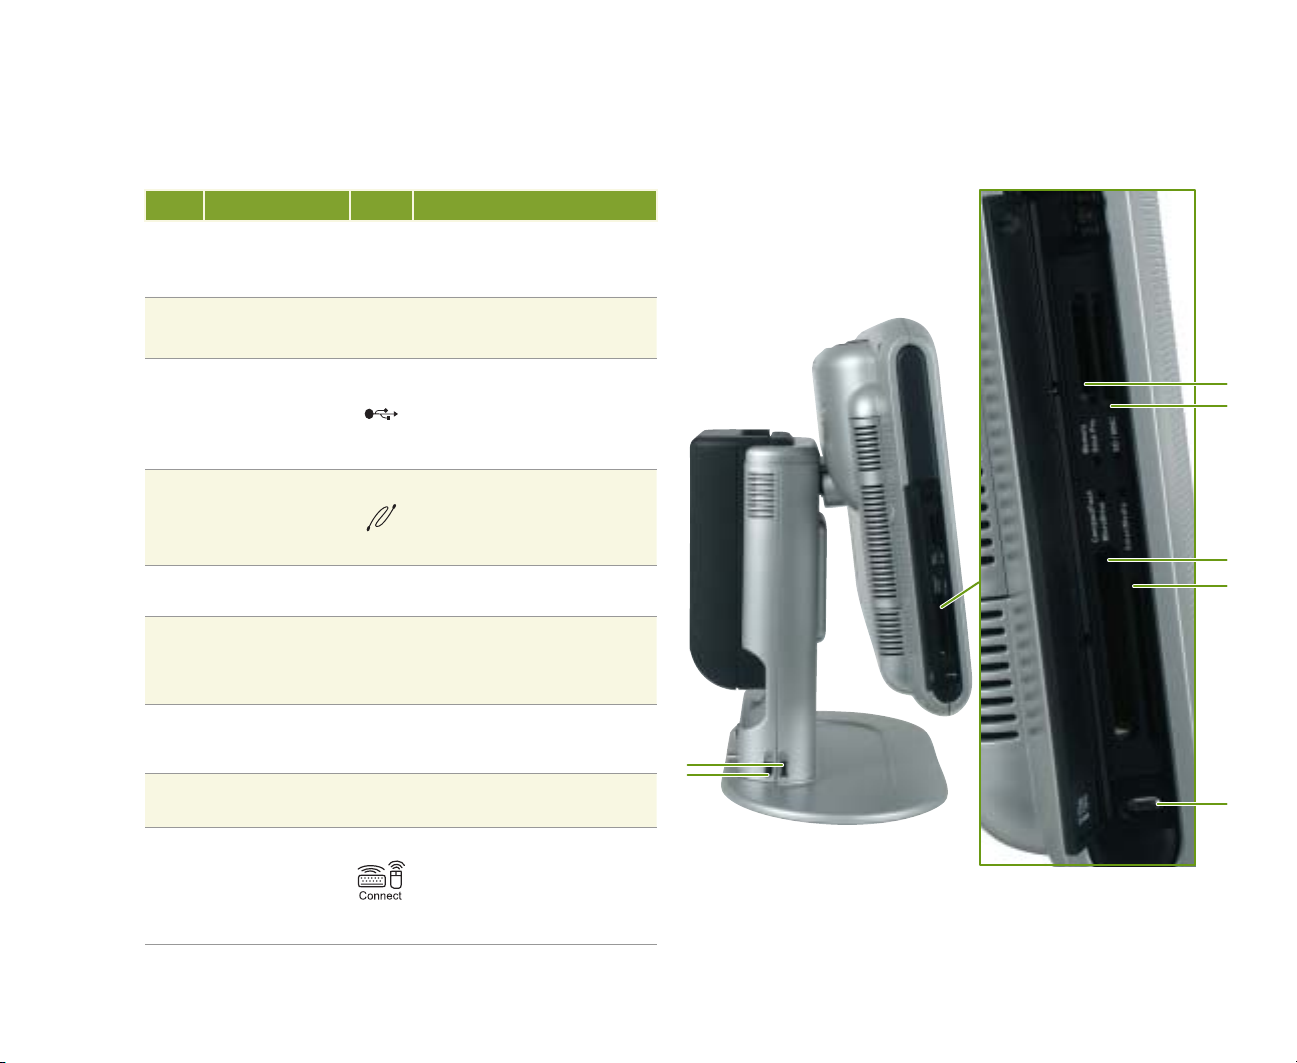
Left side
Item Component Icon Description
A Front speakers
Provides audio output when
headphones or amplifi ed
speakers are not plugged in.
B Infrared receiver
C USB port
D IEEE 1394 port
Memory Stick Pro
F
card reader
SecureDigital
(SD) / MultiMedia
G
Card (MMC) card
reader
CompactFlash /
H
MicroDrive
card reader
SmartMedia (SM)
I
card reader
J Connect button
Receives Infrared (IR) signals
from the remote control.
Plug USB (Universal Serial
Bus) devices (such as a USB
printer, scanner, camera,
keyboard, or mouse) into these
ports.
Plug an IEEE 1394 (also known
as Firewire or i.Link) device,
such as a digital camcorder,
into this 6-pin IEEE 1394 port.
Removable memory card drive.
Removable memory card drive.
Removable memory card drive.
Removable memory card drive.
Press to sync the wireless
connections between the
Media Center PC, keyboard,
and mouse. See the setup
instructions on page 11.
F
G
H
I
C
D
J
23
Page 24
Right side
Item Component Icon Description
24
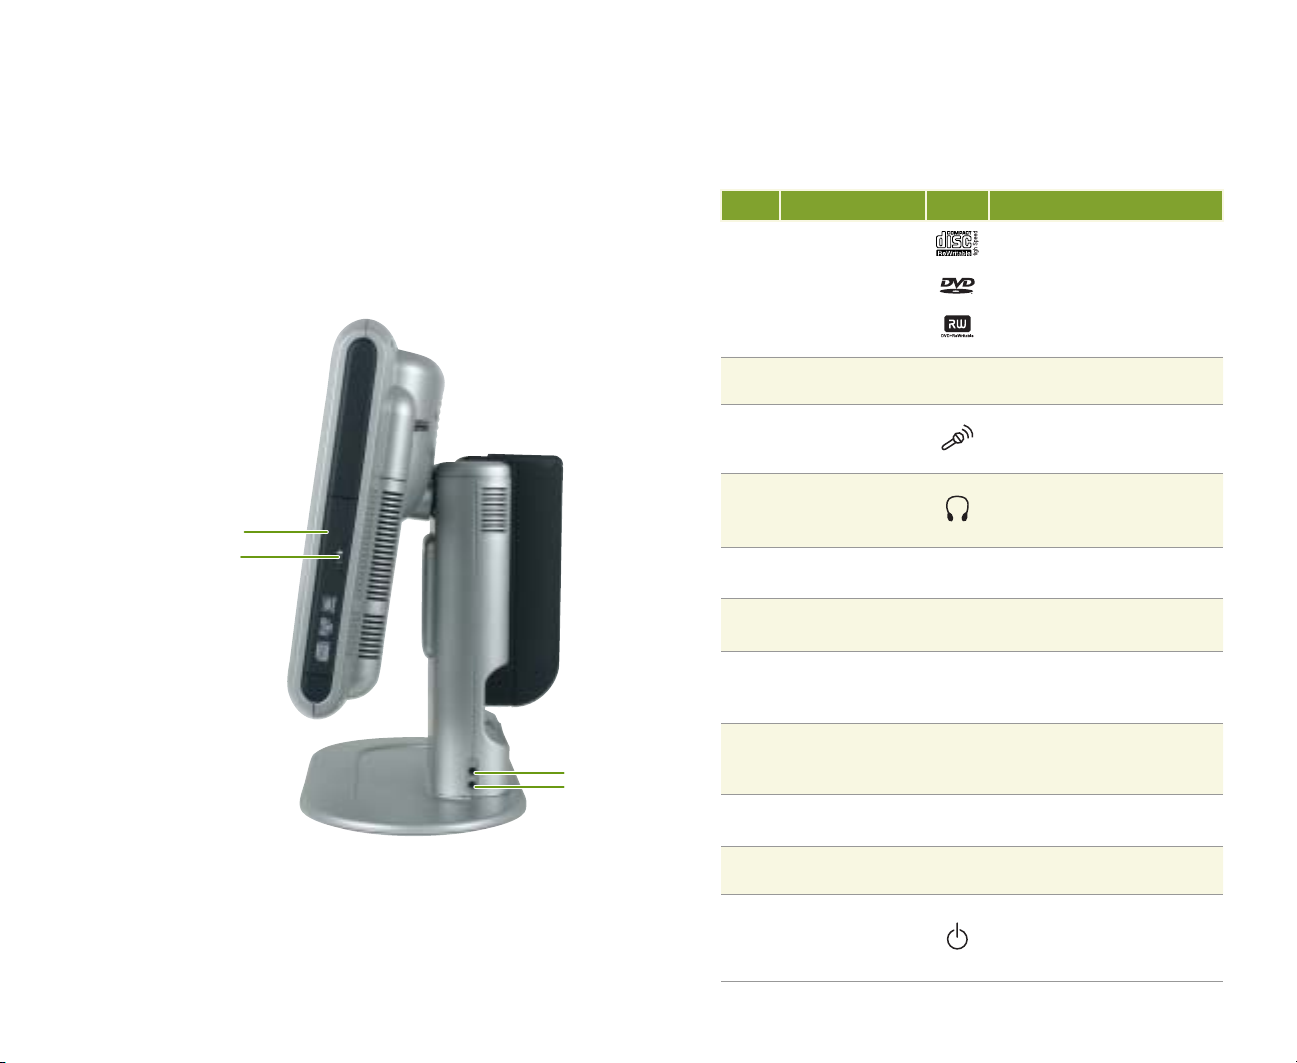
Combination DVD
+RW/+R / CD-RW
K
(recordable DVD
and CD drive)
DVD/CD drive
L
eject button
M Microphone jack
N Headphone jack
K
L
M
N
Brightness -
O
button
Brightness +
P
button
Q Channel - button
R Channel + button
S Volume - button
T Volume + button
U Power button
Play and record CDs and
DVDs in the combination drive.
R/RW
(recordable DVD is optional)
Press to remove a CD or DVD
from the DVD/CD drive.
Connect a microphone and
record voice fi les or transmit
live audio.
Plug amplifi ed speakers or
headphones into this jack.
Push to reduce the display
brightness.
Push to increase the display
brightness.
Push to change the channel
sequentially to a lower channel
number.
Push to change the channel
sequentially to a higher
channel number.
Push to reduce the volume
level.
Push to increase the volume
level.
Press to turn the power on
or off. Press and hold for a
few seconds to put the Media
Center PC in standby mode.
Page 25
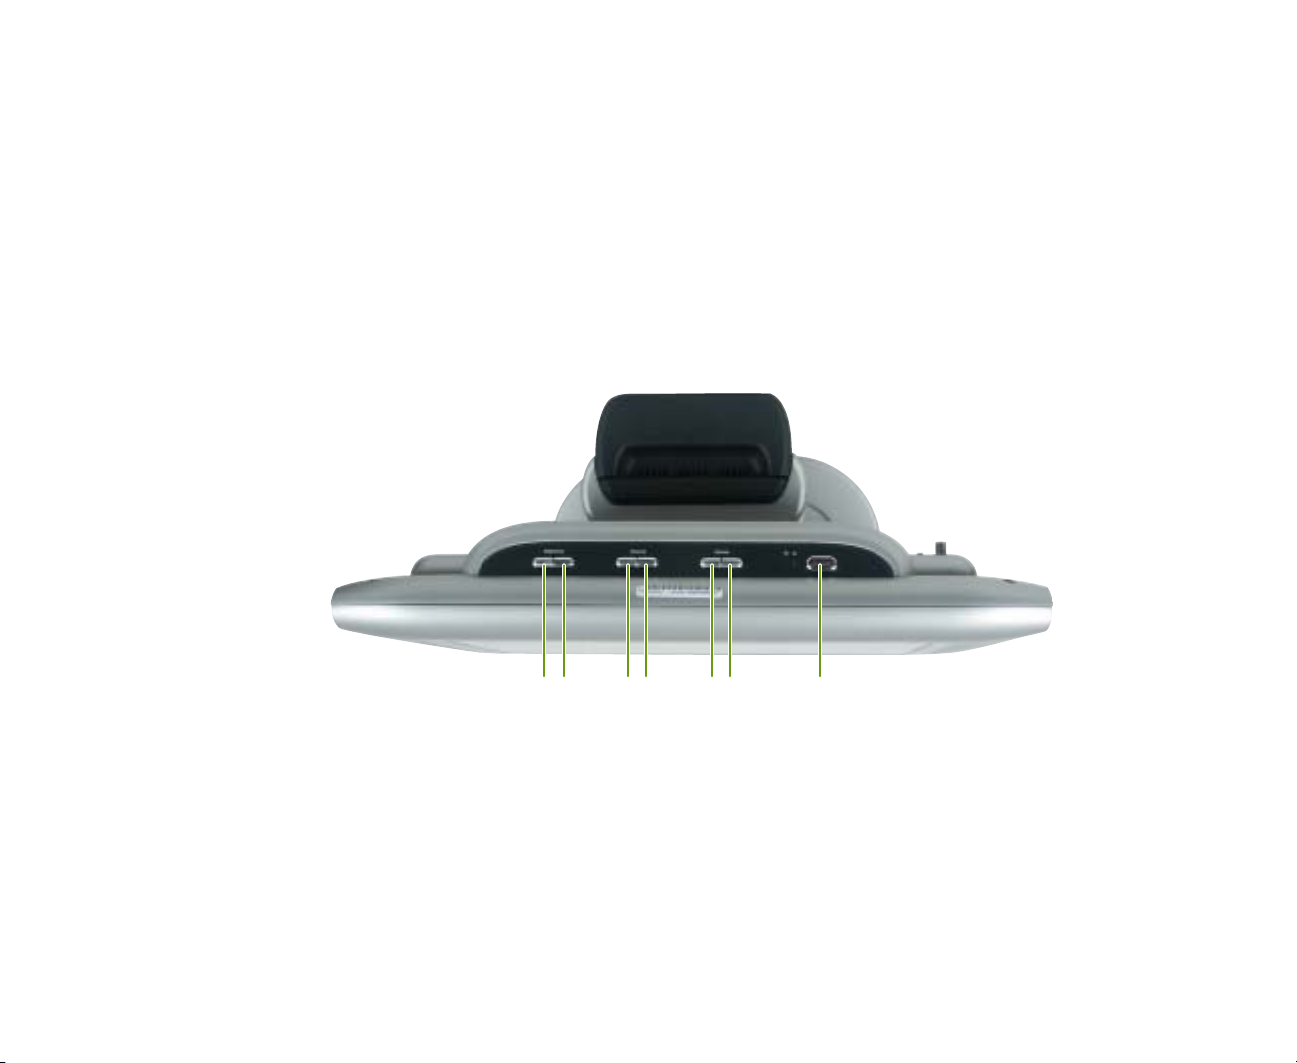
Top
OP QR S T U
25
Page 26
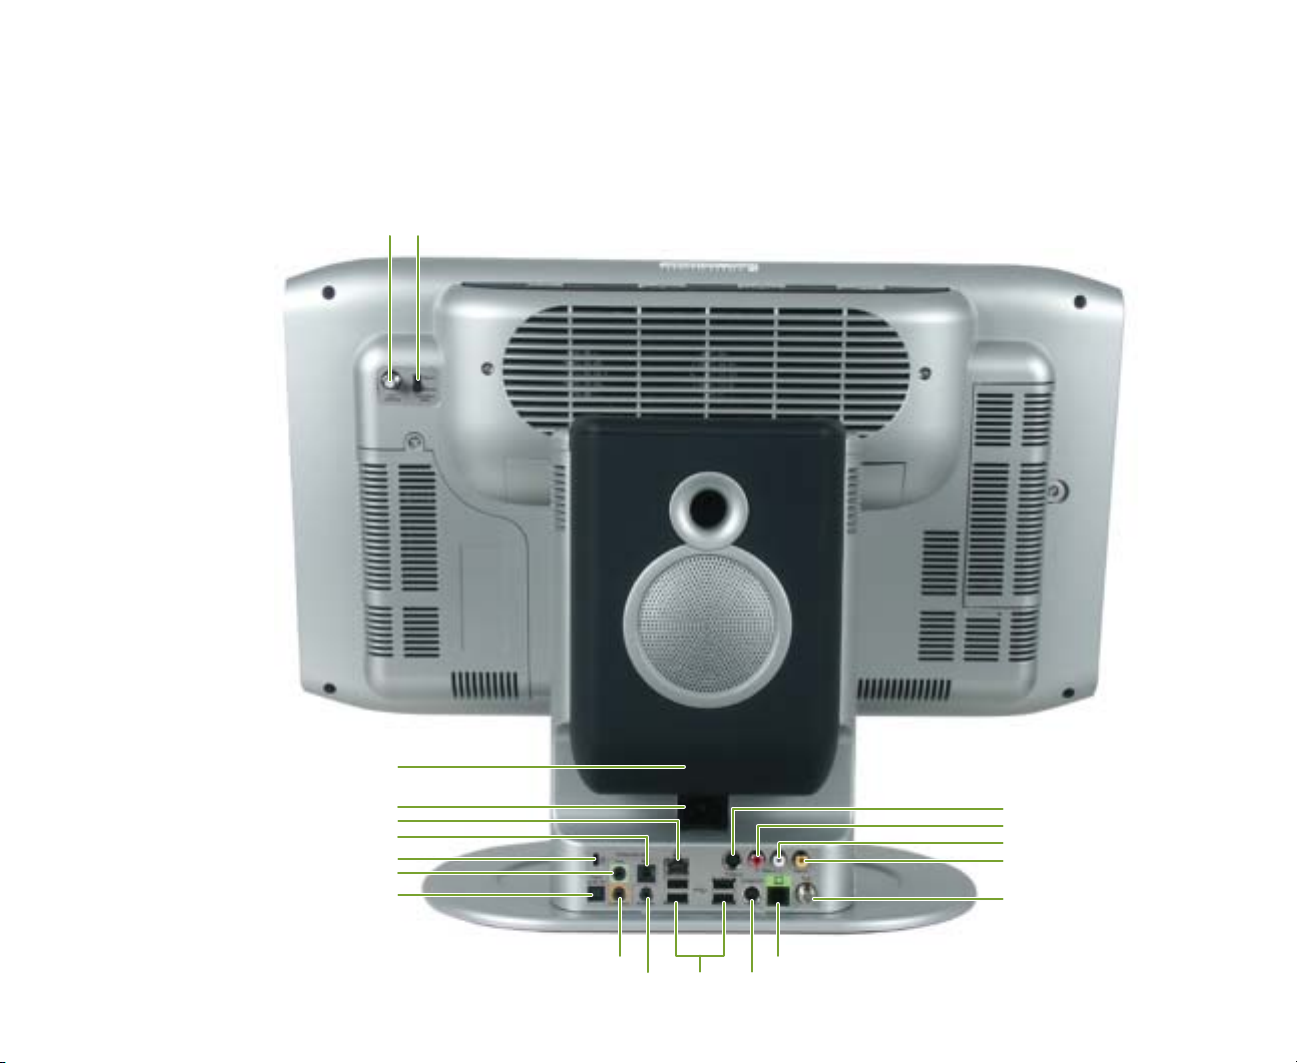
Back
CC
AA
BB
26
DD
EE
FF
GG
HH
II
SS
RR
QQ
PP
OO
JJ
KK
LL MM
NN
Page 27
Item Component Icon Description
AA FM In antenna (external coaxial connector) Connect an external FM antenna into this port.
BB FM antenna selector (internal or external) Select to use the internal FM antenna or an external FM antenna (not included).
CC Subwoofer speaker Provides subwoofer audio output when headphones or amplifi ed speakers are not plugged in.
DD Power connector Plug the AC adapter cable into this connector.
EE Ethernet jack
FF Rear Analog Audio Out jack (line out)
GG Kensington lock slot Secure your computer to an object by connecting a Kensington cable lock to this slot.
Plug 10/100 Ethernet network cable into this jack. For more information about networking,
see the “Networking Your Computer” guide. Click Start, All Programs, Gateway Documentation,
then click the networking guide.
Plug powered, analog rear speakers, or an external amplifi er into this jack. Use a 1/8” stereo
to RCA plug Y-cable.
HH Front Analog Audio out jack (line out)
II Digital Audio Out jack (S/PDIF) Plug an optical (Toslink) digital audio cable into this jack.
Center/subwoofer Analog Audio Out jack
JJ
(line out)
KK IR Control (controller) port
LL USB ports (4)
MM S-Video Out jack Provides video output for devices, such as monitors and camcorders, that support S-Video.
NN Modem jack
OO TV In jack (coaxial) Plug a coaxial cable from a video source, such as cable, satellite, or antenna, into this jack.
PP Video In jack (RCA) Plug an RCA cable from a video source, such as a VCR, into this jack.
QQ Audio In jack (left channel)
RR Audio In jack (right channel)
SS S-Video In jack
Plug powered, analog front speakers, or an external audio amplifi er into this jack. Use a 1/8”
stereo to RCA plug Y-cable.
Plug powered, center/subwoofer speakers, or an external audio amplifi er into this jack. Use a
1/8” stereo to RCA plug Y-cable.
Sends input from the keyboard or remote control to a set-top box to change channels. Plug an
IR control cable into this port.
Plug USB (Universal Serial Bus) devices (such as a USB printer, scanner, camera, keyboard,
or mouse) into these ports.
Plug an RJ-11 modem cable into this jack.
Plug an RCA cable from a left channel audio out jack, such as cable, satellite, or antenna,
into this jack.
Plug an RCA cable from a right channel audio out jack, such as cable, satellite, or antenna,
into this jack.
Plug an S-Video cable from a video source, such as cable, satellite, or antenna, into
this jack.
27
Page 28
Starting the Media Center
You can take full control of the Media Center from your
wireless keyboard, remote, and mouse. Use the device
that is comfortable for your using and viewing situation.
To start Media Center from the Start menu
Click Start, then click Media Center.
•
To start Media Center with a remote device
Press the Start button on the remote.
•
28
Page 29
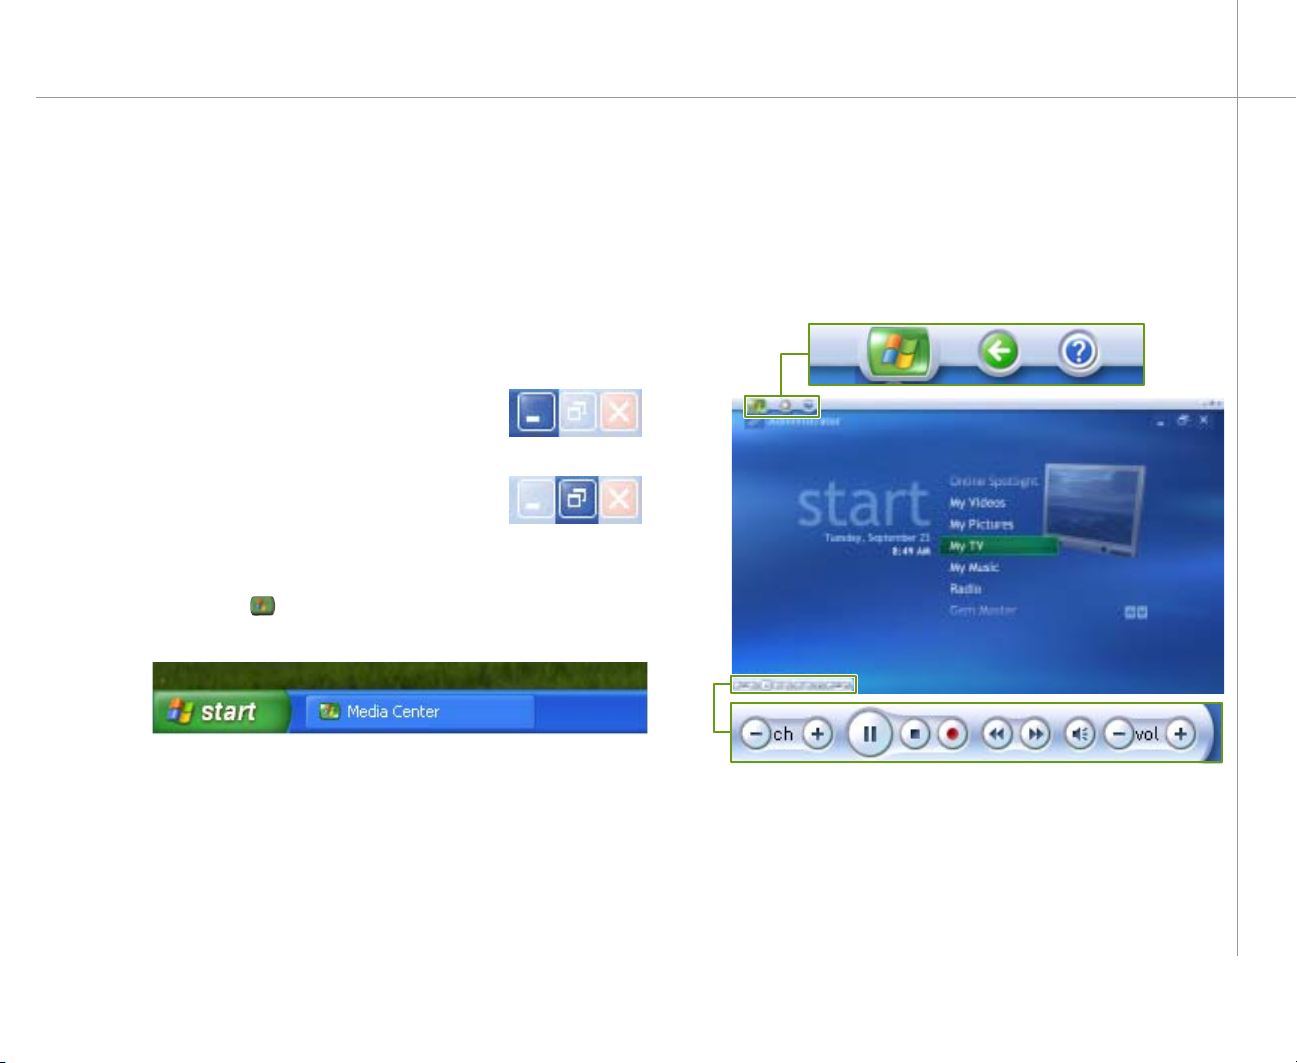
Using the Media Center
You can switch to the Microsoft Windows desktop
at any time. Media Center will continue to run in the
background.
To switch between the Media Center and the
desktop
Click the minimize button to view
•
the desktop.
Click the maximize button to
•
expand the active window to fit
the entire screen.
Click the Media Center taskbar button or the
•
Start button on the keyboard or remote to
return to the Media Center.
The Media Center menu bar and transport controls
toolbar appear when you move the mouse. Use the
keyboard, remote, or mouse to make selections.
Menu bar
Transport controls
29
Page 30
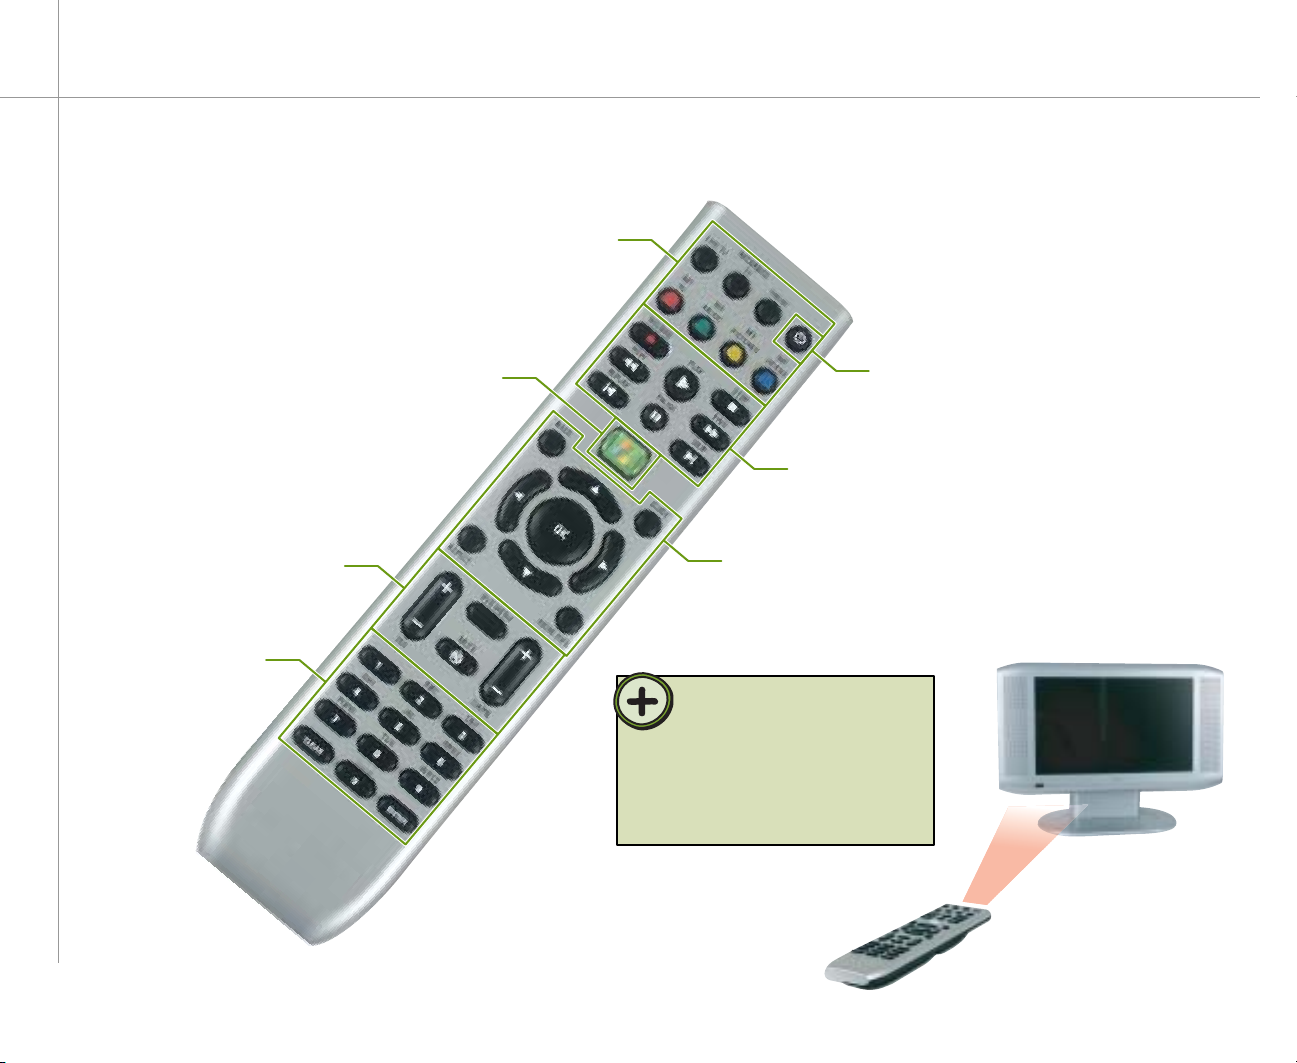
Learning about the remote control
Shortcut buttons
give you direct access to
Media Center features.
Media Center Start button
starts the Media Center software.
Audio/Video (A/V) control buttons
control volume levels, volume mute,
channel selections, and the DVD menu.
Numeric keypad/
Data entry buttons
let you enter numbers
and characters from the
remote control.
Power control button
puts the Media Center PC in Standby
mode (reduced power).
Transport buttons
let you replay buffered recorded
(buffered) TV and radio programs and
play the CD and DVD player.
Navigation buttons
let you move the cursor around the Guide and
menus, make selections, navigate back to the
previous screen, change the screen display
aspect ratio, and get more information. Press
the OK button to make a selection.
Tip:
The remote has a range of 23 feet
(7.5 meters) and performs best with
a maximum angle of 22.5-degrees
from the center of the IR receiver in all
directions. Make sure that there is a
clear line of sight between the remote
and the IR receiver.
30
Page 31

Using the remote control
Use the Media Center remote control to watch TV,
videos, and DVDs, to listen to music, and to view
pictures.
Use the remote control navigation buttons to highlight a
Media Center menu option, then press OK to select the
menu option.
Press one of the menu shortcut buttons on the remote
control for direct access to a Media Center menu.
- OR -
31
Page 32

Learning about the keyboard
Use the keyboard to navigate and select the Media
Center menus and options and perform other activities
such as typing an e-mail.
Standby control
puts the Media
Center PC in
Standby mode
(reduced power).
Internet button
starts your Internet
browser.
Shortcut buttons
give you direct access to
Media Center features.
E-mail button
starts your E-mail
program.
Tip:
The keyboard has a range of 6.5 feet (2 meters) and performs best
with a maximum angle of 85 degrees from the center of the screen
in all directions.
Transport buttons
let you replay buffered TV
programs and play the CD
and DVD player.
Audio/Video (A/V) control buttons
control volume levels, volume mute,
and channel selections.
32
Windows keys
give you direct access to
the Windows Start menu.
Application key
lets you access
shortcut menus and
help assistants in
Windows.
Directional
(navigation) keys
let you move the
cursor around the
Guide and menus.
Numeric keypad/
Data entry buttons
let you enter numbers
and characters from the
remote control.
Page 33

• Watch Live TV
• View the Guide and select TV programs
• Schedule, record, and sort TV
program recordings.
• Search for programs by categories,
title, or keyword.
• Change My TV settings
UsingMyTV
ChapterFour
33
Page 34

Watching TV
You can take control of your TV viewing experience
with My TV. Use My TV to watch TV, record TV, watch
buffered (time-shifted) TV, watch recorded programs,
search for programs, change TV settings, and more.
While watching My TV or using the Guide, you can
press the More Info button, on the remote, to view more
information about the selected program.
To watch a TV program
On the remote, press My TV. The last viewed TV
1
channel displays.
To view a TV program in full-screen mode
With My TV on, navigate to highlight Live TV.
1
Press the OK button to maximize the TV viewing
2
window to full-screen mode.
To exit the full-screen mode
With My TV in full-screen mode, press the remote
•
control’s Back navigation button. The previous
Media Center screen displays.
34
On the remote, press the CH/PG + or CH/PG -
2
button to change channels, enter a channel on
the remote’s numeric keypad, select channels
from the Guide, or search for a TV program by
category, title, or keyword.
Help:
If you prefer, you can use the computer keyboard instead of the
remote to control My TV. The arrow keys on your keyboard work
as the navigation buttons. For other commands, use the keyboard
shortcuts described in the Media Center Help. To open Media
Center Help, move the mouse to activate the menu bar, then click
the Help button .
Page 35

Using the remote to play TV recordings
My TV automatically records TV programs to a program
buffer as you watch TV. When you stop or pause live
TV programs, My TV continues recording (buffering)
the program for up to 30 minutes so you can watch
the program where you previously left off. You can also
Remote
button
Pause Pause to freeze the live TV image. While paused, My TV continues to record the program for
Stop Stop to halt live TV. My TV continues to record the program for up to 30 minutes. If you stop
Play Play to resume watching TV where you left off when you pressed the Pause or Stop button.
Fwd Fwd (Fast forward) to advance through a live TV or recorded program that has been stopped
Rewind Rew (rewind) to go back in a program that has been stopped or paused and recorded to the
Press:
up to 30 minutes. If you paused live TV for more than 30 minutes, you cannot play the show
from the exact point where you paused it.
live TV for more than 30 minutes, you cannot play the broadcast from the exact point where
you stopped it.
Press Stop to stop viewing live or recorded TV.
or paused and recorded to the program buffer. Press Fwd a second or third time to increase
the fast forward speed.
program buffer. Press Rew a second or third time to increase the rewind speed.
press the replay button, while watching a program, to
rewind and replay a segment of the program. Use the
remote transport buttons or the transport controls toolbar
(activated by moving the mouse), to control Live TV and
recorded TV playback.
Skip Skip once to advance 29 seconds through a recorded program that has been stopped or
paused and recorded to the program buffer. You can press skip repeatedly, but only until you
reach the end of the program buffer.
Replay Replay once to go back 7 seconds in a live TV or recorded program that has been stopped
or paused and recorded to the program buffer. You can press replay repeatedly, but only until
you reach the beginning of the program buffer.
35
Page 36

To rewind and replay a buffered TV program
On the remote, press Rew until you locate the
•
point on the TV program that you want to replay,
then press Play. The buffered program plays and
live TV continues to record to the buffer.
Help:
For more information about watching buffered TV programs, see
topics in About My TV section of the Media Center Help. To open
Media Center Help, move the mouse to activate the menu bar, then
click the Help button
To pause or stop and replay a buffered
TV program
On the remote, press Pause or Stop at the
1
point on the TV program that you want to pause or
stop the program. Live TV continues to record to
the buffer for up to 30 minutes.
.
36
Tip:
My TV buffers 30 minutes of TV program segments. You can
replay buffered TV programs for up to 30 previous minutes of the
program’s broadcast. If you want to replay longer TV programs or
save them to watch later, use the My TV record features. For more
information, see “Recording TV programs” on page 39.
Tip:
When you change channels, the program buffer deletes the buffer
content from the current channel and begins recording the new
channel to the program buffer.
Press Play when you want to return to watching
2
the program. The program starts playing from the
point where you paused it.
You can continue watching the time shifted
program or fast forward, rewind, skip, or replay
segments that were buffered. If you want to return
to Live TV, skipping past the buffered broadcast
segments, press Live TV.
Page 37

Using the Guide
The Guide displays channel and TV program information,
TV program titles, descriptions, categories, ratings, and
program times. You can view and scroll through the list
of current and future TV shows in the Guide. When you
select a program title, information about the program
displays below the program listings.
Use the Guide to select programs to watch, set up
program recordings, and search for TV programs.
To start the Guide
On the remote, press the Guide button. The Guide
•
opens.
To select a program listed in the Guide
With the Guide open, press the up , down ,
1
left , or right remote navigation buttons to scroll
through the TV listings line-by-line.
- OR -
Press the CH/PG + or CH/PG - buttons on
the remote to scroll through the TV listing
page-by-page.
Help:
For information about watching Pay-Per-View programs on the
Media Center, see topics in About the Guide section of the Media
Center Help. To open Media Center Help, move the mouse to
activate the menu bar, then click the Help button .
Highlight the program you want to watch and
2
press OK. One of the following will occur:
• If the program is currently broadcasting, the
window will maximize and display the program.
• If the program is scheduled to broadcast at a
later time, a detailed program information page
opens.
37
Page 38

Manually updating the Guide
When you use the Media Center setup wizard, the
Media Center Guide can be set up to automatically
download program information from your cable or
satellite service provider. However, if your Internet
Service Provider does not support automatic Guide
updates or if the Guide needs to be updated for another
reason, you may need to update the Guide manually to
refresh the program listings.
To manually update the Guide
Before starting the Media Center, make sure that
1
you connect to the Internet.
Tip:
The Media Center requires Internet access to update the Media
Center Program Guide. Make sure that you connect to your
Internet connection before continuing the manual Program Guide
update instructions. Contact your Internet Service Provider for
more information.
On the remote, press My TV. The Media Center
2
My TV starts.
Navigate to Settings, then press OK. The Settings
3
menu opens.
38
Help:
For more information about using and configuring the Guide, see
topics in About the Guide section of the Media Center Help. To
open Media Center Help, move the mouse to activate the menu bar,
then click the Help button .
Navigate to Guide, then press OK.
4
Navigate to Get Guide data, then press OK. A
5
message asks if you want to update the Guide
information now.
Navigate to Yes, then press OK. The Media
6
Center downloads Guide updates.
Page 39

Recording TV programs
Media Center lets you record the program you are
watching, record a program that is scheduled to
broadcast later, or record a recurring program series.
To record the program you are watching
Use the remote channel selector CH/PG + or
1
CH/PG -, numeric keypad, or the Guide to choose
programs that you want to record.
On the remote, press the Record button. The
2
program recording starts.
Tip:
To record programs to the hard drive, your Media Center PC must
be turned on, in standby mode, or hibernate mode. For more
information about using standby and hibernate, Click Start, Help
and Support, then search for the keywords standby or hibernate.
To set up a recording from the Guide
On the remote, press Guide. The Guide opens.
1
Highlight the TV program you want to record,
2
then press the Record button. The record
icon appears next to the program to indicate the
recording has been scheduled.
To end the program recording, press the Stop
3
button or let the recording stop automatically when
the current program is over.
Tip:
When recording a program, you can only watch the program that is
recording. If you change channels during a program recording, the
recording stops.
The program automatically records when the
scheduled program begins broadcasting and stops
recording when the program broadcast ends.
Tip:
The Guide is available to multiple user accounts on the Media
Center, however the program recording schedules are shared among
all accounts. A program recording conflict message appears if a
user tries to schedule a recording for a time that has already been
scheduled.
39
Page 40

Tip:
When you schedule to record a program series, the Media Center
records each series episode from any channel that broadcasts the
program series. Media Center will not record duplicate programs
from the series and it will look for alternative broadcasts times if a
recording time conflict occurs.
Help:
For more information about recording programs manually,
recording programs from search, and other recording methods,
see topics in Record TV located under the My TV section of the
Media Center Help. To open Media Center Help, move the mouse to
activate the menu bar, then click the Help button
.
To set up a recording for a program series
On the remote, press Guide. The Guide opens.
1
Highlight the program you want to record, then
2
press the Record button two times to record a
program series. The record series icon appears
next to the program to indicate that the recording
has been scheduled for all programs in this series.
The program automatically records each time the
scheduled series broadcasts from any channel and
stops recording when the program broadcast ends.
To change program recording settings
On the remote, press Guide. The Guide opens.
1
Highlight the program that you have scheduled to
2
record, then press the OK button. The Program
Info window opens.
Highlight a menu option, press the OK button, then
3
change the record settings to your preferences.
Help:
For more information about managing Recorded TV, see topics in
Record TV located under the Manage Recorded TV section of
the Media Center Help. To open Media Center Help, move the mouse
to activate the menu bar, then click the Help button .
40
Page 41

Using Recorded TV
Use Recorded TV to view and manage your program
recordings. After you have recorded TV programs, go
to Recorded TV to sort programs by date, name, and
category. You can also schedule new program recordings
and watch and manage scheduled program recordings.
In Recorded TV you can:
• Select Sort by date, Sort by name, or Sort
by category to set your program list viewing
preference.
To watch and manage Recorded TV
On the remote, press My TV. The Media Center
1
starts.
Navigate to Recorded TV, then press OK. The
2
Recorded TV menu opens. A list of previously
recorded and currently recording programs displays.
Tip:
On the remote, you can also press the Recorded TV button for a
shortcut to access Recorded TV.
To play, delete, or keep a recorded program until
a specified date, navigate to a recorded program,
then press OK. Select the program option.
• Select Add recording and schedule a new
program recording using the Guide or Search,
choosing Channel and time, or by Keyword.
• Select Scheduled to view and manage future
program recording options.
41
Page 42

Changing My TV Settings
Use My TV Settings to customize the Media Center My
TV. You can adjust settings for the TV recorder, Guide,
TV signal, display settings, audio, and My TV.
To use the Settings menu
On the remote, press My TV. The Media Center
1
starts.
Navigate to Settings, then press OK. The Settings
2
menu opens.
Help:
For more information about the My TV Settings options, see topics
in Change settings for My TV located under the My TV section
of the Media Center Help. To open Media Center Help, move the
mouse to activate the menu bar, then click the Help button .
In Settings you can:
• Select Recorder to view the TV program
recording history log, change drive storage
settings (such as how much disk space to
allocate for program recordings), and change the
TV program recording quality setting. Also, see
how much recording time has been used, how
much is available for recording new programs,
what the recording default settings are, and
more.
• Select Guide to edit the Guide listings, add
missing channels to the Guide, reset the Guide
lineup, and update the Guide information.
• Select Set up TV signal to choose the video
service, such as cable, satellite, or antenna, that
is connected to the Media Center PC.
• Select Adjust display settings to adjust the
video settings for the display.
• Select Audio to set audio, captioning, and
captioning display options.
• Select My TV to choose whether to automatically
start playing the TV after starting My TV or
whether to start playing the TV only when the
user selects Live TV.
42
Page 43

Burning recorded TV programs to DVD
After you have recorded a TV program, you may want
to save the program to a DVD to watch on another
computer that has a DVD player or your home DVD
player. Use Sonic PrimeTime to copy the recorded
program to a DVD (a recordable DVD drive is optional for
the Gateway 610 Media Center PC).
Use Sort by date, Sort by name, or Sort by
3
category to locate the recorded TV program you
want to record to DVD.
Tip:
Record TV programs to DVD-R type DVDs.
To use Sonic PrimeTime
1
Press the Start button on the remote. The
Media Center menu displays.
Highlight Create DVD, then press OK. The Media
2
Center minimizes and Sonic PrimeTime opens.
Use the remote to highlight the TV program or
4
programs that you want to record, then press the
OK button.
As you select TV programs, a check mark displays
beside the programs and the DVD icon shows the
recording space available on the DVD.
After you have selected the TV programs you
5
want to record, highlight Burn DVD, then press
OK. A message tells you that running additional
programs while burning a DVD may cause the
recording to fail.
43
Page 44

If you have a number of processor intensive
6
programs running, exit the programs, then click
OK. The TV programs burn to the DVD.
Tip:
DVD-Rs have a 4.7 GB maximum capacity. If the TV program
you want to record is long enough to require more than 4.7 GB
of recording space, you can reduce the Media Center program
recording quality setting before recording the program. The record
quality setting options are Fair, Good, Better, or Best:
Recording
quality
Best 3.0
Better 2.5
Good 2.0
Fair 1.0
Lowering the recording quality reduces the TV program recording
space requirement, which may reduce the TV program file size
enough for the program to fit on a recordable DVD (depending on
the TV program length).
For more information about setting the recorded image quality
option, see the topics in Change settings for My TV located
under the My TV section of the Media Center Help. To open Media
Center Help, move the mouse to activate the menu bar, then click
the Help button
Approximate
GB/hour
.
44
Page 45

• Browse music selections
• Search for music by titles and keywords
UsingMy Music
• Play music
• Add songs and audio files to the Media Library
• View music CD information such as artist
name, song title, album cover art, and more.
ChapterFive
45
Page 46

Getting started with My Music
My Music lets you enjoy a complete music experience
from the Media Center. You can listen to CDs, view
artists information, create your own music playlists,
categorize and listen to music by genres, search for
music selections, and more.
The Media Center lets you play these digital audio file
types:
File type
(format)
CD audio
Windows Media
audio files
Windows audio
files
MP3
File extension
.cda
.asx, .wm, .wma, .wmp, .wmx
.wav
.mp3 and .m3u
Tip:
Additional audio formats may be supported if you install new
codecs (compressor/decompressor software used to compress and
decompress digital media files) to play the audio file.
Adding music files to the
Media Library
The Media Center My Music works hand-in-hand with
the Windows Media Player. Use the Windows Media
Player to add, delete, categorize, and organize music.
Then use the Media Center My Music to view, sort, play,
and search for music.
To add music files on your computer to the
Media Player’s Media Library
With the mouse, click Start, then click Windows
1
Media Player. Windows Media Player opens.
46
On the left side of the Media Player, click Media
2
Library. The first time you click Media Library, a
message tells you that the Media Player needs to
search your computer for music files.
Page 47

If this is the first time you’ve added music files to
3
the Media Library, click Yes. The Media Player
searches for all music files on your computer and
adds them to the Media Library.
- OR -
If you want to add new music files to the Media
Library, click the show menu bar arrow to
display the menu bar, click Tools, then click
Search for Media Files. The Add To Media
Library By Searching Computer dialog box
opens.
Help:
You can add music CD files to the Media Library in Media Center’s
My Music, however you cannot delete, move, rename, and organize
music files with My Music features. For a variety of music file
management capabilities, use the Media Player’s My Library
features.
For more information about managing music files, see topics in
Add songs and audio files to the Media Library located under
the My Music section of the Media Center Help. To open Media
Center Help, move the mouse to activate the menu bar, then click
the Help button
.
Adding music CDs to the
Media Library
You can add and organize your personal CD
collection with the Media Player’s Media Library,
then use the Media Center as your personal
jukebox to play and enjoy your music. First use
Media Player to copy, add, delete, move, create
personal playlists, rename files on the hard drive,
and more.
Once you’ve customized your music files using the
Media Library, then use the Media Center to play
music, view song, track, and artist information.
Select search options, then click Search. The
Media Player searches for music files on your
computer and adds them to the Media Library.
To add music files from a CD to the Media
Player’s Media Library
With the mouse, click Start, then click Windows
1
Media Player. Windows Media Player opens.
Insert the CD you want to add to the Media
2
Library.
47
Page 48

On the left side of the Media Player, click Copy
3
from CD, then click Copy Music.
The Copy Options (1 of 2) dialog box opens.
Click Add copy protection to your music or Do
4
not add copy protections to your music, then
click to select the check box next to the copyright
statement. You must agree to the copyright
statement and select the check box next to the
copyright statement before you can continue
copying the CD to your computer.
If you agree to the copyright statement, click Next.
5
The Copy Options (2 of 2) dialog box opens.
- OR -
If you do not agree to the copyright statement,
click X to close the dialog box and stop copying
the CD to your computer.
Click Change my current format settings or
6
Keep my current format settings, then click
Finish. The CD copies to the hard drive.
Tip:
When adding music files to the Media Library and playing files from
the Media Center, make sure that you’re connected to the Internet to
display CD information such as artist information, CD artwork, song
titles, and more.
48
Page 49

Playing My Music
You can play music CDs with Media Center’s My Music,
or after you’ve added your CD collection to the Media
Player’s Media Library, you’ll have a variety of music to
listen to directly from your Media Center PC. You can
play individual songs, CDs (albums), shuffle play, and
customize your music files for special occasions with a
personalized music playlist. After you’ve tailored music
files with the Media Library, sit back and enjoy listening
to your favorite music with the Media Center.
To listen to a CD on the Media Center
Insert the CD you want to listen to.
1
If the Media Center TV or Guide is open, Media
2
Center asks if you want to play the CD. Highlight
Yes, then click OK.
- OR -
If the Media Center is not open, the default music
player may start playing the CD. If you want the
Media Center to be your default CD player, see
“Changing Media Center to the default player” on
page 52.
Navigate to highlight the CD selection, highlight
3
Play or Shuffle, then press OK.
The Now Playing menu opens and the CD plays.
- OR -
Press My Music. The My Music menu opens.
49
Page 50

You can also:
• Select View Song to view the CD cover artwork and
the currently playing song’s title.
• Select View Tracks to view a
list of all the tracks on the CD.
• Select Shuffle to randomly
arrange the music play
selections.
• Select Repeat to repeat play
the CD.
• Select Copy CD to copy the
CD to the hard drive and add
the music files to the Media
Library for future listening (also
see “Adding music CDs to the
Media Library” on page 47). You can also set audio,
captioning, and captioning display options.
• Select Buy Music to search for and purchase CDs.
• Select Visualize to display interesting visual
patterns on-screen while your music plays.
To listen to the Media Library music from the
Media Center
On the remote, press My Music. My Music opens.
1
50
Page 51

Navigate to:
2
• Select Albums to play music, from your Media
Library.
• Select Artists to view and
play music from a list of all
artist in your Media Library.
• Select Playlists to view and
play music from your custom
playlists or from auto-created
playlists.
• Select Songs to view
and play music from an
alphabetized list of music
files.
• Select Genres to view and
play music from music categorized by genre,
such as classical, jazz, new age, and rock.
• Select Search to search for music by a song
title.
• Select Settings to change the visualizations
options.
Help:
For more information about methods to browse and select music
files, see topics in Browse My Music and Play Music located
under the My Music section of the Media Center Help. To open
Media Center Help, move the mouse to activate the menu bar, then
click the Help button .
After you’ve selected your music, click OK. The
3
selections play.
51
Page 52

To set Media Center as the default CD player
With the mouse, click Start, then click My
1
Computer. The My Computer window opens.
Right click the Audio CD (D:) drive, then click
2
Properties. The Audio CD (D:) Properties dialog
box opens.
Click the AutoPlay tab. The AutoPlay tab
3
displays.
Click Music CD in the Select a content type list.
4
Click the Select an action to perform option.
5
Play Audio CD using Media Center under
Actions, then click OK.
52
Page 53

UsingMy Pictures
• Manage and add pictures to
your photo library
• Browse and search for pictures
• View and touch up pictures
• Print and share pictures
• Watch pictures as slide shows
• View picture details such as
file name, file date, picture
pixel size, where the picture
is stored, and more.
ChapterSix
53
Page 54

Getting started with My Pictures
The Media Center’s My Pictures makes it easy and fun
to watch your digital photos. My Pictures lets you view
your pictures individually or as a slide show. You can
organize and sort pictures by name or date. Use the
keyboard or mouse to browse your pictures with the
keyboard or remote control.
While browsing pictures or watching a slide show, you
can press the More Info button to view more information
about a picture, make adjustments to a picture, and print
a picture. The Media Center lets you view these digital
image file types:
File type (format) File extension
Joint Photographic
Experts Group
Tagged Image File
Format
Graphics Interchange
Format
Bitmap
Windows MetaFile
Portable Network
Graphics
Animated .gif fi les are not supported.
.jpg, .jpeg
.tif
.gif*
.bmp
.wmf
.png
54
Page 55

Organizing picture files
To view pictures and play slide shows in the Media
Center’s My Pictures, first copy and organize the picture
files into the My Pictures or Shared Pictures folders. The
Media Center only displays picture files placed in the My
Pictures or Shared Pictures folders.
To organize picture files
With the mouse, click Start, then click My
1
Pictures. The My Pictures window opens.
Make new folders in the My Pictures folder and
2
copy files to the folder or copy folders from other
folders to the My Pictures folder.
You can also put pictures in the Shared Pictures
folder to share pictures with other users.
Help:
For more information about managing picture files, see topics in
Work with picture files located under the My Pictures section of
the Media Center Help. To open Media Center Help, move the mouse
to activate the menu bar, then click the Help button .
55
Page 56

Viewing My Pictures
After you’ve organized your picture files in the
My Pictures or Shared Pictures folder, then you can view
pictures in the Media Center’s My Pictures. The picture
folders display just as you organized them in the My
Pictures or Shared Pictures folders.
To view pictures from the Media Center
On the remote, press My Pictures. The
1
My Pictures menu opens and the picture
folders display.
Navigate to a picture folder that you want to view,
2
then press OK. The picture folder opens.
56
Page 57

You can view individual pictures by highlighting a
picture and pressing OK.
You can also choose from the
menu options:
Using More Info
While viewing an individual picture or watching a slide
show, you can press More Info to view picture details.
• Select Play slide show to view
the pictures in a slide show.
The slide show automatically
transitions between pictures.
You can also press the left and
right remote navigation buttons
to view the pictures manually at
your own pace.
• Select Sort by name to sort
the pictures by the file names.
• Select Sort by date to sort the pictures by the file
dates.
• Select My Pictures to view all the picture folders.
• Select Shared Pictures to view pictures that are
shared from other users.
• Select Other media to view pictures that are on a
removable memory card.
• Select Settings to change the slide show
preferences, such as the order to display pictures
in, whether to show pictures in subfolders, caption
options, and transition effects between pictures.
To view More Info about a picture
On the remote, while viewing pictures, press More
1
Info. The Picture Details menu opens and the
picture displays.
57
Page 58

Choose from the menu options:
• Select Play slide show to view the pictures in a
slide show. The slide show automatically transitions
between pictures. You can also press the left and
right remote navigation buttons to view the pictures
manually at your own pace.
Playing audio during a slide
show
In addition to watching slide shows, you can also play
music along with your slide show.
• Select Rotate to rotate
the picture counter-clockwise in
90-degree increments.
• Select Rotate to rotate the
picture clockwise in 90-degree
increments.
• Select Print to print a full-page
picture print.
• Select Touch up to remove red
eye and change the picture contrast.
• Select Next to view the next picture’s details.
• Select Previous to view the previous picture’s
details.
To view a slide show with music
Use My Music to select music from your Media
1
Library, play a CD, or select a music playlist. For
more information, see “Playing My Music” on
page 49.
On the remote, press My Pictures. The
2
My Pictures menu opens and the picture folders
display.
Select the picture folder you want to watch as a
3
slide show, highlight Play slide show, then press
OK. The slide show starts.
Help:
For more information about slide show options and settings, see
topics in Play a slide show located under the My Pictures section
of the Media Center Help. To open Media Center Help, move the
mouse to activate the menu bar, then click the Help button .
58
Page 59

• Manage and add videos to your
video library
• Browse and search for videos
• View videos
• Share videos
• View video details such as file name,
file date, picture pixel size, where the
picture is stored, and more.
UsingMy Videos
ChapterSeven
59
Page 60

Getting started with My Videos
The Media Center’s My Videos makes it easy to enjoy
your digital videos. My Videos lets you watch and share
your videos. You can organize and sort videos by name
or date. Use the keyboard or mouse to browse your
videos with the keyboard or remote control.
While browsing or viewing videos, you can press the
More Info button to view more information about video.
The Media Center lets you watch these digital video file
types:
60
File type (format) File extension
Windows Media file .wm, .asf
Windows Media A/V
Video file
Movie file .mpeg, .mpg, .mpe, .m1v,
Windows MetaFile
.wmv
.avi
.mp2, .mpv2
.wmf
Tip:
Additional video formats may be supported if you install new
codecs (compressor/decompressor software used to compress and
decompress digital media files) to play the video file.
Page 61

Organizing video files
To view videos in the Media Center’s My Videos, first
copy and organize the video files into the My Videos or
Shared Video folders. The Media Center only displays
video files placed in the My Videos or Shared Video
folders.
To organize video files
With the mouse, click Start, My Documents, then
1
click My Videos. The My Videos window opens.
Make new folders in the My Videos folder and
2
copy files to the folder or copy folders from other
folders to the My Videos folder.
You can also put videos in the Shared Video
folder to share videos with other users
Help:
For more information about managing video files, see topics in
Manage video files located under the My Videos section of the
Media Center Help. To open Media Center Help, move the mouse to
activate the menu bar, then click the Help button .
61
Page 62

Viewing My Videos
After you’ve organized your video files in the My Videos
or Shared Videos folder, you can view videos in the
Media Center’s My Videos. The video clips display just as
you organized them in the My Pictures folder.
To view videos from the Media Center
On the remote, press My Videos. The My Videos
1
menu opens and the videos and video folders
display.
You can view videos by highlighting a video and
2
pressing OK.
You can also choose from the menu options:
• Select Sort by name
to sort the videos by the
file names.
• Select Sort by date to
sort the videos by the
file dates.
• Select My Videos to
view all the videos.
• Select Shared Video
to view videos that are shared from other users.
• Select Other media to view videos that are on a
removable memory card.
62
Page 63

Using More Info
While viewing videos, you can press More Info to view
information about the video (if available) and change the
video display’s aspect ratio.
To use More Info for videos
On the remote, while viewing videos, press More
1
Info. More information displays along the bottom
of the screen.
Help:
For more information about using My Videos, see topics in My
Videos section of the Media Center Help. To open Media Center
Help, move the mouse to activate the menu bar, then click the
Help button .
Tip:
You can also change the display’s aspect ratio, by pressing Aspect
on the remote.
Press OK (Zoom) to toggle through the various
2
aspect ratio screen display options.
63
Page 64

64
Page 65

UsingPlay DVD
• Play DVDs
• Set language, subtitles, and audio defaults.
ChapterEight
65
Page 66

Playing a DVD
You can watch a DVD on the Media Center. If the Media
Center is running when you insert a DVD into the DVD
drive, a message asks if you want to play the DVD. If you
select Yes or do not make a selection, the DVD plays
automatically. If you select No, then you can play the
DVD in Media Center at any time by pressing DVD Menu
or Play DVD on the Media Center Start menu.
To watch a DVD on the Media Center
Insert the DVD you want to watch.
1
If the Media Center is already running, a message
2
asks if you want to play the DVD. On the remote,
highlight Yes, then press OK. The DVD plays.
- OR -
If you are not using Media Center when you
insert a DVD, a What do you want to do? dialog
box opens. Click Play DVD Video using Media
Center. If you want the Media Center to always
play DVDs using the Media Center, click to select
the check box next to Always do the selected
action. The DVD plays.
66
- OR -
If a DVD player installation program opens (for
player software that was included with the DVD),
cancel the installation, then press the Start
button on the keyboard or remote. The Media
Center starts.
Page 67

To select DVD menu options
Press DVD menu. The DVD menu opens.
1
- OR -
Press the Stop button. The Stopped DVD menu
opens.
On the remote, highlight the menu option you
2
want to select, such as language, subtitles, and
others, then press OK.
Tip:
DVD menu options vary and are dependent upon the options
provided by the DVD publisher.
67
Page 68

68
Page 69

• Play FM and Internet radio and
preset favorite stations
UsingRadio
• Preset favorite radio stations
• Rewind, pause, stop, skip forward,
and play radio recordings.
ChapterNine
69
Page 70

Playing the Radio
You can enjoy the Media Center’s FM radio and control
playback with the remote control. When you play the
radio, the Media Center records (buffers) up to 30
minutes of the radio program much like My TV does. This
lets you go back and review part of the radio broadcast
you heard earlier or listen to a broadcast segment that
you missed while away from the radio.
Tip:
The Media Center Radio buffers up to 30 minutes of a radio
program, however it does not let you schedule a radio recording or
manually record radio programs.
While listening to FM radio you can pause, play, stop,
skip forward, or skip back in the audio stream. You can
also change to a different station by tuning to a specific
frequency, seeking the next available station, or selecting
a radio preset.
Tip:
The Media Center FM radio shares the single tuner card with My
TV. You cannot watch or record TV and listen to FM radio at the
same time. When Media Center is scheduled to start a TV program
recording, a warning appears that says FM radio stops when the
TV recording starts. If you do not select Cancel recording, Media
Center automatically stops the radio and begins recording TV.
To auto-tune the FM radio with Seek
On the remote, press Radio. The Radio window
1
opens.
With the remote, highlight the Seek + or Seek -
2
button, then press OK. The radio auto-scans for
radio stations.
When a station signal tunes in, the auto-scan
stops on the station.
You can:
• Listen to the radio station.
• Highlight the Save button,
then press OK to save
this station on the next
available preset radio
memory slot.
• Highlight the Seek + or
Seek - button to continue
auto-scanning for stations.
70
Page 71

To manually-tune the FM radio with Tune
To play FM radio
On the remote, press Radio. The Radio window
1
opens.
On the remote, highlight the Tune + or Tune -
2
button, then press OK repeatedly to manually
scan for radio stations. When a station signal
tunes in, stop on the station. You can:
• Listen to the radio station.
• Highlight the Save button,
then press OK to save
the station on the next
available preset radio
memory slot.
• Highlight the Tune + or
Tune - button to continue
manually scanning for stations.
Tip:
If you know the radio station’s frequency, you can highlight the radio
station frequency number box and type the station number you want
to tune in.
On the remote, tune to an FM station or select a
•
preset station, highlight the Start Radio button,
then press OK. (you can also press the remote
Play button). The radio starts playing and
recording (buffering) up to 30 minutes of the radio
program.
To listen to Internet radio
On the remote, press Radio. The Radio window
1
opens.
Navigate to Internet, then press OK.
2
Navigate to highlight one of the Internet radio Web
3
links from the list.
Tip:
The Internet button appears in the Media Center Radio only if
one or more Internet radio Web links have been installed. Go to
Online Spotlight to check for Internet radio Web links that you can
download and use in Media Center (press the Start button on
the remote, highlight Online Spotlight, then press OK).
71
Page 72

Using the remote to play Radio recordings
When you play the radio, the Media Center automatically
records radio programs to a program buffer as you
listen. When you stop or pause radio programs, the
radio continues recording (buffering) the program for up
to 30 minutes so you can listen to the broadcast where
Remote
button
Pause Pause to halt the radio. While paused, the radio continues to record the radio program for up
Stop Stop to halt the radio. Media Center continues to record the radio program for up to 30
Play Play to resume listening to the radio where you left off when you pressed the Pause or Stop
Fwd Fwd (Fast forward) to advance through a live or recorded radio program that has been
Rewind Rew (rewind) to go back in a radio program that has been stopped or paused and recorded to
Press:
to 30 minutes. If you pause the radio for more than 30 minutes, you cannot play the radio from
the exact point where you paused it .
minutes. If you stop the radio for more than 30 minutes, you cannot play the radio from the
exact point where you stopped it.
button. Press Stop to stop listening to a live or recorded radio broadcast.
stopped or paused and recorded to the program buffer. Press Fwd a second or third time to
increase the fast forward speed.
the program buffer. Press Rew a second or third time to increase the rewind speed.
you previously left off. You can also press the replay
button, while watching a program, to rewind and replay a
segment of the radio program. Use the remote transport
buttons or the transport controls toolbar to control radio
playback.
72
Skip Skip once to advance 29 seconds through a recorded radio program that has been stopped
or paused and recorded to the program buffer. You can press skip forward repeatedly, but only
until you reach the end of the program buffer.
Replay Replay once to go back 7 seconds in a live or recorded radio program that has been stopped
or paused and recorded to the program buffer. You can press replay repeatedly, but only until
you reach the beginning of the program buffer.
Page 73

Changing Radio Settings
Use Radio Settings to customize the Media Center
Radio. You can change, remove, and reorder the FM
radio preset stations. You can also auto-sort the stations
in numeric order.
To use the Settings menu
On the remote, press Radio. The Radio window
1
opens.
Navigate to Settings, then press OK. The Settings
2
menu opens.
Help:
For more information about the Radio Settings options, see topics
in Manage FM radio presets located under the Radio section of
the Media Center Help. To open Media Center Help, move the mouse
to activate the menu bar, then click the Help button .
In Settings you can:
• Go to the text field for the radio station preset
that you want to change, then use the numeric
keypad to enter a minimum of three new digits.
• Use the up arrow or down arrow, in the FM radio
preset list, to move a radio station up or down the
list.
• Select the X next to a radio preset station to
delete it.
• Select Auto Sort to sort the radio presets in
numeric order.
73
Page 74

74
Page 75

UsingOther Features
• Set up the external video inputs,
such as a game box or VCR.
• Adjust Media Center Settings
• Use More Programs
ChapterTen
• View the Online Spotlight
75
Page 76

Setting up the external video input
You can connect a game box, VCR, or other external
video device for viewing on the Media Center PC.
After you connect the external video device, use the
Gaming Input option to select the port for the device. You
can also select a normal or stretched video display.
To set up the external video input
76
1
Press the Start button on the remote. The
Media Center menu displays.
Highlight Gaming Input, then press OK. The
2
Gaming Input menu opens.
Select the input options that apply.
3
• Video:
• Select Video In if you connected the external
video source to the Video In port.
- OR -
• Select S-Video In if you connected the
external video source to the S-Video In port.
• Display:
• Select Normal to view the normal screen
aspect ratio.
• Select Stretch to view a wide screen
aspect ratio.
On the remote, press Back to return to the Media
4
Center menu.
Page 77

Changing Media Center Settings
You can access most of the Settings menus within
a specific Media Center feature, such as My TV, My
Pictures, My Music, and others. However, you can also
access all of the Settings menus from the Settings button
on the Media Center’s main menu. This menu provides
easy access to all of the Settings menus, including the
Media Center general settings.
Browse the Settings menu to familiarize yourself with the
Media Center settings options.
Help:
For more information about the Settings menu
options, see topics in Change settings in Media
Center section of the Media Center Help. To open
Media Center Help, move the mouse to activate the
menu bar, then click the Help button .
To access the Settings menu
1
Press the Start button on the remote. The
Media Center menu displays.
On the remote, highlight Settings, then press OK.
2
The Settings menu opens.
Select a Settings menu and use the sub-menus
3
to adjust the Media Center settings to your
preferences.
77
Page 78

Using More Programs
More Programs gives you access to other programs and
games available to use or play from the Media Center.
To use More Programs
1
Press the Start button on the remote. The
Media Center menu displays.
Highlight a program or game, then press OK.
3
78
Highlight More Programs, then press OK. The
2
More Programs menu opens.
When finished, exit the program or game. On the
4
remote, press Back to return to the Media Center
menu.
Page 79

Using Online Spotlight
The Media Center Online Spotlight highlights new ways
to enjoy and use your Media Center. Check the Online
Spotlight regularly to learn more tips and tricks and to
get the most out of your Media Center experience.
To access the Online Spotlight
1
Press the Start button on the remote. The
Media Center menu displays.
On the remote, highlight Online Spotlight, then
2
press OK. The Online Spotlight page opens.
Browse information to learn more about the Media
3
Center.
When finished, on the remote, press Back to
4
return to the Media Center menu.
79
Page 80

80
Page 81

GettingHelp
• Get answers to Frequently Asked
Questions (FAQs)
• Learn about the Media Center online
help and other information resources
• Get Gateway contact information
ChapterEleven
81
Page 82

Media Center FAQs
Following are Media Center Frequently Asked Questions
(FAQs). To view other Media Center FAQs that are not
covered in this section, go to the Gateway support Web
Site at
support.gateway.com/windowsxp/mediacenter/faqs/.
Q: Why does the Media Center video display look bad on
my TV?
A: Many factors, such as the display type, quality of the
video source, type of connection used, quality of video
cables, display device screen resolution, age of the TV,
or the type of TV (interlaced or progressive scan), can
affect the video quality substantially:
• Display type — The Media Center is best viewed
on the Gateway 610 Media Center PC display. Other
types of external display devices, including retail TVs,
may provide lower quality video.
• Quality of video source — The quality of the video
signal coming into the Media Center PC has an
affect on the video quality. The video displayed from
the Gateway 610 Media Center PC is only as good
as the source video signal. Cable, digital cable,
and satellite usually provide better quality than an
antenna.
• Type of connection used — You can connect the
Gateway 610 Media Center PC video output to a TV
S-Video port. If your TV includes an S-Video port,
connect the S-Video cable from the Media Center
PC’s S-Video Out port to the TV’s S-Video In port.
S -Video display quality is usually good for TV images.
The display quality for the Media Center computer
functions, however, is not as good as the display on
the Media Center PC. S-Video display output is not
optimized for computer video display.
• Quality of video cables — Poor quality cables
or the incorrect type of video cables can cause
problems and affect the video quality. Gateway
recommends using high quality video cables that
can be purchased from Gateway on the Web, in a
Gateway store, or on the phone.
Note: Cable connections must be connected
correctly for optimal video quality. A poor cable
connection can lower video quality.
• Screen resolution — By default, your Gateway
610 Media Center PC uses a screen resolution
of 1280 x 768. Many TVs cannot display this high
resolution and may shift, scramble, or scroll the
picture. For a better picture on a TV display, you may
need to lower the Media Center screen resolution to
800 x 600 or 640 x 480. For more information about
adjusting display settings, click Start, then click Help
and Support. Type the keyword changing display
settings in the Search box, then press Enter.
• Age of the TV — Newer TVs usually have more
advanced features, produce a better quality picture,
and support higher screen resolutions. The Media
Center PC external video display will likely be better
on a newer model TV.
82
Page 83

• Type of TV (interlaced or progressive scan)
Many TVs use interlaced video. Interlaced video
displays a video frame with two passes of alternating
scan lines. The TV screen first displays the video
image odd lines one at a time, sequentially from top
to bottom, then it fills in the other half of the video
image with the even lines. Because most TVs use
this interlaced method to display the picture on the
screen, a standard interlaced analog TV will most
likely flicker when displaying thin lines and small
text. An interlaced video display device will produce
a lower quality display, especially when viewing and
using the Media Center computer functions.
Progressive scan video displays a video frame with
one pass of sequential scan lines. A progressive
scan TV displays the entire picture, drawn
sequentially from top to bottom, without the odd/even
interlacing. This results in a fuller, sharper picture and
better display quality for viewing and using the Media
Center computer functions. The progressive scan
picture is also brighter and easier on your eyes.
Q: How do I configure my Media Center to output to
a TV?
A: Your Gateway 610 Media Center PC detects when you
use an external S-Video display device and automatically
changes the display settings for the S-Video display
device. For more information, review the FAQ topic at:
support.gateway.com/windowsxp/mediacenter/faqs/
Q: What display setting can I change to get better TV or
DVD image quality?
A: Use the brightness buttons located on the top of the
Media Center display to adjust the display brightness.
- OR -
Use the Adjust display settings calibration wizard to
adjust the display type, display width, connection type,
and display calibration. The Adjust display settings
options are located under the Media Center Settings,
TV menu options. For more information about accessing
the Media Center Settings menu, see “Changing Media
Center Settings” on page 77.
For more information review the FAQ topic at:
support.gateway.com/windowsxp/mediacenter/faqs/
Q: Can I burn TV programs that were recorded with my
Media Center PC to a DVD?
A: Yes. Media Center saves recorded TV programs in
the .DVR-MS format. You can burn a .DVR-MS file to a
DVD with DVD recording (burning) software, such as
Nero Express and Sonic PrimeTime.
Q:
Can I play recorded TV programs on other computers?
A: Yes, you can record a .DVR-MS file, as a data file, to
DVD with Nero Express and the DVD can be replayed
on another Media Center computer or on a non-Media
Center computer that has a DVD player and DVD
decoder software (such as WinDVD). The non-Media
83
Page 84

Center computer must also have Windows XP with
Service Pack (SP) 1, Windows Media Player 9, and the
Windows patch Q810243 Update.
- OR -
You can record a TV program to DVD with Sonic
PrimeTime. Sonic PrimeTime records the DVD in a DVD
format much like a DVD movie. If you want to view the
DVD on a computer, you need a DVD player and DVD
decoder software (such as WinDVD). You do not need
XP Service Pack (SP) 1, Windows Media Player 9, and
the Windows patch Q810243 Update (described above)
on your computer to play TV programs recorded with
Sonic PrimeTime.
Q: Can I play recorded programs on my home DVD
player?
A: Yes. Sonic PrimeTime, records DVDs to a format that
home DVD players can read. For more information, see
“Burning recorded TV programs to DVD” on page 43.
Q: Why do I get this “Download Error” message when the
Media Center tries to update the Program Guide?
A: You must be connected to the Internet to update the
Program Guide. Make sure that your Internet account
is set up and connected to the Media Center PC. For
information, see “Manually updating the Media Center
Program Guide” on page 38.
84
Page 85

Getting more help
The Media Center is easy to use when you follow the
on-screen menus. However, if you need additional help
or information about using the Media Center features,
help is available at your fingertips.
To open Media Center Help
In the Media Center window, move the mouse to
1
activate the Media Center tool bar. The tool bar
appears at the top of the window.
Click the Help icon to view or search for
2
information in the Media Center online help.
85
Page 86

Using Help and Support
Your Gateway 610 Media Center PC also includes Help
and Support, an easily accessible collection of help
information, troubleshooters, and automated support.
Use Help and Support to answer questions about
Windows and to help you quickly discover and use the
many features of your Media Center PC.
Click a topic link.
2
- OR -
86
To open Media Center Help and Support
To start Help and Support, click Start, then click
1
Help and Support. Help and Support opens.
Type a word or phrase (keyword) in the Search box
located at the top of any Help and Support screen,
then click the arrow button to start the search.
The search results appear below the search box.
Page 87

Other Media Center resources
In addition to this user’s guide, use other information
resources to make the most of your Media Center
experience.
Documentation
The Microsoft Windows XP Media Center Edition
guide provides information about configuring the Media
Center software, tips about using the Media Center, and
troubleshooting information.
Windows Update
Remember to check regularly for Windows updates
to keep the operating system updated with the latest
software releases and security updates.
To start the Windows Update utility, connect to the
Internet, click Start, All Programs, then click Windows
Update. The Windows Update Web site opens. Follow
the on-screen instructions.
Web site
You can get the latest FAQs, information, and tips and
tricks about making the most of your Media Center
experience. Go to the Microsoft Media Center Web
site at microsoft.com/windowsxp/mediacenter/ and the
Gateway Support Web site at
support.gateway.com/windowsxp/mediacenter/.
87
Page 88

Contacting Gateway
You can access the following services through your telephone to get answers to your questions:
Resource Service description How to reach
Fax on demand
support
Gateway’s fee-based
software tutorial
service
Gateway Technical
Support
Sales, accounting,
and warranty
Order a catalog of documents on common
problems, then order documents by document
numbers. The documents will be faxed to you.
Get tutorial assistance for software issues
billed by the minute.
Talk to a Gateway Technical Support
representative about a non-tutorial technical
support question.
TDD Technical Support (for hearing impaired)
is available:
Weekdays 6:00 a.m. - 8:00 p.m. Central Time
Weekends 6:00 a.m. - 5:00 p.m. Central Time
Get information about available systems,
pricing, orders, billing statements, warranty
service, or other non-technical issues.
800-846-4526 (US)
877-709-2951 (Canada)
800-229-1103 (charged to your credit card)
900-555-4695 (charged to your telephone bill)
800-846-2301 (US)
800-846-3609 (Canada and Puerto Rico)
605-232-2191 (all other countries)
800-846-1778 (TDD)
800-846-2000 (US)
888-888-2037 (Canada)
88
Page 89

Safety, Regulatory,
and Legal Information
AppendixA
89
Page 90

Important safety information
Your Gateway system is designed and tested to meet
the latest standards for safety of information technology
equipment. However, to ensure safe use of this product,
it is important that the safety instructions marked on the
product and in the documentation are followed.
Setting up your system
Caution:
Always follow these instructions to help guard against personal
injury and damage to your Gateway system.
90
• Read and follow all instructions marked on the
product and in the documentation before you
operate your system. Retain all safety and operating
instructions for future use.
• Do not use this product near water or a heat source
such as a radiator.
• Set up the system on a stable work surface.
• The product should be operated only from the type of
power source indicated on the rating label.
• If your computer has a voltage selector switch, make
sure that the switch is in the proper position for your
area. The voltage selector switch is set at the factory
to the correct voltage.
• Openings in the computer case are provided for
ventilation. Do not block or cover these openings.
Make sure you provide adequate space, at least
6 inches (15 cm), around the system for ventilation
when you set up your work area. Never insert objects
of any kind into the computer ventilation openings.
• Some products are equipped with a three-wire
power cord to make sure that the product is properly
grounded when in use. The plug on this cord will fit
only into a grounding-type outlet. This is a safety
feature. If you are unable to insert the plug into an
outlet, contact an electrician to install the appropriate
outlet.
• If you use an extension cord with this system, make
sure that the total ampere rating on the products
plugged into the extension cord does not exceed the
extension cord ampere rating.
• If your system is fitted with a TV Tuner, cable, or
satellite receiver card, make sure that the antenna
or cable system is electrically grounded to provide
some protection against voltage surges and buildup
of static charges.
Page 91

Care during use
• Do not walk on the power cord or allow anything to
rest on it.
• Do not spill anything on the system. The best way to
avoid spills is to avoid eating and drinking near your
system.
• Some products have a replaceable CMOS battery
on the system board. There is a danger of explosion
if the CMOS battery is replaced incorrectly. Replace
the battery with the same or equivalent type
recommended by the manufacturer. Dispose of
batteries according to the manufacturer’s instructions.
• The system does not operate properly when the
operating instructions are followed.
• The system was dropped or the cabinet is
damaged.
• The system performance changes.
Warning:
To prevent electric shock, never remove the cover. There are
no user serviceable parts inside. Refer servicing to qualified
service personnel.
Replacement parts and accessories
Caution:
Danger of explosion if battery is incorrectly replaced. Replace
only with the same or equivalent type recommended by
the manufacturer. Dispose of used batteries following the
manufacturer’s instructions.
• When the computer is turned off, a small amount of
electrical current still flows through the computer.
Always unplug all power cables and modem cables
from the wall outlets before cleaning the system.
• Unplug the system from the wall outlet and refer
servicing to qualified personnel if:
• The power cord or plug is damaged.
• Liquid has been spilled into the system.
Use only replacement parts and accessories
recommended by Gateway.
Important:
Do not use Gateway products in areas classified as hazardous
locations. Such areas include patient care areas of medical and
dental facilities, oxygen-laden environments, or industrial facilities.
Warning:
To reduce the risk of fire, use only No. 26 AWG or larger
telecommunications line cord.
91
Page 92

Regulatory compliance statements
92
Wireless Guidance
Low power, Radio transmitting type devices (radio
frequency (RF) wireless communication devices), may
be present (embedded) in your computer. These devices
may operate in the 2.4 GHz (i.e. 802.11B/G LAN &
Bluetooth), 5.2 GHz (i.e. 802.11A LAN), and traditional
cellular or PCS cellular bands (i.e. Cellular data
modem). The following section is a general overview of
considerations while operating a wireless device.
Additional limitations, cautions, and concerns for specific
countries are listed in the specific country sections
(or country group sections). The wireless devices in
your system are only qualified for use in the countries
identified by the Radio Approval Marks on the system
rating label. If the country you will be using the wireless
device in, is not listed, please contact your local Radio
Approval agency for requirements. Wireless devices are
closely regulated and use may not be allowed.
The power output of the wireless device or devices that
may be embedded in your computer is well below the
RF exposure limits as known at this time. Because the
wireless devices (which may be embedded into your
computer) emit less energy than is allowed in radio
frequency safety standards and recommendations,
Gateway believes these devices are safe for use.
Regardless of the power levels, care should be taken to
minimize human contact during normal operation.
As a general guideline, a separation of 20 cm (8 inches)
between the wireless device and the body (including
bystanders), for use of a wireless device near the body
(this does not include extremities) is typical. This device
should be used more than 20 cm (8 inches) from the
body when wireless devices are on and transmitting. If
anyone is closer than 20 cm (8 inches) to the wireless
transmitter, make sure the transmitter is turned off. For
more information, see “Turning your wireless Ethernet
emitter on or off” in the networking user’s guide included
on the hard drive. To open the document click Start,
Gateway Documentation, then click Networking
User’s Guide.
Additionally your system may have an optional wireless
keyboard and mouse included with it. The power and
frequency range associated with these devices do
not have the RF exposure concerns as previously
commented on with the wireless LAN products. The
experts on the effects of RF exposure feel these types
of devices are safe for use, due to the frequencies and
power levels involved.
The wireless devices installed in this system are
intended to be used indoors. In some areas, use of these
devices outdoors is prohibited.
Some circumstances require restrictions on wireless
devices. Examples of common restrictions are listed:
Warning:
Radio frequency wireless communication can interfere with
equipment on commercial aircraft. Current aviation regulations
require wireless devices to be turned off while traveling in an
airplane. 802.11b (also known as wireless Ethernet or Wifi) and
Bluetooth communication devices are examples of devices that
provide wireless communication.
Page 93

Warning:
In environments where the risk of interference to other devices
or services is harmful or perceived as harmful, the option to
use a wireless device may be restricted or eliminated. Airports,
Hospitals, and Oxygen or flammable gas laden atmospheres
are limited examples where use of wireless devices may be
restricted or eliminated. When in environments where you
are uncertain of the sanction to use wireless devices, ask the
applicable authority for authorization prior to use or turning on
the wireless device.
Warning:
Every country has different restrictions on the use of wireless
devices. If your system is equipped with a wireless device,
when traveling between countries with your system, check
with the local Radio Approval authorities prior to any move or
trip for any restrictions on the use of a wireless device in the
destination country.
Warning:
If your system came equipped with an internal embedded
wireless device, do not operate the wireless device unless
all covers and shields are in place and the system is fully
assembled.
Warning:
Only use drivers approved for the country in which the device
will be used. See the Gateway 610 System DVD, or contact
Gateway Technical Support for additional information.
Warning:
In order to comply with FCC requirements transmitters must
not be operated (or co-located) in conjunction with any other
transmitter or antenna installed in the computer.
Warning:
Wireless devices are not user serviceable. Do not modify them
in any way. Modification to a wireless device will void the
authorization to use it. Please contact Gateway for service.
93
Page 94

United States of America
Federal Communications Commission (FCC)
Intentional emitter per FCC Part 15
commented on with the wireless LAN products. The
experts on the effects of RF exposure feel these types
of devices are safe for use, due to the frequencies and
power levels involved.
Low power, Radio transmitter type devices (radio
frequency (RF) wireless communication devices),
operating in the 2.4 GHz band and/or 5.15 – 5.35 GHz
band, may be present (embedded) in your computer.
This section is only applicable if these devices are
present. Refer to the system label to verify the presence
of wireless devices.
Wireless devices that may be in your system are only
qualified for use in the United States of America if an
FCC ID number is on the system label.
The FCC has set a general guideline of 20 cm (8 inches)
separation between the device and the body (including
bystanders), for use of a wireless device near the body
(this does not include extremities). This device should
be used more than 20 cm (8 inches) from the body
when wireless devices are on. The power output of the
wireless device (or devices), which may be embedded in
your computer, is well below the RF exposure limits as
set by the FCC.
The wireless devices installed in this system are
intended to be used indoors. In some areas, use of these
devices outdoors is prohibited.
Operation of this device is subject to the following two
conditions: (1) This device may not cause harmful
interference, and (2) this device must accept any
interference received, including interference that may
cause undesired operation of the device.
Warning:
The transmitting device embedded in this system may not be
used with any antenna other than the antenna provided with it.
Warning:
Wireless devices are not user serviceable. Do not modify them
in any way. Modification to a wireless device will void the
authorization to use it. Contact Gateway for service.
Warning:
The transmitting device embedded in this system may not be
used with any antenna other than provide with the system.
94
Additionally your system may have an optional wireless
keyboard and mouse included with it. The power and
frequency range associated with these devices do not
have the same RF exposure concerns as previously
Page 95

Unintentional emitter per FCC Part 15
This device has been tested and found to comply
with the limits for a Class B digital device, pursuant to
Part 15 of the FCC rules. These limits are designed
to provide reasonable protection against harmful
interference in a residential installation. This equipment
generates, uses, and can radiate radio frequency energy
and, if not installed and used in accordance with the
instructions, may cause harmful interference to radio
or television reception. However, there is no guarantee
that interference will not occur in a particular installation.
If this equipment does cause interference to radio and
television reception, which can be determined by turning
the equipment off and on, the user is encouraged to
try to correct the interference by one or more of the
following measures:
FCC declaration of conformity
Responsible party:
Gateway Companies, Inc.
610 Gateway Drive, North Sioux City, SD 57049
(605) 232-2000 Fax: (605) 232-2023
Product:
Gateway 610 Media Center PC
This device complies with Part 15 of the FCC Rules.
Operation of this product is subject to the following
two conditions: (1) this device may not cause harmful
interference, and (2) this device must accept any
interference received, including interference that may
cause undesired operation.
• Reorient or relocate the receiving antenna
• Increase the separation between the equipment and
receiver
• Connect the equipment to an outlet on a different
circuit from that to which the receiver is connected
• Consult the dealer or an experienced radio/TV
technician for help
Compliance Accessories: The accessories associated
with this equipment are: shielded video cable when an
external monitor is connected. These accessories are
required to be used in order to ensure compliance with
FCC rules.
Caution:
Changes or modifications not expressly approved by Gateway
could void the FCC compliance and negate your authority to
operate the product.
95
Page 96

Telecommunications per FCC part 68 of the Code of
Federal Regulations (CFR 47) (applicable to products
fitted with USA modems)
Your modem complies with Part 68 of the Code of
Federal Regulations (CFR47) rules. On the computer or
modem card is a label that contains the FCC registration
number and Ringer Equivalence Number (REN) for this
device. If requested, this information must be provided to
the telephone company.
A telephone line cord with a modular plug is required
for use with this device. The modem is designed to
be connected to the telephone network or premises
wiring using a compatible modular jack which is Part 68
compliant. See installation instructions for details.
The Ringer Equivalence Number (REN) is used
to determine the number of devices which may be
connected to the telephone line. Excessive RENs on a
telephone line may result in the devices not ringing in
response to an incoming call. In most areas, the sum
of RENs should not exceed five (5.0). To be certain
of the number of devices that may be connected to a
line, as determined by the total RENs, contact the local
telephone company.
If this device causes harm to the telephone network,
the telephone company will notify you in advance
that temporary discontinuance of service may be
required. The telephone company may request that you
disconnect the equipment until the problem is resolved.
could affect the operation of this equipment. If this
happens, the telephone company will provide advance
notice in order for you to make necessary modifications
to maintain uninterrupted service.
This equipment cannot be used on telephone companyprovided coin service. Connection to party line service
is subject to state tariffs. Contact the state public utility
commission or public service commission for information.
When programming or making test calls to emergency
numbers:
• Remain on the line and briefly explain to the
dispatcher the reason for the call.
• Perform such activities in the off-peak hours such as
early morning or late evenings.
The United States Telephone Consumer Protection
Act of 1991 makes it unlawful for any person to use
a computer or other electronic device to send any
message via a telephone fax machine unless such
message clearly contains, in a margin at the top or
bottom of each transmitted page or on the first page
of the transmission, the date and time it is sent, an
identification of the business, other entity, or other
individual sending the message, and the telephone
number of the sending machine or such business, other
entity, or individual. Refer to your fax communication
software documentation for details on how to comply
with the fax-branding requirement.
96
The telephone company may make changes in its
facilities, equipment, operations, or procedures that
Page 97

Canada
Industry Canada (IC)
Intentional emitter per RSS 210
Low power, Radio transmitter type devices (radio
frequency (RF) wireless communication devices),
operating in the 2.4 GHz band and/or 5.15 – 5.35 GHz
band, may be present (embedded) in your computer.
This section is only applicable if these devices are
present. Refer to the system label to verify the presence
of wireless devices.
Wireless devices that may be in your system are only
qualified for use in Canada if an Industry Canada ID
number is on the system label.
As a general guideline, a separation of 20 cm (8 inches)
between the wireless device and the body (including
bystanders), for use of a wireless device near the
body (this does not include extremities) is typical. This
device should be used more than 20 cm (8 inches) from
the body when wireless devices are on. The power
output of the wireless device (or devices), which may
be embedded in your computer, is well below the RF
exposure limits as set by Industry Canada.
Additionally your system may have an optional wireless
keyboard and mouse included with it. The power and
frequency range associated with these devices do not
have the same RF exposure concerns as previously
commented on with the wireless LAN products. The
experts on the effects of RF exposure feel these types
of devices are safe for use, due to the frequencies and
power levels involved.
The wireless keyboard and mouse operate at less than
10mW for all channels. The keyboard operates at 27.145
or 27.195 MHz and the mouse operates at 26.995 or
27.045 MHz.
Operation of this device is subject to the following two
conditions: (1) This device may not cause harmful
interference, and (2) this device must accept any
interference received, including interference that may
cause undesired operation of the device.
Warning:
To prevent radio interference to licensed service or co-channel
Mobile Satellite systems, this device is intended to be operated
indoors and away from windows to provide maximum
shielding. Equipment (or its transmit antenna) that is installed
outdoors is subject to licensing.
Warning:
Wireless devices are not user serviceable. Do not modify them
in any way. Modification to a wireless device will void the
authorization to use it. Contact Gateway for service.
Warning:
The transmitting device embedded in this system may not be
used with any antenna other than provide with the system.
97
Page 98

Warning:
The 802.11a radio LAN your system may have been equipped
with operates in the same frequency range as high power
radar, which has priority use, and may damage the radio LAN if
both are present and being used in the same area.
Unintentional emitter per ICES-003
This digital apparatus does not exceed the Class B
limits for radio noise emissions from digital apparatus as
set out in the radio interference regulations of Industry
Canada.
Le présent appareil numérique n’émet pas de bruits
radioélectriques dépassant les limites applicables aux
appareils numériques de Classe B prescrites dans le
règlement sur le brouillage radioélectrique édicté par
Industrie Canada.
with a single-line individual service may be extended by
means of a certified connector assembly. The customer
should be aware that compliance with the above
conditions may not prevent degradation of service in
some situations.
Repairs to certified equipment should be made by an
authorized Canadian maintenance facility designated by
the supplier. Any repairs or alterations made by the user
to this equipment, or equipment malfunctions, may give
the telecommunications company cause to request the
user to disconnect the equipment.
Users should make sure, for their own protection, that
the electrical ground connections of the power utility,
telephone lines, and internal metallic water pipe system,
if present, are connected together. This precaution may
be particularly important in rural areas.
98
Telecommunications per Industry Canada CS-03
(for products fitted with an IC-compliant modem)
The Industry Canada label identifies certified equipment.
This certification means that the equipment meets
certain telecommunications network protective,
operation, and safety requirements. The Department
does not guarantee the equipment will operate to the
users’ satisfaction.
Before installing this equipment, users should make sure
that it is permissible to be connected to the facilities of
the local telecommunications company. The equipment
must also be installed using an acceptable method of
connection. In some cases, the inside wiring associated
Warning:
To avoid electrical shock or equipment malfunction do not
attempt to make electrical ground connections by yourself.
Contact the appropriate inspection authority or an electrician,
as appropriate.
The Ringer Equivalence Number (REN) assigned
to each terminal device provides an indication of the
maximum number of terminals allowed to be connected
to a telephone interface. The termination on an interface
may consist of any combination of devices subject
only to the requirement that the sum of the Ringer
Equivalence Numbers of all the devices does not
exceed 5.
Page 99

Mexico
Intentional emitter
Low power, Radio transmitter type devices (radio
frequency (RF) wireless communication devices),
operating in the 2.4 GHz band, may be present
(embedded) in your computer. This section is only
applicable if these devices are present. Refer to the
system label to verify the presence of wireless devices.
Wireless devices that may be in your system are only
qualified for use in Mexico if a COFETEL ID is on the
system label.
As a general guideline, a separation of 20 cm (8 inches)
between the wireless device and the body (including
bystanders), for use of a wireless device near the
body (this does not include extremities) is typical. This
device should be used more than 20 cm (8 inches)
from the body when wireless devices are on. The power
output of the wireless device (or devices), which may
be embedded in your computer, is well below the RF
exposure limits as set by SCT.
Additionally your system may have an optional wireless
keyboard and mouse included with it. The power and
frequency range associated with these devices do not
have the same RF exposure concerns as previously
commented on with the wireless LAN products. The
experts on the effects of RF exposure feel these types
of devices are safe for use, due to the frequencies and
power levels involved.
Unintentional emitter
At this time there are no mandatory requirements for
Unintentional Emitters. However, this device does comply
with multiple requirements for other countries and
regions as listed on the system label and in the user’s
manual.
99
Page 100

Television antenna connectors protection
External television antenna grounding
If an outside antenna or cable system is to be connected
to your Gateway PC, make sure that the antenna or
cable system is electrically grounded to provide some
protection against voltage surges and static charges.
7
Article 810 of the National Electrical Code, ANSI/
NFPSA 70, provides information with regard to proper
grounding of the mast and supporting structure,
grounding of the lead-in wire to an antenna discharge
unit, size of grounding conductors, location of antenna
discharge unit, connection to grounding electrodes, and
requirements for the grounding electrode.
Lightning protection
For added protection of any Gateway product during a
lightning storm or when it is left unattended or unused
for long periods of time, unplug the product from the wall
outlet and disconnect the antenna or cable system.
Power lines
Do not locate the antenna near overhead light or power
circuits, or where it could fall into such power lines or
circuits.
Warning:
When installing or realigning an outside antenna system,
extreme care should be taken to keep from touching such
power lines or circuits. Contact with them could be fatal.
1
Reference Grounding component
1
2
3
4
5
6
7
Electric service equipment
Power service grounding electrode
system (NEC Art 250, Part H)
Ground clamps
Grounding conductors
(NEC Section 810-21)
Antenna discharge unit
(NEC Section 810-20)
Ground clamp
Antenna lead-in wire
6
5
4
3
2
100
 Loading...