

Garmin GPSMAP 3006C User Manual
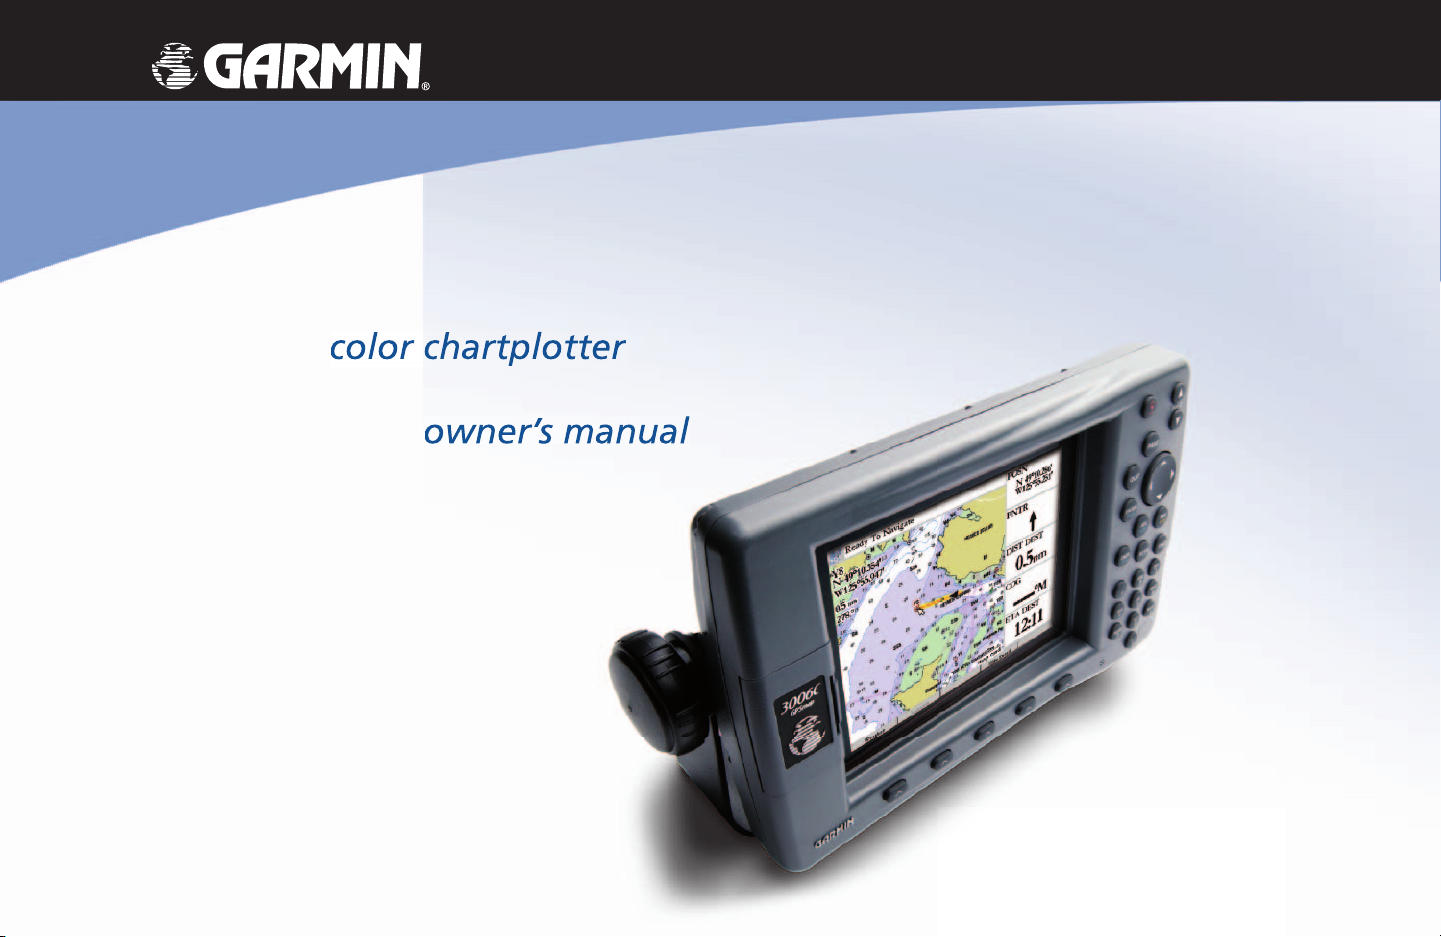
GPSMAP 3006C/3010C
(GPSMAP 3006C shown)

© Copyright 2004 Garmin Ltd. or its subsidiaries. All Rights Reserved
Garmin International, Inc.
st
1200 East 151
Street
Olathe, Kansas 66062 U.S.A.
Tel. 913/397.8200
Fax 913/397.8282
Garmin (Europe) Ltd.
Unit 5, The Quadrangle,
Abbey Park Industrial Estate
Romsey, SO51 9DL, U.K.
Tel. 44/1794.519944
Garmin Corporation
No. 68, Jangshu 2
nd
Road
Shijr, Taipei County, Taiwan
Tel. 886/2.2642.9199
Fax 886/2.2642.9099
Fax 44/1794.519222
Except as expressly provided herein, no part of this manual may be reproduced, copied, transmitted, disseminated, downloaded or stored in any storage medium, for any purpose without the express prior written consent of Garmin. Garmin hereby grants permission to download a single copy of this
manual and of any revision to this manual onto a hard drive or other electronic storage medium to be viewed and to print one copy of this manual or of
any revision hereto, provided that such electronic or printed copy of this manual or revision must contain the complete text of this copyright notice and
provided further that any unauthorized commercial distribution of this manual or any revision hereto is strictly prohibited.
Information in this document is subject to change without notice. Garmin reserves the right to change or improve its products and to make changes in
the content without obligation to notify any person or organization of such changes or improvements.
Web site address: www.garmin.com
®
GARMIN
used without the express permission of Garmin. Fishing Hots Spots
, Autolocate®, GPSMAP®, MapSource®, BlueChart® and TracBack® are registered trademarks of Garmin Ltd. or its subsidiaries and may not be
®
is a registered trademark of Fishing Hots Spots, Inc.
June 2004 Part Number 190-00371-00 Rev. A Printed in Taiwan

Welcome
Introduction
Thank you for choosing the Garmin GPSMAP 3006C/3010C. The GPSMAP 3006C/3010C utilizes the
proven performance of Garmin GPS and full-featured mapping to create an unsurpassed marine MultiFunction Display (MFD). Please take a moment now to compare the contents of this package with the
packing list on page 6 of this manual. If any pieces are missing, please contact your Garmin dealer immediately.
About This Manual
To get the most out of your new navigation system, take time to read this manual and learn the operating procedures for your unit in detail. This manual is organized into the following chapters.
The Introduction contains the Table of Contents, Warnings, and Packing List.
The Getting Started portion provides a unit overview and information that teaches you a basic work-
Use this area to record the serial number (8-digit number
located in the back of the unit) in case it is lost, stolen,
needs service, or if you need to contact Technical Support.
Be sure to keep your original sales receipt in a safe place
or attach a photocopy inside the manual.
ing knowledge necessary to use the unit to its fullest potential.
The Reference portion is divided into sections that provide detailed references to the advanced features of the GPSMAP 3006C/3010C. This allows you to concentrate on a specifi c topic quickly and can be
used to look up detailed information about the GPSMAP 3006C/3010C.
The Appendix contains information such as specifi cations, regulatory information, and unit care information. You can also fi nd warranty and support information in the Appendix.
An Index is provided at the end of the manual for reference. Simply look up the topic you wish to
learn about and read the page or pages listed.
Customer Service Product Registration
Help us better support you by completing our on-line registration today!
Have the serial number of your GPSMAP 3006C/3010C handy and connect to our Web site
The Garmin GPSMAP 3006C/3010C has no user-serviceable
parts. Should you ever encounter a problem with your unit,
please take it to an authorized Garmin dealer or contact
Garmin Customer Service (see page 86) for repairs.
The GPSMAP 3006C/3010C is fastened shut with screws.
Any attempt to open the case to change or modify the
unit in any way will void your warranty and may result in
permanent damage to the equipment.
(www.garmin.com). Look for the Product Registration link on the Home page. Also, be sure to record your
serial number in the area provided on this page.
Welcome
Serial Number
Serial Number:
,
1

Introduction
Introduction.........................................................................................................................1-6
Table of Contents
Welcome ...............................................................................................................................1
Table of Contents ..................................................................................................................2
Warnings and Cautions .........................................................................................................5
Packing List & Accessories ....................................................................................................6
Getting Started .................................................................................................................. 7-25
Map Data/Installation/Manual Conventions...........................................................................7
Unit Features.........................................................................................................................8
3006C/3010C Keypad Usage.................................................................................................9
3006C/3010C Data Entry/Shortcut/Soft Keys ......................................................................10
Using the Optional Marine Remote .....................................................................................11
Understanding the Features.................................................................................................12
Power and Backlighting.......................................................................................................13
Selecting Options ................................................................................................................14
Entering Data ......................................................................................................................15
Initializing the Receiver .......................................................................................................16
Status Bar ............................................................................................................................17
Main Pages ..........................................................................................................................18
Confi guring Main Pages ......................................................................................................19
Using Functions/DATA Key.................................................................................................21
Creating Waypoints Introduction ........................................................................................22
Basic Navigation..................................................................................................................24
Reference .......................................................................................................................... 26-74
2
How to Use the Map Page ...................................................................................................26

Using the Map Cursor .........................................................................................................27
Selecting Map Ranges ..........................................................................................................28
Map Page Options ...............................................................................................................29
Using the Compass Page......................................................................................................33
Using the Highway Page......................................................................................................34
Highway Page Options ........................................................................................................35
Video Page ..........................................................................................................................35
Creating Waypoints.............................................................................................................36
Reviewing and Editing Waypoints .......................................................................................39
Waypoint Lists ....................................................................................................................41
Going to a Destination.........................................................................................................44
Follow Track/TracBack ........................................................................................................45
Man OverBoard...................................................................................................................47
Creating a Route..................................................................................................................48
Following a Route ...............................................................................................................49
Reviewing a Route ...............................................................................................................50
Editing a Route....................................................................................................................51
Planning a Route .................................................................................................................53
Using the FIND key.............................................................................................................54
Main Menu Page..................................................................................................................55
Main Menu: GPS Tab...........................................................................................................56
Main Menu: Tide Tab ..........................................................................................................58
Main Menu: Celestial Tab ....................................................................................................60
Main Menu: Trip/Tracks Tabs ..............................................................................................61
Main Menu: DSC Tab ..........................................................................................................63
Main Menu: Cards Tab ........................................................................................................67
Main Menu: Alarms Tab ......................................................................................................68
Main Menu: System Tab ......................................................................................................69
Main Menu: Temp Tab ........................................................................................................74
Introduction
Table of Contents
3

Introduction
Appendices.....................................................................................................................75-89
Table of Contents
Appendix A: Time Offsets ...............................................................................................75
Appendix B: Messages....................................................................................................76
Appendix C: Map Datums...............................................................................................78
Appendix D: Loran TD .....................................................................................................80
Appendix E: Specifi cations/Unit Care ............................................................................82
Appendix F: Installing/Removing Data Cards.................................................................83
Appendix G: Regulatory Information .............................................................................84
Appendix G: Software License Agreement .....................................................................85
Appendix G: Limited Warranty .......................................................................................86
Appendix H: Index ..........................................................................................................87
4

WARNING: The GPS system is operated by the United States government, which is solely responsible
for its accuracy and maintenance. The system is subject to changes which could affect the accuracy and
performance of all GPS equipment. Although the Garmin GPSMAP 3006C/3010C is a precision electronic
NAVigation AID (NAVAID), any NAVAID can be misused or misinterpreted and, therefore, become unsafe.
CAUTION: The electronic chart is an aid to navigation and is designed to facilitate the use of authorized government charts, not replace them. Only offi cial government charts and notices to mariners contain all information needed for safe navigation and, as always, the user is responsible for their prudent use.
CAUTION: Use the GPSMAP 3006C/3010C at your own risk. To reduce the risk of unsafe operation,
carefully review and understand all aspects of this Owner’s Manual, and thoroughly practice operation
using the simulator mode prior to actual use. When in actual use, carefully compare indications from
the GPSMAP 3006C/3010C to all available navigation sources, including the information from other
NAVAIDs, visual sightings, charts, etc. For safety, always resolve any discrepancies before continuing
navigation.
CAUTION: IT IS THE USER’S RESPONSIBILITY TO USE THIS PRODUCT PRUDENTLY. THIS
PRODUCT IS INTENDED TO BE USED ONLY AS A NAVIGATIONAL AID AND MUST NOT BE USED
FOR ANY PURPOSE REQUIRING PRECISE MEASUREMENT OF DIRECTION, DISTANCE, LOCATION,
OR TOPOGRAPHY.
MAP DATA INFORMATION: One of the goals of Garmin is to provide customers with the most
complete and accurate cartography that is available to us at a reasonable cost. We use a combination of
governmental and private data sources, which we identify (as required) in product literature and copyright
messages displayed to the consumer. Virtually all data sources contain inaccurate or incomplete data to
some degree. This is particularly true outside the United States, where complete and accurate digital data
is either not available or prohibitively expensive.
Introduction
Warnings and Cautions
,
WARNING: This product, its packaging, and its components contain chemicals known to the State
of California to cause cancer, birth defects, or reproductive harm. This Notice is being provided in accordance with California’s Proposition 65. If you have any questions or would like additional information,
please refer to our web site at http://www.garmin.com/prop65.
5

Introduction
Packing List &
Accessories
Before installing and getting started with your unit, please check to see that your package includes the
following items. If any parts are missing, please contact your Garmin dealer immediately.
Standard Package:
• GPSMAP 3006C or 3010C Unit
• GPS 17 GPS Sensor
• Bail Mount and Two Knobs
• Power/NMEA Cable
• Marine A/V Cable
• Owner’s Manual
• Installation Manual
• Quick Reference Guide
• Protective Cover
• Flush Mount Kit Hardware
• Grommet for Marine Cable
Optional Accessories for Purchase:
• Marine Infrared (IR) Remote Control
• GDL 30/30A Marine Weather XM Satellite Receiver
• GMS 10 Network Port Expander
• GSD 20 Remote Sounder Module and Transducers
• Second Mounting Station
• Cigarette Lighter Adapter
• Marine Network Cables
• BlueChart Marine Data Cards, MapSource CDs, USB Data Card Programmer, and Data Cards
6

Using Additional Map Data
Getting Started
Getting Started
The GPSMAP 3006C/3010C comes standard with a built-in basemap showing cities, interstates, coastline detail, and U.S. tide stations. Optional Garmin Data Cards and MapSource CD-ROMs enhance the
versatility of your GPSMAP 3006C/3010C. With optional BlueChart cartography, you can access marine
navaids, wrecks, obstructions, anchorage locations, shaded depth contours, intertidal zones, spot soundings, port plans, and more. See your Garmin dealer or visit the Garmin Web site (www.garmin.com) for
more information on available pre-programmed Garmin Data Cards and other MapSource programs to
increase the mapping capability of your new unit.
Installation
Instructions for installing the GPSMAP 3006C/3010C MFD may be found in the GPSMAP 3006C/
3010C & GPS 17 Installation Guide” (p/n 190-00371-02). To complete the installation, you need the
appropriate fasteners, tools, and mounts listed in each section. Installation items that are not provided by
Garmin should be available at most marine dealers. If you experience diffi culty installing the unit, please
contact Garmin or an installation professional in your area.
Manual Conventions
• This manual refers to the GPSMAP 3006C and 3010C as “GPSMAP 3006C/3010C,” “unit,” or “MFD
(Multi-Function Display)”. It makes no distinction between these terms. “GPSMAP 3006C/3010C”
refers to both the GPSMAP 3006C and 3010C models unless specifi cally stated.
• This manual uses the terms “page,” “screen,” and “window” interchangeably.
Main Page Sequence
Map Data/Installation/
Manual Conventions
• This manual uses the words “button” and “key” interchangeably.
• This manual uses the term “press” when you need to activate the keys on the GPSMAP 3006C and
3010C or on the optional remote control.
7
7
Getting Started
Getting Started
Main Page Sequence
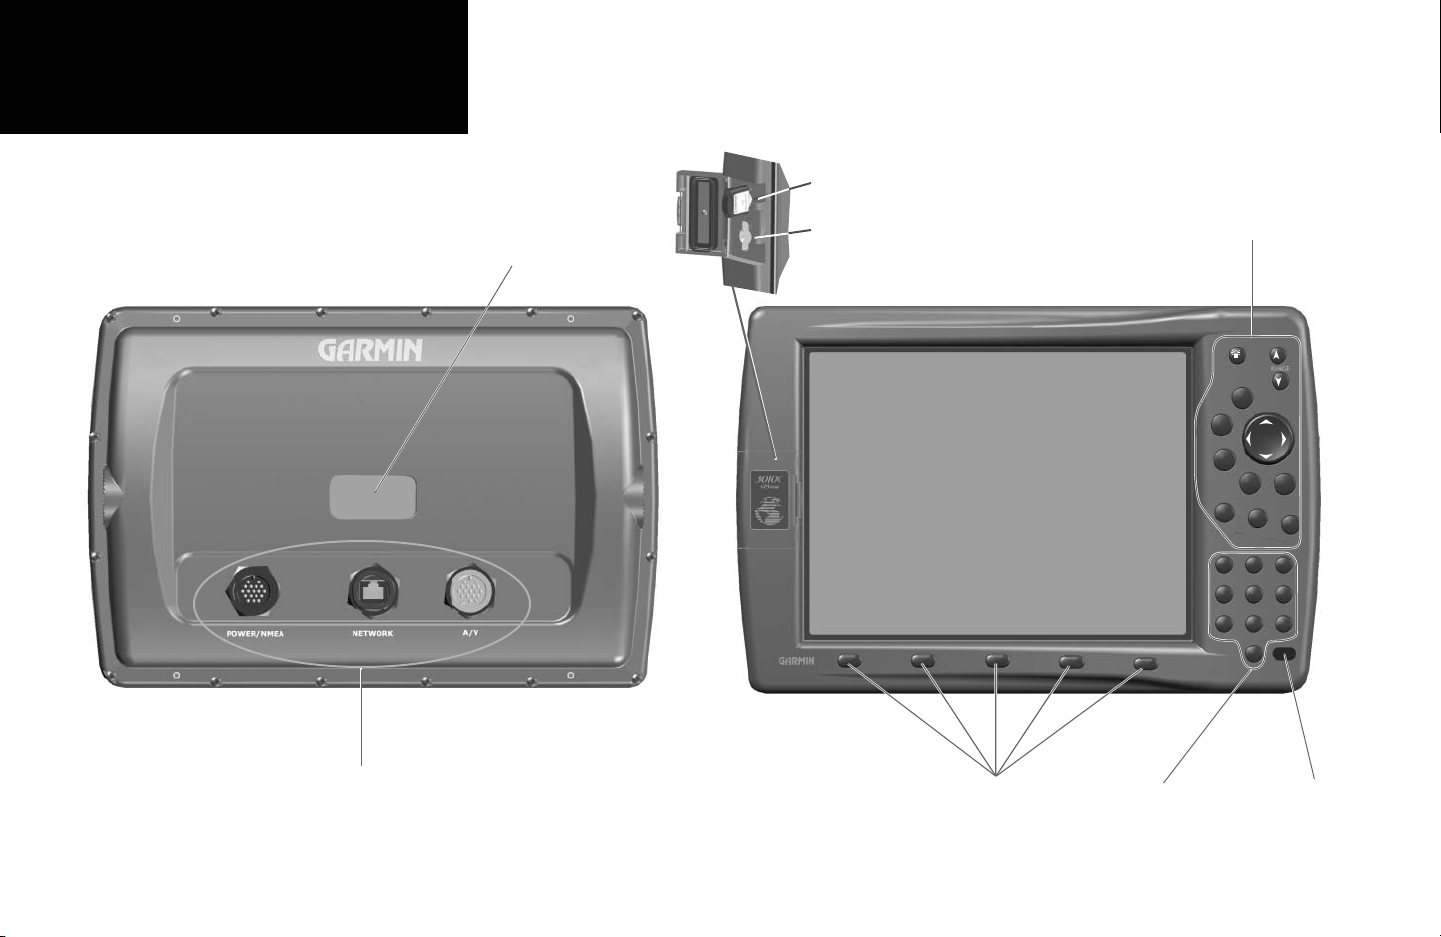
Unit Features
Data Card Slots
Data Card Slot 1
Connection Ports
Serial Number Tag
GPSMAP 3010C Shown
Data Card Slot 2
^
Soft Keys Data Entry Keys
Function Keys
VOL
PAGE
QUIT
ENTER
MARK
ADJ
NAV
MENU
MOB
DATA
CNFG
FCTN
FIND
ABC
DEF
1
2
3
JKL
GHI
PQRS
^
^
^
^
MNO
5
6
4
WXYZ
TUV
9
8
7
+-
0
Infrared (IR) Window
(For Optional Remote)
8
8

Keypad Usage
The
POWER/VOL
Key — turns on/off the unit and adjusts the display illumination. Multiple presses
toggle the unit’s backlight between maximum, user-set, and minimum brightness levels. The secondary
VOL (Volume) adjustment is for future audio expansion.
Getting Started
Getting Started
Main Page Sequence
3006C/3010C Keys
The
RANGE
Keys — adjusts the range scale to show a larger area with less detail (UP Arrow) or a smaller
area with more detail (DOWN Arrow)
PAG E
The
Key — displays the Pages window, cycles the unit through the main pages in sequence, and
returns the display from a submenu page.
QUIT
The
Key — returns the display from a submenu page, restores the previous value in a data entry
fi eld, or cancels an unintended function.
ENTER/MARK
The
Key — selects a highlighted menu option. When entering data, it allows you to initiate entry, and then to accept the selected value(s). It also marks the current location as a waypoint when
pressed and held for more than one second.
ADJ/MENU
The
Key — shows the available options and features for the current function. Displays the
Main Menu when pressed and held for more than one second.
NAV/MOB
The
Key — displays the Go To and Follow navigation menu. Activates the MOB (Man
OverBoard) navigation feature when pressed and held for more than one second.
DATA/CNFG
The
Key — toggles the display of a main page with/without function windows and data
fi elds. When pressed and held for more than one second displays the CNFG (Confi guration) page, which
allows you to customize the current main page.
FIND
The
The
The
Key — allows you to quickly access User Waypoints and other items used for navigation.
FCTN
Key — (Function) key allows you to cycle through function windows. (see page 21)
ARROW KEYPAD
— is used to select (highlight) menu options and enter data. It controls the LEFT/
RIGHT, UP/DOWN, and diagonal movement of the cursor.
QUIT
ENTER
MARK
DATA
CNFG
VOL
PAG E
Power Key
ADJ
MENU
FCTN
Arrow Keypad
NAV
MOB
FIND
)
Always press and release a key to perform its primary function. Press, hold for more than
one second, then release the ENTER/MARK, ADJ/MENU, NAV/MOB, and DATA/CNFG keys to
activate their secondary functions.
9
9
Getting Started
Getting Started
Main Page Sequence
3006C/3010C Keys
1
GHI
4
PQRS
7
ABC
2
JKL
5
TUV
8
+-
0
DEF
3
MNO
6
WXYZ
9
DATA ENTRY
Shortcut Keys
Data Entry/Shortcut Keys
The Data Entry Keys are used when entering alpha-numeric data in the unit, such as a waypoint name.
The Data Entry Keys can be used in conjunction with the ARROW KEYPAD. To select the fi rst letter press
the key once, to select the second letter press the key twice, to select the third letter press the key three
times, or to select the number press the key four times. When you have correct letter or number selected,
pause, and the unit advances the cursor to the next character automatically.
Shortcut Keys are used to quickly jump to main pages, or select menu and list options by pressing the
corresponding number of the desired selection. For numbers 1-9, press the number to choose the desired
selection. For numbers 10 and higher, press the fi rst digit, then press the second digit within one second.
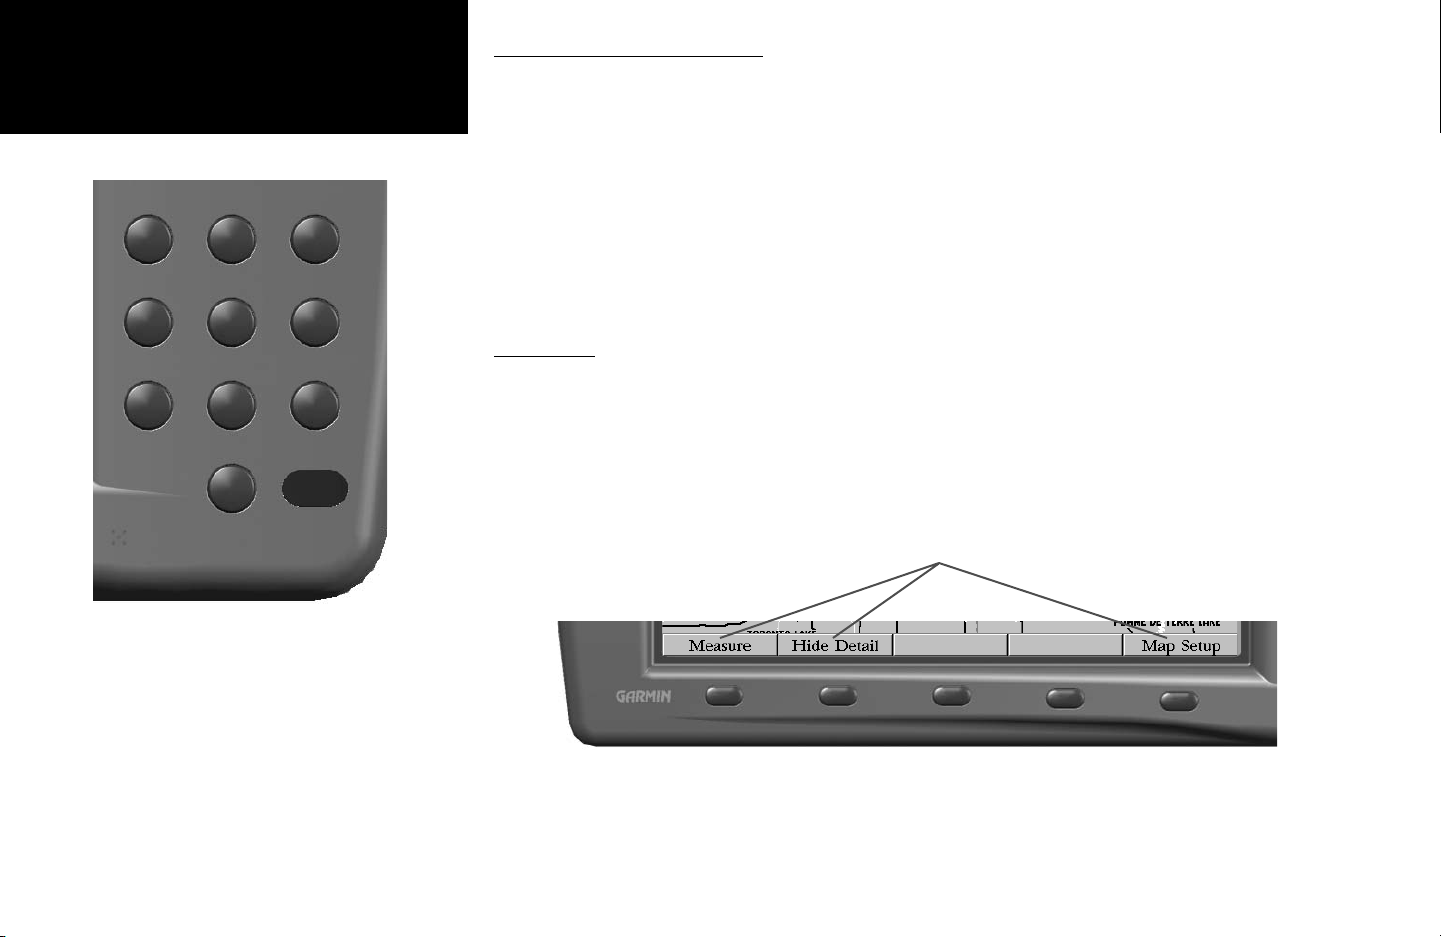
Soft Keys
The Soft Keys are located along the bottom of the display and are used as shortcuts to select the most
commonly used Adjustments for the function that is selected. To select an option, press the Soft Key below
it. Soft Key options vary, depending on which function is selected.
SOFT KEY Options
10
10
^
^
^
^
^

Optional Alphanumeric Remote Control Usage
Getting Started
Getting Started
The GPSMAP 3006C/3010C’s optional Marine Remote Control gives you the freedom to operate your
MFD from a distance using the remote’s keypad. Contact your Garmin dealer or Garmin to purchase the
Marine Remote Control
In order for the remote to operate properly, be sure to point the IR (infrared) window on the remote
towards the unobstructed IR window on the lower right corner of the GPSMAP 3006C/3010C.
The remote also has function keys that allow you to quickly enter data and perform operations on the
MFD. All the keys on the Remote Control operate in the same manner as the keypad (see pages 9-10) on
the GPSMAP 3006C/3010C. The key’s primary function appears on the key and the secondary functions (same as keys on the MFD) for the ADJ/MENU, NAV/MOB, DATA/CNFG, and THUMB STICK
(ENTER/MARK) can be activated by holding the key for more than two seconds (then release).
THUMB STICK — Combines the operations of the ARROW KEYPAD and ENTER/MARK key.
THUMB STICK
Selects menu options, changes settings, enters data, and confi rms entry. Also controls movement of the
panning cursor on the Map page. Press IN (ENTER) on the THUMB STICK to select/activate a highlighted item or begin data entry. Press IN and hold for two seconds to mark a waypoint.
Remote Control Batteries
The remote requires two AAA alkaline batteries. To install the batteries, press down on the battery
door clip, then pull the battery door away from the remote. Install the batteries observing the correct
polarity (see inside battery compartment). Replace the cover, making sure it is closed all the way.
The remote is for use in shaded/enclosed environments. Direct sunlight interferes with
,
infrared operation. This remote is NOT waterproof.
Using the Optional Marine Remote
Main Page Sequence
IR Window
RANGE
ZOOM
QUIT
ADJ
MENU
DATA
CNFG
1
GHI
4
PQRS
7
PAG E
ENTER
NAV
MOB
FCTN
ABC
TUV
DEF
2
JKL5MNO
WXYZ
8
+-
0
3
6
9
11
11
Getting Started
Getting Started
Main Page Sequence
Understanding the Features
Cursor (Highlight)
Understanding the Features
The GPSMAP 3006C/3010C unit’s advanced keypad system is designed to allow quick, convenient
selection of navigation options and data entry. As you progress through this Owner’s Manual, you will
often be directed to press a specifi c key or highlight a fi eld on the screen. When you are directed to press
a key, you should press and quickly release the key. If the key needs to be held down for a period of time
to activate a secondary function, the instructions will tell you to do so. The position of the highlight is
controlled by the ARROW KEYPAD. When a fi eld is selected on the screen, it is highlighted in yellow.
The following features are referred to throughout this manual.
Fields
Buttons
Scroll Bar
<KEYPAD KEY> - Keypress commands appear in upper case BOLD. Press the corresponding key on
the unit’s keypad. Example ENTER/MARK, PAGE, FCTN, etc.
Cursor – The highlighted area on the screen that can be moved UP/DOWN/LEFT/RIGHT with the
ARROW KEYPAD to select individual fi elds. Moving the cursor to a given location allows you to begin
data entry or scroll through a list. A yellow highlight indicates the location of the cursor.
Field – The location on a page where data or an option may be entered and displayed. The cursor is
placed on a fi eld using the ARROW KEYPAD to begin data entry or selection of options.
Button (On-Screen) – Similar to “fi eld.” Use the ARROW KEYPAD to highlight a button and press
ENTER to select the action that corresponds to the button.
Scroll Bar – When viewing a list of items too long to display on the screen, a scroll bar appears along
the right side of the list. The position of the scroll bar indicates which portion of the list is currently displayed. The height of the scroll bar indicates the number of items in the list. To scroll through a list, press
UP or DOWN on the ARROW KEYPAD.
Default – A system selection format built into the unit’s memory that is followed unless you change
a setting. For example, the default setting for speed readings is nautical miles per hour (knots), but may
be changed to kilometers or miles per hour. Once a setting is changed, the new setting is retained until
another change is made or a ‘Restore Default’ menu option is selected.
12
12
Powering On/Off the GPSMAP 3006C/3010C
( )
Learning the basic operations, before moving ahead to the features of the GPSMAP 3006C/3010C, is
essential. Many times throughout this manual you will be prompted to press a key. When instructed, press
and then release the key. If the key needs to be held down, the instructions will prompt you.
Turning the GPSMAP 3006C/3010C ON:
1. Hold the POWER
key until the unit powers on, then release.
As the unit powers on, an Introduction page is displayed. After reading the Introduction page, press
ENTER when “I Agree” highlights in yellow to display the Map Page.
Adjusting the Backlight
The Backlight can be increased in steps to produce the right lighting for the situation. You may cycle
through three light settings; Highest, Selectable, and Lowest.
Getting Started
Getting Started
Main Page Sequence
Power and Backlighting
Adjusting the Backlight’s ‘Selectable’ level:
1. Press the
2. To increase the selectable backlighting level, press the
3. To decrease the selectable backlighting level, press the
TIP:
After the Backlight Adjustment Window is activated, pressing the
through the backlight’s three settings: Highest, Selectable, and Lowest.
key to activate the Backlight Adjustment Window.
ARROW KEYPAD up.
ARROW KEYPAD down.
POWER
key repeatedly cycles
Highest
Welcome Screen
Selectable
Lowest
13
13

Main Page Sequence
Options Menu with
highlighted option.
Shorcut
Numbers
Getting Started
Getting Started
Selecting Options
Use the ARROW
KEYPAD to highlight the
desired option. Press
ENTER/MARK to
activate.
SOFT KEY Options
How To Select Options
You can select and activate options and enter data to customize the GPSMAP 3006C/3010C to fi t your
requirements. You can use the ENTER and DATA ENTRY keys, and the ARROW KEYPAD to select
options, enter names and numbers in data fi elds, activate your selections, or quickly select an option.
To select and activate an option using the ENTER key and ARROW KEYPAD:
1. Press ADJ/MENU to display the options menu for the selected function (see page 21). The options menu
displays a list of optional features which are specifi c for that particular function. Selecting any feature on
the list of options requires movement of the cursor, which is called “highlighting”, selecting or choosing an
item in a list or a fi eld (box) on a page.
2. Use the ARROW KEYPAD to move the cursor (highlight) up and down a list or up, down, and sideways on
menus.
3. Once you have moved to the desired selection, press ENTER to either activate the feature or RIGHT on the
ARROW KEYPAD to display a sub-menu or list if more feature options exist. Repeat this process to select
an option from the list or press the QUIT key to return to the previous setting.
The QUIT key moves backwards through these steps back to the main page you started on.
To select and activate an option button:
When moving about a page with option buttons, like the waypoint ‘Review’ page, you observe functions
such as ‘Add To Route’, ‘Move Wpt’, ‘Delete’ and ’OK’. To activate the option, highlight the desired button
and press ENTER.
To select and activate an option using DATA ENTRY shortcut keys:
1. Press ADJ/MENU to display the options menu for the current page or selected function (see page 21). The
options menu displays a list of optional features which are specifi c for that particular function.
2. To quickly select any feature on the list of options, press the corresponding DATA ENTRY number key. For
numbers 10 and higher, press the fi rst digit, then press the second digit within one second. Shortcut keys
always use the same corresponding number for easy operation.
To select and activate an option using SOFT KEYS:
Press the SOFT KEY that is below the desired option.
14
14

How To Enter Data
Naming a waypoint or placing any sort of data that has not been predefi ned requires the use of the
ARROW KEYPAD, ENTER, and/or DATA ENTRY keys.
To enter a name or number in a data fi eld:
1. Once you have accessed a page with programmable data fi elds (e.g. ‘ Waypoint Edit’) you can use the
ARROW KEYPAD to move the cursor (Highlight) to fi elds on the page. Use the UP/DOWN arrows to move
up or down and the LEFT/RIGHT arrows to move sideways.
2. Pressing ENTER with the fi eld highlighted begins the process for entering data in the form of alphanumeric
characters.
3. Each DATA ENTRY key has multiple characters assigned to it. Pressing the key one time selects the fi rst
character, twice selects the second character, three times the third character, and four times selects the
number assigned to the key. The only DATA ENTRY key that does not have at least four characters is the
“+, -, 0” key.
When entering data using the DATA ENTRY keys, press the key repeatedly until the correct character is
selected, then pause briefl y or press the next letter/number from a different key. The unit automatically
moves the cursor to the next placeholder.
or
Use the ARROW KEYPAD UP/DOWN arrows to cycle through numbers 0 to 9, plus/minus symbols, blank
space, and the alphabet. Pressing and releasing the keypad moves you character by character through the
list. Pressing and holding the keypad moves you rapidly through the list.
4. Use the ARROW KEYPAD LEFT/RIGHT arrows to manually move to the next character on the line or back-
wards to edit characters. Press LEFT on the ARROW KEYPAD from the fi rst character position to clear the
entire fi eld. If there are more than two lines of data, keep pressing to the RIGHT to drop down to the next
line.
5. When data entry is completed press ENTER to accept data, then move to the next programmable fi eld. Not
all data fi elds are programmable, such as the date and time. When moving about a page with these fi elds,
the cursor skips over them.
Getting Started
Getting Started
Main Page Sequence
Entering Data
Pressing UP or DOWN
on the ARROW KEYPAD
or using the DATA
ENTRY keys changes
numbers and letters.
Pressing LEFT or RIGHT
on the ARROW KEYPAD
moves the cursor along
the line or to the next
line.
15
15

Getting Started
Getting Started
Main Page Sequence
Initializing the Receiver
GPS Icon
Status Bar
GPS Tab
Initializing the Receiver
The fi rst time you power up your new GPSMAP 3006C/3010C MFD and GPS 17 receiver, the receiver
must be given an opportunity to collect satellite data and establish its present position. To ensure proper
initialization, the GPS 17 is shipped from the factory in AutoLocate mode, which allows the receiver to
“fi nd itself” anywhere in the world. The MFD usually provides a position fi x within a few minutes.
Before you initialize, make sure the GPSMAP 3006C/3010C unit and GPS 17 antenna have been correctly installed on your vessel according to the instructions in the Installation Guide. The antenna needs a
clear and unobstructed view of the sky to receive satellite signals.
To turn the GPSMAP 3006C/3010C on:
Press and hold the POWER key until the display comes on, then release the POWER key.
An Introduction page appears, displaying unit information, Network Connections (attached devices)
and important information regarding the proper use of the unit. It takes a few seconds for the MFD to
search for attached devices. Once the search is complete, the “I Agree” button highlights in yellow. After
reading the Introduction, press the ENTER key if you agree.
Next, you see the fi rst of the Main Pages (see page 18), which is the Map Page. The GPSMAP 3006C/
3010C now begins searching for the GPS satellites. The fi rst time that the unit acquires satellites take several minutes. Afterwards, acquisition times are quicker during normal use. The GPS Status icon on the left
side of the Status Bar (see also page 17) shows the progress of the satellite acquisition process. The GPS
icon status colors are:
Red— Acquiring Satellites/ Lost Satellite Reception
Orange— Ready For Navigation/ Ready For Navigation with WAAS
Gray— Lost GPS connection. (Check GPS antenna wiring connections.)
16
16
A more detailed visual reference of the satellite acquisition, GPS receiver status, and accuracy is also
available from the GPS tab on the Main Menu.
To view the GPS tab information:
1. Press and hold ADJ/MENU for two seconds, then release. The Main Menu appears.
2. If not already highlighted, use the ARROW KEYPAD to highlight the ‘GPS’ tab.
When viewing the GPS Info, a signal strength bar for each satellite in view appears on the right of the
page, with the appropriate satellite number under each bar. The progress of satellite acquisition is shown
in three stages:
• No signal strength bars— the receiver is looking for the satellites indicated.
• Hollow signal strength bars— the receiver has found the indicated satellite(s) and is collecting data.
• Solid green signal strength bars — the receiver has collected the necessary data and the satellite(s)
are ready for use.
Once the receiver has collected information from at least three satellites, the ‘Status’ fi eld displays
either “Ready for Navigation” or “Ready for Navigation with WAAS”. The GPSMAP 3006C/3010C is now
ready for use! Press QUIT to return to the Map Page.
For more detailed information on the GPS tab, its related options, WAAS, and GPS, see pages 56-57.
Getting Started
Getting Started
Main Page Sequence
Initializing the Receiver/
Status Bar
Status Bar
At the top of each page, a Status Bar provides current status information for connected devices and
several of the MFD functions. As additional devices are added to the MFD or Garmin Marine Network,
icons for the device appear in the Status Bar. Please refer to the documentation for the additional devices
for specifi c information for that device’s icon.
When navigating lists of similar items, such as waypoints, the Status Bar displays helpful tips if additional ADJ/MENU key options are available.
Alarm alerts also appear in this area. To acknowledge an alarm, press the QUIT key. If an alarm condition persists, it displays in the Status Bar area until the alarm condition no longer exists. More on alarms
may be found on page 68.
GPS Tab
Status Bar
Status Bar Messages
Press QUIT to acknowledge.
17
17
Getting Started
Getting Started
Main Page Sequence
Main Pages
Pages List
Main Pages
Main Pages are the primary screens which contain navigation and other helpful information to assist
you. There are three factory default pages: the Map Page, Compass Page, and Highway Page. One optional
page, the Video Page, appears if you are inputting a video signal (see page 35). When the unit is powered
on, the fi rst Main (Primary) Page displayed is the Map Page. As you add optional hardware to the MFD or
Garmin Marine Network, additional Main Pages, Functions (pg. 21), or Adjustments (pg. 21) may appear
automatically. For specifi c information on additional Main Page operations, refer to the documentation
that comes with the optional hardware. When the PAGE key is pressed, the Pages list displays the avail-
able Main Pages. You may cycle through the Main Pages in order, or jump to a specifi c page.
To cycle through the Main Pages in order:
1. Press the PAG E key. Each time the PAGE key is pressed the GPSMAP 3006C/3010C displays the next Main
Page and highlights (in yellow) the name on the Pages List.
2. Press ENTER to accept the current page or wait and the window automatically disappears after a few
seconds.
18
18
MAP PAGE COMPASS PAGE
To jump to a specifi c Main Page:
1. Press the PAGE key. The Pages List displays the available Main Pages along with their corresponding short-
cut number. The current Main Page is highlighted in yellow.
2. Press the DATA ENTRY number key of the Main Page you wish to view or use the ARROW KEYPAD to
highlight the desired page and press ENTER.
HIGHWAY PAGE
VIDEO PAGE (OPTIONAL)
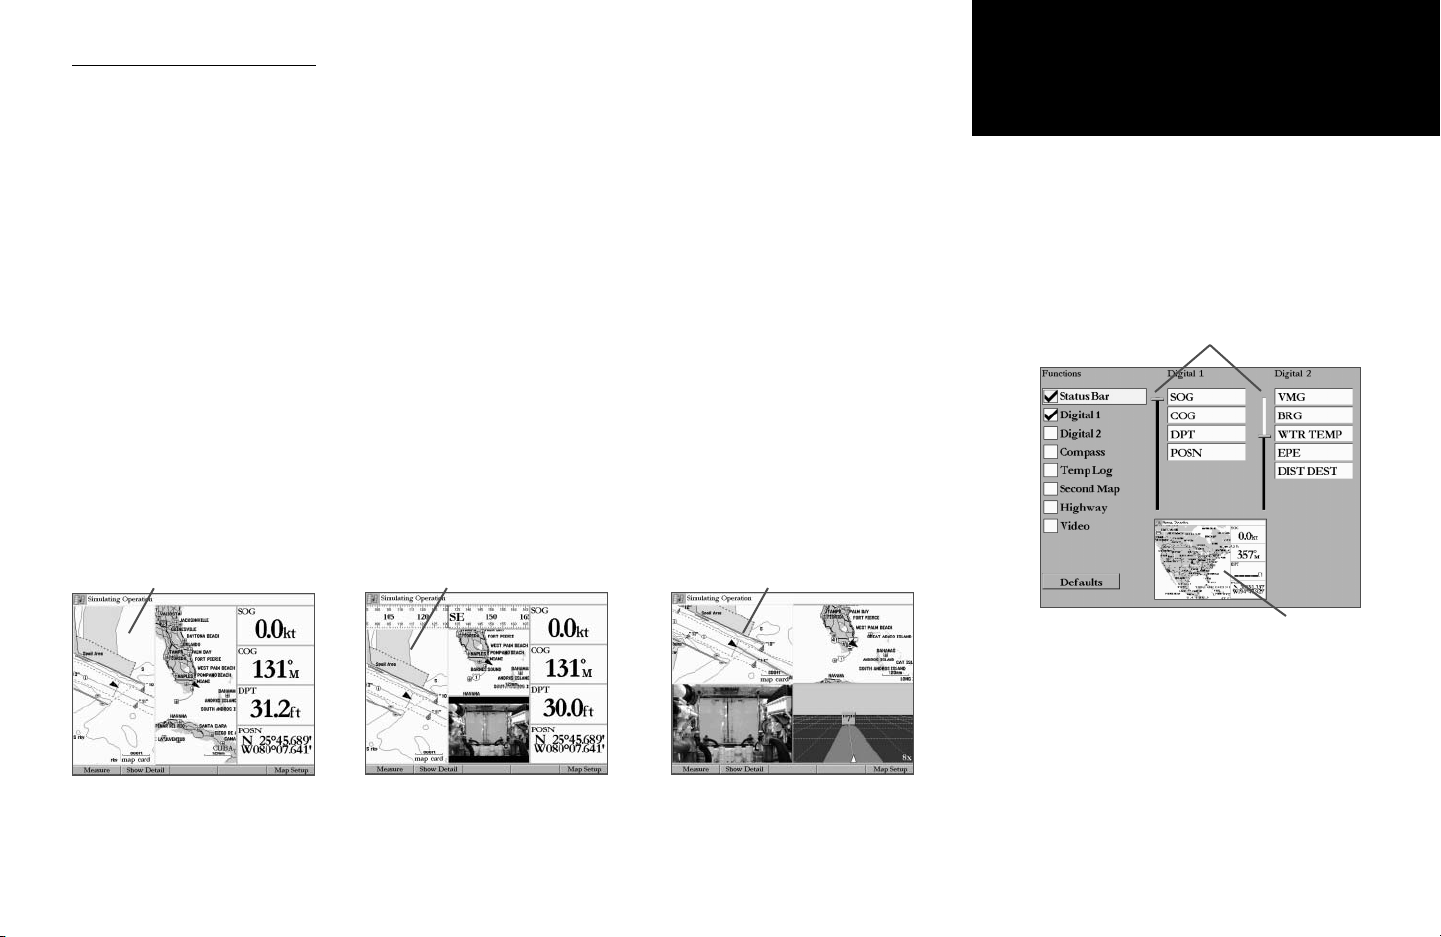
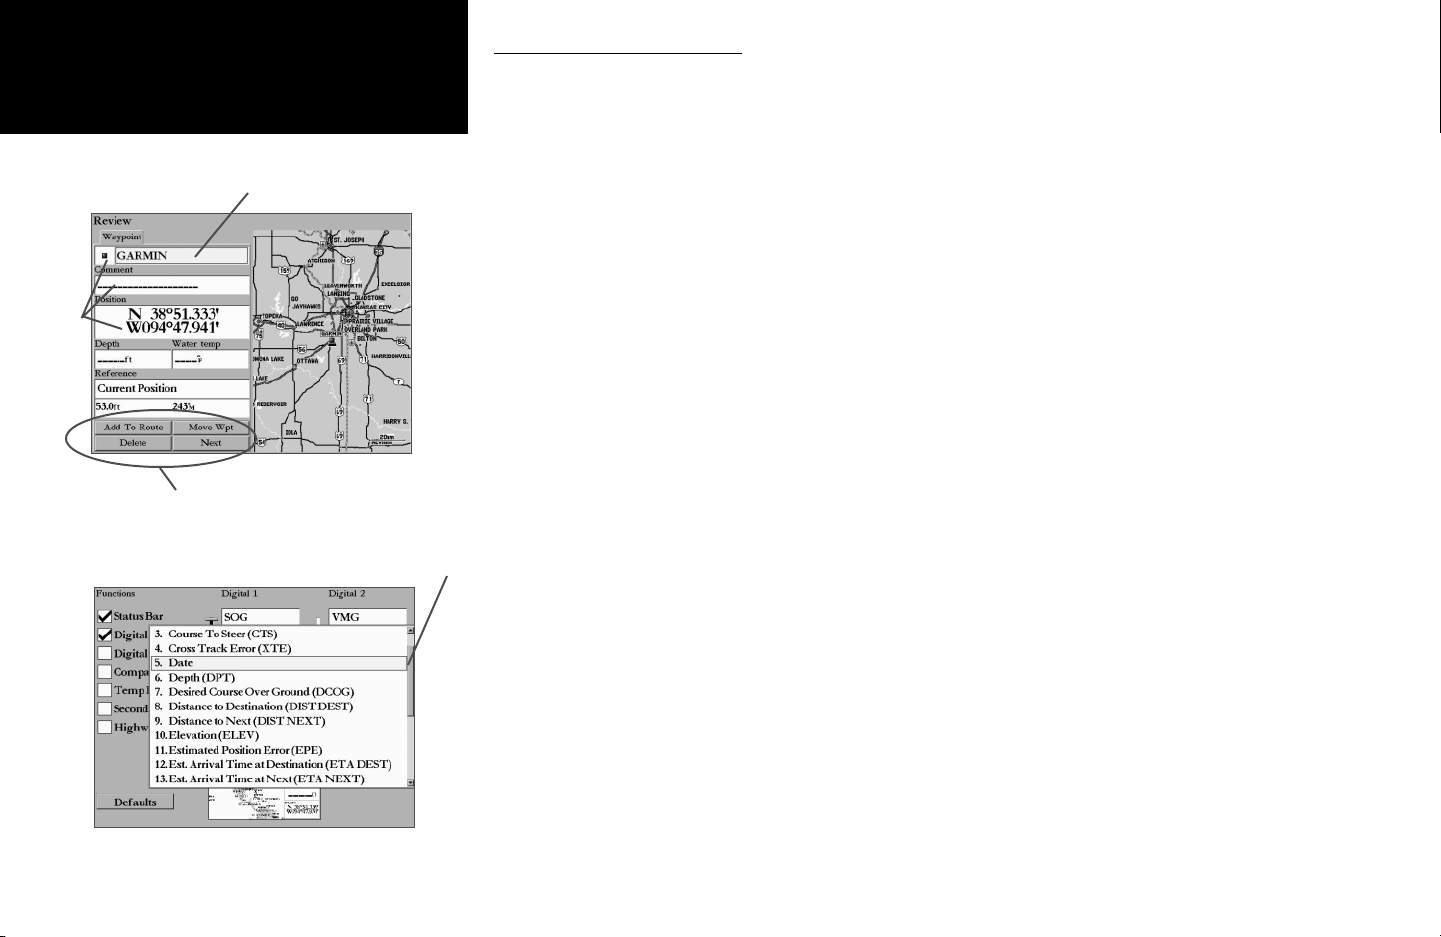
Confi guring Main Pages
Each of the Main Pages may be customized to fi t your navigational needs. You may modify digital data
fi elds and add additional secondary Functions to each of the Main (Primary) Pages. Factory default and
some optional hardware Main Pages may be added as additional Function windows or “Functions” to
any of the Main Pages. As you add optional hardware to the MFD or Garmin Marine Network, additional
Function choices may appear automatically. You may also display other Functions such as a Compass tape,
Temperature Log (if inputting Garmin or NMEA Sonar data. See page 72), or a Second Map (Map Page
only). Digital data fi elds (Digital 1 and Digital 2) may be changed in size and type of data that is displayed
in each data fi eld. As you add/remove Functions and data fi elds, a preview window shows the layout.
Getting Started
Getting Started
Main Page Sequence
Confi guring Main Pages
To add/remove Functions to a Main Page:
1. Press and hold the DATA/CNFG key for two seconds. The Confi guration page appears.
2. Using the ARROW KEYPAD, highlight the desired Function to add/remove and press ENTER. Only Func-
tions with checkmarks in the box to the left of the name display on the Main Page. Up to three secondary
Function windows may be displayed on a Main (Primary) Page. Function selections gray out when no more
can be added. The Main (Primary) Page you are adding Functions to always displays either on the left side
(2-3 Function windows) or in the upper left (4 Function windows).
3. When fi nished, press QUIT to return to the Primary (Main) Page.
Main (Primary) Page
Map Page with Second
Map and Digital 1
Main (Primary) Page
Map Page with Second Map,
Compass, Video, and Digital 1
Map Page with Second
Map, Video, and Highway
(No Digital Data)
Main (Primary) Page
Adjustment Sliders
Confi guration
Page
Preview
Window
19
19

Getting Started
Getting Started
Main Page Sequence
Confi guring Main Pages
Digital 1 with
large data fi elds.
Digital 2 with small
data fi elds.
To change the size of the Digital data fi elds:
1. Press and hold the DATA/CNFG key for two seconds. The Confi guration window appears.
2. Using the ARROW KEYPAD, highlight the Digital 1 or Digital 2 adjustment sliders and press ENTER.
3. Press UP on the ARROW KEYPAD to display larger text with fewer data fi elds. Press DOWN on the
ARROW KEYPAD to display smaller text with more data fi elds. A preview of the data fi elds appears below
in the Preview window. As you adjust the data fi eld size, the confi gurable data fi elds automatically display
in the Digital 1 and Digital 2 lists.
4. Press QUIT to exit the slider adjustment. Press QUIT again to return to the Main Page.
To change Digital 1 or Digital 2 data fi elds:
1. Press and hold the DATA/CNFG key for two seconds. The Confi guration window appears.
2. Using the ARROW KEYPAD, highlight the data fi eld you wish to change and press ENTER.
3. Move up or down on the list using the ARROW KEYPAD to highlight the type of data you wish to display,
and press ENTER or press the DATA ENTRY key(s) for the selection. To exit, press QUIT.
Available data fi eld choices are:
1. Bearing (BRG)
2. Course Over Ground (COG)
3. Course To Steer (CTS)
4. Cross Track Error (XTE)
5. Date
6. Depth (DPT)*
7. Desired Course Over Ground (DCOG)
8. Distance to Destination (DIST DEST)
9. Distance to Next (DIST NEXT)
10.Elevation (ELEV)
11.Estimated Position Error (EPE)
12.Est. Arrival Time at Destination (ETA DEST)
13.Est. Arrival Time at Next (ETA NEXT)
14.Est. Time En Route to Destination (ETE DEST)
15.Est. Time En Route to Next (ETE Next)
16.Position (POSN)
17.Speed Over Ground (SOG)
18.Speed Through Water (STW)*
19.Time of Day (TIME)
20.Turn
21.Velocity Made Good (VMG)
22.Voltage (VOLT)
23.Water Temperature (WTR TEMP)*
*Requires input of Garmin or NMEA Sonar Data to display.
20
20
Choose the type of information
you wish to display in a certain
data fi eld.
To restore the factory default confi guration:
1. Press and hold the DATA/CNFG key for two seconds. The Confi guration window appears.
2. Using the ARROW KEYPAD, highlight the ‘Defaults’ button and press ENTER.

Using Function Windows
Factory default or optional hardware Main Pages may be added as additional Function windows or
“Functions” to any of the Main Pages. (See pg. 19 for adding Functions.) Once you have confi gured a Main
Page, you can easily cycle through the available Function by pressing the FCTN (Function) key. A yellow
box highlights around the “active” Function. Each time you press the FCTN key, the highlight moves in a
clockwise motion (when three or more Functions are displayed).
Functions List
Getting Started
Getting Started
Main Page Sequence
Using Functions/
DATA Key
To cycle through Main Page Functions:
1. Press the FCTN key. The “Functions” List appears and the next Function on the list highlights.
2. Each time you press the FCTN key, the next Function highlights. Press ENTER when the desired Function is
highlighted. Or, from the Functions List, press the DATA ENTRY shortcut key for the desired Function. Func-
tions that are not currently available appear in gray and may not be selected.
Function Adjustments
Active Function
window
Each active Function (except the Compass Tape) has specifi c Adjustment (ADJ key)/SOFT KEY
options and Main Page features. You can use options from the Adjustment menu to activate Adjustments
or features for the active (highlighted) Function. As you add optional hardware to the MFD or Garmin
Marine Network, Adjustments Menu choices may appear automatically. For specifi c instructions on adjustments and features for the highlighted Function, please refer to the specifi c section (or manual) for that
Main Page.
To display the active Function’s adjustments:
1. Press the ADJ key to display the available options window. The Adjustment Menu appears for the
highlighted or active Function.
2. Press the DATA ENTRY shortcut key for an option or highlight it with the ARROW KEYPAD and press
ENTER to select the option.
DATA Key
The DATA key allows you to display the primary view of a Main Page, in a full screen mode, without
Functions, Status Bar, or Digital Data fi elds. Press the DATA key to display a full screen Main Page. Press
the DATA key again to return to the previous view.
Adjustment
Menu
Active Function
Window
Adjustment
Menu
Active Function
Window
1
4
2
3
21
21

Getting Started
Getting Started
Creating Waypoints
Main Page Sequence
Creating Waypoints
Waypoint Review Page
Through this exercise you will create a new waypoint, name the waypoint, and assign a symbol to
the waypoint. You will fi nd the term “Waypoint” is used frequently when talking about navigation. A
“Waypoint” is a position stored in the MFD’s memory that can be used for navigation. Waypoints are used
for direct navigation or you can use several waypoints to build a route.
Creating, or “Marking” a waypoint in the MFD is really very easy. The unit has to be turned on and
receiving at least three satellite signals to mark a waypoint.
Marking your present position as a Waypoint:
Press and hold the ENTER/MARK key for two seconds until the waypoint Review page is displayed.
When you hold the ENTER/MARK key, the GPSMAP 3006C/3010C captures its current location and
displays the Review page. The MFD assigns a square as the default symbol and a number as the default
name. The ‘OK’ button is now highlighted. Pressing ENTER stores the new waypoint using the default
settings for the symbol and name, or you may change the symbol.
Changing the symbol:
1. Using the ARROW KEYPAD, highlight the symbol fi eld, then press ENTER. This displays an alphabetical
list showing all of the available symbols.
2. Using the
ARROW KEYPAD, highlight a symbol and then press ENTER.
We will enter a new waypoint name using the DATA ENTRY keys. When entering data using the
DATA ENTRY keys, press the key repeatedly until the correct character is selected, then pause briefl y
or press the next letter/number from a different key. The unit automatically moves the cursor to the next
placeholder. See page 15 for more information on entering data.
22
22
You may choose from a list of
useful symbols.
Changing the name:
1. Using the ARROW KEYPAD, highlight the Name fi eld and then press ENTER. This activates the fi eld with
the highlight on the fi rst placeholder.
2. Press the
ARROW KEYPAD to the left one time to clear the fi eld.

3. For example if you wished to enter “PRACTICE 1” as a waypoint name. Press the DATA ENTRY key
labeled “P, Q, R, S, 7” one time to enter the letter “P”. (If you are entering a letter/number from the same
key, pause briefl y and the unit moves to the next placeholder automatically. Otherwise, press the next
letter/number from a different key.)
4. Press the same key three times to set the letter “R”. Continue entering the name until “PRACTICE” is
spelled.
5. To move the cursor to the right one space, press the
6. Finish the waypoint name by selecting the number “1”.
7. Press ENTER to accept the new name.
ARROW KEYPAD to the right one time.
Directly below the Name fi eld is a Comment Field. You can enter a comment of up to twenty digits
about the waypoint in this fi eld. For some more practice, enter “First Waypoint” in the comment fi eld.
Entering a Comment:
1. Highlight the ‘Comment’ fi eld and press ENTER.
2. Using the
3. Press
ARROW KEYPAD and DATA ENTRY keys, enter “FIRST WAYPOINT”.
ENTER to accept the comment.
Now that you have fi nished modifying the waypoint you will need to save it to the Waypoint List. See
page 41 for more information on waypoints and waypoint options.
To Save the Waypoint:
1. Using the ARROW KEYPAD, highlight the ‘OK’ button at the bottom of the Review page.
2. Press ENTER to save the waypoint.
Getting Started
Getting Started
Main Page Sequence
Creating Waypoints
Use the ARROW KEYPAD or DATA ENTRY
keys to enter a waypoint name.
Data Entry Tips:
•
. When using the ARROW KEYPAD, press and hold the key if you want the unit to scroll through the
alpha-numeric list quickly.
•
When using the DATA ENTRY keys, rapidly press the key the appropriate number of times for the char-
acter that you want to display. The number is always last. The unit automatically advances to the next
character position.
Use the ARROW KEYPAD or DATA ENTRY
keys to enter a Comment.
23
23
Getting Started
Getting Started
Navigating to a Waypoint
Main Page Sequence
Basic Navigation
Going to a Waypoint
GPS is all about marking positions as waypoints and navigating to them using the receiver’s steering
guidance and map displays. We’ve already seen how to use the ENTER/MARK key to store our present
position, so it’s time to move on to the fun part—going to a destination.
The NAV/MOB key is the primary tool used to select a destination Waypoint, TracBack (pg. 45), or a
Route (pg. 49) to navigate. The NAV key can be used in two primary ways:
• Pressing NAV once displays a list of options from which you can select ‘Go To Point’, ‘Follow Route’,
‘Follow Track’, ‘TracBack’, or ‘Stop Navigation’.
• Highlighting an on-screen waypoint or map item as a destination directly from the Map Page and
pressing NAV allows you to graphically select points to “Go To”.
When you begin navigation to a waypoint, the GPS sets a straight-line course to that point. The unit
draws a Course Line on the display between the current GPS location and the destination waypoint. You
may use the Map, Compass, or Highway Main Pages (or confi gure any of the other Main Pages) for navigation. For this exercise, let’s use the Compass Page. You may use the “Practice 1” waypoint you created on
the previous page or any other waypoint you have created.
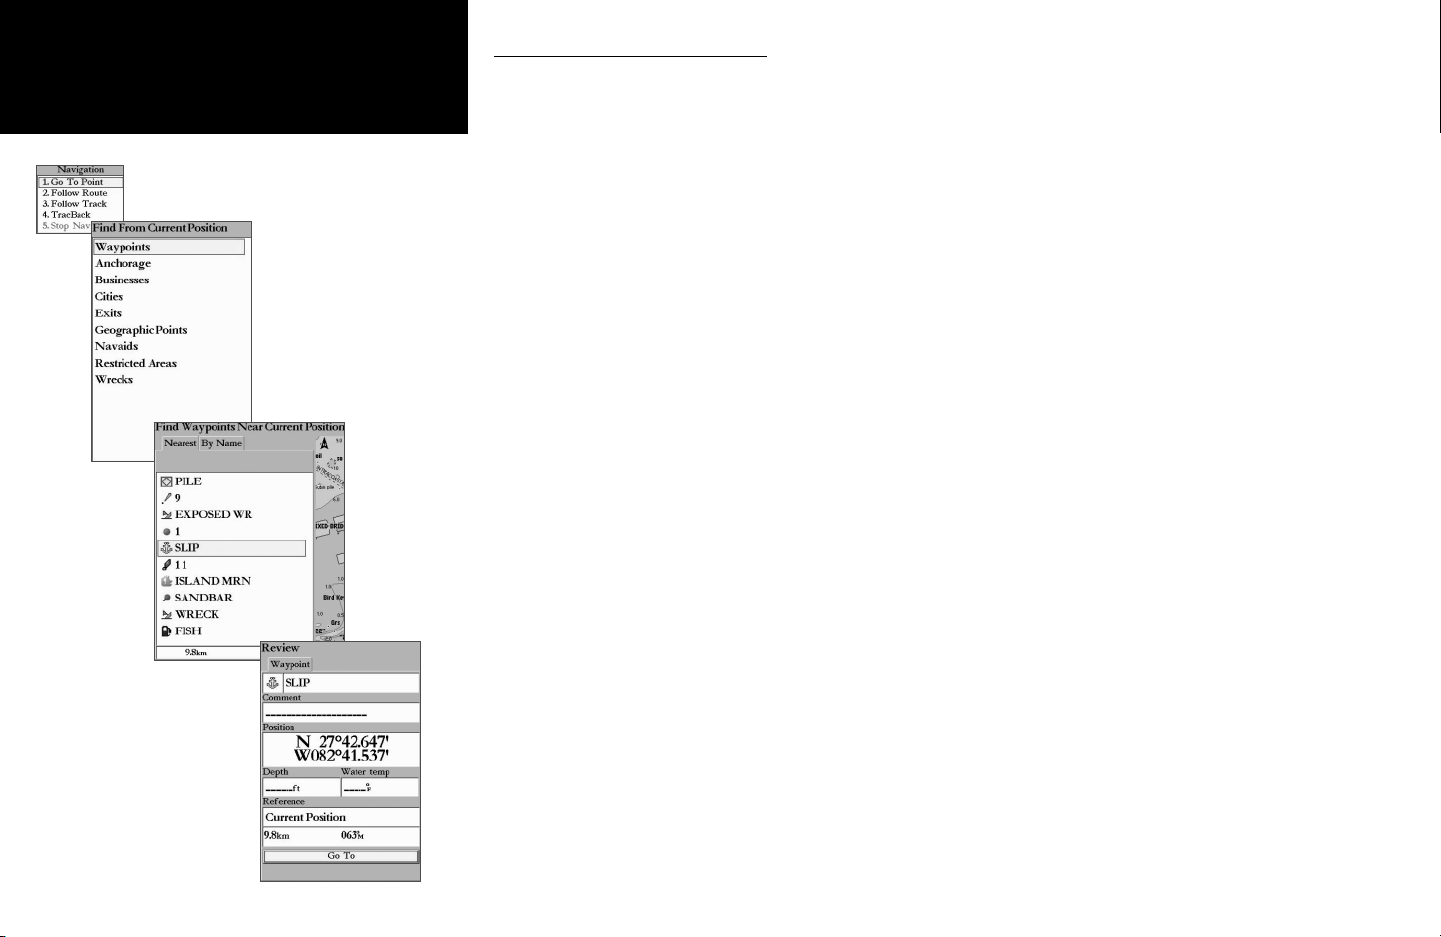
Going to a waypoint:
1. Press the NAV key.
2. Highlight ‘Go To Point’ and press
3. Highlight ‘Waypoints’ and press
can select waypoints by “Nearest” or “By Name”. Select the ‘Nearest’ tab using the
4. Press the
gate to is highlighted. Press
5. With the ‘Go To’ button highlighted, press
ARROW KEYPAD UP or DOWN to scroll through the list until the waypoint you wish to navi-
ENTER (or press the DATA ENTRY shortcut number).
ENTER. This displays the ‘Find Waypoints’ window. From this window you
ARROW KEYPAD.
ENTER to display the waypoint Review page.
ENTER to begin navigation.
24
24
Press the PAGE key and select the Compass Page.

Using the Compass Page
Getting Started
Getting Started
Located on the Compass Page are the Bearing Pointer, and a Compass Ring. For a GPS to navigate
properly, it has to be moving. When you are moving, the orange Bearing Pointer points toward your
destination, while the Compass Ring refl ects the direction that you are traveling with a red vertical line at
the top of the Compass Ring. When you are headed directly toward your destination, the Bearing Pointer
points toward the top of the display, aligned with the red vertical line displayed at the top of the Compass Ring. If you are not heading toward your destination, the Bearing Pointer turns, continuing to point
toward your destination. To head toward your destination, turn until the Bearing Pointer is aligned with
the red vertical line in the Compass Ring.
Along the right side of the display are the default data fi elds; the top fi eld is the Speed. Also shown are
the distance to your waypoint (DIST NEXT) and estimated time en route (ETE NEXT). The distance and
en route time decreases as you near your destination.
To stop Going To a point:
1. Press the NAV key.
2. Highlight ‘Stop Navigation’ and press
ENTER (or press the DATA ENTRY shortcut number).
Congratulations! You should now have enough experience to use the basic functions of your GPSMAP
3006C/3010C MFD! For detailed instructions on navigating using the Map, Compass, and Highway
Pages, and the rest of the unit’s functions, see the Reference section of this manual.
Main Page Sequence
Basic Navigation
Steer until the arrow is pointing to the red
vertical line. You are then heading straight
towards the point.
Choose ‘Stop Navigation’ to quit navigating
to the point.
25
25

Getting Started
Reference
Main Page Sequence
How to Use the Map Page
Land
Water
Geographic
Name
Boat Icon Map Scale
Full screen Map Page shown
using optional BlueChart data.
Map
Item
Navaids
User
Waypoint
Map Page
The GPSMAP 3006C/3010C’s Map Page provides a comprehensive display of electronic cartography,
plotting and navigational data. When using the unit with the optional BlueChart data or MapSource
software, the map display shows your boat on a digital chart, complete with geographic names, map
items (roads, cities, borders, etc.), navaids, and a host of other chart features. Additional information on
BlueChart data may be found in the “BlueChart User’s Guide”. The unit also plots your track and displays
any routes and waypoints you create. An on-screen cursor lets you pan and scroll to other map areas, determine the distance and bearing to a position, and perform various route and waypoint functions.
When the cursor is active, an additional data window appears in the upper left of the map to indicate
the position, any identifying text, range, and bearing to the cursor or a selected waypoint or map item. The
map range scale displays at the bottom right of the map.
The UP and DOWN RANGE keys, combined with the ARROW KEYPAD, let you select zoom ranges
and move the cursor. Two basic map operating modes, position mode and cursor mode, determine what
cartography (map data) is shown on the map display. Position mode pans the cartography to keep the present position marker within the display area, while cursor mode pans the cartography to keep the cursor
within the display area.
The GPSMAP 3006C/3010C system (by default) powers up in the position mode, with your vessel
centered on the map display.
When the ARROW KEYPAD is pressed, the MFD enters cursor mode. In cursor mode:
• The cursor can be moved over the map display using the ARROW KEYPAD.
• Whenever the cursor reaches the edge of the display, the map scrolls forward under the cursor. Keep
in mind that the boat icon moves with the map scrolling and may go off the display screen (you may
not be able to see your present position).
• When the cursor is stationary, a fi xed coordinate position appears in the position fi eld. Note that the
distance and bearing changes as the boat’s position changes.
• Whenever you change the range in cursor mode, the cursor is centered on screen.
• To return to position mode, press the QUIT key.
26
26
When the cursor reaches the edge of the map, the unit may pause as it loads new map
)
data.
Using the Map Cursor
Getting Started
Reference
Main Page Sequence
Using the Map Cursor
The cursor allows you to pan away from your present position and scroll to other map areas around
the world (even outside of your current detail coverage). As you pan past the edge of the current map display, the screen actively scrolls forward to provide continuous map coverage. A hourglass symbol appears
by the pointer while the unit is busy drawing new map detail.
Map Item
name, Cursor
Coordinates,
Distance, and
Bearing
To move the cursor:
Press the ARROW KEYPAD to move the cursor in an up, down, left, right, or diagonal direction.
As you move the cursor, the distance and bearing from your present position to the cursor are displayed in the upper left of the map, with the cursor’s position coordinates. Keep in mind that when the
cursor is stationary, the distance and bearing from your present position changes as your boat moves. The
cursor may also be used to ‘snap’ to on-screen waypoints and map items, allowing you to review a selected
position directly from the map display.
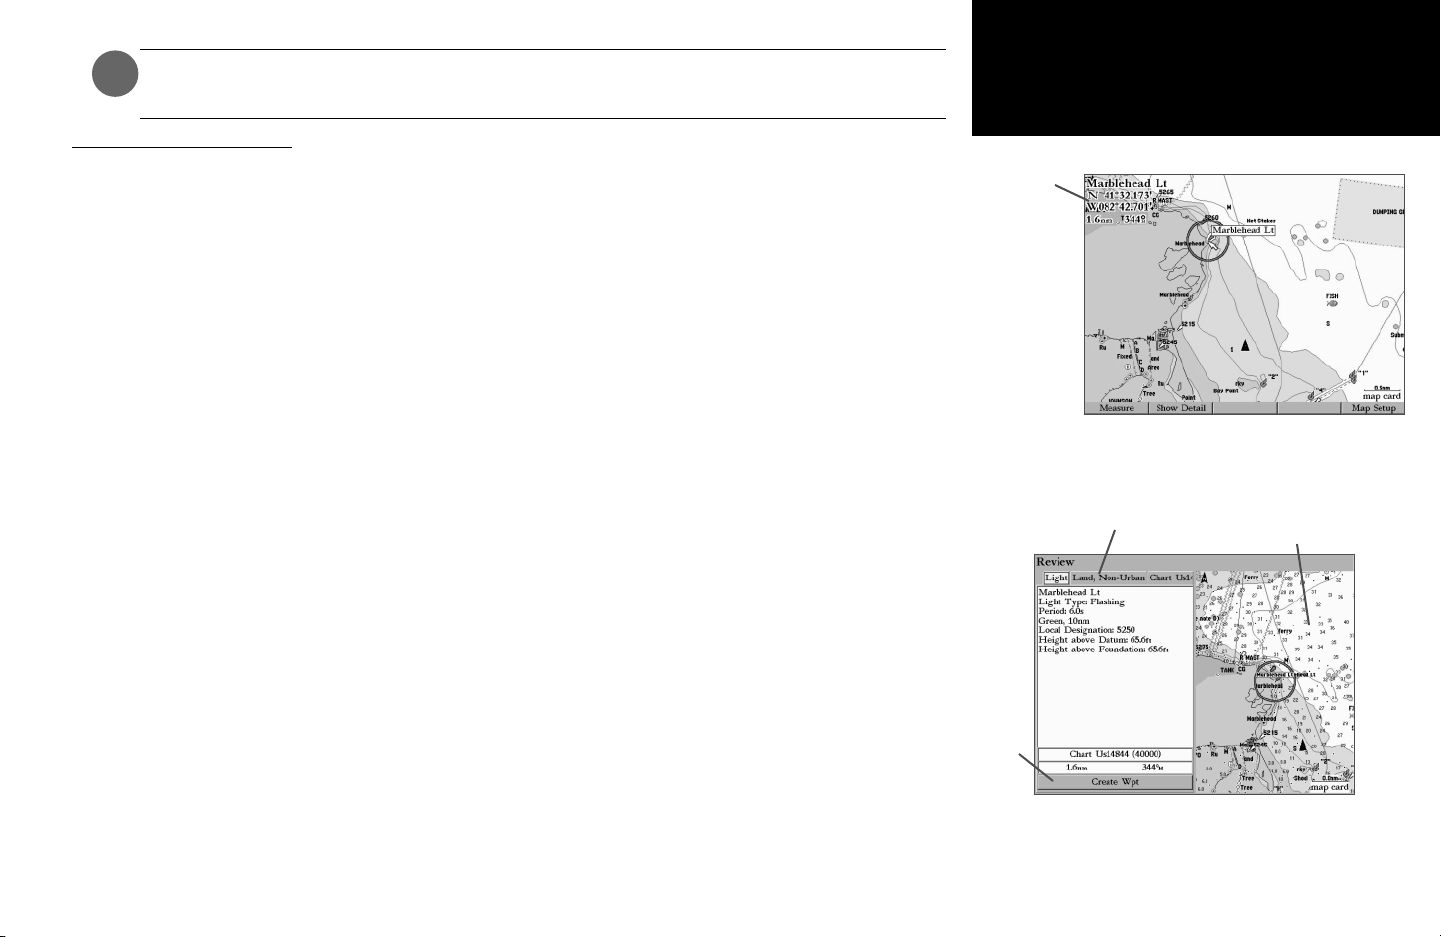
To select an on-screen waypoint or map item with the cursor:
1. Use the ARROW KEYPAD to move the cursor to the desired waypoint or map item (if there are several
waypoints grouped closely together, zoom in closer for a better view).
2. When a waypoint or map item is selected, it highlights on screen, with the name and position displayed.
Press ENTER to show details of the map item. When using BlueChart or MapSource data, or if waypoints
are grouped tightly together due to the current Range setting, additional tabs appear on the Review
page. Use the ARROW KEYPAD to highlight the individual tabs to display the information and additional
options. Press QUIT to exit.
Option
button
To view additional BlueChart chart notes:
1. Select an on-screen BlueChart map item using the steps above.
2. Use the ARROW KEYPAD to highlight the Chart <name> tab. A chart summary appears below the tab.
3. Highlight the ‘Notes’ button and press ENTER. Notes for the chart appear. Highlight the notes fi eld and
press ENTER to scroll the text UP or DOWN using the ARROW KEYPAD. Press QUIT to exit.
Move the cursor over an item on the map to
highlight it.
Additional information
tabs.
Pressing ENTER/MARK while highlighting a map item
brings up additional details and options.
Map
Window
27
27
 Loading...