

®
Apollo™ RA770 Retrofit Kit Installation Instructions............................................................................. 2
Instructions d'installation du kit adaptateur Apollo™ RA770................................................................ 3
Apollo™ RA770 Istruzioni di installazione del kit di retrocompatibilità.................................................. 4
Apollo™ RA770 Nachrüstungssatz – Installationsanweisungen.......................................................... 6
Instrucciones de instalación del kit de actualización del modelo Apollo™ RA770............................... 8
Installatie-instructies voor de Apollo™ RA770 Retrofit set................................................................... 9
Instruções de instalação do kit de retroalimentação Apollo™ RA770................................................ 11
Apollo™ RA770 改裝套件安裝指示 .............................................................................................. 12
Garmin®, FUSION®, and the Fusion logo are trademarks of Garmin Ltd. or its subsidiaries, registered in the USA and other
countries. Apollo™ is a trademark of Garmin Ltd. or its subsidiaries. These trademarks may not be used without the express
permission of Garmin.
El número de registro COFETEL/IFETEL puede ser revisado en el manual a través de la siguiente página de internet.
Printed in Taiwan
June 2018
190-02382-92_0A
Apollo™ RA770 Retrofit Kit
Installation Instructions
Important Safety Information
WARNING
Failure to follow these warnings and cautions
could result in personal injury, damage to the
vessel, or poor product performance.
See the Important Safety and Product
Information guide in the stereo box for
product warnings and other important
information.
This device must be installed according to
these instructions.
Disconnect the vessel's power supply before
beginning to install this product.
CAUTION
Always wear safety goggles, ear protection,
and a dust mask when drilling, cutting, or
sanding.
NOTICE
When drilling or cutting, always check what is
on the opposite side of the surface.
You must read all installation instructions
before beginning the installation. If you
experience difficulty during the installation,
contact FUSION® Product Support.
What's In the Box
• Two mounting plates
• Four M4 Phillips screws
• Two screw covers
• Template
Tools Needed
• Rotary cutting tool, utility knife, or file
• Phillips screwdriver
• Silicone-based marine sealant (optional)
Mounting Considerations
You can use this kit to install a FUSION
Apollo RA770 stereo in a single-DIN opening
or if you are replacing a previous FUSION
stereo, such as a MS-UD/AV650/755 stereo.
The metal brackets in this kit hold the stereo
in place from behind the mounting surface.
To allow for clearance of the screws from the
stereo to the mounting plates, you may need
to remove some existing material from the
dashboard by following these installation
instructions.
NOTE: The dust cover included with the
Apollo RA770 is not compatible when using
larger screw covers included in this kit.
Installing the Stereo Using the Mounting Kit
1
If necessary, remove the existing stereo
from the dashboard, and clean the
surface of any existing gaskets or marine
sealant.
2
Place the included template over the
opening and observe the location of the
Apollo RA770 stereo mounting holes in
relation to the existing opening on the
dashboard.
3
Select an option:
• If the existing opening allows
clearance for the stereo mounting
holes, remove the template and
proceed to step 7.
• If the existing opening does not allow
clearance for the stereo mounting
holes, proceed to the next step.
4
Using the template as a guide, remove
material from the dashboard around the
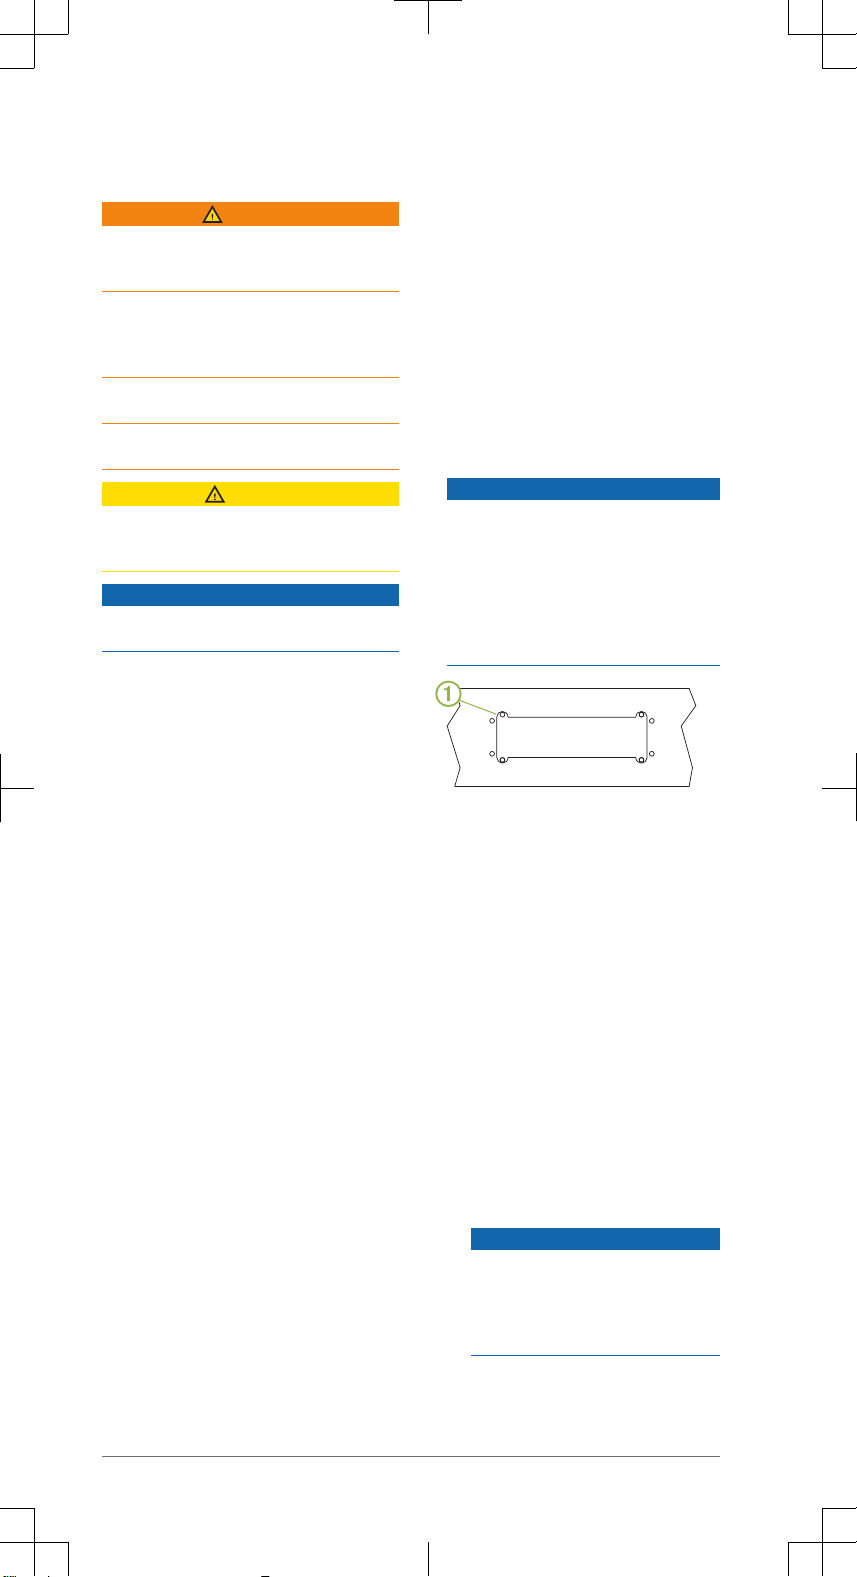
screw locations À with a rotary cutting
tool, utility knife, or a file.
NOTICE
Make sure you remove only enough
material to allow the screws clearance,
because there is not significant space
between the screws and the edge of the
stereo. Removing excess dashboard
material may be visible after installation,
and could allow for unwanted water
ingress.
5
Place the stereo in the opening to test the
screw clearance.
When you can look through all four
mounting holes on the stereo and not see
any dashboard material, you have
prepared the dashboard correctly.
6
If necessary, use a file to refine the
shape or size of the screw clearance
area.
7
Select an option:
• If you are installing the stereo in a dry
location, place the mounting gasket
Á
(included in the stereo box) on the
back of the stereo.
• If you are installing the stereo in a
location that is exposed to water,
apply silicone-based marine sealant
on the mounting surface around the
cutout.
NOTICE
Do not install the mounting gasket if
you applied sealant to the mounting
surface. Using sealant and the
mounting gasket may reduce water
resistance.
2 Installation Instructions

8
Follow the installation instructions
included with the stereo to make the
necessary wiring connections through the
dashboard.
9
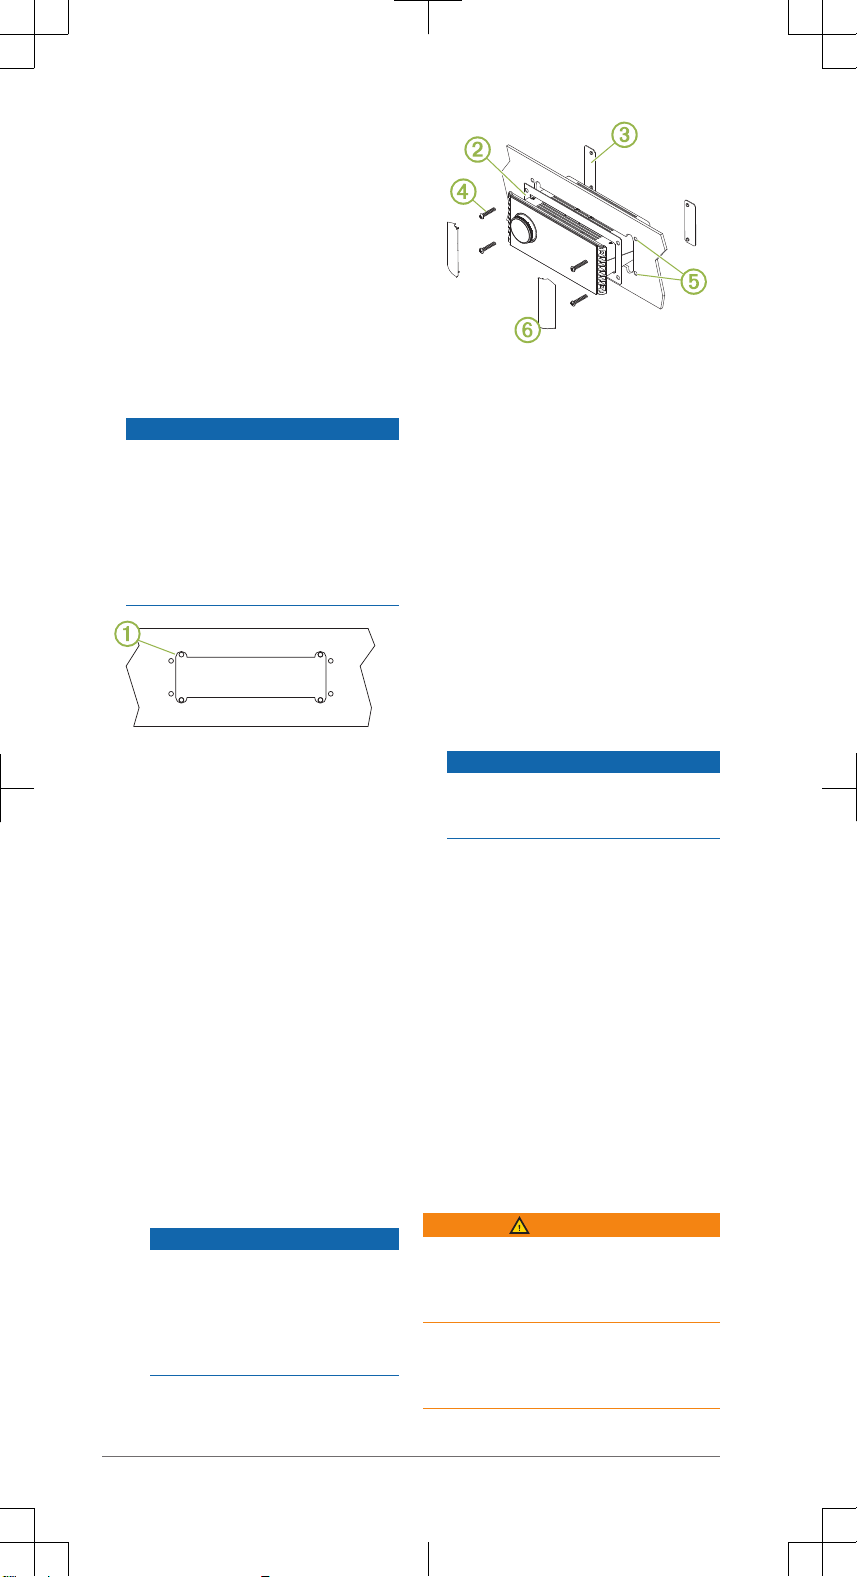
Secure the stereo to the included
mounting plates  behind the dashboard
using the screws included in the kit Ã.
You must use the screws provided in the
kit instead of the screws provided with
the stereo. The screws included in the kit
are designed for use with the mounting
plates.
10
If you are replacing a previous stereo, fill
the screw holes from the previous stereo
installation Ä with marine sealant.
NOTICE
Failure to completely fill the previous
screw holes with marine sealant may
allow for water ingress behind the
dashboard.
11
Snap the screw covers Å into place on
the sides of the stereo.
NOTE: If you are replacing a previous
stereo, you must use the included screw
covers when installing the stereo using
this kit. The screw covers included with
the stereo are smaller, and do not
visually cover the screw holes from the
previous stereo installation.
Instructions d'installation
du kit adaptateur Apollo
™
RA770
Informations importantes relatives à la sécurité
AVERTISSEMENT
Le non-respect de ces avertissements et de
ces mises en garde est susceptible de
provoquer des blessures, d'endommager le
bateau ou de dégrader les performances du
produit.
Consultez le guide Informations importantes
sur le produit et la sécurité inclus dans
l'emballage du système stéréo pour prendre
connaissance des avertissements et autres
informations importantes sur le produit.
Cet appareil doit être installé conformément
à ces instructions.
Déconnectez l'alimentation du bateau avant
de commencer à installer ce produit.
ATTENTION
Portez toujours des lunettes de protection,
un équipement antibruit et un masque antipoussière lorsque vous percez, coupez ou
poncez.
AVIS
Lorsque vous percez ou coupez,
commencez toujours par vérifier la nature de
la face opposée de l'élément.
Lisez toutes les instructions d'installation
avant de commencer l'installation. Si vous
rencontrez des difficultés durant l'installation,
contactez le service d'assistance produit de
FUSION.
Contenu de l'emballage
• Deux plaques de montage
• Quatre vis cruciformes M4
• Deux cache-vis
• Gabarit
Outils requis
• Scie circulaire, cutter ou lime
• Tournevis cruciforme
• Mastic d'étanchéité à base de silicone
(facultatif)
Considérations relatives au montage
Vous pouvez utiliser ce kit pour installer une
chaîne stéréo FUSION Apollo RA770 dans
une ouverture DIN unique ou en
remplacement d'une ancienne chaîne stéréo
FUSION, comme la chaîne stéréo MS-UD/
AV650/755.
Les étriers métalliques de ce kit maintiennent
la chaîne stéréo en place derrière la surface
de montage. Pour qu'il y ait suffisamment
d'espace pour les vis entre la chaîne stéréo
et les plaques de montage, vous devrez
peut-être retirer une partie du matériau du
tableau de bord en suivant ces instructions
d'installation.
REMARQUE : le cache anti-poussière inclus
avec l'appareil Apollo RA770 n'est pas
compatible avec les cache-vis plus gros
inclus dans ce kit.
Installation de la chaîne stéréo à l'aide du kit de montage
1
Si besoin, retirez l'ancienne chaîne
stéréo du tableau de bord et nettoyez la
surface de tous les joints ou morceaux de
mastic d'étanchéité.
2
Placez le gabarit inclus sur l'ouverture et
notez l'emplacement des trous de
montage de la chaîne stéréo Apollo
Instructions d'installation 3
RA770 par rapport à l'ouverture existante
dans le tableau de bord.
3
Sélectionner une option :
• Si l'ouverture existante laisse de la
place pour les trous de montage de la
stéréo, retirez le gabarit et passez
directement à l'étape 7.
• Si ce n'est pas le cas, passez à
l'étape suivante.
4
En vous servant du gabarit comme
modèle, retirez le matériau qui compose
le tableau de bord autour de
l'emplacement des vis À à l'aide d'une
scie circulaire, d'un cutter ou d'une lime.
AVIS
Assurez-vous de ne retirer que la partie
nécessaire à placer les vis, car il n'y a
pas beaucoup d'espace entre les vis et
les bords de la chaîne stéréo. Si vous
retirez une trop grosse partie du tableau
de bord, un trou risque d'être visible
après l'installation et de l'eau pourrait
s'infiltrer.
5
Placez la chaîne stéréo dans l'ouverture
pour vérifier l'emplacement des vis.
Pour vérifier que votre tableau de bord
est bien prêt à recevoir la chaîne stéréo,
regardez à travers les quatre trous de
montage et vous ne devriez pas voir de
résidus du matériel composant le tableau
de bord.
6
Si besoin, utilisez une lime pour ajuster la
taille de l'espace réservé aux vis.
7
Sélectionner une option :
• Si vous installez la chaîne stéréo
dans un endroit sec, placez le joint de
montage Á (inclus dans la boîte de la
chaîne stéréo) au dos de la chaîne
stéréo.
• Si vous installez la chaîne stéréo
dans un endroit potentiellement au
contact de l'eau, appliquez du mastic
d'étanchéité à base de silicone sur la
surface de montage autour de la
découpe.
AVIS
N'installez pas le joint de montage si
vous devez appliquer du mastic sur la
surface de montage. Si vous installez
le joint de montage en plus du mastic,
vous risquez de réduire la résistance
à l'eau.
8
Suivez les instructions d'installation
fournies avec la chaîne stéréo pour
effectuer les branchements nécessaires
à travers le tableau de bord.
9
Fixez la chaîne stéréo aux plaques de
montages  incluses derrière le tableau
de bord en utilisant les vis incluses dans
le kit Ã.
Vous devez utiliser les vis incluses avec
le kit au lieu des vis fournies avec la
chaîne stéréo. Les vis incluses dans le kit
sont conçues pour être utilisées avec les
plaques de montage.
10
Si vous remplacez une ancienne chaîne
stéréo, comblez les anciens trous
d'installation Ä à l'aide d'un mastic
d'étanchéité.
AVIS
Si vous ne bouchez pas totalement les
anciens trous, de l'eau risque de s'infiltrer
derrière le tableau de bord.
11
Placez les cache-vis Å sur les côtés de
la chaîne stéréo.
REMARQUE : si vous remplacez une
ancienne chaîne stéréo, vous devez
utiliser les cache-vis inclus lorsque vous
utilisez ce kit pour installer la nouvelle
chaîne stéréo. Les cache-vis inclus avec
la chaîne stéréo sont plus petits et ne
couvrent pas totalement les trous percés
pour les vis de l'ancienne chaîne stéréo.
Apollo™ RA770 Istruzioni
di installazione del kit di
retrocompatibilità
Informazioni importanti sulla sicurezza
AVVERTENZA
La mancata osservanza delle seguenti
avvertenze e avvisi potrebbe causare lesioni
personali, danni all'imbarcazione o scarse
prestazioni del prodotto.
Per avvisi sul prodotto e altre informazioni
importanti, vedere la guida Informazioni
importanti sulla sicurezza e sul prodotto
inclusa nella confezione del dispositivo.
4 Istruzioni di installazione

Questo dispositivo deve essere installato
attenendosi alle seguenti istruzioni.
Scollegare l'alimentazione dell'imbarcazione
prima di installare il prodotto.
ATTENZIONE
Durante le operazioni di foratura, taglio o
carteggiatura, indossare degli occhiali
protettivi, una maschera antipolvere e
un'adeguata protezione per l'udito.
AVVISO
Prima di effettuare fori o tagli verificare
l'eventuale presenza di oggetti nel lato
opposto della superficie da tagliare.
Leggere tutte le istruzioni di installazione
prima di iniziare l'installazione. In caso di
difficoltà durante l'installazione, contattare il
servizio di assistenza ai prodotti di FUSION.
Contenuto della confezione
• Due piastre di montaggio
• Quattro viti Phillips M4
• Due coperchi delle viti
• Dima
Strumenti necessari per l'installazione
• Seghetto, taglierino o lima
• Cacciavite Phillips
• Sigillante marino a base di silicone
(opzionale)
Informazioni sull'installazione
È possibile utilizzare questo kit per installare
uno stereo FUSION Apollo RA770 stereo in
una singola apertura DIN o per sostituire uno
stereo FUSION precedente, ad esempio uno
stereo MS-UD/AV650/755.
Le staffe di metallo di questo kit mantengono
lo stereo in posizione dalla parte posteriore
della superficie di montaggio. Per lasciare
spazio tra le viti dello stereo e le piastre di
montaggio, è necessario rimuovere alcuni
materiali esistenti dalla consolle attenendosi
a queste istruzioni di installazione.
NOTA: il coperchio antipolvere incluso con
Apollo RA770 non è compatibile quando si
utilizzano i coperchi delle viti più grandi
inclusi in questo kit.
Installazione dello stereo utilizzando il kit di montaggio
1
Se necessario, rimuovere lo stereo
esistente dalla consolle e pulire la
superficie di eventuali guarnizioni o del
sigillante marino.
2
Posizionare la dima inclusa sull'apertura
e osservare la posizione dei fori di
montaggio dello stereo Apollo RA770
rispetto all'apertura esistente della
consolle.
3
Selezionare un'opzione:
• Se l'apertura esistente lascia spazio
ai fori di montaggio dello stereo,
rimuovere la dima e procedere alla
fase 7.
• Se l'apertura esistente non lascia
spazio ai fori di montaggio dello
stereo, procedere alla fase
successiva.
4
Utilizzando la dima come guida,
rimuovere il materiale dalla consolle
intorno alle posizioni delle viti À con un
seghetto, un taglierino o uno strumento
simile.
AVVISO
Accertarsi di rimuovere solo il materiale
necessario a fare spazio alle viti. La
rimozione in eccesso del materiale della
consolle potrebbe essere visibile dopo
l'installazione e consentire infiltrazioni di
acqua indesiderate.
5
Posizionare lo stereo nell'apertura per
verificare l'ingombro delle viti.
Se risulta possibile vedere attraverso tutti
e quattro i fori di montaggio sullo stereo e
non è possibile vedere alcun materiale
della consolle, quest'ultima è stata
preparata correttamente.
6
Se necessario, utilizzare una lima per
rifinire la forma o la dimensione dell'area
di ingombro delle viti.
7
Selezionare un'opzione:
• Se si sta installando lo stereo in un
luogo asciutto, posizionare la
guarnizione di montaggio Á (inclusa
nella confezione dello stereo) sulla
parte posteriore dello stereo.
• Se si sta installando lo stereo in luogo
esposto all'acqua, applicare del
sigillante marino a base di silicone
alla superficie di montaggio intorno al
foro.
AVVISO
Non installare la guarnizione di
montaggio se è stato applicato il
sigillante alla superficie di montaggio.
L'utilizzo del sigillante e della
guarnizione di montaggio potrebbe
ridurre la resistenza all'acqua.
Istruzioni di installazione 5
 Loading...