

Page 1

CONTENTS
Quick Start .............................................3
After
Privateer
Trade .............................................4
Spending
Combat ..........................................6
Reaping
Personal Computer .................................8
Options Screen .....................................10
In the Cockpit .......................................11
Spaceflight Views ..........................11
Cockpit Gauges ............................12
Multi-Function Displays (MFDs) .......15
Other Cockpit Commands ..............18
In-Flight Systems ...........................18
is
Installed
Buying
Goods
Transporting
Collecting Profit
Money
Upgrading
Getting Work ..........................6
Preparing
Finding the Enemy
Engaging a Bogie
Speed ...................................12
Tarsus
Fuel
Shields and Armor ................13
Energy ..................................13
Radar ...................................14
Destination
Examine Target .....................15
Report Damage .....................16
Cargo Manifest .....................16
View Object ..........................16
Weapons and Gun Loadout ...17
Communications ....................17
Jumps ...................................18
Activating Guns ....................18
Ejecting Cargo ......................18
Playing the Game ..................18
Adjusting Player Options .......18
Exiting Privateer ....................18
Targeting
Inertial Targeting and
Tracking
Tractor Beam ........................19
Autopilot ..............................20
Navigation
Your
for Battle
the
Reward
Cockpit
......................................13
System
System
................
.........................4
Goods
.................4
.......................5
.............................5
Ship
...............5
.................6
...................6
....................6
........................7
.......................12
............................15
...................18
(ITTS)
...........19
System
................20
3
GEMINI SECTOR ...................................23
The Frontiersman ..................................24
Gemini Sector: an Overview .................32
Quadrants ...........................................32
Clarke, Fariss, Humboldt, Potter
Base
Types
...........................................33
Agricultural
Mining .........................................33
Pirate, Pleasure, Refinery
New
New
Oxford, Perry ...............................35
Common Base Locations .......................36
Hangar ........................................36
Bar ..............................................36
Mission
Ship
Ship
Software Booth
Mercenaries'
Merchants' Guild ..........................41
Commodity Exchange
Commonly Available Ships ...................43
Tarsus
Centurion ..................................... 44
Galaxy
Orion
Other Spacecraft ..................................50
Broadsword, Demon
Dralthi, Drayman ..........................51
Gladius, Gothri
Kamekh, Paradigm ........................53
Stiletto, Talon
Customizing Your Ship .........................55
Afterburner, Armor,
Cargo
ECM Packages, Engine Upgrades,
Jump Drive, Nav Maps,
Repair
Scanners, Shield Generators,
Tractor Beam,
Weapons
Survival Tips ........................................60
Online Services and Bulletin Boards ......64
..................................33
...............34
Constantinople
Detroit
Computer
Dealer
Modification
..........................................43
.........................................46
...........................................48
Expansion
Droid
.....................................58
......................34
..................................35
.........................37
..................................38
..........................38
.............................39
Guild
........................40
....................42
......................50
.............................52
................................54
..........................55
.................................56
Turrets
.....................57
1
Page 2

ORIGIN Systems, Inc. LIMITED 90 DAY WARRANTY.
ORIGIN warrants to the original purchaser of this computer software product thai the recording medium
on which the software programs are recorded will be free from defects in material and workmanship for
90 days from the date of purchase.
If the recording medium is found defective within 90 days of original purchase, ORIGIN agrees to
replace, free of charge, any such product upon receipt at its Factory Service Center of the product,
postage paid, with proof of date of purchase. This warranty is limited to the recording medium containing
the software program originally provided by ORIGIN. This warranty shall not be applicable and shall be
void if the defect has arisen through abuse, mistreatment or neglect. Any implied warranties applicable to
this product are limited to the 90-day period described above. If failure of the software product, in the
judgment of ORIGIN, resulted from accident, abuse, mistreatment of neglect, or if the recording medium
should fail after the original 90-day warranty period has expired, you may return the software program to
ORIGIN, at the address noted below, with a check or money order for $5.00 (U.S. currency), which
includes postage and handling, and ORIGIN will mail a replacement to you. To receive a replacement,
you should enclose the defective medium (including the original product label) in protective packaging
accompanied by: (1) a $5.00 check (2) a brief statement describing the detect and (3) your return
address. Canada and Foreign Orders Note: Only U.S. money orders are accepted.
Except as set forth above, this warranty is in lieu of all other warranties, whether oral or written,
express or implied, including any warrant of merchanlability or fitness for a particular purpose, and no
other representation of claims of any nature shall be binding on or obligate ORIGIN. In no event will
ORIGIN be liable for special, incidental or consequential damage resulting from possession, use or malfunction of this product, including damage to property and to the extent permitted by law, damages for
personal injury, even if ORIGIN has been advised of the possibility for such damages. Some slates do not
allow limitations on how long an implied warranty lasts and/or the exclusion or limitation of incidental or
consequential damages, so the above limitation and/or exclusion or limitation of liability may not apply to
you. This warranty gives you specific legal rights. You may have other rights that vary from state to state.
Page 3

QUICK START
This section of the manual will familiarize you with the basics of gameplay: getting
around a base, making money, and flying your ship. Experienced players may wish to
begin exploration without the benefit of this information. However, Privateer takes place
in a large and complex universe filled with opportunities and choices. Although you do
not have to follow the walkthrough, even experienced game players may benefit from
what follows.
NOTE: This walkthrough assumes that you are using a mouse on the bases and a joystick
for spaceflight. Experiment with your joystick buttons to determine which button is
which. Joystick button one is the trigger button and joystick button two is usually the
thumb button on top. These are referred to as #1 and #2 respectively. If you are using the
keyboard and/or not using a joystick, see the Reference Card for equivalent commands.
After Privateer is Installed
When
installation
The introduction begins. Sit back and watch as you are introduced to your character
and are provided information important to the story. If the game doesn't load properly,
consult Troubleshooting in the Install Guide. If you still have difficulties, call ORIGIN
Product Support between 9 a.m. and 5 p.m., Mon. through Fri., Central time.
When the introduction is finished, the title screen appears. At the bottom of this screen
you are
offered
on NEW or type [N].
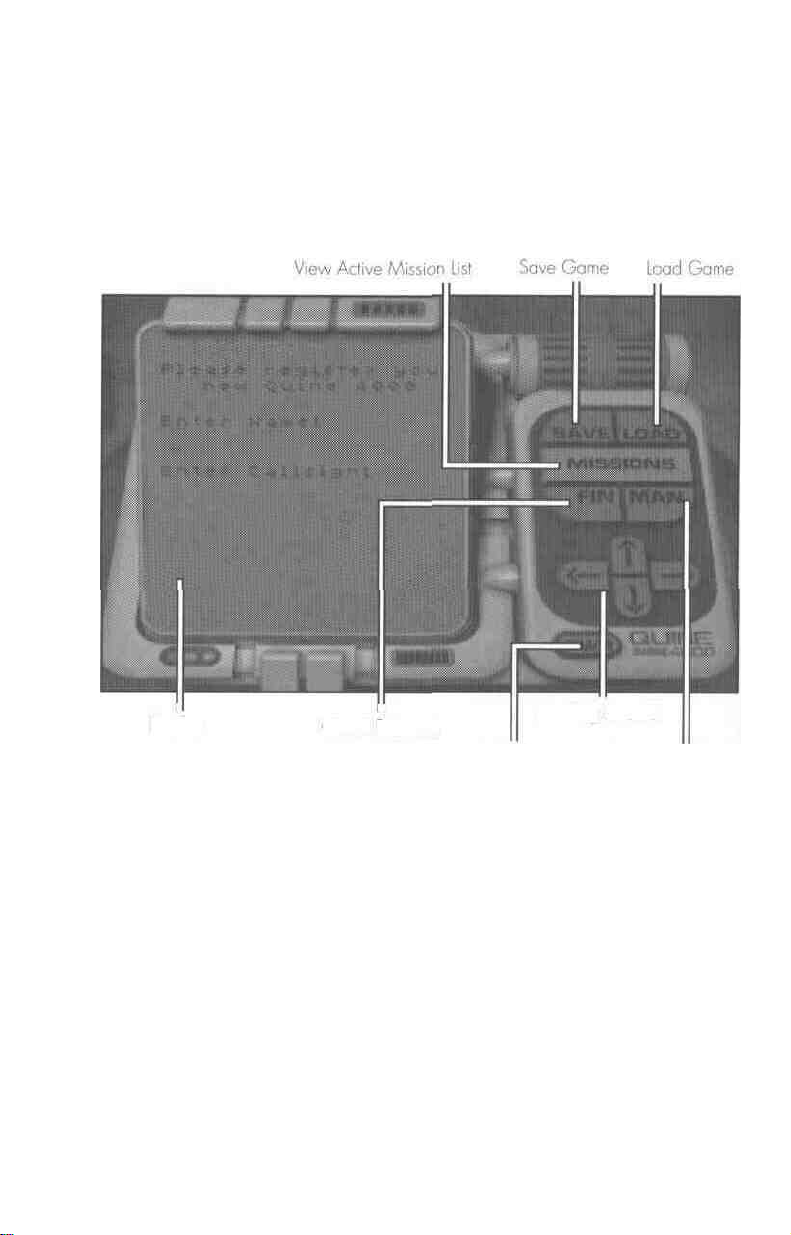
When you choose to begin a new game, the Personal Computer appears on screen. You
are asked to register your name and callsign at this time. When this is complete, you
automatically put your computer down and find yourself standing in the hangar of
Achilles, a mining base in the Troy System. The ship in front of you is the Tarsus your
grandfather left you. To your right is the entrance to the base. Enter the base by clicking
on that entrance. (See p. 36 for a picture of a hangar.)
is
complete,
several choices:
type
NEW,
PRIV
(Enter)
LOAD,
at the
OPTIONS
and
prompt.
QUIT.
To begin a new game, click
New Gome Load Game Options Screen Exit to DOS
3
Page 4
Trade
This puts you in the main concourse. There are occasional pedestrians and carts of ore
moving about the concourse. On the left of the concourse is the door to the hangar where
your ship is waiting for you. On the right there are doors on two levels: representatives
from the Merchants and Mercenaries' Guilds have their offices on the upper level; the
lower level houses the local ship dealer, bar, mission computer and Commodity
Exchange.
Buying Goods
Enter the Commodity Exchange (by clicking on its door). When the monitor comes
down it defaults to Buy Mode. Scroll through the available items using the arrow buttons
until you find goods that you can afford and that might prove desirable to an agricultural
planet. Such items might include robot workers or other durable goods. Buy as much as
you can afford by clicking on the item in the small screen. (See p. 42 for a picture of the
Commodity Exchange.)
Ship Dealer Merchants' Guild Mercenaries' Guild
Hangar Bar Mission Computer Commodity Exchange
Achilles Main Concourse
Transporting Goods
Leave the Commodity Exchange by clicking anywhere at the bottom of the scene. Go to
the hangar. Click on your ship to launch.
Once in space, press [N] to activate your navigation computer. This displays a map of the
Troy system. Nav 1 is selected. All system maps display nav points. A nav point may be a
base, a jump point or simply a buoy for navigation purposes — see the information box
Page 5

beside the map for a description of the selected nav point. Press (N) repeatedly to cycle
through the available nav points until Nav 6 is selected, or use the mouse to select Nav
6. The information box tells you about each nav point as it is selected. Once you have
selected Nav 6, the box informs you that Nav 6 is an agricultural base named Helen.
Leave the nav computer by pressing [Esc| that your Autopilot light is now lit. (Your
Autopilot light will not light when there are hostile craft nearby. In that case, you may
want to check Combat, below.) Press [A] at this point and you fly automatically to the
agricultural planet Helen. If you wish to fly there without the benefit of the Autopilot,
center the white navigation cross on your heads-up-display (HUD) and proceed in that
direction, using Q to increase speed in increments of one-eighth of your total throttle
capability.
Helen is a large and watery planet. Once you spot it, fly as close to it as you can. When
you're close enough, you are notified by the base that they are ready to engage automatic
docking procedures. You land automatically. Once you have landed, enter the base. Be
advised that they have withdrawn a docking fee of 50 credits from your funds.
Collecting Profit
Enter the main concourse of the base. (Note that this concourse is different from the last
one.) Once there, enter the Commodity Exchange. It is located on the lower level to the
right. Use the
on the small screen to sell the item displayed. If you made a wise choice, your credits
will soon surpass the 2,000 you began the game with. Otherwise, you will end up with a
net loss. Either way, let's go spend what funds you do have.
SELL
button to indicate
that
you wish to
sell
your goods. Click on the item
Spending Money
Upgrading Your Ship
Exit the Commodity Exchange. Enter the ship dealer's area. Once inside, observe a large
doorway at the back (top) of the room. This is the entrance to the Ship Modification
Screen — click on the doorway to access this screen. Use the monitor here as you did in
the Commodity Exchange. For example, you might want to upgrade your gun. First,
indicate
that
you
wish
to
sell
your
existing
items on your ship until your laser is displayed. Click on the item in the small screen to
sell it. Right now it is automatically dismounted because you have only one gun. Later,
when you have multiple guns, you will be asked to point out which one you wish to sell.
(See p. 39 for a picture of the Ship Modification Screen.)
Switch to Buy Mode by clicking on the BUY button, then use the arrows to cycle through
the available items. When the meson blaster is displayed, click on it. If you can afford to
buy it, its cost is deducted form your funds and an icon appears. Drag the icon to wherever you want to load the gun on your ship. If you cannot afford the meson blaster, purchase the most expensive gun you can afford. Exit the Ship Modification Screen by clicking on the showroom doorway (at the far left of the screen). Exit back to the main concourse by clicking on either one of the smaller doors in the dealership.
gun using the
SELL
button.
Scroll
through the
Page 6

Combat
Getting Work
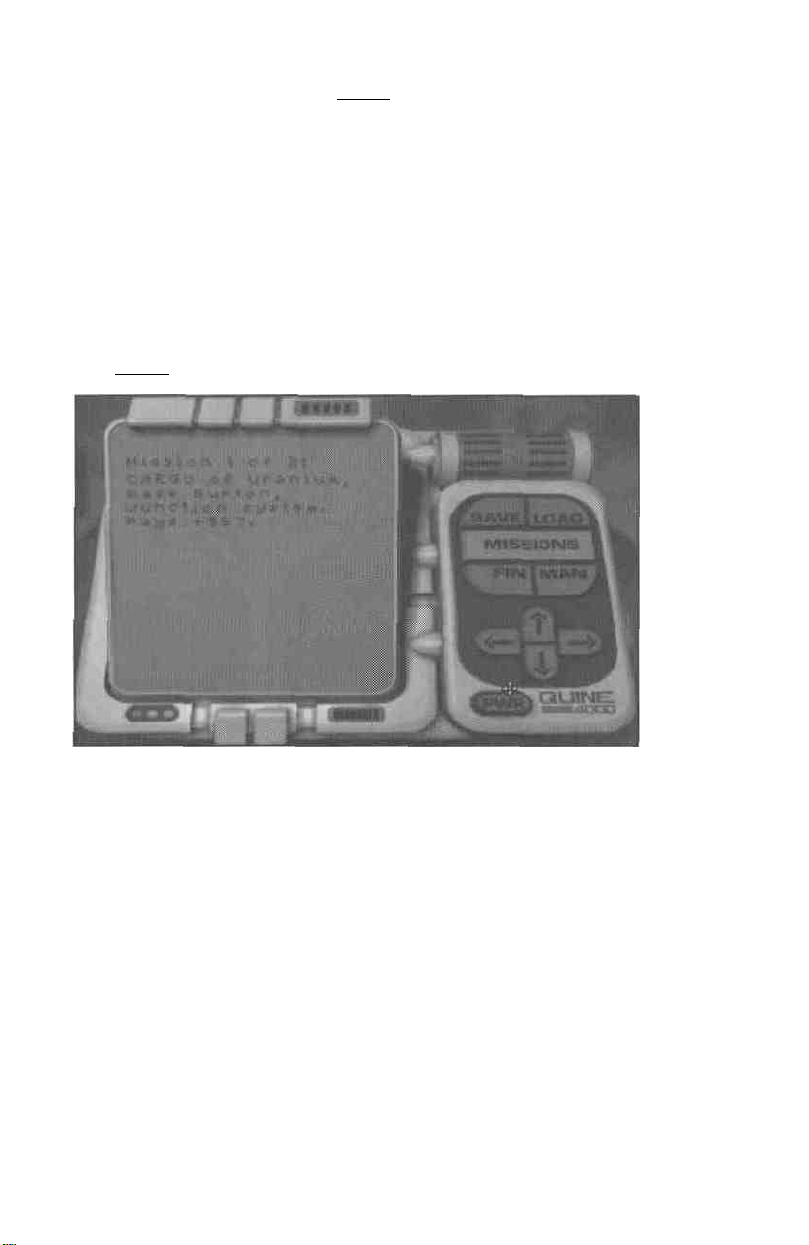
In the center of the main concourse there is a small pillar with a Mission Computer set
into it. Click on the computer to step up to it. To activate the Mission Computer, click
on the palm reader in the lower right comer. Once it has scanned all sectors for missions,
you can use the arrows in the lower left to cycle through the available missions. Read
them all before deciding to accept one. Look for a mission that takes place in Troy. You
do not have a jump drive and cannot travel to other systems yet. If possible, accept a
Patrol or Defend Base mission anywhere in Troy. You do not need to write the mission
requirements down. They appear in your Persona] Computer and your ship's nav computer. Exit the Mission Computer by clicking at the bottom of the scene. (See p. 37 for a
picture of the Mission Computer.)
Return to the hangar by clicking on the door on the lower level to the left of the Mission
Computer. Launch back out into space by clicking on your ship.
Preparing for Battle
Before doing anything else, activate your gun. To do this, press (G) to display your ordnance and select your gun. Your missile launcher is already active, and there are green
crosshairs to facilitate targeting. To activate options (p. 10), press |Alt ][0] to access the
Options Screen and click on the options you wish to activate. You may wish to activate
INVULNERABILITY
these options activated. Note that each button appears to be depressed when the system
is
active. Now click
or
UNLIMITED AMMO,
on
RESUME
although you are not paid
to re-enter the game universe.
for
missions run with
Finding the Enemy
Unless you selected a Defend Helen mission, which would bring the enemies to you,
your next step is to find the enemy. Press [N] to go to your nav computer. The nav point
or points where you must go to fulfill mission objectives are designated in red. When
you have selected a red nav point, you are ready to autopilot into the thick of it. If you
need to be reminded
right (or press (M)) and your information box lists your mission objectives in bright red.
When you have fulfilled a mission requirement, its listing changes to a dull red. Press
|Esc| to leave the nav map and press (A] to autopilot to the selected nav point.
of
your mission
objectives,
click on the
NAV/MIS
button
at
the
lower
Engaging a Bogie
When you arrive at the battlefield, gray dots appear on your Radar Screen. These indi-
cate other ships in space near you. Use the joystick to maneuver, placing one of these
dots within your crosshairs. Later, when you can afford a scanner upgrade, your HUD
should display red brackets around enemy ships and blue brackets around friendly
ships. Until then, all brackets will be gray. If you continually fire on friendly ships, their
attitude will change and they will probably begin firing back at you. Press joystick but-
ton #1 to fire your gun; press buttons #1 and #2 simultaneously to fire a missile. When
all the enemy ships have been destroyed or have run away, check your nav map to see
Page 7
if you have fulfilled the mission objective. Previously bright red nav points are displayed
in blue if their objective has been accomplished. A nav point will still be bright red if
you have missed someone. Press (M) in your nav computer to view objectives if you are
not sure what you might have missed. When you have fulfilled all mission objectives,
return to any base for payment.
Reaping the Reward
Back at Achilles, or whichever base you wish, you would find that the payment promised
for the completion of your mission has already been credited to your account, unless you
used
the
not-for-pay
the mission from being flagged as a success. To review your finances, press |AH |[c1 or
simultaneously click both buttons of your mouse or joystick to view your Personal
Computer. Clicking on the FIN button calls up your current financial status. Click on the
PWR button to exit the Personal Computer. From here you are on your own, ready to go
forth, make money and save civilization on the frontier. And if all else fails, talk to
Sandoval, in New Detroit.
options
INVULNERABILITY
or
UNLIMITED
AMMO.
Both
of
these prevent
Page 8
PERSONAL COMPUTER
The Personal Computer is as important to you as to your character. Your character uses
it to keep track of business obligations and finances. You use it to save and load games.
Effective and quick use of the Personal Computer is crucial to both of you.
Display Check Finances
Exit Personal Computer Cargo Manifest
The Personal Computer answers questions like, "How much money do I have?" and
"Which missions have I not finished?" and "Just what do I have in my cargo hold, anyway?" It is only available while you are at a base. All the information it provides is available through your MFDs and nav map during space-flight. To pull up your Personal
Computer, type [Alt] [C] or simultaneously click both buttons of your mouse or joystick.
To exit the Personal Computer, click on the PWR (power) button at the bottom of the
unit.
The Personal Computer cannot be accessed while you are interacting with another computer. Therefore, you cannot access it while at the screens for the Commodities Exchange,
Mission Computer, Ship Modification, Software Dealer's or guilds' computers.
SAVE. The Personal Computer is the only place to save a game, so you can only save
while docked
and offers you a box eight characters wide in which to name your game. If you have
other saved games, they are listed below the box.
at a base. When you click on the save button, the screen says
Scrolling Arrows
SAVE
GAME
as:
Page 9
To save your game,
game, click on the name of the old one — it appears in the box. The only limit to the
number of saved games you may have is the amount of available space on your harddrive. To exit the Personal Computer, press the PWR button at the bottom of the unit. If
the names
ther pages.
LOAD.
during
and offers you a box in which to type the name of the previously saved game you are
loading. You may select the game you wish to load by again clicking on its name and the
LOAD
to scroll through further pages. Once the name of the game you wish to resume is typed
in,
of
You
can only load a game from
your stay
button, instead.
hit
(Enter)
name
it
and
press
[Enter]
your saved games overflow
at
a base.
When
you elect to load a game, the screen reads
If
or
LOAD.
the names
You
of
your saved games overflow this screen, use
automatically
or click
this
screen, use
your
Personal
exit to the saved game
on
SAVE.
Up
or
Down
Computer,
To save over an existing
to scroll through
which is available only
LOAD GAME:
Up
fur-
or
Down
MISSIONS.
attention. If you have fulfilled all your missions or haven't taken any, the screen says NO
MISSIONS.
Computer mission screen. The top line tells you how many missions you have active. The
rest of the description tells you where you must go to complete the mission, who has contracted you to carry it out and how much they're paying. To scroll to the next mission in
the
Finance. Clicking on FIN brings up a statement of your current cash in credits. This is a
cash-only sector. People don't tend to live long enough to be a good risk for loan sharks
and banks. This is all the financial statement you'll need.
Manifest. Clicking on MAN brings up your ship's manifest, telling you what's in your
cargo hold. At the top of the screen you are informed how much space in cargo units —
roughly a cubic meter — are available in your cargo hold. Below that is a list of the items
you have and the units of each. If your manifest goes beyond this screen, use [t] or Q to
scroll through the list.
list
This
selection allows you to review the missions that are currently awaiting your
When you
use
(Up)
or
(Down).
still
have
At
the
active
missions, they will be summarized on your Personal
bottom
of
the
screen
is
the
total missions to date.
Page 10

OPTIONS SCREEN
The Options Screen
right, or at any time during the game by pressing [Alt][O].
is
available
from
the Title Screen by selecting
Options Screen
OPTIONS
at
the bottom
UNLIMITED
energy. They cause a substantial drain to your ship's power supply, which also feeds
your shields and afterburners. This option allows you to fire your weapons without using
up energy. There is still a retire delay, the time it takes a gun to re-charge between shots,
but you are able to continue firing with no penalty to your energy supply. This is a great
way for beginning players to get a feel for combat with little personal risk.
IMPORTANT.
You do not get paid for the mission if this option is active at any time during space-flight.
INVULNERABILITY.
ships, get hit by missiles or guns and never die.
IMPORTANT.
do not get paid for the mission if this option is active at any time during space-flight.
JOYSTICK CALIBRATION.
trollably through space despite your best efforts to keep it under control, you may need
to recalibrate
Screen. Follow the instructions that appear in the center of the screen. If problems per-
sist, consult your joystick's documentation or call ORIGIN Product Support.
MUSIC, SOUND FX.
"off." If you change your sound card or port configuration, follow the Install Guide
instructions and rerun the install program.
MOUSE, KEYBOARD,
or joystick. For piloting through space, however, only one may be used at a time.
Depress the appropriate button
want to use for piloting.
RESUME, CANCEL.
resume to return to the Title Screen or to where you
undo any changes you made on the Options Screen and return to where you left off.
AMMO.
Weapons in 2670 do not
You
cannot get paid
Making
this
You
cannot get paid for
If
you find your mouse pointer drifting or your ship spins uncon-
your
joystick.
Click on these to toggle music and sound
JOYSTICK.
When you have made your selections on the Options
for
selection allows you to collide with asteroids or other
To do this, select
To move
(MOUSE,
any
mission
any
mission
around
KEYBOARD
fire
hard ammo so much
flown with
flown with
JOYSTICK
at a
CALIBRATION
base,
or
JOYSTICK)
left
as
various
UNLIMITED AMMO
INVULNERABILITY
on
effects
— down
you can use the mouse,
to select the
off
in the game. Click
the
Options
Screen,
activated.
activated.
is
device
forms
You
"on,"
up
keyboard
you
click
CANCEL
of
is
to
10
Page 11

IN THE COCKPIT
This section offers a detailed description of how to use your ship's controls and what to
expect when you do. It describes the various camera views and how to make use of your
nav computer, as well as the numerous controls for activating and using each of your
ship's systems.
You begin the game flying a Tarsus you inherited from a relative, but there are three other
ship types available for sale in the Gemini Sector. Once you have accumulated sufficient
resources, you may also buy a Centurion, a Galaxy or an Orion. You can always find your
ship in the base hangar. When you move the cursor over the ship in the hangar, the word
ENGAGE
appears. Clicking on the vessel automatically launches you into space.
All cockpits feature approximately the same instruments, even though the arrangement
of the various gauges and screens may vary from ship to ship. Take a minute to familiarize yourself with the functions of each instrument and its location in the cockpit. The
ability to assess your situation and your resources in a split second may mean the difference between life and death when you are navigating in space.
Spaceflight Views
When you launch your ship, you see space directly ahead of you through the front view
screen. A green circle with cross-hairs shows you where the guns of your ship are aimed.
Any ship you have currently targeted is framed by brackets: Most scanners indicate
friendly vessels by blue brackets, hostile ships by red brackets. Poorer grade scanners
(see Scanners, p. 57) can only bracket in gray, hostile and friendly alike. When a ship
communicates with you, it is shown within white brackets. Retrievable objects and bases
are framed by yellow (or gray) brackets. Once a target is locked, it is surrounded by a
solid box.
You can shift from the front cockpit view to another view by pressing the function keys:
[F1] Returns you to the fore view from any of the views below.
[F2] Shows you the view to port.
[F3] Shows you the view to starboard.
[F4] Shows you the aft view.
[F5] Switches you to Turret 1. If your ship has no turrets, this has no effect.
[F6] Switches you to Turret 2. If your ship has less than two turrets, this has no effect.
[F7] Toggles the missile camera view on and off, allowing you to follow your missiles
in to the kill.
[F8] Switches you to chase camera view, which shows your ship from immediately
behind it.
[F9] Switches you to the theater camera, a panoramic shot of your ship and all other
objects surrounding it. This view can give you a good idea of the location of hostile fighters surrounding you in a tense dogfight.
11
Page 12
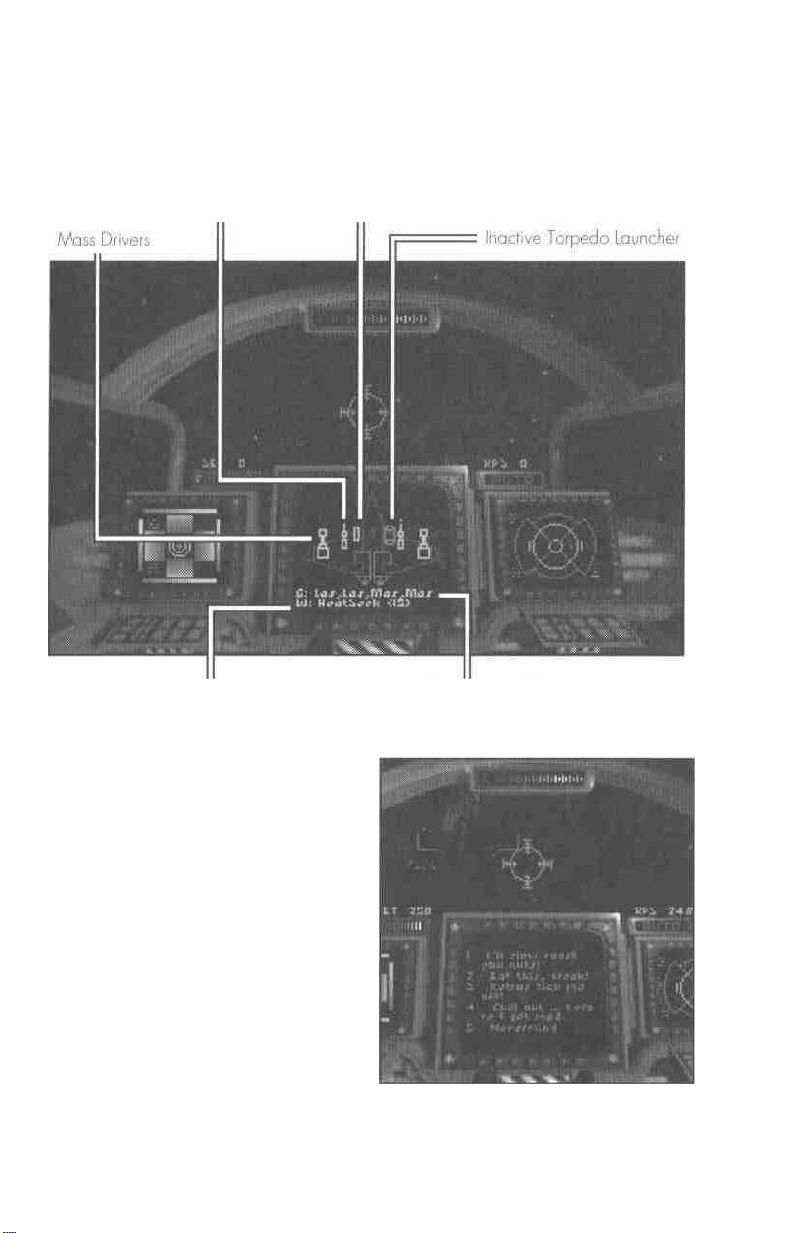
Cockpit Gauges
Speed
In the cockpit, speed is indicated by two gauges:
SET indicates the speed your ship tries to maintain during spaceflight.
KPS indicates the craft's current speed in klicks per second.
Press + to increase your speed. (If you are playing with your joystick, hold joystick but-
ton #2 down and push forward to accelerate.)
Press - to slow down. (Holding down joystick button #2 and pulling backwards also
decreases your speed.)
If your ship has afterburner capacity, press |Tab] to ignite the afterburners. (Double-click-
ing joystick button #2 or double-clicking the right mouse button also activates afterburn-
ers.) The longer you hold the key down, the longer the afterburners remain active.
However, afterburners require immense amounts of energy.
Pressing (Backspace) on your keyboard brings your ship to a halt. In some instances, this
may be a good strategy to evade enemy fire.
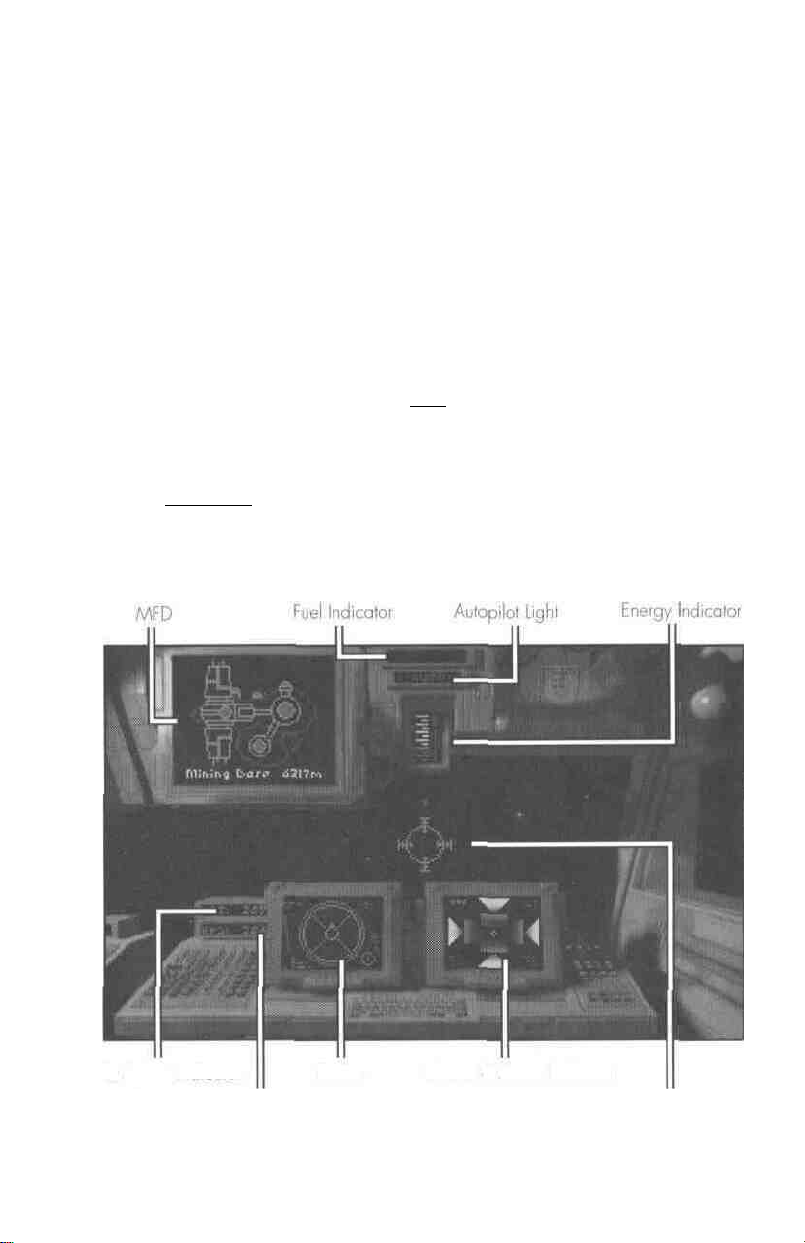
Set Speed Indicator Radar Shields & Armor Indicator
Current Speed Indicator Crosshairs
Tarsus Cockpit
12
Page 13

Fuel
The fuel gauge indicates how much fuel you have. Fuel is only used by your jump drive.
Your vessel uses energy for propulsion and afterburners (see Energy, below). Each jump
you make uses up a considerable amount of fuel — a full fuel tank provides enough for
only six jumps.
Shields and Armor
The shields display in the cockpit of your ship indicates the current status of your shields
and armor. Once you have purchased shield upgrades, you can select how many shields
you want to remain active at any point in time. Even though additional shields offer you
more protection, maintaining them expends more energy. If you are flying a highly
maneuverable ship and are in the midst of a dogfight, you may want to risk deactivating
some of your shields so you can use that energy for your blasters. Pressing [s] on your
keyboard toggles you through the various available shield levels.
As your shields take damage, they disappear from the screen, only to reappear as they
regenerate. Shields can regenerate as long as the shield generator is intact. Once the
shields have been taken out, armor begins taking damage. Unlike shields, armor cannot
regenerate.
Energy
The energy indicator shows how much regenerative power is available for your blasters,
tractor beams, shields and afterburners at any given point in time. The power generator
restores depleted energy levels quickly. Some guns use more energy than others when
firing. Afterburners deplete energy resources very quickly. If you are fighting with higher-level guns, you may want to deactivate some higher-level shields and avoid using
afterburners so you can utilize all available energy for your guns. Conversely, you may
want to hold your fire and boost your shields if you are flying a slow ship with poor
maneuvering capabilities. Purchasing engine upgrades improves your energy levels.
Page 14
Radar
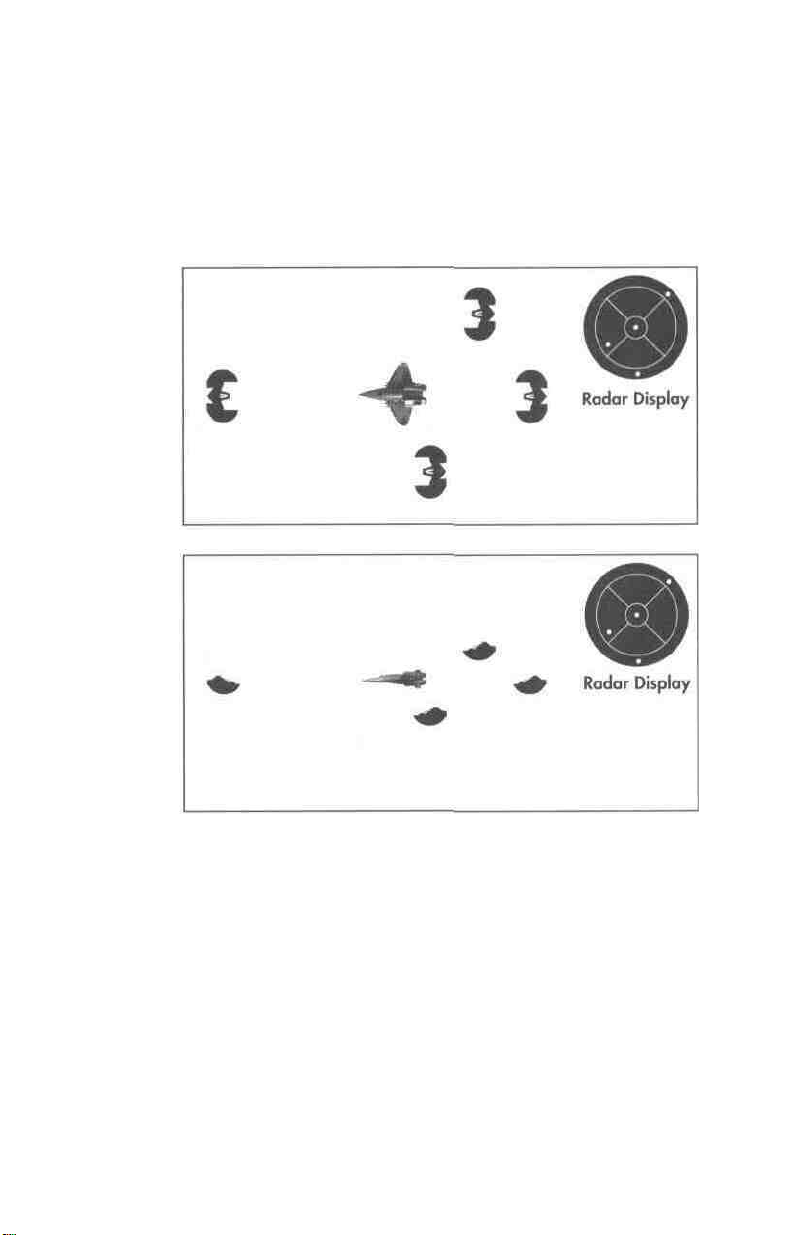
Every cockpit features a circular radar display. However, the screen does not indicate
distance to a particular ship. Instead, the different sections of the display show how far
you must rotate your ship to be able to see the object on your radar through your front
view screen. The radar display is the most important instrument in your cockpit, but it
may also be the least intuitive.
Objects detected by your radar are displayed as dots. A dot in the outer ring of your
display tells you the enemy is behind you. The innermost ring indicates objects ahead
of you. The other four sections place objects alongside, above or below you.
On a color scanner, each dot on your radar screen is color-coded:
Red indicates a hostile fighter.
Dark Blue indicates a friendly fighter.
Yellow indicates missiles in space.
Brown indicates neutral, retrievable objects.
White indicates a navigation beacon or nav point.
Light Blue indicates a jump sphere.
Gray indicates a base.
Purchasing more advanced scanners provides you with more accurate radar readings.
Refer to Customizing Your Ship (pp. 54-59) for more information on available scanners.
14
Page 15
Multi-Function Displays (MFDs)
The Multi-Function Displays in each cockpit provide a wide range of information essential to flying successful missions. The Tarsus and Centurion have only one MFD, while the
Orion and Galaxy give information on two displays. In ships with two MFDs, the relevant
information can be pulled up on either display, thus allowing you to view two different
displays concurrently. Hitting the appropriate key on the keyboard pulls the information
up on one of the two displays.
[ and ]. In ships with one MFD, you can cycle through all available displays by pressing [J] on your keyboard. In cockpits with two MFDs, [ cycles through the displays on
the left MFD, while [j] cycles through all available displays on the right MFD.
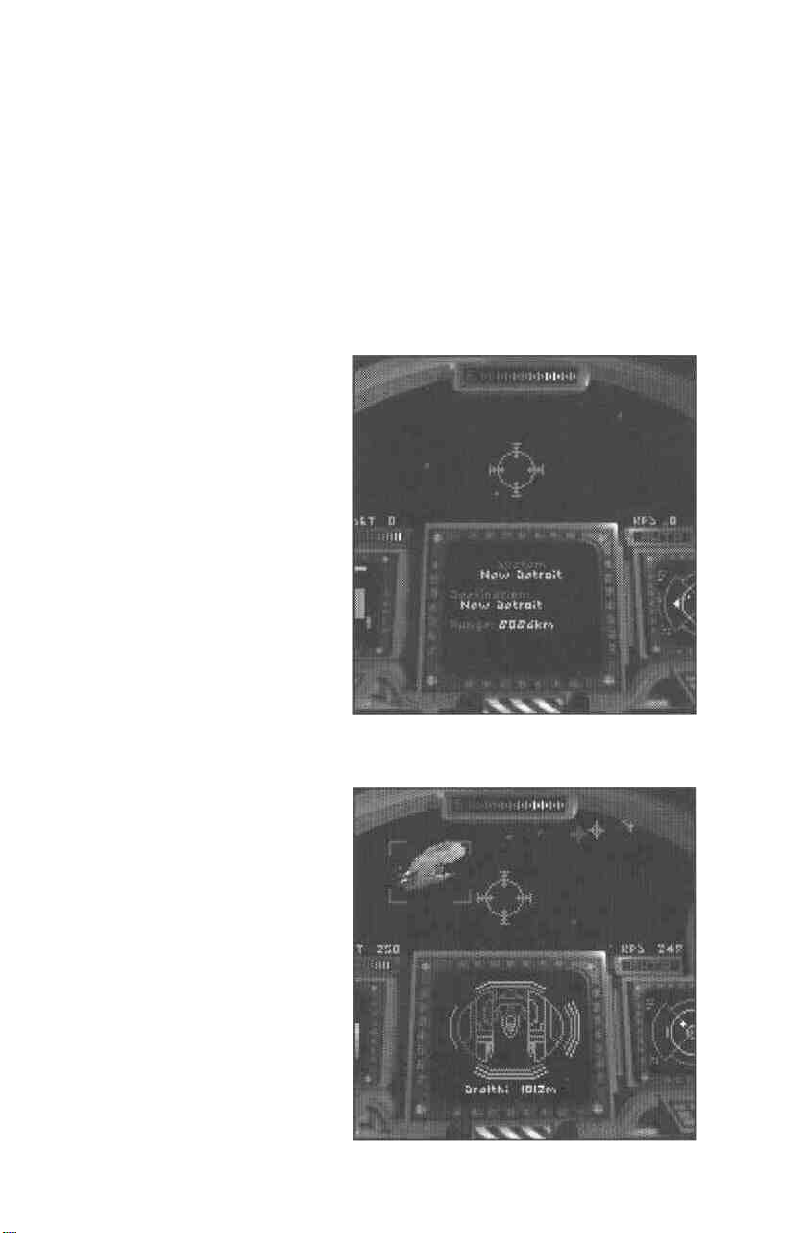
Destination. Pressing [D] calls up a
display indicating the destination you
selected on your nav map (see
Navigation System for more information on how to select your destination)
as well as the system location and
range of your destination point. The
Destination display also tells you
when and why you cannot autopilot,
tractor beam or jump. If you attempt
to autopilot and there is a hostile
fighter
in
the area, the message
NEAR
appears
Destination display.
at
the bottom
of
ENEMY
your
Examine Target. Press [E] to display
the condition of the currently targeted
object. You can distinguish its shield
strength. As shields begin taking
damage, they disappear, then reappear
as they are regenerated. When the
targeted spacecraft takes damage, the
display of the damaged section turns
red. If your scanner is sophisticated
enough, this option screen may also
tell you what kind of ship or object
you are targeting. The range to the
object always appears underneath its
display.
15
Page 16
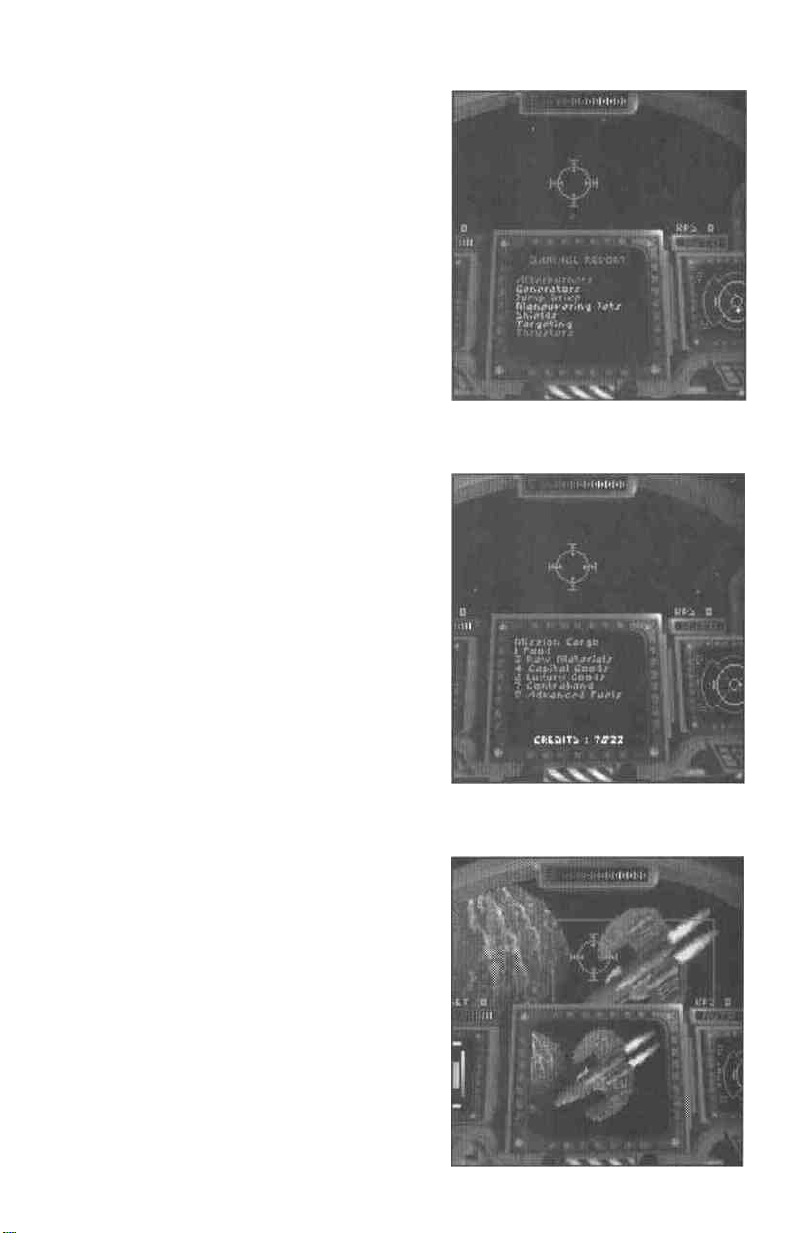
Report Damage. Press (H) to display a damage report on your ship. The listed areas of
your ship appear in different colors, according to the amount of damage done:
Green indicates an intact component.
Yellow indicates slight damage to the affect-
ed component.
Orange indicates considerable damage to the
affected component.
Red indicates that the affected component is
completely nonfunctional.
Gray indicates that the component is
completely destroyed and unrepairable.
Cargo Manifest. Press (M) to display what
cargo you are currently carrying. This MFD
option also tells you how many credits you
have in your account. Each cargo type is
labeled with a particular number. Pressing
the number immediately preceding the cargo
description on the display pulls up a different screen with additional information about
that cargo type. Pressing (T) or (M) brings you
back to the main manifest display.
View Object. Press (v] to display a camera
view of the currently targeted ship or object.
Press [z] to toggle between a close-up and
distant view. You can use this view to watch
your shots hit (or miss) their target. This can
help you correct your aim.
16
Page 17
Weapons and Guns Loadout. Press (w) to display your ship's available weapon systems.
Pressing [w] repeatedly cycles through the weapons systems and activates one system at a
time. Press [G] to display your ship's available guns. Pressing (G) cycles through all possible gun combinations. The active systems are highlighted in the display and listed below
the image of the ship.
Laser Active Missile Launcher
Weapons Loadout Guns Loadout (activated)
Communications. Press (C) to display the
Communications MFD and to talk to any
pilot in the area. If you are able to communicate when you pull up this MFD, a num-
bered list of messages you can send
appears. Press the number of the desired
message to broadcast it. You can communicate with any current target or base in
the system. When a pilot decides to communicate with you, his image appears on
your MFD. If there is more than one person to talk to, you must press on the number of the person you wish to speak to,
then select your message.
17
Page 18

Other Cockpit Commands
Jumps
To travel from one system to another, you must purchase a jump drive. If your ship is
equipped with a jump drive, you can use the jump points found in various locations.
To
jump,
fly
into a jump point and
shows how jump points connect individual systems. If you want to jump from one system to another, refer to your Navigation system to determine which jump point to use.
Activating Guns
To quickly activate your guns without going through the Weapons Loadout MFD, use the
number keys at the top of your keyboard. (1) activates the first gun type, (2) activates the
second gun type, and so forth. Each number key activates not just one gun, but all guns of
one type. In other words, if you have three lasers, one number key activates all three.
Ejecting Cargo
If you are carrying contraband and a Confederation patrol threatens to search your cargo
bay, you may want to eject your cargo before you are caught. Pressing [x] expels your
cargo into space.
Pausing the Game
If you wish to pause your game during spaceflight, press [p]. Press any key to resume play.
Adjusting Player Options
If you wish to reconfigure any of your options, press [Alt ][O] to pull up your Options
Screen (see Options Screen, p. 10). Once you have made your adjustments, select
RESUME
to return to the cockpit.
press
[J]
to
activate
your
jump
drive.
The
nav
map
Exiting Privateer
Pressing
[Alt][X]
using this option. If you quit in the middle of spaceflight or from the Options Screen
without
specifically
self-destructs your ship in flight, taking you back to the title screen.
exits the current game and returns you to
saving your game,
your
gameplay
is
not
DOS.
Exercise caution
saved.
Alternatively,
when
[AiTlfo]
In-Flight Systems
Targeting System
Your targeting system is automatically activated as soon as you launch into space. If there
are several ships visible through your front view window, this targeting feature only targets one ship at a time. Accordingly, brackets only appear around one craft.
Red brackets indicate an enemy ship.
Blue brackets indicate a friendly ship.
Yellow brackets indicate bases or cargo.
Gray brackets indicate that your scanner cannot differentiate objects.
18
Page 19
Different ITTS
Gun Type
Crosses
Initially, the targeting system defaults to the ship closest to you. Press [T] repeatedly to
cycle through the different ships, bases or cargo in sight and select your desired target.
When your targeting system is active, your tracking mechanism automatically locks onto
ships that appear through your view window. Pressing [L] while your target is visible
through your front view window causes your targeting system to continue tracking that
ship even after it has disappeared from view, if your scanner has lock capability. This feature may prove useful if you wish to keep track of a particular ship you've already damaged. A locked target is framed by a solid box instead of brackets; when you have locked
your missile on the target, a diamond will appear inside the square box. Image
Recognition and Friend or Foe missiles require the target to be locked — however, the
locking mechanism only records the position of enemy ships around you.
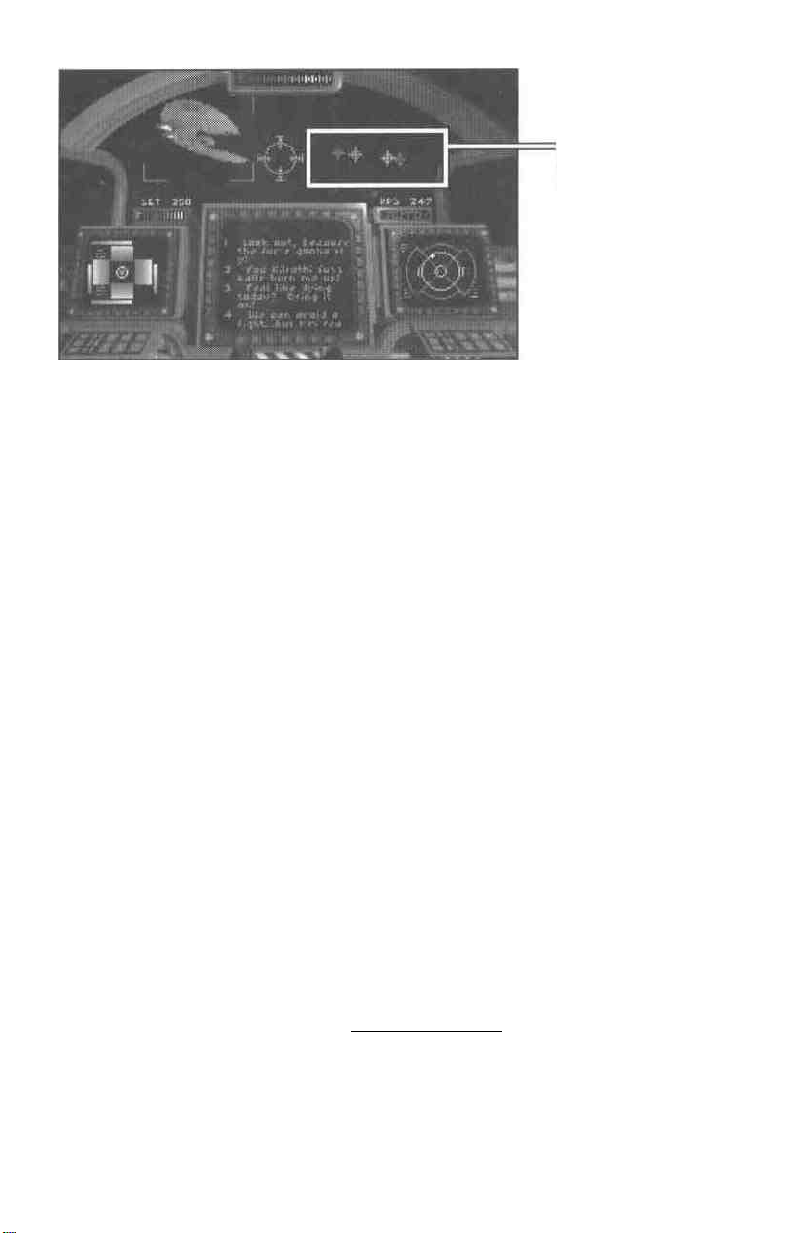
Inertial Targeting and Tracking System (ITTS)
The ITTS automatically computes the necessary lead on your target to score a hit. When
your ITTS is active ((T) toggles ITTS on and off), one cross per gun type appears on the
screen. Line up the cross inside the green crosshairs and you are more likely to make a kill.
The ITTS crosses are color-coded according to gun type:
Turquoise ....neutron gun
Off-White ....meson blaster
Peach ...........ionic pulse cannon
Gray............mass driver
Salmon .......... particle cannon
Bright Red .....laser
Dark Red.......plasma cannon
Purple............ tachyon blaster
Tractor Beam
Cycle through your weapons by pressing (w) until the tractor beam is active. When it
is active, you can fire it at any targeted cargo. All cargo is framed in yellow brackets
(if
your scanner can distinguish it). Pressing
buttons, initiates retrieval — when you do the same thing again, it turns off the tractor
beam. Be very sure that the tractor beam (and not a weapon) is active before you "fire"
at an object you are attempting to retrieve.
[Enter]
19
or
[Return],
or clicking
both
joystick
Page 20
Autopilot
You can shorten the actual time it takes to travel between two nav points by autopiloting from one
to the next. The autopilot can only be activated when there are no hostile fighters, or asteroids in
range. Once you have cleared the area of all enemies and avoided all hazards, the gauge marked
AUTO
in your cockpit
off into space.
The autopilot deactivates automatically when you are approaching a hazard or when you have
reached your destination.
lights
up. Press
(A)
and you
see
an external camera
view
of
your
ship
shooting
Navigation System
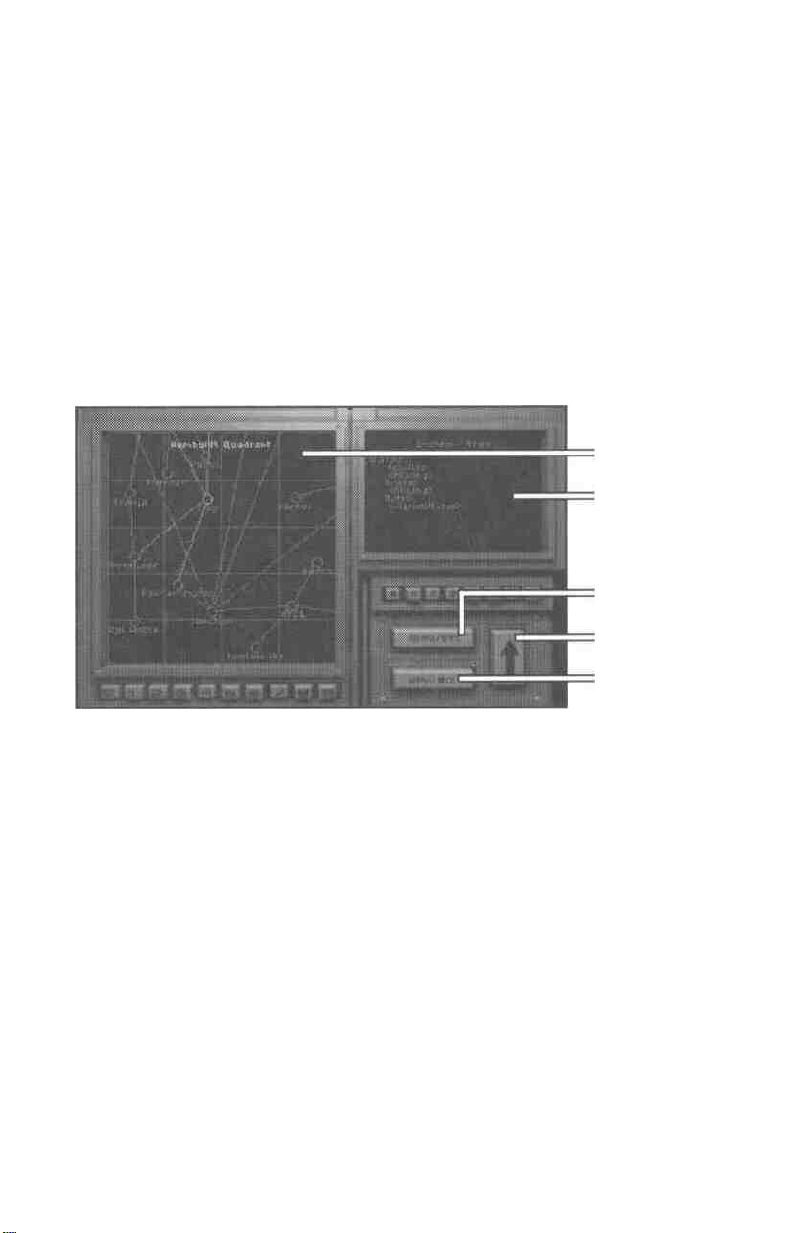
Every ship is equipped with a sophisticated navigation system. Press (N) to view your nav map.
Map
Info box
Toggle Quadrant Map
/System Map
Scroll Active Screen
Toggle Nav Info
/Mission Info
Quadrant Maps. Press (Q) to bring up the Quadrant Map. The name of the quadrant is at the top of
the screen. To scroll through the four quadrant maps of the Gemini Sector, press (Q) repeatedly or |
click on the large up-arrow button. Notice that the information window gives data on the selected
system. If the screen indicates there is no information available for a particular quadrant, that means
you don't have a map of that area — you have to buy the appropriate nav map. On the map:
Blue lines indicate jump tunnels between systems. .
Light Blue lines indicate jump tunnels that are currently available to you.
Yellow highlights the system you currently have selected.
If you want to obtain information on a different system, click on it.
Light Green highlights the system you currently occupy
(if it is not also the system that is currently selected). |
Red highlights any system containing a mission objective
(if it is not also the system that is currently selected).
System Maps. The
system close-ups. You can also switch to the system maps by pressing [N]. A system map shows
you all nav points in the system you currently occupy. Information about each selected nav point
appears in the information screen to the upper right of the navigation screen. Nav points are
color-coded according to their individual characteristics:
QUAD/SYS
button
toggles you between the quadrant maps and the
20
more
detailed
Page 21

Green Circles are nav points — usually a buoy.
Green Squares indicate a base where you can land your ship. When you select
a square, the planet types and base names located at that nav point appear in the
information screen in the upper right hand comer of the navigation screen.
Blue Circles indicate jump points.
Yellow highlights the currently selected nav point.
Bright Red Circles highlight nav points containing mission objectives.
White
Dot
indicates
the
location
of
your ship.
Pressing [N] repeatedly or clicking on the large up-arrow button selects different nav
points. You can also select a nav point by clicking on it.
Mission Listings. The
NAV/MIS
toggle button activates your
mission
listings. Pressing
M
or the large up-arrow button on the screen calls up a listing of all missions currently
assigned to you. You may accept a maximum of three different missions at the same time.
If you have already completed a mission task, it appears in dull red. Remaining tasks that
have not yet been completed are displayed in bright red. Mission text in yellow contains
hints and is not critical to the completion of your mission objectives.
Navigation Information.
When
you press
[I]
or click on the
NAV/MIS
toggle button again
while the quadrant map is on display, the Nav/Mis feature lists all planet types and base
names of the selected system in the information screen to the upper right of the navigation screen. When the system map is active, this screen displays information on the
selected nav point.
To select a mission destination, locate its system on the quadrant map, then determine
what jump tunnels you can use to get there. (System close-up maps indicate where the
appropriate jump points are located.)
Once you have made your selection on the system map (by clicking on it), return to the
cockpit by pressing [Esc].
The last selected nav point is your current autopilot destination. The currently selected
nav point/autopilot destination appears as a white cross on the HUD and on the radar.
This point is also listed as "destination" on your Destination MFD.
21
Page 22

CREDITS
Executive Producer................ Chris Roberts
Producer............................... R. Scott Russo
Associate Producer................Erin Roberts
Lead Programmer..................Ed Maurer
Programming........................Charles Cafrelli, Reinaldo Castro,
Arthur DiBianca, Edwin Herrell, Alex Jen,
Richard Dean Johnson, Jeff Wilson
Lead Designer....................... Joel Manners
Design..................................Tom Kassebaum, Anthony Nichols,
Kevin Potter, Phil Wattenbarger
Original Design ....................Joel Manners, Chris Roberts
Artwork................................Chris Douglas, Bob Frye,
Beverly Garland, Danny Garrett,
Craig Halverson, Jake Rodgers,
Brian Smith
Screenplay............................G . P. Austin
Music................................... Nenad Vugrinec
Sound Effects ........................Randy Buck, John Tipton
Sound Blaster Conversion ......Nenad Vugrinec, Mark Schaefgen
Quality Assurance................. Jerrold Harrington, Bill LaCoste,
Starr Long, Dan Orzulak, Toby Shelton,
Dee Starns, Perry Stokes, Todd Wachhaus
Document
Document Editing.................. David Ladyman
Document Design.................. Al Carnley, Trey Hermann, Jennifer Davis
Package and
Play Guide Cover Art............Chris Douglas
Package Design ....................Jennifer Davis
Writing.................Anthony
Nichols,
Kirsten
Vaughan
Special thanks to ..................Whitney Ayres, Bill Baldwin, Paul Isaac,
David Lawell, Jesse Mark, Aaron Martin,
Suzanne Taylor, Alan Perez, Jeff Wand,
Kirk Winterrowd and Jason Yenawine.
22
Page 23

GEMINI
SECTOR
23
Page 24

THE FRONTIERSMAN:
INTERVIEW WITH A PRIVATEER
As told to Chandra Karr
For the fourth installment of our ongoing series on the young pilots who make a killing
prospecting the open space lanes of Gemini, I went to find out what motivates a hotshot pilot to
risk it all, to seek out new challenges in our little corner of the war. I was curious what these
young people were leaving behind and what they hoped to achieve, knowing the odds against
them. 1 chose Helen, a small agricultural planet in Troy System, to find my subject.
Helen doesn't have much to recommend it, but at least there's a bar. Out in this part of the
Confederation there are only three kinds of people in a bar: those looking for the kind of work
that doesn't get publicly advertised, those offering that kind of work, or anyone looking to blow a
paycheck on some Mjolnarian Stout. I was hoping to attract one of the former by posing as a
fixer, and it worked.
1 was sitting at a small table near the door. listening to the bartender give advice, when I
spotted my target. A young but weathered man walked in with an air of confidence that advertised for him. He lifted his personal computer from his belt with the ease of someone who had
performed this gesture a million times. As he checked his mission roster I was drawn to the vertical scar through his left eyebrow. He looked hungry for work so I threw him a morsel.
"You looking for work or just to get drunk?" I asked, winking from my table.
"Both, if that's an option. But Til settle for either." He smiled, laid his computer on the table,
straddled the chair across from me, and asked, "What can I do for you, Ma'am?"
I explained I was writing an article and wanted to hear what had brought him here. He was
interested, eager even. What follows is his story as he told it to me over too many drinks in the
cheap bar of a nowhere agricultural planet.
[All names have been changed to prevent this from becoming a vehicle for self-promotion. To the
best of our knowledge, all the events described actually took place. Ed.]
Six weeks ago I was first mate on the Scarab, a bucket of bolts merchant ship held
together by bootlaces and luck. We were jumping out to Sheol, a deep space science station. It was a good contract running supplies, food and equipment. We'd made the run
before and I was looking forward to spending some quality time with Jo. She was heading an investigation of unstable jump points in the area and we had found each other,
well, compatible. I was on the bridge thinking about the phase ball rematch 1 owed her,
not watching the consoles at my station. The heavy sound of Geof Kane's boots clanking
on the metal deck brought me to attention.
Kane was a big man who was most comfortable wearing the mantle of command. He
was a bull of a man, always moving forward, unable to form the concept of retreat. That's
why he went freelance —too many rules of engagement in the military. Kane only
obeyed the laws of expediency and profit. He had trained all nineteen of us, forming
pilots, gunners and mechanics from the soft clay of street urchins and stowaways. We
depended on him for leadership and each of us owed him our life. Kane came in and
stood heavily by a large bay window, turning his Academy ring deliberately.
24
Page 25

"We'll be arriving soon," he said slowly, "and I want you on your toes. I don't feel
good about this run."
"Why so nervous, boss?" I asked. "You know something or just got a feeling?"
"I don't know yet. Maybe it's nothing. I know the captains of the last Draymans to
make this run. We were supposed to meet back on Baroda for a drink. I still haven't
heard from either one of them. They're old pals from my Navy days — I really should've
heard something by now."
"Maybe they just stood you up, boss."
"1 hope you're right but, just in case, I want you on your toes and ready to get us the
hell out of any trouble along the way. I don't think my friends stood me up. There
haven't been any distress calls from the base. Could be business as usual, but we should
probably expect the worst." He fidgeted with the console next to him, glanced nervously
at the windows, and left. Images ot Jolene attacked by a faceless enemy that I wasn't even
sure existed plagued me for the remainder of the journey.
The trip out was uneventful except for Kane's nervousness. After several days we
jumped out to Sheol's system. 1 was on the bridge. As the streamers of light settled into a
more familiar starfield two gray Talons raced towards us. 1 was edgy and damn near fired
on them before realizing they were our escort. The huge and ungainly Scarab made her
way to Sheol's main hangar, the Talons moving beside her like remoras on a shark.
The science outpost was made up of a series of hangars off a central hub that housed
personal quarters and open office areas for data analysis. They primarily sent out probes
or small vessels in search of new jump points and asteroids rich in mineral deposits, as
well as the smaller, more esoteric astrophysics work with no exploitable payoff for another generation or two. Because of their isolation there was no one except the researchers
— no service personnel. The dingy Apocalypse Bar was staffed by whoever was available,
usually someone waiting for a probe to reach its target system or for an automated analysis to finish. Administration, repairs, and distribution of food, clothing and equipment
worked the same way. The only full-lime position belonged to Lars Furstenburg, who
was base captain. He was held accountable for anything that might go wrong and
ignored when significant progress was made. Furstenburg was new. He had arrived less
than four months ago, well after our last run, and seemed to be still in the midst of finding his footing among the staff and crew.
Furstenburg greeted us in the sparse, unfinished hangar.
"I have regret that I did not find you," he said, "to warn you of our uncomfortable situation. The last two supply ships were destroyed. First one got blown up when leaving,
second before it left the jump sphere on its way in-system. But you had pleasant trip, no?
We will unload and then have a drink, yes? Thank you."
Geof Kane was livid. "How can you be so flippant? Who destroyed them?" He didn't
wait for an answer, "Those were my friends, sir. I'm sorry, but it seems to me that you
could have made a little more effort to reach us. Our itinerary was forwarded to you over
a month ago and we never deviated from it. You had a responsibility to warn us."
"1 will not argue with you. I, too, mourn loss of your colleagues but my responsibility
is to the people of this base. It could not be allowed that you not come from fear of being
attacked..We have been too long without fresh provisions. We have much work to do.
Meet in my office in five minutes, yes? We can use your know-how to analyze base security. We do not know who these brigands are, but we need protect ourselves and find
out if possible." He started to head up to his office, turned and said, "I sorry to gamble
25
Page 26

with your life, but is only way to get you here." I don't believe Kane was any more satisfied with that answer than I was.
The inhabitants of Sheol moved swiftly and efficiently to unload the supplies we'd
brought. I'd assigned a few of our men to security to keep an eye on our goods as they
were unloaded, but I now saw that that was unnecessary. The men and women unloading the cargo were careful, organized and visibly relieved that we had arrived. Only one
of my security men was having any problem at all — he was being badgered by a woman
whose voice echoed throughout the hangar.
"What's your name, sir?" she asked. It was Jo who was beating up my security detail. I
crossed under the Scarab's still-cooling engines toward her.
"Uh, Hank," the man stammered, "Hank Slater ...." Security personnel weren't used to
answering questions.
"And, Mr. Slater, just why in the Sam Hell are you standing around, carrying nothing
but that stupid sidearm, when we've got work to do?"
"Well, Ma'am, 1 uh ... my boss says there might be looting, and he says ...."
"Hank, be a good grunt and go tell your friggin' boss that there may be violence if he
doesn't get you guys into a few waiting cargo loaders." She motioned toward a line of
machines standing idle along the hangar wall.
By now, I was standing right behind Jo and figured it was time I announced my
arrival.
"What seems to be the problem?" I asked.
Jo answered without turning to face me, her voice filled with contempt. "The prob-
lem," she said, "is that this big ape's boss won't let him do an ounce of real work."
"You must mean me."
She turned, looked me square in the eyes and said, "Well, if it isn't Mr. Precaution
back from the hinterlands to save our starving village from itself." She smiled. "Will you
make these men useful or do you plan on spending your time here alone?" A wink softened the remark but I got the point.
"It's all right, Hank, do as she says. Collect Al and Frank and the others and report to
Captain Furstenburg for unloading assignments." I turned my attention to Jo. "Here's a
proposal for you, Doctor — you promise to quit harassing my men and I'll buy you the
best dinner this tin can has to offer. How about it?"
"How about I make no such promise and we skip dinner for healthier activities?"
"Deal. Oh, and I expect a rematch if you guys still have a phase ball court."
"We do and you're on."
She turned to go settle a dispute that was developing over fuel storage. I watched her
cross the hangar, and hoped she was as pleased at our arrival as 1 was to be here. A kind
of awkward tension had fallen over the crew before our arrival, none of us sure whether
we would have to fight or if it was all just a false alarm. Jo had pulled me out of my
depression. Hustling to unload the ship seemed to be helping everyone else. Finally we
had a task with a clear, achievable goal, getting the supplies unloaded and looking into
who might be behind these recent attacks — a welcome change of pace.
Kane was taking the whole unloading and base defense operation very seriously. No
surprise, given that he thought there was a force out there preparing to assault the base. I
figured that if he was right, then it must be a small force — anyone with the firepower to
destroy a couple of Draymans had the firepower to destroy an outpost like Sheol unless,
of course, they didn't have the fuel or munitions to do both.
26
Page 27

Once we had arranged for the unloading and distribution of cargo, I headed off to discuss security concerns with Furstenburg and Kane. Furstenburg's office looked out over
the hangar and into the void. We could clearly see our staffs cooperating to unload the
Scarab. I moved into the room, expecting something a little more commanding but
pleased to see that Furstenburg was a busy man, definitely not a delegator. He had both
a desk and a small conference table, the latter cluttered with chits and tablets that made
it clear he only used his desk occasionally — probably not enough surface area to hold
the clutter of "current" projects and files.
The two captains were already deep in discussion when I arrived, a small hologram of
the base flickering between them. As I entered, Furstenburg began shuffling through the
mountains of correspondence on the conference table.
"There is, on this table, a message that did come for you, couple of days ago," he said.
1 was surprised to hear this. Who would send me a message? Everyone I knew was
• here: Jo, Kane, the Scarab's crew. Unless it was some kind of a recruiting message from
the Confederation Militia .... Finally, Furstenburg found what he was looking for.
"Ah ha!" he said. "Here is your message sent from the Gemini sector. I see you have
frontiersmen friends, yes?" He handed me the disk. "Use the monitor on my desk should
you want to take it now."
"That's all right, we've got business to attend to."
I pocketed the disk and joined them at the conference table. I only knew one person
in Gemini, my grandfather, and 1 didn't figure he'd be sending me anything more important than a birthday card, not that I'd ever gotten one from him. The security analysis
was top priority. 1 was hoping that there would be some sort of clue in the transmissions
from the probes that Sheol regularly sends out for scientific reasons. Knowing our enemy
would be the first step in defeating them.
We all agreed that violence in the system could only imply an impending threat to the
base. There were several things we could do in order to seek out the people who
destroyed the ships and to protect the base. We divided up these tasks amongst ourselves. Furstenburg took charge of readying the base's launchers and shields, as well as
preparing a schedule for the volunteer security team. Kane would coordinate with both
Sheol's and the Scarab's pilots to develop a more effective patrol pattern. Analysis of data
sent by the probes and missing cargo ships fell to me. I was to work with Jo and Blake
Sorensen, an older researcher who would be able to spot anomalies in the transmissions.
Furstenburg pulled a monitor over to his seat, nearly knocking over a cup of coffee in
the process, to inform the members of our teams of their new assignments and that they
had only three hours to report for their first meeting. My group was to meet in Blue
Deck, Lab 37, close to my quarters. I had just enough time to eat, shower and read my
junk mail from the edge of nowhere.
With the team notified, I headed for my room in Green Deck. There was no intra-base
transportation except walking. I passed through halls filled with blue jumpsuits carrying
crates of newly arrived supplies. I stopped to help a young man move a too-heavy box
into one of the smaller dining areas that were spread throughout the base. With this
delay, it took nearly twenty minutes to reach my quarters, but I didn't mind. It was a
nice opportunity to reacquaint myself with Sheol's color-coded corridors and windowless workspaces.
27
Page 28

My room's dull grayness stood in stark contrast to the bright green of the hallway. The
bed, night stand and desk, with its small communication console, all reflected a unified
Spartan vision. Comfort was not a priority in the design. All the same, I felt relaxed by
the very austerity of the room. As 1 emptied my pockets of l.D., personal computer and a
few loose coins from Baroda, I dropped the disk Furstenburg had given me. It was time I
read my mail. I switched on the comm unit, put the disk in and sat back, expecting propaganda or a postcard from Grandpa Mack.
The screen filled with the typical sender information. It was from Mack all right, and
had apparently been forwarded six or seven times before someone knew where I'd be. It
had been sent nearly a month and a half ago, marked priority one. Better late than never,
I thought. I hit the key to proceed. Mack's face appeared on the screen. He took a drink
of something that wasn't water and began his message.
"Look, kid, you know I'm not much of a talker so I'll get straight to the point. I'm
dead. This is my last will and testament and whatever. You're all 1 got in the way of family and your mother made me promise to see that you were taken care of. So, here goes
..." He paused to take another drink, winced and continued. "I, Mack Christiensen,
being an old man and of ill health do leave whatever hasn't been repossessed to you, my
only daughter's only kid. Right now I've got a Tarsus class ship that 1 bought from an
Exploratory Services officer with too many debts, and a little cash that 1 plan on spending before you get this. Sorry, but you know how it is. Whatever's left is yours. It may
not sound like much, but what I'm trying to give you is an excuse to come see Gemini. I
was charting new jump points and getting in bar brawls out here when you were born.
There's been a lot of development since then but it's still the best place to make a quick
buck. 1 may not have given you much over the years — now that I'm dead I figure you
could benefit from a little frontier action. I guess I better go before I get all sentimental
and ..." he looked down at his glass and the screen went blank. A small green light indicated that there was a second message waiting.
I went over to the sink, washed my face, took a long hard look at myself as the only
heir of an old lush. 1 guess 1 needed a minute to take in the fact that Mack was dead. I
was sure that the second message was the executor telling me what had happened and
how to contact him — details that could wait. It wasn't the first time I'd gotten a message
like this. There were still a couple of hours before I had to meet with the investigative
team and I was planning on spending them figuring out whether or not Mack's bequest
was worth dropping everything to go out and deal with. There was a lot of work coming
up for the Scarab, and getting to Gemini wasn't exactly a day trip. We had contracts to
fulfill. I had a career with Kane, who treated me as a first officer and a son. This was a
terrible time to take an extended vacation.
I was pacing, looking over at the faint green light on the communications console,
when my reverie was interrupted. It was Jo opening the door.
"What happened to you? You look more confused than a Firrekan hatchling."
"Have a seat, Jo. It's nothing, really. Just that 1 got this message that my grandfather
died and they want me to go out to Gemini, of all places, to take care of the estate," I
said, pointing to the console.
"Oooh, an estate? Really? I thought you said Mack was an old drunk, spent his time
remembering his glory days for anyone who'd listen and a few that wouldn't." She was
shaking her hair, as if its tangles took priority over my dilemma.
28
Page 29

"Turns out he had a ship. A Tarsus. Maybe even a little cash. Who knows?"
"I think you should quit the Scarab. Go out there and get that ship," she said, with
more than a trace of sarcasm in her voice. She started to pace. "I think you should drop
everything — me, Kane, the Scarab — and run away to where you'll be poor and a
nobody." She stopped pacing, squared her shoulders and glared at me. "Look, seriously,
I don't think you should do it. If you decide to leave the Scarab, come here and work
with us, but don't go taking risks if the only up side is an out-of-date ship. The Tarsus
hasn't even been manufactured for ten years!"
I didn't answer. I didn't have an answer — not yet — and we had business to attend
to. The silence quickly got awkward, but 1 didn't know what to say. Still in silence, we
headed over to our meeting.
We were a good team. We got along well and understood what needed to be done.
With all the equipment at our disposal it was easy to set up a detector for non-standard
emissions. There was a nearby asteroid field, and that's where we focused our search. We
were poring over the data transmitted by a probe that entered the asteroids a handful of
hours ago, just before our arrival in system. Though frustrated that we hadn't discovered
anything immediately, we resolved to be patient and thorough. It wasn't too long before
the slow and steady approach paid off.
Jo spotted it first. There was a small peak in X-ray emissions, as if a short burst had hit
the probe. Blake said that he had noticed a similar anomaly a few days ago but it had
been dismissed because they were actively searching for something else. He put his tea
down to rifle through his notes from the last week and announced that the previous Xray peak was also recorded by a probe sent to the asteroids. We put the computer to
work looking through the last month's probe transmissions for other X-ray spikes. We
had to be sure it wasn't a false reading or a natural occurrence. As Blake fired search
parameters and commands into the computer, Jo and I set to work breaking down the Xray peak to see if we could determine whether it was a man-made transmission or not.
Almost simultaneously, Sorensen announced that there had been several X-ray peaks,
all from probes to the asteroid field and all within the last three months, and we discovered that it was indeed a man-made emission. The next step was to see if any information could be gleaned about where this message had been sent from. This turned out to
be the easy part. The probes automatically report the direction from which they receive
any input. Confirming with all positive reports we were able to triangulate on the source.
It was us. All the anomalous X-ray peaks had originated from Sheol.
"Can we pinpoint where the messages were sent to?" I wanted to know.
"1 don't think so. It was really sort of an accident we caught the transmission at all.
Whoever these guys are, they're definitely using the asteroids for cover," said Blake.
I was curious as to who might have access to equipment on the base that could send
such a signal. Jolene and Blake agreed that there was no convenient means available and
that whoever was sending these messages must have their own device. It was time to
bring the others in on our discovery.
We sent the base captain a report via computer. After we decided to meet again after
dinner to devise a way to search the base for an X-ray emitting device, 1 headed off to
inform Kane of our discovery and to get his input on ways to search for the emitting
device with maximum efficacy.
29
Page 30

Running up to Kane's quarters, I nearly smashed into a harried-looking Furstenburg,
who said he wanted to get the Scarab fired up and into space to fill a gap in the patrol
schedule as soon as I was ready. He wanted to come along. I thought this was a strange
request; I could think of no reason he should want to be on a patrol run. Furstenburg
didn't seem himself. Still, 1 agreed.
When I burst into Geof Kane's quarters, he was pacing the room like a caged lion,
muttering something about the two other ships that had been attacked as they neared the
base. Scratching his once black, now white, crew cut, he mumbled, "Why wasn't the
Scarab attacked?"
Reluctantly, I interrupted his pacing and filled him in on the message beamed from
the base to the asteroid field. His face became even more somber than it had been to start
with. I also told him about Furstenburg's request. Kane asked if we had determined
when the messages first began. I gave him the three-month figure and he frowned. It all
came together.
"It looks to me," Kane said, "like Lars Furstenburg is out to sabotage the base and he
needs to ensure safe passage out of the system. He expects us to be that ticket. Let's go
Kane rushed from his quarters and toward the Scarab's hangar, towing me along in his
wake. Furstenburg was there waiting for us. Kane wasn't one to let talking get in the way
of action. He moved toward Furstenburg with the ferocious look of a predator closing for
the kill. Furstenburg stood his ground, only his eyes revealing a kind of nervous fear.
Kane backed Furstenburg up the ramp and into the Scarab's hold. I was close behind.
"When is it coming?" Kane roared. "When are your people gonna attack the base?"
Furstenburg answered by pulling a blaster from beneath his coat with faster reflexes
than I'd given him credit for. He spoke slowly, steadying his nerves, "It does not matter.
There is no way this evil font of technology can survive our onslaught. You will pilot me
off base. Now! Your lives may be spared despite your high tech alliances."
Despite the obvious danger, Kane hadn't stopped moving toward him. Behind my captain's advancing bulk I was able to draw my gun, an old-fashioned laser that worked well
on flesh without damaging a bulkhead.
I dove to the side, firing past Kane on my way to the ground. A burst of brilliant red
light sliced into the base commander-tumed-Retro. Kane looked down on me.
"I'd have decked him, son. No need to get dramatic."
We had no idea how much time we had remaining before the assault. All we could do
was get out and try to stop the attackers before they reached the base. I headed for the
bridge as Kane went to assemble a skeleton crew. I had all engines ready for launch
when 1 heard the hatch close and the pounding of gunners' feet on the meial floors as
they headed for battle stations. I didn't wait for clearance to launch. The Scarab was
ready and we were likely the base's only defense. It seemed that Furstenburg had disabled the base's automatic defense systems.
Out in the void we turned toward the asteroids. White Talons, Retro ships for sure,
emerged from their hiding places and headed to intercept. The Church of Man was con-
tinuing its campaign against all things technological and we were its next target. Kane
took the helm as 1 headed for a vacant turret. It wasn't long before we were in amongst
them, the all-seeing eye of their agrarian deity emblazoned on their fighters. These were
maniacs, unafraid of death, willing to ram you, destroying your ship even if it cost them
30
Page 31

theirs. From the turret I could see flames erupt from our hull, a quick burst of plasma
destroying an enemy. That reduced the odds to five against one.
Then my radar went red. 1 thought it was a glitch. There was a swarm headed past us
straight for the base. We'd been suckered into a trap, separated from the base the way
wolves separate a calf from its mother. Before I could get a lock on any of the ships I was
slammed against the inside of the turret. We were out of control, spinning without pur-
pose. 1 unstrapped myself, clambered from the turret and headed for the bridge.
When I got there, I stopped short. The bridge was filled with smoke and debris, red
warning lights flashing in the half light, cables hanging lifelessly from the ceiling where a
panel had fallen and crushed Kane. There was nothing we could do for him. There
wasn't much we could do at all but fight for our lives. I assumed command, sent most of
the crew back to their guns and the rest to restoring our maneuverability. This was too
big a job for our one repair droid.
Outside, three Talons still circled us, two of them damaged. I knew that, given our
condition, we couldn't do much to them but there had to be something. Switching
power from guns to shields, I resolved to use the ship's bulk as her defense. It didn't take
long for a Retro to make the mistake of flying directly in front of us. I engaged afterburn-
ers and sent the Scarab's weighty prow through the tiny ship. I had the comm lines open
and shouted orders into the air.
"I'm taking the shields down. Hank and Johansen use the extra power to blast those
freaks. Everyone else hold your fire. On my mark ... NOW!"
Johansen destroyed his target, but Hank only managed to clip his. Its shields were
down but there was no hull damage. The quick Talon turned to approach us from
behind. Textbook, I thought. I hit dead stop, freezing our position. He blew past and
Hank nailed him with a torpedo. We were in the clear for now, but Sheol was dying.
Lights blinked out all along its hull as power was cut. We could see they had been
boarded — white Talons stood out against Sheol's dark hull and the guns protecting the
main hangars sat lifelessly by as enemy ships were docked. All I could think of was Jo
fighting for her life against those bark-eating, anti-urban, anti-stellar, neo-pagan, hypocritical, knowledge-destroying fanatics. I went red trying to turn the Scarab to her rescue.
They had to pry me from the controls. Sheol was a loss and we weren't doing much better.
By the time we had jumped back to a civilized world I was numb with grief. Jo was
certainly dead, we had buried Kane in space during the trip, and the Scarab had received
much more damage than we had the finances to repair. We sold the ship for scrap and
divided the cash. Some of the crew stayed together, hoping to find financial backing.
Some went back to far-away families left waiting months ago. I had no choice. I
exchanged work for passage on a small merchant ship, the Sword of Damocles, and headed for Troy in Gemini. There I knew I'd find a new beginning, a chance to be the explorer 1 had admired in Mack Christiensen and the master of his own fate 1 had admired in
Geof Kane.
Mack's bequest had the unfortunate side effect of actually costing me money. The
Tarsus he left was no longer in working order and 1 sunk most of my money and what
little he left me into repairs and hangar fees. It's been nearly two months since that day I
last saw Jo, and I'm ready to move on. I have my own ship and a new destiny as Gemini's
newest privateer.
31
Page 32

GEMINI SECTOR: AN OVERVIEW
By Lieutenant Gabriel Quentin, Exploratory Services
Gemini is still a newborn sector struggling to find her feet. It has only been 30 years
since the military set out to contain Kilralhi expansion by entrenching along the border.
It was during this early entrenching period that the Exploratory Services (ES) were first
called in to map out available resources, including habitable planets, mineral-rich asteroids and jump tunnels.
Within the first five years of exploration two major factors contributed to the opening of
Gemini to public enterprise. The first was the rapid entrenchment of military forces far
from established supply lines and support services — they needed access to local
resources. The second factor was the tremendous wealth ot resources discovered by the
ES in Gemini. This was essential in boosting the Confederation's gross worth. As developers and entrepreneurs moved in to exploit the discoveries made by the ES, several
standard base types evolved (see below). As the populations grew, Gemini was divided
into four political/cartographic quadrants — Potter, Humboldt, Fariss and Clarke, clockwise from bottom right on a standard Gunther projection.
QUADRANTS
Clarke
Clarke is the fortress, the heart of the military entrenchment begun 30 years ago. Today,
the seat of all Gemini's naval forces. Perry Naval Base, is in Clarke. This is the front line,
dotted with jump points into Kilrathi territory. In this area, ships must constantly be
ready to engage in border skirmishes. However, because of our strength,there has not
been a full scale battle in Gemini for 11 years. The whole sector owes its existence to the
strength of our naval forces, forces that have blossomed under Admiral Terrell's capable
leadership.
Fariss
Asteroids. That one word sums up any traveler's experience of Fariss. Here are more
mining bases than in the surrounding five sectors combined. There are agricultural planets and refineries, to be sure, but the most prevalent industry is the extraction of minerals from the many large asteroids that clutter Fariss' attractive vistas.
Humboldt
Humboldt is the sparsest of the quadrants. The central hub of Humboldt is Junction, a
system with three habitable planets and six jump points. The quadrant is limited in natural resources, but Junction earns its name as one of the most essential nodes in Gemini's
web of jump-ways. Aside from Junction, Humboldt offers few mining and refining
opportunities and a lot of empty space.
Potter
Potter is the heart of what little civilization Gemini has. The capital, New
Constantinople, is located here, as are many other large population centers. The most
important of these, New Detroit, is renowned for the wealth of work and opportunity to
be had there, not to mention the high quality of alcohol imported from Centauri and
32
Page 33

Ceti Prime. Potter is the only quadrant that has more than one Pleasure planet, built
entirely on rabid consumerism and providing R&R for the military types. Reports of
Kilrathi and pirate attacks in Potter have dropped to the lowest rate of any border sector.
BASE TYPES
As mankind has settled the stars, several types of bases appear wherever we go. As you
travel throughout the quadrants you will certainly encounter each of these. Below, you
will find a thumbnail sketch of each base type to help you set your expectations and
goals before landing at any given locale. Also listed are four of Gemini's most significant
places: Perry, Oxford, New Constantinople and New Detroit. Be advised that not every
base will buy what you have to sell — for example, it is obviously futile to try to sell
unrefined plutonium to an agricultural planet. Trade can be very lucrative if you don't
get discouraged and keep your wits about you. Enjoy your stay — may it be full of
adventure and profit!
Agricultural
General Notes. These are planets whose primary industry
is farming. They are usually large, with a high land-toocean ratio. Terraforming is in progress on most ot these
worlds, but domed cities are still the rule. Life here is a lot
of work, and Gemini is trying to encourage colonists to
have more children and settle down.
Trading Tips. Furs, lumber, pets, grain and foodstuffs are available here. They have a
great need for more equipment and workers, as well as housing for their growing population.
Mining
General Notes. Mining bases are affixed to and carved
into large asteroids. This means that flying through an
asteroid field is usually mandatory for getting there. Mines
are most prevalent in Fariss Quadrant, though they are
also found, less frequently, throughout the sector. The bars
are generally Spartan and all drinks have been imported
(and are therefore expensive).
Trading Tips. Mining bases need food. They have plenty of minerals and not much
interest in luxury goods. Mining bases also seek ways to distract their lonely workers.
Issues of Plaything, games or other entertainment are in high demand.
33
Page 34

Pirate
General Notes. With the population boom has come a piracy boom. At times, entire
bases have been taken over. These hostile takeovers have been mostly limited to Fariss
Quadrant and, therefore, to backwater mining bases, especially those left abandoned due
to depleted resources. Pirate bases are a hazard to aboveboard shippers and a boon to
unscrupulous dealers in illicit goods. Due to the nature of this type of base, no guild
offices are ever available here.
Trading Tips. While I would rather say that it is not possible to trade with pirates, that
is not the case. These bases need food and trade in weapons. They deal in drugs such as
Brilliance, and continue to trade slaves as if we were living in the 23rd century. Please
note that persons known to attack merchants and trade in contraband are considered
saboteurs of the war effort and are attacked on sight by Confederation forces.
Pleasure
General Notes. Pleasure planets are the result of high demand, a sudden population
explosion and a few lucky prospectors coming into too much wealth too soon in their
lives. These are places of hedonistic games, a tromp I'oeil of culture. They are also important pressure valves during these tense times.
Trading Tips. Pleasure planets are hotbeds of consumerism. The population is interested in buying drugs, art, furs, games and anything fun or exciting. Unfortunately, they
produce little besides movies.
Refinery
General Notes. Refineries are platform-based
space stations whose primary purpose is to turn
the natural resources of Gemini's asteroids and
planets into advanced fuels, durable goods, etc.
They are a major employer of skilled labor and are
found throughout all four quadrants.
Trading Tips. Like mining bases, refineries have a great need for food and entertainment. They also need natural resources shipped in for processing.
New Constantinople
General Notes. New Constantinople is the capital
of Gemini Sector. It is a major population center,
with representatives of every major industry. It is
located in central Potter and receives fairly heavy
traffic. Confederation and militia patrols have a high
chance of being around the base to protect it and to
police the merchants, preventing the movement of
contraband on or off base.
Trading Tips. Almost all art to be found in the area is produced here. New Constan-
tinople is the hub of all political and cultural events. Due to its importance, people come
from all over to buy and sell nearly everything. It is a good place to do business.
34
Page 35

New Detroit
General Notes. New Detroit is one of the most fascinating of Gemini's urban centers. It is our industrial heart
and it beats with the rhythms of heavy machinery. Even
from orbit, the pervasive gray of buildings and smog are
visible. Before there were refineries in Gemini's space,
there was New Detroit. For three decades the central
metropolis has been expanding to cover the planet's
enormous land masses. Its bars and other businesses sit at the bottom of skyscrapers like
the little hunched prophets at the bottom of Hadrian's Gorge. Definitely a place to visit
and an even better place to do business.
Trading Tips. Competition is stiff here. There is a glut of manufactured goods. If it's man-
made, you can bet New Detroit's got it. They need natural resources and are willing to pay
the price to get them. New Detroit's mixture of highbrow and sleaze industry means that
there's a nook, out of the incessant drizzle, for any goods you wish to buy or sell.
Oxford
General Notes. The intellectual seat of the sector, Oxford _
is a university planet, well known for its research facilities.
It has been built out to resemble Old Earth, specifically
the old English college town. This makes the place a fantastic draw for tourism. It is located far from the front in
Potter Quadrant and was one of the first planets terraformed in Gemini. Its library is renowned beyond
Gemini's horizons, drawing scholars from distant suns to
visit its hardwood halls and well-tended quadrangles.
Trading Tips. They will definitely sell books and other intellectual properties. Aside
from that they have the same trading needs as any heavily populated agricultural planet.
Perry
General Notes. Perry, the military center of Gemini, is
located in Clarke, not far from the Kilrathi border. Many
military patrols originate here and you have a high chance
of encountering these forces. Admiral Terrell runs his corner of the war from here. Perry is a model of efficiency
and does a lively business in all industries. It is a fine
example of starbase architecture as well.
Trading Tips. As the core of all local military operations,
many supply lines come into Perry. They need food, medical supplies and the like. They
sell lots of out-of-date weaponry here — a good start for a gun-runner. With so many
merchants coming here, there is always a chance to pick up whatever you're looking to
buy.
35
Page 36

COMMON BASE LOCATIONS
As a pilot and an entrepreneur, you need to use all the resources of the bases you fre-
quent. 1 will profile each of the major industries that will attempt to exploit you as a customer but are essential to your survival. Each of these places has been selected for its
usefulness. Some are places that broker for employers while others — like hangars with
docking fees — are necessary evils. These private sector businesses are not as convenient
or efficient as their Naval equivalent but they sure are more interesting, and they're all
we've got.
Hangar
The first impression you get of any base is its hangar. Hangar protection and services are
provided by the base in order to avoid racketeering and crowded conditions. They do
charge a landing fee that covers the cost of loading ships with jump fuel, staff, equipment
and other costs, as well as a small part serving as a tax to pay for the base's maintenance.
This fee, while a flat rate, is allowed to drop so as to never charge you more than you can
afford. Hangars have always been important to the economy of a base. They employ a
large number of people to maintain the automatic docking equipment, as radio personnel, administrators, and cargo loaders and unloaders. Many pilots assume that the
hangar is just a place to park one's ship, when in fact it is an industry as thriving as any
other — except perhaps more important to spacefarers. Imagine the chaos if the hangars
all shut down ...
To Main Concourse
Tarsus (click to take off)
Bar
Nearly every place in the human universe has a bar. Gemini is no exception. Bars are not
only one of the most prolific industries in our sector but are useful to the ambitious privateer. Businessmen in need of pilots to undertake especially lucrative (read "dangerous")
missions often solicit them over a drink. Large urban areas are more likely to produce
these fixers because of the huge number of bureaucrats and middlemen there. Be warned
that most employers met this way bind their contracts with only a handshake and often
prove not to be legit. Sandoval, in New Detroit, nearly always has something of interest.
Also of interest in our bars are the staff members. It has been my professional experience
that a good bartender knows more about the war than military intelligence types do, and
36
Page 37

more about trading than the Merchants' Guild ever will. Learning from bartenders has
always been an important part of doing business in Gemini, a part of our culture.
Mission Computer
Mission Computers are ubiquitous. These are the most popular forum for hiring pilots.
They are quick and typically built into the base itself. Many pilots rely upon their convenience for work. This automated system offers a variety of missions for widely varying
pay. The military also uses this service to solicit mercenaries, a practice they are continuing due to its cost efficiency and the high mission success rate. Whether your ship is a
cargo vessel or a killing machine, you can find work here.
Scroll through
Missions
Accept Displayed
Mission
Activate Mission
Computer
Exit
to
Main
Concourse
The interface is friendly. After a palm print identification you may scroll through the
available listings. If you accept a mission, you may use the arrows to continue scrolling
through them. The Mission Computers follow the Guild standard that you probably
ought not to take more than three missions at a time. This is for two reasons. First, pilots
who regularly accept more than three missions usually end up dropping one and either
losing someone money or causing massive casualties due to undelivered supplies or
undefended civilians. Second, limiting the number of missions is an attempt to prevent
mobsters and shady characters from accepting all the work and doling it out for a cut to
flunkies and desperates, cornering the market.
37
Page 38

Ship Dealer
The last common location is the ship dealer. These privately held dealerships are where
you can buy the latest model ship. Indicating the ship you would like will undoubtedly
lead to a sales pitch. Be forewarned — there are hitches that they do not mention in their
pitch. Here are a few things you should know before dealing with these shysters:
• When trading-in a ship you also get trade-in value for your upgrades. If you have a
turret, two meson blasters, shields and a cargo expansion, your trade-in value is the
Joan's Index Value of your old ship, minus wear and tear, plus the current selling
price for each upgrade.
• Dealerships refuse to deal with transferring cargo unless it easy on them. You must
have less cargo than the capacity of your new ship. If you trade in a fully loaded
Galaxy for a Centurion, the salesman will turn you away until your cargo is less than
the capacity of the Centurion.
• There's no financing. Unfortunately, the life span of a pilot in Gemini is short enough
that they are unwilling to take a risk on you making payments. Not surprisingly, no
insurance is available for freelancers. This means saving up a lot of cash before buying
much of anything. While inconvenient, the businesses have little choice.
Exit
to
Main
Concourse
Select Galaxy
Select Centurion Select Orion Go to Ship Modification Screen
Ship Modification
This is where you buy, sell or repair options. Options include armor, guns, turrets, cargo
expansions and anything else that adds to the performance or longevity of your vehicle.
Interfacing with Ship Modification is as simple as using a monitor. Use the buttons at the
bottom of the screen to select Buy or Sell mode. Using the arrows at the sides, you can
scroll through the available items. When you find an item you are interested in, simply
touch the screen to indicate your selection. When you have indicated a gun or other such
item, you are asked to pick the location on your ship where you would like it placed.
Please note: You are not allowed to purchase missiles or torpedoes without a launcher.
This constitutes intent to sell and is strictly prohibited. Should you decide to sell a
launcher that still has missiles or torpedoes allocated to it, the ammunition automatically
sells at the going rate. Always buy ammunition last and sell it first.
38
Page 39

Go to Software Booth
Go to Dealership
Repair Mode:
Select Item
Sell Mode Buy Mode
Scrolling Arrows
Software Booth
The other useful department in a dealership is the Software Booth. This is where you
acquire such essential equipment as maps and scanners. Both are imperative. It seems
that this is one of the areas that was too rapidly deregulated. Without a map you may as
well be flying blind. In over seven hundred years of space travel this is only the second
time we have allowed pilots to fly about with no navigational software. While the manufacture of scanners is competitive (there are three brands each with their own high and
low end models), maps are not. Scanners are important, maps are essential. Spend your
money wisely.
Puts
Item
on
Screen for Selection
Main
Repair Mode
Select Item
Buy
Mode
Sell Mode Scrolling Arrows
This listing should give you some sense of the recovery Gemini is making since the lifting of martial law. We are on the economic upswing. This is a sector of opportunity, a
frontier for the risk takers of the Confederation. Your contribution is an important part
of making us an immovable fortress on the Kilrathi border and a growth-oriented, prosperous community.
39
Exit to Ship
Modification Screen
Page 40

Mercenaries' Guild
As a long-time associate of this proud organization, I can personally speak for their
integrity and usefulness. For a reasonable membership fee, pilots are able to take a variety of jobs cleared by the Guild. This means no missions are illegal and payment is guaranteed. They also guarantee their clients that all guildmen are registered and can therefore be tracked and penalized for indiscretions. Any one individual may not have more
than three missions accepted at any one time in order to prevent racketeering or simply
over-committing out of ambition. All members have access to mission listings at any
Guild office and are paid as soon as mission requirements are fulfilled. Reporting to an
office is not necessary. The Mercenaries' Guild is an honorable society and does not
allow maintenance of offices on pirate bases.
View
Mercenaries'
Mission Computer
Exit to Mercenaries' Guild Accept Displayed Mission
Speak
to
Guild Officer
40
Exit
to
Main
Concourse
Select Mission
Page 41

Merchants' Guild
The Merchants' Guild has, in the last decade, established good relations with the
Mercenaries' Guild. They realized that there is really no competition between them. In
fact, each depends upon the other. This is especially true as the supply of pilots increases. With the war effort and the heavy campaign to advertise Gemini's opportunities
abroad, there has been an upsurge in prospectors panning for golden opportunities. This
has led to more small businesses depending on the lone pilot to transport their wares
and protect their flight paths. Not surprisingly, the guild has managed to keep its share
of the moneys involved and has almost too nice offices.
View Merchants'
Mission Computer
Speak
to
Guild
Officer
Exit
to
Main
Concourse
Accept Displayed
Mission
Select Next Mission
Exit to
Merchants' Guild
Interacting with the Merchants' Guild is similar to dealing with the Mercenaries' Guild.
You are charged to join and then may use their computer to accept missions. Any one
individual may not have more than three missions accepted at any one time in order to
prevent racketeering or simply over-committing out of ambition. For a mission brokerage firm, they are useful and professional. Do consider the type of work you would like
to do before taking missions. For a military pilot with no cargo hold there is only a little
work available through the guild.
41
Page 42

Commodity Exchange
These are automated centers of trade scattered throughout the sector. They are state run
and standardized, although prices are set locally by demand. Using the Exchange is as
easy as interfacing with the monitor provided. You select whether you are in buy or sell.
mode and scroll through the available cargo. Purchasing or selling is as easy as touching
the screen when the desired goods are being displayed. Finances are handled automatically. This lack of human supervision has both advantages and disadvantages.
Sell
Mode
Buy
Mode
Exit
to
Main
Concourse
Scrolling
Arrows
Select Item (click to select)
When the Exchange was first standardized, 15 years ago, it was heavily regulated under
Governor Meshach's orders. Costs were standardized and all transactions required
Merchants' Guild approval. The guild was a part of the Commerce Department at that
time. Then changes came ... the Meshach administration fell due to the sale of Talons to
the Church of Man. In the ensuing political vacuum, base leaders did away with the regulations and fully automated the Exchange. Now, a decade and half later, prices have
come down and profit is had trading from base to base. The only caveat is that, while
you may be able to buy and sell slaves or drugs, they are not legal. If militia or Confeds
scan your ship en route and discover contraband, you will be considered a trafficker and
summarily attacked. Also, New Constantinople and Perry Naval Base forbid the sale of
contraband through their Commodity Exchange.
There are many ways to make a profit through trade. Buying grain at an agricultural
planet, selling it at a mining base, buying ore at the base, selling it to a refinery, buying
the refinery's plastics, and selling them back at the agricultural world is just one obvious
example of a lucrative trade route. The expansion of privatized trade also opens up private interest in keeping the trade routes clear of pirates and Kilrathi. An active and
healthy Commodity Exchange spells profit for you more mercenary types as well as for
the haulers of cargo.
42
Page 43

COMMONLY AVAILABLE SHIPS
There are four basic models of single-person ship available to the general public: the Tarsus,
Centurion, Galaxy and Orion. Recently I went to several dealerships posing as a naive newcomer to Gemini and asked which ship was right for me. The salesman pitched his poor little heart out and managed not to tell me a thing. The best way for you to make the right
choice is to be well informed. If you run across a hostile pilot flying one of these vessels, it
also serves you well to be familiar with the advantages and drawbacks of each ship.
Below are my impressions of each vehicle, followed by the latest statistics available and its
probable loadout if you encounter it in hostile action. The popularity of these four ships
makes it easy to obtain parts and service through any dealership.
Max. Velocity/Afterburner Velocity. Ship velocities are expressed in kps. These numbers are
always computed relative to a stationary object near the ship, e.g. a nearby planet.
Acceleration. Ratings for ship acceleration range from Poor and Average to Good, Very Good and
Excellent
Max YPR (Maximum Yaw, Pitch, Roll). Yaw describes the ability of a ship to turn to the right or
left.
Pitch
refers
axis. The ratings for YPR range from Poor and Average to Good, Very Good and Excellent.
Armor. The measurement of the ship's defensive armor is expressed in centimeters thickness of
Durasteel (centimeters equivalent). The higher the number, the more effective the armor.
to up and down movement.
Tarsus
The mainstay of the Exploratory Services fleet just a few years ago, these steady craft are
now a familiar part of private enterprise. The Tarsus has been discontinued. We list it here
because of its popularity and general availability in the used markets.
Cockpit. Low visibility, especially through the small side windows. Cockpit placement pre-
vents any over-the-shoulder view. Offers one MFD along with standard radar and armor
displays (see illustration, p. 12). Comfort is comparable to the Orion but claustrophobic by
comparison with the other two models reviewed here.
Speed/Maneuverability. Sluggish in turns and rolls. Can upgrade to Level 1 engine.
Ordnance/Protection. No slots available for turrets. Supports Level 2 shield upgrades.
Two gun racks and two weapon or tractor beam racks.
Overall Performance Rating. I would give it a B in peacetime. With the war so close and
the rise of piracy, 1 have to downgrade my rating to a D. Longevity in Gemini is worth the
extra expense of purchasing a better ship or paying for protection.
Class
Max. Velocity
Afterburner Velocity
Acceleration
Max.
YPR
Weapons
Cargo Hold
Armor
Sides
Fore
Aft
Merchant Scout
300
600
Average
Average
Mass Drivers (2)
100 units (150 with cargo expansion)
8 cm equiv. each
10 cm equiv.
10 cm equiv.
kps
kps
Roll
measures the ability
of a ship to spin on its long
DF Missiles (3)
43
Page 44

Centurion
This is the workhorse of the
mercenary community. The
Centurion is a heavy fighter
with the ability to do almost
any gun-for-hire work. The
limited cargo hold can contain more than an overnight
bag but not by much. This is
a ship for those pilots who
love to fly, but it won't make
you a living on the trade cir-
cuit.
Cockpit. High visibility. The
dome cockpit of this single-
seater affords the pilot a clear
view of his target. Ride is
comfortable at high speeds
and in tight turns. It has one
MFD, along with standard
armor and radar displays (see
illustration). Instrument
placement is intuitive and
easy to read; overall design is
highly ergonomic.
Speed/Maneuverability.
I've been very impressed with
the roll rate of the Centurion,
although light fighters such as
the Talon easily outmaneuver
it. For a fighter of its class,
this ship offers clean tight
flight dynamics. Supports
engine upgrades through
Level 3,
Ordnance/Protection. A rear turret is a popular option for this ship. It supports up to
Level 3 shield upgrades. There are slots for four guns and two weapons or tractor beams,
even without a turret,
Overall Performance Rating. For the mercenary community this ship earns an A while
those with more mercantile ambitions find its small cargo hold, and inability to support a
cargo hold expansion a definite turn off. Consider your needs before investing.
Page 45

Fuel
Gauge
Set
Speed
Energy
Gauge
Actual
Speed
Autopilot
Light
Armor and
Shields Display
Class
Max. Velocity
Afterburner Velocity
Acceleration
Max.
YPR
Weapons
Cargo Hold
Armor
Sides
Fore
Aft
MFD
Bounty Hunter Heavy Fighter
500
kps
1000
kps
Excellent
Good
Mass Drivers (2)
Particle Cannon
IR Missiles (2)
Turreted Mass Drivers |2)
50 units
15 cm equiv, each
20 cm equiv.
15 cm equiv.
(1)
45
Radar Display
Tachyon Cannon
FF Missiles (2)
Tractor Beam
(1)
(1)
Page 46

Galaxy
A versatile merchant's vessel,
the Galaxy is perfect for those
with an entrepreneurial spirit.
She is by no means a military
vessel, but a Galaxy can usually protect herself and the
large amount of cargo she's
able to carry.
Cockpit. This large, roomy
cockpit offers decent visibility
despite the bulky ship behind
it. Some pilots may take a
while to adjust to the limited
HUD area. Unlike most modern ships, the Galaxy's HUD
is not built into the main window. Instead, it is suspended
above the MFDs in front of
the window. Dual MFDs have
been standard since the 2669
model and are a popular feature (see illustration). All displays are conveniently placed
for ease of use.
Speed/Maneuverability.
Supports up to a Level 3
engine upgrade. For a ship of
its bulk, the Galaxy is
extremely maneuverable,
although not as fast as we
would have hoped.
Ordnance/Protection. Due to the large size of this ship, it is able to support both top and
bottom turrets. Shield Level 3 is the maximum supported by the Galaxy. Without turrets,
there are slots for only two guns and two weapons or tractor beams.
Overall Performance Rating. The Galaxy is successful in its role as the top-of-the-line
mercantile vessel available to the public. I give it an A without reservation. Trigger-happy
pilots are a little disappointed in its moderate top speed, but the availability of two turrets
adds a comfortable measure of safety.
46
Page 47

Radar Display Set Speed
Actual Speed
Armor and
Shields Display
Energy Gauge Fuel Gauge MFD 1 MFD 2 Autopilot Light
Class
Max. Velocity
Afterburner Velocity
Acceleration
Max.
YPR
Weapons
Cargo Hold
Armor
Sides
Fore
Aft
Merchant Ship
300
kps
750
kps
Average
Average
Mass Drivers (2|
HS Missiles (4)
150 units (225 with cargo expansion)
17.5 cm equiv. each
25 cm equiv.
20 cm equiv.
47
DF Missiles (3)
Turreted Mass Drivers (4)
Page 48

Orion
The Orion is perhaps the
safest of all the vehicles mentioned here. It is can carry the
most armor and shields of all
ships listed (at the expense of
its maneuverability). This is a
sturdy ship, designed to last.
Cockpit. Low visibility. The
cockpit is dark and somewhat
cramped, with less window
area than the Tarsus. Dual
MFDs are standard and easy
to use (see illustration).
Instruments are not as easy to
use as in the Centurion, but
are simple to get a handle on.
Speed/Maneuverability.
Supports up to a Level 5
engine upgrade. Although the
Orion has better than average
speed, it's difficult to pull
through tight turns.
Ordnance/Protection.
Supports addition of a rear
turret. Even without the turret, there is room for two
guns and one weapon or tractor beam. With Level 5
engine upgrades, there is no
reason not to pick a high
quality gun with a high energy drain. Supports up to
shield upgrade Level 5.
Overall Performance Rating. Due to its low maneuverability, limited cargo hold, and the
expense of outfitting it, I give the Orion a low B. With enough money, though, you can
make this ship a high A. I highly recommend the full option package for this ship.
48
Page 49

Radar Display Set Speed Autopilot Liqht Actual Speed
MFD 1 Energy Gauge MFD 2 Fuel Gauge
Armor and
Shields Display
Class
Max. Velocity
Afterburners
Acceleration
Max.
YPR
Weapons
Cargo Hold
Armor
Sides
Fore
Aft
Mercenary Gunship
350
kps
800
kps
Average
Poor
Mass Drivers (2) HS Missiles (3)
Turreted Lasers (2)
50 units (75 with cargo expansion)
35 cm equiv. each
48 cm equiv.
50 cm equiv.
49
Page 50

OTHER SPACECRAFT
You encounter a wide variety of ships in the Gemini Sector, covering a whole gamut of
designs and functions. Many of the hostile forces operating in this sector fly just one type of
vessel and thus are recognizable by the design of their spacecraft. A thorough familiarity
with the most common vessels in Gemini provides you with a distinct advantage in combat.
Knowing what the advantages and the drawbacks of each ship are allows you to devise a
sound combat strategy and greatly increases your chances of survival.
Broadsword
Class
Max. Velocity
Afterburner Velocity
Acceleration
Max.
YPR
Weapons
Armor
Sides
Fore
Aft
The Broadsword is a commonly encountered Confederation fighter. It is equipped with a
deadly array of blasters and several HS and FF missiles, which pose a severe threat to any
enemy that ventures to cross its path. The Broadsword's main weaknesses lie in its slow
speed, low maneuverability and limited acceleration powers. If you are Hying a very maneuverable ship in an encounter with this vessel, the odds are definitely in your favor. A side
attack on the weaker port and starboard armor is advisable.
Confederation Fighter-Bomber
350
kps
n/a
Average
Average
Mass Drivers (3)
HS Missiles (3)
Turreted Particle Cannon (2)
17.5 cm equiv. each
25 cm equiv.
20 cm equiv.
FF Missiles (6)
Turreted Lasers |2)
Demon
Class
Max. Velocity
Afterburner Velocity
Acceleration
Max.
YPR
Weapons
Armor
Sides
Fore
Aft
The Demon combines high velocities and powerful acceleration powers with a wide array of
deadly weapons. Its torpedo loadout can even take out capital ships like the Kamekh or
Paradigm with relative ease. If you are forced to fight the Demon in a close dogfight, try to
make a side attack on that location's weak armor.
Bounty Hunter Light Fighter
450
kps
1
200
kps
Very Good
Good
Lasers (2)
HS Missiles (2)
9 cm equiv. each
14 cm equiv.
1 2 cm equiv.
Meson Blasters (2)
Torpedoes
50
(10)
Page 51

Dralthi
Class
Max. Velocity
Afterburner Velocity
Acceleration
Max.
YPR
Weapons
Armor
Sides
Fore
Aft
Most Kilrathi fighters emphasize high velocity and maneuverability, since a majority of all
Kilrathi pilots rely on aggressive combat strategies. Similar to the Gothri, the Dralthi is
designed in precisely this manner. Excellent acceleration powers, powerful afterburners and
high velocities allow a Kilrathi pilot to close in on his kill quickly and efficiently. When
confronted with the Drallhi, keep in mind that this ship's blaster loadout is relatively weak.
Even though the Dralthi carries several missiles, Dumb Fires are more easily avoided than
guided missile systems.
Kilrathi Light Fighter
400
kps
lOOOkps
Excellent
Excellent
Lasers (3) DF Missiles (3)
1 2 cm equiv. each
15 cm equiv.
1 3.5 cm equiv.
Drayman
Class
Max. Velocity
Afterburner Velocity
Acceleration
Max.
YPR
Weapons
Armor
Sides
Fore
Aft
Merchant Ship
150
kps
n/a
Poor
Poor
Meson Blasters (2)
28 cm equiv. each
35 cm equiv.
30 cm equiv.
The Drayman is one of the most basic merchant ships you are likely to encounter in the
Gemini Sector. This spacecraft is suitable for carrying cargo, but it is also extremely vulnerable to any attack. With poor acceleration, slow max. velocity and no afterburner power,
this vessel can hardly hope to evade any predator eager to take over some cargo. Weak
shields and a light weapons loadout make the Drayman a bad choice if you are traversing
unknown or hostile territory.
51
Page 52

Gladius
Class
Max. Velocity
Afterburner Velocity
Acceleration
Max.
YPR
Weapons
Armor
Sides
Fore
Aft
The Gladius combines good velocity and acceleration with an effective and varied array of
weapons. Its torpedoes make it an effective fighter for combat against capital ships. With its
fairly strong blaster loadout and HS missiles, the Gladius is a versatile dogfighting spacecraft. Due to its maneuverability, it is hard to target the one accurately, but just a few ontarget hits can down the Gladius because of its weak shields.
Militia
Light
Fighter
400
kps
lOOOkps
Very Good
Good
Lasers (2)
HS Missiles (2)
8 cm equiv. each
14 cm equiv.
10 cm equiv.
Particle Cannon (1)
Torpedoes (8)
Gothri
Class
Max. Velocity
Afterburner Velocity
Acceleration
Max.
YPR
Weapons
Armor
Sides
Fore
Aft
Kilrathi Fighter
450
kps
1200
kps
Very Good
Good
Mass Drivers (2)
FF
Missile 11)
DF
Missile
(1)
Turreted
Meson
Blaster
15 cm equiv. each
17.5 cm equiv.
17.5 cm equiv.
Particle Cannon (2)
Turreted Laser (1)
IR Missiles (3)
(1)
The Kilrathi Gothri can pose a very real threat to any ship in the Gemini Sector. With its
impressive acceleration, it can reach high velocities. When you are facing a Gothri in combat, you should concentrate on its weak armor. A few well-placed concentrated bursts of
gunfire can severely damage this fighter. However, it is not that easy to close on it. The
Gothri is very maneuverable and can easily down you first with its array of blasters.
52
Page 53

Kamekh
Class
Max. Velocity
Afterburner Velocity
Acceleration
Max.
YPR
Weapons
Armor
Sides
Fore
Aft
If you are flying missions in the Clarke Quadrant, you are apt to encounter the Kamehh
sooner or later. This imposing capital ship with its strong armor and heavy weapons loadout is one of the most impressively designed spacecraft in the Gemini Sector. The Kamekh is
not only equipped with a sophisticated arsenal of guns ranging from meson blasters to plasma cannon, but it can also effectively down enemy ships with its multiple missiles. Refer to
Survival Tips (pp. 60-63) for effective attack strategies in combat situations with capital
ships.
Kilrathi Capital Ship
300
kps
n/a
Poor
Poor
IR Missiles (2)
DF Missiles (10)
Meson Blasters (2)
Turreted Lasers (4)
55 cm equiv. each
70 cm equiv.
40 cm equiv.
HS Missile
Ionic Pulse Cannon (1)
Tachyon Cannon (2)
Turreted Plasma Cannon (2)
(1)
Paradigm
Class
Max. Velocity
Afterburner Velocity
Acceleration
Max.
YPR
Weapons
Armor
Sides
Front
Rear
Confederation Capital Ship
200
kps
n/a
Poor
Poor
Meson Blasters (2)
Ionic Pulse Cannon (1)
Turreted Lasers (3)
DF
Missiles
HS Missile
65 cm equiv. each
80 cm equiv.
50 cm equiv.
(10)
(1)
Tachyon Cannon (2)
Turreted Mass Drivers (3)
IR Missiles (2)
The Paradigm is one of the Confederations most advanced destroyers. Featuring almost
impregnable armor and shields, it more than compensates for its lack of speed and maneu-
verability. The Paradigm also has a deadly array of weapons at its disposal, making an attack
of any sort extremely dangerous. It carries an astonishing variety of blasters, ranging from
meson blasters to ionic pulse cannon. Multiple missiles can deter even the most aggressive
Kilrathi aces.
53
Page 54

Stiletto
Class
Max. Velocity
Afterburner Velocity
Acceleration
Max.
YPR
Weapons
Armor
Sides
Fore
Aft
The Stiletto is the fastest ship in the Confederation fleet. With an afterburner velocity of
1400 kps and excellent maneuverability, it can evade even the swiftest Kilrathi lighters. The
Stiletto's weakness lies in its extremely flimsy armor and relatively light weapons loadout. If
you encounter an experienced pilot in a Stiletto, however, you should prepare for grueling
combat because his high maneuverability lets him get uncomfortably close.
Talon
Class
Max. Velocity
Afterburner Velocity
Acceleration
Max.
YPR
Weapons
Armor
Sides
Fore
Aft
Confederation Light Fighter
500
kps
1400kps
Excellent
Excellent
Mass Drivers (2) HS Missiles (2)
7 cm equiv. each
9 cm equiv.
8 cm equiv.
Light Fighter
(used by militia, Church of Man, pirates)
400
kps
1000
kps
Very Good
Good
Mass Drivers (2) Particle Cannon (1)
HS Missiles (2)
8 cm equiv. each
10 cm equiv.
9 cm equiv.
The Talon is probably the ship you will encounter most often in Gemini. Flown by numerous different factions, it may appear in slightly different designs but its weapon loadouts
and dynamics remain the same. You should take extreme care to keep the Talon away from
your rear, since it is equipped with numerous HS missiles. If you are an accomplished
pilot, you should be able to take out a Talon with relative ease, especially if you are flying a
Stiletto or a Centurion, since its armor is extremely weak. Try to avoid its particle cannon,
since a hit can inflict sizable damage.
54
Page 55

CUSTOMIZING YOUR SHIP
Once you've bought the ship that is right for you, you are ready to buy the accessories that
make the ship truly your own. Whether this is your first time outfitting a ship or you're an
old pro who wants all the latest numbers, this section is for you. I have broken down the
vital statistics of each nonstandard item and listed them alphabetically. Guns are listed with
other weapons, at the end of the section.
This listing is meant as an aid to your purchasing the best equipment you can afford in the
least amount of time. Review your needs, finances and what's available, and you should end
up with the ideal vehicle for fun and profit. If only I'd had this kind of information available when I outfitted my first ship ...
Afterburner
Afterburners more than double your speed and can mean the difference between life and death in asteroid fields and combat. As they are
relatively inexpensive, I highly recommend buying afterburners,
especially if you are flying one of Gemini's slower ships.
Armor
There are two types of armor available. Both are repairable if damaged and offer significant
protection. Most ship's hulls are built to keep you pressurized and immune from radiation,
but they do not do much to stop a mass driver. If you can afford an escort, you may not
need armor, but other protection is much less reliable.
Plasteel. Protective equivalent: 10 cm durasteel. Plasteel is the least
expensive armor and protects one from the equivalent of four direct
laser hits.
Tungsten. Protective equivalent: 20 cm durasteel. Tungsten armor may cost a little more
but can slop up to two torpedoes. If you are a courier in Potter Quadrant, working for
bureaucrats, you probably don't need this level of protection. As you
are clearly a reader of our humble little journal, you are more likely
a risk taker who runs guns out to the edge of the Kilrathi border and
therefore need all the protection you can get. I recommend you not
pinch millicredits and spend the extra necessary to get tungsten
armor.
Cargo Expansion
Volume: varies by ship. Not every ship can support an internal cargo
expansion — check with your ship's manual before purchasing a
cargo expansion. These tend to pay for themselves quickly with the
additional profits gained from all that extra cargo.
55
Page 56

ECM Packages
Electronic Counter Measures come in three levels, each working to prevent missile locks. (Note that even if they break the lock, they do not
prevent missiles from flying straight and hitting you.) In our testing,
Level 1 ECM only had about a 25% success rate in breaking a missile
lock. Each upgrade seemed to improve the success rate by another 25%.
Engine Upgrades
There are five levels of engine upgrade. Each upgrade is a generator or
series of generators that powers your guns and shields. It is our recommendation that you have at least one more level of engine upgrade than
levels of shield. Power drain is an important concern that is answered
with a sufficient level of generator. Also be aware that the ship you are in
may not be able to support as many engine upgrades as you would like. Buy your guns and
shields with this in mind.
Jump Drive
This is undoubtedly one of your most important and expensive purchases. Unfortunately, one manufacturer essentially has a monopoly
on jump drives (a common problem with many frontier products).
The jump drive is your ticket to interstellar travel. Without it you are unable to travel
beyond the system you buy your ship in. All of Gemini's trade, strategic position and illicit
industry depend upon jump drives. Jump fuel is automatically lopped off as part of your
landing fees, so it's just the initial investment that hurts. However, like a cargo expansion,
this is an investment that more than pays for itself.
Nav Maps
Gemini's ship dealers have conspired at highway robbery. They require that you buy nav
maps at an additional charge. Nav maps are critical to survival as a pilot. Without one you
cannot autopilot, you cannot get a directional marker on your HUD, and you cannot obtain
any immediate information about the quadrant you are in. If you were to jump from a
quadrant for which you have a map into one with no map available, I recommend you
jump right back.
If you cannot afford to get the Gemini Sector map with all four quadrants, at least get the
map of your current quadrant. Fortunately, the All Quadrant package is sold at a discount.
Repair Droid
While the grizzled old pilots in mining base bars swear only by their
own hands, 1 have seen a repair droid bring a badly damaged ship
back from near death. These little gadgets are extremely effective if
you just can't wait to land and pay to get your damaged systems
repaired.
56
Page 57

Scanners
The scanner provides you with radar, target information, friend-or-foe HUD targeting and a
target camera. There are three brands, each with a different display and each with its own
advantages. Below are the statistics for each level of scanner, listed by brand name. All have a
range of 35,000 K, and all have HUD brackets. In general, the brands are comparable except
at the high end, in which the B&S Omni is clearly the superior (and costliest) choice.
Iris Basic radar (all).
• Mk I 5% chance per second of identifying target.
• Mk II Target lock. 15% chance per second of identi-
fying target.
• Mk III Target lock. ITTS. 25% chance per second of
identifying target.
Hunter AW Friend-or-Foe color-coded radar (all).
• 6 5% chance per second of identifying target.
• 6i Target lock. 15% chance per second of identi-
fying target.
• Infinity Target lock. ITTS. 25% chance per second of
identifying target.
B&S Fully color-coded radar (all).
• Tripwire 15% chance per second of identifying target.
• E.Y.E. Target lock. 25% chance per second of identi-
fying target.
• Omni Target lock. ITTS. 35% chance per second of
identifying target.
Shield Generators
There are live levels of shield. Not all are available for every ship. Each
uses 100 gigawatts and provides the equivalent of 100 cm of durasteel
protective value. Be sure you have enough power to generate any
shields you purchase. If other systems need power, you can divert power from your shields
by turning them off or, if they are strong enough, decreasing their power by steps.
Tractor Beam
A tractor beam is the key to efficient salvage. Cargo is usually found
after a battle, waiting for collection. Items collected are automatically
added to your manifest. The energy drain is 4 GJ / second.
Turrets
There are three types of turrets: top, bottom and rear. Availability
depends upon the type of ship you are flying. All turrets have room for
two guns and a tractor beam. While they come with an MFD for targeting and ordnance, they have no radar.
Page 58

Weapons
Guns. For many pilots in Gemini, this is the most important purchase you make after your
ship. Guns are listed here in order from least to most expensive. Be careful to balance the
energy use with the engine upgrade available. Shields and guns combined can leave you
powerless and vulnerable. Check to make sure you are getting the most power for your
credits and that you optimize your energy use. Buying a gun you haven't got the juice to
fire is a painful experience.
The velocity listed is the ammunition speed when shot from a stationary craft. Retire delay
is the shortest time in which the gun can recharge for the next shot. Energy use is the
amount of energy, in Gigajoules, used by each gun per shot. Armor penetration is based on
the durasteel standard, and is listed only for comparison.
Laser
Mass Driver
Meson Blaster
Neutron Gun
Particle Cannon
Tachyon Cannon
Velocity 1400 kps
Re fire delay 0.3 seconds
Energy use 4 GJ
Armor penetration 1.8 cm
Velocity 1 100 kps
Retire delay 0.6 seconds
Energy use 6 GJ
Armor penetration 2.6cm
Velocity 1 300 kps
Retire Delay 0.4 seconds
Energy Use 8 GJ
Armor Penetration 3.2 cm
Velocity 900 kps
Refire Delay 0.65 seconds
Energy Use 1 8 GJ
Armor Penetration 6.2cm
Velocity 1000 kps
Refire Delay 0.6 seconds
Energy Use 1 1 GJ
Armor Penetration 4.3cm
Velocity
Retire Delay
Energy Use
Armor Penetration
1
250
kps
0.4 seconds
8GJ
5.0cm
Ionic Pulse Cannon
Velocity
Refire Delay
Energy Use
Armor Penetration
1200 kps
0.7 seconds
15GJ
5.4
cm
58
Page 59

Plasma Gun Velocity 840 kps
Retire Delay 0.8 seconds
Energy Use 22 GJ
Armor Penetration 7.2cm
Missile Launcher. Missile launchers are crucial in making a quick kill.
Without shields few ships can withstand a missile hit. Missiles are listed in order, from least to most expensive, with a brief description of its
locking method. Each launcher can hold up to 10 missiles in any com-
bination. Armor penetration is based on the durasteel standard, and is
listed only for comparison. All missiles that can lock but fail to do so simply fly straight
ahead (like a DF missile). Retire delay for one launcher is 2.5 seconds — two launchers are
twice as fast.
Dumb Fire (DF)
Lock
Speed
Armor penetration
None (fires straight).
1000
kps
13
cm
Heat Seeker (HS)
Lock
Locks onto engines of target; most
effective if behind target.
Speed
Armor Penetration
800
16
kps
cm
Image Recognition (IR)
Lock
Locks onto shape of target;
effective from any angle.
Speed
Armor Penetration
850
17cm
kps
Friend or Foe (FF)
Lock
Speed
Armor Penetration
• Proton Torpedo
Speed 1200 kps
Armor penetration 20 cm
Locks onto nearest hostile ship
(or nearest ship not transmitting
friendly signal).
900
kps
17cm
Torpedo Launcher. Torpedo launchers have only one type of
ammunition and can hold a maximum of 10 proton torpedoes.
Retire delay is 0.5 seconds.
59
Page 60

SURVIVAL TIPS
by Lieutenant Travis Sanford
When I recently attended a convention on Oxford, I was fortunate enough to make the
acquaintance of a young pilot working at the fighter base. Mark Thornton's boundless
enthusiasm for his job impressed me so much that I decided to interview him for publication here. What I have compiled is condensation of our conversations about his training at
the TCSN Academy. Here are the high points of his advice tor rookie pilots.
Use your weapons and blasters wisely. When you are attacking hostile fighters with a
combination of different weapons, you should follow a few very basic rules. For example if
you open fire too quickly after firing a missile, you might hit the missile while it is still on
its way and explode it harmlessly, leaving your enemy unscathed.
In crowded dogfights, it is always advisable to keep one target locked and systematically
weaken its shields with gunfire. Once you have damaged the shield protection, you can
easily finish the job with a well-placed missile.
In general, it is crucial to maximize your energy levels at all times. Avoid opening fire randomly and at long ranges, since this wastes valuable energy and can weaken your shields
at the same time. If there is no immediate threat in the area, you should probably cut
down on your shield protection levels and save the energy in case of a sudden attack. A
few well-placed shots at close range with full blaster power are often more effective than a
whole barrage of long-range shots with diminished energy resources. You may overtake an
enemy ship with superior afterburners, but take care not to use up so much energy that
you do not have any resources left for your blasters. Balancing your energy is always a priority.
Target selection. The Examine Target MFD indicates how much damage has been inflicted
on the hostile ship. Since you can evaluate shield damage at all times, you know when to
launch an effective missile attack on your target. With the View Object MFD option, you
can see exactly where your fire is hitting the target.
Afterburner slide. The afterburner slide is one of the most effective space combat strategies. If you are maneuvering at constant speeds, enemy tracking systems have no trouble
honing in on you. Even velocity changes are not always enough to escape a deadly missile.
If you punch the afterburners, however, and then turn hard to the right or the left, your
ship will begin to slide. Since tracking systems have no way of anticipating a movement of
this kind, an afterburner slide is one of the most successful defensive ladies. Slides also
remove you from the line of fire and place you in a perfect position for a side attack on
enemy ships. Most fighters carry weaker port and starboard armor, making a side
approach the most obvious choice. When a hostile fighter is at a range of approximately
3500m, begin turning to the right at an angle of 30°. As soon as the enemy craft is barely
visible on your viewscreen, hit the afterburners and accelerate to your maximum speed.
Then turn hard to the left. Maintaining your current elevation during the slide is absolutely essential. Otherwise you are no longer able to open fire on your target from a side position.
60
Page 61

Afterburner Slide
4. At a range of 1000 - 1500 meters, the nose of
your ship should be aiming at the lead enemy ship.
Thumb the fire button for maximum effect, then turn
and follow the enemy wing.
3.
At a range of about
the right. Make sure you don't change elevation
during the turn.
2000
meters,
turn
hard to
2. Straighten out and immediately punch
your afterburners hard, making sure you
achieve maximum velocity.
1. At a range of 3000 - 3500
meters from your target, turn left
about 30 degrees.
61
Page 62

Vary your speed. The most basic evasive strategy in combat is to vary your speed. Spin
and turn maneuvers are not always sufficient to shake off a Church of Man terrorist. Using
your afterburners for short, unexpected bursts of speed add an element of unpredictability
to your projected flight path that make it hard for an enemy to zero in on your vessel. Keep
in mind, though, that afterburners expend tremendous amounts of generator power.
Similarly, decreasing your speed to zero can mislead even the most experienced opponent.
However, you must immediately increase your speed again or you become an easy target
for any aggressor.
Communications. Communications are an important part of any combat strategy. If you
wish to fight a neutral pilot, you can turn him hostile by sending insulting messages over
your communications system. On the other hand, you may also successfully appease an
incensed opponent by communicating your friendly intentions to him.
Concentrate on one enemy. The ITTS and other targeting features make it easy to keep
one ship locked into your sights at all times. Shield generators can regenerate damaged
defenses fairly quickly, making it essential to follow up each hit quickly. If you wait too
long, you waste your shots. Instead, select one enemy and focus on it. Then try to take it
out with quick, successive hits.
Attacking capital ships. Most capital ships are equipped with a formidable array of deadly
weapons, which making attacks against them extremely dangerous. In addition, most capital ships are escorted by a contingent of fighters which must be taken out first.
Once you have defeated the escorts, you approach the capital ship itself. The strong armor
and shields on these vessels effectively counteract almost any damage inflicted upon them.
Due to the blaster power on capital ships, a side attack is close to suicidal. In general, the
best strategy for a capital ship attack is a maximum velocity rear attack. There is less blaster
fire to the rear and the rear armor is usually the weakest. Make sure you have full blaster
power before you start your maximum velocity approach from a distance of 4000m. You
should begin firing missiles at a distance of about 1500m. At 1000m, break hard to the left
or right and circle back before you begin another approach. This gives you some time to
regenerate your blaster power. If you stick with this form of rear attack, you will soon
record your first capital ship kill.
62
Page 63

Attacking A
Capital Ship
Kilrathi Kamekh-class Destroyer
Hit Afterburners
1000 meters . turn left or riqht
Gun barrage from 1500 to
1000 meters
Launch missiles before
2000
meters
Centurion
Begin approach beyond
4000
meters
63
Hit Afterburners
Page 64

ONLINE SERVICES
AND BULLETIN BOARDS
Many of the most popular online services provide access to ORIGIN company
news, product updates, release dates, technical support and game hints. In addition, ORIGIN has established its own electronic bulletin board as a customer service.
America Online. You can e-mail Customer Support at ORIGIN CS or Marketing at
OSI. To reach our Customer Support board in the Industry Connection, press
[Ctrl][K]
for
"Go to Keyword." Then type
tion to reading messages, you can download files from the "Origin Software
Library." For membership information and a free starter kit, you can call America
Online toll-free at 1-800-827-6364.
CompuServe. To reach our Customer Support board in the Game Publishers
Forum, type GO GAMAPUB at any "!" prompt. Then select Origin Section (2). In
addition to reading the messages, you can download files from the "Library (Files)"
menu. To reach our Customer Service department by e-mail, our address is
76004,2612 (or you can post a message in the Origin Section). For membership
information and a free starter kit, you can call CompuServe toll-free at 1-800-8488199 and ask Representative #361 for your free introductory membership and $15
usage credit.
GEnie. You can e-mail Customer Support at ORIGIN. To reach our Customer
Support board in the Games RoundTable, Scorpia RT, type M805; at any
"?"prompt. Then select Origin Systems at Category 16. In addition to reading the
messages, you can download files from the "Games RoundTable Libraries." For
membership information can call GEnie toll-free at 1-800-638-9636.
ORIGIN
in the
Keyword
window. In
addi-
ORIGIN BBS. The ORIGIN BBS is located in Austin, Texas and has a modem support of: 300/1200/2400/9600/14,400 bauds with N,8,1. It is operational 24 hours
a day, 7 days a week. Full support is provided. Call 1-512-331-4446 to contact.
No membership is required and the only cost is any long distance charges that you
may incur.
Internet Address. You can e-mail Origin Customer Support at
ORIGIN_CS@AOL.COM or Origin Marketing at OSI@AOL.COM.
PRODUCT SUPPORT
For ORIGIN Product Support, call (512) 335-0440 Mon.-Fri., 9 a.m.-5 p.m., Central time.
©Copyright 1993, ORIGIN Systems, Inc.
Privateer is a trademark of ORIGIN Systems,
Inc. Wing Commander, Origin and We create
worlds are registered trademarks of ORIGIN
Systems, Inc. Electronic Arts is a registered
trademark of Electronic Arts.
64
 Loading...