Page 1
Page 2

Table of ConTenTs
READ BEFORE USING THE GAME . . . . . . . . . . . . . . . . . . . . . . . . . . . . . . . . . . . . . . . 2
GETTING STARTED. . . . . . . . . . . . . . . . . . . . . . . . . . . . . . . . . . . . . . . . . . . . . . . . . . . . 3
System Requirements . . . . . . . . . . . . . . . . . . . . . . . . . . . . . . . . . . . . . . . . . . . . . . . . . . . . . . . . . . . . . . 3
Installation . . . . . . . . . . . . . . . . . . . . . . . . . . . . . . . . . . . . . . . . . . . . . . . . . . . . . . . . . . . . . . . . . . . . . . . . 3
GAME SETUP. . . . . . . . . . . . . . . . . . . . . . . . . . . . . . . . . . . . . . . . . . . . . . . . . . . . . . . . . 4
Launching the Game . . . . . . . . . . . . . . . . . . . . . . . . . . . . . . . . . . . . . . . . . . . . . . . . . . . . . . . . . . . . . . . 4
Using the Menus. . . . . . . . . . . . . . . . . . . . . . . . . . . . . . . . . . . . . . . . . . . . . . . . . . . . . . . . . . . . . . . . . . . 4
Options Page . . . . . . . . . . . . . . . . . . . . . . . . . . . . . . . . . . . . . . . . . . . . . . . . . . . . . . . . . . . . . . . . . . . . . . 4
GAME MODES. . . . . . . . . . . . . . . . . . . . . . . . . . . . . . . . . . . . . . . . . . . . . . . . . . . . . . . . 8
Offline Modes . . . . . . . . . . . . . . . . . . . . . . . . . . . . . . . . . . . . . . . . . . . . . . . . . . . . . . . . . . . . . . . . . . . . . 8
Submarine School . . . . . . . . . . . . . . . . . . . . . . . . . . . . . . . . . . . . . . . . . . . . . . . . . . . . . . . . . . . . . . . . . 8
Career . . . . . . . . . . . . . . . . . . . . . . . . . . . . . . . . . . . . . . . . . . . . . . . . . . . . . . . . . . . . . . . . . . . . . . . . . . . 10
Quick Mission . . . . . . . . . . . . . . . . . . . . . . . . . . . . . . . . . . . . . . . . . . . . . . . . . . . . . . . . . . . . . . . . . . . . 12
Single Patrols . . . . . . . . . . . . . . . . . . . . . . . . . . . . . . . . . . . . . . . . . . . . . . . . . . . . . . . . . . . . . . . . . . . . 17
Museum . . . . . . . . . . . . . . . . . . . . . . . . . . . . . . . . . . . . . . . . . . . . . . . . . . . . . . . . . . . . . . . . . . . . . . . . . 18
Online Modes . . . . . . . . . . . . . . . . . . . . . . . . . . . . . . . . . . . . . . . . . . . . . . . . . . . . . . . . . . . . . . . . . . . . 19
INTRODUCTION. . . . . . . . . . . . . . . . . . . . . . . . . . . . . . . . . . . . . . . . . . . . . . . . . . . . . . 20
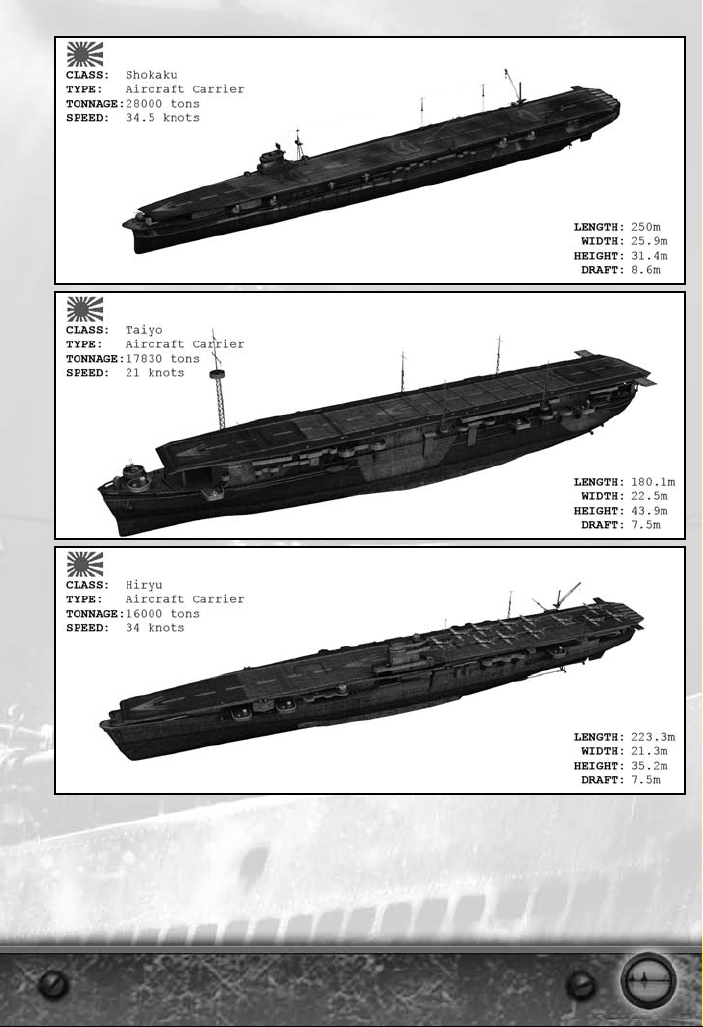
Ships ID . . . . . . . . . . . . . . . . . . . . . . . . . . . . . . . . . . . . . . . . . . . . . . . . . . . . . . . . . . . . . . . . . . . . . . . . . 21
Flags . . . . . . . . . . . . . . . . . . . . . . . . . . . . . . . . . . . . . . . . . . . . . . . . . . . . . . . . . . . . . . . . . . . . . . . . . . . . 49
PLAYING THE GAME . . . . . . . . . . . . . . . . . . . . . . . . . . . . . . . . . . . . . . . . . . . . . . . . . 51
In-Game Interface . . . . . . . . . . . . . . . . . . . . . . . . . . . . . . . . . . . . . . . . . . . . . . . . . . . . . . . . . . . . . . . . 51
Submarine Stations . . . . . . . . . . . . . . . . . . . . . . . . . . . . . . . . . . . . . . . . . . . . . . . . . . . . . . . . . . . . . . . 58
MULTIPLAYER . . . . . . . . . . . . . . . . . . . . . . . . . . . . . . . . . . . . . . . . . . . . . . . . . . . . . . . 82
Setting Up for Online Play . . . . . . . . . . . . . . . . . . . . . . . . . . . . . . . . . . . . . . . . . . . . . . . . . . . . . . . . . . 82
Multiplayer Interface . . . . . . . . . . . . . . . . . . . . . . . . . . . . . . . . . . . . . . . . . . . . . . . . . . . . . . . . . . . . . . 83
Multiplayer Game Modes . . . . . . . . . . . . . . . . . . . . . . . . . . . . . . . . . . . . . . . . . . . . . . . . . . . . . . . . . . 88
Tabs and Orders . . . . . . . . . . . . . . . . . . . . . . . . . . . . . . . . . . . . . . . . . . . . . . . . . . . . . . . . . . . . . . . . . . 88
WORLD WAR II OVERVIEW. . . . . . . . . . . . . . . . . . . . . . . . . . . . . . . . . . . . . . . . . . . . 92
World War II Timeline . . . . . . . . . . . . . . . . . . . . . . . . . . . . . . . . . . . . . . . . . . . . . . . . . . . . . . . . . . . . .92
Nationality Status Timeline . . . . . . . . . . . . . . . . . . . . . . . . . . . . . . . . . . . . . . . . . . . . . . . . . . . . . . . . . 95
Facts about U.S. Submarines in World War II . . . . . . . . . . . . . . . . . . . . . . . . . . . . . . . . . . . . . . . . .
World War II Medals . . . . . . . . . . . . . . . . . . . . . . . . . . . . . . . . . . . . . . . . . . . . . . . . . . . . . . . . . . . . . . 96
APPENDIX . . . . . . . . . . . . . . . . . . . . . . . . . . . . . . . . . . . . . . . . . . . . . . . . . . . . . . . . . . 98
Basic Controls . . . . . . . . . . . . . . . . . . . . . . . . . . . . . . . . . . . . . . . . . . . . . . . . . . . . . . . . . . . . . . . . . . . . 98
Navigation Controls . . . . . . . . . . . . . . . . . . . . . . . . . . . . . . . . . . . . . . . . . . . . . . . . . . . . . . . . . . . . . . . 98
Stations Controls. . . . . . . . . . . . . . . . . . . . . . . . . . . . . . . . . . . . . . . . . . . . . . . . . . . . . . . . . . . . . . . . . . 98
Attack Controls . . . . . . . . . . . . . . . . . . . . . . . . . . . . . . . . . . . . . . . . . . . . . . . . . . . . . . . . . . . . . . . . . . . 99
Other Controls . . . . . . . . . . . . . . . . . . . . . . . . . . . . . . . . . . . . . . . . . . . . . . . . . . . . . . . . . . . . . . . . . . . . 99
WARRANTY . . . . . . . . . . . . . . . . . . . . . . . . . . . . . . . . . . . . . . . INSIDE FRONT COVER
TECHNICAL SUPPORT . . . . . . . . . . . . . . . . . . . . . . . . . . . . . . . INSIDE BACK COVER
96
1
Page 3

Each time McClintock shifted his cross hairs from ship to ship,
his exec, Ernest Louis (“Ernie”) Schwab, Jr., 1939, would ask,
“What’s there?” McClintock replied calmly,
“Battleship…Cruiser…Battleships…Cruisers.”
Clay Blair Jr, Silent Victory.
reaD before UsInG THe GaMe
Some people are susceptible to epileptic seizure or loss of consciousness when viewing certain
types of blinking lights or other stimuli commonly found in our everyday environment. These
persons are at risk of having a seizure when they look at certain televised images or when they
play video games. Such phenomena can occur even in persons with no medical history of epilepsy
and who have never had an epileptic seizure. If you or a member of your family has ever shown
symptoms related to epilepsy (seizure or loss of consciousness) in the presence of illuminated
stimuli, consult your doctor before use. We advise parents to provide supervision when their
children play video games. Stop playing and consult a doctor immediately if you or your child
experiences any of the following symptoms: dizziness, vision problems, and eye or muscle spasms,
loss of consciousness, disorientation, involuntary movement or convulsions.
Always take the following precautions when playing video games:
• Do not sit or stand too close to the screen.
• Preferably, use video games on a small screen.
• Do not play if you are tired or have not had enough sleep.
• Play in a well-lit area.
• While playing, take 10- to 15-minute breaks every hour.
2
Page 4
GeTTInG sTarTeD
This section will help you get started playing Silent Hunter®: Wolves of the Pacific. Users familiar
with the previous versions of Silent Hunter should still scan this section for up-to-date information.
sysTeM reqUIreMenTs
Supported OS: Windows® XP/Vista Only
Processor:
RAM:
Video Card:
(256 MB RAM recommended) (see supported list*)
Sound Card:
DirectX Version:
DVD-ROM:
Hard Drive Space: 6 GB
Multiplayer: 128 Kbps upstream or faster (512 Kbps upstream or faster needed to host online games)
Supported Video Cards at Time of Release:
ATI® RADEON® 9600/9700/9800, X300 to X850, X1300 to X1800
NVIDIA® GeForce™ 6200/6600/6800/7800
These chipsets are the only ones that will run this game. Additional chipsets may be supported
after release. For an up-to-date list of supported chipsets, video cards, and operating systems,
please visit the FAQ for this game on our support website at: http://support.ubi.com.
NOTICE: This game contains technology intended to prevent copying that may conflict with some
disc and virtual drives.
InsTallaTIon
InsTallInG sIlenT HUnTer®: Wolves of THe PaCIfIC
Silent Hunter: Wolves of the Pacific must be installed before you can run the game. To install,
insert the first Silent Hunter: Wolves of the Pacific CD and wait for the launch screen to appear.
Click Install and follow the instructions as they appear.
If you have auto-run disabled, you may launch the installer manually. Choose Windows Explorer
from the Programs submenu on your Windows Start menu. Choose the Silent Hunter: Wolves of
the Pacific CD icon to display the files located on the CD. Look for Setup.exe among those files and
double-click it to run the installer.
2 GHz Pentium® 4 or AMD Athlon™ (3 GHz Pentium or AMD Athlon recommended)
1 GB (2 GB recommended)
128 MB RAM DirectX® 9-compliant video card capable of rendering Pixel Shader 2.0
DirectX 9-compliant sound card
DirectX 9 (included on disc)
4x or faster DVD drive
UnInsTallInG sIlenT HUnTer: Wolves of THe PaCIfIC
To uninstall the game, select Uninstall from the Silent Hunter Start menu item. You can also choose
Settings from the Windows Start menu and select Control Panel, select Add/Remove Programs,
left-click on Silent Hunter: Wolves of the Pacific, and click on the Add/Remove button. The game
and all its components are then removed from your system, except for your saved games.
3
Page 5
GaMe seTUP
laUnCHInG THe GaMe
When the game is installed, you are offered a shortcut on the desktop. If you decide to use it, you
can start the game by clicking the SH4.exe icon displayed on your desktop. Otherwise, click on
your computer’s Start button and select Programs/Ubisoft/Silent Hunter 4/”Play Silent Hunter 4.”
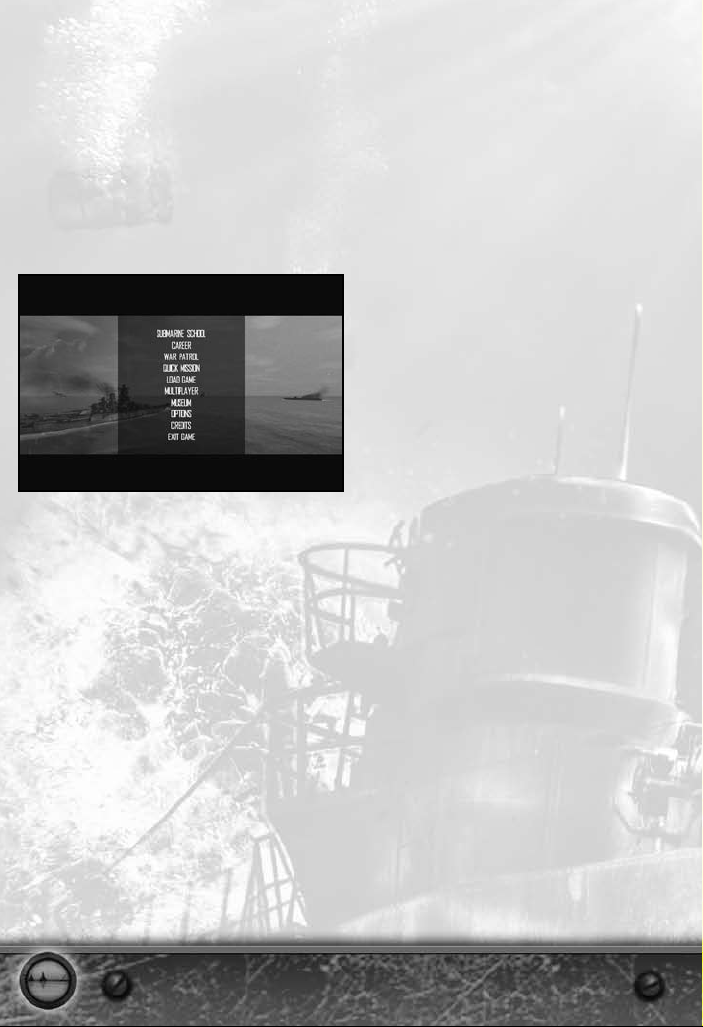
When you start the game the Ubisoft logo and Silent Hunter 4 Intro Movie will be played, and then
the Main Menu will appear on your screen. From the Main Menu you can access all of the game’s
features. See specific sections in the manual for details.
UsInG THe MenUs
KeyboarD
The Esc key takes you back to the previous screen.
MoUse
To display information, simply point at the desired icon or text with the mouse pointer. Then to
select or confirm a choice, click on the desired icon or text with the left mouse button. To return to
the previous screen, use the on-screen Back button.
oPTIons PaGe
The Options page has three types of settings:
• Sound
• Graphic
• Gameplay
4
Page 6
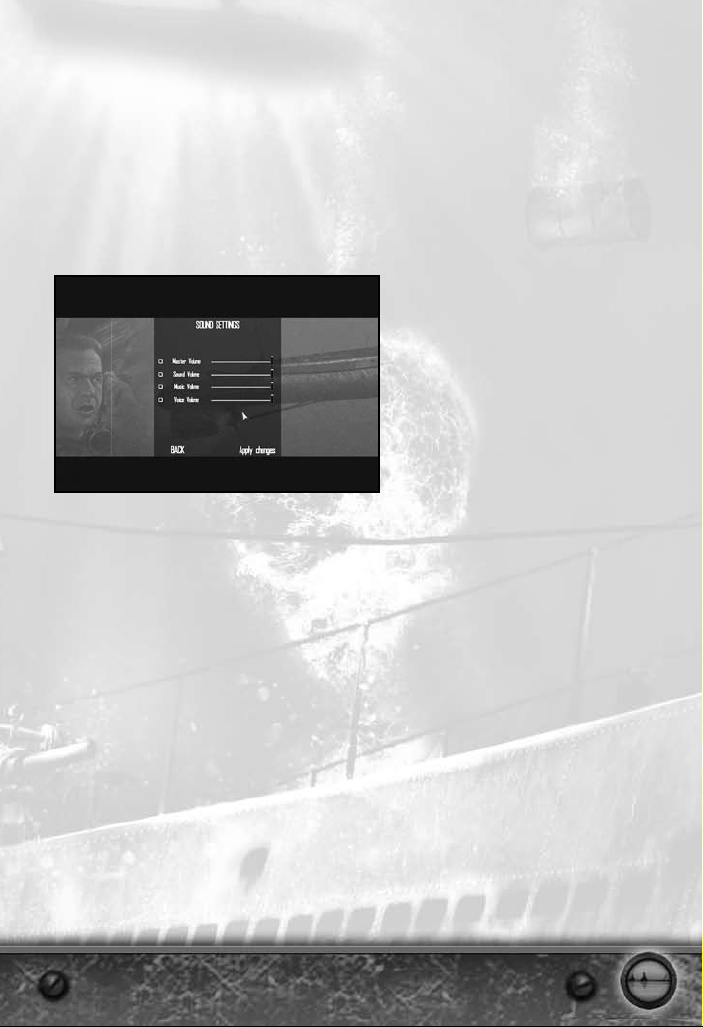
soUnD seTTInGs
• Master Volume lets you change the overall volume of the game. Check the Master Volume
box to set the volume to zero (mute).
• Sound Volume lets you change the volume of the sound effects within the game. Check the
Sound Volume to set the volume to zero (mute).
• Music Volume lets you change the volume of the music within the game. Check the box in
front of Music Volume will set the volume to zero (mute).
• Voice Volume lets you change the volume of the characters’ voices within the game. Check
the Voice Volume box to set the volume to zero (mute).
• In order for the changes to take effect you must press the Apply Changes button.
GraPHIC seTTInGs
Graphic settings can be changed in two ways. You can choose one of the three predefined
settings (Low, Medium, High), which will check/uncheck the graphic options as necessary, or you
can change the graphic settings manually by checking/unchecking the option boxes. In this case,
the graphic settings will be set to Custom.
• Game Resolution: You can switch between several resolutions from the drop-down list.
Depending on you graphic card, bigger resolutions may generate a lower performance.
• Ship 3D Damage: The visual damage on a ship has three levels of detail. If it’s set to
the maximum, you will have the best visual experience but you will encounter lower
performance.
• Character Detail: Enable or disable the usage of the normal maps on the characters.
• Particles Density: Choose the density of particles used within the game. Higher densities
may generate a lower performance.
• Window Mode: Choose whether to play in window mode or in full-screen mode.
• Post-Process Filters: Check this button if you want to enable all the photographic filters.
Full Scene Glare: Check this button if you want to enable sun glares in the game.
•
• Light Shafts: This option enables the effect of scattering sun rays under the water.
5
Page 7
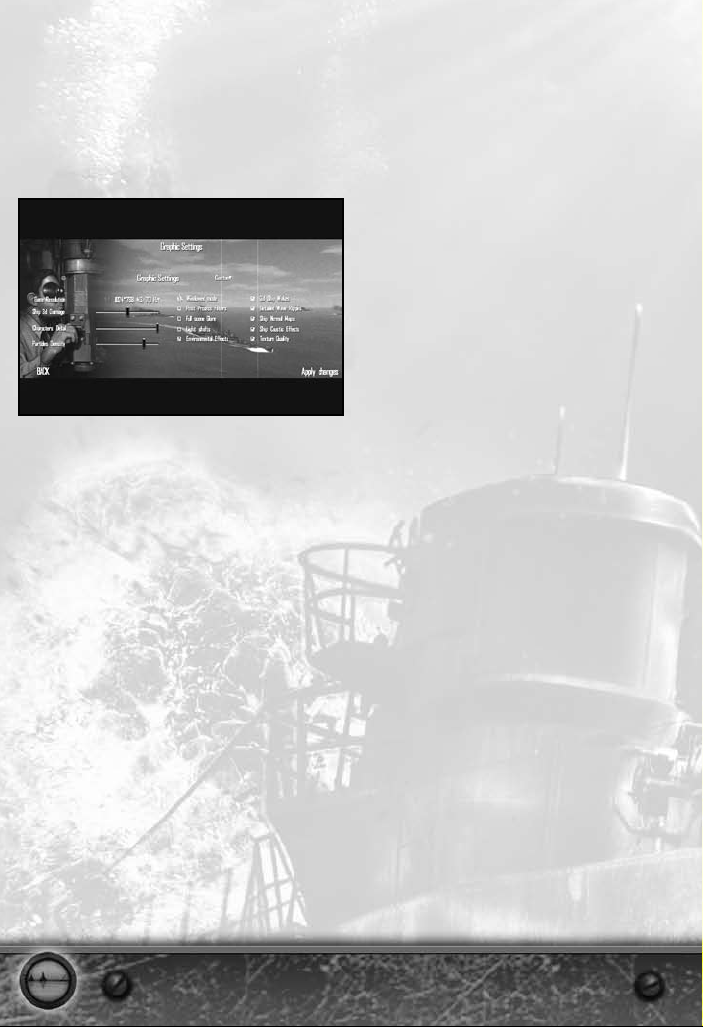
• Environmental Effects: This option enables the clouds, shadows, and volumetric fog.
• 3D Ship Wakes: This option enables the usage of 3D ship wakes.
• Detailed Wave Ripples: This option enables more realistic wave effects.
• Ship Normal Maps: This option enables the usage of normal maps on the ships.
• Ship Caustic Effects: This option enables the reflections of the sun from the water on the ship.
• Texture Quality: Choose the usage of low-quality textures or the high-quality textures.
GaMePlay seTTInGs
Gameplay settings affect the realism of the game. Please note that when playing at 100% realism,
you will need to reserve enough fuel to get back to within 25km of your home port, in order to
return to base. Once you are within 25km, press the Esc key and select the Dock at Port option.
• Limited Batteries: When selected, the batteries that power your sub’s electric engines are
limited. This, in turn, limits the amount of time you can stay submerged before the batteries
must be recharged. (5%)
• Limited Compressed Air:
surface, blowing air in the ballast tanks. If you exhaust your supply, you will have trouble
bringing the submarine to the surface. Compressed air is regenerated by your compressor
when the submarine is running on the surface, so that piece of equipment is vital. (1%)
• Limited O2: When the submarine is submerged, the crew uses oxygen and generates CO2.
With time, the air will become unbreathable, affecting the performance of the crew and
possibly even leading to their deaths. When this option is selected, you must surface your
sub periodically to resupply your sub with fresh air. (6%)
• Limited Fuel: When selected, your sub has limited fuel and, therefore, limited range. You
must return to base before your fuel supply is exhausted. There are no refueling subs in the
game. You will get a warning during a patrol when you have used 50% of your fuel. (6%)
• Realistic Repair Time: When selected, damage repairs will take longer. (8%)
•
Manual Targeting System: When selected, you must enter the appropriate information into
the TDC when firing torpedoes. You can not simply point the TBT or periscope at a target
and fire. You can still request a solution from your officers, unless the No Weapons Officer
Assistance option below is also disabled. (15%)
When selected, your sub uses an amount of compressed air to
6
Page 8
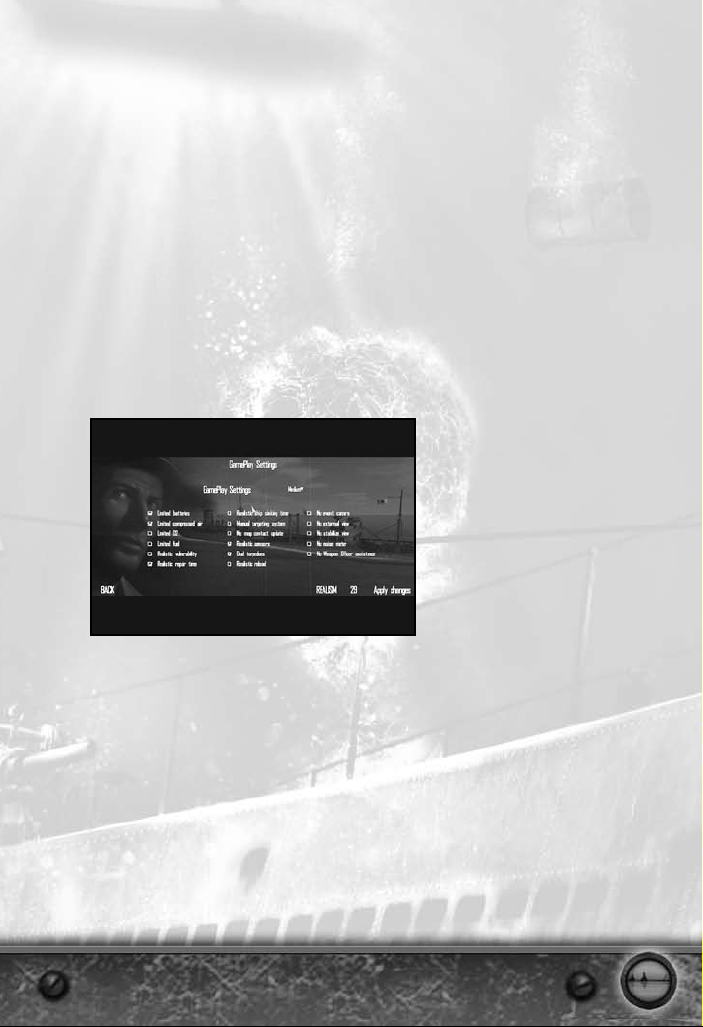
• No Map Contact Update: When selected, hydrophone and visual contacts will not appear on
the navigation map. Radio contacts, however, will periodically appear on the map. (12%)
• Realistic Sensors: When selected, the effectiveness of your hydrophones and radar is
reduced. (6%)
• Dud Torpedoes: When selected, your torpedoes will periodically malfunction. Malfunctioning
torpedoes may detonate too early or not at all. (4%)
• Realistic Reload: When selected, it will take a considerable amount of time to reload your
torpedo tubes. (6%)
• No Event Camera: When selected, the event camera is disabled. (3%)
• No External View: When selected, the external camera (hotkey F12) is disabled. (8%)
• No Stabilized View: When selected, your targeting optics (i.e., the TBT or the attack
periscope) will be realistically affected by the submarine’s movement on the waves. This will
make targeting in rough seas much more difficult. (5%)
No Noise Meter: When selected, the noise meter, which gives an indication of how
•
detectable your submarine is at the moment, will be disabled. (2%)
• No Weapon Officer Assistance: When selected, the Weapon Officer will not identify targets or
calculate firing solutions for you. You must determine range, speed, and AOB by yourself. (6%)
7
Page 9

GaMe MoDes
From the Main Menu page, choose to play either a single-player or multiplayer game.
offlIne MoDes
Silent Hunter: Wolves of the Pacific has the following single-player modes available.
sUbMarIne sCHool
GaMe MoDe DesCrIPTIon
The Submarine School is the game’s tutorial, a collection of missions teaching you the essentials
of submarine navigation and warfare. Four “courses” (objectives) are offered: Navigation, Artillery
(how to use guns), Torpedoes, and Convoy Attack.
Completing Submarine School missions is not mandatory, but it gives you a boost when starting a
new campaign. Exams can be taken an unlimited number of times, so don’t despair if you get a bad
grade your first time out. To complete a mission, finish your objectives and then press the Esc key.
ConTenT
NavigatioN traiNiNg
Objective: Reach a designated zone.
To control the speed of the submarine you may use the speed telegraph dial (the left-most dial on
the interface).You can left-click anywhere in the dial. The dive officer will automatically set the
engine speed according to your selection.
On the right side of the speed telegraph dial are the speed steps for moving ahead. On the left side
of the speed telegraph dial are the speed steps for moving backwards. In the middle lower part of
the speed telegraph is the All Stop command.
To control the direction of the submarine you may use the compass dial (the middle dial on the
HUD). You can left-click on the outer disc of the compass dial to set a new direction for your
submarine. The compass will allow you to turn the boat toward a direction and continue in that
direction.
To control the depth of the submarine you may use the depth dial (the right-most dial on the
HUD). You can left-click anywhere on the marked area. The dive officer will automatically set the
depth according to your selection. Using the depth dial, you can dive up to 165 ft. Each marking
represents 5 ft of depth.
You can use the following shortcuts to set various depths: S key to surface the submarine and P
key for dive to periscope depth
guNNery traiNiNg
Objective 1: Destroy the airplane.
8
Page 10

The anti-air (AA) and deck guns can be manned and used only when surfaced and in good
weather.
To use the AA guns manually, select the AA station from the Station panel. Alternatively, you can
use the shortcut F7 key.
Aim the guns by moving the mouse in the desired direction, after first clicking in the 3D space to
capture the movement of the cursor. To zoom the view of a target through the targeting device use
the mouse wheel or the Tab key.
Press the Space Bar to fire.
Objective 2: Destroy the merchant ship.
Unarmored ships of small size can be tackled with the deck gun or the heavier AA guns on your
submarine. It isn’t wise to engage in an artillery duel with any large ships, but occasionally you
may find targets that are not worth a torpedo.
To use the deck gun manually, select the Deck Gun Station from the Station panel. Alternatively,
you can use the shortcut F6 key.
To get a better view of a target, use the optical aiming device of the gun by using the mouse wheel
or pressing the Tab key. On the top of the optical aiming device, you will see the current elevation
of the gun in yards.
Move the crosshair left or right by using the left and right cursor keys or the mouse to point the
gun in the desired direction.
Press the Space Bar to fire.
torpedo traiNiNg
Objective: Sink the cruiser.
The periscope is the submarine’s main torpedo-aiming device while the submarine is submerged.
You can access the periscope by selecting the Periscope icon from the station panel. Alternatively,
you can use the shortcut F3 key.
To raise or lower your periscope, left-click on the Raise Periscope or Lower Periscope order from
the order bar, or use the Page Up/Page Down keys.
Turn the periscope around to locate your target. Use the left and right cursor keys or left-click
in the circular periscope view. In this way you link the periscope to your mouse. To revert to the
mouse cursor left-click again.
You can zoom your view using the mouse wheel or Tab key
Aim the center of the crosshair over the target. In Assisted mode, the AI will perform all the
necessary computing for a valid torpedo solution.
Once you have a solution you are satisfied with, you must select a loaded tube to be able to fire.
Bring out the Torpedo Tubes panel from the right edge of the screen, and then left click on a
loaded tube to select it. Left-click on the Fire button to launch a torpedo.
SoNar aNd radar traiNiNg
Objective: Detect the enemy convoy.
In this mission you will learn to use the radar and the sonar to intercept an enemy convoy.
9
Page 11
CoNvoy attaCk traiNiNg
Objective: Sink 10,000 tons of merchant ships.
This is a training exercise in which you have to engage convoy in combat conditions. The enemy
will attack you. Use the submarine’s capabilities to the maximum.
The convoy will move on a NNE course. You start in a good attack position, SE of the current
position of the convoy. The sun is setting.
Remain submerged and take a general course to NW, perpendicular to the convoy’s estimated
course. Approach the convoy at Ahead Slow to remain undetected by the escorts.
The escort’s hydrophones have a limited range. Avoid getting too close to them and you will
remain undetected. An escort’s weak spot when searching a submerged submarine is behind it.
The escort’s hydrophones cannot detect a submarine behind them because of their own propeller
noise. If you find yourself in such a position, you can move fast without being discovered. If an
escort has detected your submarine, dive to a safe depth of at least 50 m.
When an escort launches depth charges, you should move your submarine with Ahead Flank
speed and turn hard to one side or the other. After evading an attack, return to Ahead Slow to
remain undetected.
Once you pass the escort screen, the best chances to successfully attack with torpedoes a
merchant ship are when you remained undetected, within 1,000 yards, and positioned abeam of
the target.
Career
GaMe MoDe DesCrIPTIon
The Career mode is also known as the “dynamic campaign.” In this mode, you perform a series
of patrols throughout the course of the war. The length of your career will depend on your
performance. A poor player may be relieved from command early, while an excellent captain will
be offered the command of a new and better submarine and later retire to a desk job.
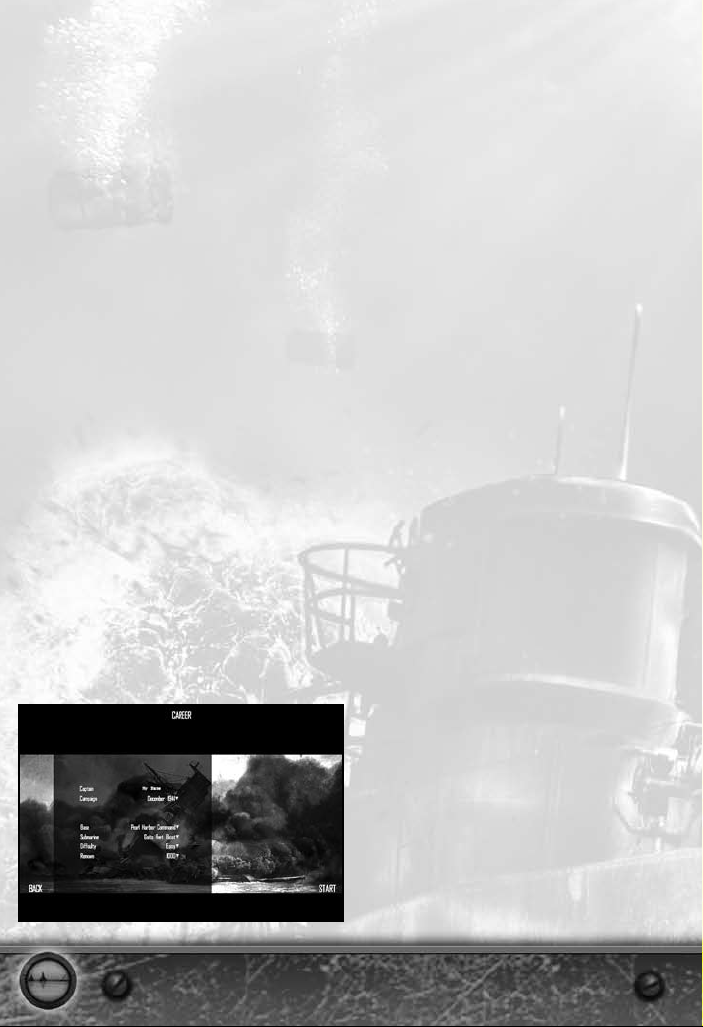
Career MenU
In the Career menu you can choose a name, the starting date of the campaign, the starting
unit that you’ll be part of, the type of submarine, the difficulty of the campaign, and the starting
renown. Several of the starting options will default to random, allowing you to receive a surprise
assignment every time you start a career.
10
Page 12

objeCTIves
Before every patrol, you will be presented with a number of objectives that your commander
wants accomplished. As the campaign and the objectives are dynamically generated, there
is no telling what each of the patrols may consist of. Your orders may, however, include the
following objectives:
• Patrol area and sink enemy ships.
• Photo recon of enemy installations.
• Lifeguard duty in support of air operations.
• Supply drop to friendly forces.
• Transport and insert Allied agents or troops on an enemy-held island.
• Stop at a friendly base.
Accomplishing the objectives is not mandatory, in that you are not required to complete them in
order to advance in the game. As in real life, sometimes it’s just not possible to complete a certain
action without losing your boat. Remember, though, that an unproductive commander will not be
appreciated, so try to bring results as well as keep your boat safe.
You are free to engage any enemy targets you encounter before, during, or after the completion of
your objectives. To terminate the patrol you will need to sail back to port.
Career ProGressIon
As you complete each patrol in your career, you will receive several rewards for your actions.
This is a measure of your fame as a submarine captain and the influence you have with
Renown:
the commanders of the submarine fleet. The more successful you are, the more renown you
gain. You can use the renown to get access to certain improvements for your submarine sooner
than they become available to the fleet. You can also use the renown to recruit better-trained
crewmembers for your submarine.
A few actions that get you renown are:
• Destroying enemy ships.
• Destroying enemy planes.
• Completing objectives.
• Saving downed Allied pilots.
Loss of Renown:
your renown. Possible reasons include:
• Sinking neutral ships.
• Sinking Allied ships.
• Shooting down friendly airplanes.
• Getting your men wounded or killed.
• Receiving damage to your submarine.
It is perfectly possible to lose the influence you have with the commanders and
11
Page 13
Promotions: If you are particularly successful, you may be allowed to award promotions to
members of your crew. If you have sufficient renown, you may even get promoted yourself.
Medals: If you are particularly successful, you may be allowed to allocate medals to members of
your crew. It is also possible for you to receive such decorations.
Qualifications: Whenever you promote a crewmember that reaches Petty Officer status, you will
be required to assign him a qualification. This will improve his skills and thus his efficiency in the
submarine, but for best results you should qualify men based on their natural skills.
savInG, loaDInG, anD DeleTInG Careers
To save your career during a mission, hit the Esc key. You will then see a menu option to save
your career.
enDInG a PaTrol
To end a patrol, you will have to reach your home base. When you’re close enough to the base, a
pop-up screen will appear asking if you wish to dock. You do not have to travel the last mile and
dock in the submarine pen, though you are welcome to try it.
renoWn anD realIsM
The renown you receive for sinking enemy ships is also affected by your realism settings. For
example, at 100% realism, you will receive full renown credit for every ship that you sink and at 0%
realism, you will receive 25% of the renown credit for every ship. However, the higher the realism
setting, the harder the game.
qUICK MIssIon
GaMe MoDe DesCrIPTIon
Quick mission allows you to take part in a quick one- or two-hour action against the enemy. While
the mission is set in stone, you may choose to play it with any type of submarine historically
available at the date that the mission takes place, in a sort of “what if” approach.
The missions have specifically set objectives that you must complete in order to be successful.
ConTenT
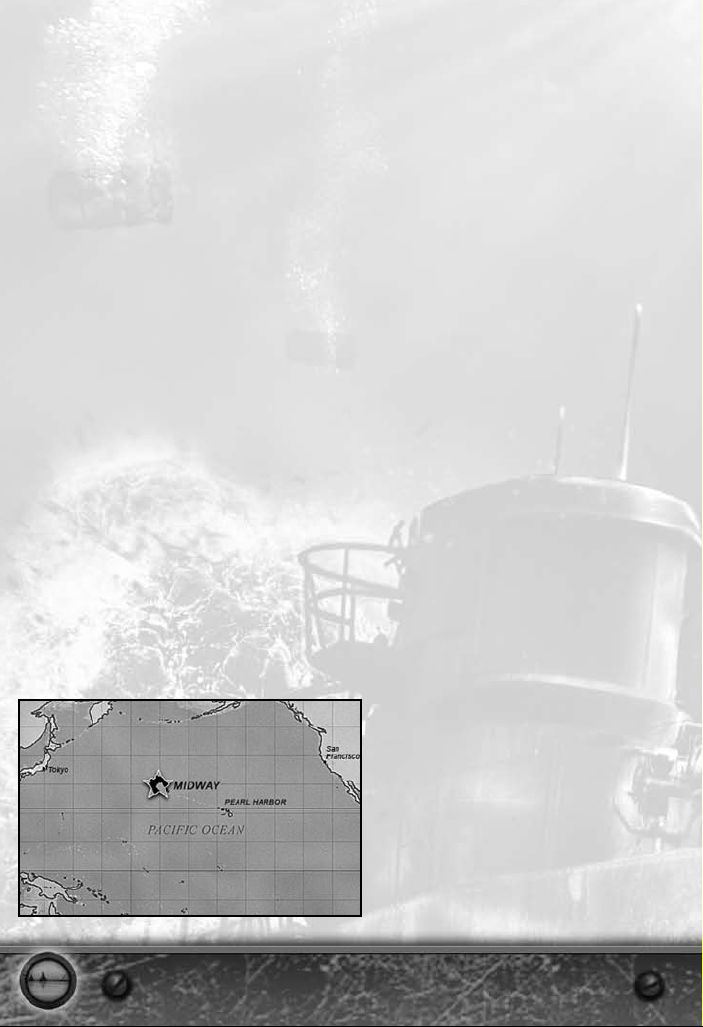
MiSSioN 1 – Battle of Midway, 1942
12
Page 14
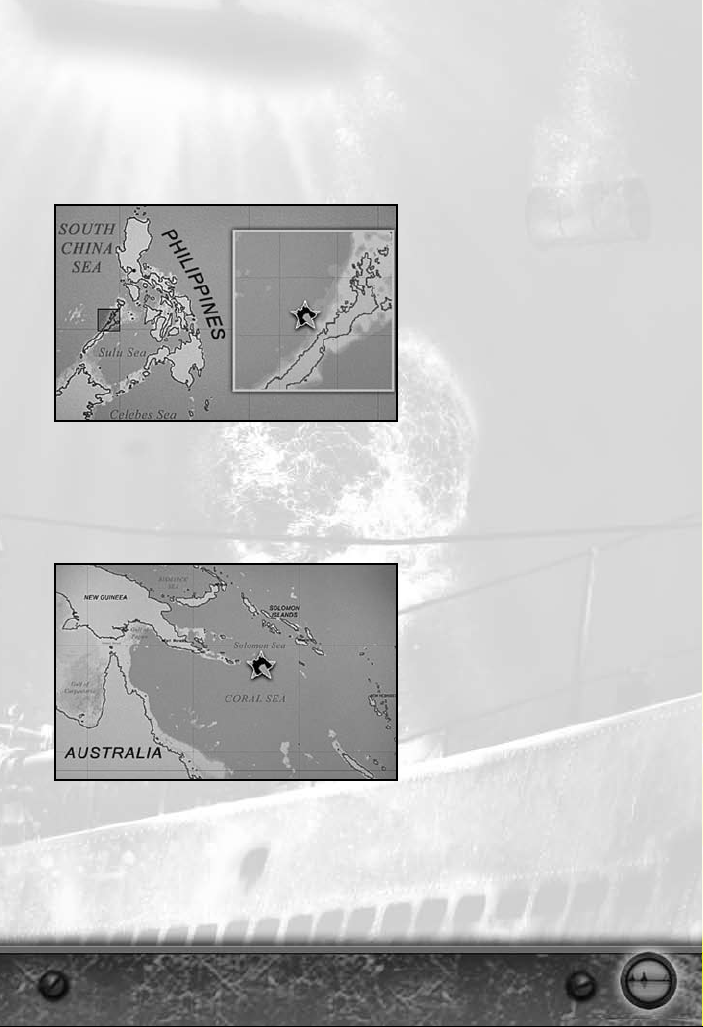
Briefing: This is our chance to turn the tide of the war in the Pacific. Using decoded Japanese
transmissions, we have turned a trap intended for our carriers into one for the Japanese. This
morning, our scout planes finally located the enemy flattops. At this moment, aircraft based on
Midway Island and our carriers are approaching the Japanese task force. Your submarine, part of
the force deployed in support of this operation, is the only one to have actually made contact with
the enemy. You have the unique chance to sink a major Japanese unit and help the war effort.
Primary objective: Sink major Japanese warships.
MiSSioN 2 – aMBuSh iN palawaN paSSage, 1944
.
Briefing: Your submarine has been deployed to intercept Japanese forces responding to the U.S.
landings on Leyte, in the Philippines. At 4:51 this morning, your SJ radar operator has detected an
important number of contacts on bearing 230. It seems the Japanese are indeed coming this way.
It’s time to go take a look at them.
Primary objective: Attack the Japanese force.
MiSSioN 3 – Coral Sea, 1943
Briefing: We have credible intelligence that the Japanese are pushing south again toward
Australia, this time looking to land at Port Arthur and conquer New Guinea from the south. The two
available U.S. fleet carriers will deploy to counter the Japanese movements, but with the limited
time available for preparations, only four of our submarines have made it to the area. This would
prove to be the first carriers-only fight in the war, foreshadowing the decline of battleships and the
rise of airpower.
Primary objective: Sink the Japanese flattops.
13
Page 15
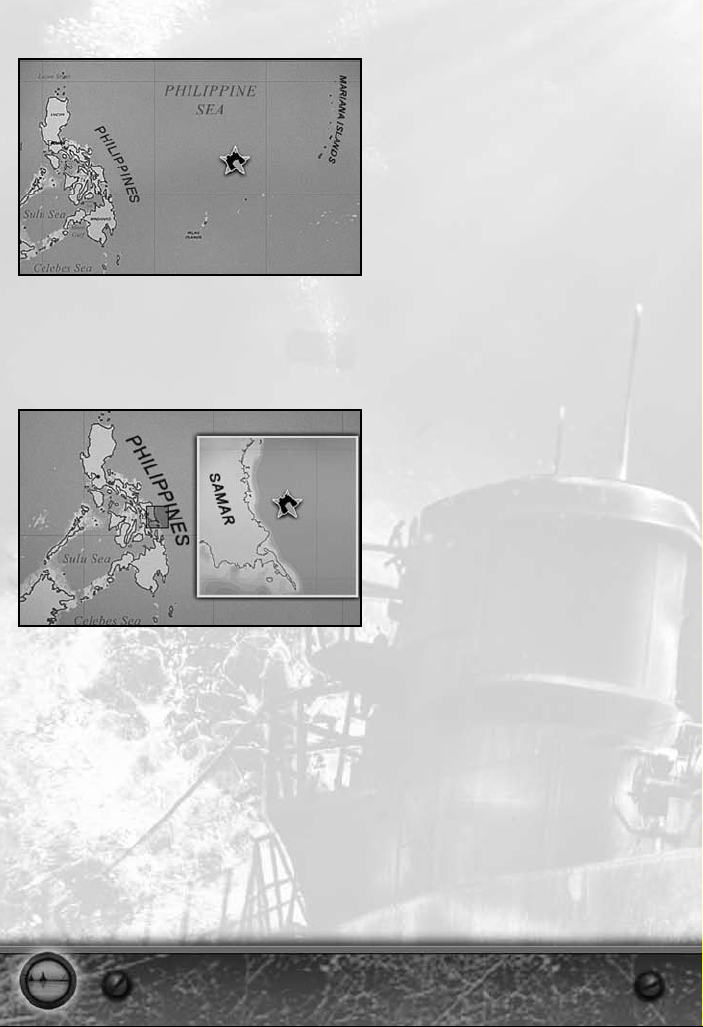
MiSSioN 4 – Battle of philippiNe Sea, 1944
Briefing: Reacting to the U.S. invasion of the Marians Islands, the Japanese fleet is sortiing in
force. They are looking for a decisive battle, but this time the U.S. fleet is more than a match for
them. However, the problem is finding the Japanese fleet in time. And your sub has just done it.
Primary objective: Sink Japanese aircraft carriers and battleships.
MiSSioN 5 – Battle off SaMar Bay, 1944
Briefing: The decisive moments of the battles around Leyte gulf are here. With the U.S. 3rd fleet
steaming north to attack the Ozawa’s carrier group, the way was left open for Kurita’s mighty
battleship force to reach the American landing beaches. Only one feeble obstacle stands in their
way: the escort carrier groups supporting the landings and your submarine. Having reported to
this station to deliver injured Ens. G.W. Rudolph to a more adequate medic station, you are now in
a good position to return the favor and attack the Japanese fleet. Attack the Japanese forces. If
enough opposition is presented, perhaps they will turn back!
Primary objective: Protect the carrier fleet.
14
Page 16
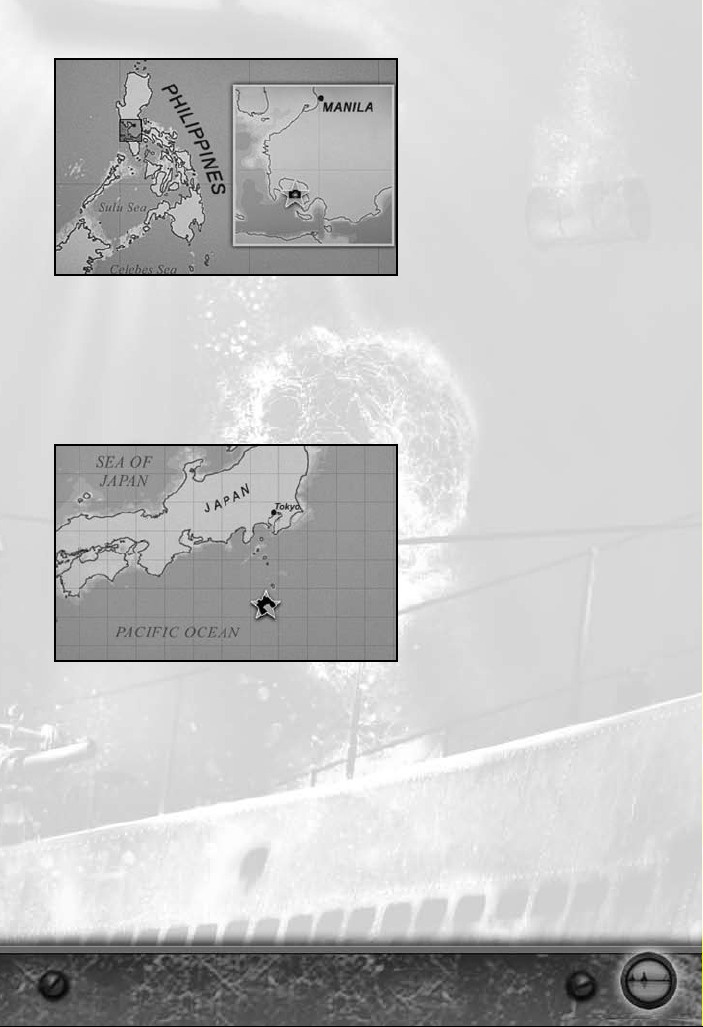
MiSSioN 6 – photo reCoN, 1943
Briefing: As part of the war effort against the empire of Japan, you are assigned to patrol the
Mindoro Strait area. Engage enemy shipping with priority on tankers. Intelligence points out
that the enemy may be using Batangas Bay as a staging area for their fleet operations. If the
opportunity arrives, conduct photographic reconnaissance of the anchorage and report enemy
fleet disposition.
Primary objective: Take photos of the enemy fleet.
MiSSioN 7 – tokyo-SaipaN CoNvoy, 1944
Briefing: On March 12, a large convoy carrying elements of the 43rd Division left Tokyo Bay
heading for Saipan, Mariana Islands. Shortly after the convoy left the Tokyo harbor a strong escort
group, under the flagship of an unidentified light cruiser, joined the convoy. Three days later on the
west coast of Aoga Island, the convoy was intercepted by USS Sandlance.
Primary objective: Engage Japanese convoy heading for Saipan.
15
Page 17
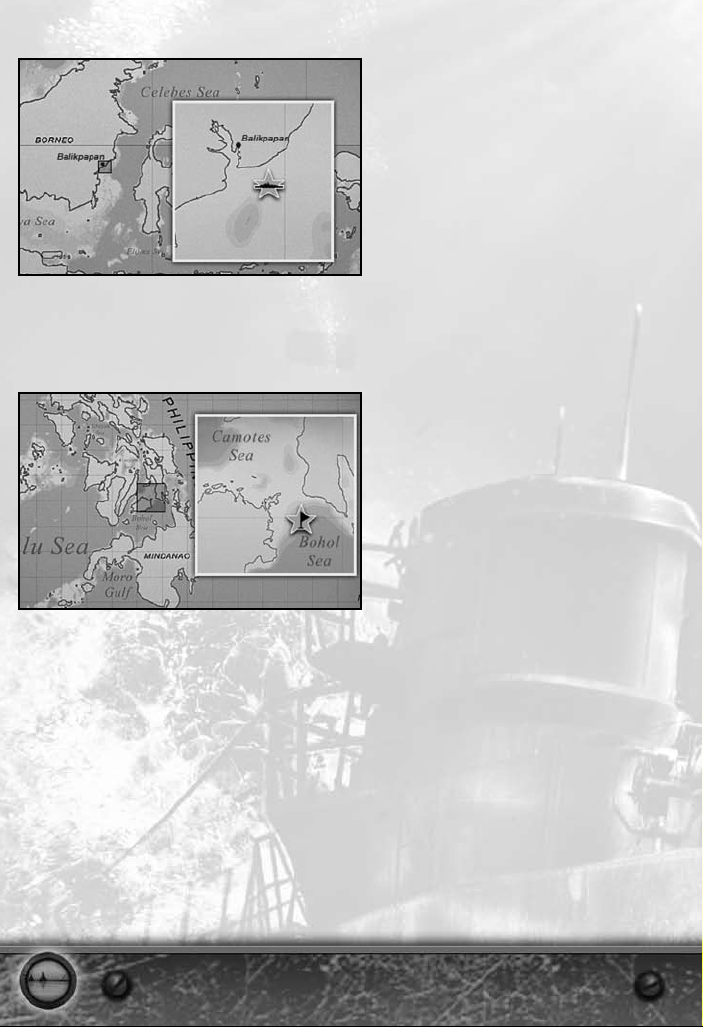
MiSSioN 8 – Battle of BalikpapaN, 1942
Briefing: On January 2, aerial reconnaissance spotted a convoy of 15 transports carrying the
landing force bound for Balikpapan, an important oil field in southeastern Dutch Borneo.
Primary objective: Engage Japanese invasion force of Balikpapan.
MiSSioN 9 – agaiNSt all oddS, 1942
Briefing: On August 22, while returning to Brisbane, the USS Skipjack was trapped by Japanese
escorts in the shallow waters of the Camotes Sea. Surrounded and heavily outnumbered, he tried
to reach the deep waters of Bohol Sea.
Primary objective: Reach the deep waters of Bohol Sea.
16
Page 18
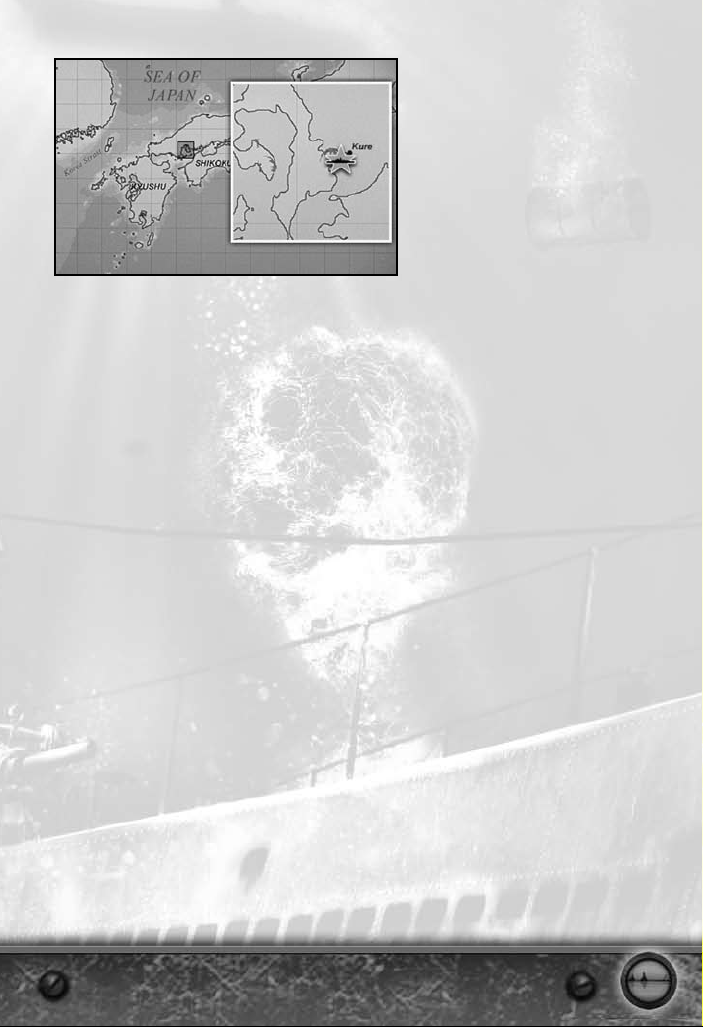
MiSSioN 10 – laSt target, 1945
Briefing: Two days ago our reconnaissance aircraft spotted a large unidentified battleship
entering Hiroshima Bay. Further information confirmed that the super battleship Yamato is
anchored for repair in the harbor of Kure. Try to infiltrate inside the naval base of Kure and sink
Yamato. It will be a great blow to Japanese morale to sink their flagship to show them there is no
place to hide.
Primary objective: Sink Yamato battleship.
sInGle PaTrols
GaMe MoDe DesCrIPTIon:
This game mode provides a bridge between the quick mission and the time-consuming dynamic
campaign. In each patrol the player leaves from the base and must complete a specially designed
patrol full of interesting encounters and events. As with quick mission, you have specifically
defined objectives that should be completed. Accomplishing them will be more time-consuming
and will generally mean you have to travel the ocean to hunt for ships and reach specific areas.
Due to the nature of the game, it is perfectly possible to encounter unforeseen – even to the
mission designers – events on the route, so each patrol will be an unique experience.
ConTenT
MiSSioN 1 – huNt for wouNded Bear, 1942
Briefing: After the Battle of Coral Sea, which took place in May, one of the most important
Japanese carriers – Shokaku – was send home for repair. Our ULTRA code-breaking service
intercepted a message about fleet carrier Shokaku leaving the port of Rabaul and heading for
Celebes Sea. For us to intercept before the ship before it reaches its home waters would be a
great blow to the Japanese Navy.
Primary objective: Intercept and sink the fleet carrier Shokaku at all costs.
MiSSioN 2 – philippiNeS attaCk, 1941
Briefing: The Philippines are under siege and the Japanese Navy is invading the island from
all directions. We must delay the invading force in order to establish defensive positions. Our
submarines will form a patrol line and will report enemy fleet moves and engage any landing force.
Primary objective: Engage Japanese landing force.
17
Page 19
MiSSioN 3 – lifeguard, 1944
Briefing: With the U.S. invasion of Saipan, a Japanese counter-attack is imminent. We expect
heavy air-to-air fights and possible an encounter between the U.S. 5
Navy. Our submarine force will perform reconnaissance and lifeguard duty in the Philippines seas.
Primary objective: Perform reconnaissance and lifeguard duty mission around Saipan.
th
Fleet and the Japanese
MiSSioN 4 – Cloak aNd dagger, 1943
Briefing: Singapore is one of the major ports of in the Southeast Asia. Our intelligence service
wants to insert an agent there to spy on the enemy harbor traffic.
Primary objective: Insert the agent near the port of Singapore.
MiSSioN 5 – hellCat, 1944
Briefing: With our advance in Marianas and the expansion of our air cover, the only safe Japanese
waters remain the Sea of Japan. Equipped with the latest sonar model, the submarines will try to
pass the heavily mined straits around the home waters and infiltrate in Sea of Japan.
Primary objective: Infiltrate in Sea of Japan and sink merchant ships.
MUseUM
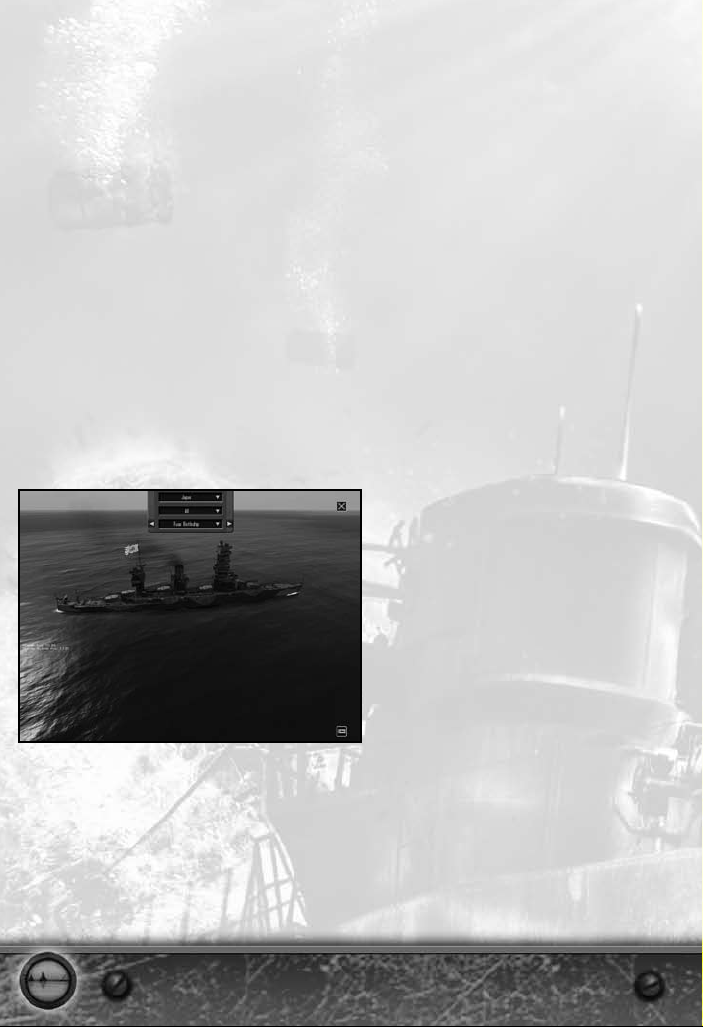
The museum option in the Main Menu allows you to view the ships, submarines, and aircraft
from all the nations portrayed in the game. You should visit the museum from time to time to keep
yourself educated, and to train in the art of ship recognition.
If you move the mouse over the upper part of the screen, a small menu will drop down that will
allow you to browse through the ships available in the game. There are three combo boxes from
which you can choose the country, the unit type, or a specific ship. In the bottom right corner you
can find the button that opens up the Recognition Manual.
18
Page 20
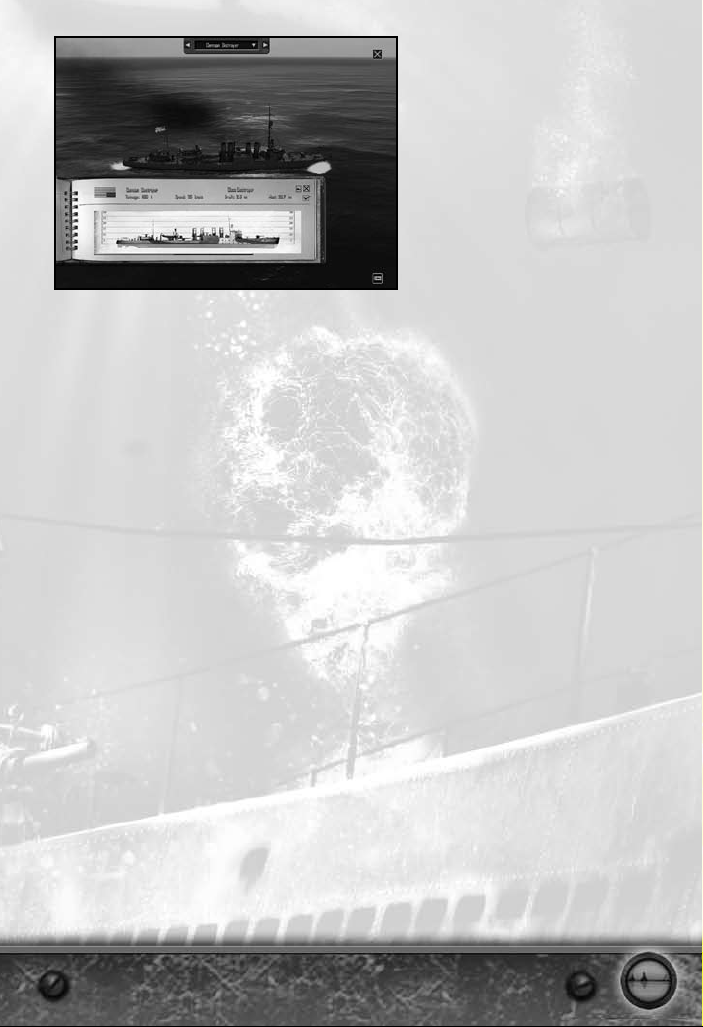
In the upper right corner you can find the Close button, which will take you to the Main Menu page.
onlIne MoDes
Silent Hunter: Wolves of the Pacific can also be played in multiplayer using a LAN
connection or over the Internet using Ubisoft Matchmaking dedicated servers
(more details in Multiplayer section).
19
Page 21
InTroDUCTIon
“When I assumed command of the Pacific Fleet on 31 December 1941 our
submarines were already operating against the enemy, the only units of the Fleet
that could come to grips with the Japanese for months to come. It was to the
Submarine force that I looked to carry the load until our great industrial activity
could produce the weapons we so sorely needed to carry the war to the enemy. It is
to the everlasting honor and glory of our submarine personnel that they never failed
us in our days of great peril.”
(Admiral Chester W. Nimitz)
For the United States, the Second World War started suddenly and bluntly with the attack on Pearl
Harbor. In that chaos, the entire battleship force of the Pacific Fleet was eliminated, negating the
U.S. as a maritime power according to the pre-war thinking on naval warfare.
Among the few ships that remained were the U.S. aircraft carriers, which would win the battles to
come, and the submarines, which would win the war.
The Submarine Service started the war with good boat designs but an outdated doctrine that
called for over-cautious attacks and put too much emphasis on operations against enemy
warships.
With time, the service and its commanders developed into a force to be feared. They fought
hard, and got bloodied but learned their lessons and further developed their boats and tactics in
accordance with the realities of submarine warfare in the Pacific.
By the end of 1944, the Japanese merchant marine was practically wiped from the surface of the
Pacific. The U.S. Silent Service contributed overwhelmingly to this accomplishment. Victory in the
Pacific was owed, in no small part, to these men.
In Silent Hunter: Wolves of the Pacific, you command a submarine of one of the main types in
the U.S. Submarine Service. You will take part in battles and missions similar to those that real
submariners had to go through. Like the real captains of the time you may get relieved from
command if you are not aggressive enough in the face of the enemy, or your career may be cut
short by a lucky shot from an enemy subchaser.
While Silent Hunter: Wolves of the Pacific is a computer game and keeps the user safe from the
real dangers or submarine warfare and service, we believe it gives the public an idea of what the
real crews manning the submarines did voluntarily.
Silent Hunter: Wolves of the Pacific is our homage to the men of the U.S. Silent Service and the
feats they accomplished.
20
Page 22
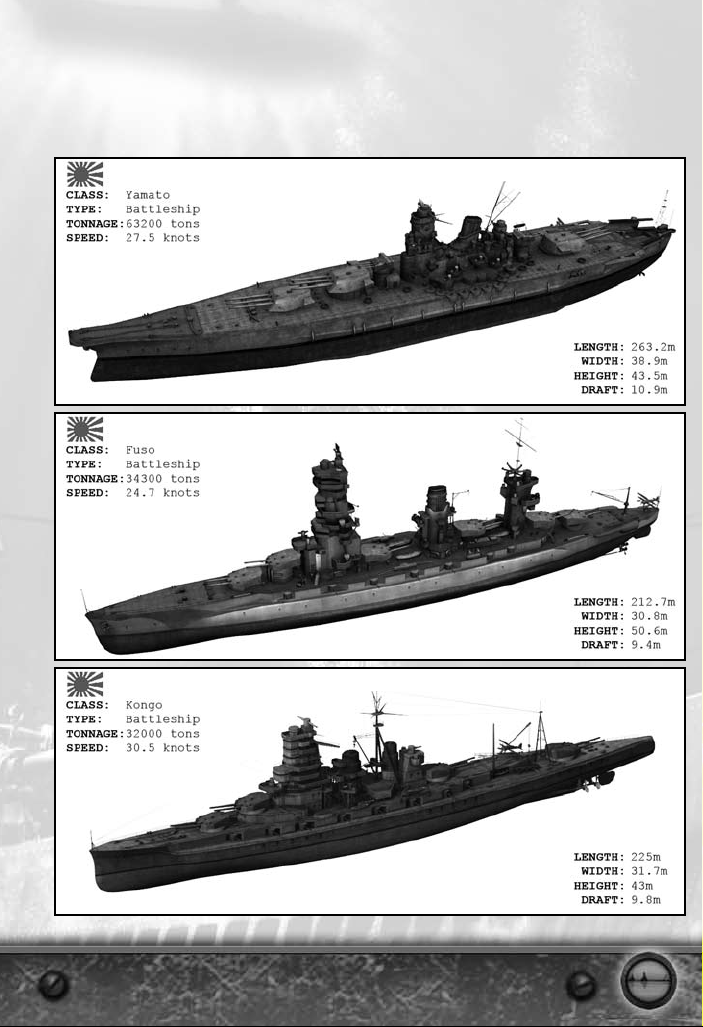
sHIPs ID
IMPerIal jaPanese navy
BattleShipS
21
Page 23
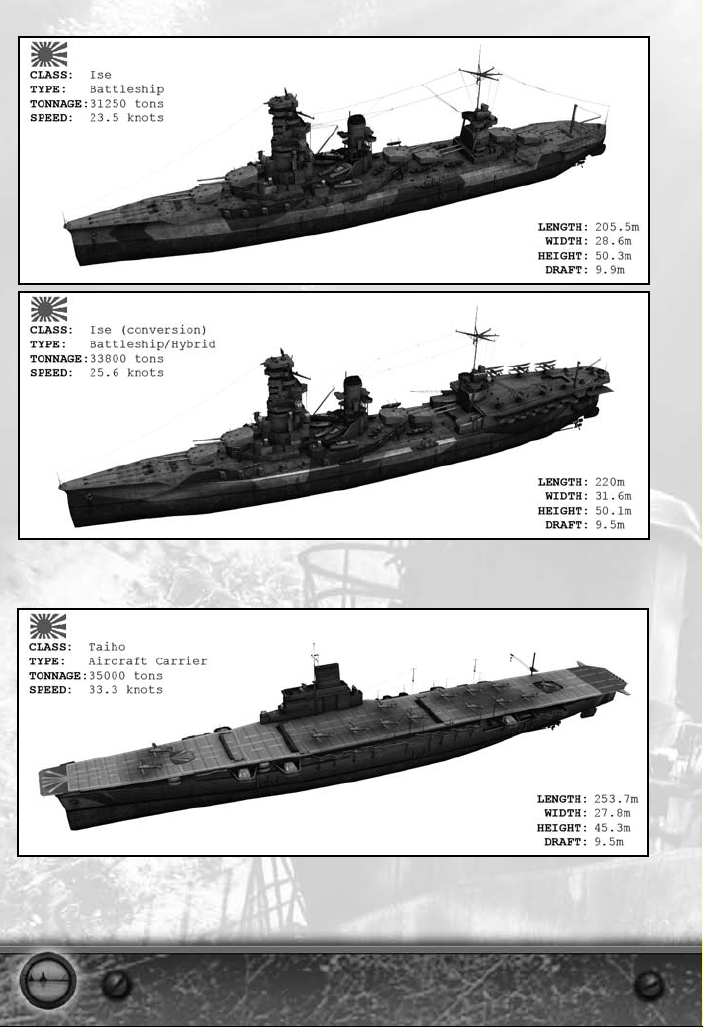
airCraft CarrierS
22
Page 24
23
Page 25
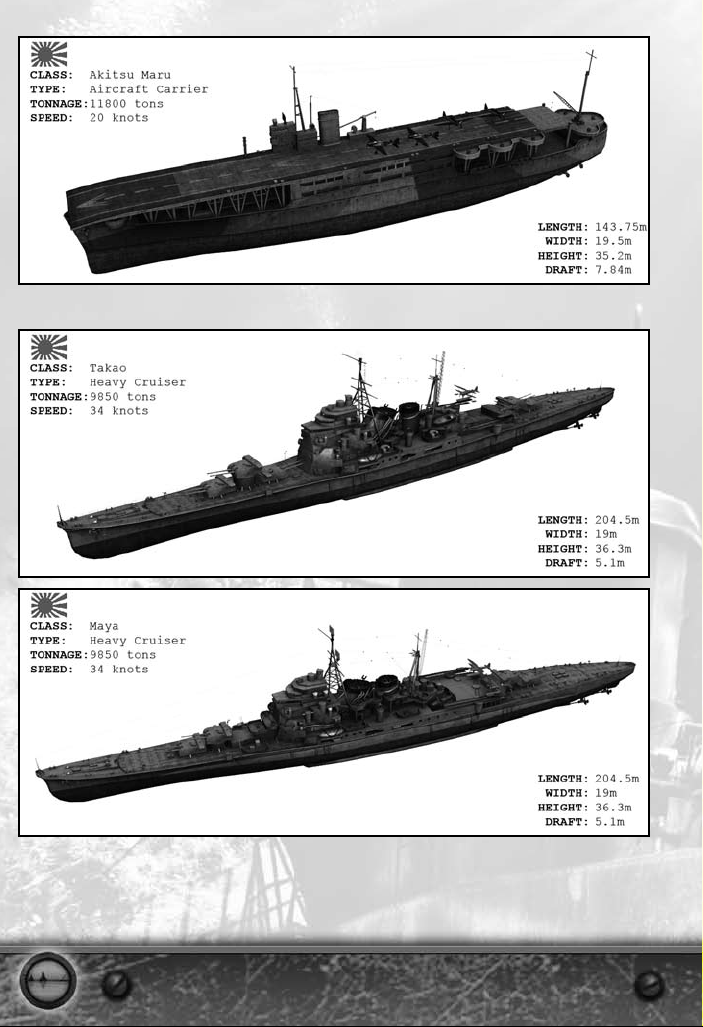
heavy CruiSerS
24
Page 26
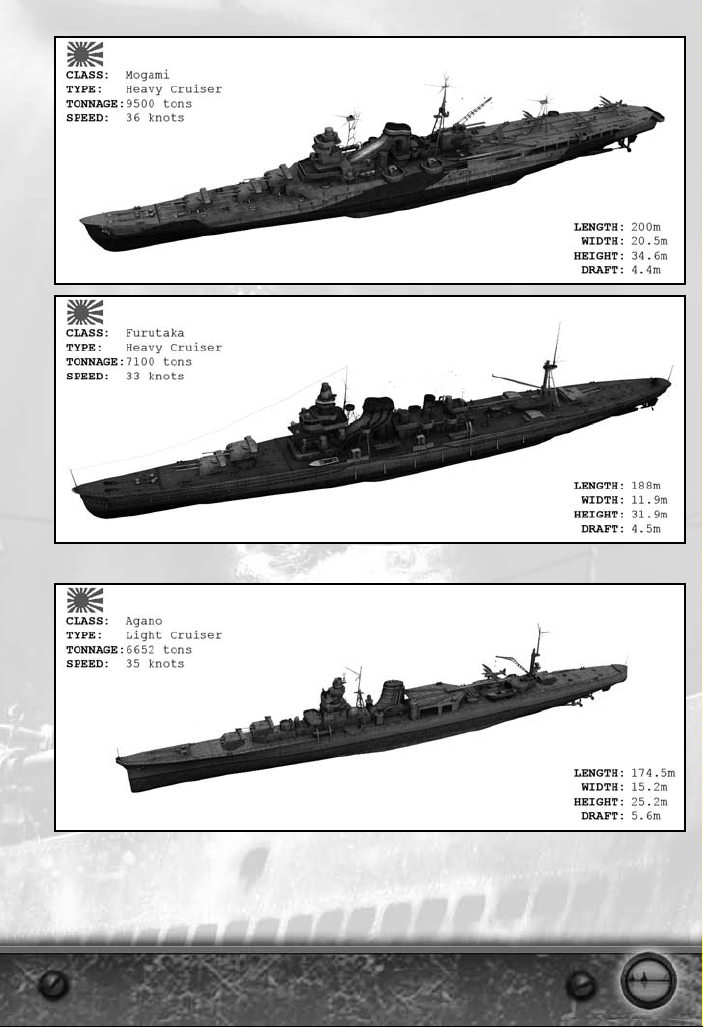
light CruiSerS
25
Page 27
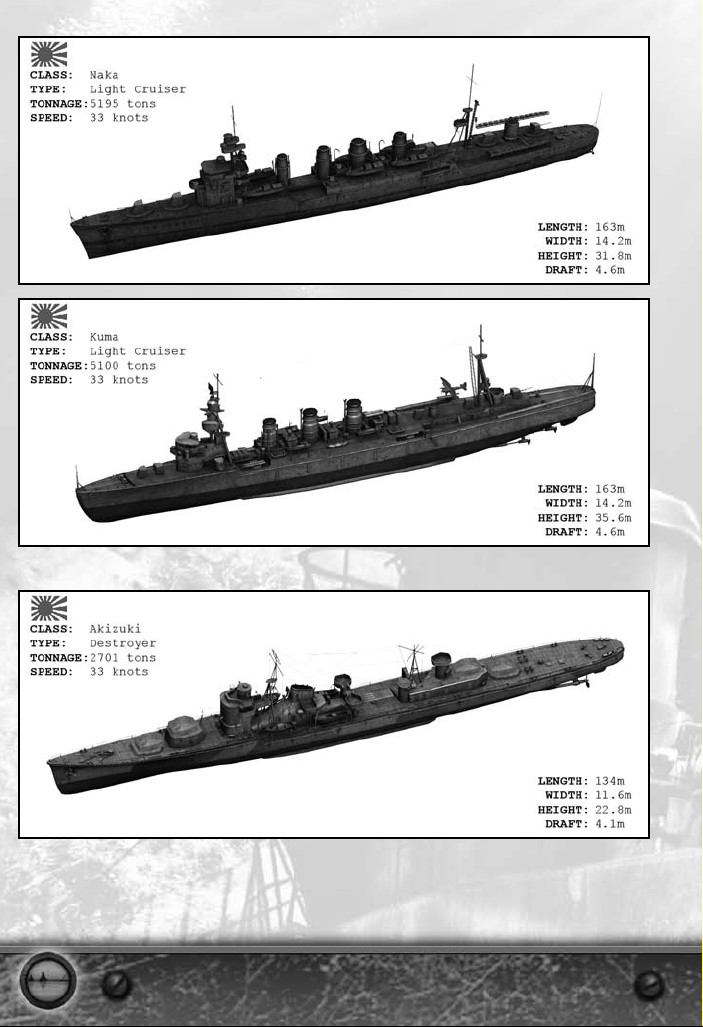
deStroyerS
26
Page 28

27
Page 29
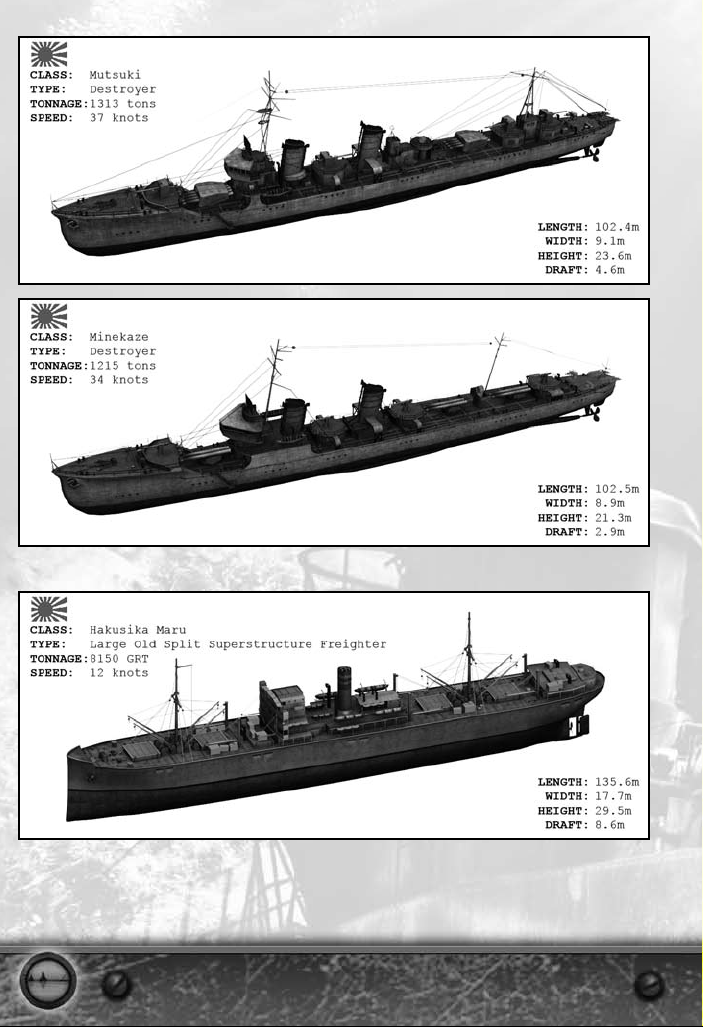
freighterS
28
Page 30
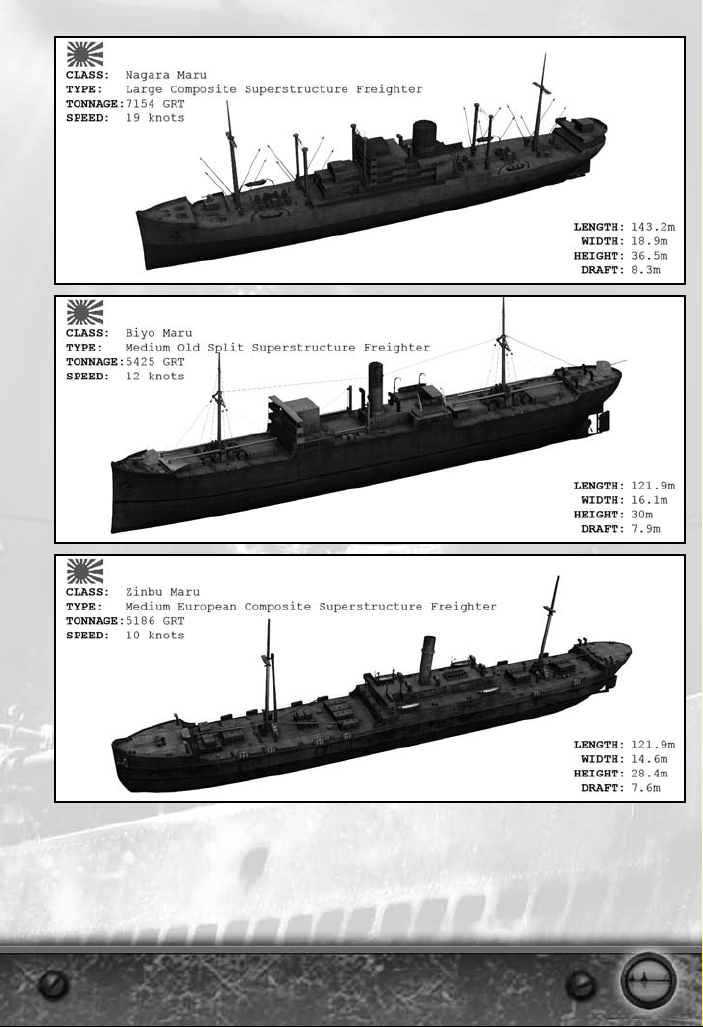
2930313233
Page 31

Page 32

Page 33

Page 34

Page 35

other typeS
34
Page 36

353637
Page 37

Page 38

U.s. navy
BattleShipS
Page 39

airCraft CarrierS
heavy CruiSerS
38
Page 40

light CruiSerS
39
Page 41

deStroyerS
40
Page 42

freighterS
other typeS
41
Page 43

424344
Page 44

Page 45

sUbMarInes
S-ClaSS
p-ClaSS
Page 46

SalMoN
45
Page 47

taMBor
46
Page 48

gato
47
Page 49

Balao
48
Page 50

flaGs
CouNtry Navy eNSigN MerChaNt eNSigN
Australia
Brazil
Canada
France
Free French
Greece
India
Italy
Japan
49
Page 51

Netherlands
New Zealand
Norway
Poland
Romania
South Africa
Soviet Union
Sweden
United Kingdom
United States
of America
50
Page 52

PlayInG THe GaMe
In-GaMe InTerfaCe
The player interface is designed to keep all vital functions of the submarine within your reach. For
this reason, almost every menu of the game can be found on-screen. The main elements of the
interface are:
• Quick Controls Panel
• Game Control Panel
• Submarine Status Indicators
• Orders Panel
• The Messages Log
• Warning Area
Each element is explained below.
qUICK ConTrols Panel
Here you will find the most common commands and instruments required to maneuver your
submarine: speed, direction, and depth. In each section, you can switch between displaying two
instruments used for the same purpose by clicking the button in the lower left corner of the section
in question.
51
Page 53

Speed
The controls that set your submarine’s speed are the engines telegraph, which requests a certain
regime from the Engine Room, and the knotmeter, which allows you to set a particular speed to
be met by the engines. Keep in mind, though, that circumstances – such as running on electric
engines, sustaining damage, or having insufficient crew – may prevent the Engine Room team from
meeting your request.
direCtioN
You can turn you submarine in two ways: click on the rudders indicator to set the rudders to the
desired position, or request a new direction relative to your current position, click on the compass,
and let the Chief Engineer do the rest.
The first method is useful when you want to start a turn of a certain rate – dependent on the
position of the rudders – for an indefinite time. The latter method, on the other hand, should
be used when a turn of precise magnitude and fixed turning rate – maximum for the current
conditions – is desired.
In the same section you will see the magnetic compass, indicating the current direction, on the top
of the panel.
Hint: Turning your boat demands a minimum speed; otherwise the rudders are not effective. The
faster the boat goes, the faster it turns.
depth CoNtrol
Depth changes are requested by clicking on the depth meter. Two versions of this instrument are
available. The fine version, marked up to 165 ft, is useful when requesting depth changes near the
surface in order to run at periscope depth or snorkel depth or surface the boat. All these important
depth settings are clearly marked on the instrument.
Should you need to go deeper than 165 ft, use the gross scale version of the depth meter.
Both versions show the depth of the submarine’s keel; for this reason, the minimum depth
indicated will be about 4 m.
Hint: While changing depth works even at zero speed by using the ballast tanks and compressed
air, it is best done when some speed is available to make use of the dive planes.
When ordering depth changes, keep in mind that each submarine has a maximum operational
depth, marked in green on the depth meters. Diving beyond that depth is a risky enterprise, but is
sometimes useful to avoid detection or depth charge attacks. When the red section of the meter is
reached, however, you are inviting disaster and pressure hull failure.
GaMe ConTrol Panel
tiMe CoMpreSSioN aNd CloCk
You can set the time compression level from 1x to 1024x. Time compression is an absolute
necessity when traveling long distances, as it makes time pass faster. Note, however, that:
• You will not be able to set time compression higher than 32x except in the Navigation Map station.
• Time acceleration will automatically drop down to lower levels in various situations, such as
when you are in close proximity to other ships or land.
52
Page 54

CaptaiN’S paNel ButtoN
Press this button to open a window with three tabs: Objectives, Radio Messages, and Captain’s
Log. Each tab is self explanatory. When a new objective is added or a new radio message is
received, the button will blink.
gaMe MeNu ButtoN
When pressed, the game menu window will pop up.
sUbMarIne sTaTUs InDICaTors
There are four indicators of vital importance: fuel indicator, power indicator, compressed air
indicator, and CO2 indicator.
orDers Panel
The Orders panel contains the following buttons:.
Command Room (F2)
1. Go to Command Room
3. Emergency Surface
5. Evasive Maneuver
7. Recharge Batteries
2. Crash Dive
4. Depth Under Keel
6. Deploy Decoys
8. Silent Running
53
Page 55

Navigation Map (F3)
1. Go to Navigation Map
3. Set Course
5. Patrol Course
Periscope (F4)
1. Go to Attack Periscope
3. Raise Periscope
5. Target Information
2. Go to Attack Map
4. Return to Course
2. Go to Observation Periscope
4. Lower Periscope
6. Recognition Manual
7. Chronometer
54
Page 56

Bridge (F5)
1. Go to Bridge
3. Crew on Bridge
5. Recognition Manual
Deck Gun (F6)
1. Go to Deck Gun
3. Hold Fire
5. Long range
2. Go to TBT
4. Target Information
6. Chronometer
2. Man Deck Gun
4. Short Range
6. Aim for Command Deck
7. Aim for Weapons
8. Aim for Waterline
55
Page 57

AAGuns (F7)
1. Go to Heavy AA
3. Go to Light AA (2nd)
5. Hold Fire
7. Long Range
9. Engage Any Target
Sonar (F8)
1. Go to Sonar
st
2. Go to Light AA (1
4. Man AA Guns
6. Short Range
8. Engage Closing Targets
2. Follow Target
)
3. Range to Target
5. Send Data to TBT
56
4. Report Contacts
Page 58

Radar (F9)
1. Go to Radar
3. One Sweep
Sub Management (F10)
1. Go to Crew Management
3. Go to Torpedo Control
Camera (F11)
1. External Camera
2. Search Mode
4. Report Contacts
2. Go to Damage Control
4. All Crew to Battle Stations
2. Free Camera
3. Event camera
5. Next Unit
4. Previous Unit
57
Page 59

MessaGes loG
Reports received from your officers or crewmen are added to the message log. Each entry
contains the following:
• The time of the report.
• The function of the person responsible for it.
• The actual report text.
Whenever an officer is selected in the Officers Panel, any reports received from him will be
highlighted in the log.
WarnInG area
The warning area will display all the important messages that require your attention and
intervention in order to repair the problem. Such messages can appear when there is a fire or
flooding aboard the submarine.
sUbMarIne sTaTIons
CoMManD rooM
orderS
• Standard Propulsion
• Recharge Mode
• Rig for Silent Running
• Secure from Silent Running
• Crash Dive
• Blow Ballast
• Deploy Decoys
navIGaTIon MaP sTaTIon
This map is used for navigation, convoy interception, etc.
58
Page 60

Map iNforMatioN
The following elements would be displayed on the navigation map:
Ports
• Submarine bases
Harbors where you can resupply with torpedoes and fuel, recruit new crew and repair
–
your submarine.
• Allied ports
–
Harbors where you can resupply with fuel and repair your submarine.
• Neutral ports
–
Harbors where you can resupply with fuel.
• Enemy ports
of groups of aircraft, ships, or convoys. The following information is available for each:
Contacts
• Type
–
Warship – represented by a diamond.
–
Submarine – represented by a circle.
–
Merchant – represented by a square.
–
Aircraft – represented by a triangle.
• Size
–
Single – represented by a small icon.
–
Convoy – represented by a large icon.
• Allegiance
–
Enemy – represented with red.
–
Allied – represented with blue.
–
Neutral – represented with green.
–
Unknown – represented with gray.
–
Player – represented with black.
• Course, displayed with a small line oriented contrary to the actual direction of movement.
Attached to the contact is a contact tag that contains:
• Moment of last contact: HH:MM (this is showed only when you lose contact with target).
• Estimated speed.
• Estimated heading.
59
Page 61

Geographical landmarks
• Sea
• Islands
• Gulfs
• Straits
• Canals
• Physical features (capes)
Navigation landmarks
• Lighthouse
• Maximum depths
• Depth lines
Map toolS/orderS
MAP NOTES
• With this tool you can place marks on the map. Each mark will have a generic name when
placed (Mark 1, Mark 2, etc).
• You can modify this name (18 characters max.) and attach a note (54 characters, centered,
max. wide 18 characters).
• You can delete this mark.
RULER
• With this tool you can measure distances and draw lines on the map.
• The steps marked on the line will be equal with the current zoom level measure unit x 5.
• The end of the line will display the total distance. All the distances will be represented in
kilometers with one decimal representing hundreds of meters. All measurement will round
up to hundreds of meters.
• The error margin serves to avoid letting you precisely measure distances on the map and
then use these measurements for firing solutions. Also it has an immersive value, which
gives a more convincing feeling of human error in estimations done on the map.
COMPASS
• With this tool you can draw ranges represented as circles around a selected unit or location.
Two types of ranges can be drawn.
Linked ranges – ranges that are linked to a unit (the unit is in the center of the circle).
–
These ranges follow the unit they are linked to.
Free ranges – ranges that are drawn on the map at any location.
–
• Both ranges have the radius length displayed.
WAYPOINTS
• This tool allows you to set a course for your submarine using a waypoint system.
• This system will contain:
60
Page 62

New course – With this, new waypoints are place on the map. After you activate the tool,
–
left-click on the map to place the first point. Then, left-click somewhere else to nominate
the next waypoint, and so on. Right-click to confirm the entire waypoint course.
Add new waypoints – When the waypoint tool is selected and a course is already plotted,
–
any new waypoint will continue from where you left off.
Insert new waypoints – When the waypoint tool is selected, left-click on an existing
–
waypoint to continue the course from this point. The existing waypoints after the one you
clicked on are deleted.
Modify current course – You can move a selected waypoint by dragging it to a new
–
position.
Delete waypoints – You can delete a selected waypoint. The new course will be plotted
–
between the remaining waypoints.
• A tag attached to each waypoint will show:
The distance from the submarine to it (in kilometers).
–
ETA – The time needed to reach it (using the course set with the waypoints and current
–
submarine speed).
ERASER
• With this tool you can delete marks, lines, range circles, and waypoints on the map.
• After you select the eraser, any object you touch with it will be deleted. Any map marking,
line, range, or waypoint you add can be deleted by left-clicking on it.
ZOOM IN
ZOOM OUT
PerIsCoPe sTaTIon
attaCk periSCope
61
Page 63

PERISCOPE ELEMENTS
• Periscope view
• Periscope vertical position
• Periscope horizontal position
• Recognition manual
• Chronometer
Torpedo timer
–
• Target information
Ship type
–
Ship class
–
Range
–
Angle on bow
–
Speed
–
• Torpedo fire control
Tubes status
–
Fire button
–
target iNforMatioN
SELECTION
When the periscope center passes over a target the following information is automatically
displayed on the Information Panel.
CASUAL EXPERT
Ship type YES YES
Range to target YES NO
Angle on bow YES NO
Target speed YES NO
Send data to TDC YES NO
SHIP TYPE
• Expert mode: When a ship type is identified the type will be replaced with the ship class.
• Casual mode: The ship is automatically identified, so the ship class is displayed.
SEND DATA TO TDC
• Expert mode: Left-clicking on the Send Data to TDC icon will:
–
Display the current Range, Angle on Bow, and Speed to TDC.
–
Switch the TDC to Track mode ON.
• Casual mode: Whenever the cursor passes over a target, the information will automatically
be sent to TDC.
62
Page 64

RESET DATA
• Expert mode: Left-clicking will:
–
Reset the information from the Information Panel and TDC to zero.
–
Switch the TDC to Track mode ON.
• Casual mode: Whenever the cursor is not over a target, you will launch the torpedo on the
current bearing.
LOCK TARGET
Left-click on the Lock button in Periscope view to follow the selected target. You will have the
freedom to move the periscope to the left or right in order to center the periscope over any
ship compartment.
SOLUTION (ONLY FOR CASUAL MODE)
Whenever the periscope center pass over a ship, a small triangle will appear under the ship. The
triangle’s color will reflect the solution effectiveness.
• Green: Excellent
• Yellow: Good
• Red: Bad
brIDGe sTaTIon
BiNoCularS
While using the binoculars, you have two orders available:
• Lock target
• Engage target
eNgage target order
When you give the Engage Target order the AI will choose to engage, depending on the target
type, with:
Deck gun: Surface targets.
•
Flak guns: Air targets.
•
63
Page 65

TbT sTaTIon
The Torpedo Bearing Transmitter (TBT) is a large binocular affixed to a special post on the deck of
U.S. submarines. Historically it was used in 1943 to help obtain the bearing and range to a target
during surface torpedo attacks. In our game, the TBT will be available from the start of the war,
simulating the ability of the crew to transmit orders verbally rather than automatically through the
rotating post of the TBT.
The TBT can be accessed in two ways. In 3D mode, go to the bridge (shortcut: F4) and left-click
on the large binoculars that you see mounted in the center. Or, you can press the U key on the
keyboard to be transported directly to the TBT.
NOTE: This station, like the bridge, is only accessible while surfaced. Function-wise, this station is
almost identical to the two periscopes, except that the range-finding mechanics are missing the
split image function. Refer to the Periscope descriptions and the chapter on conducting torpedo
attacks for further information.
64
Page 66

TDC sTaTIon
ConDUCTInG TorPeDo aTTaCKs
One cannot overestimate the importance of the torpedo attack in the training of the submarine
officer. To quote the official submarines doctrine of the U.S. Navy, as formalized by ComSubPac in
February, 1944:
The primary objectives of submarines are enemy ships. The primary weapon of the submarine is
the torpedo; the secondary weapons are the mine and gun.
A successful torpedo attack requires several steps. It is your duty as captain to ensure that each
step is completed.
The steps are:
1. Approach and positioning
2. Data collection
3. Sending data to the TDC
4. Tubes selection
5. Attack
65
Page 67

1. approaCh aNd poSitioNiNg
Your torpedoes are not extremely reliable and easy to use. Before attacking, bring your submarine
as close to the target as possible – within 1,000 yards for best results.
At short range, even if you or the torpedoes are suddenly spotted and the target starts evasive
maneuvers, it will be too late for the enemy.
Distance is not the only point of interest, however: the submarine’s position relative to the target is
equally important. Generally speaking, the best position to begin your attack would be “ahead of
the beam,” meaning 45° to either side of the target’s course. From this point, you will have plenty of
time to gather the data required for the attack and still be well placed for a bow or beam shot.
2. data ColleCtioN
To have your torpedoes meet with the target is not a simple feat. Every attack is a complex
trigonometric problem that needs to be solved.
Fortunately, most submarines of the World War II era were equipped with a Torpedo Data
Computer – an electro-mechanical device that solves the movement equations and provides you
with the data needed for the actual attack.
Unlike the TDC onboard other nations’ submarines, the U.S. TDC does a lot more, but we’ll talk
about that later.
THE TORPEDO FIRE CONTROL PROBLEM
Given an initial situation: a target ship moving on a constant, straight course C, at a constant speed
S, we need to obtain the course CT on which a torpedo of speed ST must travel in order to reach
point (X) at the same time as the target.
66
Page 68

The mechanics of torpedoes are such that after leaving the tube, they run a standard straight
distance – the so-called “torpedo reach” – before making one turn according to the set “Gyro
Angle” to reach the desired course CT.
The Gyro Angle is calculated by the Angle Solver part of the Torpedo Data Computer, but requires
the following information to be collected on the target:
• Bearing to target
• Range to target
• Angle on bow
• Target speed
To acquire this data, you will have to use one of the two main stations of attack: the Periscope
(optic used for underwater attacks) or the Target Bearing Transmitter (binoculars used for surface
attacks). Both are equipped with all the tools needed for this task. You can also obtain range and
bearing information from the Sonar stack and Surface Search Radar.
On lower difficulty settings, all data will be acquired automatically by the game whenever your
crosshairs pass over a viable target. On Historical settings, however, each step will need to be
completed by you.
Measuring Range
Determining range to a target of a known height is a simple problem, so the first step to be
undertaken in any attack is identifying the target. Bring up the recognition manual (shortcut: M
key) and flip through it until you find a match with the one you are looking at through the optics.
This is not an easy task, but focusing on the defining elements of the ship (bow and stern shape,
number and disposition of masts, number of turrets) you should be able to get a close match.
Once satisfied, check the empty box present on the manual’s page. This will identify the ship in
question and automatically enter its mast height – the tallest object on the ship – into the stadimeter.
Hint: It’s easier to identify a ship when looking at it from abeam (90° to its side) as it presents the
full profile, much like in the manual.
Click the icon on the attack data tool, which will switch it to the correct mode.
As you have the target’s real height from the ID book, all you need to do is read its apparent height
( as angle alpha ) from the periscope or TBT. Both optics are fitted with marked reticles for this
task. The periscope comes equipped with a split-image stadimeter to automatically measure it,
while the TBT only simulates the measuring process through the usage of a moving line index.
67
Page 69

The meaning of the reticle marks is outlined in the table below:
Optic Used (Zoom Level) Small Marks Large Marks
Periscope (Low Magnification)
Periscope (High Magnification)
TBT (7x) 0.2° (0°12’) 1°
1° 4°
0.25° (0°15’) 1°
To use the stadimeter, first lock the target. Next, press the
of the Attack Data tool. Your mouse cursor will be captured, and vertical mouse movement will
be used to displace a second image of the target instead. Raise it so that it touches the top of
the original image. In other words, you need to have the waterline of the target, as viewed in the
second picture, touch the masthead of the first one.
All through the process the stadimeter will automatically calculate the range to the target, based
on the angle displacement between the two images. When you are satisfied with the results, leftclick and the range will be saved. You can then use the Send to TDC button to correct or set the
target data.
Should you desire to calculate the range yourself, the formula you should be using is:
When intelligence on a target is unavailable or it is impossible to obtain an accurate identification,
you should estimate the height of the masthead or another significant feature on the
superstructure:
• Count the number of decks that are seen above the main deck.
• Add the number of decks that would cover the visible freeboard.
• Multiply the obtained number by 8, which is the average height in feet of a deck
The result gives you the height of the tallest point on the bridge structure. You can use this as a
yardstick to approximate the height of the masthead – on average 2.1 times the obtained figure. If
the masthead appears shorter, use 1.7 or 1.8 as a ratio instead.
By exercising on targets of known height you should be able to obtain an approximation good
enough for a firing solution.
icon in the upper left part
ANGLE ON BOW
The Angle on Bow (AOB) is, simply, the bearing on which the target ship would observe your
submarine. It is easier to approximate relative to your boat and is used to define the ship’s course
relative to your own.
68
Page 70

To enter AOB for your target, first switch the attack data tool to the appropriate section, by clicking
the icon. Entering the desired value is as simple as dragging on the external ring
of the dial (representing the target ship) to put it in the correct position relative to your submarine,
which is represented by the fixed index in the 6 o’clock position. The question is, what should the
desired value be?
There are multiple methods to judge AOB on a target. The quickest method is through visual
observation. This is obviously quite inaccurate, but using the recognition manual AOB page you
may come up with a reasonable value quite fast.
A more time-consuming but also more accurate and difficult method is to adjust your heading until
the lateral separation between your ships remains constant and you are both heading the same
way. At this point, you have “matched course to target.” In other words you are traveling along
parallel courses. It’s easy to determine AOB at this point, using the following formula.
AOB = 180° – bearing
SPEED
One of the most critical parts of the firing solution is to determine the target speed. In the game,
there are two methods for doing this.
The quickest method is to simply guesstimate the value by checking the target, the bow wake, and
the intelligence info that you have from the recognition manual. Estimates by the sonar man also
come in handy here.
The more precise but also more time-consuming method is to take multiple sightings (range +
bearing) of a target over a period of time. Using this data and your own speed and course, you can
determine the target’s speed. An automated method is implemented in the game.
69
Page 71

To begin the process, left-click on the clock icon on the data tool. This will take the first sighting
and begin counting the time. It is best to have the target locked at this moment. When satisfied
with the expended time – longer is better – left-click again. This will conclude the measurement
and display the results. As always, check them if you are satisfied with your approximation.
Hint: This method of finding target speed is heavily dependent on the accuracy of your range
estimation. If you are getting speed results that are “off the scale,” recheck the range.
A final method of acquiring the speed of the target would be to “match speed and course” with
it. This is somewhat similar to the technique explained in the AOB section above; you adjust your
own course and speed until the bearing and distance to target remains constant. At this point
you should be traveling along parallel courses and at the same speed. You can enter this speed
directly into the TDC.
70
Page 72

3. SeNdiNg data to the tdC
Once you have a complete set of data for the target, they need to be inserted in the TDC. On lower
levels of difficulty, this is automatically done with the data collection – when the crosshairs pass
over a target.
On Historical difficulty, however, you will be required to send the data yourself by “checking” it on
the attack data tool.
Note: You may reset the TDC and data by pressing the X icon on the notepad. This will, among
other things set “target speed” dial on the TDC to 0, which basically transforms your optics into
a point-and-shoot device. Until new data is entered, the torpedoes will shoot on the bearing the
currently used optic is pointing toward.
In most situations data collected for a target is rapidly degrading, as AOB and range change in
time even for a non-maneuvering target. Fear not, as this is just what the Position Keeper function
of the TDC has been built for.
USING THE POSITION KEEPER
The great advantage that U.S. torpedo data computers have
over those of other nations is the Position Keeper (PK). This
unique device estimates the target data based on the initial
values entered by the user. It computes the target movement
in relation to your submarine, taking into account your own
ship movements.
The output from the Position Keeper is good for evaluating
the tactical situation, but is also automatically entered into
the Angle Solver. In theory, for a non-maneuvering target,
once you take a look at the target you can let the periscope
down and just watch the PK output to decide when to attack.
The catch is, the output of the PK is only as good as the
input, so verifying the data from time to time is a good idea.
Retake range and bearing measurements and compare them
to the output of the Position Keeper. If they don’t match,
insert the new data in the TDC and try again later.
Once your measurements and the PK match to a reasonable
degree, you can be sure your approximation of the target
data was good. You are now ready to attack. At this point,
advanced players should also begin worrying about some
other settings:
71
Page 73

TORPEDO RUNNING DEPTH
This should be set in close relation to the desired detonation method (see below). For magnetic
detonations, the torpedo should ideally pass directly under the target’s keel. In this case, take
the Draft entry in the Recognition Manual and add 3 to 5 feet. Keep in mind that large waves may
cause a ship’s draft to vary quite a bit, and too great a distance may lead to the detonator not
sensing the ship’s magnetic field.
When using an impact detonator, the torpedo should be set to hit the target under the protective
armored belt. In the absence of specific information about your target’s protection, the following
settings should be used:
Target Type Depth
Battleships 20 feet
Heavy Cruisers, Carriers, Large Merchants 12 feet
Light Cruisers, Small Merchants, Submarines 10 feet
Destroyers 6 feet
TORPEDO DETONATION METHOD
Torpedoes fielded by the U.S. submarine force at the start of its involvement in World War II used
combined detonators that could be triggered by either frontal impact with a solid object or sensing
the magnetic field of a ship above it.
As in real life, your torpedo detonators will have two possible settings:
Contact Only and Magnetic Influence + Contact. When detonation is
achieved under the ship’s keel, the entire force of the explosion is
vented inside the target, literally crippling it. Even a battleship may be
sunk with a single such hit. But magnetic detonations also have
disadvantages, the main one being their poor reliability, manifested in
premature detonations. Read the “Torpedo Armament” section for
further information.
72
Page 74

TORPEDO RUNNING SPEED
The Mark 14 steam-powered torpedoes can be set to different speeds, which also affects their
range. See the “Torpedo Armament” section for further information.
Setting Speed (kts) Range (yds)
Slow 31 9000
Fast 46 4500
The U.S. submarine doctrine calls for the use of the highest torpedo speed that will still reach
the target.
High speed is essential in a torpedo in order to reduce the time required to
cover the distance from submarine to target; the higher the speed, the
less time elapses, and consequently the target has less time to maneuver
to avoid.
Slow speed should be used when conditions preclude approaching the
target to the range required by the fast setting. To keep the probability
of a hit high, such long-range shots should be attempted only against
stationary targets (from outside an anchorage) or against masses of
enemy ships.
4. tuBe SeleCtioN
This step can actually be taken at any point in the attack, as it simply means selecting the torpedo
tube to be used. You should ask yourself the following questions:
• Should this be a bow or stern shot? All factors being equal, it is best for the gyro angle turns
made by the torpedoes to be as small as possible. There are also limits to what gyro angle
can be set: 135° to either Port or Starboard.
• What torpedo should I use? It is impractical to reload a torpedo before the actual attack, as
it is a time-consuming process. Therefore, the current loadout should govern your choices in
tube(s). Check the Weapons Status panel for information on the loaded torpedoes.
•
Do I need more than one torpedo for this target? U.S. submarine service doctrine calls for
multiple torpedo salvos depending on the target size. The following historical table should be
used as a guide:
73
Page 75

Required No.
Target
Battleship 7 14 10
Large Carrier 5 10 10
Escort Carrier 3 6 6
Heavy Cruiser 3 6 6
Light Cruiser, Merchant,
Seaplane Tenders
Destroyer 1 2 3
Submarine 1 2 3
With U.S. submarines, a salvo is organized as a succession of individually fired shots. It is a good
practice to aim each torpedo at a different point on the same target – under the mast, at the
funnels, or whatever you consider a weak spot.
This can be done by placing the optic’s crosshair over the desired impact point on the target and
correcting the target bearing, before launching each torpedo. The Torpedo Data Computer is a
simple tool that will take the current bearing input as the target; this allows for very precise shots.
Another method is to keep the target bearing set for “Middle of Target” and set the appropriate
spread – which in fact adds or subtracts from the resulting gyro angle – for each torpedo to be fired.
Torpedo Hits
2 4 3 or 4
Life in
of Torpedoes To
Ensure Sinking Target.
50% Hits with Spread
Recommended
Volume of Fire
With Spread
A salvo can also be a good solution when you want to make sure you score a hit on the target,
regardless of its maneuvering prior to the hit. The angle covered by the spread of torpedoes
should be set in order to cover all the possible routes the target may take. Take into consideration
the forward motion of the target as a factor in its ability to maneuver.
74
Page 76

5. attaCk
At this point, you are ready to launch your torpedo. To speed up the process and avoid any sudden
changes in target data ruining the shot, begin opening the torpedo tube before acquiring the data.
A final assessment of the situation should be done before firing the shot. Keep in mind the
following advice:
• All factors being equal, shorter range is better (provided that arming distances is met).
• The higher the torpedo speed, the lesser the chances that the target will avoid it.
• The closer to 0° the target’s bearing is (or 180° for stern tubes shots), the less important
range estimation errors become.
• It’s best to attack from abeam (AOB ~ 90°).
DeCK GUn sTaTIon
• Normal (3D station).
• Zoom (2D station).
iNterfaCe
Moving the cursor to the left/right and top/bottom edges of the screen will move the camera view
in that direction.
ROTATE THE DECK GUN VIEW:
• With mouse: Left-click and hold moves the deck gun view camera to left/right and up/down.
The gun will follow the camera view with a reduced rotation speed.
• With keyboard:
–
Left cursor: Rotate deck gun and camera view to the left.
–
Right cursor: Rotate deck gun and camera view to the right.
Up cursor: Raise the deck gun and camera view.
–
Down cursor: Lower the deck gun and camera view.
–
FIRE THE GUN:
• With keyboard: Space Bar
CHANGE AMMO:
• With mouse: Left-click on the Ammo icon.
ACTIVATE TARGETING SYSTEM:
• With mouse: Right-click – Enter in target system
targetiNg Mode (ZooM)
ROTATE THE GUN:
• With mouse: Left-click and hold to move the gun to left/right and up/down. The camera view
will move in time with the gun.
75
Page 77

• With keyboard:
–
Left cursor: Rotate deck gun and camera view to the left.
–
Right cursor: Rotate deck gun and camera view to the right.
Up cursor: Raise the deck gun and camera view
–
Down cursor: Lower the deck gun and camera view
–
FIRE THE GUN:
• With keyboard: Space Bar for normal fire.
CHANGE AMMO:
• With mouse: Left-click on the Ammo icon.
ZOOM:
• With mouse wheel: Cycle through the zoom levels.
With mouse: Right-click to exit targeting system (return to Deck Gun mode).
•
With keyboard: Press the Tab key to cycle through the zoom levels.
•
Design Note: The rotation speed of the view will be slower at higher zoom level.
aa GUn sTaTIon
light aa guN iNterfaCe
ROTATE THE GUN:
• With mouse: Moving the mouse moves the flak gun view to left/right and up/down. The flak
gun will follow the camera view with a reduce rotation speed.
• With keyboard:
–
Left cursor: Rotate deck gun and camera view to the left.
–
Right cursor: Rotate deck gun and camera view to the right.
Up cursor: Raise the deck gun and camera view.
–
Down cursor: Lower the deck gun and camera view.
–
FIRE THE GUN:
• With keyboard:
Space Bar: Normal fire.
–
Hold Space Bar: Continuous fire.
–
ACTIVATE TARGETING SYSTEM:
• With mouse: Right-click to cycle through the zoom levels.
Design Note: The rotation speed of the view will be slower at higher zoom levels.
76
Page 78

heavy aa guN
ROTATE THE GUN:
• With mouse: Moving the mouse moves the flak gun view to left/right and up/down. The flak
gun will follow the camera view with a reduce rotation speed.
• With keyboard:
–
Left cursor: Rotate deck gun and camera view to the left.
–
Right cursor: Rotate deck gun and camera view to the right.
Up cursor: Raise the deck gun and camera view.
–
Down cursor: Lower the deck gun and camera view.
–
FIRING THE GUN:
• With keyboard:
Space Bar: Normal fire.
–
Hold Space Bar: Continuous fire.
–
ACTIVATE TARGETING SYSTEM:
• With mouse: Right-click to enter targeting system.
targetiNg Mode (ZooM)
ROTATE THE GUN:
• With mouse: Moving the mouse moves the flak gun view to left/right and up/down. The flak
gun will follow the camera view with a reduced rotation speed.
• With keyboard:
–
Left cursor: Rotate deck gun and camera view to the left.
–
Right cursor: Rotate deck gun and camera view to the right.
Up cursor: Raise the deck gun and camera view.
–
Down cursor: Lower the deck gun and camera view.
–
FIRE THE GUN:
• With keyboard:
Space Bar: Normal fire.
–
Hold Space Bar: Continuous fire.
–
CHANGE FIRING MODE:
• With mouse: Left-click to cycle through the firing modes.
ZOOM:
• With mouse wheel: Cycle through the zoom levels.
With mouse: Right-click to exit targeting system (to Deck Gun mode).
•
With keyboard: Tab key to cycle through the zoom levels.
•
Design Note: The rotation speed of the view will be slower at higher zoom levels.
77
Page 79

sonar sTaTIon
hydrophoNe/SoNar eleMeNtS
• Direction handler: Left-click on the handler to change the listening direction.
Bearing: Automatically entered; corresponds with the direction in which the hydrophone
•
is pointing.
• Range (Sonar): Display range to target.
• Send information to TDC/map.
• Hydrophone volume.
• Warning light.
Sound heard by hydrophone needs to be easily distinguished to determine:
• Contact type: Single ship or convoy.
Ship type: Merchant or warship.
•
• Range to ship:
(over 5,000 m).
• Position toward submarine: Closing or moving away.
Short (under 1,000 m), medium (between 1,000 m and 5,000 m), or long
raDar sTaTIon
• There are two operating modes for radar:
–
Oscilloscope mode.
–
PPI mode.
• Left-clicking switches the radar on/off.
Sweep/focus:
•
–
Left-clicking switches Radar mode between continuous sweep and focus.
–
In Focus mode, the radar is controlled using the radar wheel.
• Range scale: Left-clicking switches the radar scale between long and short range.
• Radar display: The green spike/dot displays signal strength.
78
Page 80

sUbMarIne ManaGeMenT sTaTIon
Without its crew, a submarine is only a tube of metal. Together, they are a lethal fighting machine.
It is your job as captain to manage the crew.
The Crew Management screen serves to watch the current state of each crewmember and the
crew as a whole. By default, the crew is a functional entity that has been arranged for you by the
officers and the chief of the boat. Your attention is required only to optimize the workings of the
crew or to respond to a crisis such as casualties being suffered onboard the submarine.
The way the crew functions in Silent Hunter: Wolves of the Pacific is inspired by reality. During
normal patrol routine, the crew stands watch to keep the vital functions of the submarine manned.
Each man stands a four-hour watch, after which he enjoys eight hours of off-duty time dedicated
to minor repairs, studying submarine theory, and last, rest and sleep.
Watches succeed automatically during the day, without any input from the player. You may choose,
however, what each crewmember’s role is in the submarine and in what watch he takes part.
When starting a combat action, the player should command the crew to Battle Stations, which
ensures that enough efficiency is generated for a combat action. Don’t overuse this feature,
though, as the crew will become exhausted and this will prevent you from undertaking combat
operations in the following days.
Each crewmember is a unique individual with a set of skills that are both innate and acquired
through education. Once a crewmember is manning a station, his efficiency is determined by his
skills and the specifics of the station. (By "station" we mean the compartment where he is located,
as a crewmember will perform differently in each part of the submarine.)
A crewmember doesn’t act on his own; he is part of a team in each compartment. First he will get a
bonus in efficiency from the leader of the compartment. Second, everyone onboard the submarine
may get a bonus of efficiency from the leader present in the command room – the Officer on Deck.
79
Page 81

daMage MaNageMeNt
Sooner or later your submarine will suffer a malfunction due to damage being taken or insufficient
care by the crew. As any properly trained submarine crew would do, your men will start repairing
damage located in their area of responsibility as soon as possible.
In addition, you can order a special damage control team to take care of especially difficult
repairs. To prioritize their tasks, simply drag the malfunctioning items into their queue.
80
Page 82

torpedo MaNageMeNt
The chief weapon of your submarine is the torpedo, and the captain must make sure the
submarine’s torpedo tubes are loaded and ready for battle. By default, the crew will start reloading
the tubes once they are emptied (through firing). You can order your crew to wait for your
commands before starting loading operations, which may be useful to conserve the crew’s energy
for later operations or to let yourself start the loading of the torpedoes.
To order the loading of a torpedo, drag it to the tube that you wish to be load. The only restriction is
that bow tubes may only be loaded from the bow torpedo room, while stern tubes are loaded only
from their room.
Reloading torpedoes is a tiring and noisy operation, and therefore all reloading operations are
stopped when the submarine is rigged for silent running.
81
Page 83

MUlTIPlayer
seTTInG UP for onlIne Play
+
The game uses MatchMaking
The DemonWare name and logo are copyright of DemonWare Ltd. 2006
The Multiplayer mode of Silent Hunter: Wolves of the Pacific’s allows you to play privately hosted
online games through the Ubisoft Matchmaking servers or local LAN games.
The following TCP and UDP ports should be opened to allow for Silent Hunter: Wolves of the
Pacific’s multiplayer gaming:
Direction Protocol Remote Port Remote Hosts Local Port Comment
Outbound TCP 3074 test.lsg.agora.mmp. Any Lobby Server
demonware.net
Outbound TCP 3074 gsdev##.gsdev.mdc. Any Development
ubisoft.com Authentication Server
Outbound TCP 3074 agora-as##.gs.mdc. Any Production
ubisoft.com Authentication Server
Outbound UDP Any Any 3074-3174 Peer to Peer
Inbound UDP Any Any 3074-3174 Peer to Peer
Outbound TCP 80 gconnect.ubi.com Any Service Discovery
Besides the Matchmaking ports these other ports need to be open:
TCP port 19.000
UDP port 19.001
UDP port 19.002
, Copyright © 2006, by DemonWare Ltd.
82
Page 84

MUlTIPlayer InTerfaCe
MUlTIPlayer MenU
From the Multiplayer menu, you can choose between a LAN game and an online game. After
choosing, you will be taken to the Profiles screen. Press Back to return to the previous screen.
ProfIles PaGe
laN gaMe
In the Profile screen, fill in the Username field and then to press Next, which will take you to the
Sessions screen.
Press Back to return to the previous screen.
oNliNe gaMe
In the Profile screen, fill in the Username field, the Password field, and the CD-KEY field, and then
press Next, which will take you to the Sessions screen. You can also create a new profile. Just
press the Create Profile button, which will open a browser window and take you to ubi.com. Follow
the instructions there to create a valid account. Then you can use the username and password
previously created to authenticate yourself in the game.
Press Back to return to the previous screen.
83
Page 85

sessIon PaGe
Here you can create a new game by pressing the Create Game button or join an existing session
by pressing the Join Game button. Press the Leave button to go to the Main Menu.
The Session page will have the following fields:
Session: The name of each session will be displayed here.
•
Map: The name of the maps will be displayed here.
•
Mode: The type of game – Co-op or Adversarial – will be displayed here. There are two type
•
of game:
• Players/Max:
number of players allowed.
• Latency.
The session’s list can be sorted by:
• Session.
• Map.
• Mode.
• Players.
• Maximum number of players.
• Latency.
This field indicates the number of players in a session and the maximum
84
Page 86

CreaTInG a neW GaMe
When creating a new game, you must enter a session name in the Session field. Setting a
password for your session is optional. You must also set the maximum number of players – which
can be as low as two players or as high as eight players. You can set the game mode to Co-op or
Adversarial.
There are two check boxes: Submarine Selection and Crew Selection. Checking them will allow
joining players to select the submarine type and the crew’s skill. Leaving them unchecked means
that only the server will be able to select the submarine type and the crew’s skill.
Pressing the Create button will take you to the Lobby page. Pressing the Back button will take you
to the previous screen.
lobby PaGe
The Lobby page contains a list of the available slots and the connected players, the type of
submarine for each player, the crew’s skill and the latency. Next to each player there is a check
mark showing the status of each player. The host of the game will also have an X mark next to the
check mark, which makes it possible to kick players out of the game.
To the right of the screen is a window where you can choose the mission from a drop-down list.
Once a mission is selected, a description of the mission will appear below the drop-down list.
85
Page 87

LIST OF PLAYERS (MAXIMUM 8)
• Player’s name
• Player’s submarine type
Allow players to select their submarine type
–
• Players crew experience level
Allow players to select their crew experience level
–
• Latency
• Ready icon
• Kick icon (only for server)
CHAT OPTION
• To all
• To allies
REALISM
• Easy
• Normal
• Hard
• Very hard
IN-GAME CHAT
• Radio
• Normal
86
Page 88

MAP SELECTION
• Single player mission
• Random mission
Mission period
–
Mission time
–
Convoy type
–
Convoy size
–
Escort size
–
Escort experience
–
Air cover
–
Distance to convoy
–
LEAVE
READY (FOR CLIENT) / START (FOR SERVER)
MUlTIPlayer resUlTs sCreen
PLAYERS SCORE LIST
• Player name
• Sub type
• Number of Merchants sunk
• Number of Warships sunk
• Total tonnage sunk
• Renown won
• Status
Killed
–
87
Page 89

OBJECTIVES STATUS
• Objective name
• Objective status
MUlTIPlayer GaMe MoDes
CooPeraTIve MoDe
In cooperative multiplayer a maximum of four players over the Internet and eight players on a LAN,
each commanding a submarine, must work together toward the completion of a common set of
objectives. Enemy ships are controlled by the computer.
The main objective for the players is to sink a specific amount of tonnage in enemy shipping, but
there may be specific objectives depending on the mission.
aDversarIal MoDe
Adversarial mode is similar to the Cooperative mode except for the fact that one player – the
server operator – controls the escort ships present in the scenario. Your objective during the game
is to stop the submarine players from achieving their goals in the set time of the mission.
To accomplish this, the player uses the sensors and weapons onboard the escorts, locating,
attacking, repelling, and, hopefully, sinking the submarines.
Tabs anD orDers
esCorT ConTrol Tab
• Center camera view (on selected escort).
Defensive / aggressive mode.
•
Defensive (default mode): Escort engage submarines only on the assigned patrol zone.
–
Aggressive: Escort engage any submarine contact.
–
Search on/off mode (default off).
•
When Escort Search mode is on, escort makes search patterns on the assigned patrol
–
zone.
• Attack with side ASW:
–
Escort will immediately use the side (left and right) ASW weapons.
Attack with aft ASW:
•
Escort will immediately use the aft (back) ASW weapons
–
88
Page 90

QuiCk SeleCtioN paNel (oNly oN the eSCort taB paNel)
This panel allows player to select any escort using the combo box. This combo box appears only
on the Escort Tab panel.
esCorT ConTrol DIals
These dials appear only when an escort is selected.
Engine telegraph
•
–
This panel allows player to set the speed for selected escort.
• Escort course
–
This panel allows player to set the course for selected escort.
Escort position
•
89
Page 91

Fore
–
o
Inner circle (1-4 km around the convoy)
o
Outer circle (5-9 km around the convoy)
Aft
–
o
Inner circle (1-4 km around the convoy)
o
Outer circle (5-9 km around the convoy)
–
Left
o
Inner circle (1-4 km around the convoy)
o
Outer circle (5-9 km around the convoy)
–
Right
o
Inner circle (1-4 km around the convoy)
o
Outer circle (5-9 km around the convoy)
Escort patrol zones (inner and outer circle) change accordingly with the new convoy shape, but
their position is constant:
• 3-5 km for inner defensive screen
• 5-9 km for outer defensive screen
Convoy
This panel allows you to control the convoy (not the escorts).
Zigzagging: Convoy will start zigzagging.
•
Slow/Fast: Toggle between two-thirds speed and full speed.
•
90
Page 92

MaP
This panel allows you to access the navigation map.
• Go to Map Station.
• Set Course:
merchants) and set their course.
Any action you take – set new course, attack with depth charges, etc. – overrides AI current
actions.
On the navigation map, the Convoy Commander can select escorts (not
UnIT seleCTIon
You can select escorts on the navigation map. You can set a course or give orders to selected
escort units the Escort Panel or dials.
CaMera ConTrol
This panel allows player to control the camera.
• Free camera.
• View next escort.
• View previous escort.
• View next convoy ship.
• View previous convoy ship.
Free camera for the Convoy Commander does not work underwater and it will only move up to a
certain distance from friendly units.
91
Page 93

UnIT seleCTIon
You can select escorts while in the Free Camera mode. Left-click to select and right-click
to deselect.
WorlD War II overvIeW
WorlD War II TIMelIne
1939
Sept. 1 German Army invades Poland.
Sept. 3 Britain and France declare war on Germany.
Sept. 27 Warsaw falls to the Nazis.
1940
Mar. 12 Finland signs peace treaty with Soviet Union.
April 9 German Army invades Denmark and Norway.
May 10 German Army invades France, Belgium, Luxembourg and the Netherlands.
May 15 Holland capitulates to Nazis.
May 28 Belgium capitulates to Nazis.
June 10 Norway capitulates to Nazis; Italy declares war on Britain and France.
June 14 Nazis take Paris.
June 22 France capitulates to Nazis.
July 10 Battle of Britain begins.
Aug. 3 Italian Army invades British Somaliland.
Aug. 13 Luftwaffe begins raids on British airfields and aircraft factories.
Aug. 25-26 Royal Air Force mounts reprisal raid against Berlin.
Sept. 7 Italian Army attacks Egypt.
Sept. 27 Tripartite alliance formed between Germany, Italy and Japan.
Oct. 7 German troops occupy Romania.
Oct. 28 Italian Army attacks Greece.
Nov. 10-11 RAF raid cripples Italian fleet at Taranto.
Nov. 20 Romania joins Axis.
92
Page 94

1941
Jan. 22 British take Tobruk in North Africa from Nazis.
Feb. 11 British Army attacks Italian Somaliland.
Mar. 7 British Army comes to aid of Greece.
April 6 German Army hastily invades Yugoslavia and Greece.
April 17 Yugoslavia capitulates to Nazis.
April 27 Greece capitulates to Nazis.
May 10 Rudolf Hess flies to Scotland on “peace mission.”
June 8 British Army invades Lebanon and Syria.
June 22 Hitler launches operation Barbarossa; invasion of the Soviet Union.
June 28 Germans capture Soviet city of Minsk.
Aug. 12 Atlantic Charter signed by Roosevelt and Churchill.
Aug. 20 German siege of Soviet city of Leningrad begins.
Sept. 19 Germans capture Soviet city of Kiev.
Oct. 30 German Army occupies the Crimea.
Dec. 6 Red Army launches major counter-offensive.
Dec. 7 Japanese attack Pearl Harbor.
Dec. 8 United States and Britain declare war on Japan.
Dec. 11 Germany declares war on the United States.
1942
May 8 Germans launch summer offensive in the Crimea.
May 30 Royal Air Force launches first 1,000 bomber raid on Cologne, Germany.
June 4 Japanese Navy resoundingly defeated at Battle of Midway.
June 21 German Afrika Korps recaptures Tobruk.
July 3 Sevastopol falls to German Army.
July 5 Nazi conquest of Crimea achieved.
July 9 German Army begins push towards Stalingrad.
Sept. 13 German attack on Stalingrad begins.
Oct. 23-Nov. 3 Afrika Korps defeated by British at El Alamein.
Nov. 8 Allied invasion of North Africa begins in “Operation Torch.”
Nov. 11 Axis forces occupy Vichy France.
Nov. 19 Soviet forces encircle German Sixth Army at Stalingrad, this is the beginning of the
end of Hitler, the Russians turn the war.
1943
Jan. 2-3 German Army retreats from Caucasus.
Jan. 23 British forces take Tripoli.
Feb. 2 German Sixth Army at Stalingrad surrenders to the Russians.
Feb. 8 Red Army takes Kursk.
Mar. 2 Afrika Korps withdraws from Tunisia.
May 7 Allies capture Tunisia.
May 16-17 RAF targets German industry in the Ruhr.
July 5 Largest tank battle in history begins at Kursk.
July 9-10 Allied forces land on Sicily.
July 25-26 Mussolini and the Fascists overthrown.
Sept. 8 New Italian government announces Italy’s surrender.
Nov. 6 Soviet Army recaptures Kiev.
Nov. 28 Roosevelt, Stalin and Churchill meet at Tehran.
93
Page 95

1944
Jan. 6 Soviet Army liberates Poland.
Jan. 22 Allied forces land at Anzio, Italy.
Apr. 8 Soviet Army begins offensive in the Crimea.
June 5 Allied forces enter Rome.
June 6 D-Day: invasion of Europe begins with Allied landings at Normandy.
June 9 Soviet Army liberates Finland.
July 9 Allied troops liberate Caen.
July 20 Hitler survives assassination attempt.
July 25-30 Allied forces break-out of Normandy encirclement in “Operation Cobra.”
Aug. 15 Allies invade Southern France.
Aug. 19-20 Soviet liberates Romania.
Aug. 25 Paris liberated.
Aug. 31 Soviet Army takes Bucharest.
Sept. 3 Brussels liberated.
Sept. 4 Antwerp liberated.
Sept. 13 American troops reach the Siegfried Line in western Germany.
Sept. 26 Soviet Army enters Estonia.
Oct. 5 British invade Greece.
Oct. 14 British liberate Athens.
Oct. 20 Belgrade, Yugoslavia welcome Soviet forces.
Oct. 23-26 U.S. naval forces destroy remnants of Japanese Navy at the Battle of Leyte Gulf.
Dec. 16 German Army launches “Battle of the Bulge” offensive on the Western Front.
1945
Jan. 9 American forces invade Phillipine island of Luzon.
Jan. 17 Soviet Army liberates Warsaw.
Jan. 19 German lines on Eastern Front collapse.
Jan. 20 Hungary signs armistice with Allies.
Feb. 4-11 Roosevelt, Churchill and Stalin meet at Yalta Conference.
Mar. 3 American forces liberate Manila in the Phillipines; Finland declares war on Germany.
Mar. 9 Tokyo firebombed.
Mar. 21 Allies take Mandalay, Burma.
Mar. 30 Soviet Army liberates Danzig.
Apr. 16 Soviet Army launches Berlin offensive.
Apr. 18 German forces in the Ruhr capitulate.
Apr. 28 Mussolini hanged by Italian partisans.
Apr. 30 Adolf Hitler and wife Eva Braun commit suicide in Chancellery bunker.
May 2 All German forces in Italy surrender.
May 7 Unconditional surrender of all German forces.
May 8 Victory in Europe (VE) Day.
June 5 Allies divide Germany into occupation zones.
Aug. 6 First atomic bomb dropped Hiroshima.
Aug. 9 Second atomic bomb dropped on Nagasaki.
Aug. 14 Unconditional surrender of Japanese forces.
Aug. 15 Victory over Japan (VJ) Day.
Nov. 20 Nuremberg War Crimes Tribunal begins.
Oct. 16 Hermann Göring commits suicide; 11 other war criminals hanged.
94
Page 96

naTIonalITy sTaTUs TIMelIne
95
Page 97

faCTs aboUT U.s. sUbMarInes In WorlD War II
• Submarines comprised less than 2% of the U.S. Navy during World War II.
• U.S. submarines sank over 30% of the Japanese navy.
• In fact, U.S. submarines sank eight Japanese aircraft carriers.
• U.S. submarines played an important role in the virtual strangling of the Japanese economy.
• U.S. submarines sank almost 5 million tons of Japanese shipping.
• 200 U.S. subs sank 201 Japanese warships and 1,113 merchant ships.
• 211 subs were built with an operational peak of 182 in 1945.
• The U.S. lost 52 subs with 3,503 crew.
• Gato-class subs were mainly used early in World War II. Later, they were joined by similar
Balao-class subs.
WorlD War II MeDals
sUbMarIne
CaMPaIGn sTar servICe MeDal MeDal of valor
vICTory Cross WoUnDeD MeDal PaTrol sTar
96
Page 98

ranKs
Seaman Recruit Seaman Apperntice Seaman Petty Officer 3rd Class
Petty Officer 2nd Class Petty Officer 1st Class Chief Petty Officer Senior Chief Petty Officer
Master Chief Petty Officer Ensign Lieutenant (Junior Grade) Lieutenant
97
Page 99

aPPenDIx
basIC ConTrols
F1 Help
Esc Menu
navIGaTIon ConTrols
sPeeD ConTrols DIreCTIon ConTrols DePTH ConTrols
` All Stop [ Hard to Port (left) E Emergency Surface
1 Ahead Slow ] Hard to Starbord (right) P Periscope Depth
2 Ahead 1/3 ‘ Rudder Amidships A Maintain Depth
3 Ahead Standard S Surface
4 Ahead Full D Dive
5 Ahead Flank C Crash Dive
6 Back Slow
7 Back 1/3
8 Back Standard
9 Back Emergency
sTaTIons ConTrols
F2 Command Room
F3 Navigation Map
F4 Attack Periscope
F5 Bridge
F6 Deck Gun
F7 AA Gun
F8 Sonar
F9 Radar
F10 Sub Management
F11 External Camera
F12 Captain’s Panel
T Torpedo Management
Y Damage Management
U TBT (Target Bearing Transmiter)
O Observation Periscope
K Captain’s Log
M Radio Messages
98
Page 100

aTTaCK ConTrols
Return Fire
Space Bar Fire
Tab Zoom
Q Open/Close Selected Tube Door
W Cycle Tubes
L Lock View to Target
J Deploy Decoys
Z Toggle Silent Running Mode
oTHer ConTrols
N Recognition Manual
X Chronometer
TIMe CoMPressIon
Numpad – Decrease Time Compression
Numpad + Increase Time Compression
Back Space Pause
evenT CaMera
V Maximize/Minimize Event Camera Viewer
/ Turn off Event Camera
, Previous Unit
. Next Unit
PerIsCoPe ConTrol
Ins Up Observation Periscope
Del Down Observation Periscope
Page Up Up Attack Periscope
Page Down Down Attack Periscope
free CaMera ConTrols
Cursor Up Move Camera Ahead
Cursor Down Move Camera Back
Cursor Left Turn Camera Left
Cursor Right Turn Camera Right
Shift + Cursor Fast Camera Movement
Ctrl + Cursor Slow Camera Movement
Left Mouse Button Select
Right Mouse Button Return to Previous View
99
 Loading...