

Page 1

Silent Hunter 3
Mission Editor Manual
Page 2

The Silent Hunter 3 Mission Editor.................................................................................... 3
Types of editable data......................................................................................................... 4
Missions.......................................................................................................................... 4
Campaign layers.............................................................................................................. 4
Editor’s Interface ................................................................................................................ 5
Name bar......................................................................................................................... 5
Menus.................................................................................................................................. 6
File .................................................................................................................................. 6
New............................................................................................................................. 6
Open (Normal Mission, Random layer, etc)............................................................... 6
Merge.......................................................................................................................... 6
Save.............................................................................................................................6
Save (Normal Mission) as........................................................................................... 6
Save Random Layer.................................................................................................... 7
Save Scripted Layer.................................................................................................... 7
Save Map Notes Layer................................................................................................7
Save Land Units Layer................................................................................................ 7
Edit.................................................................................................................................. 7
Copy (shortcut: Ctrl+C; Ctrl+Insert) .......................................................................... 7
Paste (shortcut: Ctrl+V; Shift+Insert).........................................................................7
Mission............................................................................................................................ 7
Parameters................................................................................................................... 7
Objectives ................................................................................................................... 9
Triggers....................................................................................................................... 9
Events........................................................................................................................ 10
Validate Mission....................................................................................................... 11
Tools ............................................................................................................................. 11
Radius Ruler (shortcut: R)........................................................................................11
Show Estimated Time of Arrival.............................................................................. 11
Pan View (shortcut: SPACE)....................................................................................11
View.............................................................................................................................. 12
Tool Bar....................................................................................................................12
Status bar................................................................................................................... 12
Render Accurate shore line (shortcut: O) ................................................................. 12
Show minefield distribution (shortcut: M) ............................................................... 12
Performance.................................................................................................................. 12
Editing....................................................................................................................... 12
Simulation................................................................................................................. 12
Help............................................................................................................................... 13
Toolbar.............................................................................................................................. 14
Time Filter Controls...................................................................................................... 14
Simulation Controls...................................................................................................... 14
Units Roster/Explorer ....................................................................................................... 15
Map View.......................................................................................................................... 15
Status Bar...................................................................................................................... 15
2
Page 3

Working with the editor.................................................................................................... 15
Creating Single Units....................................................................................................15
Creating Ordnance........................................................................................................16
3
Page 4
The Silent Hunter 3 Mission Editor
Advanced users that require more from the game than it offers in its current form
can use the mission editor to add content. This is basically the same tool used to develop
Silent Hunter 3 content, so the power is yours.
Types of editable data
Missions
Missions are designed to be single engagements with a limited duration in time.
They should focus on limited areas of the map, but there are no limits imposed to the
designer. Missions are run over the campaign engine, so you do not need to cover the
whole world with shipping and units. The campaign will take care of this and those
players that simply refuse to do what they’re told – sub simmers for example.
Campaign layers
The SH3 dynamic campaign runs thousands of units at a time, over the whole
world. The data for the campaign is composed of three layers:
The Random Layer – includes all the naval traffic, from convoys to local fishing
boats
The Scripted Layer – includes all the warship patrols, hunter-killer groups,
military task forces and the mine fields
The Land Unit Layer – includes the naval bases, the air bases and the coastal
defenses
4
Page 5

Editor’s Interface
Name bar
Up on the program window name bar you can see the current Mission Editor
working mode. This acts as a filter for the data to be saved and decides the requirements
needed for validating the file. Possible working modes are:
• [Normal mission]: the mission must have human controlled units, the save
operation saves everything in the “scene”, validates triggers, objectives etc
• [Random data layer] – no validation performed, only random groups are saved
• [Scripted data layer] – no validation performed, saves everything except
random groups
• [Map notes layer] – no validation performed, only map notes are saved
• [Land Units Layer] – no validation performed, only land units are saved
5
Page 6

Menus
File
New
Prompts you with a starting date and creates a new mission based on the date and
time entered. Sets the Editor to “Normal Mission” working mode.
Open (Normal Mission, Random layer, etc)
Opening a file completely loads the data in it, regardless of the type of file the
editor is should be looking for. It also sets the editor in the appropriate working mode.
Merge
Loads data from another file on top of the one currently displayed. The editor will
prompt you to set all data as “to be saved” or not. It is useful, when creating missions or
other files of limited scope, to merge the campaign data as “not save-able”, to avoid
unpleasant interferences between the campaign and mission data.
WARNING: File merging in editor can result in duplicated data.
Save
Simply saves the current, savable, data according to the current mode the editor is
working in. This may exclude some of the edited data. Before the actual saving takes
place, a validation check may be performed.
Save (Normal Mission) as
Checks for validation, then saves all data set as “savable” into a complete mission
file. In order to access the mission from within the game, the location will have to be:
- For single player missions:
GameInstallFolder\Data\SingleMissions\English
- For multiplayer missions:
GameInstallFolder\Data\MultiMissions\English
(The default Game Install Folder is
You will need to create a folder for your mission in that location, bearing the same name
as the mission file.
Note: Administrator privileges are required to properly access and save data in
the game folder. Please make sure you backup all data that you modify in the campaign
before overwriting it, or you may end up with an unusable install of the game.
C:\ProgramFilesFolder\Ubisoft\SilentHunterIII)
6
Page 7

Save Random Layer
Save a random layer for the campaign. To use in the game, it will have to replace
the file:
GameInstallFolder\data\Campaigns\Campaign\Campaign_RND.mis
Save Scripted Layer
Save a scripted layer for the campaign. To use in the game, it will have to replace
the file:
GameInstallFolder\data\Campaigns\Campaign\Campaign_SCR.mis
Save Map Notes Layer
Save a map notes layer. These are not currently used in the game but may be
useful as an aid to editing the campaign.
Save Land Units Layer
Save a land units layer for the campaign. To use in the game, it will have to replace the
file:
GameInstallFolder\data\Campaigns\Campaign\Campaign_LND.mis
Edit
Copy (shortcut: Ctrl+C; Ctrl+Insert)
Copies the selected unit to the clipboard.
Paste (shortcut: Ctrl+V; Shift+Insert)
Pastes a unit from the clipboard. The unit will be placed at the mouse cursor’s
location.
Mission
Parameters
Of vital importance for a mission, not so for the campaign data are the mission
parameter.
7
Page 8

Mission name
Not used during actual game-play, the mission name is nevertheless useful in
distinguishing one mission from the other.
Briefing
The mission briefing that the player(s) will see must be entered here.
Mission Type
This flag will set the mission as meant for Single or Multi player. This will decide
the number of controllable submarines that need and can be placed in the mission. You
will still need to place the files in the correct location for the game to locate them (see
above).
Start date
The mission start date will influence the units that can take part in it – according
to their historical availability.
Start time
Changing the mission start time will radically change game play, like changing
night to day. In fact, it may even do that!
Weather parameters
8
Page 9
A number of parameters (wind, clouds, fog, precipitations) are used to define the
weather conditions. The weather, in turn, will influence sensors efficiency, weapons
reliability and the battle in general. You can also adjust the amount the weather can
change from the starting conditions, and how soon will it be allowed to do so.
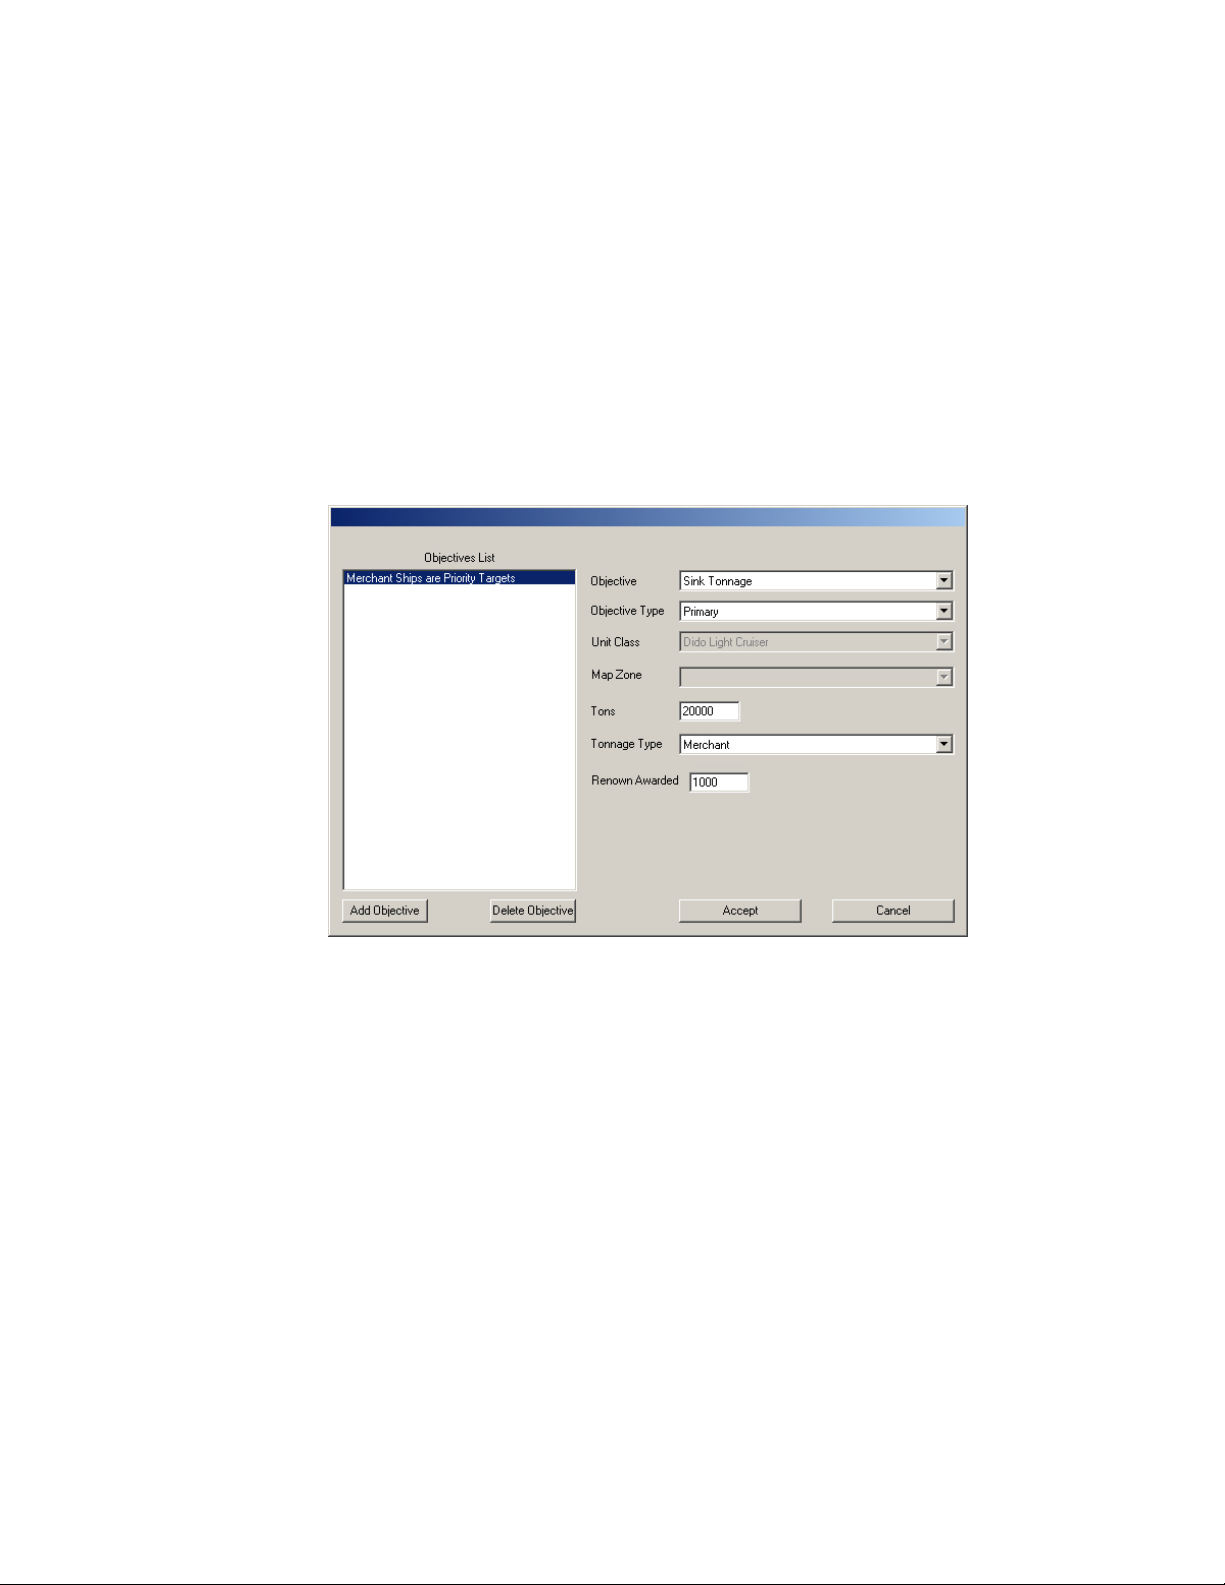
Objectives
Objectives are needed to give the mission a purpose and the players something to
complete. Primary type of objectives must be achieved for the mission to be considered
completed, while secondary ones are only meant to give the player a sense of
achievement. Hidden objectives need to be revealed using Triggers and Events, or it will
not be apparent to the player that he or she needs to complete them.
Triggers
Triggers are mission elements used to launch specific events, during the game, in
specific conditions. The trigger types are:
9
Page 10

Reach Zone
Trigger is activated when the player’s u-boat reaches a set zone in the game.
Obviously, this does not go very well with multiplayer missions
Time
Trigger is activated when a period of time passes from mission start
Unit destroyed
Once a certain unit in the mission is destroyed, the trigger is activated.
Class destroyed
Once a certain number of entities of a set class are destroyed, the trigger is
activated.
Objective
Once the objective in question is achieved, the trigger is activated.
Tonnage
Trigger is activated when the player has sunk a certain shipping tonnage.
Events
Events take place when a trigger, or a combination of triggers, are activated.
Using events, you can control the displaying of mission objectives, messages to be
received by the player and even the appearance of scripted units.
10
Page 11

Validate Mission
Check the mission to see if the mission basic requirements are met and the
objectives are valid. You will be unable to save the data if it does not pass a validation.
Tools
Radius Ruler (shortcut: R)
Toggle mouse between normal mode and Ruler mode. In the ruler mode, it left
click and drag to measure distances over the map. Overrides Pan Mode.
Show Estimated Time of Arrival
Toggles the ETA display for waypoints of scripted units shown on the screen.
ETA is based on unit speed, time of departure, and distance to travel. It can be used to
synchronize the arrival of multiple units at one location.
Pan View (shortcut: SPACE)
Toggle Mouse Left Click between the two working modes: Pan (click and drag of the
map to change the displayed area) and Select (click on an unit to select it).
11
Page 12

View
Tool Bar
Un-checking this option will disable the buttons toolbar. This will gain you some
space for the main editing window at the cost of having several options of the editor less
accessible.
Status bar
Un-checking this option will disable the bar on bottom of the screen.
Render Accurate shore line (shortcut: O)
Checking this option will increase the resolution and precision the coastlines are
rendered at when the map view is zoomed to higher levels of magnification. This may
allow for more accurate placement of units, but in turn it will degrade performance.
Show minefield distribution (shortcut: M)
Checking this option will display actual mines inside the minefields. These are
only to be treated as illustrative for the minefield’s density and distribution, not as actual
positions of mines within the game.
Performance
Editing
These options affect the main operating mode of the editor – when you are
placing units, groups and routes for them to use.
Show WP icons
Toggles the display of actual waypoints for all units. Those of the currently
selected group/unit are always displayed, regardless of the state of this option.
Show WP radius
Toggles the display of random placement radius for the waypoints of the units on
the screen.
Simulation
These settings affect the simulation operating mode of the editor – basically a
preview mode for the mission/campaign you are editing.
Show WP icons
Same as above but affects display during the simulation
Show WP radius
Same as above but affects display during the simulation
Show random instance parent
Toggles a line uniting each random group/unit generated within the simulation to
its parent entity.
Show random instance name
Toggles the name of the units that are run by the simulation.
Show random instance path
Toggles the display of the actual path taken by the units that are run by the
simulation.
12
Page 13

Help
This shortcut will display information on the mission editor. Check this to see the
version of the editor you are running.
13
Page 14

Toolbar
Groups several of the most used options and commands in a quickly accessible
panel. Additionally, a number of controls indispensable for working on the campaign are
only shown here:
Time Filter Controls
Only entities active during the period covered by the filter setting are displayed
and run by the simulation. Additionally, entities allegiance (color coded as follows: blue
– axis, green – neutral, red – allies) is shown for the start of the filtered period.
Simulation Controls
The most time-effective way to check the campaign or even a mission is by
simulating its progress. You can Start, Pause and Stop the Simulation, and change the
speed at which it is run. Keep in mind that it will run from the Start of the Time Filter
Period, so make sure to use the Time Filter Controls:
Note: during simulation the random groups will generate random group instances
(marked with green circles) that do not have properties and cannot be selected. For
cluttered maps, you can toggle the displays of helpers through the Performance –>
Simulation controls.
14
Page 15

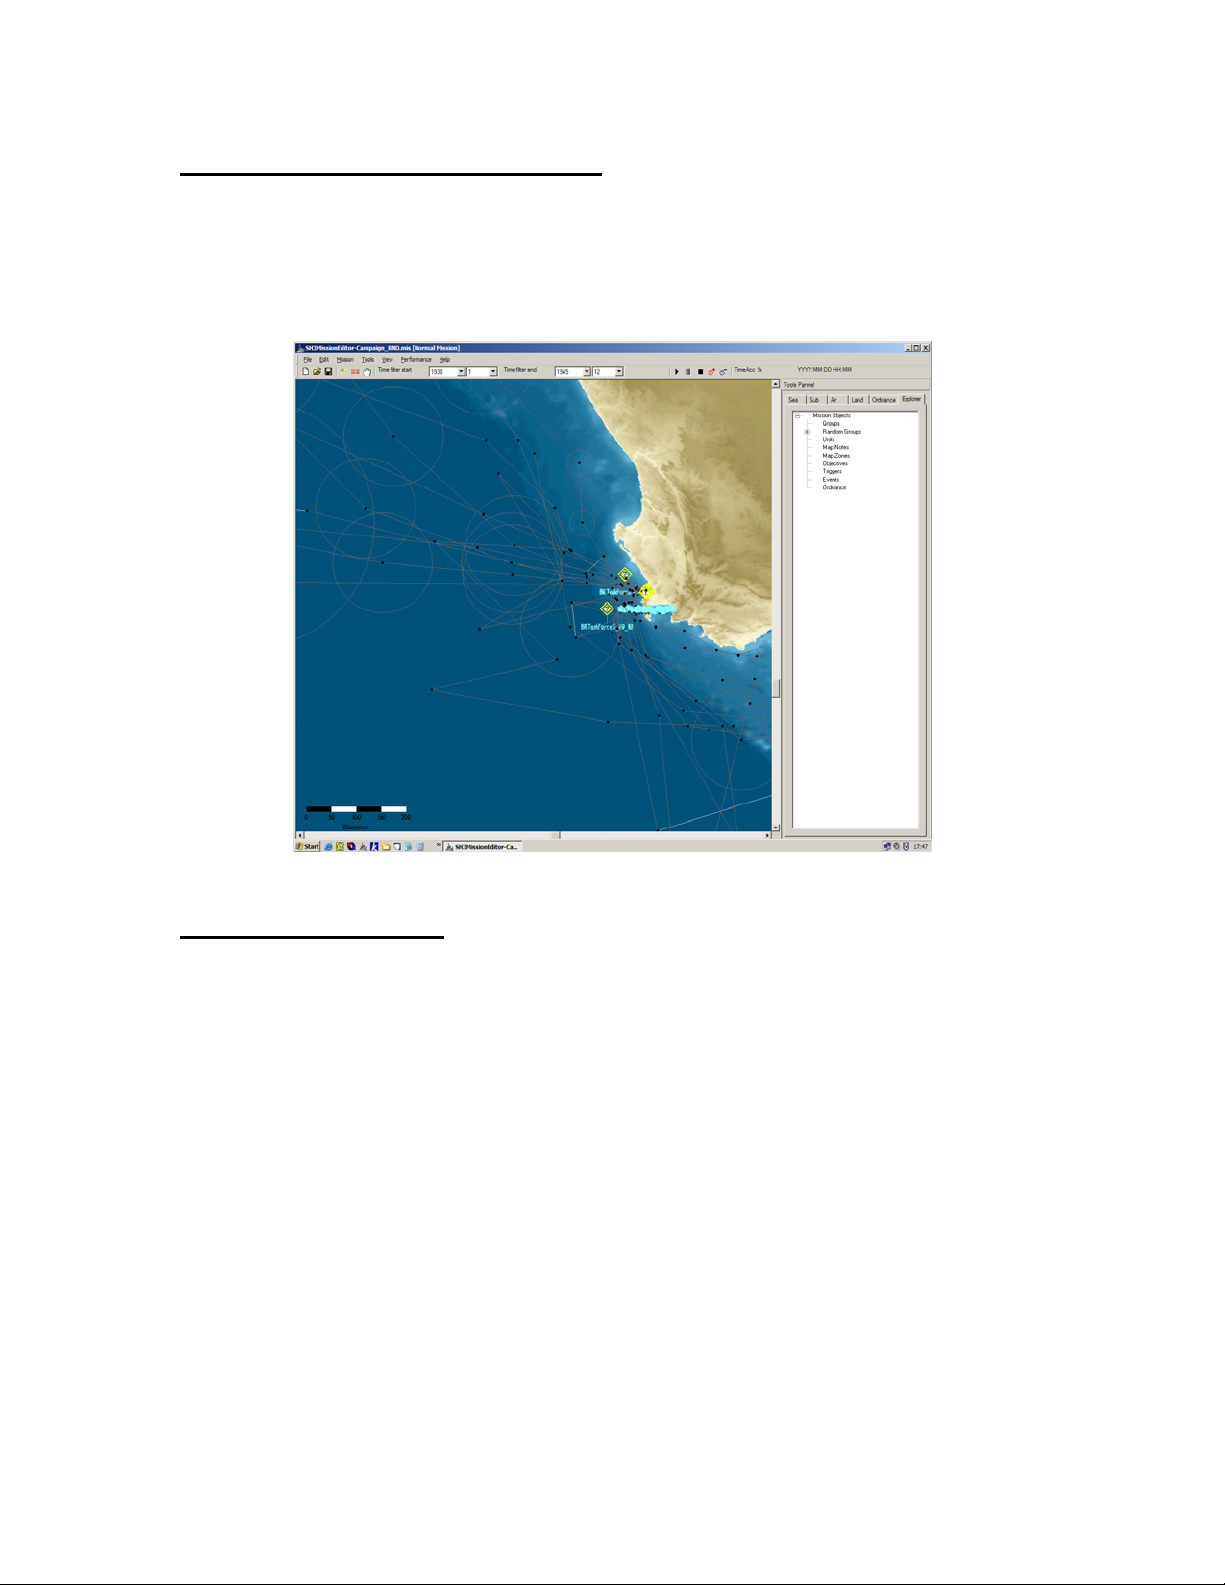
Units Roster/Explorer
The meat and bones of the mission are the units that take part in it. Through the
Roster displayed in the right part of the screen, you can add those needed one by one and
then group them in units. To do this, simply select the desired entity, then drag and drop
it in the map view. If it does not appear there, check the time filters. It may be that the
unit in question is not available in the displayed time period.
Map View
The main view used during editing, it displays the world map and the units placed
in it. Only currently loaded entities are displayed, but remember that all single missions
are merged by the game with the campaign data. Therefore, a check of the campaign data
is advisable.
A useful shortcut when working over the map view is “H” – displaying the height
of the land under the mouse cursor. The height can be read on the status bar, after the
geographical coordinates of the point in question. It is important when creating missions
to judge the depth of the water available for submarines to dive to.
Status Bar
The bar on the bottom of the screen displays the current coordinates – latitude and
longitude – of the cursor. The coordinates are given both in meters and the more accurate,
from a geographical point of view – degrees.
Coordinates are always measured from the intersection of the Greenwich
Meridian and the Equator line. Longitude is measured on Meridians – on the left-right or
East-West axis, while Latitude is measured on Parallels – on the up-down or North-South
axis.
Working with the editor
Creating Single Units
To create a single unit, simply drag it from the roster to the desired location on the
map. Then select it by left clicking on it, then:
Right click on it to change it’s properties
Right click on the map to add waypoints
Properties of obvious importance are the unit’s heading and speed (the last one
can be set per each waypoint – affecting the unit’s behavior from there onwards) but also
the unit version – affecting sensors and fixed weapons loadout – and the game entry and
exit dates. If you are not meeting the unit in the game when you should be, double-check
this dates. It may be that the unit is not supposed to be in the game at that time.
One word on the unit versions – supply during wartime can never be 100% counted
on. Sometimes, units that are supposed to receive a certain loadout may end up with an
older one.
15
Page 16

Creating Ordnance
Ordnance – static, unmanned defenses – require special attention for
editing
Minefields: a minefield is composed of a minefield entity – placed
anywhere on the map – and the waypoints that actually define its location. The
radius of every waypoint is the dimension of the field at that particular point.
Interpolation is performed between the values set for two adjacent waypoints. A
value of 0 cannot be taken into account for this purpose, so 15 m is taken into
account in such case.
Anti Submarine Nets: Anti-sub nets can only be placed as a succession of
86.3 meters long pieces. The editor takes care of this when the entity is
created or modified. To place a Net, first place an anti-sub net entity on
the map. Unlike minefields, this is used as starting point of the actual net.
Next, a succession of waypoints connected to the entity defines the net’s
course. When placing new waypoints, the editor will automatically snap
the line to a multiple of 86.3m. Moving waypoints at the end of a segment
will not always result in a segment disappearing. Most of the time, a red
helper line will display a portion of the net that will appear in game to
complete a 86.3m segment.
16
 Loading...