

Page 1
DATA BOOK
Page 2

BEFORE YOU BEGIN...
2
We know you’re anxious to begin S
meets the following minimum system requirements:
! 486DX/66 MHz IBM PC or compatible
! 8 MB of RAM
! MS-DOS 5.0 - 6.22
! An Uncompressed hard drive with 35 MB free for the small install
! A 1 MB SVGA graphics with a color SVGA Monitor
! A 2X speed CD-ROM drive (350 ms access and 300 KB transfer rate)
! A 100% Microsoft or Logitech compatible mouse
! Microsoft mouse driver version 9.0 or higher, or Logitech mouse driver 6.24 or higher
The minimum amount of free base RAM required is:
! 500,000 BYTES OF FREE BASE RAM
! 6,900,000 BYTES OF FREE XMS
Remember, 1K is equal to 1024 bytes. For example, 500K equals 512,000 bytes.
Users with 8 MB systems who have TSR (Terminate and Stay Resident) files loaded high (including
RAM caches such as Smartdrive) may have to create a boot disk to run S
“Troubleshooting” section for more details.
If you get the following error when you begin the game: ”Failed to Init Heap”, then you must create a
boot disk. (This error means that your computer doesn’t have enough XMS to run the game).
ILENT HUNTER
, but before you do, please be sure that your system
ILENT HUNTER
. Refer to the
NOTE:
directions in the “To Check Your Free Base RAM” section to determine if you have enough available
memory to run the game.
Hard drive size and total system memory available have no bearing on free RAM. Follow the
BOX CONTENTS
Your game box should contain one CD-ROM disc (CD), one S
Pacific Submarines in World War II” booklet, and this S
Book.
ILENT HUNTER
Windows® 95 Users
If you run S
random times and might run substantially slower. We recommend that you run the game in DOS
Mode, but if you are going to run in Windows 95, you must make sure no other applications are
running, and your screen saver is turned off. Running S
recommended.
ILENT HUNTER
through the Windows® 95 environment, S
To Check Your Free Base RAM
Type MEM from within the DOS directory. The free base RAM is listed as “LARGEST EXECUTABLE
PROGRAM SIZE.” Compare the listed amount to the amount of free memory required by the game.
Also listed is “FREE EXTENDED MEMORY” (or free XMS). If your amount is lower than the game
requires, follow the instructions for making a “boot disk” given under the “Memory” section of this data
card, or free up additional memory (see the Memory Management section of your DOS manual) before
continuing.
ILENT HUNTER
ILENT HUNTER
User Manual, the “U.S.
Commander’s Edition Data
ILENT HUNTER
under Windows 95 is not
may lock up at
Page 3

INSTALLING THE GAME
The game cannot be played from the CD, some files must be installed to your hard drive before you
can begin play.
1. To install the game, place the CD in your CD-ROM drive. Be sure this drive is the active drive. For
example, to make drive D the active drive, type D: and then press Enter.
2. Type INSTALL and press Enter. Four installation choices are displayed:
Small Install Animation and Speech on CD (35 MB)
Regular Install Animation only on hard disk - faster Animation (47 MB)
Large Install Speech only on hard disk - faster Speech access (75 MB)
Maximum Install Animation and Speech on hard disk (88 MB)
3. Follow all on-screen prompts.
For all of the install options other than Maximum Install, the speech and/or animation will be read from
the game CD during play. Loading either speech or animation from the CD may cause delays during
game play.
If you experience problems during installation, please refer to the “Troubleshooting” section of this
data card. Additional information regarding memory, sound, video, and mouse setup can be found
there.
3
STARTING THE GAME
1. Boot your system normally with MS-DOS 5.0 or greater.
2. Insert the CD into the CD-ROM drive.
3. Be sure that the hard disk containing the game is the active drive.
4. Change the current directory to the game’s directory. For example, to change to the default
directory type CD \SILENT and press Enter.
5. Type SH and press Enter to start the game.
For complete and specific “how to play” information, please refer to the User Manual. Any notes
regarding changes to the game made after the User Manual was printed, or any rules errata can be
found in the README.TXT file. Please read the README.TXT file in your game directory for more
information.
SAVING GAMES
ILENT HUNTER
S
You need approximately 10,000 bytes free on your hard drive for each saved game, after installing the
game.
requires space on your hard drive for saved games and temporary files.
TROUBLESHOOTING
This section provides you with several easy steps to solve some common problems.
MEMORY
This game requires 500,000 bytes of free base memory and 6.9 MB of XMS memory to run. Read the
“To Check Your Free Base RAM” section to find out how to check your free RAM. If your system does
not have enough free base memory, the game may tell you in the form of an error message or it may
crash after startup or during play. Not having files and buffers set correctly for the program can result
in corrupted data in saved games and/or crashes during play.
Page 4

HOW TO MAKE A BOOT DISK:
You can free more conventional memory and eliminate most potential problems by creating a book
disk. A boot disk is the best way to temporarily change your system’s configuration without any risk
Note: this boot disk maker will not run under Windows ‘95. You must be in DOS mode to use the boot
disk maker.
1. Place a blank disk in your A: drive. (this must be your A: drive to operate properly)
2. Place the game CD in the CD-ROM drive.
3. Change the active drive to the CD-ROM drive (usually D:) by typing D: and pressing enter.
4. Type the word BOOT and press enter.
5. Follow the on-screen prompts until the program is finished.
6. Reboot your system with the Boot disk in the A: drive and then change to the game directory and
start game.
VIDEO CARDS/VESA DRIVERS
The following video cards are supported: ATI; Cirrus (Cirrus Logic); Diamond (many cards, may
require individual drivers);Genoa; Orchid; Tseng (ET 4000)
If you are experiencing any problem with your video/VESA driver, type SH /V at the command line,
rather than SH. This enables a universal VESA driver which is compatible with the video cards list
above.
4
MOUSE SETUP
If your mouse is not functioning, you should make sure the driver has been loaded for use with DOSbased programs. Windows and other programs of its type have built-in mouse drivers that do not
function outside of their environment. Loading a mouse driver may be as simple as typing MOUSE
(and pressing Enter) before starting the game. Since the command differs from mouse to mouse, you
may need to consult your mouse user’s guide for the location and name of your particular driver
software.
If your mouse is acting erratically, it may be due to an old mouse driver for your mouse, or it may not
be fully Microsoft or Logitech compatible. Check with the mouse manufacturer to see if there is an
updated mouse driver available.
SOUND CARDS
The following sound cards are supported: UltraSound, Sound Blaster 16; Sound Blaster Pro III; Sound
Blaster Pro II; Sound Blaster Pro I; Sound Blaster Regular; Media Vis i on PAS-16.
If you are experiencing problems with your sound card, try running the diagnostic software that comes
with your card. Eighty percent of all sound card problems are due to mistaken configurations. If you
are running a sound card that is not listed above, or are running a sound card in an emulation mode,
your results may not be optimal. This game was tested only on the listed cards.
Page 5

If you are experiencing problems with the game, try configuring the game for No Sound. If the game
will now run normally (but without sound, of course), then you probably need to reconfigure your
sound. Type SETSOUND from the SILENT subdirectory, choose “NO” when asked to accept the
default settings, correct the IRQ setting, and try starting the game again. If your game still will not run,
consult the manual that came with your sound card for diagnostic procedures.
ILENT HUNTER
The S
SSI Technical Support. If you have a sound card that is not on the list of supported sound cards, you
may have to set the sound up for Sound Blaster emulation or run the game with no sound.
sound installer lists several sound cards that are not supported by the game or
CONTACTING SSI TECHNICAL SUPPORT
If you are having problems, please consult the “Troubleshooting” section of this data card before
calling technical support. We have a staff of technical support specialists ready to help you with any
problem you may encounter with the game.
If your problem is due to your system configuration they will tell you of the game’s requirements and
suggest some possible solutions. Because of the millions of different hardware and software
combinations possible with today’s PCs, you may still have to consult with your computer dealer,
hardware manufacturer, or software publisher in order to properly configure their product to run with
our game.
If at all possible, be near your computer when you call. The technical support specialist will need
specific information about your machine and may need you to access or change some files while you
are on the phone. If it is not possible to be near your computer, be sure to have the following
information:
5
A listing of all of your machine’s hardware and its settings.
The contents of your AUTOEXEC.BAT and CONFIG.SYS files.
All the information listed after the MEM command (read the “To Check Your Free RAM” section for
pertinent information) .
The current configuration of your game.
Our technical support number is (408) 737-6850. Our hours are 11 a.m. to 5 p.m., Pacific time,
Monday through Friday, holidays excluded. ABSOLUTELY NO GAME PLAYING HINTS WILL BE
GIVEN THROUGH THIS NUMBER. If you cannot get through during our normal business hours,
please fax our Technical Support Dept. at (408) 737-6814. Please include a printout of your
CONFIG.SYS and AUTOEXEC.BAT files along with a complete description of the problem.
SSI ONLINE
Strategic Simulations, Inc. is currently represented on two online networks: CompuServe and America
Online. We also maintain a home site on the World Wide Web. You can reach us on these networks
as stated below.
World Wide Web: http://www.ssionline.com
Page 6
America Online E-Mail: Stratsim
CompuServe E-Mail: 76711,250
SSI Files/Discussion can be found at GO SSIFORUM
VERSION 1.1, 1.2, AND 1.3 UPGRADES
6
ILENT HUNTER
The S
version 1.3. Additional features not included in the S
Commander’s Edition contains the latest upgrade to the S
ILENT HUNTER
User Manual are detailed following.
ILENT HUNTER
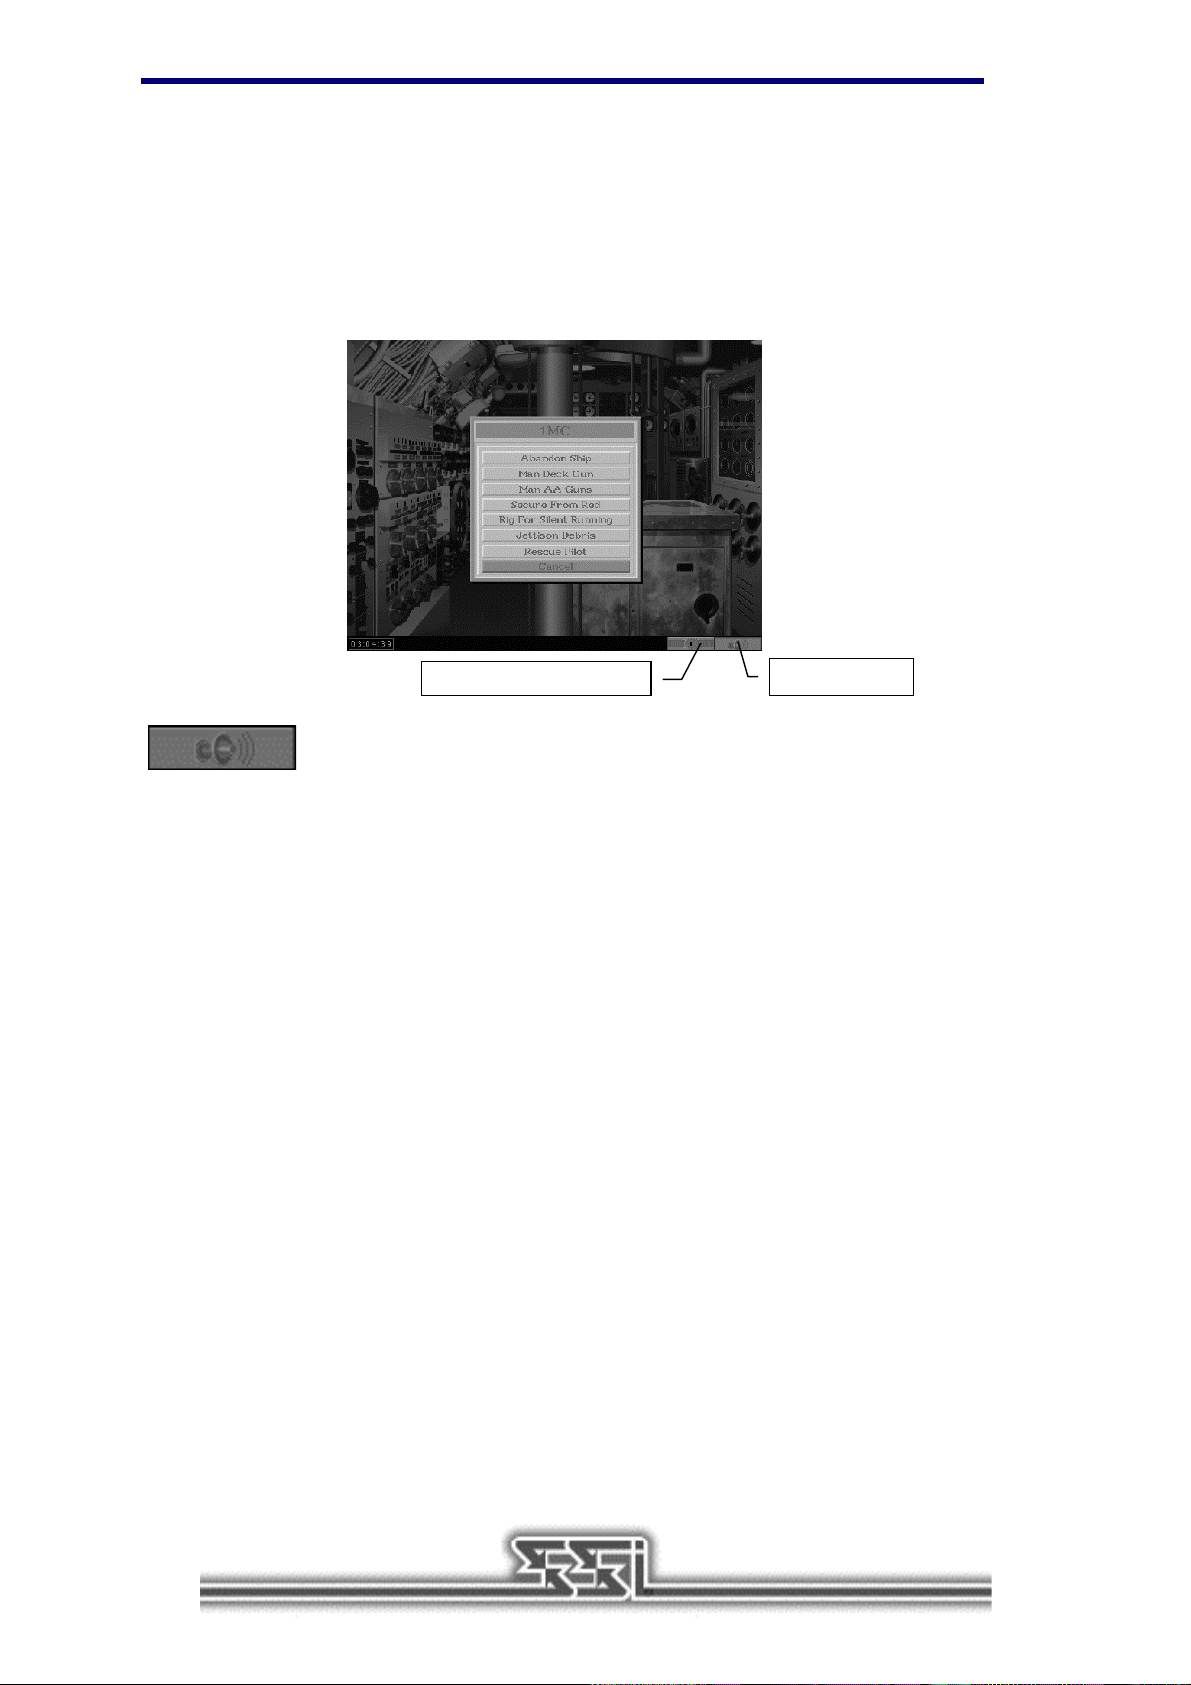
1 MC Button
engine,
1MC Menu
The 1MC button appears in the lower-right corner of the Control Room screen, and
opens a menu with several options. Depending on the submarine’s physical location, on the surface,
submerged, running deep, and so on, some options may not be available.
Abandon Ship
If the submarine is on the surface or submerged in less than 180 feet of water, you can order the crew
to abandon and scuttle the submarine by clicking on this button. You are prompted to confirm this
decision, similar to the Abort option. Abandoning ship is not permitted at depths below 180 feet
because none of the crew would make it to the surface alive.
Abandoning ship during a scenario or encounter simply ends the mission. During a campaign, your
commander and his crew can be rescued, or captured by the enemy. If they are are rescued, your
commander can be given another submarine.
Man Deck Gun
This option orders the crew to man the deck gun and fire at the nearest target. This is identical to
going to the Deck Gun station and placing it on Auto. The crew’s chance to hit is based on the
distance to the target and their quality setting.
Page 7

Man AA Guns
This option orders the crew to man the anti-aircraft guns and fire at any attacking aircraft. There is no
“Anti-aircraft gun” station, so manual control is not possible. The crew’s chance to hit is based on the
distance to the target and their quality setting.
Rig for Red / Secure from Red
Rigging for Red activates red lighting in the Control Room, to allow for better night vision. Securing
from Red deactivates red lighting.
Rig for Silent Running / Secure from Silent Running
Silent running is the precursor to modern stealth technology. A submarine under silent running moves
at roughly 1/3 ahead, with all unnecessary functions, movement, and noise curtailed as a measure to
avoid detection by the enemy.
Note:
Torpedoes are not reloaded while Running Silently.
Jettison Debris
The only way a surface vessel could tell if a submarine had been destroyed, was when debris and fuel
oil floated to the surface. Canny submarine commanders learned that jettisoning a mixture of those
items was a ruse that could occasionally permit escape from a determined hunter. Obviously, this
technique works best in deeper waters, where it is less likely for an observant patrol craft or destroyer
crew to see the submarine.
7
Rescue Pilot
On Lifeguard Duty missions, downed pilots must be picked up to complete the mission. This option on
the 1MC menu has the same effect as pressing the “E” key. Any visible, downed pilot within 200 yards
of the submarine is “extracted,” or rescued. Note: The submarine must be traveling at 5 knots or less.
New Special Missions
Two new missions have been added to the Special Mission menu, the Photo Recon and Submarine
Encounter missions.
Photo Recon Mission
The Photo Recon mission takes advantage of a submarine's ability to approach a target (hopefully)
undetected, gather valuable intelligence, and escape.
You are assigned to Photo Recon missions in campaigns via a radio transmission. In addition to the
radio message a red "T" icon appears on the chart screen over the facilities to be photographed. In
order to successfully complete a Photo Recon Mission the sub must move close enough to the target
area. A "red" light, located in the TBT or Periscope viewing area will indicate the sub is close enough
to take a picture. The "TAB" key is used to take the photograph. You know the mission has been
accomplished when the "T" icon disappears from the chart screen; this is accompanied by a voice and
text message stating "Mission completed, sir." Scoring - Each completed Photo Recon mission is
worth 500 points at the 100% realism setting. NOTE: Photo Recon missions can only be accomplished
during daylight hours. It is best to remain completely zoomed out (1x) in order to locate the area that
needs to be photographed.
Page 8

8
Life Guard Duty
Like the Photo Recon mission, in campaigns, you receive orders via a radio transmission. A red "T"
icon will appear over the port that will be bombed by American aircraft. The user can watch the
airstrike in progress while sitting off the coast of the target area; the attacking bomber group appears
on SD radar, and on the Chart screen. After the airstrike is finished, blue triangle icons appear
indicating the approximate location of downed pilots. When the pilots are spotted, you get a voice and
text message stating "Downed Pilot spotted." As the sub closes within 200 yards of the downed aviator
a "We're close enough for a rescue, sir!" voice and text message informs you that the pilot can be
extracted. The sub must slow down to 5 knots or slower and then press the "E" key OR the sub can
run over the pilot in order to pick him up. Scoring- each pilot saved is worth 200 points at 100%.
NOTE: Pilots can only last a limited time in the water before being captured or succumbing to the
elements. So it is entirely up to you if one of America's valiant sons resides with NEPTUNIS REX in
his watery domain or perishes in a priso n camp.
Submarine Encounter Mission
This type of mission is set up similarly to a Warship Encounter with the weather conditions, time of
year, and crew quality for both vessels being set by you.
Ship Identification Manual
Other enhancements to the S
Manual corresponding to the classes of vessel portrayed:
! BB — Battleships
! CV — Aircraft Carriers
! CA — Heavy Cruisers
! CL — Light Cruisers
ILENT HUNTER
Time Compression 1MC Button
engine include “tabbed” pages in the Ship Identification
! DD — Destroyers
! DE — Destroyer Escorts
! PC — Patrol Craft
! MR — Marus (Merchant shippi
Command
Sound Options
Volume Sliders
Save Mission
Game Options Menu
Pressing Alt-O during a mission opens the Game Options menu where several “command” functions
and sound effects can be toggled on or off. There are also slide controls for speech and sound effects
volume.
Command Functions
These options can be toggled off or on to enhance realism by letting the crew handle these operations
with or without direct orders.
Page 9

! Auto Torp Load — Automatically causes torpedoes
to be reloaded when on.
When off,
torpedoes must be loaded by going to the Status screen
and moving torpedoes from storage to their tubes using
the mouse.
! Auto SJ Radar — When toggled on, this option
activates the radar, on submarines equipped with radar,
as soon as the submarine is at radar depth (a depth of
approximately 50 feet). Otherwise, the radar must be
switched on manually in the Radar room.
! Auto SD Radar — When toggled on, this option
activates the radar, on submarines equipped with radar, as soon as the submarine is at radar
depth (a depth of approximately 50 feet). Otherwise, the radar must be switched on manually in
the Radar room.
! Auto Red Lights — Automatically switches to Rigged for Red mode as soon as darkness falls and
switches back to Secured from Red at dawn. Otherwise, this option must be switched on using the
1MC button in the control room.
Sound Effects
9
The sound effects controls toggle the sound on or off for: Sound Effects (all sound effects), Engine
Sounds, Collision Alarm, and Speech.
Save Mission
Left-clicking on the Save Mission button allows the current mission to be saved. You are prompted for
a name to save the mission under.
Continue Mission
The Continue Mission button has been added to the Single Mission menu to load missons saved with
the Save Mission button. You are shown a listing of saved missions which
displays the Mission Data at the bottom of the screen. Cancel returns to the Single Mission menu,
Delete removes the file, and Begin resumes the mission where it was saved.
USER MANUAL CORRECTIONS AND ADDITIONS
Page 11, Base Menu Options, line 7 - there is no Officer's Club.
Page 50, Radar and Bathythermograph - Imp. SJ Radar was available in August 1943, not December
1942.
Page 68, Basic Approach Objective - 10 feet for a cruiser
Battery use
In order to charge the batteries, the sub must be surfaced, and running at standard speed or slower.
At all stop, all available engines (to a maximum of 3 on a 4 engine sub) are automatically set to charge
when appropriate. The battery's voltage gauge is located on the gauges screen (F7).
Page 10

10
Radar And Land Masses
If you are near land at the start of a single mission, and cannot find the enemy on radar, the land mass
may be masking enemy ships. Intervening land masses prevent radar sightings.
Returning To Base
You must be on surface out of visual contact of the enemy to return to base
Radio Logbook
The Radio Logbook is accessible from the captains quarters or by hitting Alt-F9. The user will be given
a date, a time and a location of Life Guard or Photo Recon missions.
Reviewing Messages
To review a message that has been given by one of the crew members, press the backspace arrow
until the desired message comes on-screen in the lower left of the screen. These messages will loop.
STARTING THE EDITOR
ILENT HUNTER
The S
Mission button from the Main Menu and then left–clicking on the Build Custom Mission button.
Scenario Editor can be started from within the game by choosing the Single
SCENARIO EDITOR MOUSE CONTROLS
ILENT HUNTER
S
latitude, longitude, and depth at that position are displayed in the bar at the bottom of the screen.
Moving the mouse over a screen object such as the player’s submarine, a Japanese ship, or a
Japanese city causes a small information window to open with useful details about that object.
In this book, the term “click” means move the mouse icon (an arrow, brackets, cross–hair box) to the
desired area on the screen, and press either the left or right mouse buttons.
“Left–click” means move the mouse icon to the desired area and press the left mouse button. Left–
clicking is used to select controls, place objects such as submarines, and press screen “buttons.”
“Right–click” means move the mouse icon to the desired area and press the right mouse button.
Right–clicking is used to toggle between the Toolbox window and File / Edit menus, and can be used
to abort most controls before an option has been selected.
features an active mouse pointer; while the mouse pointer is over the map, the
THE TOOLBOX
When the Scenario Editor title screen clears, the Chart screen appears. The default Chart screen
shows the Southern Japan patrol area with the Toolbox window open. One object starts on the map, a
blue icon representing the player’s submarine. The default here is a T–class submarine. The active
object is contained within white brac kets.
The Scenario Editor operates by placing objects on the selected Patrol Area Chart.
These objects include the player’s submarine; ships, both single and convoys; aircraft; and mission
icons for photo reconnaissance and/or lifeguard duty missions.
Page 11

11
y
Memor
Player
Latitud
Longitude Depth
Scenarios are built us ing a comb ination of two sets of co ntrols, the f irst is call ed
the Toolbox, the second is a Menu bar. Several buttons on the Toolbox window
appear similar to buttons used in S
Centering buttons work t he same as th ey would while c ommanding a s ubmarine.
By moving the mouse pointer and left–clicking, the active object can be moved anywhere on the map.
Moving the mouse pointer to the edge of the map scrolls the map in that direction until the edge of that
patrol area is reached. In the lower left corner of the screen, the current latitude, longitude, and depth
are displayed.
ILENT HUNTER
; for exam ple, the Zoom , and
Right–clicking changes to the File / Edit menus, which displays the Menu bar. For more information
about this see the “Menus” section starting on page 17.
The Player’s Submarine
The first object on the Chart screen is the player’s submarine. It starts out on the surface, with a green
crew, facing due North at full stop unless changes are made in the Toolbox window.
Selecting the Class
The default submarine is a T–class, indicated by a button appearing under the PLAYER line on the
Toolbox window. Left–clicking T–class where it says GATO opens the SELECT SUB TYPE window
where the submarines available to the player are listed. Submarine availability is based on the date
selected using the Environment menu option. If the Limited by Date toggle in the Options menu is
inactive, then any U.S. submarine in S
“Environment” section starting on page 19 or the “Options” section starting on page 21.
ILENT HUNTER
can be used. For more information see the
Page 12

12
Once a class of submarine has been chosen, the SELECT SUB NAME window appears. The names
of the submarines listed were on active duty during that period of the war. Choose a name or left–click
on Cancel to accept the default submarine. The submarine name appears on a button near the bottom
of the Toolbox window. Left–clicking there restores the SELECT SUB NAME window, where the
submarine name can be changed at any time.
Submarine Speed
The button below the selection button reads Stop as a default. Left–clicking on this button cycles
through the following speed settings: Ahead 1/3, Ahead 2/3, Ahead Standard, Ahead Full, Ahead
Flank, Back Emergency, Back Full, Back 2/3, Back 1/3 and returns to Stop.
Crew Quality
The Crew Quality button cycles through three options for crews on submarines: Green Crew, Veteran
Crew, and Elite Crew.
Crew quality on player’s submarines affects loading and repair times, as well as their accuracy with
anti–aircraft guns or the deck gun when it is set to Auto.
Depth
The Depth panel has three numerical buttons on it for setting the initial depth for
the player’s submarine. Left–clicking on these buttons sets the depth in increments of hundreds, tens,
and zero to nine feet. Three other buttons, PERI, RAD, and SURF, set the submarine’s depth at the
following preset depths: Periscope depth is 65 feet, Radar depth is 48 feet and Surface depth is 15
feet. The submarine’s test depth, which is the deepest it can submerge safely, is also listed for
reference.
The Importance of Visibility
Visual Range
Visual Range
Radar Range
As soon as another ship or ships have been placed on the map, the Toolbox window and Chart screen
change to reflect this. The player’s submarine has a blue circle around it if the selected ship is inside
visual contact range. A black circle indicates the effective radar detection range if the submarine is
equipped with radar. Another way to check this is by using the Next–and Previous–Object buttons to
select the ships you have placed. An “Eye” icon appears in the lower right corner if the active object is
in visual range, and a “Radar” icon appears if the object is within radar range of the submarine.
Radar Range
Page 13

13
Visibility is based on the size of the Japanese ship and quality of the submarine crew. If more than one
enemy ship has been placed in the scenario, for example a small cargo ship and the battleship Fuso,
use the Next– or Previous–Object buttons to switch from one to the other and watch the circle change
size. Awareness of detection range is important because it is very easy to miss an enemy vessel on
the open sea. Also, the scenario may end prematurely if there are no enemy vessels in contact range
at the start of the scenario and the End on Break Contact option is active on the Options menu. For
more information see the “Options” section starting on page 13.
The size of the circle can also be affected by environmental conditions. For more information see the
“Environment” section starting on page 19. Note: If you place Japanese submarines close to Japanese
ships, they can be attacked.
Mission Editing Controls
The top two rows of the Toolbox contain controls for adjusting the point–of–view, and adding and
removing object s.
Zoom and Center View Buttons
The Zoom buttons increase and decrease the level of magnification in the Chart
screen. The “+” button displays a zoom frame which can be placed over any area of the map. Left–
clicking with the frame causes the magnification level to increase by one.
With the frame visible, pressing the “Z” key repeatedly shrinks the size of the frame, increasing the
level of zoom when the mouse is left–clicked. Pressing the “X” key repeatedly increases the size of the
frame, decreasing the level of zoom when the mouse is clicked.
Left–clicking the Center View button causes the active object to be centered on the screen.
Remove Object
Left–clicking on the Remove Object button opens a control window for undoing the
placement of all types of objects with the exception of the player’s submarine. This object can never
be removed, although it can be edited for type of submarine. For more information about this see the
“Select Ship / Submarine Type” section on this page.
Add Ship
This button opens the Select Ship Type window, which displays the enemy warships,
submarines, and merchant shipping available based on the date of the scenario. The ship listing is by
type, starting with battleships, carriers, and continuing on through the merchant ships, and can be
scrolled through using either the slide bar or the up– and down–arrow buttons.
Above the listing are the ship specifications including length, tonnage, depth charge load, and active
dates. Above that are four views of the ship showing it broadside, head–on, and at 15º and 45º views.
Once a ship has been selected, the Add Ship window appears. The Zoom and Centering buttons work
as described previously, and allow for more precise placement on the map screen. The Exit button
aborts the process, as does right–clicking.
Next and Previous Object Buttons
Once another object besides the player’s submarine has been placed the Next– and
Previous–Object buttons become active. They enable you to switch from object to object without
having to scroll across the map.
Ship Controls Section
All movable objects in a S
scenario design process. The following controls apply to Japanese ships and submarines.
ILENT HUNTER
scenario must be assigned actions as part of the
Page 14

14
y
Select Ship / Submarine Type
As you move from object to object using the Next– and Previous–Object buttons the name on the
Object ID button changes to reflect the active object. The active object is also centered in white
brackets. Left–clicking on the Object ID button displays the Select Ship Type window where the
identity of the ship can be changed using the method described in the “Add Ship” section on this page.
Orders
If the active object is a ship or submarine, the button below the Object ID button is the Orders button. It
functions slightly differently depending on whether or not the active object is a ship or a submarine. If
the active object is a Japanese ship, it can be given several different kinds of orders depending on its
class.
Capital and Merchant Ships
! None – No orders. The ship sits where it is placed even if given a course and speed using the
Compass and Speed controls.
Note:
The ship can not move or fire weapons without orders.
Convo
Escort
! Convoy Leader – When the active ship is designated as a convoy leader, the Plot Course window
appears, and the mouse pointer is connected to the ship with a drag–line. The mouse pointer and
line can then be used to assign a course, via a series of way points, for the ship and its convoy to
follow. When the course is complete, left–click on the Done button to complete the process and
return to the Toolbox window. A convoy leader has a yellow cross inside a yellow box
superimposed over it at high levels of magnification.
Left–clicking on the Clear button before the Done button clears the current way points and restarts the
process.
A ship that is a convoy leader has an additional button appear in the Toolbox window; the Zigzag
button. This button is an on/off toggle which causes the convoy to maintain a zigzag course when on.
This tactic was used by Japanese ships to make themselves a harder target for U.S. submarines by
sailing an unpredictabl e cours e.
! Convoy Member – A ship that is to be assigned as a convoy member should be placed on the
map near its leader and have Convoy Member chosen for its orders. The Pick Convoy window
appears, which features zoom, center, and Exit buttons. The Exit button defaults to the active ship
of the first listed convoy, if there are more than one, and exits to the Toolbox window. A convoy
member has a small yellow cross superimposed over it at high levels of magnification. Selecting a
convoy manually can be done by left–clicking over a convoy on the map. Note that if the convoy
leader has been assigned a course and speed, the new convoy member’s course and speed
change to reflect that of the convoy.
Page 15

15
Escort Ships
Destroyers, escort destroyers, and patrol craft can all have one of the following types of orders.
! None – No orders. The ship sits where it is placed even if given a course and speed using the
Compass and Speed controls. Note: The ship can not move or fire weapons without orders.
! Escort – Escort orders create an escort for an existing convoy. Escort ships follow a pattern
around the convoy they are assigned to until they make contact with a submarine. When the
escort ship is placed, the Plot Course window opens. The mouse pointer shows a drag–line
leading to the active escort ship which is used to describe the pattern that the escort ship will
follow by setting a series of way points. An escort pattern can be set with as few as three way
points, but this means the escort ship has to make more radical turns to maintain course, and this
is likely to slow it down.
When the course is set, left–click on the Done button to enable the selection of the convoy to be
escorted. The Plot Course window is replaced with the Pick Convoy window, which features zoom,
center, and Exit buttons. The Exit button defaults the escort to the first listed convoy, if there are more
than one, and exits to the Toolbox window. The escort’s speed is set to allow it to keep pace with its
convoy.
At the bottom of the Toolbox window, two new text buttons have appeared: the Convoy
button, and the Alerted button. The Convoy button simply cycles through which convoy the escort is
assigned to, if there are more than one. When the Alerted button is toggled on, the escort is aware of
the submarine’s presence before the player has a chance to order an attack.
! Patrol – Patrol orders establish a patrol route for an escort type ship. Once the active escort ship
has been selected and placed, the mouse pointer shows a drag–line leading to it which is used to
assign a series of way points that the escort ship will follow. Once the course has been laid, left–
click on the Done button to return to the Toolbox window. Note that the Convoy button is inactive
and that the ship cannot start in an Alerted state.
Japanese Submarines
! None – No orders. The submarine sits where it is placed even if given a course and speed using
the Compass and Speed controls.
orders.
! Patrol – Patrol orders establish a patrol route for a submarine. Once the active submarine has
been selected and placed, the mouse pointer shows a drag–line leading to it which is used to
assign a series of way points to be followed during the scenario. This course can be either an
open–ended or closed course, meaning that the Japanese submarine does not have to end its
patrol where it started. Once the course has been laid, left–click on the Done button to return to
the Toolbox window.
Note:
The submarine can not move or fire weapons without
Sampans
! None – No orders. The sampans sits where it is placed even if given a course and speed using
the Compass and Speed controls.
! Fishing – A sampan with fishing orders slowly meanders the patrol area it is assigned to making
random course changes.
Page 16

16
Crew Quality
The Crew Quality button cycles through three options for crews on ships and submarines: Green
Crew, Veteran Crew, and Elite Crew.
Crew quality on Japanese ships affects their spotting, rate of fire, and accuracy.
Crew quality on the player’s submarine affects loading and repair times, as well as their accuracy with
anti–aircraft guns or the deck gun when it is set on Auto.
Course
The compass panel in the Toolbox window is used to set the initial heading for all ships and
submarines in the scenario. The default heading is 0º. This can be changed by
left–clicking directly on the compass, or left–clicking on the number buttons until the heading is
appropriate.
Speed
The speed of the active ship or submarine is set using these number buttons. The active ship’s
maximum speed is displayed at the bottom of the panel as a reference.
Damage
Ships can start a scenario with accrued damage. Left–clicking on the two numerical buttons can sets
the damage between 0 and 99%. Accrued damage makes a Japanese vessel easier to sink.
Add Aircraft
Left–clicking on the Add Aircraft button opens the Select Aircraft Type window, which is
basically the same as the Select Ship Window. Once an aircraft has been chosen, the Orders window
opens.
Aircraft Orders
Aircraft can be given three different kinds of orders:
! Patrol – Aircraft patrol a circular area determined by selecting a center point and a patrol radius.
Selecting patrol orders opens the Select Point window; the center point is selected by left–clicking
on the map where a green airplane icon appears. The patrol radius is set by dragging a line to the
desired radius when the Select Radius window is open, and left–clicking again. A green circle
appears around the aircraft at the desired radius. If an aircraft on patrol encounters the player’s
submarine in this area, it engages and pursues the submarine if possible.
! Escort – Escorts are placed on the map and given a patrol radius exactly like patrol aircraft, but
there is a third step for them: they are then assigned to a convoy. An aircraft with escort orders
“patrols” the area around the convoy it has been assigned to guard.
! Follow Path – An aircraft with follow path orders has a series of way–points assigned along a
course which it must follow. The aircraft is placed by left–clicking on the map; this opens the Plot
Course window. The course and way points are assigned by dragging the “string” to a selected
point and left–clicking aga in. As each point is ass ig ned, a shape is desc rib ed in gr een whic h
shows the aircraft’s course. Move the mouse pointer to the Done button to complete this process,
or the Exit button to abort it. Unlike Patrol or Escort orders, whose final steps return you to the
Toolbox, the Follow Path orders must be ended with the Done button to take effect.
Page 17

17
Add Airstrike Mission
Airstrikes are assigned to enemy coastal cities in order to create an opportunity for
Lifeguard Missions. During an Airstrike, there is a chance for bombers to be shot down, making their
crews available for rescue.
Select a City
Left–clicking on the Airstrike button opens the Select a City window, which contains a list of available
targets in that patrol area.
default. Even if no other city is selected, or you change your mind and decide to set up another type of
mission, that city has been assigned an Airstrike, and must have the “Airstrike” object removed using
the Remove Object tool in order to abort this mission.
Note:
When this window appears, the top city on the list is selected by
Once a city has been selected, the Toolbox window is restored with controls for defining the conditions
for carrying out a Lifeguard Mission.
Below the bar labeled AIRSTRIKE, appears a long button bearing the name of the target city selected
in the previous step, above another button which reads Strike Size: SMALL. The first button restores
the Select a City window where another city can be chosen. Left–clicking on the Strike Size button
cycles through the three sizes of bombing missions that can be assigned: SMALL, MEDIUM and
LARGE. A larger Airstrike means more pilots are going to need to be rescued.
Message and Flight Times
The next two panels bear the legends Time Delay and Flight Delay. The Time Delay control
determines when a radio message assigning the submarine to lifeguard duty is sent. The Flight Delay
panel determines an approximate time for how long after the message is sent that the bombing
mission actually occurs.
For example, if the settings in the Time Delay and Flight Delay panels are 1:00 and 6:00, the message
ordering the submarine to a lifeguard station arrives approximately one “in–game” hour after the
scenario starts, giving the submarine approximately six in–game hours to get to its station. The time is
not exact in order to allow some leeway in arriving on-station.
An important factor to take into account when designing a Lifeguard Mission scenario is the amount of
time required for a submarine to move from one place to another. During the war, submarines were
usually notified well in advance of an airstrike to make sure that they were “on station” when the
bombers arrived.
Photo Recon Mission
Photo Recon missions require the player’s submarine to sail into an enemy port and take
photographs during daylight.
Page 18

Select a City
Left–clicking on the Photo–Recon button opens the Select a City window, which contains a list of
available targets in that patrol area.
selected by default. Even if no other city is selected, or you change your mind and decide to set up
another type of mission, that city has been assigned a Photo–Recon mission, and must have the
“Photo–Recon mission” object removed using the Remove Object tool in order to abort this mission.
Note:
When this window appears, the top city on the list is
Photo-Recon
18
Setting Time Delay and Limit
The next two panels bear the legends Time Delay and Time Limit. The Time Delay control determines
when a radio message assigning the submarine to the Photo–Recon mission is sent. The Time Limit #
panel determines how long the player has to complete the mission after receiving orders.
MEMORY GAUGE
The Memory Gauge meter indicates how much of your computer's memory capacity is allocated to this
scenario. Note: This number is based on your computer's memory configuration, so that 100% of the
memory on a 16 megabyte system is 200% of the memory available on an 8 megabyte machine. It is
possible to design scenarios which are too large to run. When you try to play a large scenario a dialog
appears prompting you to continue or abort; continuing may cause the game to crash.
THE MENUS
Right–clicking the mouse anytime the Toolbox window is visible changes to the Menu screen where
there are two sets of menu options: Files and Edit.
Files Menu
These menu options control file operations such as loading, saving, and deleting and exiting the
ILENT HUNTER
S
Run
The Run option only appears if you have come to the S
ILENT HUNTER
S
ILENT HUNTER
S
Scenario Editor.
ILENT HUNTER
. It allows a scenario to be run as soon as it has been created. If you have started the
Scenario Editor from the DOS prompt by typing SE then this option does not appear.
Scenario Editor from within
When this option is selected, a warning appears if the player's submarine is beyond detection range,
either visual or radar, and the Exit on Break Contact option is active. If this is the case, the scenario
ends as soon as it is begun. If the scenario has not yet been saved, then you are prompted to save
the scenario prior to playing.
Page 19

New
This option resets to the default settings for the current patrol area. All objects are removed,
environmental conditions reset to clear and calm, and the date and time are reset to December 7,
1941 and 12:00 hours. You are prompted to Save, Discard, or Cancel the current settings.
Load Historical
19
This option loads an historical scenario from S
ILENT HUNTER
S
saved as conventional Scenario Editor scenarios using the Save Scenario option.
Patrol Disk 2. These scenarios cannot be saved over the original scenarios, but can be
ILENT HUNTER
, the first S
ILENT HUNTER
Patrol Disk, or
Load Scenario
This option loads scenarios you or someone else has created using the S
Editor. If you wish to load a scenario created by someone other than yourself, copy the scenario into
the CUSTOM subdirectory found in the directory where you installed the S
Edition files.
ILENT HUNTER
ILENT HUNTER
Scenario
Commander’s
Save Scenario
This option prompts you to name your scenario if this is the first time it has been saved, or lets you
rename a previously saved scenario. If you are overwriting a previously saved scenario, you are
prompted to make sure you want to overwrite that scenario. Scenarios are saved in the CUSTOM
subdirectory of the directory where the game is installed.
Delete Scenario
Using the Delete Scenario option you can remove a scenario from the CUSTOM directory without
having to exit to DOS. You are prompted to confirm the deletion.
Exit
This option exits the Scenario Editor. You are returned to S
Editor using the BUILD A CUSTOM MISSION option. If you entered the Scenario Editor by typing
SE.EXE at the DOS prompt, you return to the DOS prompt.
ILENT HUNTER
if you entered the Scenario
Edit
The Edit menu options allow for powerful customization of scenario
features such as equipment, weather, patrol areas, and game
options.
Password
Password protection is available with this option and permits the
scenario to be played but not loaded into the Scen ar io Ed itor un les s
the password is known. Usethis option with care and remember your
password!
Briefing Text
Text entered here appears in the briefing window when the Load Custom Mission or Historic Mission
options are made in S
window.
ILENT HUNTER
. Text automatically wraps within this win do w and the briefing
Page 20

20
Patrol Area
A screen displaying the Pacific Ocean from Asia to Hawaii and Australia to the Aleutians appears. Up
to fifteen patrol areas are available; different patrol areas are made available based on the date set
using the Environment m enu.
Current
Patrol
Areas
Patrol areas can be selected
using the list or by left–click ing on
the small rectangles on the actual
chart area of the screen. The
areas of the map in red are under
Japanese control at the time of
the war currently set using the
Environment menu option. Patrol
areas may be unavailable if the
Patrol Area toggle is “On” in the
Limit by date panel of the Options
window. For more information
see the “Options” section starting
on page 21.
Environment
The Environment options window allows the date, time, weather, and sea conditions to be changed,
and displays the resulting changes in a panel near the bottom of the window. Below the weather
display is a reference panel which displays the times for sunrise, sunset, moonrise, and moonset, as
well as what the lunar phase is on the current date.
Date
The range of dates available is December 7, 1941 through
August 15, 1945. This date setting affects a number of variables
within a scenario if the Limit by Date options are active. For more
information see the “Options” section starting on page 21.
Time
The time of day is adjusted by Left–clicking on the numerical
buttons. Time is expressed in zulu terms, so that 12:00 is
equivalent to 12 noon.
Weather
Alt F9 Go to Radio Log.
Alt F10 Go to Calendar.
‘E’ To extract downed pilots that
are within 200 yards.
‘Tab’ Takes a picture to complete the
Photo Recon Special Mission.
Press the ‘Tab’ key when you
see the red light in the
periscope or TBT.
save a screen capture.
Alt-O Open the Game Options menu.
Alt-S Toggles SJ radar on or off.
Note:
This does not actually
‘M’ Brings up the 1MC menu
where you can engage new and
existing features such as:
• Abandon Ship
• Man the Deck Gun
• Man the Anti–Aircraft
(AA) Gun
• Rig for Red (for night vision)
• Rig for Silent Running
• Jettison Debris
• Rescue Downed Pilot.
Alt-A Toggles SD radar on or off.
Alt-Q Quit Silent Hunter and return
to the operating system.
Page 21

APPENDICES
Table of Speeds
Class Ahead 1/3 Ahead 2/3 Standard Full Flank
S–Class 5 7 9 12 14
Barracuda 5 9 13 15 17
Narwhal 5 10 12 14 16
P–Class 3 8 11 16 18
Salmon 4 9 14 17 19
T–Class 4 9 14 17 19
Gato 4 9 14 18 20
Balao 4 9 14 18 20
Tench 4 9 14 18 20
Speeds are in knots, for submarines on the surface in calm seas.
Radar and Bathythermograph
Name Use Range Available
SD Air 6–10 miles Jan. 1942
SJ Surface Aug. 1942
Imp. SJ Surface Dec. 1942
A–Scope Surface Dec. 1941
PPI Surface Sept. 1943
APR–1 Radar Detector Surface May 1944
Bathythermograph Submerged Thermal Layers Mar. 1943
21
CREDITS
Developed by Aeon Electronic Entertainment
Programming and Design William T. Becker
Art and Design Kim Biscoe
Published by Strategic Simulations, Inc.
Producer Carl C. Norman
Associate Producer Jeff Pena
Test Manager Sean Decker
Test Supervisor Jason Ray
External Testers Bill Waldheim, K.C. Cook, David Roderick,
Robert Carey, Kenny Cawthorne
Manual Mark Whisler
Manual Editor Anathea Lopez, Aaron Sche ib er
Technical Support and Voice Talent Bob Coates, Steve Murphy, John Ross
Scott Evans
Audio Engineer Maurice Jackson
Historical Scenario Design James Young
Page 22

22
STRATEGIC SIMULATIONS, INC. LIMITED WARRANTY
Strategic Simulations , Inc. (“SSI”) warr ants that th e media o n which t he enclose d program is r ecorded
will be free from defects in materials and workmanship for a period of 30 days from the date of
purchase. If within 30 days of purchase the media prove defective in any wa y, you may return the
media to Strategic Simulatio ns, Inc ., 67 5 Alm anor A venue, Suite 201, S unn yvale, CA 940 86-290 1 and
SSI will replace the media free of charge. In addition, if the m edia pro ve def ective at an y tim e af ter the
first 30 days, return the media to SSI and SSI will replac e the media for a minimum charge of $10.00
plus $4.00 for shipping and handling. California residents, add applicable sales tax.
SSI MAKES NO WARRANTIES, EITHER EXPRESS OR IMPLIED, WITH RESPECT TO THE
SOFTWARE PROGR AM RECORDED ON THE C D OR DISKETT E OR THE GAME DESCRI BED IN
THIS RULE BOOK, THEIR QUALITY, PERFORMANCE, MERCHANTABILITY OR FITNESS FOR
ANY PARTICULAR PURPOSE. THE PROGRAM AND GAME ARE SOLD “AS IS.” THE ENTIRE
RISK AS TO THEIR QU ALITY AND PERFORMANCE IS WITH THE BUYER. IN NO EV ENT WILL
SSI BE LIABLE FOR DIRECT, INDIRECT, INCIDENTAL, OR CONSEQUENTIAL DAMAGES
RESULTING FROM ANY DEFECT IN THE PROGRAM OR GAME EVEN IF SSI HAS BEEN
ADVISED OF THE POSSIBILITY OF SUCH DAMAGES. (SOME STATES DO NOT ALLOW THE
EXCLUSION OR LIMITATION OF IMPLIED WARRANTIES OR LIABILITY FOR INCIDENTAL OR
CONSEQUENTIAL DAMAGES, SO THE ABOVE LIMITATION OR EXCLUSION MAY NOT APPLY
TO YOU.)
The enclosed sof tware program and this ru le book are cop yrighted. All rights are res erved. This rule
book may not be copied, phot ogra phed, reproduced, or tra ns lated or reduced to any e lectr ic a l m edium
or machine-readable form, in whole or in part, without pri or written consent from SSI. The program
accompanying this rule book may be copied by the original purchaser only as necessary for use on the
computer for which it was purchased.
Any persons reproducing any portion of this book for any reason, in any media, shall be guilty of
copyright violation and subject to the appropriate civil or criminal action at the discretion of the
copyright holder(s).
”1997 Strategic Simulat ions, Inc . Al l Rights Res erve d.
ILENT HUNTER
S
is a Trademark of Strategic Simulations Inc.
WHAT TO DO IF YOU HAVE A DEFECTIVE CD OR DISK
Each of our games under go es ex te ns iv e p laytesting prior to its rel eas e. T hr oug h th is pr oces s we hope
to uncover and correct any errors in programming. Due to the complex nature of our simulations,
however, some program errors may go undetected until after pu blication. In addition to errors in the
program, there are occasion ally problems with the m edia itself. W e experience the industry st andard
of approximately a 3 to 5% failure rate of duplicated disks. Before assuming that the media is
defective, make s ure to check your disk drive. U p to 95% of the m edia returne d to us as d efective will
run fine on our computer systems. Often the problem is with a disk drive that needs servicing for
alignment, speed, or cleaning.
Should you have def ectiv e m edia, ple ase retur n th e disk or CD only (k eep all other p arts of the gam e)
to our Customer Support Department, along with a note describing the problem you have
encountered. Replacement media will be provided upon our receipt of the defective media.
Should you uncover a n er ror i n th e pro gr am, return both your game disk and any “save game” disks to
our Customer Support Department. Please enclose a description of what was taking place in the game
when the error occurred. Upon correction of the program error, we will return an updated disk to you.
Always make sure to include your name, address, and daytime telephone number with any
correspodence. We will do our best to see that any problems are corrected as soon as possible.
Our main business number is (408) 737-6800. If you encounter disk or system related problems you can call our Technical
QUESTIONS OR PROBLEMS?
Support Staff at (408) 737-6850 between 11 a.m. and 5 p.m., Pacific Time, Monday through Friday, holidays excluded. NO GAME
PLAYING HINTS WILL BE GIVEN THROUGH THIS NUMBER. You can write to us for hints at: Hints, Strategic Simulations, Inc.,
675 Almanor Avenue, Suite 201, Sunnyvale, CA 94086 (include a self-addressed, stamped envelope for reply).
 Loading...