

Page 1
Warning: To Owners Of Projection Televisions
Still pictures or images may cause permanent picture-tube damage or mark the
phosphor of the CRT. Avoid repeated or extended use of video games on largescreen projection televisions.
Epilepsy Warning
Please Read Before Using This Game Or Allowing Your Children To
Use It.
Some people are susceptible to epileptic seizures or loss of consciousness when
exposed to certain flashing lights or light patterns in everyday life.
Such people may have a seizure while watching television images or playing
certain video games. This may happen even if the person has no medical
history of epilepsy or has never had any epileptic seizures.
If you or anyone in your family has ever had symptoms related to epilepsy
(seizures or loss of consciousness) when exposed to flashing lights, consult your
doctor prior to playing.
We advise that parents should monitor the use of video games by their children.
If you or your child experience any of the following symptoms: dizziness,
blurred vision, eye or muscle twitches, loss of consciousness, disorientation, any
involuntary movement or convulsion, while playing a video game,
IMMEDIATELY discontinue use and consult your doctor.
Precautions To Take During Use
• Do not stand too close to the screen. Sit a good distance away from the
screen, as far away as the length of the cable allows.
• Preferably play the game on a small screen.
• Avoid playing if you are tired or have not had much sleep.
• Make sure that the room in which you are playing is well lit.
• Rest for at least 10 to 15 minutes per hour while playing a video game.
1
Page 2

Preparing for Battle . . . . . . . . . . . . . . .47
Deploying your army - Attacking .47
Deploying your army - Defending 47
Engaging with the Enemy . . . . . . .48
Advanced Control Techniques . . .48
Changing game speed . . . . . . . . . .49
Using the Terrain . . . . . . . . . . . . . .50
Weather and Seasonal Conditions .50
Conditions required for Victory . .51
Historical Battles . . . . . . . . . . . . . . . . . . .51
Custom Battle . . . . . . . . . . . . . . . . . . . . .53
Unit Types . . . . . . . . . . . . . . . . . . . . . . .54
Soldiers (Units) . . . . . . . . . . . . . . . .54
Strategic Units . . . . . . . . . . . . . . . .57
Buildings . . . . . . . . . . . . . . . . . . . . . . . . .59
Castles . . . . . . . . . . . . . . . . . . . . . .59
Other Buildings . . . . . . . . . . . . . . .60
Buildings and Upgrades not . . . . . . .
dependent upon Castles . . . . . . . .68
In Game Menu . . . . . . . . . . . . . . . . . . . .69
Options . . . . . . . . . . . . . . . . . . . . . . . . . .69
Accessing In-Game options: . . . . . .69
Video Options . . . . . . . . . . . . . . . .70
Audio Options . . . . . . . . . . . . . . . .70
Performance Options . . . . . . . . . . .71
Control Options . . . . . . . . . . . . . . .71
Game Options . . . . . . . . . . . . . . . .71
Saving and Loading . . . . . . . . . . . . . . . .72
Load Game . . . . . . . . . . . . . . . . . . .72
Save Game . . . . . . . . . . . . . . . . . . .72
Multiplayer . . . . . . . . . . . . . . . . . . . . . . .73
The Multiplayer Main Menu . . . . . . . .73
Play On
EA Play . . . . . . . . . . . . . . . .74
Logon Information . . . . . . . . . . . . .74
Logged On To
EA Play . . . . . . . . . . . .74
Chat Room Selection Screen . . . . . . . .74
The Chat Window . . . . . . . . . . . . .75
Creating A Chat Room . . . . . . . . . . . .77
Roll of Honour . . . . . . . . . . . . . . . . . .77
Internet Games - Single Battle Setup .78
Hosting a Multiplayer Game . . . . . . . .79
The Multiplayer Lobby Screen . . . . . .80
Multiplayer Army Selection . . . . . . . .81
Multiplayer Waiting to Go Screen .81
LAN Games . . . . . . . . . . . . . . . . . . . . .82
Glossary of Terminology . . . . . . . . . . . .82
Credits . . . . . . . . . . . . . . . . . . . . . . . . . . .86
Returns After Warranty . . . . . . . . . . . . .88
BASIC COMMAND
SUMMARY
See the separate Key Command Card
CONTENTS
Introduction . . . . . . . . . . . . . . . . . . . . . . .4
Campaign Mode . . . . . . . . . . . . . . . .5
Other Game Types . . . . . . . . . . . . . .6
The World of
Shogun - Total War™
will live on . . . . . . . . . . . . . . . . . . . .6
Installing the Game . . . . . . . . . . . . . . . . .7
Setting Up the Game . . . . . . . . . . . . . . . .7
Main Menu . . . . . . . . . . . . . . . . . . . . . .7
New Game Menu . . . . . . . . . . . . . . . . .8
Full Campaign . . . . . . . . . . . . . . . . . . .8
Objectives of the Full
Campaign Game . . . . . . . . . . . . . . .9
The Flow of the Game . . . . . . . . . . .9
Creating a Full Campaign Game . .12
Full Campaign Mode - The Strategic Map 13
The Means of Expansion . . . . . . . . . .13
Koku . . . . . . . . . . . . . . . . . . . . . . . .13
Technology and Progress . . . . . . .15
Buildings . . . . . . . . . . . . . . . . . . . .18
Soldiers (Units) . . . . . . . . . . . . . . . .18
Events . . . . . . . . . . . . . . . . . . . . . .19
The Strategy Map Screen . . . . . . . . . .19
Navigating the Map Screen . . . . . .20
The Icon Menu Bar . . . . . . . . . . . . .20
The Info Parchment . . . . . . . . . . . .21
Building your Clan . . . . . . . . . . . . . . .23
Training Units . . . . . . . . . . . . . . . .23
Constructing Buildings . . . . . . . . . .25
View The Throne Room . . . . . . . .26
Mobilising your Armies . . . . . . . . . . .26
Organising and Directing Units . . .26
Invading an Enemy Province . . . .27
Ending a Turn . . . . . . . . . . . . . . . .28
Castles and Sieges . . . . . . . . . . . . .29
Other Factors . . . . . . . . . . . . . . . . . . .30
Population Loyalty and Revolts . . .30
Religion . . . . . . . . . . . . . . . . . . . . .32
Ronin . . . . . . . . . . . . . . . . . . . . . . .32
Weather and the Seasons . . . . . . . .33
Battle Mode . . . . . . . . . . . . . . . . . . . . . . .33
Tutorial - A Guided tour of
Battle Mode . . . . . . . . . . . . . . . . . .33
The Battle View . . . . . . . . . . . . . . . . .34
Cursor Help . . . . . . . . . . . . . . . . . .35
Surveying the Domain . . . . . . . . . .35
Knowing your Army . . . . . . . . . . . . . .36
The Unit Flag . . . . . . . . . . . . . . . . .36
Selecting and Moving Units . . . . . .38
Grouping Units . . . . . . . . . . . . . . . .39
Commanding Your Army . . . . . . . . . .40
The Icon Menu Bar . . . . . . . . . . . . .40
Drop Down Menu . . . . . . . . . . . . .41
Battle Mode Keyboard Shortcuts . .43
Battle Formations . . . . . . . . . . . . . . . .44
Quick Guide to Unit Formations . .45
Quick Guide to Group Formations 46
Melee Mode . . . . . . . . . . . . . . . . . .47
2 3
Page 3

Campaign Mode
The Main Game or Campaign mode is divided into two main game sections.
Turn-based Strategy
In addition to taking the role of commander-in-chief of your armies, you must
also manage the wealth of your lands, construct defences and dojos, train your
men and balance alliances with rival Daimyo while you wait for the right time
to strike. Use Ninja, Shinobi and other strategic units to gain every advantage
you can and so take control of Japan region by region.
• See
The Strategy Map Screen section on p.19, for instruction on this
component of the game.
Real time epic battles
When two armies clash on the Strategy map, you will experience war, as it
occurred in the 16th century. It is bloody, but it is also glorious, with a strict
code of honour that must be adhered to if you are to overcome your enemies.
As your men gain experience, their honour increases, and this reaps great
rewards for you as Daimyo. Their desire to follow your orders and their
willingness to fight and die at your command will make the difference between
creating a powerful clan of long-standing strength and a quickly forgotten and
disparate group of lawless and leaderless ronin. With an intuitive yet richly
diverse interface you can command thousands of soldiers in one battle! Warfare
has never been experienced on a grander or more epic scale.
• For instruction on real-time battles, see
Battle Mode on p.33.
• To play a single, user definable, battle, see the
Custom Battle section on p.53
INTRODUCTION
In Shogun - Total War™ you are plunged, headlong, into the world of the 16th
century Japanese warlord. The game is set during the Sengoku Jidai period. The
literal translation is ‘The Age of the Country at War’ and, as you will learn, it
certainly earned that name.
You take the place of one of seven warlords, or ‘Daimyo’ and must manoeuvre,
bargain, manage and battle your way to take your predestined place as Shogun,
‘the commander-in-chief for the suppression of barbarians’. However, your path
to divine glory will not be a smooth one. With 6 cunning rivals, all tutored in
the noble arts of the Samurai and the strategies and techniques of Sun Tzu’s
‘The Art of War’, you would be well advised to use all your wits and wiles if
you are to reign triumphant.
• If you feel ignorant or hungry for knowledge, you would do well to
consult the ‘Way of the Daimyo’ manual. It will give you an invaluable
overview of this fascinating and brutal period of history.
To access the manual: Click Start on the Windows Taskbar, then
select Programs >Total War>Shogun - Total War>The Way of
the Daimyo.
Note:
Internet Explorer 4 or higher must be installed to view ‘The Way of the
Daimyo’ manual.
4 5
Page 4
INSTALLING THE GAME
See the enclosed Reference Card.
SETTING UP THE GAME
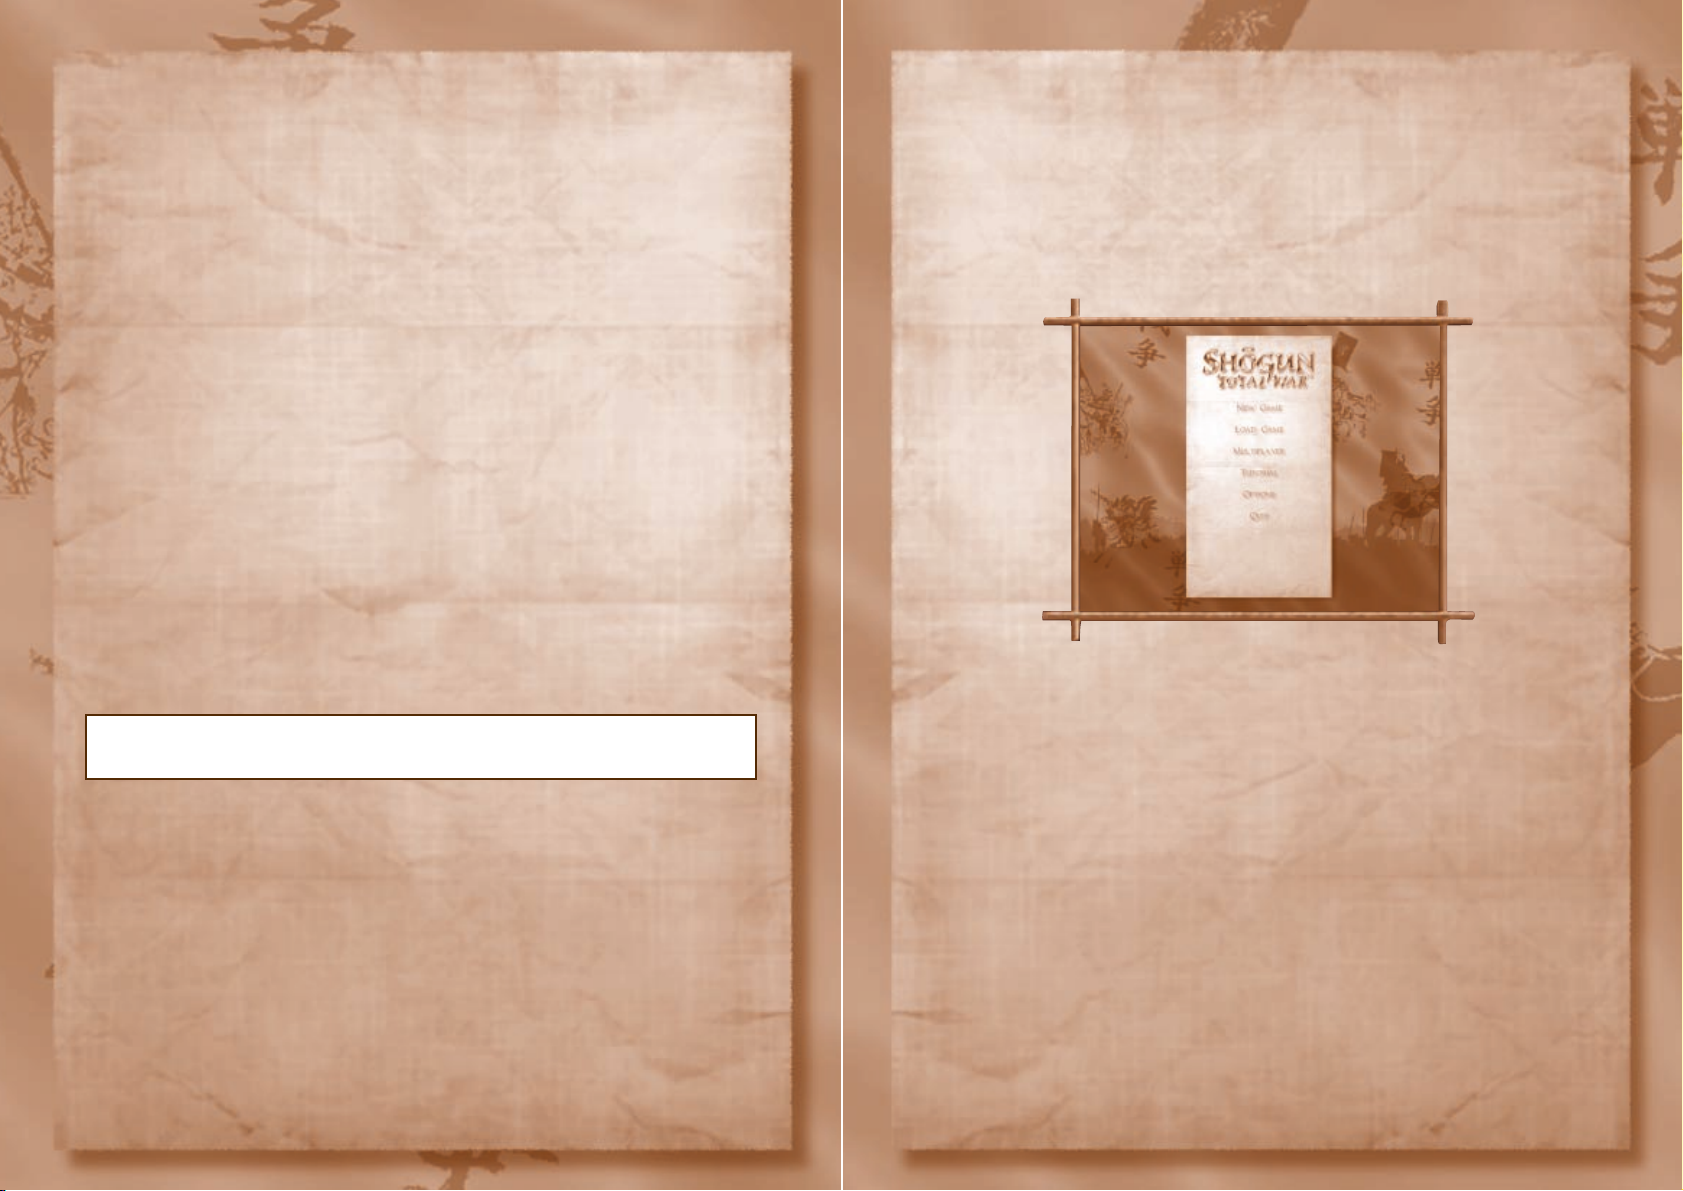
MAIN MENU
NEW GAME Begin a new game.
LOAD GAME Load a previously saved game. See Saving and
Loading on p.72
MULTIPLAYER Search for Shogun servers or create a Multiplayer game
(See
Multiplayer section on p.73)
TUTORIAL Familiarise yourself with
Shogun – Total War’s battle
interface
OPTIONS Adjust Audio, Video, Gameplay, Control setups and
Performance (See
Options on p.69)
QUIT Quit
Shogun – Total War and exit to Windows
• To proceed, click on the desired option.
Note: Default options are listed in bold.
6 7
Other Game Types
In addition to the fully interactive Full Campaign mode described above, there
are a multitude of other gameplay options to suit everyone from the casual
gamer to the die-hard ‘Net Warrior.
HISTORICAL BATTLE MODE – Recreate some of Feudal Japan’s greatest
battles. The simulations have been constructed using the expertise of
some of the period’s leading historical authorities. See the
Historical
Battles section on p.51 for details of the battles.
MULTIPLAYER MODE– Take on all comers over EA.NET, get involved in a
world ranking tournament, create private chat rooms to chat and fight
with your friends around the world. Or simply set up a LAN game in the
office or at home. See the
Multiplayer section on p.73 for further details.
CUSTOM BATTLE - Engage in a fully-customisable single battle.
The World of Shogun - Total War™ will live on
• Online events planned.
• More Historical battles to download.
• Patches and updates ensure that the game evolves with you, the player.
For more info on this and more and the latest updates on Shogun, visit
www.totalwar.com
• For more info about other titles, check out EA Play on the web at
http://www.ea.com.
Page 5
Objectives of the Full Campaign Game
The 16th Century was a period when rival Clans of samurai led by their Daimyo
(Warlords) fought for supremacy across the length of Japan. The greatest of
these Daimyo aspired to become Shogun, the supreme military leader of the
country.
Like them, you must build up a strong army and the associated support
structures necessary to support a warring clan. Then, through negotiation with
rival Daimyo, and the early European settlers, combined with wise patriarchal
management of your units (both battle and strategic), you may well chart a
path for your clan and take your place, at their head, as Shogun.
Winning the Game in Campaign Mode
The game ends when you and your clan have united Japan beneath the might
of your Samurai armies or you die leaving no heir to take on the mantle of
Daimyo.
The Flow of the Game
Below is a short description of the various stages of each turn in the game. If
you are familiar with PC gaming, this section provides a broad overview of the
game flow. Other players can use it as a brief introduction before the game
interfaces and battle strategies are discussed in detail, later in the Strategy Map
and the Battle Mode sections of the manual (p.19 and p.33).
Prepare for War!
As a Daimyo of one of the clans you control a number of provinces at the start
of the game. Each province provides a variable amount of income in the form
of koku (one man’s yearly rice ration). As this income is generated and gathered
from your provinces, you can spend it on the training and maintenance of your
armies and other special units as well as upgrading your buildings, fortifications
or expanding economic production.
• Always build a castle in your most important provinces. Without the most
basic fortification, you cannot train soldiers, nor hold out in a siege.
• A rival Daimyo can immediately claim a province that doesn’t have any
troops stationed in it.
NEW GAME MENU
Choose from three modes of play:
FULL CAMPAIGN - Select a clan and conquer the whole of Japan to become
supreme ruler of Japan, the Shogun.
CUSTOM BATTLE - Engage in a fully-customisable single battle.
HISTORICAL BATTLES - Take part in some of Medieval Japan’s greatest
battles.
• Highlight and
click the game mode of your choice.
Returning to the Main Menu
To return to the Main menu at any time, click the Folded over page
at the bottom of a menu screen.
Note: Any changes you have made to video, game, audio and other options are
retained for the game you are about to play.
FULL CAMPAIGN
Select one of seven clans and fight a campaign that may extend over 80 years
or more. This mode of play combines a strategic element with a real time battle
element to create a truly immersive gameplay environment. But, be mindful, it
may take many generations, encompassing years of struggle and sacrifice, to
conquer the whole of Japan and become Shogun!
• To begin immediately, see Creating A Full Campaign Game on p. 12.
• For an overview of Full Campaign, it is recommended that you refer to
The Flow of the Game section, below.
Tip: If you want to play a quick game, refer to the Custom Battle section
on p.53
8 9
Page 6

Toast your Victory or lick your wounds
When a battle is resolved on the battlefield, the surviving armies return to the
Strategy Map and the winner of the battle controls the disputed province
(though, if the defending army retreats to a castle, you must take the castle
before you fully control the province).
In this way, you must expand your domains to reign over all Japan. However, it
would be a foolish man who did not remember that all rival Daimyo are equally
ruthless, ambitious and driven by a belief in their own destiny. You can be
assured that, each one, in his own way, will be trying to wrest your territories
from you.
Each turn consists of the following sequence of events
1. Select Training and Building options and view information.
2. Move army and strategic unit pieces (See The Strategy Map Screen
section pp.19 – 22).
3. Click ‘END TURN’ button (See The Map View on p.19).
4. View and decide events (enemy unit movements, battles, etc.). Then
resolve any battles automatically or in real-time.
5. Review of the Harvest (each Winter i.e. once every four turns).
Lead your army into battle
Once you have trained armies and given them each a general, you can
command them into battle by moving the specific army piece into an enemy’s
province. This move of aggression will provoke one of three results:
•
The enemy army stands firm and readies itself for battle. The
two armies clash on the Strategy Map and a real-time battle is fought, if
you wish. See Battle Mode on p.33 for details.
Note: You are given the option of letting the game automatically calculate the
result. However, a human general is invariably a far wiser general than his
Artificial Intelligence stand-in.
•
The enemy Daimyo decides it is prudent to withdraw. He draws
his forces back to a castle, thus forcing you into a siege situation (see
Castles and Sieges section on p.29). If he has no castle, he may retreat to
a neighbouring province (if it is part of his territory), so saving himself
from an inglorious defeat.
Note: As Sun Tzu makes clear, to withdraw does not mean your enemy is
beaten. Almost invariably, he will be back, and in greater numbers.
• There is no enemy army. If there are no enemy troops defending the
province or garrisoned in the castle, you can take the province
unopposed.
Note: After you have conquered a province, you will need to station troops
there to cement your authority as a firm and powerful ruler (see Population
Loyalty and Revolts section on p.30).
10 11
Page 7
FULL CAMPAIGN MODE - THE
STRATEGIC MAP
Here, in front of the Strategy map, you can view the entire Japanese nation and
plan your conquest at your leisure. It is central to Full Campaign mode and is
where you issue orders, commission the construction of buildings, order the
training of your warriors and direct your units to mobilise for battle or
missions.
This is your war room and your meeting room, where you must manage your
economy and organise your dealings with rival Daimyo through diplomacy, or
espionage and assassination. To understand the nature of your undertaking,
you must first familiarise yourself with the resources at your disposal as well as
the concepts of creating a mighty clan.
• The onscreen prompts alert you to any important events that must take
place in your Throne Room – see
View the Throne Room section on p.26
for further information.
THE MEANS OF EXPANSION
Koku
The standard unit of
currency in 16th
Century Japan. Literally,
the amount of rice
needed to feed one man
for one year. It is the
measure of the value of
all commodities and is the single most important resource in Feudal Japan. Each
province provides an income (paid each Winter) to the Daimyo controlling it.
Clearly then, areas with a high koku yield are more desirable territories than
those with a low koku yield.
Without an income of koku, a Daimyo is powerless to train men, construct
buildings or maintain his clan forces so the need to control land and the bounty
it brings forth is immediately apparent.
Creating a Full Campaign Game
1. Click NEW GAME. The NEW GAME MENU appears.
2. Now, click FULL CAMPAIGN.
3. The Difficulty Level pop-up appears. Click on your favoured level of
difficulty.
4. The Clan Selection screen appears.
5. Now, click on a Clan symbol on the banners to view the forces at your
disposal, a short background description of the clan and the provinces of
Japan currently in their power. When you have chosen, click START
GAME.
6. The Strategy Map appears (See following page).
Note: Each Clan has it’s own history, strengths, weaknesses and strategies as
well as a set number of units at the start of the game. When you play as a
particular clan, you should try and take advantage of their respective strengths
- so read the Clan Descriptions carefully.
12 13
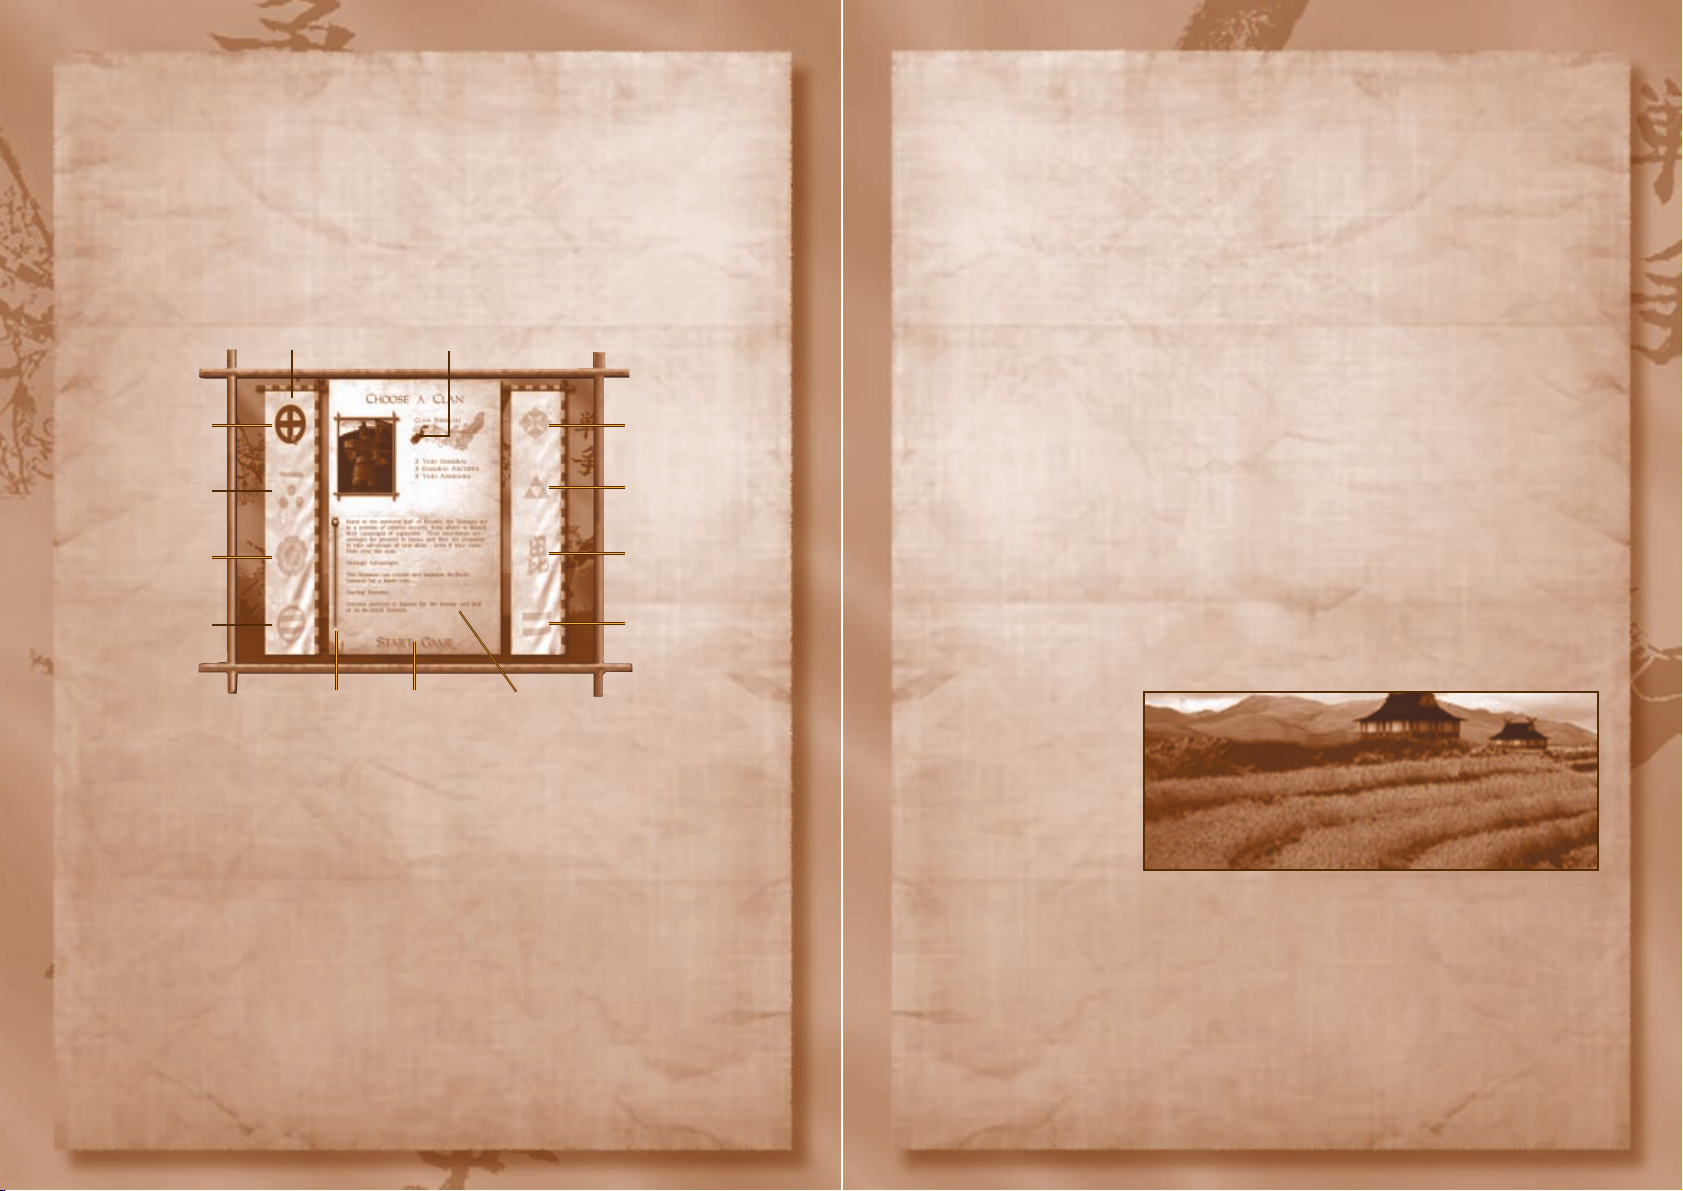
Click a Clan symbol on either
banner to view clan details
Clan Hojo (Purple)
Clan Uesugi
(Navy Blue)
Rebels and Ronin
(Not selectable)
Click to select a
clan and begin a
Full Campaign game
Scroll Bar – Click,
hold and drag to
view clan
description
Clan
Description
Extent of Clan Shimazu’s province
Clan Shimazu (Green)
- Selected
Clan Mori (Red)
Clan Oda (Mustard)
Clan Imagawa
(Turquoise)
Clan Takeda (Black)
Page 8
Technology and Progress
In all civilisations, innovation is tied inextricably to progress. So it goes in
Shogun – Total War. You should take note that you cannot run before you can
walk. In the same way, you cannot build a mighty Citadel without first
constructing lesser defences.
The linear nature of your construction options is illustrated on the enclosed
Technology Tree for clarity’s sake. But simply, be aware that as your wealth,
honour and experience increase, so the options available to you will also
increase and become attainable.
• Before you can train units in a province, you must first construct a castle
and the respective training facility.
• Building options vary from province to province. These options are
dependent upon the province’s geographical location (i.e. a Port) or upon
the presence of valuable mineral deposits.
Shogun – Total War’s technology tree is intuitive so you can pick it up as you
play. However, since good generals leave nothing to chance, here are a few
important points to consider:
Basic Tips for holding your territory
Defend your territory
- Always keep a group of units in each province
bordering an enemy province otherwise aggressive forces may take the territory
unopposed.
Population Loyalty - Keep an eye on the loyalty of your subjects or they
may revolt. To do this, right-click a province to bring up the province Info
Parchment (See Info Parchment section on p.21) Less than 100% indicates that
you may have problems with the population in this province.
• See
Population Loyalty and Revolts section on p.30 for more information.
Important Koku factors
• Harvests vary from year to year and are gathered in each Winter. A good
year can be +50% up on a normal yield, while a bad year can drop as low
as –50%. Additionally, natural disasters can completely destroy a year’s
harvest in a province.
• Each Farmland upgrade can increase base koku yield significantly.
• Increase income through trading. To trade, you must build Ports.
• Increasing the tax rate will increase your income but be aware as it will
also reduce the loyalty of your subjects.
• Building Mines can also create additional koku.
• Troops (Units) cost a certain amount of koku to maintain each year after
they are trained.
Tip: In the Building Panel, you can upgrade farmland to improve potential
koku yields. Additional ways of increasing koku yield are through the building
of mines in mineral rich areas and the encouragement of trade.
Protect Your Koku Yields
The areas with the highest koku yield, either from agriculture, mines or trade
are your greatest asset – they should be protected at all costs.
• A castle allows you to hold out in a siege. The larger the fortification, the
more units you can garrison there and the longer they can hold out.
Note: If a province is disputed, neither clan derives any income until the siege
has been resolved.
Other sources of Koku
Always check on a province’s other natural attributes. If you can build a mine
in a province, this makes it very valuable. Equally, a province with coastal
access is suited to trading.
14 15
Page 9
Terrain advantages
The terrain varies in each province and, as a result, imparts different
advantages to the wise leader. Mountainous provinces are much easier to
defend, but their farmland is not generally as bountiful. Provinces with rivers
have a triple advantage; they are easier to defend, don’t suffer any penalties in
their income and also encourage trade. Provinces with a coastline offer the
added advantages of increased trade opportunities and moving units by ship.
Tip: Ports enable you to move your armies to any other province under your
control, which also has a Port. This is essential as your empire grows, enabling
you to quickly move your armies to the front lines.
Strategic Units – Neglect them at your peril
Though comparatively costly, strategic units should not be overlooked as an
important method for strengthening your position amongst the Daimyo
hierarchy. Remember, there may be occasions where negotiation and subterfuge
can guide you along a far preferable path than direct confrontation and bloody
warfare.
• Any strategic unit can be used to spy and provide basic details. Simply
drag them into the province you require information from.
• Emissaries – Enable you to propose alliances to other Daimyo.
• Shinobi - Spy on enemy provinces, incite revolts and counter spy.
• Ninja – Assassinate your enemies and their worthies.
• Priest – A Catholic emissary. Especially useful in dealing with Christian
Daimyo.
• Legendary Geisha – The most effective assassin in the game.
To send any Strategic unit to perform a task, drag them onto an enemy unit or
castle. A pop-up appears giving you various options.
Note: Strategic Units only become available once you have constructed the
requisite buildings. See the enclosed Technology Tree and the Strategic Units
section on p.57 for full details.
Scouting - You would be well advised to scout out enemy provinces to see
which ones are most bountiful. If you are successful in your expansionary
aggression not only do you benefit from the extra koku yield that province
provides, but your enemy is all the weaker for the loss of income.
Spying - Any strategic unit can be used to spy in an enemy province, while
watchtowers act as spies into neighbouring provinces.
Note: The longer the Shinobi stays in the province the more information he will
gather.
The Cost of War - When a province falls to an enemy Daimyo, the level of
the castle, and some of the building upgrades that depended on that level are
downgraded by one level (or destroyed if they are at a basic level). You should
always attempt to keep your most important buildings well protected and away
from the heat of battle.
Regional Specialisation - Different provinces are renowned for their
specialisation in training different types of units, for example Iga is famous for
the skills of its Ninja. Investigating the strengths and weaknesses of a province
before deciding whether to build there is always advised.
• You can get an indication of the specialisation of each province by
looking at the illustrations on the Strategy Map or by checking the
province’s Right-click Info Parchment (See Info Parchment on p.21).
16 17
Page 10
Events
Events of note take place in the Daimyo’s Throne Room at the end of each turn
in the Map Screen. You sit before your Map, waited on by your trusty advisor
and a geisha while you receive visitors from Japan and beyond. Some may
come with the best of intentions whilst others may be bent upon coercion and
even out-and-out aggression. You must make the choices that will mould the
future of you and your peoples.
• See the
View the Throne Room section on p.26 for more information.
THE STRATEGY MAP SCREEN
Your view of the war map of Japan.
Manage Your Koku Wisely
Keep an eye on your income – taxes only come in once a year and it’s easy to
run out of money between buildings, upgrades and training units.
Buildings
To become Shogun, you must build a mighty army but,
without places for unseasoned young men to be tutored in the
noble arts of samurai warfare, you cannot prepare for the long
battles ahead. A wise Daimyo will carefully consider where he constructs his
buildings and trains his forces to ensure his territories remain the property of
his clan. Of course, koku reserves must be available to cover any work ordered
or the buildings cannot be built.
• See the
Constructing Buildings section on p. 25 for building instructions.
• You can review your income and your costs by looking at the Economic
Info Parchment (see
The Info Parchment section on p.21).
Note: For a full list of Building types available in Shogun - Total War, see the
separate Technology Tree.
Soldiers (Units)
To create a mighty army you must first recruit
and train your warriors in the arts of Bushido
in your dojo (training centres). As explained
in the Technology Tree, you must first
possess a Castle and a specialist building.
Once you’ve met these criteria, unit
training options become available to you.
• Be mindful. Your store of koku is not
endless and the neighbouring Daimyo
may have a far mightier army than
your own. Attack only when you are
confident of victory or your reign will
be brought to a swift and final
conclusion!
Note: To view all unit options, see the Unit Types section on p.54.
18 19
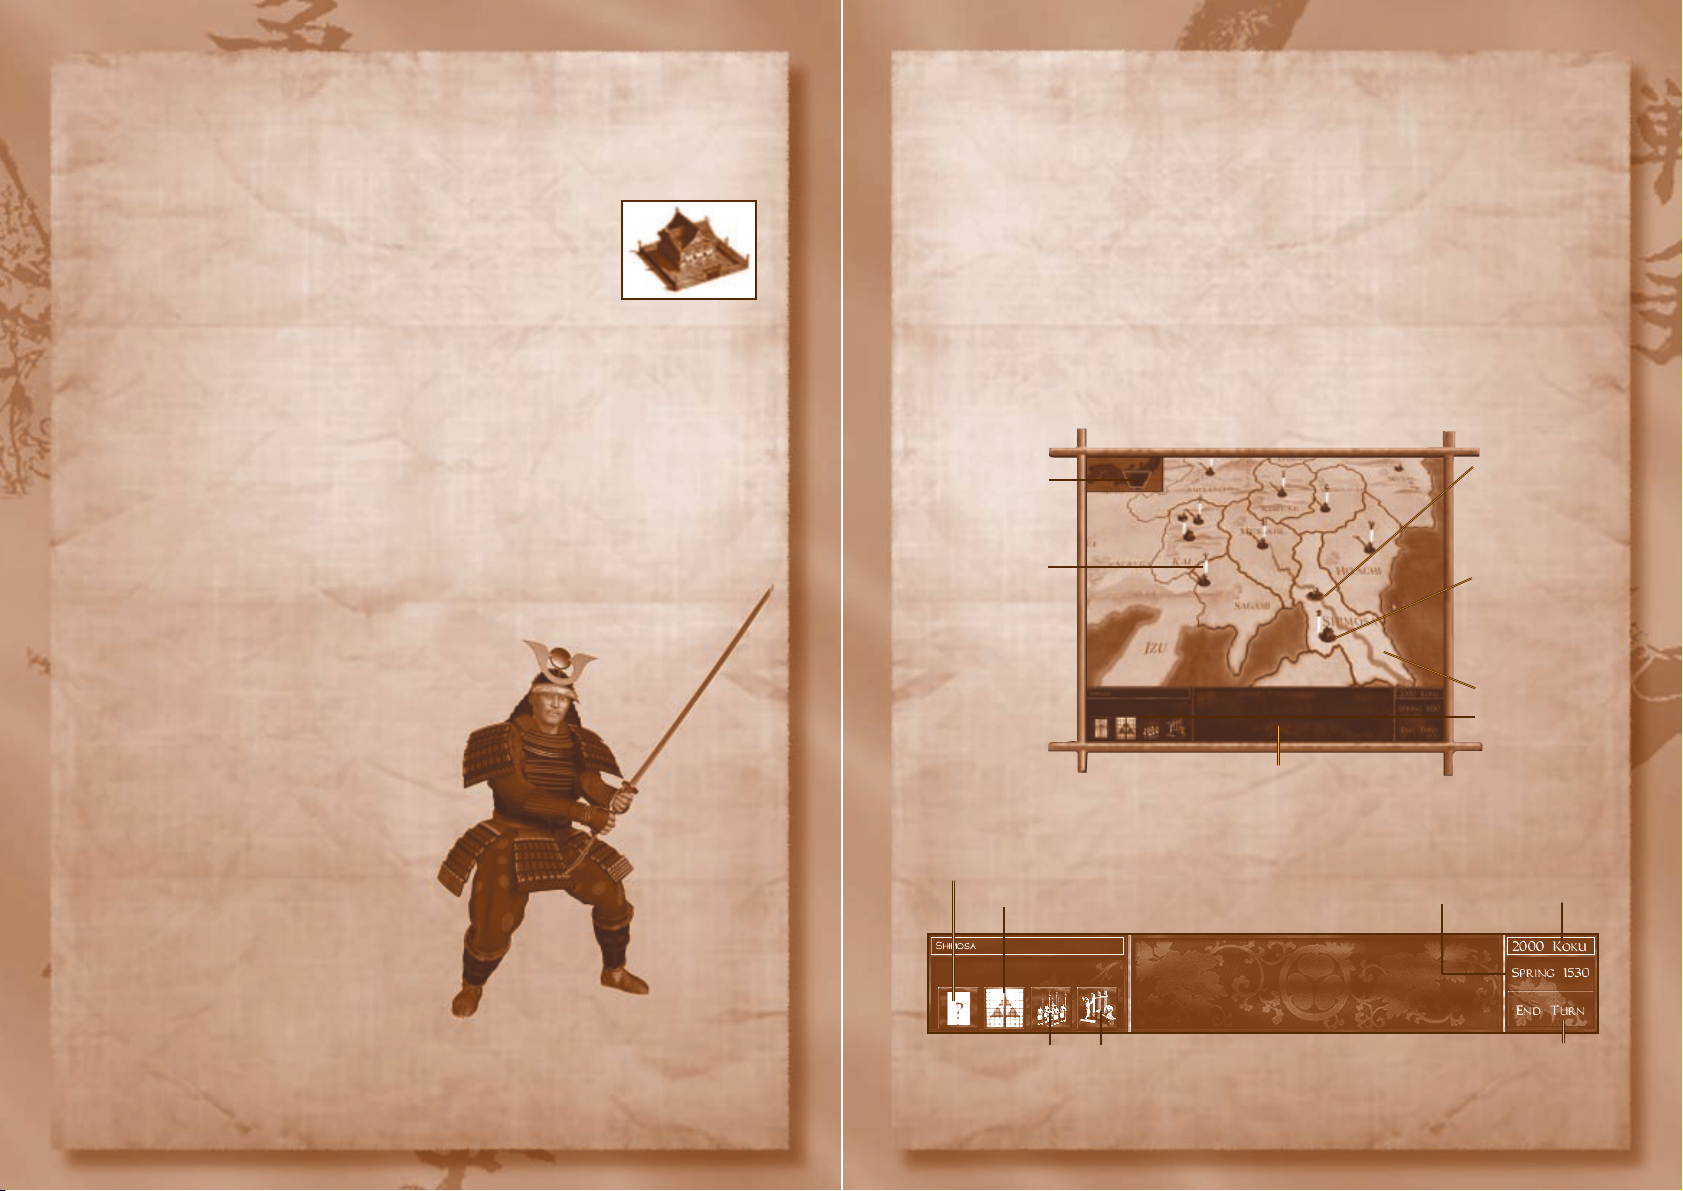
Mini-map – Click
to move the main
Map view
Daimyo’s
Garrison – Click
here to view
current units
contained within.
Icon Menu Bar
Display Info Parchment – Click to
get detailed summaries about your
alliances, military status, economy,
subterfuge and heirs.
Selected Province.
View the Throne Room
The Review Panel – Displays
general information on the selected
item, province or castle.
Right-
click the relevant item for details.
Train Units Construct Buildings
Koku stores (Total
cash) – Click to open
the ‘Set Tax Rate’
pop-up
Season and Date
Click to move to the next season (1 turn)
Strategic Unit –
A selected unit
has a grey
highlight round
its base.
Banner Army Size
Indicator –
A ’ bar graph’ style
indicator of the
number of units. To
get an exact
breakdown of an
enemy army you
must spy on the
province in some way
Page 11
VIEW THE THRONE ROOM –Seek words of wisdom from your advisor and
meet with dignitaries – see the View The Throne Room section on p.26.
TRAIN UNITS – Build an army that will bring honour to your clan. See
Training Units section on p.23.
CONSTRUCT BUILDINGS – The building blocks from which military might
springs. See
Constructing Buildings section on p.25
The Info Parchment
In the early stages of your tenure as Daimyo, you will be hungry
for knowledge of the lands of your forefathers. The Right-click
Info Parchments provide information on unit types, buildings and
provinces while the Info Parchment toggle provides details on your
current alliances, military, economy, your subterfuge operation and
your heirs.
•
Right-click and hold on any item or province on the map to view
information.
•
Click the Info Parchment toggle ON/OFF to view or hide all alliances,
military, economy, subterfuge and heirs information.
Navigating the Map Screen
Use the following key commands to navigate the Map screen.
• For a full list, consult the enclosed key command card.
General
Scroll around Map Arrow keys or Mouse Scrolling
New Season ENTER or click the END TURN button
Skip the scenic tour SPACEBAR
Return to the Map Click the Map
Screen from the
Throne Room
Go to In Game Menu
ESC
Note: The scenic tour allows you to view all troop movements taking place in
provinces you can currently see. Other events of note appear in pop-up boxes or
take place in your Throne Room.
Building
Show buildings in a province Click on a province
Troops
Show units available in a Castle Click on a Castle
View units under a general Click on an army piece
View Info Parchment on provinces,
castles, pieces, buildings or units Right-click
The Icon Menu Bar
The Icon Menu Bar on the Map screen
is the control panel for your
campaigns. Make the decisions that will speed you to victory – or defeat.
Here is a brief description of the Options available to you.
DISPLAY INFO PARCHMENT –
Shogun – Total War’s in-depth info.
Click to display information on alliances, military, economy, subterfuge
and heirs. Once selected, click one of the icons at the bottom of the
parchment to view other pages.
20 21
Page 12
Tool Tips
Hold the mouse over any item to get a tool
tip description; if you wait longer you get
more detailed information.
BUILDING YOUR CLAN
The following section deals with the foundation and expansion of your clan
from humble beginnings to historical significance.
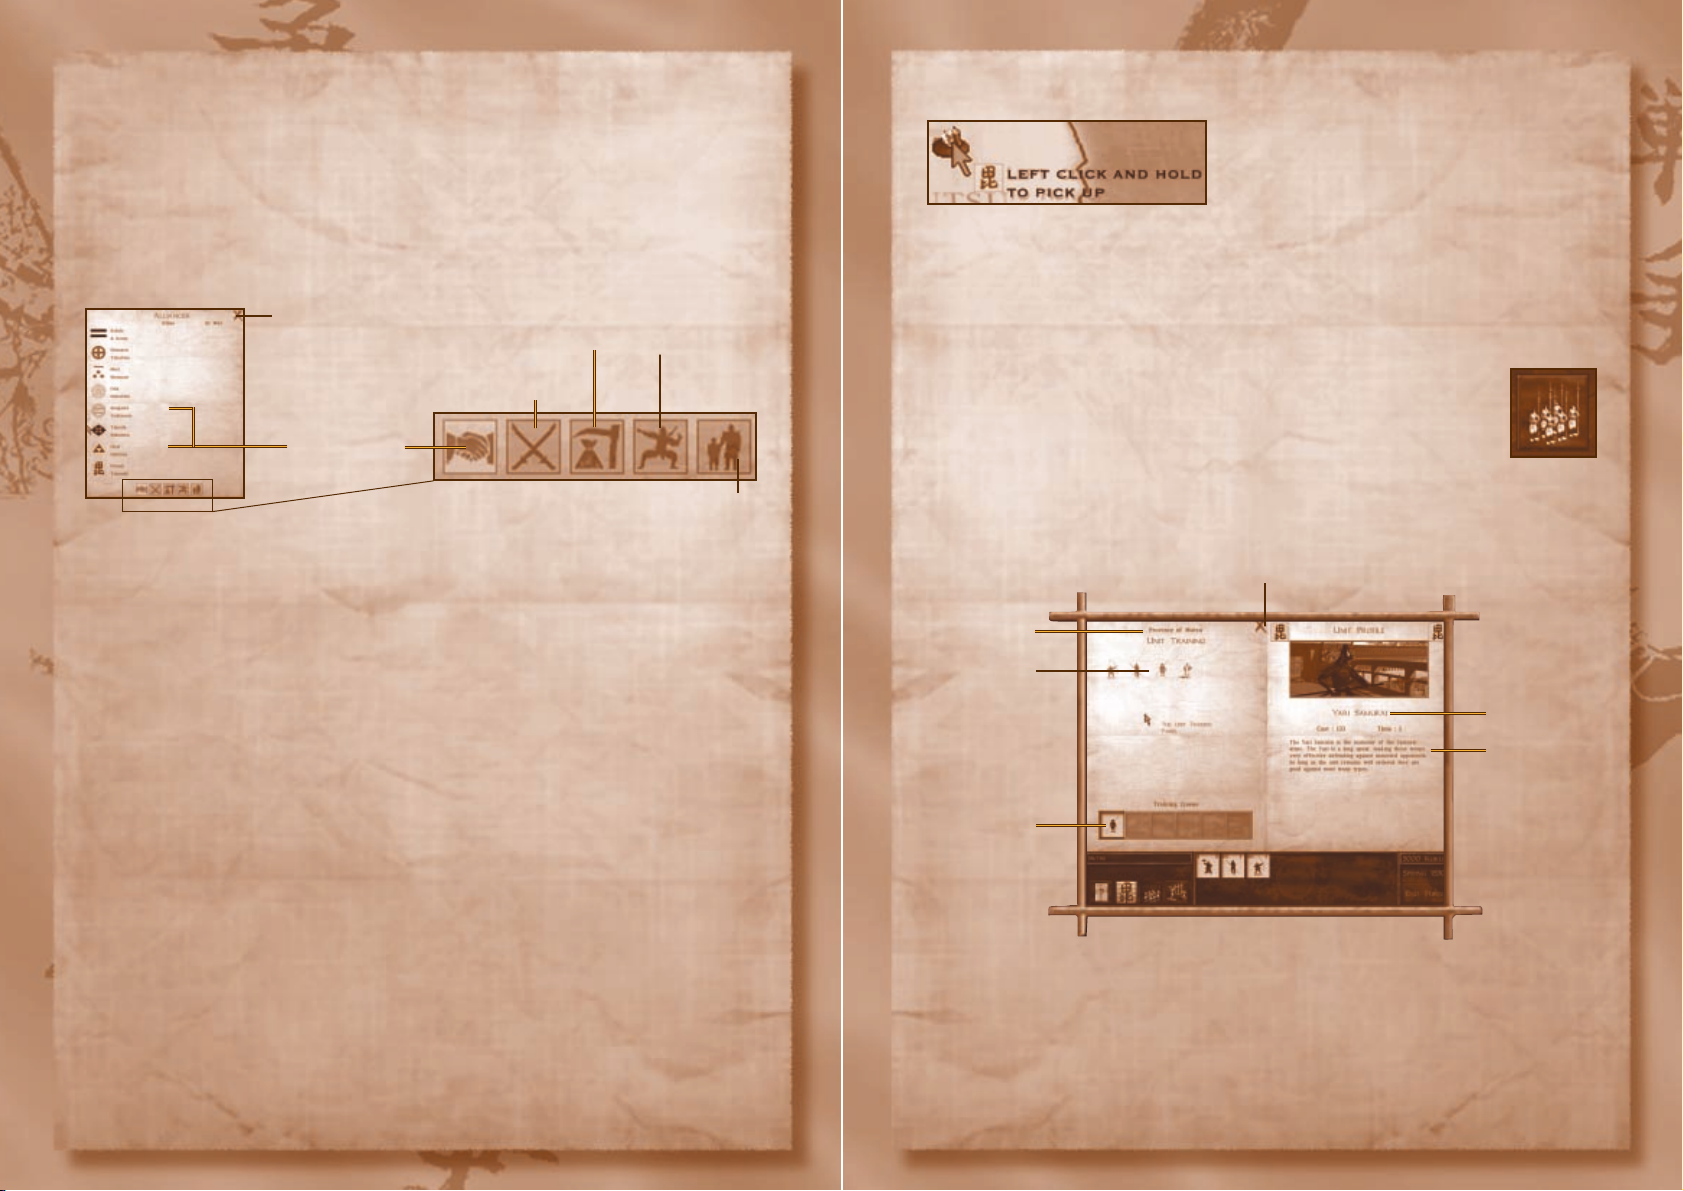
Training Units
1. First, click on a province containing a castle and training
facilities (buildings). Any buildings already constructed are
displayed in the Review Panel.
2. Now, click the TRAIN UNITS toggle and your current unit training options
appear in the Unit Training pop-up.
3. Click on the unit type you wish to train, taking note of how much each
unit costs. Continue adding units to the queue (up to a maximum of six
units).
The Alliances Parchment – Proposing Alliances
You can propose Alliances to other Daimyo by dragging an emissary piece onto
another Daimyo (in the field he is identified by a Mounted Samurai piece,
though he may be resting in a castle, too).
Both clans vow not to raise arms against each other or their lands and the good
will between them ensures a temporary peace.
To ensure that you are aware of all current alliances, you should consult the
Alliances Parchment. For Samurai, the breaking of an alliance, under most
circumstances, is against all honourable virtues. If you do break an alliance,
your Daimyo’s honour will suffer as a result.
•
Click the Info Parchment toggle to bring up the Alliances Parchment.
There are a series of icons on the Parchment to access information on
Armies, Economy, Spies, Ninja and their missions and Heirs.
22 23
Current Alliances
Click to view list
of your armies
Click to view
Economy Info
Click to view Spies
and Ninja info
(Subterfuge)
Click to view Heirs Info
Click to Close
Parchment
Province where
training takes
place
Click on the
unit you wish
to train
Training Queue
–to remove the
unit from the
queue,
right-
click on the
unit icon
Close Parchment or
click the TRAIN
UNITS toggle.
Unit Type – See
Unit Types
section on p.54
for more details
Unit Profile
Page 13
Constructing Buildings
Building Structures
1. Click
on the province where you want to construct a building.
2. Click on the ‘CONSTRUCT BUILDINGS’ toggle. The Building Production
pop-up appears. Click the building you wish to add to the Production
queue.
Note: Highlight a building with the cursor and an Info Parchment describes the
building type.
3. Now you may either click on another building (see Job Queuing), another
region or click again on the ’CONSTRUCT BUILDINGS’ toggle to close the
Building Production pop-up.
Note: The building is not constructed overnight but takes a number of seasons,
the exact number is defined in the Building Profile Info parchment. This is
viewed from the Review Panel when the BUILDING PRODUCTION pop up is
active.
Once the building is constructed, it appears in the Review Panel when you click
the province where you ordered it built. The only exception to this are Castles,
which are displayed on the map itself.
• To cancel a building, either
right-click the building or drag and drop its
icon outside of the production queue. It disappears from the production
queue. Once construction of a building has started, you cannot cancel it.
• To change the order of any unit or building in the production queue, click
and drag the building icon to a new position in the queue.
• The grey shading on the icon of the building being built indicates
progress. The less grey there is, the nearer the building is to completion.
4. To close the pop-up, click the TRAIN UNITS toggle or the close parchment
(X) button.
5. Once trained, the units remain in the garrison awaiting your command.
• To break up a large army into two or more smaller armies, select an
army then click and drag one or more of the units onto the map.
• To merge armies or move units between garrisons and armies, see
Organising and Directing Units on p.26
Note: When your Daimyo is a general of an army the army’s piece (icon) is a
mounted horseman. This is equally useful when you engage with enemy
armies, since you can see, at a glance, whether a rival Daimyo is leading the
opposing army.
Job Queuing
If you are particularly wealthy, you may wish to queue certain jobs. Both
building and training jobs can be queued in the Queue bar in the Building
Production and Unit Training pop-ups.
Note: If you queue up a building or training command and run out of money
before the building or training has commenced then the order will stay in the
queue until you have enough koku to complete it. The entire cost of a building
(or of training a unit) is deducted in the first season when building or training
commences.
Cancelling an order
You can cancel any building or training order at any time during a turn.
However, if you click the END TURN icon, you cannot then cancel an order that
has already been started in the previous turn.
1. Click on TRAIN UNITS or CONSTRUCT BUILDINGS toggle.
2. Now, right-click on the unit icon you wish to cancel in the respective
job queue. The icon disappears from the job queue and the order is
cancelled.
Note: Like units, the cost of building a structure is deducted from your reserves
when you click the END TURN icon.
24 25
Page 14
Drag and Drop Units from an Army or Castle
You can select units from the Review Panel when either a castle or army is
selected.
•
Click on the unit/s in the Review Panel. Then drag the selected unit/s
directly into the province or onto another army or castle in the same
province.
• Dragging units into a castle garrisons the castle.
Note: To de-select a unit from the group, click the unit again.
Merge Units
Create a large army from two or more smaller armies.
• Drag one army piece and drop it on another army piece and the two
units are merged.
• The maximum number of units your can merge together is 16 units.
Note: The units must have occupied the same province for one turn before
they can merge.
Merge Two Units of the same type
If two or more units have suffered great losses, you can merge the units
together. However, they won't merge, if they exceed the maximum unit size (See
Performance Options on p.71).
• To merge units,
click the unit on the Review Panel and drag it onto the
unit you are merging it with.
Invading an Enemy Province
Once you feel that the time is right for an attack on an enemy Daimyo’s
territory, you should do the following.
1. Click and drag your troops into the province you wish to conquer. An
event pop-up appears, allowing you to confirm whether you wish to wage
war against this Daimyo.
Note: No pop-up is shown if you are already at war.
2. Then, if you have completed all your actions this season, click the END
TURN icon.
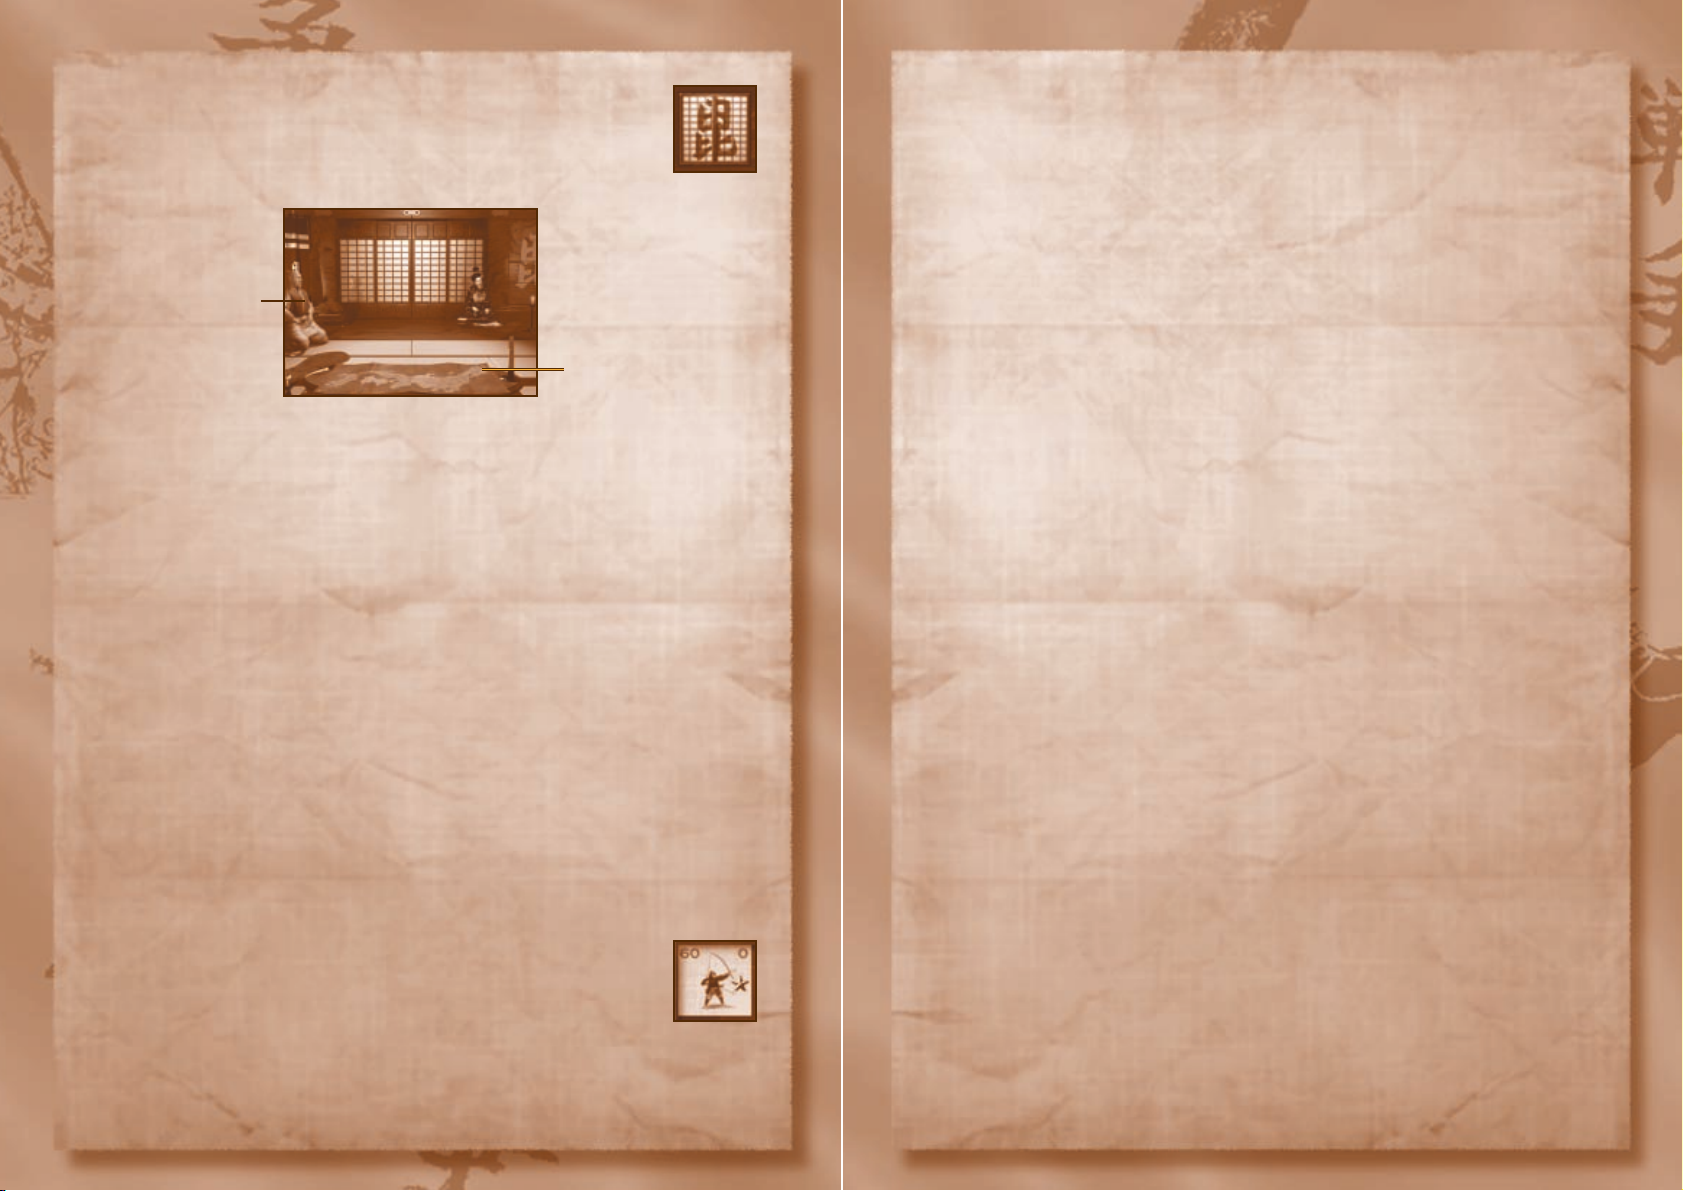
View The Throne Room
The Throne Room is where you automatically go each time an
emissary or other visitor is granted an audience by you.
• To cut short a visitor’s speech and go straight to making a decision, press
SPACEBAR.
MOBILISING YOUR ARMIES
When the time is right, you should begin your campaign of Total Warfare.
Mobilising your armies takes the battle to other Daimyo’s territory and could
leave your own provinces relatively peaceful – for now, at least.
Organising and Directing Units
Crucial to your aim of becoming Shogun is the organisation and mobilisation of
your trained units. Promoting a general allows the honoured individual to head
up a mobile unit of your trusted soldiers. This is the only way units can leave a
garrison in the province where they were trained to assist you in the conquest
of all Japan.
Tip: Split up large armies into smaller armies to expand into empty territory
more rapidly.
The General Unit
When you create an army, the general is contained within the first
unit chosen to create that army. To find which unit he is in, click the
army piece. Now, look at the Review Panel. The unit with a star is
the unit containing your general.
26 27
Click to receive a pearl
of oriental wisdom
from your trusty
advisor
Move mouse over map to
see the names of each
province. Click map to
return to Map Screen
Page 15

Castles and Sieges
If you successfully invade a province with
a castle garrisoning troops then the
defenders can hold out inside the
fortifications and prepare themselves for
a siege. The attacker and defender have a
number of options.
As Attacker
Siege:
Don’t attack the castle. Each turn that the defenders stay besieged
in the castle they will lose a number of men to famine and disease.
Storm the castle: Attack the castle and fight on the Castle battlefield.
Move your units onto the castle to activate this function.
As Defender
Siege:
The defender can attempt to hold out against the attacking army.
Note: It is not possible to build or train while under siege and neither side gets
any income from the province while it is in turmoil.
Break Siege: The defender can choose to charge out of the castle and
attack the attackers in a field battle trying to drive them from the
province. Move your armies from your Castle onto the province to break
the siege.
Note: If a defender loses a castle battle they will suffer 100% casualties, as there
is no route of escape or retreat. However, the defender may bring in additional
troops from neighbouring provinces to help break the siege.
3. Once you have been notified of any events of note, you proceed to Battle
Mode to fight it out in real-time.
• Taking your Daimyo into battle will inspire units to fight with more
intensity, but there is a risk that he can be killed. If your Daimyo is killed
and has no heirs, then your Clan will be without a leader and will break
down – the game is over.
Ending a Turn
Whilst it may seem sensible to speed the passage of time
to build up your treasury’s koku reserves, this is not the
path of a wise man. You should manage each of your
provinces and ensure that, each turn, you do all you can
to speed yourself along the path to total domination.
• When you are finished with your decision-making,
click the END TURN
icon.
Note: Once you have clicked END TURN, any orders you made cannot be
cancelled.
The Scenic Tour
The Scenic tour enables you to view the troop movements in adjacent enemy
provinces in the previous turn. It is very useful for gauging the military climate
and intent as well as highlighting the course of other Daimyo’s respective
fortunes.
• To skip scenic tour hit the SPACEBAR.
28 29
Page 16

Garrisons: If you have an army in a province it will help to settle the
subjects. You should ensure that you have particularly large garrisons in
recently conquered areas. A weak Daimyo is one that the populace will
have no respect for.
Shinobi: Shinobi can stir trouble in an enemy province by encouraging
revolt. In addition, they can provide counter intelligence services in their
own province, which can decrease the chance of revolt.
Daimyo’s remoteness: The distance from the province to the Daimyo
affects how loyal a population feel.
Typhoons & Earthquakes: Though acts of God, your populace don’t
tend to respond well to natural disasters.
Land Improvements: The upheaval necessary to change for the better
will, of course, negatively affect loyalty in the short term.
Border Towers and Border Forts: No one likes to feel they’re being
spied on.
Religious unrest: When your Daimyo’s religion doesn’t match his
people’s religion, there may be trouble.
Revolt Types:
Peasant Revolt:
The revolutionary army will be primarily made up of
Ashigaru rabble.
Loyalist Revolt: This is a revolt where the province is still loyal to the
previous Daimyo. As a result, the revolutionary army will be a samurai
army.
Buddhist Revolt: This is possibly the most dangerous revolt of all, as
the revolutionary army is made of fanatical warrior monks. With their
mobile temples and their innate religious gravitas, Warrior monks may
make your Buddhist warriors falter in battle.
Christian Revolt: The revolutionary army will be a Christian Samurai
army.
Note: Revolts also influence the neighbouring provinces, and if a revolt starts
in one province it can soon spread to other provinces.
OTHER FACTORS
Population Loyalty and Revolts
In Feudal Japan, though the overlord
wielded absolute power, without the
support of the people, his tenure could be
abruptly ended by other upstart samurai.
In general, the people were loyal where
they experienced strong, yet fair, rulers.
There are many occasions of peasants’ revolts throughout the period, and, for
the most part, these revolts occurred because a Daimyo showed weakness or
incredible cruelty.
“
One who does not gain the masses will not be victorious”
- Sun Pin (Sun Tzu’s grandson)
When you view the Info Parchment for each province you will notice a statistic
for Population Loyalty, represented as a percentage. This number represents
how content the peasants are with the Daimyo who controls that province.
• If the Peasant Loyalty is below 100% then there is a chance that there will
be a revolt in the province.
Population Loyalty is affected by numerous factors:
Tax Rate:
You can set the tax rate at any time. Click on the ‘Koku’
counter on the information panel to open the ‘Set Tax Rate’ pop-up. High
tax rates may bring in more koku but your population loyalty may suffer
as a result.
Harvest: A good harvest will make your subjects content, a bad harvest
will make them unhappy.
Loyalty to a former Daimyo: The subjects are loyal to the Daimyo
they are familiar with. If you take over a province then the peasants will
be unsettled and prone to revolt. It can take up to 5 years until their
loyalty is completely transferred to a new Daimyo.
30 31
Page 17

Weather and the Seasons
You should certainly take note of the
potential weather conditions when
planning your battles in the Map Screen. If
you choose to attack in winter you will
have much less time to resolve the battle
once you enter Battle mode, since your
armies will only fight effectively during
daylight hours. In addition, wet weather
tires troops more quickly since their armour is strung together with absorbent cord
and the quilting padding also absorbs water making the suit very heavy. Equally,
snow affects the troops resolve and obscures their vision over long distances.
Accordingly, many units are affected to differing degrees and in different ways
by inclement weather:
• The arquebus and musket will not work in wet weather, except light rain.
• Bows become less effective in wet weather as the strings get damp.
• Both accuracy and range of bows is reduced in high wind.
BATTLE MODE
If you want to tighten the straps of your helmet and lead your army straight into a
pre-definable battle against the CPU, choose HISTORICAL BATTLES or CUSTOM BATTLE.
• To take on another human opponent, see the
Multiplayer section on p.73.
• You also enter Battle mode to resolve battles in a FULL CAMPAIGN game,
should you choose.
Tutorial - A Guided tour of Battle Mode
Below, you can find all you need to know when you command your armies in
Battle Mode.
• If you require a walkthrough of battle mode, choose the TUTORIAL option
in the Main menu.
Note: Battle Mode is accessible as part of the Full Campaign, Historical Battles,
Custom battles and Multiplayer.
Religion
There are a number of factors that can
influence the chances of religious revolts
(Christian or Buddhist).
Churches & Temples:
A province containing a Church or Temple is a devout one and many of
its subjects will have a fervent belief in the chosen religion - fervent
enough to fight a Daimyo ignoble enough to encroach on their holy land.
Christian Emissaries or Warrior Monks: Christian Emissaries are
unsurpassed in negotiation with Christian Daimyo while Warrior Monks
will fight against their enemies with a fervour that has to be seen to be
believed.
Changing Religion: If you renounce Buddhism to embrace Christianity
(in order to trade for guns with westerners) then your Buddhist followers
may very well turn against you.
Ronin
If a Daimyo dies and has no heirs then all the provinces which
were under his control will break up into independent, lawless
provinces controlled by independent armies of masterless
samurai (ronin). They may have no master but their resolve to
defend is, nonetheless, strong.
32 33
Page 18

Cursor Help
When you point the cursor at icons and units, you get a quick description
alongside the cursor.
Red text – Enemy information
White text – Your units’ information.
• This text gives you a good idea of how individual units are fairing in
battle so don’t neglect it.
Range indicator cursor
• If the arrow is green, this indicates that the enemy units are
within range of your missile-firing units. Red indicates the units
are currently out of range.
• If the arrow is crossed through, the currently selected unit is out
of ammunition, or can't fire due to wet weather.
Surveying the Domain
Use the Arrow keys or the mouse-scroll to move around the map.
Changing your Viewpoint
• Right-click on the terrain to centralise focus on that point.
• Your viewpoint is indicated on the Map View by the white quarter circle
Note: If ‘mouselook’ is selected in the control options (see Control Options on
p. 71) then you can hold down the right mouse button for ‘mouselook’.
Line of Sight
In order to create more realistic battlefield scenarios, you can only see as far as
your units’ line of sight allows.
• Before battle commences, the pale circle on the Map View
shows the extent of your unit’s view of the terrain. Using
units to scout and extend your view over the terrain
should not be overlooked as an effective strategy.
Note: To switch ‘Line of Sight’ off, go to Game Options, Realism Settings and
deselect RESTRICT CAMERA.
THE BATTLE VIEW
This is the view you will see just before battle commences.
• To command your units using the Icon Menu Bar, first select the unit/s
you wish to command, then
click on the relevant icon.
• For a full explanation of command terminology, see the
Commanding
your Army section on p.40
34 35
The Icon Menu Bar - See
Commanding Your Army section on p.40
Group Formations Control Panel –
Click to create group formations
Time Limit – For the
attacker, there is a
time limit in battles
(Appears here once
the battle begins)
Selected Unit
(Standard bobs
when selected and
the Unit flag is
depressed and
highlighted white)
Unit Flags (Includes
standard/general's
standard symbol,
unit type and
number of troops)
Map View
including position
of your units,
enemy units and
position and extent
of your view
Speed Slider (Left =
Normal speed. Drag
right to speed up)
Kill Meter – When battle commences, more
than 50% green indicates that your army
has the upper hand. More than 50% red
indicates that the enemy are currently
triumphing
Army Formation
icon –
Right-click
to create a full
formation with your
whole army
Click and drag to
enlarge Map View
Page 19

• A Grey Unit Flag indicates the unit is not currently selected.
• A White Unit flag indicates that the unit/s are selected.
• The unit containing your general is denoted on the battlefield by the
same General’s standard displayed on the Unit Flag.
Action Indicator
Here is the full list of action indicator icons that you will encounter in battle.
Unit under fire
Unit routing. If the Flag is blinking, the unit is wavering.
Unit firing Hand to hand combat
Mouse-defined Camera Positioning
Note:
Only accessible when mouselook is switched off.
See Control Options p.71.
Right click, hold and drag to radically alter you viewpoint. The start point of
your click and drag is where the camera will be positioned whilst the point
where you release the button is the centre of the new view.
Note: This is the principle camera option in software mode. When used, the
camera jumps directly to the new view point.
Zoom to your Battle units
To move your viewpoint directly behind your gathered forces,
double-click on one of the unit flags in the bottom left of the
screen.
• If the units are on-screen,
double-click on the unit itself.
KNOWING YOUR ARMY
To be a great general, you must know your units. To know your units you must
learn their ways. The next section will take you through every aspect of
controlling your warriors in a battlefield scenario.
The Unit Flag
At the bottom of the screen are the unit flags. These display important
information about the status of each of your units. Use this as a constantly
updated status report to allow you to make the correct decisions for you and
your clan.
36 37
Point of the triangle
represents the new
camera position
Flat side represents
the new view
Generals Standard
Unit Energy – More
counters = More
energy
Projectiles
Remaining –
grey bar = no
projectiles left
Unit Honour
Standard
March Quick March(Run)
Unit Type
Weapons upgrades
Number of
warriors in unit
Armour rating
Page 20

Deselecting Units
Click another unit to deselect the previously selected unit.
Deselect All Units
ENTER deselects all units.
Grouping Units
Selecting Groups of units
If you want to create a temporary group of units, hold down the CTRL button
when you click the unit flags or the units themselves then press G to group
them.
• Alternatively, hold
CTRL, then right-click and drag on the ground to
drag a selection box around units. Finally, press G to group them.
Creating Pre-defined Groups
In the heat of battle, quick selection of pre-defined groups of units may mean
the difference between glorious victory and ignoble defeat.
• To assign units to a group press
CTRL + SHIFT + ‘number’. That group
is now assigned with the number you chose.
Selecting Pre-defined Groups
• To select a pre-defined group, press CTRL + ‘number’. All units within
that group are now selected to do your willing.
Deselecting a unit from a group of units
• Select the individual unit and press G.
Note: This function does not work with pre-defined groups.
Selecting and Moving Units
To move units, you must first select the unit. There are three methods you can
use to select a unit.
•
Click on the unit you wish to select.
•
Click on the Unit flag of the troops you want to command.
Take note that a selected toggle is depressed and highlighted
white.
•
Double-click the unit flag to select a unit and move your
viewpoint behind the unit.
Note: The Standard of any units currently selected pulses.
Once the unit/s are selected,
click on the ground at the point you want them
to move to.
• If you want the selected units to run/charge,
double-click.
•
Hold CTRL and click and drag. A ghost image of how your units will
end up like will appear.
• If the arrow on the move icon is red you are moving your troops to an
area which is out of their line of sight. This may place them in danger.
To Order an Attack
• Click on the enemy units. The unit moves to attack the chosen enemy
Unit.
•
Double-click to order your unit/s to charge.
If your unit is a range unit (archer/arquebusiers), they move into range.
Other units move in to engage the enemy hand-to-hand.
Note: Ordering your units to charge or run increases their fatigue.
To force range units into melee mode (Force Move for other units)
• ALT + click.
Viewing the ‘Ghost’ destination of units
• To see the ‘ghost’ destination of your units, press the SPACEBAR and a
‘ghost’ of the selected units final destination appears.
38 39
Page 21

Drop Down Menu
Halt -The selected unit(s) halt where they are.
Formation - Change the selected unit(s) organisation (See Quick Guide
to Unit Formations section on p.45) to choose between
Close/Loose/Wedge formations.
Hold Position - The selected unit(s) attempt to hold their ground as
long as possible. Their defensive attributes increase though their offensive
attributes suffer as a result.
Melee Mode - Choose three types of melee mode for your selected units
to adopt: Skirmish/Hold Formation/Engage at Will.
Fire At Will - Only active when a unit with projectile weaponry is
selected.
Rally - Your Taisho (or you in the Daimyo’s role) can attempt to rally
routing troops. The honour level of the individual leader determines
success. Once units have been successfully rallied, they can be ordered in
the normal fashion.
Note: The Rally button is only available a limited number of times in a battle,
when not available it is greyed out.
COMMANDING YOUR ARMY
Use any of the control methods or combine them to tailor the interface to your
own preference. In the heat of battle, the ability to issue multiple orders quickly
and accurately will offer the sure-footed general a distinct advantage.
There are three methods of accessing orders:
Icon Menu Bar – Visual method with tooltips. Select unit/s and then
click the icon to give an order.
Drop Down Menu – Select unit then right-click. Click when you have
highlighted the desired order.
Keyboard shortcuts – Press the respective keyboard shortcut to issue
the order.
The Icon Menu Bar
* Note: You must select more than one unit for these options to become
available
• Select a unit or group of units and click on the relevant command toggle.
These are described, in detail, below.
40 41
Halt
Group Loose
Formation
Skirmish
Hold
Position
Wedge
Formation
Hold
Formation
Rout
Close
Formation
Group Formation
Control Panel
Toggle *
Rally Engage
at will
Fire at
will
Page 22

Battle Mode Keyboard Shortcuts
Rally . . . . . . . . . . . . . . . . . . . . . . . . . . . . . . . . . . . . . . . . . . . . . .R
Rout . . . . . . . . . . . . . . . . . . . . . . . . . . . . . . . . . . . . . . . . .CTRL + O
Group / Ungroup . . . . . . . . . . . . . . . . . . . . . . . . . . . . . . . . . . . . .G
Close Formation . . . . . . . . . . . . . . . . . . . . . . . . . . . . . . . . . . . . .C
Loose Formation . . . . . . . . . . . . . . . . . . . . . . . . . . . . . . . . . . . . .L
Wedge Formation . . . . . . . . . . . . . . . . . . . . . . . . . . . . . . . . . . . .W
Melee Mode - Engage at will . . . . . . . . . . . . . . . . . . . . . . . . . . . .E
Melee Mode - Hold Formation . . . . . . . . . . . . . . . . . . . . . . . . . . .F
Melee Mode - Skirmish . . . . . . . . . . . . . . . . . . . . . . . . . . . . . . . .S
Hold Position . . . . . . . . . . . . . . . . . . . . . . . . . . . . . . . . . . . . . . .H
Auto Fire (Fire at will) . . . . . . . . . . . . . . . . . . . . . . . . . . . . . . . .A
Withdraw from battle . . . . . . . . . . . . . . . . . . . . . . . . . .CTRL + W
Halt (Forget all orders) . . . . . . . . . . . . . . . . . . . . . . .BACKSPACE
Select All . . . . . . . . . . . . . . . . . . . . . . . . . . . . . . . . . . . . .CTRL + A
Units Quick March (Run) . . . . . . . . . . . . . . . . . . . . . . . .CTRL +R
Set Facing/Move with Fixed Facing . . . . . . . . . . . . . .ALT + click
Unit/s formation faces in the same direction on arrival at new location.
Rotate unit/s to face a new
direction
. . . . . . . . . . . . . . . . . . . . . . . . . . . .Right-click, hold and drag
Look At (selected unit)
. . . . . . . . . . . . . . . . . . . . . . . . . . . . . .SHIFT + L
Rout - The selected units flee for their lives.
Note: If they run from the battlefield you lose them from this particular
battle.
Select All - All units on the battlefield are selected.
Group - Only active if multiple units are selected. The selected units
work as one, offering new group formation strategies.
Group Formation - Open the Group Formations drop down to order the
selected group of units to adopt a group battle formation. See Quick
Guide to Group Formations section on p.45.
Run - The selected units march more quickly to their destination.
Look At - Camera focuses on and behind the selected unit/s
Withdraw from battle - Your entire army retreat from the Battle Map
• Select unit(s) and then click on the desired command. The selected troops
then attempt to carry out your orders.
• Any Menu option with an > indicates that other options will drop down if
selected.
• Currently selected orders are highlighted with an asterisk (*)
42 43
Page 23

Creating Line Formations
Line formations are most important for your
Missile-firing units (archers, arquebusiers and
musketeers) since only the front ranks can fire.
Stretching them out so they are two ranks deep
ensures that all arms can be brought accurately
to bear upon your enemy.
1. Select a unit (or group of units). Now, click, hold and drag out the
mouse. A ghost of the selected units appears.
2. Move the mouse so you are happy with the unit formation and release the
Left Mouse button.
3. The units move into their new position.
Quick Guide to Unit Formations
CLOSE FORMATION – Shortcut: C. Best for defence or general combat.
Also best for morale to stop your men routing.
LOOSE FORMATION –
Shortcut: L. Best if under attack from range
projectile weapons.
WEDGE FORMATION –
Shortcut: W. Best for breaking through enemy
lines. Increases the damage your men inflict, but at the cost of their
defence.
LINES –
Select, hold and drag. Best used with missile-firing units
(archers and arquebusiers) since only the front ranks can fire.
Hints on using formations
• If your men are attacked from the rear or from the flanks they fight
much less effectively.
• If formations break up or your men are not in ordered ranks then their
morale will be put to the test. In such situations they may well rout.
BATTLE FORMATIONS
To be a master of warfare you must first become conversant with the
techniques by which your army can overrun an opponent in the heat of battle.
Whilst much may be down to the unit type and experience of individual
soldiers, a wise Daimyo, familiar with the battle strategies of Sun Tzu, can
triumph against seemingly overwhelming odds.
Different unit formations have strengths and weaknesses, which a wise man
will soon become patently aware of. Move answered by counter move is sure to
occur when two mighty generals clash, so make sure you know your battlefield
tactics when you take on the enemy!
Changing Preset Formations
In the heat of battle, a good general must be able to direct his troops quickly
and surely. The ability to command multiple units and ensure they are in the
formation best suited to that particular situation is a skill that must be learned
through study and hard lessons at the hand of more experienced generals or
Daimyo.
1. Select the units whose formation you want to change.
2. Click relevant icon on the Icon Menu Bar.
or
Right-click, then highlight FORMATION in the drop-down menu and highlight
and click the Formation type you wish your selected units to adopt.
or
Press the relevant keyboard shortcut (detailed below).
3. The unit(s) move into position.
Note: Clearly, it takes a certain amount of time to move into position. Ensure
you allow enough time for your units to re-form or you may be trounced by the
opposing army.
44 45
Page 24

Melee Mode
Order your selected units to fight the enemy in one of three melee styles.
• To use Melee mode, you must first select one or more units.
SKIRMISH: The selected units break out of formation on hit-and-
run attacks before returning to the safety of the unit
formation.
HOLD FORMATION: The selected units attempt to stay in formation as they
engage the enemy.
ENGAGE AT WILL: The units engage with the enemy without retaining
their formation.
PREPARING FOR BATTLE
Deploying your army - Attacking
The attacker chooses the day of the invasion. This allows you to have some
choice over the weather on the day of the battle. The disadvantage is that you
have to enter battle in a pre-defined formation and position.
• Take note of the Timer in the top right hand corner of the
Battle View. You must vanquish your foe before the white runs
out.
Deploying your army - Defending
If you are defending, you can deploy your units anywhere you wish within the
confines of the area designated by the bamboo poles.
When you define the position of a unit, it is immediately placed in the desired
location.
• When you have finished deploying your units,
click BEGIN BATTLE to let
battle commence.
Quick Guide to Group Formations
When you click the Group Formation icon, the following icons appear along the
top of the screen. If you use the drop down menu, they appear in a new menu.
Note: The keyboard shortcut numbers are in bold.
SINGLE LINE: Good all-purpose formation to deploy your
troops in a single line.
1.
DEFENSIVE: Puts your defensive units to the front ready to
bear the brunt of an enemy attack.
2.
SQUARE FORMATION: Good defensive formation, which protects your
Taisho within the ranks of his warriors. 3.
SKIRMISH LEFT: Puts your missile-firing units (archers and
gunners) to the left, ready to harass the enemy.
4.
SKIRMISH CENTRE: Puts your missile-firing units (archers and
gunners) to the centre, ready to harass the
enemy.
5.
SKIRMISH RIGHT: Puts your missile-firing units (archers and
gunners) to the right, ready to harass the
enemy.
6.
LEFT HAND OFFENSIVE: The formation is structured to support attack
to the left.
7.
CENTRE OFFENSIVE: The formation is balanced on either side ready
to attack. 8.
RIGHT HAND OFFENSIVE: The formation is structured to support attack
to the right.
9.
Note: You must have two or more units selected to employ any sort of Group
Formation.
46 47
Page 25

Using Fixed Facing
Fixed facing allows you to ensure that your units face in the correct direction
upon arrival at their new location.
• To order the units to move without changing the direction the front ranks
are facing, hold
ALT and click.
• To change the direction the unit/s face, hold ALT + right-click. The
units do not proceed to the point but turn to look at it.
Changing game speed
Sometimes, you may want to speed up the flow of the game.
•
Click and drag the speed slider beneath the radar to adjust the game
speed.
•
CTRL + T to jump from 0% (normal speed) to 100%
(Fastest game speed).
• Move the slider left to slow the game down to the
basic speed (0%), and right to speed it up (100%).
• To pause the game, press the Pause or P button.
Note: In single player games you can issue orders to your men while the game
is paused.
Stats and Display
You might want to remove certain information from the game screen:
Toggle unit stats display
ON/OFF . . . . . . . . . . . . . . . . . . . . . . . . . . . . . . . . F1
Toggle mini-map overlay (radar) ON/OFF . . . . . . . . . . . . . . . . . . . . . . . . . . F5
Toggle between Icon Menu Bar/Group formation control panels . . CTRL + P
Toggles the Icon Menu Bar/Group formation control panel ON/OFF . . . . . F6
Note:
You must have two or more units selected for this to work
Toggle the unit flags
ON/OFF . . . . . . . . . . . . . . . . . . . . . . . . . . . . . . . . . . . F7
Engaging with the Enemy
1. First, select one or more units.
Now, move the cursor over the unit you wish to attack.
The cursor icon changes.
• A sword icon indicates that your units will attack hand-to-hand.
Displayed for melee (hand-to-hand) troops –
Click to attack,
double click to charge.
• A Bow icon cursor indicates that your units will use projectile
weaponry. This icon is displayed for both archers and gunners –
Click to fire.
Note: Missile-firing units do not have unlimited ammunition and can run out.
Take note of their ammunition levels and attempt to conserve supplies. If you
wish to alter reality settings see Game Options on pp.71-72.
Force missile-firing units to fight hand-to-hand
There are situations where you may want to force your missile-firing units to
fight hand-to-hand. For example, if you want to wipe out the last few survivors
of an enemy unit.
• Press
ALT + click to force missile-firing units to fight hand-to-hand.
Advanced Control Techniques
Using Waypoints
Use waypoints to give your units specific instructions about a route that you
want them to follow.
Setting a waypoint - SHIFT + click
• Remember, hit the SPACEBAR to show the ‘ghosts’ for your units next
destination.
• To show the current waypoints for selected units, hold
SHIFT.
48 49
Page 26

When you choose to attack in Battle Mode you can, to a limited extent, choose
what sort of conditions you will attack under when your advisor informs you of
the weather conditions. However, there comes a point when the enemy is upon
you and the battle must commence.
Additionally, the length of a battle is decided by the season since victory must
be decided before nightfall. This offers an advantage to defending armies if a
battle takes place in winter. Conversely, a summer battle gives an attacker a
longer amount of time to grind down his adversary.
Conditions required for Victory
There are a range of victory conditions.
General battles - Your objective is to kill or rout the enemy from the
battlefield.
Castle battles/Sieges - Your objective is to fight your way into the castle
and take the keep by killing or routing the enemy.
Note: In winter, the days are shorter and the aggressor only has a limited
amount of time to win the battle. If the aggressor does not defeat the enemy
quickly then they must withdraw.
HISTORICAL BATTLES
Take the place of one of the four most important Daimyos in Japanese history
in a selection of pre-set battles. Spanning thirty of the most turbulent years of
the country’s history, you can command the armies of the four great ‘Daimyos –
Oda Nobunaga, Takeda Shingen, Tokugawa Ieyasu or Toyotomi Hideyoshi.
The battles are as follows:
DAIMYO BATTLES
Nobunaga Anegwa, Nagashima
Takeda Shingen 4th Kawankajima
Tokugawa Nagakute, Mikata Ga Hara
Hideyoshi Yamazaki
Using the Terrain
You will soon become aware of the advantages that are to be gained if you use
the terrain to good effect. If you neglect to use the terrain you can be assured
that your opponent will.
Hills
Fighting from higher ground gives your troops a significant advantage in
combat; they can see more of the action and can react and fight more strongly
than their opponents who have to advance uphill.
“Fight going down hill, not climbing up.”
—
Sun Tzu, The Art of War
• The range and accuracy of missile-firing units is improved.
• Units get tired more quickly moving uphill.
• Units fighting downhill gain a combat bonus.
• The range of their line of sight is improved.
Forests
Using the natural cover is something that generals would be wise to do,
especially when threatened by projectile fire or cavalry charges. Trees enable
your units to hide from the enemy and the vegetation overhead provides cover
from projectile attack. The movement of cavalry is severely restricted by forests
and this makes them vulnerable to infantry units.
Other Factors:
• Cliffs are impassable to all units so offer a definite strategic advantage
should your units be positioned upon them.
• It should be noted that bridges over rivers are very easily defended.
Weather and Seasonal Conditions
As discussed earlier in the Full Campaign section of the manual, a wise Daimyo
will be aware of the drawbacks of waging war in differing seasons and weather
conditions. Your units are, after all, human, and are therefore subject to the
same laws of nature that affects all living creatures!
50 51
Page 27

CUSTOM BATTLE
Choose one of 7 Daimyo and engage in a fully-customisable epic single battle in
glorious real time.
Creating a Custom Battle Game
1. Click NEW GAME. The NEW GAME MENU appears.
2. Then, click CUSTOM BATTLE. The CUSTOMISE BATTLE MENU appears.
3. Once you have entered all the
variables, click ACCEPT to proceed.
4. The CUSTOM GAME menu appears. Click on the location’s name for a
view of the province. Once you have selected a location, time limit,
season and difficulty level, click CONTINUE to proceed.
5. Now choose your armies and their honour level. Once you have chosen,
click READY. Right-click to remove an army.
6. The Battle begins.
• For details on all of the historical battles, please refer to the historical
battle descriptions in the HISTORICAL BATTLE selection menu.
Starting a Historical Battles Game
1. Highlight and click NEW GAME. The NEW GAME Menu appears.
2. Highlight and click HISTORICAL BATTLES and the Historical Battle
selection menu appears.
3. Now, click one of the listed battles to see a short description and the
conditions required for victory.
4. Once you have chosen the battle you wish to recreate, highlight and select
FIGHT BATTLE.
5. The battle begins.
52 53
Click and Enter
your name
Click and enter the amount of KOKU (currency) you
and the CPU player have to recruit and train warriors
Choose whether
you will attack or
defend
Click to choose
your favoured
clan Mon
Click here and the
CPU generates units
for that opponent
Click the boxes
to add additional
CPU players
Click to choose
whether CPU
players attack or
defend
Click to use the
previous Custom Battle
setup
Click to proceed
Click to return
to the Main menu
Page 28

Yari Ashigaru
Requires: Spear Dojo
The standard Ashigaru is equipped with light armour and a Yari - a long spear.
They are conscripted peasants and, as such, are poorly trained. The wall of
spears which they can present to the enemy make them singularly effective
against enemy cavalry, as long as they can hold formation. When their fear of
the enemy exceeds their fear of their masters, they often waver.
Yari Samurai
Requires: Spear Dojo
The Yari is a long spear, making these troops very effective defending against
mounted opponents. So long as the unit remains well ordered, they are good
against most troop types.
Cavalry Archers
Requires: Horse Dojo and Archery Dojo
A mounted Samurai with sword and bow. They are fast, flexible, and pack a
nasty sting from medium range. They are best employed in harrying poorly
defended troops at close quarters and standing off and peppering slower units
with bow fire.
Warrior Monks
Requires: Buddhist Temple
These Buddhist fanatics carry a portable shrine as their unit standard, which
makes enemy Buddhist troops most reluctant to engage them. Christian troops
do not suffer this same reluctance.
UNIT TYPES
Here is a full list of unit types and the facilities needed to produce them.
Note: Training options do not appear until you have fulfilled the building
requirements.
Soldiers (Units)
The building blocks of your armies; essential in your campaign to become
Shogun. You should be wary though for, once trained, there is a fixed cost to
maintain them. This cost may become a drain on your resources, if you do not
manage your finances carefully.
Honour
When units are trained they generally begin with an honour level of 0. However,
if they are trained in certain provinces, renowned for the skills of their
inhabitants or with certain building upgrades, they may gain an honour bonus.
This can give a Daimyo a great advantage against his enemy on the battlefield
and should not be underestimated.
• Honour of your units grows with battle experience. The very sight of a
battle-hardened army in full armour will strike fear into the heart of
young, inexperienced samurai recruits.
Armour
In addition, with an Armoury or Swordsmith your smiths can produce better
armour and weapons. See the Technology Tree for further details.
Note: All units gain experience in battle and as their honour level increases
they can become far more effective.
Samurai Archers
Requires:
Archery Dojo
These are the standard Samurai foot soldiers. Their main weapon is the bow
but, should it be necessary, they can fight, hand-to-hand with their katana. With
experience, they can become fearless, ruthlessly efficient cornerstones of your
forces.
54 55
Page 29

Yari Cavalry
Requires: Spear Dojo and Horse Dojo
These mounted samurai, armed with spears, are not as heavily armoured as
heavy cavalry is, but they make up for this with additional speed. They are
very useful as a strike force against enemy units who are poor in hand-to-hand
combat or for chasing down retreating enemies.
Strategic Units
Taisho
Requires:
Nothing
A Taisho (or general) is required to lead a group of units into battle. As he gains
in rank and experience he adds to the combat ability and morale of all his
troops. Normal Taisho can be leaders of any unit type. They can be identified in
battle by their special standards.
Note: If you take your Daimyo onto the battlefield, he appears on the
battlefield with a small group of Heavy Cavalry bodyguards.
Emissary
Requires:
Tranquil Garden
These are Samurai trained in all the traditional arts and used as diplomats. They
are sent to enemy Daimyo on missions to propose treaties and to gather
information on enemy armies and defences. All Emissaries gain experience each
time their mission succeeds. Experience is their only defence against Ninja
Attack.
Shinobi
Requires:
Tea House
Shinobi are spies. In an enemy province they can provide information about
enemy armies and defences, while also encouraging discontent among the
peasants, which can lead to revolt. In your own province they can act as
counterspies, seeking out enemy spies. In addition, they can also increase the
loyalty of your own peasants.
Arquebusiers
Requires:
Trading Post
Conscripted foot soldiers equipped with simple arquebuses (muskets). They are
effective at longer range than archers are and only the heaviest armour has a
chance of stopping their shot at short range. However, they are very poor in
hand-to-hand combat.
Note: The arquebusiers will only fire their weapons in very light rain at a
reduced rate and accuracy. Heavier rain will render their weapons useless
Naginata
Requires:
Spear Dojo and Armoury
Samurai foot soldiers equipped with heavy armour and Naginata - short pole
arms. They are very strong defensively but a little slow.
Heavy Cavalry
Requires:
Famous Horse Dojo and Armoury
Mounted Samurai equipped with heavy armour and swords. These human and
equine war machines are the feared elite of the Samurai army and are highly
effective as defensive units and utterly deadly when used offensively. Only
long spears and guns are effective against them.
No-Dachi Samurai
Requires:
Sword Dojo
The No-Dachi is a huge two-handed sword, and, accordingly, the stout
troops that wield them are most deadly. They don’t defend well, but are great
for breaking enemy formations and routing troops who are wavering.
Musketeers
Requires
: Port and Trading Post (Dutch) or Port, Trading Post and Gun
Factory (Portuguese)
These are improved Ashigaru who benefit from contact with the European
traders. With a longer range and a higher rate of fire, they can be employed in
the front lines of an army formation. Like the Arquebusiers they can only fire
their weapons in very light rain at a reduced rate and accuracy. Heavier rain
will render their weapons useless.
56 57
Page 30

BUILDINGS
Castles
There are four levels of
castles in Shogun - Total
War, but they all
perform the same
function.
They are garrisons for you and your armies. In addition, they are the visible
signs of a Daimyo’s power, honour and control of his provinces. Without a
castle to act as an administrative centre, no other military structure can be built
in a province. You must build each grade of castle before you can construct the
next one !
Castle
The lowest grade of fortification. You can garrison 4 units
within this building and it allows the construction of basic
training dojo and other low level structures.
Large Castle
An impressive intermediate structure. It only becomes
available in your Building Production pop-up if you have
already constructed a castle. Once built, your technological
advancement can continue apace and the opportunity for
garrisoning enough units and supplies increases to an extent
that you can hold out for longer in a siege.
Fortress
A Fortress is a good indication to all who covet your provinces
that they will not have an easy time of it, should they decide
to try and wrest it from your grasp. Once built, training dojo
of famous and legendary proportions will ensure that units
trained here brook little resistance in their struggle to unite
Japan under your leadership.
Jesuit Priest
Requires:
Jesuit Church
These Jesuit-trained priests are excellent emissaries when dealing with Christian
Daimyo. While sending a Priest is no guarantee that a proposed treaty will be
accepted, at least you won’t get his head sent back in a bag. Unless, of course,
the enemy Daiymo is Buddhist! Jesuit Priests also help to spread the influence of
Christianity to any provinces that they visit.
Ninja
Requires:
Ninja House
The Ninja is trained from birth for spying and assassination. Enemy Daimyo,
Taisho, Unit Leaders and Emissaries are all possible targets. The more senior the
target, the lower the chance of success. A Ninja’s experience and effectiveness
increases each time he makes a kill.
The Legendary Geisha
Requires:
Geisha House
The Legendary Geisha is a master assassin. The enemy Daimyo knows well
enough what a Geisha is capable of, but protocol prevents him from acting
against her openly. Commissioning a very experienced Ninja is an accepted
method of ridding the Daimyo of this beautiful hindrance.
58 59
Page 31

Archery Dojo
Requires: Castle
Samurai originally
defined themselves by
their skills at archery,
especially archery from
horseback. The
magnificent asymmetrical longbows of the samurai needed highly skilled
craftsmen to construct them so it was in the interests of every Daimyo to
ensure that such craftsmanship was encouraged in his domain. As such, the
Archery Dojo is one of the basic and fundamental military improvements that
can be constructed at any castle.
• An Archery Dojo allows the castle where it is located to produce Samurai
Archers and it can be upgraded to Famous or Legendary status when
larger castles are built, facilitating general unit improvements.
Armoury
Requires: Castle and
province with iron sand
deposits
Samurai nearly always
provided their own
armour and weaponry.
The same, however, was not true of the ashigaru who were drawn from the
lower, poorer classes. The importance of providing standardised equipment to
their soldiers was realised by the more astute Daimyo during the Sengoku
period. Apart from the obvious benefits of ensuring that their troops were
properly equipped, there was an additional benefit in terms of creating an esprit
de corps among the troops.
• In Shogun - Total War, an Armoury improves the armour values of any
units trained at the castle where it is located. An Armoury can also be
improved to Famous or Legendary status in larger castles with
subsequent armour benefits for units.
Citadel
A Citadel represents the pinnacle of a clan’s rise,
demonstrating to all those whose eyes fall upon its massive
ramparts, that the clan who built it should not be trifled with.
Once built, sensei of legendary status can be acquired by construction of final
dojo upgrades. Units trained and equipped by such masters will undoubtedly
present a fearsome sight to any army unlucky enough to encounter them.
Other Buildings
Spear Dojo
Requires: Castle
A dojo is a place of
training where a sensei
— a master in a
particular skill, craft or
art — can impart his
knowledge to students in the proper atmosphere of calm and learning. This is
as true for the martial arts as for any peaceful pursuit. The best of the sensei
were always encouraged to settle by Daimyo and begin their teachings, not only
for the practical benefits of spreading their skills, but also for the reflected glory
and honour that a true sensei could give to his patron.
• Both Ashigaru and Yari Samurai units can be trained at the Spear Dojo. It
can be upgraded to Famous and Legendary status at larger castles.
• Once it has been upgraded to Famous Spear Dojo status it can also be
used to train Naginata Samurai, providing there is an Armoury at the
castle too.
60 61
Page 32

It allows the transportation of all units, by sea, to any other provinces with a
Port ruled by your clan. In addition, the construction of a Port gives a trade
revenue bonus.
Note: Without a Port, you will not encounter Europeans and acquire their
modern technologies.
Tea House
Requires:
Castle
“Pen and sword in
accord” is a
simplification of the
Samurai way, but it is
an accurate one.
Samurai were not only expected to be skilled warriors, but highly cultured men
able to produce a haiku verse or officiate at the tea ceremony. A Tea House is a
focal point for travellers and, as such, is the ideal venue to facilitate the training
of Shinobi, the secret agent of the Sengoku Jidai period.
• Once constructed, Shinobi may be trained here. He can then be employed
in spying and counter spying activities. A Tea House can be upgraded to
Famous and Legendary status at larger castles
Sword Dojo
Requires:
Large Castle
and a Legendary
Swordsman (see Note
overleaf)
The sword is the
weapon most closely
associated with the samurai, and mastering its proper use takes time and
endless practice. Many schools of swordsmanship existed in Japan, and
adherents of particular styles were not above duelling against one another to
prove who was the best.
• Once constructed, you may train No Dachi units. As with other buildings,
you may upgrade a Sword Dojo.
Tranquil Garden
Requires:
Castle
Most temples and large,
formal houses in Japan
included space for a
garden as a place for
rest and reflection.
Gardens are also, of course, the perfect place to have a private conversation
with agents, spies and emissaries away from the ears of guards and servants —
not something that was very easy in a Japanese building with thin bamboo and
paper screens!
• A Tranquil Garden can be built in any castle and allows the training of
emissaries. It is also a pre-requisite before building any kind of Temple or
Church.
Ninja House
Requires:
Castle
The secretive Ninja
require their own dojo
(of sorts) to learn their
secret arts of invisibility,
assassination and
spying. Their weapons and skills are so specialised that only a master Ninja can
hope to teach his followers.
• Once a Ninja House is constructed, Ninja may be trained.
Tip: Use Ninja to eradicate emissaries and gain extra Ninja experience for
successful assassinations.
Port
Requires: Castle and a
coastal province
A Port can be built in
any coastal province
that contains a castle.
62 63
Page 33

• The construction of a Swordsmith ensures that units trained in that castle
training facility will gain an attack advantage in battle. A Swordsmith can
be upgraded to Famous and Legendary status at larger castles
Portuguese & Dutch
Trading Posts
Requires:
Large Castle
and Port; also time
dependant
The arrival of
Portuguese traders
brought the arquebus into Japanese warfare. These weapons were acquired
through trade with the ‘shifty foreign devils’ and were then copied by Japanese
craftsmen. By the time the Dutch arrived in Japan, the Portuguese and the Jesuits
had been there for some time. The Dutch were the same in their willingness to
provide arquebuses to any Daimyo who was willing to trade for them!
Note: A Daimyo can have either Portuguese traders or Dutchmen in his
domain, but not both.
Buddhist Temple
Requires:
Tranquil Garden
Although religion often
leads to a contemplative
life of meditation, there
have always been
religious orders that have valued military prowess as much as prayer. In Japan,
several orders of Buddhist warrior monks were the equal of any other warriors
at the time, and showed no reluctance to becoming involved in politics – and
war - beyond the Temple walls.
• Warrior Monks can be trained once a Temple has been built. A Temple
can be upgraded giving honour bonuses to units trained therein.
Tip: A Temple helps to support the doctrines of Buddhism among the people of
nearby provinces and can “roll back” the presence of Christianity.
Note: A Sword Dojo can only be built when a samurai in the Daimyo’s army
has become a legendary swordsman by killing many opponents in battle. You
are notified when one of your units achieves this status.
“To master the virtue of the long sword is to govern the
world and oneself, thus the long sword is the basis of
strategy. If he attains the virtue of the long sword, one man
can beat ten men. In my strategy, one man is the same as ten
thousand, so this strategy is the complete warrior’s craft.”
— Miyamoto Musashi, The Book of Five Rings, The
Ground Book
Horse Dojo
Requires: Large Castle
and Archery Dojo/Spear
Dojo to train units
A battle is a frightening
and confusing
experience for a man,
let alone an animal.
Training a horse so that
it was willing to charge the enemy took time and skill. A Horse Dojo provides
just such a location, where horses can be trained expressly for conveying a
proud Samurai horseman into battle.
• A Horse Dojo can produce Cavalry Archers (with an Archery Dojo) and
Yari Cavalry (with a Spear Dojo). With an Armoury, a Famous Horse Dojo
can also train Heavy Cavalry.
Swordsmith
Requires: Large Castle
The importance of highclass weaponry to the
Samurai is renowned
even today. Skilled
swordsmith were the
princes of craftsmanship and any Daimyo worth his salt would lay great store
in having craftsmen and the necessary materials to provide katanas of
unsurpassable quality.
64 65
Page 34

Gun Factory
Requires: Citadel, Port,
Portuguese or Dutch
Trading Post and
Armoury
Once knowledge of
arquebuses was
generally available, the Daimyo wasted little time in setting up their own
craftsmen to make them. Within a remarkably short space of time Japanese
armourers had mastered all the skills they needed and were producing
arquebuses that were as good as anything from abroad. Once built, the cost of
training gunmen is reduced.
• A Gun Factory can only be created at the largest of castles.
Geisha House
Requires: Citadel,
Infamous Ninja House
and Legendary Tea
House
When all the trappings
of Japanese culture have
been built, a Daimyo can add the final flourish: a Geisha House. These can only
be built at the very largest castles, and help train Geishas for use as spies and,
more importantly, super assassins.
• Geisha can only be killed by another Geisha or a highly experienced Ninja.
Church
Requires:
Large Castle
and acceptance of
alliance with Portuguese
The Portuguese not only
brought advanced
military technology in
the shape of guns, they also imported a religion as well: Roman Catholicism.
The Jesuits who came to Japan spread a very militant variety of Christianity,
and within a few years of their arrival, the Jesuits had converted substantial
sections of the local population.
Once built, Churches help to spread the doctrine of Christianity to the local
population, increasing the number of Christians in nearby provinces and, in the
long term, reducing the chance of a religious revolt.
• A church allows the training of Priests. Once you have six Churches, you
may then construct a Cathedral, which holds even greater sway in
speeding the spread of Christianity. Note, however, that a Citadel is also
required in the province.
Tip: A Christian Daimyo with a Cathedral collects tithes from all of Christian
Japan. This makes Christianity a very lucrative business!
Palace
Requires:
Large Castle
A Palace of any size is
the outward sign of a
healthy and wealthy
Daimyo. His subjects
and soldiers can feel
proud to be a part of a strong and civilised clan.
• A Palace imparts a morale bonus to all units. Palaces can be upgraded to
Golden and Legendary status.
66 67
Page 35

IN GAME MENU
Save your game, make changes to your OPTIONS, EXIT to the Main menu or
QUIT Shogun – Total War.
• To access the In Game menu, press ESC.
RESUME GAME – Highlight and
click to return to your game.
LOAD GAME – Highlight and
click to open the Load Game menu and load
a previously saved game (See Saving and Loading section on p. 72).
SAVE GAME – Highlight and
click to open the Save Game menu (See
Saving and Loading section on p. 72).
OPTIONS – Highlight and click to access the Options menu (See below).
EXIT GAME – Highlight and
click to finish game and return to the Main
menu.
QUIT – Highlight and
click to quit to Windows.
OPTIONS
Select OPTIONS from the Main menu to optimise or adjust Audio, Video and
Control setups.
VIDEO – Configure video settings and screen resolution.
AUDIO – Configure Audio settings.
PERFORMANCE - Configure Graphic detail settings and unit limits to
optimise performance on your PC.
CONTROLS – Customise keyboard and mouse controls.
GAME – Customise Interface settings, control menu, realism settings.
Accessing In-Game options:
• Press ESC.
Buildings and Upgrades not dependent upon Castles
Improved Farmland
Improved farmland
increases agricultural
output of the region by
20% each harvest. This
translates directly into
more koku at the end of
the year.
Watchtowers &
Border Forts
There are two
“non-economic”
improvements that a
Daimyo can make in
Shogun - Total War that
do not require the construction of a castle. Firstly, he can build a Watchtower in
any province that he controls. This doesn’t help defend the province, but it does
act as a permanent spy in all the adjacent provinces.
Once you have built Watchtowers in a province you may build a Border Fort,
which acts as a permanent counterspy in the province where it is built. This
stops enemy spies from obtaining any information about the province.
Watchtowers and Border Forts also help improve the loyalty of the local peasants.
Mines and Mine
Complexes
You can build Mines in
provinces with mineral
wealth. There’s nothing
quite as useful as finding
gold or other mineral
riches in your domain! This was what allowed the Takeda clan to be so mild in
their taxes and yet build up a substantial cavalry army.
• Once a mine is constructed, you will gain additional koku income each year.
68 69
Page 36

Performance Options
Adjust the Battle mode graphics options here. Default options are listed in bold.
SMOKE –
Click to turn smoke ON/OFF.
AMBIENT FAUNA – Click to turn decorative bird life ON/OFF
DEFAULT UNIT SIZE – Move slider to adjust the default Unit size
(
60/80/100/120).
Note: Only increase unit size if you have a recommended specification PC (See
the enclosed reference card).
Control Options
MOUSELOOK ON/OFF– Activate mouselook (only available in 3D
accelerated mode).
MOUSEMOVE –
Click to turn Mousemove ON/OFF.
CAMERA ROTATE SPEED –
Click and drag the slider to adjust the speed
that the camera rotates.
CAMERA MOVE SPEED – Click and drag the slider to adjust the speed
that the camera moves.
ASSIGN KEYS – Customise your key presses for
Shogun – Total War.
Game Options
Interface Settings:
ICON BAR – Click to turn the Battle Mode Icon Bar ON/OFF.
RADAR –
Click to turn the Battle Mode Radar ON/OFF.
WIDESCREEN/FULLSCREEN – Click to choose your favoured view.
Video Options
PRIMARY DISPLAY DRIVER/ANY OTHER DETECTED 3D
ACCELERATOR/SOFTWARE MODE - Choose your primary display driver. If
you do not have a 3D accelerator card, select Software mode.
USE 8 BIT TEXTURES – Select 8 bit textures only if your card supports this
feature.
STRATEGY MAP RESOLUTION – Move the slider to alter the resolution of
the Strategy Map.
BATTLEMAP RESOLUTION – Move the slider to alter the resolution of the
Battle Map.
GAMMA CORRECTION – Increase gamma correction to improve brightness.
TEST DISPLAY MODE – View the
Shogun – Total War™ Samurai logo to
preview any display mode changes you may make.
Note: To run the Battle map at higher resolutions requires considerable CPU and
video card capability. Slower CPUs will suffer performance loss if you set the
resolution too high.
Audio Options
SUBTITLES - Click to turn subtitles ON/OFF.
MUTE –
Click to turn sound ON/OFF.
MUSIC VOLUME –
Click and drag to adjust the volume of background music.
SFX VOLUME –
Click and drag to adjust the volume of Sound effects.
SOUND QUALITY – Reducing the sound quality will use less RAM and
may allow the game to run more quickly.
SPEECH – Click to choose between ENGLISH speech or JAPANESE speech.
70 71
Page 37

Strategy Map Quicksave and Quickload
• To quicksave a game, press CTRL + S whilst in-game (Strategy Map only).
• To ‘quickload’ the last quicksaved game, press CTRL + L at anytime
during the game or open the Load Game menu.
MULTIPLAYER
Multiplayer is available via LAN and Internet.
THE MULTIPLAYER MAIN MENU
Connect to EA Play, chat with other Shogun - Total War™ players and play
multiplayer games over the Internet or on a Local Area Network.
PLAY ON EA PLAY – Register a player name at www.TOTALWAR.COM and
then chat, create a game or search for a game created by other players.
LAN GAME – Set up a multiplayer game on a Local Area Network or
serially connected computers or connect to a game created by someone
else.
SHOGUN WEBSITE – Connect to the Internet and get all the latest news on
Shogun – Total War including tips, hints and competitions as well as a
world-wide roll of honour.
SHOGUN NEWS SERVER – Connect to
Shogun - Total War’s online news
server for up-to-date news bulletins.
CONNECT TO THE INTERNET – Connect to the Internet via dialup
adapters.
Realism Settings:
MORALE – Click to turn unit morale ON/OFF.
FATIGUE –When OFF, units do not get tired in battle.
LIMITED AMMO – When OFF, missile-firing units have unlimited
ammunition.
RESTRICT CAMERA – When
ON, you can only view the terrain that your
units can see.
SAVING AND LOADING
Load Game
Select this option to load a previously saved game.
1. In the Main menu, click the LOAD GAME option.
• In the Strategy Map screen, press ESC and select LOAD GAME from the In
Game Menu.
2. The Load Game menu appears. Click on the name of the game that you
wish to load from the lists available to highlight it, then click LOAD.
3. The game loads.
Save Game
Select this option from the In Game menu to save the game currently in
progress.
1. Press ESC to go to the In Game menu. Then highlight and click SAVE
GAME.
2. Click on the dialogue box, then enter a name for your saved game.
Now, highlight and click SAVE. The game is saved.
• To return to the In Game menu,
click the folded corner of the
parchment.
Note: In addition, the game also automatically saves to the ‘autosave’ slot once
each game year.
72 73
Page 38

• To create your own Chat Room, click CREATE CHAT ROOM and see
Creating a Chat Room section on p.77 for more details.
• To view and join any Internet Games in this room,
click INTERNET
GAMES.
• To Leave to the current Chat Room and enter its parent room, select
LEAVE CHAT ROOM.
The Chat Window
The Chat window is your contact with other Shogun players. You can find
individuals, send private messages and, above all, make buddies! It appears in
many of the Multiplayer setup screens and enables you to discuss and plan with
other players in remote locations.
Select a player
Click
on a player name and then type the message in the Text Entry box. This
makes him or her the target of a private comment.
Sending a message
Click
and type at the cursor in the Text Entry Box. Press Enter to send the
message to the selected person(s).
75
PLAY ON EA PLAY
Logon Information
Enter your Shogun Total War Online Details
• When all the variables above are complete, click CONTINUE.
LOGGED ON TO EA PLAY
Select either:
CHAT ROOMS - Go to the Chat room selection screen.
INTERNET GAMES – To find a game on the Internet.
LOG OFF EA PLAY – To exit to the Main menu.
CHAT ROOM SELECTION SCREEN
This is where you’ll start your foray into the Online world of Shogun – Total
War. Choose a Chat Room from one of the Official EA Chat Rooms, where you
can match yourself up against players of a similar standard. Alternatively,
choose Chat Rooms created by other Shogun Players.
• To Connect to a Chat Room,
click it so it is highlighted, then click JOIN
CHAT ROOM.
74
Click and Enter
your CD Serial
Code (See back
of CD jewel case)
Click to choose
a Family name
Click and enter
an Online Name
(This will be used
as a forename)
Click and enter
a password
Click ALL to send
a message to
everyone in the
chat room or
click an
individual to send
a private message
Individuals currently in chat room
Name of chat room
Text Entry Box – The Prompt tells
you who the message will go to
Text Window
Scroll Bar –
click
and drag to view
previous dialogue
Page 39

77
CREATING A CHAT ROOM
Creating a chat room is something you may want to do if you want to play
with a select group of players. You can elect to make the room private
(requiring the entry of a password) or public.
Note: If you make your chat room private, you must let other players know
what the password is or they won’t be able to connect.
ROLL OF HONOUR
The Roll of Honour ranks players according to the number of battles they have
fought. Results are weighted according to who you defeated and their respective
position in the roster. You can also view your own battle statistics.
• The Roll of Honour is located at
www.totalwar.com
Add a Buddy
Simply type ‘#Buddy’ followed by the players full online name but not the
family name.
Note: Once a player is labelled a buddy, you are informed when they connect
and disconnect from the server.
Remove a buddy
Type ‘#Unbuddy’ followed by the players full name to remove the player from
your buddy list.
Ignore a player
Type ‘#Ignore’ followed by the players full name, if you don’t want to read the
player’s chat output.
Unignore a player
Type ‘#UnIgnore’ followed by the players full name to stop ignoring that player.
AFK
Type ‘#AFK’ to notify players that you are away from your keyboard.
Blackmarking players
Type ‘#Blackmark’ followed by the players full name if you want to censure
another player. You cannot blackmark multiple players and you may only issue
a blackmark once every fifteen minutes.
Paging a player
If you want to contact another player and you are not sure which chat room
they are in, type ‘#Page’ followed by the players name. If the player is on
EA.Play they will be notified of your page.
Locating a player
If you want to locate another player, type ‘#Locate’ followed by the players
name.
76
Click and enter
the name of
your chat room
Enter the
maximum
number of
Shogun players
allowed in the
room (2-100)
Click and enter
password
Page 40

HOSTING A MULTIPLAYER GAME
1. Once you have entered all the variables, click CONTINUE.
2. The Multiplayer Lobby Screen appears.
Note: Other players enter the Multiplayer Lobby screen when they click JOIN
GAME in the Internet Games/LAN Games screen.
79
INTERNET GAMES - SINGLE BATTLE SETUP
You can choose to host a game or join a game that is being set up by another
player in the chat room or return to the chat room selection screen.
•
Click CHAT ROOMS to return to chat room selection screen.
• Highlight a game then
click JOIN GAME to continue. See The Multiplayer
Lobby Screen section on p.80.
•
Click HOST GAME if you want to create a new game (See below).
78
Click on a
game to
highlight it,
then click JOIN
GAME
Click to Join
the highlighted
game
Click to Host Game (See Hosting a
Multiplayer Game section on p.79)
Chat if desired
Click and drag to
scroll through
other maps
Click to
choose a Map
Click to include results of the battle in a
league table (competitive/friendly) (Internet
game only)
Click to proceed to the
Game Lobby
Click and enter the
server name here
(not on screenshot)
(LAN game only)
Click and enter a
password here
(optional)
Click and enter
the number of
units of koku each
player will have
Click arrows to adjust
the time limit (5-60
minutes/No Limit)
Click and enter maximum
number of players
Click to choose
a season type
Click to exit
Page 41

MULTIPLAYER ARMY SELECTION
Choose your troops up to the amount of koku you have allocated.
• The game monitors for when all players are ready. When ready, you
proceed to the Lobby ‘Waiting to Go’ screen.
• If a player quits out at this point everyone is returned to the Multiplayer
Lobby Screen. If the Host quits out you return to the Internet Game/LAN
games screen.
Tip: If you are playing on the same team, it may be wise to discuss your troop
choices so that your armies compliment each other.
Multiplayer Waiting to Go Screen
In this screen you can chat with players or decide to exit. Once all players are
ready the battle begins automatically.
• See
Battle Mode section on p.33 for details on how to command your
army and rout the enemy.
• Once the battle is complete, you can chat in the Battle Results chat screen
before returning to the Internet Games/LAN Games screen where the
game was launched.
Note: The game speed must be adjusted by all the players for it to affect the
game.
81
THE MULTIPLAYER LOBBY SCREEN
The Multiplayer Lobby screen appears when you join a game or when you have
setup a game.
• When you join you are automatically allocated to the side with less
players.
• You may
click on ATTACK or DEFEND to change sides.
To Begin
• Once the Host is happy with the setup he/she should press ACCEPT.
• Everyone else selects Ready after the Host has clicked ACCEPT.
80
The amount of
koku you can
spend on troops
and honour
Your name automatically appears here
(you can change this in the LAN game)
Click to return to Internet
Games/LAN Games
Click, ATTACK or
DEFEND to change
sides
Click to accept
settings (Only the
Host can click
ACCEPT)
Click on an
individual name
or ALL to chat
Click a symbol to choose your colour
and standard (Mon)
Chat if desired
Click when your army is selected
Click on units up
to the value of the
koku allocation
Click to change
your Army Standard
(Mon)
Highlight a
selected unit and
increase their
honour (This
costs koku)
Chat as desired
Page 42

GLOSSARY OF TERMINOLOGY
Arquebus Matchlock gun, also called “teppo” in Japan.
Introduced in 1543 by the Portuguese.
Ashigaru Literally, ‘light feet’. Peasant troops recruited into a
Daimyo’s service. Often fought with little or no
armour, footwear or weaponry until they could be
looted from the enemy.
Bushido ‘The Way of the Warrior’.
Daimyo A powerful feudal land owner. Many Daimyo
dreamed of uniting Japan under their own swords.
Do Body armour. Usually consisting of four plates.
Dojo A place for teaching martial arts.
Geisha ‘Art person’. A class of professional women trained
from adolescence in conversation, dancing and
singing for the entertainment of men. Sometimes
geishas were also Ninja and, therefore, would be
involved in sabotage and assassinations.
Hara-kiri Suicide by cutting into the stomach.
Hatamoto A Daimyo’s personal bodyguard.
Ikki Armed peasant league.
Ikko-ikki ‘Single-minded League’ – 15
th century militant
religious group. The term also came to mean rioting
mobs. These mobs usually acquired a degree of
political power through their military activities.
Junshi The act of suicide committed by a loyal retainer or
servant following the death of their lord.
Kanashi The act of suicide committed in protest.
83
LAN GAMES
You can choose to host a game or join a game that is being set up by another
player.
• Highlight a game then
click JOIN GAME to continue. See The Multiplayer
Lobby Screen section on p.80.
•
Click HOST GAME if you want to create a new game
(See Hosting A Multiplayer Game p.79).
•
Click EXIT to return to the Main menu.
82
Click on a game
to highlight it,
then click JOIN
GAME
Click to return to the Main menu
Click to Host Game
(See Hosting a
Multiplayer Game
section on p.79)
Click to Join
the highlighted
game
Page 43

Sengoku Jidai ‘Age of the Country at War’. (the period from 1457 to
1615). Much of the samurai tradition was established
during this time. Shogun - Total War is set during
this period.
Seppuku A less vulgar term for hara-kiri. Considered an
honorary death by the samurai class. Modified in
later years to allow the presence of a second who cut
off the victims head at the moment of agony.
Shogun Abbreviated form of Sei-I-Tai Shogun (‘barbarian
subduing general’). The hereditary commander of the
Japanese army who, until the revolution of 1867,
exercised absolute rule under the nominal leadership
of the emperor. The rank to which all Daimyo
aspired.
Sohei ‘Priest Soldiers’. Commonly known as warrior monks
but some were thought to be non-ordained warriors
recruited by the temples.
Taisho General on the field of battle.
Tameshi Gusoku Bullet tested armour. Sold with dents as proof of its
effectiveness.
Wakizashi Sword 30 to 61cm (1-2ft) long. Worn by both samurai
(with a katana) and ashigaru.
Yari Spears used as defensive weapons. The lengths
varied depending on the individual Daimyo’s
preference but averaged around 5 metres.
Yoroi Of the many armour types, this is the classic samurai
armour which consisted mainly of the do (body
armour), suneate (leg armour), tsurubashiri
(breastplate), eboshi (cap), kabuto (helmet), sode
(shoulder guards) and Hoate (face mask).
85
Katana A long, two-handed, slightly curved sword that was
considered the ‘soul of the samurai’. Often carried
together with the wakizashi, the Katana was used as
both shield and sword due to it’s superior strength
and cutting edge gained through the meticulous
construction process.
Kengo A master swordsman. Kengo usually went on a
musha shugyo or ‘warrior pilgrimage’ to improve their
skills.
Koku Measurement of wealth, usually defined as the
amount of rice needed to feed a man for a year.
Mon Family crests.
Naginata Pole-arm, fitted with curved single-edged blade.
Nanban-do ‘Body armour of the southern barbarians’. Bulletproof
armour adapted from European armour.
Nanbanjin ‘Southern barbarians’. Name given to westerners who
arrived in the 1540’s.
Ninja Assassins and spies: practitioners of the Art of
Invisibility. Expert in the use of weapons but also
skilled in use of poisons and explosives. Both male
and female ninjas existed.
No-Dachi A very heavy and long sword which was about 25
percent longer than an average sword.
Okegawa do Simple, mass produced armour worn by the ashigaru.
If this had the Daimyo’s mon on the front it became
known as okashi gusoku (honorable loan armour).
Ronin ‘Wave men’ – samurai without a lord.
Samurai Member of the warrior class; warrior in Daimyo’s
service.
Sashimono Identifying banner, fitted to the back of the armour.
Often had the mon of the clan or family on it.
84
Page 44

Historical Consultant:
Dr. Stephen Turnbull
Writing and Additional Content:
Mike Brunton
Electronic Arts - Asia Pacific:
Studio General Manager:
Steve Dauterman
Executive Producer: Michael de Plater
Associate Producer: Ed Larrosa
Marketing: Nick Love
Public Relations: Derek Proud
ELECTRONIC ARTS EUROPE
Product Manager: Owen O’Brien,
Steve Perkins (USA)
Localisation Project Managers:
Sandra Picaper (Europe), Christine Kong
(Asia), Utano Tadera (Japan)
Documentation: James Lenoël
Pack Design: Caroline Page
Documentation Layout: John Montague
Translation Co-ordination:
Rebecca Gordon, Joanna Taylor
Localisation Co-ordination - Export
and Web:
Clare Parkes
Public Relations: Simi Belo
Web Publishing Manager: Nina Dobner,
Lloyd Sharp
Site Architect: Chris Morgan
OnLine Engineer: Kaine Varley
Bullfrog Tools and Libraries: Mark
Lamport, Ben Deane
Database Design: SolidSoft Ltd
Producer: Andy James
Engineer: Iain Quick
Materials Co-ordination: Lynn Moss
Studio Ops: Steve Fitton, Ian Law
Testing UK: Pat Russell (QA Manager),
Pete Samuels (Senior QA Manager),
Mark Inman (Project leader), Ross Manton
(Team Leader), Gary Bird, Paul Dolton,
Matt Follett, Nick Gerig, Steve Lawrie,
Phil Maskell, Lee Smith, Paul Watson,
Stuart Williams, Steve Winning
Config UK: Joseph Grant (Technical
Testing Manager), Rob Charlish,
Thomas O'Connor
(Technical Requirement Auditors)
Testing US: Bryan Brown (Lead),
Brad Frazier (Asst. Lead), Dave McCormick
(Asst. Lead - Multiplayer), Tim Attuquayefio
(AI/tuning), Matthew Brown (Online
Manual), Terry McElroy, James DeGuzman
(Test Plan), Dan Tovar, Dayrl Humdy,
Collin Clarke, Peter Trice, Justin Holst,
Ryan Gorospe
Customer Quality Control:
Simon Romans, Andrew Chung
Special Thanks
Jonathon Harris, Steve Miller,
Nigel Sandiford, Henry Ryan,
Paulette Doudell, George Fidler
87
CREDITS
CREATIVE ASSEMBLY
Project Director: Mike Simpson
THE PROTOTYPE TEAM
Programming: A.P.Taglione (Tag),
Matteo Sartori, John McFarlane,
Art: Will Hallsworth, Joss Adley,
Nick Tresadern,
Design Coordinator: Mike Simpson
THE PRODUCTION TEAM
Programming: A.P.Taglione (Tag),
Matteo Sartori, John McFarlane, R.T.Smith,
Shane O’Brien, Darran Eteo, Dan Parkes,
Charlie Dell
Art : Will Hallworth: Joss Adley,
Nick Tresadern, Nick Page, Sadie Peet
SUPPORTING ROLES
Project Management: Mike Simpson,
Luci “Loki” Black, Tim Ansell
Art: Al Hope, Jude Bond, Joel Smith, Siu
Jone Lee, Ester Reeve, Howard Raynor
Coding: Mike Simpson, Tim Ansell
Tools: A.P.Taglione (Tag), Nick Tresadern,
Charlie Dell
TESTING
QA Manager: Richard Chamberlain
Testers: Anthony Simcock, Tony Sinclair
MOTION CAPTURE
Motion Capture Lead Technician:
Alan Ansell
Motion Capture Editing &
Processing:
Greg Alston, Leonor Juarez
Motion Capture Actors: Angela Kase,
Emmanuel Levi, Daley Chaston
AUDIO
Music: Jeff van Dyck
Audio Management:
DNA Multimedia Audio
Sound Effects: Sam Spanswick @ GMD,
Karl Learmont @ GMD, Jeff van Dyck
Movie Post Production: Jeff van Dyck,
Angela Somerville
Audio Director: Jeff van Dyck
Casting & Voice Production:
Philip Morris @ AllintheGame Ltd
Voices: Togo Igawa, Eiji Kusuhara,
Simon Greenall, Kentaro Suyama
Historical Consultant: Stephen
Turnbull
Writing & Additional Content: Mike
Brunton
Dreamtime Interactive
Studio Marketing Manager:
Jason Fitzgerald
Web Marketing Manager:
Richie Skinner
PR: Cathy Campos, Panache PR
Legal Affairs: John McIntyre
Business Affairs Assistant: Ben Greer
Directors: Alan de Plater, Norm Fricker,
Malcolm Greer
Audio Director: Jeff Dyck,
DNA Multimedia
86
Page 45

Notice
ELECTRONIC ARTS RESERVES THE RIGHT TO MAKE IMPROVEMENTS TO THIS PRODUCT DESCRIBED IN THIS MANUAL AT
ANY TIME AND WITHOUT NOTICE.
THIS MANUAL, AND THE SOFTWARE DESCRIBED IN THIS MANUAL, IS UNDER COPYRIGHT. ALL RIGHTS ARE RESERVED. NO
PART OF THIS MANUAL OR THE DESCRIBED SOFTWARE MAY BE COPIED, REPRODUCED, TRANSLATED OR REDUCED TO
ANY ELECTRONIC MEDIUM OR MACHINE-READABLE FORM WITHOUT THE PRIOR WRITTEN CONSENT OF ELECTRONIC
ARTS LIMITED, PO BOX 181, CHERTSEY, KT16 0YL, ENGLAND.
ELECTRONIC ARTS MAKES NO WARRANTIES, CONDITIONS OR REPRESENTATIONS EXPRESS OR IMPLIED, WITH RESPECT TO
THIS MANUAL, ITS QUALITY, MERCHANTABILITY OR FITNESS FOR ANY PARTICULAR PURPOSE. THIS MANUAL IS
PROVIDED “AS IS”. ELECTRONIC ARTS MAKES CERTAIN LIMITED WARRANTIES WITH RESPECT TO THE SOFTWARE AND
THE MEDIA FOR THE SOFTWARE. IN NO EVENT SHALL ELECTRONIC ARTS BE LIABLE FOR ANY SPECIAL, INDIRECT OR
CONSEQUENTIAL DAMAGES.
THESE TERMS AND CONDITIONS DO NOT AFFECT OR PREJUDICE THE STATUTORY RIGHTS OF A PURCHASER IN ANY
CASE WHERE A PURCHASER IS A CONSUMER ACQUIRING GOODS OTHERWISE THAN IN THE COURSE OF A BUSINESS.
Limited Warranty
Electronic Arts warrants to the original purchaser of this computer software product that the recording
media on which the software programs are recorded will be free from defects in materials and
workmanship for 12 months from the date of purchase. During such period defective media will be
replaced if the original product is returned to Electronic Arts at the address at the rear of this
document, together with a dated proof of purchase, a statement describing the defects, the faulty
media and your return address.
This warranty is in addition to, and does not affect your statutory rights in any way.
This warranty does not apply to the software program themselves, which are provided “as is”, nor does
it apply to media which has been subject to misuse, damage or excessive wear.
Returns After Warranty
Electronic Arts will replace user-damaged media, current stocks allowing, if the original media is
returned with a cheque or postal order for £7.50 per CD, payable to Electronic Arts Ltd.
Please remember to include full details of the defect, your name, address and, where possible, a
daytime telephone number where we can contact you.
Electronic Arts Customer Warranty, PO Box 181, Chertsey, KT16 0YL, UK.
Software © 2000 Dreamtime Interactive Pty Ltd. Documentation © 2000 Electronic Arts Inc. All rights
reserved. Shogun Total War and the Total War logo are trademarks or registered trademarks of
Dreamtime Interactive Pty Ltd. in the United States and/or other countries. All rights reserved.
Electronic Arts and the Electronic Arts logo are trademarks or registered trademarks of Electronic Arts
Inc. in the US and/or other countries. DirectX, Direct 3D,DirectSound, DirectDraw, Windows and
Microsoft are either trademarks or registered trademarks of Microsoft Corporation in the United States
and/or other countries. QSound and the Q Logo are registered trademarks of QSound Labs, Inc.
“Environmental Audio” is a trademark and the Environmental Audio Logo is a registered trademark of
Creative Technologies Ltd. All other trademarks are the property of their respective owners.
88
 Loading...