

Page 1

Chapter 1
FLIGHT
PREPARATIONS
Air combat is the excitement fighter pilots live for. But behind every
white-knuckle second in the cockpit are hours of careful preparation.
Choose Activity Screen
The Choose Activity Screen acts as a “main menu” for the rest of the game.
Each of the options on the Choose Activity Screen are discussed below.
Choose Activity Menu Bar
The Choose Activity Menu Bar gives you access to the Graphics Prefs and
Sound/Music Prefs control panels. Options on these control panels are
described in the Install Guide.
Selecting Onscreen Options
You can select items on the screen using your mouse. Simply point at the
option you want to select and click the left mouse button. Many of the flight
preparation screens share features such as buttons and switches. These are
described below.
Menu Bar
All flight preparation screens have pull-down Menu Bars along the top edge of
the screen. To access a Menu Bar options, move the mouse cursor to a menu
and hold down the left mouse button. When the options appear, drag the
highlighted bar down to the option you want and release the mouse button.
Page 2
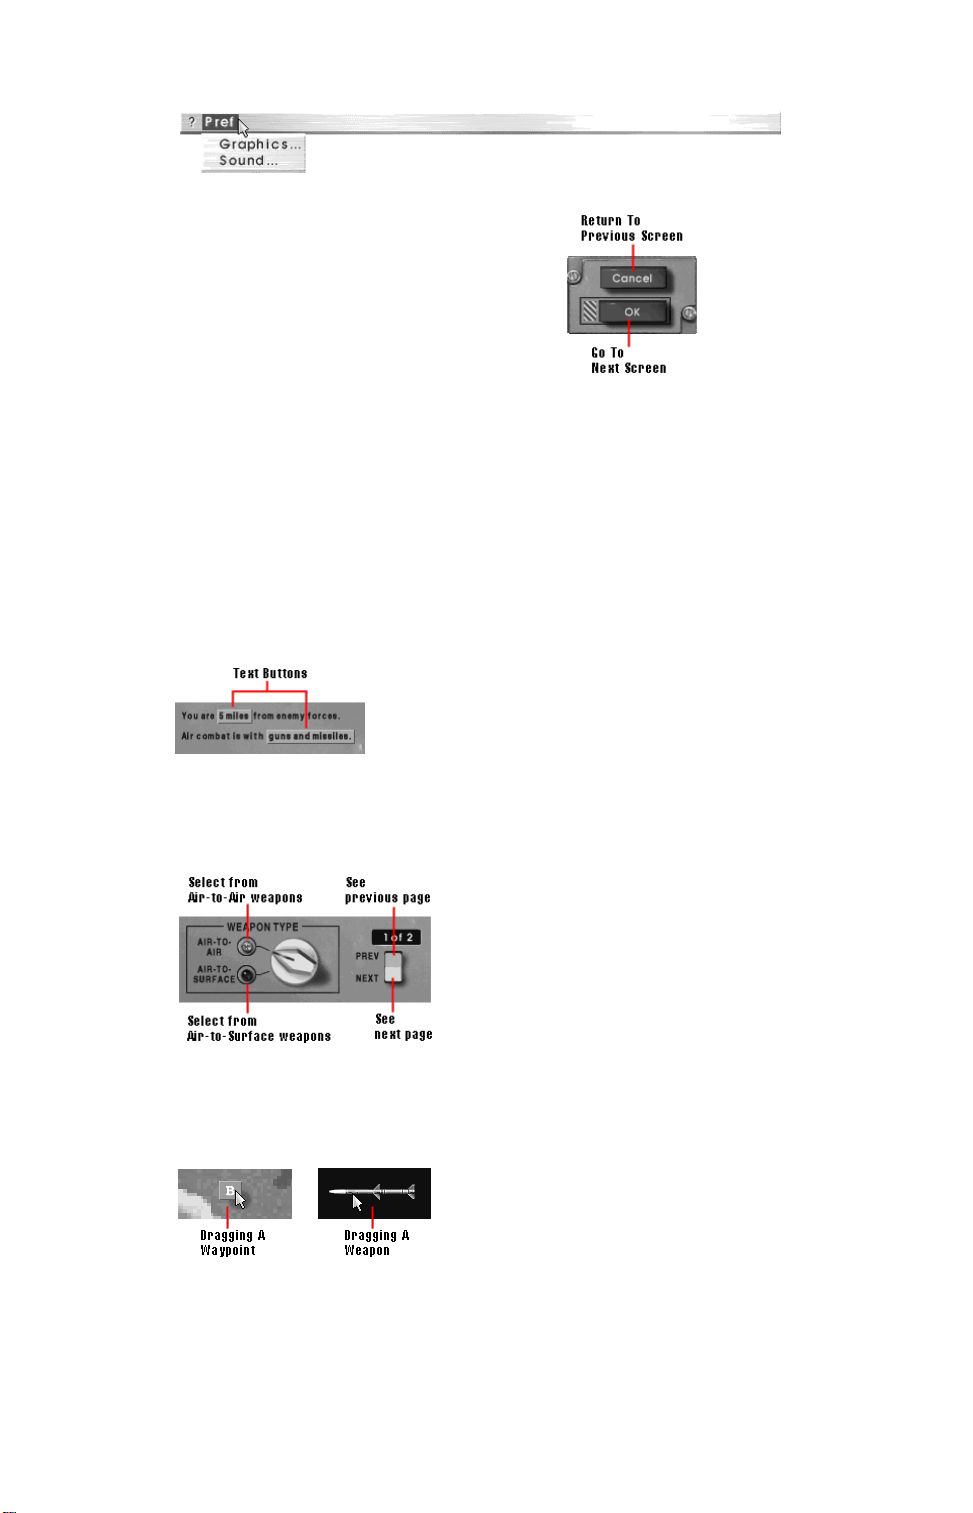
Buttons
Buttons are another method for
choosing options.
Those buttons identified by a blue hash mark allow you to confirm a choice
and proceed to the next screen. The keyboard equivalent for these buttons is
Enter.
Green buttons with the word “Cancel” on them allow you to return to the
previous screen or the Choose Activity Screen. The keyboard equivalent for
these buttons is Esc.
Text Buttons
Text buttons provide multiple options within the given context. Clicking on a
text button cycles through different options. The left mouse button goes
forward through the options; the right mouse button goes in reverse.
Switches and Dials
Switches and dials perform multiple functions depending upon what part of the
switch or dial you click on. Text written next to switches and dials indicate
what each particular position does.
Objects You Can Drag
Objects you can drag — such as map objects and weapons — can be moved
from one part of the screen to another. Click on the desired object select it,
and then use the mouse to drag it to the desired position.
The ? Menu
The ? Menu is available on every menu bar in the game. In the preparation
screens, the ? Menu contains a single option, Quit to DOS (Ctrl-C). In the
cockpit, the ? Menu contains an additional End Mission (Ctrl-Q) option.
Page 3
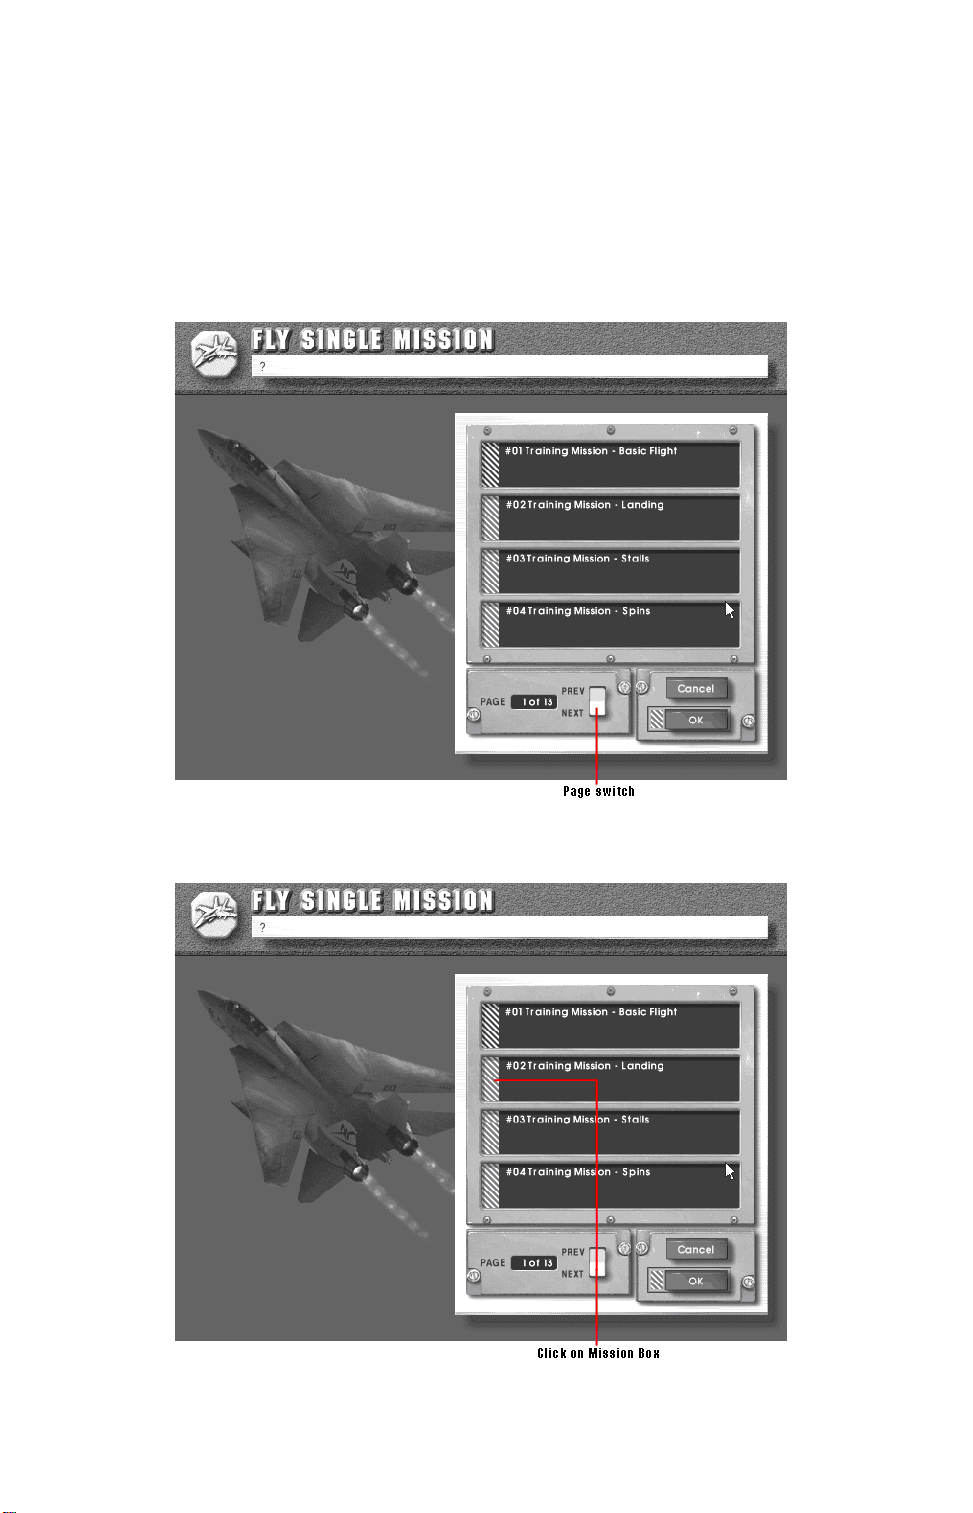
Play Single Mission
The Play Single Mission option allows you to undertake a single, unique
mission — either one of the many provided with the game, or one that you or a
friend has custom-designed using the Pro Mission Creator.
To play a single mission:
1. From the Choose Activity Screen, select Play Single Mission. The Fly
Single Mission Screen appears.
2. Clicking on the Page Switch allows you to view the available single
missions. When you see a mission you want to fly, click on the Mission
Box to move the yellow highlight to that mission.
3. Click on the Ok button or press Enter to select the mission. Depending
Page 4
on how the mission was set up, you may see one or more of the following
screens: Mission Brief, Mission Map, Aircraft Selection, or Load
Ordnance. Each of these screens is covered in this chapter under Start
New Campaign.
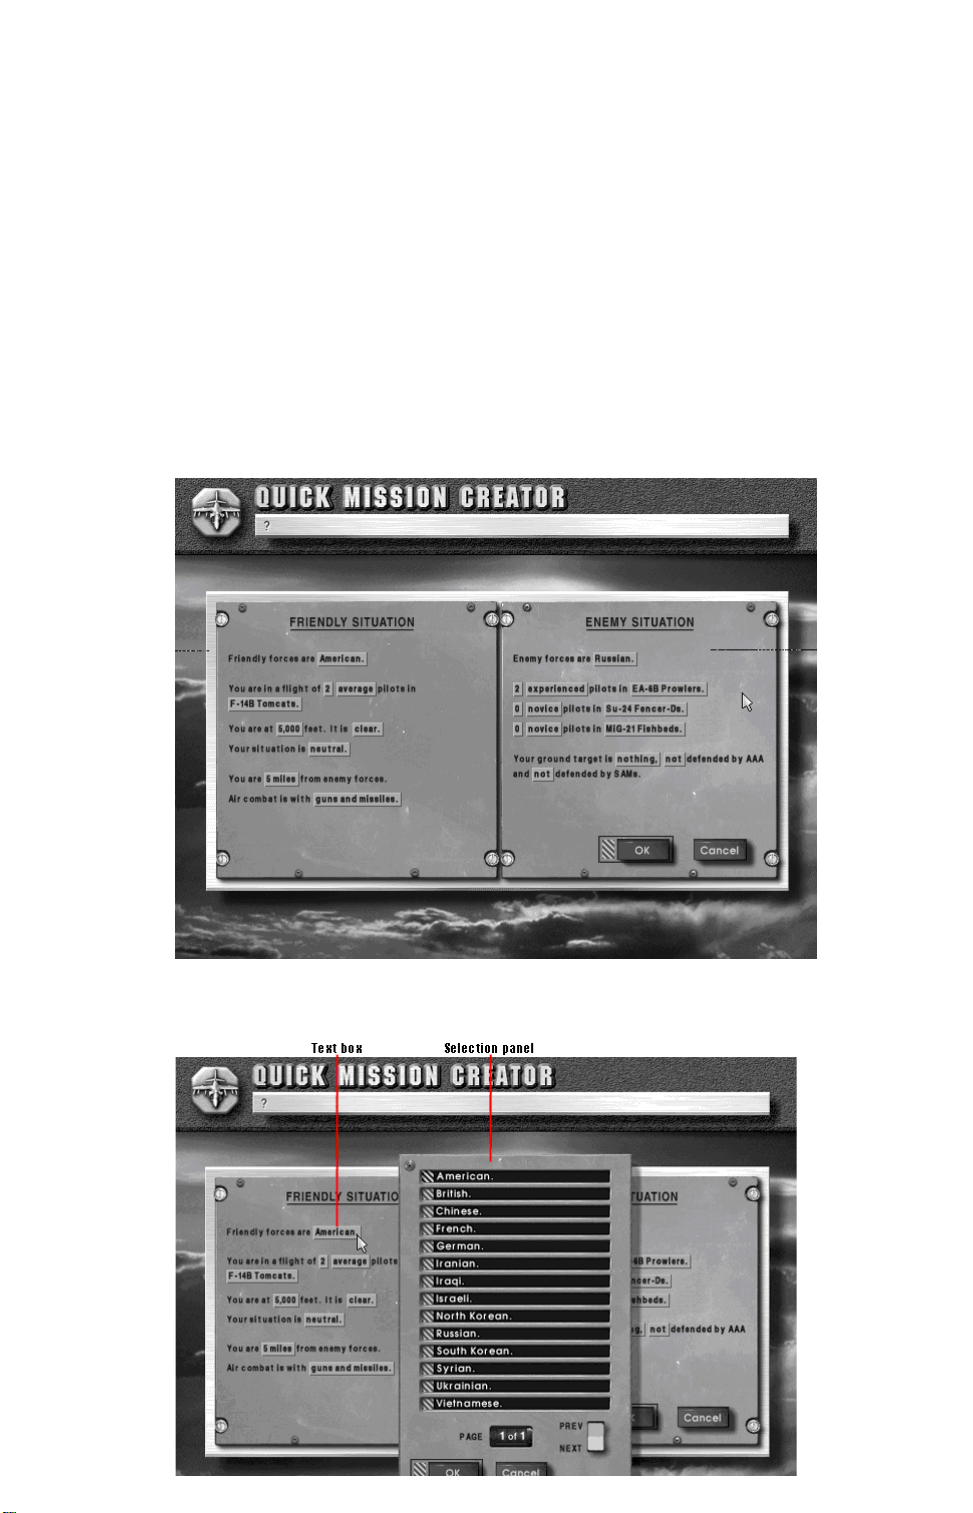
Create Quick Mission
The Quick Mission Creator allows you to set up an air combat engagement
quickly and painlessly. You specify general design parameters and the Quick
Mission Creator delegates most design tasks to the computer. Quick
Missions, therefore, retain the element of surprise, making excellent training
missions.
To create a Quick Mission:
1. From the Choose Activity Screen, select Create Quick Mission. The
Quick Mission Creator appears.
2. Click on the text boxes to bring up selection panels that let you change
various mission parameters for both friendly and hostile forces. These
parameters are explained below.
Page 5
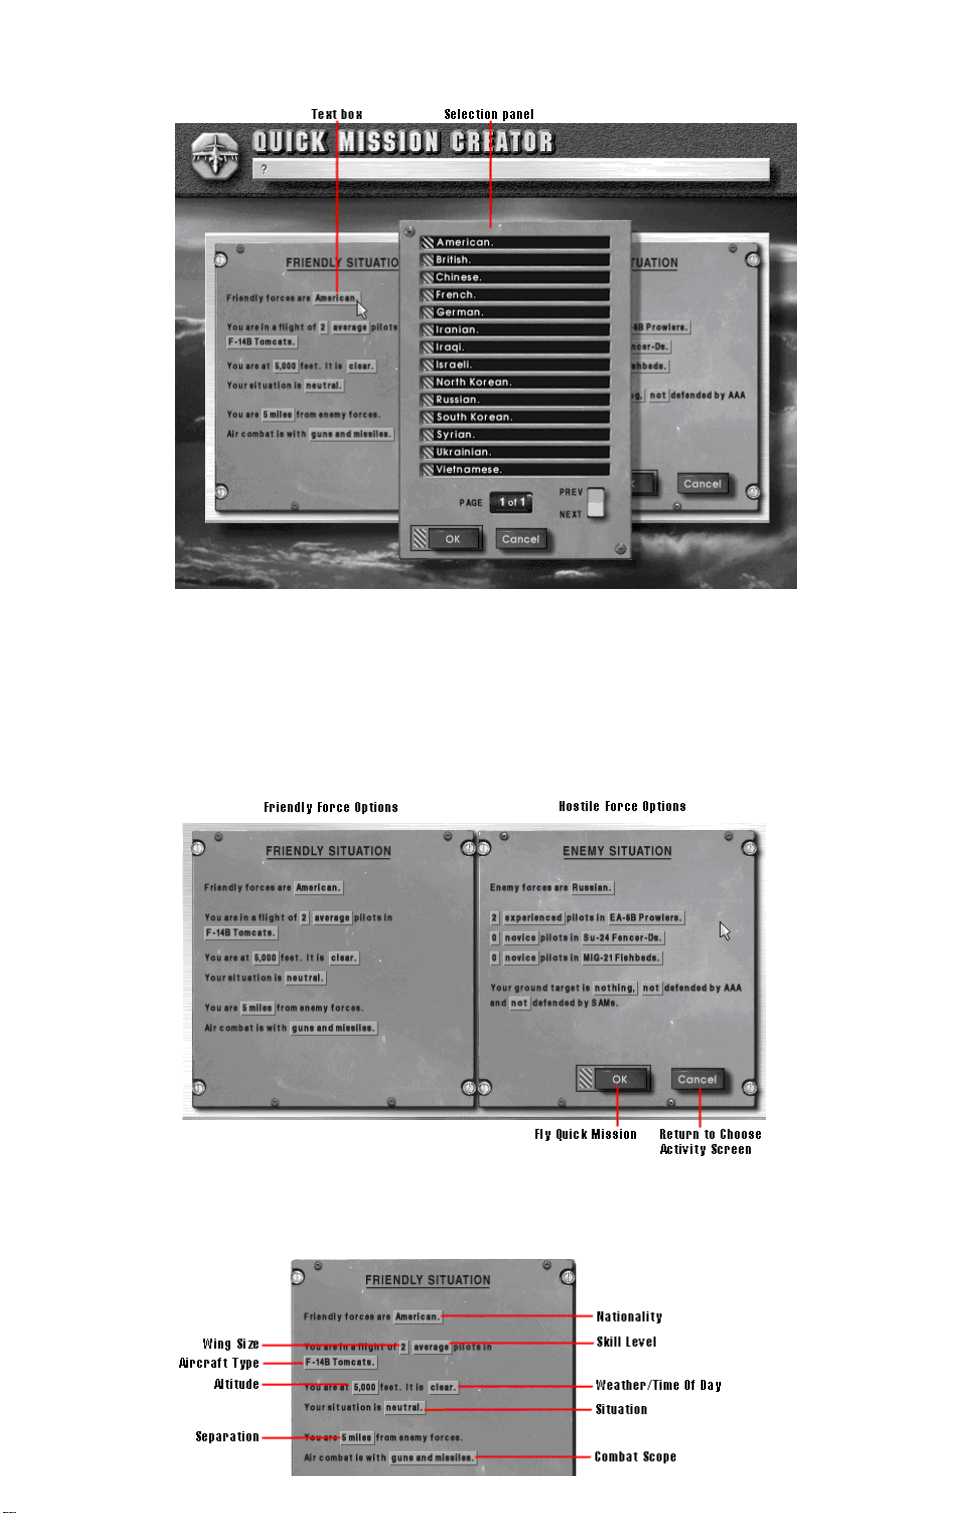
3. When you have set the mission parameters to your liking, click on the
OK button or press Enter. You will be placed in the lead aircraft of the
friendly group. All aircraft carry default weapon loads.
Setting Up Quick Missions
The Quick Mission Creator allows up to three friendly aircraft, three enemy
flights, and one option ground target in a single mission. How these units
begin the scenario and fight is determined by the parameters you specify.
Friendly Forces
As the name implies, friendly forces fly and fight with you. By clicking on the
text buttons you may alter:
Page 6
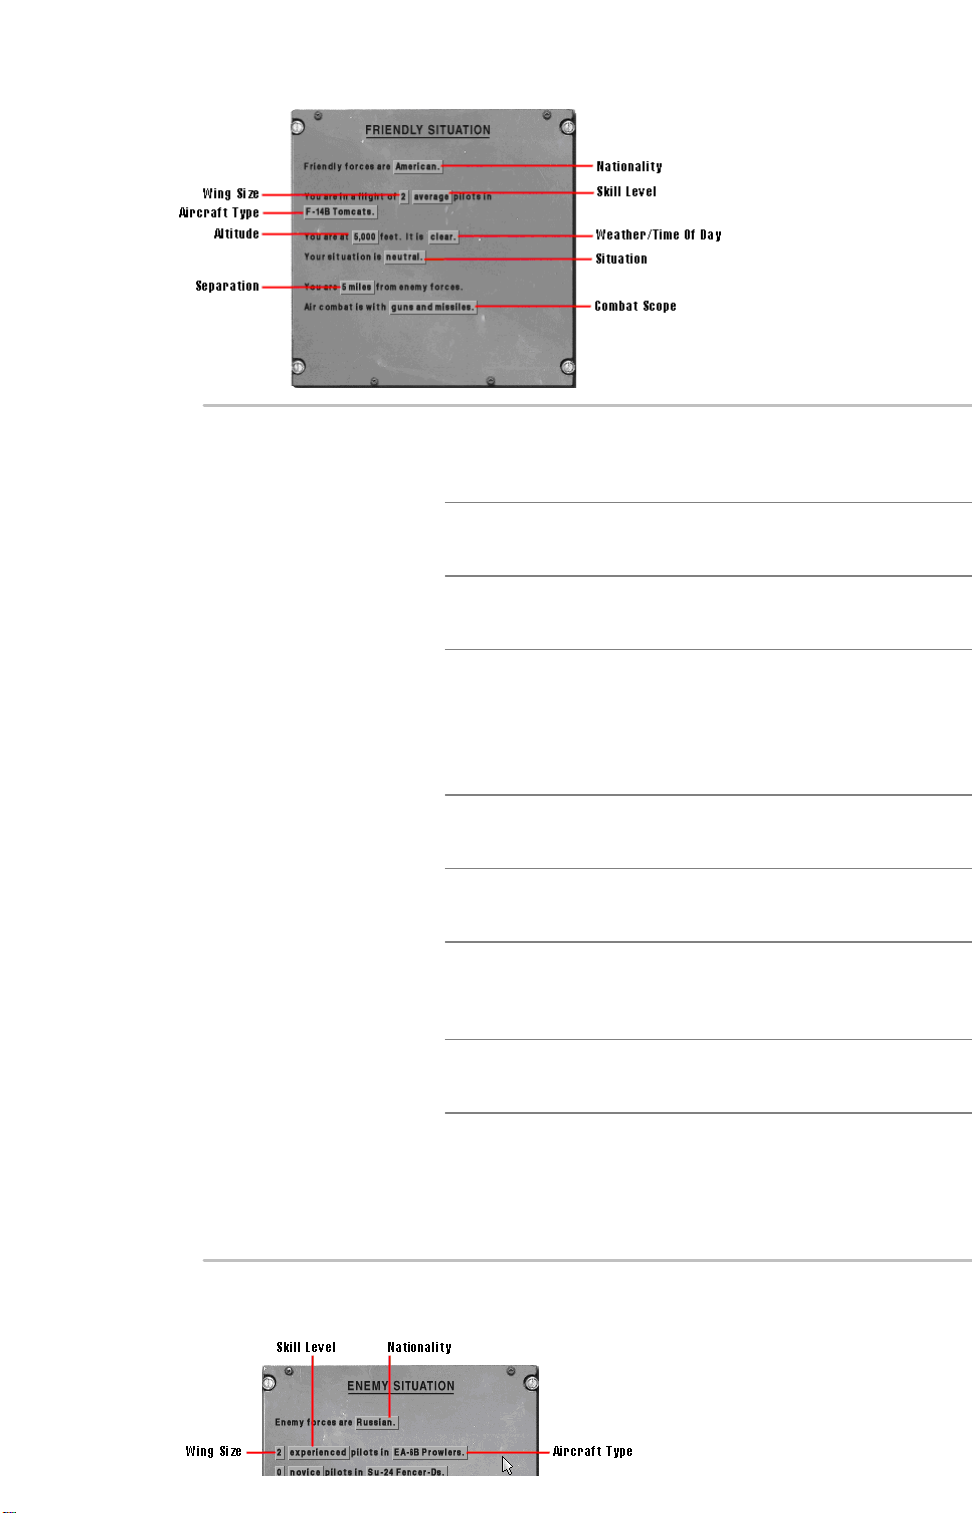
Nationality Select the nationality for which you will fly.
Choosing a nationality does not limit your choices
of aircraft.
Wing Size Specify the number of pilots (including yourself) in
your group, up to a maximum of three.
Skill Level Select Ace, Experienced, Average, or Novice skill
level for your wingmen.
Aircraft Type Choose the type of aircraft your forces will fly
during this mission. All friendly aircraft will fly this
same aircraft type. You may only choose one of
the six aircraft available to players: the F-14,
F/A-18, F-22, F-104, A-7, or Su-33.
Altitude Specify the starting altitude of the group: from
5,000 to 40,000 feet.
Weather/Time of
Day
Situation Specify the situation your friendly forces are in.
Separation Set the initial separation between friendly and
Combat Scope Select which weapons will be used: Guns Only or
Hostile Forces
For hostile forces, you may alter the following:
Set the weather or time of day: Dawn, Clear,
Cloudy, Overcast, Foggy, Sunset, or Night.
Friendly forces can hold the Advantage, be in a
Neutral situation, or be at a Disadvantage.
hostile forces: from 1 to 50 nm.
Guns and Missiles. Note that guns only means no
air-to-air missiles. Air-to-air ground missiles are
still allowed so you can attack a ground target if
you’ve specified one.
Page 7
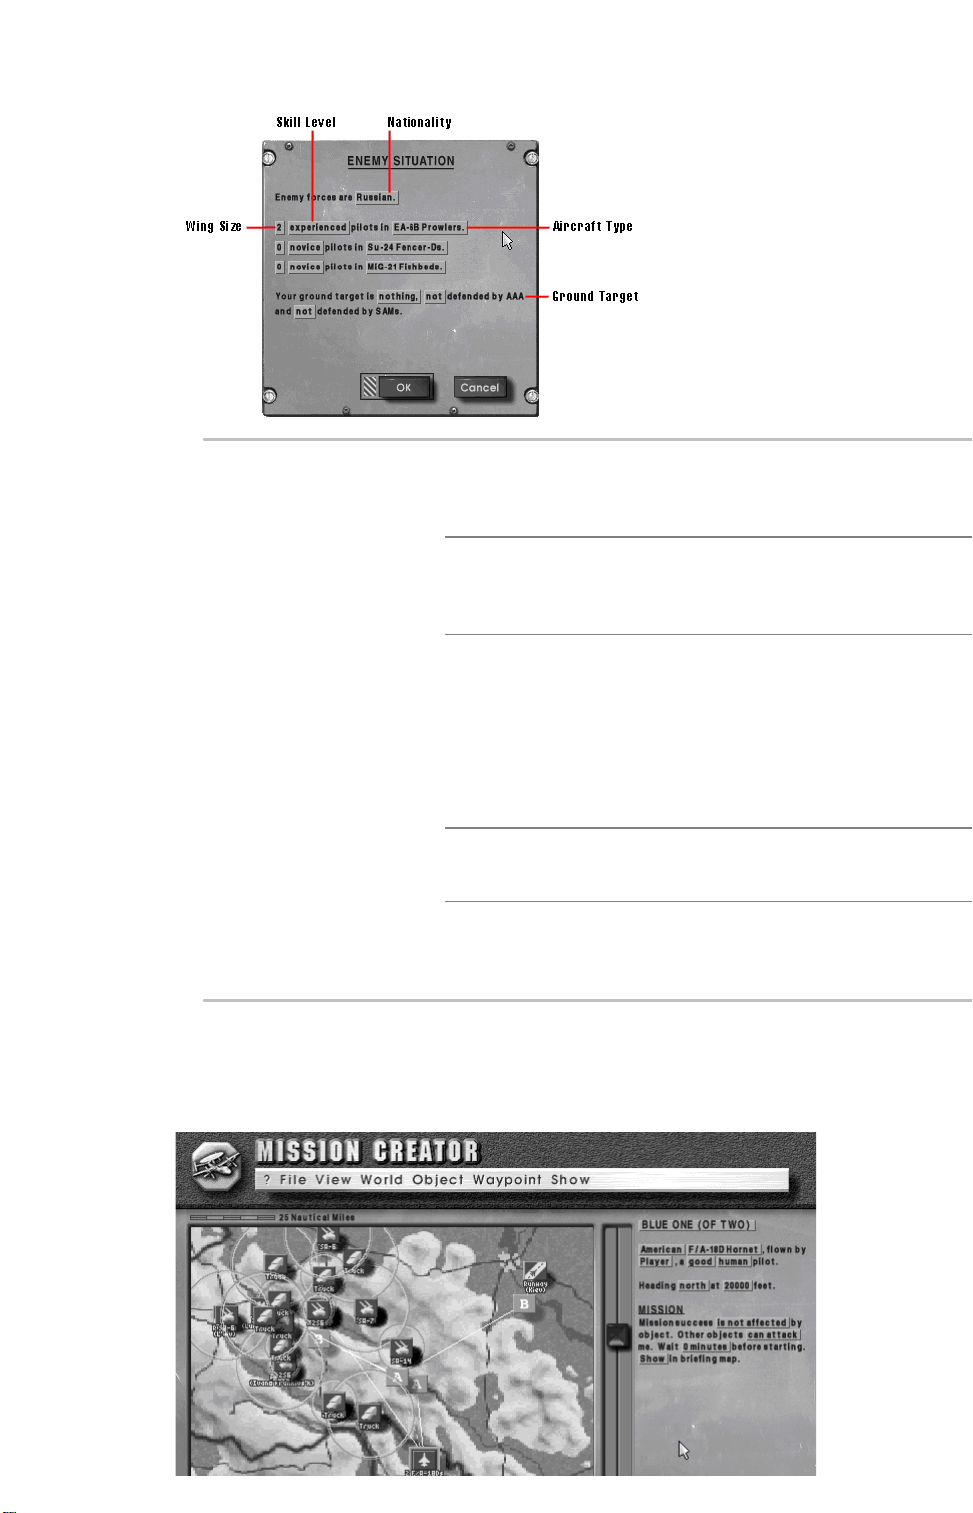
Nationality Specify which country enemy forces come from.
This is merely for designation purposes and does
not limit enemy aircraft to any certain nationality.
Wing Size You may add up to three enemy groups, each
with up to 5 aircraft. Select 0 to disable a
particular group.
Skill Level Choose from Ace, Experienced, Average, or
Novice for the specified group. Select Ace,
Experienced, Average, or Novice skill level for your
wingmen. As with the friendly forces, the skill level
indicates the range of skill levels in the given
group. The exact skill level per pilot is chosen
randomly by the Quick Mission Generator.
Aircraft Type Choose the type of aircraft used by the specified
group.
Ground Target You may select a ground target for your forces.
Additionally, you can determine how heavily
SAMs and AAA defend the target.
Create Pro Mission
The Pro Mission Creator allows you to set up complex missions involving
multiple wings, multiple ground targets, air defenses — even a campaign of
your own.
Page 8
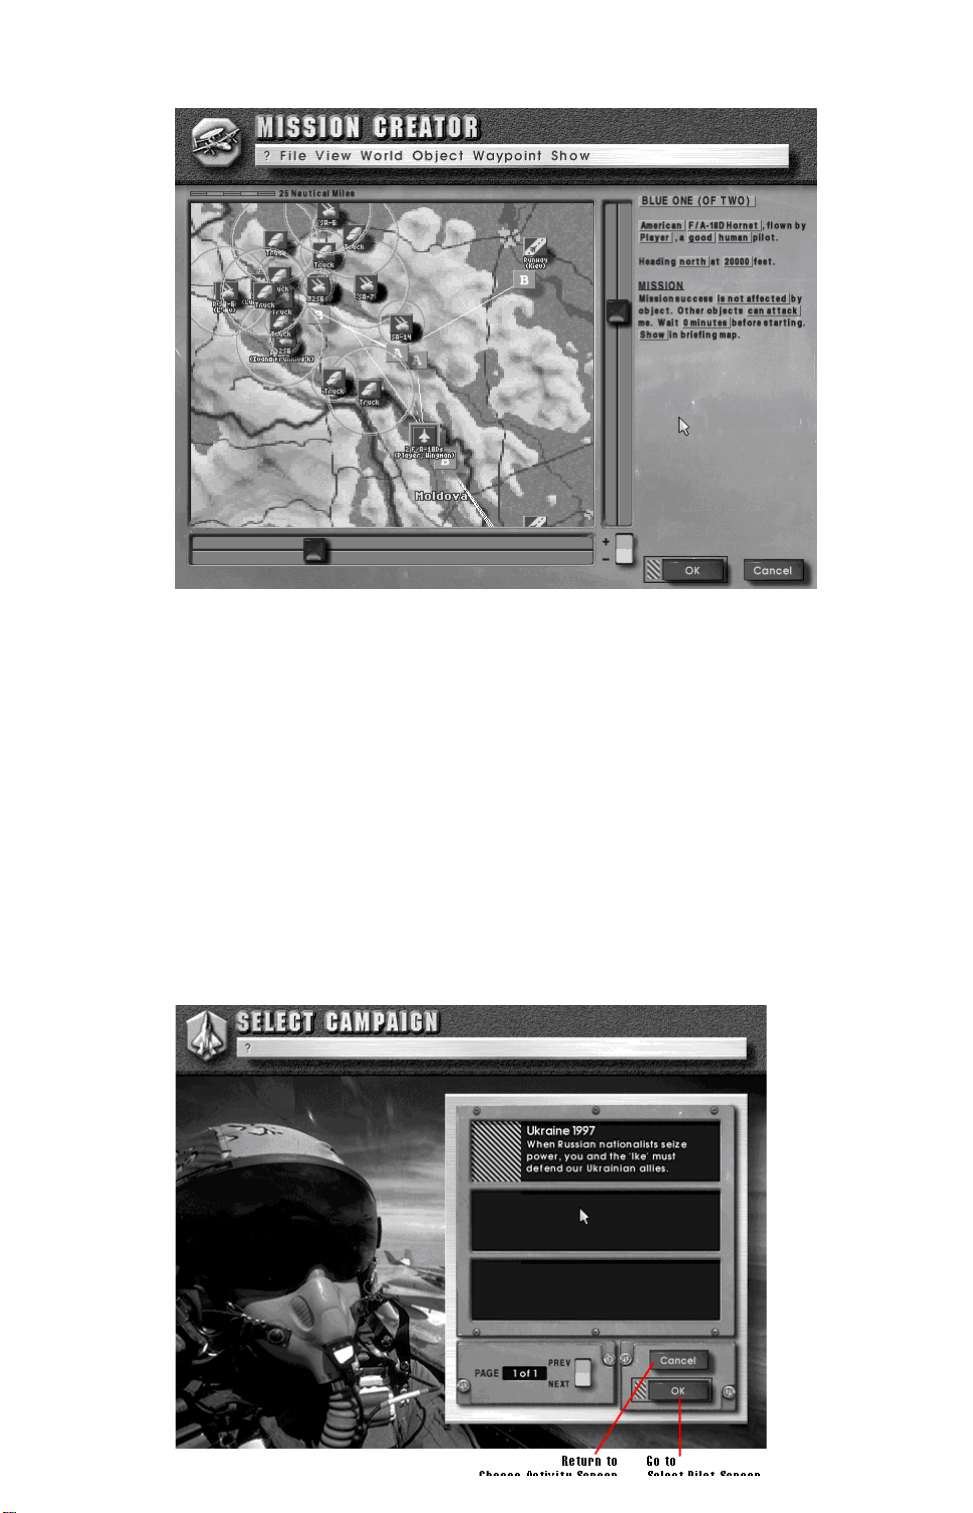
The Pro Mission Creator is a complex tool requiring a detailed explanation.
See Chapter 7: Creating Custom Missions.
Replay Last Mission
The Replay Last Mission option allows you to do just that: repeat the last
played mission. This option assumes that you haven’t quit out of U.S. Navy
Fighters since your last mission.
Start New Campaign
Campaign Mode is the heart of U.S. Navy Fighters. All of your training has
prepared you for this moment. Trouble brews in the distant parts of the world,
and you’ve been called upon to protect U.S. interests.
Select Campaign Screen
From the Choose Activity Screen, select Start New Campaign. The Select
Campaign Screen appears.
Page 9
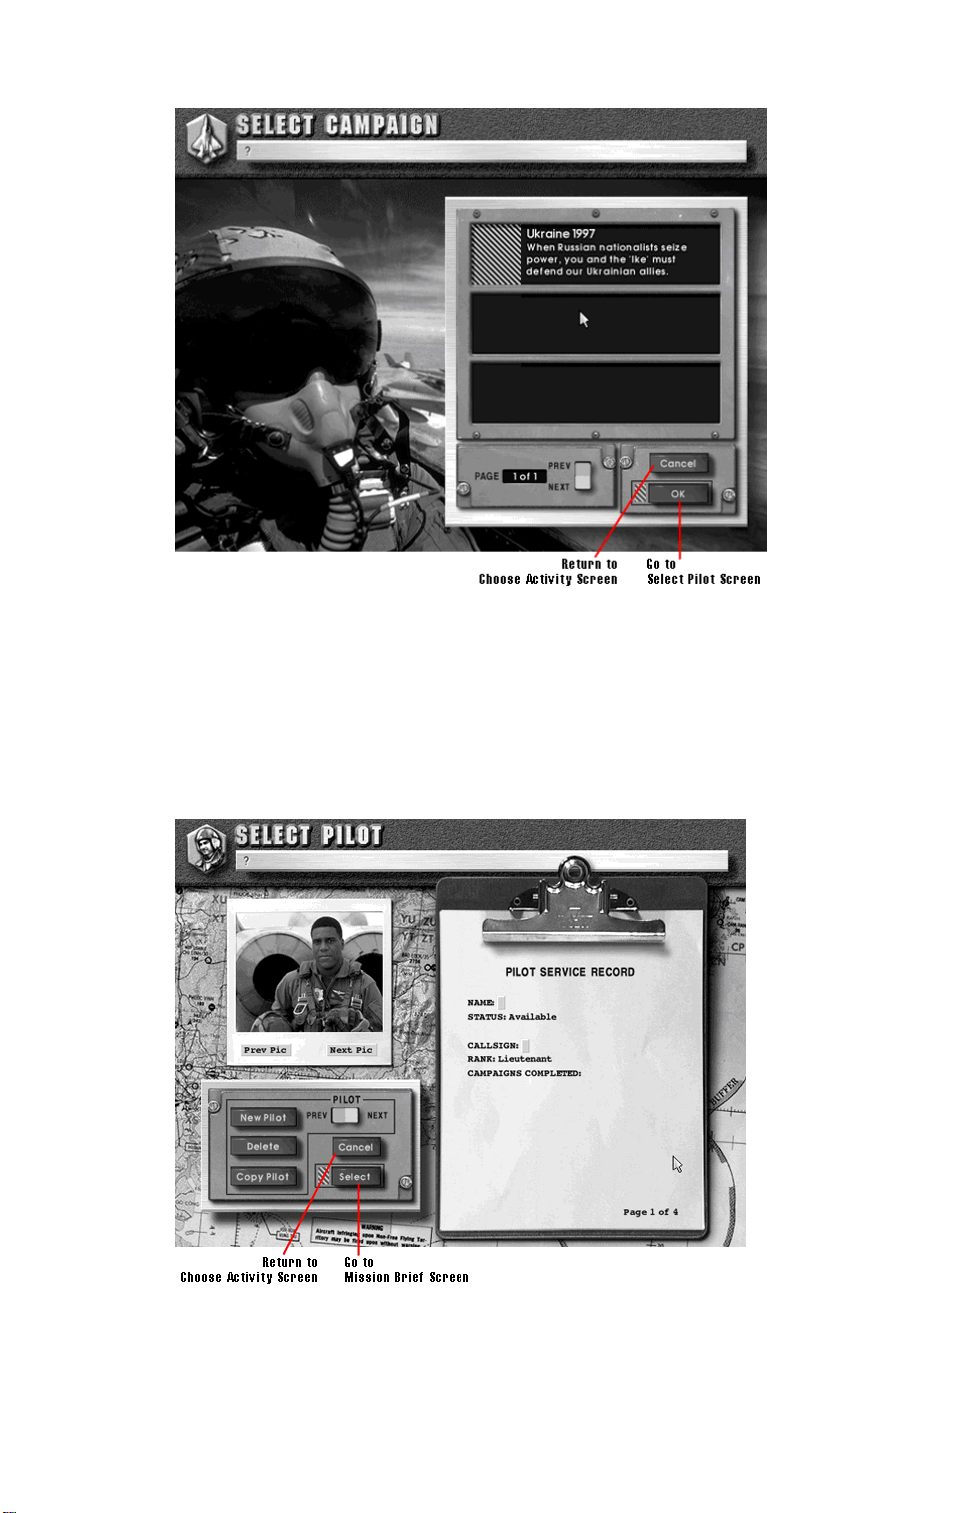
The original U.S. Navy Fighters comes with one 50 mission campaign: Ukraine
1997. Since this option is already highlighted, clicthe OK button or press
Enter.
Select Pilot Screen
The Select Pilot Screen does more than let you choose your alter-ego in the
campaign. A pilot is in essence a saved game. Creating a new pilot is
equivalent to starting a new campaign. Likewise, choosing a pre-existing pilot
is equivalent to continuing his campaign.
Use the Page Up and Page Down keys to flip through the clipboard pages,
which allow you to alter your aircraft’s nose and tail art as well as view any
campaign medals you may have earned.
Page 10

Click on any of the following onscreen options to alter a pilot file:
Pilot Switch You can create multiple pilots, each active in a
separate campaign. Use this switch to select the
desired pilot.
New Pilot Create an entirely new pilot. The pilot begins with
the ranof Lieutenant and no awards or
commendations.
Delete Pilot Delete the currently selected pilot.
Copy Pilot Create a backup copy of your pilot. If your pilot is
killed or captured, you may resume his career
from the last backup.
Name Specify your pilot’s full name.
Callsign Specify your pilot’s callsign.
Squadron Choose your pilot’s squadron. Squadron choice
determines what emblems are displayed on your
aircraft.
Prev Pic View the previous picture. You choose the face of
your pilot.
Next Pic View the next picture.
Nose Art You may add customized artwork to the nose of
your aircraft.
Tail Art You may add customized artworto the tail of your
aircraft.
When you’ve created the pilot you want, clicthe Select button or press Enter.
Video Briefings
You typically fly two missions a day. At the beginning of each day you receive
a short briefing from the intelligence officer. Before each mission you receive
an additional mission briefing from your CO. You can skip any individual
briefing by pressing spacebar. If you want to skip all of the briefings before
any given mission, press Esc.
Mission Brief Screen
The Mission Brief Screen allows you to read the background and objectives of
each mission in the campaign.
Page 11

Click on the Page switch or use the Page Up and Page Down keys to flip
through the clipboard pages. Once you feel like you’ve got a handle on the
situation, click on the OK button or press Enter.
Mission Brief Menu Bar
Campaign Menu
Option Description
Replay This
Mission
Exit Campaign Return to the Choose Activity Screen.
Go bacto the beginning of the mission so you can
view the videos again.
Mission Map Screen
The Mission Map Screen lets you plan your waypoints according to the
mission
objectives.
Page 12
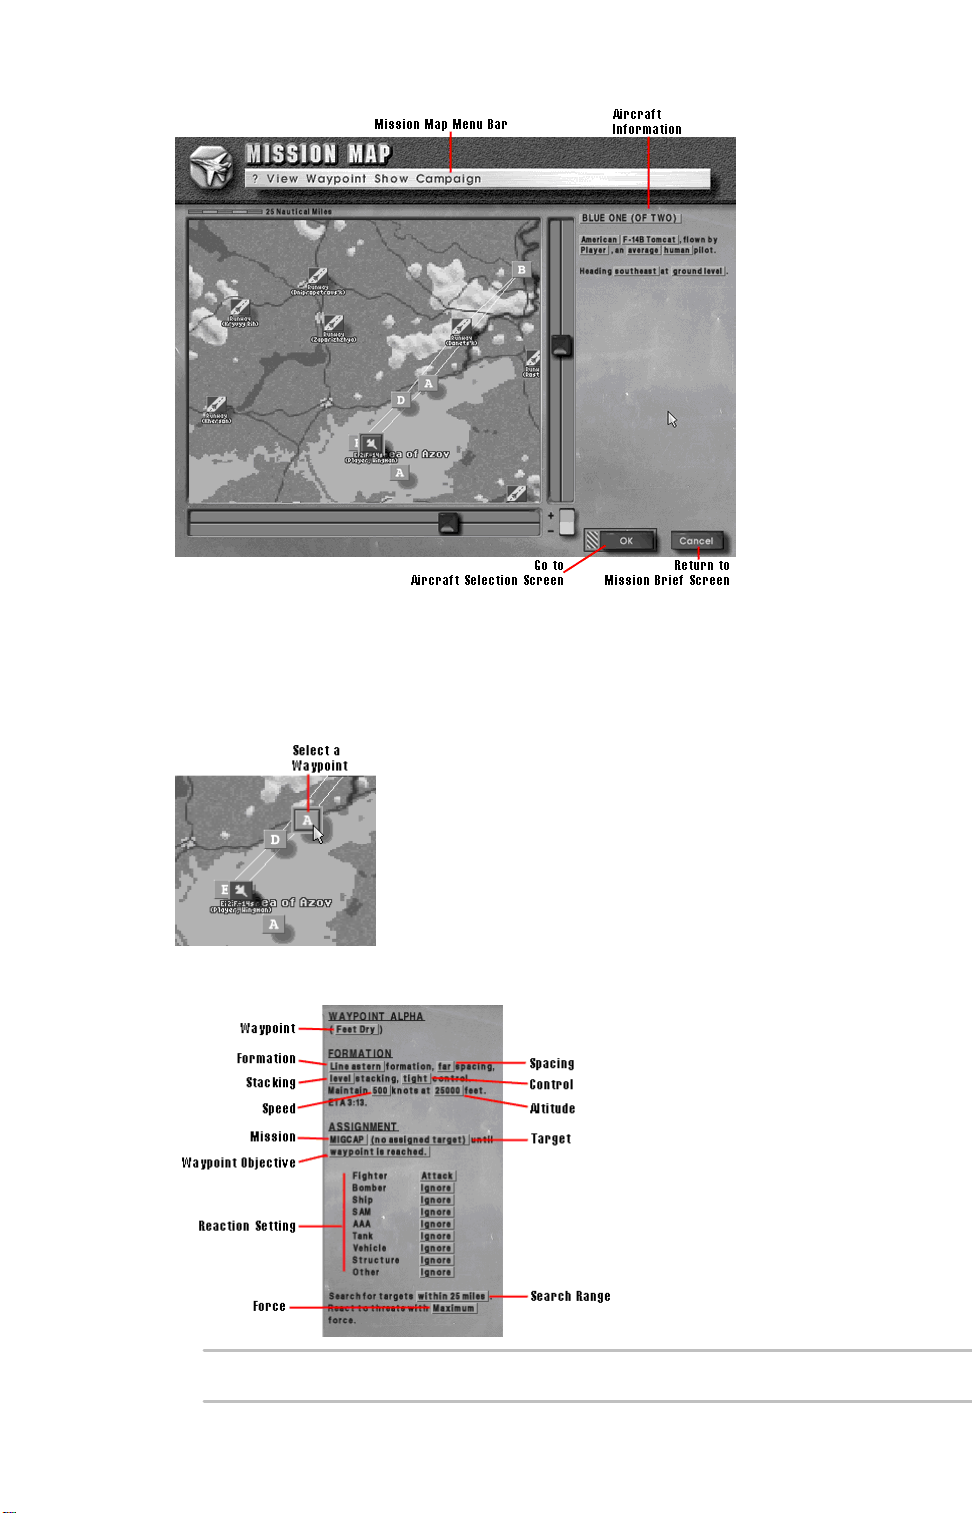
Editing Waypoints
You can edit waypoints in the mission for your wing only. Your superiors
designate the waypoints for other aircraft in the mission — these cannot be
altered.
Click on a waypoint to select it.
Waypoint settings appear in the Object Details panel. Click on the text
buttons to change the following settings:
Setting Options Description
Page 13

Waypoint Brings up a selection panel that lets
you name the waypoint (Ingress,
Merge, Strike, Feet Wet, etc.)
Formation Echelon,
Line
abreast,
Line
astern
Spacing Far,
Near
Stacking High,
Level,
Low
Control Tight,
Loose,
Medium
Speed 0
3,000
kts
See Waypoint Formation for wing
formations, spacing, and stacking.
See Waypoint Formation for wing
formations, spacing, and stacking.
See Waypoint Formation for wing
formations, spacing, and stacking.
See Wingman Commands for control
setting descriptions
How fast your wing should travel to the
waypoint. Note that setting a speed
(for example, 3,000 kts) does not
guarantee that your particular airplane
is capable of that speed at the given
altitude.
Altitude 0
80,000
ft
Mission Normal
Flight
MIGCAP
BARCAP
Wild
Weasel
CAS
Anti-Ship
Hi/Lo
Sweep
Target Variable The enemy target you’re meant to
The altitude at which your wing should
travel to the waypoint. Note that setting
an altitude (for example, 80,000 ft)
does not guarantee that your airplane
is capable of attaining that altitude.
See Saving Custom Missions7_1_9 for
Objective descriptions.
destroy or the friendly object you’re
supposed to protect. Click on the text
button, and then click on the enemy
target or friendly object. If no specific
target is assigned, no assigned target
appears here.
Page 14

Reactions Attack,
Defend,
Ignore,
Evade
Search Range Various The range within which your wingmen
The reaction of aircraft in your wing to
various types of enemy objects. These
represent your wingmen’s default
orders only — any orders you give
them during the mission replace these
orders.
will search for enemies. Note that your
wingmen are still limited by the type of
detection they are using.
Force Equal,
Double,
Maximum
Mission Map Menu Bar
The Mission Map Menu Bar gives you control over waypoints and your view of
the map.
View Menu
Option Key
Equivalent
Scroll left cursor
left
Scroll right cursor
right
Scroll up cursor upScroll map view up.
Scroll down cursor
down
No effect on your wing.
Description
Scroll map view left.
Scroll map view right.
Scroll map view down.
Center map at
cursor
Center map at
selection
Zoom in plus
Zoom out minus
Smart zoom When activated, you zoom in and out
N Center the map display on the current
cursor position.
B Center the map display on the
currently selected object.
Zoom in on map.
(+)
Zoom out on map.
(-)
on the currently selected object. If no
object has been selected, you zoom in
and out on the center of the map.
Page 15

Waypoint Menu
Option Key
Equivalent
Add A Add a waypoint for a selected aircraft,
Delete D Delete a waypoint for a selected
Create loop C Create a loop between two waypoints.
Delete loop E Deletes a loop between two waypoints.
Description
wing, ship, or vehicle. The object must
be selected before you can assign it a
waypoint.
aircraft, wing, ship, or vehicle. The
waypoint must be selected before you
can delete it.
Select the beginning waypoint, select
Create loop, and then click on the end
waypoint. The aircraft will travel from
the initial waypoint, along any
intermediary waypoints, until it
reaches the end waypoint. It will repeat
this process indefinitely.
Select the end waypoint, and then
select Delete loop.
Select prev
waypoint
Select next
waypoint
Show Menu
Planes, SAM
sites, etc.
[ Select the previous waypoint for the
selected object.
] Select the next waypoint for the
selected object.
The Show Menu controls what classes
of objects are currently displayed on
the map. Complex missions may
require “decluttering” the screen by
disabling some frequently-appearing
units, such as AAA and SAM sites.
This menu allows you to hide classes
of objects while viewing a mission.
When a checmarappears next to an
object class, objects from that class
are displayed on the map. To hide a
class, select it from the menu; the
checmardisappears and objects from
that class are no longer shown on the
map. The units still exist in their proper
Page 16
positions, they’re simply not
displayed.
Mission Map Menu Bar
Campaign Menu
Option Description
Replay This Mission Go bacto the beginning of the
mission to view briefings again.
Exit Campaign Return to the Choose Activity
Screen.
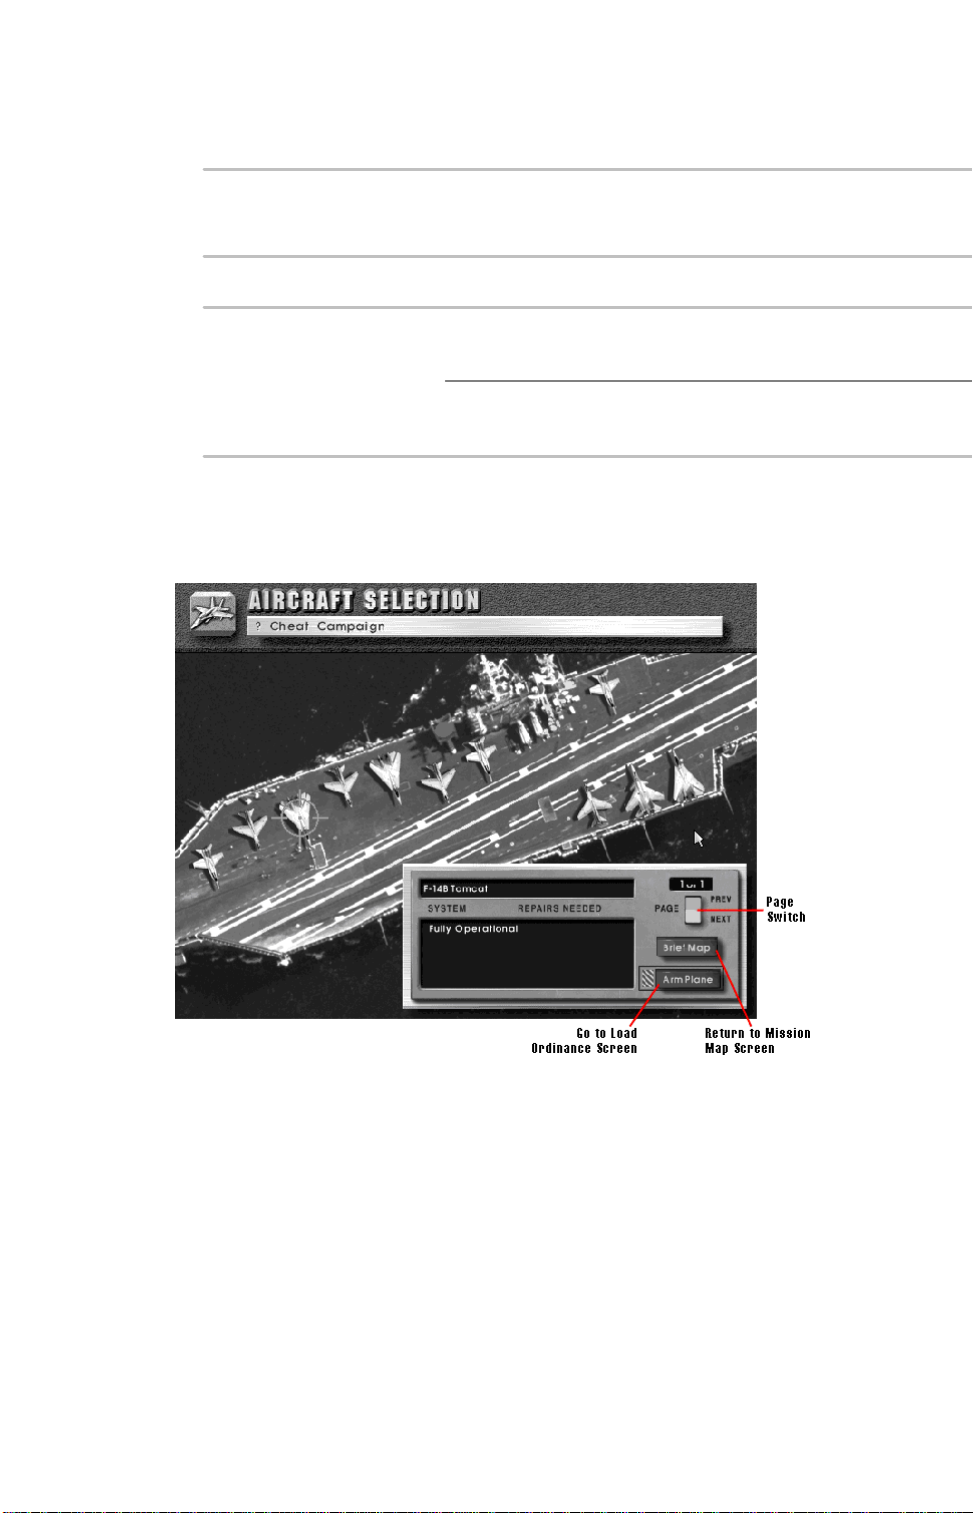
Aircraft Selection Screen
The Aircraft Selection Screen shows all of the aircraft available to you for the
rest of the campaign. This is where you decide which aircraft you’ll take up on
the mission.
There are a few considerations involved in selecting an airplane. Suitability to
the mission is your primary consideration. Here knowledge of the aircraft
available to you is invaluable. For example, it wouldn’t be wise to undertake a
strike mission in a F-14B, which lacks strike capabilities. Likewise, don’t rely
on the A-7E to be a good interceptor — it lacks speed and maneuverability.
Choose the right airplane for the right job.
Your second consideration is damage. It’s almost inevitable that your aircraft
will take damage in some missions. Damaged airplanes must be repaired, and
the man-hours of mechanic’s time available to you are limited. For details on
repairing aircraft see Repairing Aircraft.
Click on the airplane you want to fly on the mission , and then click on the
Arm Plane button or press Enter.
Page 17
Aircraft Selection Menu Bar
Cheat Menu
Option Description
Allow Flying Any Plane Allow unlimited airplanes for the
campaign, including the F-22,
which normally doesn’t appear
until Mission 40. As a bonus,
you can also fly the F-104, which
would not appear on a carrier in
real life.
Campaign Menu
Option Description
Replay This Mission Go bacto the beginning of the
mission so you can hear the
videos again.
Exit Campaign Return to the Choose Activity
Screen.
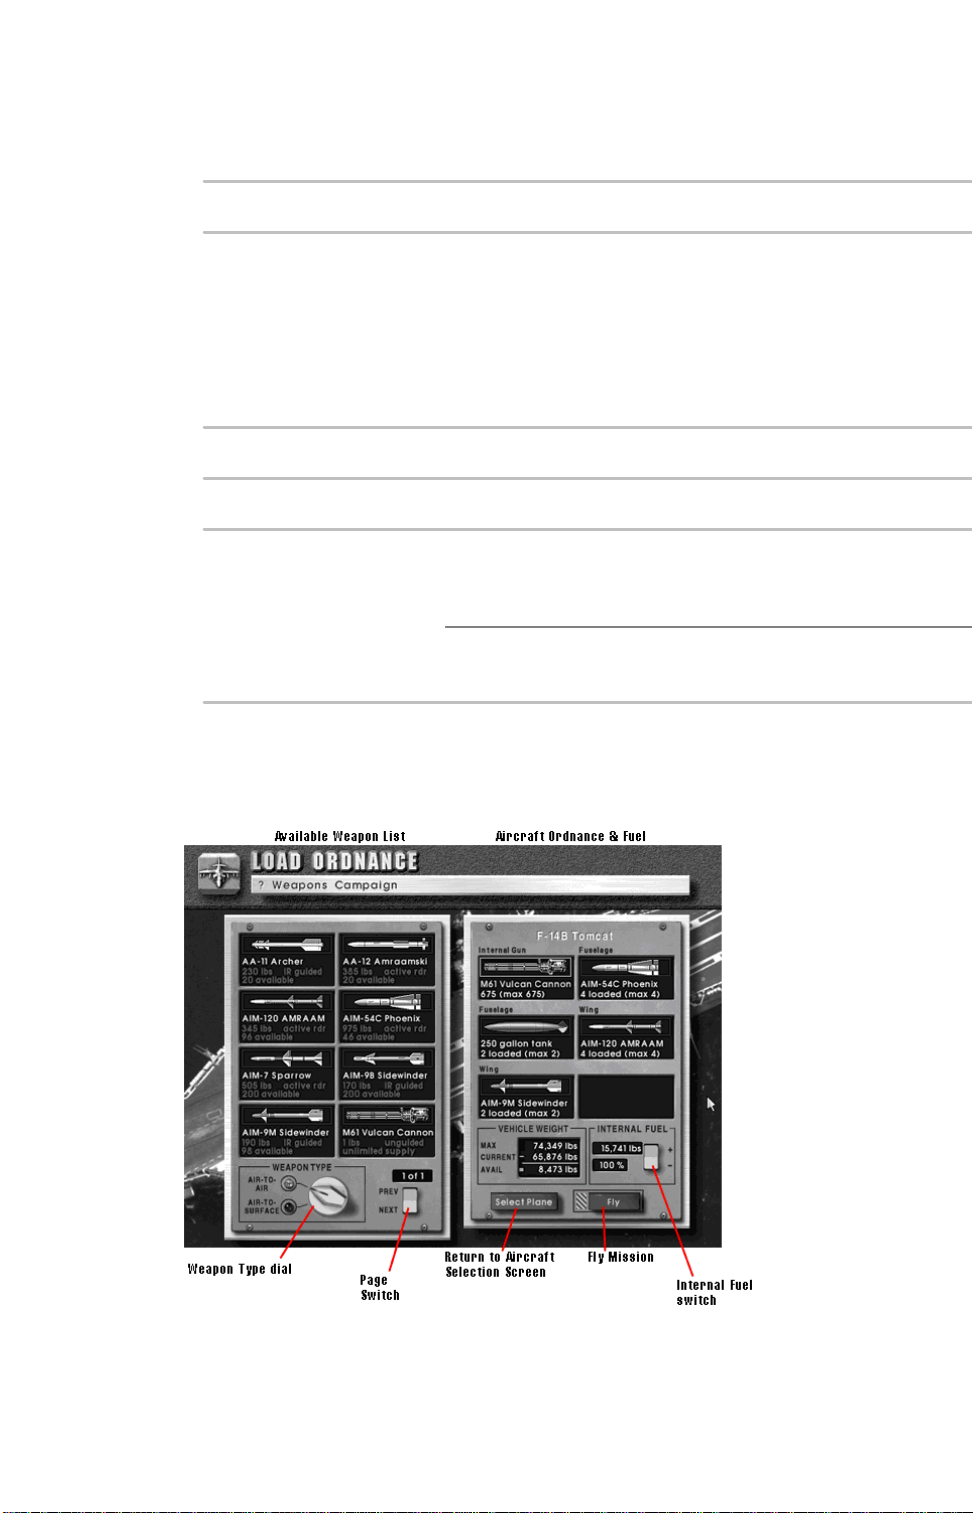
Load Ordnance Screen
The Load Ordnance Screen allows you to designate the number and types of
weapons your aircraft will carry in the mission. Your airplane’s hardpoints
appear on the right, while available weapons appear on the left.
Loading & Unloading Weapons
Use your mouse to choose weapon types (Air-to-Air or Air-to-Surface) by
Page 18
clicking on the red lights next to the Weapon Type dial.
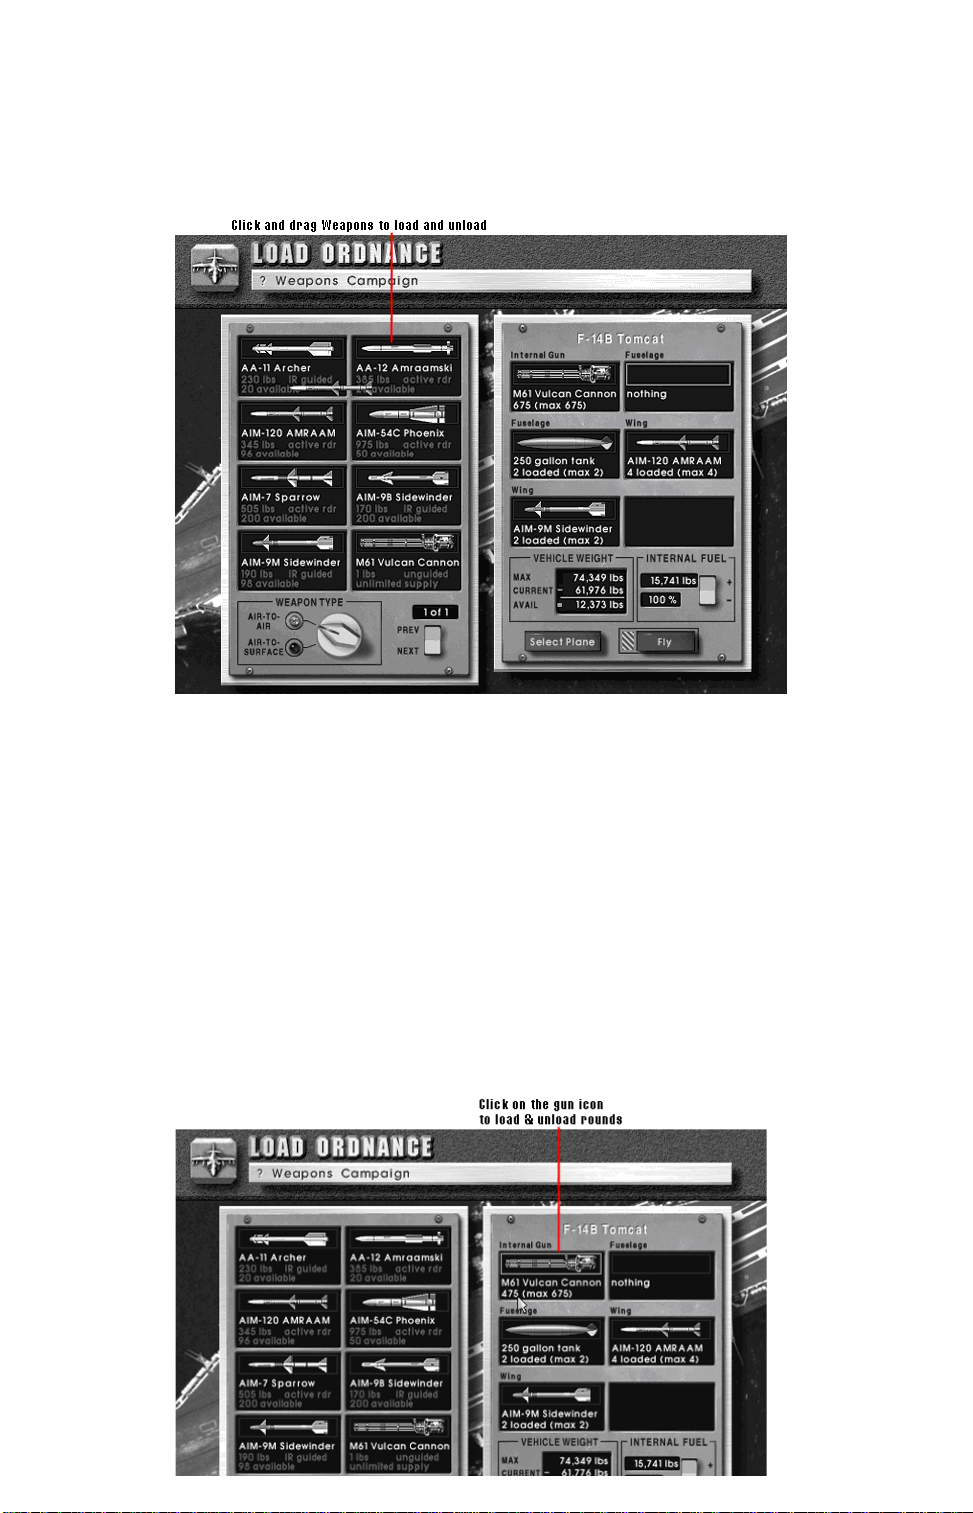
To load weapons or extra fuel tanks onto hardpoints, move the mouse cursor
over a weapon, hold down the mouse button, and drag the weapon to the
hardpoint.
To unload specific weapons from your hardpoints, move the mouse cursor over
a weapon, hold down the mouse button, and drag the weapon bacover to the
weapon list. You can also select Unload All from the Weapons Menu to clear
all ordnance from your aircraft.
Weapon loads on aircraft must be balanced — that is, the weight distribution
on the wings and fuselage must be equal. Your weapon load is automatically
balanced for you as you choose weapons.
If you need to adjust the fully loaded weight of your airplane, you can left-click
on hardpoints to increase weapons or right-clicto decrease weapons. Once
you’ve loaded the ordnance you want on the mission, click on the Fly button or
press Enter.
Loading & Unloading Gun Rounds
To unload gun rounds, clicthe right mouse button on the gun icon. To reload
gun rounds, clicthe left mouse button on the gun icon.
Page 19
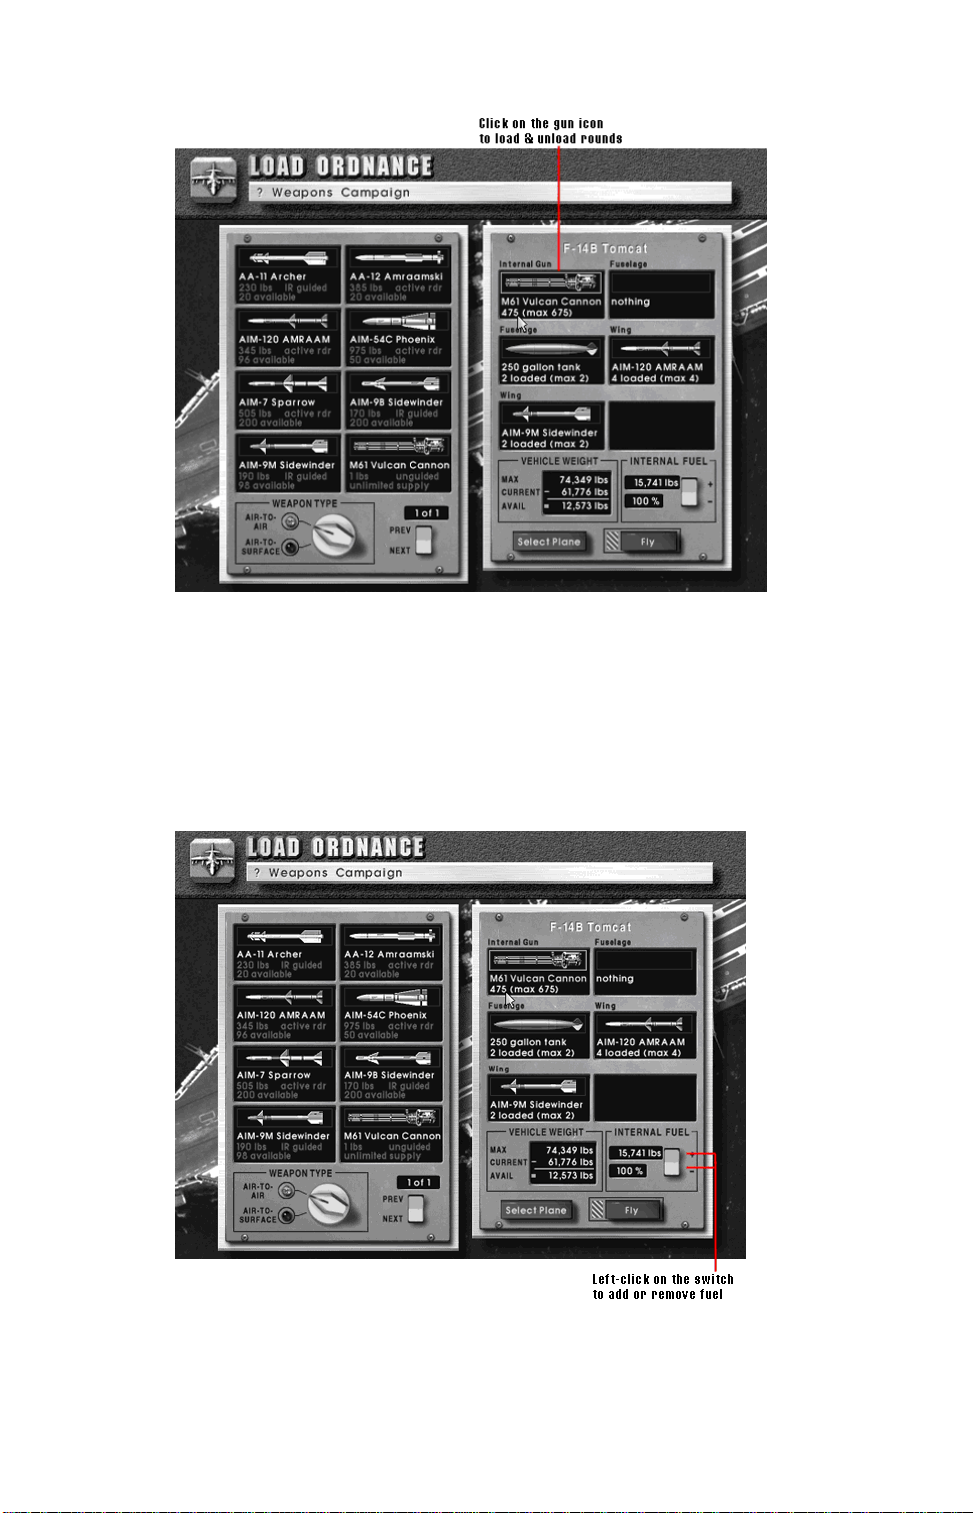
Adding & Removing Fuel
The current takeoff weight (in the Vehicle Weight box) is the combined weight
of your airplane, weapons, and fuel. You may need to reduce your internal fuel
to accomodate more weapons or, eliminate weapons to increase your fuel for
long-range missions. For example, the Su-33 has a massive internal fuel tank,
giving it exceptional range; however, at 100% fuel it can barely carry a few
missiles. To remove fuel from your internal fuel tank, move the mouse cursor
to the Internal Fuel Switch and left-click on the minus (-) end. To add fuel,
left-click on the plus (+) end of the switch.
Note that you must keep your weight under the maximum takeoff weight or
you won’t be able to fly.
Load Ordnance Menu Bar
Page 20

Weapons Menu
Option Description
Unload All Unload all weapons from your
aircraft. Your internal gun
remains fixed, though it now
carries no rounds. Your internal
fuel supply remains unchanged.
Cheat (load anything anywhere) Gives you unlimited vehicle
weight, allowing you to load as
many weapons as you like onto
your hardpoints. Note that the
number of hardpoint stations
remains the same, thus limiting
how many kinds of weapons you
can take.
Campaign Menu
Option Description
Replay This Mission Go bacto the beginning of the
mission so you can hear the
videos again.
Exit Campaign Return to the Choose Activity
Screen.
Ending the Mission
You can end a mission by selecting End Mission (Ctrl-Q) from the ? Menu or
by exiting to DOS (Ctrl-C).
In order for the mission to end successfully, you must achieve all of your
mission objectives and get within 8 nm of the carrier. A radio message —
“We’re almost home!” — lets you know when you’re in the carrier’s protective
zone.
If you don’t achieve your mission objectives but make it bacto the carrier, you
fail your mission. If you end the mission before you make it bacto the carrier’s
protective zone, you fail the mission and lose an airplane.
Ejecting is another way to end the mission, and it’s a risky one at that.
Whenever you bail out, you lose that airplane from your inventory. If you’re over
enemy territory, you also run a risof being captured by enemy forces. This
ends the campaign immediately. If you’re rescued, you continue the campaign
minus the aircraft you lost.
Repairing Aircraft
After each mission, the Aircraft Repair Screen appears. This screen allows
you to make repairs to the limited number of airplane’s available to you in
Campaign Mode.
Page 21

Anytime an aircraft is hit by enemy weapons, it takes damage. Aircraft require
a high degree of maintainance — even the stress of normal flight will result in a
small fraction of miscellaneous damage to your airplane.
Damage is measured in terms of percentages. At 100% damage, your airplane
is guaranteed the loss of one or more critical systems: oil lines, fuel tank,
radar, weapons, control surfaces, etc. Your airplane can take damage beyond
100%, but it won’t be capable of flying again until its damage is repaired to
under 100%.
You are allotted 50 man-hours of repair after each mission. You don’t
necessarily have to repair the airplane you just flew — you can choose to
spend these hours on any damaged aircraft on the deck. Note, however, that
hours are not cumulative; that is, you cannot save them from mission to
mission. If possible, spend all of the hours available repairing aircraft, because
they won’t be available to you on the next mission.
If an aircraft takes damage, you’ll notice yellow mules surrounding it. The more
mules, the more damage the aircraft has taken. You can view the exact
amount of damage on any of your airplanes simply by pointing the mouse
cursor at the airplane and clicking.
To repair the damage to an airplane, click on the damage line in the selection
panel. The man-hours needed to repair it are automatically subtracted from
your total.
Death, MIA, Reassignment
There are several ways for the campaign to end permanently. Your pilot can
die. He can bail out and get captured by the enemy. Or he can fail more than
five missions and get reassigned to some other part of the world.
In all of these unfortunate events, there is a way to turn bacthe hands of time
and give your hero another chance. After flying the losing mission, a dialog
panel will appear asking you if you want to try this mission again. If you select
No, you’re pilot is gone forever and that campaign is over. If you select Yes,
wait for the mission brief screen to appear. If you don’t want to replay the
mission now, select Exit Campaign from the ? Menu. If you don’t actually
want to replay the mission, just wait for the Mission Brief Screen to appear
and select Exit Campaign from the ? Menu.
Winning The Campaign
A campaign consists of a series of missions which must be executed in order.
As in real life, your primary goal is survival. You must survive all of the sorties
in your tour in order to win. This means that you don’t have to repeat individual
missions until you succeed at each one. If you fail a particular mission, its
assumed that other pilots step in and achieve your mission objective for you.
Keep in mind that the Brass doesn’t like to re-deploy assets to cover your
failures. While your superiors understand the formidable challenges you face,
they expect maximum performance from you. If you fail more than four
missions, you will be assigned a different tasfar away from the carrier. The war
will be over for you.
Resource Management
You begin the campaign with a limited number of aircraft of fighter aircraft.
Page 22
What you see on the decis what you get, except that you have an unlimited
number of A-7E attack aircraft. In addition to your initial aircraft, you receive
one F-22 after completing Mission 39.
The goal is to complete the campaign with a limited number of aircraft and
missiles. Lose all of your best aircraft in the beginning missions and you may
find yourself in trouble down the line. Waste all of your expensive, high-tech
missiles too soon and you may not have enough to hit critical targets later on.
Continue Old Campaign
Campaigns are saved under the names of pilots. The Continue Old
Campaign option brings you to the Select Pilot Screen. Select the pilot
associated with the saved campaign you want to play.
For more details, see Select Pilot Screen under Start New Campaign in this
chapter.
Configure Hardware
The Configure Hardware option allows you to change the current game
configuration. Consult the Install Guide for more details on configuring the
game.
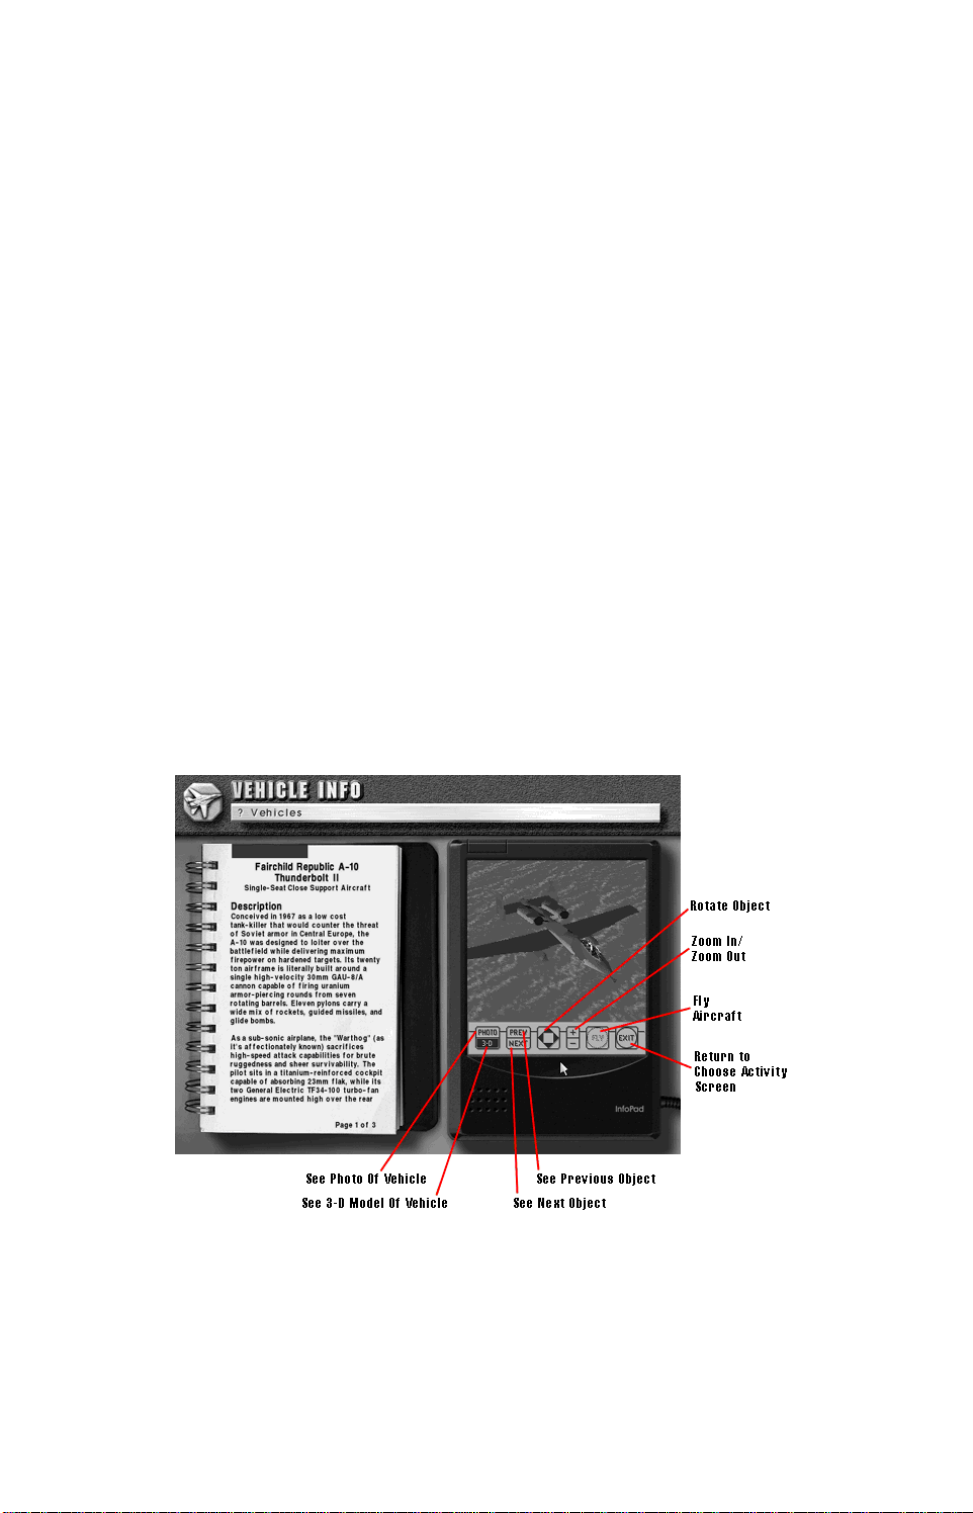
See Vehicle Info
The See Vehicle Info option lets you view all of the aircraft, ships, ground
vehicles, and objects in U.S. Navy Fighters.
Click on the onscreen options to manipulate your view or to looat another
object.
Use the Page Up and Page Down keys to flip through the text describing the
object. When you are finished looking at vehicles, click on the Exit option or
press Esc.
Vehicles Menu
Use the Vehicles Menu to change the class of vehicles you’re viewing.
Page 23
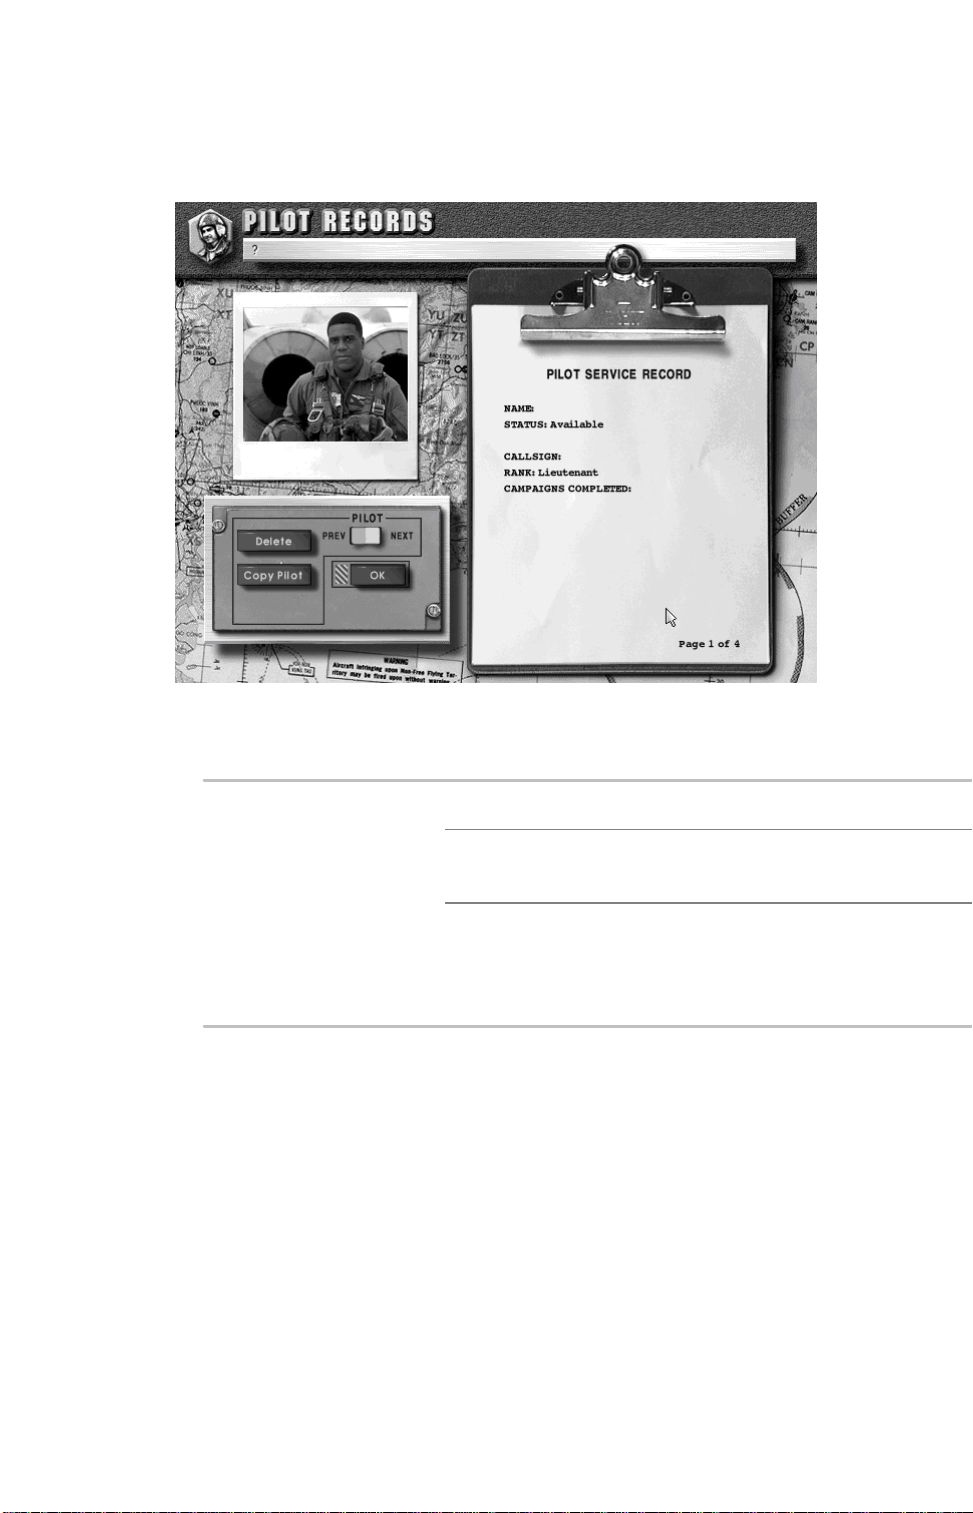
View Pilot Records
The View Pilot Records option lets you view all of the active and inactive
pilots.
Use the Page Up and Page Down keys to flip through the clipboard pages,
which allow you to view your aircraft’s nose and tail art as well as any
campaign medals the pilot may have earned.
Pilot Switch Clicswitch to view your pilots.
Delete Pilot Delete the pilot you’re currently
viewing.
Copy Pilot Create a backup copy of your
pilot. If your pilot is killed or
captured, you may resume his
career from the last backup.
When you’re finished viewing your pilots, press Oor press Enter to return to
the Choose Activity Screen.
Page 24
Chapter 2
COCKPIT FAMILIARIZATION
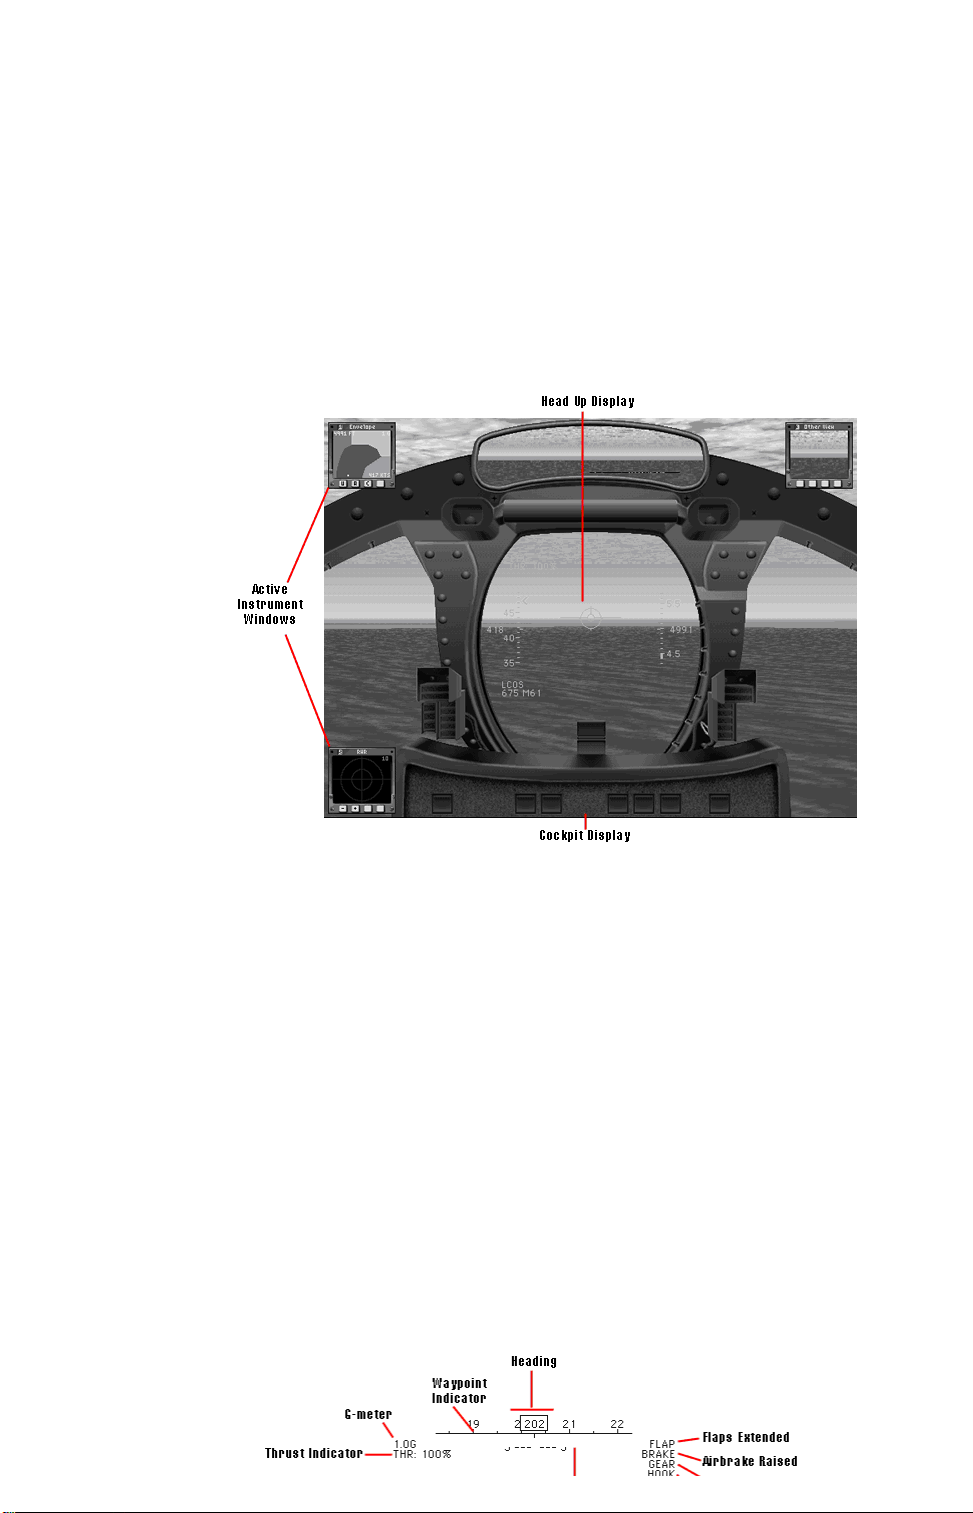
Cockpit Elements
While flying, your immediate environment consists of a cockpit display, the
Head Up Display or HUD, and a number of instrument windows that you can
activate.
The Cockpit Display
You can display the cockpit for added realism or hide it in order to increase
your view of the world outside. Press Backspace to turn the cockpit on or off.
The Head Up Display
The Head Up Display, or HUD, is a transparent sheet before the glareshield
upon which critical information is projected. The HUD reduces the need to look
at other instruments in the cockpit, thus allowing the pilot to concentrate on
the combat situation.
Information Windows
Information Windows let you display important instruments, views, and
information in the corners of your screen. You choose which windows are
displayed, depending on the nature of the task.
HUD Flight Information
Basic flight information is displayed whenever the HUD is active. Each
airplane’s HUD has slightly different symbology. For example, altitude might
be displayed numerically, or with a “tape,” or both.
Page 25
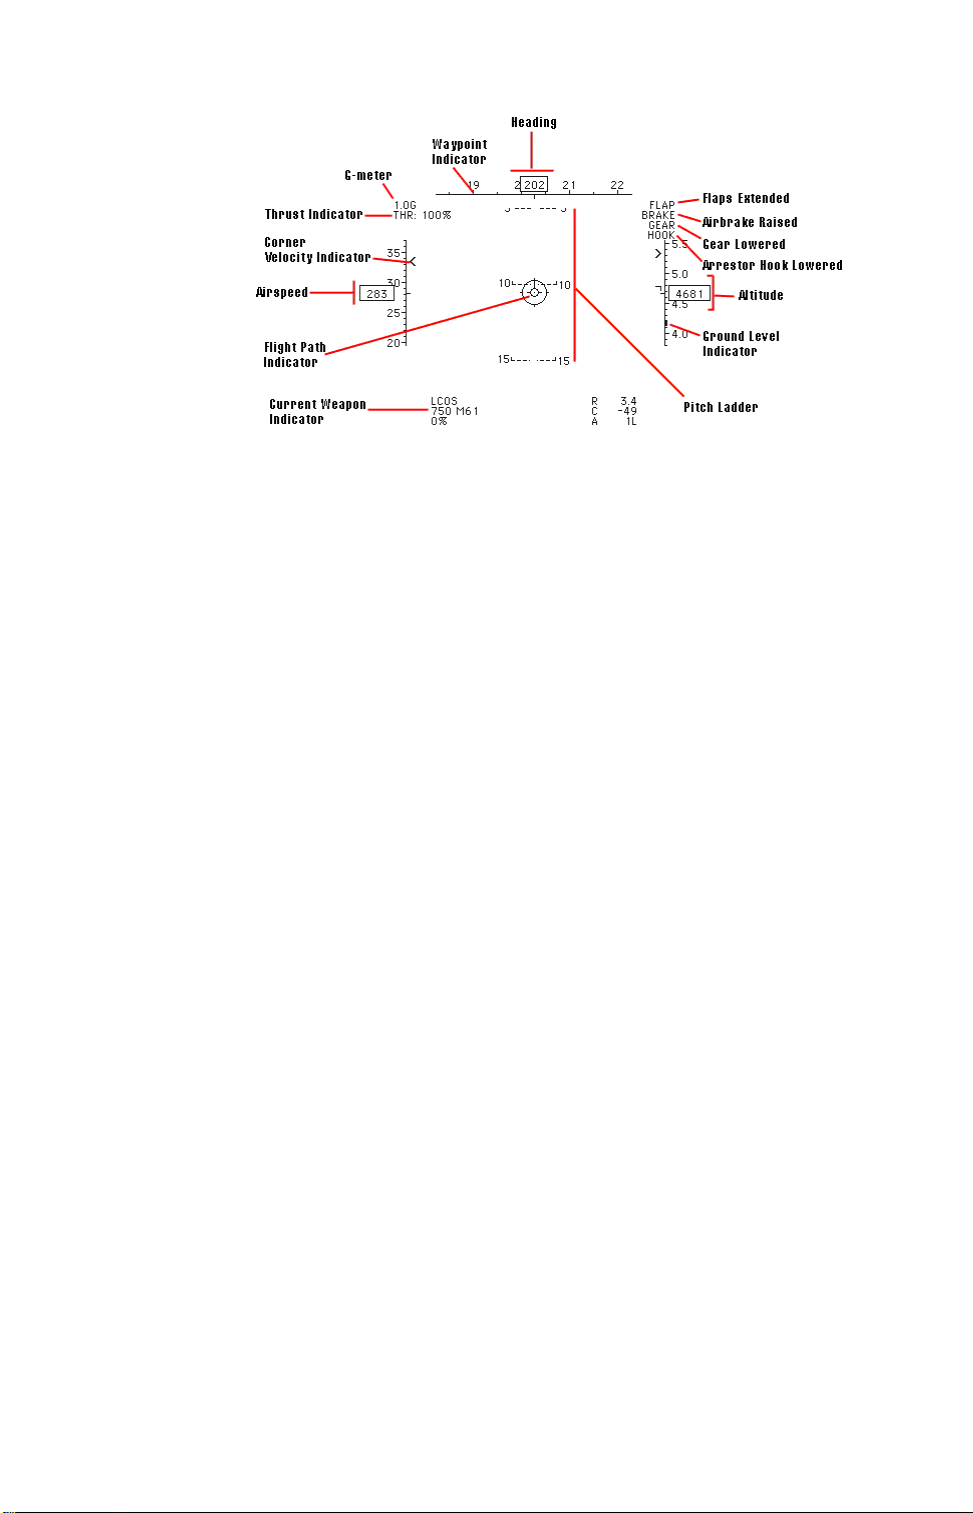
Above Ground Level Indicator
As you fly over land, ground level changes. The AGL indicates your relative
proximity to the ground below your aircraft. For example, when flying over a
mountain, you could be 5,000 feet above sea level but only 200 feet above the
ground.
Pay particular attention to the AGL when flying in clouds or fog.
Airspeed
The airspeed tape scrolls up and down, indicating changes in airspeed. Your
current airspeed is displayed numerically at the center of the tape. Indicators
show your maximum and minimum (ie, stall) speeds.
In U.S. Navy Fighters, your airspeed indicator measures true airspeed and not
indicated airspeed.
Altitude
The altitude tape scrolls up or down, indicating changes in altitude above sea
level. Your current altitude is displayed numerically at the center of the tape.
When the ILS is engaged, additional marks indicate your current vertical
speed (how fast you are diving or climbing) and what the maximum vertical
speed allowed for landing is.
For more information on the ILS, see HUD in Navigation Mode in this chapter.
For a detailed guide to using the ILS, see Chapter 5: Carrier Qualifications.
Auto
Indicates that the autopilot is engaged and steering your aircraft to the current
waypoint. Press A to turn the autopilot on/off.
Corner Velocity Indicator
The corner velocity indicator shows your corner speed at your current altitude.
If you’re flying faster than corner speed, the cue will be displayed below the
numeric airspeed readout. If you’re flying slower than corner speed, the cue
will be displayed above the numeric airspeed readout. When you fly at the
indicated corner speed, you have maximum turn performance available. Above
or below this speed, turn performance suffers.
For more information on corner velocity, see Turn Performance in Chapter 3:
Flight School.
Page 26

Current Weapon Indicator
Indicates the current weapon and the number of rounds left.
Flaps, Gear, Brakes & Hook
The upper right hand corner of the HUD indicates the flap, gear, and brake
status. If FLAPS, GEAR, BRAKE, or HOOK appears in the upper right corner,
then the specified device is extended. If the word does not appear here, the
device is retracted.
Flight Path Indicator
The Flight Path Indicator shows which direction the aircraft is actually moving,
regardless of flight attitude. When Angle of Attack (AOA) is positive, the Flight
Path Indicator is below the HUD’s center. When the AOA is negative, the
Flight Path Indicator is above the HUD’s center.
For more information on Angle of Attack, see Chapter 3: Flight School.
G-Meter
The G-meter shows how much G the aircraft is currently pulling. For more
information on role of G-Force in maneuvering, see Chapter 3: Flight School.
Heading
The heading tape is your compass. It scrolls right and left, indicating changes
in your heading. Your current heading is displayed numerically at the center of
the tape.
Pitch Ladder
The pitch ladder indicates the aircraft’s pitch and roll relative to the horizon.
The center of the HUD always represents where the nose of your aircraft is
pointing. Each pitch ladder line represents 5 degrees above or below the
horizon. Positive pitch lines — indicating that the nose is pointed above the
horizon — are solid. Negative pitch lines — indicating that the nose is pointed
below the horizon — are represented by dashed lines. The ends of the pitch
lines always point toward the horizon.
The pitch ladder lines also represent your aircraft’s roll. Think of them as
representing your wings: when the lines are horizontal, your wings are parallel
to the horizon. When the lines are vertical, you wings are at a right angle to
the horizon.
Thrust Indicator
The thrust indicator shows the engine’s current throttle setting as a
percentage of maximum engine output. AFT indicates that afterburners have
been lit.
Time Compression Level
Rate of time compression appears in the upper right corner when time
compression has been activated. During time compression, your stick inputs
are reduced so your airplane is still controllable.
Page 27
Waypoint Indicator
The waypoint indicator moves along the underside of the heading display
showing the direction to the selected waypoint. When the indicator is centered
under the heading readout, you are flying directly at the next waypoint.
For more information on waypoint navigation, see The HUD in Navigation Mode
in this chapter.
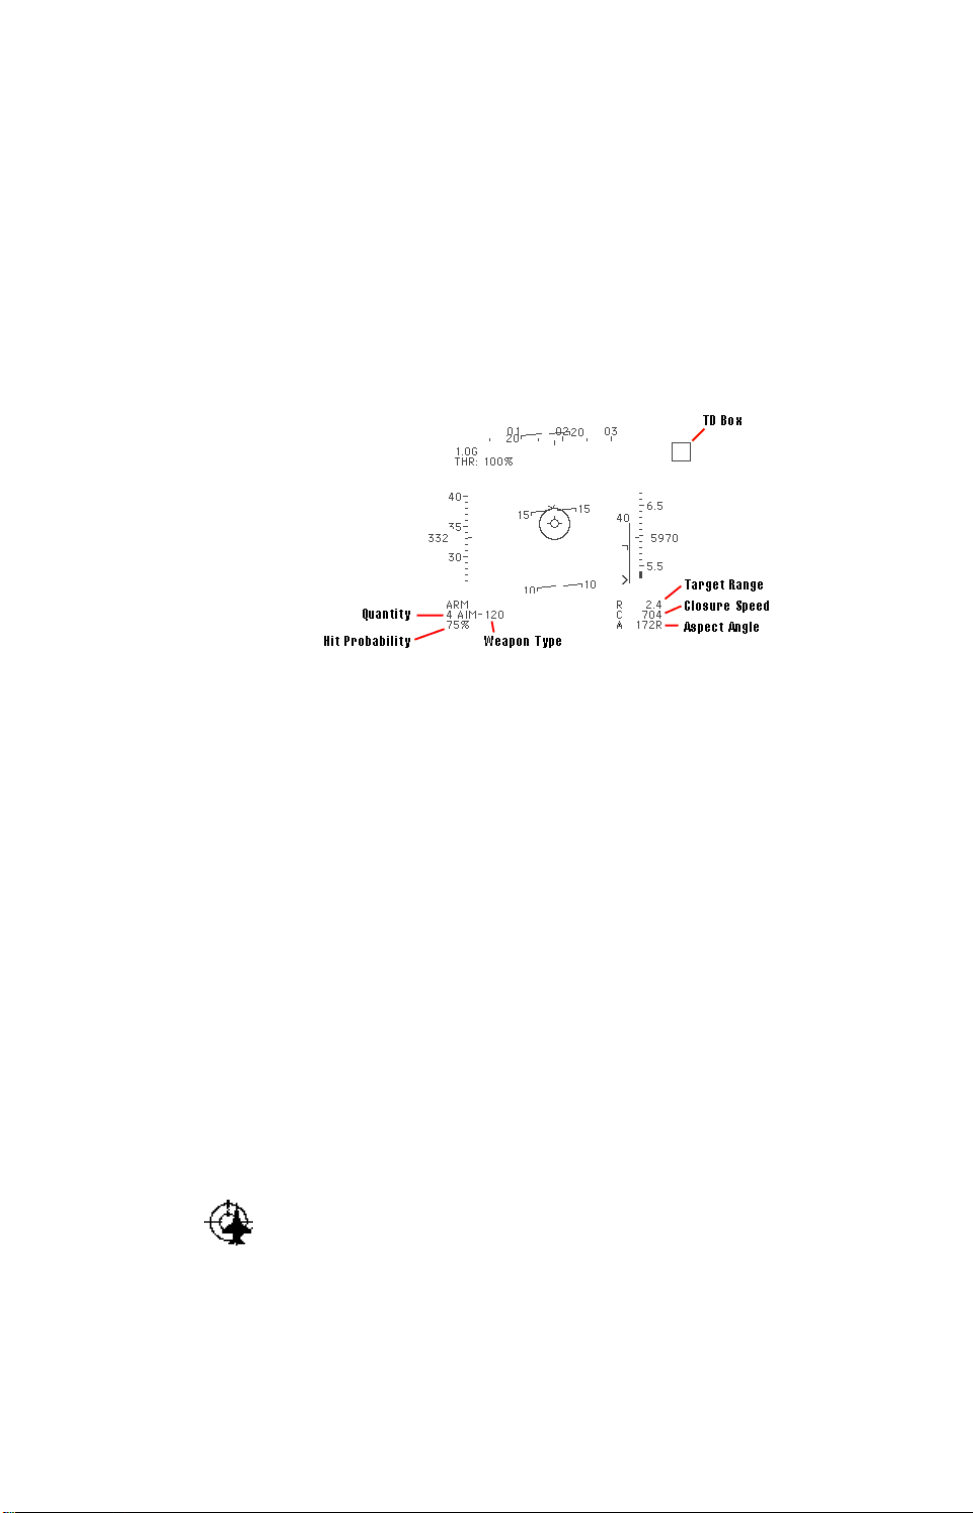
The HUD In Weapons Mode
Weapons Mode provides you with targeting symbology needed to designate
and engage targets.
Aspect Indicator
Indicates a targeted aircraft’s aspect angle in degrees. The aspect angle
measures the angle between the target’s nose and your airplane. When the
target is at 180 degrees, it’s facing you. 90L means that the target’s left wing
is facing you; 90R means you’re looking at the right wing. When a ground
target or ship is targeted, the aspect indicator reads XXXX.
This is the numeric equivalent of the aspect angle indicator in the center of the
HUD (see HUD Flight Information above).
Closure
Appears beneath the range indicator showing the target’s speed relative to
yours. A positive closure means the target is approaching you, a negative
closure means it is moving away.
Hit Probability
Shows the weapon’s current hit probability. The percentage takes into account
all factors which may affect the missile’s overall chance to hit — such as
weather — but does not consider enemy maneuvering.
IN RNG appears next to the hit probability when the target is within the
weapon’s minimum/maximum range.
Note that your missile must have a lock – not just a
minimum hit percentage – in order to have any chance
of hitting.
Offscreen Target Marker
The Offscreen Target Marker shows the shortest path to your current target. In
order to follow the shortest path, roll your airplane until the marker is at the top
of your screen, and then pull back on the stick. As long as the marker
Page 28
remains at the top of the screen you’re following the shortest path.
Range
Indicates the range to the target in nautical miles (nm).
TD Box
The target designator box, or TD box, is superimposed on the HUD over the
target, even if the target is outside of visual range.
Weapon Type & Quantity
Displays the number and type of the currently selected weapon.
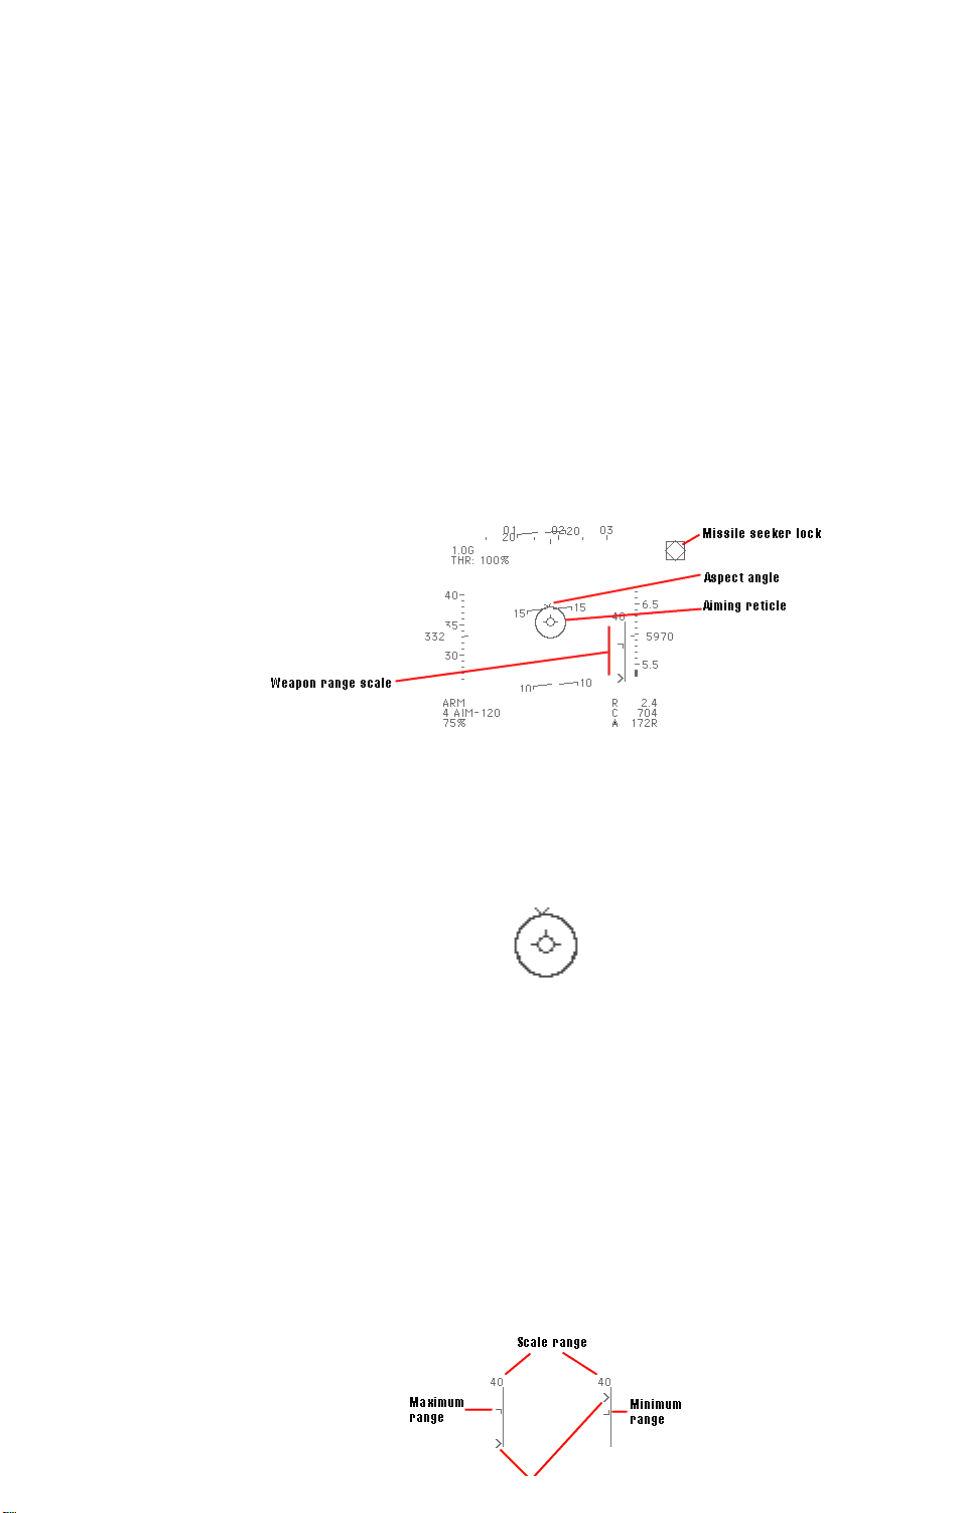
HUD in Missile Mode
In missile mode, the HUD shows not only the missile type and number
remaining, but information that’s useful in achieving the best launch conditions
for the weapon.
Aiming Reticle & Aspect Angle
The center of the HUD displays the aiming reticle, which is the center of the
missile seeker’s field of view. This circle remains fixed while the aspect angle
indicator moves around it. The aspect angle indicator shows the angle
between the target’s flight path and your line of sight to the target.
If the aspect angle indicator is at the top of the aiming reticle, the target is
heading directly toward you. If it’s at the bottom of the aiming reticle, the
target is heading directly away from you. If the indicator is along either side,
you are looking at his wing.
For hints on using the aspect angle information to your advantage, see
Chapter 6: Advanced Combat Techniques.
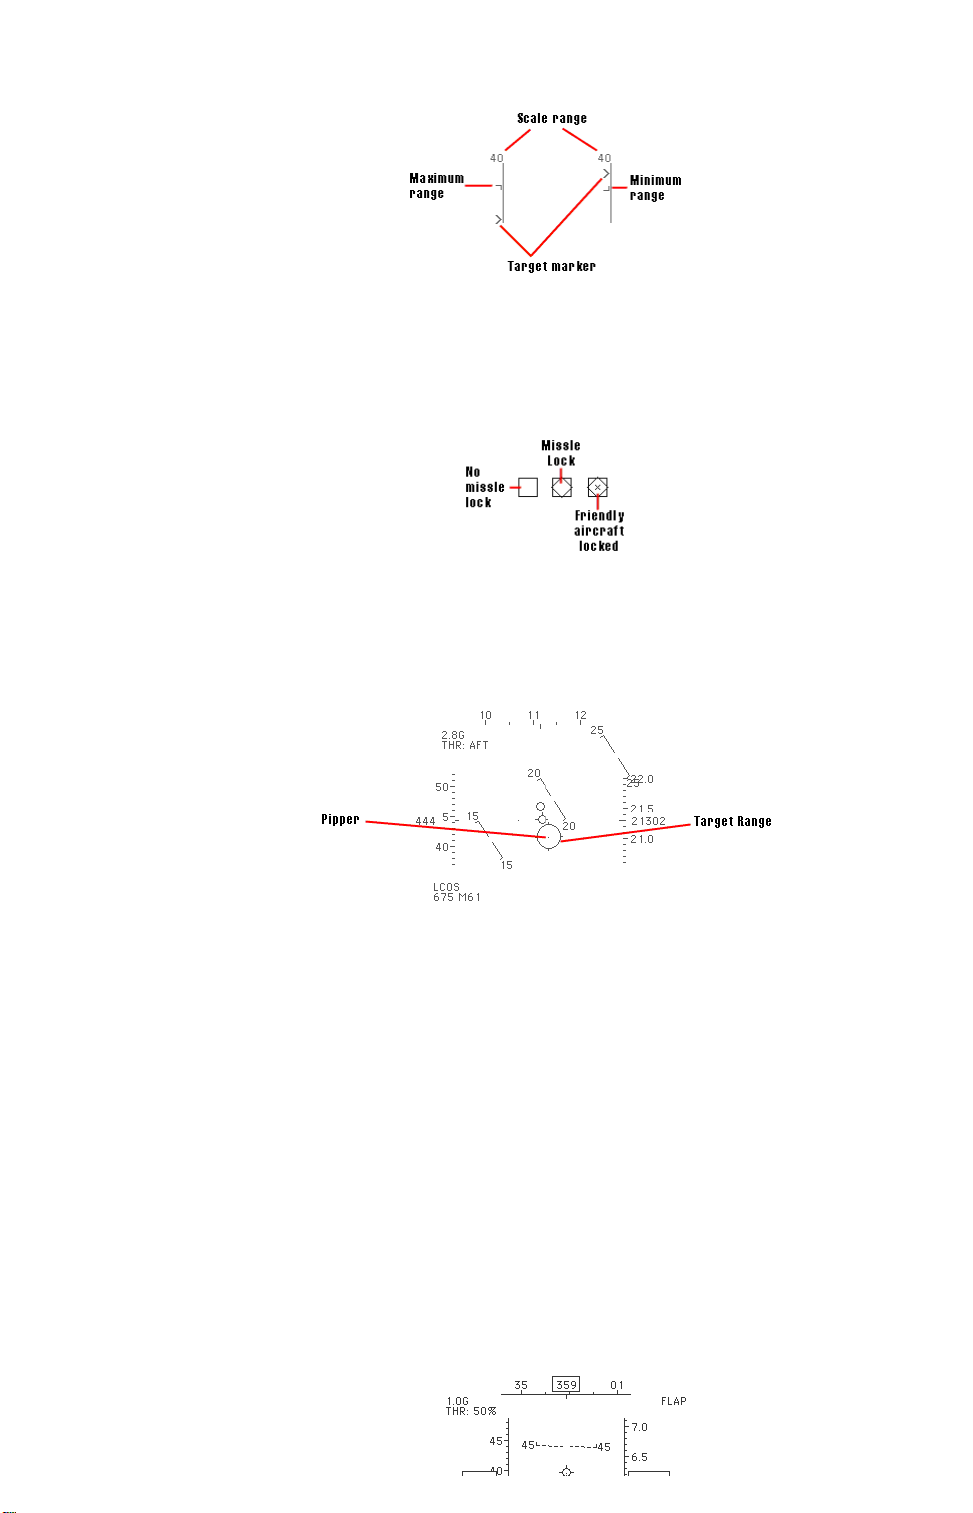
Weapon Range Scale
The vertical scale to the side of the aiming reticle shows your weapon’s
minimum and maximum range. The scale range is listed at the top of the
indicator. The target marker indicates where the current target is in the
missile’s range. If the target is outside of the missile’s range, the target
marker is not displayed.
Page 29
Missile Seeker
The missile seeker is represented by a floating diamond on the HUD. When
the missile seeker acquires the target, a flashing diamond appears in the TD
box. This indicates the missile is tracking the target and can be fired, but
does not indicate if you are in a good firing position.
HUD in Guns Mode
The HUD in guns mode shows the number of rounds left in your internal gun.
In addition, your gunsight changes depending on whether you’re attacking with
radar on or radar off.
When your radar is off, the pipper is set to indicate where a bullet will fall at
1,000 feet. If a target is beyond this distance, you need to lead the target
more. If the target is less than 1,000 feet, you need to lead it less.
With radar on and your target locked, the pipper changes range to match that
of the target and automatically calculates lead requirements. For you, this
makes life simple — just place the pipper on the target and fire. Your active
radar also provides your gun computer with range information. As you close in
on your target, a thick line moves along the perimeter of the pipper. This circle
measures range from your current position to the target. When there is no
thick arc on your pipper, your chances of hitting are zero. When the arc has
filled in the pipper, your chances of scoring a hit with a well-aimed shot are
excellent.
HUD in CCIP Mode
CCIP stands for Continuously Calculated Impact Point. The HUD in CCIP
displays all the symbology necessary to accurately strike ground targets with
unguided bombs.
Page 30
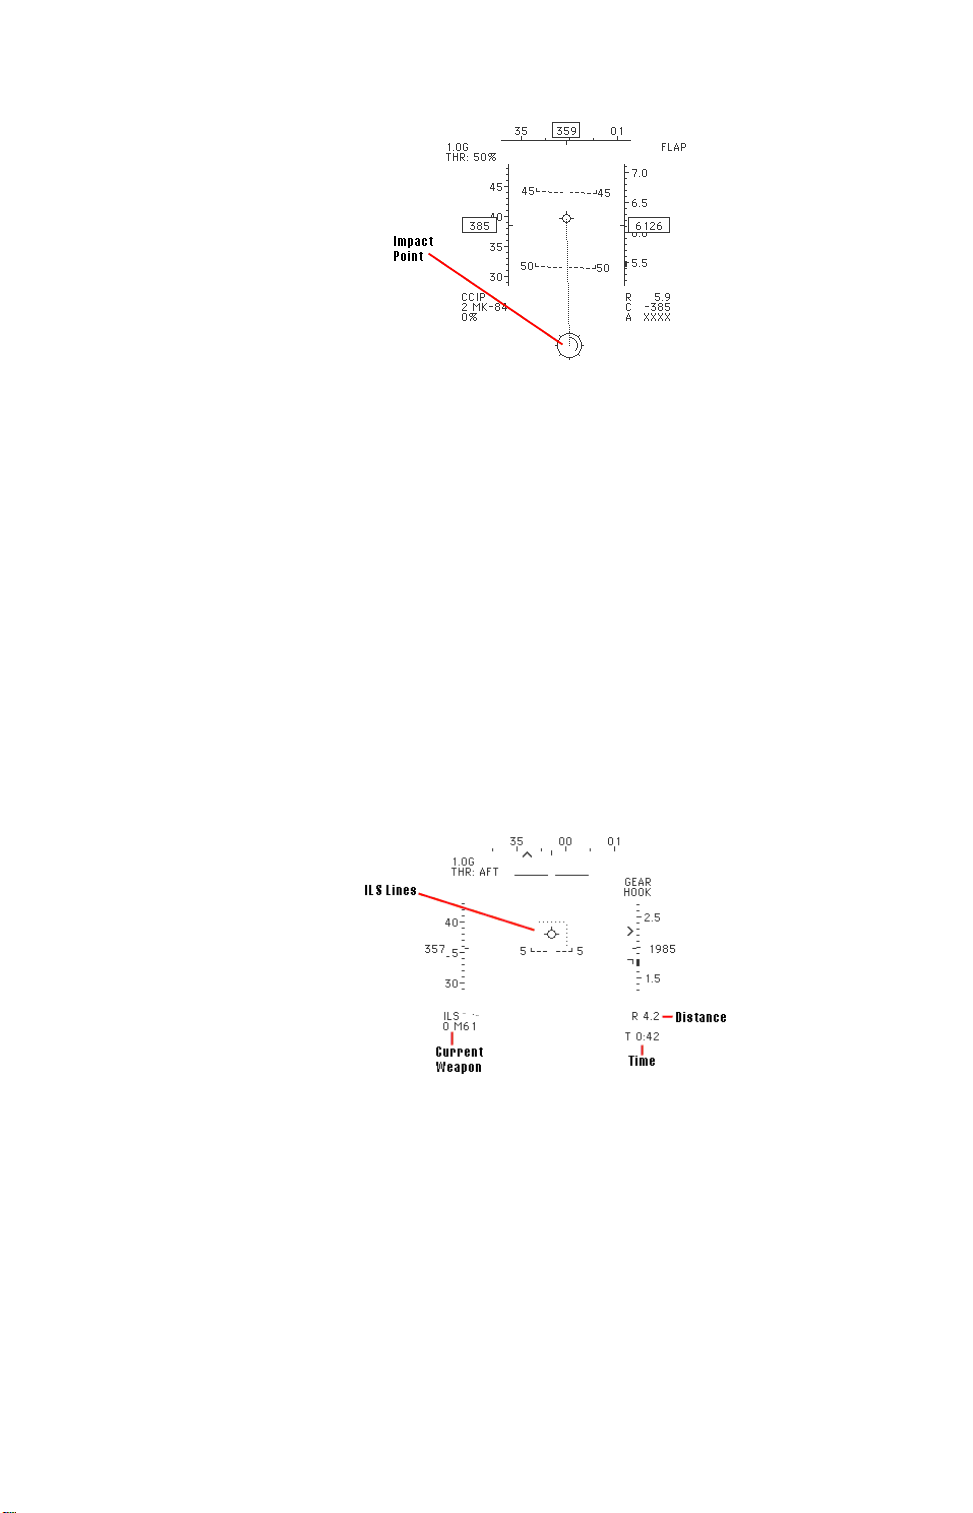
The dotted line extending from the center of the HUD indicates which path the
bombs will follow upon release, and the impact point pipper shows where the
bomb will land. In level flight, you often can’t see the pipper on your HUD; to
see the pipper, you must either dive or significantly increase speed. The
slower you fly, the steeper you must dive to keep the CCIP pipper on the
screen.
An arcing line moves inside the CCIP pipper. This circle measures range from
your current position to the drop point. When the inner arc forms a complete
circle the target point is 10,000 feet or more away. When the inner arc forms a
half-circle, the target point is 5,000 feet away. Accuracy reduces as range
increases, effectively limiting bombs to a 2 nm range. Beyond this range your
chances of hitting the intended target are very low.
The HUD In Navigation Mode
Navigation Mode provides you with the information you need to fly to
pre-established waypoints and make successful carrier landings. To switch
between Weapons Mode and Navigation Mode, press N.
Current Weapon
The current weapon is always displayed in the event that you need it.
Distance
The distance to the current waypoint in nautical miles (nm).
Time
The time to the next waypoint based on your current airspeed in
minutes:seconds
ILS System
The instrument landing system, or ILS, provides landing guidance. The ILS
Page 31

displays horizontal and vertical lines on the HUD which guide you to the carrier
during landings, especially when the deck is obscured by bad weather or
darkness. ILS lines are displayed only when you are in a landing configuration.
The ILS automatically displays on the Navigation mode HUD under the
following conditions:
Gear and hook down
Within 5nm of the carrier
Under 2,000 feet of altitude.
The ILS lines show where your aircraft needs to fly. The horizontal line shows
your altitude and the vertical line shows how well you are lined up with the
runway. The dots are tightly spaced when following a good approach and
loosely spaced when outside approach parameters. When the dotted lines
form a cross in the center of your HUD, you’re on the glide path for a correct
landing.
For more information on ILS operation and carrier landings, see Chapter 4:
Carrier Qualifications.
Instrument Windows
All instruments except the HUD are displayed in user-selectable windows.
You select only the windows you need for the current task, saving screen
space and increasing the speed of the game by closing non-necessary
windows.
Flight Envelope
Window
The Flight Envelope Window shows your aircraft’s current state within its flight
envelope.
The flight envelope is basically a series of graphs showing the aircraft’s
minimum and maximum speed and altitude and its turn performance. With the
Flight Envelope Window, you can graphically see how your aircraft is
performing within the following limits:
Stall Speed
The stall speed curve graphs the altitude and speed at which stalls occur. If
the dot representing your aircraft moves toward the left side of the envelope,
you need to pick up speed or a stall is imminent.
Wing Lift Limit
Shift - 1
The wing lift limit curve represents the aircraft’s ceiling. The aircraft can’t climb
above this altitude because the air is too thin — not enough lift can be
Page 32

generated to overcome the airplane’s weight. If the dot representing your
aircraft hits this upper limit, nothing will happen; however, since you’re in your
1g envelope, you won’t be able to do much in the way of maneuvering.
Thrust Limit
The thrust limit curve represents the limit of your engines at high altitude.
Above the tropopause (36,600), your engines can’t produce enough thrust to
go beyond certain speeds. If the dot representing your aircraft hits its thrust
limit, nothing will happen — you simply can’t go any faster.
Structure Limit
The structure limit curve represents the maximum speed your airframe can
handle. Go too far beyond this limit and your wings will tear off. If the dot
representing your aircraft approaches this limit, think about slowing down
immediately.
G-Load
Each flight envelope is defined by the number of g’s your aircraft can pull.
G-loads measure your aircraft’s turning. This is explained in detail in Chapter
3: Flight School, however, the window can be explained here briefly. To
simplify, the more G’s you’re pulling, the harder you’re turning. The number of
G’s you can pull are limited by the following factors:
Altitude At higher altitude, where the air is significantly
thinner, the wings cannot generate as much lift. As a
result, you can pull fewer G’s at high altitude than at
low altitude.
Speed The faster you’re going, the fewer G’s you can pull.
Structure An aircraft is built to endure only a certain amount of
G-force. Beyond that range, the airplane’s structure
is fatigued to the point that the wings crack.
Pilot Humans can only tolerate a certain amount of G-force
stress. Too many seconds of + 9g maneuvering and
you black out. Maneuver too long at - 5g and you
experience “red out.”
Load Amount of ordnance and fuel you’re carrying. The
more weight on your airplane, the fewer G’s you can
pull.
The Flight Envelope Window is useful for quickly seeing the number of g’s
available to you at any time. If you get involved in a turning fight with an
opponent, you typically want maximum g’s in order to out-turn your opponent.
Depending on the combat situation, you may want to be in the smallest
(highest G) envelope in the window. When used with the Corner Speed
Indicator on the HUD, you can determine what speed will give you the best
turn performance and what you need to do in order to achieve it. Note: The G’s
shown in the Flight Envelope are for “clean” aircraft not loaded down by
ordnance. Since weapons increase both weight and drag, you may not be able
to pull the maximum G shown depending on your weapon load.
Page 33

For more details on corner speed, see Chapter 3: Flight School.
Flight Envelope Window Modes
The Flight Envelope Window has three buttons along the bottom which modify
the flight envelope display.
Current Curve
Displays the the envelope for the G-load currently being experienced by your
aircraft. For example, when flying straight and level at 450 kts and 1g, the 1g
curve is displayed. When flying at 450kts at 3g, the 3g curve is displayed.
All Curves
Diplays the flight envelopes for all G-loads your aircraft is capable of. This
mode is useful for seeing how close you are to the “next” envelope and gives
you a clue as to how you can increase G. For example, if the dot appears on
the far left side of the graph, you’re moving too slowly to pull much G — you
should add thrust and/or sacrifice altitude for speed. If the dot appears near
the top, you’re already at maximum altitude — you should decrease altitude
quickly (via a Split S, for example). If the dot appears near the right side of the
graph, you’re moving too fast to pull more G — you should climb or simply put
up your brakes.
Compare Curves
Page 34

Displays your flight envelope over that of your currently selected target,
providing you with a quick comparison of aircraft performances.. Areas where
the opponent holds the advantage are shaded red.
You must have a target lock to use this display mode. For more information on
locking a target, see Targeting Commands in Chapter 5: Fundamentals of Air
Combat.
Forward View Window Shift - 2
Since you can’t always look ahead during a dogfight, the Forward View
Window gives you a look at where you’re going while your head is turned. This
compensates for the fact that in reality you can shift views more quickly than
in a simulation.
Other View Window Shift - 3
The Other View Window lets you choose another view and display it
throughout the mission. To set the window’s view, switch to another view (F2 -
F12 ). Press V to set the view as your Other View. The Other View Window
automatically appears.
Target Window Shift - 4
The Target Window lets you view your currently selected target and see data
on its skill and activities. Note: When using TV- or laser-guided bombs, the
view from the missile is displayed this window until the missile explodes.
Activity
A target’s Activity tells you what specifically he’s doing in order to complete
his Tactical Goal. This can range from SEARCHING for other opponents to
ACQUIRING, PURSUING, or doing one of many maneuvers.
Bearing
The target’s bearing is represented by hours on the clock, with 12 o’clock
being the nose of your airplane and 6 o’clock being your tail. Hi and Lo provide
a general idea of the target’s altitude relative to your own.
Damage
Damage to the target is indicated by the vertical bar on the right side of the
window. White represents damage to the target. When the bar is completely
black, the target has taken no damage. When the bar is completely white, the
target is destroyed. Damaged computer opponents suffer reduced turn
performance and reduced thrust.
Tactical Goal
A target’s Tactical Goal can be one of four things, represented by one of the
following markers:
Page 35

Marker Goal Description
A Attack Attack something other than you.
N Neutral Follow waypoints and fulfill mission.
E Evade Evade something other than you.
A Attack Player Attack you specifically.
E Evade Player Evade you specifically.
C Crash Die screaming.
Range
The distance of the target from you, measured in nautical miles (nm).
Skill
The pilot’s skill is shown by dots in the following manner:
# of Dots Skill Description
None Novice An easy target. Don’t expect
fancy maneuvers from this guy.
One Average Hard to tell if this guy’s a
turkey or an eagle.
Two Experienced Don’t expect an easy fight.
This guy’s got some cards up
his sleeve.
Three Ace A pro. He’ll turn and burn with
you until one of you earns
yourself a nylon letdown.
Type
Displays the type of target you’re facing.
RWR Window Shift - 5
The Radar Warning Receiver (RWR) Window displays all active radar sources
around your aircraft.
Page 36

The center represents your aircraft, with the top of the display indicating
what’s in front of you and the bottom of the display indicating what’s behind
you. All received radar sources appear as a green dot around your aircraft,
relative to your current position. The selected range is displayed in nautical
miles in the upper right corner.
When a radar source is detected a small “R” is displayed in the lower right
corner of the RWR. A bright “R” indicates that the aircraft has a lock on you
and may fire on you soon. If the “R” begins to flash, a missile is currently
locked on you and in flight. Your RWR also gives you other information not
available in the real world: it can detect infrared seekers, indicated by a small
“I” in the lower right corner. The “I” functions identically to the “R” — a bright “I”
means an IR-homer is locked on you, and a flashing “I” means a missile is
headed for you.
Missiles appear on the RWR as smaller dots. Rapid flashing indicates the
missile is actively tracking you. Your missiles will also appear on the RWR,
so pay attention. Lastly, the RWR shows the status of your jamming
equipment, displaying “JAM” when your ECM gear is activated.
Changing RWR Range
Press period (.) to increase RWR range. Press comma (,) to decrease RWR
range. Maximum RWR on any aircraft in U.S. Navy Fighters is 50 nm.
NAV Window Shift - 6
The NAV Window shows bearing and range to waypoints along with the
estimated time of arrival (ETA) in minutes:seconds. The currently selected
waypoint is always highlighted.
Waypoints must be manually selected except when the autopilot is in
operation. Press W to switch to the next waypoint, or press Shift-W to go to
the last waypoint. Alternately, you can change waypoints by clicking on the +
and - buttons at the bottom of the NAV Window.
“Bearing” is not the heading you must fly, but the number of degrees you must
turn in order to fly directly at the waypoint. If the bearing is negative, turn left. If
Page 37

the bearing is positive, turn right.
System Status Window Shift - 7
The System Status Window displays throttle, engine temperature, oil
pressure, and hydraulic pressure. This view is useful for assessing systems
damage and viewing fuel levels.
Stores Window Shift - 8
The Stores Window displays the number and type of weapons the aircraft
currently carries and how much fuel is remaining.
You can change your current weapon using the square bracket keys ( [ ] ).
Alternately, you can change current weapons by clicking on the + and buttons at the bottom of the Stores Window.
Radar Window Shift - 9
The Radar Window displays your radar scope (in a two-seater, that of your
RIO). The window will appear only if your radar has been activated (press R).
Deactivating your radar (press R again) automatically closes the radar window.
The Radar Window is a top-down view. The nose of your aircraft is in the
center of the bottom edge of the window. The top edge represents far edge of
radar coverage. Contacts appear as dots on the grid.
Your radar can detect aircraft and large surface objects such as ships.
Interference from the ground prevents your radar from detecting tanks or small
vehicles. To detect these targets, you need to carry either an infrared detector
or HARM missiles, which home in on enemy radar emissions.
TWS/RWS Indicator
Page 38

The TWS/RWS Indicator indicates whether the radar is in Range While Search
(RWS) or Track While Scan (TWS) mode.
Range While Search (RWS) mode uses continuous wave emissions to provide
contact range and bearing at extremely long ranges. Primarily a scanning
mode, RWS cannot provide detailed tracking information. You cannot target a
contact while in RWS mode. RWS mode engages automatically when you
increase radar range past maximum tracking range.
Track While Scan (TWS) mode uses pulse-Doppler radar to target a
designated contact, thereby providing detailed tracking information, while still
providing scanning of other nearby contacts. TWS mode automatically
disengages when you increase radar range past maximum tracking range.
Aircraft Max RWS Range Max TWS Range
A-7 150 nm 50 nm
F-104 150 nm 25 nm
F-14 150 nm 150 nm
F/A-18 150 nm 50 nm
F-22 150 nm 150 nm
Su-33 150 nm 100 nm
Radar Contacts
Contacts appear as dots on this grid based on their range from your aircraft.
For example, with a 100 nm range selected a contact at 50 nm would appear
in the middle of the display, a contact at 75 nm would appear near the top,
and a contact at 10 nm would appear near the bottom. If you decrease range
to 50 nm, the 75 nm contact disappears and the others both move closer to
the top of the display.
At long range, radar may be unable to distinguish between multiple targets
flying closely together. A tight formation of two MiG-29s at 100 nm may
appear as a single dot on your radar until you get much closer. Beware of
single contacts: they may unexpectedly multiply!
Aircraft appear as small squares. In TWS mode, a small “tail” on the target
indicates the contact’s heading relative to your heading. When a contact is
targeted, two vertical lines, called “captain’s bars,” surround the designated
contact. Surface targets appear as single-pixel dots.
Page 39

Target Elevation & Azimuth
Two arrows move along the left and bottom edges of the radar window. The
arrow along the left edge shows the target’s altitude relative to your own. If the
target is beneath the plane of your nose, the elevation indicator moves below
center. If the target is above the plane of your nose, the elevation indicator
moves above center. The bottom arrow indicates target azimuth, or horizontal
displacement. If the target is left of your nose, the azimuth indicator moves left
of center and vice versa.
Increasing/Decreasing Radar Range
Press period (.) to increase radar range. Press comma (,) to decrease radar
range. Maximum RWS and TWS ranges are listed above.
Historical Mode
Press Y to activate your radar system’s historical mode. This displays a
series of dots behind a contact giving a visual representation of the contact’s
movement over time. Alternately, you can click on the Y button on the Radar
Window.
IR Mode/HARM Mode
The Radar Window is also used for aircraft carrying infrared sensors or HARM
missiles.
Airplanes equipped with the AAS-38 FLIR IR-sensor can detect target objects
based on their infrared signatures. The IR-sensor has two advantages — it
allows you to detect ground targets, and enemies are not aware that you’ve
targeted them. Unfortunately, it’s less effective in bad weather than radar, and
Page 40

it’s short range limits you to close engagements.
Note that the SU-33, SU-27, and MiG-29 all have built-in IR sensors.
Press I to turn off your radar and activate the IR-sensor, or click on the “M”
button on the Radar Window. You designate targets with the IR-sensor
exactly as you would with your active radar. If you want to return to active
radar mode, press R.
If your aircraft is carrying HARM missiles, press M to turn off your radar and
turn on the radar-homing seeker used by the missile. The HARM missile is
deadly against enemies employing radar. You designate targets for the
radar-homer as you normally would for your active radar. If you want to return
to active radar mode, press R. For more information on IR and HARM modes,
see Chapter 5: The Fundamentals of Air Combat.
Authentic vs. Standard Radar CRT
The Standard Radar CRT is a top down view of what’s in front of your airplane.
Authentic Radar mode works differently. It’s basically a graph with vertical
lines indicating angles off your airplane’s nose and horizontal lines indicating
range.
To figure out where a contact is, you must count over horizontally to its
approximate angle off your nose, and then go up to determine range. Contacts
are also displayed differently on the Authentic Radar CRT. The “tail” indicating
the contact’s flight path is relative to its angle off your nose. For example, a
contact with its flight path “tail” pointing down is actually headed directly for
you.
View Controls
Lose Sight, Lose The Fight - Motto, US Navy Fighter Weapons School
The fanciest flying in the world will still get you killed if you don’t know where
the bandit is. Keeping visual contact, or tally, on the bandit is arguably the
most critical aspect of aerial combat.
Page 41

Fixed Views
Key View Description
F1 Forward Look ahead. This is your
normal view — when in
doubt, press F1.
F2 Back Look over your tail at
what’s behind you. This
is your “check six” key.
F3 Up Look above the standard
F1 view. This is useful in
a turning dogfight.
Tracking View
Key View Description
F4 Tracking This view follows the
current target within the
bounds of normal head
rotation.
External Views: Player Referenced
Key View Description
F5 Player ->
Threat
F6 Player ->
Wing
F7 Player ->
Target
External Views: Other
Key View Description
F8 Target ->
Player
External view of your
aircraft, facing any
inbound missiles.
External view of your
aircraft, facing your
wingman.
External view of your
aircraft, facing your
current target.
External view of your
current target, facing your
aircraft.
F9 Fly By External view of your
Page 42

aircraft from a fixed point
as it flies by.
F10 External View External view of your
aircraft.
F12 Missile ->
Target
External view of your
missile, facing its current
target.
View Reference Keys
The Alt and Ctrl keys change which object your view is referenced from.
Pressing Alt makes the current view relative to your target instead of your
aircraft. Pressing Ctrl makes the current view relative to your last launched
missile instead of your aircraft.
View Panning & Zooming
The internal views and fixed external views can be rotated or panned using the
arrow keys. Use the cursor arrow keys (or Ctrl and the arrow key if not using a
joystick for flight control) to change your perspective.
Alternatively, you can pan your view by holding down Right Shift and moving
your joystick. This command is good for looking around during combat.
Use the plus (+) and minus (- ) keys to increase and decrease view
magnification.
Inflight Menu Bar
Pressing Esc during flight activates the inflight menu bar. The inflight menu bar
has five menus:
Pref Menu
Option Key
Equivalent
Stick Choose a control device
Rudder Choose a control device
Throttle Choose a control device
Graphics... Shows the Graphics
Description
for your flight stick:
Keyboard, Joystick, or
Thrustmaster FCS
for your rudders:
keyboard or rudder
pedals.
for your throttle: keyboard
or throttle stick.
Prefs selection panel,
which allows you to turn
Page 43

various graphic effects on
and off. See the Install
Guide for a complete
discussion of the
Graphics option.
Sound... Shows the Sound/Music
Prefs selection panel,
which provides volume
control for various sound
and music effects. See
the Install Guide for a
complete discussion of
the Sound option.
HUD Pitch Ladder? When activated, displays
the pitch ladder on the
HUD.
Dim HUD Shift - [ Reduces the brightness
of the HUD.
Brighten HUD Shift - ] Increases the brightness
of the HUD.
View Transistions? When activated, you see
“transitions” when shifting
views. If this option is not
activated, you “snap”
from one view to another.
Authentic Radar CRT When activated, displays
an “authentic” radar CRT
in the Radar Window. If
this option is not
activated, the Standard
Radar CRT is shown.
See Authentic vs.
Standard Radar CRT.
Cockpit? backspace When activated, displays
the cockpit.
Rear View Windows? When activated, rear view
windows in the cockpit
let you watch your six.
Note that your cockpit
must be displayed in
order to see rear view
windows.
Radio-Silence? Alt-S When activated, you
don’t hear your wingman
Page 44

or RI0 chatter. They
reserve their messages
for the most important
situations, such as
missile launches.
View Menu
The View Menu allows you to choose from U.S. Navy Fighters’ different views.
See View Controls.
Window Menu
The Window Menu allows you to choose from U.S. Navy Fighters’ different
Instrument Windows. See Instrument Windows
Cheat Menu
Invulnerable? When activated, makes
you invincible to enemy
fire and crashes.
Unlimited Ammo? When activated, provides
you with unlimited
ammo. Note that the
types of weapons you’re
carrying remain the same.
Unlimited Fuel? When activated, provides
you with unlimited fuel.
Easy Aiming? When activated, near
misses with your gun
become hits.
No Crashes? When activated, you can
crash into the ground and
live to tell about it.
No Spins? When activated, your
airplane will never go into
a spin.
Extra G? When activated, you can
pull a few extra G’s over
your normal limit.
Ignore Weapon Weights? When
activated,
your airplane
will perform
as if it were
carrying no
Page 45

weapons.
No Sun Whiteout? When activated, you see
no glare when staring into
the sun.
No Redout or Blackout? When activated, you do
not suffer redouts or
blackouts from excessive
positive and negative
G-loads.
Ignore Mid-Air Collisions? When
activated, you
cannot collide
with another
airplane.
Show Target Info? When activated, target
info appears below
targets on the main view.
Target type is indicated.
If the target is an
airplane, its current
maneuver appears as
well. The information is
orange unless the object
is targeting you, in which
case it appears in red.
Air Combat Guns Only? When activated, all
air-to-air missiles are
removed from all aircraft.
Page 46

Chapter 3
FLIGHT SCHOOL
Piloting an aircraft requires an understanding of aerodynamics. For a fighter
pilot this is more than just a question of safety. In combat, a firm grasp of the
fundamental principles of flight is the difference between life and death. Air
combat usually boils down to a fight to out-turn your opponent, point your nose
at him, and fire weapons. Understanding how and why your aircraft turns under
various circumstances is essential for combat success.
Pitch, Roll & Yaw
Aircraft maneuver in three dimensions: pitch, roll, and yaw. These dimensions
are always referenced from the pilot’s point of view, regardless of the aircraft’s
orientation or flight attitude.
Pitch is the movement relative to the horizontal plane realized by the nose and
tail moving in opposite directions (normally up and down). Pitch is controlled
by the aircraft’s elevators.
Roll is the movement relative to the aircraft’s longitudinal axis realized by the
wingtips moving in opposite directions (normally up and down). Roll is
controlled by the aircraft’s ailerons.
Yaw is the movement relative to the vertical plane realized by the nose and tail
moving in opposite directions (normally sideways). Yaw is controlled by the
aircraft’s rudders.
Flight Controls
You control the aircraft with three primary controls, the flight stick, the rudder
pedals, and the throttle.
Page 47

Flight Stick
Moving the stick forward and back moves the aircraft’s elevators and causes a
change in pitch. Pulling the stick back, called applying aft stick, causes the
aircraft’s nose to rise. Pushing the stick forward — applying forward stick —
causes the aircraft’s nose to lower.
Moving the stick right and left, called applying lateral stick, controls the
ailerons. For example, moving the stick left causes the left wing to drop and
the right wing to rise, rolling the aircraft left.
Rudder Pedals
The rudder pedals move the aircraft’s rudders, controlling yaw. Applying right
rudder yaws the aircraft’s nose right. Pushing the left rudder yaws the
aircraft’s nose left.
Rudder usage also induces roll. When using rudder, most aircraft will roll the
direction rudder is applied. The amount of roll varies with aircraft type. Some
aircraft, like the F-104, roll the opposite direction of rudder inputs.
In U.S. Navy Fighters, flight controls are automatically coordinated, so rudder
usage is not required for normal flight. Rudders are primarily used for lining up
gun shots and spin recovery.
Throttle
The throttle controls the engine’s output. Pulling the throttle back closes the
throttle, decreasing engine output. Rapidly closing the throttle is called cutting
or chopping the throttle. Pushing the throttle forward opens the throttle and
increases engine output. The engine’s maximum output without using
afterburner is called full military power.
The afterburner increases engine thrust even more by dumping fuel into the
engine’s exhaust and igniting it. It provides a significant thrust increase over
military power, but consumes fuel at a frightful rate, guzzling gas about 4
times faster than military power. Afterburner provides a powerful boost, but
must be reserved for critical situations.
The Four Forces of Flight
Flight is the result four forces acting upon the aircraft: weight, lift, drag, and
Page 48

thrust. When these four forces are properly proportioned, an aircraft becomes
and remains airborne. You must understand how these forces interact on your
aircraft before learning how to maneuver it.
Weight
Weight is the most basic of the four forces. At all times, gravity accelerates
objects toward the planet’s surface at 32.2 feet per second squared. Weight,
by keeping man firmly planted to the ground, prevented humankind from flying
for centuries.
Lift
If weight is the most basic force, lift is the most important. The aerodynamic
opposite of weight, lift is the upward force generated by the aircraft’s wings.
When lift exceeds weight, the aircraft rises. When lift equals weight, the
aircraft remains at its present altitude. When lift is less than weight, the
aircraft descends.
Lift is generated perpendicular to the plane of the wing. The lift vector — the
mathematical representation depicting the direction of the wing’s lift — pushes
up when the airplane is in level flight. When the wing rolls or rotates, so does
the direction of the lift vector. Your lift vector forms the basis of air combat
maneuvering.
The movement of air over the aircraft’s wings and tailplane generate lift.
Movable control surfaces — ailerons, rudders, and elevators — alter lift to
rotate the airframe around its center of gravity. These are what the pilot uses
to maneuver the airplane.
Bernoulli’s Principle
Bernoulli’s Principle explains the dynamics surrounding the wing.
As the wing moves through the air, it splits the flow along its upper and lower
edges. The curved upper surface causes the airflow to move faster over the top
of the wing than below it. As a result, the faster-moving airflow on top of the
wing has less pressure than the air below. Since nature abhors a vacuum, the
air below moves upward to fill the low pressure zone, taking the wing with it.
The result is lift.
Page 49

The amount of lift generated as the airplane moves through the air is
determined by two things: the density of the air at it’s current altitude, and the
speed of the wing through the air. More lift is generated as airspeed and air
density increase. Conversely, less lift is generated as airspeed and air density
decrease.
The laws are easy to remember.
The faster you go, the more lift is available. Speed is important.
The denser the air, the greater the lift. Air is more dense near the ground and
gets thinner the higher you go. The result: you have less lift when you’re up
high than when you’re near the ground.
Both of these laws are influenced by the airplane’s attitude: its Angle Of
Attack (AOA) and its roll.
Angle of Attack
AOA is the angle at which the wing meets the flow of air. If an aircraft is flying
straight and level — neither gaining or losing altitude — its wings meet the
airflow at a low AOA. However, if the airplane pitches up, the wings meet the
airflow at a higher angle.
AOA is important because it causes the airflow over the top of the the wings to
accelerate. This in turn reduces air pressure above the wing, resulting in even
more lift. In other words, lift increases as AOA increases.
Lift, however, does not increase indefinitely with AOA. The airplane requires a
smooth, steady flow of air over the wing. The pilot can increase AOA to the
point where the flow of air is disrupted. When this happens, lift decreases and
gravity takes over — the aircraft can literally fall from of the sky. This is known
as a stall.
Page 50

Thrust
The wing doesn’t magically propel itself through the air. The force pushing it is
called thrust.
Thrust controls the direction the aircraft travels. If an aircraft suddenly pitches
up or down, its momentum causes it to continue moving along the original
direction until the thrust from its engines pushes it in a new direction.
Drag
As the saying goes, there’s no free lunch. Thrust produces an undesirable
side effect: drag. Drag is basically resistance to air. The airplane’s engines
must overcome air resistance in order to push the wings through the air and
create lift. Additionally, as the airplane’s AOA increases, the surface area
meeting the air increases, too. As a result, drag increases with speed and
AOA.
G-Forces
The forces of lift and weight described above are measured in terms of “G,”
where 1g equals the force exerted by the Earth’s gravity.
For an aircraft to fly, its wings must generate more than 1g of lift to overcome
the 1g of weight gravity exerts on all objects. Once airborne, the wings must
Page 51

maintain at least 1g of lift or the aircraft succumbs to gravity.
Apparent Weight
Angle of Attack is one factor that affects lift. What happens when the aircraft
rolls?
In level flight, lift and weight are perpendicular to the wing, pointing straight up
and down. When the aircraft rolls, lift and weight remain perpendicular to the
wing but are no longer vertical.
For the aircraft to maintain altitude, the vertical component must equal or
exceed the weight of the aircraft. As a result, more lift must be generated to
maintain sufficient force to offset the 1g of gravity exerted by the Earth.
As the figure above illustrates, 3g of actual lift must be generated to provide a
vertical 1g of required lift. The pilot achieves this by pulling back on the flight
stick. As he does so, he feels the increase of lift as apparent weight — in
other words, the pilot actually feels 3 times heavier than normal. The same
forces are at work when you’re pinned to your seat in the tight turn of a
roller-coaster.
As the aircraft banks even further, actual lift must be increased proportionally.
For instance, as the aircraft approaches a 90 degree bank, actual lift must be
increased dramatically to produce 1g of required lift. A pilot in a 90 degree
banking turn may experience 8 or 9 times the normal force of gravity.
The Flight Envelope
Lift is a function of airspeed, altitude, and the aircraft’s flight attitude. All of
these factors work together to produce flight, and all three must be considered
together when talking about how airplanes maneuver.
The aircraft’s flight envelope measures all three factors. A flight envelope is a
graph showing potential airspeed, altitude, and G-load. Here is the flight
envelope for a fictitious fighter:
Page 52

On the vertical axis is the airplane’s altitude; on the horizontal axis is the
airplane’s speed. Plotted on the graph are curves representing G-load
envelopes (severity of turn).
Absolute Limits
The outside curve shows the aircraft’s speed and altitude limits at 1g (straight
and level flight). This curve defines the aircraft’s absolute flight parameters. The
left edge plots the airplane’s minimum speed at various altitudes. Beyond this
edge, the airplane isn’t going fast enough to create 1g of lift. When an airplane
hits this edge of its envelope, it stalls.
The top of the curve defines the aircraft’s maximum altitude. Above this
altitude, the air is too thin (and the airplane’s wing is too small) to create 1g of
lift.
The right edge defines the airplane’s maximum speed at various altitudes.
Note that the airplane depicted above can fly fastest at 36,600 ft. This altitude
represents the atmosphere’s tropopause. Above this altitude, the air is too thin
for the airplane’s engines to create more thrust — the airplane simply can’t go
any faster. Below the tropopause the air is considerably thicker. Here the
airplane’s structure limits it from going any faster. If the pilot takes the airplane
beyond its structural limit, air resistance will weaken the airframe and the
wings will eventually be torn off.
G-Loading Limits
The inner curves plot the maximum G’s (severity of turn) you can pull at
various speeds and altitudes. You can use this information in two ways,
depending on your reference point.
You can look at your current point on the graph (altitude and speed) and see
how many G’s you can potentially pull. This provides an indication of how
tightly you can turn.
For example, say the aircraft shown above is flying at 40,000 ft at a speed of
700 kts. The flight envelope tells you that you could potentially pull a
maximum of 3g’s — a very low banking turn. If the airplane were to climb to
45,000 ft, its maximum G-load would decrease to 2g. At 49,000 ft, the airplane
would scarcely be able to do much more than fly straight and level.
During combat, the Flight Envelope Window can provide you with a general
notion of the number of G’s you can pull. The darker the shade in the window,
the fewer G’s you can pull at your current speed or altitude.
Page 53

Conversely, you can look at how many G’s you want to pull and figure out how
to get there. For example, say you’re near the top of your aircraft’s envelope,
where you can turn only one or two G’s. You would need to decrease altitude
and/or speed until you’re in the deepest shade of the envelope.
Instantaneous Turn vs. Sustained Turn
So far you’ve seen that lift increases or decreases according to airspeed,
altitude, and the severity of the aircraft’s maneuvering. These three factors
interact dynamically — that is to say, they influence each other at all times.
This is readily evident when considering two kinds of turns: instantaneous and
sustained.
When a pilot pulls back on the stick in order to turn, more of the airplane’s
surface area meets air resistance. Drag increases as a result, which in turn
slows the airplane down. The slower airspeed reduces the amount of lift
generated. In order to maintain the turn, more thrust from the airplane’s
engines must overcome the greater drag.
For example, say an airplane flying at a speed of 400 kts and an altitude of
24,000 ft is capable of pulling a 5g turn.
The airplane banks. The increased drag exceeds available thrust and the
aircraft slows to 350 kts. The initial 5g load is called instantaneous G. It is the
amount of lift the airplane can initially produce at that speed. As drag slows
the airplane, it falls into its 4g envelope. With a lower G-load, drag decreases
slightly. The airplane slows to 325 kts, where it can only pull 3g. The drop in G
Page 54

again reduces drag. Now, drag no longer exceeds thrust and the aircraft
maintains 325 kts at 3g. This is called sustained G. At this point, the airplane
has reached equilibrium — it can maintain this speed and G-load.
Putting It All Together: Turn Performance
The number of G’s you can pull is only a general indication of how tightly you
can turn. G’s represent the physics of your overall turn performance; however,
geometry is also a factor.
Turn Rate & Turn Radius
Turn performance is measured in terms of turn rate and turn radius. Turn rate
is number of degrees per second a particular aircraft can turn. Turn radius is
the distance required to complete the turn. A high turn rate and a low turn
radius yield good turn performance.
Corner Speed
Turn rate and turn radius depend on two variables: airspeed and lift. Both turn
rate and radius improve as airspeed increases, but only to the point where
maximum lift is achieved. Once an aircraft achieves maximum lift, airspeed
has the reverse effect — it reduces turn rate and turn radius.
The point where maximum lift occurs with the least amount of airspeed is
known as the corner speed. Corner speed is the velocity at which the best turn
performance is achieved— that is, the highest possible turn rate with the
lowest possible turn radius.
Using Corner Speed To Your Advantage
Flying above or below corner speed reduces your aircraft’s turning
performance. If you’re involved in a turning fight with an enemy fighter, you
want to stick to the corner speed. If the corner speed is above your current
airspeed, you need to increase airspeed by adding power (igniting
afterburners) or diving. If the corner speed is below your current airspeed, you
need to decrease airspeed by climbing.
Keep in mind that your corner speed will only give you maximum g’s for your
current altitude. In other words, if you’re aircraft is limited by altitude to a
maximum 3g turn and you reach your corner velocity, you’ll only be able to
pull 3g’s. If you want maximum turn performance against an enemy, you need
to be at an altitude that gives you your maximum G.
Corner speed at the current altitude is always marked on the airspeed ribbon
by the corner velocity indicator.
Page 55

Effects of Weapon Loads
The Flight Envelope Window depicts the performance of your airplane when
it’s “clean,” ie, not loaded down by ordnance. Since weapons increase both
weight and drag, airplane performance suffers when carrying weapons. As a
general rule of thumb, you can assume that G-loading suffers in proportion to
the extra weight carried by your airplane. If 50% of your total weight is
ordnance, you can expect a 50% reduction in the number of G’s you can pull.
In a bad situation you may have to reduce your weapons load to lighten your
airplane. You can press Shift-K to jettison all air-to-ground ordnance. You may
be unable to complete your mission, but at least you’ll come home alive.
Fuel weight affects performance in the same manner. As your airplane
consumes fuel during the mission, it becomes progressively lighter; however,
you may be carrying external fuel tanks to increase your mission range. If you
find yourself in a turning fight that isn’t going right, you can jettison your
excess fuel by pressing Shift-J.
Summary
Maintain corner speed is important in a turning fight with an opponent. Keep in
mind, however, that every aircraft has different turning capabilities. If your
opponent’s airplane has a better turn performance than yours, you may want
to avoid a turning fight altogether. In some instances, climbing tactics may
prove better than turning tactics. Chapter 6: Advanced Combat Techniques
describes general considerations when choosing the kind of fight you’re going
to engage in.
Page 56

Chapter 4
CARRIER QUALIFICATIONS
Carrier operations introduce challenges not associated with land-based
runways. Launching from and recovering to a moving, pitching surface less
1/10 the length of most land based runways requires special training, skill, and
abilities. These are best gained by actual practice.
Preflight
It’s recommended that you read the following instructions while practicing. To
begin, load U.S. Navy Fighters and select Play Single Mission from the
Choose Activity Menu.
When the Mission Selection Menu appears, select Training Mission 1. Read
the mission objectives and select a F-14B as your aircraft. When the Load
Weapons Screen appears, unload all of your weapons so that your hardpoints
are clear. Select Fly and you’re ready to go.
Takeoff
You begin on the catapult, ready to launch. Keep in mind that you can pause
the game at any time by pressing Ctrl-P. When you’re ready to resume flight,
press Ctrl-P again.
Ready On The Cat
The cat officer, visible at the right side of your view, is signaling you to
increase power. Check the upper right corner of the HUD and verify the flaps
are extended. Press 6 to engage afterburner. The cat officer signals
appropriately and the catapult launches your aircraft into the air.
Page 57

After clearing the deck, quickly raise the gear by pressing G. Fly straight and
level until airspeed reaches 200 kts, then press F to raise your flaps. Reduce
throttle from afterburner to 100% by pressing 5.
Navigating
Keep the nose level and power at 100% until airspeed reaches 250 kts. Open
the NAV Window by pressing Shift-6. This mission includes two waypoints.
The first lies approximately 20 nautical miles due south of your carrier. Your
navigation window should indicate the waypoint lies at least 30 nm at a
heading of roughly 180 degrees.
When airspeed reaches 250 kts, bank left roughly 45 degrees and pull back
on the stick.
Continue this left hand turn until you center the waypoint indicator under your
heading readout. Watch the G reading in the HUD’s upper left corner carefully;
do not exceed 3g in this turn or you risk stalling out. Pull gently back on the
stick until the indicator reads 3g, then hold the stick at that position. When
the waypoint indicator becomes visible, begin to level the wings slowly such
that the wings are level just as the waypoint indicator centers under the
heading display. The bearing in the navigation window should read zero and
the range should be decreasing.
Keeping the throttle at 100%, pull back on the stick until the nose pitches up
10 degrees, and fly directly at the waypoint. When you reach 10,000 feet,
gently push the stick forward and level the nose. When you get within 1nm of
the waypoint, the navigation window substitutes feet for nautical miles in the
range display. As you pass the waypoint, the bearing to the waypoint will
change rapidly and the range increases. Fly directly at the waypoint until the
heading suddenly changes and the range starts increasing again. You are now
approximately 25 nm southeast of the carrier, perfectly positioned for
Page 58

practicing landings.
Landing Practice
Despite the rigors of combat, landing your jet on a pitching, moving aircraft
carrier may well be the toughest task you face. Little more than a controlled
crash, carrier pilots must land their aircraft in a box roughly 60 feet wide and
40 feet long grabbing an arresting cable. Missing this box could mean colliding
with aircraft or equipment parked on the deck; missing the arresting cable
means getting your aircraft airborne quickly and trying again. Carrier landings
require precision flying acquired only by practice, practice, and more practice.
Approach
A landing is only as good as the approach. A good approach usually results in
a good landing. A bad approach results in a bad landing or even a crash.
Executing a proper approach requires two things:
1. Profile. Know where your aircraft is supposed to be and when. Know
altitude and airspeed requirements for all critical points along the approach.
2. Control. Know how to control your aircraft to meet the specified profile. A
mandatory pre-requisite for understanding any approach profile.
A carrier landing always requires a positive AOA while descending, meaning
the aircraft’s nose will be pointed above where the aircraft is heading.
Typically, you should maintain 13 to 15 degrees AOA and a constant sink rate
of 500 to 700 feet per minute during the approach. How do you maintain this
approach? Use this rule: use pitch to control airspeed and throttle to control
altitude. There is no other rule or guideline as important as this.
This may sound contrary to common sense. Throttle should control speed and
pitch controls altitude, right? Wrong.
During landings you use your throttle to control altitude while using pitch to
control your speed. Let’s illustrate this through a practical example. Your F-14
should be at about 10,000 feet and 450 kts. Set throttle to 75% by pressing 4.
Pitch the airplane up. Pull back on the stick and raise the nose about 45
degrees. Watch the altitude and airspeed readouts closely. Notice that your
altitude is increasing but airspeed is dropping rapidly. As airspeed slows, so
does your climb rate. Eventually airspeed decays too much and the aircraft
stalls.
Push the nose back down and watch the airspeed again increase. This
example shows us that raising the nose, or increasing pitch, impacts airspeed
more than it impacts altitude. The resultant changes in airspeed subsequently
determine altitude changes. Despite the 45 degree pitch, you cannot maintain
the climb rate without increasing throttle.
Practicing A “Simulated” Landing
You’re going to employ this rule to your advantage by practicing a simulated
landing. Imagine there’s a hard deck at 5,000 ft. If you go below 5,000 feet,
you’ve “crashed.”
Climb to any altitude above 10,000 feet. First, let’s analyze control response .
Reduce power to 50% by pressing 3 and extend the speed brake by pressing
B. As speed drops, gently pull back on the stick to keep the aircraft level.
When speed drops to 280 kts, lower the gear by pressing G and retract the
Page 59

speed brake by pressing B again. When speed drops to 225 kts, extend the
flaps by pressing F. When airspeed reaches 180 kts, pull back on the stick
and pull the nose up 10 degrees. Notice that airspeed drops quickly, followed
by a loss of altitude.
Before airspeed drops below 140 kts, increase power to full afterburner by
pressing 6. Note that your speed stabilizes and your altitude decreases at a
slower rate. Eventually, speed goes above 200 kts and the airplane begins to
climb.
Before the aircraft exceeds 300 kts, level the nose, reduce power to 50%, and
extend the speed brake until speed drops to 225 kts. As mentioned earlier, an
aircraft typically maintains 13 to 15 degrees AOA during a landing. You will
now use performance information you just learned to maintain a 15 degree
AOA during a descent. During this exercise, keep speed above 150 kts at all
Page 60

times to avoid stalling. If at any point the airspeed drops to 150, lower the nose
immediately.
Climb to 10,000 ft again. Set power to 25% and raise the nose 10 degrees. Do
not adjust the throttle during this exercise. If airspeed approaches 200 kts,
extend the speed brake. Keep speed between 150 kts and 180 kts. Hold the
nose at 10 degrees while the aircraft descends. If speed drops to 150 kts,
lower the nose. If airspeed increases, raise the nose until it drops. Continue to
work the nose up and down to maintain a speed between 150 and 180kts until
you reach the hard deck at 5,000 feet.
If you maintain this speed, the aircraft will descend. The wings do not produce
enough lift at that speed to keep the aircraft aloft. If you stall or spin the
aircraft, add power, climb back to 10,000 feet, and repeat the exercise, being
very careful to lower the nose before speed drops too low. If the aircraft tends
to climb instead of descend, work the nose higher to control airspeed. Pull
back farther on the stick, bringing the nose higher. Do not change throttle
settings during this exercise. Control your airspeed throughout the descent by
changing only pitch.
Next, practice controlling descent with the throttle. Climb back to 10,000 feet.
Pitch the nose up 15 degrees and reduce power to 25%. As airspeed
decreases, the climb rate slows. Watch the HUD altimeter closely. When
altitude begins decreasing, apply more throttle. If altitude drops more than 150
feet, immediately apply afterburner. Do not raise the nose above 15 degrees!
Raising the nose slows the aircraft more, increasing its descent rate even
more. If the aircraft begins to climb, reduce power. If it climbs more than 150
feet, reduce power to 25%. While keeping the nose at 15 degrees, continue
working the throttle until you can maintain a steady altitude.
When you can consistently control airspeed with pitch and altitude with
throttle, you’re ready to try a real landing. Descend to 6,000 feet, increase
speed to 400 kts, and head directly for the waypoint. After passing the
waypoint, turn to a heading of 000, due North.
Approach Profile
The approach typically begins around 20 nm behind the carrier at the marshal
point, a point behind the carrier designed to align returning aircraft with the
carrier. In U.S. Navy Fighters, the next to the last waypoint is your marshal
point. Your aircraft always receives first landing clearance; all other aircraft
hold marshal while you land. In this exercise, the waypoint represents the
marshal point.
Departing Marshal
Turn toward the carrier (in this case, heading 000), set speed to 250 kts, and
slowly descend. Altitude should be 2,000 feet when 10 nm from the carrier.
Level off and hold 2,000 feet until 3 nm from the carrier. At 3nm you will enter
the traffic pattern.
Page 61

Final Approach
When you reach heading 350, you should be approximately 2 - 3 nm from the
carrier at 180 kts. Because the flight deck is angled 10 degrees, your final
approach heading should always be 10 degrees left of the carrier. Since the
carrier is currently heading 0 degrees, your final approach heading is 350
degrees.
At this point, there are four systems which guide your aircraft down: the
Landing Systems Officer (LSO), the ILS, and the HUD’s flight path indicator. A
perfect lineup is essential. Being off even a few feet can result in disaster,
such as colliding with aircraft parked on the carrier’s deck. If the lineup isn’t
perfect, don’t land.
Landing Systems Officer
The LSO guides every aircraft during the final stages of carrier landing. The
LSO can see your aircraft better than you can see the ship and gives
important verbal cues to perfect your lineup. Always obey the LSO. The LSO
gives the following basic commands:
“Go Right” You are too far left. Turn right slightly to improve your
lineup.
“Go Left” You are too far right. Turn left slightly to improve your
lineup.
“Higher” You are too low. Climb immediately. Increase power.
“Lower” You are too high. Decrease power slightly. Also,
pitch the nose up more. This decreases speed and
increases your sink rate.
“Call the Ball” The LSO wants you to verify you can see the
meatball. Normally, you’d respond into the radio your
identification, your aircraft type, the word “ball,” and
how many pounds of fuel you have remaining. When
the LSO hears this, he knows you can see the deck.
If you cannot see the meatball, especially during bad
Page 62

weather, the LSO may order a wave off.
“Go Around” or
“Wave off”
“Bolter” Your tail hook did not catch any of the four arrestor
ILS
The instrument landing system appears as two lines on your HUD indicating
how well your aircraft is aligned with the runway. The vertical bar, called the
Localizer Deviation, indicates horizontal lineup. If you are right of the runway,
the LD bar will be on the left side of the HUD and vice versa. The horizontal
bar, called the Glide Slope Deviation, indicates vertical lineup. If you’re too
high, the GSD bar appears at the HUD’s bottom and vice versa.
The LSO is ordering you not to land. Maybe your
lineup is off, or maybe other aircraft are on the deck
in the way. If the LSO orders wave off, apply full
power, climb slightly, maintain current heading until
past the carrier, then prepare for another try.
cables. Apply full military power and gently climb
back off the deck. Extend past the aircraft carrier and
prepare for another try.
Flight Path Indicator
The HUD’s flight path indicator shows where your aircraft is actually moving.
Keep an eye on the flight path indicator during landing. If the flight path
indicator is short of or beneath the aircraft carrier, you’re sinking too fast and
will crash short of the runway. If the flight path indicator is positioned past the
arresting cables you’re coming in long and will miss the wires.
Try to keep the flight path indicator about 13 to 15 degrees below the HUD
centerpoint. This indicates an AOA of about 13 to 15 degrees, the proper
approach AOA. As long as the flight path indicator is beneath the HUD center,
you know your aircraft is sinking.
Complications: The Moving Carrier
The carrier continues to move during your landing. Since it’s runway is angled
10 degrees off, the runway will always appear to be moving to your right during
a landing. You will have to make small course corrections to remain properly
aligned. Do not use the rudder to correct alignment! When you change
Page 63

heading with the rudder, the aircraft continues along its original course even
though the nose has turned. If you turn the aircraft using the rudder, the nose
will point toward the runway, but the aircraft will sideslip along its original path.
Instead of using the rudder, turn the aircraft by rolling in the appropriate
direction and turning toward the runway.
In The Groove: 12 Seconds of Terror
The final 12 seconds or so after calling the ball is known as “in the groove.”
Your life gets very busy during these final seconds. As the Landing Systems
Officer (LSO) gives you verbal flight instructions at this point you must control
the aircraft’s speed and altitude using pitch and throttle, respectively to keep
the ILS lines, the meatball, and the LSO happy. It’s not an easy job, and most
pilots agree its as strenuous as any battle, but there’s no other place to land.
You either bring it back aboard the boat or you swim home.
When the ball becomes visible, make one quick scan around the cockpit.
Verify that the arrestor hook, gear, and flaps are down
The approach techniques you practiced earlier are critical during this phase. If
you drift too high, cut power immediately, don’t point the nose down. The nose
has to be pitched up at the proper AOA at touchdown so the main gear absorb
the landing shock and the hook catches a wire. If the nose is down, the nose
gear takes the impact and will collapse. You can lower the nose slightly to
recover airspeed, but never lower it below zero degrees. If you sink too low,
don’t raise the nose. Raising the nose slows the aircraft more and causes it to
drop even faster. Apply full military power quickly, using afterburner if you’re
very slow. Keep careful watch on your speed; stalling at this altitude will result
in a crash.
Any of the four arresting cables will stop your aircraft. Ideally, you will snag the
3rd wire from the back, called the “3 wire.” Why? Come in too low and you’ll
crash, come in too high and you’ll miss all four wires. A perfect approach at
perfect altitude sets you down in the middle of the four wires. Your hook then
catches the next one, the 3 wire, as you move forward.
Page 64

When the main gear touch the deck, apply full military power immediately. If
you miss the wires you’ve only got a few hundred feet to get airborne again
and you’ll need every ounce of thrust you have. If the LSO yells “Go around!” or
“Wave off!”, you know you missed a wire and have to get your aircraft airborne
quickly.
Waveoffs
If the LSO orders a waveoff, apply full military power immediately and climb. If
you’re extremely low or slow, engage afterburner. Additionally, you may have
to “clean up” the aircraft, or reduce drag, by retracting flaps, speed brakes, or
landing gear.
Do not change course! Continue along the landing heading (in this case 350
degrees) until you are past the carrier. Reduce engine power as soon as
possible, keeping speed below 300 kts and altitude below 800 feet. Extend
past the aircraft carrier, then make a left-hand turn and find the glide path
again.
“Touch and Go’s,” using standard bolter procedures, make excellent landing
practice. Follow all normal landing procedures except do not lower the hook.
This allows you to practice landings without stopping.
Back On Deck
Once you’ve completely stopped moving, reduce power to 25%, raise the
hook, and release the brakes. Your aircraft will begin moving. Keep power at
25% or lower for taxiing around the deck. Turn right and taxi toward the forward
elevator. When you’re clear of the runway, cut engine and reapply brakes.
Additionally, any time you come to a complete stop on the carrier, your
aircraft is automatically refueled. If you look toward the forward catapults,
you’ll see the cat officer signalling you. If you taxi forward, obeying his signals,
you can reconnect to catapult 1 and launch again. This is another effective
way of practicing landings.
Page 65

Stalls
A stall occurs when AOA exceeds maximum allowable levels and a smooth
airflow over the wings is disrupted. Lift evaporates and the airplane falls toward
the Earth. Knowing how to get out of a stall is critical.
First Warning: Buffet and Tickle
As a stall approaches and the airflow over the wings roughen, the plane begins
to vibrate, with severity increasing as the airflow worsens. The point where the
vibrations or buffet begins is called the tickle. Pilots with a light touch can feel
the tickle and realize they’ve reached maximum performance without looking
at the instrumentation or actually entering a stall.
Second Warning: Stall Horn
If you do not take action to increase airflow, usually by relaxing G-load and
Page 66

reducing drag, the disruption and buffeting worsens. If possible, try to increase
speed. Fighter aircraft are equipped with a warning called a stall horn which
makes a loud, easily distinguishable wail alerting you to the potential stall.
When the Stall Occurs
If you still take no corrective action and a stall occurs, the aircraft begins to
fall. If in a turn, the aircraft remains banked, but stops turning and moves in a
straight line tangent to the original turn circle. This is called departing
controlled flight, or departure.
Stall Recovery
Airflow must be re-established over the wings to end the stall, which usually
means increasing the aircraft’s speed. Engaging afterburner in high-thrust
aircraft, such as the F/A-18, sometimes provides sufficient boost. Most
aircraft, though, cannot produce enough thrust, even in afterburner, to simply
blast their way out of a stall.
Pointing the nose down quickly adds airspeed and helps re-establish smooth
airflow. Of course, your airplane is dropping, so it’s critical that you have
enough altitude available. A stall at low altitude is often fatal. Also, aircraft
control decreases as the stall worsens since there isn’t enough airflow over
the control surfaces. If you wait too long to begin stall recovery, you may find
the aircraft uncontrollable. In that event, you’re simply along for the ride and
waiting until the aircraft begins to recover on its own. Again, at low altitude,
you may not have enough time to wait. Keep the following guidelines in mind:
Page 67

1. Attempt stall recovery as soon as possible. The longer you wallow
uncontrolled around the sky the greater the chance someone will shoot
you or you will crash.
2. Always monitor airspeed and AOA instruments. Don’t let speed drop
below stall speed or AOA exceed maximum.
3. Pay attention to stall buffet. If the aircraft buffets, a stall is imminent.
4. Avoid stalls at low altitude. Devote special attention to avoiding stalls
near the floor. Stall recovery often requires altitude. If there isn’t enough
room to recover, you could buy the farm.
Spins
Spins occur when one wing loses significantly more lift than the other. The
wing drops, pulling the aircraft into a rotating, spiral dive. As long as the
rotation continues, most control inputs are useless, and some may even
aggravate the spin.
Spins were deadly killers during the early days of aviation, before pioneer
pilots discovered spin recovery procedures. Some historians estimate more
World War I pilots died from spinning and crashing their aircraft than from
combat with the enemy. In U.S. Navy Fighters, spins only occur if you use the
rudder in the direction of the wing that’s dropping. Since rudder control is
automatically coordinated in the game, you will only encounter spins while
manually controlling rudders.
Some of the aircraft you can fly enter spins easily. Others are easier to
recover. Note that the F-22, with computer flight controls, will never go into a
spin.
Aircraft Spin Entry Spin Recovery
* Easy Hard
F-104
A-7 Easy Easy
F-14 Easy Hard
F/A-18 Easy Easy
Su-33 Hard Easy
F-22 Impossible Irrelevant
The F-104 can enter an unrecoverable flat spin if you
keep feeding rudder into the spin. Your only option in an
unrecoverable spin is to eject.
Spin Recovery
Once understood, spin recovery is relatively easy, but requires prompt action.
A spin may consume several thousand feet of altitude on each revolution, and
spin recovery may require several revolutions. Spins at low altitude, therefore,
are extremely dangerous. Keep the following guidelines in mind:
1. Neutralize lateral stick. Using the ailerons at this point often aggravates
Page 68

the spin — center the joystick.
2. Apply full opposite rudder. A message on the HUD will indicate which
rudder to apply.
3. Apply forward stick. Push the stick forward to keep the nose down.
4. Maintain control inputs until rotation stops. Keep the controls in this
position until the aircraft stops rotating. You will generally find yourself
nose-low at low speed and presenting a perfect target for any nearby
bandits. Gently pull out of the dive, apply full power, and return to normal
flight.
5. Don’t panic. If you’ve done all of the above the aircraft is unwilling to
recover, keep your head about you and go through the procedure again.
You might also try increasing your throttle in addition to the above.
Page 69

Chapter 5
FUNDAMENTALS OF AIR
COMBAT
Air combat requires locating, targeting, and attacking the enemy while
defending yourself against counterattack.
Terminology
Contact An unidentified object detected by any type of sensor.
Bogey Same as contact.
Bandit A confirmed hostile contact.
Target A targeted contact — not necessarily identified, but
being tracked by onboard sensors.
Detection
Detecting the enemy first gives you the initiative, allowing you to gain
advantages in altitude, speed, and relative position. In World War I, this
consisted of visually scanning the skies. Good eyesight counted for a lot in
the early days of air warfare. This remained true in World War II, though radio
communications, formation flying, and radar also played important roles. In
modern air warfare, detection has become a matter of searching a radar scope
as well as visually scanning the sky. In addition, many modern fighters are
now equipped not only with radar but infrared sensors, too.
Active Radar
Radar emits bursts of electromagnetic energy into the air. When the waves of
energy strike an object, part of the wave is reflected back to the transmitter.
Based on the strength of the returning wave, how long it took to return, and its
frequency shift, the radar system can determine the object’s range, altitude,
bearing, and speed.
Active radar allows you to detect and target enemy aircraft at far beyond visual
range. Maximum search range is limited only by the size of the radar in your
airplane. The only drawback to active radar is that enemies — both on the
ground and in the air — can easily detect your radar emissions on their Radar
Warning Receivers (see below).
Infrared (IR) Systems
In addition to active radar, some aircraft also carry infrared (IR) sensor
systems. The IR-sensor looks for heat generated by other targets. The IR
system is passive — it doesn’t emit energy, it just looks for objects that are
“hotter” than the rest of the environment. It can be used freely in combat
because computer enemies never know when they’re being tracked by
IR-sensors.
With the exception of the F-14B and Su-33, all of the airplanes in U.S. Navy
Page 70

Fighters can be fitted with a FLIR (Forward Looking Infrared) pod which
attaches to one of the availble hardpoints. The FLIR pod provides you with
IR-sensing capabilities, allowing you to target objects like tanks and ground
vehicles from beyond visual range. The Su-33 does not require a FLIR pod
because it has a built-in IR-sensing system.
IR-sensors are limited in that they have a significantly shorter search range
than active radar. In addition, cloudy and foggy weather can reduce IR-sensing
effectiveness.
Radar Warning Receiver
Active radar can be detected by anyone within range with a Radar Warning
Receiver (RWR). An RWR is a passive device — it doesn’t emit energy, it just
detects radar emissions from aircraft, ground units, and ships.
All radar emissions — friendly or enemy, in the air or on the ground — appear
on your RWR. Likewise, when you use active radar to search for bandits, your
radar emissions appear on enemy RWRs. You should judiciously limit active
radar use when the mission calls for stealth or surprise.
Detection & Weather
Sensor performance varies with atmospheric effects. Weather can radically
increase or reduce sensor performance. The table shows how the range for
each sensor type is modified for each weather type. The numbers are
percentages of the respective sensors’ maximum effective range. For
example, night reduces visual sensors to 25% of their normal range while
extending IR performance to 125% of normal.
Weather Visual Laser Infra-red Active
Radar
Night 25% 100% 125% 100%
Day 100% 100% 100% 100%
Twilight 75% 100% 100% 100%
Haze 75% 100% 100% 100%
Clouds 10% 50% 10% 75%
Fog 25% 50% 10% 100%
Targeting
There are several ways to target an object in U.S. Navy Fighters. Personal
preference and the task at hand should be your guide to which means you
use. Note that all targeting commands assume some kind of detection device
— either the object is in visual range directly ahead, or you’ve turned on your
active radar, IR-sensor, or HARM warhead seeker.
Targeting Aircraft
Activation Description
Enter When a target is directly in front of you, you can press
Page 71

Enter. This locks the next visible object, from left to right.
Apostrophe (’) In the normal forward view you can press apostrophe (’) to
lock the visible object closest to the center of the screen.
T or Shift-T When the Radar Window is active, you can press T or
Shift-T to step through each target visible on the Radar
Window. These commands also apply to the Radar
Window in IR or HARM mode (see Radar Window in
Chapter 2: Cockpit Familiarization). Note that if several
targets are at long range, they may appear as a single
target in the Radar Window — you may only be able to
target one of them.
Click on
Radar Window
Click on
Visible Target
You can lock on a target by moving the mouse cursor to
the Radar Window and clicking on a contact.
You can lock on a target visible in your normal forward view
by moving the mouse cursor onto it and clicking.
Targeting Ground Objects
The pulse-doppler radar systems on most airplanes are designed to
accurately track fast-moving objects such as other aircraft. These radar are
incapable of detecting small, slow-moving ground targets like tanks and
vehicles.
To target a ground object, you must be carrying a FLIR (Forward-Looking
Infrared) pod. The FLIR pod lets you target objects in IR mode (see Radar
Window in Chapter 2: Cockpit Familiarization). Note that the Su-33 has a
built-in IR-sensor and does not require a FLIR pod.
If you don’t have a FLIR pod, you can still visually target a ground object.
When the object appears in your normal forward view, press Enter or
apostrophe (’) to lock the target.
The Radar Window in HARM mode can also be used to target ground targets
employing active radar. Your airplane must be carrying HARM missiles in
order to target in HARM mode (see Radar Window in Chapter 2: Cockpit
Familiarization).
Identification Friend or Foe (IFF)
Missiles extend combat to beyond visual range (BVR). In a BVR environment,
identifying targets as friendly or enemy is understandably difficult, especially if
allied countries fly the same aircraft as your enemies. To overcome this
problem, air forces typically outfit their aircraft with IFF (Identification Friend or
Foe) transmitters. These devices allow the pilot to transmit an electronic code
to a targeted aircraft. If the targeted aircraft’s IFF box answers the code, the
pilot knows that he’s targeted a friendly aircraft.
In U.S. Navy Fighters, pressing U sends an IFF transmission to a targeted
aircraft. If the target aircraft can decipher the transmission, it responds with a
similar transmission informing you it is friendly. However, if you do not receive
a reply, you do not necessarily know that the target is hostile. The target
aircraft’s transponder could be damaged, or it could be a civilian passenger jet
Page 72

not equipped with a military transponder. An “UNKNOWN” reply does not
necessarily mean the target is hostile.
Note: The transmitter has a range of 100 nm — if
the target is beyond that range, you’ll still receive an
“UNKNOWN” message.
Attacking
Air-to-Air Missiles
Air-to-air missiles extend air combat beyond the limits of gun range. Although
effective weapons, air-to-air missiles are not the “one-shot, one-kill” devices
they are often billed as. Used improperly, air-to-air missiles perform dismally.
Air combat success demands a thorough understanding of the weapons at
hand.
Semi-Active Radar-Guided
Semi-active radar-homing (SARH) missiles use emissions from your airplane’s
radar system to home in on targets. With no radar of their own, these missiles
must rely completely on the launching aircraft to maintain a lock on the target.
As long as the aircraft “paints” the target with radar, the missile can maneuver
toward its prey. If the targeting aircraft breaks its lock — even momentarily —
the missile may lose its lock and “go ballistic.”
SARH missiles can be launched at medium ranges (usually 15 - 20 nm) but
are very poor in the short range. They also don’t typically work well when fired
from above the target, as radar reflected from the ground confuses the missile.
The most famous SARH missile — the AIM-7 Sparrow — is notoriously
inaccurate, especially when pointed at the ground.
When attacking with a SARH missile, listen for the high-pitched tone emitted
by your onboard weapons computer — when tone is good and strong, the
missile is locked onto its target.
For comparisons of various semi-active radar missiles, see Chapter 8:
Technical Data.
Active Radar-Guided Missiles
Active radar-guided missiles like the AIM-54 Phoenix and AIM-120 AMRAAM
have their own onboard radar which they use to track targets. Upon launch,
the missile’s guidance system receives coordinates from the aircraft’s weapon
system. The missile flies to the designated point and activates its radar, which
it then uses to home in on the target. Since the missile guides itself, the
launching aircraft can break its target lock any time after firing. For this
reason, active radar missiles are known as “fire-and-forget” weapons.
For comparisons of various active radar missiles, see Chapter 8: Technical
Data.
IR-Homing Missiles
IR-homing (heat-seeking) missiles home in on the heat generated by the
target. Heat-seeking missiles do not require a radar lock on the target before
launch or during flight, but their onboard seeker must be tracking the target
when you fire. Their “lock status” is best communicated through an audible
“growling” sound. The louder the growl, the better the lock. Compared to
radar-guided weapons, heat-seeking missiles have fairly short ranges, usually
Page 73

between 3 - 10 nm.
All heat-seeking missiles have a tendency to be confused by the sun and may
stray off toward it. As a general rule, never fire IR-homers when facing the sun.
In addition, clouds and fog reduce an IR-seeker’s effective range to 10% of
normal.
IR-homing missiles are most accurate when fired from behind a target. Early
heat-seeking missiles like the AIM-9B are only effective from the target’s rear
quarter, where the seeker has a clear view of the aircraft’s exhaust. The more
modern AIM-9M can track targets from any angle, but still work best when
behind the target.
Also note that newer heat-seeking missiles have deadlier warheads than their
older counterparts. The AIM-9M’s annular blast-fragmentation (ABF) warhead
is significantly more effective than warheads used in older missiles.
For comparisons of various IR-homing missiles, see Chapter 8: Technical
Data.
Launch Considerations
One thing is always true regarding missiles: they’re fickle creatures prone to
failure if not handled perfectly. When fired outside of specified parameters,
they almost always miss. When fired within design launch parameters they
sometimes miss anyway. The belief that missiles have reduced air combat to
a long-ranged, guaranteed-kill affair is pure myth. The following restrictions
apply to missile combat.
Maneuvering
The rail or hardpoint the missile mounts on generally has G load restrictions.
Some missiles can be fired from rails under as much as 7g, others only at 5g
or less. Hard maneuvering onto a bandit’s six does little good if you can’t fire
the missile because you’re pulling too many G’s. If you pull G above the
launch maximum you will lose all lock indicators.
Launch Parameters
The closer to maximum range the missile must fly, the greater chance it will
miss. The AIM-54 Phoenix is hailed as 100 nm-ranged missile, but tactical
doctrine almost always holds fire until within 80 nm of large targets or 60 nm of
fighter-sized targets. Why? Because missile engines do not burn for the entire
missile flight. The motor engages initially and rapidly accelerates the missile
to top speed. While the engine is burning the missile has incredible thrust and
is extremely maneuverable. Once the engine runs out of fuel — usually within
5 - 10 seconds after launch — the missile glides the rest of the way to the
target, losing speed as it glides. As speed decays, so does maneuverability.
The AIM-54 can reasonably reach a target at 100 nm, but has virtually no
maneuverability at that range. If the target isn’t obligingly holding a steady
flight profile, the missile will almost certainly miss.
Most missiles have minimum launch ranges, too. The missile requires room to
get up to speed, and the seeker needs a good lock on the target before it
starts maneuvering. Since the probability of a direct hit on a maneuvering
target is unlikely, missiles are designed to cause a wide field of damage.
Some missiles release a giant, expanding ring of iron bars, while others
release hundreds of smaller metal fragments. The larger the area covered by
these warhead, the greater the probability of a kill. Most missiles have
Page 74

minimum launch ranges to ensure that the launcher doesn’t inadvertently harm
himself.
In general, you want to launch within the missile’s optimal launch parameters.
These can be gauged by watching the Hit Probability Indicator on your HUD.
Target Aspect Angle
Target aspect-angle plays a large roll in missile effectiveness. Low-aspect
shots, or those fired from directly behind the target, have a greater chance of
success than those from high-aspect shots fired at the target’s side. In
general, the missile must pull at least 7 times the G-load as the target. If the
target is pulling 9g, the missile will need to pull as much as 63g.
Target aspect also impacts missile range. If the target is moving toward the
launching airplane, the missile has less distance to travel. The missile can be
fired sooner, therefore, because the target will “fly into” it. This effectively
extends the missile’s maximum range. Conversely, if the target is moving
away, the missile’s effective range is reduced. The missile must be fired from
a closer range to ensure it has enough energy to travel the additional distance
covered by the target.
In general, firing missiles from shorter ranges and from directly behind the
target results in higher hit rates. Firing from long range at maneuvering targets
results in lower hit rates.
Air-to-Ground Weapons
Air-to-ground weapons come in two basic varieties; guided and unguided.
Guided weapons, such as Maverick missiles and laser-guided bombs, have
seekers and the ability to modify their path while flying to the target. Unguided
weapons, called iron bombs, fall along a predictable trajectory. Both types
require a different delivery approach.
Air To-Ground Missiles
Air-to-ground missiles, such as the IR-homing AGM-65 Maverick or the active
radar-guided AGM-84E SLAM, are long-range “standoff” weapons. Once fired,
these weapons do not require the launching aircraft to guide them. As such,
they are “fire-and-forget” weapons — you can launch them and immediately
turn toward a new target.
Anti-Radiation Missiles
The AGM-88 HARM (Highspeed Anti-Radiation Missile) detects radar
emissions and homes in on them. HARMs are only useful against objects
employing active radar, such as SAM sites. If the target shuts off its radar for
any reason, the missile may lose its lock and fly off course.
The HARM is another “fire-and-forget” weapon — once launched, the missile
requires no guidance from the aircraft.
Iron Bombs
Despite technological advances, most militaries still rely on inexpensive,
low-tech general purpose “iron bombs” for destroying enemy targets.
Bombs rely on gravity to pull them down to the target. Once released, they
follow a predictable path to the Earth based on the aircraft’s pitch, speed and
altitude. The higher the aircraft is, the longer the bomb’s range.
Page 75

Accurately dropping bombs is easier said than done. If your airplane is moving
wildly upon release, the bombs will fall likewise. It’s important that you hold
the aircraft stable while dropping bombs. Iron bombs are further limited by a
short range of 1 - 2 nm. Beyond this range the chance of hitting the intended
target is almost zero.
Laser-Guided Bombs
A laser-guided bomb is an iron bomb fitted with a seeker and movable
canards, which help guide the weapon to the target. The bombing sequence
works like this. The aircraft illuminates the target with a “laser-designator”
carried on one of the aircraft’s hardpoints. Once the bomb is dropped, its
seeker homes in on the laser reflection and provides direction to the movable
canards. The canards modify the bomb’s glide path to some extent, resulting
in more accurate hits than conventional iron bombs.
In U.S. Navy Fighters, both NATO and Russian laser-guided bombs require the
Pave Spike laser designator for target illumination. You must maintain a lock
on the target until the bomb has hit — if you suddenly target another object,
the bomb will fall blindly to the ground and will most likely miss.
Guns
Once thought out-dated by the air-to-air missiles, the gun has proven itself a
staple of air combat.
Guns are generally effective only under 2 nm. A single burst of gunfire
generally won’t kill an aircraft. It may cripple it, but unless you’re lucky enough
to wound the pilot, a single hit probably won’t remove the enemy aircraft from
the fight.
Defensive Systems
Attacking the enemy is only half the job — surviving the mission is the other
half. Your aircraft carries various defensive systems designed to protect you
and your airplane.
Warning Tones
Two audible tones support the RWR: one for radar-guided missiles, and
another for IR-guided missiles. A slow-pulsing tone indicates an enemy seeker
is tracking your aircraft. A fast-pulsing tone indicates an inbound missile is
tracking your aircraft. Both of these tones are lower-pitched than the lock tone
indicating one of your missiles is locked on to a target and ready to be fired.
Chaff
Chaff is the standard defense against radar-guided missiles. Chaff consists of
spools of material designed to reflect enemy radar signals. Hopefully, the
material will reflect more radar energy than your aircraft, thus providing a
“brighter” target for the missile’s seeker. With careful use, chaff will attract
inbound missiles away from your aircraft.
Flares
Flares are the heat-seeking equivalent to chaff. Flares create hot, bright
fireballs designed to attract heat-seeking missiles. Older heat-seeking
missiles are easily deceived by flares while newer designs are quite resistant.
Page 76

Jamming
Electronic Counter Measures, or ECM, attempts to deceive enemy radar by
emitting large amounts of electromagnetic energy. Also called “jamming,”
these bursts of energy appear as “fake” radar returns to the radar source. The
radar source sees not just the “real” radar return, but all the “fake” ones
generated by the jammer. The radar cannot distinguish the real one from the
fake ones, so it displays them all on the radar screen. Because of the fake
returns, the radar knows something is out there, and even which direction it’s
at, but cannot determine the target’s precise location. Therefore, jamming
announces your presence to the enemy, but hides your exact position from
them. RWRs also detect jamming signals; therefore, never use jamming
unless the enemy is using active radar.
Using Defensive Systems
Missiles are very maneuverable but have limits. Remaining outside of the
enemy missile’s range is by far the best defense. Failing that, using ECM at
moderate to long ranges may jam enemy radar and prevent enemies from firing
at you. ECM has no effect against heat-seeking missiles and unpredictable
results against radar-homing missiles fired at close range. Under these
conditions you must rely on maneuvering and chaff or flares to defeat the
missile.
Beating Radar-Guided Missiles
Normally, turn toward the missile such that the missile is always facing your
side. This forces the missile to continually turn to track you. Keep the missile
off your wing using low G turns as the missile closes. When the missile
closes within 2,000 feet, rapidly release 3 or 4 chaff and execute a maximum
G break turn toward the missile. Ideally, the missile will momentarily target the
chaff cloud while the high-G turn moves you outside the missile’s field of view.
When the missile loses lock it stops pointing at you. Using alternate views,
such as the F5 window, to watch the missile’s smoke trail to determine if it’s
still tracking you or not. Remember that your warning horn will sound at a
faster-pace as long as the missile is tracking you.
Page 77

Beating Heat-Seeking Missiles
The same procedure for radar-guided missiles holds for heat-seeking missiles
substituting flares for chaff. Older heat-seeking missiles require a clear view of
your aircraft’s exhaust. Besides out-maneuvering the missile, the break turn
may hide your exhaust from the missile’s seeker. Turning toward the sun and
turning off your afterburners may also help. With any luck, the flares or the sun
will entice the heat-seeker away from your aircraft.
Guns Defenses
Jinking, or making numerous, unpredictable, erratic flight movements, is the
standard guns defense. The key to evading enemy gunfire is being
unpredictable. The enemy may be firing anywhere from 1/2 to 2 miles away
and must aim his bullets at where he thinks you’ll be by the time the bullets
get there. Changing course often gives your opponent ample room to make a
mistake.
Signatures
Every object has a set of “signatures” corresponding to each sensor type. For
example, an object’s “radar signature” indicates how easily it is detected by
radar. Your aircraft’s configuration can modify signature values. For example,
using afterburner increases your IR signature to 200%, making you twice as
detectable as normal. Carrying external stores increases your radar signature
by 33%, making you one-third more detectable than a “clean” aircraft.
Lowering gear likewise increases radar signature by 25%.
Radar jamming reduces the chances of being tracked by radar sources but
drastically increases your chances of being detected. Pointing your aircraft at
a sensor greatly reduces the corresponding signature since an aircraft
appears smallest when viewed from directly ahead.
Taking Hits: The Effects of Damage
With luck your airplane will never see damage. In the event that you take
some hits, though, it’s good to know what’s critical and what’s not.
Each aircraft has multiple subsystems, such as propulsion and control
surfaces, and each subsystem has multiple items, such as fuel flow,
elevators, etc.
Damaged control surfaces make the aircraft difficult to fly or possibly even
uncontrollable. The autopilot cannot be used with damaged control surfaces.
Damaged elevators reduce pitch control, damaged ailerons reduce roll control,
damaged rudder usually causes the aircraft to yaw one way or the other.
Some types of damage cause the aircraft to porpoise or jolt in random
directions. If the hit damages the airframe, pulling high G loads will likely
destroy it.
Several types of propulsion damage ultimately lead to a catastrophic failure.
Damage to the oil systems causes engine overheating unless the throttle is
kept low. Even then aircraft may eventually overheat. Compressor damage
risks catastrophic engine failure when the engine is above 25% throttle.
Damaged tail cones limit afterburner use.
Generally, when the engine takes damage, reduce power. Engine explosion
may be inevitable based on the extent of damage, but reducing power will
Page 78

always delay it. If intuition tells you the engine is about to explode, bail out.
You, the pilot, may also take damage from explosions, shrapnel, or fire. Each
wound requires medical attention or you will die. You may have as much as 15
minutes or so to return to base after the first wound, but subsequent wounds
greatly reduce that time.
Wingman Commands
Lone wolf cowboy tactics will leave you riding the silk elevator down to the
ocean every time. Aircraft work in groups, usually pairs, for mutual support and
protection. Your wingman is there to protect you and you’re there to protect
him.
Your wingman executes command based on formation scope. There are two
formation scopes: Loose and Medium.
Loose Under Loose control, your wingman will break from
your formation when an enemy is detected or if an
incoming missile is detected. Once he moves out of
formation to attack, he will continue to search for and
engage enemies until you tell him to disengage.
Medium Under Medium control, your wingman remains in
formation unless you direct him to attack a target,
though he will break in order to avoid an incoming
missile.
There are 19 different wingman commands available:
When You
Press
Alt - 1 Fly straight and
Alt - 2 Break left Wingman breaks left
Alt - 3 Break right Wingman breaks right
Alt - 4 Break low Wingman breaks low
Alt - 5 Break high Wingman breaks high
Alt - 6 Approach left
Alt - 7 Approach right
Alt - 8 Approach low
Alt - 9 Approach high
Command Name The Wingman Executes
Wingman rolls out and flies
level
straight and level
Alt - B Bug Out Order wingman to return to
base
Page 79

Alt - C Toggle control
scope
Alt - T Set formation type Selects formation type
Selects control scope loose or
medium
Alt - H Set formation
horizontal spacing
Alt - V Set formation
vertical spacing
Alt - E Engage my target Orders wingman to break from
Alt - W Engage target class Order wingman to engage all
Alt - R Engage from
formation
Alt - P Protect me Orders wingman to attack
Specifies horizontal distance
between you and wingman
Specifies vertical spacing
between you and wingman
formation and engage whatever
target you currently have
locked
targets of the same type as
the target you currently have
locked
Orders wingman to engage
your target but remain in
formation with you (ie, use a
long-ranged missile like the
AIM-54)
bandits threatening you.
Alt -D Disengage Orders wingman to break off
attack and reform on your wing.
Page 80

Chapter 6
ADVANCED COMBAT
TECHNIQUES
Air combat is a complex, dynamic environment. To succeed, you must be
thoroughly prepared before engaging the enemy. The following are theoretical
principles that have real application in U.S. Navy Fighters. Understand them
and you’ll be well on your way to becoming an ace.
Geometry
A few geometry concepts are needed for a complete discussion of air combat.
Angle Off Tail
Angle off tail (AOT) measures the angle between your flight path and that of
the target. At low AOT, you are either at the target’s 6 o’clock as it moves
away from you, or at it’s 12 o’clock as it moves toward you. In either case,
weapons need only fly a straight line into the target. Almost all weapons
perform better when fired from low AOT.
As AOT increases, the target is moving away from your flight path. Missiles
have to turn more to track the target and gun shots must lead the target,
allowing the target to “fly to” the bullets. During a sustained engagement your
goal is to reduce AOT as much as possible before firing.
Aspect Angle
Aspect angle indicates which aspect of the target is facing you. Think of it as
a numerical way of expressing which part of the target you’re looking at.
From the diagram, you can see that a “left 90 degree” aspect angle on the
target means that if you looked at the target — regardless of where it is
around your airplane — you would see its left wing. A low aspect angle
Page 81

(approaching zero) indicates that the target’s tail is in view. A high aspect
angle (approaching 180) means the target’s nose is pointed at you.
Closure Rate
Closure rate is the combat epitome of the old high school math problems
about trains leaving Dallas and Kansas City at different times headed for each
other. Closure is your aircraft’s speed relative to a moving target. If closure is
positive you are getting closer to the target; if it’s negative the target is getting
farther away. The higher the value of the number, the faster the range is
changing. A closure of -700 kts means the target is moving away from you
very fast while a closure of -70 kts means the target is moving away from you
slowly.
Alternatively, visualize closure as the speed you would be flying if your target
suddenly became stationary. If you and your target are flying directly at each
other both at 450 kts, your closure speed is 900 kts. If you happened to be
900 nm apart, it would take you one hour to pass each other. If the target
suddenly froze in mid-air, your aircraft would have to accelerate to 900 kts to
arrive at the target in the same length of time.
Closure, therefore, is a good indicator of the target’s aspect. When closure is
a high positive value, you know he’s heading for you. Closure also impacts
weapon performance. At a high positive closure rate, the range to the target is
rapidly decreasing. A missile doesn’t have to fly as far to the target since the
target reduces range by flying into the missile. Conversely, if the closure is a
high negative value, the target is running away and the missile must fly farther
to overtake the target.
Pursuit Curves
When dogfighting, there are three types of pursuit, lead, lag, and pure.
Depending on the combat situation, you will find all three necessary
Lead Pursuit
As the name implies, lead pursuit means predicting where the target aircraft
will fly next, then leading the target, or pointing your nose ahead of the target.
In other words, you point your flight path to cross the target’s predicted flight
path.
Page 82

Because you’re pointing ahead of the target, lead pursuit increases closure, or
the rate at which you approach the target. If you’re positioned beyond your
weapon’s maximum range, lead pursuit will bring you closer to your opponent.
Lead pursuit, however, depends upon accurately predicting where the bandit
will fly. Pulling your aircraft into lead pursuit causes the target to disappear
beneath your aircraft’s nose. If the target makes an erratic maneuver, you may
be unable to see it. Therefore, as is so often the case in ACM, small, patient,
persistent lead pursuit angles that keep the target in sight are the most
desirable.
Pure Pursuit
Pure pursuit is a direct chase. You point your aircraft directly at the target and
follow its maneuvers. Pure pursuit is generally used when firing weapons. At
long ranges, both missiles and guns require some leading, but at close ranges
put your nose directly on the target and fire.
Lag Pursuit
As the name implies, lag pursuit points your flight path behind the target,
using turn rate, not turn radius, to follow the enemy. Lag pursuit is a critical
combat tactic that requires not only an awareness of the battle, but an
awareness of your aircraft’s capabilities.
Page 83

Whereas lead pursuit increases G-loading to tighten turn radius and point
ahead of the target, lag pursuit surrenders the turn radius battle and relies on
turn rate. For example, comparing the different turn rates and turn radii of a
F-18, F-4, and MiG-21 at 36,000 feet at a constant 4g, you can see that the
F-18 has a significant edge over both other aircraft using a significantly slower
speed.
Now imagine a high-speed F-18 with a low speed MiG-21. The Hornet comes
screaming in at mach 1.4 towards the MiG moving a mere Mach .5. At this
speed, the F-18 has a superior turn rate, but a vastly inferior turn radius. There
is no way the Hornet can turn inside the slower adversary.
The maximum amount of G the F-18 can pull under these circumstances is
5.25g for a 9.5¡/second turn rate, compared to the MiG-21’s 2g for a 6¡/second
Page 84

turn rate. The F-18 can use its turn rate advantage to lag pursue the bandit
despite a turn radius disadvantage. The F-18 can relax to approximately 4g
and match the MiG-21’s turn rate, circumscribing a concentric turn circle
outside the MiG-21 without overshooting.
This a perfect lag pursuit opportunity for the F-18, granted the pilot realizes his
turn rate is better than his enemy’s. If the F-18 tries to match the MiG-21’s
turn radius by pulling a maximum 5.25g, he will not only overshoot by some
3,000 feet, but will rapidly bleed speed as drag increases, wasting his initial
energy advantage. Lag pursuit allows the F-18 to remain in the MiG-21’s blind
spot (i.e., directly beneath it), avoid overshooting, and effectively conserve its
initial energy advantage.
Lag pursuit is easy to execute. Pull back on the stick until the target aircraft
is positioned on your HUD only slightly above the flight path indicator, then
release pressure on the stick so that it remains stationary at that HUD
position.
Energy Management
There are two types of energy in the world, kinetic and potential. Energy, in
both its manifestations, is the core of aerial combat. At any given instant, an
aircraft possesses some quantity of kinetic energy (measured by its speed)
and some quantity of potential energy (measure by its altitude). Energy
translates directly into maneuverability. Air Combat Maneuvering, or ACM, is a
game of managing energy to maximize maneuverability and defeat the enemy.
Exchanging Energy
Energy types are exchangeable. An aircraft at high altitude and slow speed
has lots of potential energy, but little kinetic energy. By diving, the aircraft can
convert the altitude into speed, thus increasing kinetic energy. A fast aircraft
at low altitude has lots of kinetic energy but little potential energy. The aircraft
can convert the kinetic energy back to potential energy by climbing. The
aircraft slows down, but its altitude increases, maintaining the aircraft’s total
energy state. An aircraft at low speed and low altitude has very little total
energy. An aircraft with energy has maneuvering options, an aircraft without
energy generally becomes a target.
Maneuvering uses energy. Every maneuver you make “burns” kinetic energy.
Because you want maximum maneuverablility from your aircraft at all times,
you must ration your energy use, always maintaining a sufficient supply for
whatever maneuver you might execute.
Playing the Energy Management Game
Never waste energy. Don’t pull 6g when 2g will suffice. How do you know that
lower G loading is acceptable? Watch his nose and remember this simple
rule: when his nose isn’t pointed at you, he’s not a threat.
Obviously, most weapons can be fired from various aspect angles besides
directly astern, but by watching his nose you can determine when he’s
achieving a firing solution. For guns, his nose must be pointed slightly ahead
of you due to lead requirements. Even with missiles, his nose must be pointed
generally in your direction for a decent shot.
If he’s behind you and pulling into a firing solution, you need to extract every
ounce of maneuverability from your airframe. If, however, he doesn’t have his
nose pointed toward you, he cannot shoot at you. Before spending the
Page 85

maximum G available you have to determine what you’ll get in return. If you
pull max G now, will you get a shot opportunity? If not, then pulling maximum
G is probably a bad idea.
When you’re out of energy, you have to get some back. Extending for energy
means relaxing the back pressure and rebuilding airspeed. It can mean
unloading to 1g and flying straight and level, or it can mean simply unloading
from 4g to 3g and slow the energy bleed. Many times, wasting energy at a
slower rate is as important as getting more back.
In short, treat energy as money. You can save it, waste it, or spend it
foolishly, and once it’s gone it’s gone forever.
Picking Your Fight
Arguably, the first few seconds of a fight are the most important. With most
dogfights lasting less than a minute, whoever grabs the advantage in the first
few seconds usually wins. Ideally, you want to start the fight with an
advantage, such as directly behind the bandit in his six o’clock low blind spot.
Most of the time that’s not an option and you find yourself closing
head-to-head with the bad guy.
Choosing The Energy Fight
The energy fight basically concedes turning performance to the enemy. The
energy fighter keeps his speed extremely high, minimizes lateral separation
on the merge, tries to take a shot at the bandit at the merge, then extends in
a straight line far beyond the opponent. The energy fighter must maintain
enough speed to quickly exceed his opponent’s weapon range. This isn’t too
difficult if the bandit only has guns or heat-seeking missiles. While the bandit
executes a high G turn to enter the fight, the energy fighter zooms away in
spiralling dive or climb. Eventually, the energy fighter executes a low G turn (to
conserve airspeed) and makes another pass at the bandit, in a “hit-and-run”
attack.
When executed correctly, the energy fighter remains outside the bandit’s
weapon envelope nearly the entire fight. The energy fighter chooses when and
where he’ll engage, always bringing the fight on his terms. Even better, thanks
to the speed surplus, the energy fighter can extend and exit the fight almost at
will. The energy fight requires discipline, though. One speed-bleeding turn and
the energy fight option is gone forever.
Angles Versus Energy
At the merge you have a choice: enter a knife fight and rely on your turn
performance to win the day (the angles fight), or use superior energy and
hit-and-run tactics (the energy fight). Every fight is different, and an aircraft
designed for angles fighting may find itself better suited for an energy fight.
How do you decide which to use?
First, estimate your turn performance versus your opponent’s. Being at and
maintaining your corner speed means squat if the bandit can out-perform your
best turn. Second, estimate your energy status. If you enter a fight 200 or 300
kts above your corner speed, don’t merely waste all of that energy and
decelerate to corner, initiate an energy fight and make use of that power. A
well-flown energy fight is difficult to beat, as proven in Vietnam by F-4 pilots
flying against MiG-17 and MiG-21 opponents.
Page 86

Setting Up the Merge
The merge, or meeting the bandit head on, generally leads to one of two types
of fights: one-circle or two-circle.
Two-Circle Fights
Two-circle fights, also called nose-to-tail fights, commence when both fighters
turn toward each other at the merge. The distance between the fighters, called
lateral separation, is turning room both fighters use, that is, part of their turn
radius toward the bandit is offset by the lateral separation.
Two-circle fights rely on turn rate more than turn radius. The pilot tries to
create enough lateral separation at the merge to account for his turn radius,
then relies on a superior turn rate to bring his nose to bear on the bandit
faster. Two-circle fights keep the bandit in view at all times and also tend to
increase the distance between the aircraft.
Generally, attempt to minimize lateral separation to the distance of your turn
radius. If the enemy aircraft has substantially worse turn performance than
you, don’t give him any extra room to work with, keep lateral separation to the
bare minimum you require. If the bandit has significantly better turn
performance than you, deny him the chance to use it by coming in at
maximum speed with as little lateral separation as possible.
One-Circle Fights
One-circle fights commence when both fighters turn the same direction. One
fighter sacrifices any lateral separation, relying on turn radius to out maneuver
the enemy. The one-circle fight is generally only used when you have a
significant turn radius advantage over the bandit.
Page 87

The one-circle fight tends to keep the participants closer together than the
two-circle fight. The fighter that chooses to go one-circle and turns away from
the bandit must momentarily lose sight as the bandit crosses his tail. In
fighters with poor rearward visibility, this loss of visual contact can be
devastating. Since the one-circle fighter surrenders the lateral separation to
the bandit, he should minimize lateral separation during the merge.
Timing The Initial Turn
Timing the initial turn is critical. Turning too soon or too late surrenders
advantage and often proves fatal. Turning too soon pulls you across the
bandit’s nose, not only giving him a snapshot opportunity but also putting you
on the defensive. Turning too late puts you out of position and allows the
bandit to gain angles. The perfectly timed turn should deny the bandit any
advantages while maximizing your own performance.
Air Combat Maneuvers
Break Turn
The break turn is the most basic of all combat maneuvers designed to
increase AOT rapidly when a bandit is preparing to shoot you. It is a high G
maneuver utilizing maximum instantaneous turn rate toward the attacker.
Page 88

Once you execute a break turn, do something else almost immediately.
Sustaining a break turn leaves you as a nice, stable, predictable target waiting
to die. Once the break turn has commenced, both you and the target share a
common plane in space. Generally, your next maneuver should take you out
of this plane and even further away from the target.
High Yo Yo
The high yo yo is the root of all offensive air combat, replacing intelligent
maneuvering for “G for brains” high-G tactics. The high yo yo reduces AOT at
the cost of increased range between attacker and target.
The yo yo begins during a turning fight when you have assumed an aggressive
position behind the bandit, but are stuck in lag pursuit and unable to bring your
nose to bear. Roll out slightly, maintaining the lag pursuit, then pull the nose
up.
Generally, a series of small yo yos that nibble away at the AOT problem work
better than one large yo yo. Once committed to a large yo yo, you’ll be unable
to respond to any sudden changes the bandit may make. Patiently working
small yo yos by bringing the nose just above the horizon chips away at your
AOT problem and moves you into the target’s elbow without pulling super high
Page 89

G loads.
Low Yo Yo
The low yo yo is the logical opposite of the high yo yo and performs the exact
opposite function. Whereas the high yo yo decreases AOT and increases
range, the low yo yo increases AOT while decreasing range.
The low yo yo is generally used when you and have a good shot opportunity,
but you’re outside your weapon’s maximum range. To get closer, you lower
your nose below the horizon. Lowering the nose increases speed.
Unfortunately, the increased speed almost always results in increased turn
radius, forcing you into lag pursuit and increasing AOT. A low yo yo, therefore,
almost always requires a following high yo yo to correct the angles problem
generated by the increased speed.
The low yo yo is often used in chases where the bandit has superior speed,
has leveled its wings, and is trying to run home as you chase it from just
outside your weapon’s envelope. In this case, you could lower the nose and
dive below the target. The increases speed will increase closure, but you must
be careful not to dive too steeply. If you dive too far below the target or build up
too much speed in the dive, you may still be unable to bring the nose to bear
on the target which is now far above you.
Barrel Roll
The barrel derives its name from the flight path the aircraft performs,
circumscribing the shape of a barrel in the sky. The barrel roll is more than an
airshow stunt, it’s an energy management maneuver with both offensive and
defensive potential.
Offensive Barrel Rolls
Offensively, always remember: do anything it takes to prevent an overshoot.
Overshooting and flying in front of an enemy are deadly mistake which will
most likely cost you your simulated life. Overshoots are caused by excessive
closure which you can’t get rid off; you approach the bandit too fast and can’t
stop in time. The barrel roll is one solution. If you can’t reduce speed fast
enough by pulling the nose up, then pull back on the stick and execute an
aileron roll to the direction opposite of your current turn. The raised nose
Page 90

reduces speed while the roll out turns you away from the target and prevents
an overshoot. Completing the roll leaves you heading in the original course,
albeit no longer overtaking the enemy.
Defensive Barrel Rolls
The barrel roll can be used to force the attacker to overshoot while maintaining
enough AOT to prevent him from firing at you. Defensive barrel rolls must be
carefully timed. Initiate the roll too soon and the bandit will recognize it and
follow you through it. Start it too late and the bandit will have already shot you.
Perfect timing requires surprising the bandit and denying him sufficient time to
react before he overshoots.
Scissors
Ask any combat pilot and he’ll tell you the same thing: if you get into a
scissors fight, you screwed up.
A scissors is a series of reversing turns where each aircraft turn back towards
each other, each trying to force the other out in front. A scissors usually
begins when the attacker realizes he’s going to overshoot. The defender sees
the imminent overshoot and reverses his turn back toward the attacker too
early, thus resulting in a fairly neutral pass. If you’re an attacker, the only way
you can get into a scissors duel is by screwing up and overshooting. If you’re
offensive, scissoring should be the last thing on your mind. If you’re defensive,
you already screwed up. Reversing into a scissors indicates the attacker also
made a mistake, but you compounded your error by reversing too soon and
wasting the advantage.
Once in a scissors, there’s nothing to do but keep the G high and keep turning
into the bandit. Of course, this bleeds speed and energy horrendously. Ideally,
the “winner” of a scissors match forces the bandit ahead of him while still
having enough energy to bring his nose to bear. More often, one aircraft stalls
out and plummets earthward. If the other aircraft has any semblance of energy
left it rolls, dives on the bandit, and shoots it before it recovers. Alternatively,
the participants may begin a series of barrel rolls instead of break turns. This
maintains some energy due to the altitude/speed tradeoffs, but is far from an
ideal solution.
Each time the aircraft cross, they risk both collision and gunfire. Passing too
far apart allows your opponent a guns snapshot while passing too close
usually results in a crash. In short, scissoring is not good.
If you find yourself in a scissors, how do you get out? In a guns only
environment, executing a split-S immediately after crossing your opponent’s
tail usually does the trick. If you can rapidly increase and maintain speed, you
can extend beyond his gun range. Executing a split-S in a missile
environment invites a heat seeker up your exhaust. If you can’t get outside the
Page 91

bandit’s weapon range, then you have to win the scissors fight. If you can’t win
the fight by out-turning the bandit, you’re dead.
Immelman
The immelman is a high-thrust, vertical reversal. Effected by pitching the nose
up, low-thrust aircraft usually execute one-half of a loop and terminate the
maneuver at a higher altitude, inverted, flying the opposite direction.
High-thrust jets broaden the maneuver by climbing pure vertical, using an
aileron roll during the climb, then completing the half loop. This effectively
allows the aircraft to make square corners in the horizontal by displacing the
vertical.
Split S
A split-S is a diving half loop. Rolling inverted and pulling back on the stick
causes the aircraft to dive. Maintain back pressure until the aircraft levels out
heading in the opposite direction.
The split-S gains speed quickly. Besides diving, rolling inverted adds the
aircraft’s lift vector to gravity, thus increasing acceleration. On the down side,
the increased speed increases vertical turning radius. Start a split-S from low
altitude or maintain too much speed during the dive and the aircraft won’t be
able to pull out.
Page 92

The split-S makes a great escape maneuver in a guns-only environment
because of the rapid speed gain. It’s usually ineffective in missile
environments, though, since missiles have significantly longer ranges.
Ground Attack
Surviving ground-attack missions boils down to hitting the enemy while not
getting hit yourself.
Surprise
Surprising the enemy is always a good thing. Try flying low, 500 ft or less,
under the enemy’s radar. Ground-based radar systems can detect your
aircraft at high altitude but not close to the ground. Many enemy air-defense
units have to physically move to engage your aircraft. If you approach
undetected from an unexpected direction the air-defenses may be unprepared.
It takes them time to turn and engage, giving you an opportunity to deliver
ordnance and escape.
Radar also cannot penetrate fixed objects, like hills and buildings. Try flying
low between hills or behind clusters of buildings to hide from enemy radar.
Remain Outside Enemy Range
Try to stay outside of enemy defense envelopes. For example, if the target is
heavily defended with radar-guided SAMs, approach at low altitude; such
SAMs often have trouble engaging low-altitude targets. If the primary defense
is anti-aircraft artillery (AAA), stay above 5,000 feet; AAA cannot reach that
high.
Similarly, try using long-ranged standoff weapons. If the enemy defenses have
a maximum range of 20 nm, attack with a 30 nm-ranged weapon. This keeps
you safely outside of the enemy’s defenses. Obviously, standoff weapons
won’t always be available or suitable for a given mission, but always consider
using them.
AAA Weaknesses
AAA is deadly against low-altitude targets but does have limitations. While
modern AAA uses radar to calculate lead requirements, older AAA systems
must eyeball you in their sights. Older AAA systems, therefore, must lead you
Page 93

— if you approach them from any direction other than head on, you’re almost
guaranteed that they’ll miss. Further, the faster you fly and the more you jink,
the harder it is for AAA to calculate lead.
Page 94

Chapter 7
DESIGNING PRO MISSIONS
Using the Pro Mission Creator you can create complex combat situations with
multiple aircraft, ground forces, and complex mission objectives.
To view the Pro Mission Creator, click on Create Pro Mission in the Choose
Activity Menu.
Though creating a challenging mission is more of an art than a science —
requiring many modifications until the mission is suitably “difficult” — the
process can be boiled down to a few basic activities:
Determining an objective for each side
Choosing weather and time of day
Adding friendly and enemy units
Assigning units objectives and waypoints
Determining An Overall Objective
All missions begin with objectives, that is, what each side is attempting to
accomplish. Objectives should be thought of in terms of attacking and
countering an attack. If one side’s objective is to strike a target, the other
side’s objective is to defend it. Even air superiority missions require offensive
and defensive roles – one side flies in to sweep the enemy from the skies,
while the other rises up to counter them.
An interesting mission requires a challenging goal and well-balanced
gameplay. If the mission is too simple or too hard, players will lose interest.
Your goal as mission designer is to create a challenging but achievable
mission.
Page 95

Setting Friendly & Hostile Sides
The first step in creating your mission is deciding which countries are “friendly”
and which countries are “hostile.”
To set hostile forces, select Set friendly & enemy sides... from the World
Menu. A control panel appears:
Buttons that are ON are considered hostile; buttons that are not ON are
automatically considered friendly. To change a country’s alliance, click on its
button.
Setting Weather/Time of Day
Weather conditions and time of day can help or hinder all sides in air combat.
For example, cloud cover and darkness provide visual cover for attacking
aircraft and create headaches for the defenders.
To choose the weather or time of day for your mission, select Set weather...
from the World Menu. A control panel appears:
Select from the available weather conditions and times of day. Click OK or
press Enter.
The Mission Map
The mission map displays the theater where the mission will take place.
Page 96

Even before you add aircraft, ships, and ground units to the world, there are a
number of permanent objects — runways, bridges, roads, etc. — fixed on the
map. You can see all permanent objects by selecting Other from the Show
Menu.
Permanent objects cannot be deleted, changed, or assigned as mission
objectives. They can be attacked during the mission, and fragile objects like
buildings and bridges can be destroyed; however, damage done to permanent
objects have no bearing on mission outcomes.
Viewing the Map
To zoom in and out on the mission map, click on either end of the Zoom
Button or press plus (+) or minus (-).
To scroll the mission map, point to either of the Scroll Buttons, hold down a
mouse button, and drag. Alternately, you can scroll the map using the cursor
arrow keys on your keyboard.
Adding Objects
Select Add from the Object Menu, or press Insert. The Add Object selection
panel appears:
Page 97

The selection panel lists all of the objects in U.S. Navy Fighters. Objects
followed by asterisks (***) can be flown by players; all other objects must be
controlled by the computer.
Click to choose an object, and then press Enter. The object’s icon appears in
the center of the map:
Note: If the object doesn’t appear on the map, make
sure that the class to which it belongs is currently
activated in the Show Menu.
Selecting & Moving Units
Click on any unit to select it. To move a selected unit to another location,
point to the unit icon, hold down the left mouse button, and drag the unit.
Duplicating Objects
Once you’ve created a unit, you can make as many copies of it as the
mission requires. To duplicate a unit, select Duplicate from the Object Menu
or press D.
Page 98

Unit Options
Once an object is placed, you can define what kind of object is, its
assignment, and its effect on the player’s success or failure.
To modify the object, its assignment, or its effect on the mission, click on one
of the text buttons.
Object Description
The text buttons at the top of the panel allow you to define the object.
Nationality Brings up the Choose Nationality selection panel,
allowing you to change the object’s nationality. Click
on a nationality, and then click OK or press Enter.
Object Type Brings up Choose Object selection panel, allowing
you to change the type of object. Click on a new
type, and then click OK or press Enter.
Name Brings up the Enter Pilot Name panel. Type a name
for the pilot, and then click OK or press Enter.
Experience Click to choose the experience of the pilot: novice,
average, good, or expert. Pilot experience affects
many things: how well the pilot pays attention to his
radar and RWR; his repertoire of offensive and
defensive maneuvers; etc.
Control Click to designate whether the pilot is controlled by a
Page 99

human or the computer. Note that humans can only
control a limited number of aircraft.
Heading Click to give the object an initial heading: north,
south, east, or west.
Speed Click to give the object an initial speed, ranging from
0 to 3,000 kts. Note that setting a speed does not
guarantee that the object is capable of that speed.
Object Assignment
The assignment options allow you to designate:
An enemy the object should attack
A friendly the object should protect
The object’s reactions to various classes of enemies
Specific Tasks
You can assign the object to destroy a target or protect a friendly object. Click
on the text button, and then click on the enemy target or friendly object.
Reactions
For every aircraft, ship, and ground unit in the mission, you must specify
reactions to various classes of enemies. You can set the following types of
reactions:
Attack Search for enemy targets of this class and attack
them.
Defend Defend if under attack from class type of enemy.
Ignore Ignore enemies of this class.
Evade Attempt to gain separation between you and any
object of this class.
Search Range
You can designate the range at which the object will search for enemies. Note
that any particular object is still limited by the range of its detection device.
Object’s Effect On Mission
Page 100

Mission Objective
The mission options let you designate the object as a “mission objective.”
Mission objectives determine whether the player succeeded or failed. You can
designate the following for the currently selected object:
Mission success is not affected by object.
The object has no bearing on the player’s success or failure.
Mission success only if object is destroyed.
The player must destroy the object in order to succeed.
Mission success only if object survives.
The player must protect the object from all aggressors.
Mission success only if object finishes waypoints.
The player must protect the object from all aggressors until the object finishes
its waypoints.
Attack/Ignore
Choose whether other objects can attack or just ignore the object. This only
affects computer-controlled enemies and in no way limits the player from
attacking the object.
This option is basically a cheat for the mission designer — you can ensure
that computer-controlled objects do not do the player’s work by destroying
mission objectives.
Delay
Allows you to force an object to wait before beginning its mission. Note that
this only applies to objects on the ground. Aircraft at any altitude above ground
level are moving and cannot be “delayed.”
Show/Hide
Lets you determine whether or not the player will see the object on the briefing
map. This allows you to determine how current the player’s intelligence data
is. Does he know where enemy SAM sites are located, or are air defenses
unknown?
Creating Wings
Aircraft can operate together in groups called wings. A wing allows you to
assign a single mission objective to up to six aircraft.
To create a wing, add a number of aircraft to the map. Click on one of the
aircraft to select it. From the Waypoint Menu, highlight Add To Wing. A
submenu appears listing six wing “colors.”
 Loading...