

Page 1

Welcome to Arulco ..........................................................1
Tutorial ...............................................................2
Part One: Assemble a Team.............................................2
Part Two: Travel to Interesting Places................4
Part Three: Meet Interesting People .....................5
Part Four: And Kill Them...............................................6
Reference ............................................................9
Logistics: The Laptop .......................................................9
Hiring Mercs.................................................................9
Shopping at Bobby Ray’s ............................................13
Getting Information ...................................................13
Table of contents
Page 2

Reconaissance: The Tactical Screen ......................14
Mercenary Portraits ....................................................14
Movement ...................................................................15
Inventory .....................................................................20
Items and Interaction .................................................23
Meeting Non-Player Characters ................................26
Tactics: Fighting the Enemy .......................................27
Firing Weapons...........................................................27
Hand-to-Hand Combat..............................................29
Interrupts and Action Points......................................29
Explosives and Grenades ............................................30
Wounds and Bandaging..............................................31
Ending a Turn .............................................................32
Ending Combat...........................................................32
Advanced Tactics:The Rules of War .........................32
Strategy: The Map Screen ............................................35
Merc Assignments ......................................................35
Sleep ............................................................................38
Renewing Contracts and Firing Mercs......................38
Using the Map.............................................................38
Other Map Features....................................................40
Travel via the Map Screen ..........................................41
Town Loyalty...............................................................43
Militias ........................................................................43
Game Options .......................................................................44
Appendices..........................................................47
Keyboard Commands ........................................................47
Frequently Asked Questions ......................................50
Index......................................................................54
Table of contents
Page 3
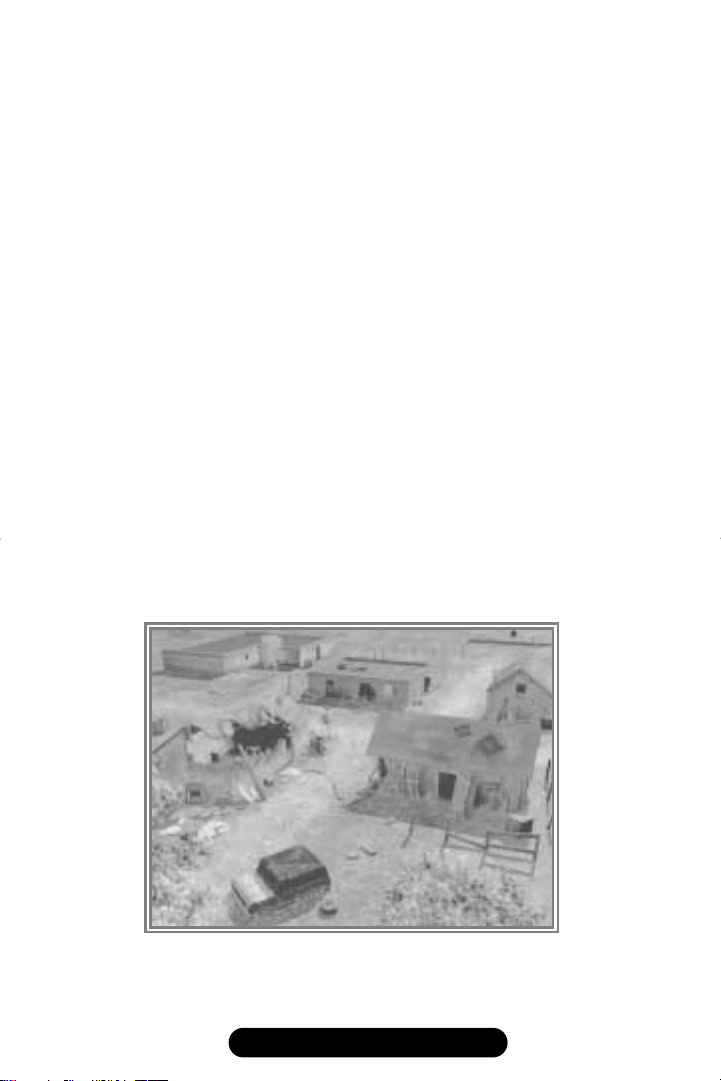
Welcome to Arulco
You hold a nation’s fate in your hands. Enrico Chivaldori, deposed ruler of
the war-torn country of Arulco, has hired you to return him to power. It’s not
an easy task. You’ll need the strategic insight of a general, the negotiating skills
of a diplomat, the financial savvy of a CEO—and a squad of some of the
deadliest mercenaries to ever hit the streets.
This is Jagged Alliance 2, an exciting mix of strategy and role-playing that puts
you in charge of a nation’s fight for freedom. You’ll hire a core group of skilled
professionals through A.I.M., the Association of International Mercenaries.
You’ll win the local population over to your side by displaying courage and
loyalty. You’ll train your men around the clock, then send them into dangerous missions and lethal firefights. You’ll conquer the depths of underground
mines, reap their riches, and discover their secrets.
Each success will bring you closer to total victory; each failure must be overcome with iron determination. In the end you will prevail, if you remember a
few things. Stay focused on your goal. Keep your men well supplied with
both ammunition and inspiration. And keep the cash flowing–there’s nothing, nothing, nastier than a mercenary whose paycheck just bounced.
To jump into the game, just turn the page. The Tutorial will walk you through
your first exploits in Arulco. The rest of the manual contains detailed information on strategy and tactics that you’ll need in the rest of your campaign.
The battle for Arulco is about to begin.
1
JAGGED ALLIANCE 2
Page 4
Tutorial
Tutorial
This brief tutorial will help you jump-start your mercenary career. It explains
the basics of recruiting mercenaries, exploring the world, and fighting battles.
It doesn’t cover everything, though. For detailed information on strategy and
tactics, consult the comprehensive Reference section that follows.
Part One: Assemble a Team …
When the Initial Game Settings screen appears, click on OK to accept the
default settings. (Warning: If you’re already familiar with Jagged Alliance or
similar games, you may want to try Experienced mode instead of Novice.
You’ll find the full details on these settings in the Reference section.)
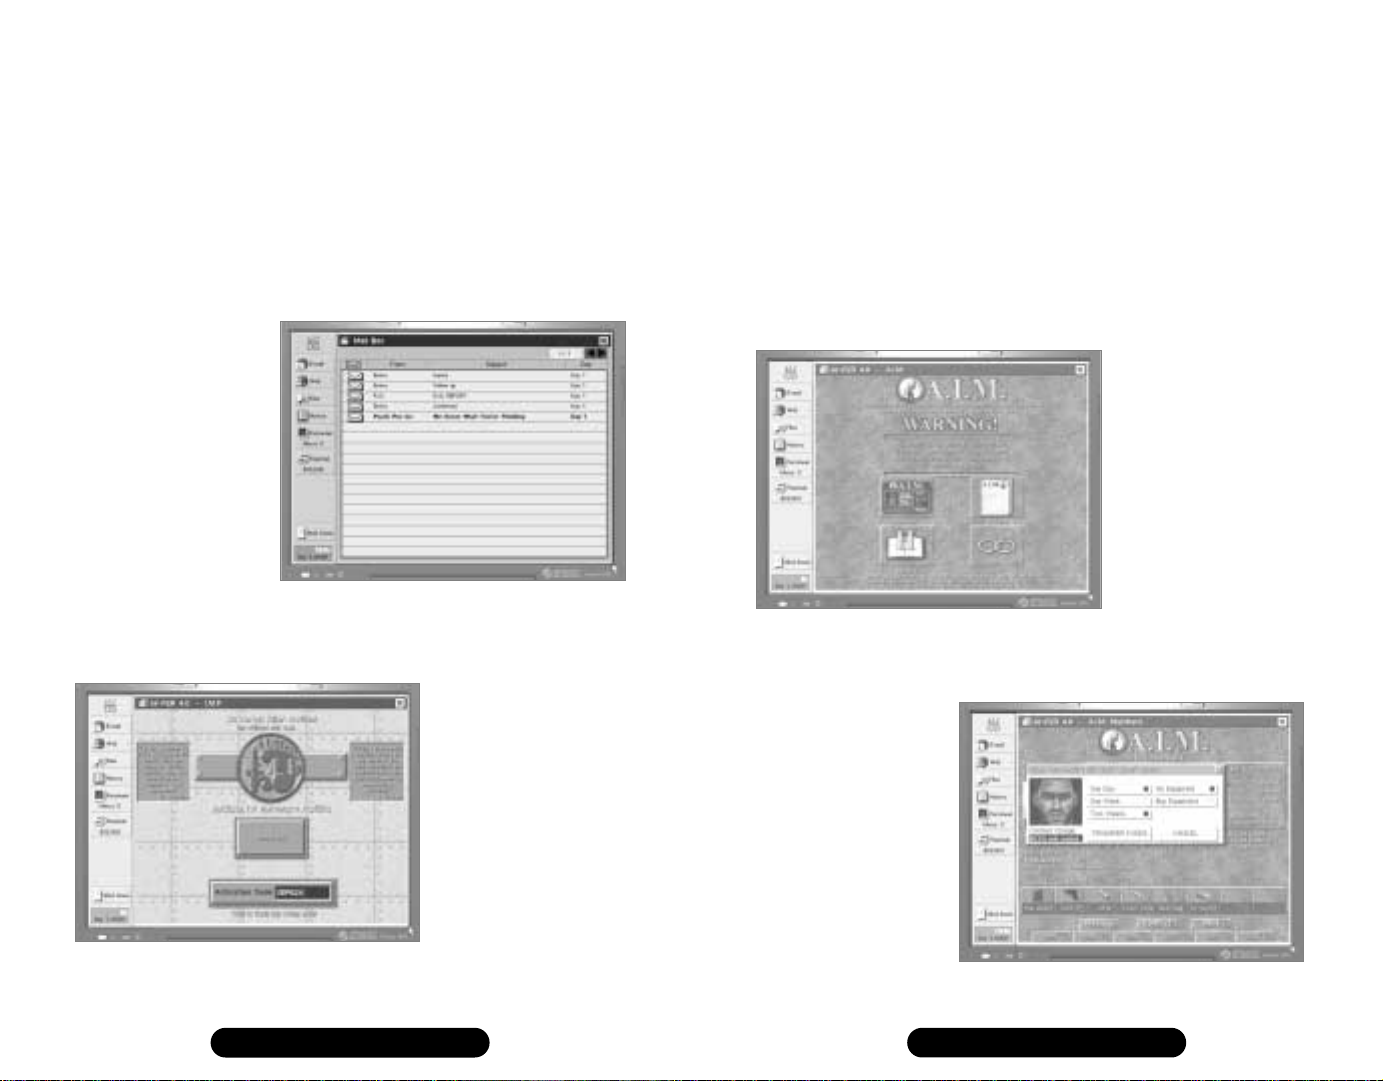
After viewing the introduction, you’ll open your
trusty laptop computer,
ready to read some important e-mail that has
just arrived. To read it,
click on the E-mail button on the left side of the
screen. Several messages
are waiting for you. Most
are from your employer,
Enrico, while the last is
from the mysterious
“Psych Pro Inc.” This
company’s personality
profiling service allows you to create a custom mercenary, for a small fee. Jot
down the access code, XEP624. (It’s in the second part of the e-mail message:
click on the right arrow button to see the second part.)
It’s time to pay a visit to
I.M.P., the Institute for
Mercenary Profiling. Click
on the Web button and select I.M.P. from the menu
of bookmarks. Once at the
I.M.P. site, enter XEP624 as
the access code and press
the Enter key.
To start character creation,
click on the Begin button.
Enter your character’s full
name (e.g. “Herman
Noodleman”), plus your character’s cool nickname (like “Flayer”). You also
select the character’s gender at this stage.
The next task is to complete the character’s personality profile. While some
of the questions are a bit, um, unusual, your answers will determine the
personality of your creation. Be sure to answer the way you feel your merc
would.
After outlining his quirks and oddities, you will allocate attribute points to
your character. These determine the character’s strengths and weaknesses in
important areas such as Health and Agility. While allocating your points,
keep in mind that a skill of 0 can never be improved. After deciding on your
attributes, choose a portrait and style of voice that fits your character.
After creating your custom
character, you’ll want to
hire some more firepower.
Return to the Web menu
and select “A.I.M.” This
takes you to the Website of
the Association of International Mercenaries, where
you’ll hire your first mercenaries. A good initial team
is Blood, Buns, and
Hitman, but keep in mind
that they might not be
available. Regardless of
whom you do hire, keep
some money on hand to renew their contracts in the future. It may be a while
before you find a steady source of income for your team.
While using the Laptop,
you may want to make
quick visits to some of
the other sites available
from A.I.M.’s links page.
Also take the time to
read the overview of
Arulco contained in your
file manager. It’s useful
background material on
Arulco, the country
you’re about to visit.
2
JAGGED ALLIANCE 2
JAGGED ALLIANCE 2
3
Page 5
Tutorial Tutorial
When you’re ready to head out into the field, select “Shut Down” on the
laptop. The Map Screen will now appear. The Map Screen contains all sorts
of cool functions and features. For now, though, concentrate on the lower
right section of the screen. Click on the small arrow to the right of the word
“Paused.” It’s time to head to Arulco.
Part Two: …Travel to Interesting Places…
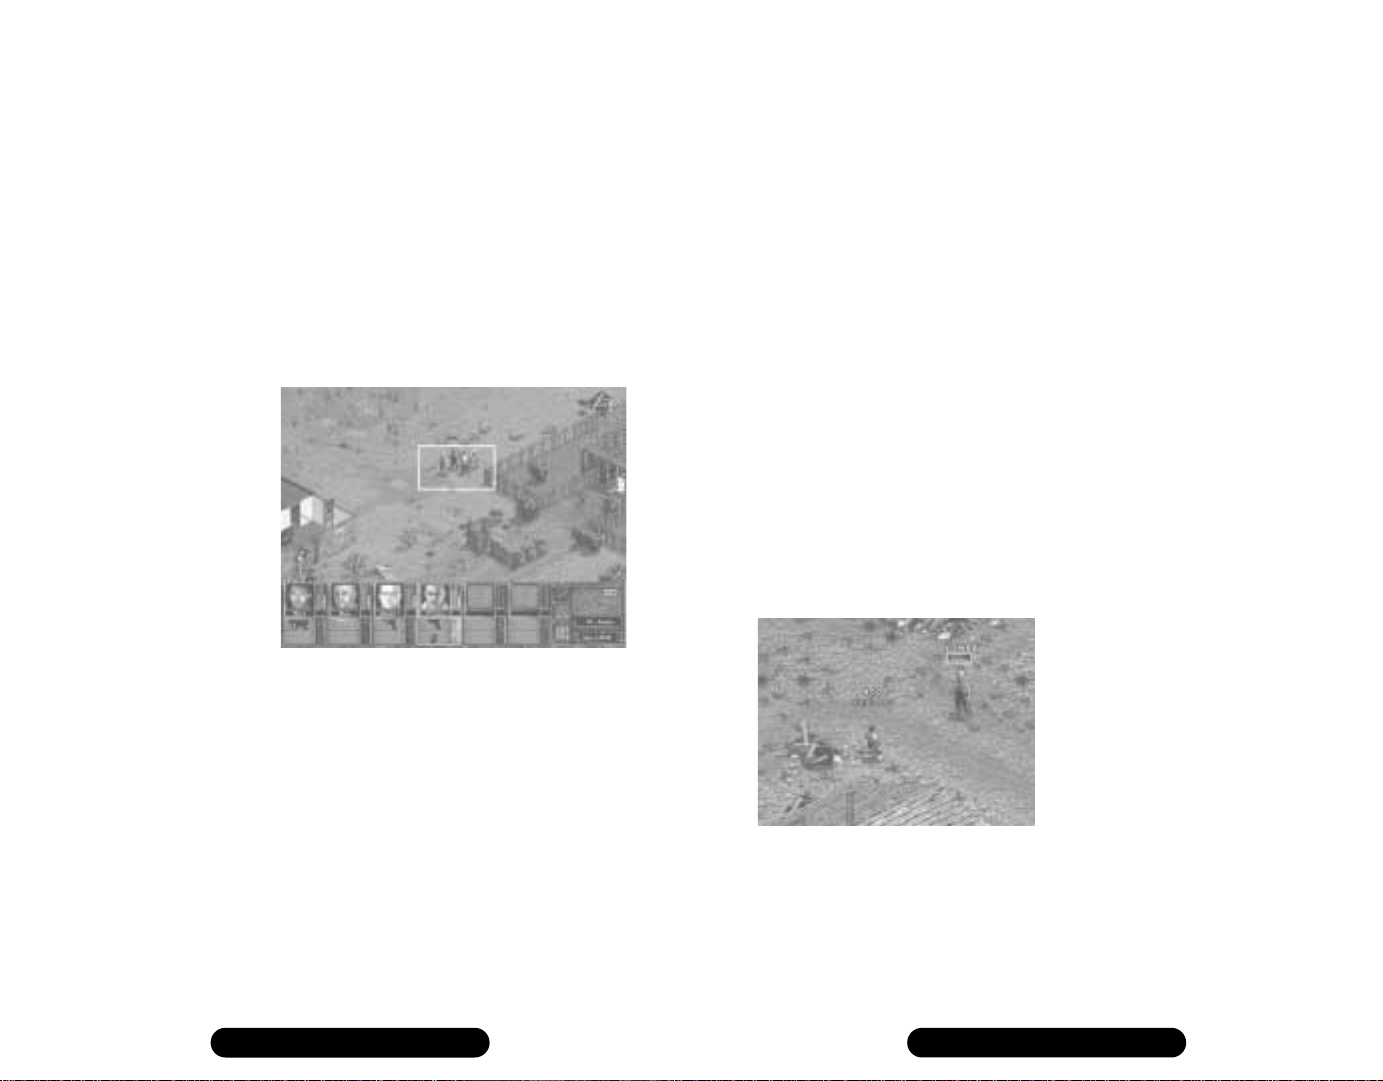
The next thing you’ll see is your mercenaries being dropped into the town of
Omerta. Once they’re all off the helicopter, you’ll be able to give them
commands.
Before you can give a mercenary an order, you must select him. To select a
merc, either left-click once on the merc’s figure on the main screen, or left-
click on the merc’s portrait at the bottom of the screen.
To make a selected merc
move, just left-click on a
destination. The merc will
begin to make his way
over. (Of course, this
won’t work if there’s another merc or an obstacle
in the way. Hey, your
mercs may go through hell
for you, but they’re not
about to walk smack dab
into a wall just so you can
have a cheap laugh.) If
you’re in a hurry, double-
click on the target to make
him run there instead.
Often, you’ll want to move several mercs at once. To select a group of mercs,
left-click on the ground and drag the mouse to draw a box around the mercs
you wish to select. This “rubber band” method lets you select some or all of
your mercs at once. You can also ALT-left-click on an individual merc’s body
to add him to the selected group. (If a merc is already part of the selected
group, ALT-left-click will remove him from the selected group.)
Note that different mercenaries move at different speeds, so you may have to
wait a bit for the slowpokes in the group to shuffle over to their goal. Also
note that group movement does not work during turn-based combat. You’ll
definitely want to handle one merc at a time in the midst of a shoot-out.
And make no mistake, a shoot-out is about to begin. You’ll encounter hostile
troops shortly after your team lands. When one of your mercs sees an enemy,
turn-based combat will begin. In combat, you control each merc individually;
group movement and selection modes are no longer active. In turn-based
mode, every mercenary has action points which decide how much he can do
in a single round of combat. Faster, more agile mercs might be able to shoot
multiple times or run great distances, while slow mercs may have difficulty just
getting off one shot in a given round.
To fire at an enemy in your mercs’ visual range, hold the cursor over the enemy. A targeting crosshairs will appear. Left-click to fire the gun. For more
advanced combat options, such as refining your aim, throwing grenades, and
hand-to-hand combat, see the Tactics section of this manual.
Any merc standing bolt upright in battle is begging for death, and the enemy
will be happy to give it to him. Your mercs can stand, crouch, or lie prone,and
they’ll need to do a combination of these if they want to survive. To make a
merc change stance, hold the mouse cursor over the selected merc. You’ll see
one arrow pointing up and one arrow pointing down. While holding down
the left mouse button, drag the mouse up or down, depending on the way
you want to change the merc’s stance. Standing and lying prone are two
arrows apart, while standing and crouching are one arrow apart.
The puny enemy forces in this sector are no match for your team. You should
be able to defeat them with only minor casualties. If you have a merc with
medical knowledge and equipment on your squad, you’ll be given the option
to automatically bandage the injured after the battle ends. (You did hire a
medic, didn’t you?)
Part Three: …Meet Interesting People…
Take a look around after you win the
battle. You’ll find a young boy
named Pacos just south of where
you landed.
If you move the cursor over Pacos, a
‘moving lips’ icon will appear. This
is the symbol for the Talk com-
mand. The cursor in Jagged
Alliance 2 will automatically change
to the most logical option in many
situations. If you put the cursor over
someone you can speak to, it will change to a pair of lips; if you put it over an
enemy, it will turn into a crosshairs; if you move it over a closed door, it will
change to a hand, and so on.
Left-click the Talk cursor on Pacos. A box appears, offering different stances
describing your attitude toward the boy. However, Pacos’s mother has told
him not to talk to strangers–especially strangers with guns! He’ll eventually
run away no matter what you say to him. Follow him into the building.
4
JAGGED ALLIANCE 2
JAGGED ALLIANCE 2
5
Page 6
Tutorial Tutorial
Pacos will lead you to his mother, Fatima. Talk to Fatima using the “friendly”
stance. She’ll listen to your mercs, but she’s skeptical. You can convince her of
your credentials by giving her a letter you received from Enrico Chivaldori.
Right-click on the face of the first merc in your team, the one on
the far left of the bottom of the screen. This will bring up that
mercenary’s Inventory Panel. There you’ll see an outline of your
team member and pictures of his equipment. One of these items is
the letter. Left-click on the letter to pick it up, and then left-click
on Fatima to give it to her.
Fatima will lead your team towards the rebel headquarters after she
reads the letter. Eventually, she’ll leave the sector, exiting off the
right side of the screen. To follow her, move your mercs to the edge
of the sector, then bring your cursor all the way over to the eastern
side of the screen. As long as everyone is within a few spaces of the edge of
the sector, the cursor will change to an exit sign. Make sure all your mercs are
nearby, then left-click with the exit cursor showing. An options box will
appear. Click “OK” and your squad will travel to the next sector (sector A10).
Once you make it inside rebel HQ, listen to everything that Miguel, the rebel
leader says. When he’s done talking, try to Recruit him. (You’ll find the
Recruit option in the conversation window.) You’ll be directed to recruit Ira,
another member of the rebels’ team. Once you have been given a mission and
a new team member, you’ll leave the rebels’ basement hideout.
Part Four: …And Kill Them.
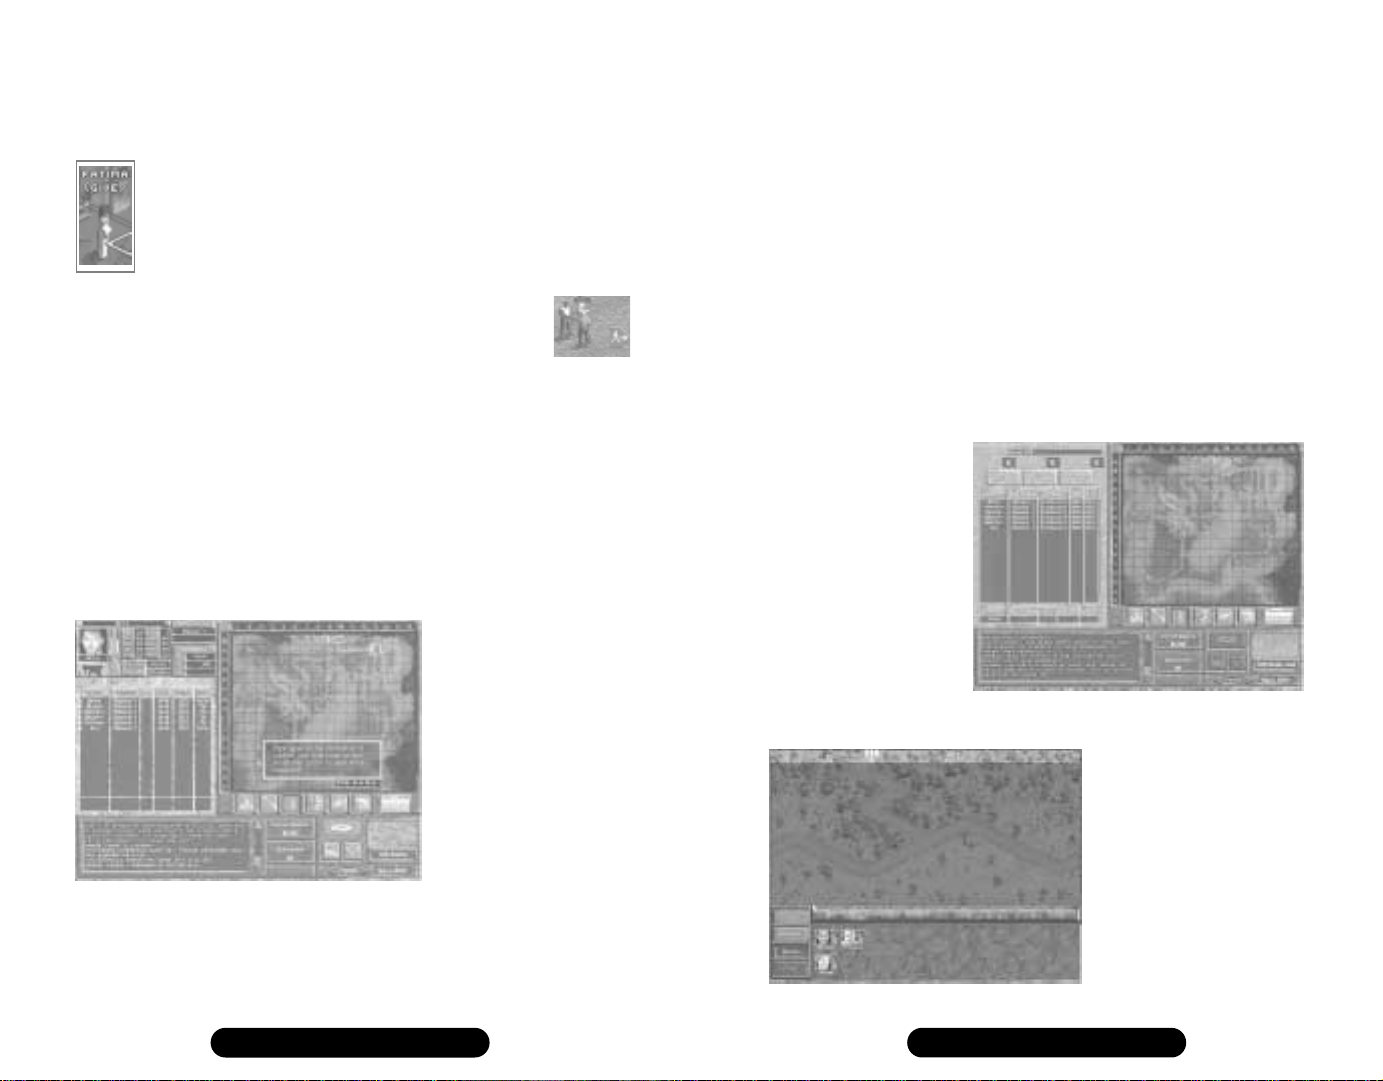
Your mission is to travel to
the city of Drassen. To
plan your journey, enter
the Map Screen by either
left-clicking the triangle
button, or by pressing the
M key.
Before you get into any
more trouble, it’s a good
idea to save your game.
First, either left-click on
the big button with a picture of a compact disc on
it, or press O. This brings
up the Options Screen. Now click on the button labeled “Save Game” to save
your game. You’ll enter a screen with a list of slots in which to save your game.
Just left-click on the second slot, and enter an appropriate description (like
“Showing Deidranna Who’s Boss”). The first slot is reserved for the Quick
Save feature, explained in the Reference section.
After your game is saved, you’ll return to the Map Screen. There’s a lot of
information here, but you can safely ignore most of it for now. It’s time to tell
your team to head to Drassen. In the top-left section of the screen you’ll
notice a list of all of your mercenaries. To begin plotting your trip, click in the
column marked DEST for any of your mercenaries. Now turn your attention to the map itself, and click twice on sector B13, the top sector of the town
of Drassen. This will start your squad off on their expedition.
There’s just one small catch.Your mercs won’t move because time has stopped.
No, the world hasn’t ended—it’s just that the game automatically goes into
Pause mode when you enter the Map Screen. To get things moving again,
take a look at the time controls in the bottom right corner of the Map Screen.
These controls compress time, so that you can get events moving at just the
speed you prefer. Click on the small arrow to the right of the blinking word
“pause” to speed up time and start your party walking. Each time you click
that button, time moves faster. It takes about 8 game hours to get to Drassen,
so the fast “60 min.” setting is best.
You’ll see your team, represented as a yellow arrow,
being their journey. If you
don’t run into some enemies along the way, you
definitely will once you
reach Drassen. When you
encounter hostile forces
while traveling, a warning
box will appear with three
buttons: “Auto-resolve,”
“Go to sector,” and “Retreat mercs.” Don’t wimp
out—pick “Go to sector”
to begin a battle.
Upon entering the sector,
you’ll encounter a screen allowing you to strategically
place your mercenaries
along the edge of the sector.
For now, just left-click
“Group,” and place your
mercs with the cursor. Left-
click “Done” once you’re
ready. You’ll be taken down
to the battle.
6
JAGGED ALLIANCE 2
JAGGED ALLIANCE 2
7
Page 7
Tutorial
Reference
This bunch is tougher than the crew you mowed down back in Omerta. Take
some time to plan your strategy. Remember, your mercenaries are in this for
the long haul. You don’t want them shot to pieces in the first few hours of
your campaign.
With the battle for Drassen begun, you’ve taken the first vital steps in
liberating Arulco. Consult the “Reference” section which follows for more
detailed information about the game. Or, just press the H key at any time to
get instant help on the game’s features.
Good luck! Between Queen Deidranna and the even more sinister forces that
lurk in the countryside, you’re going to need it.
The Reference section contains in-depth information on specific game functions. Here you’ll find information on:
• Logistics: The laptop, dealing with A.I.M. and hiring mercenaries.
• Reconnaissance: Exploring Arulco, talking to its inhabitants, and
using items.
• Tactics: Everything you need to know about combat.
• Strategy: Using the Map Screen, changing merc assignments, and
traveling long distances.
• Game Options: How to configure the game to your liking.
Logistics: The Laptop Screen
Hiring Mercs
The first step in acquiring some good hired guns is contacting the Association
of International Mercenaries (A.I.M.). A.I.M. acts as the employment
agency for the best of the best in the merc community. To contact them, use
your laptop. From the Web button on the left side of the screen, selectA.I.M.
from your bookmarks.
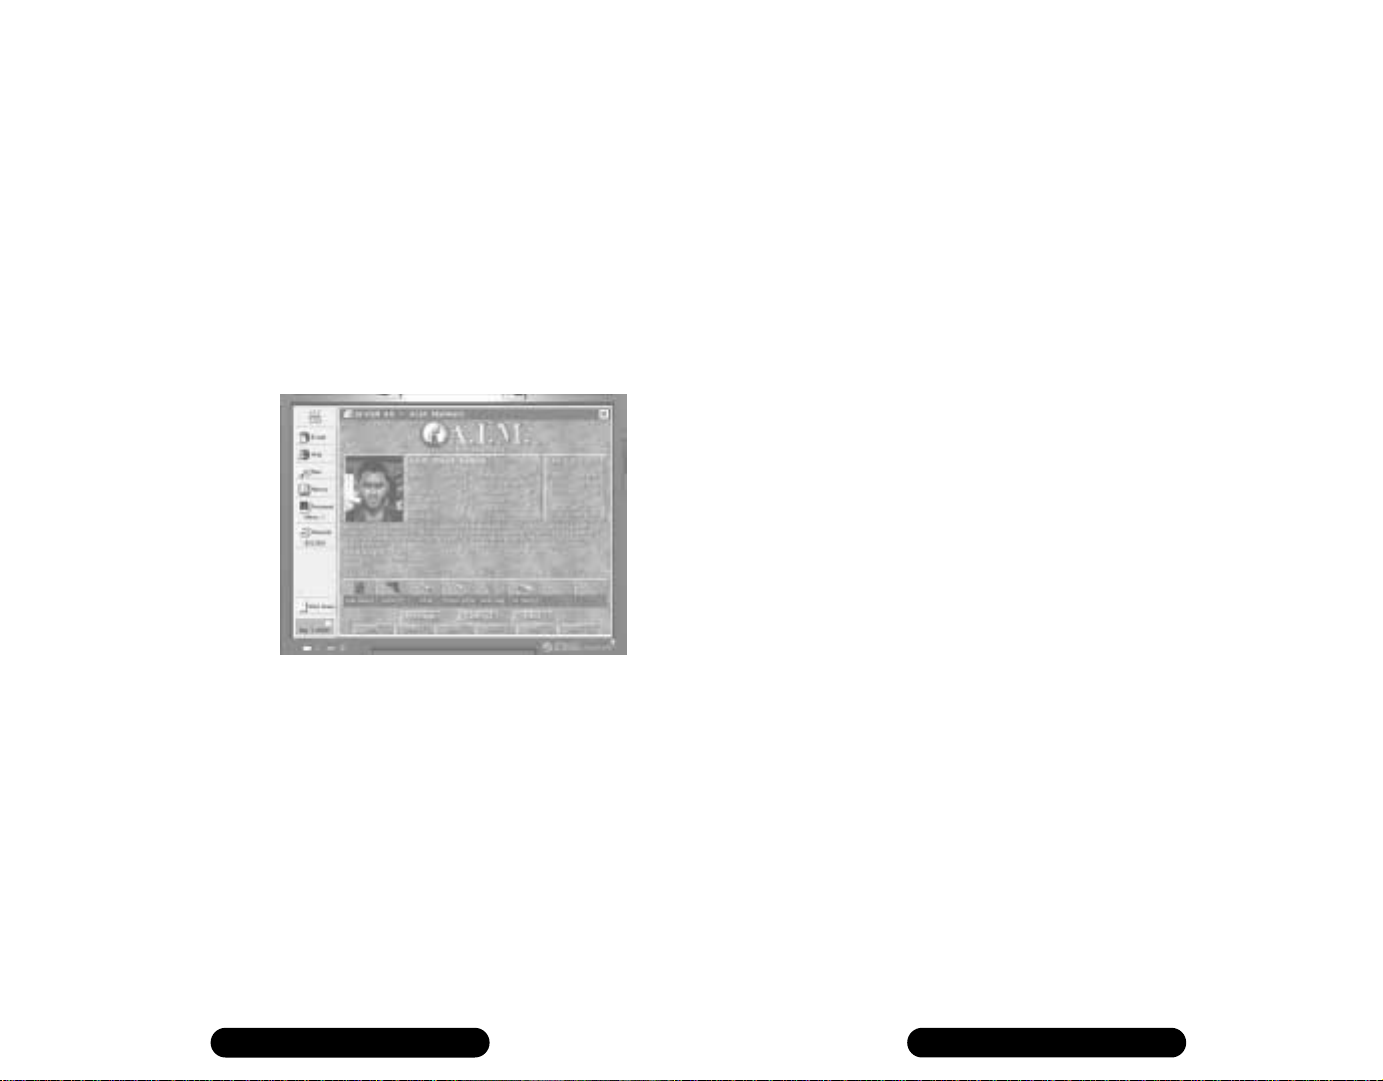
On the A.I.M. home page,
you’ll find buttons leading
to Members, Policy, His-
tory, and Links. Policy
and History will give you
some background information, while Links leads
to Web sites such as Bobby
Ray’s Guns and Things.
The Members section is
where you find the real
meat of the A.I.M. site: reviewing and hiring mercenaries.
A.I.M. Roster: The options available in the A.I.M. Members section allow
you to view available mercs. You can sort the merc roster by Price, Experience,
Marksmanship, Medical, Explosive, and Mechanical—very handy for making
your employment decisions. You can also view the mug shot index, read
individual mercenary files, and read about A.I.M. alumni.
8
JAGGED ALLIANCE 2
JAGGED ALLIANCE 2
9
Page 8
Reference Logistics
Click on M to view the Mug shot index. This brings up the picture of every
merc in A.I.M. If you sorted in descending order, then the mercenaries with
the highest attribute will be at the top left hand side of the map. Sometimes
(particularly when dealing with price) you may be searching for lower
attributes. In this case, simply sort in ascending order or look at the bottom
of the list. Once you click on a mug shot, you’ll get all the necessary information on that merc. Clicking on F goes right to the mercenary File, which
provides you with detailed information on individual mercenaries. A will take
you to the Alumni roster, containing the stories of the many old-time A.I.M.
veterans who have since left the mercenary business.
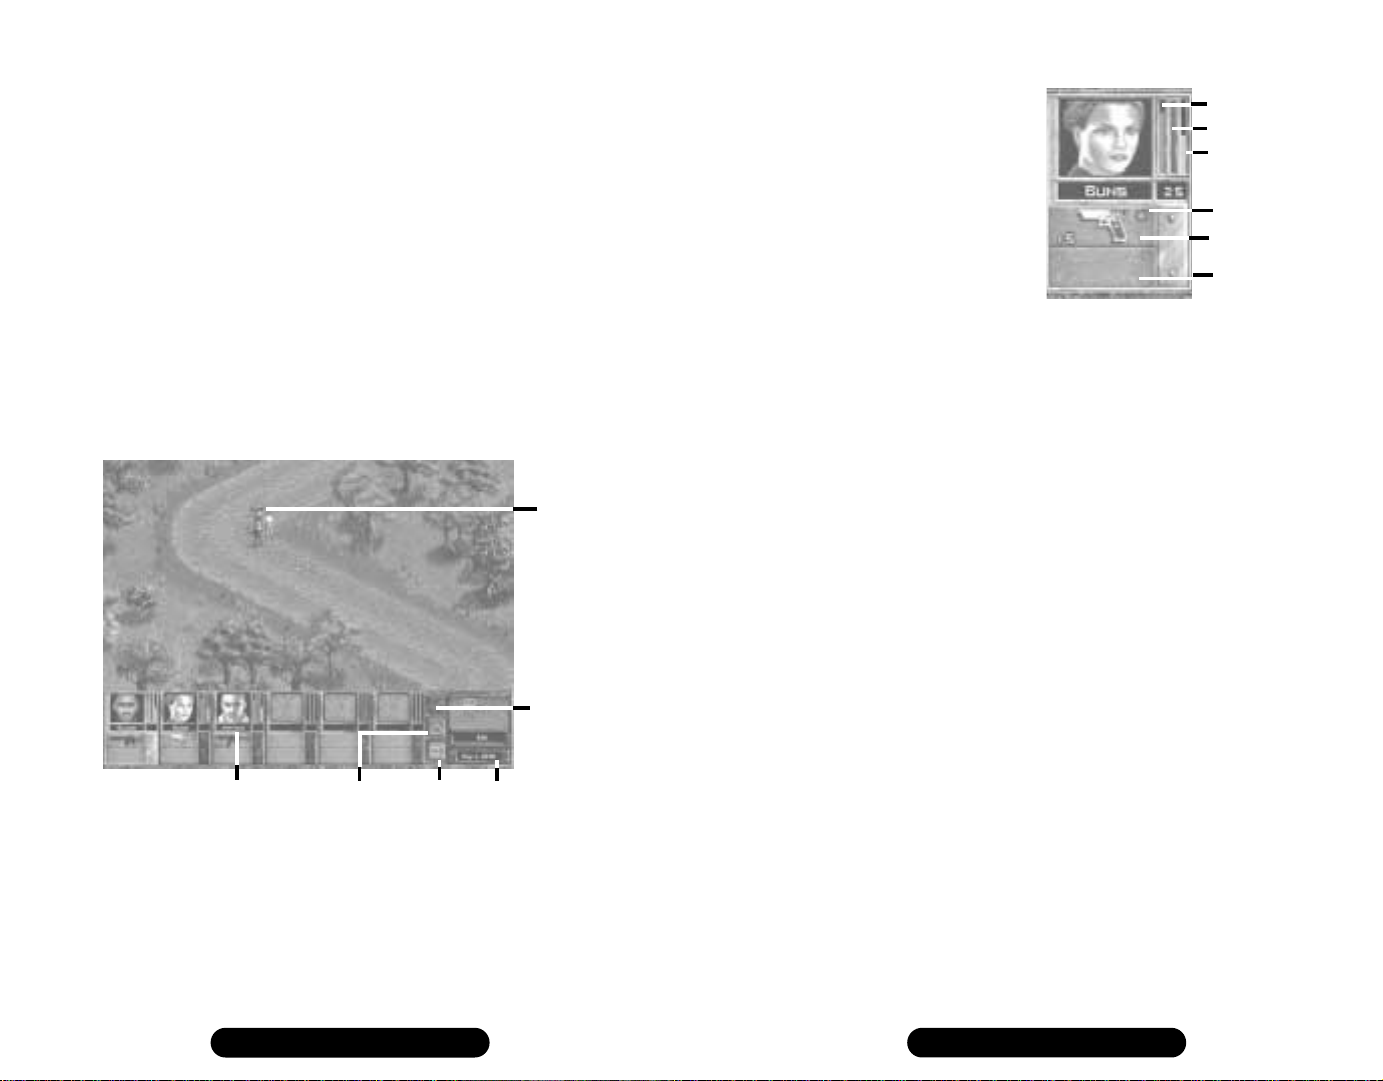
Mercenary Files: These pack a lot of information into one screen. Left-click
on the merc’s portrait to offer him a job, and Right-click on the portrait to
return to the mug shot index. Next to the portrait are attributes and skills
(described below).
On the far-right side of
the File screen is contract
information. This tells you
the fees for hiring the merc
for one day, one week, and
two weeks, as well as the
merc’s medical deposit. To
find out more about mercenaries, their skills, and
their quirks, read their
background information.
Finally, near the bottom of
the screen, is the Optional
Items section. The merc
joins your team with this
equipment, if you choose
to pay the additional cost.
Mercenary Statistics: Take a close look at a mercenary’s statistics while
viewing his file. A mercenary’s statistics represents his overall ability in
various areas. Each statistic ranges from 0 to 100, with 0 being pathetic and
100 being top of the line. Some mercenaries can improve their statistics by
training and field missions. As a mercenary’s statistics increase, he becomes
more valuable, and therefore demands a higher . . .
Salary is the amount a merc charges for his services. A merc charges
differing amounts depending on whether the contract is for a day, a
week, or two weeks. A merc’s salary comes directly out of your main
bank account, and must be paid in advance. (A.I.M. Mercs operate
on a strictly cash-up-front basis, for obvious reasons.) Don’t blow
your entire wad on expensive mercs until you can afford their
exceptional talents.
Health represents both the physical well-being of a mercenary and
the amount of damage he can take before death. A mercenary with
100 health is in perfect physical condition. A mercenary with 10
health could be killed by a stubbed toe. Health also influences the
overall performance of a mercenary and the effectiveness of other
statistics and skills. After all, it’s hard to perform any job well when
your arm is falling off.
Agility measures how well a mercenary reacts physically to a new
situation, whether it’s a shotgun blast or a pesky mosquito. Agility
affects the speed, coordination and control a merc displays while
recognizing and reacting to an event, as well as the merc’s traveling
speed.
Dexterity measures a mercenary’s ability to perform delicate or
precise movements correctly. For certain skills, like medical talents,
a high dexterity is very important. Having read all the books doesn’t do much good if your hands shake during surgery.
Strength represents a mercenary’s muscle and brawn. You’ll find it
particularly important in hand-to-hand combat and forcing things
open.
Wisdom affects a mercenary’s ability to learn from experience and
training. Naturally, it also affects his interpretation of things. Highly
intelligent mercs have no difficulty mastering the inner workings of
complex military items. Those not so mentally blessed take more
time to absorb the intricacies of a skill or action. (Hey guys! Look at
the funny metal pineapple with the pin in it!)
Leadership measures charm, respect, and presence. Leadership
affects your mercs’ performance in the field and their interactions
with non-player characters.
Mercenary Skills: In addition to statistics, everyone on your team has four
basic skills that lie at the heart of the mercenary trade. Like statistics, skills
range from zero to 100 and may increase with practice. A skill of zero, however, will never improve. Some people just aren’t cut out to be doctors or
mechanics.
Medical: Since they seldom get into firefights near hospitals, injured
mercs must rely on one another for treatment. A member’s medical
skill represents his current medical knowledge and ability to heal the
wounded. A mercenary with a high medical skill could perform brain
surgery with a can opener and a sewing kit, while a low skilled
mercenary would have trouble applying a Band-Aid correctly.
Explosives: A member’s explosives skill determines his ability to create, use, and disarm explosives without blowing himself sky-high.
10
JAGGED ALLIANCE 2
JAGGED ALLIANCE 2
11
Page 9

Reference Logistics
A highly skilled merc could disarm the most complex bomb without
breaking a sweat, while an unskilled merc might destroy the building
just by trying to light a sparkler.
Mechanical: Mercenaries use all sorts of gadgets—their weapons,
radios, locks, and so on. Mechanical skill rates a merc’s ability to
repair damaged, worn-out or broken items or equipment (such as
vehicles), jimmy locks, and to combine existing objects to form new
ones.
Marksmanship: A keen eye and a steady hand contribute to the
sought-after talents of the marksman. A mercenary’s marksmanship
skill reflects his ability to hit, precisely, any given target with a
firearm.
Experience Level is the most important mercenary trait. It reflects
the sum of their abilities: their years in A.I.M., the amount of combat they’ve seen, and how knowledgeable they are in the field. As
mercenaries gain in experience class, they also gain certain benefits:
• Their ability to detect boobytraps and ambushes improves.
• They become sneakier and their stealth increases.
• They are able to focus their sights on an enemy target more
quickly and accurately.
• They become more effective at interrupting enemies (and
avoiding being interrupted themselves.)
• Their overall proficiency in field operations increases.
• Their salary increases (mind you, it’s a benefit to them.)
Hiring: After reviewing the files, you’ll be ready to assemble a team. Left-
click on a merc’s portrait to hire him. This brings up a series of dialog boxes.
The first box has the options Hire and Hang up. The next box is much more
detailed. Choose whether to hire a merc for one day, one week, or two weeks,
and whether to leave the merc naked and defenseless, or buy his optional
equipment. You may have to wait several game hours for your new hires to
catch the next chopper to Arulco. (Some mercs may be not be available
when you try to hire them. Leave them a message to find out when they are
available.)
Newly hired mercs will initially be dropped off in the town of Omerta. If
you like, you can have them dropped off at other locations. See the description of the Airspace Filter in the Map Screen section of the manual for more
information.
Medical Deposit: Some mercenaries require medical deposits. The medical
deposit is compensation for the merc putting their life and livelihood on the
line while working for you. If a mercenary leaves your service unscathed, you’ll
get this deposit back. If he’s injured, you may be able to get a partial refund.
If, however, the mercenary leaves your employ in a pine coffin, the medical
deposit is forfeit.
Insurance: Insurance is a good way to protect your “investment” in
mercenaries. For a small premium up front, you can be guaranteed a refund
for every day that a dead merc has left in his contract. For instance: suppose
you hire a merc for one week at $1000 per day, and that merc dies on day
three. With insurance, you’ll get $4000 back which otherwise would have
been lost. The full details are on Malleus, Incus, & Staple’s Web site (there’s
a link to it on A.I.M.’s site).
Shopping at Bobby Ray’s
You’ll find a link to Bobby Ray’s Gubs ‘n Things on the Links page of the
A.I.M. Web site. It takes a while for Bobby Ray to open up his shop, but
when he does you’ll find he sells just about everything on your wish list.
Once in Bobby Ray’s, just left-click on the items you want to put them in
your shopping cart. To remove an item from your shopping cart, right-click
its picture instead. After you have selected the appropriate items, go to the
Order Form page. Here you’ll find an inventory of the items you’re ordering.
Select a destination for your goods, and a method of shipping.Then click on
the Order Button.
Your weapons will be delivered to the destination town in a few days.
Meduna and Drassen are the only two towns with airports in all of Arulco,
so expect to pick up your order in one of those two sites. The enemy holds
these towns at the beginning of the game, so you’ll have to do some fighting
before you can pick up your deliveries.
Note: Bobby Ray’s isn’t the only place you can stock up on new items. You
can also buy and sell from characters you’ll meet in Arulco. Though they
might not have the selection, you won’t have to pay hundreds of dollars in
shipping charges or wait several days for your goods to arrive.
Getting Information
The laptop contains all sorts of other useful information. Consult the laptop
frequently to check your e-mail, monitor your mercs’ performance, and read
essential reconnaissance files.
E-mail: If you have new e-mail when you start up your laptop, you’ll be
notified. Select E-mail from the list on the left, and the new messages will
be bolded to set them apart from the rest. Besides giving you information,
some e-mail will give you new Web sites to visit, which then appear as bookmarks in your Web browser.
Personnel Manager: The personnel manager provides detailed information
12
JAGGED ALLIANCE 2
JAGGED ALLIANCE 2
13
Page 10
ReconnaissanceReference
on your mercs and their accomplishments. The main screen is made up of an
index of mercs. You can view the statistics and inventory of each
mercenary. The statistics section compares the attributes and skills of all your
mercs. It also contains miscellaneous personal information on your mercs,
such as the number of kills they have, and information on their contracts and
prices. This information can be essential for deciding who to retain and who
to give the old heave-ho.
File Viewer: Over the course of your liberation of Arulco, you’ll acquire
computer files which can be read in this viewer. Initially, the only file present
is a reconnaissance report on Arulco.
Reconnaissance: The Tactical Screen
To complete your liberation campaign, you must explore Arulco thoroughly
and interact with its inhabitants. You’ll accomplish these missions from the
Tactical Screen. From the Tactical Screen you can move your mercs, obtain
information about them, and use the items you find in Arulco. As the name
Selected
Merc
End Turn
New
Merc
Portrait
suggests, the Tactical Screen is also where you’ll do your fighting.
Map
Screen
Squad
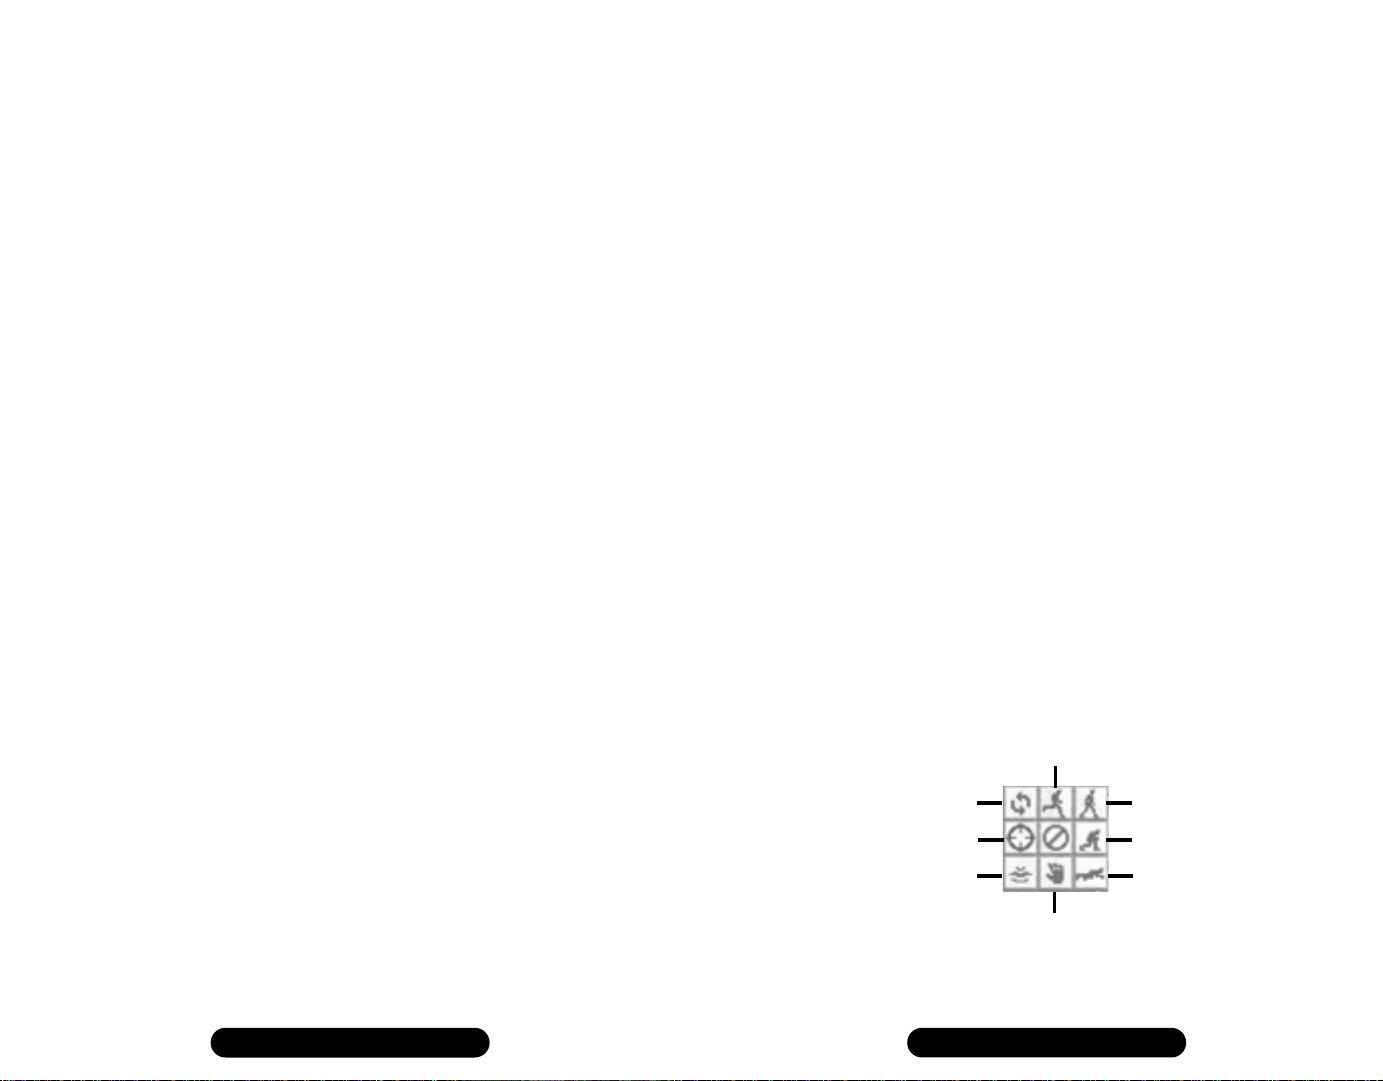
Mercenary Portraits
Along with your surroundings, the Tactical Screen also displays some of your
Sector
Info
mercs’ portraits, along with their vital
statistics.
Portrait: Left-click on a merc’s
portrait to select him; right-click to
bring up his Inventory Panel.
Name: During combat, the amount of
action points a mercenary has left is
displayed to the right of the merc’s
name.
Indicator Bars: These track the current level of three important mercenary
statistics, Health, Energy, and Morale.
Health: The red bar tracks the mercenary’s current physical state. If a
mercenary is wounded, the health bar drops to reflect the damage and leaves
an “injury tracker” in its place. Injuries left untreated are shown in yellow,
while treated injuries show pink. Untreated, injuries have the potential to
permanently lower a mercenary’s health rating.
Energy: The blue bar tracks a character’s breathing rate and energy. The bar
will fall as the merc performs activities, and rise when the character rests.
How quickly a merc regains energy depends on the member’s well-being and
how tired he was in the first place. Sleep (or lack thereof) can greatly affect a
merc’s available energy. A merc who hasn’t been sleeping will have his
potential energy decrease as well, and will eventually collapse from exhaustion.
Morale: Morale is a measurement of how a merc is feeling. A normal merc
is at the morale midpoint, stable. The higher the morale bar, the happier the
merc is. Though your mercs probably won’t quit on you if they’re unhappy,
their performance may suffer, or they may refuse to renew their contracts.
The Main Hand and the Secondary Hand: The items a merc has in his hands
are displayed here. To swap an item from the Secondary Hand to the Main
Hand, right-click on the Secondary Hand. For more information, see the section on the Inventory Panel.
Health
Energy
Morale
Attachment
Main Hand
Secondary
Hand
Movement
Selecting Mercs: To get a mercenary to follow your orders, you must first select
him. Mercenaries may be selected by left-clicking on their portraits, pressing
F1 through F6, or by left-clicking on their figures on the playing field. A
selected merc’s panel is highlighted.
Getting a Clearer View: If trees are blocking your view, you can get a better
view by pressing the T key to toggle Treetops on and off. (If you toggle
Treetops off, the trees are still there, but only their stumps show on screen.)
14
JAGGED ALLIANCE 2
JAGGED ALLIANCE 2
15
Page 11
Reference Reconnaissance
The W key (for Wireframe buildings) serves a similar function for buildings.
For an overhead view of the entire sector, either press the INSERT key or
right-click on the small map in the lower right corner of the Tactical Screen.
Walking Around: In real-time mode, the normal destination cursor is a
square. Left-click with this cursor on the destination, and the currently
selected mercenary will attempt to travel there. A mercenary’s movement
speed depends on their physique, energy level, and the type of terrain. In
combat, it also depends on the number of action points a merc has. For more
information, see the section on action points later in this manual. You can also
make a merc run to his destination by double-clicking there.
Mercs will avoid obstacles in their path and generally choose the easiest and
shortest route. Of course, what a merc considers the best route may not be the
one you would have chosen! To plan a precise route, hold down the SHIFT
key while choosing your destination. The SHIF T key displays the exact path
your mercenary will take. It also makes the cursor “hug the ground.” This is
helpful in close quarters, where walls or other obstacles may block the way.
Group Movement: As explained in the Tutorial, you may select a group of
mercenaries by left-clicking and dragging to draw a box around them. You
may also ALT-left-click on an individual merc’s body to add him to the
selected group. (If the merc is already part of the selected group, ALT-left-
click will remove him from the selected group.)
Sometimes you want all mercs in a squad to gather together at one location.
Jagged Alliance 2 provides a convenient way to move all of your mercs to the
same destination:
• Left-click on the destination and hold the mouse button down. A
red square will appear.
• Press down on the right mouse button. Another red square will
appear inside the first red square. (To make the mercs run instead of
walk, click the right button twice.)
• Now release both mouse buttons. All squad members will walk
towards that destination.
Note that the group movement modes don’t work during turn-based combat.
Ambling along in a nice ordered line is the last thing your mercs are going to
want to do when they’re surrounded by hostile forces.
CONTinuing an Action: During turn-based combat, your merc may pause
while en route to a destination and report on something he’s seen. To make
the merc continue on his way, click on the merc’s portrait or press the END
key. The word CONT on a merc’s portrait indicates he was interrupted in
mid-action.
Movement Modes: Normally, your mercs just saunter along. However, just
sauntering along in a battlefield will get you your head blown off,which is why
Jagged Alliance 2 offers you several additional movement modes.
• Stand/Run: When you have the need for speed. Running is the
fastest way to move, but it also depletes the blue Energy bar the
fastest. Running mercs are less perceptive and more likely to make
noise.
• Stand/Walk: The typical way to travel.
• Crouch/Squat: Makes mercs less visible and safer from enemy fire.
• Prone/Crawl: Hugging the ground is the safest way to travel under
heavy fire. It’s also the slowest, and quite exhausting to boot.
There are a number of ways to change your movement mode:
1. The Cursor: Place the cursor over the merc. An arrow will appear.
2. The Merc Options Panel: Right-click and hold. The Merc
To make a standing merc crouch, left-click and hold, then pull the
mouse cursor down. To make the crouching merc lie prone, repeat
the process. You can make a crouching character stand up by holding
the cursor over the merc, left-clicking and holding, and then pulling
up instead of down. If you drag up or down far enough to see two
arrows, you can go directly from standing to lying prone, or vice
versa.
Options Panel will appear, allowing you to change your movement
mode.
Run
Look/
Turn
Use
Talk
Hand
Walk
Crouch
Prone
16
JAGGED ALLIANCE 2
JAGGED ALLIANCE 2
17
Page 12

Reference Reconnaissance
3. The Inventory Panel: Right-click on a mercenary portrait at the
4. The Keyboard: The R key switches to Run mode, S changes to
5. Scrolling Through Movement Modes: This method is only
Change facing: If someone sneaks up behind you with a shotgun, you’ll need
to turn around in a hurry. To make a mercenary look in a different direction,
right-click and hold to bring up the Merc Options Panel, then left-click on
the arrows icon. Now left-click again in the direction you want the merc to
face. You may also press the L key to bring up the Look cursor directly.
Backing Up/Sidestepping: Hold down the ALT key while you left-click on
a target square, and the selected merc will back up or sidestep all the way to
their destination. This is perfect for times when you’re trying to move away
from the enemy while still providing cover fire for your other mercs.
Exchanging Mercs: To exchange two mercs (or a merc and a civilian), select
one and put the movement cursor on the other. Then press X on the
keyboard. This can also be done in combat, but both parties need enough
action points to do it.
Climbing: This technique allows you to climb walls or jump fences. Walk
right up to the wall, left-click and hold, then pull the cursor up to get a
bottom of the screen to bring up that merc’s Inventory Panel. From
here you can change your movement mode, along with a number of
other options.
Mute
Examine
(Ctrl)
Look Talk
Burst Fire
Cursor
Level (Tab)
Merc
Information
Previous/Next
Merc
Game Options
Standing stance, C changes to Crouching stance, and P changes to
Prone stance.
available during turn-based combat. Left-click on the destination
and hold. Now right-click repeatedly to scroll through the different
movement types available. An animated cursor will display the
movement mode during combat, along with the cost in action points
Climb
Stance
Up
Stealth
Mode (Z)
Stance
Down
ladder-shaped arrow. If you don’t get that cursor, you won’t be able to climb
that wall. Note that you may only climb onto flat surfaces.
Once a merc has climbed up, the cursor will raise up to the rooftop level. To
change the cursor elevation level between roof level and ground level, either
use the buttons inside the inventory panel, or press the TAB key.
Stealth Mode: Sometimes, a merc needs to move as silently as possible to
sneak up on the enemy. Stealth Mode prevents you from raising a racket, but
it comes at a high price in terms of action points. To start sneaking, bring up
the merc’s Inventory Panel and press the Stealth Mode button. This button
will be highlighted while Stealth Mode is active. While in Stealth Mode, the
movement cursor will appear in yellow, and a yellow rectangle will appear
around the merc’s portrait. You can toggle Stealth Mode on and off by
pressing the Z key, or make your entire squad sneak by pressing ALT-Z.
Swimming: Your team will encounter various streams, lakes and rivers in
their campaign. Mercs can navigate these water hazards, but, unless there’s a
handy bridge nearby, it will involve getting wet.
Swimming can be very exhausting. Before a mercenary takes the plunge,
check his blue Energy bar. As he swims across the waterway,often laden with
heavy gear, he tires and the Energy bar falls. Mercenaries with watery
destinations will tread as long as they can until given a new destination, or
they run out of energy. When the merc’s Energy bar reaches zero, the
mercenary drowns and becomes fish food.
There is always a chance that your
mercenary’s inventory may be
damaged by the water while
swimming. If you are concerned
about damaging a particular
item, avoid deep-water areas
where the mercenary has to swim
with a submerged inventory.
After crossing a river, review each mercenary’s inventory to get an up-to-date
report on the working status of each item. Check your weapons, as they are
usually the first to be damaged.
Moving to Adjacent Sectors: If all the mercs in a squad are close to a stairway or the edge of a sector, you will be able travel to the neighboring sector.
Move your mouse to the edge of the screen that corresponds with the edge of
the sector, and an Exit Cursor will appear. Left-click to bring up a window
containing several travel options:
18
JAGGED ALLIANCE 2
JAGGED ALLIANCE 2
19
Page 13

Reference
Reconnaissance
Selected Merc: This will move only the currently selected merc into the
adjacent sector.
All Mercs in Squad: This will move the entire squad into the adjacent sector.
Go To Sector: This is useful if you are moving only part of a squad. Check this
box to ‘follow’ the selected mercs into the new sector. Otherwise, the screen
will stay on the current sector.
For information on making long journeys to non-adjacent sectors, see the
section on the Map Screen.
Inventory
Each of your mercenaries is equipped with all sorts of gadgets essential to his
survival. To access a mercenary’s Inventory Panel, right-click on a
mercenary’s portrait or press the ` key (it’s right above the TAB key on most
keyboards). The Inventory Panel for that mercenary will appear.
Chest
Helmet
Armor
Head
Gear
Main
Hand
Secondary
Hand
Leg
Armor
The Main Hand: You equip a merc with new weapons and items by using
the different item slots. The most important of these is the Main Hand slot.
The item a mercenary has in his Main Hand is the item he will use in play.
This is most often a weapon, but it could be a medical kit, an explosive, or
other items.
The Secondary Hand: Mercenaries also have a Secondary Hand where they
hold items that may be called into play. Items in the Secondary Hand can be
transferred to the Main Hand quickly and easily during play by right-clicking
on the item in the Secondary Hand. For example, suppose Hitman has a pistol in his Main Hand and a grenade in his Secondary Hand. To transfer the
Inventory
Items
Withdraw
Funds
Key
Ring
grenade to Hitman’s Main Hand so he can throw it, right-click on the
grenade in the Secondary Hand. Note: Certain large items, such as rifles and
shotguns, require both the Main Hand and the Secondary Hand to operate.
Also, you can put pistols (or other one-handed weapons) in each hand, and
fire them together for double the fun.
There are also slots for headgear, leg armor, chest armor, and a helmet, plus
twelve inventory slots in your pack. Jagged Alliance 2 will only allow you to
place items in their proper places—for example, you cannot wear a grenade for
a helmet, or use a medical kit as body armor.
Examining an Item: While in the inventory panel, right-click on an item to
get its full description.
New Items: Any items that your mercs have recently picked up will have a
glowing aura around them.
Viewing Other Squad Members: Click on the arrows beneath a portrait in
the Inventory Panel to bring up the Inventory Panels of other squad members.
Selecting Multiple Items: Left-click to select an item and pick it up. To pick
up several items in the same slot–three clips of .45 ammunition, for
example–SHIFT left-click on the items.
Drop an Item: Select the item to drop or throw. If you hold the selected item
close to the merc’s body on the Tactical Screen, the word “drop” will appear.
Left-click to drop the item at your merc’s feet.
Transferring Items: While viewing a mercenary’s inventory, you may trade
items with other nearby mercs. All mercenaries who are within reach are
highlighted, and mercs who are next to one another will form a chain to pass
items along. Mercenaries who are too far away will be grayed out.
You can also pass or throw an item to another squad member. Left-click on
the item to pass in the Inventory Panel, then put the cursor over another
mercenary’s body on the Tactical Screen. Beside the target merc’s name, the
word “pass” or “catch” will appear below the cursor. Just left-click, and the
selected merc will pass or throw the item to the other merc. (If the words
“pass” or “catch” do not appear, or the recipient merc’s inventory panel is
grayed out, the recipient merc is too far away.)
Giving an Item: This functions just like passing, except the target is a
non-player character instead of a merc. (Don’t bother trying to butter up
non-player characters with random gifts, as they’ll only take certain specific
items.)
Ejecting Ammo: Right-click on the gun, to bring up its full description.
Next, left-click on the colored bullet that shows how much ammunition is
inside. This will take the ammo out of the weapon.
20
JAGGED ALLIANCE 2
JAGGED ALLIANCE 2
21
Page 14

Reference Reconnaissance
Attachments: You can enhance the abilities of certain items by adding
attachments. Place the weapon in the mercenary’s Main Hand. Select an
attachment, such as a scope or silencer, and then left-click on the gun in the
Main Hand. You’ll see four slots to the right of the item’s picture. Left-click
in an empty slot to “attach” the attachment. You can also add or merge some
items together, or apply one to the other. This works the same way as with
weapon attachments.
Merging Items: You can merge two partially used items (e.g. two partially
depleted .45 ammo clips) together by putting one item in the merc’s Main
Hand, then putting the second item on top of it. You’ll be asked if you want
to merge. If you do, your two items will become one.
You can also merge partially used items by stacking them in one slot, holding
down the CTRL key, and then clicking on the stack. If you stacked three
partially used med kits with values of 30%, 40%, and 60% and then CTRL-
clicked on them, the result would be two med kits–one at 100%, the other at
30%.
Using an Item on Yourself: A merc can use some items, such as canteens and
camouflage kits, on himself. Left-click on the item, and then, while it’s
selected, left-click on the large figure of your merc’s body in the Inventory
Panel.
Other Information: The Inventory Panel lists three important pieces of
information directly affected by the items the merc is using: his armor rating,
the weight he’s carrying, and his camouflage rating.
Armor: The higher the percentage, the better protected your mercenary is.
Note that this rating is an average for the merc’s entire body. Even the best
chest armor won’t help you if you take a bullet in the noggin and you’re not
wearing a helmet.
Weight: Your mercs can only carry so much. As you keep loading them up
with more stuff, you’ll notice that their listed weight value increases. Be sure
this doesn’t go above 100%, or your merc will be hindered by the weight.
Camo: The higher the percentage, the harder it is for the enemy to see you.
Use a camouflage kit to increase the rating. Camouflage will eventually wear
off, especially if the merc gets wet.
Pockets: Last, but not least, each merc has pockets where he keeps his bank
card and his key ring. These items are accessed by the buttons shaped like a
dollar bill and a key, respectively.
Depositing and Withdrawing Money: If your merc finds himself in need of
a little cash, he can withdraw funds from your main account. Just click on the
Deposit/Withdraw Money button, shaped like a dollar sign. This will open
up a new window, from which you can choose dollar amounts in units of
$1000, $100, and $10. Left-click each of the dollar amounts until you reach
a desired total, and then press Done. (You can right-click to reduce the
amount.)
Depositing cash is simple by comparison. Pick up the money, move it over the
Deposit/Withdraw Money button, and left-click to increase the amount
deposited. (Right-click to reduce the amount.)
Finally, you can divide bills in your inventory into two separate piles of cash.
Just right-click on the bills, and you’ll be confronted with an interface
identical to the one for withdrawing money. Just pick an amount of cash, and
you’ll then have two piles of bills.
Key Ring: If you pick up one or more keys and want to save space in your
inventory, pick up the key, move it over the key ring icon, and left-click. If
you want to retrieve it in the future, just left-click on the key ring icon
without a key selected.
Items and Interactions
Using Items: Now that you understand the Inventory Panel, you’ll want to try
out all those interesting items your mercs carry. To use an item in Jagged
Alliance 2, place the item in the selected mercenary’s Main Hand then
right-click in the Tactical Screen. (If you have all the squad’s portraits showing on the screen, you can also left-click on the item in the Main Hand to get
the Use cursor.)
Depending on the item’s nature, different Use cursors will appear. Firearms,
for instance, will show a crosshairs cursor, a first aid kit shows a red cross
cursor and so on. If you try to use an item, but get a “?” cursor, then the item
has no immediate use in the playing field. However, a merc may be able to use
that item on himself, if the merc figure in the center of the inventory panel
glows when you select it with the mouse cursor.
With the Use cursor showing on the field, left-click on the target or object,
and action begins. For instance, a mercenary with a medical kit will attempt
to heal someone who’s feeling a bit under the weather. If the target is out of
range, the merc will proceed toward the destination until in range and then
perform the selected action. A small icon will appear on the mercenary’s
portrait to show their current activity.
The Hand Cursor: You can change the cursor to a Hand at any time on the
Tactical Screen by holding down the CTRL key. While holding down the
CTRL key, left-click on the object or item you wish to manipulate, and the
mercenary will move into range, then search, open or otherwise handle the
item or object. You can use CTRL-left-click to pick up items on the ground,
open and close doors and crates, and more. (Experiment!)
22
JAGGED ALLIANCE 2
JAGGED ALLIANCE 2
23
Page 15

Reference
Reconnaissance
If you see an item out on the field, hold the cursor over it for a second, and it
will automatically turn to a Hand Cursor, even if your merc is standing over
the item. Left-click and the mercenary will try to go to it and pick it up. If
there are several items stacked together,you’ll be able to pick from a list of the
available items. Left-click each of the items you want, or press Select All to
select all of the items. You can then press the Checkmark to take the
selected items.
Searching the Area: To have a merc search an area, bring up the Hand Cursor
and move it over nearby items. If there’s anything there the merc can pick up
or use in some way, the Hand Cursor will turn red.
Doors and Crates: Doors and crates are a special case. If the door or crate is
locked or already open, left-clicking on it will cause a small window to pop
up, offering a number of icons laid out in a panel. The options available to your
merc will depend on the items he’s carrying. For instance, if your merc
doesn’t have a crowbar, the Use Crowbar option will be grayed out. During
combat, actions will also be grayed out if the merc does not have enough
action points to perform the action.
Use Key
24
Open Manually
Examine for Traps
Force Open
Disarm Trap
Open/Close: These options are available on any door or crate,whether
it is locked or unlocked. Of course, if it’s locked, it’s not going to open.
Unlock: If you are lucky enough to have a key, this is all you’ll need to
open the door. Assuming, of course, that it’s the right key.
Use Crowbar: If you have a crowbar, you can try to pry open a door or
crate with it.
Examine For Traps: If you suspect a lock is trapped, try this option.
Bear in mind that what your merc tells you might not necessarily be the
truth.
Lockpick: If the merc has a lockpick kit, he will attempt to pick the
lock. If you fail, give it a few more tries. Your merc will tell you if he
thinks it’s impossible.
Force Open: If all else fails, try brute strength. Your merc will give it a
good solid kick.
JAGGED ALLIANCE 2
Crowbar
Pick Lock
Use Door
Untrap: If Examine for Traps suggests the door is trapped, your merc
may attempt to disable the trap with this option.
Use Door Explosive: The fun way to get a door open. If you have the
right stuff, you might just be able to blow the door off its hinges.Note:
A.I.M. recommends that only explosives experts try this.
Cancel: If your merc is clueless and the door looks unbreachable, select
this option to give up.
Hidden Items: Not all items are immediately visible. Some mercenaries have
seen a lot of hostile territory and tend to take particular notice of bumps on
the ground or strange patterns in the grass. Other mercs, those equipped with
metal detectors, might just be able to find items even the best trained eyes
would have passed over.
When mercenaries find what they believe is an item buried in the ground,
they’ll place a blue flag over it. Of course, what’s actually buried there—if
anything at all—is anybody’s guess. It might be a land mine that’ll blow you
40 feet into the sky . . . or the item you’ve been seeking for days. To dig up or
disarm the item, use the Hand Cursor on the blue flag (and cross your fingers).
Using Vehicles
Slogging along on foot can be a drag. Sooner or later, you’ll find vehicles that
allow you to zip across Arulco in style. To have a merc enter a vehicle, select
a merc, hold down CTRL to get the hand cursor, and then click on the
vehicle. (The cursor will change to a steering wheel.) It has to be a working
vehicle, of course–clicking on a bombed-out heap won’t work. Once a merc
enters a vehicle, he temporarily leaves his squad, and his assignment on the
Map Screen shows up as “Vehicle.” To get out, left-click on the seatbelt icon
in the merc’s Secondary Hand slot. Up to six mercenaries can ride in one
vehicle.
You cannot drive a vehicle around on the tactical screen. You can, however,
drive vehicles from sector to sector. Just go to the Map Screen, give a squad
inside a vehicle another sector as a destination, speed up time if needed, and
zoom! off they go. Driving is the preferred travel method for long trips,
because it’s far faster than walking.
As any resident of Los Angeles knows, stray gunfire may damage both
vehicles and the people inside them. You may have to repair a vehicle to make
it work properly.
JAGGED ALLIANCE 2
25
Page 16

TacticsReference
Meeting Non-Player Characters
Not everyone you’ll meet is an
enemy. The local population is
often friendly, and is an excellent
source of information and supplies.
When you run across a new
character on the Tactical Screen, place
the cursor over their body. If a name
and the Talk cursor, a pair of lips, appear over the character,you may speak
with them. Walk up to the character
and left-click to start a conversation.
If the selected mercenary isn’t in a good position to talk to the other character,
the Talk cursor will flash red and gray.
While talking to a character, you see his portrait plus a list of different
attitudes and actions you can take during the conversation:
Friendly: Friendly is just that, in the hope that being nice will get some
information.
Direct: Cut right to the point. Blunt comments may offend some
people.
Threaten: Get what you want out of an NPC by force or intimidation.
No one likes being threatened, but at least you might have the chance
to get what you want.
Give: Choose this option to give an item to a non-player character, and
it will bring up your inventory panel.
Buy/Sell: Some NPCs are willing to trade. This button brings up a
window showing the items the NPC has for sale, along with your
inventory so you can sell your own items. Left-click on the NPC’s
items to put them on the “counter top”. To return an item to the NPC’s
stock, left-click on it. You can also left-click on your own items to offer
to sell them, and back out with a right-click. Once you have selected all
the items you want to buy or sell, press the Transact button to finish the
deal. Don’t forget to pick up your purchases before leaving.
Repair: Some NPCs don’t have anything for sale, but will offer a
useful service: repairing your items for a fee.
Recruit: Recruit gives the NPC the opportunity to join your team, or
tell you about someone who will.
Tactics: Fighting the Enemy
You won’t spend all your time in Jagged Alliance 2 strolling around talking to
the locals and picking up souvenirs. As soon as you encounter an enemy,
things will quickly heat up. Combat begins when one of your mercs spots an
enemy, or an enemy spots one of your mercs.
When combat starts, the game will automatically switch from real-time mode
to turn-based mode. During turn-based combat, everything a merc does costs
him action points. Action points are replenished at the beginning of each
turn.
Firing Weapons
A mercenary’s first instinct when he sees an enemy is to fire. To do so, make
certain there’s a loaded weapon in the merc’s Main Hand. (Of course, to those
trained in the martial arts, an empty hand can be a loaded weapon . . . .)
Targeting Enemies: If you move the cursor over a bad guy, a crosshairs will
automatically appear. You can also right-click to bring it up the crosshairs at
any time. Next, left-click on the item or person you wish to shoot. Targeting
and firing uses up some of the merc’s action points for the turn. The action
points required are shown in the center of the target. (For more information
on action points, see the section on action points later in this manual).
During combat, you may notice a number in the upper left corner of a
mercenary’s portrait. This is the number of enemies he sees (and can shoot
at). To cycle through all the enemies the selected merc has in visual range, either
click on the number in the upper left corner of the portrait or press the E key.
To cycle through all the enemies your entire team currently knows about, press
ENTER.
If the enemies are tightly bunched together, it may be hard to get a fix on the
one you want to shoot first. Press the N key to cycle through targets that
overlap on the screen.
26
JAGGED ALLIANCE 2
JAGGED ALLIANCE 2
27
Page 17

TacticsReference
Targeting and Action Points: Bringing a gun up to a shooting position takes
a certain amount of action points. How quickly a mercenary can do it depends
on his experience and the nature of the gun. A big honking grenade
launcher will take more time, and more action points, to draw than a
well-oiled Mac-10. When you first target the enemy, you’ll see the minimum
amount of action points required to make the shot.
Concentrating Your Aim: If you’re willing to expend the action points, you
can perfect your aim. To do so, just right-click while targeting. You’ll see
points being added. As a result, your mercenary is taking a bit more time to
perfect his shot. Keep in mind, though, that for the cost of two good shots,
you might be able to fire off three cheap ones. However, if you can’t afford to
miss, the extra time might just pay off. If the gun is equipped with a scope,
this extra time is required in order to make use of it. How much can you
increase your aim? At most, four points. After a certain amount of time,
you’ve pretty much done all you can do.
Burst fire: If you have an automatic weapon, you can spray a number of shots
into your enemies at one time. Right-click on your merc to bring up their
inventory panel, then left-click on the burst button. (Surprisingly enough,
this is the button with the picture of the gun on it.) An even easier way to
toggle burst mode is to press the B key. Burst mode will stay on for that
mercenary until you turn it off. You won’t be able to concentrate your aim
while using burst mode.There’s no such thing as carefully spraying your enemy
with a torrent of bullets.
Spread fire: Once a merc’s gun is in burst mode, you can also spread his shots
out over an area, and a number of targets. While the burst mode cursor is up,
left-click and drag the cursor over the area you want to fire at. A number of
little red crosses will appear depicting the target area. Release the left mouse
button to fire; press ESC to cancel spread fire.
Pulling the Trigger: Once your gun is drawn and aimed, left-click to deliver
the bullet to its destination. Jagged Alliance 2 will let you know of any damage
you’ve done by flashing the damage inflicted above the target. Of course, the
enemy’s howl of pain will, too.
Refires: Since you’ve already turned to meet your enemy and readied the gun,
refires typically cost fewer points than first shots.
Hitting the Target: A mercenary’s marksmanship, his gun’s abilities, and the
range to the target all play a large part in his chances of being successful, but
other factors also come into play. For instance, if you’re trying to shoot at an
enemy through trees or while you’re nearly unconscious, your odds of hitting
the target are slim. Accuracy is a matter of sight, skill and, sometimes, plain
ol’ luck. (You never know when your shot will head dead on toward a target,
only to be deflected by a sparrow who happened to be in the wrong place at
the wrong time . . . .)
Reloading: If a mercenary runs out of ammo, the targeting cursor will be
replaced by an ammo cursor. Simply left-click to reload. Reloading takes 5
AP, however, so you may want to take cover before you put in a new clip. If a
merc doesn’t have the right type of ammo or is out entirely, you’ll have a grayed
out cursor (and, of course, he’ll let you know with a few choice words).
We’re Jammin’: Guns will occasionally jam, especially if they’re in poor
condition. A trip to a repair specialist,a mechanic, may be necessary. It’s also
been reported that the re-firing of a jammed gun sometimes also clears up the
problem.
Aiming at Terrain: Sometimes there’s a strategic advantage in blowing up
objects instead of people. (And sometimes you’ll want to do it for sheer fun.)
Move the aiming cursor over the object and right-click to bring up the
crosshairs. If the crosshairs shows red, as it does over an enemy, you can
attempt to destroy it. If the crosshairs is gray, you may still fire, but the shot
is unlikely to affect the object.
Aiming at Other Elevation Levels: Occasionally you’ll find your merc
located above or below an enemy. To change the cursor’s elevation level, press
TAB or press the appropriate button inside your mercenary’s inventory screen.
An enemy on a rooftop is easily picked out by his yellow glow, compared to
enemies on the ground, who have a red glow.
Hand-to-Hand Combat
Your mercs can fight with their bare hands, if the need arises. Simply remove
all items from the merc’s Main Hand,right-click to bring up a fist cursor, and
then left-click on the target. Of course, your merc will need to be quite close
to the enemy to carry out a physical attack. Bullets usually do more damage
than a punch, but mercs trained in martial arts can be surprising deadly in
hand-to-hand combat.
Interrupts and Action Points
Sometimes you’ll want to end a turn even though you haven’t used all of a
merc’s action points. If a merc is experienced enough, he may be able to
interrupt an enemy while the enemy is in the middle of his move. During the
interrupt, your merc will be able to take a shot at the enemy, move away, or
take any other action. However, any action your merc takes during the
interrupt requires action points. Your merc won’t be able to make use of the
interrupt if you spent all of his action points in the preceding turn.
Bear in mind that enemies can also get interrupts. If you make a green Level
1 merc dash out in front of a group of experienced enemies, they may all get
interrupts and blow him to pieces before he can escape. This is even more
likely if the merc is running, wounded, or distracted by other enemies.
28
JAGGED ALLIANCE 2
JAGGED ALLIANCE 2
29
Page 18

TacticsReference
If you don’t use all of your action points in a turn or an interrupt,up to 5 points
will roll over to the next turn. If you have more than that left over, the extra
is lost when your next turn begins.
Explosives and Grenades
Explosive devices are the play toys of mercenaries. Sooner or later, you’ll run
into (or away from) an explosion or a deadly gas. While certain things, like
gas masks, may protect you from the effects of gases (if you’re wearing them),
a sudden explosion can easily level you, your team, your equipment, and the
surrounding countryside. The damage your mercenaries take from explosions
and gases depends on how close you are to them when they detonate, how
deadly the explosion or gas is and how well protected you were when the blast
or gas hit.
Grenades: Naturally, you’d much rather blow stuff up than be blown up
yourself. To blow something small up (like an enemy), you’ll need a grenade.
Put the grenade in your Main Hand. Right-click and a special cursor will
appear to designate that you are throwing the item. Now just pick a target and
left-click. Be careful. A poor throw can damage your own team more than
it damages the enemy.
Note: While targeting, you’ll see a red cursor on the ground. This marks
where the grenade is most likely to land. This information is vital in two cases:
1) trying really fancy moves, like banking a grenade off a wall, and 2)
checking that a grenade won’t hit the wall and bounce back right on top of
you. If you try to aim farther with a grenade than its range will allow, the
cursor will stop at the maximum range. If you’re trying to put your grenade
somewhere in which there’s absolutely no chance of it reaching its target, the
cursor will go black.
Explosives: To blow something really big up, you’ll need explosives. To place
the explosives, put them in the merc’s Main Hand, right-click to bring up a
bomb-shaped Use cursor, then left click on the spot where you wish to place
them.
Explosives come in two main varieties: timed and remotely detonated. When
you place a timed explosive, you will be prompted to choose an amount of time
that will pass before it goes off. Be sure to leave yourself enough time to
escape the blast.
Remotely detonated devices come in two parts: explosives and a remote
detonator. When you place the explosive, the game will prompt you to pick a
frequency from one to four. To set off the explosive, have a merc use the
remote detonator. It will prompt you to pick a frequency. The detonator will
cause all the explosives “tuned” to the chosen frequency to explode at once.
All of this messing around with explosives will probably lead you to the
subjects of wounds and first aid.
Wounds and Bandaging
Getting Wounded: How much damage a mercenary takes when injured
depends on many factors. If the mercenary was wearing a Kevlar vest, for
instance, he might feel the impact of a bullet, but otherwise suffer no damage.
If a mercenary is hit in the head with a mortar shell, though, you’ll probably
be left with nothing more than a grease spot.
A merc’s wounds shown as yellow on his health bar. If left unbandaged, the
mercenary will continue to lose health. Should their health fall below 15, the
member falls down, becomes immobile,and slips toward unconsciousness and
death. Most importantly, if he slips below 15, each time he loses a point of
health, it comes off his maximum health permanently.
Once down, a merc can’t shoot or move but can perform some very basic tasks
like talking or listening to his teammates. If a mercenary’s health drops below
10, he will fall into a state of unconsciousness, and a dark grille will appear
over his portrait. An unconscious member who does not receive treatment
quickly may die.
Bandaging Wounds: Any member with some medical skill and a first aid or
medical kit may bandage wounds. First, move the kit to the medic’s Main
Hand. Next, right-click to bring up the first aid cursor, then left-click on the
mercenary whom you wish to treat. The medic will move into position next
to the injured mercenary and begin applying first aid. (To have a medic treat
himself, right-click to bring up the first aid cursor, then left-click on the
medic.) As the bandages are applied, the yellow portion of the injured merc’s
health bar will begin to turn pink.
Both the medic and patient are very vulnerable to attack during treatment. A
patient may be able to fire off a shot or two, but his aim will be hindered by
the bandaging process.
Autobandage: At the end of combat, you’ll have the option to automatically
bandage your mercs. The Autobandage feature may also be invoked by
pressing the A key if you’re in real-time mode and the sector is clear of enemies.
Keep a good stock of medical supplies on hand. It’s embarrassing to win a
battle, only to have your team die a slow death from untreated wounds.
While bandaging stops the bleeding, it does not permanently restore the
injured merc’s Health. Permanent healing is done by using the Doctor and
Patient mercenary assignments. See Merc Assignments in the Map Screen
section.
30
JAGGED ALLIANCE 2
JAGGED ALLIANCE 2
31
Page 19

TacticsReference
Ending a Turn
The checkmark button is used to end your turn. In general, you can do all you
want to in your turn until:
• All your mercs run out of action points, or have too few to do
anything with,
• You call it quits because you’ve done all you wanted to do. (Maybe
you just want to stay out of harm’s way,)
• You choose to reserve some action points for a possible interrupt.
Ending Combat
Turn-based combat automatically ends when your mercenaries go for a
couple of turns without spotting a live enemy. The game then switches back
to real-time mode. Your mercs will let you know whether you have
eliminated all enemies, or if some are still skulking about. If you have
defeated every enemy, then your mercs will have the chance to automatically
heal their wounded teammates.
Another way to finish a combat is to have the computer Auto Resolve the
battle. In that case, the computer controls your mercs and reports the battle
results to you. To Auto Resolve combat, go to the Map Screen and try to
compress time. (See the Map Screen section of the manual to learn about
time compression.) A message will appear, telling you whether Auto Resolve
is available. In certain situations, such as attacking a hostile sector or
ambushes, Auto Resolve cannot be used.
If the tide of battle turns against, you can also end combat by retreating—
moving all your mercs to the edge of the sector and leaving the sector. He who
fights and runs away . . . .
Advanced Tactics: The Rules of War
There are two simple rules to remember, if you wish to master the art of
battle in Jagged Alliance 2:
1. You see what your mercenaries see, and
2. All actions, from moving around to firing a weapon, are governed by
action points.
Line of Sight: While exploring a sector, you’ll often come across things you
hadn’t seen before—an ammo clip in the grass, say, or an enemy merc aiming
a shotgun at your head. You see only what your mercs see, and each mercenary
only sees what’s within his line of sight.
Just as in real life, how much a merc can see is limited by the terrain. For
instance, if all your mercenaries remain on one side of a wall, you’ll have no
idea what’s on the other side and it won’t show on your screen.
As objects or enemies come into a mercenary’s line of sight, they’ll appear on
screen. When enemies leave a mercenary’s line of sight, they will disappear
from sight. They’re still there, though, lurking around the next bush or
corner.
If an enemy’s position is known, but not seen, he’ll be grayed out. This
typically happens when another one of your mercs can see the bad guy,but the
currently selected merc can’t.
Night: When darkness falls, so does a mercenary’s range of vision. Special
equipment such as night vision goggles and break lights will aid you in
exploring the dark.
Sounds: Similar “line of sight” rules apply to sounds. The crack of a twig
might give away even a well-hidden ambush, if your mercs are close enough
to hear it . Of course, if the enemy is four miles away, your mercs won’t hear
a thing. Enemies can hear you, too, if they’re near enough.
Action Points: Action points govern all combat actions in Jagged Alliance 2.
For whatever a merc does, Jagged Alliance 2 will continually alert you to the
action point cost. You’ll see the amount in the center of your cursor. Action
points are a numerical representation of how much a mercenary can do in a
single turn, and are based upon the experience and overall statistics of the mercenary including his health.
For example, a mercenary who can run 20 feet in one second would have 20
action points (he can move quickly). A mercenary who can only run only 5
feet in one second would have 5 action points (and be pretty darn slow). The
more the mercenary can physically do in a set amount of time, the more action
points he has. So, a faster mercenary can do more.
However . . . certain actions take a set amount of time, no matter how fast the
mercenary is. For instance, if a fast merc and a slow merc both pull the
trigger of identical guns at the same time, both bullets will fire at the same
time and take the same amount of time to head down the barrel. So, the faster
mercenary would expend more points to perform the action than the slower
mercenary would. Just because one mercenary is fast doesn’t mean he can
make a bullet go down the barrel of a gun faster.
Since their action points are limited, be careful not to run slower mercenaries
all over the place. An action that takes 10 points might not be much to a guy
who has 20, but it’s sure a lot to a merc with 12! There’s only so much he can
do in the space of seconds, and it would be a pity to have a merc bravely run
up to an enemy, eagerly draw his gun . . . and then have no time left to shoot.
Leave marathon stealth runs to the fast guys.
32
JAGGED ALLIANCE 2
JAGGED ALLIANCE 2
33
Page 20

StrategyReference
Examples: Some quick examples will illustrate the point. Suppose we’re both
standing in a gym class. The teacher says, “All right. You’ve got five seconds.
For every jumping jack you do, you get an action point.” During the course
of that five seconds, you do 30 and I do 6 (hey, I’ve been sick).
Next, he says, “You’ve still got that same five seconds. Stand still for one
second (i.e. firing a gun... which is not all that rare in some gym classes) and
do jumping jacks for the other four.”
This time, you stood still for a fixed second and did 24 jumping jacks. I stood
still for a fixed second and did 5 jumping jacks. That one second only reduced
my action points by one. It reduced yours by 6. If one second is 1/5th of the
time we have, then what we could do in that time is our action cost.
A Sample Look at Five Seconds.
(Each shaded number matches a part of the shaded timetable below.)
Each guy takes 2 steps at 2 action points per step. Since the fast guy
1.
can move quickly,it doesn’t take him as much time to perform the same
action.
While the slower guy is still walking to his destination, the fast guy
2.
moves to a second destination 4 steps away. He reaches his second
destination at the same time the slow guy reaches the first.
They both draw their guns at a cost of 1 action point. The fast guy
3.
whips his gun from his holster, while the slow guy takes more time.
The fast guy takes time to aim carefully expending 2 action points.
4.
They both fire their guns. The particular model of gun they have takes
5.
a full second to fire. Because the speed of a bullet flying down the
barrel of a gun has nothing to do with speed of a mercenary, it costs the
fast guy a full second (six action points) and the slow guy a full second
(two action points).
Fast Guy - 30 Action Points
0 3 6 9 12 15 18 21 24 27 30
0 1 2 3 4 5 6 7 8 9 10
Slow Guy - 10 Action Points
<Action
Points
< 5 Seconds
<Action
Points
Strategy: The Map Screen
Powerful guns and skilled
mercs are great, but the
real key to winning the
game is having the right
information. You’ll need
to keep track of where
you’ve been, where you’re
going, and what the
enemy is doing. The Map
Screen lets you monitor it
all. It also gives you the
low-down on any militias
and mines you may have,
and allows you to supervise your mercenaries.
The upper left portion of the Map Screen
contains everything you need to know
about the mercenaries in your employ.
Each merc is listed, along with such vital
information as his assignment, location,
destination, and when he will depart.
The top part of the mercenary display
shows the currently selected merc; to
select another merc, left-click on the
merc’s name in the mercenary list. You
may also check out a mercenary’s inventory from this screen—just left-click on
the item box beneath his portrait.
Merc Assignments
The Map Screen allows you to change your mercs’assignments. Assignments
determine how a merc spends his time, whether it be on-duty in the field,
repairing items for the team, or training the local militia.
To change assignments from the Map Screen, left-click on that merc’s entry
in the Assign column. You’ll get a menu of assignments to pick from. (Note
that you cannot change a merc’s assignment while he is travelling between
sectors or in combat.)
Tip: You may be able to change a merc’s assignment from the Tactical Screen
as well. If the merc has any assignment except On-Duty, just left-click on the
mercenary’s figure on the Tactical Screen. The assignment menu will appear.
34
JAGGED ALLIANCE 2
JAGGED ALLIANCE 2
35
Page 21

StrategyReference
The mercenary assignment options are:
On-Duty: Giving a merc an On-Duty assignment status accomplishes two
things. It removes any other chore that merc may have had—training,
repairing, etc.—and prepares him for action. On-Duty can be also used to
assign your mercs to different squads.
Squads: All of your on-duty mercenaries in Jagged Alliance 2 are split
up into squads. Squads are tight-knit teams of mercs that travel
together, fight together, and complain behind your back together. You
can have up to six mercenaries on a squad. You may hire up to 18
mercenaries at once and spread them amongst as many squads.
Mercs who are repairing, training, doctoring, or being a patient do not
belong to any particular squad while they are assigned to that duty.
However,all mercs who are fighting or traveling must belong to a squad
or vehicle. If you can’t get a merc to move to another sector or confront
the enemy, it may be because he is training or repairing, and doesn’t
currently belong to a squad or vehicle. (To switch squads from the
Tactical Screen, press the Change Squads button, located in the bottom
right-hand section of the Tactical Screen.)
Note: Your mercs need sleep. Ordinarily they’ll take care of this themselves, but if you keep one squad moving into new sectors and fighting
all the time, they’ll eventually collapse on you. Give your team some
“down time” by leaving them to their own devices for a while—don’t
give them any new assignments.
Changing a Squad Assignment: To assign a mercenary to a new squad,
click on the “Assign” field for that mercenary, then select “On Duty.” A
list of squads will appear. You can start a new squad by assigning a merc
to a squad that doesn’t currently have anyone in it. Of course, you can’t
transfer a merc to a squad that’s a zillion miles away. To transfer a merc
from one existing squad to another, both squads must be in the same sec-
tor.
Doctor: This assignment is only available if the merc has a medical skill of
greater than zero and some sort of medical kit. Doctoring will permanently
heal wounds, as opposed to the temporary bandaging done in the field. This
is the fastest way to permanently heal wounds.
Patient: A patient will receive care from any merc in the same sector with an
assignment of Doctor. Obviously, a merc must be injured in order to be a
patient. Mercenaries do heal naturally, even if no Doctor is assigned, but natural
healing can be very slow.
The speed of natural healing depends on what the merc is doing, and
how serious the wound is. Wounds heal more rapidly if the merc is
resting, sleeping, or has an assignment of Patient; hiking through the
wilderness is not a good way to recuperate. Small wounds heal at a
quicker rate than big wounds.
Vehicle: This appears when the mercenary is riding inside a vehicle.
You can make the merc exit the vehicle by giving him a different
assignment, such as On Duty.
Repair: If you place a merc on Repair assignment, he’ll be able to
repair damaged items or jammed guns. He’ll repair as many damaged
items as possible, starting with the item in his Secondary Hand. Other
equipment in the same sector may be listed and repaired, such as vehicles. Mercenaries given the Repair assignment must have a tool kit in
their inventory.
The merc with the Repair assignment will repair jammed items and
items in his own inventory first, then move on to weapons and armor
being used by other mercs. More experienced mercs get priority. If two
or more mercs in the same sector have the Repair assignment, they will
team up to repair items.
Repairs are done in the following order: 1) Anything jammed, 2)
anything on the repairman himself, 3) anything carried by other mercs
in either the 2 hand positions or the armor slots (vest, helmet, legs), 4)
anything worn by others in the 2 headgear positions, and 5) anything
carried by others in their pockets.
Train/Practice: Pick the skill or attribute you want that merc to train
in. The merc will practice that skill. Results can vary wildly, depending
on the mercenary.The higher the skill or attribute is, the slower it will
improve. Training may be ineffectual above a certain point, as well.
Train/Militia: This assignment serves two purposes. If you give a
merc this assignment in a town sector without a militia, he will recruit
a militia for you. If the town’s militia is already full, the merc will train
the existing militia. Each time a new militia squad begins training, it
costs money for recruitment and supplies.
Train/Trainer: If a merc teaches a skill, any other mercs in the same
sector who are practicing that skill will improve much faster than from
practicing alone. A merc must be fairly competent in a field in order to
successfully train others.
36
JAGGED ALLIANCE 2
JAGGED ALLIANCE 2
37
Page 22

StrategyReference
Depending on their assignments, some mercs may have two numbers displayed over their portraits. For instance, a doctor’s portrait might have the
numbers 23/42. This means that, under the current circumstances, he’ll be
able to heal 23 points of damage in an hour. However, at full potential (in
perfect health with flawless equipment) he would be able to heal 42 points.
If a mercenary’s assignment flashes, the merc can’t accomplish anything with
his current assignment. Examples include: uninjured doctors without patients, trainers without students, students without trainers, and militia
trainers in towns that are no longer loyal to your cause.
Sleep
Mercs get tired, just like anyone else. Tired mercs have a lower Energy level
than rested mercs. Mercs slowly recover their maximum Energy level just by
standing around doing nothing, but sleep is the by far the fastest way to refresh
a bleary-eyed mercenary.
To order a merc to get some shut-eye, go to the Map Screen and click on the
column beneath the bed-shaped icon. The merc will lie down on the spot and
sleep until his fatigue is gone. You can also awaken him by clicking again on
his entry beneath the bed icon. Mercs that aren’t tired can’t be told to sleep.
Renewing Contracts and Firing Mercs
To change a mercenary’s employment contract, click on his name. Next, click
on the column marked Dep (the one showing how many days before each
merc departs). From here, you can hire the merc on for an additional day,
week, or two weeks. This amount will be added on to his current contract.
You can also terminate the merc’s contract, effective immediately.
Using the Map
The map displays the entire
country in one grand overview.
As you can see, Arulco is broken
down into rectangular sectors.
To see an intelligence report on a
particular sector, right-click on
that sector. Some areas simply
provide a general description
(“Road,” “Plains”) but others
have more detailed information.
Right-click on a city, for example, and you’ll learn about its inhabitants. You’ll also see the
number of enemies you know (or think you know) are in a sector, plus the
number of known items scattered around in the sector.
Filters: For more information on Arulco, use the various map filters. The filters give you information on specific topics, and can be accessed by using the
buttons below the map.
Town filter: This explains which sectors are part of what towns, and the
loyalty of the inhabitants to your cause.
Mine filter: This shows the locations of the individual mines. Once a
mine is under your control, it also displays the mine’s efficiency and the
amount of money it earns per day.
Team filter: This shows your mercs and vehicles, and their locations on
the Map Screen.
Town militia filter: Shows militia locations and numbers. You’ll need
to turn this filter on to move your militias.
Airspace filter: As you take over certain key sites in Jagged Alliance 2,
you’ll “clear” the surrounding airspace. This keeps the areas clear of
SAM attacks. Though the map is all red at first, it will turn green as
you take over the right sectors.
You’ll see a gold icon when you turn on the Airspace Filter. This icon
represents the drop-off point for newly hired mercs. To change the
drop-off point, click on the icon to pick it up,then click on another sector to put it back down. All new mercs you hire will be flown to this
location. If the drop-off point falls into enemy hands, the helicopter
pilot will land in a nearby friendly sector instead.
Map Level Selectors: Use these to change the view from the normal ground
view to one of the three underground views. Map Level 1 is ground level,
while Map Level 4 displays the deepest areas of mines.
Items Button: The box-shaped Items button lets you see items you’ve left
behind in a sector. Just click on the Items button, then click on the sector.
(You can also right-click on a sector, then click on the Inventory button.)
If you move the cursor over an item in the sector inventory, its location will
highlight on the small map in the lower right-hand corner of the screen. If
your merc is in that sector, you can transfer the item directly to your merc’s
inventory from the sector inventory. Grayed-out items are not available and
can’t be obtained using this method.
38
JAGGED ALLIANCE 2
JAGGED ALLIANCE 2
39
Page 23

Reference Strategy
Game Options
Sector
Laptop
Time
Compression
Tactical
Screen
Date and
Time
Overview
Other Map Features:
Message Display: At the bottom left of the Map Screen is a panel which dis-
plays recent messages, conversations, and events. Use the scroll bar to read
older messages you may have missed.
Game Options Button: Located below the map, this button takes you to the
Game Options screen. You may also press the O key.
Laptop Button: Takes you to your laptop, where you may contact A.I.M.,
review your finances, read e-mail, and so on.
Tactical Button: Click on the button with the triangle icon, or press the ESC
key, to return to the tactical screen for the currently selected sector.
Time Compression: This display shows different rates of time compression:
Paused, 5 min, 30 min, and 60 min. The larger the number, the faster time
will pass in the game. On the 60 min setting, an entire day will pass in under
a minute of real time. When something important happens, however, the
game will automatically switch to Paused mode.
If you try to compress time during a battle, you may be asked whether you
want the computer to Auto Resolve the fight. If you choose Auto Resolve,
the computer handles the combat and reports the results back to you. Note
that time compression and Auto Resolve are not available in every battle.
Mine Income: The Map Screen displays your Current
Balance–how much cash you have on hand–as well as
your Daily Income. The more working mines you control, the higher your Daily Income. To gain control of a
mine, first eliminate all enemies from the sector the mine
is in, then speak to the Head Miner. He’ll give you the
mine’s earnings each day.
Mines are your main source of cash, so keep them well-protected. The enemy
can, and will, try to recapture them.
Travel via the Map Screen
Moving to Another Sector: To send an entire squad to a far-off sector, choose
any of the mercs in that squad, then click on the DEST field for that merc.
You can now plot the squad’s route on the sector map. A cursor showing a
little walking man will appear. Place the cursor over a sector and left-click
once. This sets a waypoint. You may now place additional waypoints, or you
may click again on the same sector to set it as your final destination. The cur-
sor will turn into a check mark to show you are confirming a final destination.
Note: If you leave the Map Screen without confirming a final destination, your
squad will not begin their trip.
More About Movement: Here are some additional hints on guiding your
mercs on their travels.
• If you’re trying to sneak around an occupied sector, you may want to
set several waypoints before selecting your ultimate objective.
• You can cancel the last waypoint you placed by right-clicking on the
map. To cancel the entire route, right-click on the DEST. field for
any merc in the travelling squad.
• By default, a squad will take the quickest route to a destination. If
you’d like your mercs to take the most direct route instead, hold down
the SHIFT key while plotting the route.
• To stop a squad while they’re traveling, right-click on the DEST
field for any merc in that squad.
• Another way to move your mercs is to turn on the Team Filter, and
then left-click twice on a sector where your mercs are. Select some
or all of your mercs, and then move them (using the waypoint system) as described above.
• Mercs traveling between sectors on foot move at the rate of the slowest merc in the squad. If a merc's weight carried goes over 100%, the
encumbered mercenary will slow down and begin to tire (i.e. their
blue energy bar will drop quickly). Mercs traveling in vehicles are
not affected by weight.
• It may take several hours, or even days, for your squad to reach their
destination. You will probably want to speed things up by using time
compression. Remember, though, that traveling mercs eventually
become fatigued, sleepy, and generally cranky. Rest up before you
venture into enemy territory.
Coordinated Attacks: A good strategist will often want two or more squads
to attack the same sector from different directions. For example, you may
40
JAGGED ALLIANCE 2
JAGGED ALLIANCE 2
41
Page 24

Reference Strategy
want squad 1 to attack from the east, while at the same moment squad 2
attacks from the north. Jagged Alliance 2 lets you coordinate your squads for
pinpoint precision.
To plan a coordinated attack, place all the squads taking part in the attack in
sectors directly adjacent to the target sector. Next, give all the squads the
target sector as a destination and compress time. When the first squad arrives
at the boundary of the target sector, the game will ask whether you want to
wait for the other squads to arrive, so you can coordinate their attacks.
Combat while Traveling: If your
mercs enter hostile territory while on
the road, a battle may break out. A
window will appear which lists the endangered mercs and the number of enemies they’ll be fighting. It also gives
you several options for entering or
avoiding combat:
Auto Resolve: Auto Resolve allows you to avoid dealing with the detail
of a fight in the tactical screen. It is mainly used when the enemy
attacks a sector you control, or during chance encounters while you’re
traversing Arulco. This option is not always available, especially when
attacking known enemy strongholds. If you choose Auto Resolve, your
mercs will not use explosive weapons such as grenades during the fight.
At the end of the battle, your mercs will attempt to Autobandage their
wounds.
Go To Sector: This command takes you to the Tactical Screen for the
sector hosting the fight. You’ll be in real-time mode until one of your
mercs spots an enemy.
Retreat Mercs: Run Away! Retreating will return your mercs to the
sector they were in before they got into trouble. They’ll be facing in the
opposite direction, naturally. Of course, the bad guys are still waiting in
the other sector (and probably making very derogatory remarks about
your cowardly team.) If the enemy ambushes you, this option won’t be
available.
The Placement Screen: Troop placement
is key when entering hostile territory. The
Placement Screen gives you the power to
put your mercs where you need them when
they cross the line into an enemy area.
Choose Spread, and your mercs will be
spread out all over the edge of the sector.
You can press Spread multiple times, until
you get your mercs into the right positions.
If you want your mercs close together in-
stead, choose Group and left-click on an appropriate location for your mercs.
You can also place your mercenaries individually. Left-click on a merc’s portrait and then left-click on a suitable location in the field. Once you are satisfied, choose Done. The battle will begin.
Note: The Placement Screen will not appear when your squad moves from a
town sector to an adjacent, hostile town sector. Instead, your mercs will automatically appear in the same relative positions they were in when they left the
previous sector.
Exploring a Hostile Sector: You may not spot the enemy immediately when
entering a new sector. You’ll be in real-time mode until one of your mercs sees
an enemy or vice-versa. Other than the strong possibility that you’ll get into a
firefight, you can treat exploring an enemy-infested sector just like exploring
any other. Just proceed with extreme caution.
Town Loyalty
Town loyalty represents the faith that the people of that town have in your
team. If you keep winning battles, gaining territory, and treating the people
well, their loyalty will increase over time. What goes up may come down,
and town loyalty can decrease as well. Loyalty may plummet if Deidranna
successfully retakes sectors you have liberated.
You’ll need to earn some town loyalty before you can successfully train a
militia, or get income from mines. To check on a sector’s loyalty, use the Town
Filter on the map.
Militias
Militias are your main defense against Queen Deidranna’s army. To recruit a
local militia, assign one or more mercs to Train/Militia in any loyal town.
Your account will be charged a fee for supplies. After training a militia, you
can distribute your troops throughout the town. To distribute your militia,
left-click on the Militia Filter, and then right-click on the appropriate
sector. Left-click on the Auto button to put an equal number of militia units
in each sector of the town, or right-click to pick up a militia element and left-
click to place it.
Militias come in three different varieties. Green militias are, of course,
rookies. Aqua militias are regulars, meaning they have some battle experience
or have been trained extensively.Blue militias are veterans, and only get to this
stage through battle experience.
Towns need a good militia to defend them. The enemy might refrain from
attacking while your mercs are in the sector, but as soon as your mercs leave
the enemy will pounce. Guard your mines closely, as well—sectors with mines
42
JAGGED ALLIANCE 2
JAGGED ALLIANCE 2
43
Page 25

Game Options
Game Options
are especially tempting to the enemy.
Game Options
Initial Game Options: The initial game options can be set only once: when
you select the Start New Game option at the beginning of the game. These
options set the overall flavor and challenge of the game.
Difficulty Level: The choices are Novice, Experienced, and Expert.
This affects the number of enemies in each sector,as well as many other
factors. The default option is Novice.
Novice: Choose this if you are new to the Jagged Alliance
series, haven’t played a lot of strategy games, or want shorter
battles in the game..
Experienced: For those who have played previous Jagged
Alliance titles, or have a lot of other strategy games under their
belt.
Expert (or, as some refer to it, “Suicidal”): For those seeking
the ultimate challenge. You have been warned.
Extra Difficulty: The two choices are Unlimited Time, which allows
you all the time you want for your mercs to move or fire in combat,and
Timed Turns. This picks up the pace a little by giving you only a limited amount of time to control your mercs each turn.
Gun Options: The choices available are Normal (the default) and
Additional Guns. Additional Guns gives gun experts a wider selection
of weapons. If you appreciate the precise differences between a M24
and a Dragunov, select Additional Guns. If you don’t know, and don’t
want to know, about these subtle details, leave it set at Normal. (Don’t
worry, you’ll still get plenty of weapons to choose from.)
Game Style: This is set to Sci Fi by default. With the Sci Fi option on,
you’ll encounter some, ah, very unusual things during your campaign.
Check Realistic if you don’t feel Arulco is an appropriate place for
anything you’d find in a science fiction movie.
In-Game Options: In-game options may be changed at any time. To get to
the game options screen, click on the Game Options button (shaped like a
compact disc). You’ll find in the lower right corner of the Map Screen, or in
the lower left corner of the Inventory Panel. You can also press O to reach the
Options screen.
Saving, Loading, and Quitting: The Save Game, Load Game, and Quit
buttons are located at the bottom of the options screen. Clicking Quit will
take you back to the main menu. Clicking Save will bring up a list of
savegame slots. Select one and type a description. To load a savegame, just
click Load, and select the game you wish to load.
If you’re in the Tactical or Map Screens and want to quick-save your game in
the Quick-Save slot, press ALT-S.. To quick-load the game in the Quick-
Save slot, press ALT-L. To bring up the full Save screen while playing, press
CTRL-S; to bring up the load screen, press CTRL-L.
Volume Sliders: There are separate sliders for Sound Effects, Speech, and
Music. These sliders allow you to change individual volume levels to get the
mix you desire. Pulling a slider all the way down will mute that part of the
game’s sound.
Toggled Options: These options are either checked (On) or unchecked
(Off).They control various elements of play such as speech or selecting mercs.
Speech. Keep this option On if you want to hear character dialogue.
Default setting: On.
Mute Confirmations. Checking Mute Confirmations will disable the
mercenaries’ verbal “OK” confirmations. Default setting: Off.
Subtitles. Controls whether on-screen text is displayed for dialogue.
Default setting: Off.
Pause Text Dialogue. If subtitles are On, turn this on also to be able
to take your time reading NPC dialogue. Default setting: Off.
Hide Shadows. On a slower computer, you may want to Hide Shadows
in order to increase performance. Default setting: Off.
Blood ‘n Gore. For those wimpy types that can’t stand the sight of
blood. Default setting: On
Never Move My Mouse! With this option On, your mouse won’t au-
tomatically move over pop-up confirmation boxes when they appear.
Default setting: Off.
Old Selection Method. Turn this On for character selection to work
as in previous Jagged Alliance games (which is the opposite of how it
works now). Default setting: Off.
44
JAGGED ALLIANCE 2
JAGGED ALLIANCE 2
45
Page 26

Game Options
Appendices
Show Movement Path. Turn this On to display movement paths in
Real-time mode. If you leave it Off, press the SHIFT key when you
want to display movement paths. Default setting: Off.
Show Misses. Turn this On to have the game show you where your
bullets end up when you miss. Default setting: Off.
Real-time Confirmation. Real-time confirmation will require an additional “safety” click for movement in Real-time mode. Default setting:
Off.
Display Enemy Indicator. When On, displays the number of enemies
seen by a merc over his portrait. Default setting: On.
Use Metric System. When On, the game uses the metric system for
measurements. Otherwise, it uses the Imperial system. Default setting:
Off.
Merc Lights During Movement. When On, the merc will light the
ground as he walks. Turn this Off if you have performance problems
during night missions. Default setting: On.
Snap Cursor to Mercs. When On, moving the cursor near your mercs
will automatically highlight them. Default setting: Off.
Snap Cursor to Doors. When On, moving the cursor near a door will
automatically position the cursor over the door. Default setting: On.
Make Items Glow. Items on the ground will be highlighted with a
pulsing glow when this option is On. Default setting: On.
Show Tree Tops. When On, you see the leafy tops of trees. When
Off, you only see the trees’ trunks. Default setting: On.
Show Wireframes. Shows the wireframe outline of structures, even
when you’re inside them. Default setting: On.
Show 3D Cursor. Displays the cursor as a 3D box. Very handy when
aiming at rooftops. Default setting: Off.
Keyboard Commands
Selecting Mercs and Squads
F1..F6 Selects mercs in the current squad.
/ Center on currently selected merc.
SPACE On the Tactical screen, SPACE selects the next merc in the
current squad.
ALT When clicking on a merc’s portrait, holding ALT down will
locate him or select him depending on the setting of the
Old Selection Method option. (It locates mercs if On)
ALT-F Keeps the screen centered on the selected merc during turn-
based combat.
= Selects all mercs in the current sector, regardless of squad.
1..0 Tactical Screen: Change to that squad number, if they are in
the same sector. Map Screen: Select all members of that
squad number.
SHIFT 1...0 Map Screen: Select all members of squads 11 through 20.
CTRL Map Screen: Hold down CTRL while selecting mercs to
add additional mercs to the selection group.
SHIFT Map Screen: Hold down SHIFT while selecting mercs to
select a range of mercs.
SHIFT-SPACE Selects next squad.
Movement and Stance
C Changes to CROUCH stance.
L Look/Turn cursor. Use to change merc’s facing.
P Changes to PRONE stance.
R Changes to RUN mode.
S Changes to STANDING stance.
X eXchanges places with another person.
Z Stealth Mode (on the Tactical Screen)
SHIFT In movement mode, SHIFT makes a merc’s movement
path visible. It also forces the cursor to hug the ground,
which is very handy in tight quarters.
END CONTinue along movement path.
ALT While moving a merc, makes a standing merc sidestep or
back up.
ALT-Z Stealth Mode for the entire Squad.
46
JAGGED ALLIANCE 2
JAGGED ALLIANCE 2
47
Page 27

Appendices
Keyboard Commands
Actions
A Auto-bandage your mercs (if possible).
B Toggles Burst mode for burst-capable guns.
ESC Aborts action (such as movement, firing, or first aid).
CONTROL Brings up hand cursor.
Game Interface
C Map Screen: Contract Merc
D Done with turn (turn-based combat only).
E Cycles through all enemies seen by selected merc.
H Brings up context-sensitive Help.
I Toggle glowing Items on and off.
K Opens keys panel.
M Map Screen .
N Cycles between targets that overlap on screen.
O Options screen.
V Displays Version number.
W Toggle additional building Wireframes.
T Toggle Treetops.
Z Show militia (in the Map Screen only).
‘ Toggles between Team and Inventory panels.
* Toggles between red and white glowing items.
SHIFT In a merc’s inventory, use the SHIFT key to select stacked
units of a given item. For example, to pick up and move 3
clips of .45 ammo from a merc’s inventory, just hold down
SHIFT and click on the stack of 3 clips.
Holding SHIFT down while scrolling the Tactical Screen
increases the scroll speed.
When plotting travel routes on the Map Screen, hold down
SHIFT to make mercs travel the most direct route (instead
of the fastest.)
SPACE On the Map Screen, SPACE toggles between Pause mode
and your last selected rate of time compression.
PAUSE Pauses the game.
TAB Toggles cursor level (ground level/upper level)
ENTER Tactical Screen: Cycles through all enemies your team
knows about. Map Screen: Enter/exit merc inventory.
INSERT Tactical Screen: Displays sector map. Map Screen: Up one
map sublevel.
DELETE Map Screen: Down one map sublevel.
HOME Map Screen: Jump to oldest (first) message
END Map Screen: Jump to newest (last) message
PGUP Map Screen: Page back through messages
PGDN Map Screen: Page forward through messages
F1...F6 Map Screen: Sort Merc List by Column 1-6
Up Arrow Map Screen: Scroll messages back 1 line
Down Arrow Map Screen: Scroll messages forward 1 line
Left Arrow Map Screen: Select Previous Merc
Right Arrow Map Screen: Select Next Merc
ALT-C Load last saved game (Main Menu screen only)
ALT-S Quick Save.
ALT-L Quick Load.
ALT-X eXit the game.
CTRL Display game settings for save (Load Screen only)
CTRL-S Bring up Save screen.
CTRL-L Bring up Load screen.
48
JAGGED ALLIANCE 2
JAGGED ALLIANCE 2
49
Page 28

Appendices
F.A.Q
.
Frequently Asked Questions
Combat
Q: One minute I see the enemy, the next minute he disappears! What’s
going on?
A: Remember, you see what your mercs see. The enemy hasn’t disappeared, he’s
just moved out of your mercenaries’ line of sight. Move your mercs closer, and
he’ll come back into view.
This idea is crucial to understanding night combat. When an enemy fires a
weapon in the dark, the muzzle flash from his weapon may make him visible
for an instant. When he’s done firing, he “disappears” from view. He’s still
there, of course, lurking in the darkness.
Q: Why are some enemies in gray?
A: If a bad guy is gray, the currently selected mercenary can’t actually see him.
However, the selected merc does know the enemy’s position. This is probably because another one of your mercs can see that enemy.
Q: How come that enemy is glowing yellow? or Why can’t I ever hit that
enemy who’s standing on a roof?
A: Glowing yellow enemies are at a higher elevation level. To target him,press
the Tab key. This allows you to aim at targets on the upper level. Press Tab
again to switch back to the ground level.
Q: Why did some of my mercs suddenly drop to the ground? I didn’t tell
them to.
A: That’s a result of suppression fire from enemies. It can cause your mercs to
freeze or lower their stances. (Like any other action, these moves will cost
your mercs action points.)
Mercs can also collapse from exhaustion. Don’t have your mercs travel and
fight constantly–give them some time to relax. Better yet, allow them to sleep
by going to the Map Screen and clicking on the merc’s entry under the bedshaped icon. (It’s next to Assign.)
Q: During an interrupt, I noticed that once of my mercs had negative
action points. Is that a bug?
A: Nope. When a merc is hit by enemy fire, it uses up some of a merc’s action
points. If the merc is hit many times, he may temporarily have negative action
points until the next turn begins.
Managing Your Mercenaries
Q: How many mercenaries can I hire in total?
A: You may have at most 18 mercenaries on your team at one time.
Q: I’m trying to give a merc a new assignment, but his assignment menu
won’t come up on the Map Screen. What’s wrong?
A: You can’t change a merc’s assignment during combat–a firefight is no time
to take a nap or repair your clock radio–or while he’s traveling to another sector.
Q: I had a merc train/be a doctor/exit a vehicle,etc. Now he’s no longer part
of his old squad. What happened?
A: Some mercenary assignments may break up a squad. When this happens,
just put the old squad back together. Get everyone in the same sector, go to
the Map Screen, and assign each person to the same squad.
Q: If have two mercenaries training the same skill in the same sector, will
their students learn twice as fast?
A: No. Only the merc with the better skill will count as a trainer.
Q: If one of my mercs is dead, how do I get rid of him?
A: Left-click on either the column marked Dep or Assign in the Map
Screen. You’ll get the option there to Remove Merc, which will dispose of
the body.
Q: What happened to the list of mercenaries in the manual, like there was
in the first Jagged Alliance?
A: It’s in the game. A.I.M’s Web site has many useful features, such as the
ability to sort the merc list by attributes, skills, or prices.
Items and Weapons
Q: I was looking in a merc’s inventory, and some of his items had a funny
glowing outline around them. What’s up with that?
A: Items your merc has picked up recently are marked with a glow for easy reference. Also, if you put the mouse cursor over a weapon or ammunition, the
weapon and its matching ammunition will have the same colored glow to
show they go together.
Q: I put an item down in a sector I visited a few days ago. I went to look for
it but it’s gone! Where’d it go?
A: Someone stole it. If your merc leaves some $500 item lying around on the
ground, don’t be shocked when it eventually disappears.
50
JAGGED ALLIANCE 2
JAGGED ALLIANCE 2
51
Page 29

F.A.Q.Appendices
F.A.Q.
Q: I took a 10-round clip of 7.62 mm ammo out of a sniper rifle and loaded
it into my assault rifle. Then I removed the clip. Now it’s turned into a
mostly empty 30-round clip, instead of a full 10-round clip! What’s going
on?
A: You can’t just take a 10-round magazine for your sniper rifle and pop it
straight into your assault rifle. The magazine wouldn’t fit. Instead, your merc
takes the bullets out of the 10-round magazine and then loads each one into a
spare 30-round magazine (which the mercs are assumed to have on them.)
This process of converting magazines bullet-by-bullet takes time, and therefore uses up more action points. The moral: try to reload with the correct
magazine size during battles.
Q: I don’t see any information about weapons in the manual. Is this just a
cheap ploy to get me to buy a hint book?
A: The helpful hint book is chock-full of useful hints and strategies, but you
won’t need it to get full information on the weapons in the game. Just right-
click on a weapon to get its description and vital statistics. If you go to Bobby
Ray’s Guns and Things Web site, you can get information on weapons before
you buy them.
Q: OK, but what do those statistics for the weapons mean? How can I tell
whether one gun is better than another?
A: The key attributes of a weapon are:
Damage: The average damage done when you hit an unarmored target
with this weapon. Your mileage may vary.
Range: The effective range of the weapon. You can aim at targets past
the effective range, but you’re unlikely to hit them.
AP: The number of action points it takes for a mercenary with 20
marksmanship to fire the weapon.
Some weapons have two AP numbers displayed. The one on the left is for
single-shot mode, while the one on the right is for burst mode. The number
of bullet icons next to the burst AP number indicates how many bullets are
fired in a single burst. A burst may be from three to six rounds, depending on
the weapon.
A good weapon does a lot of damage, has a long range, fires many bullets in a
single burst, and only takes a few AP to fire.
Q:The weapon description claims it takes 7 AP to fire this gun. Why, then,
does it take fewer than 7 AP for my merc to actually shoot it?
A: The AP figure in the weapons description is the figure for a merc with only
20 marksmanship. Mercs with a higher marksmanship skill may be able to fire
the weapon for fewer points.
Strategy
Q: I can’t take this one sector no matter what I do!
I’ve tried sending in a squad many times, but the enemy is just too strong.
A: If one squad isn’t enough to take a sector, use two or more. More than one
squad can be involved in a battle. Using multiple squads to attack a sector is
an essential tactic late in the game.
Q: Alright, so suppose I’m sending two squads in to attack the same sector.
How do I make sure the two squads attack at the same time?
A: You can coordinate attacks involving multiple squads so that all the squads
show up in the enemy sector at the same time. Move the squads into sectors
next to the target sector. Go to the Map Screen, give all the squads the target
sector as a destination, and then compress time. When the first squad arrives
in the target sector, you’ll be asked whether you want to wait for the other
squads before starting your attack. See “Coordinating Attacks” in the “Travel
via the Map Screen” section of the manual.
Q: How do I prevent militia loyalty from dropping?
A: Set a good example. Never order your mercs to abandon a militia in the
middle of a battle. Also, pay close attention to Miguel’s e-mail messages. If
Miguel is concerned about your leadership, you can bet the militias are as well.
Q: I keep going broke. How do I earn more money?
A: A constant flow of cash is vital to success in any operation. The primary
method for making money in Jagged Alliance 2 is by controlling mines. As you
capture the sectors containing the mines from Queen Deidranna’s army, you
can persuade the Head Miner at each mine to hand the mine’s proceeds over
to you. The amount of money you’re making from each mine and the efficiency of the mine both appear on the Map Screen when the Mine Filter is on.
There are other ways to make some extra cash as well, such as by selling items
you find in the field. The easiest way to make more money is to take new
mines in new towns, though. Be sure to protect your all of your mines with
a militia.
52
JAGGED ALLIANCE 2
JAGGED ALLIANCE 2
53
Page 30

Credits
credits
Sirtech Team
Produced and Directed by...........................................................................Ian Currie
Story and Characters................................................................................Shaun Lyng
Game Design ..................................................Ian Currie, Shaun Lyng, Linda Currie
Additional Game Design..........................................Chris Camfield, Eric T. Cheng,
Andrew T. Emmons, Scot Loving, Kris Märnes, Alex Meduna
Contributing Designers........................................................................Everyone else!
Lead Programmer........................................................................Andrew T. Emmons
Programming ..............................................................Chris Camfield, Kris Märnes,
Dave French, Alex Meduna
Additional Programming .......................................................................Mark Carter,
Derek Beland, Bret Rowdon
Scripting ......................................................................................................Ian Currie
Recycled Code Remnants .............................Alex Meduna, Ian Currie, Ray Bornert
Lead Artist ................................................................................................Scot Loving
Portraits......................................................................................Joey “Joeker” Whelan
3D Animation...........................................................................................Scot Loving
Artwork and Modeling .................................Norman “NRG” Olsen, Eric T. Cheng,
Scot Loving, Joey “Joeker” Whelan
Screen Design........................................................Andrew Stacey, Dimitri Joannides
Touchup Artist.....................................................................................Weldon Poapst
Additional Modeling......................................................................Richard Dancause
Programmer Art ......................................................................................Kris Märnes,
Dave French, Andrew T. Emmons
Sector Design ..........................................................................................Linda Currie
Writers ...................................................Shaun Lyng, Brenda Garneau, Josh Mandel
Additional Writing........................................................Lynn Holowka, Mark Carter
Original Score......................................................................................Kevin Manthei
Additional Music...............................................................................Scott Daughtrey
3D Data Wranglers...........................................Lynn Holowka, Christopher Pollard
Cinematics.....................................................................................................Hypnotix
Sound Design.......................................................................................George Brooks
Voice Actors ..................Sonja Ball,Tyrone Benskin, Maria Bircher, Thor Bishopric,
Mark Camacho, Joe DePaul, Aidan Devine, Teddy Lee Dillion,Tedd (T.O.) Dillon,
Bruce Dinsmore, Richard M. Dumont, Ian Finlay, Kathleen Flaherty, Susan Glover,
A.J. Henderson, Matt Holland, Gary Jewell, Rick Jones, Donald Jordon, John
Koensgen, Pierre Kohl, Pierre Lenoir, Pauline Little, Shaun Lyng, Gordon Masten,
Brady Moffatt, Michael Rudder,Terrance Scammell, Neil Shee, Linda Smith, Harry
Standjofski, John Stocker, John Tarzwell, Ross Wilson
Voice Direction.........................................................................................Shaun Lyng
Recording Engineers ...................................................Randy Young, George Brooks
Beta Test Coordinators........................................Lynn Holowka, Jennifer Kauffman
Internal Game Testers ..................................................Eric T. Cheng, Brian Healey,
Joseph Beauchamp, Norman Olsen, Scot Loving, Joey Whelan,
Robert Davis, Lynn Holowka, Christopher Pollard,
Derek Beland, Steve McIvor, Richard Dancause
External Game Testers ...........................................Steven Del Toro, David DeMille,
George El-Koura, Tim Emmerich, Jonah Falcon, Jim Fisher,
Michel Gingras, Steven Hartzell, Scott Haynes, Frank Heukemes,
Robert Kalahan, Andy Krywonizka, Fred Kuhlman, Ben Lemmex, Shawn A.
LoBosco, Paul Lyng, Brandon Lyng, Ed Mayhall , Aaron McCaffrey,
Jack Post II, Garth V. Pricer, Philip Tinney, Steffan Watkins
Technical Support................................................Christopher Pollard, Neil M. Yates
Game Manual ................................................................Charles Miles, Nathan Koch
Special Thanks
Special thanks to Norman and Robert Sirotek, Andrew Stacey, Stefanie Emmons,
Adrian & Jennifer Camfield, Nicole Sukkan-Märnes, Deane Rettig, Brian Healey,
Bruce Wilson, Frank Heukemes, Hypnotix, Heckler & Koch Inc. (Jim R. Schatz),
Syntrillium Software (Cool Edit Pro), Event Electronics (Darla sound device), Meta
Creations (Fractal Design Painter), 4D Vision (4D Paint), Ron Allan (Digg Design),
Andrew Huggett (Blue Turtle Sound), General Assembly Production Center, the
Association of International Mercenaries, caffeinated beverage makers world-wide,
and everyone else we forgot to thank!
TalonSoft, Inc. Post-Production Team
Chief Creative Officer.................................................................................. Jim Rose
Executive Producer................................................................................. Tony Farmer
Producer......................................................................................... Brian M. McGinn
Production Assistance......................................................................... Robert Waters
Art Director, Production Materials............................................ Stephen Langmead
Assistant Art Director, Production Materials........................................... Tim Kipp
Additional, Production Materials.............................. Chrissy Lagna, Peter Muench
Additional Video Editing..................................................... Tim Kipp, Brian Weber
Product Manager................................................................................ Melissa Farmer
Production Coordination.................................... John Davidson, Linda Wratchford
Marketing Manager................................................................................ Mark Moon
General Manager – PC Products (Take-Two) ....................................... Jamie Leece
Director of Business Development (Take-Two) .................................... Chris Mate
Technical Support ......................... Ashton V. Fletcher, Phil Santiago, Frank Runge
Special Thanks
Bob McNamara, Charles Kibler, Edwin Steussy & Amy Yancey (Mars Publishing),
Mohammad Waliullah & John Wong (Macrovision), and the ever-patient Beta
Brigade.
Mars Publishing Manual Production Team
Publisher ...........................................................................................Edwin E. Steussy
Managing Coordinator .............................................................................Amy Yancey
Graphic Artist....................................................................................Michael Duggan
Uses Smacker Video Technology.
Copyright (c) 1994-1998 by RAD Game Tools, In
c.
54
JAGGED ALLIANCE 2
JAGGED ALLIANCE 2
55
Page 31

If you have a technical problem concerning the operation of our software, please con-
TM
tact our technical support staff. When you call or write, be at your computer if possible and have the following information ready: computer type, available hard drive
space, total RAM, type of video card, and a list of options you chose when you
installed the game.
If you have internet access and would like to contact us on-line, you will find us at:
TECHNICAL SUPPORT: 1-410-933-9191, M-F 9-5pm, EST
TalonSoft, P.O. Box 43730, White Marsh, MD 21236
http://www.talonsoft.com
E-mail us at talon@talonsoft.com
Product Support (U.K.)
Product Support (U.S.)
Post: Take 2 Interactive Technical Support
Telephone +44 (0)1429 855046 (weekdays, 9:30am-5:00pm GMT)
Fax +44 (0)1429 233677
e-mail take2@startekeurope.com
Web Site www.take2europe.com
Unit A, Sovereilgn Park
Brenda Road
Hartlepool
TS25 1NN
or
tech.support@take2europe.com
and
www.take2games.com
NEED HINTS?
Call the Jagged Alliance 2 Hint Lines
1-900-933- 4468 (US Only)
Cost $0.95/min/18 years or Parent’s Permission/ Touch-Tone Phone Required
Users outside of the US, please check with your local retailer
for the
Jagged Alliance 2 © 1999 Sirtech Canada, Limited. All rights reserved.
No part of this software or printed material may be reproduced in any way, or transmitted,
in any form or by any means, electronic, mechanical, photocopying, recording, or otherwise
without prior permission in writing from the publisher, except for reviewers, who may quote
brief written passages to be printed or quoted in magazine, newspaper, radio, or television.
Jagged Alliance‚ is a registered trademark of 125919 Ontario Inc. The trademarked names
are the property of their individual owners and use of such names without mention of trademark status is not a challenge to their status.
This software product is sold
tributors make no warranty with respect to the performance, quality, merchantability, fitness
for any purpose of the software. The original purchaser must complete and return the
enclosed registration card within 30 days of purchase. The enclosed media will be replaced
free of charge for the first 90 days after purchase, providing you send the defective media
along with a note describing the problem.
Jagged Alliance 2 Official Strategy & Secrets
AS IS
and Sirtech, TalonSoft, their suppliers, dealers or dis-
Jagged Alliance 2
manual by
hintbook.
INDEX
Action Points . . . . . . . . . . .15, 27, 29, 32-34
Action Points, Examples . . . . . . . . . . . . . .34
Action Points, on Merc Names . . . . . . . . .15
Agility, Statistic . . . . . . . . . . . . . . . . . . . .11
A.I.M., Hiring Mercenaries . . . . . . . . . . . .9
A.I.M., Links . . . . . . . . . . . . . . . . . . . .9, 13
A.I.M., Mercenaries . . . . . . . . . . . . . . . . .10
Aiming Guns . . . . . . . . . . . . . . . . .5, 27-28
Aiming at other elevation levels . . . . . . . .29
Aiming at terrain . . . . . . . . . . . . . . . . . . .29
Airspace filter . . . . . . . . . . . . . . . . . . . . . .39
Ammo, Ejecting . . . . . . . . . . . . . . . . . . . .21
AP . . . . . . . . . . . . . . . . . .See Action Points
Assignment, Doctor . . . . . . . . . . . . . . . . .36
Assignment, Mercenary . . . . . . . . . . . . . .35
Assignment, On Duty . . . . . . . . . . . . . . .36
Assignment, Patient . . . . . . . . . . . . . . . . .36
Assignment, Repair . . . . . . . . . . . . . . . . .37
Assignment, Squad . . . . . . . . . . . . . . . . . .36
Assignment, Train/Trainer . . . . . . . . . . . .37
Assignment, Train/Militia . . . . . . . . . . . .37
Assignment, Train/Practice . . . . . . . . . . . .37
Assignment, Vehicle . . . . . . . . . . . . . . . . .37
Attachment, Dot . . . . . . . . . . . . . . . . . . .15
Attachment, Window . . . . . . . . . . . . . . . .22
Autoresolve . . . . . . . . . . . . . . . . . . . . . .7, 42
Backing Up . . . . . . . . . . . . . . . . . . . . . . .18
Bandaging Wounds . . . . . . . . . . . . . . .30-31
Blood n' Gore, Option . . . . . . . . . . . . . . .45
Blue Flag . . . . . . . . . . . . . . . . . . . . . . . . .25
Bobby Ray's . . . . . . . . . . . . . . . . . . . . . . .13
Bullets, Taking . . . . . . . . . . . . . . . . . . . . .21
Buried Objects . . . . . . . . . . . . . . . . . . . . .25
Burst Mode . . . . . . . . . . . . . . . . . . . . . . .28
Buying Items . . . . . . . . . . . . . . . . . . .13, 26
Buy/Sell Conversation Option . . . . . . . . .26
Camouflage . . . . . . . . . . . . . . . . . . . . . . .22
Change Facing . . . . . . . . . . . . . . . . . . . . .18
Climbing . . . . . . . . . . . . . . . . . . . . . . .18-19
Combat, Action Points . . . . . .27, 29, 32-34
Combat, Ending . . . . . . . . . . . . . . . . . . . .32
Combat, Interrupts . . . . . . . . . . . . . . . . . .29
Combat, Rules of . . . . . . . . . . . . . . . .27-34
Combat, Turns . . . . . . . . . . . . . . . . . .27, 31
Concentrating Your Aim . . . . . . . . . . .27-28
CONTinuing an Action . . . . . . . . . . . . . .16
Contracts, Renewing . . . . . . . . . . . . . . . .38
Contracts, Starting . . . . . . . . . . . . . .3, 9, 12
Contracts, Terminating . . . . . . . . . . . . . . .38
Crates, Opening . . . . . . . . . . . . . . . . . . . .23
Crawling . . . . . . . . . . . . . . . . . . . . . . . . .17
Crouching . . . . . . . . . . . . . . . . . . . . . . . .17
Crowbar, Use on Door . . . . . . . . . . . . . . .24
Cursor, Hand . . . . . . . . . . . . . . . . . . .23-24
Cursor, Move . . . . . . . . . . . . . . . . . . . . . .17
Cursor, Talk . . . . . . . . . . . . . . . . . . . . .5, 26
Damage, Permanent . . . . . . . . . . . . . . . . .31
Damage, Taking . . . . . . . . . . . . . . . . . . . .31
Damage, Weapon . . . . . . . . . . . . . . . . . . .52
Death, Preventing . . . . . . . . . . . . . . . . . . .31
Depositing Money . . . . . . . . . . . . . . .22-23
Dexterity, Statistic . . . . . . . . . . . . . . . . . .11
Difficulty Level, Option . . . . . . . . . . . . . .44
Direct, Conversation Option . . . . . . . . . .26
Display Enemy Indicator, Option . . . . . . .45
Doctor, Assignment . . . . . . . . . . . . . . . . .36
Doctors, Performance of . . . . . . . . . . . . . .37
Door Option, Examine for Traps . . . . . . .24
Door Option, Force Open . . . . . . . . . . . .24
Door Option, Unlock . . . . . . . . . . . . . . . .24
Door Option, Untrap . . . . . . . . . . . . . . . .25
Door Option, Use Crowbar . . . . . . . . . . .24
Door Option, Use Door Explosive . . . . . .25
Doors and Locks . . . . . . . . . . . . . . . . . . .24
Doors, Opening . . . . . . . . . . . . . . . . . . . .24
Doors, Closing . . . . . . . . . . . . . . . . . . . . .24
Doors, Door Options Panel . . . . . . . . . . .24
Drawing a Gun . . . . . . . . . . . . . . .27, 33,34
Dropping Items . . . . . . . . . . . . . . . . . . . .21
Ejecting Ammo . . . . . . . . . . . . . . . . . . . .21
Elevation Levels, Aiming at . . . . . . . . . . .29
Elvis . . . . . . . . . . . . . . .R.I.P. (Get Over It)
E-mail . . . . . . . . . . . . . . . . . . . . . . . . .2, 13
Encounter Window . . . . . . . . . . . . . . . . .42
Encumbrance . . . . . . . . . . . . . . . . . . . . . .22
Ending Combat . . . . . . . . . . . . . . . . . . . .32
Ending Turn . . . . . . . . . . . . . . . . . . . . . . .32
Enemy Indicator . . . . . . . . . . . . . . . . .27, 45
Enemies, Targeting . . . . . . . . . . . . . . . . . .27
Energy, Decreasing/Fatigue . . . . . . . . . . .38
Energy, Indicator Bar . . . . . . . . . . . . . . . .15
Energy, Running . . . . . . . . . . . . . . . . . . .17
Energy, Swimming . . . . . . . . . . . . . . . . . .19
Energy, Using it Up . . . . . . . . . . . . . .17, 19
Equipment, Buying/Selling . . . . . . . . .13, 26
Equipping Items . . . . . . . . . . . . . . . . .20-21
Exchange Mercs . . . . . . . . . . . . . . . . . . .18
Exit Game . . . . . . . . . . . . . . . . . . . . . . . .44
56
JAGGED ALLIANCE 2
JAGGED ALLIANCE 2
57
Page 32

INDEX
INDEX
Experience Class, Gaining . . . . . . . . . . . .12
Experience Class, Statistic . . . . . . . . . . . .12
Explosives . . . . . . . . . . . . . . . . . . . . . . . . .30
Explosives, Door . . . . . . . . . . . . . . . . . . . .25
Explosives, Skill . . . . . . . . . . . . . . . . .11-12
Extra Difficulty, Option . . . . . . . . . . . . . .44
Facing, Change . . . . . . . . . . . . . . . . . . . . .18
Fatigue . . . . . . . . . . . . . . . . . . . . . . . . . . .38
File Viewer . . . . . . . . . . . . . . . . . . . . . . . .14
Files, Merc . . . . . . . . . . . . . . . . . . . . . . . .10
Filter, Airspace . . . . . . . . . . . . . . . . . . . . .39
Filter, Mine . . . . . . . . . . . . . . . . . . . . . . .39
Filter, Team . . . . . . . . . . . . . . . . . . . . . . .39
Filter, Town . . . . . . . . . . . . . . . . . . . . . . .39
Finding Mercenaries in Field . . . . . . . . . .15
Fire, Burst . . . . . . . . . . . . . . . . . . . . . . . .28
Fire, Spread . . . . . . . . . . . . . . . . . . . . . . .28
Firing Guns . . . . . . . . . . . . . . . . . . . . . . .27
Firing, Likelihood of Hit . . . . . . . . . . . . .28
Firing Mercenaries . . . . . . . . . . . . . . . . . .38
Force Door . . . . . . . . . . . . . . . . . . . . . . . .24
Frequently Asked Questions . . . . . . . . . . .50
Friendly, Conversation Option . . . . . . . . .26
Game Options . . . . . . . . . . . . . . . . . . . . .44
Game, Quit . . . . . . . . . . . . . . . . . . . . . . .44
Game, Restore . . . . . . . . . . . . . . . . . . . . .44
Game, Save . . . . . . . . . . . . . . . . . . . . . . .44
Game Style, Realistic . . . . . . . . . . . . . . . .44
Game Style, Sci-Fi . . . . . . . . . . . . . . . . . .44
Gear . . . . . . . . . . . . . . . . . . . . . . . . . .20-23
Give, Conversation Option . . . . . . . . . . . .26
Grenades . . . . . . . . . . . . . . . . . . . . . . . . .30
Group Movement . . . . . . . . . . . . . . . . .4, 16
Group, Placement . . . . . . . . . . . . . . . .42-43
Gun Options, Addtional Guns . . . . . . . . .44
Gun Options, Normal . . . . . . . . . . . . . . .44
Guns, Aiming . . . . . . . . . . . . . . . . . . . .5, 27
Guns, Firing . . . . . . . . . . . . . . . . . . . . . . .27
Guns, Jammed . . . . . . . . . . . . . . . . . . . .29
Guns, Refire . . . . . . . . . . . . . . . . . . . . . .28
Guns, Reloading . . . . . . . . . . . . . . . . . . .28
Guns, Targeting an Enemy . . . . . . . . .27-28
Hand Cursor . . . . . . . . . . . . . . . . . . .23-24
Healing . . . . . . . . . . . . . . . . . . . .31, 36-37
Health, Indicator Bar . . . . . . . . . . . . . . .15
Health, Statistic . . . . . . . . . . . . . . . . . . .11
Help . . . . . . . . . . . . . . . . . .Press the H key
Hidden Objects . . . . . . . . . . . . . . . . . . . .25
Hide Shadows, Option . . . . . . . . . . . . . .45
Hiring Mercenaries . . . . . . . . . . . . . . . .3, 9
Income . . . . . . . . . . . . . . . . . . . . . . .40, 53
Insurance . . . . . . . . . . . . . . . . . . . . . . . .13
Interrupts . . . . . . . . . . . . . . . . . . . . . . . .29
Inventory . . . . . . . . . . . . . . . . . . . . . . . .20
Inventory, Sector . . . . . . . . . . . . . . . . . . .39
Items, Attaching . . . . . . . . . . . . . . . . . . .22
Items Button . . . . . . . . . . . . . . . . . . . . . .39
Items, Buying . . . . . . . . . . . . . . . . . .13, 26
Items, Dropping . . . . . . . . . . . . . . . . . . .21
Items, Finding . . . . . . . . . . . . . . . . . . . . .25
Items, Giving . . . . . . . . . . . . . . . . . . . . .21
Items, In A.I.M. . . . . . . . . . . . . . . . . . . .10
Items, Looking at . . . . . . . . . . . . . . . . . .21
Items, Merging . . . . . . . . . . . . . . . . . . . .22
Items, Optional . . . . . . . . . . . . . . . . . . . .10
Items, Passing . . . . . . . . . . . . . . . . . . . . .21
Items, Picking Up . . . . . . . . . . . . . . .23-24
Items, Placement in Inventory . . . . . . . . .21
Items, Provided with Hired Mercs . . . . . .10
Items, Repairing . . . . . . . . . . . . . . . . . . .37
Items, Searching For, Hand Cursor . .23-24
Items, Selling . . . . . . . . . . . . . . . . . .13, 26
Items, Swapping Main & Secondary .20-21
Items, Taking Apart . . . . . . . . . . . . . .21, 22
Items, Throwing . . . . . . . . . . . . . . . . . . .21
Items, Using . . . . . . . . . . . . . . . . . . . . . .23
Items, Water Damage . . . . . . . . . . . . . . .19
Jammed Guns . . . . . . . . . . . . . . . . . . . . .21
Keyboard Commands . . . . . . . . . . . . . . .47
Keys, Storing . . . . . . . . . . . . . . . . . . . . . .23
Keys, Using . . . . . . . . . . . . . . . . . . . . . . .24
Key Ring . . . . . . . . . . . . . . . . . . . . . . . . .23
Laptop Button . . . . . . . . . . . . . . . . . . . .40
Leadership, Statistic . . . . . . . . . . . . . . . .11
Line of Sight . . . . . . . . . . . . . . . . . . .32-33
Load Game . . . . . . . . . . . . . . . . . . . . . . .44
Locks . . . . . . . . . . . . . . . . . . . . . . . . . . .24
Lockpick, Door Option . . . . . . . . . . . . . .24
Loyalty,Town . . . . . . . . . . . . . . . . . . . . .43
Main Hand . . . . . . . . . . . . . . . . . . . . . . .20
Make Items Glow . . . . . . . . . . . . . . . . . .46
Making Money . . . . . . . . . . . . . . . . .40, 53
Map . . . . . . . . . . . . . . . . . . . . . . . . . . . .38
Map Level Selector . . . . . . . . . . . . . . . . .39
Map Screen . . . . . . . . . . . . . . . . . . . .35-43
Marksmanship, Skill . . . . . . . . . . . . . . . .12
Mechanical Skill . . . . . . . . . . . . . . . . . . .12
Medic . . . . . . . . . . . . . . . . . . . . .31, 36-37
Medical Deposit . . . . . . . . . . . . . . . .12-13
Medical, Skill . . . . . . . . . . . . . . . . . . . . .11
Merc Lights During Movement . . . . . . .46
Mercenaries, Assignments . . . . . . . . .35-38
Mercenaries, Deaths . . . . . . . . . . . . . . . .51
Mercenaries, Files . . . . . . . . . . . . . . . . . .10
Mercenaries, Firing Them . . . . . . . . . . . .38
Mercenaries, Firing Guns . . . . . . . . . . . .27
Mercenaries, Gear . . . . . . . . . . . . . . .10, 20
Mercenaries, Health, Status Bar . . . . . . .15
Mercenaries, Hiring . . . . . . . . . . . . .3, 9-12
Mercenaries, Inventory . . . . . . . . . . .10, 20
Mercenaries, Locating on Field . . . . . . . .15
Mercenaries, Main Hand . . . . . . . . . . . . .20
Mercenaries, Movement, Swimming . . . .19
Mercenaries, Moving . . . . . . . . . . .4, 16-20
Mercenaries, Muting . . . . . . . . . . . . . . . .45
Mercenaries, Payment . . . . . . . . . . . . . . .10
Mercenaries, Portraits . . . . . . . . . . . . . . .15
Mercenaries, Searching . . . . . . . . . . .23-24
Mercenaries, Secondary Hand . . . . . .20-21
Mercenaries, Selecting . . . . . . . . . .4, 15, 16
Mercenaries, Trading Items . . . . . . . . . . .21
Merging Items . . . . . . . . . . . . . . . . . . . .22
Message Display . . . . . . . . . . . . . . . . . . .40
Militia, Obtaining . . . . . . . . . . . . . . .37, 43
Mines, Capturing . . . . . . . . . . . . . . .40, 52
Mine Filter . . . . . . . . . . . . . . . . . . . . . . .39
Money, Depositing . . . . . . . . . . . . . . .22-23
Money, Making . . . . . . . . . . . . . . . . .40, 53
Money,Withdrawing . . . . . . . . . . . . .22-23
Morale . . . . . . . . . . . . . . . . . . . . . . . . . .13
Movement . . . . . . . . . . . . . . . . . . .4, 16-20
Movement, Action Points . . . . . . . . .33-34
Movement, Backing Up . . . . . . . . . . . . .18
Movement, Between Sectors . . . . . . .19-20
Movement, Climbing . . . . . . . . . . . . .18-19
Movement, Crawling . . . . . . . . . . . . . . . .17
Movement, Crouching . . . . . . . . . . . . . .17
Movement, Group . . . . . . . . . . . . . . . .4, 16
Movement, Map Screen . . . . . . . . . . . . .41
Movement, Running . . . . . . . . . . . . . . . .17
Movement, Sidestepping . . . . . . . . . . . . .18
Movement, Sneaking . . . . . . . . . . . . . . . .19
Movement, Squatting . . . . . . . . . . . . . . .17
Movement, Stealth . . . . . . . . . . . . . . . . .19
Movement, Swimming . . . . . . . . . . . . . .19
Movement, Switching Places . . . . . . . . . .18
Movement, Tactical Screen . . . . . . . . .15-20
Music . . . . . . . . . . . . . . . . . . . . . . . . . . .45
Mute Confirmation, Option . . . . . . . . . .45
NPCs, Buy/Sell . . . . . . . . . . . . . . . . . . . .26
NPCs, Giving Items . . . . . . . . . . . . . . . .26
NPCs, Meeting . . . . . . . . . . . . . . . . . . . .26
NPCs, Options . . . . . . . . . . . . . . . . . . . .26
NPCs, Recruit . . . . . . . . . . . . . . . . . . . . .27
NPCs, Repairing Items . . . . . . . . . . . . . .27
Old Selection Method, Option . . . . . . . .45
On Duty, Assignment . . . . . . . . . . . . . . .36
Option Button . . . . . . . . . . . . . . . . . . . .40
Option Panel, Door . . . . . . . . . . . . . . . . .24
Option Panel, Merc . . . . . . . . . . . . . . . . .17
Options, Blood 'n' Gore . . . . . . . . . . . . .45
Options, Difficulty Level . . . . . . . . . . . . .44
Options, Display Enemy Indicator . . . . .45
Options, Extra Difficulty . . . . . . . . . . . . .44
Options, Game Style . . . . . . . . . . . . . . . .44
Options, Gun Options . . . . . . . . . . . . . .44
Options, Hide Shadows . . . . . . . . . . . . . .45
Options, Make Items Glow . . . . . . . . . . .46
Options, Merc Lights . . . . . . . . . . . . . . .46
Options, Mute Confirmation . . . . . . . . . .45
Options, Never Move My Mouse! . . . . . .45
Options, Old Selection Method . . . . . . .45
Options, Pause Text Dialogue . . . . . . . . .45
Options, Real-time Confirmation . . . . . .45
Options, Show 3D Cursor . . . . . . . . . . . .46
Options, Show Tree Tops . . . . . . . . . . . .46
Options, Show Misses . . . . . . . . . . . . . . .45
Options, Show Movement Path . . . . . . . .45
Options, Show Wireframes . . . . . . . . . . .46
Options, Snap Cursor to Doors . . . . . . . .46
Options, Snap Cursor to Mercs . . . . . . . .46
Options, Speech . . . . . . . . . . . . . . . . . . .45
Options, Subtitles . . . . . . . . . . . . . . . . . .45
Options, Use Metric System . . . . . . . . . .46
Options, Volume Sliders . . . . . . . . . . . . .45
Passing Items . . . . . . . . . . . . . . . . . . . . .21
Pause Text Dialogue . . . . . . . . . . . . . . . .45
Paying Mercs . . . . . . . . . . . . . . . . . . . . .10
Permanent Damage . . . . . . . . . . . . . . . . .31
Personnel Manager . . . . . . . . . . . . . . . . .14
Placement Screen . . . . . . . . . . . . . . . . . .42
Portrait, Merc . . . . . . . . . . . . . . . . . . . . .15
Prone . . . . . . . . . . . . . . . . . . . . . . . . . . .17
58
JAGGED ALLIANCE 2
JAGGED ALLIANCE 2
59
Page 33

Quit Game . . . . . . . . . . . . . . . . . . . . . . .44
Range, Weapon . . . . . . . . . . . . . . . . . . . .52
Recruit, Conversation Option . . . . . . . . .27
Recursion . . . . . . . . . . . . . . . . . . . . . . . .56
Real-time Confirmation, Option . . . . . . .45
Refiring Guns . . . . . . . . . . . . . . . . . . . . .28
Reloading Guns . . . . . . . . . . . . . . . . . . .29
Repair, Assignment . . . . . . . . . . . . . . . . .37
Repair, Conversation Option . . . . . . . . . .27
Repairing Items . . . . . . . . . . . . . . . . . . . .37
Restore Game . . . . . . . . . . . . . . . . . . . . .44
Roofs, Aiming at . . . . . . . . . . . . . . . . . . .29
Roofs, Climbing up to . . . . . . . . . . . .18-19
Running . . . . . . . . . . . . . . . . . . . . . . . . .17
Salary, Mercenary . . . . . . . . . . . . . . .10, 12
Save Game . . . . . . . . . . . . . . . . . . . . . . .44
Saved Games, Reviewing . . . . . . . . . . . . .44
Screen, Map . . . . . . . . . . . . . . . . . . . .35-43
Screen, Tactical . . . . . . . . . . . . . . . . .14-20
Searching for Items, Hand Cursor . . .23-24
Secondary Hand . . . . . . . . . . . . . . . .20-21
Sector Inventory . . . . . . . . . . . . . . . . . . .39
Selecting a Difficulty Level . . . . . . . . . . .44
Selecting a Merc . . . . . . . . . . . . . .4, 15, 16
Selecting Multiple Mercs . . . . . . . . . . .4, 16
Selling Items . . . . . . . . . . . . . . . . . . .13, 26
Show 3D Cursor . . . . . . . . . . . . . . . . . . .46
Show Misses . . . . . . . . . . . . . . . . . . . . . .45
Show Wireframes . . . . . . . . . . . . . . . . . .46
Shut Up, Mercs . . . . . . . . . . . . . . . . . . . .45
Sidestepping . . . . . . . . . . . . . . . . . . . . . .18
Skills . . . . . . . . . . . . . . . . . . . . . . . . .11-12
Snap Cursor to Doors . . . . . . . . . . . . . . .46
Snap Cursor to Mercs . . . . . . . . . . . . . . .46
Sneaking . . . . . . . . . . . . . . . . . . . . . . . . .19
Sounds . . . . . . . . . . . . . . . . . . . . . . . . . .33
Sound, Game Options . . . . . . . . . . . . . . .45
Squads, Changing . . . . . . . . . . . . . . . . .36
Squads, Managing . . . . . . . . . . . . . . . . . .36
Squads, Moving . . . . . . . . . . . . . . . . . . .41
Squatting . . . . . . . . . . . . . . . . . . . . . . . .17
Spread Fire . . . . . . . . . . . . . . . . . . . . . . .28
Spread, Placement . . . . . . . . . . . . . . .42-43
Stand . . . . . . . . . . . . . . . . . . . . . . . . . . .17
Statistics, Merc . . . . . . . . . . . . . . . . .10-11
Stealth . . . . . . . . . . . . . . . . . . . . . . . . . .19
Strength, Statistic . . . . . . . . . . . . . . . . . .11
Subtitles, Option . . . . . . . . . . . . . . . . . . .45
60
INDEX
Swapping Mercs . . . . . . . . . . . . . . . . . . .18
Swimming . . . . . . . . . . . . . . . . . . . . . . .19
Tactical Screen . . . . . . . . . . . . . . . . . .14-20
Targeting an Enemy . . . . . . . . . . . .5, 27-28
Team Filter . . . . . . . . . . . . . . . . . . . . . . .39
Terrain, Aiming at . . . . . . . . . . . . . . . . . .29
Threaten, Conversation Stance . . . . . . . .26
Throwing Grenades . . . . . . . . . . . . . . . .30
Throwing Items . . . . . . . . . . . . . . . . . . .21
Time Compression . . . . . . . . . . . . . . .7, 40
Time Display . . . . . . . . . . . . . . . . . . . . .40
Time Indicator . . . . . . . . . . . . . . . . . .7, 40
Town Filter . . . . . . . . . . . . . . . . . . . . . . .39
Town Loyalty . . . . . . . . . . . . . . . . . . . . .43
Town Militia . . . . . . . . . . . . . . . . . .39, 43
Trading Items . . . . . . . . . . . . . . . . . . . . .21
Train, Assignment . . . . . . . . . . . . . . . . . .37
Traps, Examine for . . . . . . . . . . . . . . . . .24
Traveling by Map Screen . . . . . . . . . . . . .41
Traveling by Tactical Screen . . . . . . . .19-20
Tree Tops, Eliminating . . . . . . . . . . . .15-16
Turn, Ending . . . . . . . . . . . . . . . . . . . . .32
Two-handed weapons . . . . . . . . . . . . . . .21
Unlock Door . . . . . . . . . . . . . . . . . . . . . .24
Untrap Door . . . . . . . . . . . . . . . . . . . . . .25
Use Metric System . . . . . . . . . . . . . . . . .46
Using Items . . . . . . . . . . . . . . . . . . . . . . .23
Vehicles . . . . . . . . . . . . . . . . . . . . . . . . . .25
Vehicle, Assignment . . . . . . . . . . . . . . . .37
Vehicles, Movement . . . . . . . . . . . . . . . .41
Volume, Sound . . . . . . . . . . . . . . . . . . . .45
Walking . . . . . . . . . . . . . . . . . . . . . . .16, 17
Waypoints . . . . . . . . . . . . . . . . . . . . . . . .41
Weapon Damage . . . . . . . . . . . . . . . . . . .52
Weapon Range . . . . . . . . . . . . . . . . . . . .52
Web site, A.I.M. . . . . . . . . . . . . . . . . . . . .9
Web site, Bobby Ray's . . . . . . . . . . . . . . .13
Weight . . . . . . . . . . . . . . . . . . . . . . . . . .22
Wisdom, Statistic . . . . . . . . . . . . . . . . . .11
Withdrawing Money . . . . . . . . . . . . .22-23
JAGGED ALLIANCE 2
Beat Back the Coup
One Bloody Sector at a Time
Liberate a shattered country and
restore Arulco’s leader to power in
Jagged Alliance®2
Official Strategies
& Secrets
from
Sybex.
INSIDE
YOU’LL
FIND:
■ Detailed maps and
walkthroughs for every
townsite, plus critical
information for all sectors
in between
■ Essential info on each
mercenary’s abilities and
quirky personality
■ Expert combat strategies
to guarantee victory
■ Advanced techniques for building your merc squads
and maximizing your weapons
AVAILABLE AT BOOKSTORES,
SOFTWARE STORES, AND ONLINE.
JAGGED ALLIANCE 2
™
ISBN: 0-7821-2441-0 SRP $19.99 U.S.
61
www.sybex.com
Page 34

 Loading...