

Page 1

Jagged Alliance
Game Manual
Page 2

Gaming Questions?
Hints Hotline Support!
Available 7 Days a Week
If you have a question about Jagged Alliance or need a game hint,
we have someone waiting to help you.
In the United States and Canada
4:00 to 8:00 p.m. Eastern Time
Monday through Friday
12:00 noon to 4:00 p.m. Eastern Time
Weekends and Holidays
Phone (315) 393-6633
Need Technical Support? Phone (315) 393-6644, 9:00 a.m. to 5:00 p.m.
Eastern Time, Monday through Friday. This line is not for game hints.
We could give you answers, but then again, we'd just be making them up.
See Extra: Customer Support for
More Services
1234567890
Jagged Alliance application software
Copyright © 1995 by Sir-tech Software, Inc.
All logos, printed graphic designs and printed materials
Copyright © 1995 by Sir-tech Software, Inc.
All rights reserved. No part of this software or printed material may be reproduced in any way,
or transmitted, in any form or by any means, electronic, mechanical, photocopying, recording, or
otherwise without prior permission in writing from the publisher, except by reviewers, who may
quote brief written passages to be printed or quoted in a magazine, newspaper, radio or television.
Jagged Alliance ® is a registered trademark of Sir-tech Software, Inc. Other trademarked names
are the property of their individual owners and use of such names without mention of trademark
status is not a challenge to their status.
Page 3

Credits
Developed by .......................................... Madlab Software
Produced by .......................................................Linda(Sirotek)Currie
Original Concept ........................................................... Ian Currie
Game Design ........................ Ian Currie, Shaun Lyng, Linda (Sirotek) Currie
Additional Design ...................................................... Alex Meduna
Storyline & Dialogue ....................................................Shaun Lyng
Programming ............................................... Ian Currie, Alex Meduna
Additional Programming ...................... Ray E. Bornert II, Bret Rowdon
Mike Poullas, David Smoth
Graphics & Animation ........................................ Mohanned Mansour
Additional Graphics ........................... Dave Menehan, Harry Akalestos
Music ........................................................................... Steve Wener
Sound ..................................................................... Sean McDermott
Game Manual .............................................................. Brenda Garno
Playtesters ....................... Glen Anderson, Marty Berkman, Les Berkman,
Steven Berra, Nathan Bruyere, Bill Dedi, Paul Gittens,
Steven Al Hartzell, Megan Hartzell, Nathan Koch,
Phil Lewis, Jim McDonnell, Gila Monster, Moon Mulligan,
Joseph Pacelli, Michael Percell, Declan Rodrigues,
Clancy Shaffer, Dan Sherry, Norman Sirotek,
Robert J. Sowerwine, Jr., F.O. Soup, Quentin Spooner
Voice & Casting Director ............................................... Rick Jones
Associate Director .......................................................Shaun Lyng
Sound Engineer ....................................... Randy Hes Sleeping Young
Voices ........................................ Carl Alacchi, Sonja Ball, Tyrone Benskin
Thor Bishopric, Mark Camancho, Aidon Devine,
Teddy Lee Dillon, Richard Dumont, Hubert Fielden
Sergie Golikov, Al Goulem, Dean Hugopian,
A.J. Henderson, Matt Holland, Gary Jewel, Rick Jones,
John Keonsgen, Alan Legros, Pierre Lenoir, Shaun Lyng,
Liz Macrea, John Moore, Nancy Neilson, Kevin ONeil,
Howard Rsyhpan, Michael Rudder, Terrance Scammel,
Roland Smith, Wayne Spencer, Mark Trafford
Recorded at Playhouse Studio, Ville St-Laurent, Quebec, Canada.
Page 4

AcknowledgementS
THANKS & GREETINGS TO
Linda (Sirotek) Currie & the rest of the Currie Clan, Lee-Ann Reny, Brandan, Paul,
James, Sandra & Kevin Lyng (and the rest of the family), Big Paul, Nancy and Ron (and
yes, Dad, its finished yet!), Alex Meduna, Mr. & Mrs. Mansour, Mohammed Mansour,
Sabrina Toglia, Everyone at Sir-tech (especially Norm & Rob), Ray Bornert, John Miles,
Vince De Nardo, Mike Poullas, Guido Henkel, Sandra Eber, Eramelinda Boquer
(A.K.A. The Bug), the Pontano Bros., Lloyd Mitchell, Garry Prokosh & everyone at
C.N. - H.R., Cyrus Hogg, Jeff Pasternak, Mr. Stephan Anastasiue, Mark Kasens,
Camelot Info, Crazy Irving, Dantek Computers, Tetrode, C. & H..
Page 5

Table of Contents
Welcome to Metavira ................................................................ 1
Your Office In Paradise............................................................ 2
Selecting Your Difficulty Level 2
Main Office Screen 2
Contact A.I.M., Sleep (Begin Game) 3
Control Panel, View Team, Save Game 3
Restore Game, Quick Start Party, Leave 3
Step 1: Contacting A.I.M. .......................................................... 4
Contact A.I.M., The A.I.M. Screen 4
The Portrait (Hire), Biography 4
Gear, Info, Basic Statistics 5
Basic Skills, Experience Class 6
Step 2: Hiring Mercs ................................................................ 7
Deciding Who To Take 7
Offering a Contract, Getting the Contract 7
Being Turned Down, Firing a Mercenary 7
Heading to Metavira 7
Step 3: Preparing for the Day ................................................ 8
The Calm Before the Storm 8
Reviewing Your Position 8
The Assignment Screen, Giving Orders 9
How Will the Doctor or Mechanic Perform 10
The Inventory Screen, The Members Inventory 10
The Inventory Pool, Getting Rid of Items 11
Trading Items, Returning to the Map Screen 11
Step 4: Hiring a Workforce ................................................... 12
The Main Screen - Workers Section 12
How Many Workers 12
The Current Employment Situation 12
Hiring Tappers, Hiring Guards, Salary, Cost 13
Step 5: Reviewing Expenses .................................................... 14
The Big Production Picture 14
The Financial Panel 14
Returning to the Map Screen 15
Overview of a Complete Pre-Mission Sector 15
Step 6: Hitting the Beach ...................................................... 16
Hitting Metaviras Beachs 16
The Main Play Screen, Adjusting Your view 16
Automap 16
Mercenary Panels, Locating a Member 17
Sector Number, Quick Inventory, The Cursor 18
Selecting a Mercenary for Action 19
Page 6

Table of Contents
Destination Cursor - Moving 19
Using Items 20
Moving Items Between Mercenaries, Using Hands 20
DONE (Combat Only), TRAVerse 21
INVentory, MAP 21
OPTions, ABORT 22
Step 7: Moving Out .................................................................. 23
Checking Things Out, Line of Sight 23
Hearing, Waterways 23
Buildings, Finding Objects, Detecting Buried Objects 24
Keeping Your Eyes Open 24
Step 8: The Rules of War ....................................................... 25
Traversing Sectors, Gaining Control of a Sector 25
Gaining Linked Sectors 25
Losing Sectors, Meeting the Enemy 26
Action Points 27
Step 9: Military Maneuvers .................................................... 29
These times, they are a changin 29
Taking Turns & Action Points 29
Targeting an Enemy, Guards Help 29
The Firing Process, Moving to Another Merc 30
Firing Features, Once the bullets on its way 31
Taking a Bullet, Reloading, Jammed Guns 31
Explosives & Deadly Gases, Taking Damage 32
Medic!!! 32
Worker Casualties, Enemy Health 33
Before alls said and you click DONE 33
About Santino & His Troops 33
Step 10: At Days End ............................................................... 34
Its Killer Time, The Post Day Screen - I 34
The Post Day Screen - II 35
Reviewing Statistics, Wrapping it Up 35
Extra: Bobs Bullet Bunker ...................................................36
Extra: Mercenary Profiles .................................................... 38
Extra: Customer Support .......................................................48
Index ........................................................................................50
Page 7

Disclaimer
Neither Sir-tech Software, Inc., the author(s), distributor(s) or seller(s) of this
product shall have any liability or responsibility to the purchaser or any other person
or entity with respect to any liability, loss or damage caused or alleged to be caused
directly or indirectly by this product, including but not limited to an interruption
of service, loss of business and anticipatory profits or consequential damages
resulting from the use or operation of this product. This product will be exchanged
if defective in the manufacture, labeling or packaging, but except for such
replacement the sale or subsequent use of this program material is without warranty
or liability.
Note: This product is copyrighted and all rights are reserved. The distribution and
sale of this product are intended for the personal use of the original purchaser only,
and for use only on the computer system(s) specified herein. Renting this product,
or duplicating and selling or renting or otherwise distributing this product, in any
form, is hereby expressly prohibited.
Epilepsy Warning
A very small percentage of individuals may experience epileptic seizures when
exposed to certain light patters or flashing lights. Exposure to certain light patterns
or backgrounds on a television or a computer screen or while playing video or
computer games may induce an epileptic seizure in these individuals. Certain
conditions may induce undetected epileptic symptoms even in persons who have
no history of prior seizures or epilepsy. If you, or anyone in your family, has an
epileptic condition, consult your physician prior to playing. If you experience any
of the following symptoms while playing a video or computer game: dizziness,
altered vision, eye or muscle twitches, loss of awareness, disorientation, any
involuntary movement or convulsions, IMMEDIATELY discontinue use of this
product and consult your physician before resuming play.
Page 8

WELCOME TO METAVIRA
Jagged Alliance is the first in a new series and a new genre of strategy role-
playing games. Combining a delicate mix of high technology, tactical
maneuvers and strategic planning with a nerve-racking storyline, Jagged
Alliance will take your strategic and role-playing talents to their very limits.
Landing on Metavira, you learn the plight of the island, the Fallow tree and
its precious and precariously rare medicinal sap. You'll meet Jack and Brenda
Richards, the father and daughter team whose very experiments with the
Fallow's liquid have the ability to save countless numbers of lives. And you'll
learn of Lucas Santino, the once trusted, fellow research scientist, who has
nearly taken over the island . . . his greed means more than any life or
lifesaving discovery possibly could.
But you're here to change all that by getting Jack and Brenda back into
business and their processed sap out to those who need it desperately.
You'll call upon your contacts within A.I.M., the Association of Interna-
tional Mercenaries, and check out the dossiers of each hired gun while
reviewing their wartime toys. You'll interview and attempt to sign on a group
of mercenaries who meet the rigorous demands of your campaign. Then, if
they agree to join you, it's off to Metavira and with Jack's help, you'll try
to take the island back.
From your headquarters, you'll review your position each morning and set
your strategy for the day. Through strategic planning and tactical maneuver-
ing, you'll determine how, when and where the mercenaries move. Then,
you'll put your plan into action. Of course, Santino's thugs will be on the
move, too.
As you muscle sectors into your control, you'll gain access to Fallow trees
holding the sap that Jack and Brenda urgently need. By recruiting natives as
tappers and guards, you'll harvest the trees' bounties and earn cold, hard cash
to support your continuing efforts. Eventually, Jack and Brenda hope you'll
rid Metavira of Santino once and for all.
And so it begins . . . an individual campaign among campaigns, your effort to
take back the island sector by precious sector.
The shortest and surest way of arriving at real knowledge
is to unlearn the lessons we have been taught,
to remount first principles,
and to take nobody's word about them.
Bolingbroke
Shut up and get on with it.
Frank Hitman Hennessy
1
Page 9

YOUR OFFICE IN PARADISE
The helicopter touches down as the sun burns the afternoon sky. Palm leaves
whip in the wind, and great clouds of whirling dust sting the faces of those who
have been waiting for your arrival.
They approach the craft, urging you off the 'copter and into their compound.
Jack and Brenda Richards are people with no time to waste. Their quick but
unceremonious welcome is all you receive before you're ushered inside to
begin preparations for the days ahead.
So begins your jagged alliance with this island, Metavira, its people, your
adversaries and the members of A.I.M. Setting up your equipment, you steel
yourself for the tasks ahead.
Select START NEW GAME from the main menu to begin Jagged Alliance.
Selecting
Your
Difficulty
Level
Main
Office
Screen
Before you head off to blast Santino's men, Jagged Alliance allows you to select
a difficulty l evel that's fitting with your talents and yearning for challenge. Once
you select the level of difficulty for a particular game, it may not be changed later on.
So, make sure you choose it carefully.
In general, your choice will determine how tough your campaign will be. It
affects the size of the enemy's army, their aggressiveness and their cunning
among other things. If this is your first shot at a strategy or a role-playing game,
you might want to try it on the Easier level. The Harder setting is
recommended only for seasoned, hard-core gaming veterans who want the very
best (worst?) that Metavira and Lucas Santino and his grunts are capable of.
Once you select the level of difficulty, you'll arrive at your headquarter base on
the island. From here, you can access many of the game's features and, most
importantly, you can contact A.I.M. As you move the mouse around the
screen, the options will become available to you.
Restore GameSave GameView Team
Control
Panel
2
Sleep
(Begin Game)
Contact
A.I.M.
Leave
Page 10

YOUR OFFICE IN PARADISE
On your desk rests your sole method of communicating wi th A. I .M. Selecting
CONTACT A.I.M. opens the gateway and gives you access to the biographies and
dossiers of each of the mercenaries represented by The Association of
International Mercenaries. From here, you'll be able to check out and
hopefully hire on the beginnings of your team.
Once you've sent for the mercenaries that will form your team, select SLEEP to
rest up and to prepare for the next day's activities. (It's a good time to save your
game, too.) You'll wake up refreshed and ready to tackle a new day on
Metavira.
Only players who have at least one mercenary in their team can
sleep through the night and begin the game. Otherwise, you'd
just toss and turn... provided Santino didn't take your bed out
from under you. If you haven't hired mercenaries yet, CONTACT
A.I.M.
Clicking on the metal cabinet allows you to customize the game configuration
to your liking. Complete information on the CONTROL PANEL's features is in
the Quick Reference Card.
Sliding the loose board on the window gives you a chance to review your team
and your status on Metavira as it exists in the game you are currently playing.
You may use this option to review each of your saved games by loading another
game and returning to this panel.
As you and your mercenaries gain ground on Metavira, you'll likely want to
save your progress. To do so, just click the top half the wall calendar. Jagged
Alliance will ask you to select a slot for your SAVE GAME and will also allow you
to give it a descriptive title. You may save up to ten different games.
Contact
A.I.M.
Sleep
(Begin
Game)
Control
Panel
View
Team
Save
Game
Move the pointer over the bottom-half of the wall calender, and select
RESTORE GAME to load a previously saved game. Jagged Alliance will show you
a list of your saved games. Just click one to restore it. You can use the View
Team option to review the particular game you've loaded.
If you want to get right into the meat of the Metavira, select RESTORE GAME and
choose QUICK START, NORMAL DIFF. The Quick Start Team consists
of a well-balanced, carefully chosen group of eight mercenaries with all the
necessary skills and equipment to give you a good start on your campaign. Keep
in mind, though, that this team is by no means the best possible starting team.
What works best for you depends on your personal preferences. There's lots of
mercs to choose from.
When your day's adventure has come to an end, move the cursor over the door
and select LEAVE. Jagged Alliance will return you to the main menu.
Restore
Game
Quick
Start
Party
Leave
3
Page 11
STEP 1: CONTACTING A.I.M.
Contact
A.I.M.
The
A.I.M.
Screen
The Association of International Mercenaries acts as the sole agent for those
individuals making a name for themselves in the shady underworld of the hired
gun. By selecting CONTACT A.I.M. from the Main Office menu, the complete
files on these mercenaries are available for your inspection.
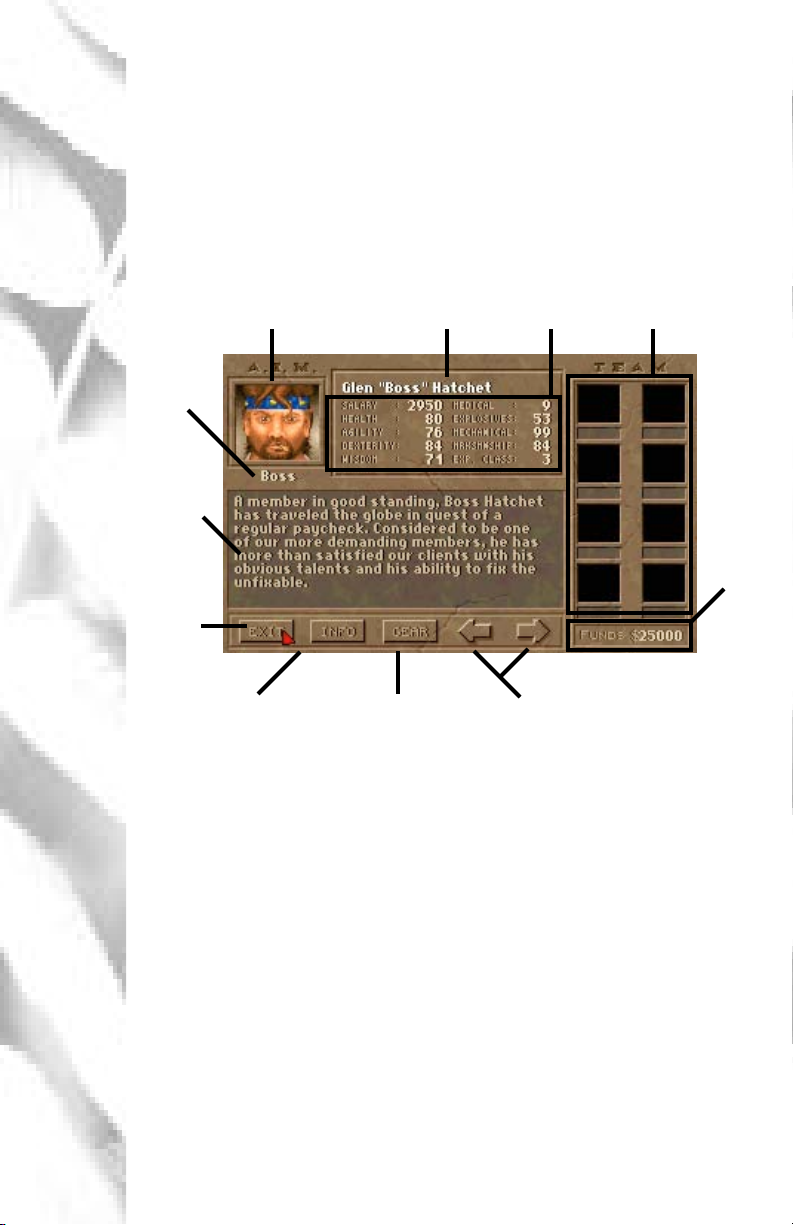
When you first CONTACT A.I.M., you'll see a mercenary's screen similar to the
one below.
New Mercs & Current
Team Members
Your
Funds
(Click here to hire)
Field
name
BIO or
Gear
Info
Exit
A.I.M.
Portrait
Name Statistics
The
Portrait
(Hire)
Biography
4
Detailed Status
Information
Toggles Between
BIO and GEAR
Windows
Move to the Next or
Previous Mercenary
Reviewing the mercenaries' files, you hope to gather a team up to the rigors
of Metavira. Of course, they will be reviewing your credentials, too.
A mercenary's portrait gives you a look at who you're dealing with. Mercenar-
ies who are not currently available for hire will have "On Assignment stamped
across the file's portrait (after all, you're not the only one who's hiring).
Left clicking on a mercenary's portrait offers him a contract with your
[
team. Should the merc accept, his file moves to the Team Member
section. If he's on assignment, it tells you when he'll return.
Right clicking on a member's portrait scrolls you through A.I.M.'s files
]
quickly.
Through A.I.M.'s intense network, biographies are kept of all its mercenaries.
These snapshots allow you a look into the personality and skills of a potential
member, and give you a chance to judge his or her suitability for your team.
Page 12

STEP 1: CONTACTING A.I.M.
Clicking on the GEAR button toggles to the gear screen. Mercenaries may carry
a personal collecti on of goodies that they consider necessary tools for their trade
(medical bags, lockpicks, etc.). Click on an item to get its description.
Selecting INFO, Jagged Alliance reveals to you details on your current team. By
checking out the team's average marksmanship, intelligence and other mean
stats, you'll be able to get an idea of how they'll perform in the field.
In general, a mercenary's statistics represent his or her overall ability in an area
and are shown as a number between 1 and 100 with 100 being the top of the
line. Through training and field missions, though, some mercenaries may even
increase some of their statistics. As their statistics increase, naturally,
mercenaries become more valuable in the overall scheme of things and may
want to up the price of their . . .
Salary. Representing the amount the mercenary charges for a day of his or her,
uh, services, this payroll comes directly from your pocket. Be careful not to
spend yourself dry with high-priced guns until you can afford their exceptional
talents.
Health represents the general, physical well-being of a mercenary and the
amount of damage he can take before death. A mercenary with 100 health
is in perfect physical condition. A mercenary with 10 health, let's say, would
be better off carried in another member's backpack. Health also determines
the overall performance of a mercenary and the effectiveness of other statistics
and skills. It's hard to perform any job well when your arm's falling off.
Gear
Info
Basic
Statistics
Salary
Health
Agility is a measure of how well a mercenary reacts physically to a situation,
whether it be a blast from a shotgun or something as simple as avoiding a crack
in the sidewalk. Generally, agility affects the merc's traveling speed and the
speed, coordination and control he or she displays while recognizing and
reacting to an event.
Dexterity measures a mercenary's ability to perform delicate or precise move-
ments correctly. For certain skills, like medical talents, a high dexterity is very
important - having read all the books doesn't do much if your hands shake
during surgery. In general, dexterity affects a member's ability to use his skills
to the best of his ability and the success of any movement requiring hand
precision.
A mercenary's wisdom affects his ability to learn from experience and training.
Naturally, it also affects his interpretation of things. (What gunshot? I thought
you burped.) Highly intelligent members have no difficulty learning the
complex inner-workings of intense military items. Those not so mentally
blessed take more time to absorb the intricacies of a skill or action. (It's all
right, Norm. Next time, keep the pin and throw the grenade, okay?)
Agility
Dexterity
Wisdom
5
Page 13

STEP 1: CONTACTING A.I.M.
Basic Skills
Medical
Explosives
Mechanical
All A.I.M. members have four basic skills that define the heart of the mercenary
trade. Like statistics, skills range from 1 to 100 and may increase with practice.
Mercenaries tend to get hurt; it's all a part of the job. Whether it be a life-
threatening bullet wound or something as mild as a thorn's scratch, medical
treatment is required. Metavira, though, doesn't have a hospital (unless of
course you count Bob's Wala Wala Band-Aid® and Bullet Bunker), and so,
mercenaries must rely on one another for treatment.
A member's medical skill represents his or her current medical knowledge and
ability to heal the wounded. A highly skilled mercenary could perform surgery
with plastic cutlery, while a low skill mercenary would fatally wound himself
shaving.
A member's explosives skill shows his understanding of the fine art of
pyrotechnics and determines his ability to create and use explosives without
blowing himself through the roof and destroying surrounding fauna. It also
reflects his ability to detect and diffuse explosives hidden by enemies.
Many items that a mercenary uses or comes into contact with on a daily basis
are mechanical in nature. Their firearms, radios, locks . . . and a myriad of other
goodies consist of tumblers, assemblies and electronic do-hickeys that require
a mechanically skilled hand to keep them in top operational order. Mechani-
cal skill rates a merc's ability to repair damaged, worn-out or broken items,
jimmy jammed locks and bypass locked devices, to create mechanical objects
from basic supplies and to manipulate existing objects to form new objects.
Marksmanship
Experience
Class
6
A keen eye and a steady hand contribute to the sought-after talents of the
marksman. A mercenary's marksmanship skill reflects his or her ability to hit,
precisely, any given target with a firearm.
Of all mercenaries' traits, experience class is the most importantit reflects
the sum of their abilities, their years in A.I.M., the amount of combat they've
seen and how knowledgeable they are in the field. All in all, it reflects a level
of talent and of hardcore exper ience. Without question, a member's experience
class is the definitive statement of who they are.
As mercenaries move through A.I.M.'s ranks and gain in experience class, they
also gain certain benefits:
Their ability to detect boobytraps and ambushes improves
They, too, become sneakier and their stealth increases
They are able to focus their sights on an enemy target more quickly
and accurately
Their overall proficiency in field operations and skill increases
Their salary may increase (mind you, it's a benefit to them)
Page 14

STEP 2: HIRING MERCS
After reviewing the files of A.I.M., you likely have ideas about certain
mercenaries and may want them to join your team. Assembling a teama well-
balanced team that won't get laughed at (Hey, look, Bob, it's the Wimp Brigade
with their big, bad waterguns! Ooooooo!)isn't as easy as you might think. So,
before you wantonly offer contracts to every mercenary and his or her brother,
take some time to think things over.
How many mercenaries do you need on your team? Take the
minimum number necessary to complete your objectives.
Try to get a good mix of skills on your team. A group of four
mechanics isn't going to scare anybody (surrender those trees now,
buddy, or we'll fix your car).
When you've decided who you want for your team, click his or her portrait,
and the meeting begins. The mercenary mulls over your offer, and may or may
not accept a position on your team.
Once you successfully contract a mercenary for your team, his or her portrait
will appear in the Team Members section of the A.I.M. screen, and worldwide
the file will be stamped ON ASSIGNMENT. The portraits of the mercenaries who
have just signed on are grayed. Those mercenaries, meanwhile, get ready for
their flight to Metavira. Those in your employ and already on the island are
in full color.
Sometimes negotiations don't go so well. Mercenaries can turn down your
offer of employment for many reasons, all of which depend on their personali-
ties and how they react to your actions (or lack thereof) in the field.
Remember, these men and women have their own attitudes, allies and
enemies, and, since you're not their only employer, you really need them more
than they need you.
Deciding
Who to
Take
Offering a
Contract
Getting the
Contract
Being
Turned
Down
To remove a mercenary from your team, left click on his or her portrait in the
Team Members section. To just check out their stats, right click.
Members who have been hired but have not been transported to
Metavira won't be too upset. No time lost, they figure.
Members who have been transported to the island, on the other hand,
may not take firing so lightly. Hey, they're just like you and me. (You
want to fire me because you hate the manual? Oh. Okay, no problem.
Hey, listen Norm. You wanna go out for a beer after I clean out my
desk?)
Select EXIT from the A.I.M. screen to end your communications. If you've
hired on any new members, A.I.M. will transport them to the island for a fee.
Soon, they'll be flying in, getting their first look at a war zone they'll eventually
know very well. Note: Only one helicopter transport may be made per day,
and A.I.M. will not be open for discussions until the following day.
Firing a
Mercenary
Heading to
Metavira
7
Page 15
STEP 3: PREPARING FOR THE DAY
The Calm
Before the
Storm
Once you have selected your team or added new members and are secure at
headquarters, select SLEEP to give your body and mind the only R&R either are
likely to see in the next 24 hours. As you wake with the sun's rise, you'll find
your mercenaries on the island and ready to tear into the day.
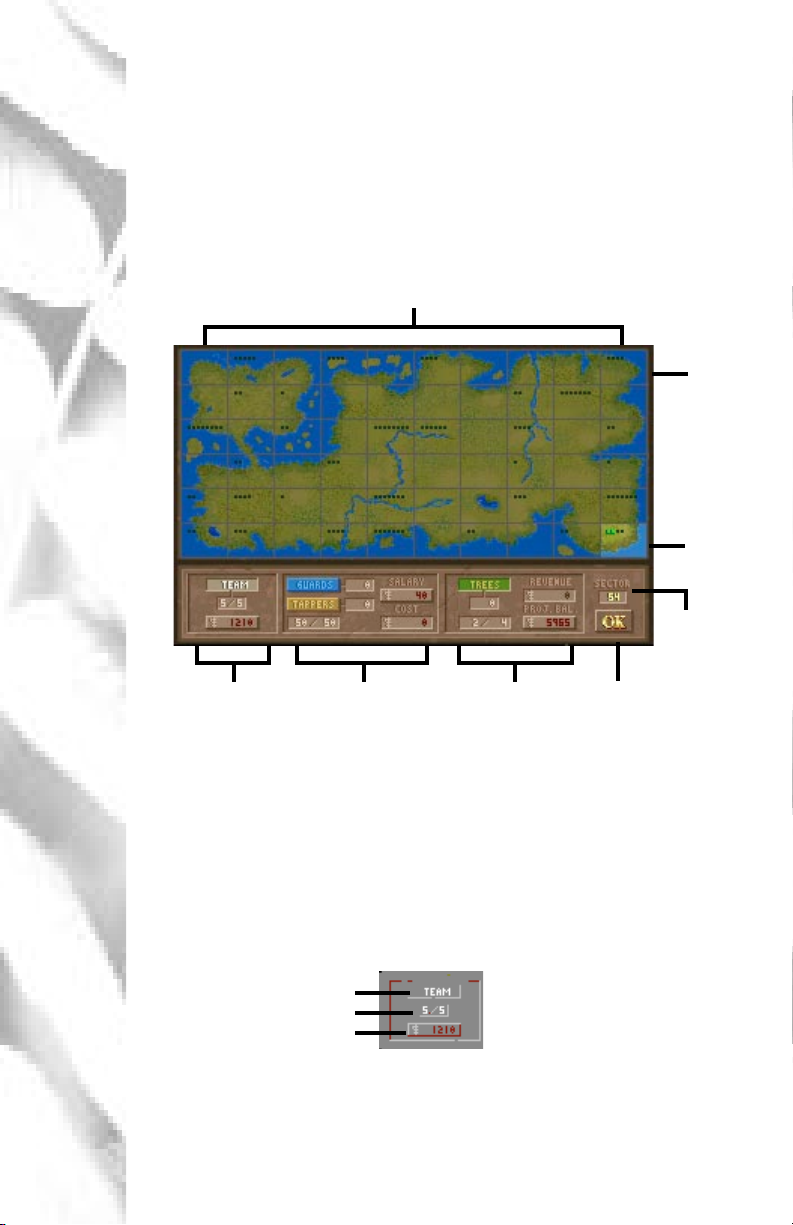
From the Map Screen below, you'll set the day's strategy by determining the
activities of your team members.
Sectors 1 through 60
Enemy
Sectors
(dark)
Sector
Owned
Sector
Highlighted
Team
Section
Worker
Section
Production &
Income Section
Begin
Work
Reviewing
Your
Position
Placing
Your Team
8
When your campaign first begins, you won't have a choice of starting
locations. You have only one in your control! Later, though, when you've
fought to regain control, you can place mercenaries in any sector you own that
is linked by land to the home base. Of course, your team always travels as a
team, and can only occupy one sector at a time.
To place your mercenaries in a sector, first click on the TEAM button in the
Team Section of the Map Screen. Next, move the pointer over Metavira's
map. Jagged Alliance traces each sector with a white box as you pass over it.
Team Button
On Duty Mercs/Total Mercs
TOTAL SALARY Button
Left click in the sector
[
to place your team.
You'll see a white icon
for each team member.
Right click to remove
]
your team.
With a starting point selected, hand out assignments for the day. Click the
TOTAL SALARY button in the Team Section to move to the Assignment Screen.
Page 16
STEP 3: PREPARING FOR THE DAY
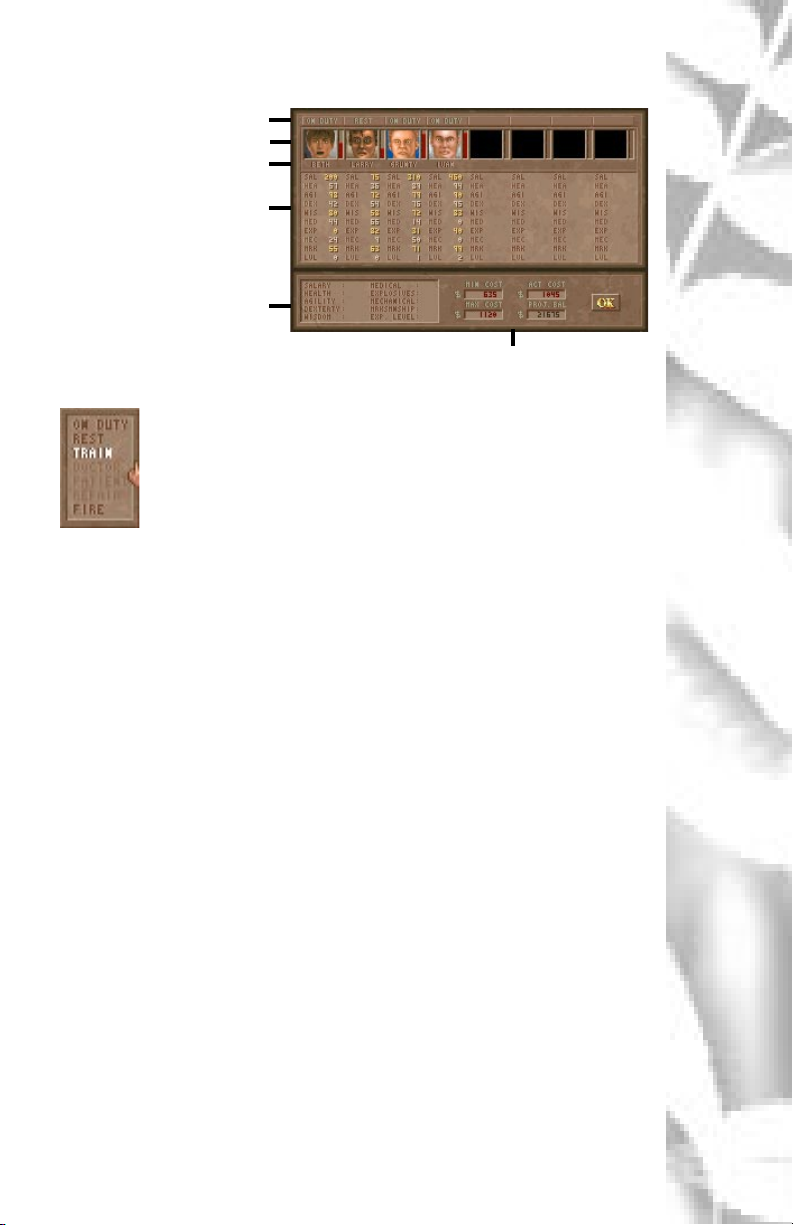
Assignment Button
Portrait (click to view inventory)
Name
Statistics
Mercenary Statistics
(when only one is selected)
Team Finance shows you what you're spending as
well as minimum and maximum budgets
When you begin Jagged Alliance, all your mercs are ON DUTY,
just the way they should be fresh off the 'copter. However, as
the campaign progresses, you might need your merc to tend to
other matters. Whatever the case, click the desired assignment
to dish out your orders.
ON DUTY (Full Salary): Off to the field to tear Santino apart.
REST (Half Salary): Taking a break. Resting heals some wounds, and
although natural healing is a slow process, it helps recoup some energy to
face another day. It's cheap, too.
TRAIN (Full Salary): Grunts may choose to stay at the base camp to hone
their marksmanship, medical, mechanical or explosives skills. Mercs
training in marksmanship must have a gun in their main hand. They may
also opt for a physical workout that might improve their health, dexterity
and agility. Grunts who are already quite proficient in an area will gain little
if anything, while novices may initially improve their skills quite rapidly. A
mercenary's ability and willingness to learn affects the training's outcome.
DOCTOR (Full Salary): Administering proper treatment and permanent
healing to fellow members who are PATIENTS. Naturally, a doctor with
actual medical skill is preferred and a medical or first aid kit must be in the
doctor's hand. Additional kits may be required (in any pocket) to use a
doctor's healing potential fully. Doctors requiring treatment will tend to
themselves first and will then divide their attention to all patients equally.
PATIENT (Half Salary): Receiving permanent healing and attention for
medical wounds by an assigned doctor. Unlike Rest, the grunts receive
the benefits of rest and doctoring. Note: should a medically skilled
mercenary require healing, select Doctor; he or she will tend to his or her
own wounds first (remember, while doctoring, he or she makes full salary).
REPAIR (Full Salary): Repairing items that wear out in the high heat,
humidity and action of Metavira. To repair items, a mechanic must have
a tool box in his or her main hand and the broken item in his or her
secondary hand. Other items needing repair may be placed in the merc's
pockets; he or she will fix the items in the pockets in a top-down order. The
location of the main hand, pockets, etc. is covered in the next section.
FIRE (Ah... No Salary): Ciao!
The
Assignment
Screen
Giving
Orders
9
Page 17
STEP 3: PREPARING FOR THE DAY
How will
the Doctor
or Mechanic
Perform?
The
Inventory
Screen
Picking Up
& Checking
Out Items
The
Member's
Inventory
Doctors and mechanics may see the potential effectiveness of the day's healing
or repairs on their portrait. You'll see something like 28/32. In this case, the
mercenary's best rating is 32 points. Because of outside factors, maybe his
equipment isn't up to par, he'll only be able to provide 28 points of healing or
repair to the patients or objects.
While on the assignment screen, you may also review and manipulate your
mercenary's inventory. Left clicking on his or her portrait moves you to the
Inventory Screen.
Right click on an item to get its description.
]
Left click on an item to pick it up. You may then move the item to
another slot, the inventory pool or another member. Left click again
[
to place it.
Shift/Left click on a group of items (like three grenades) to pick all
S
of them up.
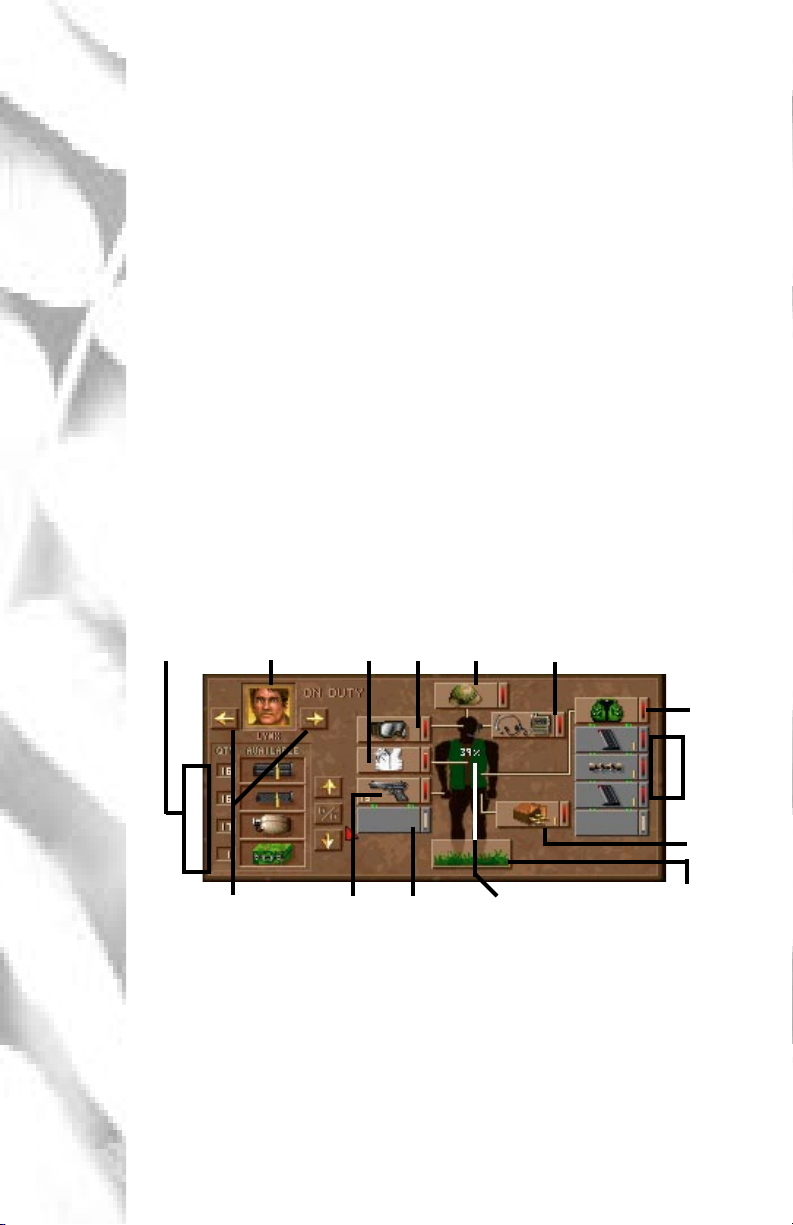
There are two parts to the inventory screen: the member's inventory on the
right and the inventory pool on the left.
The member's inventory contains items that he or she is currently equipped
with and has sole access to.
Inventory
Pool
Exit
Chest
Cover
Face
Gear
Head
Gear
Communications
Device
10
Vest
Vest
Pockets
Secondary
Hand
Next/Previous
Merc
Main
Hand
Attachment
Position
Protection
Percentage
Drop Item to
Ground
Within each slot you'll see a picture of the item, and its working status if
applicable. For grouped items, the number of individual items is also shown.
For items that hold ammunition, you'll see the remaining ammo amount
instead.
The Head Gear, Communications Device, Face Gear and Chest Cover slots
hold corresponding items. The Main Hand, Attachment Position, Secondary
Hand and Vest slots, though, are somewhat different and a bit more complex.
Page 18

STEP 3: PREPARING FOR THE DAY
Vests have a varied number of pockets that may be used to store single or
grouped objects. Jagged Alliance will add an inventory slot for each pocket the
vest has. You can transfer the vest to another member or the inventory pool
with its pockets full, or you may empty the pockets one at a time.
The Main Hand holds whatever a mercenary plans to use. Most often, the
grunt will be holding a rifle or handgun or some other article of war. Other
times, depending on the situation, it could be his medical bag or toolkit.
Mercenaries use their Attachment Position to hold and manipulate items.
When an item is placed in the Main Hand, the open slot below may be used
to add an attachment to the item or to permanently combine items. Rifles, for
example, may be fitted with scopes. The working status of any new object
created or improved upon typically depends on the mercenary's talent and the
quality of the items themselves. The attachment position can also be used to
take things apart, like a message in a bottle, for instance. Not all items can be
put together and taken apart like this, but Jagged Alliance always displays an
attachment slot so you can be creative and experiment.
Mercenaries have a secondary position and hand where they hold items that
may be called into play. Items in the secondary hand can be transferred to the
main hand quickly and easily during play by right clicking on the item in the
secondary hand on the main play screen.
The inventory pool is a stockpile of items at home base. While still at
headquarters, members can grab anything from or put anything into the pool.
While in the field, items in the inventory pool remain at headquarters and
aren't accessible . . . nor are they subject to the normal wear and tear of military
maneuvers. Using the arrows to the right of the pool, you can scroll through
the collection. Clicking on the % button toggles between the working
percentage status and quantity of an item. When you add items to the
inventory pool by clicking on any slot, occupied or not, the pool automatically
adds a slot and places the item with others like it (guns go together for
instance).
Vests
Main Hand
Main Hand
Attachment
Position
(Hold or
Manipulate
Items)
Secondary
Hand
The
Inventory
Pool
Before the day actually begins, your mercenaries can PERMANENTLY rid
themselves of unwanted items. While in the inventory screen, just pick the
item and drop it to the ground at the mercenary's feet. Click the item in the
garbage can followed by OK to permanently drop it.
The arrows to the right and left of the mercenary's portrait allow you to scroll
through the team. You can also move items between members this way. Left
click on an item to pick it up, and scroll through to the desired recipient.
Once you've hired your personnel, equipped them and given them their daily
assignments, click on mercenary's portrait (if you're still in the inventory
screen). From the Assignment Screen, click OK to return to the Map
screen.
Getting
Rid of Items
Trading
Items
Returning
to the Map
Screen
11
Page 19

STEP 4: HIRING A WORKFORCE
The Main
Screen -
Worker's
Section
How
Many
Workers?
The Current
Employment
Situation
With your mercenaries on the island, equipped and ready to go, only a
workforcesomeone to bring in the doughis needed. In fact, much of the
money maneuvering you do will be a direct result of your workforce: the teams
of tappers and guards you assign to harvest and protect the trees in your
possession. Without tappers, for instance, your Fallow trees will do little but
provide shade for your mercenaries as they shine their guns.
The amount of workers you need depends entirely upon the number of trees
in your possession (for the tappers) and the lengths you'll go to protecting them
and the sector (for the guards). It also depends on your ability to process the
sap you've collected. If you can't process all that you have coming in, there's
no point employing people to collect these reserves.
Green icons show Fallow trees that are healthy, safe and ready to tap.
Black icons represent Fallow trees that the natives aren't willing to
tap. In general, the safer a sector is from attack (guards as well as
adjoining sectors), the more the natives will do for you.
Light Brown icons show Fallow trees that are in sad shape and not
healthy enough to tap.
The Worker Section, gives you a run down of the current employment
situation:
Employed Guards
Employed Tappers
Worker Pool
Daily Salary Per Worker
Total Worker Cost
Hiring
Tappers
12
Natives currently in
your employ
As you gain the natives' trust and they lose their fear of Santino, more will be
willing to work for you and Jack. Of course, a lot of worker deaths can turn the
tide against you.
Tapping Fallow trees is a delicate, day-long process that
requires the patience and knowledge of three native tappers,
who diligently extract the sap from the temperamental
network of roots bundled near the ground's surface.
To hire Metavirans for tapping, just click on the TAPPERS button. Next, move
the pointer to any of your sectors on the map screen. Jagged Alliance outlines
the sectors white as you pass over.
Left click to add a group of tappers to a sector. A yellow icon,
[
representing a group of three tappers, will be placed in the sector.
Naturally, there must be at least one safe Fallow tree (a green icon) per
group of tappers placed.
]
Right click to remove a group of tappers from a sector.
The total number of natives
willing to tap or to guard trees for
your team
Page 20

STEP 4: HIRING A WORKFORCE
Tappers turn their backs to the world while they work. So, they have reason
to ask for a little protection. (At any moment, one of Santino's men could sneak
up and kick them in the butt . . . thus ramming their foreheads into a Fallow
treeyou never know.) By hiring personnel to guard the tappers , you can instill
a bit of confidence in them, allowing them to do their jobs better while
discouraging attacks by Santino's men.
Guards also serve as an important element of your defense. By placing guards
in a sector you own, you help to protect it from Santino's forces. In fact, should
you take over a new sector, it's a good idea to move guards in right away (see
MAP: Guard Management on page 21 for more information).
To hire guards, click on the GUARDS button in the Worker Section of the
screen. Next, move the pointer over the map screen. Like before, Jagged
Alliance will highlight a sector white as you pass over it.
Left click to place a guard in a sector. If you like, you can place up
[
to eight guards in one sector. When you add guards to a sector, you'll
see the blue icons representing them appear.
Right click to remove a guard from a sector.
]
Money makes the world go 'round. On Metavira, it's no different. The salary
you're paying your tappers and guards is shown on the SALARY button in the
Worker Section. When you first begin Jagged Alliance, your tappers and guards
will be earning a normal, daily salary. However, if your performance isn't
instilling the kind of confidence to lure a native workforce, you might have to
resort to monetary incentives. Left click the SALARY button to do so. Then right
click for every doll ar you wish to increase their salary. When you're finished, left
click again.
Hiring
Guards
Salary
NOTICE: Once you've increased your workers' salary, you can't lower
it later on. That just wouldn't go over well (imagine your boss suggesting
the same thing to you).
After you've finished placing your tappers and guards and have decided their
salary, take a gander at the Cost box in the Worker Section. Here, you'll see
the total, daily cost for your workforce.
Cost
13
Page 21

STEP 5: REVIEWING EXPENSES
The Big
Production
Picture
After placing your mercenaries, tappers and guards, mission control puts all the
numbers into placehow much is going out and how much you're earning
in the Production and Income section of the Map Screen.
Production Ratio
Harvest Ratio
Production Ratio: The amount of sap actually being processed versus
the amount that your facilities can handle each day.
Harvest Ratio: The amount of safe trees that may be tapped versus
the total number of trees you own.
Trees: Click and hold the TREES button to review the status of all
factories, their capacities and how many trees they are processing.
Revenue: The total expected revenue from today's venture.
Projected Balance: Your total funds at day's end if everything goes
your way. Jagged Alliance adds today's revenue to your bankroll and
subtracts the day's expenses to arrive at your projected balance.
Projected Balance will be in the black and likewise colored if you're
expected to make money at day's end. If, however, your plans cause
a deficit, your Projected Balance will be in the red, and you'll have
to take a closer look at the situation. It's possible to be in the red for
the day but still finish with a positive balance as long as your bankroll
is big enough to support your losses.
Trees
Revenue
Projected Balance
The
Financial
Panel
14
All of the information Jagged Alliance reports in the Production and Income
section is, of course, speculative. If all goes well during the day, it's an accurate
representation. However, if your crusade doesn't go as planned, the numbers
can change drastically. Santino's men might kill a bunch of your tappers or take
over a processing plant. A mercenary may even die resulting in expenses you
didn't anticipate at the beginning of the day.
Clicking on the Projected Balance button gives you a complete breakdown of
your financial standing.
Showing both your expenses and income along with a balance sheet of sorts, the
information on the financial panel can help you to get a grasp on the flow of
money into and out of your small organization. Money on its way into your
pocket shows black; money on its way out shows red.
Page 22

STEP 5: REVIEWING EXPENSES
Income:
Per Tree: Shows you the amount of revenue you'll receive for each
tree tapped and processed.
Total: Reveals the amount of money you'll be earning that day if you
successfully tap and process all the trees you plan to.
Expenses:
Team: The total salary paid to your team of mercenaries.
Tappers: The total salary paid to the tappers in your employ.
Guards: The total salary paid to the guards in your employ.
Total: The total of all your daily salaries to the team, tappers and
guards.
Balance:
Day: Displays the current day for your reference.
Current Balance: The actual balance at the beginning of your day.
Projected Balance: The estimated balance at the end of the day after
adding revenue and subtracting the day's expenses.
Net Difference: The overall net gain or net loss affecting your
balance expected after the course of the day's activities.
When you first begin Jagged Alliance, you'll be in the red for a while . . . after
all, your back's to the wall and you're not bringing any dough in. In these tough
times, you'll have to rely on your initial bankroll to get you through. If you find
yourself in the red later on, though, make certain that you're tapping all trees
available to you (the guards' and tappers' salaries seldom exceed the revenue
from a tree). Secondly, take a look at your mercenary expenses. You might be
able to cut back there.
Income
Expenses
Balance
If You're
in the Red
Once you've finished reviewing your financial standing, click OK from the
Financial Panel to return to the Map Screen.
An Overview of a Complete Pre-Mission Sector
Mature Trees (Green icons)
Tappers (Yellow icons): Click the
TAPPERS button and left click in a
sector to place.
Guards (Blue icons): Click the
GUARDS button and left click in a
sector to place.
Mercenaries (White icons): Click
the TEAM button and left click in a
sector to place.
Returning
to the Map
Screen
A Complete
Pre-Mission
Sector
15
Page 23

Step 6: Hitting the Beach
Hitting
Metavira's
Beaches
The Main
Play Screen
Adjusting
Your View
Once you've hired and placed your mercenaries, tappers and guards, you're
ready for your first hard-core mission. Click OK from the Map Screen to
head into the field.
Arriving in your sector you'll see the Main Play screen of Jagged Alliance. As
you fight your way sector to sector through Metavira the screen and options
below will be your guide.
Sector #
Mercenary
Panels
Main Hand Vest Pockets Secondary Object/
Depending on personal preference, Jagged Alliance offers you four views of
Metavira.
Play
Options Time
Main Play
Window
Selected
Mercenary's
Quick
Inventory
Hand
Automap
16
O
Scroll
N
T
INS
T
Full: Removes the top bar and the inventory bar in addition to the
mercenary panels.
Wide: Removes the merc panels from both sides. When you select
mercenaries on the field, though, their portraits and quick inven-
tory bar will briefly appear on the screen.
Through
Normal: The screen as it, uh, normally appears.
Sector: The bird's eye view replaces the playing screen with an
overhead view of the full sector. While in sector view, you can
move, but you can't target enemies should one appear.
Press TAB to toggle between the Normal view and your last setting
of Wide or Full.
Press INSERT to view the automap. Jagged Alliance will reveal the
places you have been and, more importantly, those corners, nooks
and hiding places you've waltzed right by. You can see the whole
sector map by pressing TAB. To exit the automap and view another
location in the sector, right click on that location.
Page 24

Step 6: Hitting the Beach
While in sector or automap view, you'll see various icons on the screen
representing your guards, mercenaries, tappers and enemies.
White: Active mercenary
Gray: Non-active mercenaries
Blue: Guards
Yellow: Tappers
Red: Enemies
The panels to the left and right of the Main Play Window show you the
mercenaries' general well being and give you access to each mercenary's
information. Within each mercenary's panel, three status bars track his or her
most vital information.
Health: The red bar tracks the member's current physical state. If
a mercenary gets wounded, the health bar drops to reflect his or her
condition and leaves an injury tracker in its place. Injuries left
untreated are shown in yellow. Treated injuries, on the other hand,
show pink. Left untreated, injuries have the potential to permanently lower
a mercenary's health rating.
Breath: The blue bar tracks a mercenary's breathing rate and energy.
It will lower as the member exerts energy and performs activities, and
will rise as he or she rests. How quickly the member recoups breath
depends on the member's general well being and how exhausted he
or she was in the first place. The heat of the day also plays a part.
Action Points: In combat, the orange bar tracks a mercenary's
action points. Depending on the speed of a character, he or she has
a certain amount of action points that determine just how much the
merc can do in a given round of combat. Mr. Hyper on Sugar, for
instance, has about 24 action points, meaning he can do a lot in a
single round of combat. Mr. Slightly Faster Than Death, on the other
hand, has only 8 action points and might get around to shooting an
enemy... if he feels like it, maybe.
Automap
& Sector
Icons
Mercenary
Panels
The Status
Bars
A left click on these status bars shows you the mercenary's statistics.
[
Right clicking on the mercenary's panel spins you to their personal
options. Here, you can set certain default behaviors. Mute, for instance,
]
allows you to play a bit quieter late at night by turning off the merc's
attention and OK sounds. You still receive radio communications,
though. The other personal options determine how he or she fights and
moves in a combat situation, and are covered fully in Step 9: Military
Maneuvers.
As mercenaries travel throughout wooded sectors, you may occasionally lose
sight of one. To locate the mercenary, left click on his or her portrait. A white
circle will flash over the mercenary to indicate his or her location. On the
playing field, you can also click on a merc's body. Jagged Alliance will let you
know who's who by revealing the merc's portrait and name.
View Stats
Personal
Options
Locating a
Member
17
Page 25

Step 6: Hitting the Beach
Sector
Number
Time
Bar
Real
Turn-
Based
Paused
Compressed
Quick
Inventory
The sector's number alerts you to potential conflicts. When there are no
enemies in the sector, you'll see a green background. When enemy troops are
present in the sector, it flashes red to warn you.
As the day passes, the time bar gradually turns to red, and the mercenaries head
to home base. There are three different forms of time in Jagged Alliance, along
with "Pause to stop time altogether:
Real time: The normal, continuous passage of time. The sun rises
and sets in Metavira (whether you're watching the action or not).
Turn-based time: Turn-based time begins whenever a mercenary
enters hostile territory or enemies enter the sector and allows you time
to think over strategic issues and orders. When the threat has passed,
real time resumes its countdown.
Pause: Jagged Alliance pauses whenever you press P or click on the
time bar. Time also pauses when you review a mercenary's inventory,
view the map or check out the game options. When time is paused, a
watch appears in the main play window as a reminder. It also shows
you the current time of day on Metavira. Press any key to resume time.
Compressed Time: If you want to move things along, maybe you've
finished your mission for the day, press C to compress time. If
enemies are in or enter the sector, compressed time is not available.
Once mercenaries have been selected (double click on their portraits or click
on their figures), the contents of the selected mercenary's vest pocket as well
as the items held in his or her hands line the bottom of the Main Play Screen.
Cursor
18
The
Main Hand: The slot on the far left holds the item the mercenary
intends to use, typically his or her gun or another weapon of some
]
sort. Right click on the main hand to move the item to the secondary
hand, if available, or a vest pocket, if available.
Secondary Object/Hand: The slot on the far right is the mercenary's
secondary object and is a great holding place for items you want to
]
access quickly. Right click on the secondary hand's item to swap it
for the item in the main hand.
Vest Pockets: The middle slots show you the items currently in the
mercenary's vest pockets. The number of slots available to you
]
depends on the number of pockets in the vest. Right click on a vest
pocket to quickly view the mercenary's complete inventory. You may
also press I or click the INV button.
Left click on any item to pick it up and move it to another location.
[
Depending on your course of action, Jagged Alliance's cursor will alternate
between three possible cursors, the Destination Cursor, the Use Cursor and
the Hand Cursor. These different cursors are covered next.
Page 26

Step 6: Hitting the Beach
Mercenaries may be selected by double clicking on their portraits or single
clicking on their figures on the playing field. A selected member's panel shows
gold, and his or her inventory lines the bottom of the screen.
The normal destination cursor is a small square. Left click with this cursor on
an acceptable destination, and the mercenary will attempt to travel there.
While mercenaries are in route, a blue box will appear around their portraits.
Move all: Left click on a destination and, while still holding the left
mouse key, right click. In turn-based time, this option isn't available.
Sneak: Moving quietly. Hold SHIFT and select the destination.
Back up: Hold CTRL and select the destination.
Crouch: Makes merc less visible and harder to hit. Right click over
selected merc and then left click to confirm, or ALT click over merc.
Mercenaries move across the terrain of Metavira with varying speeds depending
on their general physique, energy level and even the terrain they travel over.
They avoid obstacles in their path and generally choose the easiest and shortest
route. Of course, what a merc considers to be the best route may not be the one
you would have chosen. So, if you want a precise route, you may want to
strategically control his path in short bursts. Using options in the Control Panel
(or OPT on the screen's top), you may toggle four options to assist you:
Show Paths: If s how pat hs i s ON, Jagged Alliance will show you the
intended route of the mercenary from one point to another. Since
there may be areas you don't want him to cross (maybe you think
there's a land mine), his path might clue you into his intentions.
Safety Move: To protect yourself from the effects of a hair-trigger
mouse finger, you may want to employ safety move. When ON,
Jagged Alliance will ask you to confirm all intended destinations with
an extra click. On the first click, you'll see a red square. If that's
where you want the mercenary to head, click again.
Fast Scroll: If fast scroll is ON, you'll be able to visually zip from one
end of the sector to another to see what's going on. Players on slower
computers may want to try this option to increase performance. Fast
computer users, on the other hand, may suffer from whiplash.
Step Sounds: When step sounds is ON, you hear your mercenaries
moving from one location to another.
Selecting a
Mercenary
For Action
Destination
Cursor -
Moving
Moving
All, Sneaking,
Crouching
& Backing Up
Out for a
stroll . . .
Show Paths
Safety Move
Fast Scroll
Step Sounds
When mercs are traveling narrow corridors or bridges, they may need to switch
places with another merc or a guard one square away. To do so, select one of
the mercenaries. Now, put the cursor over the other, and press X.
All forms of movement require a mercenary to exert energy and to lose breath.
When a member's breath rate gets low, he will have trouble moving and will
voice his concerns to you. If he becomes completely exhausted, he'll fall flat on
his face and try to recoup enough breath just to stand up again. Naturally, the
more exhausted the member, the longer it takes him or her to recoup these
energies. In combat, action points are used to determine how much a mercenary
can move. Action points are covered in Step 9: Military Maneuvers.
Get Outta My
Way, Jerk!
The Effects
of Movement
19
Page 27

Step 6: Hitting the beach
Using
Items
Moving
Items
Between
Mercenaries
To use any item in Jagged Alliance, it must first be in the selected mercenary's
Main Hand. You can move items to his or her main hand by viewing their
inventory (right click in any of the vest pockets along the bottom of the screen,
click INV on the screen's top or press I).
Right click in the main play window to use the item in the main hand.
Depending on the item's nature, different Use cursors will appear.
]
Firearms, for instance, show a target cursor, keys show a key-shaped
cursor, a first aid kit shows a first aid cursor and so on. Note: If you try
to use an item, but don't get a special cursor, then the item probably
needs to be merged with something else to have an effect.
With the Use cursor on the field, left click on the target or object, and
action begins. For instance, a mercenary with a medical kit will attempt
[
to heal someone who's feeling a bit under the weather. If a mercenary
is out of range, he or she will proceed toward the destination until in
range and then perform the selected action. A small icon will appear
on the mercenary's portrait to show you that they are busy.
While viewing a mercenary's inventory, you may trade items and review other
members who are near the selected mercenary. All members who are within
reach are highlighted, and mercenaries who are next to one another will form
a chain to pass items along.
Moving to another member: Click on a member's portrait to move
to his or her inventory screen.
Trading an item: Select the item, move to another member's screen,
and deposit it in an available slot.
Using
Hands
Changing
to a Hand
Examining
Items
Picking
Up Items
Auto
Pick Up
20
While on Metavira, mercenaries use their hands for many reasons, whether it
be to open a door or to search inside a desk. You use the Hand Cursor for any
activity that requires the mercenary to use his or her hands.
You can change the cursor to a Hand at anytime by holding the CTRL
F
key down.
While holding the CTRL key down, right click to magnify any visible
]
item for identification purposes. It's also a great way to read signs. You
can also press Z to zoom into the item while your cursor's over it.
While holding the CTRL key down, left click on the object or item you
wish to manipulate, and the mercenary will move into range, then
[
search, open or otherwise handle the item or object.
To pick up items or search areas automatically, move the cursor over
[
the location. If it's an area a merc can't go (X), left click on the area.
The cursor will change to a hand. Left click again, and the mercenary will
search the area. If you see an item out on the field, hold the destination
cursor over it for a few seconds, and it will automatically turn to a Hand
Cursor, even if your merc is standing over the item. Left click and the
mercenary will try to go to it and pick it up.
Page 28

Step 6 1/2: Top Screen Options
Press DONE during combat to let Jagged Alliance know you've finished your
strategic moves and are ready for the enemy to make his. DONE, a combat
option, is covered fully in Step 9: Military Maneuvers.
The TRAVerse button allows your team to traverse into a nearby sector. With
your mercs at the edge of a sector, select TRAVerse followed by the direction
you want to travel to.
INVentory lets you check out all of the selected mercenary's belongings or
equip new items he finds. To switch to another member, just click on his
portrait. Inventory was previously covered in The Member's Inventory on
page 10.
To see all of Metavira and to review your defenses, click MAP. From the
overhead view, you'll get a quick look at the sectors you're in control of . . .
as well as those you're fighting to recover. You'll also be able to review and
change the defensive positions of your guards.
Enemy
Sectors
(dark)
DONE
Combat
Only
TRAVerse
INVentory
MAP
Overall Guard
Management Stats
Current Action
Tracker
Back to
the Field
Guard Management provides you with an opportunity to evaluate and change
the current defensive positions of your guards. Maybe you just won a sector and
want to have some guards hold your ground while the team heads off to take
new territory. On the other hand, maybe Santino's men are making serious
inroads into one of your sectors and some reinforcements are desperately
needed.
For whatever reason, you may use Guard Management to move your current
guards into new, defensive positions within your territorythey aren't dumb
and won't go waltzing into Santino's territory until you take it over.
Guard
Management
21
Page 29

Step 6 1/2: Top Screen Options
Selecting
Guards
to Move
Placing
Reassigned
Guards
Stopping
Transit
Right click to select a guard to move. When you do, the cursor will
change to show you how many guards are currently available for
]
reassignment. The current action trackers will change as well:
Stationary Guards: Tracks the guards standing their ground.
Guards in Transit: Shows you the amount of guards that will be
in transit for the time being.
Total Guards: The size of your defensive empire.
Awaiting Destination: The amount of guards selected for
reassignment that are awaiting their destination.
From Sector: Indicates the home sector of the guards. You can
only move guards from one sector at a time, but may place them
in any sector you own.
Minimum Traveling Time: In general, baring any unforeseen
circumstances, it takes a guard 30 minutes of game time to travel
from one adjacent sector to another. By holding the highlight
over a potential destination sector, Jagged Alliance will calculate
the time for you.
Left click to place a guard in a sector. As guards are placed, a light
[
blue ghost guard icon will appear to let you know the guard is there
in spirit and his body's on the way. The cursor will also change to
indicate the amount of guards still awaiting your destination orders.
Jagged Alliance will let you know when they reach their destinations.
To remove a guard in transit and send him back where he came from,
F
hold down the control key while right clicking. Once you leave this
screen, though, the guards begin transit and cannot be recalled.
OPTions
Quick Save
Quick
Restore
ABORT
22
OPTions allow you to Quick Save your game or toggle various Control Panel
features while playing Jagged Alliance.
Quick Save allows you to save your progress along the way. Keep in mind,
though, you're only allowed to quick save during real-time play when there are
no enemies present in the sector. However, if you really, really need to leave
the game in the heat of combat (For the seventh time, 'Dinner's ready!' ), press
ALT-X to leave the game. Jagged Alliance will ask you if you wish to save.
When you begin Jagged Alliance again, you will be asked if you wish to resume
a game in progress. If you say no, your quick save will be deleted. All quick
saves are automatically deleted at the end of a day.
Quick Restore, uh, restores a quick save. You may use this option any time a
quick save file exists.
Select ABORT to terminate the day's mission. Jagged Alliance will roll back the
clock to the sun's rise. If you choose not to replay the day, though, you'll return
to your headquarters where you may load another game, quit or begin anew.
Page 30

Step 7: Moving Out
Metavira's a beautiful island, but it's by no means a paradise. Be cautious in your
moves and leave nothing unturned. Better yet, take a few minutes to draw your
guns, search the ground and walk through the sector you've arrived in. You
never know what's lying around awaiting your discovery.
Moving about a sector, you'll soon discover a mercenary's greatest asset is his
or her line of sight. Being able to see an enemy before said enemy blows one's
head off is of critical importance. On the Main Play Screen, you'll see exactly
what your mercenaries see. For instance, if all your mercenaries remain on one
side of a wall, you'll have no idea what's on the other side and, so, it won't show
on your screen. As objects or enemies come into a mercenary's line of
sight, they'll be revealed.
The crack of a twig underfoot or the chilling tick-tick-tick of a bomb might
give away even the most well-hidden ambush. How mercenaries interpret the
sounds, however, is another matter indeed. Of course, enemies can hear you,
too.
Lots of waterways crisscross the island of Metavira. While you might be able
to take a bridge across a stream or a river, sometimes swimming or wading
through the water is more practical (but may be more dangerous).
Swimming is the most demanding form of movement. So, before a mercenary
takes the plunge, check his or her breath rate. As they swim across the
waterway, often laden with heavy gear, they tire. Mercenaries whose
destinations are in water will tread as long as they can until given a new
destination. Once a member is out of breath and begins to drown, his or
her health bar will also go down. When it reaches zero, the mercenary
drifts lifelessly in the current (here, fishy, fishy, fishy).
Checking
Things Out
Line of
Sight
Hearing
Waterways
While swimming or wading, members may not use mechanical weapons like
guns (they're either held over the head to avoid water damage or slogged along
on the merc's back if he's swimming). However, since waterways possess their
own set of dangers and obstacles, it's a wise idea to equip your mercenaries with
a short range, non-mechanical weapon like a knife before they cross bodies of
water.
There is always a chance that your mercenary's inventory may become exposed
to water when swimming and items may become damaged. If you are really
concerned about a particular item, avoid deep water areas where the mercenary
has to swim and therefore submerge his inventory. After crossing a river, review
each mercenary's inventory to get an up-to-date report on the working status
of each item.
Defending
Yourself
Water
Damage
23
Page 31

Step 7: Moving Out
Buildings
Finding
Objects
Detecting
Buried
Objects
A variety of buildings, ranging from factories to houses, barracks to one-room
dilapidated shacks, decorate Metavira's landscape. You'll see buildings as you
approach them, but, naturally, you won't be able to see inside. If the door is
unlocked or if you have the right item to get in, you'll see the inside of a building
as it is revealed to your mercenary. However, if the door doesn't open, you'll
have to find some other way into the building. Be creative... if you really want
in, you might just find a way.
Occasionally, your mercenaries may find objects which will appear as a
miniature version of the real thing. Like all other things, the object will appear
on your screen when it enters a mercenary's line of sight.
Sometimes, though, you may have to search for items. Objects of great
importance typically aren't lying around in a field waiting to be picked up. To
get at well-hidden items, search for them with the Hand Cursor (press CTRL
or leave the destination cursor over the object for a few seconds). Left click on
any object with the Hand Cursor and the mercenary will walk over to
investigate. If the mercenary has no room in his or her inventory for the item,
he or she will need to drop something on the ground to make room.
Some mercenaries have seen a lot of hostile territory and, so, tend to take
particular notice of bumps on the ground or strange patterns in the grass. Other
mercs, those equipped with metal detectors, might just be able to find items
even the best trained eyes would have passed over.
When mercenaries find what they believe is an item buried i n the ground, they'l l
place a blue flag over it. Of course, what's actually buried thereif anything
at allis anybody's guess. It might be a landmine that'll blow you 40 feet into
the sky . . . or the item you've been trying to find for weeks. To dig up or disarm
the item, use the Hand Cursor on the blue flag (and cross your fingers).
Keeping
Your Eyes
Open
24
While routing out all the goodies, keep in mind that the games of war tend to
be more devious than most. Land mines, bombs and other high-tech toys are
available to blow your mercenaries 100 feet in the air. Keep your eyes open
for anything that looks suspicious.
Page 32

Step 8: The Rules of War
Around the corner, just out of si ght, a master mercenary waits. He's not on your
side, though. And when your team gets in his range and in his sights, he intends
to smoke every last one of you. Unless, of course, you get him first.
So it is with combat on Metavirayour speed and accuracy on the trigger and
your stealth in the field will most certainly influence your campaign and the
number of sectors in your control.
One of the most common invitations to combat is an unwelcome intrusion
into an enemy sector. By traversing sectors, your team is essentially declaring
war on its current occupants.
To traverse into a sector, all of your mercenaries must be together, as a team,
next to a border in the sector you currently occupy. Then, just click the
TRAVerse button on the top of the screen or press T.
Instead of clicking TRAV, you may also hold the left mouse button
down and slide in in the direction you want to traverse. You team will
[
soon cross the line to the next sector. Needless to say, you probably
won't be welcomed with open arms.
To gather your mercenaries quickly, move one mercenary to a
[
Sectors come into your control when you succeed in blowing away Santino's
men through a combination of bullets and sheer brute force. Once you take
total control of a sector, it's a good idea to place guards to keep an eye on your
perimeters and to protect any Fallow trees. See Guard Management on page
21 for more information.
As you and your team muscle Santino's group out of sectors, you'll eventually
establish a safe path of linked sectors across the island. Linked sectors are
connected to one another and ultimately to your home, headquarter sector.
Linked sectors are connected by one of their four sides, not diagonally, and may
not be divided by large bodies of water (those tappers would have a heck of
a time getting the sap back whilst slogging through the Atlantic Ocean).
location as you normally would (left click on his destination). While
left clicking, press the right mouse key, too. Everyone will join him at
]
that location.
Traversing
Sectors
Gaining
Control of
a Sector
Gaining
Linked
Sectors
Linked sectors allow you to:
Transport the Fallow's sap from a sector back to your home sector for
processing and shipment
Safely travel from one sector to another
Determine mercenary and native movement about the island
Access processing plants
Increase the number of trees that can be harvested
Move closer to Santino
25
Page 33

Step 8: The Rules of War
Losing
Sectors
Battles in
Other Sectors
Run Away!
Meeting
the Enemy
As you and your team strive to gain ground on Metavira, keep in mind that
Santino's goals, while much less admirable, are no different than yours. As you
gain sectors, he'll be working overtime to take them back. And, losing a sector
can create serious problems for you.
Since Santino's thugs are always on the move, don't be surprised if you hear of
battles in sectors other than the one you're in. It's a menancing reality. Of
course, guards are your number-one defense against Santino's soldiers they
will fight until the sector is secured or until they are wiped out and the sector
changes hands. Without a sufficient line of defense you risk losing the sector
to the enemy and, perhaps, an important link to your home sector.
If things are getting pretty hairy, you may want to get your guards out of a
sector. As long as it's linked to the home base, you can retreat guards at any
time your choose. To do so, bring up the full MAP view (all of Metavira), and
select their current (but doomed) sector. Next, remove your workers. They'll
attempt to make their way back, but might become the target of enemy forces.
Tappers, because of the nature of their work, will remain behind hoping you'll
rescue them. For more information on Guard Management and moving them,
see page 21.
Naturally, strolling into strange sectors has side effects. The most reported and
noticeable symptom is bullet wounds. Should you traverse to a new sector, be
on the lookout! Remember, YOU see what your mercenaries see. So, just
because the other side of a building looks like it's home to a couple of happy,
little bushes doesn't mean it is. You see what your mercenaries see.
26
Page 34

Step 8: The Rules of War
Everything in a combat situation is governed by action points. Action points
are a numerical representation of how many actions a mercenary can perform
in a single turn, and are based upon the experience and overall statistics of the
mercenary including his or her health. Mr. Hyper on Sugar can swim around
Metavira several times, host a beachside infomercial on psychic haircare
products and still have time to raise his gun to shoot someone. Mr. Slower than
Death, on the other hand, would have just figured out that s omething was going
on in that same period of time.
For instance, a mercenary who can run 20 feet in one second would have 20
action points (he can move quickly). A mercenary who can only run only 5
feet in one second would have 5 action points (and be pretty darn slow). The
more the mercenary can physically do in a set amount of time, the more action
points he or she has. So, in combat, where physical actions cost action points,
a faster mercenary can do more.
Some actions, though, take a set amount of time no
Action
Points
head down the barrel. So, the faster mercenary would expend more points to
perform the action than the slower mercenary. Just because one mercenary is
fast doesn't mean he can make a bullet go down the barrel of a gun faster. (See
page 28 for a detailed description and explanation of this if you think we've
clearly lost our collective minds.)
matter how fast the mercenary is. For instance, if a fast
mercenary and a slow mercenary pull the trigger of
identical guns at the same time, both bullets will fire at
the same time and take the same amount of time to
Action
Points
For
Physical
Things . . .
For
Timed
Things . . .
In general, though, action points determine how much your mercenary can do
when it's his or her turn in combat. Since their action points are limited, be
careful not to run slower mercenaries all over the place. An action that takes
10 points might not be much to a guy who has 20, but it's sure a lot to a merc
with 12. There's only so much he or she can do in the space of seconds, and
it would be a pity to have a merc bravely run up to an enemy, eagerly draw his
gun but have no time left to shoot. Leave the marathon stealth runs to the fast
guys.
For whatever you choose to do, though, Jagged Alliance will continually alert you
to the action point cost. You'll see the amount in the center of your cursor.
If you don't use all of your action points in a turn, up to 5 points will roll over
to the next turn. If you have more than that left over, the extra is lost.
For a very simple and a very
detailed discussion on action points,
flip the page.
But In
General . . .
Leftovers
27
Page 35

Step 8: The Rules of War
What This Writer Hopes Will Be The World's
Easiest Way to Understand Action Points.
We're both standing in a gym class. The teacher says, All right. You've got five seconds. For
every jumping jack you do, you get an action point. During the course of that five seconds,
you do 30 and I do 6 (hey, I've got a manual to write).
Now, she says, You've still got that same five seconds. Stand still for one second (i.e. firing
a gun... which, I guess, is not all that uncommon in some gym classes) and do jumping jacks
for the other four.
This time, you stood still for a fixed second and did 24 jumping jacks. I stood still for a fixed
second and did 5 jumping jacks. That one second only reduced my action points by one. It
reduced yours by 6. If one second is 1/5th of the time we have, then what we COULD do in
that time is our action cost.
A Sample Look at Five Seconds.
Each Shaded Number Matches a Part of the Shaded Timeline Below.
1. Each guy takes 2 steps at 2 action points per step. Since the fast guy can move quickly,
it doesn't take him as much time to perform the same action.
2. While the slower guy is still walking to his destination, the fast guy moves to a second
destination 4 steps away. He reaches his second destination at the same time the slow guy
reaches the first.
3. They both draw their guns at a cost of 1 action point. The fast guy whips his gun from
his holster, while the slow guy takes more time.
4. The fast guy takes time to aim carefully expending 2 action points.
5. They both fire their guns. The particular model of gun they have takes a full second to
fire. Because the speed of a bullet flying down the barrel of a gun has nothing to do with
speed of a mercenary, it costs the fast guy a full second (six action points) and the slow
guy a full second (two action points).
28
Fast Guy - 30 Action Points
0 3 6 9 12 15 18 21 24 27 30
01 23 4 5 67 8910
Slow Guy - 10 Action Points
Note: In the above example, 30 action points are used for simplicity.
In Jagged Alliance, however, the maximum number of APs is actually 25.
<Action Points
< 5 Seconds
<Action Points
Page 36

Step 9: Military Maneuvers
There he is. Santino's gunner. Walking into a new sector, you see him leaning
against the wall, guarding the door to a small hut. If you can set your sights on
him and blow him away before he sees you, your team might just be able to
discover what secret of Santino's he's guarding.
When your team enters hostile territory, Jagged Alliance changes from real time
to phased time to allow you the mental breathing room to make those strategic
life-or-death decisions. So, combat is handled in turns. If you see the enemy
before he sees you, your team goes first and gains the initiative. Otherwise, the
enemy gets the first shot.
As soon as you enter a hostile situation, the DONE button along the top of the
screen becomes active. In general, you can do all you want to in your turn until
you either:
Run out of action points (or have too few to do anything with) or;
Call it quits because you've done all you wanted to do. Maybe you
just want to stay put and out of harm's way.
As you move the cursor around the screen, Jagged Alliance will continuously let
you know how many action points your choice will take.
When you've finished your turn, click DONE to tell Jagged Alliance to turn
control over to the enemies.
Sometimes, though, you might be interrupted mid-move. For instance, your
mercenary might be running to take cover behind a building. As he passes by
a tree, an enemy rushes him with a knife. The enemy, then, gains initiative.
Once he's, ah, completed his action, control will be returned to you. If you
want the mercenary to continue on his previous route, just pass the mouse over
his portrait. CONTinue may appear indicating a stored action. Click again,
and he resumes his original route. Of course, he's also able to stay there and
kick the guy's face in.
These times,
they are a
changin'
Taking
Turns &
Action
Points
Finishing a
Turn
Continuing
a Turn
Naturally, a mercenary's first instinct when he sees an enemy is to fire. To do
so, make certain there's a weapon in his or her main hand (bottom left screen
corner).
Right click to get the Target Cursor
]
Then, left click on the item or person you wish to target. The
[
Once an enemy is targeted, the actual firing process begins.
If you have guards in the same sector as you, they will help you to the best of
their abilities. They'll also report the location of all enemies they see to the
mercs by radio, extending your visual range.
action points will be shown in the center of the target.
Targeting
an Enemy
Guards
Help, Too
29
Page 37

Step 9: Military maneuvers
The Firing
Process
The Draw &
Basic Aim
Concentrating
the Aim
Naturally, there's more to firing a gun than owning one (just ask the NRA;
they'll send you a million or so pamphlets on it). First, your mercenary draws
the gun and aims, concentrates his aim if he chooses to, and finally, he fires the
gun.
Drawing the gun (time varies merc to merc): Bringing a gun up to
a shooting position takes a certain amount of time. How quickly a
mercenary can do it depends on his or her experience and the nature
of the gun. A 50-pound, NRA-issue lobbyist rocket laucher will take
more time to draw than, say, Bob's deer rifle. When you first target
the enemy, you'll see the minimum amount of action points required
to make the shot. If you have Max Aim set, though, you'll see that
number instead.
Concentrating Your Aim: If you have ti me and want to expend the
action points, you can perfect your aim. To do so, just right click while
]
targeting. You'll see points being added. As a result, your mercenary
is taking a bit more time to perfect his shot. Keep in mind, though, that
for the cost of two good shots, you might be able to fire off three cheap
shots. However, if you can't afford to miss, the extra time might just
pay off. If his or her gun is equipped with a scope, this extra time
is required in order to make use of it.
How much can you increase your aim? At most, four points.
After a certain amount of time, you've pretty much done all
you can do.
By selecting Max Aim, you can permanently set your
mercenary to fire to the best of his possible ability. See Firing
Features below.
Firing
the Gun
Refiring
Moving to
Another
Merc
30
Firing the Gun (time dependant - same for all mercs): Once your
gun is drawn and aimed, left click to deliver the bullet to its
destination. Jagged Alliance will let you know of any damage (of course,
if you hit an enemy, his groan will, too).
Refires (time dependant - same for all mercs): Since you've already
turned to meet your enemy and readied the gun, refires typically cost
fewer points than first shots.
Once one merc has fired or used all his action points, you can select another
grunt for action by clicking on his or her portrait or body on the field. Once
all of your mercenaries have used all their points, or you've done all you wanted
to do, click DONE to pass the turn. Keep in mind, though, that mercenaries
can do lots of things during combat, doctoring a wounded comrade (put the
medical kit in your main hand), lofting various war toys into the air (ah,
experiment... there's lots of cool stuff) or hiding behind a tree to preserve at least
one member of the squadron.
Page 38

Step 9: Military Maneuvers
Jagged Alliance incorporates two features that allow you to set certain defaults
to a mercenary's firing habit s. Both are available on the flip side of a mercenary's
portrait. Just right click on the portrait to reach them.
Max Aim: If you always want a mercenary to fire at his or her best,
select Max Aim. Jagged Alliance will always allocate the maximum
number of points (of what's left) to perfecting the merc's shot. You
may, however, right click to lower these points.
RSV PNTS (Reserve Points): If you want to insure that your
mercenary will always have enough points to fire, lob his grenade or
stab with his knife when he reaches his destination, select RSV PNTS.
Once a merc has reached a point where any further action would leave
him without time to fire, he will stop, and his action points will be
displayed in yellow. Of course, you can keep him moving on his
selected path if you choose to. Once he's beyond the minimum firing
amount, the action points will be displayed in red.
As a bullet races from the barrel of a gun, it heads toward its target hoping for
deadly accuracy. Naturally, a mercenary's marksmanship and his or her gun's
abilities play a large part in successful (or not so successful) hits. However, lots
of other factors also come into play. For instance, if you're trying to shoot at
a Santino grunt through trees or while you're nearly unconscious, your odds of
hitting the target are slim. Accuracy is a matter of sight, skill and, sometimes,
plain ol' luck. (You never know when your shot will head dead on toward a
target only to be deflected by a tree branch blowing in the breeze.)
Firing
Features
Max Aim
Reserve
Points
Once the
bullet's on
its way . . .
When someone is hit, a number will flash above the mercenary or enemy on
the field. For mercenaries, you'll also see his or her character portrait flash red,
and his or her health may drop if damage is done. If that mercenary takes too
many hits, or perhaps a single lethal one, a skull replaces the portrait. Damage
is fully discussed on the next page (after explosions... which tend to be a major
source of it).
If a mercenary runs out of ammo, he'll immediately reload from his supplies. If,
however, he doesn't have the right type of ammo or is out entirely, he'll let you
know.
Sometimes, guns . . . especially those in poor working order . . . can become
jammed. Obviously, a trip to a repair specialist, a mechanic, is necessary. On
some occasions, though, it has been reported that the re-firing of a jammed gun
may clear up the problem.
Taking a
Bullet
Reloading
Jammed
Guns
31
Page 39

Step 9: Military maneuvers
Explosions
& Deadly
Gases
Taking
Damage
Making it
Permanent
Explosive devices are the play toys of mercenaries. Santino's troops also find
them endlessly entertaining. So, on occasion, you're likely to run into (or away
from) an explosion or a deadly gas. While certain things, like gas masks, may
protect you from the effects of gases (if you're wearing them), a sudden
explosion can easily level you, your team, the surrounding fauna and send a
depth charge to the native fish around the island. For the most part, the damage
your mercenaries take from explosions and gases depends on how close you are
to them when they detonate, how deadly the explosion or gas is and how well
protected you were when the blast or gas hit.
How much damage a mercenary takes depends on lots of different factors. If
the mercenary was wearing a bullet-proof vest, for instance, he or she might feel
the impact of the bullet, but otherwise suffer no damage. Or, if a mercenary's
hit with a Super-Turbo- High-Powered-El ephant-Vaporizor gun, you'll pr obably
be left with a grunt that resembles little more than a bowl of french onion soup
(a bad, burned and sizzled bowl of french onion soup, mind you).
When hit, a member suffers a certain degree of damage that may be healed with
medical treatment. This damage is shown in yellow. If left untreated, the
mercenary will continue to lose health. Should their health fall below 15, the
member falls down, becomes immobile and slips toward unconsciousness.
Most importantly, if they slip below 15, every time they lose a point
of health, it comes off the top health permanently.
Once down, naturally, the member can't shoot or move but can perform some
very basic tasks like talking or listening to fellow members. If a mercenarys
health drops below 10, he or she will fall into a state of unconsciousness, and
a dark grill will appear over his or her portrait. All radio contact ceases with
unconsious members, and they aren't likely to be seen on the Main Play
Window unless they're in another mercenary's line of sight. Any unconscious
member that does not receive treatment to return him to a level of consciousness before
the end of the day will probably die.
MEDIC!!!
32
When members are woundedespecially wounded and unconscious
immediate medical attention is required to stabilize their wounds and to
prevent further or permanent damage.
Any member with a first-aid or medical kit may administer field treatment.
First, move the kit to his or her Main Hand.
Right click to bring up the first aid cursor and;
]
Left click on the mercenary you wish to give the medical
[
treatment to. The medic will move into position next to the
injured mercenary and begin applying first aid. Click on a medic
again, and she will treat herself.
Page 40

Step 9: Military Maneuvers
As the bandages are applied, the yellow portion of the health bar will begin to
turn pink. If treatment is disrupted before completion, though, the pink will
slowly begin returning to yellow, and once again treatment will be required to
prevent further damage.
While wrapping those bandages and tending to wounds, keep in mind that the
doctoring and receiving mercenaries are vulnerable to attack. Not only are they
preoccupied, they are generally unarmed.
Your workforce, both tappers and guards, are susceptible to enemy fire . . .
especially when your group isn't around to protect them. If some tappers are
killed or otherwise put out of commission, they will try to regroup, always
attempting to put a group of three together to resume tapping. A collection
of guards can help to cut down Metaviran losses.
Since guards, though, are most likely to take fire, it's in their job description,
Jagged Alliance reports their relative health to you. That way, you can reinforce
weak guards with stronger recruits. To find out their health, just hold the
destination cursor over them. Depending on their relative well being, they may
be: excellent, strong, healthy, poor, wounded, critical or dying.
If you want to find out the health of any enemy, just place the cursor over him
or her. Jagged Alliance will report the current status to you just as it does for
guards.
Before you relinquish the turn to Santino's men, make certain that you've done
all you really wanted to do. Maybe someone still has enough points to fire off
a shot or sneak into an opened door. When you're certain you're ready for what
they have to deliver, click DONE.
Santino's mission, like yours, is two-fold; to hold what he has and to drive Jack
and Brenda off the island by gaining control of your home sector. Similar to
your men and women, his grunts are individuals, planning and carrying out
their moves and missing no opportunity to make your life a living hell!
Under his direction, they move from sector to sector, reinforcing their ranks,
searching out your weaknesses, looking to regain any Fallow trees they might
have lost, all the while attempting to sever your link to the home sector. They
will stop at nothing. And before the campaign is complete, youll taste the full
effect of their deadly determination.
Worker
Casualties
Checking a
Guard's Health
Enemy
Health
Before all's
said and you
click DONE
About
Santino &
His Troops
33
Page 41

Step 10: At Day's End
It's Killer
Time
The Post
Day Screen
- Part I
The sun draws a red glow across the western edge of the island, and your
mercenaries begin their trek back to home base to report the day's events to Jack
and Brenda. Your workers carry the medicinal sap they have toiled all day to
collect, and you look forward to the proceeds it will bring you.
Arriving at home base, Jack greets you and gives you an overview (opinionated
though it may be) of your progress. Jack meets with you on a regular basis at
the end of the day to discuss your performance and keep you abreast of any on-
going situations.
Day's Results and Overall Performance Statistics
While Jack talks to you, you can review the Day Results and Overall Statistics
(total) panel on the Post Day Screen:
34
Mercenary Deaths: The number of mercenaries you've sent on
permanent vacation.
Native Deaths: The number of Metaviran natives who have died
while on your payroll.
Enemy Deaths: The number of Santino's men who won't be putting
on suntan lotion and soaking rays on Metavira's beaches again.
Sectors: The first number is the total number of sectors you control
at the end of the day. The second number is the change in sector
possession since the previous day.
Trees Owned: A real indicator of your potential financial well being.
The first number is the total trees you own at the end of the day. The
second number is the change in trees owned since the previous day.
Harvestable: The number of trees that are capable of being harvested.
The second number reflects any changes to that number since the
previous day.
Rating: Based upon your day's overall performance, Jack rates your
progress. After all, he is your employer.
Page 42

Step 10: At Day's End
Your group stands before t he map screen li ke rookies at a football trai ning camp.
You watch as the battles you fought are replayed. Your marksman takes notes,
and you criticize your medic for being too slow. Jack watches with you too,
hoping you'll understand things you could have done better or, perhaps,
enjoying your satisfaction of a day well done.
As Jack leaves the room, your mercenaries settle down for a daily team meeting
before the Post Day Screen II. Here, you check out the ledger and review the
day's revenues and expenses on the Money Panel of the screen. Jagged Alliance
breaks everything down into a financial statement of sorts:
Revenue: The number of trees harvested during the day multiplied
by the rate per tree plus any bonuses you've earned.
Expenses: The total of your team's wages and your natives' wages.
Results: Yesterday's balance plus (or minus) today's net gain (or
loss).
When time comes to hand out paychecks, each mercenary receives his or her
share through direct deposit. If there is a cash flow problem, the Team Expense
and New Balance portion of the screen will flash, and will continue to do so
until you reduce your New Balance deficit to zero (at least) . . . which might
mean not paying some of your mercenaries. If this is the situation you're in,
left click on the portraits of the mercenaries to select who won't be getting
their just rewards.
While you and your mercenaries make your way to your rooms, Jagged Alliance
tracks each member's performance and adjusts their statistics, skills and/or
experience class if they've improved. The middle portion of the Post Day
Screen, like the Assignment Screen, lists their stats, and highlights any
changes for you.
Reviewing the
Action
The Post
Day Screen
Part II
Paying your
mercenaries
Reviewing
Statistics
A mercenary who spent his day blowing everything up with a good rate of
accuracy would likely learn a bit and also would get more proficient in his
or her explosive ability. Naturally, some members tend to pick up some things
more quickly than others. (All right, Norm, for the last time, throw a grenade
after you pull the . . .)
Once paychecks have been handed out and your mercenaries have received
their performance appraisal, other matters may require your attention. If that's
the case, Jagged Alliance will let you know . . . and then will let you plan, sleep
and prepare for the next day.
From the moment you arrived on this island, you felt confident that with the
right bunch of mercenaries, you could kick Santino off the island and return it
to the handsand good intentionsof Jack and Brenda Richards.
Only time will tell whether you'll be ending your campaign to the sound of
champagne corks or to the last dying gasps of those who had mistakenly placed
their faith in your abilities.
Increases to
Attributes,
Skills and
Experience
Class
Wrapping
it Up
35
Page 43

Extra: Bob's Bullet Bunker
The Toys
of War
Radio
Extended
Ear
Canteen
Camo-U-
Flage Kit
Between A.I.M.'s mercenaries and Santino's thugs, there are dozens and dozens
of items you might be able to get your eager hands on. In this section, some of
the basic items are covered for your reference.
A UHF, 8-channel, 10-watt communication system with trans-
mission scrambler and squelch control. The hands-free, bone-
vibration adjustable headset bring a whisper in clearly without
distracting attention from surrounding noise. A radio allows you
to communicate with mercs on your team.
Hear the enemy long before it hears you. A listening device with
a hyper-sensitive microphone and an adjustable headset, the
Extended Ear is capable of picking up a soft whisper at a distance
of sixty yards. The extended ear, of course, improves your
hearing, and additionally functions as a radio.
Constructed of odor-free polyethylene, this one-quart capacity,
water-filled canteen is a must for day-long excursions, especially
in hot climate situations, to ward off fatigue and heat stroke.
When a merc is low on breath & energy, sometimes a drink may
help. To use a canteen, pick it up in the inventory screen and
click over the face portion of the mercs silhouette.
A full palette of long-lasting, non-running, non-cracking, facial
paint and applicators. Set includes: woodland, jungle and grass-
land motifs along with appropriate decal accessories and cold
cream. Camo-U-Flage, as might be expected, makes a merc less
visible. To use it, pick it up in the inventory screen and click over
the chest area of the mercs silhouette.
First Aid Kit
Medical Kit
Tool Kit
36
A canvas kit containing limited supplies for the field treatment
of casualties. Set includes: suture utensils, gauze, wound dress-
ings, tweezers, Novocain, antiseptics, pain medication and a
field guide to administering aid. Use by placing in mercs main
hand. See Using Items.
A full complement of limited, sterilized, medical supplies for
mobile surgery and the post-operative treatment of battle casu-
alties. Set includes: scalpels, retractors, clamps, anesthetic, mor-
phine, antibiotics, etc. Given the more complete supplies on
hand, you can generally work a lot more effectively with a medical
kit. Use by placing in merc's main hand. See Using Items.
A complete set of tools for repairing most combat items. The kit
contains a wide range of screwdrivers, ratchets, pliers, clamps and
clasps and numerous other items, including a hammer and sewing
kit. Use by placing in a mercs main hand. Mechanics rely on
their their tool kits to repair battle worn items, and may only do
so by staying behind for a day.
Page 44

Extra: Bob's Bullet Bunker
A complete set of tools for picking locks and bypassing tumblers
on safes.The kit contains such diverse items as picks, shims, a
stethoscope and palm-key press. Use by placing in a mercs main
hand. See Using Items.
A compact, Smith & Wesson Special Bodyguard .38 revolver
with a six-cartridge chamber, a pressure-eased trigger and a hard,
chrome finish. With only average performance, it remains
suitable for short range combat.
This special forces issue, semi-automatic pistol with a six bullet
clip is recoil operated, air cooled, and has a corrosion-resistant
Metalife finish. Slightly longer range & faster operation make it
preferred over the .38 revolver.
This locked-breeched, double-action, semi-automatic pistol has
a capacity of fifteen rounds of 9mm ammo. Its better than
average range, and fast operation make it a favorite weapon of
tactical mission troops.
This Smith & Wesson Model 13 has a three-inch barrel and a
ten-bullet chamber. Customized as a combat revolver with
refined double-action tuning and a recontoured trigger, it is the
most powerful standard issue handgun available.
A Winchester, Model 1300, Stainless Marine Defender, pump-
action shotgun with metal-bead front sight, traditional-ribbed
forearm, and six .12 gauge shell capacity. Though not fast, its
range and damage potentialexceeds that of any available hand-
gun.
Locksmith's
Kit
S & W .38
Colt .45
Beretta
9mm
.357
Magnum
.12g Pump
Shotgun
A modified version of their stock .12 gauge, this gas-operated,
semi-automatic, double-barreled combat shotgun with a six
shell capacity offers fast, long range operation, and has made the
standard .12 gauge virtually obsolete.
A Chinese version of the G.I. issue M14 manufactured by
Norinco. This gas-operated, 7.62mm, 20-cartridge capacity, clip-
loaded rifle is more powerful than a .12g, and has a range second
only to the favored M16 rifle.
This converted Colt AR-15 is a .223-caliber, gas-operated and
air-cooled, single-option, semi-automatic with a twenty-car-
tridge, removable-magazine capacity. Its superb range and speed
of operation make it a favorite.
.12g Rifle
M14 Rifle
M16 Rifle
37
Page 45

Extra: Mercenary Profiles
Dr. Mark
Needle
Kranhium
Gary
Roachburn
Samuel
Garver
Glen
Boss
Hatchet
Lesley
Smoke
Peterson
Doctor Mark Kranhuim has tended to the wounded on
numerous assignments. His sound knowledge of medicine is
believed to be responsible for bringing back two members
from the dead. However, a wandering right eye has hindered
any improvement to his shooting ability.
A new member of A.I.M., Gary is another Roachburn from a
long family line of mercenaries to join A.I.M.. Like his father,
Col. Leon Roachburn, a loose-lipped legend, Gary can be
trusted to keep you informed of all your team members
thoughts and intentions.
A member in good standing, Samuel Garver rose from the
hardships of the deep South to gain a renown and illustrious
reputation as one of the most sought after and experienced
soldiers for hire. For a man of his years, his health remains
remarkable.
A member in good standing, Boss Hatchet has traveled the
globe in quest of a regular paycheck. Considered to be one of
our more demanding members, he has more than satisfied our
clients with his obvious talents and his ability to fix the
unfixable.
On probationary standing, Smoke Peterson has recently been
cited by another member, once again, for short-fusing explo-
sives. Though A.I.M. has done all it can to weed out these
types of pranksters, we concede that smart explosives experts
are a rare commodity.
Jimmy
Upton
Dr. Ahmad
Doc
Koolhan
Wink E.
Dinkerson
38
A recent addition, Jimmy Upton arrives upon the mercenary
scene courtesy of the Ohio state penal system. A locksmith by
trade, he can get into or out of anything. Upton is unavailable
for duty in any country holding an extradition treaty with the
U.S.
Doc Koolhan has extensive battle casualty experience with
the Red Crescent, Red Cross and as a medical member of
A.I.M.. His marksmanship, although still relatively weak, has
improved considerably over the past couple of assignments.
As a part-time member of A.I.M., Wink Dickerson, a former
major league pitcher, has used his natural talents to our
clients advantage for years. Though still plagued by poor
target sense, he is by all accounts a gamer waiting for the right
opportunity.
Page 46

Extra: Mercenary Profiles
As a relatively new recruit, Mary Beth Wilkens desperately
wants the chance to prove herself. While her stats may appear
weak, Wilkens is a quick learner with some medical experi-
ence and a gung ho attitude. She also has no qualms about
ratting on fellow team members.
A member in excellent standing, Rudy Roberts has proven
himself during many missions to be capable of shooting for
distance no matter how small the target. His favorite pastime,
as he gleefully explains, is to track down endangered species
and finish them off!
A member in good standing, Bud Hellar craves the affection
of management and is a bootlicker from way back. If you want
to know what your team thinks of you, Buds your man. As a
loyal defender of the big guy, he has spent years fighting for
the freedom of corporate logos.
Victoria Waters is without a doubt A.I.M.s finest female
mercenary. Possessing deadly aim, determination and an
experience class any mercenary would be proud of, Victoria
works best with her hands and is currently restoring her dads
64 Chevy.
On probationary standing, Larry Roachburn, a somewhat
respected explosives expert, was a young survivor of the
C.I.A./L.S.D. years. And when not on assignment, he contin-
ues to subject his body to the whims of pharmaceutical
researchers around the world.
Mary Beth
Wilkens
Rudy
Lynx-Eyed
Roberts
Bud
Hellar
Victoria
Waters
Larry
Roachburn
A long-time member, Ed Stockwells loyalties have always
been strongly influenced by the signature on his paycheck. As
a jack-of-all-trades and master of none, Ears Stockwell offers
versatility at an affordable price and a commitment to tell you
all he hears.
Murray Ebstern has been with A.I.M. for a great number of
years. Until recently, his status within the organization was
graded as high as excellent, but failing health and a faulty
memory have forced a downgrade in his standing to a respect-
able good.
A man of uncommon attitude, Patrick Phillips was recruited
by the organization primarily for his reputation as a repairer of
revolvers and rifles. Though patience is not his strong point,
he was recently awarded the Stalkers Cross for relentless
persistence.
Edward
Ears
Stockwell
Murray
Moses
Ebstern
Patrick
Screw
Phillips
39
Page 47

Extra: Mercenary Profiles
Helmut
Grunther
Russell
Hunter
Ivan
Dolvich
Dr. Bernie
Gloveless
Unusually
Ruthless
Reuban
Helmut Grunther is a young up-and-comer to the mercenary
market. Comfortable with taking the point position, he
expects to make his mark in this merciless milieu in the near
future. Of course, thats if it doesnt make its mark in him!
From igniting fireworks at theme parks in Orlando to detonat-
ing dynamite in Southeast Asia, Russell Hunter has explored
the world of explosives. As one of our more stable explosives
experts, he is very much in demand, and in turn, very much
demanding.
A new member and a onetime decorated Major in the Red
Army, Ivan Dolvich has, like his country, switched from
killing for Lenin to dying for Lincolns. However, unlike his
homeland, Ivan actually appears to be good at it!
A member in excellent standing, Doctor Bernie Gloveless has
been responsible for treating the wounded and administering
the annual physical of A.I.M. members for more than five
years. Both his operating and examining techniques have
become... well... timeless!
On infinite probation, Unusually Ruthless Reuban is best
described by his nickname. Hes called Ruthless, because he
wiped out his entire family with a cordless hedge trimmer, and
Unusually Ruthless, because he recharged the appliance
twice before he was finished!
Murray
Pops
McGillicutty
Col. Leo
Kelly
Tex R.
Colburn
40
A member in good standing, Murray McGillicutty has been
with A.I.M. since it was founded. As one of the oldest fighting
men alive, his cock-and-bull stories about prehistoric warfare
and his ability to cheat death are mythical amongst the
younger members.
A member in excellent standing, Col. Leo Kelly is a veteran
of Northern European conflict. Regarded as a mercenarys
mercenary, he served as Michael Jacksons bodyguard for two
years and as a technical consultant on three Chuck Norris
films.
A new member, Tex R. Colburn joins A.I.M. from the wide
open ranges of Tokyo, Japan. This Asian cowboy-wannabe
has limited experience, but seems to pick up on things rather
quickly. However, you will have to put up with some pretty
annoying B western cliches!
Page 48

Extra: Mercenary Profiles
The irrepressible Fidel Dahan was bred for this business. At
ease with firearms and explosives, he is wanted on a worldwide
warrant for his role in the Cancun Catastrophe, but has
managed to stay one step ahead of the organizations seeking
his capture.
In the short span of time Hurl E. Cutter has been with the
organization, he has become a familiar sight to our medical
staff and a great source of insider information. Though
perfectly healthy, this chatty mercenary just cant seem to
keep his lips shut.
A reluctant and nervous mercenary, Biff Apscott is still trying
to overcome the disturbing flashbacks of a bad birth and a
spiteful mother. With only one short assignment under his
belt, he requires patience, understanding and decaffeinated
coffee.
A seasoned veteran of international conflict, Major Spike
Scallion was deservingly decorated for the unflinching cour-
age he exhibited while evacuating the villagers of Kampoa
under extremely heavy fire. This Major commands respect
and a sizable fee.
Born to parents of Jamaican and Scottish ancestry, Dr.
Raffitto Leevon has attempted to care for the casualties of war
during countless conflicts. However, as of this moment, his
standing within the medical profession remains sketchy.
Fidel
Dahan
Hurl E.
Cutter
Biff
Apscott
Major
Skipe
Scallion
Dr. Raffitto
Leevon
Dangerous, desirable and devious, Cynthia Guzzman is the
latest female addition to our organization. A former nurse
from Newark with a doctors attitude, the Fox is known for her
field treatment of casualties, excellent agility and amazing
dexterity.
A quiet and reflective member in excellent standing, Sidney
Nettleson entertains a certain fondness for putting things to
sleep permanently. Sometimes referred to as the Sandman,
his low-key approach doesnt alter the fact that hes a harsh
professional.
Little can be said about Mike, the Mystery Mercenary,
simply because little is known. Persistent rumors, however, do
place him in Dallas on the day Kennedy was shot and at
Stormin Normans pool party in Kuwait. A known fact - he
only works for the extremely experienced!
Cynthia
The Fox
Guzzman
Sidney
Nettleson
Mike
41
Page 49

Extra: Mercenary Profiles
Hector
Alvarez
Johnny
Snake
Edwards
Ice
Williams
Speck T.
Kline
Willy
Weasel
Augustin
A member in good standing, Hector Alvarez was born in
Margarita, Venezuela and is therefore familiar with South
American terrain and its sweltering temperature. Being a
relatively new member, he is eager to take on with almost
anyone who will give him the chance.
Agile and able, slippery and swift, Johnny Edwards has
managed to slither into range unnoticed, sight up his unsus-
pecting target, then disappear before the smoke dissipates,
time after time, mission after mission!
A longtime member, Ice Williams has been primarily used as
a sniper since joining the organization. Undaunted by the
prospect of working for those of unknown reputation, he
instead prides himself in helping those new to the mercenary
game establish themselves.
Speck T. Kline is one of the more able and less demanding
mercenaries within the organization. Taking it apart and
putting it back together, so that its once again in working
order, is a hobby and a living for this nervous mercenary from
lower Manhattan.
Mouthpiece is a fitting title for wee Willy Augustin, a
personality trait that he excels at like no other. Weasel has
been with A.I.M. for over five years, and besides some serious
fisticuffs with Ears Stockwell, his history within the organiza-
tion remains uneventful.
Timothy
Leech
Jenkins
Dr. Clifford
Highball
Frank
Hitman
Hennessey
42
A two-time world champion trapshooter, Timothy Jenkins
has turned in his clay pigeons for the chance to engage in some
live action. Dedicated to duty, the cynical Leech has a
tendency to be over enthusiastic, and a reputation for being
slightly hard to shake.
The flexible Doctor Clifford Highball has honed his shooting
skills with a needle and rifle, and is a devout member of A.I.M.
for the past six years. Though more versatile than most
doctors, he still maintains the medical hard-line about fees for
service.
Undisturbed by the scent of death, Frank Hennessy is a
member in excellent standing. A private, yet personable
individual, the Hitman has a proven track record and a no
nonsense disposition. A note of caution: he suffers from
buoyancy difficulties.
Page 50

Extra: Mercenary Profiles
Fresh meat to the mercenary game, Lance Fisher joined the
organization after a short stint with the Indiana National
Guard and an even shorter stint, a weekend, in Grenada. Hes
perfect brownnoser material eagerly awaiting his first assign-
ment.
Doctor Margaret Stella Trammel was the first female to join
the ranks of A.I.M.. As a non-specialist, she worked her way
through med school as a soldier for hire during spring and
summer breaks. She now practices mercenary medicine with-
out the prevalent medical attitude.
Doctor El i Summers has been a devoted member of A.I .M. for
over seven years. Though a poor shot, with no hope of
improvement, he has hung in during some of the most
devastating assignments, only to sign up for another with little
hesitation.
Elroy B. Tolken was one of the key men inside the Watergate
hotel when Gordon and company were discovered. After
serving his time, the longest of those sentenced, he joined
A.I.M., and has since plied his trade without legal conse-
quences.
Appropriately known as Wolf, Peter Sanderson has been
tracking down the enemy and acquiring a well-rounded
knowledge of all mercenary disciplines as a member of A.I.M.
for the past four years. His reputation is that of a proven
professional.
Lance
Fisher
Dr.
Margaret
Trammel
Dr. Eli
Summers
Elroy B.
Tolken
Peter
Wolf
Sanderson
Back on probation, Bruce Bonner has skirted the edge of
reality and toyed with demonic fantasy since childhood.
There exists a serious difference of opinion as to whether he
should remain within the organization. However, qualified
explosives experts remain hard to find.
Under evaluation for possible eye problems, Walter Yuntz has
been with A.I.M. long enough to show substantial improve-
ment in his marksmanship, but it hasnt happened. For the
time being, we suggest hed be used for his competence in
other fields.
The laid-back Kirk Stevenson has been with A.I.M. long
enough to acquire a respectable experience class and salary.
A decent shot and a technical wizard, Static worked for
years as the lead sound technician on the never-ending
Grateful Dead tour.
Bruce
Skitz
Bonner
Walter
Yuntz
Kirk
Static
Stevenson
43
Page 51

Extra: Mercenary Profiles
Herman
Turtle
Regents
Corp. Len
Anderson
Marty
Kaboom
Moffat
Earl
Magic
Walker
Reverend
Clyde
Potter
As his nickname, Turtle, suggests, Herman Regents is by no
stretch of the imagination one of our most agile members. He
is, however, one of the swiftest... He has seen plenty of action
in North Africa, and was also a decorated officer on a major
metropolitan police force.
A member in excellent standing, Len Anderson has been
fighting for truth and justice since his teens. A onetime
member of the Green Berets and a longtime member of
A.I.M., his salary may seem excessive, but his extraordinary
abilities easily merit the price.
Another member on probation, another explosives expert,
Marty Moffat has stood too close to too many explosions and
as a result requires a baby-sitter more than a commander. On
a more positive note, he is definitely one of the least discrimi-
nating members on file.
Cautious, light-footed and extremely agile, Earl Walker is
considered to be one of the best second story men in the
business. And even when hes been fingered, his sharp eyes
and deadly aim have eliminated the dilemma of witnesses!
As a supposed member of the clergy and as a member of
A.I.M., the Reverend Clyde Potter has toted superior fire-
power and carried the burden of sinners for nearly twelve
years. If you can handle the Voice of God within shouting
distance, then the price is a sin.
Megan
Sparky
Roachburn
Dr. Mitch
Shudlem
Robert
James
Sullivan
44
The youngest child and only daughter of the legendary
Colonel Leon Roachburn, Megan Roachburn has decided,
like her brothers Gary and Larry, to join the family business
and work for A.I.M.. Despite a strong desire and extensive
training, Sparky is unable to swim.
Originally an obstetrician, Doctor Mitch Shudlem has come
a long way in the treatment of battle casualties. Like most
members on the medical staff, hes weary of financial risk, but
committed to the well-being of fellow team members.
Robert James Sullivan is a distinguished member of A.I.M.
and is known in the business as a fearless finisher. When the
chips are down and the enemys jugular is exposed, theres no
better man with a knife in his hand than Scully.
Page 52

Extra: Mercenary Profiles
Though Howard Melfield has slowed with age, he continues
to serve as an effective member of A.I.M.. Despite his obvious
lack of specialization, he is devoted. Displaying no loyalty to
his peers, hell relay all the team scuttlebutt with the precision
of a poet.
A once-heralded professional wrestler, Carl Goodman is a
recent addition to A.I.M.. He is often referred to by those who
knew him during his ring days as It, because of his size and
manner. However, those who have seen him in water call him
Rock.
Caught between the world of war and the world of wiseguys,
Vincenzo Massimo has opted for the life of a soldier of fortune.
Able to fix anything (including college basketball games), he
is fast approaching his first anniversary within the A.I.M.
organization.
Captain Bob Adams retired from the Air Force at forty-one.
He was a decorated F-18 pilot with extensive combat experi-
ence. Bored, and eager for action, he joined A.I.M. a year ago,
and has made the transformation to field combat rather easily.
Howard
Carp
Melfield
Carl It
Goodman
Vincenzo
Massimo
Captain
Bob
Adams
45
Page 53

46
Extra: Mercenary Profiles At A Glance
Name Salary Health Agility Dex.
Dr. Mark Needle Kranhium 1900 92 80 81
Gary Roachburn 315 83 68 59
Samuel Garver 2750 75 58 55
Glen Boss Hatchet 2950 80 76 84
Lesley Smoke Peterson 560 78 87 80
Jimmy Upton 800 84 82 73
Dr. Ahmad Koolhan 1750 74 77 61
Wink E. Dickerson 240 92 80 68
Mary Beth Wilkens 330 77 90 36
Rudy Lynx-Eyed Roberts 3300 81 79 86
Lt. Bud Hellar 1100 73 79 75
Victoria Waters 2850 79 85 72
Larry Roachburn 140 46 72 54
Edward Ears Stockwell 375 72 67 58
Murray Moses Ebstern 1900 49 39 29
Patrick Screw Phillips 1500 82 66 71
Helmut Grunther 490 82 79 76
Russell Hunter 1650 74 71 89
Ivan Dolvich 1500 94 90 95
Dr. Bernie Gloveless 2650 69 39 48
Unusually Ruthless Reuben 35 57 45 39
Murray Pops McGillicutty 2800 38 14 4
Col. Leo Kelly 4700 95 87 91
Tex R. Colburn 275 71 71 57
Fidel Dahan 1500 88 83 64
Hurl E. Cutter 400 100 81 71
Biff Apscott 95 73 74 71
Maj. Spike Scallion 6000 77 69 86
Dr. Raffitto Leevon 100 70 93 14
Cynthia The Fox Guzzman 515 77 85 100
Sidney Nettleson 4000 80 70 91
Mike 12000 97 95 94
Hector Alvarez 410 79 84 88
Johnny Snake Edwards 1150 65 89 86
Ice Williams 1300 90 88 87
Speck T. Kline 365 69 51 77
Willy Weasel Augustin 180 56 44 36
Timothy Leech Jenkins 1150 63 58 70
Dr. Clifford Highball 3000 73 60 53
Frank Hitman Hennessy 1800 80 81 40
Lance Fisher 230 76 69 61
Dr. Margaret Trammel 3500 85 24 75
Dr. Eli Summers 1400 81 73 58
Elroy B. Tolken 345 63 54 88
Peter Wolf Sanderson 1850 87 73 84
Bruce Skitz Bonner 90 48 60 51
Walter Yuntz 650 82 55 62
Kirk Static Stevenson 3100 79 66 95
Herman Turtle Regents 250 53 8 21
Corp. Len Anderson 6500 96 83 89
Marty Kaboom Moffat 210 71 93 91
Earl Magic Walker 5600 90 99 98
Rev. Clyde Potter 740 74 46 41
Megan Sparky Roachburn 205 52 68 88
Dr. Mitch Shudlem 3800 83 71 88
Robert James Sullivan 7500 90 90 96
Howard Carp Melfield 575 55 54 52
Carl It Goodman 155 95 55 74
Vincenzo Massimo 385 73 75 74
Capt. Bob Adams 1200 81 68 66
Page 54

Extra: Mercenary Profiles At a Glance
Wisdom Medical Explos. Mech. Marks. Exp Class Notes
88 98 6 34 62 2
60 11 14 22 67 1
91 11 22 65 86 4
71 95399843
44 79020691
47 01692562
83 83 0 3 66 2
59 2 1 2 38 1
80 44 0 22 55 1
71 23 50 19 99 3
69 19 8 18 78 2
85 16 28 90 80 3
58 49 82 7 50 1
79 22 18 26 54 1
89 29 31 88 84 5
68 42482643
72 14 25 40 69 1
68 07130643
83 54010912
85 94 0 4 75 3
28 0 1 0 32 1
88 18 6 9 85 9
81 13 0 67 94 4
52 0 2 32 65 1
71 3 97 6 85 2
55 44 0 0 60 1
58 0 0 0 47 1
85 11 53 76 92 5
29 4 2 2 44 1
76 60 8 15 54 1
78 39 14 0 91 4
96 67 97 98 99 8
72 61738611
57 02212802
71 0 0 35 86 2
86 11 8 99 49 1
60 0 40 5 54 1
54 91710982
87 79 10 0 83 3
74 33411933
56 21 0 0 44 1
88 89 0 21 69 3
77 70 0 65 49 2
39 12 6 81 55 1
74 44 32 48 74 2
31 0 69 0 47 1
83 24 48 95 24 2
60 10 24 98 84 3
85 2 5 12 75 2
83 35 47 54 83 5
13 08427581
80 14 22 91 93 4
54 15 41 15 64 2
51 02886471
97 96 24 13 56 3
93 36 58 61 91 5
77 2 5 15 67 2
29 0 0 3 61 1
65 0 4 87 65 1
97 37 33 26 72 2
47
Page 55

Extra: Customer Support
In United States and Canada
See inside front cover for support phone numbers
and hours of operation
We Need
Your Ideas!
Technical
Support
Getting
A Busy
Signal?
As you play Jagged Alliance and read its manual, you may think of ways we can
improve our products. If you do, we want to hear from you. Send your
comments, compliments, criticisms and suggestions to:
Product Development
Sir-tech Software, Inc.
P.O. Box 245
Ogdensburg, NY 13669
If your game isn't working as you would expect it to, feel free to call us at (315)
393-6644 or fax us at (315) 393-1525 (sorry, no game hints . . . tech support
people don't play the game, so they'd just be making it up anyway). Technical
Support lines are open Monday through Friday, 9 a.m. to 5 p.m. (except
holidays). You may also write to us.
Technical Support
Sir-tech Software, Inc.
P.O. Box 245
Ogdensburg, NY 13669
When you call, fax or write, please have ready your computer make, amount of
memory and extended or expanded memory. Additionally, please inform us if
your computer has any special start-up programs or memory resident programs.
For the fastest service, be at your computer and have your computer on.
Getting a busy signal on the hotline when you dial us? When a game is first
released, that's not uncommon - lots of people are trying to get through.
Remember, you can still fax us. Our phone lines are typically less busy on
weekend. If you can save your call 'til then, you might want to consider it.
Weekend hotline hours are 12 noon to 4:00 p.m. You may write to us. We have
someone waiting to answer your letter.
Return
Your
Warranty
Card
48
Hints Hotline
Sir-tech Software, Inc.
P.O. Box 245
Ogdensburg, NY 13669
Please return your warranty registration card. Doing so will guarantee you the
fastest possible repair or replacement of a damaged diskette. We'll also be able
to let you know about upcoming and newly released Sir-tech products . . . so you
can share in the fun.
Page 56

Extra: Customer Support
In United States and Canada
For on-line support of Jagged Alliance and other Sir-tech products via
CompuServe, contact us in the Game Publishers B Forum (GO GAMBPUB).
Our CompuServe ID number is 76711,33. You may also join your fellow gamers
in the Gamers Forum (GO GAMERS). By joining CompuServe and the Game
Publishers Forums, you can get the latest product updates, read new product
announcements and download demos of upcoming Sir-tech games. If you are
not already a member of CompuServe, call (800) 524-3388 and ask for
representative 451 to get your free introductory membership and $15.00 on-
line usage credit. Sir-tech neither endorses nor implies an endorsement of any
on-line information service.
If your disk has become unreadable within 30 days of purchase, return it with
a dated, original receipt to Sir-tech Software, Inc. for a free replacement. After
30 days, enclose $10.00 to cover costs of media restoration or replacement plus
$2.50 to cover shipping and handling. (NY residents, please add 7% sales tax
to the total of repair and shipping.) Prices are subject to change without notice.
Please include the following information in your package. Failure to do so could
delay processing time:
Original master diskettes
Warranty card (if not already sent to us)
Letter explaining problem and computer configuration
For free replacements within 30 days, original and dated sales receipt
(it will be returned to you)
For replacements after 30 days, $10.00 repair charge plus $2.50
shipping handling fee and tax if applicable
Contacting
Us On-line
Repairs
Please call ahead to determine availability
Product updates from Sir-tech are available for $15.00 for media update plus
$2.50 to cover shipping and handling (NY residents, please add 7% sales tax to
total of update and shipping). Prices are subject to change without notice.
Updates are frequently available on CompuServe as well. Please include the
following in your package. Failure to do so could delay processing time:
Original master diskettes
Warranty card (if not already sent to us)
Letter requesting the update including computer configuration re-
quired
$15.00 update fee plus $2.50 shipping handling fee and tax if appli-
cable
Updates
49
Page 57

Index
A.I.M., Contacting .................................. 3,4
A.I.M., Exiting ............................................ 7
A.I.M., Hiring Mercenaries ........................ 7
ABORT Button ........................................ 22
Action Points ....................................... 27,29
Action Points, Status Bar ......................... 17
Adding Guards to a Sector ....................... 13
Adding Tappers to a Sector...................... 12
Agility, Statistic .......................................... 5
Aiming Guns ............................................ 30
Assignment Button ..................................... 9
Assignment Screen .................................. 8,9
Assignment, Doctor .................................... 9
Assignment, Fire ......................................... 9
Assignment, On Duty................................. 9
Assignment, Patient ................................... 9
Assignment, Repair..................................... 9
Assignment, Rest ........................................ 9
Assignment, Train ...................................... 9
Automap ................................................... 16
Backing Up ............................................... 19
Balance ..................................................... 15
Begin Game (Sleep) .................................... 3
Biography .................................................... 4
Blue Flags (Buried Objects)...................... 24
Bob ......................................................... 7,30
Boom......................................................... 32
Breath, Movements Effects On ................ 19
Breath, Status Bar ..................................... 17
Breath, Swimming .................................... 23
Buildings ................................................... 24
Bullets, Taking .......................................... 31
Buried Objects .......................................... 24
Casualties, Workers ................................. 33
Combat, Action Points ............................. 27
Combat, Continuing a Turn..................... 29
Combat, In Other Sectors ........................ 26
Combat, Rules of ...................................... 25
Combat, Taking Turns ............................. 29
Combat, Time Change ............................. 29
Compressed Time ..................................... 18
Configuration .............................................. 3
Contact A.I.M. ........................................ 3,4
CONTinuing an Action ........................... 29
Contract, Getting ....................................... 7
Contract, Offering ...................................... 7
Contract, Refusing ...................................... 7
Control Panel.............................................. 3
Control Panel, Options While in Play...... 22
Cost of Workforce .................................... 13
Crouching ................................................. 19
Cursor ....................................................... 18
Cursor, Hand ............................................ 20
Cursor, Special Use Cursors ..................... 20
Damage, Taking ................................... 31,32
Death, Preventing ..................................... 32
Defense, Guards ........................................ 13
Destination Cursor ................................... 19
Dexterity, Statistic ...................................... 5
Difficulty Level ........................................... 2
Doctor......................................................... 9
Doctor, Performance ................................. 10
Doctor, Damage ................................... 31,32
DONE (Combat) ............................ 20,29,33
Doors, Opening ........................................ 20
Dropping Items ......................................... 11
Elvis (Wasnt Sighted on Metavira) ........ No
Enemies, About ........................................ 33
Enemies, Deaths ....................................... 34
Enemies, Targeting ................................... 29
Enemy Sectors ............................................ 8
Exit Game ................................................... 3
Exiting, A Very Bad Day .......................... 22
Exiting, A.I.M. ............................................ 7
Exiting, Assignment Screen...................... 11
Exiting, Compressing Time to Finish Day 18
Exiting, Financial Panel ............................ 15
Exiting, Map Screen ................................. 16
Expenses .............................................. 14,15
Experience Class, Gaining .......................... 6
Experience Class, Skill ................................ 6
Exploring, Tips .......................................... 23
Explosions ................................................. 32
Explosives, Skill .......................................... 6
Fallow Trees.............................................. 12
Fallow Trees, Owned at End of Day......... 34
Fallow Trees, Production.......................... 14
Fast Scroll, Movement .............................. 19
Finance, Team ............................................ 9
Financial Panel, Exiting ............................ 15
Financial, Paying Mercenaries .................. 35
Financial, Production Picture ................... 14
Finding Buried Objects............................. 24
Finding Mercenaries on Field ................... 17
Fire .............................................................. 9
Firing Guns ............................................... 30
Firing Mercenaries ...................................... 7
Firing, Likelihood of Hit ........................... 31
Firing, Options.......................................... 31
French Onion Soup ..................... 1/28/94,32
Gaining Sectors ......................................... 25
Game Options, Main Play Screen ............ 22
Game, Quick Restore ............................... 22
Game, Quick Saving................................. 22
Game, Quit ................................................. 3
Game, Restore ............................................ 3
Game, Save ................................................. 3
Gases ......................................................... 32
Gear ............................................................ 5
Gila Monster............................................. 23
Guard Management .................................. 21
Guards Button .......................................... 13
Guards, Adding/Removing from Sector ... 13
Guards, Casualties .................................... 33
Guards, Help in Combat........................... 29
Guards, Hiring .......................................... 13
50
Page 58

Index
Guards, Management ............................... 21
Guards, Moving From a Sector ........... 21,22
Guards, Retreating .................................... 26
Guns with Scopes, Concentration ............ 30
Guns, Aiming ........................................... 30
Guns, Description of Basics ...................... 36
Guns, Firing .............................................. 30
Guns, Firing Features ............................... 31
Guns, Jammed .......................................... 31
Guns, No Use While Swimming............... 23
Guns, Refire .............................................. 30
Guns, Reloading ....................................... 31
Guns, Targeting an Enemy ....................... 29
Hand Cursor ............................................. 20
Harvest Ratio ............................................ 14
Healing ..................................................... 32
Healing Mercenaries ................................... 9
Healing, How Much? ................................ 10
Healing, Using Medical Kits on the Field 20
Health, Statistic.......................................... 5
Health, Status Bar .................................... 17
Health, Workers and Enemies ................ 33
Hearing ..................................................... 23
Helicopter Transport .................................. 7
Help .................................... 1-315-393-6633
Hiring a Workforce................................... 12
Hiring Mercenaries ..................................... 4
Icons, Ghost Guards ................................. 22
Icons, Guards............................................ 13
Icons, Sector & Automap View ............... 17
Icons, Tappers........................................... 12
Icons, Trees............................................... 12
Income ................................................. 14,15
Increasing Salary, Workforce.................... 13
Info.............................................................. 5
Initiative, In Combat ................................ 29
Interrupts .................................................. 29
Inventory .................................................. 10
Inventory (Gear) ......................................... 5
INVentory Button, Main Play .................. 21
Inventory Pool .......................................... 11
Inventory, Quick ...................................... 18
Inventory, ViewingAssignment Screen .... 10
Items, Buried............................................. 24
Items, Description of Basics...................... 36
Items, Dropping ........................................ 11
Items, Finding ........................................... 24
Items, In A.I.M. .......................................... 5
Items, Magnifying/Inspecting .................... 20
Items, Main Play Screen ........................... 18
Items, Merging..................................... 11,20
Items, Picking up ...................................... 20
Items, Picking up in Inventory Screen ..... 10
Items, Placement in Inventory .................. 10
Items, Repairing .......................................... 9
Items, Searching For, Hand Cursor .......... 20
Items, Swapping - Main/Secondary .......... 18
Items, Taking Apart ................................. 11
Items, Trading ..................................... 11,20
Items, Using .............................................. 20
Items, Water Damage ............................... 23
Items, Working Status .............................. 10
Jammed Guns ........................................... 31
Kill ............................................................ 39
Levels .......................................................... 6
Line of Sight ............................................. 23
Linked Sectors .......................................... 25
Load Game ................................................. 3
Losing Sectors........................................... 26
Main Hand .......................................... 11,18
Main Hand Attachment........................... 11
Main Office Screen ..................................... 2
Main Play Screen...................................... 16
MAP Button ............................................. 21
Map Screen................................................. 8
Map, Guard Management......................... 21
Map, Reviewing Your Position ................. 21
Marksmanship, Skill ................................... 6
Max Aim................................................... 31
Mechanical, Skill ........................................ 6
Medic ........................................................ 32
Medical, Skill .............................................. 6
Memphis (Pumpkin Man Is There) ........ Yes
Mercenaries, Action Points ................. 17,27
Mercenaries, Backing Up.......................... 19
Mercenaries, Biographies ............................ 4
Mercenaries, Breath, Status Bar ............... 17
Mercenaries, Crouching ........................... 19
Mercenaries, Combat Options, Firing ...... 31
Mercenaries, Deaths ................................. 34
Mercenaries, Description of...................... 38
Mercenaries, Finding Buried Items ........... 24
Mercenaries, Finding Items ...................... 24
Mercenaries, Firing .................................. 7,9
Mercenaries, Firing Guns ......................... 30
Mercenaries, Gear....................................... 5
Mercenaries, Healing .................................. 9
Mercenaries, Health, Status Bar ............... 17
Mercenaries, Hearing ............................... 23
Mercenaries, Hiring ................................. 4,7
Mercenaries, Inventory ............................. 10
Mercenaries, Likelihood of Hit ................. 31
Mercenaries, Line of Sight ........................ 23
Mercenaries, Locating on Field ................ 17
Mercenaries, Main Hand .......................... 18
Mercenaries, Movement, Swimming ........ 23
Mercenaries, Moving All .......................... 19
Mercenaries, Moving in Main Play........... 19
Mercenaries, Muting................................. 17
Mercenaries, Not Paying .......................... 35
Mercenaries, Panels on Main Play Screen 17
Mercenaries, Payment .............................. 35
Mercenaries, Personal Options ................. 17
Mercenaries, Placing in a Sector ................ 8
Mercenaries, Portrait, Firing Options ....... 31
Mercenaries, Refusing Contract ................. 7
Mercenaries, Searching & Using Hands .. 20
51
Page 59

Index
Mercenaries, Secondary Hand .................. 18
Mercenaries, Selecting for Action ............ 19
Mercenaries, Sneaking .............................. 19
Mercenaries, Switching Places .................. 19
Mercenaries,Turns in Combat ............. 29,30
Mercenaries, Trading Items................. 11,20
Mercenaries, Training................................. 9
Mercenaries, Vest Pockets........................ 18
Merging Items (Main Hand Attachment) 11
Money, Bringing it in ................................ 14
Move All Mercs ........................................ 19
Movement, Action Points ........................ 27
Movement, Effects of ................................ 19
Movement, Moving All Mercenaries ....... 19
Movement, Special Options ..................... 19
Movement, Swimming .............................. 23
Movement, Switching Places .................... 19
Moving...................................................... 19
Moving to Another Sector ....................... 21
Moving, Backwards................................... 19
Moving, Sneaking ..................................... 19
Mute ......................................................... 17
Norm................................................... 5,7,35
NRA (oh, theyll probably hate my joke) . 30
On Assignment, Mercs ............................... 7
On Duty................................................... 8,9
OPTions Button ....................................... 22
Options, Main Office Screen ...................... 2
Orders, Giving ............................................ 9
Party ............................................................ 5
Patient......................................................... 9
Paused Time ............................................. 18
Paying Mercenaries ................................... 35
Personal Options ...................................... 17
Personal Options, Max Aim ..................... 31
Personal Options, Reserve Points ............. 31
Perspective, Adjusting .............................. 16
Phased Time (Turn-based) ....................... 18
Pickles (a dumb clue) ............................... 28
Placing Mercenaries .................................... 8
Portrait ........................................................ 4
Processing Plants, Viewing ....................... 14
Production ................................................ 14
Production Ratio....................................... 14
Projected Balance ..................................... 14
Quick Inventory ....................................... 18
Quick Restore........................................... 22
Quick Save ............................................... 22
Quick Start ................................................. 3
Quit Game .................................................. 3
Rating, End of Day ................................... 34
Reading Signs (Using Hands) ................... 20
Real Time ................................................. 18
Refiring Guns ............................................ 30
Reloading Guns ........................................ 31
Removing Tappers from a Sector ............. 12
Repairing Items ........................................... 9
Repairing, Effectiveness ............................ 10
Reserve Points .......................................... 31
Rest ............................................................. 9
Restore Game ............................................. 3
Restore Game, Quick Restore .................. 22
Revenue ............................................... 14,15
RSV PNTS ............................................... 31
Safety Move, Movement........................... 19
Salary Button, Increasing.......................... 13
Salary, Statistic ........................................... 5
Salary, Team ............................................... 9
Salary, Workforce ..................................... 13
Sap, Production ........................................ 14
Save Game .................................................. 3
Save Game, Quick Save ........................... 22
Saved Games, Reviewing ............................ 3
Scopes, Required Concentration .............. 30
Searching For Items, Hand Cursor ........... 20
Secondary Hand ....................................... 18
Sector Number .......................................... 18
Sector, Adding/Removing Guards............ 13
Sector, Adding/Removing Tappers........... 12
Sector, End of the Day Round Up ............ 33
Sector, Entering/Main Play Screen ........... 16
Sector, Evacuation .................................... 26
Sector, Gaining Control of ....................... 25
Sector, Gaining Linked............................. 25
Sector, Losing ........................................... 26
Sector, Moving to Another ...................... 21
Sector, Overview of a Complete ............... 15
Sector, Placing Mercenaries in ................... 8
Sector, Traversing into Enemy Territory .. 25
Sector, Viewing Status While in Game .... 21
Sector, Yours & Theirs ............................... 8
Selecting a Difficulty Level ......................... 2
Show Paths, Movement ............................ 19
Shut Up, Mercenaries ............................... 17
Shut Up, Step Sounds .............................. 19
Signs, Reading, Hand Cursor ................... 20
Skills, Basic ................................................. 6
Sleep (Begin Game) ................................. 3,8
Sneakers (Yet another clue) ..................... 28
Sneaking ................................................... 19
Start New Game ......................................... 2
Starting Game (with team)......................... 8
Statistics, Basic ........................................... 5
Statistics, End of Day................................ 34
Statistics, Increasing and Reviewing......... 35
Statistics, Viewing in Main Play Screen ... 17
Step Sounds, Movement........................... 19
Swimming ................................................. 23
52
Page 60

Index
Tappers Button ......................................... 12
Tappers, Adding/Removing from Sector . 12
Tappers, Casualties ................................... 33
Tappers, Hiring ......................................... 12
Targeting an Enemy .................................. 29
Team Button............................................... 8
Team Finance ............................................. 9
Team, Expenses of .................................... 25
Team, Info About ....................................... 5
Team, Members on ..................................... 7
Team, View................................................. 3
This writer/ Wonders if anyone will ......... 28
This writer/ see this. Does anyone ........... 28
This writer/ actually read indexes? ........... 28
This writer/ hm - if you see this, write ...... 28
This writer/to us - the first 5 people ......... 28
This writer /to write to us and say, ........... 28
This writer/I saw this in the index .......... 28
This writer/and Pickles do not wear ......... 28
This writer/ sneakers win a free .............. 28
This writer/strategy guide! ........................ 28
Time of Day .............................................. 18
Time, Changing from Real to Turn-based 29
Time, Different Types............................... 18
Time, For Guards to Move ....................... 22
Total Salary Button .................................... 8
Trading Items ...................................... 11,20
Train ........................................................... 9
TRAVerse Button..................................... 21
Trees Button ............................................. 14
Trees, Icons............................................... 12
Trees, Owned at End of Day .................... 34
Trees, Production ..................................... 14
Turn-based Time ...................................... 18
Using Items ............................................... 20
Vest Pockets ............................................. 18
Vests ......................................................... 11
View Team.................................................. 3
View, Adjusting ........................................ 16
Waterways ................................................ 23
Wimp Brigade............................................. 7
Wisdom, Statistic ....................................... 5
Worker Casualties .................................... 33
Workers, Deaths ....................................... 34
Workers, Hiring ........................................ 12
Workforce Salary ...................................... 13
53
 Loading...