

Page 1
Page 2

Page 3

Contents
Introduction by Raymond E. Feist.........4
Designer Notes .....................................8
Game Play ...........................................10
Getting Around in the Game........11
Getting Started .............................11
The Main Menu ..................................12
Start New Game ...........................12
Restore Game ...............................12
Preferences....................................13
Contents.......................................14
Quit to DOS ................................14
The Travel Screen ................................15
Moving the Party..........................16
Action Buttons —
Follow Road .................................16
Cast (Spellcasting) ........................17
Encamp ........................................18
Map..............................................20
Bookmark ....................................22
Options ........................................22
Save Game ...................................22
Talking to Other Characters ................23
Ratings and Skills.................................24
Ratings .........................................26
Skills.............................................27
Fairy Chests .........................................32
Inventory .............................................34
Examining Items...........................34
Equipping Characters ...................35
Keys..............................................35
Bags ..............................................35
Picking Up Objects.......................36
Transfering Inventory Items .........36
Using an Inventory Item...............37
Opening Locks .............................38
Eating ...........................................38
A Guide to Inventory Items ..........39
Combat................................................42
Initiative Advantage ......................42
Controlling Your Characters.........43
Thrusting with a Sword or Staff....43
Swinging with a Sword or Staff.....43
Traps ............................................44
More Combat Options .................44
Spellcasting...................................45
On Death and Dying....................47
Combat Strategies.........................48
Magic...................................................52
A Guide to Spells..........................54
Locations .............................................56
Entering Houses and Buildings.....56
Entering Cities..............................56
Shops, Taverns and Inns...............56
Buying Items ................................57
Selling Items .................................57
Temples........................................58
Teleport........................................58
A Guide to Locations....................59
People & Creatures..............................64
The Riftwar Saga .................................75
Credits .................................................83
Technical Support................................84
Customer Services................................85
A Special Offer from Doubleday..........87
2
Page 4
3
Page 5

Introduction by Raymond E. Feist
love games. ◆ It’s the little kid in
me who refuses to grow up, the
very same child who plays “let’s
pretend” all day in his office and
gets paid for it. ◆ I write highly
improbable stories about people
who find themselves living in a
very unusual landscape: a world
populated by fantastic creatures, ancient magics, and
rogues and villains of all stripe.
I’ve wasted hours in front of computers playing games when I should have been
working, like most every one of you. My first encounter with a computer game was the
infamous Adventure. I played it on the university’s computer when I should have been
typing runtime exercises for my class in programming. Rather than work, I’d sit up all
night in the computer center facing the alien-green screen of a flickering TTY terminal
trying to find whatever silly item I needed to get to the next room where I’d find
4
Page 6

another silly item I needed somewhere else. And, like most of you, every once in a while
I’d think, “Why can’t these games be more like a good fantasy adventure novel?”
But games are one thing and books are another, right?
Seemed that way for years. Computer role-playing was either a glorified arcade game —
with names of fantasy characters hung onto a computer graphic with no other
relationship to the literary work it was based upon — or it was basic fantasy role-playing
run by a computer: kick down a door, kill something, get treasure, go up in power, get
better at kicking down doors, killing things and getting treasure, so you go to the next
level where the doors are harder to break down, the monsters are tougher, and the
treasure’s harder to find. After a while, it’s all pretty much the same.
Then over the last few years some folks introduced problem-solving. Sure, you still had
to kill a lot of ugly-buglies to get the Wand of Chaos; but once you got it, you could
defeat the evil wizard Wartface and save the kingdom.
Still a pretty pale imitation of a good fantasy novel, right?
So then folks added more colorful graphics and pretty pictures and sound and
animation… and it’s still pretty basic stuff. For the most part.
By their nature, books and games ask you to do two different things. A book asks you to
fasten your seatbelt while the author takes you for a ride. A game asks you to participate
and make decisions. Given the nature of computers today, no matter how fast they
evolve there’s still a limit to the amount of information you can put in a computer on
your desktop, while the author of a novel can take you anyplace and show you anything.
I have an unlimited special effects budget when I work and I don’t have to fret over
memory size or how fast a CPU the reader owns. The mind is still the best computer for
dreaming up wonders!
5
Page 7

So, when John Cutter and the folks at Dynamix said they wanted to “design a game that
felt like one of your books,” I said, “Right,” with a knowing wink and a nod. But, being
polite, I listened and we talked. And we talked some more. You’re now about to
experience the result of those talks.
Games can never be like books, but this new game, Betrayal at Krondor, is as close as I’ve
seen a game get. How’d they do it? Dynamix put a lot of thought into doing more than
drawing nice characters on the screen and giving them names from my books as they
jump over trolls and duck fire blasts from wizards. They have more here than a simple
arcade game or a simple fantasy game. They’ve put time and energy into saying, “What
if the player was going to act as a character in a new book, one that takes place after A
Darkness at Sethanon?”
Dynamix didn’t just license a game, hang character names on generic icons and call it a
Riftwar Game! They spent hours talking to me about all manner of things in a heartfelt
attempt to “get it right.” The object of the exercise was always to be the first computer
game that felt like it was part of a good adventure novel.
Which is what this game has evolved into being. You possess what will be, I hope, the
first in a series of games that, I believe, reflect the feeling of my work or as much as is
possible in a game. When you cross paths with Prince Arutha or Jimmy and Locklear,
they act pretty much as I expect them to act and, when you have decided what to do
next, they react to your choice pretty much as I would expect. When you travel across
the map of the kingdom, it’s pretty much the same map as you find in the books.
I feel pride and satisfaction that I was the author Dynamix chose to include in this
project, that my work was the model upon which these beautiful works of “computer
fiction” were based. I thank everyone at Dynamix for thinking highly enough of my
original words to want to do it, and for listening to me when I put in my two cents
worth. For those of you familiar with my novels, I think you’re going to recognize the
6
Page 8
landscape and for you who haven’t read any of my work, I
hope you’ll enjoy this visit enough to want to read some of
the work upon which it is based.
So quit reading this and go play the game! Enjoy your visit
to Midkemia.
About The Author
Raymond E. Feist was born in Los Angeles in 1945 and has
lived most of his adult life in Southern California. He entered
higher education a bit later than is usual and graduated from
the University of California, San Diego in 1977. Feist first made publishing history with his
epic novel Magician, which was later split into two novels: Magician: Apprentice and
Magician: Master. These were then followed up with the best-selling novels: Silverthorn, A
Darkness At Sethanon and Prince of the Blood, all featuring the twin fantasy worlds of
Midkemia and Kelewan. He also co-authored a series of books with Janny Wurts featuring
the deadly Tsurani culture in Daughter of the Empire, Servant of the Empire and Mistress
of the Empire. Feist now writes full time and resides in San Diego, California.
7
Page 9

Designer Notes
hile I have been an enthusiastic fan of roleplaying games for a number of years, I was
W
literature. ◆ The novels I looked at seemed to be little
more than romanticized versions of Tolkien’s classic
Middle Earth tales. ◆ Then I picked up a copy of
Magician: Apprentice, by Raymond E. Feist. ◆ Here was
a book filled with marvelous images of incredible worlds,
and a real emphasis on character development, political
intrigues, and military tactics and strategies. ◆ It was
obvious to me that there was material for a great game
here — heck, a hundred great games!
I called Ray’s agent the next day.
Ray was fantastic to work with. He consulted with us tirelessly, answering questions, and
offering suggestions and advice. Together, we were determined to create a new story, an
interactive computer adventure that would feel like a new Riftwar book.
We decided the game should be an interactive story. Characters would be multidimensional and capable of stirring the player’s emotions. The story would be carefully
plotted with lots of surprises, a good mix of humor and pathos, and abundant amounts
of mystery and foreshadowing to keep the player intrigued.
8
never a big fan of the popular fantasy
Page 10

Balancing play against plot is the most confounding job any game designer can face on a
fantasy role-playing game. In Betrayal at Krondor, we have integrated our plot so that it
provides ample gaming opportunities, while also giving the player a sense of time, place
and purpose. This is achieved, by making an on-screen map available to the player at all
times; and by creating short term goals — the nine chapters in the game — which give
us a unique opportunity to tell a progressive story that still gives the player plenty of
freedom to explore and adventure without being confined to a scripted plot. Next, we
built a tactical combat game with detailed character interaction and an elaborate magical
system to please our most demanding fantasy role playing gamers.
The end result is that we are proud to have created a new, fulfilling direction for fantasy
role playing entertainment and we look forward to creating future installments in our
Riftwar Legacy. We think you will look forward to playing them.
— John Cutter
9
Page 11

Game Play
etrayal at Krondor is an entirely new story based
on the best-selling Riftwar novels by Raymond E.
B
interactive fantasy story divided into chapters like a book.
◆ Gameplay within each of the nine unique chapters is
totally non-linear; you do have a goal that must be
accomplished before you can see the rest of the story, but
how that goal is accomplished is entirely up to you! ◆
There is no time limit, so if you want to roam around the
world talking to characters, killing monsters and finding
treasure — that’s fine. ◆ In fact, at the beginning of the
game this strategy may even be necessary to help you and
your party prepare for the increasingly fierce opponents
you will face as you head south to Krondor.
Each chapter contains a number of unique characters and monsters. Even though you
don’t necessarily need to face the dangers of the Dimwood forest in Chapter One, there’s
nothing to prevent you from going there — and you will find a new set of monsters if
you choose to return there in Chapter Two! It’s almost like having nine different games
for the price of one! Like a book, the characters you are playing with (or reading about)
will change, leave, and reappear based on the chapter.
Feist, and is the first serious attempt to present an
10
Page 12

The purpose of this section is to give an overview of game commands and functions.
You will find installation and system specific controls on the Betrayal at Krondor Quick
Reference card.
Getting Around in the Game
Betrayal at Krondor is driven by a point and click interface. (For information on
keyboard commands, refer to your Quick Reference card.)
In general, the left mouse button is the action button. Clicking on an object with the left
mouse button is equivalent to using the item that was clicked on. The right button is the
examine button, use it to read a description of the item you have selected.
NOTE: There are many places in the game where you can use the right mouse button to
read on-line help text. If you are not sure what a particular item does, try clicking on it
with the right button to display a brief description.
Getting Started
Take action,
use an item.
Examine object
or read text.
After the opening animation, the Main menu will appear. (Press either mouse button or
the Spacebar to skip the opening animation or to skip to the next “page” in a dialogue
scene.)
Spacebar
Skip opening animation or
skip to next “page.”
11
Page 13
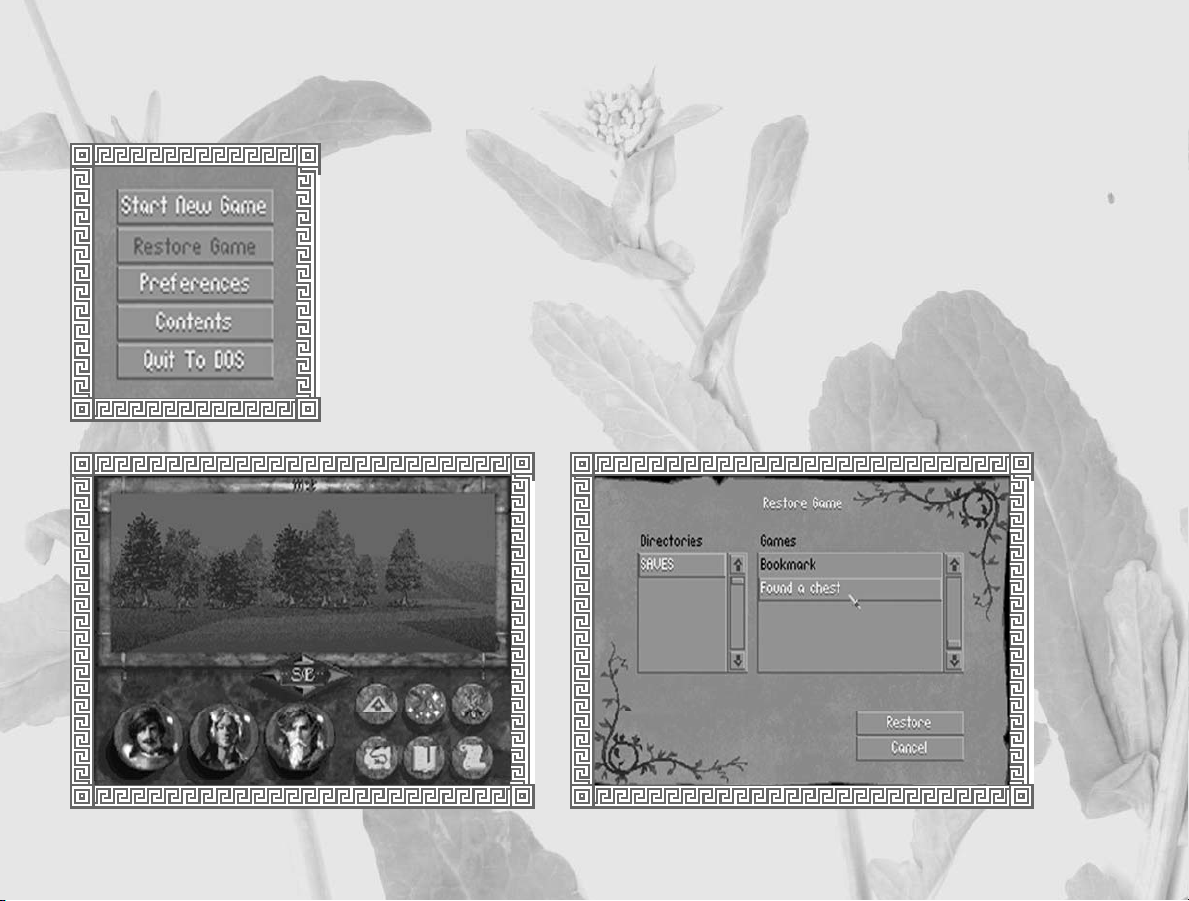
The Main Menu
Start New Game
Go to the Travel screen to begin game.
Restore Game
Use to restore saved games. The current directory is always highlighted in the
Directories scroll box. If you have created additional directories using the Save Game
option, select one by clicking on it with the left mouse button. Any games saved in that
directory will show up in the Games scroll box.
12
Page 14

Preferences
Use the Preferences section to customize the game to best match your
preferences or to compensate for very slow or very fast computers.
Preferences include:
Step Size:
Small — The slowest but smoothest
movement mode. The party takes
small steps.
Medium — Default mode. The
party takes medium steps.
Large — The party takes large steps
for fastest movement.
NOTE: Changing step size does not
affect gameplay. It will still take the
same amount of game time to reach a
given destination.
Text Speed:
Wait — Text screens wait for key
press before advancing.
Medium — Default mode, for
average readers.
Fast — Text screens advance very
quickly for fast readers.
Sound:
Toggle sound effects on or off.
Music:
Toggle music on or off.
Combat Music:
Toggle combat music on or off.
Introduction:
Toggle introduction on or off. (If
you load the game with the
introduction turned off, it will skip
the introductory sequence and go
straight to the Main menu.)
13
Page 15
Turn Size:
Small — The smoothest mode. The
party turns slowly.
Medium — Default mode. The
party makes medium-sized turns.
Large — The party makes large turns
for fastest rotation.
Detail:
Minimum — The fastest mode.
Trees: Minimum number, small size
Horizon: No
Textured mountains: No
Floor & ceiling textures: No
Object filtering: Maximum
Low —
Trees: Low number, medium size
Horizon: Yes
Textured mountains: No
Floor & ceiling textures: No
Object filtering: High
Contents
At the beginning and end of each chapter you will view a noninteractive cinematic scene to advance the story and suggest your party’s
goal for the upcoming chapter. Use the Contents page to view these
sequences as many times as you like. Only the chapters you have
finished playing will be accessible, based on games saved in the current
directory.
High —
Trees: High number, almost normal size
Horizon: Yes
Textured mountains: Yes
Floor & ceiling textures: Yes
Object filtering: Low
Maximum — The slowest mode.
Trees: Maximum number, normal size
Horizon: Yes
Textured mountains: Yes
Floor & ceiling textures: Yes
Object filtering: Minimum
14
Quit to DOS
Exit the current game and return to DOS.
Page 16
The Travel Screen
rom the Travel screen
Spell Glyphs
F
you can control the
movement of your
characters, open chests and
doors, and examine items.
◆ You may also view
maps, initiate dialogues
with new characters, shop
for weapons and other
items, or camp to rest and
heal.
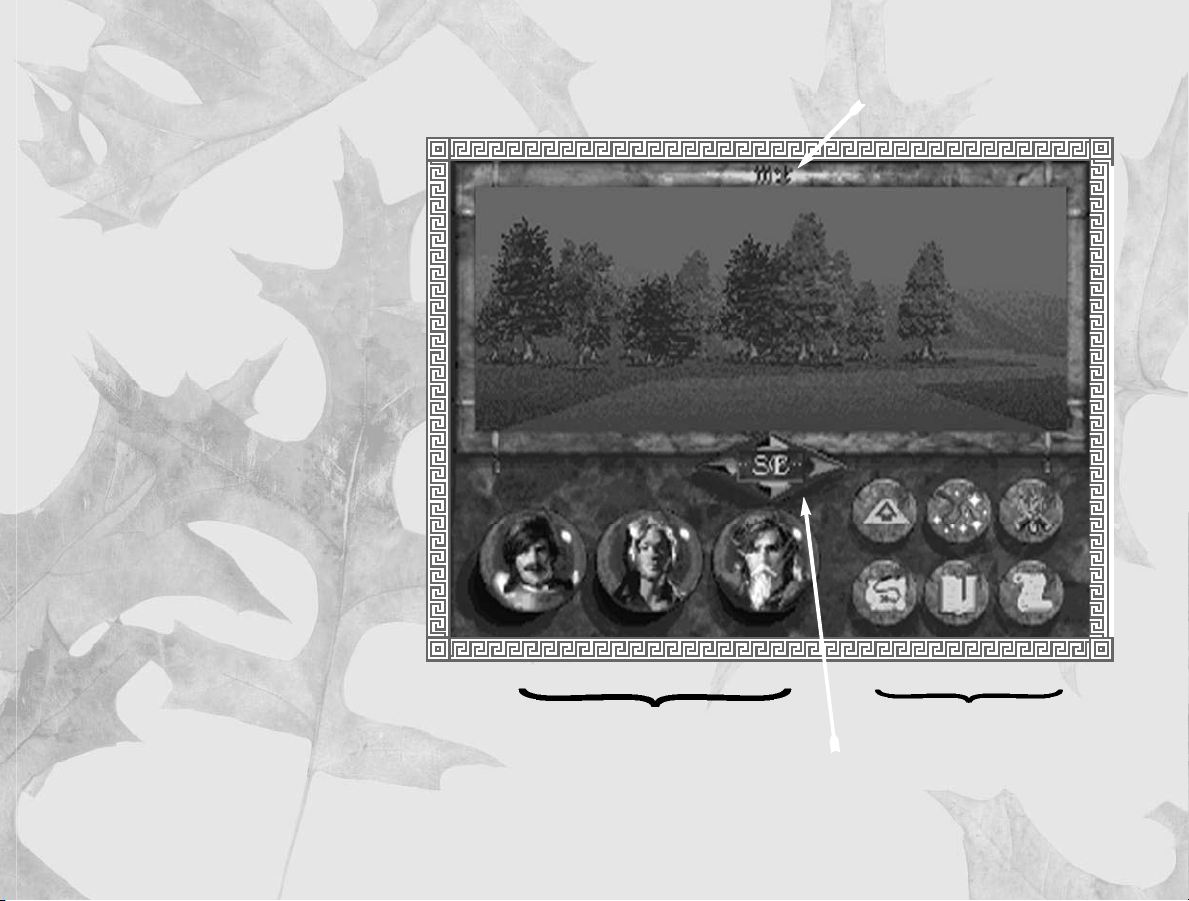
The Travel screen is divided into two
parts. The upper section contains the main
view window. The lower section contains
six Action buttons and up to three crystal
globes, each representing a different
character in your party.
Main View Window
Crystal Globes
Action Buttons
Movement Icon
15
Page 17

Moving the Party
Click on the Movement icon to move the party forward or back, or to turn to the left or
right. Hold the mouse button down on the forward or back button and the party will
move in that direction until the button is released. (For information on changing your
step or turn size, see Preferences on pages 13-14.) A compass in the center of the
Movement icon, rotates to indicate the direction the party is currently facing.
It is not always possible to walk between mountains or hills that are very close together
— even though it may appear that your characters could slip through. Generally, when
you bump into the base of a mountain, your party will automatically turn to one side. In
“tight” spots you may find it easier to navigate using the overhead map (see page 20).
Action Buttons
The six Action buttons on the lower right side of the Travel screen are available to the
player at appropriate times. They include: Follow Road, Cast, Encamp, Map,
Bookmark, and Options.
Follow Road
You must be standing in the center of the road to choose this option. The Follow Road
button is active when an illustration of a road receding into the distance appears on it.
When selected, the image on the button will change to a road with an arrow, indicating
that the party will now automatically follow the road.
16
When Follow Road is selected, the party will follow the main road wherever it leads if
you hold down the forward button on the Movement icon. The only time the party will
stop is if the road forks or comes to a “T.” In this case, use the Movement icon to turn in
the direction you want to go, then continue as before. It doesn’t matter if your party is
facing straight down the road or not, when you move forward, the party will
Page 18
automatically turn to follow the path. Select the button again to toggle Follow Road off.
NOTE: It is not possible to move off the road when this mode of movement has been
activated.
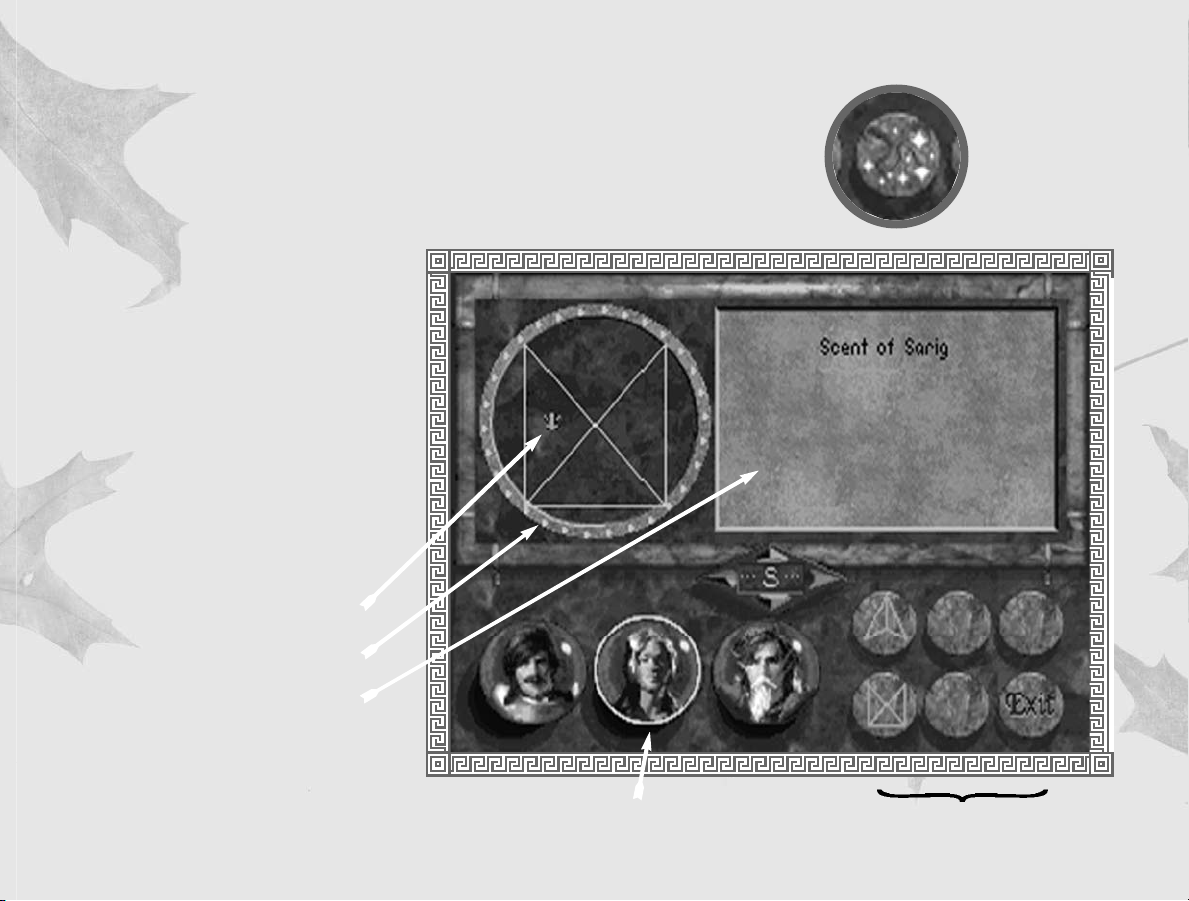
Cast
Select the Cast button to display the Spellcasting screen. (This option will not be
available unless there is a spellcaster in the
party.) A list of available spells will appear
on the right. Magic symbol buttons at the
bottom of the screen can be selected to
access groups of spells.
Within the circle on the left is one of up
to four magical symbols, each neatly
dividing the circular region into a number
of smaller segments. Each segment can
contain one unique glyph for each spell
known by the caster. Moving the cursor
over these glyphs will display a description
of the spell in the parchment area on the
right.
Spell Glyph
Gemstones
List of Available Spells in
Current Spell Group
Magician selected
Magic Symbol Buttons
17
Page 19

To cast the currently displayed spell, press your left mouse button. If the spell can be cast
within a range of Health/Stamina points, the gemstones around the circle will be
highlighted. The number of highlighted stones represents the number of the magic user’s
Health/Stamina points that will be used in order to cast the selected spell. To complete
the spell, click on a gemstone. Spells that require higher Health/Stamina points are more
powerful and effective, but carry the disadvantage of weakening the caster. (For more
information on Health/Stamina, Ratings and Spellcasting see pages 26 and 45.)
To determine if there are spells active, look at the symbols at the top of the Travel
screen.
When there is more than one magical character in a party, you can select a different
magician by moving the cursor to the appropriate character globe and pressing the left
mouse button. This is a non-combat option only.
Encamp
Use the Encamp option to rest your characters and to heal them when injured.
Generally, the party should camp at night when it is difficult to travel without a torch or
magic spell to light the way.
When you select Encamp, a gemstone-studded sun dial will appear in place of the main
view window. The current time of day is indicated by a highlighted stone that shows the
location of the sundial’s shadow. The upper half of the dial indicates day, the lower half
indicates night.
18
To sleep for a specific amount of time, click the left mouse button on one of the stones
around the outer ring to select the time you want to break camp. (Once the shadow
begins to move you can select the Stop button at any time.)
Page 20
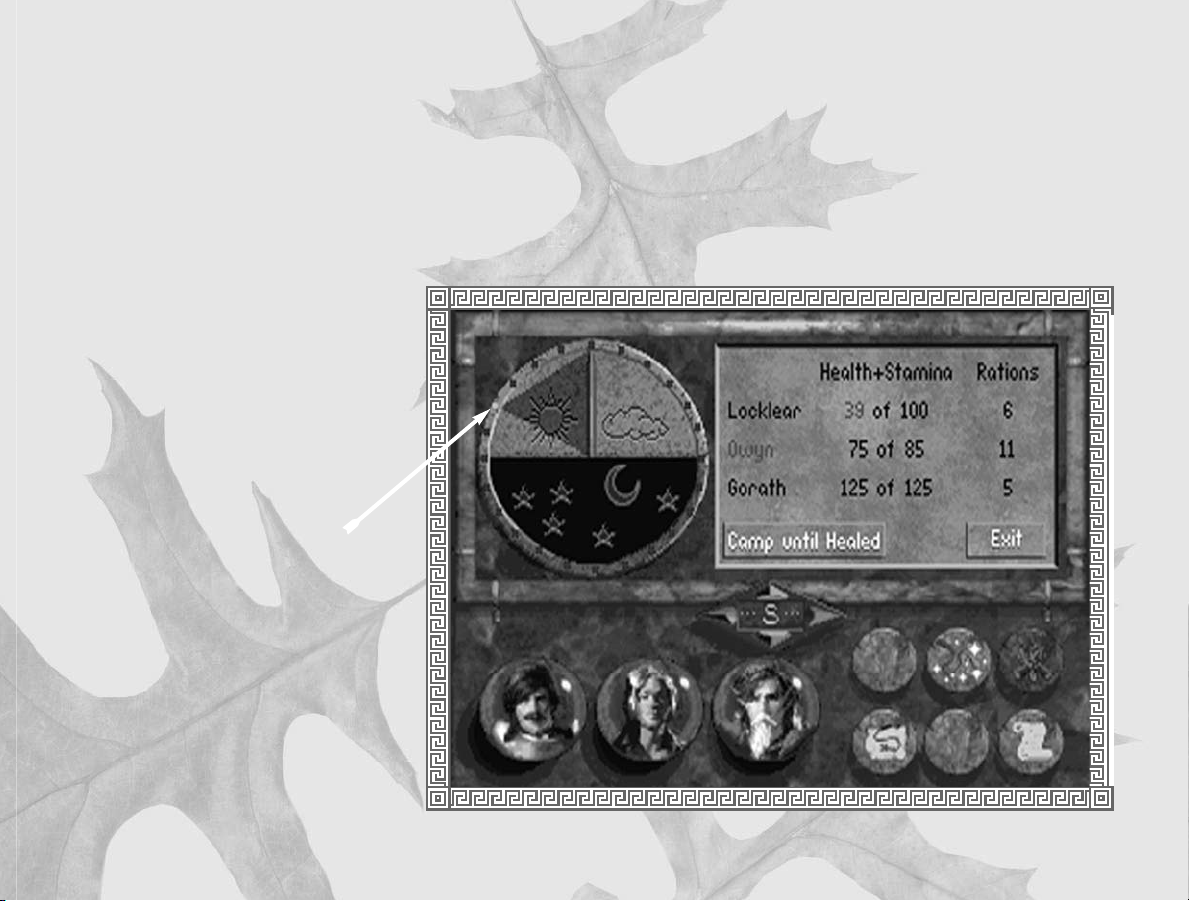
Camp Until Healed
Camp until all of your injured or tired characters are at full strength, or until you hit the
Stop button. You can monitor the Health/Stamina and Rations of each character in a
message window to the right of the sundial. The Health/Stamina of injured characters
will be highlighted in red.
Sleeping in the discomfort of the wilds will only restore a character to approximately 80
percent of his potential Health/Stamina rating. The rating will return to its normal black
color when this figure is reached. The
names of characters suffering from a
debilitating condition (sick, drunk,
plagued, poisoned, etc.) appear in red.
NOTE: The Encamp option is not
possible when enemy opponents are
nearby.
Highlighted Stone
19
Page 21

20
Map
Selecting Map will display a map of the party’s immediate surroundings in the main
view window. The buttons at the bottom of the screen will be replaced with the
following options: Follow Road (not shown), Full Map, Zoom In, Zoom Out, Encamp
and Main. The triangle in the center of the screen indicates the party’s current position.
Zoom In, Zoom Out
These buttons allow you to zoom in for a
very close view of the map, or zoom out
for a wide view of your surroundings.
NOTE: You can move your party in this
view using the Movement icon. Traveling
on the Map display is very fast (particularly
when you are zoomed in close), but carries
the disadvantage of not allowing you to see
interesting and possibly valuable items
beside the road, or dangerous adversaries
in your path.
When you are in an underground
dungeon, mine or sewer, the Map function
works a little differently. In these
situations, the entire map is initially dark,
indicating the fact that the characters are
entering a new and unfamiliar area. As the
party wanders around, more of the map
will be revealed. This option is very useful
to show you places where you have and
have not been should your party find itself
lost underground.
Full
Map
Zoom
Out
Zoom
Encamp
Main
In
Page 22

Main
Select this button to display the Travel
screen.
Full Map
This button switches to a full screen map
showing all the major roads, cities and
towns in the kingdom. (Cities are
indicated by white points, smaller towns
appear on the map as brown points.) A
small flashing icon indicates the location
and direction of the party.
Move the cursor over the points on the
map to display the names of towns or
cities.
Click on the Exit button in the lower right
corner of the screen to return to the map
of the party’s immediate surroundings.
21
Page 23
Bookmark
Use Bookmark to quickly save a game in progress without leaving the Travel screen.
Your game will be saved under the file name “Bookmark.” (This file is available in each
directory. Every time the Bookmark option is selected, the previously saved Bookmark is
overwritten.) The Bookmark icon will only be visible when a directory has been set up
using Restore or Save Game.
Options
Left click on the Options button to start a new game, restore and save games, change
game preferences, look at the Contents page, or quit to DOS. (For more information on
Preferences see page 13.)
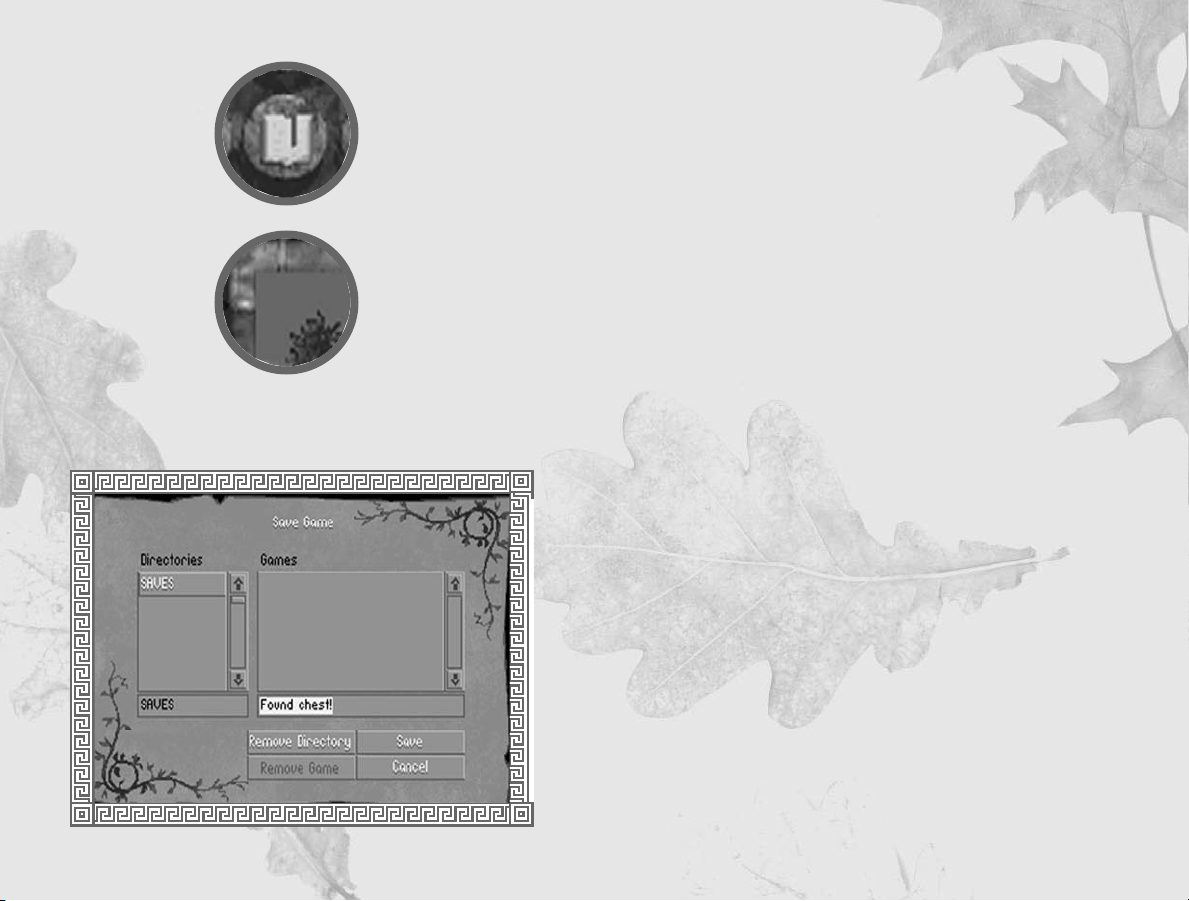
Save Game
To save games in progress, simply click on the requester box beneath the list of saved
games. You may then type in a file name using as many letters as will fit
in the box. These games will be saved in the highlighted directory in the
Directories scroll box.
To create a new directory, type in a directory name in the requester box.
Directory names must be a valid DOS 8-character directory name
without an extension.
To delete the currently highlighted directory in the scroll box, left click
on the Remove Directory button and then click on Yes to confirm your
choice. (This option will remove the directory and all games contained
therein.)
22
To delete the currently highlighted game in the scroll box, left click on
the Remove Game button (This option will remove the single
highlighted game).
Page 24
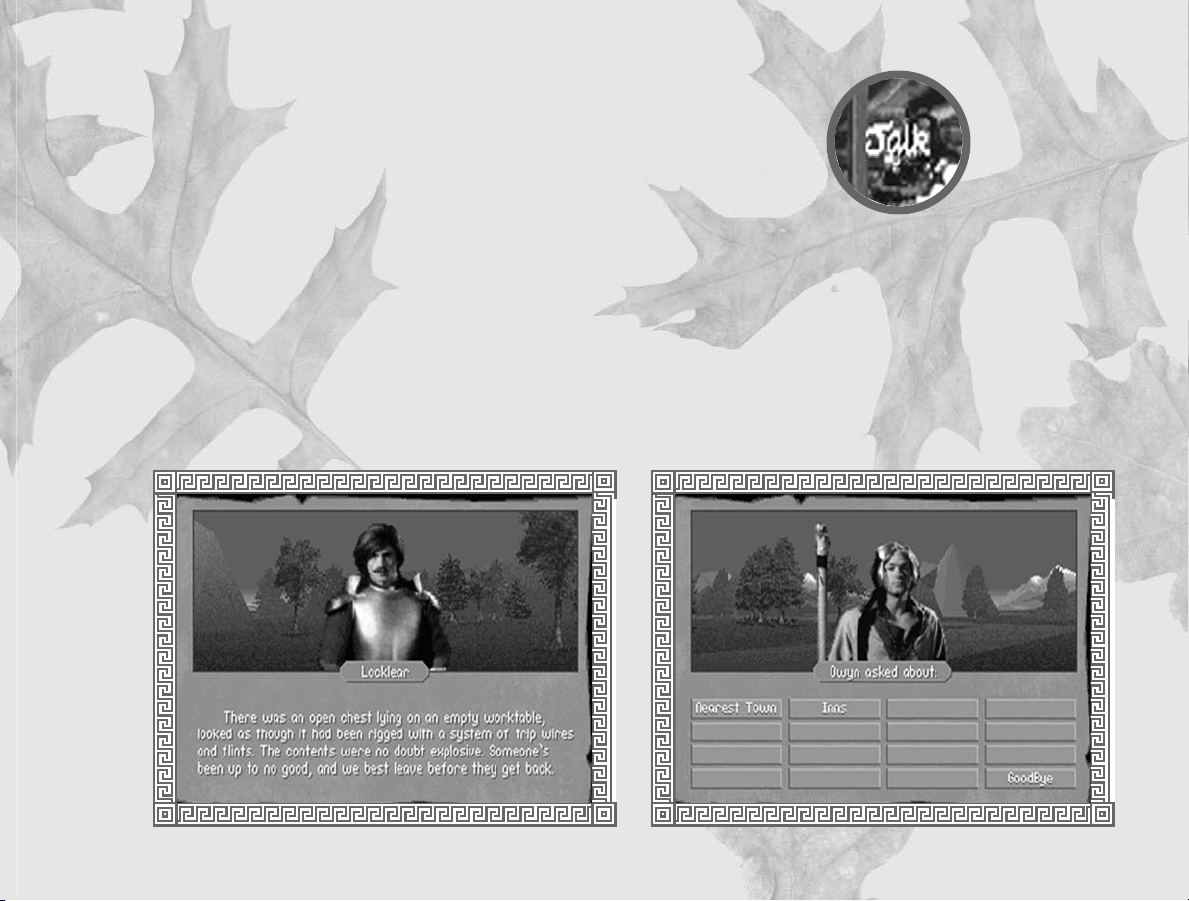
Talking to other characters
Some dialogues are initiated automatically. Others can be initiated by clicking on a
character when the cursor changes to the word “TALK.” Following a short, noninteractive exchange, some characters will allow you to ask them questions about a
variety of topics. Possible questions will appear as Keyword buttons at the bottom of the
screen. Left click on any button to find out more about the selected subject.
NOTE: The more you know, the more your character can learn by asking questions.
Asking questions using Keyword buttons will open up new keywords with that character
or other characters in the game.
23
Page 25

Ratings and Skills
o examine the skills and ratings of characters in
your party, right click on the desired character’s
T
globe. ◆ This will display the ratings and skills of
each character.
Ratings will be displayed at the top of the screen. Skills are represented at the bottom of
the screen using swords. A red bar graphically represents the numerical figure displayed
just above it.
NOTE: Skills displayed in red indicate that skill level has changed since you last viewed
it.
A picture of the currently selected character is displayed in the upper left corner of the
screen. Left click on it to cycle through the other characters in your party, or right click
on it to read background information about the character.
NOTE: A character can only improve skills by practicing them. To improve the rate at
which a skill increases, select the sword handle that represents the desired skill. The fewer
skills you select, the greater the increase. The more skills you select, the slower they will
increase. Skills also improve slowly if none are selected.
Understanding Ratings and Skills
Each character in the game has four ratings — Health, Stamina, Strength, and Speed —
and a number of skills including Lockpicking, Haggling and Stealth.
24
Page 26

While it isn’t necessary to understand the way ratings and skills
work in order to enjoy the game, you may be interested in learning
more about how these calculations are made. Each rating and skill
has a potential value and a current value. The current value is an
indication of a character’s condition at that moment in time. In
other words, if a character with a Stamina of 32 is hit with a sword,
his potential Stamina will remain 32, but his current Stamina will
drop. By resting after combat, your current skills and ratings will
return to their potential values.
NOTE: You may find some useful items or potions that could cause
a large, though temporary, increase in your current ratings or skills,
when used in combat. The effect of these will generally wear off
following the battle.
Improving Potential Ratings and Skills
Improving your characters’ potential ratings is very difficult. Ratings
have no upper limit and changes will usually show up as gradual improvements over
time.
Skills will vary from 0 - 100 and will increase the more they are used. For example, a
character’s Lockpicking skill will go up a fractional amount each time he successfully
picks a lock. (The closer this number gets to 100, the harder it will be to affect an
increase in the skill.)
Conditions
A character may find himself suffering from any one of a number of debilitating
conditions during the game (sick, drunk, poisoned, plagued, etc.). Names of characters
suffering from a condition will be highlighted in red on the Encamp screen. Some
conditions will be alleviated by prolonged rest, others may require the services of a
temple. Sick characters can only be healed by resting for extended periods of time.
25
Page 27

Ratings
Health/Stamina
Health and Stamina, though separate ratings, are added together to determine a
character’s overall physical condition. When a character is injured, damage sustained is
subtracted from his Stamina rating. When this has been depleted (i.e. Stamina = 0), his
Health rating begins to go down. If a character’s Health rating drops all the way to 0, he
is critically injured.
The ratio of the current Health rating to the potential Health rating affects the
remainder of a character’s ratings and skills by a proportionate amount. If a character’s
current Health is 50 percent of his potential Health, his other ratings and skills will
automatically be 50 percent of their potential values.
EXAMPLE: A character with 35 Health points and 10 Stamina points is attacked during
a combat round and receives 10 points of damage. His Stamina will drop down to 0, but
his Health will remain at 35. The rest of his ratings and skills will also be unchanged. If
the next stroke does an additional 10 points of damage, his Stamina will remain at 0, but
his Health will drop by 10, from 35 to 25. His current Health is 71 percent of his
potential Health. Therefore, his other current ratings and skills will drop to 71 percent
of their potential values, as well. (His speed, for example, will drop from 5 to 4.)
While resting or after using a restorative, a character’s overall physical condition will
begin to go up; his current Health will increase first until it reaches the potential Health,
then his current Stamina will go up until it reaches the potential Stamina.
26
Strength
This rating represents a character’s physical strength and determines the amount of
damage a character can inflict in hand-to-hand combat. It will decrease when the
Page 28

character’s Health is reduced. Strength will improve, slowly over time, with each
successful sword or staff strike. Current Strength can sometimes be modified by magical
“strength boosters,” which can cause a temporary increase above the potential rating —
but only for the duration of the combat in which they are used.
A
ncient Midkemian
legends tell of
quicker ways to
Speed
This rating is expressed in terms of “steps.” It indicates the number of steps a character
may take during his turn in combat. A character’s potential Speed rating will not change
over the course of the game.
Skills
Defense
This skill, expressed as a percentage, is part of the calculation to determine how many
Health/Stamina points a character will lose due to a successful enemy strike in combat.
Defense simulates a character dodging or ducking slightly so as not to receive the full
effect of a blow. A high Defense skill will also cause enemy opponents to miss more
often.
Crossbow Accuracy
This skill indicates how accurate a character would be if he fired at an enemy two steps
away. If the skill is 45 percent, your character will have a 45 percent chance of striking
an opponent 2 steps away. (These figures assume you are firing a “normal” quarrel. You
may find some quarrels that perform with better accuracy.) Remember accuracy is also
affected by distance. The further a character is from his opponent, the less chance he
will have to hit him.
increase potential Strength.
27
Page 29

Melee Accuracy
The accuracy of your characters when fighting with a sword or staff is based on this skill.
The weight and class of sword being used also affect the character’s chance of hitting an
opponent.
Casting Accuracy
This skill is only used for magical spells that require line-of-sight targeting and are,
therefore, affected by distance.
Assessment
This combat skill affects how much information can be gathered by a character when
using the Assess option during combat.
A character can learn a number of things by taking a moment to “size up” his opponent.
By studying an opponent’s movements, he might determine that a particular foe is very
quick or very slow. He might notice a limp or see him favoring one side of his body over
the other due to an injury. Some of the things you will learn in this way will be more
valuable than others; the higher the Assessment skill is, the more information will be
displayed. The information is displayed through an opponent’s ratings.
Weaponcraft
The Weaponcraft skill is employed whenever you use a whetstone to repair a damaged
sword. The figure you will see by a sword when it is in Inventory, indicates its
condition. This number will go down slightly each time the sword is used in combat.
28
When you repair a sword (by dragging the whetstone over it and releasing), the sword’s
condition will improve — assuming it has not recently been repaired. The higher the
character’s Weaponcraft skill, the more the condition will improve.
Page 30

It is important to check your sword often as the blade will gradually suffer damage until
it is essentially a worthless piece of metal. It will last much longer if you keep it in good
repair with a whetstone.
Armorcraft
The Armorcraft skill is employed whenever you use an armorer’s hammer to repair a
damaged suit of armor. Beside each suit you will notice a percentage which indicates the
condition of the armor (100 percent would indicate perfect, undamaged armor). The
percentage will go down slightly each time a character is hit.
When you repair a piece of armor (by dragging the armorer’s hammer over it and
releasing), the armor’s condition will improve — assuming it has not recently been
repaired. The amount that it improves will depend on the Armorcraft skill of the person
who is repairing it. Armor will regain a percentage (equal to the character’s Armorcraft
skill) of the condition that has been lost.
Your armor will be much more effective if you keep it in good repair using an armorer’s
hammer.
Barding
Barding is a skill that can be used in taverns to gain gold. If your skills are good enough
(or the patrons are drunk enough), you will be paid for your efforts. The amount of gold
you receive and the Barding skill level required to “loosen their coin purses” will vary
greatly from tavern to tavern. In general, there is more gold to be had in larger city
taverns. However, these patrons also tend to be more discerning and will throw you out
if your music is not to their liking.
To bard, move the cursor up to the tavern interior and find the lute. As you move the
cursor over it, it will change to the word “BARD.” Press the left button to complete the
action.
29
Page 31

Practice Barding
If you can find a practice lute, you can practice your skills by going to a
character’s inventory and selecting it. Then click on the Use button.
Repeated practice will cause that character’s Barding skill to increase.
Haggling
Haggling is an important means of lowering the price of items for sale.
You will notice that prices vary, sometimes dramatically, from shop to
shop. This is based on the whims of the shopkeeper, who will attempt
to make as much profit as possible. Generally, you will find better
prices in the larger cities and towns.
When the party enters a shop, each item for sale will be displayed with
a price. When you pick up an item using the left button, and drag it to
one of the character globes at the bottom of the screen, a menu will
appear with the following choices:
Accept — Left click on the Accept button to buy the item at the
advertised price.
Decline — Return to the shop view.
Haggle — Not all shopkeepers will haggle, but if you select this
button you can attempt to get the price of the item reduced by
haggling with the shopkeeper. Your chance of success will be based
on the Haggle skill of the character attempting to purchase the
item. Be careful. If the attempt is unsuccessful, the shopkeeper may
get angry and refuse to sell you the item at all.
30
Page 32

Lockpicking
This skill indicates a character’s ability to pick locks, though it is also
used to disarm traps. When confronted with a locked chest or door, the
Lock screen will appear. (For information on the mechanics of picking
locks, see page 38.)
Scouting
The Scouting skill allows the character to detect enemy ambushes as the
party is moving around in the world. The party member with the
highest Scouting skill is automatically chosen as the party’s scout. If an
ambush situation is detected, a warning message will appear. At this
point you have two choices. You can continue and risk running into an
ambush, or try to go back or “around” the situation.
Stealth
This skill is used when one of the characters in your party has detected a potential
ambush situation with his Scouting skill. The chance of successfully sneaking past is
directly related to the Stealth rating of the worst party member.
It is also used when you select an opponent in an attempt to gain an initiative
advantage. Once again, the chance of successfully “sneaking up” on an enemy and
catching them off guard is directly related to the Stealth of the worst party member. (See
Initiative Advantage page 42 for more information.)
31
Page 33

Fairy Chests
“A fairy chest in ears of corn,
Drew me from my way,
But when I spied its lock I cried
For answer I would pay...”
— The Fuller’s Jig
In the Kingdom of the Isles, a farmer will occasionally stumble across a strange locked
chest in his fields. Folk myth contends that these are “fairy chests” containing items lost
by individuals who have somehow displeased Banath. They are actually boxes which
traveling Moredhel use to pass messages back and forth. (Most kingdom couriers refuse
to travel in the lawless Northlands and will not venture past Inclindel Pass or Cutter’s
Gap.) In peace time, these locked chests contain only messages and harmless scribblings
between mercenaries. When hostilities flare within the Kingdom, however, they are often
used as secret highways to pass weapons, communiqués, poisons and other items of
intrigue.
32
Page 34

Moredhel chests possess “wordlocks,” a series of small cylinders onto which have been
inscribed letters of the Moredhel alphabet. Once the letters on the cylinders are rotated
to form a pre-designated word (this is accomplished by moving the mouse up to a
letter and clicking on it with the left mouse button), the catches on the box are
automatically sprung. Most of these
chests also have a steel plate (inscribed in
Moredhel) affixed to them with a puzzlelike rhyme so that forgetful couriers can
still make their appointed rounds. A
typical Moredhel clue plate might read:
Prince Arutha, from his lofty perch,
Will find our troops without a search.
His men will fall, his castle too,
And then what will Prince Arutha do?
Answer: Die.
While most citizens dismiss the existence
of these boxes as hearsay, there are a few
scattered scholars who have been known
to point travelers to sites where these
boxes can be found. To read clue plates,
someone in your party must be able to
read Moredhel.
33
Page 35

Inventory
o look at the items a character is carrying, select
the character’s globe with the left mouse button. ◆
34
T
The items that character is carrying will appear on
the right side of the screen. ◆ Items a character is
equipped with will appear on the left.
Examining Items
Right click on an Inventory item to get a description of it. For more detailed
information about weapons or armor, select the More Info button on the left side of the
screen. The information available will include the following:
Base Dmg — Base damage for swords is displayed for swinging and thrusting. This
figure takes into account a character’s Strength rating. (Crossbow damage is
calculated based on the damage of the quarrel +/- the damage of the crossbow.)
Accuracy — Each melee weapon modifies the Melee Accuracy skill for both
swinging and thrusting. (Crossbow accuracy is modified by the crossbow value +/the quarrel value.)
Armor Mod — Represents the percentage of the base damage being deflected by
the particular armor type.
Active Mods — Combat modifiers that are currently affecting the weapon. (These
are not represented in the base damage display.)
Resistances — Resistances that may be in effect for a particular piece of armor. (Armor
can be made resistant against any of the active Mods. For example, substances can be
found or bought that will make your armor resistant to Flame damage.)
Bless Type — If an item is blessed, the type of blessing will be displayed here.
Racial Mod — Weapons and armor designed for a particular race will not be quite
as effective when used by a member of a different race. Indicates the race an item
was designed for.
Page 36

Equipping Characters
If a character is not equipped with a crossbow or a suit of armor, you
will see an empty frame. To equip a character with these items, pick up
the item by moving the cursor over it and clicking and holding the left
mouse button. Then drag the item over to the equipment area on the
left side of the screen and release the button. The empty frame will
disappear and the character will be equipped.
NOTE: Fighters must have a sword and magic users must have a staff
at all times. Also, it is possible to trade or share items by dragging them
down to an appropriate character’s globe.
Keys
To look at the party’s keys, select the key ring icon at the bottom of the screen. To get a
description of each key, click on it with the right mouse button. The number beside
each key shows how many of that key the party is carrying.
Like gold and silver, keys are automatically collected and pooled and don’t take up room
in anyone’s Inventory. For this reason, they cannot be dropped. They can, however,
break when used in the wrong lock.
Bags
Should you want to lighten your load of items, you can drop items into a bag by
holding down the left mouse button over an item. The key ring will then turn into a
bag. Drag the selected item down to the bag icon, and release the button. The bag will
then be dropped and the party can return for it later. The bag icon will replace the key
ring as soon as an item is selected.
35
Page 37

NOTE: If you hope to retrieve items you have dropped in a bag, be very careful where
you drop it. A bag dropped in the middle of an open field or near a town will be easily
spotted and will probably be empty when you return. If you want to remove something
valuable from your Inventory, the safest hiding place is inside a locked box or chest. You
will find these as you explore. (For more information on locked boxes and chests, see
pages 32, 38.)
Picking Up Objects
The opportunities to add items to your Inventory are countless. You can buy items in
shops, receive items from other characters and pick things up along the way. Some
objects in the world — dead bodies, holes in the ground, and bags, for example — will
instantly reveal their contents when you click on them with the left mouse button.
Boxes and chests may also be opened this way, though you will find that many of these
items are locked. (See pages 32, 38.)
When the Inventory screen appears for a particular object, you will see an icon appear in
the lower right portion of the screen. It will be highlighted, indicating that you are
currently looking at the Inventory for that object. To give an item to a player, click on it
with the left mouse button, hold the button down, then drag it to one of the character
globes at the bottom of the screen. When you release the button, the item will disappear
into the selected character’s Inventory.
36
Transfering Inventory Items
View items in your Inventory, switch weapons, or transfer an item to another character
by clicking on the desired character globe with the left mouse button. You must be
standing beside a character you wish to switch or transfer items with.
Page 38

NOTE: Viewing inventory uses one combat turn, whether an object is actually used or
not.
When transfering a number of items, the Transfer menu will appear. If you want to give
another party member only a portion of a group of selected items, left click on
the greater than/less than symbols to change the number of items designated on the top
button of the menu. Click on the share with party button to let the computer divide the
selected items between all party members.
Using an Inventory
Item
To use an item in a character’s Inventory,
left click on the item and then on the Use
button. You may also double click on an
item to use it. Some items must be
combined with others. For example, you
can use a whetstone to sharpen a sword
blade by picking it up, dragging it over the
blade, and releasing it.
37
Page 39

he Scent of Sarig
spell can help
T
magicians detect
booby-trapped boxes and
chests. ◆ If you opt to
disarm such an item, the
Opening Locks
When the party is confronted with a locked door or chest, the Lock
screen will appear. A lock will be visible on the left side of the screen,
and the party’s keys and any picklocks they have collected will be
pooled together and displayed on the right. The party member with the
highest lockpicking skill will automatically be highlighted at the bottom
of the screen. To choose a different character, left click on the desired
globe. Right click on the lock or keys to get a description of each. This
information could help you make a better choice. Be careful, if you
attempt to use the wrong key to open a lock, it may break.
To attempt to open the lock, select a key or picklock with the left
button, drag it over to the lock, and release it. A character’s
Lockpicking skill is a factor when attempting to pick a lock. Like the
keys, lock picks can break, especially when a character has a low
Lockpicking skill and is working on an especially difficult lock.
Eating
Each character in the game will automatically consume one ration per day. (They will
disappear from his Inventory at the end of the day.) Each ration represents one day of
food, so a character with seven rations will be fine for one week before he starts to lose
Health/Stamina points due to hunger.
character with the best
Lockpicking skill will
automatically be chosen to
make the attempt.
38
NOTE: If you transfer a packet of rations to a starving character it will be eaten
immediately, rather than at the end of the day.
Page 40

A Guide to
Inventory Items
Following are a few of the unusual but useful
items you will encounter on your journey.
Items may be bought, found or given to you.
Be on the lookout for stray objects as you
travel. Even the most insignificant seeming
items can prove to be essential later in your
travels. (See page 34 for information on using items.)
Broadsword
A broad-bladed sword meant for hacking,
but not particularly effective for lunging.
Due to its weight, it is a damaging but
none too accurate weapon.
Medium Crossbow
The standard issue weapon for Midkemian
archers. It is fairly accurate and powerful.
Bowstring
This kind of string can be used on light or
medium crossbows when the bowstrings
break. It cannot be used on the Heavy
Crossbow. Drop the bowstring on the
crossbow to use.
Silverthorn
Silverthorn is easily recognizable due to its
distinctive silver thorns on a rose-like stem
and its corpulent red berries. It is a deadly
but detectable general purpose poison and
is especially well suited for treating
weapons. Each berry may be used for one
application.
Naphtha
Naphtha is highly flammable. Applied to a
sword blade it can cause extensive flame
damage to an opponent.
39
Page 41

t is called a Bessy
“
Mauler. ◆ Why it is
I
named after Bessy is
not known, but it is
indeed a mauler.”
A Darkness At Sethanon
— Baru
Lightning Staff
The Lightning Staff is an ancient magical
tool. With this item, magic users can call
forth a bolt of lightning, without losing
Health/Stamina Points.
Glory Hand
The Glory Hand is the shriveled hand cut
from a thief who was hung at midnight.
When used in conjunction with the
Nightfingers spell, it allows the user to
magically steal almost any item from a
combat opponent, then it crumbles to
dust.
Infinity Pool
The Infinity Pool is an ancient artifact
used by magicians to magnify the effects of
any combat spells that they cast. At first
glance, it seems like an ordinary pendant
— brown leather cord, brass catches, a
small glass globe — but close inspection of
the interior reveals thousands of scarlet
points of light.
Bessy Mauler
The heaviest of the Midkemian crossbows,
it is also the strongest available, able to put
a dent in even the toughest armors. The
power of the Bessy Mauler brings with it
some sacrifice in accuracy.
Elven Quarrel
This elven crossbow load has a special
accuracy modifier that makes it
enormously accurate and long-ranged.
Considered one of the best loads to have
with a crossbow of any make, the Elven
Quarrel is particularly effective if used
with an Elven Crossbow.
Moredhel Lamprey
The Lamprey is a favorite weapon of
Moredhel raiders. The blade edge is
composed of a series of mini-blades useful
for both sawing and slicing.
Torch
A branch or club wrapped with oil-soaked
rags. Torches may be used indoors or
outside.
40
Page 42

Galon Griefmaker
This elven blade is an effective compromise
between weight and accuracy. Highly
accurate, it is weighted in such a way that
it can be used to either hack or to stab, but
is especially effective when swung. Like the
Moredhel Lamprey that followed it, the
Griefmaker has small teeth for sawing.
Herbal Pack
Usually containing the standard healer’s
materials of alum and healer’s alcohol,
herbal packs can help prevent deadly
infections. A healing herbal pack can be
used to double the rate at which a party
member heals.
Weedwalkers
Worn inside the shoes, these magical green
slippers greatly increase your stealth,
improving your odds of creeping by
enemies without being detected.
Restoratives
These small vials of green liquid are helpful
for restoring Health/Stamina to injured or
ill party members.
Picklocks
Complex sets of precisely crafted hooks,
files, clips, pins and picks, good picklocks
are usually fashioned from sterling silver.
They can be used to open nearly every
lock, depending on the user’s skill.
Whetstone
Use in conjunction with the Weaponcraft
skill to maintain and repair chipped or
broken blades.
Armorer’s Hammer
Similar to a ball-peen hammer, this
hammer is needed by anyone who wishes
to repair armor with their Armorcraft skill.
Rations
This is the food that each party member
carries. Rations seem to travel best when
wrapped in small packages with brown
paper and tied with string. Food might
include salted sweetmeats, hard rolls,
sliced apples or strawberry tarts to last
from one to fourteen days.
41
Page 43

Combat
ombat can be initiated in a variety of ways. ◆
Most will occur while you are exploring, as your
C
assassins. ◆ Digging up a grave can also result in a
combat situation, as deadly spirits known to Midkemians
as “shades” will often attack the party.
party attempts to fend off attacking monsters and
Initiative Advantage
When you first spot an opponent, you can click on him/her with the left button to try
to gain an initiative advantage. (The odds of this happening are based on your party
member with the worst Stealth rating.) Once you’ve selected an opponent, you must
immediately rush forward and attack to maintain an advantage. (It is possible for
enemies to ambush your party, in which case they have the initiative advantage.)
If no one has an initiative advantage, the order of who goes first when the combat
begins is based on Speed ratings. (This rating is also used to determine how far each of
your characters can move per turn.) Imagine the combat area as a grid. (You can, in fact,
press the “G” key on the keyboard to display a grid on the combat area. Press “G” again
to turn it off.) Each “square” on this grid represents one step. A character with a speed
rating of “5” can move five steps in one turn.
42
Page 44

Controlling Your Characters
Combat is turn-based, so there is no time limit for selecting a character action.
Since only one character can be controlled at a time, only one character globe
will be displayed at the bottom of the screen. That character will also have a
square-shaped highlight around his feet in the combat window.
To move the highlighted character to a new position, move the cursor into the
combat view and move it until you see a green highlight square. This indicates
a position the character can move to, i.e. a spot inside his movement range
that isn’t already occupied by another character. Press the left button to move
the highlighted character to that spot.
Thrusting with a Sword or Staff
You can only thrust at an opponent who is within range. If your
character has enough Speed to reach the enemy character in one combat turn, he is in
range. When you position the movement cursor under your opponent, the cursor will
turn yellow. The information in the box next to your character’s globe will tell you his
chances of hitting his opponent and how much base damage would be caused by a
successful strike. Click the left mouse button to complete the action.
Highlight
Combat Option Buttons
Swinging with a Sword or Staff
Swinging a sword or staff requires a great degree of concentration and balance. You
must be “in position” before this option will be available. This means your character
must be lined up vertically or horizontally with his opponent while standing no more
than one step away. Swinging will tire characters, lowering their Stamina; however,
Health will not be affected.
43
Page 45

To swing, target your opponent as you would for a Thrust, but click the right button. A
message box will show the Accuracy and Damage values for both swinging and thrusting
to help you decide on the best option.
Traps
During your travels you will undoubtedly run across magical traps left by devious
enemies of the Kingdom. Keep in mind that spellweavers always design such traps with
a “way out” to avoid accidentally trapping their own. Though little is known of these
devices, scholars tell of dangerous crystals and “lines that must not be broken.” Floating
“keys,” both crystal and solid, can somehow affect an escape.
To escape a trap it is often only necessary for one character to move “through” or “past”
it. Be careful when moving your characters, they will only move in straight lines and
when forced to go “around” an object or character, may select the wrong direction and
move into harm’s way. Press the “G” key to turn on the “grid.” This will make escape easier.
NOTE: After one character has been moved, press th “R” key to “cycle through” the other
characters (this works the same as left clicking on the character’s position to “rest” him) until
you get back to the character you are controlling.
More Combat Options
44
The following options can be selected at the bottom of the Combat screen:
Fire Crossbow
You must have a crossbow and quarrels and be at least one step away from the nearest
opponent to choose this option. When it is available, left click on the Quarrel icon. The
last quarrel type fired is automatically selected. To choose a different load left click on
Page 46

the button displaying the desired quarrel type. There are more quarrel types than there
are buttons, click on the More button until you see the load you want.
Target an enemy by moving the cursor to the opponent’s feet. When the highlight
appears at his feet you will see an information box displaying the Accuracy and base
damage you can expect from the selected quarrel type. Left click to shoot.
NOTE: You cannot target opponents unless you have them in your line of sight. If another
character or object is between an archer and his opponent, that opponent cannot be targeted.
Spellcasting
You must be standing at least one step away from the nearest opponent. The combat
window will be replaced by a marble colored background on which you will see a circle
studded with 30 small gemstones. A list of available spells will appear on the right.
Magic symbols will appear on the buttons at the bottom of the screen, select these to
access different spells. (Also see pages 17 and 52.)
When a spell is selected, the combat view will return and you may select a target by
moving the cursor to an appropriate character or opponent. Left click to cast the spell.
To cancel a spell, click on the Cast button, then choose Exit.
◆ Some spells will require that your target be within your line of sight (such as when
firing a crossbow). Such spells will indicate this in a message box when you move
the cursor over their magic glyph.
◆ To see which spells a particular magician knows, select him with the right mouse
button, then click on the Spells button to bring up a list of all his known spells.
◆ Some spells will require special items. For example, Nightfingers can only be cast if
the magician has a Glory Hand in his Inventory.
45
Page 47

Retreat
Selecting this option will not always be successful. In some combat situations, such as
when caught in some magic traps, retreat is not possible. Also, if one or more of your
party members go down in combat, the others will refuse to leave. If a retreat attempt is
successful, the party will automatically fall back and regroup some distance away from
where the encounter took place.
Try not to let enemy opponents retreat during combat. This is especially important
early in the game, as retrieving items from the inventories of fallen foes is a crucial
means of finding valuable items that can be used or sold in nearby shops.
NOTE: Regardless of its success, an attempted retreat counts as one combat turn.
Defend
This option causes a character to assume a defensive posture, increasing the chance that
he will successfully parry an incoming sword strike for one combat turn.
Assess Opponents
Each character in the party has an Assessment skill, that can be used during combat to
“size up” enemy opponents. To use this option, left click on the Assess button and then
on an opponent in the combat window. Assess Opponents uses one combat turn. The
amount of information you receive is proportionate to the Assessment skill of the
character.
46
Rest During Combat
Choose this option to allow a character to regain lost Health/Stamina points.
NOTE: Resting during combat increases the likelihood of your character being injured
if he is attacked.
Page 48

Auto-Combat
Left click on the Auto-Combat button to allow characters to begin fighting on their
own, without your direction. This option is convenient in situations where victory is
assured. To interrupt this mode and regain control of combat, left click on the Exit
button at the bottom of the screen.
NOTE: Auto-Combat is unavailable when the party is caught in a magic trap.
On Death and Dying
Any characters who fall during combat can still be revived by the surviving party
members following combat. Revived characters will be extremely weak and will recover
much more slowly than from a normal injury. To help such characters recover, go to the
nearest temple and pay for a Cure. If all of your characters go down, the game will end
and you will be taken back to the Options page.
47
Page 49

Combat Strategies
Swinging or Thrusting
When you attack an opponent during combat, several factors must be taken into
consideration. First, the Accuracy of the attack, which you will see in the message
window at the bottom of the screen once an opponent has been targeted. Accuracy is
determined by the character’s current Melee Accuracy skill, which is then modified by
the overall balance of the weapon being used.
Some swords are better suited to a swinging attack, others may be better balanced for
thrusting. Also to be considered are:
◆ The current condition of the character (injuries and sickness will cause a loss in all
general coordination skills).
◆ The condition of the weapon (weapons are displayed with the percentage of their
effectiveness).
◆ The class of the weapon being used (a human fighter will not be quite as effective
using a Moredhel sword, just as a Moredhel would be less effective using a
Kingdom blade).
◆ If the weapon has been blessed by the gods of a local temple.
To learn more about the strengths and weaknesses of weapons in your Inventory, right
click on them.
48
The base damage of a melee attack is determined by the Strength rating of the character
and the Damage rating of the weapon being used. Like the Accuracy figure described
above, the overall condition of the character and the weapon, the class of the weapon
etc., must also be considered.
Page 50

You will find objects that can help increase the damage caused by your weapons. For
example, a fiery substance called naphtha, though rare, can be used to create a fire-edged
blade, significantly increasing the damage it will do. (To use, drag the naphtha over to
your blade and release it.)
The following visual effects will be created when characters are hit with “enhanced”
weapons:
Sword Icon Target Effect
Poisoned green drop Flash green
Flaming flame Red sparks
Frosted Blade snowflake Sparkle blue
Clerical Enhancement 1 cross Glow white
Clerical Enhancement 2 cross Glow blue
NOTE: Objects and potions exist that will make your armor resistant to many of these
special enhancements.
Please note that the damage information displayed at the bottom of the screen when you
target an opponent represents base damage. This figure will be reduced by the defensive
skill and armor of your opponent.
In general, successfully striking an enemy with a swinging attack will do more damage
than a quick, jabbing thrust.
STRATEGY TIP: The enemy cannot swing their weapons unless they are close enough
to do so. Keep in mind that if you move a character into position, or choose a thrusting
attack (your character will automatically move into position), you will be open to a
swing maneuver on the opponent’s next turn. If possible, try to stay at least a step away
and let your opponent come to you.
49
Page 51

Crossbow Strategy
Each fighter in the game has a Crossbow Accuracy skill which, in conjunction with the
distance the character is from his opponent, will determine the likelihood of a successful
strike. Other things affect this accuracy as well, such as the condition of the character, (a
drunk character, for example, will have a significantly harder time using a crossbow) the
condition of the crossbow, and the accuracy of the load (elven-fletched quarrels fly
truer).
Be extremely careful when targeting enemy opponents. Errant crossbow shots are very
unpredictable, and could easily strike a character in your party who is nearby.
The amount of damage a character can inflict with his crossbow is
based on the crossbow type and condition and the amount of damage
associated with the type of quarrel loaded.
STRATEGY TIP: You can view accuracy and damage information for
each type of quarrel you possess by choosing a load and targeting an
enemy. Information about your current load will appear in the message
window. Repeat the process to view information on other loads. This
should help you choose the best load for the current combat situation.
Defense Strategy
Choose this combat option when you feel the enemy is about to attack.
The effect is to raise a character’s Defense percentage, protecting the
character from losing too many HealthStamina points. Another
advantage of this option is that successfully parrying a blow will sometimes leave an
opponent open for a melee attack on your next turn. The effectiveness of this attack will
be slightly greater than normal.
50
Page 52

Enemy Intelligence
With time, you will recognize many differences in enemy intelligence and motivation.
For example, you will find that some of your opponents will attack recklessly, while
others will be more cautious, stopping to rest before stepping back into the fray. A
group of Moredhel who happen across your characters while on a routine patrol will be
much more likely to retreat, once injured, than a Moredhel party assigned to protect a
strategic pass through the mountains.
STRATEGY TIP: If you can determine which character in the enemy party is the
leader, go after him first. If he is killed or chased away, the rest of his party will be much
more likely to retreat.
Some enemy parties will include a leader, archers, and possibly a spellcaster or two.
Spellcasters, in addition to casting offensive spells, are particularly dangerous because
they can also use their powers to heal injured comrades.
Almost every opponent you will come across has a weakness of some kind. Find this
weakness and exploit it. Many opponents will also be resistant to certain things. A giant
spider, for example, will have a natural resistance to some poisons as they are substances
manufactured by its own body.
Poison
Poison will affect characters much more severely during combat than when they are
merely traveling.
“...you must stay to the
off-hand side. ◆ With the
big swords, your opponent
gets one swing, then you’ve
got an opening —”
— Prince Arutha
Magician: The Author’s Preferred Edition
51
Page 53

Magic
wo kinds of magic exist on Midkemia: magic of the
Greater Path and magic of the Lesser Path. ◆
T
practitioners of the magic arts. ◆ Long before the Riftwar
with Kelewan, when the Greater Path magic was brought
to Midkemia, the forerunners of the Lesser Path began
their explorations into the nature of the universe,
especially into the nature of magic. ◆ These early
magicians became tribal shaman, medicine men, and
witches and warlocks.
As civilization rose, so did the estate of the Lesser Path, though never as quickly nor as
high. Old superstitions die hard and the Lesser Path magicians became objects for
distrust, fear and even active persecution. As a result, most modern Lesser Path
magicians tend to be solitary creatures, rarely gathering in large social groups. Even
those that live in cities tend to have few friends or acquaintances. The exception is at the
Academy Of Magicians, a place where many who walk the Lesser Path have found
fellowship in the brotherhood of magicians.
Lesser Path magicians are the original human
52
Page 54

In general, the Lesser Path magician is seen as a person who is involved in the “craft” of
magic while the Greater Path is seen as the path of scholars. This is partially incorrect, as
those who follow the Lesser Path possess a great deal of knowledge about the nature of
magic. But it is generally true that Lesser Path is a talent, while the Greater Path is
associated with scholarship. Lesser Path magicians approach their education in a much
more ritualistic manner than do those of the Greater Path.
At one time it was believed that Greater Path and Lesser Path powers could not be
combined; but Pug, the most powerful magician in Midkemia, proved that it was
possible to use the Lesser Path skills he had learned as a young magician on Midkemia,
and the Greater Path skills he learned as an adult. Pug now teaches both Lesser and
Greater Path magic at his academy at Stardock.
(For information on Spellcasting, see pages 17 and 45.)
53
Page 55

“
nyone who employs
magic must have a
A
focus for the power
he uses. ◆ Priests have
power to focus their magic
through prayer; their
A Guide to Spells
The wilds of Midkemia are filled with dangerous and menacing foes. Sometimes your
only defense is powerful magic. You can learn spells from other characters in the game
or from scrolls that you buy or find. To learn a spell from a scroll, you must click on it
with the left mouse button, then click on the Use button. The scroll will disappear.
Following are some of the spells you may find at your disposal.
incantations are a form of
prayer. ◆ Magicians use
their bodies, or devices, or
books and scrolls.”
— Master Magician Pug
Magician: The Author’s Preferred Edition
54
Flamecast
Creating a deadly ball of flame that travels
from the caster to the enemy, the
Flamecast spell is used only in combat. It
causes damage to anyone within two steps
of the target, if hit.
Skyfire
The Skyfire spell can only be cast on a
character who has some sort of metal on
his person: metal armor, a metal helmet, a
metal sword, etc. It is delivered much like
Flamecast, though it takes the form of a
lightning bolt channeled from above.
Hocho’s Haven
Hocho’s Haven creates a surrounding wall
of energy that will protect the target from
receiving damage from any and all attacks.
The wall disappears when its limit is
exceeded.
Gift of Sung
Gift of Sung (Sung is the god of healing)
can be cast on any party member except
the caster. It facilitates a one to one health
transference from the magic user to the
recipient. The recipient can’t exceed his
health rating.
Page 56

Grief of a Thousand Nights
Effective only on sentient creatures, this
spell is used to immobilize single enemy
targets. When cast on an enemy, the
creature suddenly falls into a deep
melancholy, lost in recollections of past
sorrows. The victim will remain in place
until the spell is overcome or wears off.
River Song
This spell summons a Rusalki who fights
for the player. After combat she returns to
her element.
The Unfortunate Flux
When cast on an enemy, the victim begins
to sweat an amber-colored liquid. Soon,
elemental sprites appear and begin to
consume the liquid and the victim along
with it.
Stardusk
This spell allows the party to “see” in the
darkness of night. It can only be used
outside. Once cast, the scene appears as
though it is daytime.
Invitation
Invitation is a strategic spell that draws the
enemy into close range for combat. It is
especially effective against enemy archers
or spellcasters as they may be drawn too
close to cast or shoot.
Final Rest
This spell must be cast on a dead
Nighthawk or Black Slayer. This is a final
blessing from Lims-Kragma that allows a
humanoid creature to return to the
Drawer of Nets. If it is not cast, and there
are other Black Slayers in the immediate
area, dead Nighthawks will become Black
Slayers.
“
agic, by its
nature, is
M
unstable. ◆
Occasionally a spell will
become warped — why, we
don’t know — to such a
degree, it… tears at the
very fabric of the world. ◆
For a brief time a rift
occurs, and a passage is
formed, going…
somewhere.”
— Kulgan
Magician: The Author’s Preferred Edition
55
Page 57

Locations
56
Entering Houses and Buildings
To attempt entry, click on a house or building with the left mouse button.
Entering Cities
Access larger cities on the map by approaching them. When the party gets close enough,
a message will appear asking whether you want to actually enter it or not.
Should you choose to enter, a map view will be displayed as the party automatically
follows the nearest road into the city. Upon arrival, the town will be displayed in the
main view window. As you move the cursor over the town, you will see it change,
indicating actions you can take and places you can go. For example, if you move the
cursor over a particular building and the word “TAVERN” appears on the screen, you
can left click to enter the tavern.The cursor might also change to a magnifying glass,
which indicates things that can be examined more carefully by clicking with the left
button.
Shops, Taverns and Inns
You can enter most shops, taverns and inns by left clicking on them. When you move
the cursor over a shop’s interior, it may change to the words, “BUY/SELL.” Clicking the
left button will cause the shop’s inventory to appear. To exit from this screen, move the
cursor down to the shop description. When the cursor changes to the word “EXIT,”
press the left button. Some shops have “Repair” areas that may be clicked on. In such
shops, the cursor will change to “REPAIR,” giving you the option of repairing weapons
or armor for a price.
Page 58

Buying Items
When the inventory for a shop is
displayed, the shop icon in the lower right
corner of the screen will be highlighted,
indicating that you are looking at the
inventory for the shop. Purchase items by
dragging them down to one of the
character globes at the bottom of the
screen. You will then have the option to
purchase the item for the advertised price,
exit without buying the item, or Haggle
with the shopkeeper in an attempt to
lower the price. (For more on how to
Haggle, see page 30.)
Gold sovereigns and silver royals are the
primary methods of payment in
Midkemia. Ten silver coins are roughly
equivalent to one gold coin.
Selling Items
Sell an item by clicking on a character globe to view that character’s inventory. Then,
drag an object down to the shop icon in the lower right corner. A message will appear
telling you how much the shopkeeper will offer for the item. You can sell the item for
that price or exit without selling anything. Shopkeepers will offer less for damaged
items. It may be useful to make a note of these locations. To return to the shop
inventory where you can buy items, select the shop icon.
ancy shells and
gemstones can be
F
traded and will
generally bring a good
price in shops that deal in
such items.
57
Page 59

Temples
From here you will be able to teleport to other locations on the map,
cure ailing characters, bless items in your inventory or speak with the
priestesses or priests of the temple.
Teleport
Most of the temples in the game will have a special pattern on one wall.
Upon entering a temple, the party will automatically make note of this
special pattern to teleport back to the current temple from some other
temple.
To teleport, move the cursor to the pattern, when the cursor changes to
the word “Teleport” press the left mouse button. You will see the game
map indicating your current location. If there are temples available for
you to teleport to, they will be marked. As you move the cursor over
other temples, the menu in the upper left corner will tell you its name and how much it
will cost you to teleport there. Click the left mouse button to complete the operation.
Enter
This option allows you to enter the cloisters where you will have the following options:
Talk — Talk to the priests or priestesses of a temple.
Bless — Bless your armor and bladed weapons. When the Inventory screen
appears, move the cursor over the item you want blessed. When the cursor changes
into the shape of a hand, press the left button.
Cure — This option can be used to remove any conditions a character may be
suffering from (i.e., poison), but it will not improve Health/Stamina points. A
character who has been injured in battle cannot be cured if he has no specific
condition (i.e., poison or plague).
58
Page 60

A Guide to Locations
The land of Midkemia consists of a
multitude of colorful and sometimes
mysterious towns and landmarks.
Following are some of the places you may
encounter during your travels through
Midkemia.
Krondor
Krondor is the traditional home of the
heir apparent to the throne of the
Kingdom of the Isles. Located beside the
Bitter Sea, it is the capital of the Western
Realm. Once a trading outpost in Keshian
Bosania, it has a long and turbulent
history as numerous princes and dukes
have struggled for control of the city.
During the time of the Riftwar, it was
temporarily seized by Guy du Bas-Tyra at
the command of mad King Rodric, but was later rightfully restored to the ConDoin line.
It now is peacefully ruled by Prince Arutha and the Princess Anita.
Palace
Though built as a fortress to withstand attacks from both land and sea, visitors from
foreign lands receive warm welcome from the royal family and their servants. Located
within the main court of the palace are the enclosed sleeping quarters of the royal family
and their servants, the throne room, a well-appointed banquet hall, a recently
redecorated gymnasium and a minor shrine dedicated to each of Midkemia’s gods.
59
Page 61

Sewers
Also known as the Thieves’ Highway, Krondor’s labyrinthine sewer system
extends for miles beneath the city of Krondor. The underground passages are
completely controlled by the Mockers, a guild of thieves ruled by a
mysterious figure known as the Upright Man.
Sarth
Tall, iron-banded wooden gates straddle the roadway. A stone wall a dozen
feet high stretches around Sarth, which had once been a fortress. Around the
ancient tower, a larger single-story keep building had been added as well as
two outbuildings.
Sarth is maintained by the Brothers of Ishap, a religious order that worship
the god Knowledge. People often travel to Sarth in search of the answer to a
question that can be answered nowhere else. Long before the Brothers of
Ishap found the keep, it was maintained by a Keshian robber-baron who was
eventually assassinated by the local peasantry.
The Vaults
Located under the old keep at Sarth are large vaulted chambers with shelving
along the walls and free-standing shelves in the center of the rooms. All
shelves are packed with books. From the top of the hill to the lowest level
there are over a thousand chambers housing thousands upon thousands of
books. The vaults are tended by Brother Anthony and Brother Marc.
60
Page 62

Romney
Not so much a town as a meeting place, Romney is a bustling hub of hawkers
calling their wares. In every direction, carts, colorful tents and even more colorful
characters fill the landscape. Travelers passing through often get caught up in the
general carnival atmosphere that pervades the place.
Black Sheep Tavern
The Black Sheep Tavern is a two-story structure that also serves as an inn for the
those coming off the dusty road. Its strange L-shape seems to indicate that an
addition has been made onto the original structure, thus enlarging it to
accommodate the increasing numbers of people beginning to stream through the
town. Inside it is a very standard tavern where one can acquire food and drink.
Fletcher’s Post
Run by a sly-looking elven owner, the Fletcher’s Post exclusively deals in exotic
archer’s goods, particularly elven arrows. The proprietor has been known to teach a
few elven spells for a handful of gold.
Stardock Annex
The annex is really nothing more than simple sleeping quarters adapted into a tiny
shop for the use of magicians visiting the Ishapian brothers. Rudimentary magical items
such as, Rings of Prandur, healing salves, and scrolls, are available here.
61
Page 63

Highcastle
Highcastle was easily overrun by the
Moredhel in the Battle of Sethanon during
the Great Rising. Since then, Prince
Arutha has realized his weakness in the
North and reinforced the fortifications
there to discourage any further incursions
into the Kingdom of the Isles. Highcastle
is essentially a frontier fort town that
guards Cutter’s Gap.
Sar-Isbandia (Armengar)
Armengar was completely destroyed
during Murmandamus’ march to
Sethanon. Only recently have the
Moredhel returned to claim their “prize.”
Scavengers have erected small tents while
others live in the burnt-out rubble. A faint smoke still drifts over the town, issued from
the mouth of a hole where the keep once stood.
Temple of Eortis
Constructed on an island, the Temple of Eortis is a monument to the god of the sea
constructed eons ago when Silden was only a simple fishing village. White marble
columns rise thirty feet into the air, supporting an equally heavy ornamented roof from
which dolphin heads emerge in majestic poses. The temple is attended by the High
Priestess of Eortis.
62
Page 64

Sethanon
Once the site of a minor Barony, Sethanon has never been well
defended and for this reason was destroyed in the infamous Battle
of Sethanon. Now overgrown with weeds, it looks like a sad old
ghost town, though a close look at it reveals signs of the battle that
raged there. Once the battle was over, King Lyam decreed that the
town should be abandoned as a memorial to those who fought and
died there.
Lifestone Crater
The result of the eruption of the Lifestone at the end of the Great
Rising, the Lifestone Crater looks like a huge lava flow. The mouth
of the crater has a strange glow emanating from it.
63
Page 65

People & Creatures
hroughout your travels you are sure to meet a
number of interesting new people and creatures. ◆
T
very dangerous. ◆ Following are descriptions of some of
the inhabitants of Midkemia.
Beware, as all are not as they appear and some are
Seigneur James
Once known as Jimmy the Hand, Seigneur James is the son of the Upright Man, the
leader of the thieves’ guild in Krondor, though James is not aware of his heritage.
Elevated to the nobility by Arutha, Seigneur James has taken his position of authority
with reluctance and still wanders his old thief haunts in disguise. He is extremely loyal to
Arutha, and will do anything that his liege lord asks him to do.
There is a cynical look that touches Jimmy’s face when he is about to go into a new or
strange situation. Although elevated to the position of Seigneur in Arutha’s court, he is
mischievous and has the air of a rogue about him.
64
Page 66

Seigneur Locklear
The youngest son of the Baron of Land’s End, Locklear has been the constant friend of
Jimmy since they were boys. His mind is razor sharp; an attribute that has made him a
valuable asset to Krondor. Although physically slower than Jimmy, he can usually defeat
him in rapier duels because of his shrewd combat strategies.
Seigneur Locklear sports a healthy tan year round as he often vacations near his father at
Land’s End. He is one of the finest swordsmen in Midkemia.
Owyn Beleforte
Owyn is the son of a minor noble in the Eastern
Kingdom but has been spared most of the treacherous
politicking that occurs in other courts. Although he
displayed some ability at magic while he was young,
his father insisted on yoking him to the
responsibility of the court. He has two older
brothers Neville and Robert.
An extremely thin young man whose innocent blue
eyes belie his age, Owyn’s magic is a force to be
reckoned with. In many ways, he resembles the man
he idolizes, Pug the Magician.
65
Page 67

Gorath
Gorath looks as menacing as Owyn looks innocent. There is a haunting quality in
his eyes that seems wolfish, as if he is a creature on the run. A long scar, nearly
hidden by his hairline, traces the left side of his face from temple to cheek. The son of
a Moredhel father and a human mother, Gorath wears a beard that is not possible for
those of pure Elven and Moredhel descent. He does however have the lobeless pointed
ears typical of his kind.
Makala
A man of remarkable intensity and great mental resources, Makala is one of the
members of the Tsurani Assembly of Magicians, an organization of magicians to
which Pug belonged while he was living on Kelewan. Since the Riftwar, Makala has
been an avid student of the war between the Tsurani and the Kingdom, spending
a great deal of time visiting with Master Magician Pug discussing historical and
magical issues.
Dressed in the mode of a Great One (the title which Tsurani magicians are given),
he always wears a voluminous black robe that hides his otherwise frail frame.
66
Page 68

Pug
Orphaned at a young age, Pug was raised in the kitchens of Crydee in the Western
Empire. Apprenticed to Kulgan the magician, he showed little magical promise
initially. Pug was captured and enslaved by the Tsurani during the Riftwar.
Seeing vast potential in the boy, the Great Ones of the Tsurani Empire began to
train him in the magic of the Greater Path. When Pug returned to Midkemia, he
helped bring an end to the Riftwar with the help of Macros the Black. He was
also adopted into the royal family and awarded the land to begin his Academy of
Magic at Stardock. His irresistible friendliness belies the fact that he is the
unchallenged master of magic in Midkemia. Pug is the father of two, an adopted
daughter Gamina who possesses telepathic powers, and William, his natural son.
Patrus
Before the days of Pug’s Academy of Magicians at Stardock, Patrus was kept busy
with the buzzing questions of his young apprentices. Now, he finds himself
without students, a fact that bothers him more than he cares to admit. Too
proud to seek a scholar’s position at the Academy, he spends much of his
time locked in the towers of Northwarden studying books he has borrowed
from Sarth. From time to time he is called upon to work some minor
magic or another, but few tasks truly challenge his abilities.
Although Patrus seems addle-brained at times, he is numbered among the
most capable magicians in Midkemia. Wrinkled as yesterday’s laundry, his
face is greatly expressive. Although he is balding, the sides of his head still
foster white wisps of hair and his pointed chin is covered by a haze of beard.
He walks with a slight hunch, is still fairly spry for his age and has no problem
keeping up with his younger companions.
67
Page 69

Delekhan
Leader of the unified Nations of the North, Delekhan was once one of Murmandamus’
field generals during the war of the Great Rising in which the Moredhel made a bloody
march to Sethanon.
He has risen to great power by taking advantage of the disunity among his people
following their humiliating defeat. With his power, he has terrorized various clans
into joining him in another siege on Sethanon, telling his people that
Murmandamus is being held captive by the Kingdom of the Isles. To this end, he
has hired a band of mercenary magicians (dubbed “The Six” by his advisers) who
help him to consolidate his power.
Always arrayed in battle gear, his mercurial temper is as legendary as his hatred for the
chief rival to the throne in Sar-Sargoth, Gorath of the Ardanien.
Brother Marc
Well regarded as a researcher among his brethren at the Abbey
of Ishap at Sarth, Brother Marc has a knack for finding
obscure scraps of information. Whether researching the
mating habits of the Kuilli birds of Kelewan or the chess
gambits of the ancient Keshian game masters, it is rare that
he is unable to answer a visitor’s question. He is warmly
remembered by all who meet him as a man with a friendly
smile and gentle eyes.
68
Page 70

Dubal An Loch
Dubal is a cantankerous dwarf who likes to mix it up with humans and elves from time
to time. A veritable fixture at the LaMut’s Blue Wheel Inn, he can be found smoking his
herbal pipe for hours while he chats about his old campaigning days. His left eye, scarred
above and below, is covered by a milky white cataract through which he claims he can
still see. Unlike the rest of his kin, he keeps his beard trimmed relatively close and his
braided hair has become quite white.
Duke Martin
A man of few words, Duke Martin is always awkward in the
presence of others. His narrow eyes seem strangely exotic,
as if they could see through solid objects. His hands are
elegant, well suited to pulling the bowstring of the
magnificent Elven bow that is always at his side. His
hair is black and tied in a short pony tail. A former
ranger, Martin would prefer to avoid strangers, but is
often sought after for his knowledge of scouting
techniques.
69
Page 71

“
surani are
slaves to
T
politics, as
any student of the
Game of the
Council can
attest; while we
of the Assembly
are reputed to be
above such things,
we have our own
factions and
infighting, not always
settled in a peaceful,
bloodless manner.”
— Hochopeppa
Magician: The Author’s Preferred Edition
Sumani
For all of his fine training under the LaMutian corps,
Sumani retains much of his Tsurani raiding demeanor.
When he smiles, the expression is somewhat enigmatic; you
never know if he is truly pleased or not. His hair is black,
with streaks of silver beginning to appear. Most of the hair is
shaved at the rear of his neck except for one rat’s tail which he
adorns with silver bells. Like many of the Tsurani, he wears fur
and multiple-layers of wool as Midkemia is unforgivably cold in
comparison to his home-world of Kelewan.
Tomas
Though his basic nature is that of a man raised in the kitchens of Castle Crydee, Tomas
is an individual of great power. A blue-eyed human with sandy hair, his features have
changed through his contact with the terrible magic of the ancient Valheru, a race which
once ruled all of Midkemia. His ears have become pointed in the elven fashion and his
eyes possess a dim glaze left over from a once towering battle-madness. He is in his midthirties and is the consort to Queen Aglaranna of the Elves. It would take a very bold or
very stupid man to contradict Tomas face-to-face.
70
Page 72

“
ong before
man or dwarf
Aglaranna
The Queen of the Elves, Aglaranna is often described as
beautiful, though not in entirely human terms. Her pale
blue eyes seem almost luminous in certain lights. Her face is
finely chiseled with high cheekbones, a strong jaw and a full
smile. A simple circlet of gold holds back her hair and reveals the
lobeless, upswept ears that are the hallmark of her race.
Although she is well over two hundred, Aglaranna looks barely twenty, the legacy of
her elven blood. She is married to the Warleader Tomas and she is a proud, fiery
woman who has been a wise and much-loved leader to her people.
Katala
Katala’s calm nature, intelligence, and ability to deal with people tactfully have made
her the natural leader of a diverse community of magic users and their families. A
striking woman in her mid thirties with dark hair and large, dark eyes she commands
the utmost respect and affection from those around her. Married to Pug, Katala came
from Kelewan, the home of the Tsurani people.
L
came to this
world, the Valheru
ruled. ◆ They
were part of the
world, fashioned
from the very
fabric of its
creation, nearly
godlike in power and
unfathomable in purpose.
◆ …Upon the backs of the
great dragons they flew, no
place in the universe
beyond their reach. ◆
…This world was their
dominion. ◆ And we were
their creatures.”
— Queen Aglaranna of the Elves
Magician: The Author’s Preferred Edition
71
Page 73

Moredhel
Distant relations to the Elves, the Moredhel have darker skin, hair and eyes and tend to
be much more violent than their Elven counterparts. Having been close to the Valheru
in ancient times, they are warriors by nature and relish combat.
Ordinary warrior dress usually consists of furred robes of bear or deerskin. Moredhel
typically wear brown trousers with open vests and knee length boots.
Nighthawk
The Nighthawks are a guild of assassins who have crept about in Midkemia for several
centuries, though they have only truly organized themselves in the past hundred years.
They dress for concealment under the cover of night, so they tend toward entirely black
wardrobes. Nighthawks have been known to turn into Black Slayers. Black Slayers are
“undead” zombie-like creatures that have been brought
back to life by evil means. Once killed, they will
continue to rise until the player casts the “Final
“
he dark elves have
been attacking
Rest” spell on them.
T
castles on and off as
far back as anyone can
remember. ◆ And
goblins… well, they’re
goblins.”
— Master Magician Pug
Magician: The Author’s Preferred Edition
72
Page 74

Rusalki
A Rusalki is the restless and often deadly spirit of a drowned girl that has come back near
the body of water where she died. When people are near, particularly young men, the
Rusalki will attempt to lure them close enough to kill them.
As spirits, the Rusalki have an ethereal presence and appear semi-transparent. Usually
they take the form of a young girl, with tendrils of seaweed dangling from their arms.
Quegian Pirate
Though usually pirates by trade, there are a few
landlocked freebooters among the Quegians who
enjoy traveling wherever their services can be offered.
Typically young, these mercenaries copy the
gregarious mode of dress of the Eastern Empire.
Highly polished boots, a red sash that drapes from
left shoulder to right hip, and black pantaloons
make up the usual ensemble
73
Page 75

Giant
Giants look like very large human beings. Standing about ten feet tall, Giants are capable
of hurling very large rocks. Little more than wild animals, they wear only minimal
clothing. Giants will attack ferociously, if their territory is invaded.
Troll
Human-like, but short and broad, with long,
thick arms that hang nearly to the ground,
Trolls can walk on two legs but will often run
on all fours. Their bodies are covered by a
thick gray hide and their lips, drawn back,
reveal long fangs. The ugly creatures rarely trouble
larger groups of humans, but they will attack lone
travelers or parties of less than four members from time to
time. Trolls are feral creatures but easily manipulated. The Moredhel often use them for
attacks on the kingdom.
Brak-Nurr
These troublesome creatures live in the depths of caves and
mines, preying almost exclusively on the dwarves of the Grey
Towers. Their flesh resembles crumbled blocks of stone,
allowing them to lie back in small culverts without attracting
notice. Small flecks of gold in their skin help them to lure
dwarven miners near enough for attack, though they have
been known to attack almost any creature without
provocation. They are quite broad and appear to have no eyes
74
Page 76

The Riftwar Saga — An overview of Raymond E. Feist’s Riftwar books
rydee lies in the
westernmost duchy of
the Kingdom of the Isles.
◆ Here, an orphan
kitchen boy named Pug
was made an apprentice
magician. ◆ An
indifferent student of
magic, he nevertheless rose to high station and became a
squire of the court.
With his best friend Tomas, Pug discovered the wreckage of an alien vessel from
Kelewan, a world dominated by the mighty Empire of Tsuranuanni. After several of the
Duke’s men studied the remains of the ship, they surmised it had come through a
magical gate called a rift and feared warships would follow.
Leaving his eldest son Lyam behind, Duke Borric and his younger son, Arutha, led a
company of men south to Krondor to warn Prince Erland of the possible attack. In the
75
Page 77

“
here are mines
throughout these
T
mountains, ancient
tunnels under the Grey
Towers… ◆ There is one
mine that passes completely
under the mountains,
coming out on the other
side of the range.”
woods they found themselves beset by Moredhel, but eventually escaped to the relative
safety of the Mac Mordain Cadall, an ancient dwarven mine.
During the trek through the Mac Mordain Cadall, Tomas became separated from the
group and found one of the last of the golden dragons, ancient and near death. The
dragon told of his life and his encounter with a strange sorcerer, Macros the Black.
Dying, he left Tomas with a magical gift of golden armor that would forever change his
life.
When the anticipated Tsurani invasion came to pass, Borric took command of the
Armies of the West and rushed into battle. Realizing the importance of learning more
about the magical rifts, the Duke sent Pug into Tsurani-held territory, but the boy
magician fell captive and was taken to Kelewan.
— Dolgan, King of the Grey Towers
Magician: The Author’s Preferred Edition
76
Enslaved by the Tsurani, Pug began a new life and fell in love with a girl named Katala,
but was snatched away from his slave owner when it was learned he knew something of
magic. Immediately he was taken to the Assembly of Magicians and began training in
the Greater Path, a magic nonexistent in Midkemia.
Tomas matured into a warrior of stunning power, made so by his ancient armor, once
worn by a Valheru — a Dragon Lord. Little was known of these legendary first people of
Midkemia, save they were cruel and powerful and had kept the Elves and the Moredhel
as slaves. Aglaranna, the Elf queen, feared Tomas was being consumed by the power of
Ashen-Shugar, the ancient Dragon Lord whose armor he wore.
The Riftwar raged into its ninth year. Arutha feared they were losing the struggle and
went to Krondor to appeal for help from the Prince. Finding the city besieged, Arutha
was captured by the guild of thieves and was befriended by a young pick-pocket named
Jimmy the Hand, who would figure prominently in the future prince’s life.
Pug attended the Imperial Games on Kelewan, commemorating the Warlord’s smashing
victory over Lord Borric. Pug became enraged at the cruelty displayed at the games,
Page 78

especially the brutal treatment of Midkemian prisoners. In a fit of rage, he destroyed the
arena, shaming the Warlord and throwing the politics of the Empire into chaos. Pug
then fled with Katala and his son William back to Midkemia.
In Midkemia, the war was going badly for the Kingdom of the Isles. During a mad
offensive against the Tsurani, the King became mortally wounded and, lacking an heir,
named Borric’s eldest son Lyam as the successor to the throne, also making Arutha the
Prince of Krondor.
Eventually the Tsurani and the Kingdom sued for peace and brought the war to an end,
but during the ceremony Macros the Black appeared and closed the rift between worlds.
In the process, he was assumed to be killed.
All returned to the throne city of Rillanon for Lyam’s coronation, save
Arutha and Pug who visited the isle where Macros had lived. A servant
of Macros told them the sorcerer had destroyed the rift to avoid
drawing attention to the Enemy, a vast and terrible power known to the
Tsurani in ancient times who could use the rift to find its way to
Midkemia.
For a year peace reigned in the Kingdom, but violence erupted once
more as a member of the Nighthawks guild of assassins attempted to
take Arutha’s life. Having saved the Prince’s life, Jimmy the Hand was
forced to leave the Mockers and became a squire of the Prince’s court
where he met Squire Locklear. Despite the differences in their
upbringing, they became lifelong friends and comrades in arms.
Using Jimmy’s knowledge of the seedier elements of Krondor, the
Prince created a plan to capture his assassins, but when confronted most
of them chose suicide rather than surrender. One captive, a magically
disguised Moredhel, rose up from the dead and called upon his master
Murmandamus, the evil leader of the Moredhel Nations of the North.
77
Page 79

“
T
here is an order to
things… a balance
imposed by Ishap,
Alarmed, Arutha told his advisers of the danger but decided to proceed with his plans to
wed Anita, daughter of the former Prince of Krondor. Unfortunately, a Mocker assassin
slipped into the wedding and made a second attempt to kill Arutha. He struck the brideto-be with an arrow tipped with a rare poison, Silverthorn.
the One Above All. ◆ The
greater gods rule through
the lesser gods, who are
served by the priesthoods.
◆ Each order has its
mission. ◆ An order may
seem to be in opposition to
another, but the higher
truth is that all orders have
a place in the scheme of
things.”
— Father Nathan
Silverthorn
78
While on a quest to find the antidote to the deadly Silverthorn and save Anita’s life,
Arutha learned the Moredhel were acting on a prophesy that they would rise to power
once the “Lord of the West” was dead. They believed Arutha was the “Lord” in question.
Pug determined that the dark forces behind Murmandamus’ incredible power were of
Tsurani origin. The Enemy — the ancient terror mentioned by Macros’ servant at the
end of the Riftwar — was attempting to find a way through the rift.
In Elvandar, Tomas was reunited with Pug who told him the Tsurani Enemy was trying
to find a way into Midkemia. Pug also said both Kelewan and Midkemia faced their
worst threat since the days of the Chaos Wars. He asked Tomas to come with him.
Tomas agreed and, using his special powers, summoned a dragon, Ryath, upon whose
back they could travel between dimensions and times.
Ryath took them to a being known as the Oracle of Aal who informed them that only
Macros the Black knew the answers they sought.
In search of Macros, they travelled to the City of the Dead Gods where they discovered
countless monuments. Tomas pointed out the gods and their duties and explained that
originally Ishap had created a hundred gods, but only sixteen survived the insanity of the
Chaos Wars to become the gods of Midkemia.
After he discovered yet another plot against his life, Arutha staged his death to throw his
enemies off-track. While Krondor mistakenly mourned Arutha, he headed north to kill
Murmandamus. At the boundary between the Kingdom and the territory of
Murmandamus, the party was taken captive by strangers. They were led to the most
militarily impressive city that any of them had ever seen — Armengar. They realized the
Page 80

city would be one of the first major targets that Murmandamus would attack before
heading into the Kingdom.
Pug and Tomas eventually found Macros in the garden of the mysterious City Forever,
but also found themselves caught in a time-trap set by the Enemy who had stripped
Macros of his power. They managed to outwit the Enemy and broke free from their
temporal confinement.
“
e shall call our
servants, the
W
goblins, the
mountain trolls, the landstriding giants. ◆ All shall
At Armengar, Murmandamus attacked the city. Realizing they would be unable to hold
the citadel from the Moredhel, Arutha and the city’s Protector, Guy du Bas-Tyra,
ordered the city burned in an effort to incinerate Murmandamus’s army. Unfortunately
the Moredhel leader escaped the city unscathed and Arutha and the rest of the refugees
headed for Highcastle, the next stop on Murmandamus’s path.
En-route to assist Prince Arutha — Pug, Tomas and Macros passed through the Hall of
Worlds, a place that gave them access to Midkemia. Tomas asked Macros about the
Valheru. In response, Macros passed a hand over Tomas’s eyes and Tomas began to
“remember” a past life as a Dragon Lord.
Years before, when Tomas had received the armor, he inherited the powers and mind of
Ashen-Shugar, father of all the Valheru, who once strode the lands of Midkemia. AshenShugar, like the rest of his kind, was continually at war with every being that lived and
was one of the most powerful entities in the universe. Tomas and Ashen-Shugar shared a
mind-link that spanned centuries, both learning from the link and gaining qualities of
the other. This was how Tomas had become a legendary warrior and how Ashen-Shugar
learned the quality of compassion.
Eventually the gods of Midkemia came into being and the Valheru warred upon them.
In the process, time and space became warped. This was the time of the Chaos Wars,
when the Valheru warred with thousands of different races on thousands of different
worlds. Finally, one of the Valheru, Draken-Korin, forged a tool to use in the war, the
Lifestone, an item tied to all life in the world. Since the gods were also tied to that life,
come to serve us. ◆ We
shall march into human
lands and burn their cities.
◆ I shall erect my throne
upon a mountain of their
bodies. ◆ Then, O my
children, shall we spill
blood.”
— Murmandamus
Silverthorn
79
Page 81

the Valheru hoped to extinguish the gods with the Lifestone and escape through time,
returning later to reclaim their world. Ashen-Shugar would not allow it and slew
Draken-Korin. Later, as Ashen-Shugar grew old and tired, his life essence drained into
his armor — the armor that was given to Tomas.
Macros explained that Murmandamus was likely to be swarming over Highcastle on the
way to Sethanon, a city built on the ancient site of the Lifestone. They realized the
Enemy was not a single entity, but was the combined will of all the ancient Valheru
trying to come back and take Midkemia.
At Highcastle, the Moredhel armies massed for the assault and Prince Arutha discerned
part of the Moredhel plan, though unaware of their goal. Realizing that Highcastle
would be easily taken, he told the Baron to leave the castle; but the Baron insisted they
could take anything the Moredhel threw at them. The battle went terribly wrong and the
Baron was killed during a Moredhel raid. The Prince was finally able to convince the
surviving Highcastle commanders to quit the castle and head for Sethanon.
Pug contacted his daughter, Gamina, and summoned the magicians of his magical
academy and the armies from Kelewan to meet him at Sethanon.
Sethanon was under attack and the defenders attempted to hold out for the arrival of
reinforcements. Confronting Murmandamus on the walls of the city, Arutha identified
himself to the Moredhel as the “Lord of the West,” knowing Murmandamus was using
this allegation to manipulate the will of his troops.
80
Tomas, Macros, Pug, Arutha, and Ryath descended to the Lifestone chamber far below
the city. Macros informed them that if the Moredhel reached the Lifestone, it would
mean the end of all life on Midkemia.
Murmandamus strode through the bodies of the dead and drew his magic from death
itself. Steeped in power, he decided that he was now strong enough. He abandoned his
monstrous army and headed to the chamber of the Lifestone.
Page 82

Protected by a talisman from Macros, Arutha began an incredible duel to the death with
Murmandamus. Pug and Macros tried to hold closed the rift that the Enemy was
attempting to open with the help of Murmandamus.
After great effort, Arutha killed Murmandamus. In death, his true nature was revealed.
He was not a Moredhel but a Pantathian snake priest, a race of beings dedicated to
bringing their Valheru mistress, Alma-Lodka, back into the world. With his death, Pug
and Macros felt a sudden surge of energy as the rift opened for a brief second, just long
enough to let the ancient spirit of Draken-Korin into the room.
Tomas/Ashen-Shugar intercepted Draken-Korin as the evil Dragon Lord strode toward
the Lifestone and the two began a fearsome battle. Finally, when it seemed Draken was
going to activate the Lifestone, Tomas killed him and drove his golden sword through
the Valheru and into the Lifestone.
For a moment there was a brilliant sparkle in the skies as the ghostly forms of the
Dragon Lords appeared, but their power wasn’t equal to the powers of life that rejected
them from the world. Suddenly everyone in the area was swept by a sense of joy and
happiness. The Dragon Lords were defeated!
King Lyam dispensed titles and honors to the heroes of Sethanon while Pug and Tomas
said a reluctant farewell to Macros. Ryath was mortally injured in the battle and Macros
placed the Oracle of Aal into the dragon’s emptied mind and placed her in charge of the
future defense of the Lifestone. Slowly, the veterans of the war went their separate ways.
81
Page 83

Peace reigned. For ten years, the Kingdom prospered. Prince Arutha’s twin sons Borric
and Erland grew into rambunctious teenagers; Squire Jimmy matured, becoming a much
respected Seigneur of Krondor’s court; Pug returned to his Academy of Magic at
Stardock and began a program of information exchange with the Assembly of Magicians
on Kelewan, though refusing information specific to the battle of Sethanon; and Squire
Locklear briefly entered military service under a daring garrison leader named Baron
Moyiet who watched the Moredhel with an unforgiving eye. His watch would not go
unrewarded.
Still bitter over their defeat at Sethanon, the Moredhel yearned, driven by a belief the
Kingdom had tricked them and imprisoned their leader, Murmandamus. Battles raged
between rival clans who sought to control the future of the Moredhel. Those who had
migrated from the Green Heart during the Riftwar chafed to return to their ancient
forests, but were captured or killed as various chieftains attempted to brutalize the clans
into a fearful union. When at last a Moredhel chieftain named Delekhan seized control
of the ancient fortress Sar-Sargoth, he vowed revenge for the wrongs done to the
Moredhel as he unfurled a banner not seen for ten years… the battle standard of
Murmandamus.
War would soon follow.
82
Page 84

Credits
Designer & Director.................John Cutter
Original Story...........................Neal Hallford
Raymond E. Feist
Art Director..............................William M. McHugh
Lead Programmer .....................Nels Bruckner
Programming............................Steve Cordon
Timothy Strelchun
Lead Production Artist..............Mark Vearrier
Game Text & Event Design .....Neal Hallford
Assistant Designer.....................Tim McClure
Research & Development .........Darek Lukaszuk
Piotr Lukaszuk
Steve Cordon
John Leavens
Background Paintings...............D. Brent Burkett
Artists .......................................Robert Kraft
Viqqi Hippler
3-D Artists................................Damon Mitchell
Vance Naegle
Original Musical Score .............Jan Paul Moorhead
Sound Effects............................Christopher Stevens
Tim Clarke
Additional Sound Editing.........Ken Rogers
Theatrical Coordinator .............Sher Alltucker
Photographer ............................Dale Tendick
Production Assistants................Joseph Muennich
Chris Medinger
Ken Paulson
Puzzle Editor ............................Alan Roberts
Quality Assurance Manager ......Forrest Walker
Lead Quality Assurance
Analyst..................................Chris Singleton
Quality Assurance
Technician............................Dave Steele
Quality Assurance Analysts .......Dan Hinds
James Domico
Duri Price
Chris Medinger
Joseph Muennich
Gerald Azenaro
Chris Hunt
Zach Marcus
Corey Reese
Robert Harrington
Technical Support Advisor .......Larry Buchanan
Costume Construction .............Laura Peasley
Nancy Manley
Barbara Williams
Kim Harris
Sher Alltucker
Prop Construction....................Douglas Zalud-Mackie
Sher Alltucker
Spider/Scorpion Wrangler ........Cowboy Mike
Manual Editor ..........................Barbara Ray
Manual Design .........................Sue Roberts
Box Cover Design.....................Roger Smith
Box Cover Art ..........................Roger Smith
D. Brent Burkett
Betrayal at Krondor is
based on characters created
by Raymond E. Feist
Special Thanks
Bob Lindstrom, Dan Hinds, Janna Silverstein, Joel
Mariano, Thomas Van Velkinburg, Kerrie Abbott,
Rhonda Conley, Kyle Miller, David Aughenbaugh,
Jenny Gray, Mike Boyersmith, Stephen Abrams,
April Abrams, Steve Barrett, Anita and Jon Everson,
Dave Guinasso, Conan LaMotte, Tim LaSelle,
Ethan Munson, Bob Potter, Rich Spahl, Alan
Springer, Lori and Jeff Velten, Sean Murphy, Peter
Lewis, Tito Pagan, Ivan Tomicic, David Sandgathe;
the Bob Squad: Bob Bauer, Kurt Engle, Rick
Overman; Backstage Dancewear
Betrayal at Krondor is based on the
Midkemian Universe created by Midkemia
Press and Raymond E. Feist. Portions © by
Raymond E. Feist or Midkemia Press.
83
Page 85

Technical
Support
If you receive an error message when playing or
installing a Sierra or Dynamix game, refer to the
following explanations and solutions.
CRC ERROR — This means you have a bad disk.
It stands for Cyclic Redundancy Check, a way to
check for disk errors. (See Replacement Diskettes,
page 86.)
DATA ERROR READING DRIVE A or B — This
means you have a bad disk. (See Replacement
Diskettes, page 86.)
GENERAL FAILURE READING DRIVE A or B
— This could indicate you are trying to read high
density disks with an incompatible low density drive.
YOU NEED “____” MORE BYTES OF FREE
MEMORY AVAILABLE TO RUN THIS GAME
— There is not enough free memory to successfully
run the program. You may need to boot your system
with a boot disk. (See Boot Disk instructions
included on the Quick Reference card.)
SECTOR NOT FOUND READING DRIVE A —
This means you have a bad disk. (See Replacement
Diskettes, page 86.)
Memory Requirements
Sierra and Dynamix programs require a large
amount of memory (RAM) in order to function
properly. If you are encountering difficulties and
84
(MS-DOS only)
want to see how much memory is available through
MS-DOS, type MEM. If the “largest executable
program size” line is below 604,160 (590K), please
use a boot disk. (Minimum memory requirements
may vary per game.) NOTE: Some games require
expanded memory (EMS). If your game requires
EMS memory and the MEM command does not
indicate any EMS memory available, run the install
program an choose to make a bootable floppy or
follow the instructions on creating a boot disk on the
Quick Reference card.
Boot Disk Instructions
For information on creating a boot disk for Betrayal
at Krondor see the Quick Reference card.
Trouble-Shooting Tips
If you have created a boot disk (see the Quick
Reference card for instructions) and booted your
system with it before playing a Sierra or Dynamix
game and still have problems, something else may be
wrong. Following are some trouble-shooting
recommendations from Sierra’s Technical Support
Department.
• Boot your system with the boot disk you
created.
• Reinstall the game under a boot disk
environment.
• If you experience any form of program
hesitation or lockups during game play and are
using a Sound Blaster or compatible sound
card, try the following temporary solution. For
Sound Blaster or compatible sound card users,
run the install procedure from the game subdirectory and select “Ad Lib” or “PC Internal
Speaker” for music. Please Note: This
temporary solution does not give you the
option to hear sampled sounds or speech that
may be available in your game. For a
permanent solution to sound card problems
call Technical Support at Sierra On-Line or
your sound card manufacturer.
• If you continue to encounter difficulties with
your program, contact Sierra On-Line’s
Technical Support.
“Robo Tech”
Sierra On-Line’s Automated Technical Support
Representative
As part of our commitment to provide the best
Customer Service in the industry, we offer a 24 hour
automated Technical Support Line. “Robo Tech”—
our automated Technical Support Representative,
has answers to our most frequently asked technical
questions and is available by calling our Technical
Support Line at (209) 683-8989 (a touch tone
telephone is required for automated support).
There is no automated voice response system in the
U.K. at this time. Answers to many technical
questions are available on the Sierra U.K. BBS at
(44) 734 304227. To speak to an actual Technical
Support Representative call (44) 734 303171
Monday through Friday, 9a.m. to 5p.m.
Page 86

Customer
Services
The best customer service in the industry — “You
don’t just buy our games, you buy the support of
the whole company.”
Sierra On-Line is dedicated to helping you with each
and every question or problem. Whether it’s memory
shortages, software compatibility, or any other issue
affecting our products, we guarantee your
satisfaction.
Customer Service
Contact the Customer Service Department, 1-800SIERRA-5, for issues pertaining to returned
merchandise, back orders, defective merchandise, and
general game information.
U.S.
Sierra On-Line
Customer Support
P.O. Box 600, Coarsegold, CA 93614-0600
1-800-SIERRA-5 (1-800-743-7725)
EUROPE (U.K.)
Sierra On-Line Limited
Unit 2, Technology Centre, Station Road
Theale, Berkshire RG7 4AA, United Kingdom
Technical Support
Direct questions on hardware and software
compatibility to the Technical Support Department.
Call (209) 683-8989 in the U.S. or (44) 734 303171
in the U.K. for convenient, person-to-person
technical assistance. If you prefer, you may contact
Technical Support by Fax (209) 683-3633 in the U.S.
or (44) 734 303201 in the U.K., or by mail. If you
choose to write or fax us with your request, please give
us detailed information on your computer system and
the nature of your problem. In addition, please
include your address and telephone number should we
need further information.
U.S.
Sierra On-Line
P.O. Box 800, Coarsegold, CA 93614-0800
Attention: Technical Support
Monday-Friday, 8:15 a.m. - 4:45 p.m.
Call (209) 683-8989, Fax (209) 683-3633
EUROPE (U.K.)
Sierra On-Line Limited
Attention: Technical Support
Unit 2, Technology Centre, Station Road
Theale, Berkshire RG7 4AA, United Kingdom
Monday-Friday, 9:00 a.m. - 5:00 p.m.
Call (44) 734 303171, Fax (44) 734 303201
Sierra Technical Support is also available through:
Sierra BBS*: U.S. (209)683-4463 or
U.K. (44) 734 304227
CompuServe-GAMAPUB, Section 11 (Technical
Support ID - 76004,2143)
Prodigy
(for Sierra: Technical Support ID- WBWW55A)
(for Dynamix: Technical Support ID- WBWW55B)
America Online
GEnie
*Answers to our most frequently asked questions are
available through our Sierra BBS (U.S. only).
Boot disk instructions for other DOS formats are
available for downloading from the Sierra BBS.
BBS file name: BDALL.EXE
Hints
Game hints are available by phone, hint books, the
Sierra Bulletin Board Service (209) 683-4463 or by
mail. For an immediate response, call our 24 hour
Hint Line at: 1-900-370-5583. In the U.K., call
(44) 734 304004. Charges are 75¢ each minute.
Long distance charges are included in the fee. U.K.
customers will be charged the normal rate for U.K.
telephone calls. Callers under the age of 18 must get
their parent’s permission before calling the hint line.
ABSOLUTELY NO HINTS WILL BE
PROVIDED THROUGH OUR CUSTOMER
SUPPORT LINES. At this time, the automated hint
system is only available within the United States. All
contents are copyrighted by Sierra On-Line and may
not be reproduced in any form without written
permission.
U.S.
Sierra On-Line
Hint Dept.
P.O. Box 200, Coarsegold, CA 93614-0200
24 hour Hint Line:
U.S. 1-900-370-5583 (75¢ each minute)
EUROPE (U.K.) (44) 734 304004
85
Page 87

Orders
Order games, hint books or hardware, redeem
coupons, use special discounts, or get a list of
software dealers in your area where you can purchase
Sierra games by calling 1-800-326-6654.
U.S.
Sierra On-Line
Sales Dept.
P.O. Box 978, Oakhurst, CA 93644-0978
For direct orders:
Call 1-800-326-6654, Fax (209) 683-4297
EUROPE (U.K.) orders:
Call (44) 734 303171, Fax (44) 734 303201
Patch Disks
Please send your request to the Patch (repair) Disk
address below. Let us know the game and disk size
you are having problems with.
Sierra On-Line
Dept. 10
P.O. Box 485, Coarsegold, CA 93614-0485
The Sierra No Risk
Guarantee!
THE PROMISE: We want you to be happy with
every Sierra product you purchase from us.
Period. If for any reason you’re unhappy with the
product, return it within 30 days for an exchange
or a full refund...EVEN IF YOU BOUGHT IT
RETAIL! (Hardware ordered direct must be
returned within 10 days.)
THE ONLY CATCH: You gotta tell us why you
don’t like it. Otherwise we’ll never get better.
Send it back to us and we promise we’ll make
things right. (If you bought it at a retail outlet,
please send your original sales receipt.)
Limited Warranty Notice
The publisher of this software wants your continued
business. If you fill out the enclosed product
registration card and return it to us, you are covered
by our warranty. If your software should fail within
90 days of purchase, return it directly to us, and we
will replace it free. After 90 days, enclose $10 for
5.25" or 3.5" disks and return the software directly
to us. Sorry, without the registration card you are
not covered by the warranty. This warranty gives
you specific legal rights, and you may also have other
rights which vary from state to state.
Replacement Diskettes
Should you receive faulty or damaged disks, send the
original disk #1 in the size you need (3.5" or 5.25")
to:
U.S.
Sierra On-Line
Fulfillment
P.O. Box 485 , Coarsegold, CA 93614
Attention: RETURNS
EUROPE (U.K.)
Sierra On-Line Limited
Attention: Returns
Unit 2, Technology Centre, Station Road
Theale, Berkshire RG7 4AA, United Kingdom
86
Include a note stating your computer type and the
size of diskette you need (3.5" or 5.25"). We will
gladly replace your program free of charge for the
first 90 days of ownership (please enclose a copy of
your dated sales receipt with your request). After 90
days there is a $10.00 (£6.00) charge for 3.5" or
5.25" diskettes.
Page 88

IT IS ILLEGAL TO MAKE UNAUTHORIZED COPIES OF THIS SOFTWARE
This software is protected under federal copyright law. It is illegal to make or distribute copies of this software except to make
a backup copy for archival purposes only. Duplication of this software for any other reason including for sale, loan, rental or
gift is a federal crime. Penalties include fines as high as $50,000 and jail terms of up to five years.
as a member of the Software Publishers Association (SPA),
supports the industry’s effort to fight the illegal copying of personal computer software.
Report Copyright Violations To:
SPA, 1730 M Street, NW, Suite 700, Washington, DC 20036
(202) 452-1600
Copyright Notice
This manual, and the software described in this manual, are copyrighted. All rights are reserved. No part of this manual or the described software may be copied,
reproduced, translated or reduced to any electronic medium or machine-readable form without the prior written consent of Dynamix, Inc., P.O. Box 485, Coarsegold,
CA 93614.
® and ™ indicate trademarks of, or licensed to, Dynamix, Inc. © 1993 Dynamix, Inc. All rights reserved. Printed in the U.S.A.
Betrayal at Krondor is based on the Midkemian Universe created by Midkemia Press and Raymond E. Feist. Portions © by Raymond E. Feist or Midkemia Press.
P
88
Page 89

006221000
 Loading...