

Page 1
Page 2

EPILEPSY WARNING
A very small percentage of individuals may experience epileptic seizures
when exposed to certain light patterns or flashing lights. Exposure to
certain patterns or backgrounds on a television screen or while playing
video games may induce an epileptic seizure in these individuals.
Certain conditions may induce previously undetected epileptic
symptoms even in persons who have no history of prior seizures or
epilepsy. If you, or anyone in your family, has an epileptic condition,
consult your physician prior to playing. If you experience any of the
following while playing a video game — dizziness, altered vision, eye
or muscle twitches, loss of awareness, disorientation, any involuntary
movement, or convulsions — IMMEDIATELY discontinue use and consult
a physician before resuming play.
PRECAUTIONS TO TAKE DURING USE
• This game disc is intended for use exclusively on Windows®-based
systems with the minimum configurations specified on the system
requirements of the game purchased.
• Do not sit too close to the screen. Sit a good distance away
from the monitor, as far away as the length of the cable allows.
• Avoid playing if you are tired or have not had much sleep.
• Make sure that the room in which you are playing is well lit.
• Rest for at least 10 to 15 minutes per hour while playing
a video game.
HANDLING YOUR GAME DISC
• Avoid bending the disc. Do not touch, smudge or scratch its surface.
• Do not leave the disc in direct sunlight or near a radiator or other
source of heat.
• Take occasional rest breaks during extended play.
• Always store the disc in its protective case.
ESRB RATING
This product has been rated T for Teen by the Entertainment Software
Rating Board. For information about the ESRB rating, or to comment
about the appropriateness of the rating, please contact the ESRB at
www.esrb.org.
2 REWRITE THE PACIFIC WAR!
2 Take Your Battlestation,
Henry Walker!
3 SETTING UP
3 Installing the Game
3 Uninstalling the Game
3 Running Battlestations: Midway
4 DEFAULT CONTROLS
4 Menu Controls
4 Game Controls
6 QUICK START
6 MAIN MENU
7 SINGLE PLAYER MODE
7 Campaign Groups
7 US Campaign
8 Naval Academy
8 Ship/Plane/Submarine
Challenge
8 Game Screens
8 On-Screen Help
8 SHIPS & SURFACE CRAFT
8 Ships & Surface Craft Controls
9 Ships & Surface Craft Game
Screen
9 Movement & Helm Controls
10 Unit Window
11 Radar/Compass
12 Weapons Systems
14 AIRCRAFT
14 Aircraft Controls
15 Aircraft Game Screen
16 Engine & Flight Controls
16 Aircraft Weapons Systems
18 SUBMARINES
18 Movement
18 Submarine Controls
18 Depth Level Indicator
19 Air Supply
19 Weapons
20 ADVANCED MANAGEMENT
SYSTEMS
20 Map Screen
21 Map Screen Controls
22 Issuing Orders
23 Command Menu
25 Repairs
26 Repair Screen
27 Controlling Carriers
29 OPTIONS
29 AWARDS
30 MULTIPLAYER MODE
30 LAN Game
30 Multiplayer Unit Icons
31 Internet Game
32 GLOSSARY
33 CREDITS
36 TECHNICAL SUPPORT
Page 3
REWRITE THE PACIFIC WAR!
TAKE YOUR BATTLESTATION, HENRY WALKER!
Battlestations: Midway represents a radical advance in naval
war gaming. Now YOU can control and direct every aspect
of naval warfare, with genre-defining control systems
and strategic interactive maps.
From your early days captaining a wooden-hulled torpedo
boat, your challenge is to advance through the ranks
of the United States Navy to command the largest
battleships and aircraft carriers of World War II.
Ultimately, you will direct entire battle groups of
ships and subs, as well as squadrons of aircraft,
to strike against the jewels in the crown of the
Japanese Navy.
This may sound like a tall order, but with
training at the Naval Academy, you’ll grow
in skill and experience. With resolve, focus
and determination — plus a little bit of luck
— perhaps you can you triumph against
a deadly opponent, an enemy equipped
with weaponry and units that equal
those of the Allied forces.
The Pacific is at battlestations. Are you
equal to the challenge?
•Enter the Naval Academy and be schooled in the noble art
of seamanship.
•Grow in stature as a naval commander, and try your hand
at a range of Challenge missions.
•Throw yourself into the fray in Multiplayer mode, competing
with opponents locally via Local Area Network or remotely
over the Internet via the GameSpy Matchup service.
•Check out the comprehensive Battlestations: Midway website
at www.battlestations.net.
SETTING UP
INSTALLING THE GAME
1. Make sure the system requirements and specifications shown
on the game pack match those of your machine.
2. Place the Battlestations: Midway DVD into your DVD-ROM drive. The disc
will autorun and display the installation screen.
NOTE: If Autorun is disabled on your machine, right-click the DVD-ROM
drive icon and select Explore. Then double-click autorun.exe.
3. If the game has not yet been installed, click Install to begin the process.
4. Follow the on-screen instructions to complete installation.
IMPORTANT: To run Battlestations: Midway, you need to have DirectX 9
installed on your PC. To install, select Install DirectX 9 from the
Battlestations: Midway Autorun program, or, from the Explore menu,
open the directx9 folder and double-click dxsetup.exe.
UNINSTALLING THE GAME
To uninstall the game software, select Start #Battlestations: Midway
Uninstall, or Start #Control Panel #Remove Programs #Remove
Battlestations: Midway.
RUNNING BATTLESTATIONS: MIDWAY
With Battlestations: Midway installed on your PC, do one of the following:
• Double-click Battlestations: Midway icon your your desktop (if you chose
this option during installation).
• Select Start #All Programs #Eidos #Play Battlestations: Midway.
• Insert the Battlestations: Midway DVD-ROM into your DVD-ROM drive.
If Autorun is enabled, the game will run automatically. If Autorun is
disabled, right-click the DVD-ROM drive icon and select Explore, then
double-click autorun.exe. Select Play to start the game.
#
2
3
Page 4
DEFAULT CONTROLS
MENU CONTROLS
Highlight option cursor keys 1/2 or W/S
Change setting/Move slider cursor keys 4/3 or A/D
Confirm/Next menu Enter/left-click
Cancel/Previous menu Backspace
GAME CONTROLS
Rudder A/D
Adjust speed W/S
Roll left/right (aircraft) mouse 4/3
Dive/Climb (aircraft) mouse 1/2
Dive/Ascend (submarine) C/F
Rotate camera (marine vessels) mouse
Rotate camera (aircraft) Left Shift (hold)+ mouse
NOTE: Battlestations: Midway supports a variety of controllers.
To check if your controller is supported with a preset
configuration, select Options #Controls from the Main Menu.
GAME CONTROLS (continued)
Cycle formations/squadrons Q/E
Cycle units in selected formation F/C
Fire weapon left-click
Change weapon (except in aircraft) Left Shift (hold)
Bomb/Torpedo Mode Hold Left Shift to aim, then press left mouse
button to drop bomb/torpedo
Select target right-click
Clear target Spacebar
Launch attack (aircraft) right-click
Jump in X
Binoculars/Periscope middle mouse button
Zoom binoculars/periscope in/out mouse wheel
Command Menu Hold Alt, use A/D/W/S to select order
Repair Screen R
Control Panel (Flight Deck/ Left Shift (with unit/facility selected)
Airfield Launch/Shipyard)
Open/Close map Ta b
Show/Hide objectives O
Cycle objectives cursor keys 4/3
Zoom map in/out mouse wheel
Pause/In-game menu P/Esc
4
5
Page 5
QUICK START
SINGLE PLAYER MODE
To quickly launch a Single Player game:
1. When you run the game, the Profile Select menu appears.
2. Select New Player Profile. A typewriter screen appears.
3. Use the keyboard to enter a player profile (in-game) name. Select Done
to proceed to the Main Menu.
NOTE: All your game progress will now be recorded to your player
profile. To delete a profile, highlight it and select Delete.
4. Select a campaign group.
the Single Player Naval Academy missions first. These practical
introductory missions teach you to control the various units.
5. Select one of the unlocked missions to continue to the Mission Map
and Briefing screen.
6. Select a difficulty level to progress to the Load screen. Good luck!
(See page 7.) We recommend that you complete
MAIN MENU
•SINGLE PLAYER — Start your career in the Pacific Theater. You can
begin at the Naval Academy, dive straight into the US Campaign, or try
your hand at one of the unlocked Challenge missions.
•MULTIPLAYER — Pit your naval skills against other players and team up
with your buddies in Battlestations: Midway Multiplayer mode.
•OPTIONS — Adjust Game, Audio/Video and Controls settings. (See page 29.)
•AWARDS — View the Medal Screen, Unit Identification and Videos.
•LEADERBOARDS and ACHIEVEMENTS — Check game awards.
•CREDITS — View names of the people who brought you
this historic game.
(See page 30.)
(See page 29.)
CAMPAIGN GROUPS
•US CAMPAIGN — The Single Player campaign begins on the eve
of one of the key battles of the Pacific conflict.
•NAVAL ACADEMY — Learn the control method and units you will command
in this comprehensive set of 11 tutorial missions.
•SHIP CHALLENGE — Show your skills in challenges designed to test your
mettle as a mariner to the limit.
•PLANE CHALLENGE — Demonstrate competence as a naval pilot in tough
missions to win the crucial air superiority battle.
•SUBMARINE CHALLENGE — Evade destroyers and hunt transports as you
show your colors as a true sea wolf.
NOTE: We recommend that you complete the Naval Academy missions first
to gain competence and confidence, before playing the other modes.
US CAMPAIGN
The US Campaign is the heart of the Battlestations: Midway Single Player game,
shadowing Lieutenant Henry Walker and his old friend Major Donald Locklear
as they meet near the US Navy base at Pearl Harbor. Use skills you’ve learned
in the Naval Academy to help you complete each mission.
NOTE: You can only select unlocked missions.
•Select Start to begin. The Mission Objectives screen appears.
•Press the cursor keys4/3or left-click the numbers to cycle through
the objectives.
•Left-click Background to view mission background and the units under your
command. Press the cursor keys4/3to toggle between the two screens.
•Select Back to return to the Mission Objectives screen.
DIFFICULTY SETTINGS
Before you begin each mission, you’ll be able to select your difficulty level:
•ROOKIE — Suitable for beginners.
•REGULAR — For experienced players who require a ramped-up
difficulty setting.
•VETERAN — Only for the elite. Push your skills and use of resources
to the limit against an unwavering foe.
6
7
Page 6
NAVAL ACADEMY
The Naval Academy missions can help you get a grip on every aspect of the
game’s controls. If you get stuck, head to the Academy for a quick primer.
SHIP/PLANE/SUBMARINE CHALLENGE
The Challenge modes initially offer one mission each, providing a sampler
of the wide selection of units you can control as you progress through
Battlestations: Midway’s US Campaign. When you complete a challenge
mission, the next one is unlocked.
GAME SCREENS
The game screens provide massive amounts of information while you’re
playing Battlestations: Midway. Use them, and you’ll have a good chance
of triumphing over enemy forces. Ignore them, and face the consequences!
SHIPS & SURFACE CRAFT GAME SCREEN
4
2
3
1
ON-SCREEN HELP
As you advance through the Naval Academy missions, on-screen help appears.
This information can assist you in learning the game controls and features,
so take time to read it.
NOTE: Naval Academy missions can be replayed.
SHIPS & SURFACE CRAFT
SHIPS & SURFACE CRAFT CONTROLS
Rudder A/D
Adjust speed W/S
Aim weapon/Rotate camera mouse
Fire weapon left-click
Change weapon Left Shift hold
8
a Helm Controls (see below)
b Unit Window (see page 10)
c Radar/Compass (see page 11)
d Crosshairs (see page 12)
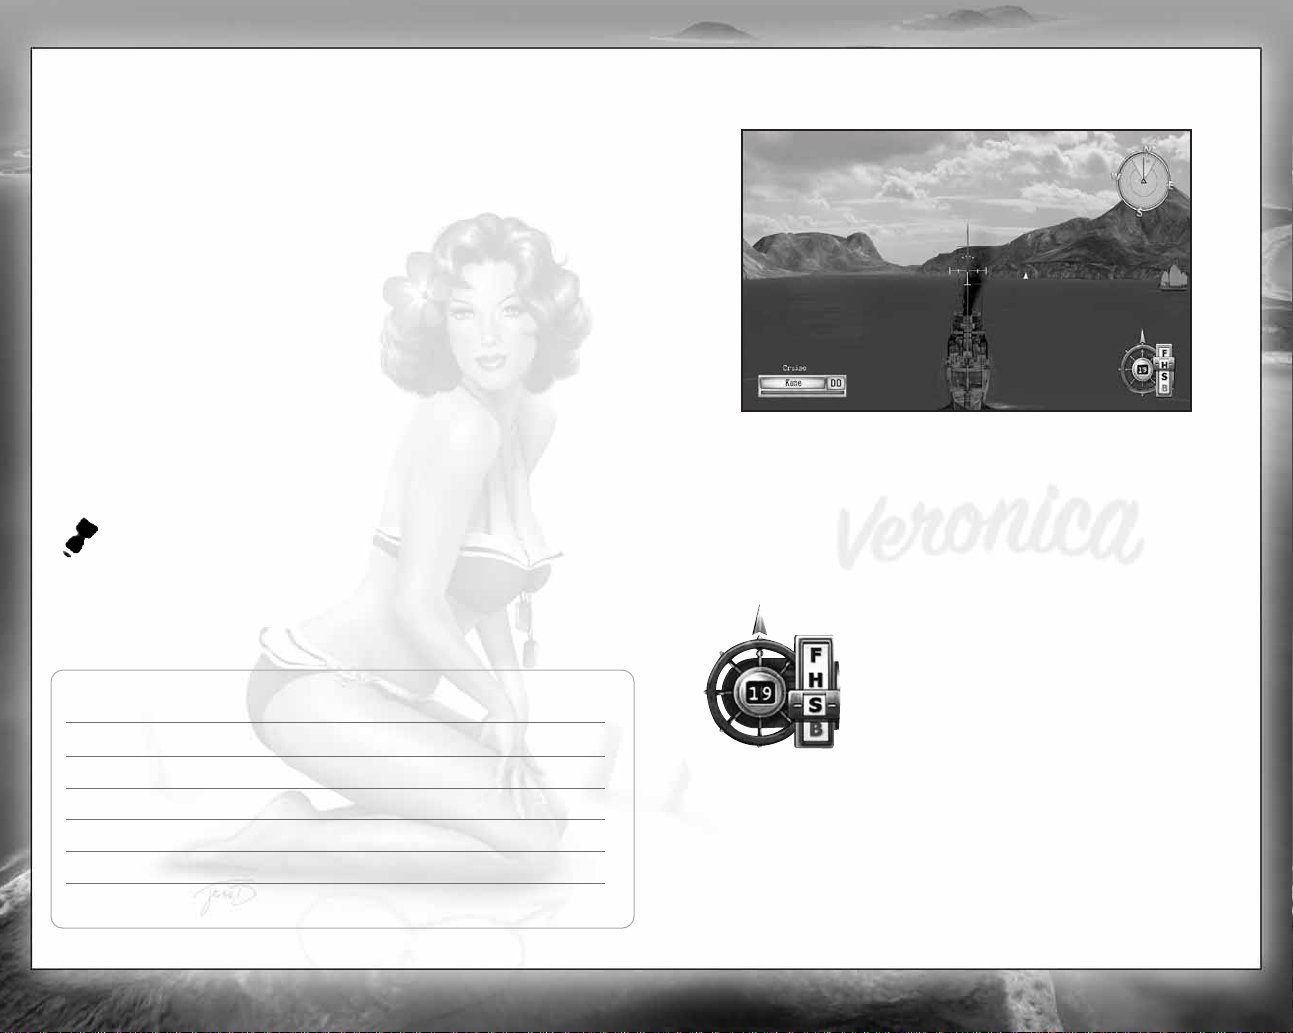
MOVEMENT & HELM CONTROLS
Use the helm controls to pilot the ship and control the engine speed.
Arrow = rudder direction
F = Full ahead
H = Half ahead
S = Stop
B = Reverse
Number = current speed
STEER LEFT/RIGHT A/D
Once you set a rudder heading, it holds until you make another control
input or set orders that override it.
ADJUST SPEED W/S
A ship’s engines propel the craft fore and aft. Once you set the speed,
it holds until you change it or give orders that override it.
9
Page 7

NAV AIDS
Move Camera mouse
•Roll the mouse to look around your ship, pilot it and acquire targets.
Binoculars (on/off) click middle mouse button
Zoom binoculars in/out mouse wheel
•Use the binoculars to extend your eyesight to spot enemy units
at longer distances.
UNIT WINDOW
The Unit window shows the currently selected unit, providing a visual
indication of your ship’s health, its type, its place in a formation and whether
or not it is a mission critical unit.
Gold border = Mission critical unit
Yorktown = Unit name
CV = Unit type
Green bar = Unit health
Left arrow = Other units under your control
Up arrow = Other units in this unit’s formation
•To cycle formations/squadrons under your command, press Q/E.
•To cycle units in the selected formation, press F/C.
SHIP DESIGNATION ABBREVIATIONS
During the Pacific War, the Allied navies use the following abbreviations
to denote the class of a ship. These designations are used in Battlestations:
Midway in both the Unit and Target windows.
PT = Motor Torpedo Boat
CV = Aircraft Carrier
DD = Destroyer
BB = Battleship
CL = Light Cruiser
CA = Heavy Cruiser
SS = Submarine
AK = Cargo Ship
LST = Landing Ship, Tank
REPAIR SCREEN
When the ship is under attack, its health bar shrinks. Use the Repair screen
to keep your ship in service, by allocating crew to repair duties.
Open Repair Screen R
•The Naval Academy mission “Dealing with Emergencies Onboard” guides you
through the ship’s repair systems.
(See page 25.)
RADAR/COMPASS
The Radar/Compass provides an overview of the location of other units
in relation to your unit. Press Tab to open the map to view more detailed
unit information.
NOTE: The Compass shows the direction you are looking in, NOT the direction
your unit is heading in.
Red dot = Japanese unit
Blue dot = US unit
Green dot = Neutral unit
Yellow dot = Objective
Direction of travel = Black pointer
Field of vision = Lighter segment
•Roll the mouse to look around the ship.
•Use the compass and direction of travel indicators to help you control
the unit’s movement while you’re in another screen or operating a weapon.
•Press Ta b to open the map.
10
11
Page 8

WEAPONS SYSTEMS
The key to a warship’s power are its weapons systems.
Aim Weapon mouse Anti-Aircraft Guns 1
Fire Weapon left-click Artillery (Main Guns) 2
Change Weapon Left Shift (hold) Torpedo 3
Depth Charge (DC) 4
•The Naval Academy mission “Manning the Guns” guides you through
the use of all types of ship-borne weapons systems.
•“Aerial Ordnance” covers aircraft weapons systems.
• “Silent Hunting” details submarine weapons systems.
NOTE: For details of Aircraft Weapons Systems,
CROSSHAIRS
The crosshairs changes to show weapons system is currently
selected, and the status of those weapons. The image at the left
shows its neutral state.
AA Crosshairs
The crosshairs for Anti-Aircraft (AA) and AA flak cannons differs
from those of other ship-borne ordnance in one crucial way: it is
dynamic. This means the crosshairs’s appearance changes when
your shots are on target.
Target inactive = Your shots will not hit their target.
Lock-on target = Your shots will very likely hit their target.
Aiming at Fast Moving Targets
When you man the guns against airborne
targets, placing the crosshairs directly over
your intended target often does not change
the crosshairs’s state. This happens because
you must “lead” the target, i.e. aim the
weapon to fire where the target will be in
the future. Notice in the image at right that
the active crosshairs is a good distance
ahead of the aircraft.
NOTE: The Leading Target Indicator is
active in Rookie difficulty mode only.
see page 16.
Artillery Crosshairs
Artillery are large-caliber main guns, suitable for attacking
armored vessels, land-based fortifications and large cargo ships
— all surface targets. Artillery can only be aimed at a solid
surface, and not at airborne units.
Green = Weapon is ready to fire and in range of the target.
Red = Weapon is not ready to fire or is out of range of the target.
Flashing red = Weapon is reloading.
Yellow = Weapon is in range but turning and will be ready soon.
Purple = Weapon is out of ammunition.
Grey = Weapon damaged, but is repairable.
WEAPON STATUS INDICATOR LIGHTS
(See page 25.)
Torpedo Crosshairs
A bubbling torpedo wash is a sight that strikes fear into the
heart of every seaman. These propeller-powered underwater
missiles are guaranteed to blow holes in any ship they strike.
Ships with hull breaches are in imminent danger of sinking,
unless quickly repaired.
Torpedoes are difficult to aim at long distances and, once
launched, cannot be guided.
NOTE: Torpedoes are most effective when a group of them are
fired in an arc, known as a “spread.” This technique gives
the helmsman of the enemy ship less room to maneuver
and avoid all the torpedoes launched.
Depth Charge Crosshairs
The depth charge is the only weapon effective against
submerged submarines. Depth charges cannot be directly aimed
at a target, because they are dropped from the back of the ship.
Using them successfully requires skillful piloting maneuvers
and split-second timing.
•Press 4 to move to underwater view and drop depth charges. Continued key
presses release additional groups of charges.
•You can still control the ship’s movement with A/D/W/S.
12
13
Page 9

AIRCRAFT
AIRCRAFT GAME SCREEN
AIRCRAFT CONTROLS
Rudder A/D
Adjust speed W/S
Roll left/right mouse 4/3
Dive/Climb mouse 1/2
Fire weapon left-click
Rotate camera Left Shift + mouse
Bomb/Torpedo Mode Hold Left Shift to aim, then left-click to drop
bomb/torpedo
Auto-land Press and hold Alt, then press D to select Land
NOTE: For more detailed control of groups of aircraft (squadrons),
see pages 27-28.
1
3
5
2
4
6
L
J
8
7
a Current target — Associated unit/current target distance shows
the unit under the crosshairs. Otherwise, it is the unit your squadron is
associated with. If the squadron has a target, this indicator shows
the squadron’s target.
b Target health
c Distance to target
d Target in range
e Radar/Compass
f Dynamic crosshairs
g Unit window
h Selected weapon — Press and hold Left Shift to change to alternate weapon,
if available.
i Unit condition
j Altimeter
k Artificial horizon
l Throttle
m Air speed indicator
9
K
M
14
15
Page 10

ENGINE & FLIGHT CONTROLS
You must use both flight and throttle controls simultaneously if you want
to become an ace pilot.
ALTIMETER
This gauge indicates your plane’s current height above
sea level. If it flashes red, you are close to a collision
with the ground or sea.
ARTIFICIAL HORIZON
This instrument lets you gauge the attitude of your plane
in relation to the horizon — ideal for flying in your straps
during dog-fights.
Green segment = Ground or ocean surface
Blue segment = Sky
Central line = Horizon
BOMB CAM
Bombs are primed and aimed using the Bomb Cam. The crosshairs
is calibrated to compensate for your forward movement, so be ready
to drop bombs when the crosshairs is on your target.
•Pull and hold Left Shift to activate the Bomb Cam crosshairs.
•Left-click to release the bomb(s) when the target is under the crosshairs.
PLANE STATUS
The Unit window tracks the health of the squadron
leader; the number indicates total squadron members.
• Keep an eye on your damage status. To repair damaged units automatically,
order them to land on their carrier or airfield.
NOTE: For a full walkthrough on bombing, play the Naval Academy mission
“Aerial Ordnance.” Learn general flying and dogfighting in “Piloting a Plane.”
RADAR/COMPASS
As in ships, the plane’s radar shows all units within a certain
distance of the plane, as well as your current heading.
AIRCRAFT WEAPONS SYSTEMS
AIRCRAFT MACHINE GUNS & CANNONS
Both aircraft machine guns and cannons have dynamic
crosshairs to show whether or not your shots are on target.
• Use A/D/W/S and the mouse to aim.
• Left-click to fire weapon.
NOTE: If you are leading a squadron, the other aircraft in the squadron
will attack the targets you specify for them. If they have no specific target,
they’ll attack the same unit you’re attacking.
16
WEAPONS ICONS
The machine gun is the default weapon on most aircraft.
Dive bombers and level bombers are equipped with a payload
of bombs, which are aimed using the bombing reticle.
You must drop torpedoes just above the water. Once launched,
they cannot be aimed, so make sure you line them up effectively.
17
Page 11

SUBMARINES
For instruction on captaining a submarine, and avoiding detection,
play the Naval Academy mission “Silent Hunting.”
Movement
In addition to the helm controls on a ship, the submarine has
controls for diving and surfacing. It is also equipped with
a periscope for covert surveillance of surface targets
and an air supply indicator.
Submarine Controls
Move camera mouse
Binoculars on/off (when surfaced) middle mouse button
Periscope up/down middle mouse button
Zoom binoculars/periscope mouse wheel
Pan binoculars/periscope mouse 4/3
Dive/Ascend toward surface C/F
DEPTH LEVEL INDICATOR
Submarines in Battlestations: Midway move in two planes: vertical and
horizontal. The first set of movement controls (A/D/W/S) are the same
as for surface craft, and operate identically above and below the surface
of the water.
The submarine’s dive and surfacing capabilities are controlled with C/F.
Subs operate at four ocean levels, as described on the next page.
•LEVEL 1 (Surface) — Subs must surface intermittently to replenish their air
supply
(see below). On the surface, the sub is highly visible to other ships,
making it vulnerable to enemy ordnance, including torpedoes. However, you
can use the sub’s own torpedoes and any deck-mounted weaponry. While on
the surface, press Left Shift to cycle through your weapons systems
•LEVEL 2 (Periscope Depth) — At this depth, the sub is invisible to units without
sonar. Those equipped with sonar, i.e. destroyers, recon planes, etc., can still
locate you. The tell-tale sonar ping warns that you’ve been spotted by an
enemy unit’s sonar array. To avoid detection, press Ta b to open the map to
check on the enemy unit’s sonar range, denoted by a green circle. Use the
periscope to assist you in covertly aiming torpedoes at enemy targets. Subs
are also highly vulnerable to depth charges at this level. Note that a raised
periscope mast may be damaged if it contacts another unit. While this is not
recommended, the mast might be repaired in time.
•LEVEL 3 — This operating depth is ideal for skulking around and maneuvering
your sub into position. While you’re at this level, enemy units have more
difficulty targeting you with depth charges, but your boat is still vulnerable
to well-aimed charges.
•LEVEL 4 — Operating the sub at this depth for extended periods causes
the pressure hull to rupture, with potentially catastrophic consequences.
Conversely, your sub is invisible to sonar and invulnerable to depth charges.
Dive to this depth only in emergencies, and only for brief periods, in order
to evade expert sub killers.
AIR SUPPLY
Submarines possess a limited supply of fresh air, for use by their
engines and crew while submerged. When the gauge on the sub’s
helm controls enters the red “low air” sector, it’s time to surface to
take on another load of air. Use the map to choose your surfacing
location carefully.
•If you do not surface manually, the sub surfaces automatically to take on air.
WEAPONS
Submarines are equipped with torpedoes as standard weapons. You can launch
torpedoes at periscope depth or when surfaced. Aim torpedoes by steering the
submarine to point at your target.
Most subs are also equipped with deck-mounted AA guns; some larger subs may
even sport an artillery piece for use against armored targets. You can only use
deck-mounted weapons when the sub is surfaced.
18
19
Page 12

ADVANCED MANAGEMENT SYSTEMS
As you advance in your naval career, the ability to fight bravely as an
individual should be overshadowed by the importance of successfully
commanding and directing all the units under your command.
To do this effectively, make the game’s management systems work for you.
There are three separate systems, with some overlap, enabling you to tailor
your Battlestations: Midway gameplay experience to your own tastes.
NOTE: As missions become more complex, begin balancing your time
between manually commanding a particular unit or squadron, and issuing
orders to other units or squadrons to carry out on your behalf.
•MAP SCREEN
an overview of the conflict situation in your War Room. You can direct
units, order attacks and plan defense of your units here.
•COMMAND MENU
Menu. Issue specific as well as standing orders to individual units, groups
and squadrons. Your orders affect the way these forces react when they
encounter enemy units.
•IN-GAME — Issue orders, join units, set targets, and manually launch
attacks using the crosshairs and mouse buttons.
MAP SCREEN
The Map screen is your center of operations. You can command your entire
fleet through this dynamic map, while observing all enemy unit information
supplied by your units.
a
(see below) — Press Ta b to open the Map screen, where you get
(see page 23) — Hold down Alt to open the Command
a Enemy unit
b Your selected unit
c Radar range (green
indicates sonar/visual
c
detection area)
MAP SCREEN CONTROLS
Open/close Map screen Ta b
Move cursor mouse
Show/Hide objectives O
Cycle objectives cursor keys 4/
Zoom in/out mouse wheel
Cycle formations/squadrons Q/E
Cycle units in selected formation F/C
Select unit left-click
MAP SCREEN ACTIONS
•Left-click to select a highlighted unit or squadron.
•Move the cursor over a coordinate and right-click to order a selected unit
or squadron to move to that location.
•Move the cursor and right-click to create waypoints and plot a course.
•Move the cursor over an enemy unit and right-click to target that enemy
unit with your selected unit.
•Use the mouse wheel to zoom in/out.
•With one ship selected, highlight a friendly ship and right-click to join
the ships and create a formation.
•With a plane selected, highlight a friendly unit and right-click to circle
the friendly.
•Set Orders from the Command Menu. (
•With a unit selected, press Spacebar to cancel a command.
See page 23.)
3
20
MISSION OBJECTIVES
Gray = Active
Green = Completed
Red = Failed
b
21
Page 13

ISSUING ORDERS
UNIT SELECTION
Select a unit in order to issue orders to it. A unit is
selected if you can see its Unit window in the bottom
left corner of the screen.
•In the Map screen, left-click a unit to select it.
•In-game, highlight the unit and press X to “jump in” that unit.
•Press Q/E to cycle between formations/squadrons in your control.
•Press F/C to cycle between units in the selected formation.
COMMAND MENU
Use the Command Menu to issue specific commands to the currently selected
unit or squadron. The Ship Command Menu is pictured above.
•Press and hold Alt to open the Command Menu.
•Use A/D/W/S to select a command.
ORDERING AN ATTACK
1. On the Map screen, highlight the unit you
want to carry out the attack, and left-click.
2. On the Map screen, right-click an enemy unit to order your selected unit
to attack it. A red arrow appears, connecting the attacking unit to its
target. Also, the Target window in the top left corner of the screen shows
which enemy unit is targeted.
•If you issue an attack order to a formation leader, the other units
in the formation will attack the same target.
•If you issue an attack order to a unit within a formation, that unit will
break from the formation to launch its attack.
•A yellow light indicates a target within range of your current unit’s
weapons; the number above is the target’s distance from the unit.
3. Once you issue an attack order, the unit attacks the target until either
the target or the attacking unit is destroyed.
ORDERING UNITS TO A WAYPOINT
Ordering units to a point on the map is a key part of reconnaissance
and protecting sea or airspace around a convoy, formation or battle group.
Both ships and planes can be useful in this role.
To set a waypoint:
1. Enter the Map screen (press Ta b), then select the unit you want to send
to the waypoint.
2. Move the cursor to the first waypoint and right-click. A blue line
appears, indicating the route that your unit will follow.
3. Repeat steps 1 and 2 to add additional waypoints.
ORDERS
You can apply certain priorities, known as “standing orders,” to units, groups
and squadrons. Standing orders affect the way a force automatically reacts
in wartime situations, when you are not manually controlling it. Following is
a discussion of the standing orders available from the Command Menu,
and the units they relate to.
•Press A/D/W/S to toggle between orders.
•Press Enter to confirm and close the Command Menu.
•You can override a unit’s standing orders by taking control of the unit.
Ships/Boats/Submarines
•FREE FIRE — The unit’s gunners can set and fire upon their own targets.
Default: On.
•FREE MOVE — A ship can move where its captain decides is strategically
best to engage with enemy units. Default: On. If a unit is in a formation,
this defaults to Off.
•TORPEDO — If set to On, the torpedo-equipped ship will attempt to sink
enemy craft with torpedoes. Default: Off.
•TORPEDO AVOIDANCE - Lookouts and the ship’s pilot will attempt to avoid
any torpedo onslaught. Default: On.
Aircraft
•FREE FIRE — An aircraft can move to where its pilot decides is strategically
best, to engage with targets and initiate battle.
•CAP (Combat Air Patrol) — If set to On, the squadron guards the unit it is
assigned to. Highlight the unit you want to assign to a CAP and left-click.
The squadron will guard the unit until it is issued with other orders.
22
23
Page 14

FORMATIONS
Fleet formations are groups of ships that patrol in formation. The Naval
Academy mission “Fleet Formations” teaches you how to switch between
units, and organize your ships into formations.
•The Formation option is only available to ships already in a formation,
so first, learn how to create a formation.
•To switch between units, press F/C, or position the crosshairs
over the unit you want to switch to and press X.
Creating a Formation
With one ship selected, move the crosshairs over another ship that will be
the formation leader, and right-click. The ship you are currently in control
of is now “in formation” with the formation leader.
•Press F/C to switch between formation members.
•The selected unit’s order state appears above its Unit
window. For example, Follow indicates that a unit is
in formation and following the formation leader.
NOTE: A gold band around a Unit window denotes a key unit.
Changing the Shape of a Formation
1. Press and hold Alt, then press S to open the Formation screen.
2. Select the unit you want to move (highlighted yellow).
3. Left-click the unit and drag the mouse to adjust the position
of the unit in relation to others in the formation. Repeat with other
units in the formation.
4. Press Enter to accept changes and ensure the lead unit is underway
so the units can assume their new formation.
Leaving/Disbanding a Formation
•Select the unit you want to leave the formation, press and hold Alt,
and press D to select Leave. The unit leaves the formation and will
now act alone, according to any orders you might issue it.
•If the unit you select is the formation leader, the option is Disband,
and it breaks up the entire formation.
SQUADRONS
•AT TAC K - An attack command issued when you are leading a squadron.
As squadron leader, you can then attack another target.
•REGROUP - Withdraw entire squadron from the ordered attack, and regroup
with the squadron leader.
•LAND - Order squadron to return to its home carrier or airfield.
SHIPS
•AT TAC K - An attack command issued when you are the captain of a ship.
Once you give this order, the ship will navigate to attack your target.
You can then concentrate on aiming or you can jump to another unit.
NOTE: When you select targets in the Map screen, the Attack command is
applied automatically.
Repairs
The Repair screen (see page 26) is available for all watercraft except the PT boat.
Play the Naval Academy mission: “Dealing with Emergencies Onboard” for
a walkthrough of the Repair screen. (Damaged aircraft should return to their
base to be repaired.)
•Press R to open the Repair screen.
•Use the mouse or press W/S to select various areas of Damage Control.
•Use the mouse or press W/S to allocate crew to the various sections
of damage control.
REPAIR SCREEN ICONS: DAMAGE MANAGEMENT
The Repair screen icons change color as a visual key to assist with allocation
of damage crew resources. Ignore this information at your peril.
Yellow = Mild damage
Red = Heavy damage
Flashing red = Malfunction has been identified
If a Fire icon lights up, it is wise to tackle this as a priority because
of the chance of a secondary explosion. Ignore Fire icons for too long,
and a magazine explosion may well destroy your ship.
If the Hull Breach icon is lit, a serious hull breach has occurred.
Man the pumps! A single arrow indicates a less serious breach.
24
25
Page 15

REPAIR SCREEN
a
b
c
d
e
g
h
i
j
k
l
m
f
a Unit name and class
b Water — Assign crew to pump water and make holed sections watertight.
c Fire — Assign crew to fight fire.
d Maneuver — Assign crew to repair engines and steering.
e Weapons — Assign crew to repair weapons. (A separate image is
displayed when Weapons crew is highlighted.)
f Flight Deck — Assign crew to keep the flight deck and hangar lifts
operational.
g Damage — An overview of the unit’s hull damage status.
h Hull Breach icon — When lit, indicates a breach in the hull. Fewer arrows
indicate a less serious breach.
i Flooding — A visual indication of how much water the ship has taken on.
Assign more crew to Water duties if this is filling.
j Fire icon — When lit, indicates a fire is present onboard.
k Flight Deck icon — When lit, indicates damage to the flight deck.
l Cog icon — When lit, indicates damage to the engines.
m Ship’s Wheel icon — When lit, indicates damage to the steering.
b
Controlling Carriers
Carrier operations are likely to be the key to victory in the Pacific. A carrier’s
main weapon is a complement of specially designed aircraft, berthed in hangars
beneath the flight deck. The Naval Academy mission “Carrier Ops” details
the basics of managing an aircraft carrier and its flight deck.
•Control a carrier’s movement just like any other large ship.
FLIGHT DECK PANEL
When in control of a carrier, press Left Shift to open/close the Flight Deck Panel.
Use this panel to manage your aircraft.
a
a Number of planes airborne/
b
d
c
maximum number
b Squadron status
c Squadron details
d Plane type
e Additional ordnance loadouts
e
Giving Orders to Squadrons
You can issue orders from the Flight Deck Panel to control the squadrons
of aircraft at your disposal. Use A/D to highlight a Squadron Status icon
and then left-click repeatedly to cycle through available orders. (For a list
of orders,
see page 28.)
Squadron is in hangar.
Squadron is ordered to take off.
Squadron is in the air following last orders.
Squadron is under landing orders.
Squadron has been destroyed. This squadron is no longer available.
Launch a new squadron, if one is available.
(below),
26
27
Page 16

Squadron Orders
•SELECT AIRCRAFT TYPE — With the Flight Deck Panel open, press A/D
to highlight a squadron slot. Press S to select Type. Then press A/D
to choose the type of plane for this squadron.
•SELECT NUMBER OF AIRCRAFT — With the Flight Deck Panel open,
press S until Assigned is highlighted. Press A/D to choose the number
of planes in the squadron: 3 max for a medium bomber squadron; 5 max
if you can launch in any other squadron.
•SELECT SECONDARY WEAPON — Press S until Weapon is highlighted
and then press A/D to select the aircraft’s secondary weapon. Different
aircraft have different armament options.
•ATTACK CARRIER’S TARGET — If a carrier has a target (check the Target
window at the top left of the screen), right-click to launch squadrons
against this target.
•“JUMP IN” COMMAND — To quickly jump to a squadron from the Flight
Deck Panel, select the squadron and press X. You’ll jump to the view
of the squadron leader’s plane.
Squadron Leader’s Orders
Commanding squadrons effectively could mean the difference between
success and failure as a naval strategist. If you gain the skill to use
squadrons skillfully and efficiently, they could become your most
powerful weapon.
•
ACQUIRE CLOSEST TARGET — Right-click to select the closest target.
Right-click repeatedly to cycle through other potential targets.
•COMMAND MENU — Use the Command Menu to issue standing orders,
attack, regroup and landing orders to the other aircraft in your squadron.
Press and hold Alt to open the Command Menu, and press A/D/W/S
to select the specific order.
•ESCORTS — Escorts (and CAP below) are key uses of your fighter
squadrons, crucial for guarding the heart of your task force, and achieving
tough mission objectives against a determined foe. With a squadron
selected, highlight a unit in the Map screen and right-click. The squadron
is linked to the unit or squadron by a green line and will now patrol
the skies above or around that unit, and acquire and attack targets
if their Command Menu orders are set to Free Fire: On.
•CAP (Combat Air Patrol) — This order equals Escorts in tactical value.
When CAP is applied, aircraft engage with enemy units at a range
of 2 miles. A CAP order automatically sets Free Fire: On.
(See page 23.)
(See page 23.)
OPTIONS
To adjust various options within Battlestations: Midway, select Options in the
Main Menu, or press P or Esc in-game to open the Pause Menu. Select Options
to open the Options Menu. Left-click select/confirm/advance to a sub menu.
•GAME — Enable subtitles, camera shake and water drops on camera options.
•AUDIO — Adjust volume settings for music, speech and sound effects.
If your system supports EAX, select Enable EAX Effects to adjust the speaker
system settings.
•VIDEO — Adjust a range of display and graphics detail settings.
•CONTROLS — View and remap a range of controls, or choose a preset
configurations (depending on your game controller).
AWARDS
Access Awards from the Main Menu to see details of your service record.
•MEDAL SCREEN — View the medals you’ve won or the conditions required
to be awarded such accolades.
•UNIT IDENTIFICATION — Brush up on your unit recognition skills.
•MOVIES — Review film footage unlocked as you complete missions.
•LEADERBOARDS — View your online status.
•ACHIEVEMENTS — View the list of your achievements so far, and the gamer
points won for each of the 22 achievements available. These points add
to your Multiplayer gamer score. (Small craft such as LCPs, LSTs and PT
boats do not count toward any achievement that requires sinking
marine vessels.)
28
29
Page 17

MULTIPLAYER MODE
Battlestations: Midway for PC offers two Multiplayer options, allowing you
to enjoy a variety of Multiplayer mission with friends, by using a crossover
Ethernet Cable or Local Area Network (LAN), or by playing online, using
the GameSpy Matchup service.
•LAN GAME — Participate in a game of up to 8 players over a Local
Area Network. Connecting more than two PCs requires a hub/router
and a CAT 5 Ethernet cable for each PC.
•INTERNET GAME — If your PC has a broadband Internet connection,
choose this option to pit your wits against players from around the world.
LAN GAME
To set up a Multiplayer session locally, connect from 2 to 8 PCs using
crossover Ethernet Cables. Alternately, use a hub, switch or router that is
part of your home network.
HOSTING A LAN GAME
1. From the Main Menu, select Multiplayer #LAN Game #Create Server.
The server name is set as your currently selected profile name.
2. Select the number of Player Slots (max 8).
3. In the Game Lobby, left-click the arrows (or press the cursor keys4/3)
to select the Mission Map. Once the map is selected, all players can
consult the Briefing screen.
4. All players must now highlight Select Player Slot and choose their units
(icons pictured below). Roll the mouse over the units to see unit information.
5. Finally, all players must select Ready. The game starts when the host
selects Ready.
MULTIPLAYER UNIT ICONS
Armor rating
Speed rating
Main gun
complement
AA Gun
complement
Torpedo
complement
Shipyard
Airfield
Number
of fighters
Number
of torpedo
bombers
Number
of dive
bombers
JOINING A LAN GAME
1. Left-click Join Server. The Server Browser menu appears, displaying all
current sessions on the network.
•Left-click Refresh if the server you want to join isn’t on the list yet.
•Left-click Sort Servers to re-order available sessions by Ping (low ping
figure means faster connection), Free Slot or Max Players.
2. Left-click the session you want to join. If the Join option is active, left-click
to proceed. The Game Lobby appears.
3. After the host chooses a mission, left-click Select Player Slot.
4. Choose a slot based upon available units. Left-click an empty slot,
and then Left-click Back to return to the Game Lobby.
5. Click Ready and wait for other players to join. The game begins
when the host selects Start.
Internet Game
LOGGING INTO GAMESPY
A GameSpy account is required in order for you to play Battlestations:
Midway over the Internet. There are two ways to access GameSpy settings
from the Main Menu:
1. Left-click Multiplayer, and then left-click Internet Game. – OR –
2. When logging in with a new profile, left-click Ye s at the GameSpy prompt.
• NEW ACCOUNT HOLDERS — Enter a nickname, which will be your GameSpy
online gamer name on GameSpy. Enter a valid email address and password
for your GameSpy account. Finally, left-click Register.
• EXISTING GAMESPY ACCOUNT HOLDERS — Enter your GameSpy nickname,
the email address you registered with, and your account password. Click
Login Selected to log-in.
INTERNET GAME MENU
•QUICK GAME — Join an online game in one key press. If no games are
available, create and host one.
•JOIN HOST — Search for a particular online game by choosing game
characteristics. To join, follow the steps
•CREATE HOST — Host a Battlestations: Midway session, control the settings,
and choose maps. To host a game, follow the steps on
•LOG OFF — Log-off from your GameSpy account.
•CHAT BOX — Left-click the Chat Box in the lower left corner, enter to chat
from the keyboard, and press Enter. Press the cursor keys4/3to switch
modes between General Chat and Team Chat.
at the top of this page.
page 30.
30
31
Page 18

GLOSSARY
CREDITS
AA Anti-aircraft. A weapon or weapons designed for use against
enemy aircraft.
ABDACOM American-British-Dutch-Australian Command. A supreme
command for all Allied forces in the Pacific, created
in early 1942.
AK Cargo ship.
BB Battleship.
CA Heavy cruiser.
CAP Combat Air Patrol. A defensive mission given to fighter aircraft,
in which they patrol the skies above a designated site.
CINCPAC Commander-in-Chief, Pacific. The commander responsible
for all US service forces in the Pacific Theater.
CL Light cruiser.
COMSUBPAC Commander Submarine Force, Pacific. The commander
responsible for US submarine operations in the Pacific Theater.
DC Depth charges.
DD Destroyer.
FLAK Explosive air-bursting shells fired at planes from large-caliber
guns. The term is derived from the German work
Fliegerabwehrkanone, which means “anti-aircraft weapon.”
IJN Imperial Japanese Navy.
LCP Landing Craft, Personnel. A small vessel used to ferry troops,
small vehicles and supplies to and from a transport ship.
LST Landing Ship, Tank. Landing craft used to land men and tanks
on enemy beaches.
PT Patrol Torpedo boat. A small, fast-attack boat equipped
with torpedoes.
RN Royal Navy. The naval forces of Great Britain.
SS Submarine.
USN United States Navy.
Head of Studio
Klaude Thomas
Project Manager
Söröss Attila
Assistant Project Manager
Tankó Veronika
Lead Designers
Györei Viktor
Szalacsi Botond
Senior Designer
Kasszián Károly
Designers
Andrássy Balázs
Andrássy Gábor
Báling Péter
Béressy Gábor
Lead Programmer
Somfai Ákos
Senior Programmer
Horváth Zoltán
Programmers
Benke Zsolt
Bodács Gábor
Kiss Árpád István
Kullai Imre
Lehõcz Kornél
Lead Artist
Nagy Zoltán
Senior Artists
Négyesi Szabolcs
Tóth Péter
Artists
Hollósy Zoltán
Kiss Ferenc
Kerti Tamás
Radványi Norbert
Rigó Péter
Seres Lehel
QA Supervisor
Kozma Zoltán
QA Lead (360)
Mohácsi Attila
QA TechnicianS
Ács Máté
Heiczinger Zsolt
Deák Attila
EIDOS HUNGARY
Office Administration
Katona Andrea
System Administration
Horváth Péter
Additional Sound Effects
& Mixing
Ambrus Ákos
Tolnai Péter
Varga János
Zizics László
Supplementary Artwork
Ifj. Rácz László
Szalai István
Wave Simulation
Carsten Wenzel
Additional Design
Anga Attila
Domján László
Fekete Tamás
Matthew Miles Griffiths
Salamon György
Sigér Imre Csaba
Solymosi Tamás
Tímár-Geng András
Zsolt Nyulászi
Additional Programming
Dorka Gábor
Eisler Zsolt
Iszak Donát
Iváncsy Gábor
Kutenics Gábor
László Milán
Magyar László
Márta Krisztián
Motyán Zoltán
Nyakó Sándor
Punk József
Székely Tibor
Soltész Péter
Tajti Attila
Tolnay Krisztián
Additional Artwork
Horváth Csaba
Cseuz Dániel
Csige Tamás
Deák Attila
Dosa Gábor
Fábos György
Gaál Attila
Haui Balázs
Hegybíró Bence
Horváth Csaba
Illés Róbert
Kalózdy Balázs
Ketzer Máté
Ludas Zoltán
Mátéfy Szabolcs
Molnár Sándor
Polgár Tamás
Szalai István
Szücsy Péter
Tóth Attila
Tóth György
Tóth Róbert
Tüske Imre
Veljko Radenkovic
Additional QA
Gombosi László
Faludi Tamás
Katona Zoltán
Mikola Ferenc
Petrekovits Péter
Rieger Péter
Selmeczi Ferenc
Somorjai Zoltán
Szappanos Gábor
Vári Zoltán
Additional Management
Petró Norbert
Ruttmayer Antal
Thanks to
Guillaume Mahouin
Juhász Benedek
Marinov Gábor
Matt Russell
Mike Hornemann
Peter Bratcher
Richard Jacques
Sugár Róbert
Zsolt Tátrai
From an idea by Zsolt Nyulászi
32
33
Page 19

CEO
Jane Cavanagh
Commercial Director
Bill Ennis
Financial Director
Rob Murphy
Company Secretary
Anthony Price
Head of European Publishing
Scott Dodkins
Product Acquisition Director
Ian Livingstone
Development Director
Darren Barnett
Development Manager
Lee Singleton
Producers
Nick Clarke
Sarah Van Rompaey
Klaud Thomas
Senior Designer
Matthew Miles Griffiths
Designer
Anna Marsh
Worldwide CTO
Julien Merceron
Head of Global Brand
Larry Sparks
Brands Controller
Sarah Hoeksma
Brand Manager
Matthew Russell
Creative Manager
Quinton Luck
Senior Designer
Jodie Brock
EIDOS UK
Head of Support Services
Flavia Timiani
Senior Localisation Manager
Monica Dalla Valle
Localisation Manager
Guillaume Mahouin
Localisation QA Supervisor
Arnaud Messager
QA Localisation Lead Technician
Pedro Geppert
QA Localisation Technicians
Edwige Béchet
Arianna Pizzi
QA Manager
Marc Titheridge
QA Supervisor
Dave Isherwood
QA Lead Technicians
Hugo Hirsh
Henley Bailey
William Wan
QA Technicians
Steve Addis
Dominic Andoh
Andrew Brown
Andrae McKenzie
Digby Murray
Jonathon Redington
Zesh Sadique
David Sangan
Shams Wahid
Daniel Webster
Mastering Supervisor
Jason Walker
Mastering Engineer
Ray Mullen
Console Programming
Littlestone Software
Music Composition & Production
Richard Jacques
Sound Effects
Air Studios
Voice Recording
Jake Hughes
Mike Peaselee
The Annex
Scriptwriting
Steven Bailie
Game Manual
James Lenoël@Lenoël Creative
Support Services
Tom Waine
Ship References
National Maritime Museum
Thanks
ATI
Code Mafia
Dreamtime Research
Imagemetrics
Logitech
Nvidia
Saitek
Six by Nine
Steven Blackburn
Special Thanks
Kevin Strange
Martin Mannix
Matthew Ibbs (a gentleman
of taste)
Sam Brown
William Wan
CEO & President,
Eidos North America
Bill Gardner
Executive Vice President
of Sales & Marketing
Robert Lindsey
Vice President of Legal
& Business Affairs
James O’Riordan
PUBLISHING COORDINATOR,
LEGAL & BUSINESS AFFAIRS
Clint Waastad
Vice President of Finance
Malcolm Dunne
Director of Marketing
Matt Gorman
Marketing Manager
David Bamberger
Creative Director
Karl Stewart
Director of Public Relations
Michelle Seebach Curran
Public Relations Manager
Oonagh Morgan
EIDOS US PUBLISHING
Community Specialist
Tony Perata
National Sales Manager
Joe Morici
Channel Marketing Manager
Diane Eng
Channel Marketing CoordinatorS
Rafal Dudziec
David Bushee
Web Producer
Roderick van Gelder
Web Designer
John Lerma
Media Manager
Micheal Tran
Graphic Designer
James Song
Operations Manager
Gregory Wu
Senior External Producer
Nick Goldsworthy
Associate Project Manager
Clayton Palma
Product Specialists
Jeff Lowe
Stephen Cavoretto
Aaron Safronoff
Katie Bieringer
Mastering/Hardware
Jordan Romaidis
Patrick Goodspeed
CUSTOMER SERVICE
Sean McCloskey
Richard Campbell
Special Thanks
Danny Jiang
Hanshaw Ink &Image
Jessica Dougherty
James Bowen
R.W. Russell, www.midway42.org
All the volunteer staff
of the USS Hornet, Alameda
& the USS Pampanito,
San Francisco
Very Special Thanks
Lieutenant Commander
Otis Kight, USN (Ret.)
34
35
Page 20

TECH SUPPORT
Register online at
www.eidosregistration.com
CONTACTING TECH SUPPORT
If you have a technical problem with the
game, our Support Department is here to
help. Our web site contains up-to-date
information on the most common
difficulties with our products; this
information is the same as that used by
our support agents. If you are unable
to find the information you need on our
web site, please feel free to contact us
via email, fax, telephone or letter.
(When contacting us via email or fax,
please be sure to put the game title
in the subject of your message.)
ASSISTANCE VIA
THE WORLD WIDE WEB
The fastest way to answer most
questions is by visiting our online
support. You can find the latest
support information at
http://support.eidosinteractive.com/.
Our support FAQ’s are available 24/7
for your convenience. These pages are
updated frequently and have the same
information that our support techs will
use to answer your question if you call
or email us. The answers to about 90%
of the questions we are asked can be
found there, so it really is worth the time
to take a look!
The second fastest way to get an answer
to your question is to email us. (You will
find our email submission forms at our
web site.) We typically respond to email
queries within 24-48 hours during the
business week. Response times can be
considerably longer over the weekend,
holidays and immediately after a
product release. It all depends on how
many people we have working and how
much email is coming in at any one
time, but we do try really hard to get
you the right answer as quickly as
possible. Weekdays, excluding holidays,
during the hours when the phones are
open, we still give email questions our
highest priority.
Through this site you will also have
access to our FTP (File Transfer
Protocol) area where you can download
patches and new enhancements as soon
as they become available.
ASSISTANCE VIA TELEPHONE
OR FAX
We are available to take your calls
Monday through Friday, 9:00 a.m. –
12 noon and 1 p.m – 5:00 p.m.,
Pacific Time at (415) 615-6220 (voice)
or (415) 547-1201 (fax). Our tech
support department is closed on all
major holidays.
Note: You are responsible for all toll
charges when calling.
To ensure the quickest service you will
need to be at your computer and have
the following information at hand:
• A complete listing of your computer’s
hardware. (Contact your computer
manufacturer if you are unsure.)
• What version of Windows®you
are using.
• A copy of your DirectX Diagnostics
report.
1. Click Start.
2. Click Run.
3. Type dxdiag.
4. Click OK.
5. Click the Save Information button
and save the file to your computer.
6. When you call our Technical
Support line, either have this file
open or have a printed copy.
If you send an email query you
may attach the file to the email.
• What error message(s), if any, you
have had.
• How the game is currently
configured.
EIDOS, INC., LICENSE & LIMITED WARRANTY
Eidos, Inc., warrants to you, the original purchaser of this disc, that for a period of ninety (90) days from
the date of your purchase, this disc shall be free from defects in materials and workmanship. If, at any time
during the applicable ninety (90) day warranty period you determine that this limited warranty has been
breached, Eidos, Inc., agrees, in its sole option, to repair or replace, free of charge, any such disc, provided
the disc is returned postage-paid to the Eidos, Inc., Factory Service Center and a proof of date of purchase
is included. This limited warranty is not applicable to normal wear and tear and shall be void with respect
to any defects that arise from disc abuse, unreasonable use, mistreatment or neglect. This disc is sold “as
is” without any warranties of any kind, express or implied, including implied warranties of merchantability
or fitness for a particular purpose, other than the limited warranty expressly stated above.
No other claims arising out of your purchase and use of this disc shall be binding on or obligate Eidos, Inc.,
in any manner. Eidos, Inc., will not be liable to you for any losses or damages incurred for any reason
as a result of your use of this disc, including, but not limited to, any special, incidental, or consequential
damages resulting from your possession, use or malfunction of this disc.
This limited warranty states the entire obligation of Eidos, Inc., with respect to the purchase of your disc.
If any part of this limited warranty is determined to be void or illegal, the remainder shall remain in full
force and effect.
For warranty support please contact our Customer Support department at (415) 615-6220. Our staff is
available Monday through Friday, 9:00 a.m. to 12:00 noon and 1:00 p.m. to 5:00 p.m. Pacific Time. You are
responsible for all toll charges. Customer Support Representatives will not provide game hints, strategies
or codes.
PRODUCT RETURN PROCEDURE
In the event our support agents determine that your game disc is defective, you will need to forward
material directly to us. Please include a brief letter explaining what is enclosed and why you are sending it
to us. The agent you speak with will give you an authorization number that must be included and you will
need to include a daytime phone number so that we can contact you if necessary. Any materials not
containing this authorization number will be returned to you unprocessed and unopened.
Send your postage-paid package to the following address:
Eidos, Inc. Customer Services
RMA# (state your authorization number here)
651 Brannan Street, Suite 400
San Francisco, CA 94107
You are responsible for postage of your game to our service center.
© 2007 Eidos Interactive Limited. Battlestations: Midway is a trademark of Eidos Interactive Limited. Eidos and the Eidos
logo are trademarks of Eidos plc. All Rights Reserved. Uses Miles Sound System. Copyright © 1991-2007 by RAD Game
Tools, Inc. Uses Bink Video Tools. This product contains software technology licensed from GameSpy Industries, Inc.
©1999-2004 GameSpy Industries, Inc. GameSpy and the “Powered by GameSpy” design are trademarks of GameSpy
Industries, Inc. All rights reserved. The ratings icon is a registered trademark of the Entertainment Software Association.
All other trademarks are the property of their respective owners.
36
 Loading...