

Page 1
Page 2

User Manual
SSG
Decisive Battles Series
Battles in Normandy™
Copyright Strategic Studies Group Pty Limited 2004
Battles in Normandy™ is a Trademark of Strategic Studies Group
Page 3
1 Introduction
France - June 1944.
th
In the predawn hours of June 6
the open doors of their transport aircraft into the darkness that was the Normandy Peninsular in northern
France. Below them their German foe gradually awoke from their slumber to sound the alarm and begin the
nearly constant barrage of anti-aircraft fire that would continue well past dawn. The mission of the airborne
invaders? To secure vital towns, villages, road junctions and bridges that would prevent German
reinforcements interfering with the massive seaborne landings now but hours away. Thus began the first
momentous steps in what would become known as D-Day – The Longest Day.
But the success of the landings alone would not be enough to ensure victory. Massive quantities of men and
material would need to be landed safely ashore to fuel the huge armies fighting for a toe hold on Hitler’s
Fortress Europe. And beyond the horror of the beaches lay some of the most difficult fighting terrain on the
continent – the dreaded hedgerows.
For the German defenders living in relative luxury on the peninsular, the invasion came as an anti-climax.
Finally they would be able to test their training against the fresh young Allied soldiers from across the ocean.
With gun pits and machineguns sighted in, artillery points registered, they lay in wait for the inevitable. Would
they be able to stand up to the challenge? Would their panzers be able to fling the assault back into the ocean
as they had done at Dieppe two years previously?
1944, three Allied Airborne Divisions totalling nearly 19,000 men leapt from
Can you?
2 The Object of the Game
The object of the game in Battles in Normandy™ is, by commanding the Axis or Allied armies, to amass more
Victory Points than your opponent. This can be achieved in several ways but there are time limitations on you
to do so. At the end of a set period, the difference between the two side’s Victory Points will decide the level of
victory (or defeat!).
Victory Points are gained by destroying enemy units and capturing (or defending!) objectives. The player does
this by moving friendly units on a Tactical Map and combating opposing forces.
3 Getting Started
Battles in Normandy™ uses a simple but
powerful interface that allows players of
different skills to obtain maximum
control of their units. For those familiar
to wargaming and wishing to jump
straight in, a quickstart Player’s Guide is
included. For those not familiar with the
game however, the tutorials are an
excellent way to familiarise yourself with
the interface and game principles.
Everything you need to know to play the
game is discussed in this manual,
including tips on strategies and tactics.
You do not need this manual to play
Battles in Normandy™, but you do need
to read it to be successful.
1
Page 4
3.1 Welcome Screen
To begin, double click the Battles in Normandy™ icon on your desktop. This will launch the program. The
options are:
Start New Game: This starts a new game.
Load Last Game: This will bypass further menus and load the last saved game. This is useful if you are
returning to a game after a break.
Tutorial: This takes you to the Tutorial. Here you will find a number of very detailed lessons to help you with
the various game mechanics.
Load a Save Game: Allows loading of save games.
Load Email Game: Allows loading of email games. Games must be placed in the \Battles in
Normandy™\Save Email folder to be loaded.
Create New Battle for Edit: This option is only used for scenario creators, and will be explained in the
Editor Manual. Everybody who just wants to play the game can ignore this option.
View Game Credits: Lists those responsible for creating the game.
Go to Options Screen: This takes you to a menu for setting screen resolution, music volume, and sound
volume.
Resolution: Toggles the various screen resolutions supported by the game. Resolution changes only take
effect on the main game screen.
Music: Toggles music on or off to start the game. Also allows you to set music volume.
Sound: Toggles sound effects on or off to start the game. Also allows you to set sound effects volume.
2
Page 5
3.2 The Start Screen
To start a new game, select a battle or
scenario from the list box on the left of
screen.
The line marked B.. will take you up one
level. (ie. Back)
Lines marked F.. are folders. (ie. Folders)
Selecting a battle or scenario will activate
the buttons on the right hand side of the
screen and display a brief description of
the battle at the top of the screen.
Play Battle: Takes you to the Game
Options screen.
Edit Battle: Starts the Editor
Go Back: This will return you to the
Welcome screen.
3.3 Scenario Options Screen
The Scenario Options Screen allows you to make many changes for the both the Axis and Allied side in the
scenario you wish to play. These options will be applicable for both an email, hotseat or single player game.
These choices may not be changed once a game is begun.
Weather: Weather may be set at Normal (i.e. the actual historical weather) or Random weather. Random
weather varies within limits that reflect historical weather patterns.
Human, Computer -, Computer, +, ++ :This selects either a human, computer or enhanced mode for a
side. Computer – handicaps the computer, Computer is normal, Computer + means that supply will be +25%,
replacements +1 and attacks +1. Computer ++ means supply will be +50%, replacements +2 and attacks +2.
Hidden or Exposed Units: A side’s units may be hidden (until sighted by an enemy unit) or exposed at all
times. Hidden enemy units become exposed when close to a friendly unit. Initially, information is limited to
the fact of the unit’s presence, but as friendly units get closer more is revealed.
3
Page 6
Normal Supply, Supply +25%, Supply +50%: A side may receive normal or increased supply. As in most
wars, soldiers in World War II did not always receive as much food, fuel and ammunition as they would have
liked. Dealing with supply limitations is one of the aspects of good generalship.
Normal Replacements, +1, +2: A side may receive normal replacements or it may receive extra
replacements. Replacements mainly represent the rest and reorganisation of a unit after it has been battered
by combat.
Normal Combats, Dice Rolls + 1, Dice Rolls +2: The side may attack normally or it may have one or two
added to every attack die roll. Adding one or two to the die roll in an attack increases the chance of the attacker
gaining a favourable outcome.
Unknown Units On/Off: Players may choose to play with unknown units. This feature forces all combat
units to randomly draw several values from a large pool of possible values at the start of the game. This adds
variability and uncertainty to the game and is highly recommended.
The variable values are the combat strengths and shock values. These values are shown on the unit with a ‘?’
until the unit is adjacent to an enemy unit or strongpoint.
Combat Advisor On/Off: This setting will allow a player to play with the Combat Advisor on or off. If this
setting is set to off the in-game Combat Advisor Button will be greyed out.
Points Handicap: Sides can start the game with extra Victory Points
Set Up Email: This button will take you to the Setup Email Game Screen where you can set up the name and
email address of a competitor.
Set Up Hotseat Game: This button will take you to the Setup Hotseat Game Screen where you can set up
Tournament games.
Start Game: This button takes the player to the main game screen and begins the game.
Go Back: Returns to the Start Screen.
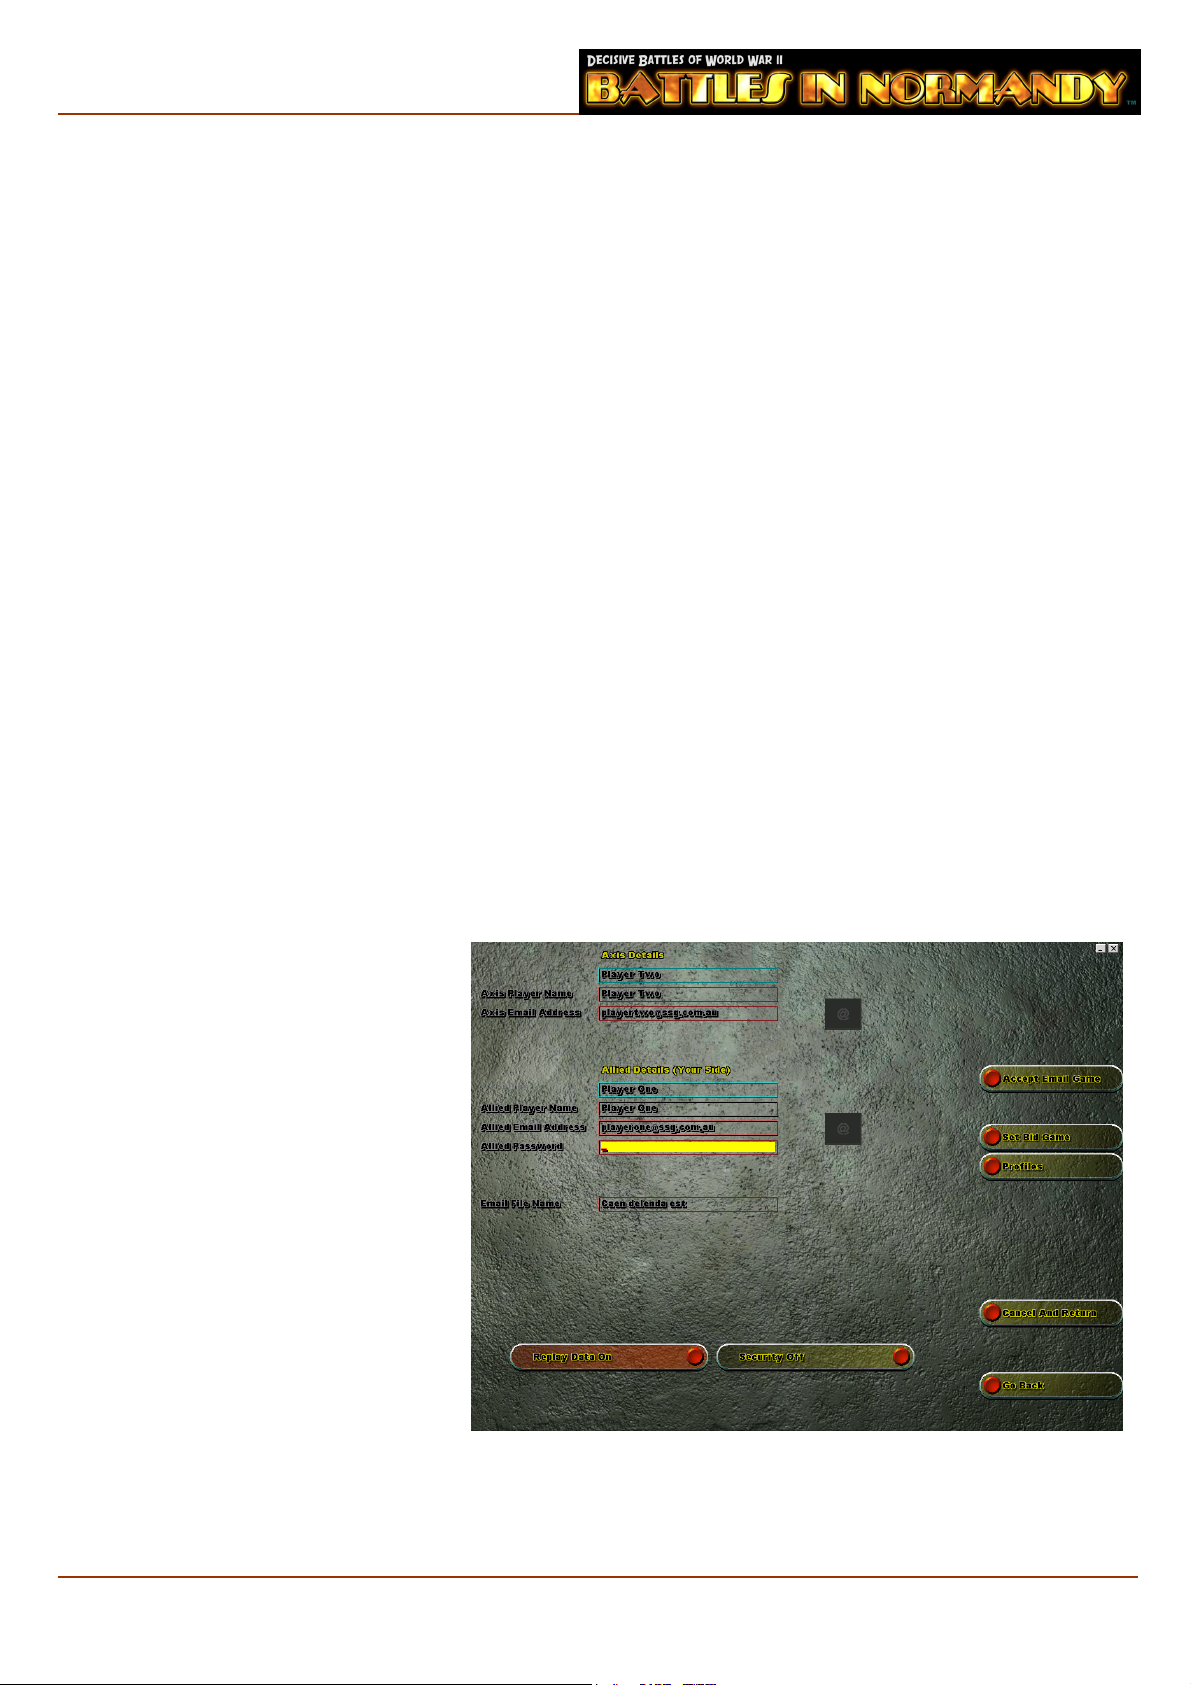
3.4 Setup Email Game Screen
This screen allows you to set up an
Email game. The fields on the left side of
the screen should be filled in
appropriately. Once you are satisfied
that the data in these fields is correct,
you may proceed.
Allied Player Name: Name of the
player who will control the Allied side
(max 45 characters)
Allied Email Address: Email address
of the player who will control the Allied
side (max 45 characters)
Axis Player Name: Name of the p
who will control the Axis side (max 45
characters)
Axis Email Address: Email address of
the player who will control the Axis side
(max 45 characters)
Email File Name: This is the file name the game will use. Each turn will use this name as the basis for the
filename and in addition have the side and turn number added (max 45 characters). i.e. UtahTurn_Axs_01
These turns will be saved in the Send Email folder in the Battles in Normandy™ directory.
layer
4
Page 7

Replay Data On/Off: This is a global switch. Once enabled/disabled it will remain so for the duration of the
game. If this switch is set to on, each player will be able to view the previous turn via the game screen. If this
switch is set to off, the Replay Game Button will be greyed out during the game and previous turns may not be
viewed.
Security On/Off: Enabling email turn security ensures that each game turn can only be opened by the player
it is destined for. If this feature is set to off then all game turns can be opened by any player.
Profiles: The profile button will take you to a screen whereby you can create and store profiles of players.
Accept Email Game: This will accept the information as entered in the fields above and return you to the
Scenario Options Screen.
Set Bid Game: Email games can be set up as Bid games. Handicap, Supply, Replacements, Combats and the
Combat Advisor settings can all be changed. The changed options constitute a Bid game. These details are then
sent to your email game opponent, who has the option to choose to play either side (thus ensuring that your
bid is reasonable).
Cancel and Return: This will cancel the current email game and return you to the Scenario Options screen.
Go Back: This will return you to the Scenario Options screen but will not cancel the current email game.
3.5 Profile Screen
The Profile screen allows you to create and save email profiles of any number of players. These profiles can
then be selected from the Set-up email screen to save you entering the details manually. The options are:
Create New Profile, Edit Existing Profiles and List All Profiles. Profiles are saved in .PRO files stored in the
\Save Emails\Profiles folder.
3.6 Hotseat Screen
There are two options for hotseat games. The Autosave option will save the game at the end of every turn. The
Replay option will allow replays of the previous player’s turn.
4 Sequence of Play
A single Battles in Normandy™ turn consists of an Allied and an Axis turn played sequentially. During his
turn, the player may watch a replay of the previous turn, move units, conduct combat, assign onboard and offboard artillery, assign reinforcements and transport, amongst many other facets of gameplay. The player then
depresses the end of turn button and play switches to the other side. In the case of an email game, the player is
returned to the email setup screen where he/she has the option to exit and send the game turn.
The game is controlled with the mouse, but many commands have keyboard shortcuts and these are listed in
the rulebook section for those commands.
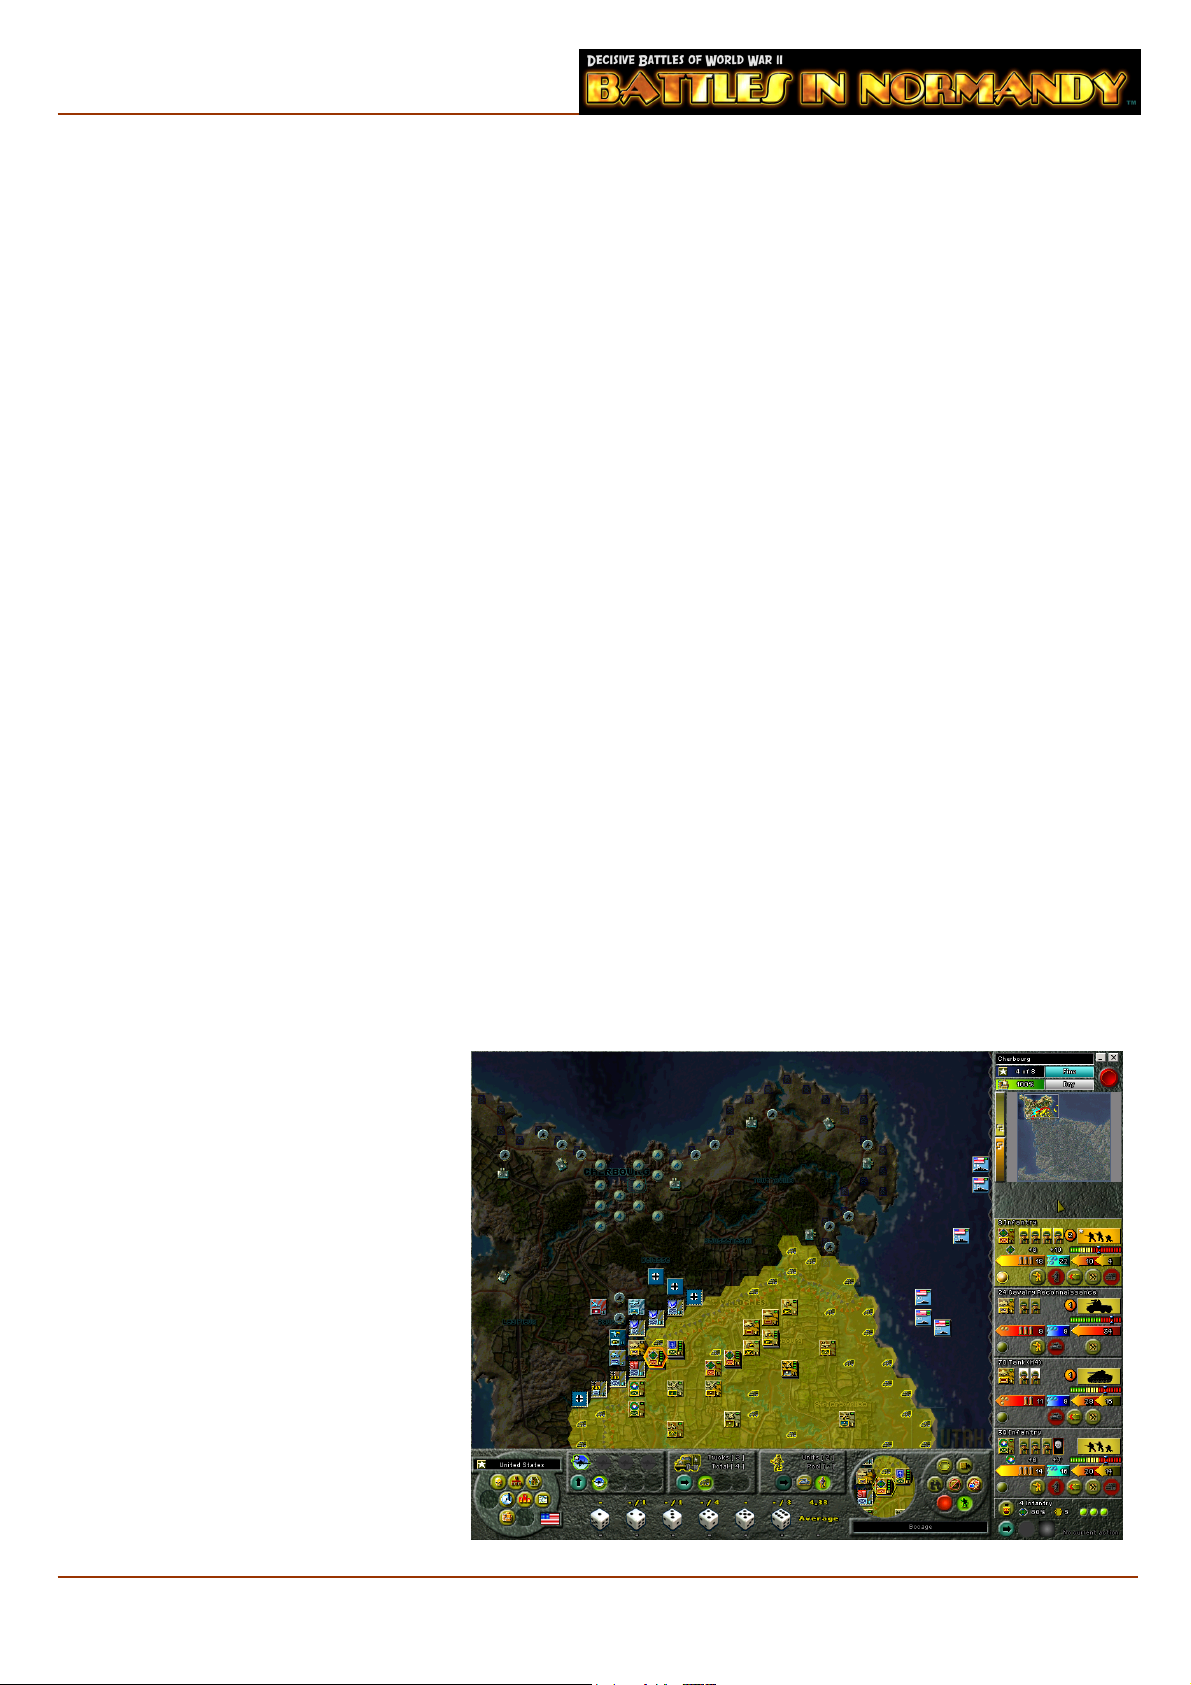
5 Main Screen
Gameplay is conducted on the main screen. This screen is divided into several different display areas that are
discussed below. Each of these displays is explained in detail in following Chapters.
The first and largest portion of the main screen is the Tactical Map which displays a portion of the current
map. The Tactical Map is where movement of units and combat takes place.
5
Page 8
Below the Tactical Map on the left is the Control Panel which contains buttons that control general aspects
of the game.
To the right of the Control Panel are the Interdiction, Transport and Replacement Panels.
To the right of these buttons is the Unit Control Area which contains buttons enabling precise actions to be
given to individual units and groups of units, changing map views and a detail from the tactical map showing
the currently selected unit.
At the top right of the screen is the Information Panel which contains information about the current game.
This panel includes the End of Turn button which is used to end the current turn.
Below the Information Panel is the Strategic Map which is a miniature version of the entire map.
Below the Strategic Map is the Unit Display Area with room to display up to four units and Strongpoint
information.
In the bottom right of screen is the Division Display Area which contains information about a highlighted
unit’s parent group.
Below the Division Display Area is the Action Control area.
6
Page 9
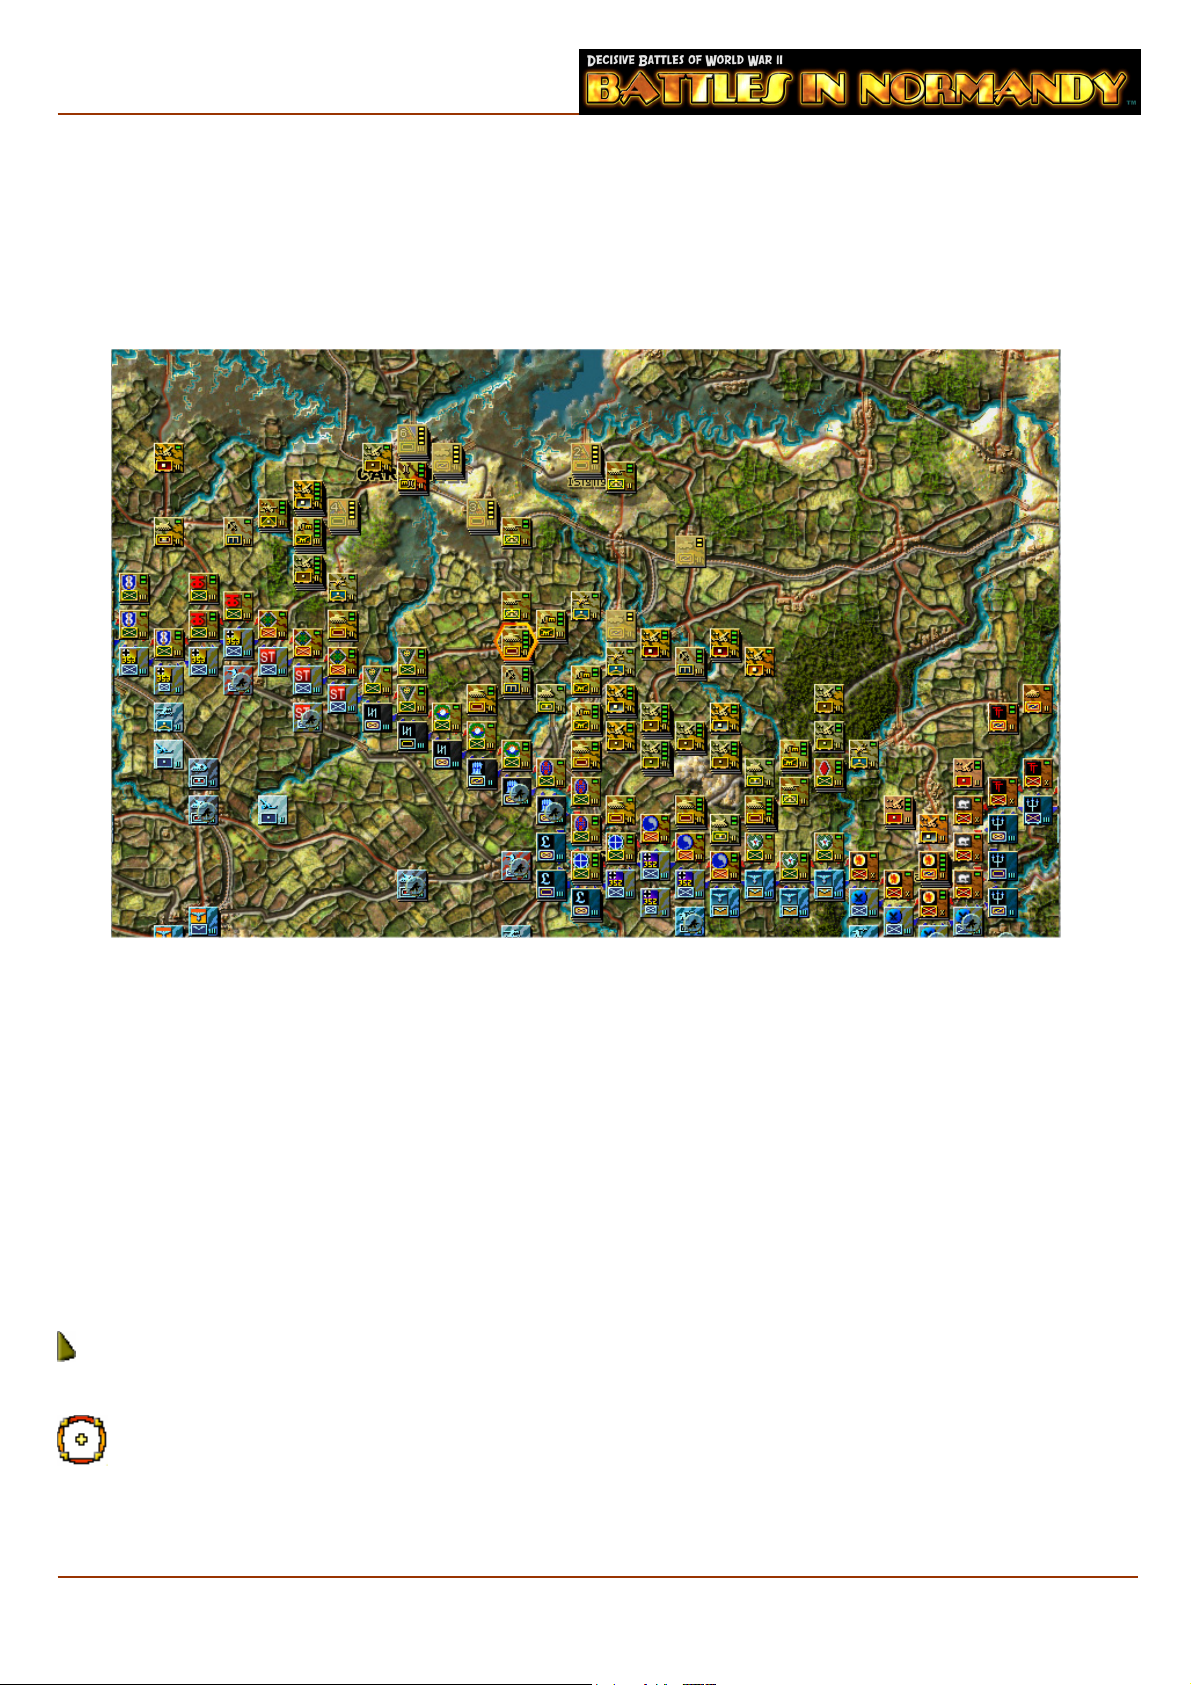
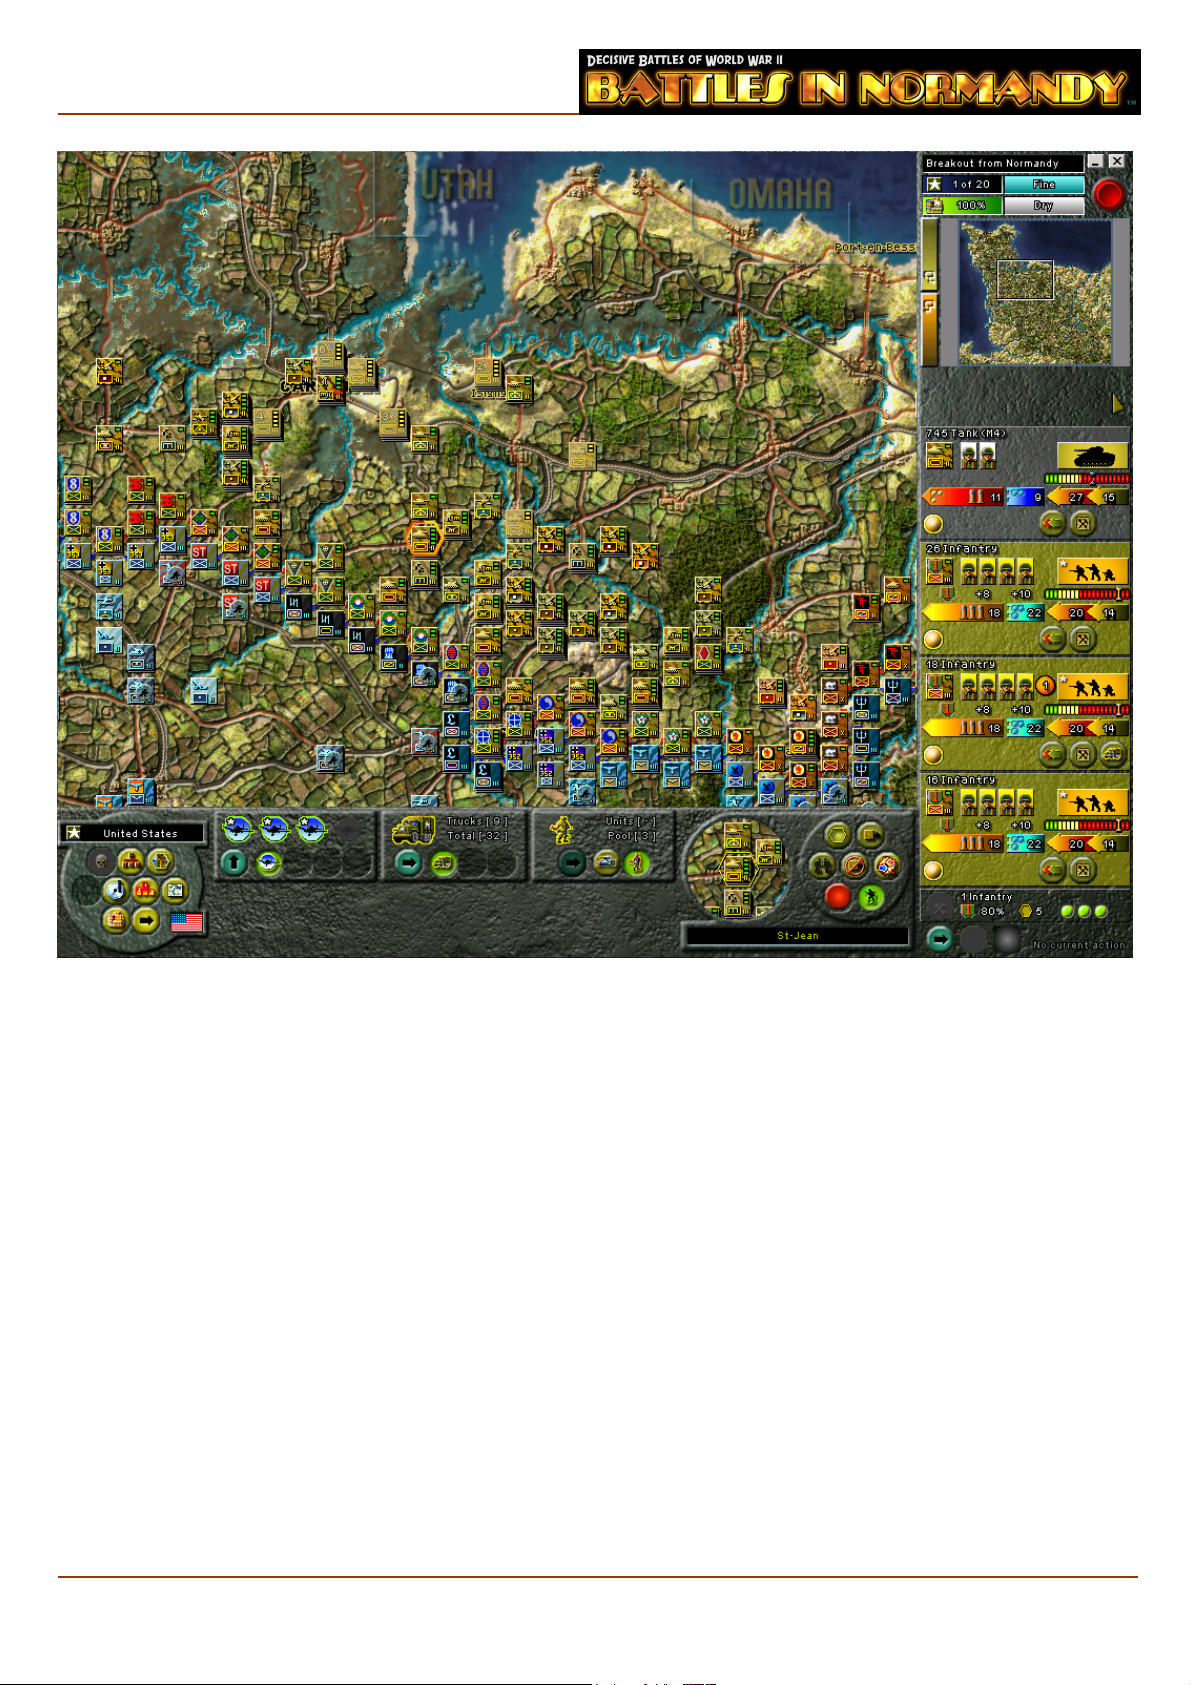
6 Tactical Map
The tactical map in Battles in Normandy™ is a hex based top down view of part of the battlefield where each
hex represents approximately four kilometres. The hex grid may be either displayed or not, depending on
preference. The map is where you move your forces and engage in attacks. Moving the mouse to the edge of the
screen will scroll the tactical map in that direction.
6.1 Terrain Elements
The map contains many different terrain elements that affect movement and combat. Battles in Normandy™
has two maps, one for Good ground conditions and one for Bad ground conditions.
Note: A full list of terrain elements and their values is viewable using the Terrain and CRT button in the
Control Panel.
6.2 Map Cursors
Map cursors play an important role in Battles in Normandy™ for providing information during a turn. As you
move your mouse over the map the cursor will change in response to different conditions. The possible cursors
are:
Note: The term mouse clicking refers to the left mouse button unless otherwise stated.
Arrow
This is the standard cursor
Gun Sight
This is the unit selection cursor. It appears over friendly units. Clicking on a stack will select a unit or units for
movement and display those units in the Unit Display Area.
7
Page 10
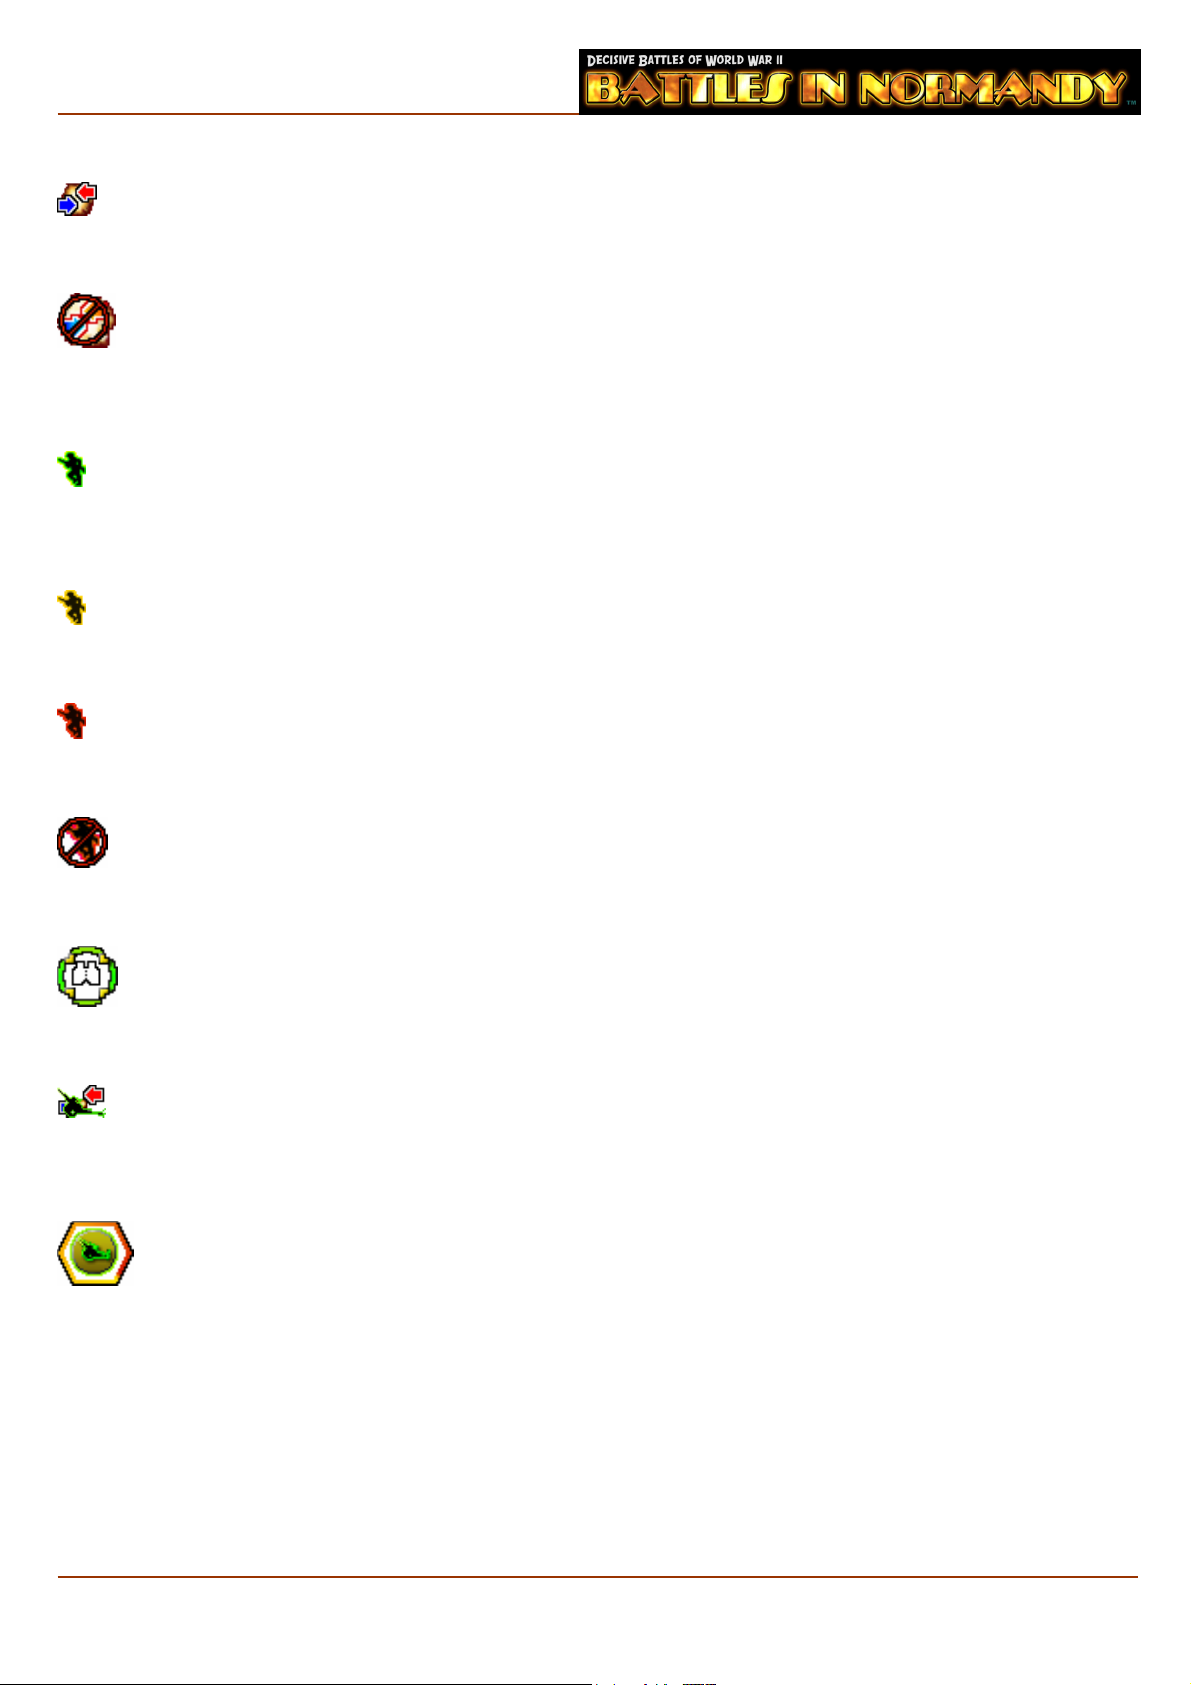
Clashing Red and Blue Arrows
This is the combat cursor. It appears over enemy units or strongpoints that you can attack. Clicking will open
the combat display
Clashing Red and Blue Arrows with ‘No Go’ Symbol
The ‘No Go’ symbol is the standard road sign; a red circle with a diagonal red slash through it. This is the no
combat allowed cursor. It appears over enemy units or strongpoints that, for one reason or another, cannot be
attacked
Running Soldier with Green Outline
This is the movement cursor. When a unit or stack is selected and the mouse is held over a hex the unit or
stack can move to in the current turn, then this cursor appears. Clicking on the map will move the selected
unit(s) to the selected hex.
Running Soldier with Yellow Outline
This cursor appears when the current unit or stack has the capability to move into a hex but cannot due to
stacking limits.
Running Soldier with Red Outline
This cursor appears when a unit or stack may not move onto a hex because it has insufficient OPs to reach that
hex. If this hex is clicked then the unit or stack will move as close as possible to this hex.
Running Soldier with Red Outline with ‘No Go’ Symbol
This cursor appears when a unit or stack is selected and the mouse is held over a hex the unit or stack could
not move to because it is occupied by an enemy unit, or there is no path to that hex.
Binoculars
This is the deselect cursor. This will appear over a unit already selected. Clicking will deselect the unit, allowing
you to select a new unit.
Artillery with Combat Arrows
This is the bombardment cursor. If an artillery unit or stack is selected, this cursor will appear over any
strongpoint that can be bombarded. Artillery must be bombardment capable for this cursor to appear. Click to
initiate the attack.
Artillery Unit on Green Disc
This is the ground interdiction cursor. If an artillery unit or stack is selected, this cursor will appear over any
hex that can be interdicted. Artillery must be interdiction capable for this cursor to appear. Click to interdict
the hex.
8
Page 11
6.3 Exposure
If you are playing with the Hidden Units option enabled, not all enemy units will be visible at all times. They
will become visible according to three states of unit exposure. These states are Hidden, Nationality Exposure
and Fully Exposed. The closer a unit approaches, or is approached by an enemy unit, the more likely it is to be
exposed. Conversely, the further away a unit moves from the enemy or the enemy moves from it, the higher the
chance it will lose exposure. In addition the type of unit, either combat or support, also affects the ability to
expose it. The three different levels of exposure are:
Hidden - A unit is this state may not be seen by the enemy.
Nationality Exposure - If a unit is in this state, the enemy will see the unit background with an appropriate
national symbol but no indication of unit type.
Fully Exposed - A unit in this state will display all information.
Combat units are harder to hide than their non-combat brethren and therefore will become exposed to the
enemy more easily. Exposure rates for units can vary between sides and can also vary with the weather. Recon
units have a much greater ability than other combat units to expose enemy units.
Note that a move which changes the Exposure of an enemy unit cannot be undone.
7 The Control Panel
The control panel consists of nine buttons. Each of these buttons when depressed will
activate either an onscreen display or submenu. Each button and its function is described
below. If a function has a keyboard shortcut it is listed alongside in parenthesis.
7.1 KIA Button (k)
This button removes all the units from the map and displays only those units that have been killed in the
course of the battle.
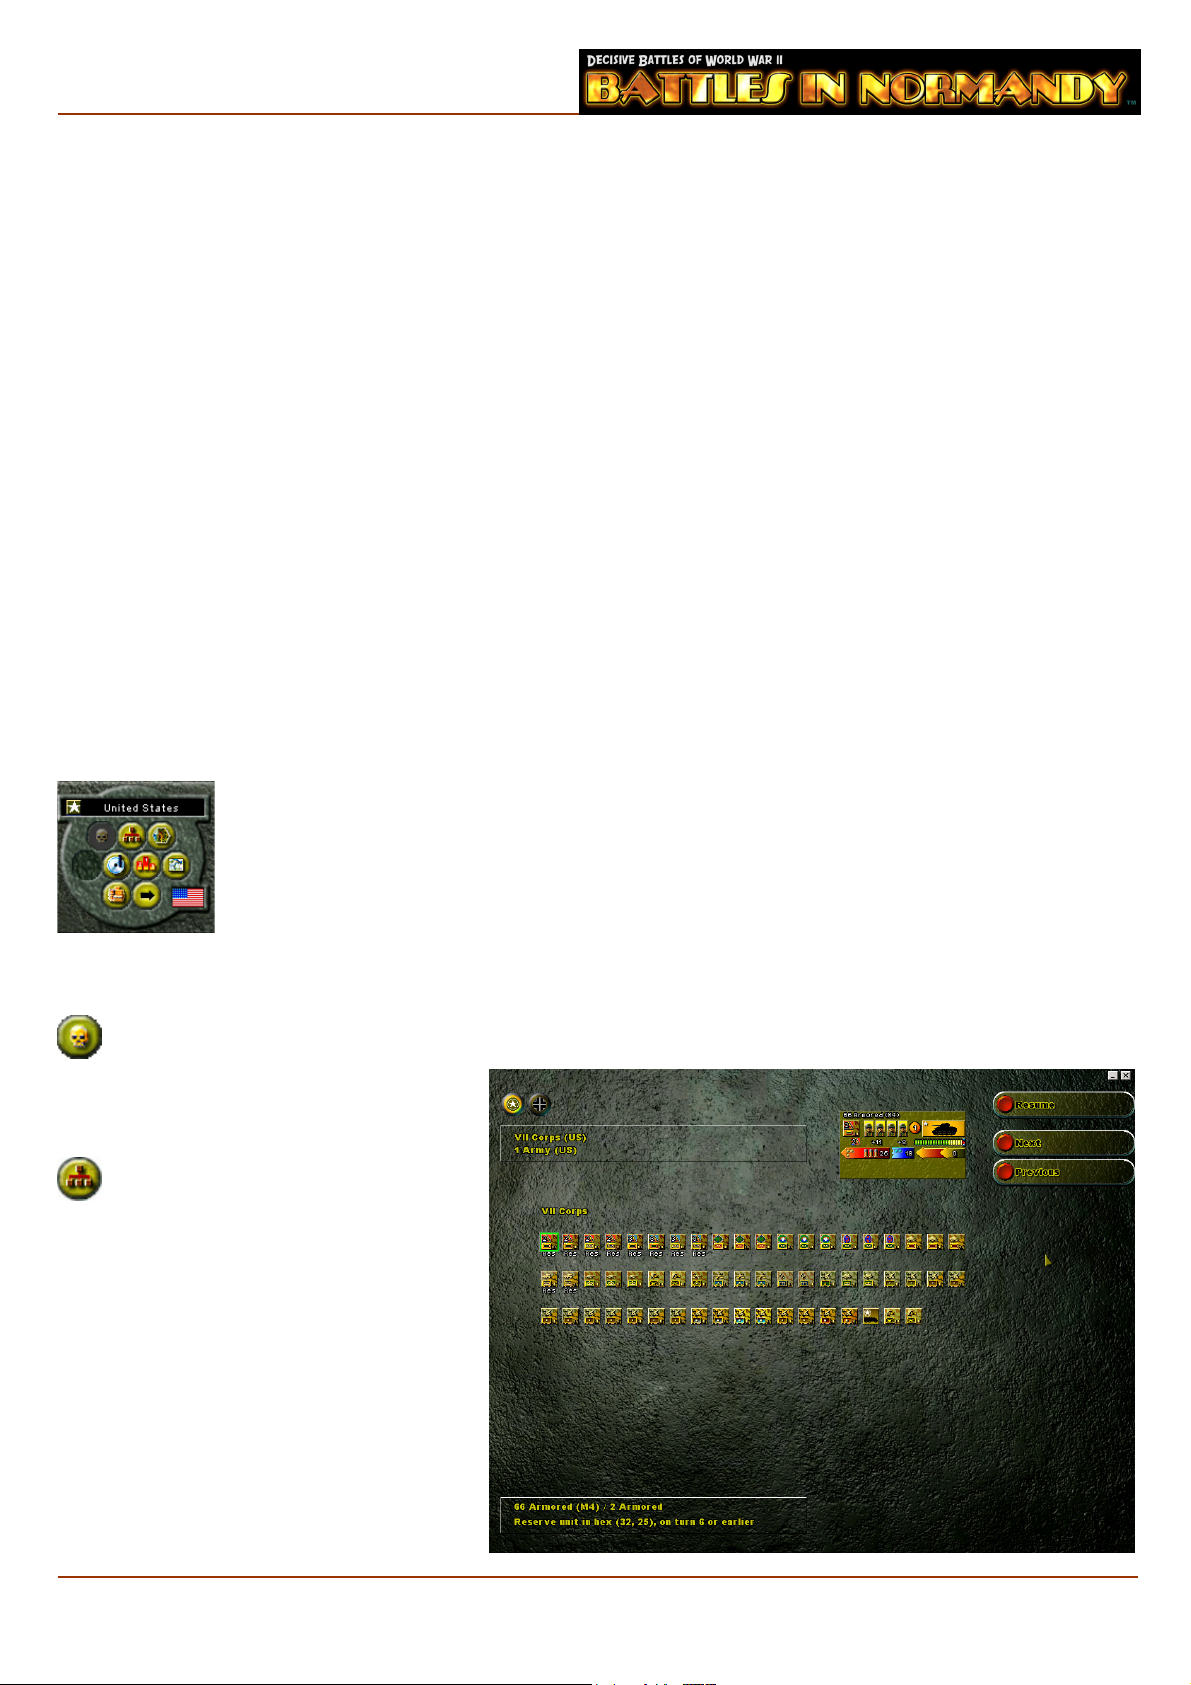
7.2 Order of Battle
This button will invoke a full screen
display identifying all units in the
battle and their parent formations. These
are viewable for all sides. Units that have
been destroyed in combat will have a
small skull superimposed over them.
Units that have not yet appeared in battle
will have their arrival turn number below
them.
9
Page 12
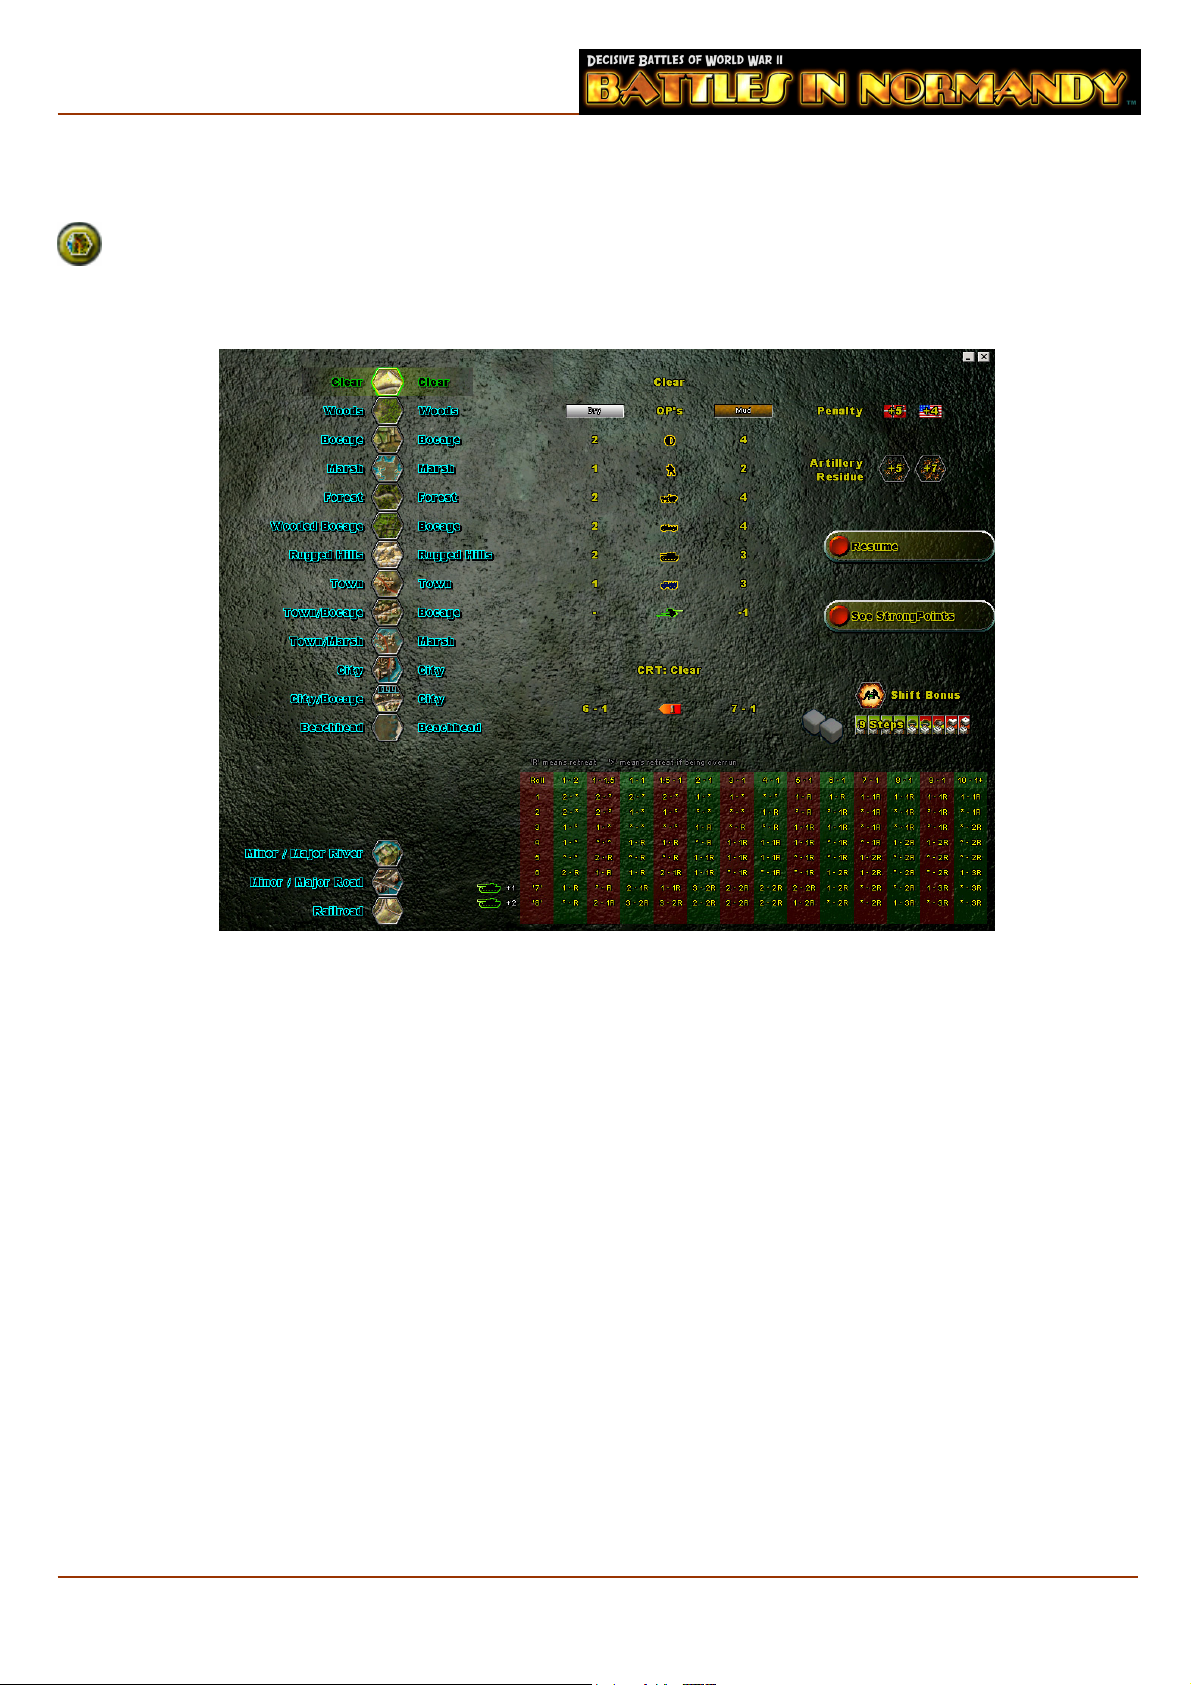
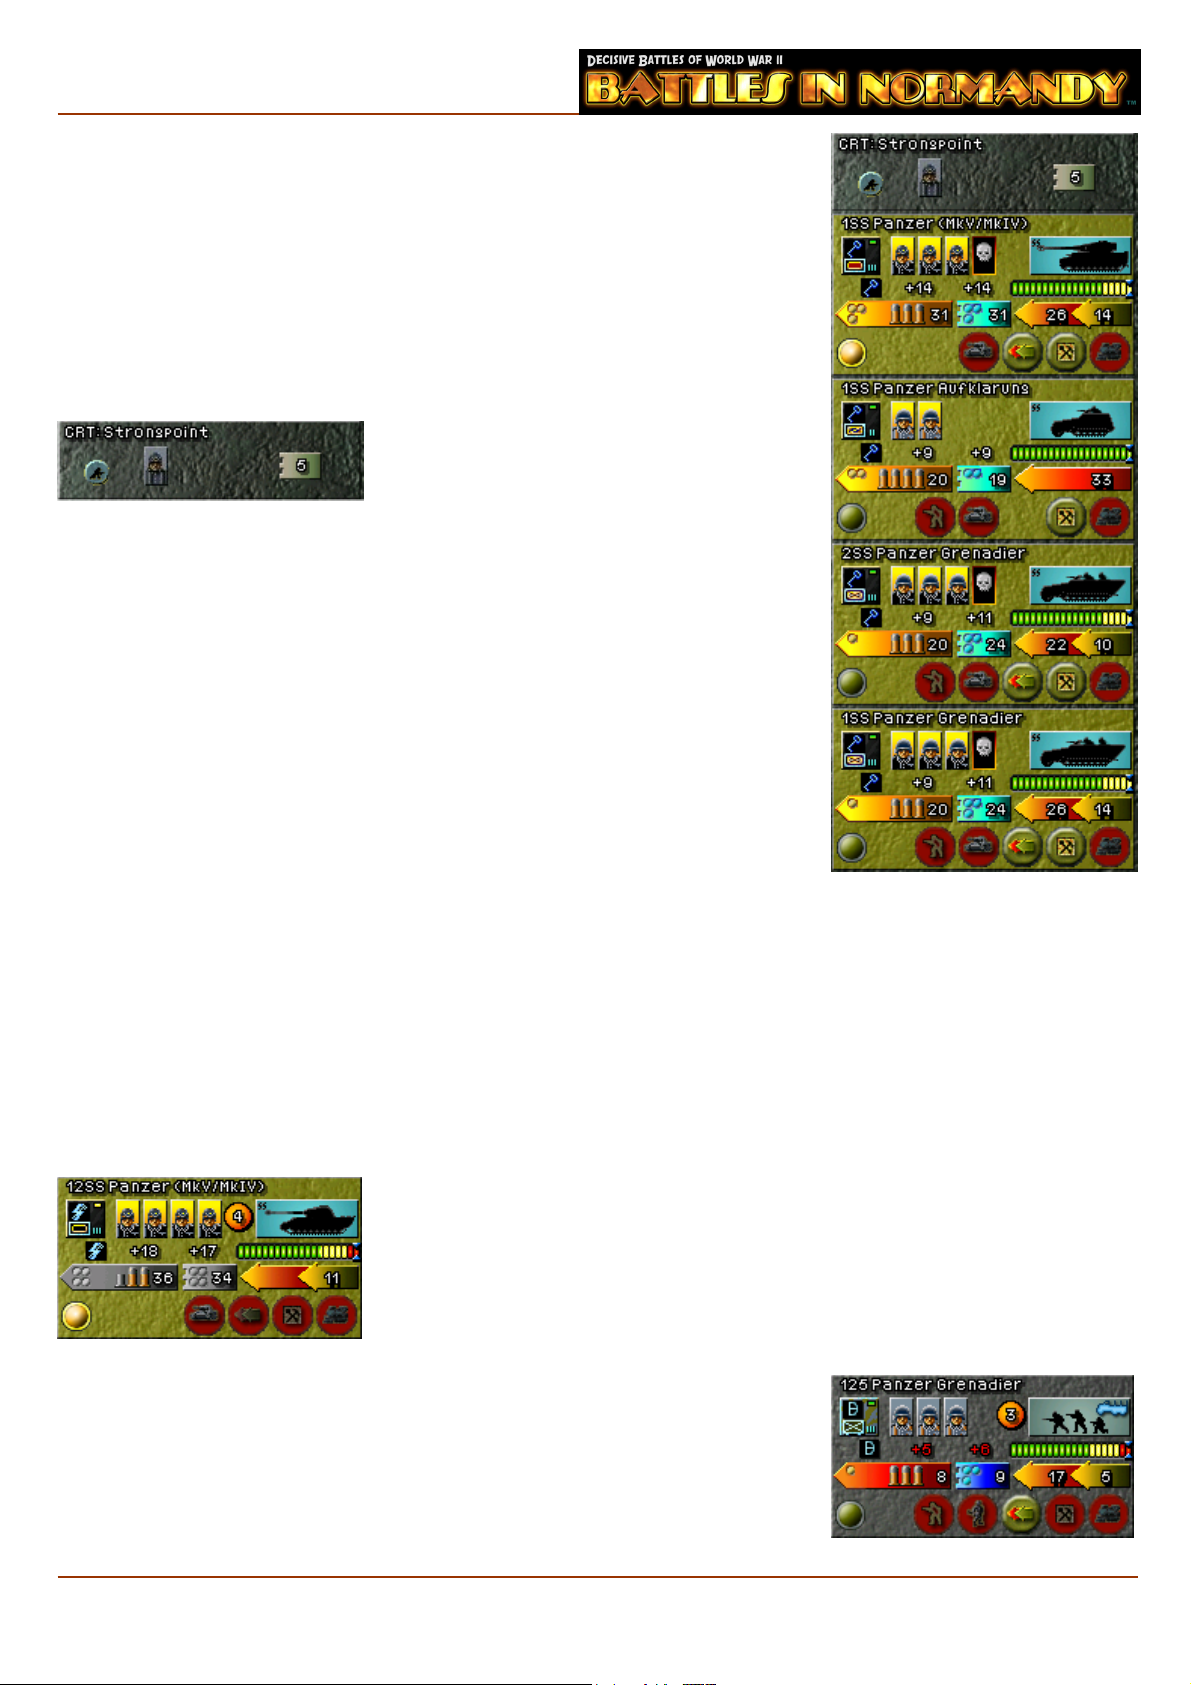
7.3 Terrain and Combat Result Tables Button
This button toggles a screen which displays all the terrain features you will find in Battles in
Normandy™, their associated movement costs and Combat Result Tables or CRT’s. Combat in Battles in
Normandy™ is resolved by a die roll applied to a CRT appropriate to the terrain type in the defending hex. A
comparison of strength between Attacker and Defender dictates the particular column of a CRT used.
Selecting an individual terrain element on this screen will cause the associated CRT for that terrain to be
shown at the bottom of the screen and also display many items of information for that particular type of
terrain. This information includes:
OP costs for each of the four movement types in good and bad ground condition.
Anti-tank shock value (if any) in good and bad ground condition.
Combat odds necessary to retain Action Capability (conduct overrun) for the turn.
OP penalties that will be applied to a unit that enters an enemy controlled hex.
OP penalties for light and heavy artillery residue.
Amount of steps defending the hex for two dice to be used to decide combat outcomes. This is expressed as a
threshold.
Note: If the number of defending steps is 1 less than the threshold, there is a 75% chance of 2 dice being rolled;
2 less is 50% and 3 less is 25%.
Strongpoint CRT’s and terrain data may also be viewed by selecting the See Strongpoint button.
A non-combat unit CRT is also listed with the Strongpoint CRT’s and is used for whenever an attack is made
against an enemy artillery, supply or support units on their own.
Note: It is a good idea to have a look at the CRTs before playing a game for the first time. For instance,
examining the Beachhead CRT in Battles in Normandy™ will make it obvious that the defender in a beachhead
combat is in a very dangerous position.
10
Page 13
7.4 Replay Button
The Replay Button brings up the replay toolbar below the tactical map screen and allows you to replay
your opponent’s previous turn in realtime on the tactical map. This is especially useful for watching an
email opponent’s turn before you continue. The replay toolbar has several buttons for which to control the
replay. These are:
Play – this will begin the replay running from beginning to end continuously.
Rewind Replay – this will rewind the replay to the beginning.
Play till next Action – this in effect plays each individual unit action and then halts awaiting instruction.
Play till Combat – the replay will begin playing and halt upon reaching a combat. The combat odds will be
displayed for the player to review.
Exit – the small cross in the right hand top corner of the toolbar will exit the toolbar.
Note: The replay toolbar button is only available if the Add Replay Data feature has been selected when setting
up the game.
7.5 Load/Save Button
The Load/Save button will bring up a menu that will allow you to either load an existing game or save
your current game. Save Games can be a combination of letters or numbers to a maximum of 45.
Resume will take you back to your current game.
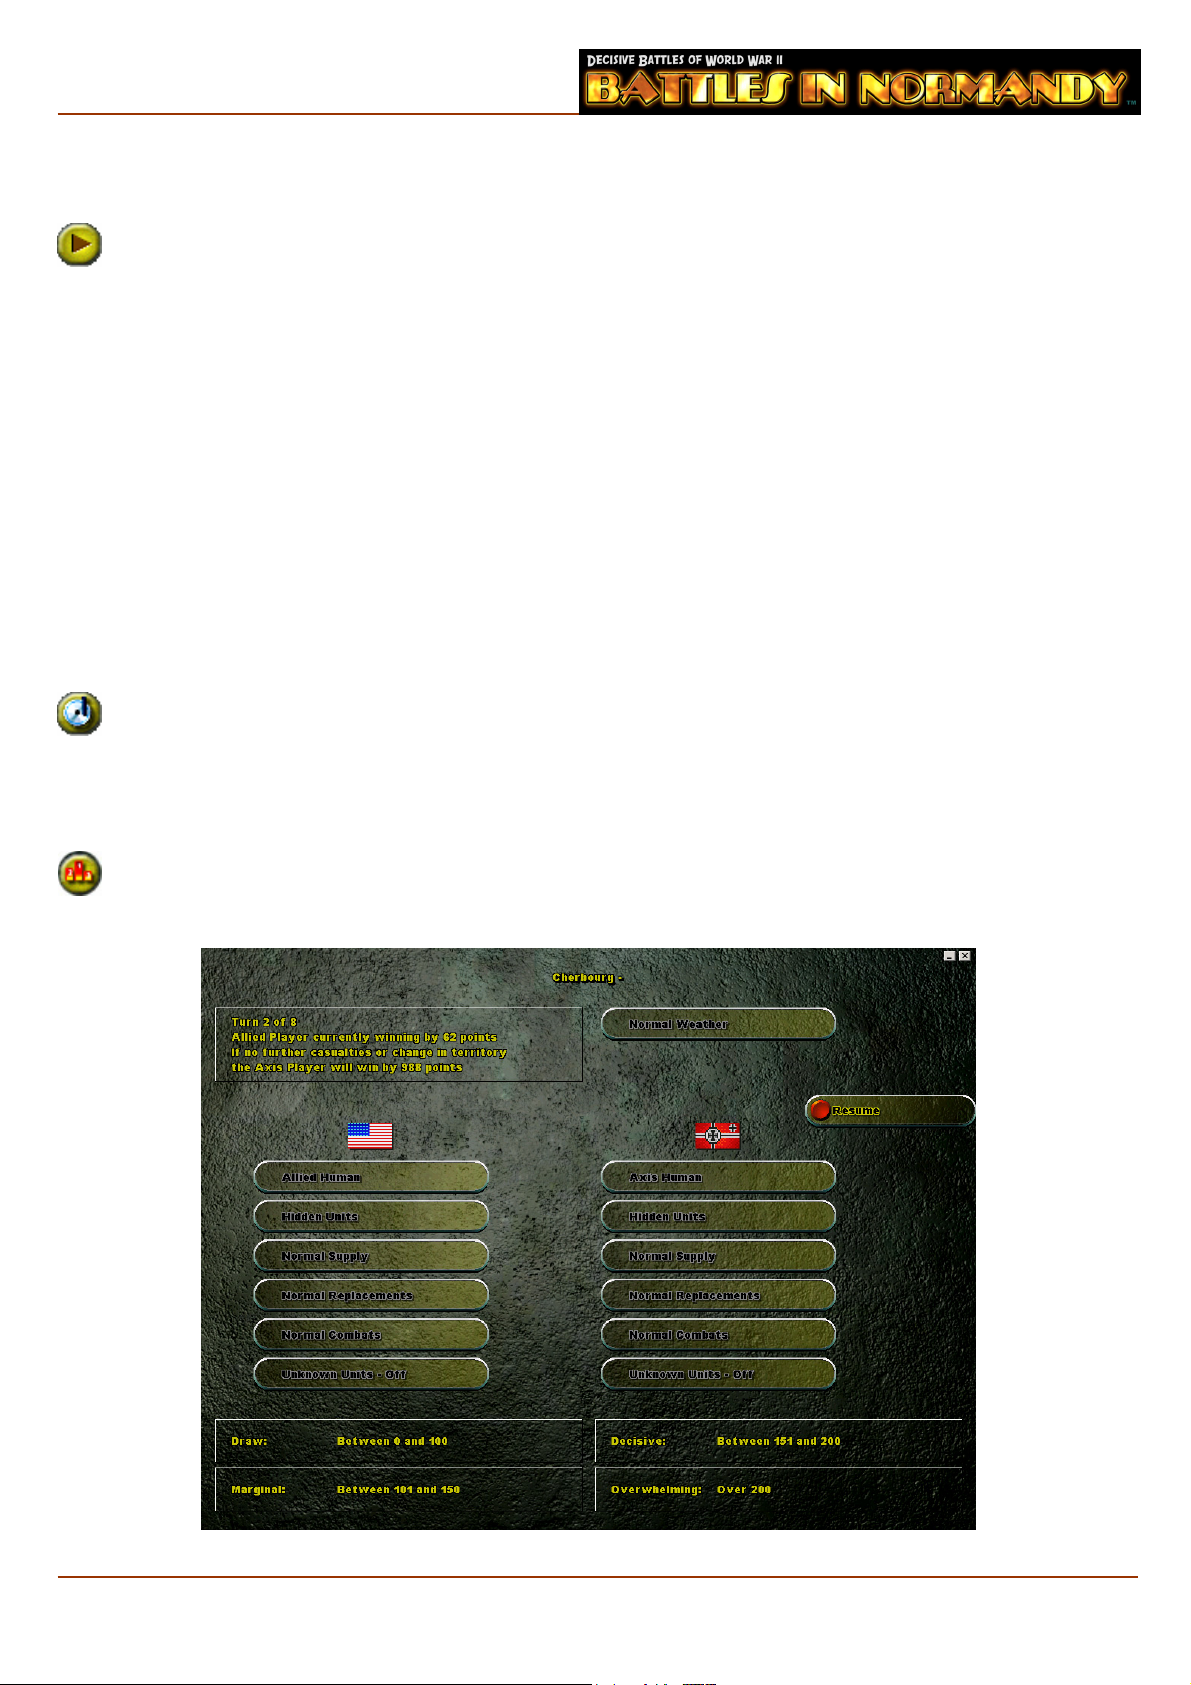
7.6 Victory Screen
This button will invoke a full screen display that will show you the current level of victory or defeat and a
prediction of the score at the end of the game if no change takes place. The score necessary for each level
of victory is displayed at the bottom of the screen.
11
Page 14
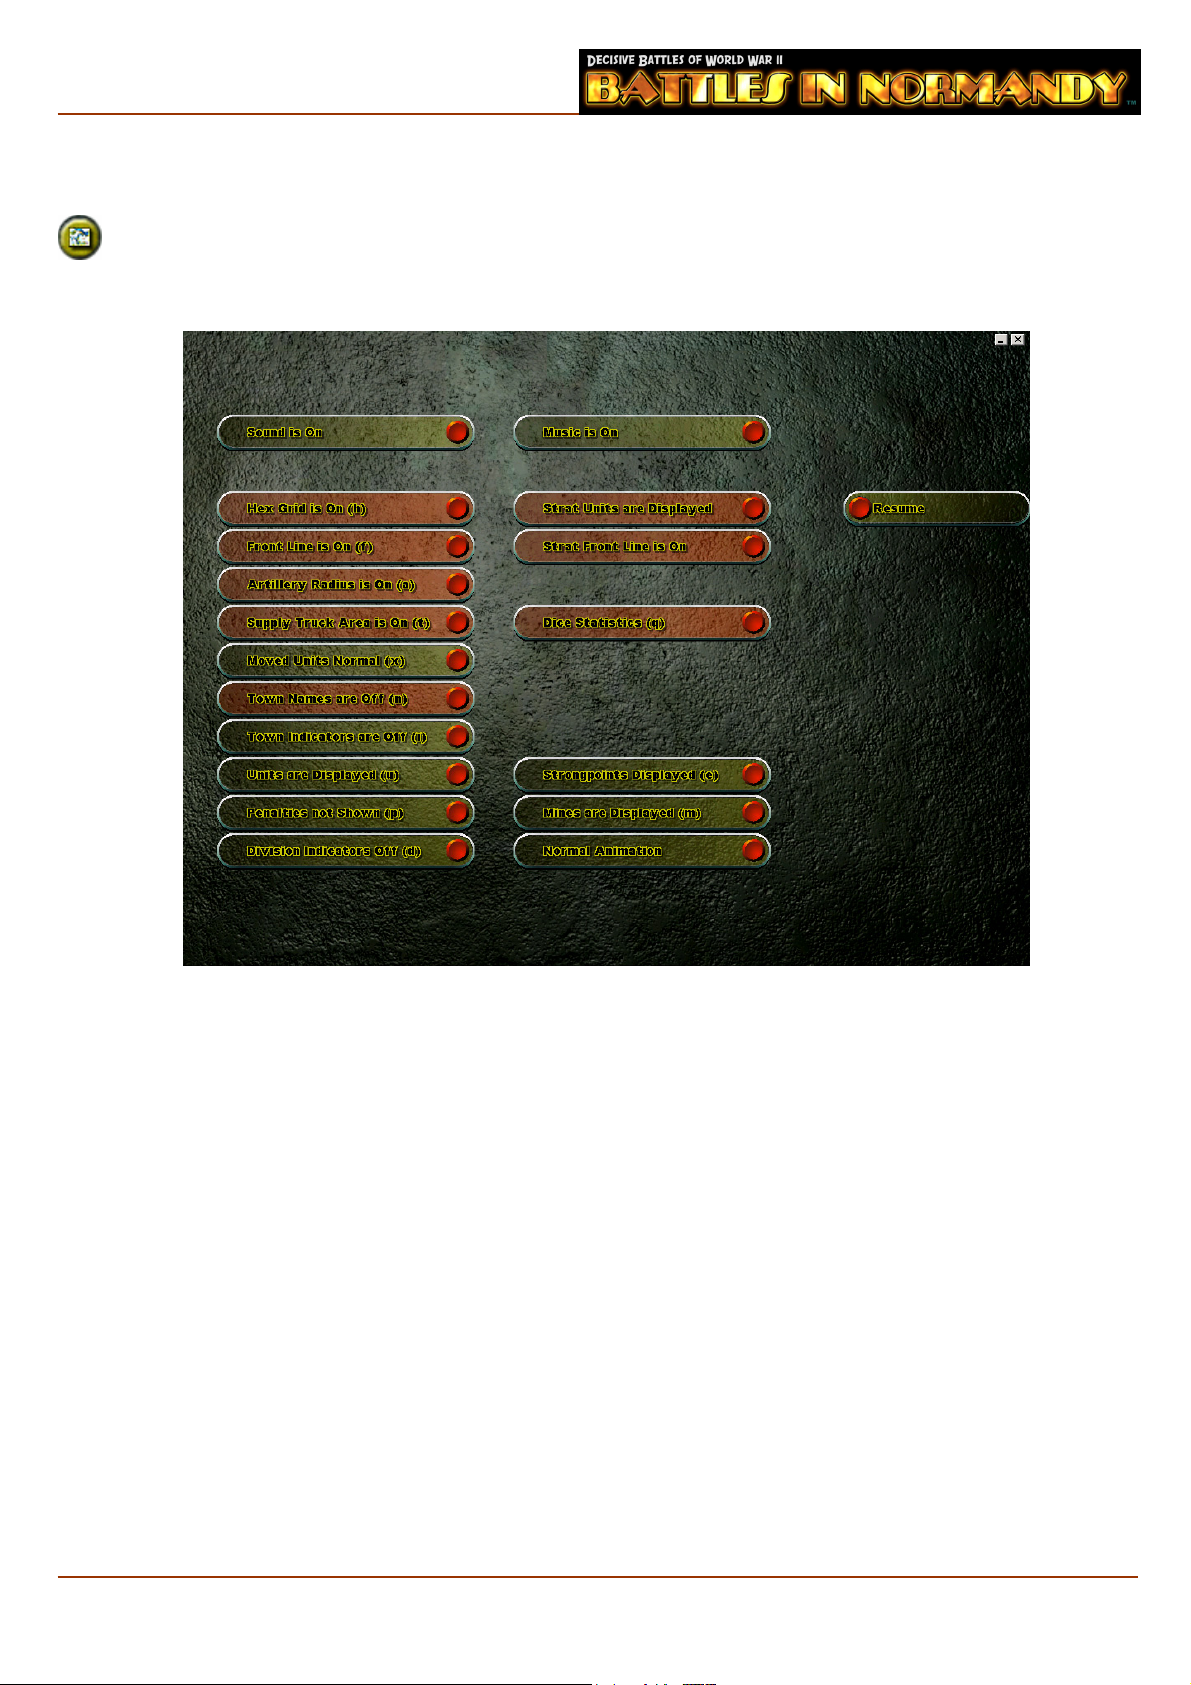
7.7 Map Options
The Map Options button opens a pop-up menu that allows the player to change various options. The
Map Options are listed below. If the map option has a keyboard short-cut key, it is shown in
parentheses. The default state of each feature is listed in bold.
Sound On/Off – toggles the sound on or off
Hex Grid On/Off – This will toggle a hex grid overlay on the tactical map. (h)
Front Line On/Off – This will toggle the front line on the tactical map. (f)
Artillery Radius On/Off - If an artillery unit is the only selected unit, the unit’s range will be shown. (a)
Supply Truck Area On/Off - If a supply truck is the only selected unit, the probable area to be supplied by
that truck in the next turn is shown. (t)
Note: Don’t forget, enemy action can often ruin your plans!
Moved Units Normal/Darkened – This button will toggle shading for all units which have been moved in the
current turn.
Town Names On/Off/Important – This button will toggle the names of all objectives on the tactical map.
There are three levels, All Towns, Important Towns and No Towns)
Town Indicators On/Off – This toggle button will display a gun sight over every objective on the tactical map. (i)
Units are Displayed/Hidden – This will toggle the display of all units on the tactical map to allow review of
the terrain beneath. (u)
12
Page 15
Penalties are Displayed/Not Shown – This button will toggle a display of movement penalties for each map
hex a player can see. If the Hidden Units option is on you will only see movement penalties for enemy hexes
that have been exposed by your units. (p)
Division Indicators On/Off – This toggle button will allow all units of a selected division to be highlighted by
a green outline when an element of their division is selected. When a supply truck is selected then it will show
the other supply trucks on the map. (d)
Music On/Off – toggles the music on or off.
Strategic Units On/Off - This button will toggle the display of units on the Strategic Map. Because of the size
of the Strategic Map units are shown as coloured squares.
Strategic Front Line On/Off – This button will toggle the display of the front line on the Strategic Map.
Dice Statistics/Victory Status/Alert Status/Help Text/No Lower Display – toggles the type of display at the
bottom of the screen. New users should choose the Help Text option. (q)
Dice statistics displays all the rolls made by each player for this turn and cumulatively, together with
the current average.
Victory status displays a summary of the current status of victory. This detail is a summary of the
Victory Screen.
Alert status displays a summary of the current alert units and replacements activated for each side.
Help Text shows help text as the mouse is moved over different screen elements.
Strongpoints Displayed/Hidden – This button will toggle the display of minefields and detachments on the
tactical map. (e)
Mines and Detachments Displayed/Hidden – This button will toggle the display of minefields and
detachments on the tactical map. (m)
Normal/Fast Animation/Fast Naval AI Animation/Fast AI Animation – This button will toggle the display
speed of units on the tactical map. Fast Animation dramatically speeds up all unit movement, and is especially
useful for players with older machines. Fast Naval AI Animation speeds up the AI’s movement of naval and
amphibious units and Fast AI Animation speeds up movement of all AI controlled units.
Resume – this button takes you back to the main screen.
7.8 Show Supply Net (s)
The Show Supply Net button is a toggle
button that displays the supply status of
all hexes during the current turn. Hexes
shaded green are in supply and can
supply replacements. Hexes shaded
yellow are in supply but can’t supply
replacements. Hexes with a truck icon
were supplied by a supply truck, and
hexes with a Strongpoint icon had their
own supply from the Strongpoint there.
Out of supply hexes are darkened.
Units that occupy a supplied hex are in
supply and will be able to continue
moving and fighting. If an unsupplied
unit moves onto a supplied hex in its
turn, it will immediately become
resupplied.
13
Page 16
Red hexes mean that the hex is currently out of supply. A unit that begins its turn on a non-supplied hex
cannot replenish supply (without moving). Once it uses the reserves carried with it, the unit will become
helpless and far more prone to destruction.
7.9 Change Allied Countries
In Battles in Normandy™, there are two opposing sides, the Axis and the Allies. For the purposes
of Battles in Normandy™, the Allies consist of the United States and Great Britain. Other Allied
nations are subordinated to one of these two countries.
Many important game functions, such as combat, supply, interdiction , replacements are not shared, but are
specific to a particular country. The Switch Countries button will change the current country, and various
displays will change as a result.
8 Asset Placement Area
Interdiction is enemy activity which interferes with supply lines and/or which
makes it more difficult for enemy units to move. In Battles in Normandy™,
interdiction is represented by four different types: Air, Partisans, Minefields and
Strongpoints.
If an interdiction type is available, its button will appear at the bottom of the Interdiction Panel. You select
between interdiction types by clicking on these buttons. The amount of interdiction is shown by the number of
icons at the top of the Interdiction Panel.
To place an interdiction type, click on the up-arrow button at the left of the Interdiction Panel. The cursor will
change to show the type of interdiction being placed, and the map will highlight all legal placement hexes. To
place, click on a legal hex. To cancel without placing, click again on the up-arrow icon.
Once an interdiction marker has been placed, the icon above the interdiction button will turn red. Clicking on
the red or grey icon will centre the map on the hex where the interdiction has been placed. [Ctrl]-clicking on
the red will remove the interdiction marker from the map. Alternatively the Undo Button may be used for the
same result.
Right-clicking anywhere in the Interdiction Panel will bring up the Interdiction Popup Display. Selecting a
turn box on the bottom of the popup will display information for the current turn, or subsequent turns. In
historical weather games, you will be able to see seven turns ahead. In random weather games you can see only
two: the current turn and the next turn. For each type of interdiction capability, you are told the number
available, the effective radius and the distance from your front limitation, if any.
Each method of interdiction has its own characteristics that are discussed below.
8.1 Air Interdiction
Air Interdiction is the ability of aircraft to attack a road or
junction to slow movement and/or supplies. Air Interdiction
imposes a movement penalty to each hex affected by Air
Interdiction for the following enemy turn. In Battles in
Normandy™, the effect of Air Interdiction can be reduced by the
presence of enemy flak units. The Air Interdiction penalty and
its reduced state are both shown in the Interdiction Popup
Display.
Note: Air Interdiction can only be placed in enemy territory and
affects the hex it is placed in and any roads in and around the
placement hex. Therefore the best position for Air Interdiction is
usually on road junctions.
14
Page 17
8.2 Minefields
In Battles in Normandy™, minefields are represented by a
skull and crossbones icon. They may be present on the
map from the beginning of play or placed via the
Interdiction Panel.
Minefields cannot be attacked. They apply a movement
penalty to an enemy unit moving through them. Enemy
units attacking from a minefield hex contribute no tactical
shift of any type to combat. Units defending in an enemy
minefield hex suffer negative tactical shifts, so attacking
units on a minefield is often a good idea.
Although they cannot be attacked, Minefields can be cleared. See Sections 20.2 and 20.3 for more details.
8.3 Strongpoints
Strongpoints represent hastily prepared small fixed defensive works. They act in an
identical manner to other fortifications and defensive works in that units stacked with
them augment its defensive capability, but are not affected by the combat result.
Strongpoints are placed on the map in the same manner as minefields but unlike
minefields, do have a small defensive value and require attacking by an enemy to
clear. They do not count for stacking limits.
Losses sustained by a strongpoint are permanent; once destroyed a strongpoint will
not return.
8.4
Partisans
Partisans act in a similar fashion to Air Interdiction, imposing movement penalties on enemy units and
supplies. In Battles in Normandy™, only the Allies have Partisan Interdiction. Some German units, typically
Military Police units, have an Anti-Partisan capability, and can reduce the effectiveness of Partisan
Interdiction. Details on Partisan Interdiction availability and effect are found in the Interdiction Popup
Display.
9 Transport Area
In Battles in Normandy™, transport is represented by truck and rail travel. This travel
represents the vast quantities of trucks, half tracks and railcars available in the theatre
to transport divisions to and around the battlefield. Their use can greatly increase the
movement capacity of a unit, but comes at a cost.
Clicking on the Truck or Train Icon at the bottom of the Transport Panel selects the current transport type.
Clicking on the right-arrow button cycles through all units capable of using the selected transport type. The
amount of the selected transport type and the number of units eligible to receive it are displayed at the top of
the Transport Panel.
To allocate a transport to an eligible unit, click on the Transport Button in the unit’s display in the Unit Display
Area on the right of the map.
Right-clicking anywhere in the Transport Panel will bring up the Transport Popup Display. Selecting a turn
box on the bottom of the popup will display information for the current turn, or subsequent turns. In historical
weather games you will be able to see seven turns ahead. In random weather games you can see only two: the
current turn and the next turn. For each type of transport capability, you are told the quantity available, and
the movement capability in OP’s assigned to each.
Sea Transport, (as opposed to amphibious landings), is not used in Battles in Normandy™, but will be used in
the next Decisive Battles game, Sicily, Salerno, Anzio.
Note: Utilising Truck or Train Transport will expend the unit’s Action Capability for that turn.
15
Page 18
9.1 Truck Transport
In order to use motorised transport, a unit must:
Be capable of truck movement, and
Begin its turn on a friendly road hex, and
Not be adjacent to an enemy controlled hex, and
Have not used its Action Capability in this turn.
If a unit meets these requirements and Truck Transport is available, a Truck Button will become active on the
unit’s display. Clicking the Truck Button will attach transport to that unit for the current turn. This will greatly
increase the unit’s movement capability for the remainder of the turn. Units using Truck Transport cannot
move into enemy controlled areas.
9.2 Rail Transport
In order to use Rail Transport, a unit must:
Be capable of rail movement, and
Begin its turn on a friendly rail hex, and
Not be adjacent to an enemy controlled hex, and
Have not used its Action Capability in this turn.
If a unit meets these requirements a Train Button will become active on the unit’s display. Clicking the Train
Button will attach transport to that unit for the current turn. This will greatly increase the unit’s movement
capability for the remainder of the turn. Units using Train Transport cannot move into enemy controlled areas.
10 Replacement Panel
In battle, it is common place over time for a unit to decrease in combat strength. This
may result from enemy action, environmental attrition, fatigue, disorganisation etc.
Replacements are a means by which a unit can regain lost strength. In Battles in
Normandy™, replacements are organised in steps, and represent activities by which a
unit regains its combat strength, including absorbing new troops, resting, regrouping,
refitting etc. There are two types of replacements, Infantry and Mechanised, and two methods by which they
can be utilised, fixed and timed.
Fixed Replacements are made available from the reinforcement schedule and are assigned by the player using
the Replacement Button. Timed Replacements are handled automatically by the computer unless overridden
by the player. Some units cannot take any type of replacement and are therefore quite vulnerable.
Right-clicking anywhere in the Replacement Panel will bring up the Replacement Popup Display. Selecting a
turn box on the bottom of the popup will display information for the current turn, or subsequent turns. In
historical weather games you will be able to see seven turns ahead. In random weather games you can see only
two: the current turn and the next turn. You are presented with information on your replacements, and on the
alert status of your forces.
The Replacement Pop-up Display shows several items of information. For replacements, you are shown the
number of casualties in your army, divided into losses which can be made good only by Regular Replacements
and those which will be made good, eventually, through the Timed Replacements system. Furthermore, you
are shown the replacements added to the pool in the selected turn, and the unused replacements accumulated
in the pool.
If any alert forces are applicable to the scenario, you are shown the number of alert points gained so far
towards replacements and new units. In the next column you are shown the points required to earn a new
replacement or unit while the final column shows how many of each type you have earned so far.
16
Page 19

10.1 Regular Replacements
When a unit takes a casualty, at least one step will be destroyed. This is
displayed on the unit display as a red skull on a black background. This step
is then capable of being replaced using Regular Replacements.
Regular Replacements comprise both Infantry and Mechanised Replacement
Steps. Most units can use the more plentiful Infantry Replacements, but
armoured and mechanised units require the less plentiful Mechanised Replacements. These replacements are
assigned using the Replacement Button.
Note: As in the screenshot, skulls will be white on a black background if the losses were suffered in a previous
turn.
10.2 Replacement Buttons
The buttons at the bottom of the Replacement Panel are used to select the replacement type. The number of
replacements available and the number of eligible units are displayed above the buttons.
Clicking the right-arrow button will cycle you through all available units that can accept the selected
replacement type. In order to accept a Regular Replacement, a unit must:
Be in supply, and
Be capable of accepting replacements and
Have not used its Action Capability in this turn.
If a unit meets these requirements a Replacement Button of the appropriate type will become active on the
unit’s display in the Unit Display Area. Clicking the Replacement Button will attach the replacement step to
that unit. This will increase the unit’s strength by one step.
Note 1: A Regular Replacement can be used to rebuild a step undergoing timed replacement if desired.
Note 2: Some Supply Sources cannot also provide replacements so a unit must also also be in a hex capable of
providing replacements in order to take a regular replacement.
Assigning replacements will expend the unit’s Action Capability for that turn and a unit cannot take more than
one replacement in a turn.
Unused replacements will accumulate if not used.
10.3 Timed Replacements
Timed Replacements are unique to each individual combat unit and
represent a unit’s ability to rebuild itself internally after combat. A combat
unit that is capable of utilising Timed Replacements will have a small yellow
circle in its unit display (alongside the steps) with a number superimposed on
it. This number is the amount of timed replacements this unit is capable of
and can vary from 1 to 9.
If a unit of this type takes a casualty, at least one step will be destroyed. This is displayed on the unit display as
a white skull on a red background. Further to this, the skull will have a small number superimposed over it.
This is the number of turns until the step is replaced automatically by a Timed Replacement. Each turn, the
superimposed number will decrement by one until the dead step is replaced.
Note that if the unit in question meets the criteria for Automatic Refit, then the superimposed number will
decrement by two.
If more than one casualty is incurred and a unit has more than one Timed Replacements available, a second
red casualty icon appears. This second icon always has a time frame number at least 1 more than a previous
casualty.
17
Page 20

Once all a unit’s Timed Replacements are consumed, all further losses can only be made good by Regular
Replacements. Recovering a step in the timed replacement procedure is ‘automatic’, so Action Capability for
the turn is not used.
If a unit shows both types of casualties, adding a Regular Replacement will make good the black background
step loss. If a unit shows only timed replacement losses, and the replacement eligibility icon is present, you
may immediately make one of those losses good by adding a Regular Replacement, if you have one. This action
does not waste the Timed Replacement; it is returned to the unit’s pool.
Note: Some units have only Timed Replacements and cannot take Regular Replacements.
11 Unit Control Area
The Unit Control Area shows the currently selected unit and surrounding
hexes in a small circular display. This display is where unit specific
actions such as bridge blowing and bridge repair may be made. The Unit
Control Area also contains buttons enabling selection, deselection and
grouping of units.
If a unit is selected it will appear in the centre of the circular display. If a
unit occupies a hex containing a town or city, this name of this town or
city will appear beneath the circular display.
11.1 Bridge Blowing
Blowing bridges is an effective means of slowing enemy movement. A blown bridge immediately increases the
movement penalty in that hex effectively slowing traffic. In addition supply, truck and rail movement cannot
pass over a destroyed bridge. Therefore, blowing bridges is a vital technique in defence.
All combat units and some support units (e.g. Engineer) can attempt to blow a bridge. The chance for a
successful bridge blowing is displayed as a dice next to a dynamite plunger in the unit’s popup. The number on
the dice is the minimum number that must be rolled for a successful bridge blowing. In order for a unit to
attempt to blow a bridge it must:
Not be adjacent to an enemy unit or strongpoint, and
Not have used its Action Capability in this turn.
If a unit meets this criteria and is adjacent to a bridge that can be blown, the bridge blowing icon (a dynamite
plunger on a red background) appears in the hex across the bridge from the unit, both on the Tactical Map and
in the round window in the Unit Control Area. If a unit fails to meet the criteria the dynamite plunger icon will
be grey.
To attempt to blow a bridge, click on the red icon in the Unit Control Area. A sound effect appropriate to the
action will be heard.
If successful, the bridge will be replaced with a blue bridge blown symbol.
If unsuccessful, the dynamite plunger on a red background icon will be replaced with a grey icon denoting
further attempts by that unit are not possible in that turn.
Note: Clicking on this icon on the Tactical Map will simply move the unit over the bridge.
Attempting to blow a bridge will expend the unit’s Action Capability for that turn.
18
Page 21

11.2 Bridge Repair
Bridges in Battles in Normandy™ may begin the game in a blown state or be destroyed by units as per the
method above. It is possible to repair these bridges, though only units with bridge repair capability (mainly
engineers, but some combat units) can do so. If a unit can repair a bridge it will be shown by an icon in the
unit’s popup. Repairing a bridge has the benefit of reducing the movement penalty in that hex and therefore
making road movement quicker.
To be eligible to repair a bridge a unit must:
Be bridge repair capable, and
Not be adjacent to any enemy units or strongpoints, and
Not have used its Action Capability in this turn.
If a unit meets this criteria and is adjacent to a blown bridge, the bridge repair icon (a blue icon with a crossed
hammer and spanner) will appear on the other side of the bridge to the selected unit both on the Tactical Map
and in the round window in the Unit Control Area.
To repair this bridge, click on the blue icon in the Unit Control Area. A sound effect appropriate to the action
will be heard.
Note: Clicking on this icon on the Tactical Map will simply move the unit over the bridge.
Repairing a bridge is always successful. When rebuilt, the blue blown bridge symbol is replaced by a bridge
symbol. In addition congestion markers will appear on either side of the bridge and a movement penalty is
imposed on any unit moving through the congested hex, even if doesn’t cross the bridge. The penalty lasts for
the turn the bridge is repaired and the following turn. This in effect replicates the congestion of traffic that a
newly built bridge would suffer. Go to the Terrain Effects Table to observe the different penalties for repairing
bridges across major and minor rivers.
Note: Repairing a bridge will expend the unit’s Action Capability for that turn.
11.3 Bridge Building (Pontoons)
Certain units in Battles in Normandy™ are capable of building new
bridges. To be eligible to build a bridge a unit must:
Be bridge build capable, and
Not be adjacent to any enemy units, and
Not have used its Action Capability in this turn.
If a unit meets this criteria and is adjacent to a blown bridge, the bridge repair icon (a yellow bridge symbol)
will appear on the other side of the bridge to the selected unit both on the Tactical Map and in the round
window in the Unit Control Area.
To build this bridge, click on the yellow icon in the Unit Control Area. A sound effect appropriate to the action
will be heard. The same congestion penalties for repaired bridges also apply to built bridges.
11.4 Toggle Units, Mines, Strongpoints, Reinforcements and Supply Hexes (Ctrl-u)
This button toggles the display of all Units, Mines, Strongpoints, Reinforcements and Supply Hexes on
the map.
11.5 Next Unit
The Next Unit Button will cycle the cursor through every unit on the Tactical Map that has movement
capability remaining. This is handy for finding units that have not yet been moved in this turn. Once a
unit has expended some of its movement capability, it will be ignored by this function.
19
Page 22

11.6 Deselect Unit
The Deselect Unit Button will deselect the current selected unit.
11.7 Leave Unit and Get Next One
The Next Unit Button in effect ‘marks’ the unit as having moved and the Next Unit Button will ignore it.
Note: This function can be overridden and the unit can still be selected manually if required.
11.8 The Combat Advisor Button (o)
The Combat Advisor is a powerful tool. When depressed, the button toggles an overlay display on the
tactical map of every possible combat that may be attempted by the player at this precise moment in the
current turn. Each possible combat is overlayed with an odds description that represents the maximum
possible odds attainable in a combat on that hex. To aid in your interpretation of the odds, the display
backgrounds are colour coded for easy reference. Overrun odds are shown in green, good odds are bright
yellow, reasonable odds are yellow and poor odds are orange.
Clicking on a hex containing combat odds display on the Tactical Map will then highlight the units that are
needed to mount the attack at those odds. These will be combat units and possibly artillery. Units that are not
needed for the attack will be darkened. If a stack is highlighted during this process this signifies that one or
more of the units within the stack are needed to achieve the combat odds displayed. Right clicking on the stack
will display which of the units are needed. Those not needed will be displayed by a generic nationality icon.
Note: If you select a unit that has been highlighted, then the system will display a move path to the destination
hex that the Combat Advisor has selected for the unit. You don’t have to move the unit to that hex, but if you
don’t you may not get the odds that the Combat Advisor can.
Used correctly this is an extremely powerful tool for the player as it can display at a glance exactly which
enemy units/hexes represent the best chance of success in a combat.
The display treats each combat individually and hence once a combat takes place the display is automatically
toggled off and must be selected again for recalculation.
Since different countries on the same side cannot combine in a single attack, the Combat Odds will only be
shown for the current country.
11.9 Undo Button
The Undo Button will undo the previous action made if you change your mind. The Undo Button is
limited to one action only. Most actions can be undone. These include movement (unless it reveals
previously hidden units), allocation of replacements or transport and the placement of interdiction markers.
The action to be undone is shown to the right of the Undo Button. Some actions cannot be undone. These
include moves that have revealed hidden enemy units, revealed unknown units, bridge repair, attempted
bridge blowing and combat.
12 Game Information Panel
The Information Panel contains many elements of information about the
current game. These are listed below and discussed in detail.
12.1 Title
This panel contains the title of the current scenario.
20
Page 23

12.2 Minimise/End Game
In the top right hand corner of the display are functions for minimising the game to desktop or exiting the
game. If you choose to exit the game a popup will appear to confirm this action.
12.3 Side and Turn Indicator
This panel contains an icon representing the current player’s side.
Alongside this icon is the current turn number and total number of turns for this battle. Right-clicking on this
panel will display a popup screen containing historical notes, the current (game) date and time of day.
12.4 Supply State
The panel displays the current supply efficiency.
12.5 Weather
This panel describes the current weather conditions.
Right clicking on this panel will display a popup that
shows the weather condition expected for the next
seven turns (historical) or one turn (random weather
game).
Note: The method of weather forecast is based on the
choice made in the scenario select screen at the start of
play.
12.6 Ground Condition
This panel shows the current ground condition. Right clicking on this panel will display a popup that shows the
actual ground condition expected for the next turn (historical) or the percentage chance that the ground
condition may change next turn. Ground condition can be one of two types; Good or Bad. Both types are
represented visually on the map and impose different values on the terrain.
13 End Turn Button
The End Turn Button is the large red button in the top right hand corner of the display. It is pressed
once all actions for that turn have been made and you are ready to progress. When the button is
depressed, you will move to one of the following screens:
13.1 Standard Game
If you are playing a game against the
computer or a Hot-Seat Game with a
friend, you will arrive at the Next Turn
Screen. This screen will display a
background graphic representing the next
side to play and a confirmation dialogue to
begin the turn.
Note: In a game against the computer,
confirming this dialogue will hand control
to the computer for the next turn.
21
Page 24

13.2 Email Game
If you are playing an email game, you will arrive at the Email Confirmation Screen. This screen contains the
email information as entered in the game at Email Game Setup by yourself or the opposition. There are two
buttons on the right hand side.
Resume: this is essentially a ‘Back’ Button and will take you back to the game without sending it via email.
Exit and Send: this button will close the Battles in Normandy™ game and after a short period launch your
default email browser with a new message invoked. This new message will use the data from the Email
Confirmation Screen as the basis for the message. The Battles in Normandy™ turn will automatically become
an attachment to this message via inbuilt proprietary software: EmailSender.exe.
Your email may then be sent via normal methods.
Note: The message created and attachment may be treated as any other email at this point including adding
additional text to the message.
The save game turn is located in the \SaveEmail\Send folder in your game directory.
Return to Start: This will end the current game and take you to the Main Menu. The save game turn has
been created and can be found in the \SaveEmail\Send folder in your game directory if you wish to send the
file manually.
14 Strategic Map
The Strategic Map is a miniature version of the entire battle map. A small
rectangular box within the Strategic Map shows the current area the Tactical
Map represents. As the mouse scrolls the Tactical Map, this rectangle will
move to reflect the current position. Clicking on the Strategic Map will cause
the Tactical Map to ‘jump’ to that position, centred on the cursor. In addition,
holding the mouse button down when clicked will allow the rectangle and
hence the tactical map to be scrolled smoothly.
In addition, there are two buttons to the left hand side of the display that allow several different methods of
viewing the map. The top green button will toggle the size of the strategic map itself between two sizes.
The Strategic Map can display the units of both sides and
the front line if desired. Axis units are represented in
blue, Allied in yellow and the frontline in red. These
displays can be toggled via the Map Options in the
Control Panel.
Operational Map
14.1
The lower green button next to the Strategic Map will
bring up the Operational Map. This shows the complete
battlefield on one screen, and a summary of changing
victory points over time.
22
Page 25
15 Unit Display Area
The Unit Display Area is immediately below the Strategic Map. Information
on all units and fortifications in a selected hex is given in the Unit Display
Area. Up to four units and a fortification can occupy any one hex. For each
unit there is a large amount of information that can be displayed. This
information and what it represents is discussed below.
15.1 Fortification Display
Any fortification present in a hex will always
be displayed as the top item in the Unit
Display Area. The details shown are similar
to that of an ordinary unit. They are:
The Combat Result Table (CRT) the strongpoint uses,
A picture of the strongpoint,
The number of steps the strongpoint has, and
The fortification’s current defence value.
Timed replacements, if any.
Note: Strongpoints may never have Attack Values.
15.2 Unit Name
Every unit in Battles in Normandy™ represents an actual unit that took part
in the historical battle. The name of each unit is shown on the top left corner
of each unit in the Unit Display.
15.3 Unit Icon
Below the unit name is the Unit Icon. This icon is the same that appears on the Tactical Map and will contain
the historical unit’s insignia if it has one. The icon may appear in the normal raised manner or in a sunken
scalloped form. This latter form denotes the unit is entrenched.
15.4 Unit Quality
In battle, the quality of a unit can greatly affect the skill with which it performs its duties. In Battles in
Normandy™, a unit will experience differing bonuses/penalties depending on its quality. This quality is
displayed to the player via the colour of the unit’s background in the unit display. The possible background
colours and benefits (if any) are:
Elite units have a gold background. For their skill they receive a +1 tactical
shift bonus in any combat they take part in.
Note: There is a maximum of one such shift allowed in any combat and it can
be used in either defence or attack.
Standard units have a grey background. They receive no bonus for quality but
can assist in contributing other types of tactical shift bonuses.
23
Page 26

Substandard units have a light red background. These units receive no bonus
for quality and further can never contribute any type of offensive tactical shift
bonus to a combat regardless of situation.
Isolated Units have a bright red background. They are units that are out of
supply and have used all their bullets. These units are in serious trouble and
cannot attack. They receive no bonus for quality regardless of type and cannot
contribute to other tactical shift bonuses. They will take additional losses in
any combat and will always suffer a retreat result.
15.5 Unit Strength
To the right of the Unit Icon is between one and four boxes containing either soldier’s heads or skulls. These
boxes indicate the strength of the unit, measured in steps. A unit with one step is very weak and easy to destroy
whereas a unit with four steps is large and difficult to destroy.
When a unit loses one or more steps in combat, it will have skulls shown in place of the heads. These losses can
be one of two kinds.
15.5.1 Regular Losses
Regular Losses are displayed as white or red skulls on a black background. To be replaced, a Regular
Replacement step of the appropriate type must be used.
15.5.2 Timed Losses
Timed Losses are displayed as red skulls on a red background, with a
white numeral superimposed. These losses will repair themselves in time.
The number of turns that this will take is shown by the small white
number on the loss icon itself. Most units that have this capability have a
finite number of these Timed Replacements and this number is shown in
a small yellow circle to the right of the step icons. Once used, this circle
will no longer appear.
Note: No circle means a unit has no timed replacements.
15.6 Movement Mode
To the right of the step display is a rectangular box displaying the movement mode of the selected unit. This
display shows the primary means of transport used by this unit and main type of vehicle
Each of these methods of transport has differing capabilities that vary depending on the terrain being
traversed.
See Section 21 for more details on movement.
15.7 Combat Strength Values
The next line in the unit display shows a series of four coloured bars with
bullets and figures overlayed. The first of these two bars represent the
Combat Values of a unit. These are Attack Strength and Defence Strength
respectively. In addition there is information on supply and shock imprinted
on each.
24
Page 27

15.7.1 Unit Supply Status
In Battles in Normandy™, supply at combat unit level is represented by ‘bullets’. All units in the game have a
one to four bullet capacity. The number of bullets available for use by a unit is visually displayed on the red
Attack Strength Bar. An expended bullet is displayed as an empty cartridge case.
A unit that begins a turn on a supplied hex or moves to a supplied hex during a turn will immediately recover
all expended bullets.
Each time a unit attacks or performs an action (taking a replacement, accepting motorised transport, enhanced
movement, entrenching, creating a detachment, blowing or repairing a bridge) it expends a bullet. Only one
bullet can be expended by a unit per turn. When a unit expends a bullet the Attack Strength Bar will change to
grey to denote its use. This unit will not be able to participate in other activity that requires expense of a bullet
for the remainder of this turn.
A unit which is out of supply can continue to fight as long as it has bullets. When it has no bullets and is
attacked or otherwise uses an Action Capability, it becomes isolated. Isolated units are shown on a bright red
background in combat and will suffer additional combat losses; even the strongest units can quickly
disintegrate when isolated.
15.7.2 Attack Strength
The Attack Strength of a unit in Battles in Normandy™ is a measure of how strong a unit is when it attacks an
enemy. It represents the total ability of the unit to coordinate its elements in battle. This strength is based on
the type of unit, the number of steps it has and whether the unit is supported by other elements of its division,
and is represented by a white number that is displayed next to the bullets on the red Attack Strength Bar.
Note: If a unit has expended its Action Capability for a turn the attack bar will be grey.
This figure is the base attack value used in the calculation to determine a combat result.
Some units like supply, artillery, fortifications and support units have no attack capability. These units will not
have a red attack flag. This means that they are either not combat units, or (like artillery) their combat strength
is measured in a different way.
If a unit has any shock ability, it is represented by one to four dots to the left of the supply bullets.
15.7.3 Defence Strength
The Defence Strength of a unit in Battles in Normandy™ is a measure of how effectively a unit can defend itself
against the enemy. It represents the total ability of the unit to coordinate its elements in battle. This strength is
based on the type of unit, the number of steps it has and whether the unit is supported by other elements of its
division, and is represented by a white number that is displayed on the blue Defence Strength Bar.
This figure is the base defence value used in the calculation to determine a combat result.
A battered unit quickly loses the urge to attack, but can still defend itself vigorously. Therefore, though
defensive strength is also reduced by step losses, it is usually not to the same degree as the attack value. A
unit’s defence strength can be enhanced by such measures as Divisional Integrity or Entrenchment.
If a unit has any anti-shock capability, it is represented by one to four dots on this Bar
15.8 Movement Values
Most units in Battles in Normandy™ have the ability to move. Exactly how these units move and at what rate is
determined by the Movement Values. These values represent the ability of a unit to move across terrain using
organic or assigned transport.
The values are displayed on arrows to the right of the Attack and Defence Strength Bars and are the enhanced
movement and normal movement values respectively.
The Normal Movement value is expressed in Operation Points (OPs) as a white figure on a yellow arrow. In
addition a player may choose to adopt the Enhanced Movement mode. If he does so, the unit will use the
Enhanced Movement Value displayed on the orange arrow.
25
Page 28

A unit expends its movement OP according to many different influences such as terrain type, enemy zone of
control and interdiction.
Using Enhanced Movement mode costs a unit its Action Capability for that turn.
Reserve OPs are used to fuel Enhanced Movement. The gauge above the movement arrows shows the number
of Reserve OPs a unit is carrying. A unit with lots of Reserve OPs is capable of sustained manouver, a unit with
no Reserve OPs cannot even use Enhanced Movement.
The gauge is organised as follows:
The Green and Yellow bars together show the relative total of Reserve OPs carried by the Unit, while the Red
bars show that proportion of the unit’s Reserve OP Maximum that have already been expended. The yellow
portion shows those OPs which could be expended this turn using Extended Movement.
The small triangular markers indicate approximately where the OP Reserve level will be next turn. If the
markers are Gold, then the unit currently qualifies for an Automatic Refit next turn. If the unit moves, then the
Gold markers will turn to Gray, as a unit that moves this turn does not qualify for an Automatic Refit next turn.
See Section 21 for more details on movement.
15.9 Divisional Integrity
In warfare, combat elements at all levels are just one portion of a larger parent organisation. Although these
elements are designed (and can) operate effectively on their own, when supported by other units of their own
parent organisation, can receive substantial benefits. These benefits can vary from the most basic luxuries of
camaraderie and familiarity in combat, through to the more substantial benefits such as higher level leadership
and use of divisional assets. In Battles in Normandy™, these benefits are expressed as a Divisional Integrity
Bonus which can greatly increase the strength of a unit in both attack and defence.
All divisional units in Battles in Normandy™ may become eligible to receive a Divisional Integrity Bonus. To
be eligible to receive the bonus, all elements of a division must be within a specified number of hexes of each
other. The distance can be seen visually by turning on the Division Indicators option in Map Options. The
actual distance is set by the scenario creator, and can vary by division.
There are several visual indicators to show when a division achieves integrity. Firstly, the attack and defence
bars for each unit will change in colour from red and blue to gold and aqua respectively. In addition the bonus
figures above the attack and defence bars will change from red to white.
Note: Destroyed units or Reinforcement Units yet to appear on the map are not considered Divisional Units for
the purpose of Divisional Integrity.
Divisions that begin a turn in a non-integral state will receive the bonus during the turn if requirements
become met. Similarly the bonus will be lost if the requirement is failed during a turn.
15.10 Divisional Integrity Bonus
The Division Integrity Bonus directly increases both the Attack Strength and Defence Strength values of every
unit in the Division while the requirement for integrity is met.
This bonus can differ for each unit and will alter as the quantity of steps increases or decreases during play. It
is displayed as positive figures directly above both the attack and defence bars. When integrity is achieved
these figures are added directly to the base Attack and Defence Strengths, raising them to enhanced levels.
These enhanced strengths are then displayed in place of the original and used for combat calculations.
26
Page 29

15.11 Unit Selection Button
At the lower left hand side of each Unit Display is a yellow toggle button which is the Unit Selection
Button. Clicking on it will select the unit and cause the button to be lit. Conversely if the button is lit,
selecting it will deselect the unit and cause the button to become unlit.
Units stacked together in a hex can conduct movement and combat simultaneously. When you click on a hex
only the top unit in a stack will usually be selected. By using the Unit Selection Buttons on the individual unit
displays, units can be grouped for action in any combination of one, two, three or four units.
Note: At least one unit in a stack will remain selected at all times.
To quickly select a particular unit in a stack, click on the unit’s icon in the Unit Display Area. This will cause
this unit alone to be selected and all others deselected.
Depressing the Space Bar will select all units in a hex.
16 Unit Action Controls
At the bottom of each Unit Display is a row of unit action buttons that allow advanced actions to be preformed
for each unit. These will be lit if the criteria required for each is met by the unit. Each of these buttons has a
specific function that is detailed below.
16.1 Create Detachment Button
Withdrawing from contact can be a difficult and dangerous process and a time when your troops are
most vulnerable. Therefore, it is often prudent to leave behind a small skirmish group to impede enemy
movement. In Battles in Normandy™ these are called Detachments.
Detachments are created using the Create Detachment Button. Only certain units are capable of creating
detachments. These are designated by the scenario designer. Detachments may not be created on hexes
containing minefields or fortifications. Only one detachment can be placed in a single hex.
Detachments impose a penalty to enemy movement only. This penalty can be different for each side, and is set
by the scenario designer. Detachments have no inherent Attack or Defence Strength and therefore cannot be
attacked. Detachments are removed automatically a specified number of turns after they were created,
regardless of enemy activity. Enemy units attacking from a Detachment hex contribute no tactical shift to
combat.
To create a Detachment, a unit must:
Be of suitable type, and
Be in a friendly controlled hex
Not be on a hex containing a strongpoint or minefield, and
Not have used its Action Capability in this turn.
If a unit meets these requirements the Create Detachment Button will become active. Clicking the Create
Detachment Button will cause the unit to create a detachment.
If a Detachment capable unit is destroyed it will leave behind a detachment.
Note: Creating a Detachment will expend the unit’s Action Capability for that turn.
16.2 Attach Replacement
The Attach Replacement button is used to attach replacements steps of the appropriate type to a selected
unit. This button will only be lit if a unit meets certain criteria. These criteria are discussed in detail in
the Replacement Chapter.
To attach a Regular Replacement, click the Attach Replacement Button.
27
Page 30

16.3 Enhanced Movement Button
This is the Enhanced Movement Button. In order to use Enhanced Movement, a unit must:
Be of suitable type, and
Have Reserve OPs, and
Not have used its Action Capability in this turn.
If a unit meets these requirements the Enhanced Movement button will become active. Clicking the Enhanced
Movement button will allow the unit to use the Enhanced Movement OP value for its movement for the current
turn. This will greatly increase the unit’s movement capability.
Note: Using Enhanced Movement will expend the unit’s Action Capability for that turn.
16.4 Entrench Unit Button
In defence, combat units will often entrench themselves for better protection against attack. This
includes digging trenches, sighting guns and husbanding resources. In Battles in Normandy™, this
ability is called Entrenchment.
Many (but not all) units in Battles in Normandy™ have the ability to entrench. Entrenched units have sunken
appearance on the tactical map and a scalloped edge. They receive a bonus to their Defence Strength and may
also receive additional defensive shifts when attacked.
For a unit to entrench it must:
Be of suitable type, and
Be on a friendly controlled hex, and
Not have used its Action Capability in this turn.
If a unit meets these requirements the Entrench Unit Button will become active. Clicking this button will cause
the unit to entrench.
Note: Entrenching a unit will expend the unit’s Action Capability for that turn.
16.5 Attach Transport
The Attach Transport button is used to attach motorised transport to a selected unit. This button will
only be visible if a unit meets certain criteria. These criteria are discussed in detail in the Motorised
Transport Chapter.
To attach transport, click the Attach Transport Button.
Note: Attaching Transport will expend the unit’s Action Capability for that turn.
17 Unit Specific Controls
In addition to the standard unit controls, some unit types have specific display and buttons in their display
area that are specific to their unit types. These are explained below:
17.1 Amphibious Units
Units in Amphibious Transport mode are particularly vulnerable while
landing. Units in this mode have a different display along the bottom of the
Unit Control Area. When in contact with enemy forces, these units may
show a row of blue dice along the bottom of the display. These dice
represent the individual chance of each step of that unit taking losses when
landed. Each dice has a number imprinted on it and that number is the
minimum roll necessary to inflict damage on that particular step. All rolls
are handled by the computer once a unit is committed to land. A unit cannot roll more dice than it has steps.
28
Page 31

The range at which enemy forces can cause damage is displayed as a number inside a hex icon, similar to the
way artillery ranges are displayed. Any enemy units, of any type and any enemy Strongpoints within the
displayed hex range of the landing unit will contribute to the chance of attrition. Since only the the number of
steps is important, destroying a single step Strongpoint has the same effect as removing one step from a three
step fort, or killing a step from a unit.
For a unit to land and exit amphibious mode it must land at a beach hex. When a unit has reached an
appropriate hex, the amphibious transport button will light. Depressing this button will cause the unit to land
and any losses (if applicable) to be effected.
The capability of a landed unit depends on choices made by the scenario designer. Units may have full, half or
no move, and might also lose their Action Capability when landed.
Landing cannot be undone.
17.2 Supply Units
Supply units have a different display in the unit display area.
At the top of the Unit Display is the unit name. Beneath that is the unit’s
icon and the step icon for its single step. Next to that are two icons that
show whether the truck can supply other trucks and if it can supply
replacements. At the extreme right is the movement type icon.
Supply units cannot attack, so their attack icon carries supply information.
The color of this icon shows the strength of the truck’s Supply Burst. Green is a Maximum burst, Orange is
Reduced, Red is Minimum and Gray indicates no supply.
The first icon on the attack icon shows the mode that the Supply Burst uses. The second icon shows a number
of crates, for emergency supply. If a supply truck cannot make a Supply Trace, it will use emergency supply to
make a Minimum Supply Burst.
The defence icon shows the Defence Strength. The movement icon shows the unit’s OPs for movement, but
also displays an icon showing the movement type used by the truck’s Supply Trace.
A supply truck has three different modes associated with it, so it’s important to distinguish between them. It’s
a unit like any other, so it has a move type (usually Wheel, though it could be Horse). It has a move type to use
for it’s Supply Trace. This often Supply movement, as this works best along roads. Then there’s a move type for
its Supply Burst. This is often Leg, as this is usually best for travelling into difficult off road terrain, which is
where you need it most.
The last line of the Unit Display starts with the standard unit select button. The icon to left changes the
weather display (not the weather itself) for the following three buttons. These buttons show the Supply Burst
at Maximum, Reduced and Minimum. By default, the weather display is set to the current weather. Hitting the
Weather Display button toggles the weather for those Supply Burst settings, and thus allows you to forecast
what your Supply Burst would be in different weather conditions. The weather being displayed is written above
the move icon.
The last button shows the result of a Supply Trace from every hex on the map for the selected supply truck. It
will help you decide optimum locations for moving your supply trucks.
17.3 Engineer Units
Engineer units can be either combat units or support units. Most Engineer
units can repair bridges, this is shown by the crossed spanners icon. A few
Engineer units can actually build bridges, this is shown by a bridge icon to the
right of their unit icon.
29
Page 32

17.4 Artillery Units
Artillery units do not have an Attack Strength like regular combat units.
Instead they contribute odds shifts to any attack they participate in. The
number of shifts is shown by the number of gun silhouettes in their attack
bar. The range of the unit is shown by the figure inside the hex icon.
Most artillery units can contribute a defensive odds shift to any friendly unit
being attacked. The number of shifts is shown by the number of gun
silhouettes in their defence bar. Artillery units do have Defence Strength, and this is also shown in the defence
bar, along with any anti-shock value they may have.
The system will automatically choose the best defensive artillery unit withing range and a unit can contribute
defensive shifts to an unlimited number of combats, even if it used its Action Capability in the previous player
turn. In any combat where there is a chance of two combat dice being rolled, two defensive artillery units can
contribute their shifts.
Some artillery units can interdict movement. These have a gun outline to the right of their unit icon. Some can
also attack Strongpoints, these have a small strongpoint icon and a dice indicating their chance to hit a
Strongpoint to the right of their unit icon.
Ships act like artillery units. Only Destroyers and Destroyer Escorts can provide shifts in combat, but all ships
can attack strongpoints. Some ships can also provide interdiction.
Support Units
17.5
Support Units in Battles in Normandy™ include Engineers, Anti-Tank, Flak and Military Police. Some of these
have special functions.
Air Interdiction Suppression: Flak units can reduce the effects of Air
Interdiction. This is shown by a muted version of the interdiction map icon.
The range of the effect is shown to the right of the icon.
Partisan Suppression: Some Support units, typically Military Police, can
reduce the effects of Partisan Interdiction. This is shown by a muted version
of the interdiction map icon. The range of the effect is shown in the middle of
the icon.
18 The Division/Group Display
The Division/Group Display contains information about the current
Division to which the selected unit belongs. This information is:
Division Cycle Button: Clicking this button will cycle through all units in the division.
Division Designation: This is the name and/or designation of the divisional group.
Division Symbol: This is the historical insignia of the division if any.
Divisional Integrity Bonus: This is represented as a percentage and is the figure used to determine the
integrity bonus.
30
Page 33

Divisional Integrity Radius: All elements of a division must be within this range of each other to qualify
for the Divisional Integrity Bonus.
Number of units: This is the total number of units that belong to the division. Green signifies active and in
divisional integrity, grey signifies active but not in divisional integrity, red signifies destroyed and orange
signifies a reinforcing unit not yet on the map.
18.1
Attribute Search
Sometimes you need to find units with a particular attribute, such as being
able to repair a bridge. The Attribute Search system, located at the very
bottom of the screen, allows you to do just that.
The arrow button cycles between Combat, Support and Artillery unit types. Once you’ve chosen a unit type, the
Attribute Button cycles through the different searchable attributes that those unit types have. The unit icon
shows the first unit that fits the search criteria, and clicking on the unit icon cycles through all units that fit the
search criteria. The search results are summarised to the right of the unit icon.
In the screenshot example, we have searched Combat units for Recon ability. The first Recon unit found is
shown, and there are ten units fitting our search criteria.
19 Units
There are many different types of units in Battles in Normandy™. They represent units which fought in the
battle. These units form the manoeuvre elements in the game that you will command on the Tactical Map.
Most units have inherent Attack and Defence Strengths, Movement rates (expressed as OP’s) amongst many
other abilities. Most units in the game are regiments although some brigades, battalions and batteries are
included.
19.1
Unit Icons
Units are either components of a division or non divisional assets, such as independent formations,
artillery, anti-tank units or engineers. Divisional units display the historical divisional insignia
whereby non divisional units have a silhouette of the basic unit type.
Below the divisional insignia, or the silhouette, all units have a standard NATO military symbol showing what
type of unit they are. This symbol may be gold in colour if the unit is elite or red if it is substandard. In the
bottom right of each unit icon is a standard NATO military size designation; two vertical strokes for a
battalion, three for a regiment and a single cross for a brigade, etc.
Running down the right hand side of the unit icon is one to four vertical coloured bars. Each bar gives supply
and Action Capability information for one unit in the stack, so the number of bars immediately shows how
many units are stacked in a hex. Each bar can be one of five different colours. The meaning of these colours is
listed below.
Green: A green bar means that the unit is in supply and has its Action Capability for this turn intact.
Yellow: A yellow bar means that the unit is in supply but has expended its Action Capability for this turn.
Grey: A grey bar means that the unit is out of supply but still has Action Capability for this turn.
Orange: An orange bar means that the unit is out of supply, has expended its Action Capability for this turn,
but has at least one bullet remaining.
Red: A red bar means that the unit is isolated. It is out of supply, has no bullets remaining and will take extra
losses if attacked.
31
Page 34

20 Miscellaneous Unit Types
There are several other miscellaneous unit types in Battles in Normandy™. These are listed below.
20.1 Strongpoints, Forts and Pickets
Strongpoints and Forts represent fixed defensive works of varying strengths. Most are present on the
map from the beginning of play. They are stationary and cannot move or attack. Their strength may
be from one to four steps.
Any friendly unit may move into a hex containing a Strongpoint or Fort. They do not count for stacking limits.
Units stacked with the structure augment its defensive capability, but are not affected by the combat result.
Any attack on a hex containing a Strongpoint or Fort is conducted solely against the structure using a specified
Combat Results Table. The structure must be cleared away before the units stacked with it can be attacked.
Losses sustained by a Strongpoint can be either permanent or timed. A Strongpoint cannot take Regular
Replacements, but have an unlimited supply of Timed Replacements.
20.2 Minefields
The Atlantic Wall as designed by the Germans made extensive use of defensive minefields. You will
find the shoreline in Battles in Normandy™ well covered. Minefields are represented by a skull and
crossbones icon and may be present on the map from the beginning of play or created by the player
during the game.
Minefields have no defensive capability but slow down an attacker and hamper his attacks. They do this by
applying a Movement Penalty to an enemy unit moving through them. The OP penalty for a hex containing a
minefield is specified by the scenario designer.
Enemy units attacking from a minefield hex contribute no tactical shift for hex control to combat.
Units who are attacked while located in an enemy minefield may suffer negative combat odds shifts.
Minefields cannot be attacked, but can be cleared. Each minefield may have a duration value of one to three
with three being the default. As a minefield is cleared, its duration value is reduced until it reaches zero,
whereupon the minefield is considered cleared and is removed from the map.
20.3 Minefield Reduction
An enemy Minefield may be reduced by a friendly unit occupying a hex containing it or, under the right
conditions, occupying a hex adjacent to it.
If a friendly unit occupies a hex containing a Minefield, the Minefield will be reduced at the following rate.
If the Minefield has an enemy unit adjacent to it, its value is reduced by one per turn.
If the Minefield does not have an enemy unit adjacent to it, its value is reduced by two per turn.
If a minefield does not have an enemy unit adjacent to it and it is occupied by a unit capable of repairing
bridges (i.e. Engineer), its value is reduced by three per turn.
If a friendly unit occupies a hex adjacent to a Minefield, the Minefield will be reduced at the following rate.
If the Minefield does not have an enemy unit adjacent to it, its value is reduced by two per turn.
If the Minefield has an enemy unit adjacent to it, its value is reduced by one per turn.
If the Minefield hex is occupied by an enemy unit its value is not reduced.
Enemy Minefield values are reduced at the start of the enemy player turn.
32
Page 35

21 Movement
In Battles in Normandy™, all units except Fortifications have some ability to move. This is performed on the
Tactical Map. Movement requires the expenditure of Operation Points (OP’s) and the rate at which they are
expended is dependant on such factors as terrain conditions, interdiction and zones of control.
21.1 Operation Points
A unit’s ability to move is represented by its Operation Points (OPs). These OPs are expended as a unit moves
and are replaced at the beginning of each new turn. They are replaced at two different rates that are linked to
supply. Together these form a unit’s OP level for any given turn.
21.1.1 Basic Operation Points
Each unit has a designated Basic Operation Point (BOP) level and these are renewed at the start of each turn. A
unit gets these points regardless of supply status. When a unit moves, these are the first OPs to be used. Some
units, typically heavy artillery units, get no Basic OPs, and must use RMC OPs to move.
21.1.2 Regular Move Capacity (RMC)
A unit must be In Supply to get its RMC. A typical combat unit will get most of its OPs as Regular OPs, so if it
doesn’t get any, it’s not going far.
Some units (such as Supply Trucks) have no Regular OPs, and can only use their Basic OPs.
21.1.3 Resupply Value
The maximum number of Regular OPs that a unit can get from the supply system in a turn is the Resupply
Value. If the Country Supply Level is less than 100%, a unit will get less than the maximum.
See Section 28 for details on Supply.
21.1.4 Extended Move Capacity (EMC)
The maximum number of Regular OPs that a unit can use to pay for movement is the Extended Move Capacity.
Since a unit can always spend its Basic OPs, the addition of Basic OPs and Extended Move Capacity represents
the absolute maximum of OPs that a unit can spend in a single turn.
Note: The EMC and the RMC are usually different. A unit with EMC greater than its RMC, and that moves as
far as possible each turn, is essentially running at an OP deficit. The difference must be made up from Reserve
OPs, and when these are exhausted the unit will simply be unable to move as far as it did when it could still use
Reserve OPs to make up the difference.
21.1.5 Reserve Operation Points
Most units maintain a pool of Reserve OPs. These represent logistical capacity retained within the unit itself.
The scenario designer decides the maximum size of the Reserve OPs pool, and its level at the start of a
scenario.
Reserve OPs are used to pay for Enhanced Movement. If you don’t have Reserve OPs, you can’t do Enhanced
Movement.
Also, if a unit has an RMC number higher than its Resupply Value, then it will never get enough RMC OPs in a
turn to pay for its full movement. It can use Reserve OPs to make up the difference, and allow full movement.
RMC OPs that are unspent in a turn are transferred to the Reserve OP pool at the end of a turn. Basic OPs can
never be transferred.
The other method of accumulating Reserve OPs is through the Automatic Refit Process. See the Supply Section
for more details on the Refit process.
33
Page 36

21.2 Moving a Unit
To move a unit in Battles in Normandy™, select it on the Tactical Map. The unit will become highlighted and
(by default) the region to which it may move will also be highlighted; any region that the unit may not move to
will become shaded. Click on the hex where you wish it to move.
If you select a unit and hold down the mouse button on the destination hex, the path will be displayed and the
destination hex will show the number of OPs remaining when the unit reaches the destination hex.
The path that a unit will take is shown by arrows. These arrows indicate the unit’s movement status for each
hex. If the arrow in a hex is green, the unit can reach that hex this turn. Red arrows indicate hexes on the unit’s
path that cannot be reached this turn.
A unit may remain stationary, be moved once or a number of times in any one turn. A unit which can move 10
hexes can move 10 hexes all at once or can move one hex ten times with other units moving in between. It can
stop to fight at any stage and if it has enough OPs it can continue movement afterwards.
21.3 Moving Multiple Units
Units may be moved singly or as part of a Stack. To move a stack of units select them in the Unit Display using
their Unit Selection Buttons. The stack will become highlighted and (by default) the region to which it may
move will also be highlighted; any region that the stack may not move to will become shaded. Click on the hex
where you wish it to move.
Note: Any given hex where a stack would violate stacking limits will not be highlighted.
When units with dissimilar movement modes are stacked together, they pay the highest possible cost for each
hex. Dissimilar move mode units should therefore be moved separately.
21.4 Extended Movement
In Battles in Normandy™, many units can swap their Action Capability for extra movement potential. This is
called Extended Movement. Extended Movement uses a unit’s Reserve OPs for the extra movement, so a unit
with no Reserve OPs cannot use Extended Move.
To use Extended Move, click on the unit’s Extended Move button in the Unit Display Area.
Note: Using Extended Movement will expend a unit’s Action Capability for that turn.
22 Operation Point Expenditure
In Battles in Normandy™, every hex on the map has a base OP cost that is directly related to the type of terrain
in that hex. In order for a unit to move from one hex to another, it must expend OP’s at the following rate: the
cost of the hex departed plus the cost of the hex entered divided by two. This then means a unit pays the
average cost of two hexes to move from one to another.
The base OP cost for each hex differs depending on the Movement Mode of the unit being moved (i.e. tracked,
wheeled, leg, or horse). These costs are detailed in a table in Appendix B.
Note: Operation Points are not expended in combat.
22.1 Movement Type
In military organisations there are many different types of method of movement used. In Battles in
Normandy™ these are categorised into one of five dominant types: Tracked, Wheel, Leg, Horse and Motorised
Leg. These are explained below.
Tracked
In World War Two, the tracked vehicle was the predominant method of movement for armoured units. From
the mightiest tank to the humble halftrack, tracked vehicles for the first time allowed combat units to travel
off-road at reasonable speed, and bring decisive weapons to combat in a protected environment. Tracked
34
Page 37

vehicles allowed the use of Blitzkrieg tactics eventually adopted by all armies. A pitfall to their use was their
inherent dependency on supplies in the form of fuel. This is reflected in Battles in Normandy™. These units
form some of the strongest in the game but when caught out of supply become quickly immobilised.
Wheeled
The advent of trucks into military use was a significant event. Armies could finally move both prodigious
quantities of troops and equipment into battle quickly. The downside to this was that the trucks needed both
quality roads and large amounts of fuel to do so. In Battles in Normandy™ wheeled vehicles have high OP
capabilities but suffer in poor terrain. Like their tracked cousins they are highly dependant on supply.
Leg
Since man first fought together in organised warfare, all combat in the end has come down to the common
infantryman and his innate ability to hold terrain and endure punishment. The battles that took place in
Normandy were no exception. From sunken swampland to the hell that was the hedgerow, infantry went
where vehicles would not or could not go.
In Battles in Normandy™ infantry units form the backbone of both armies. Though average in speed, they can
move easily enough across all terrain. They are not as dependant on supply for movement as their wheeled or
tracked counterparts.
Horse
Though cavalry units in Normandy were a rare occurrence, an often overlooked fact is that even by 1944 most
German artillery and support vehicles were still horse drawn. Though this allowed units to traverse terrain
unsuitable for vehicles, it made units very slow and susceptible to attack.
Motorised Leg
Some infantry units are equipped with sufficient transport to be able to move their fighting formations by
truck just using their own resources. This movement mode reflects the facts that these units can sometimes
move as wheeled units, and sometimes as leg.
22.2 Additional Movement Modes
In Battles in Normandy™ two new modes of transport are introduced to the Decisive Battles System:
Amphibious Movement and Rail Transport.
22.2.1 Amphibious Mode
Many units in the Allied Order of Battle begin the game in this mode. This represents the massive
Allied ability to transport prodigious quantities of men and equipment across the ocean to the coast of France.
Units in amphibious mode travel in predesignated friendly areas of the ocean called sea lanes. When a unit
reaches landfall, it may then disembark from the Amphibious Mode using the Amphibious Mode Button on the
unit display. The computer will then calculate any losses (if appropriate) and the unit will then function as a
land unit.
All units in amphibious mode have their defence strength set to 1, so hanging around on the beach in this mode
is not advisable.
22.2.2 Rail Mode
Rail Mode represents the ability to move men and material by rail. Some units appear the game as
reinforcements already in rail mode.
For a unit to use rail movement it must:
35
Page 38

1) Be allowed to use rail movement, and
2) Start its turn on a friendly controlled rail hex, and
3) Not have used its Action Capability in this turn.
If a unit is capable of utilising rail mode and if there is such transport available, it may be attached using the
Attach Transport Button in the Unit Display Area.
Note: Utilising Rail Mode will expend a unit’s Action Capability for that turn.
22.2.3 Road Mode
Road Mode represents the ability to move men and material in trucks. Some units appear the game
as reinforcements already in Road Mode.
For a unit to use truck movement it must:
1) Be allowed to use truck movement, and
2) Start its turn on a friendly controlled road hex, and
3) Not have used its Action Capability in this turn.
If a unit is capable of utilising Road Mode and if there is such transport available, it may be attached using the
Attach Transport button in the Unit Display Area.
Note: Utilising Road Mode will expend a unit’s Action Capability for that turn.
23 Movement Penalties
In addition to the basic OP costs of each hex, a unit may also have to pay additional movement penalties when
moving. These factors can be present in a hex from the start of a turn or be created in a hex during a turn due
to combat. These OP penalties are in addition to a hex’s base OP cost. The different types of miscellaneous
factors are:
23.1 Weather Effects
The difficulty of moving and fighting during bad weather is often overlooked. Though Operation Overlord took
place in the European summer, the weather was often inclement and made fighting harder than it already was.
This was particularly so during the period of June 19-22 when an unseasonably fierce storm swept the
continent and put Allied schedules even further behind.
In Battles in Normandy™ the map will change depending on the ground conditions present. If the theatre is
experiencing bad ground conditions, the map changes to show Mud. In Mud, movement becomes more
difficult and rivers become more of an obstacle for movement and combat.
23.2 Combat Remnant
A Combat Remnant is representative of the dozens of miscellaneous artefacts of combat that remain
after a unit is destroyed. They serve to slow an aggressor’s movement after a battle. If a unit is
destroyed in combat, it leaves a Combat Remnant OP penalty. This OP penalty only takes effect if a
unit is destroyed in combat and is set by the scenario designer.
23.3 Combat Residue
Many battles involve large amounts of firepower to be employed. This firepower not only affects an
enemy unit but terrain and surroundings as well. In Battles in Normandy™, this is called Combat
Residue. Use of artillery, barrages or air power will greatly increase the possibility of Combat
Residue.
Combat Residue will cause an OP penalty to be enforced on all affected hexes. The penalty reflects both the
time taken for the combat to occur as well as the added physical difficulty of crossing an area recently fought
36
Page 39

over. It is represented on the Tactical Map as a series of shell craters in the affected hexes and can apply to
adjacent hexes as well.
Combat residue in a hex can be one of two different levels; Heavy and Light. Penalties will reduce by one level
per turn so that after one turn Heavy combat residue goes to Light and Light to none.
Note: The OP penalty for each type of residue differs for different terrain types. You may view all of these
penalties by opening the Terrain and CRT Table button from the Control Panel menu.
23.4 Air and Partisan Interdiction Penalty
Air Interdiction is activity that prevents the free movement of enemy troops and supplies on the
road network by enemy air forces. The effect of interdiction is to increase the cost of moving units or
of tracing supply through the interdicted road hexes.
Air Interdiction can be placed in any hex and applies an OP penalty to that hex (if it contains a road) and to a
number of adjacent road hexes for the duration of the enemy turn. The effect of Air Interdiction is shown in
the Interdiction Popup.
Partisan Interdiction works in exactly the same way as Air Interdiction.
Note: OP penalties from multiple interdiction missions are not cumulative.
23.5 Zones of Control
Historically, the rate of movement of units in enemy territory was only a fraction of that possible in their own
rear areas. This was due to uncertainty. Nobody knew exactly whether what might lie across the hedgerow: an
unoccupied stretch of farmland or an anti-tank gun!
In Battles in Normandy™, an unoccupied enemy hex has an OP penalty of between zero and nine. Moving onto
an enemy controlled hex converts that hex into a contested hex. At the end of the player’s turn, all contested
hexes change to the control of that player. Any enemy controlled hex which is adjacent to friendly units but not
to enemy units is also converted to friendly control.
In addition, all Combat Units and Fortifications exert an influence or Zone of Control (ZOC) into all adjacent
hexes including those containing enemy units. ZOCs are represented by additional OP Penalties.
The ZOC penalty reflects how much more difficult it is for a unit to move when it is near the enemy. The size of
the penalty is dependent on the type and number of enemy units exerting a ZOC into the hex. These are:
Combat Unit – OP Penalty is one plus the number of combat steps present.
Strongpoints – OP Penalty is two.
Note: The maximum Movement Penalty penalty for any hex is nine.
OP Movement Penalties can be viewed by using the ‘P’ key.
23.6 Minefields
A Minefield adds the same OP penalty to a hex regardless of the duration value of the minefield, until it is
cleared. This only affects enemy units.
23.7 Bridge Repairs
When a bridge is repaired it continues to hamper movement to some degree for two turns. This
represents the time taken to repair the bridge and the large amount of troops and materiel trying to
simultaneously cross.
Both sides of a repaired bridge incur congestion symbols. These will disappear after two turns. The OP
Movement Penalty for congestion is set by the scenario designer and can be found in the Terrain/CRT
Information screen.
37
Page 40

24 Combat
One of the fundamental aims of warfare is to destroy the opposing army while keeping your own intact. In
order to do this, you must at some point attack the enemy. In Battles in Normandy™ this is achieved by using
Combat Units.
In most circumstances, in order to conduct an attack in Battles in Normandy™, a Combat Unit must be
adjacent to the defending enemy unit or fortification. Selecting an eligible unit and placing the cursor over the
enemy unit to be attacked will cause the cursor to change to a clashing arrows icon. Clicking on the enemy unit
will then initiate the attack.
Combat is conducted by the computer comparing the Attacker’s strength to the Defender’s strength. This
creates a initial expression of odds. These odds are then altered by any tactical shifts and bonus shifts affecting
the combat, to produce a set of final odds. These final odds determine what column will be used on the
appropriate Combat Results Table or CRT. A random number from one to six is determined by the computer
and that number is applied to the CRT to produce a set of results. These results are applied to units in question
automatically by the computer.
When a combat is initiated, the screen below the Tactical Map will change to two new displays: the Combat
Control Panel and the Combat Results Panel. The first of these allows you to apply assets that will contribute
Bonus Shifts to the battle. The latter displays all information relating to an attack.
Taking part in combat may result in the loss of a proportion of a unit’s fighting power (steps) and may cause
some units to retreat. Any unit which loses all its steps is destroyed and removed from the game. A unit which
is removed from the game is not considered to have lost all its men and/or vehicles but rather to have been
rendered useless as a fighting force.
Any Fortification in a defending hex must be fought first and results will be determined using its own CRT.
Defensive Strength is derived from itself or the units stacked with it – whichever is higher. Once the
Fortification is destroyed, the remaining units can be attacked normally.
Some units, such as supply trucks, engineers and units that have expended their attacking Action Capability
will be unable to initiate or contribute their strengths to a combat.
Note: Conducting an attack will usually cost a unit its Action Capability for that turn.
A defending unit that has combat conducted against it in a turn will expend one bullet of supply.
Attacking units are never forced to retreat.
24.1 Combat Results Tables
Each different terrain element in Battles in Normandy™ has its own set of odds columns.
These tables are called Combat Results Tables (CRT’s). These values are set and cannot be
altered. They may be viewed by selecting the View CRT Button on the Control Panel.
Therefore an attack made at 5:1 odds on an enemy unit situated in Clear Terrain will use the
5:1 odds column on the Clear CRT while an attack at the same odds on a unit in a Forest will
use the 5:1 odds column on the Forest CRT.
38
Page 41

The results in the CRT’s can vary dramatically representing the different type of terrain fought over. The same
attack by the same unit against the same enemy may have a very different outcome depending on whether the
defenders are situated in clear fields or dug in, in the forest. Simply put, the worse the terrain, the better for
the defenders and the higher the odds the attackers will need to make their attack successful.
24.2 CRT Glossary
The CRT’s contain several different combinations of letters and numbers that represent the results of the
combat.
All results that begin with an A refer to the Attacker. Any number after the letter is the number of steps the
Attacker loses in this combat.
All results that begin with a D refer to the Defender. Any number after the letter is the number of steps the
Defender loses in this combat. In addition, the letter R after the numeral means the defender was forced to
retreat a hex. The > symbol indicates results that will be treated as an R result if the attack was an overrun.
For example A1 - D2R means that the attacker loses one step, the defender loses two and is forced to retreat.
24.3 Tactical and Bonus Shifts
The attack and defence strengths used to determine the initial odds of an attack are the sum of the units taking
part in the combat. These odds can be improved (or reduced!) by applying Bonus Shifts to a battle. Some shifts
(particularly in defence) are automatic and cannot be influenced by the player. Other shifts certainly can be
and their application is critical in determining the final success or failure of a battle.
There are many types of Bonus Shifts in Battles in Normandy™. They are explained in their relevant sections
in the Combat Control Panel and Combat Display Panel Chapters.
25 Combat Control Panel
When a combat is initiated, the Combat Control Panel will appear directly below the Tactical Map. It contains
both information and controls relating to the combat. Some of the Buttons contain numerals above them.
These numerals signify the quantity of that asset available.
Note: Not all of these controls may be available during any given combat. If not available they will be greyed
out.
25.1 Overrun Icon
In general a unit may only attack once per turn. There are exceptions to this however Each
CRT may specify an Odds column at or above which the attacking units do not use their attack
capability. This is called an Overrun.
The Action Capability Icon is also accompanied by a combat odds figure. If an attack is made at or above these
odds, the Action Capability Icon will light to signify the attacker’s Action Capability will not be expended in this
attack.
For attacks in which an Overrun is possible, but the necessary odds have not been achieved, the word ‘Possible’
is printed to the right of the Action Capability Icon. For attacks where overrun odds have been achieved the
word ‘Overrun’ is printed in green.
Note: Artillery units that take part in combat always expend their Action Capability.
25.2
Carpet Bombing Button
If Carpet Bombing is available, this button will be enabled. Carpet bombing is a special aerial attack
that takes place before the main combat.
39
Page 42

25.3 Reset Button
The Reset Button cancels the selection of all units without cancelling the combat.
25.4 Max Button
The Max Button will assign all possible units and combat additions to give the greatest possible odds.
Units may end up assigned to the combat which are not required to achieve the maximum odds, so use
this feature with care.
Note: The computer will not move any combat units but simply apply the strongest artillery (to a maximum of
four) and any shifts possible.
25.5 Leaders Button
The Leaders Button adds the personal attention of a combat leader to this particular battle. It gives a
Bonus Shift of +1. Only one leader may be applied to any one combat.
25.6 Air Support Button
The Air Support Button applies any available Air Support capability to a combat. It gives a Bonus Shift of
+1. Only one sortie may be applied to any one combat.
25.7 Barrage Button
The Barrage Button applies Off Map assets such as Heavy Artillery to a combat. It gives a Bonus Shift of
+1. Only one Barrage may be applied to any one combat.
25.8 Artillery Button
The Artillery Button is used to automatically add up to a maximum of four Artillery units to the combat.
Artillery can add a Bonus Shift of +1, +2 or +3, depending on the unit. This button adds the most
powerful units first.
Note: Only Artillery Units within range can be assigned to a combat.
Artillery Units can be added manually by selecting the unit in the Unit Control Panel.
25.9 Next Combat Unit Button
The Next Combat Unit Button cycles through any available Combat Units, but does not automatically
add them to the combat. They can be added by clicking on their Unit Selection Buttons on their Unit
Displays.
25.10 Next Artillery Unit Button
The Next Artillery Unit Button cycles through any available Artillery Units, but does not automatically
add them to the combat. They can be added by clicking on their Unit Selection Buttons on their Unit
Displays.
25.11 Centre Button
The Centre Button centres the Tactical Map on the current combat.
25.12 Conduct Combat Button
The Conduct Combat Button will carry out the attack with the currently selected units and asset
additions.
Note: The Conduct Combat Button will only be available if the minimum odds of 1:2 have been
achieved.
This action may not be undone.
40
Page 43

25.13 Exit Button
The Exit button will leave the combat mode, and no attack will take place. The exit button is also used to
return to normal operations after a combat has taken place.
26 Combat Results Panel
When a combat is initiated, the Combat Display Panel will appear directly below the Combat Control Panel. It
contains all information relating to the combat strengths, shifts and odds in a battle. These are detailed below.
26.1 Defender Display
This area shows all units defending in a particular hex. If the hex contains a Strongpoint or
Fortification, it must be attacked first before any other attacks on this hex may take place.
This area will display an enlarged hex icon of the defending combat terrain and the
defending steps of the Strongpoints. Any other units stacked in the hex will appear on the left hand side in a
greyed out appearance.
A defending hex that does not contain a fortification will show the defending units and their step breakdown.
26.2 Combat Strengths and Shifts
Next to the Defender Display are two columns. These show the
defenders and attackers combat strengths and all factors which affect
the final odds. Combat shifts which work in favour of the defender are
shown as a negative number, as these will shift the final odds lower.
Similarly, Combat shifts which work in favour of the attacker are shown
as positive numbers.
26.2.1 Defenders Combat Shifts
Elite Units: Having a defender who is an elite unit (one with a Gold background) is advantageous. A combat
shift in favour of the defender is applied and this is shown in the defender’s Combat Strength icon.
Minefields: Defending in an enemy minefield is definitely disadvantageous. A combat shift in favour of the
attacker will be applied, and this is shown next to the Minefield icon.
Entrenchment: Defending while entrenched is advantageous, and a shift in favour of the defender will be
applied. This is shown next to an entrenchment icon.
Defending Artillery: Shifts from defending artillery are shown next to the artillery icon.
26.2.2 Attackers Combat Shifts
Elite Units: Having a attacker who is an elite unit (one with a Gold background) generates a combat shift in
favour of the attacker. This is shown in the attacker’s Combat Strength icon.
Air Support: Allocating Air Support generates a shift in favour of the attacker and this is shown next to the Air
Support icon.
Barrage: Allocating Barrage generates a shift in favour of the attacker and this is shown next to the Barrage
icon.
Leaders: Allocating a Leader generates a shift in favour of the attacker and this is shown next to the Air
Support icon.
41
Page 44

Tactical Shifts: A rosette with six lobes displays the tactical shifts. An attacker can potentially receive a positive
tactical odds shift for each different hex from which he is attacking. For each of the first two contributing hexes
the attacker receives a +2 shift. For each subsequent contributing hex the attacker receives an additional +1
shift.
Attacking units which are adjacent to enemy units (other than the defending stack) can only contribute a shift
if the number of attacking steps is greater than the number of adjacent enemy steps (excluding the target hex).
Units attacking across a river or from a minefield or detachment hex do not contribute a tactical shift.
A red lobe means that there is no attack from that hex. An orange lobe means that there is an attack but it is
not generating a shift. A green lobe means that there is an attack which is generating tactical shifts. The overall
result may be a shift in favour of either the attacker or defender, and this result is shown next to the rosette.
26.3 Final Shift
Between the Defenders and Attackers columns is the Final Shift that is applied to the raw combat odds, after
all tactical factors, including artillery have been taken into account.
The Final Shift is then automatically applied to the CRT being used for the battle.
26.4 Combat Residue
Underneath the Final Shift display is the Combat Residue display. This will show if the combat will result in
either Light or Heavy Combat Residue.
26.5 Artillery Column
As artillery units are assigned to the battle, an icon appears in the Artillery Column which shows
the shift that each artillery unit is contributing to the battle. Some scenarios will give some sides
extra shifts for a combat in which artillery is used, and if present, this will be displayed at the
bottom of the Artillery Column.
26.6 Combat Result Table Display
The Combat Results Table lists the final odds for the combat, and the six possible combat
results. To the right are icons showing if Shock or Anti-Shock Bonus Shifts will influence the
combat and underneath are the actual combat dice. If the defender has a large number of
combat steps (this number varies with the terrain), then two combat dice will be rolled,
generating two combat results. However, in a two dice combat, only the first dice can cause a
Retreat result.
Note: The CRT column displayed is after amendment by the Tactical and Bonus Shifts.
26.7 Shock / Anti-Shock Bonus Shifts
In Battles in Normandy™, another factor in attacks is Shock. Certain units, such as armour,
have a Shock value, representing their power in attack. Shock value may be 0 to 4. It is not
cumulative. The Shock value of the attack is the highest Shock value of any attacking unit.
Therefore, attacking with three tank units, all with Shock +1 gives a total value of +1, not +3.
Shock value can add a maximum of +2 to a combat. This will in effect be added to the die (dice) roll.
Note: All CRTs have 1-8 results for each Odds column, though only six of them will be active for each combat.
To offset Shock, certain units have an Anti-Shock value. These are primarily anti-tank units and forts. The
Anti-Shock value of the defender is the highest Anti-Shock value of all the defending units or Strongpoints.
When an attack is resolved, the Anti-Shock value is subtracted from the Shock value to get a final modifier.
This modifier can never be a negative number. Anti-Shock units can cancel out the Shock advantage, but can
never do more.
42
Page 45

Note: Anti-Shock Values that are present in a hex due to terrain, are cumulative with the Anti-Shock value
from the units.
Shock and Anti-Shock is displayed to the right of the CRT Column. The defender’s total Anti-Shock strength is
displayed as an anti-tank gun icon(s) on the left. The attacker’s Shock strength is displayed as a tank icon(s) on
the right. Any Shock and Anti-Shock strengths that negate each other will be coloured orange. Any remaining
Shock strength will be green and a modifier will be present on the combat dice below.
27 Combat Display Panel Shot
To the right of the Combat Results Panel is the Combat Display Panel.
This shows a close up on the actual area of combat and more information
on the tactical shifts generated by the units in combat.
The circular display shows the actual hex and surrounds involved in the
battle.
Alongside the circular display is a display that shows exactly what
Tactical Shifts attacking units are contributing to the combat.
Arrowheads that are green mean attacking units are contributing normal
tactical shifts from that hexside. Orange arrowheads signify attacking units are contributing no tactical shifts.
In addition, the display will indicate why no shifts are being contributed from a hexside such as the defender
having too many steps adjacent, a riverside intervening or the attacker attacking from a hex that contains a
minefield or detachment.
27.1 Combat Results
Once the Conduct Combat button is pressed, a random result is calculated by the computer and the results are
shown. Each result can include attacker losses, defender losses and/or retreat. Under some circumstances the
defender may lose more steps during his retreat.
27.2 Losses
Combat losses for defenders are displayed on the unit icons on the Combat Control Panel.
Losses for attackers are shown directly on the Unit Display for each unit.
Losses are shown by the heads displayed on steps being replaced by white or red skulls;
white are losses that have occurred in a previous turn. Red skulls are losses that have been incurred in the
current turn and may be replaced by normal replacements. Losses with a number overlayed are timed losses
and will replace themselves over time.
If a stack of units is required to take losses, the first loss is suffered by the unit with the greatest number of
steps, the second loss by the unit with the second greatest number of steps etc.
If two or more units have equal numbers of steps then the unit with the lowest attack value (in the case of an
attacking stack) or defence value (in the case of a defending stack) loses the first step, second lowest loses the
second step etc.
If all units have taken one step loss and the number of step losses required by the combat result has not been
met then the above process is repeated until the required number of steps has been removed. This will result in
units being killed and removed from the game.
43
Page 46

27.3 Retreats
Sometimes a combat result will call for a defender to retreat. A retreat is always one hex per unit. Retreats are
handled automatically by the computer and are made according to Retreat Priorities.
The unit with the greatest number of steps will retreat first. Where units have equal numbers of steps the
following order will be used:
leg units
horse units
wheeled units
tracked units
supply units.
Note: Only a defender may be required to retreat.
27.4 Retreat Priorities
Units will attempt to retreat to the most favourable hex. Exactly which hex is considered the most favourable is
decided by the computer based on the following criteria (from most favourable to least favourable):
Not occupied by a friendly unit, containing no enemy ZOCs and not across an intervening river/stream (nonbridge)
Not occupied by a friendly unit, containing no enemy ZOCs and across an intervening river/stream (nonbridge)
Occupied by a friendly unit, containing no enemy ZOCs and not across an intervening river/stream (nonbridge)
Occupied by a friendly unit, containing no enemy ZOCs and across an intervening river/stream (non-bridge)
Not occupied by a friendly unit, containing enemy ZOCs and not across an intervening river/stream (nonbridge)
Not occupied by a friendly unit, containing enemy ZOCs and across an intervening river/stream (non-bridge)
Occupied by a friendly unit, containing enemy ZOCs and not across an intervening river/stream (non-bridge)
Occupied by a friendly unit, containing enemy ZOCs and across an intervening river/stream (non-bridge)
If there are two or more possible retreat hexes of equal favour, the computer will choose the one which will be
closer to the nearest friendly controlled town.
27.5 Additional Losses due to Retreat
If no legal retreat hex is available, the defender will remain in place and may lose one additional step. The
chances of losing this additional step depend on the quality of a unit. An elite unit only has a 30% chance of
losing the step, a standard unit a 50% chance. Substandard and isolated units always lose the extra step.
If the hex to which a unit retreats is adjacent to an enemy unit and is not occupied or adjacent to a friendly
unit, then the retreating unit may lose an additional step.
If all units in a stack are isolated then all ( - ) results in a CRT become R; all D# and D#R results become
D#+1R.
27.6 Advance after Combat
There is no formal advance after combat. If attacking units have enough movement OPs available, they may
continue to move. This can allow a defender to be attacked multiple times in a turn, upon which the results will
usually be devastating.
44
Page 47

27.7 Isolated Units
If a unit is attacked in the enemy player’s turn it loses a bullet (only one
regardless of however many times it is attacked).
If a unit has no bullets and is out of supply, it becomes isolated. It can run out
of bullets by being attacked or by choosing to expend its last bullet on actions
like entrenching.
Isolated units appear on a red background in the combat screen and the unit popup on the map. They defend
at half strength and suffer additional losses in combat. If there were no losses and no retreat, the unit still
retreats. If there was a retreat, then an additional loss is applied. If there were also losses, then these are
increased by one.
Since units are most likely to be in this state through being surrounded, the results can be catastrophic.
Note: It is usually worth attacking isolated units even at normally unfavourable odds.
28 Supply and Refit
In Battles in Normandy™, simply to move your units and attack the enemy is not enough. To continue doing
so your units must be constantly resupplied with enough equipment, ammunition and fuel necessary to
continue the attack. Fortunately, the distribution of supply in Battles in Normandy™™ is handled by the
computer. That said, it is necessary for the player to understand the logistics involved and therefore make it as
easy as possible for your ‘Quartermasters’ to fulfil their tasks uninterrupted.
28.1 Supply Definitions
Supply Source: A Supply Source is an independent supply location, i.e. one that does not have make a
Supply Trace to be in supply. Map edge supply locations are always Supply Sources, but Supply Dumps and
Drop Zones can also fit into this category.
Supply Point: A Supply Point is a supply location that must make a Supply Trace to a Supply Source before it
can supply anything. Supply trucks are Supply Points, although some trucks can supply other trucks, acting as
a relay to the ultimate Supply Source.
Supply Trace: The process by which a Supply Point traces back to a Supply Source. The strength of this
connection affects the level of the Supply Burst that Supply Points can make.
Supply Burst: Each Supply Source or Supply Point broadcasts supply to as many hexes as it can reach. There
are three levels of Supply Burst, Maximum, Reduced and Minimum. Many dynamic factors such as weather,
ground condition, enemy ZOCs and interdiction can all affect the Supply Burst.
In Supply: If a hex has been reached by at least one of your Supply Bursts then its In Supply. If not, it’s Out of
Supply.
Country Supply Level: Each country has a supply level. These are 25%, 50%, 75% and 100%. This supply
level determines how much of its maximum OPs (called the Resupply Value number) that a unit actually gets
when it is In Supply. A unit will only get its maximum OPs if its Country Supply Level is at 100%, otherwise it
gets less, as designated by the Country Supply Level. This factor applies to all supplied hexes belonging to a
Country in a turn and affects the Refit rate in the same way as the Supply Level.
Automatic Refit: A unit that fulfills certain conditions will have a multiple of its Resupply OP value added
directly to its pool of Reserve OPs. This is an automatic process, done at the start of the turn and reflects the
fact that units will always do their best to improve their logistical condition. However the actual amount
received is multiplied by the Country Supply Level. If the Country Supply level is less than 100% then the OPs
received through Automatic Refit will be correspondingly reduced.
45
Page 48

28.2 Supply Summary
Each hex on the map is either In Supply or Out of Supply and this is determined at the start of the turn, and
does not change during a turn. The Country Supply Level determines how much of a unit’s maximum OPs a
unit actually receives. A supplied hex may also allow a unit to take replacements, but this is not automatically
so. A unit gets supplied by either starting a turn on a supplied hex or moving onto a supplied hex at some stage
during a turn.
A hex is In Supply if either a Supply Point that made a Supply Trace or a Supply Source was able to reach that
hex with a Supply Burst.
28.3 Refit Calculations
Most units (those who don’t rely soley on Basic OPs) are eligible for Automatic Refit. A unit that has a
successful Automatic Refit will have a number of OPs added directly to its Reserve OP pool at the start of a
turn.
Each Country has a Refit Value, and this is a multiplier applied to a unit’s Resupply OP value. The calculations
are done and the OPs added at the start of a turn. The formula for the actual amount added is:
Resupply Value x Refit Value x Country Supply Level.
Refit Value is typically 100 – 300%. The maximum value for Country Supply Level is 100%, so any values less
than that will reduce the amount of OPs gained by refitting.
To qualify for an Automatic Refit a unit must:
1) Not rely solely on Basic OPs
2) Start the turn on a supplied hex
3) Not have used its Action Capability the previous turn
Not have been attacked the previous turn
Not be adjacent to enemy units this turn
Important Note: In a turn, if a unit qualifies for Automatic refit, and it has a step or steps with timed
replacements, then the wait time for those step(s) will be reduced by two rather than one.
28.4 Supply Display
To see which hexes are supplied, hit the ‘s’ key or the Show Supply button on the Control Panel. Hexes shaded
green are in supply and can supply replacements. Hexes shaded yellow are in supply but can’t supply
replacements. Hexes with a truck icon were supplied by a supply truck, and hexes with a Strongpoint icon had
their own supply from the Strongpoint there. Unshaded hexes are Out of Supply.
28.5 Supply Truck Display
If a supply truck is selected, the truck shows its Supply Trace back to Supply Source as a dashed line on the
map.
Other information is shown in the Unit Display.
At the top of the Unit Display is the unit name. Beneath that is the unit’s icon and the step icon for its single
step. Next to that are two icons that show whether the truck can supply other trucks and if it can supply
replacements. At the extreme right is the movement type icon.
Supply units cannot attack, so their attack icon carries supply information. The color of this icon shows the
strength of the truck’s Supply Burst. Green is a Maximum burst, Orange is Reduced, Red is Minimum and
Gray indicates no supply.
The first icon on the attack icon shows the mode that the Supply Burst uses. The second icon shows a number
of crates, for emergency supply. If a supply truck cannot make a Supply Trace, it will use emergency supply to
make a Minimum Supply Burst.
46
Page 49

The defence icon shows the Defence Strength. The movement icon shows the unit’s OPs for movement, but
also displays an icon showing the movement type used by the truck’s Supply Trace.
A supply truck has three different modes associated with it, so it’s important to distinguish between them. It’s
a unit like any other, so it has a move type (usually Wheel, though it could be Horse). It has a move type to use
for it’s Supply Trace. This often Supply movement, as this works best along roads. Then there’s a move type for
its Supply Burst. This is often Leg, as this is usually best for travelling into difficult off road terrain, which is
where you need it most.
The last line of the Unit Display starts with the standard unit select button. The icon to the right changes the
weather display (not the weather itself) for the three following buttons. These buttons show the Supply Burst
at Maximum, Reduced and Minimum. By default, the weather display is set to the current weather. Hitting the
Weather Display button toggles the weather for those Supply Burst settings, and thus allows you to forecast
what your Supply Burst would be in different weather conditions. The weather being displayed is written above
the move icon.
The last button shows the result of a Supply Trace from every hex on the map for the selected supply truck. It
will help you decide optimum locations for moving your supply trucks.
28.6 Supply Example
Let’s consider an example involving the US beachhead at Omaha. The US gets a Supply Source on Turn 3 at the
small town of St Laurent. It’s a Supply Source because it does not need to trace supply to anywhere else. This
source has a Supply Burst of 10 OPs at Leg movement. This will enable it to supply a radius of roughly four or
five hexes around the beachhead itself, though this Supply Source cannot allow Replacements.
While this is enough for the initial landings, it will hardly be enough to enable important objectives like St Lo
to be captured. The US V Corps also gets a supply truck so let us assume that it has moved some four or so
hexes inland from the beachhead. The truck is a Supply Point, since it must make a Supply Trace back to the
Supply Source. This is not too difficult although this truck must trace using Leg movement, which means that
this particular supply truck cannot get too far away from its Supply Source.
If we were to use the Show Supply key at this stage, we would see a number of hexes with a truck icon,
indicating that they were being supplied by the truck and not the beachhead.
Now let’s imagine a savage storm hits Omaha beach. The scenario designer has designated the Omaha
beachhead Supply Source as only giving a Minimal Burst in Storm weather. This has an important
consequence. Although its own local Supply Burst is unaffected, it can only pass on a Minimal Burst to any
Supply Point that traces to it.
Our V Corps supply truck can only trace to the beachhead, so regardless of the state of its Supply Trace, the
best it can do is give a Minimal Burst to the hexes around it.
Now let us suppose that German resistance is minimal, and that US troops are driving inland, and their supply
truck drives deep inland with them. But while the Wehrmacht is folding, the Luftwaffe bursts out of the clouds
and lays some Air Interdiction on the road between the supply truck and the beachhead. V Corps is now in a
spot of bother. The truck’s Supply Trace, already paying Leg movement for each hex, now confronts the Air
Interdiction penalties, and fails to make the trace. Though all is not lost, the V Corps supply truck is forced to
use its single crate to make another Minimal Burst.
That’s two turns in a row of Minimal supply, which will somewhat restrict the ability of the US forces to make
deep incursions into enemy territory. This is by design, as Allied logistics were simply not up to the task of
supporting such a drive in the early days of the invasion.
However, help is at hand. A new Supply Source, Mulberry A, arrives at Port-en-Bessin on Turn 8. It uses
Supply movement, greatly extending its range along roads, and allows replacements. The V Corps supply truck
uses the Battles in Normandy™ evolving units feature to morph into a much better unit. It has more OPs for
both tracing and bursting, more crates for emergency supply and uses Supply movement for tracing, meaning
that it can now operate at and distance from the Supply Source, so long as it stays on the roads.
47
Page 50

This change reflects the improvement in Allied logistics over time, and will provide much better support for a
breakout.
In this example, the US Country Supply Level is at 100%, meaning that all US units which are In Supply get
100% of their maximum OP allowance. A country getting only 75% is under a serious handicap, and those only
getting 50% had better hope that their sector of the front is very static. Any country getting only 25% Country
Supply Level should call in the diplomats immediately, and take whatever terms it can get.
29 Information Pop-up Display
To assist the player to make the right decisions in the game, there is further information available for both
units and map hexes via the Tactical Map display. By displaying the Information Pop-up window, you may
view information about the terrain, units present and other information for that hex.
Note: This information will be complete for friendly units but may be only partially complete for an enemy
unit. Terrain and Objective information is always complete.
To view advanced information for a hex, right-click and hold the mouse button over a hex in the Tactical Map
display. This will display a pop-up window on the Tactical Map. Releasing the right mouse button will cause
the display to close.
The Information Pop-up Display incorporates many boxes that contain elements of information that may be
viewed. To view these elements, guide the mouse cursor over the boxes. The display will change to show
information about the current box.
The box in the bottom left hand corner of the display always shows the terrain that the hex contains. Above the
terrain element are boxes containing from one to four units that may be situated in the hex. The boxes running
from bottom left to right show firstly supply, objectives, reinforcements, and finally fortifications present in
the hex. These different elements are discussed in detail below.
Note: Remember the right mouse button must continue to be depressed during this operation.
The type of information present in the boxes is hex dependant therefore all items shown here may not appear
in any one given Pop-up window.
29.1 Friendly Hex Terrain Information
Placing the mouse cursor over this box will cause
Terrain Information to display in the main pop-up
screen. This information is:
Terrain Icon
This icon is an exact replica of the terrain icon in the
selected hex. It is enlarged for easy viewing.
Hex OP Penalty
This is the Hex OP Penalty (if any). This penalty applies to movement of units and represents the difficulty of
moving in enemy territory. It may be anywhere in the range of two through to nine, depending on influences
from other hexes and/or enemy units.
The OP Penalty is used in addition to the base hex movement cost when traversing. It will usually be present in
hexes that are enemy controlled, subject to an enemy zone of control or have some form of interdiction or
detachment in them. Hex OP Penalties usually subside as territory becomes friendly.
Anti-Shock Modifier
This is the terrain anti-shock modifier (if any). This modifier is used in the calculation of anti-shock in a
defensive combat. Unlike the anti-shock values inherent in some combat units, terrain anti-shock modifiers
are cumulative in a combat. This represents the benefits of defending in good terrain.
48
Page 51

Hex Location
These are the map hex co-ordinates for the selected hex. They allow you to identify a specific location.
Terrain Type
This is name of the type of terrain present in the hex. The descriptive name is the most prominent type of
terrain in any given hex.
Terrain CRT
This is the Combat Result Table type that will be used in any combat that takes place in the selected hex.
Minefield
If there are any friendly or enemy minefields in the hex, a description will appear here with the strength of any
enemy minefield; they may range from one (light) to three (heavy).
Tactical Display
On the right of the information area is a graphic display which shows you graphical information about the
current hex such as roads and railways that move through it and any hex sides that contain rivers.
Note: The type of information is dependant on the type of terrain therefore all items shown here may not
appear in any one given hex.
29.2 Enemy Hex Terrain Information
Placing the mouse over the terrain icon on an enemy
occupied hex will display quite different information.
In addition to the terrain data as discussed above, the
player is also provided with detailed combat related
information pertaining to the ability to generate
tactical shifts from the target hex. These hex sides are
indicated by coloured arrowheads and include a small
icon to illustrate why a shift cannot be achieved (if
applicable).
A green arrowhead indicates that attacking units will receive normal tactical shifts from the hex side. This is a
favourable position.
A red arrowhead indicates that this hex side will never provide a tactical shift from this direction. This is most
likely because of a river intervening.
An orange arrowhead indicates that this hex side will not currently provide a tactical shift, but that this
situation is variable. This may be because of an OP penalty in the hex which can eventually be cleared such as a
minefield, a penalty exists in the hex which will disappear after a set time such as a detachment, or that the
presence of too many enemy steps adjacent to an attacker is causing the shift to be negated.
In the latter instance a small soldier’s head icon will accompany the orange arrow. It may be nullified by
moving an equal or greater amount of friendly steps into the attacking hex.
Unit Information
29.3
Placing the mouse cursor over a unit in this pop-up
display will cause Unit Information to display in the
main pop-up screen. In the case of friendly units, this
information will be complete unless the unknown
setting is enabled, whereby information will be
disguised by a question mark until the unit makes first
contact with enemy forces.
49
Page 52

If the unit is an enemy unit, many basic items will be revealed as long as the unit has been contacted by
friendly forces. Some items such as current supply level will not be revealed.
Note: The type of information is dependant on the type of unit and therefore all items shown here may not
appear in any one given pop-up window.
Unit Name
This is the name of the selected unit.
Unit Icon
This is the unit icon for the selected unit.
Unit Steps
This is the current number of steps possessed by the selected unit.
Timed Replacements
This disc displays the number of Timed Replacements the selected unit has remaining.
Note: Replacements are discussed in detail in the Replacement Chapter.
Unit Type
This icon is a rectangular box displaying the movement mode of the selected unit. This display shows the
primary means of transport used by this unit and main type of vehicle.
Divisional Display
This display refers to the Division a unit belongs to. On top of this display is the Divisional Title. On the left
hand side of the display is the Divisional Symbol followed by the percentage increase a unit will receive as
bonus if eligible for Divisional Integrity.
The colour of the box indicates whether a unit currently has Divisional Integrity or not.
Combat/Defensive Strength
This is the base Attack and Defensive Strengths of the selected unit displayed on red and blue sections of a
rung respectively. Each rung displays information about one of the unit’s steps with the top rung being the
unit’s current combat strengths. This rung will also have the unit’s supply status expressed in bullets
overlayed. The rungs for any steps that have been destroyed will be greyed out but still contain possible
strengths (i.e. If the steps are replaced).
Shock/Anti-Shock Modifiers
These are the shock and anti-shock modifiers applicable for the unit (if any). The modifiers are shown as
roundels in the unit’s Attack and Defence strength sections. Shock values are shown in the Attack section, and
Anti-Shock in the Defence section.
Movement Type
This is the movement class of the unit and it determines which movement costs the unit will pay when moving.
Movement Values
These are the current Movement Values for the unit expressed in OP’s. The yellow arrow contains the standard
movement OP’s and the orange arrow contains the Extended Movement values.
Unit Value
This is the game value of the unit. It is the Victory Point value to the enemy if this unit is destroyed in combat.
Miscellaneous
The Pop-Up display may also feature several icons in round button displays on the right hand side. Each of
these icons signifies a different capability of the unit. These are:
50
Page 53

Replacement Type – denotes the type of replacement a unit may use.
Bridge Repair Capability – denotes if a unit is capable of repairing bridges.
Detachment Capability – denotes if a unit is capable of leaving detachments.
Recon Capability – shows if a unit has a Recon bonus to its viewing range.
Truck Capability – denotes if a unit can use Truck transport.
Train Capability – denotes if a unit can use Train transport.
Ship Capability – denotes if a unit can use Ship transport.
Entrench Capability – denotes if a unit can Entrench and the level of the bonus.
Reserve OP Maximum
Bridge Blowing chance
29.4 Supply Information
Placing the mouse cursor over this box will cause
Supply Information to display in the main pop-up
screen. This information is:
Name
The name of the Suppy Source.
Location
These are the map hex co-ordinates for the selected
hex. They allow you to identify a specific location.
OP Burst and Burst Type
This details the Burst OPs for the Supply Source, and the icon identifies the Movement type for the Supply
Burst.
Termination Conditions
Details the reaction of the Supply Source to enemy encroachment.
Supply Levels by Weather Conditions
Weather can affect a Supply Source. This shows the supply levels for each weather state.
Truck and Replacement Supply
Icons show whether the Supply Source can or can’t supply Trucks and Replacements.
29.5 Objective Information
There are two objective boxes for each objective – one
Axis and one Allied. Each will display side specific
information about the objective in the current hex.
Placing the mouse cursor over these boxes will cause
Objective Information to display in the main pop-up
screen. This information is:
Name
This is the name of the objective.
51
Page 54

Intrinsic AA
This is the AA capacity that is inherent to objective that are controlled by their original owner. It is lost if the
objective is captured, and is not restored, even if the objective is recaptured.
Turns Owned
This is the number of turns the objective has been owned by the appropriate side.
Points
This is the number of Victory Points a side has accrued from this objective to date.
Score
This is the total number of points for a side in the game to date.
Active
This group or groups of turns indicates the period during which an objective is active for a given side. A side
will receive the VP value of the objective for each turn it controls the objective during this period.
VPs/Turn
This is the number of victory points awarded per turn for ownership.
Owned
This is the number of turns the objective has been owned by the appropriate side.
Capture
This is the VP value of the objective for capture only.
Note: This value is a once off reward and not reliant on the turn number.
Alert Points
Some objectives are detailed to release Alert Points to friendly or enemy forces upon their capture. Alert Points
serve to accumulate and trigger reinforcements when a certain level has been reached. Upon capture of an
objective, Alert Points are sent to the country whose flag is displayed over the objective.
29.6 Reinforcement Information
Placing the mouse cursor over this box will cause
Reinforcement Information to display in the main popup screen. This information is:
Number of Turns till Reinforcement
This is the number of turns remaining until the
adjacent reinforcement(s) appear.
Reinforcement Units
These are the unit(s) that will appear on this hex once the number of turns has expired.
Moving the cursor over the unit icons will display details on the reinforcing unit in the popup.
Note: Reinforcement Hexes that are overrun by the enemy will still supply reinforcements but at an alternate
location, specified in the popup.
52
Page 55

29.7 Strongpoint Information
Placing the mouse cursor over this box will cause
Strongpoint Information to display in the main pop-up
screen. This information is:
Supply
Some Strongpoints can provide supply.
Strongpoint CRT
This is the CRT any combat against this fort will use to determine a result.
Strongpoint Icon
This is the fort’s icon.
Number of Steps
This is the number of steps a fort contains.
Defensive Strength
This is the defensive strength of the strongpoint.
Victory Points
The number of Victory Points awarded for destruction of the strongpoint.
Note: Fortifications are discussed in detail in the Miscellaneous Unit Chapter.
30 How to Win
There is no correct way to achieve victory in Battles in Normandy™. As in war, victory will often go to the side
that makes the least mistakes. However there are a few important principles to remember that will assist you
to make fewer mistakes.
Concentrate to attack.
Because of the way combat is structured you will need to mass units in attack. This will give you the best odds
in a combat. Be careful though, not to strip other parts of your line and create weak spots.
The best attacks use multiple types of units from as many adjacent hexes as possible. This will give you those
vital tactical shifts that can turn a probe into a full scale assault.
Time your attacks
As an attacker it is very easy to keep the attack going just one or two turns too long only to find that your under
strength units cannot then resist an enemy counterattack. Watch your strengths and if necessary form a
defensive line and reinforce weak units with replacements.
Disperse to defend (but not too far).
The best defence is a continuous line as this negates some of the attacker’s tactical shifts. But taking advantage
of covered terrain such as woods, forests and villages is probably more important.
If you are forced to defend in clear terrain make sure units are entrenched and have anti-shock capability.
Don’t attack across rivers
Attacking across rivers halves the attacking strength and stops units receiving a tactical shift. If possible move
your best attacking units over a river to attack from the same side.
53
Page 56

Attack units twice.
Where possible, units should be attacked twice in the one turn. This will cripple or kill even the strongest
defender. If this isn’t possible, it can still turn a strong portion of a line into a hole.
Make sure there’s some cannon fodder for attacks.
Losses are always taken by the unit with the highest number of steps. If units have equal steps, the weakest
unit will lose the step. So if you want to keep your armoured spearhead in top shape it is useful to have some
full strength infantry units also participating in any big attacks.
The converse is true in defence. The first loss is always taken from the unit with the most steps but after that
the lowest defence strength is used to choose the next loss. Often this will be an armoured unit. Using armour
for defence is a waste (but often you will have no choice).
Use units in their historical role.
The strengths and movement values of units have been set such that the best units in attack are tanks and the
best units in defence are infantry and anti tank guns. If you want to attack, don’t use the infantry division that
has just arrived as a reinforcement, put it into the line and use that armoured division that you have been
forced to use defensively instead. These sort of swaps are inconvenient but more often than not will pay off in
terms of better results.
Keep your divisions together.
Good divisions receive generous strength bonuses whenever all divisional units take part in an attack or
supporting range of each other in defence. Therefore, unless there are exceptional circumstances, there is a
good reason to keep divisional units close to each other. Even if one or more regiments are destroyed, the
bonus still applies as long as the remaining units are kept close together.
Penetrate, but not too far.
The way advance is to break lines and not allow them to reform. The key to breaking a line is to push units
through gaps. However, if you push units too far through a gap they will be cut off and destroyed easily. The
middle ground is to create a solid finger of units into and through the gap. Supply can then be able to be traced
back through these units.
Crush, kill, destroy!
The best way to kill units in this game is to surround them. Isolated units are far more susceptible to taking
losses.
Hold that line.
If you are defending, you need to watch every enemy success and prevent it becoming a full scale
breakthrough. Seal off breakthroughs as quickly as possible but not at the expense of other areas.
Move those Supply Trucks!
There is nothing more frustrating than having a successful breakthrough grind to a halt through lack of supply,
because sloppy staff work failed to move the supply trucks forward. Keep the trucks close to the breakthrough
but on good roads so that they can be resupplied.
Check and move reinforcements.
Sloppy staff work can also cause reinforcements to pile up as they patiently await orders to advance. At the end
of a turn, it’s useful to quickly scan the map edges to see if there are reinforcements sitting idle on an entry
road.
Wear Sunscreen.
Beaches are fun during peacetime, but not in times of war. If you leave a unit on an invasion beach without
landing, it will be prone to easy counterattacks.
54
Page 57

Look to the Future.
Recon units in Battles in Normandy™ have a higher ability to see the enemy form a distance, use them to
reconnoitre terrain.
Have fun!
Fortunately we do not have to wade out of the sea at 5.45 in the morning under enemy fire as the poor souls in
Normandy had to that fateful day. This is only a game so remember that if all else fails, enjoy yourself. That is
why we play after all.
31 Credits
SSG
Design: Ian Trout, Roger Keating, Steve Ford, Gregor Whiley
Programming: Roger Keating, Alex Shaw
Art Direction: Steve Ford
Executive Producer: Gregor Whiley
Scenario Design: Ian Trout, Gregor Whiley, Steve Ford
Music: Courtesy of Tomahawk Films, www.tomahawkfilms.com
Game Sound: Robert Gjessing, Gregor Whiley
Game Manual: Scott Wilson, Gregor Whiley, Robert Gjessing, Marty Lewis
Tutorial: Ian Trout
Web Site Support, Forum Support and User Support above and beyond the call of duty: Robert Gjessing
Game Testing: Marty Lewis, Matthew Urch, David Alston, Chris Merchant, Andy Brown, Scott Wilson, Stefan
Norberg
SSG Website:
Matrix Credits
Executive Producer: David Heath
Associate Producer: Shaun Wallace
Logo Art Design: Steve Ford
Web Site Design
Marc Schwanebeck
Official Web Site
http://www.ssg.com.au
Matrix Games -
Our Strength
We thank God for giving us the ability and strength to complete this project
and follow on our dream. We also like to thank our families, and friends for
giving us their non-stop love and support during this project.
http://www.matrixgames.com/games/battlesinnormandy.com
55
Page 58

32 Appendix A
Supply
The calculations behind the supply system in Battles in Normandy™ are comprehensive but logical. The game
system does a very good job of displaying the results of this system to the player, but a good understanding of
how those results were achieved will enable greater finesse in gameplay.
Supply is calculated in three main phases.
Phase Ia
Firstly, determine which supply points are actually working. Supply Points could be not working due to enemy
activity or scenario limits.
Secondly, look at all trucks which can supply other trucks (we’ll call these supply transfer trucks). We need to
determine if these can act as Supply Sources. Each supply transfer truck has defined a Trace OP number for
each combination of a Side’s Supply Level (25%, 50%, 75%, 100%) and the Air Condition (eight combinations
in all).
We cross reference these two factors to find the right Trace OP number for this turn for each truck. Each truck
then attempts to trace to a Supply Source, using this Trace OP number and the Trace Mode (such as Supply or
Leg) that has been defined for it. If a truck can trace, then it itself is a valid Supply Source for other trucks,
though the level of that supply has yet to be determined. If it cannot trace, or the OPs required to trace exceed
the available Trace OPs then the truck skips the next calculations.
To determine the level of supply, we compare the lowest number of OPs used to reach a Supply Source (there
may have been a number of valid traces) with the ‘Maximum Burst when less than’ value as defined in the
Editor. If the OPs used are less than the Maximum Burst number then the truck is eligible for a Maximum
Burst. If the OPs used are between the Maximum Burst value and the Reduced Burst value, then it is eligible
for a Reduced Burst, otherwise it is eligible for a Minimum Burst.
However, eligibility is not the same as delivery. Each Supply Source that the supply transfer trucks are tracing
to has its own supply level, which can be affected by factors such as weather. The truck that is tracing cannot
do any better than the supply level of the Supply Source it is tracing to, regardless of how good its trace is. For
example, if a source is at Minimum supply, any trace to that source cannot do better than Minimum.
At the same time, we check for the ability to supply replacements. This is handled separately from supply level,
and can be traced separately, so a truck could easily have one trace for supply, and another for replacements.
We now have a collection of Supply Sources. These are:
Those Supply Sources defined in the scenario (that are still working)
Those supply transfer trucks which have successfully traced to a Supply Source
Supply Dumps defined in the scenario that have traced to a Supply Source or are using their own Dump
supplies and are still working
Drop Zones defined in the scenario that have traced to a Supply Source or are using their own Dump supplies
and are still working
Each of these sources has worked out its supply level and whether it can supply replacements or not. It also
knows whether it can supply trucks or not. Strongpoints can never supply trucks, while Supply Dumps and
Drop Zones may or may not be allowed to supply trucks.
Phase Ib
Now we look at ordinary trucks, i.e. those that cannot supply other trucks. They must now try to trace to a
Supply Source (that can supply trucks) from the list above. Trucks calculate their traces to various Supply
56
Page 59

Sources, and choose the best case. Again, they can have separate traces for supply and replacements. Each
truck will end up with the best case supply level it can manage and a yes/no answer on replacements.
Phase II
This is the phase in which supply is actually distributed by Supply Points. This is called Bursting, as the supply
is spread in an area around the Supply Point.
Any truck that successfully traced in Phase 1b is a Supply Point, and all the Supply Sources from Phase 1a are
also Supply Points. A truck that couldn’t trace but has a crate for Emergency Supply is a Supply Point that can
only give Minimum supply.
Each Supply Point has determined its supply level and for each supply level it has a number of Burst OPs, as
defined by the scenario creator. These Burst OPs use a Burst Move Type (Supply, leg etc) also as defined.
Each Supply Point then works out which hexes it can reach with supplies, using the OPs and move type. Each
hex it can reach is then in supply. Those Supply Points that can distribute replacements then go through the
same process to see which hexes can be reached with replacements.
Strongpoints can defined in the scenario as having their own supply (though these can only ever supply units
in the same hex as themselves).
Phase III
The end result is simple. Each hex on the map end up being either in supply and able to provide replacements,
or in supply but without replacements, or out of supply. There are no levels of supply for a hex, nor does it
matter if a hex was reached by ten Supply Points, or just one.
57
 Loading...