


Titanium
ITALIANO
• 1 •
Ci congratuliamo per la vostra scelta!
Grazie a questa macchina Gaggia potrete gustare un delizioso caffè o cappuccino nel
comfort della vostra casa.
L’espresso viene preparato facendo filtrare rapidamente dell’acqua sotto pressione e riscaldata alla giusta temperatura attraverso una
miscela finemente torrefatta.
Il cuore della macchina espresso è costituito da
una pompa ad alta prestazione.
Il flusso dell’acqua è comandato tramite un interruttore.
AVVERTENZA:
La macchina espresso è stata studiata unicamente per uso domestico.
Qualsiasi intervento di assistenza o di riparazione fatta eccezione per le operazioni di pulizia e di normale manutenzione, dovrà essere
effettuato da un Centro di Assistenza autorizzato.
1. Controllare che il voltaggio indicato sulla
targhetta corrisponda al vostro.
2. Non utilizzare mai acqua tiepida o calda
per riempire il serbatoio dell’acqua. Utilizzare unicamente acqua fredda.
3. Non toccare con le mani le parti calde della
macchina ed il cavo di alimentazione durante il funzionamento.
4. Non pulire mai con detersivi corrosivi o utensili che graffino. E’ sufficiente un panno
morbido inumidito con acqua.
5. Per evitare la formazione di calcare, si può
utilizzare acqua minerale naturale.
6. Non immergere la macchina in acqua.
PRECAUZIONI
IMPORTANTI
Durante l’utilizzo di elettrodomestici, è
consigliabile prendere alcune precauzioni per limitare il rischio di incendi,
scosse elettriche e/o incidenti.
1 Leggere attentamente tutte le istruzioni ed
informazioni riportate in questo manualetto
e in qualsiasi altro opuscolo contenuto nell’imballo prima di avviare ed utilizzare la
macchina espresso.
2 Non toccare superfici calde.
3 Non immergere cavo, spine o il corpo della
macchina in acqua o altro liquido per evira-
re incendi, scosse elettriche o incidenti.
4 Fare particolare attenzione durante l’utiliz-
zo della macchina espresso in presenza di
bambini.
5 Togliere la spina dalla presa se la macchi-
na non viene utilizzata o durante la pulizia.
Farla raffreddare prima di inserire o rimuo-
vere pezzi e prima di procedere alla sua
pulizia.
6 Non utilizzare la macchina con cavo o spina
danneggiati o in caso di guasti o rotture. Far
controllare o riparare l’apparecchio presso
il centro di assistenza più vicino.
7
L’utilizzo di accessori non consigliati dal pro-
duttore può causare danni a cose e persone.
8 Non utilizzare la macchina espresso al-
l’aperto.
9 Evitare che il cavo penda dal tavolo o che
tocchi superfici calde.
10 Tenere la macchina espresso lontano da fonti
di calore.
1
1 Controllare cha la macchina espresso sia in
posizione “0” prima di inserire la spina nel-
la presa. Per spegnerla, posizionarla su “0”
e rimuovere quindi la spina dalla presa.
12 Utilizzare la macchina unicamente per uso
domestico.
13 Fare estrema attenzione durante l’utilizzo
del vapore.
CONSERVARE QUESTE ISTRUZIONI

ITALIANO
Descrizione:
FIG. 01
1 Interruttore principale / Spia di accensione
2 Interruttore acqua calda/caffè (pompa)
3 Spia di raggiungimento temperatura corretta
4 Interruttore vapore (temperatura)
5 Griglia
6 Serbatoio dell’acqua (estraibile)
7 Manopola rubinetto vapore/acqua calda
8 Tromboncino vapore (estraibile)
9 Portafiltro
10 Filtro (1 tazza o cialde)
11 Filtro (2 tazze)
12 Bacinella
13 Disco “crema perfetta”
14 Gruppo di erogazione caffè
15 Guarnizione sottocoppa
16 Porta-doccetta
17 Doccetta
18 Pressino
19 Cavo e spina di alimentazione
20 Misurino
21 Beccuccio erogazione
22 Montalatte (estraibile)
Istruzioni sul cavo elettrico
A Viene fornito un cavo elettrico abbastanza
corto per evitare che si attorcigli o che vi
inciampiate.
B Si possono utilizzare, con molta attenzio-
ne, delle prolunghe.
C Qualora venga utilizzata una prolunga, ve-
rificare:
1 che il voltaggio riportato sulla prolunga sia
perlomeno, uguale al voltaggio elettrico dell’elettrodomestico;
2 che sia munito di una spina a tre pin con
messa a terra (qualora il cavo dell’elettrodomestico sia di questo tipo);
3 che il cavo non penda dal tavolo per evita-
re di inciamparvi.
Preparazione della macchina da
caffè Espresso:
1. Togliere il serbatoio dell’acqua (6) e riempirlo con acqua fredda. Vedi FIG. 02
IMPORTANTE:
Una volta reinserito il serbatoio, assicurarsi che i tubi in silicone siano all’interno del serbatoio. Controllare che
non sia né attorcigliato né bloccato.
2 Inserire la spina (19) in una presa adegua-
ta (Cfr.”Avvertenza” punto 1)
3 Posizionare l’interruttore principale (1) nel-
la posizione “1”. La spia di accensione si
illuminerà.
Assicurarsi che l’interruttore acqua calda/
caffè (2) e l’interruttore vapore (4) siano nella
posizione “0”.
Messa in servizio
Questa procedura consente di riempire la caldaia con acqua fredda.
Si consiglia di seguire questa procedura
ogniqualvolta la macchina viene usata per la
“prima” volta.
Questa macchina utilizzando una pompa per
l’erogazione del caffè, è dotata di un sistema
autoinnescante. Collocare una tazza vuota
sotto il gruppo erogatore (14) senza inserire
il portafiltro e posizionare l’interruttore acqua
calda/caffè (2) nella posizione “1”.
Si potrà udire il suono della pompa così attivata e dopo qualche secondo l’acqua comincerà
a scendere dal gruppo erogatore (14).
• 2 •

ITALIANO
Dopo aver lasciato riempire la tazza riportare
l’interruttore acqua calda/caffè (2) nella posizione “0”.
La macchina Gaggia è ora pronta all’uso.
NOTA: può succedere che l’auto-innesco della
pompa non funzioni temporaneamente a causa di una “bolla d’aria”.
Qualora non scendesse acqua dal gruppo
erogatore (14) operare come segue:
a) Collocare una tazza o un bricco sotto
l’ugello del vapore (8).
b) Ruotare la manopola (7) in senso antiorario
per aprire il rubinetto di erogazione vapore/
acqua calda e posizionare l’interruttore vapore (4) e l’interruttore acqua calda/caffè (2)
nella posizione “1” per attivare la pompa.
c) Dopo pochi secondi, inizierà ad uscire ac-
qua dal tromboncino del vapore. Far fuoriuscire circa una tazza di acqua. Chiudere
il rubinetto di erogazione vapore/acqua
calda e portare l’interruttore acqua calda/
caffè e l’interruttore vapore (4) nella posi-
zione “0”.
La macchina Gaggia è pronta all’uso.
d) N.B.:
La spia di raggiungimento della temperatura corretta (3) continuerà a spegnersi e ad accendersi automaticamente durante il periodo di riscaldamento. Dopo aver
acceso la macchina, per il primo caffè,
aspettare circa 6 minuti per il riscaldamento ideale, mentre per quelli successivi la
macchina sarà sempre pronta.
Altra caratteristica della macchina è il sistema
anti-gocciolamento che elimina la maggior
parte del gocciolio dal gruppo erogatore (14).
Dopo l’erogazione del caffè, comunque, ci potrà essere un leggero gocciolamento a causa
dei fondi di caffè bagnati contenuti nel
portafiltro.
Attenzione! Non azionare mai la
pompa senza acqua nel serbatoio
onde evitare di danneggiare la pompa stessa. Un utilizzo scorretto della pompa
non è coperto da garanzia.
Cosa dovete sapere
1 Il sapore dell’espresso dipende dalla quan-
tità e dal tipo di caffè utilizzato.
Il particolare sapore di un chicco di caffè
dipende da diversi fattori ma il suo gusto ed
il suo aroma sono il risultato del processo di
torrefazione.
I chicchi di caffè torrefatti per un periodo
più lungo e a temperature più elevate presentano un colore più scuro. Chicchi più scuri
liberano più aroma rispetto a chicchi chiari.
2 Troverete sul mercato diverse qualità di caf-
fè. Ogni tipo di torrefazione è caratterizzato da una miscela di chicchi torrefatta ad
una particolare temperatura e con un particolare tipo di aroma.
Esistono decaffeinati contenenti soltanto il 2%
di caffeina.
Sperimentate con la vostra macchina espresso uno dei vari tipi di caffè in
vendita. Scoprirete probabilmente un aroma
migliore rispetto a quello della miscela finora utilizzata.
3 Le macchine espresso a pompa richiedono
una miscela finemente macinata. Assicurarsi
di acquistare o di farsi macinare questo tipo
di miscela. E’ preferibile usare un macinino
a macine piuttosto che un macinino a lama
perché questo libera troppa polvere di caffè e produce una miscela macinata in modo
irregolare.
4 Il vero espresso si riconosce dal colore scu-
ro, dal gusto ricco e dalla tipica “crema”.
5 Il cappuccino è una speciale combinazione
di caffè espresso e latte caldo emulsionato.
Si può servire con una spruzzata di cannella, noce moscata o cacao.
6 Servire immediatamente il caffè espresso
dopo averlo preparato.
7 Servire il caffè espresso in tazzine da caffè ed
il cappuccino in tazze da prima colazione.
8 Sarebbe l’ideale macinare il caffè appena
prima dell’uso. Non dimenticare che deve
essere macinato per la macchina espresso
a pompa.
9
E’ consigliabile conservare il caffè macinato
o in chicchi, in barattoli ermetici nel freezer. Il
caffè macinato assorbe facilmente gli odori.
• 3 •

ITALIANO
Come preparare un buon Espresso
1 Seguire la procedura descritta nel capitolo
“Preparazione”.
2 Scegliere il filtro corretto (10 o 11) ed inse-
rirlo nel portafiltro (9).
Utilizzare il filtro piccolo per 1 tazza ed il
filtro grande per 2 tazze.
Inserire quindi il portafiltro (9) nella macchina e attendere che si riscaldi.
3 Attendere che la macchina raggiunga la tem-
peratura corretta con la coppa portafiltro inserita (tempo di riscaldamento di circa 6 minuti).
Preparare nel frattempo tazze, caffè latte, ecc.
4 Dopo il riscaldamento, togliere il portafiltro
(9) e riempirlo con caffè macinato utilizzando il misurino fornito.
Considerare un misurino per ogni tazza di caffè.
Non riempire troppo.
Premere utilizzando l’apposito pressino (18).
Non premere troppo.
5 Pulire il bordo del portafiltro (9) da eventuali
residui di caffè. Inserire il portafiltro nella macchina con un movimento a 45° verso sinistra.
Ruotare quindi verso destra per bloccarlo in
posizione. Il manico del portafiltro dovrà trovarsi in posizione perpendicolare alla macchina o leggermente spostato verso destra.
6 Disporre una o due tazze sotto il portafiltro.
Posizionare l’interruttore acqua calda/caffè
(2) su “1”. Il caffè inizierà ad uscire.
7 Quando le tazze saranno piene per 3/4, ri-
portare l’interruttore caffè nella posizione “0”.
Il caffè sarà più o meno forte a seconda della quantità di acqua.
Un buon caffè preparato seguendo la giusta
procedura avrà la tipica “crema” marrone.
In caso contrario consultare “In caso di
malfunzionamento”
8 Togliere le tazze e servire.
9
Per preparare dell’altro caffè, togliere lentamente ed attentamente il portafiltro muovendolo verso sinistra. Fare attenzione a non
scottarsi con l’acqua rimasta sui fondi di caffè. Un po’ d’acqua continuerà a sgocciolare
una volta rimosso il portafiltro. Questo è dovuto alla pressione dell’acqua nel sistema.
Togliere i fondi dal filtro. Per preparare dell’altro caffè, ripetere le fasi da 4 a 8.
• 4 •
OPTIONAL
Disco “crema perfetta”(13)
Per un miglior funzionamento del Disco “crema perfetta” inserire il rompigetto
emulsionatore nella coppa portafiltro.
Si raccomanda di pulire il Disco “crema perfetta” giornalmente, prima dell’uso, per evitare che il foro di passaggio si otturi. Se necessario utilizzare uno spillo per liberare il foro.
Quando la macinatura del caffè non è corretta, l’utilizzo del disco “crema perfetta” produrrà la tipica crema dell’espresso.
N.B.:
Utilizzare il disco “crema perfetta solo
con il filtro grande per 2 tazze
Come preparare un buon
cappuccino:
Prima di iniziare a preparare il cappuccino, assicurarsi di avere tutto il necessario a portata di
mano fra cui il bricco (o tazza) riempito a metà
con latte freddo e tazze da caffelatte.
Emulsionare il latte
La densità del latte emulsionato dipenderà dal
contenuto di grassi del latte. Il tromboncino (8) (o
il montalatte pos.22) produrrà tutta l’emulsione
necessaria senza portare il latte ad ebollizione.
Con due o tre prove ed un po’ di impegno diventerete esperti nella preparazione del cappuccino. Spostare leggermente verso l’esterno il
tromboncino del vapore (o il montalatte) in modo
da inserire il bricco senza urtare la base della
macchina espresso.
Versione con tromboncino:
1 Preparare l’espresso in tazze grandi come
già specificato.
2 Posizionare l’interruttore vapore (4) su “1”.
3 Dopo 15-20 secondi e quando la spia di
raggiungimento della temperatura corretta
(3) si accenderà, collocare il bricco riempito
a metà con latte freddo sotto il tromboncino
del vapore. Vedi Fig.03
4 Ruotare lentamente la manopola del rubi-
netto di erogazione vapore (7) in senso
antiorario per far fuoriuscire il vapore.
IMPORTANTE La pressione del vapore aumenterà col ruotare della manopola.
N.B.:
Si consiglia un’erogazione massima
di 60 secondi.
5 Ruotare il bricco con movimento circolare fa-
cendo attenzione che l’estremità dell’ugello
vapore sia appena immersa nel latte quando inizierà a formarsi l’emulsione. Non portare il latte ad ebollizione.
6 Una volta ottenuta l’emulsione desiderata,
ruotare in senso orario la manopola vapore
per interrompere l’erogazione del vapore e
togliere il bricco. Posizionare l’interruttore
vapore (4) su “0”.
7 Versare il latte emulsionato nel caffè. Guarnire
con cannella, cacao, noce moscata. Servire.
8 N.B.:
per preparare subito dell’altro caffè,
riempire la caldaia con acqua per portarla
alla temperatura corretta. In caso contrario,
il caffè potrebbe sapere di bruciato.
Collocare una tazza vuota sulla griglia. Non
inserire il portafiltro. Posizionare l’interruttore acqua calda/caffè (2) su “1” facendo
riempire la tazza di acqua.
Portare l’interruttore caffè nella posizione “0”.
Potrete preparare ora dell’altro caffè.
ITALIANO
OPTIONAL
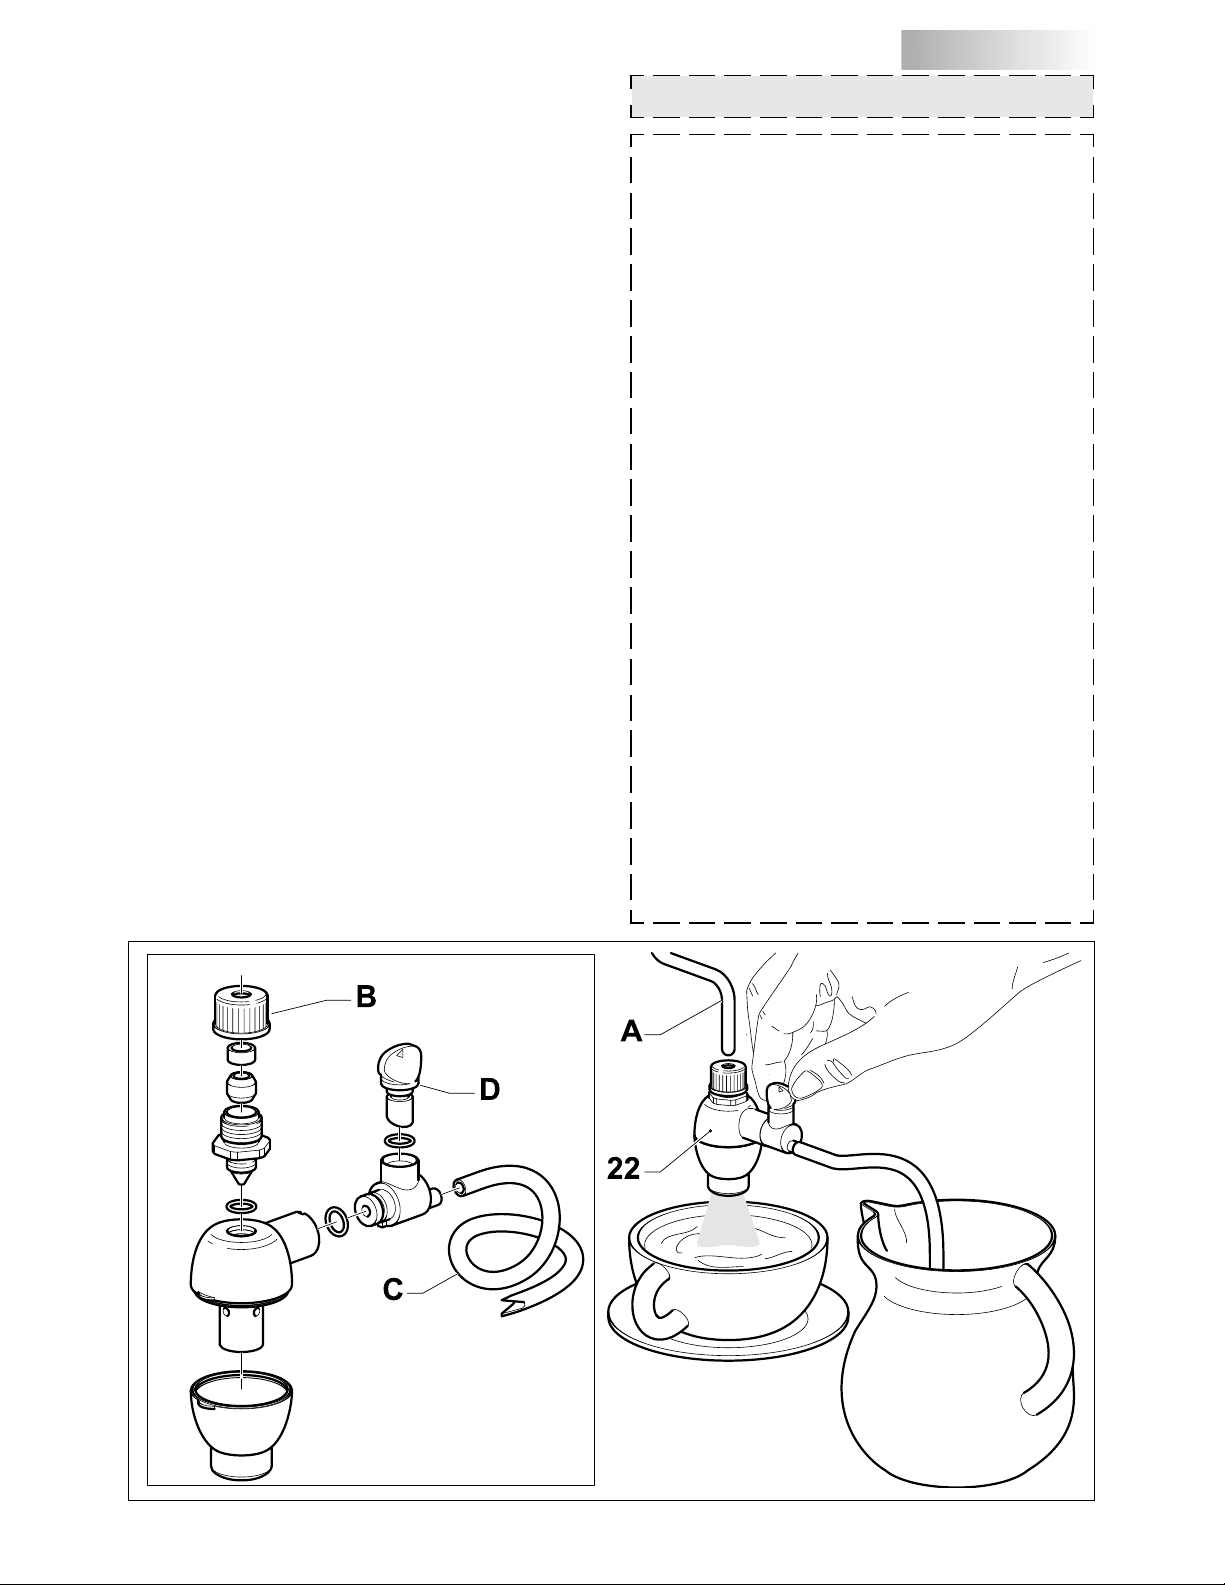
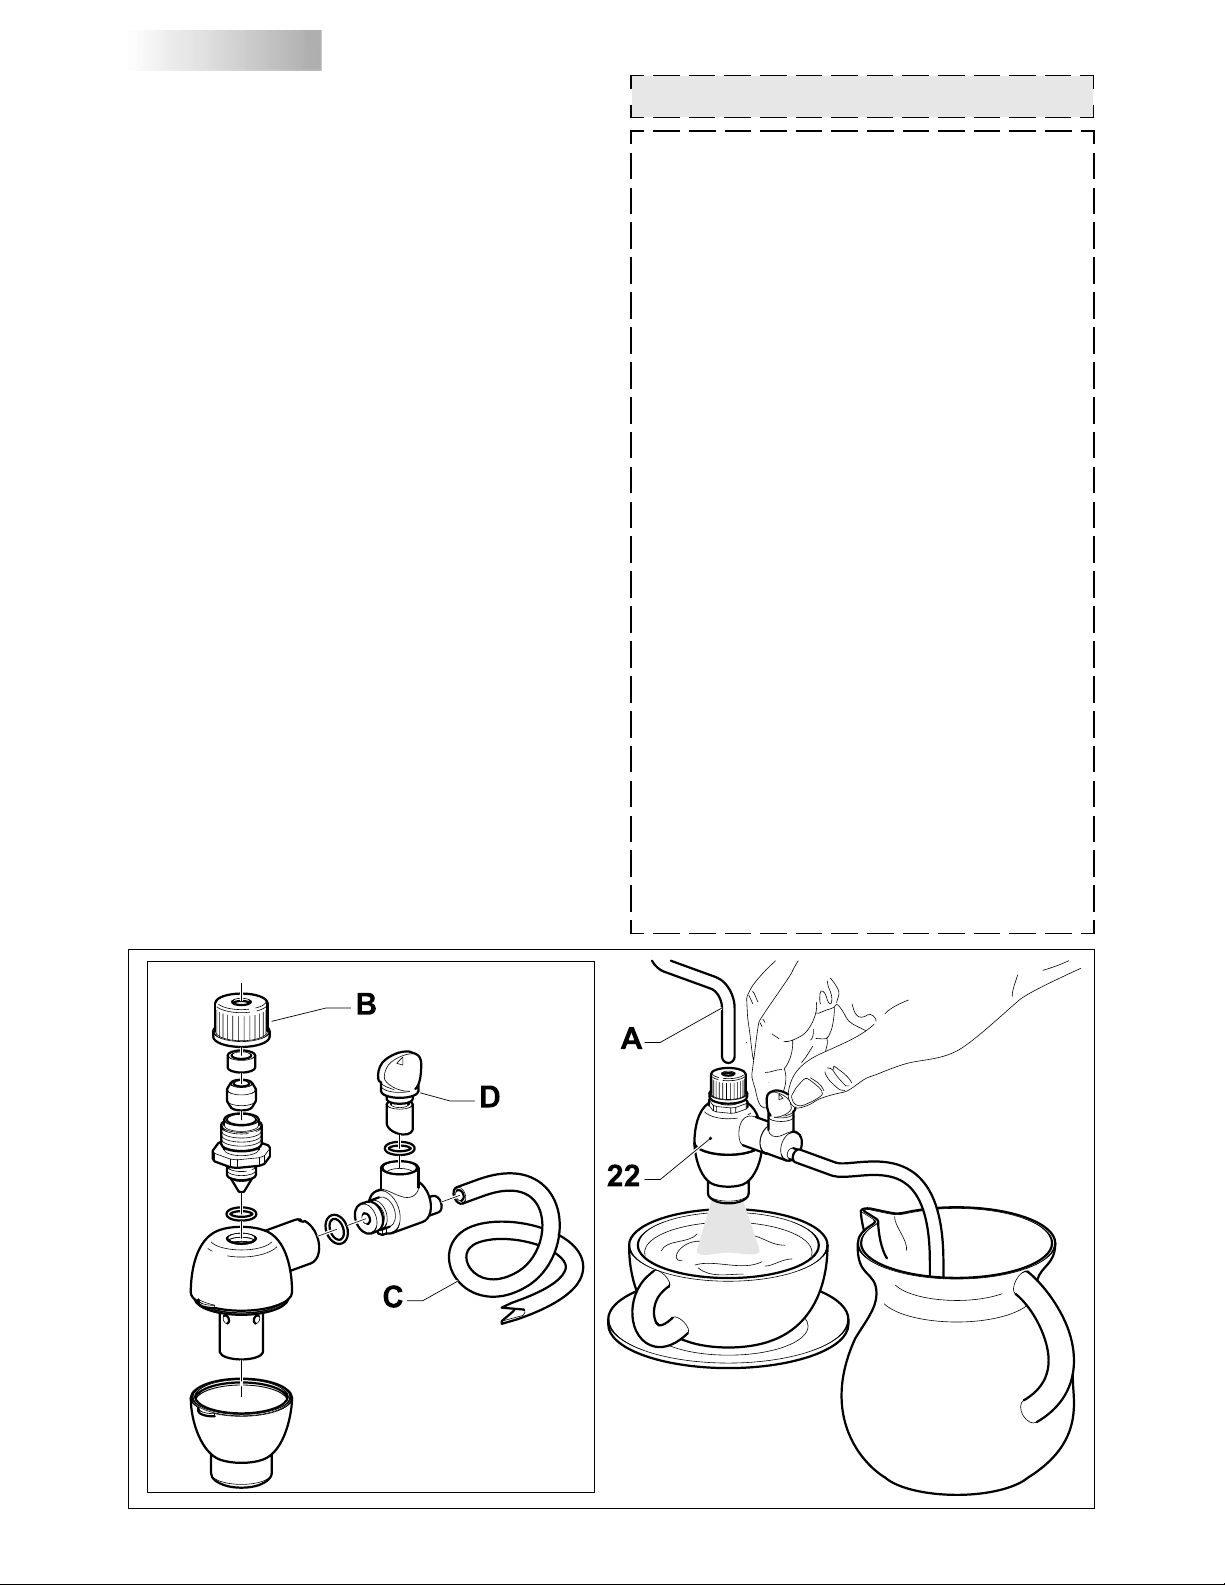
Montalatte (22)
Il montalatte (22) è uno speciale dispositivo
che permette di emulsionare il latte aspirandolo direttamente dal contenitore.
Prima di iniziare a preparare il cappuccino,
assicurarsi di avere tutto il necessario a portata di mano fra cui il contenitore del latte
freddo e tazze da caffelatte.
Verificare che il montalatte (22) sia inserito
correttamente sul tubo vapore (A) ruotando la
ghiera (B) ed inserire il tubo di aspirazione
(C) nel contenitore del latte freddo.
Tramite l’astina (D) si può regolare la quantità di latte aspirata. Nella posizione indicata
in figura l’aspirazione è massima “latte più
freddo”. Ruotando l’astina (D) di 180° si ha
l’aspirazione minima “latte più caldo”.
Emulsionare il latte con il montalatte:
1 Preparare l’espresso in tazze grandi.
2 Posizionare l’interruttore vapore (4) su “1”.
3 Dopo 10-15 secondi o quando la spia di
raggiungimento della temperatura corretta (3)
si accenderà, collocare il tubo di aspirazione
(C) nel contenitore del latte freddo e la tazza
con il caffè espresso sotto il montalatte (22).
• 5 •
ITALIANO
4 Ruotare lentamente la manopola del rubi-
netto di erogazione vapore (7) in senso
antiorario per far fuoriuscire il vapore.
IMPORTANTE
La pressione del vapore
aumenterà col ruotare della manopola.
5 Una volta ottenuta la quantità di latte desi-
derata, ruotare in senso orario la manopola vapore per interrompere l’erogazione
del vapore. Posizionare l’interruttore vapore (4) su “0”.
6 Guarnire con cannella, cacao, noce mosca-
ta. Servire.
7 N.B. Per preparare subito dell’altro caffè,
riempire la caldaia con acqua per portarla alla temperatura corretta.
In caso contrario, il caffè potrebbe sapere
di bruciato.
Collocare una tazza vuota sulla griglia.
Non inserire il portafiltro. Posizionare l’in-
terruttore acqua calda/caffè (2) su “1” facendo riempire una tazza di acqua.
Portare l’interruttore caffè nella posizione
“0”. Potrete preparare ora dell’altro caffè.
Come preparare l’acqua calda
1 Seguire la procedura descritta nel capitolo
“Preparazione”.
2 Posizionare l’interruttore principale (1) su
“1”.
3 Attendere 6 minuti per consentire alla mac-
china espresso di raggiungere la temperatura corretta.
4 Collocare un bricco sotto l’ugello vapore (8).
5 Ruotare lentamente la manopola vapore (7)
in senso antiorario e posizionare l’interruttore acqua calda/caffè su “1” per consentire
l’erogazione di acqua calda.
peratura della caldaia dalla macchina alla
temperatura corretta per la preparazione del
caffè. Si eviterà in tal modo che il caffè presenti uno sgradevole gusto di “bruciato”.
Collocare una tazza vuota sulla griglia e
non inserire il portafiltro.
Posizionare l’interruttore acqua calda/caffè
(2) su “1”. Far riempire la tazza di acqua.
Posizionare quindi l’interruttore caffè su “0”.
Procedere ora alla preparazione del caffè.
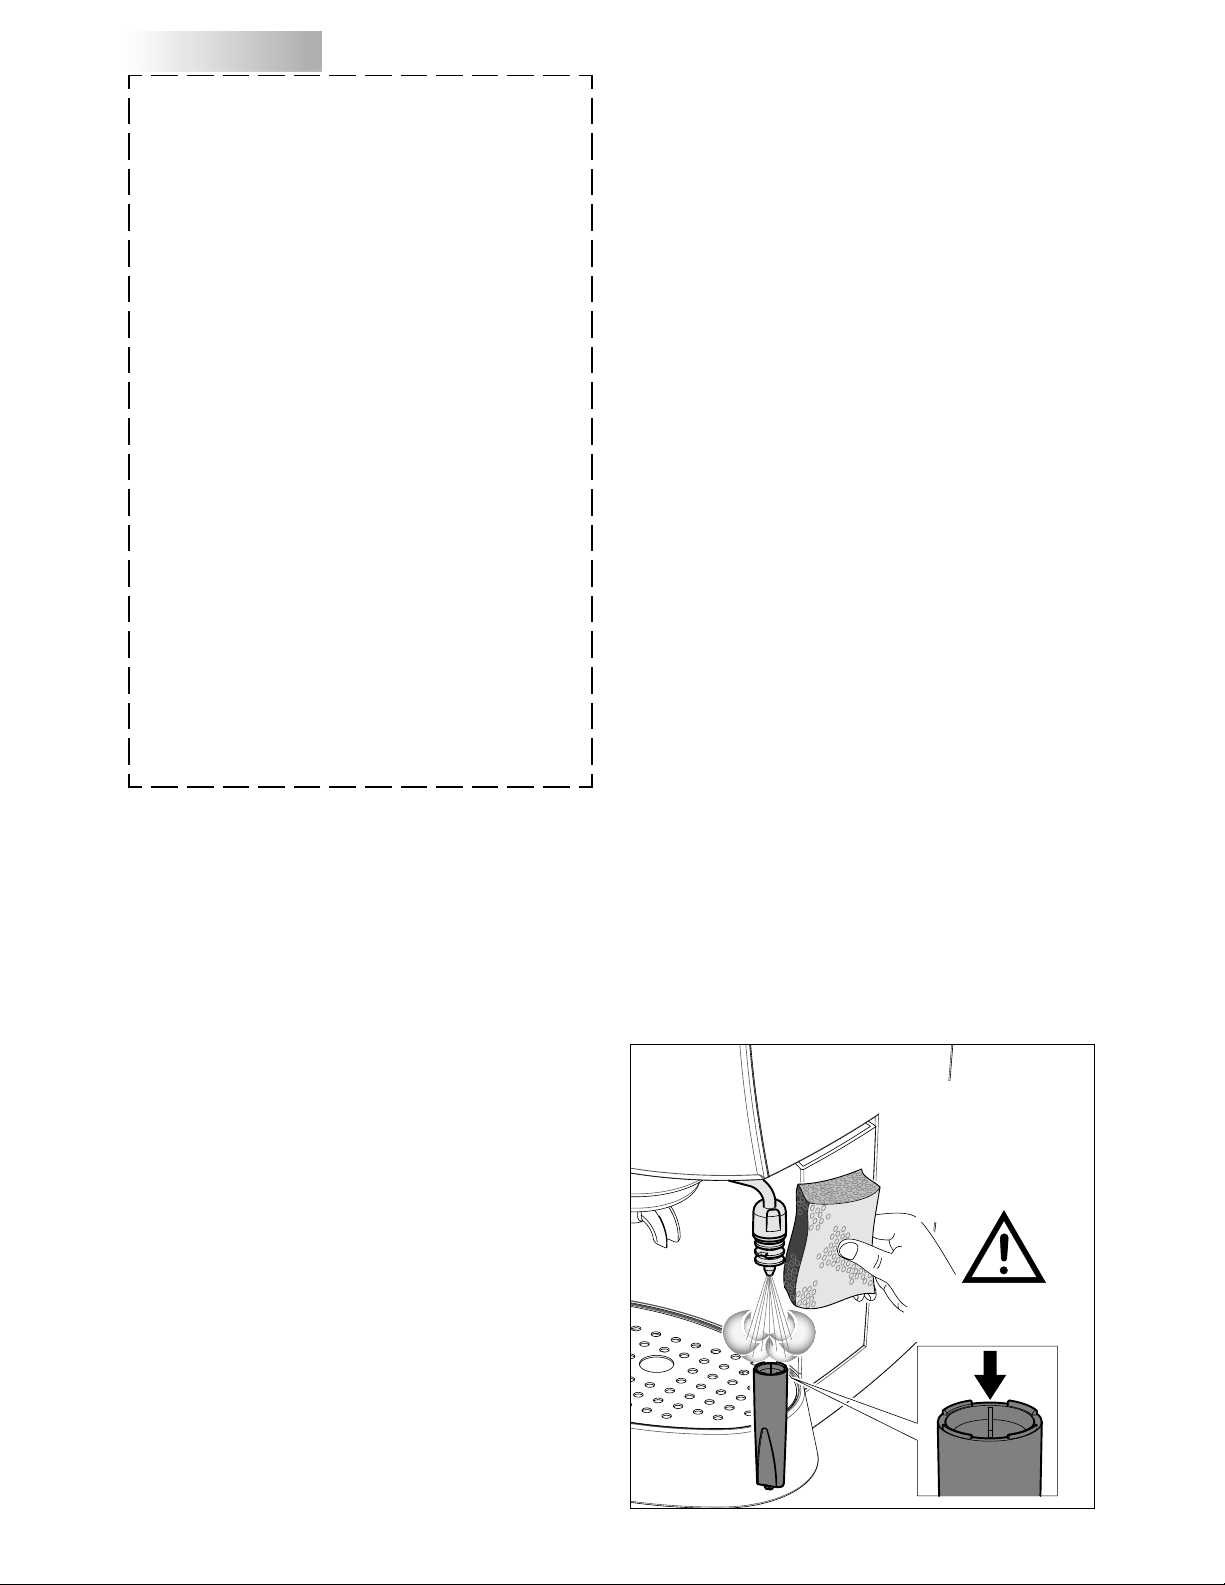
Istruzioni per la pulizia:
1 IMPORTANTE:
dopo averlo immerso nel latte per evitare di
otturare l’ugello ed il foro di presa d’aria e per
non fare indurire i depositi di latte esterni.
Per facilitare l’operazione di pulizia, come
indicato alla voce “DESCRIZIONE” la parte
esterna dell’ugello è facilmente rimovibile
tirandola verso il basso.
Utilizzare un panno umido per pulire l’estremità dell’ugello e aprire la valvola di
erogazione vapore.
Lasciare fuoriuscire il vapore per uno o due
secondi per liberare l’ugello.
Pulire l’esterno dell’ugello del vapore. Se
necessario utilizzare un ago per pulire il foro
del getto del vapore.
2 Pulire il portafiltro ed il filtro con acqua tiepi-
da e con regolarità.
Pulire l’ugello del vapore
Fare molta attenzione a
non toccare il
tromboncino vapore:
potrebbe essere
molto caldo!
N.B.:
Si consiglia un’erogazione massima
di 60 secondi.
6 Una volta ottenuta la quantità di acqua cal-
da desiderata, ruotare la manopola vapore
in senso orario e posizionare l’interruttore
acqua calda/caffè su “0” per interrompere
l’erogazione. Rimuovere quindi il bricco.
7 N.B.:
Qualora si desidera procedere alla
preparazione del caffè subito dopo
l’erogazione di acqua calda, portare la tem-
Presa d'aria da tenere
pulita e libera da residui
• 6 •

ITALIANO
• 7 •
3 Pulire il corpo macchina con un panno umido
.
4 Estrarre la vaschetta e la griglia (5, 12) e
lavarle con acqua. Non usare abrasivi.
5 Pulire la guarnizione (15) all’interno del
gruppo di erogazione caffè (14).
Mantenerla pulita.
6 Svitare e pulire periodicamente, a seconda
della frequenza d’uso, la doccetta (17).
7 Se la macchina non viene utilizzata per lun-
ghi periodi, rimuovere l’acqua nella caldaia
posizionando su “1” l’interruttore acqua calda/caffè e facendo uscire dal tromboncino
una quantità d’acqua pari a due tazze da
cappuccino.
Eseguire comunque questa operazione solo
dopo aver riempito il serbatoio con acqua
fredda. Non azionare mai la pompa senza
acqua.
8 N.B.:
E’ normale che una macchina espresso emetta vapore o sgoccioli acqua di tanto
in tanto dato che la pressione dell’acqua stessa cambia durante l’uso.
Non dimenticare di svuotare la bacinella (12).
Decalcificazione:
In località con acqua particolarmente calcarea,
il funzionamento della macchina risulterà compromesso.
Pulire ogni 2 mesi circa (a seconda dell’uso e
delle caratteristiche dell’acqua) la macchina con
l’apposito decalcificatore Gaggia (seguire le
istruzioni ivi riportate).
Estrarre la doccetta (17) e pulirla.
Versare la soluzione nel serbatoio e attivare la
pompa per 15 secondi. Far scorrere la soluzione nel gruppo di erogazione caffè e nell’ugello
vapore per alcuni secondi. Attendere 20 minuti
e poi ripetere l’operazione fino ad utilizzare
tutta la soluzione.
Risciacquare la macchina facendoci scorrere
acqua fredda. Ricollocare la doccetta (17).
N.B.:
Guasti dovuti ad accumulo di calcare
non sono coperti da garanzia. L’utente non dovrà prestare nessun altro servizio di manutenzione.
Utilizzare il decalcificante Gaggia per risultati
migliori.
Problema: Controllare :
Mancata erogazione di
caffè.
Che vi sia acqua nel serbatoio.
Che il filtro non sia otturato perché la miscela è troppo fine o il
caffè troppo pressato.
Che la doccetta sia pulita.
L’erogazione del caffè è
troppo rapida.
Che il caffè non sia stato macinato troppo grossolanamente.
Che il caffè sia stato premuto con il pressino.
La pompa fa troppo
rumore.
Che ci sia acqua nel serbatoio.
Che la pompa sia innescata.
Che il caffè non sia stato macinato troppo grossolanamente.
Eccessiva perdita di acqua
dal portafiltro.
Che il portafiltro sia stato inserito correttamente.
Che la guarnizione non sia sporca o consumata.
Che non vi siano residui di caffè sul bordo del portafiltro.
L’espresso ha poca
“crema”.
Che il caffè non sia stato macinato troppo grossolanamente.
Che il caffè sia stato premuto con il pressino.
Che il caffè non sia troppo vecchio o secco.
Il caffè è troppo freddo.
Che la macchina sia stata riscaldata (6 min.).
Che il caffè non sia stato macinato troppo grossolanamente.
Il latte non viene
emulsionato sufficientemente.
Che l’ugello vapore e/o foro di presa d’aria non siano otturati.
Che il latte non sia troppo caldo.
In caso di malfunzionamento

ENGLISH
Congratulations on your wise choice!
As the proud owner of the Gaggia machine,
you can now experience the taste of a delicious
cup of espresso or cappuccino in the comfort
of your own home.
Espresso coffee, originally created in Italy, is
made by rapidly forcing water that has been
heated to the correct brewing temperature,
through a special finely ground coffee.
The heart of the espresso machine is a precision
engineered pump.
The pump and water flow is easily controlled
with just a flick of the switch.
CAUTION:
This appliance is for household use
Any repairs or servicing operations, with the
exception of normal cleaning and maintenance
operations must be undertaken by an
authorized service centre.
1. Check voltage to be sure that the voltage
indicated on the plate agrees with your
voltage.
2. Never use warm or hot water to fill the water
tank. Use cold water only.
3. Keep your hands and the cord away from
hot parts of the appliance during operation.
4. Never clean with scouring powders or hard
implements.
5. To avoid your machine scaling up, use
purified or bottled water.
6. Do not immerse base in water.
• 8 •
SAVE THESE INSTRUCTIONS
IMPORTANT
SAFEGUARDS
When using electrical appliances, basic
safety precautions should always be
followed to reduce the risk of fire, electric
shock, and/or injury to persons,
including the following:
1 Read all instructions and information in this
instruction book and any other literature
included in this packaging referring to this
product before operating or using this
appliance.
2 Do not touch hot surfaces. Use handles or
knobs.
3 To protect against fire, electric shock and per-
sonal injury do not immerse cord, plugs, or
appliance in water or other liquid.
4 Close supervision is necessary when any
appliance is used by or near children.
5 Unplug from outlet when not in use and before
cleaning. Allow to cool before putting
on or taking off parts and before cleaning
the appliance.
6 Do not operate any appliance with a
damaged cord or plug or in the event of
appliance faults or damages. Return
appliance to the nearest authorized service
centre for examination, repair or adjustment.
7 The use of accessory attachments not
recommended by the appliance manufacturer
may result in fire, electric shock or personal injury.
8 Do not use outdoors.
9 Do not let cord hang over edge of table or
counter, or touch hot surfaces.
10 Do not place on or near a hot gas or electric
burner, or in a heated oven.
11 Always turn appliance to “0”, then plug cord
into the wall outlet. To disconnect, turn switch
to “0”, then remove plug from wall outlet.
12 Do not use appliance for other than intended
household use.
13 Use extreme caution when using hot steam.

ENGLISH
Description of parts:
FIG. 01
1 On-Off-switch/Power-on light
2 Hot water/brew switch (pump)
3 Temperature ready-light
4 Steam switch (temperature)
5 Drip plate
6 Removable water tank
7 Steam/hot water knob
8 Turbo frother steam nozzle
(removeable)
9 Filterholder
10 1 cup filter (or coffee pod)
11 2 cup filter
12 Drip tray
13 “Perfect crema” device
14 Brewing head
15 Filterholder gasket
16 Shower disc holder
17 Shower disc
18 Tamper
19 Power cable and plug
20 Measuring spoon
21 Delivery spout
22 Milk frother (removeable)
Instructions for the power supply cord
A A short power-supply cord is provided to
reduce risks of getting tangled up or tripping
over a longer cord.
B Longer extension cords are available and
may be used if care is exercised in their use.
C If a long extension cord is used:
1 the marked electrical rating of the extension
cord should be at least as great as the
electrical rating of the appliance.
2 if the appliance is of the grounded type, the
extension cord should be a grounding type
3 the cable does not hang from the table to
avoid the risk of getting caught up in it.
Preparation:
1. Remove the water tank (6) and fill with cold
water. See FIG. 02.
IMPORTANT:
Once the tank has been
reinserted, ensure that the silicon pipes are
inside the actual tank and not tangled or
blocked.
2. Insert plug (19) into a suitable wall outlet
(see point 1 under “Caution”).
3. Turn the power switch (1) to “1”. The power-
on indicator light will light up.
Make certain that the hot water/coffee switch
(2) and that the steam switch (4) are in the
“0” position.
Starting up
This procedure fills the water boiler with fresh
water.
This should be done whenever the machine is
switched on.
This machine, featuring a pump to brew coffee,
is equipped with a self-priming system. Place
an empty cup under the brewing head (14), do
not insert filter holder and press hot water/
coffee switch (2) (pos. “1”).
You will hear the sound of the operating pump
and after few seconds, water will start to escape
from the brewing head (14).
• 9 •
ENGLISH
Once cup is filled, set coffee switch (2) onto
pos “0”.
The Gaggia machine is now ready to be used.
NOTE: It may happen that the self-priming
feature of the pump fails to work temporarily
due to an air lock.
In this case water does not flow from brewing
head (14), and the following procedure should
be followed:
a) Place a small frothing pitcher or mug under
the steam nozzle (8).
b) Turn the steam knob (7) counter-clockwise
to open the steam/hot water valve, and turn
the steam switch (4) and the hot water/brew
(2) to “1” to activate the pump.
c) Alter a few seconds, a steady stream of
water will emerge from the steam
nozzle.Allow about one cup of water to fill
the pitcher. Shut the steam/hot water valve
and turn hot water/brew switch and the
steam switch (4) to “0”.
The Gaggia machine is now ready to be used.
d) NOTE: T
he temperature ready-light (3) will
automatically flash as the machine boiler
heats.
After switching on the machine for the first
coffee, wait 6 minutes until the machine has
fully heated up, while for all subsequent
coffees the machine will be ready to use.
Another feature of the machine is the “no-drip
system”, eliminating most of dripping from
brewing head (14). After coffee brewing,
however, a little dripping may occur due to wet
coffee grinds in the filter-holder.
Important to know……
1. The taste of your coffee depends on the
characteristics of the beans from which it is
made, the type of bean, where it was grown
and processed. The coffee beans that are
roasted for a longer period of time and at
higher temperatures will be much darker in
colour.Darker beans will produce a richer
cup of coffee than the lightly-roasted beans.
2. A variety of dark roasts are available from
which you can choose to brew your espresso. Each of these roasts is a blend of coffee
beans that are roasted at a specific temperature producing a specific type of
flavour.There are decaffeinated beans that
have up to 98% of the caffeine content
removed. The next time you purchase coffee
for your espresso maker, experiment with
one of the many kinds of coffee being sold.
You may just find that it tastes better than
the blend you have been using.
3. A fine “espresso grind” for pump-driven
machines must be used. Be sure to ask for
this when buying coffee or when having
beans ground. Do not use a blade-type
grinder because it makes too much coffee
dust and produces an irregular grind.
4. The mark of real espresso is its dark color,
rich taste and the light brown, natural froth
called “crema” in Italian.
5. Cappuccino is simply a combination of
espresso and hot, frothy milk.Cappuccino
is usually topped with cinnamon, nutmeg or
cocoa powder.
6. Espresso Coffee should be served
immediately after it is made.
7. Espresso is served in 2 to 2 ½ oz. demitasse
cups. A 4 or 6 oz. cup or glass is used for
cappuccino
8. Ideally, coffee beans should be ground
immediately before using. Remember, it must
be an “espresso grind” for pump-driven espresso machines.
9. It’s best to store ground coffee or beans in
an airtight container in the freezer of your
refrigerator. Ground coffee tends to absorb
food odours.
• 10 •
Caution: Never operate pump
without water in machine as damage
to the pump may occur.Damage of
pump run without water is not covered by
warranty.

ENGLISH
How to make a good Espresso coffee:
1 Follow the procedure described under
“Preparation”.
2 Select the correct filter basket (10 or 11) and
insert it in the filter holder (9).
Use the small filter for 1 cup and the large
filter for 2 cups of espresso.
Then insert the filter holder (9) into the
brewing head (11) to warm-up
3 Wait until the machine has reached the correct
temperature with filter holder inserted
(heating time of about 6 minutes).
Use this time to set table, prepare cups,
coffee, milk, etc
4 After the warm-up period, remove the warm
filter-holder (9) from the brewing head and
fill with correctly ground espresso coffee using
the measuring spoon provided.
Place one level measure of coffee in basket
for each cup of espresso. Do not overfill.
Gently tamp down coffee with the tamper
(18) provided. Do not compress too firmly.
5 Clean any excess coffee from the rim of filter
holder (9). Insert filter holder into brew head
by holding handle approximately 45
degrees to the left as you face machine. When
properly aligned,move handle firmly to the
right to lock into position.
The handle should point to the front of the
machine or slightly to the right.
6 Place one or two espresso cups on the drip
plate to line up with the spouts of the filter holder.
Depress hot water/brew switch (2) to pos. “1”.
Espresso will start to flow into cups.
7 When cups are 3/4 full, release brew switch
to “0”. The more water you allow to flow, the
weaker the coffee. When properly made, the
espresso will have a light brown foam “crema” floating on the top.
If not, refer to “In the event of faulty
function”.
8 Remove cups and serve.
9 To make more espresso, carefully and slowly
remove the filter holder by moving handle to
the left. Be careful as hot water will be on top
of the coffee grinds in the holder. Some water
will continue to drip from brewing head as
filter holder is removed. That is normal and
due to the pump pressure in the system.
Knock out used coffee grinds from filter. For
more espresso repeat steps 4 to 8 above
Preparing cappuccino:
When preparing to make a cappuccino, have
all of the ingredients at hand as well as a
frothing pitcher (or mug) halffilled with skimmed
or low-fat milk and cups that are larger (6 oz.)
than those used for espresso.
Frothing Milk:
The higher the fat content in the milk the denser
the froth will be. The Turbo-Frother (8) or milk
frother (22) will give you all the froth required
but don’t let milk come to a boil.
It may require two or three attempts to “become
an expert” but you will be successful at frothing
milk if you give it a chance. Swivel the TurboFrother steam nozzle (or milk frother) slightly
outward so that you can get the frothing pitcher
under the nozzle without knocking the base of
the machine.
Turbo frother steam nozzle version:
1 Make espresso (in a large cups) as described
above
2 Position steam switch (4) to “1”.
3 After 15 to 20 seconds or, when temperature
ready-light (3) goes on, place the frothing
pitcher halffilled with low-fat milk under Tur-
bo Frother steam nozzle so that tip is just
under the surface of the milk. See Fig.03.
• 11 •
OPTIONAL
“Perfect crema” device (13)
To ensure the optimum function of the “Perfect
cream” device, insert the frothing jet device
into the filter holder.
We recommend that the “Perfect cream”
device be cleaned on a daily basis, before
use, in order to prevent any blockage of the
delivery holes. A pin may be used to clean
out the hole.
Even if the type of coffee grinding is not correct
the use of the “Perfect cream” device will produce the typical creamy froth of an espresso
coffee.
N.B.:
Only use the “perfect cream device with
a large 2-cup filter
.
ENGLISH
4 Slowly turn steam valve knob (7) counter
clockwise to release steam.
OPTIONAL
IMPORTANT.
The more you turn the knob,
the greater the steam pressure for frothing.
N.B.:
Dispensing should not exceed 60
seconds.
5 Move pitcher in circular motion keeping the
tip of steam nozzle just under surface of milk
as it begins to froth. Do not let milk come to
a boil since it will not froth.
6 When you have made enough froth,turn steam
knob clockwise to shut off steam and remove
pitcher. Put steam switch (4) to pos. “0”.
7 Spoon the froth onto the espresso in each
cup and gently pour the hot milk along the
side of the cup. Top each cup of cappuccino with a dash of cinnamon, cocoa and
nutmeg. Serve.
8 NOTE:
If you want to make more espresso
immediately after steaming milk, the machine
boiler must be refilled with water and temperature brought down to a brewing temperature. Otherwise, espresso may taste “burned”.
To do this: place an empty cup on drip plate.
Do not insert filter holder. Turn hot water/
brew switch (4) to “1” letting cup fill with
water. Turn brew switch “0”. You many now
proceed to make more espresso.
Milk frother (22)
The milk frother (22) is a special device that
allows an easy frothing by sucking milk
directly out from its container.
When preparing to make cappuccino, have
all the ingredients at hand as well as a
container of cold milk and cups that are larger
than those used for espresso.
Make sure that the milk frother (22) is correctly
mounted on the steam nozzle (A) by turning
the ring nut (B), and place the suction pipe (C)
into the cold milk container.
It is possible to adiust the amount of milk that
is sucked up by means of the bar (D). The
position that is shown in the picture indicates
the maximun suction, milk is lukewarm. By
turning the bar (D) 180°, the minimum suction
is set,and milk is warmer.
Milk frother version:
1 Make espresso (in large cups) as described
above.
2 Depress steam switch (4) to “1”.
3 After 10 to 15 seconds or when the tempe-
rature ready-light (3) goes on, place the
suction pipe (C) into the cold milk container
and the cup containing the espresso under
the milk frother (22) .
• 12 •

4 Slowly turn steam valve knob (7) counter
clockwise to release steam.
IMPORTANT:
The more you turn the
knob, the greater the steam pressure for
frothing.
5 When you have made enough froth, turn
steam knob clockwise to shut off steam.
Put steam switch (4) to “0” position.
6 Top each cup of cappuccino with a dash
of cinnamon, cocoa, nutmeg. Serve.
7 NOTE: If you want to make more espres-
so immediately after steaming milk, the
machine boiler must be refilled with water
and temperature brought down to a
brewing temperature.
Otherwise, espresso may taste “burned”.
To do this: place an empty cup on the drip
plate.
Do not insert filter holder.
Turn hot water/brew switch (2) to “1”
letting cup fill with water.
Turn brew switch “0”.
You may now proceed to make more
espresso.
ENGLISH
To do this: place an empty cup on drip plate.
Do not insert filter holder. Turn hot water/
brew switch (2) to “1” letting cup fill with
water. Turn brew switch “0”.
You may now proceed to make espresso.
Keeping it clean:
1 IMPORTANT:
cleaned after each use in order to avoid build
up of milk deposits that are very difficult to
clean. Cleaning is made easy as can be seen
in the DESCRIPTION OF PARTS. The outer
part of nozzle can be removed by pulling
downward.
The outside of the steam pipe can be cleaned
with a damp cloth.
the steam nozzle should be
Making hot water:
1. Follow the procedure described under
“Preparation”.
2. Turn the power switch (1) to “1”.
3. Allow about 6 minutes for the machine to reach
its proper operating temperature.
4. Place a pitcher under the steam nozzle (8).
5 Slowly turn steam valve knob (7) counter
clockwise and turn the hot water/brew switch
to “1” to release hot water.
N.B.:
seconds.
6 When you have prepared the desired
quantity of hot water, turn steam knob
clockwise and hot water/brew switch to “0”
to shut off hot water and remove pitcher.
7 NOTE:
immediately after making hot water, the temperature of the machine boiler must be
brought down to a brewing temperature.
Otherwise, espresso may taste “burned”.
Dispensing should not exceed 60
If you want to make espresso
The steam jet is cleaned by running a shot of
steam through it.
The hole in the steam nozzle must be kept
open. A needle may be used.
2 Clean filter holder and filter in warm water
after use.
Pay attention as the
Turbo-Frother
steam nozzle
could be hot!
Air intake to be kept
clean and free from
residues.
• 13 •

ENGLISH
14
3 Wipe body of machine with a damp cloth as
required.
4 Remove drip tray and plate (5-12) and wash
in warm soapy water. Do not use abrasive
substances.
5 Clean the seal (15) inside of the brewing
head (14) and keep it clean.
6 The shower disc (17) should be unscrewed
and cleaned periodically depending on
frequency of use.
7 After long periods of non-use, drain stale
water from machine by turning hot water/
coffee switch to 1. However, do this only
after you have filled tank with fresh water.
Never operate pump unless there is water
in tank.
8 NOTE: It is very normal for an espresso
machine to emit steam and drip occasionally
as the water pressure changes during use.
Be certain to empty drip tray (12) as
required,
Descaling:
In hard water areas, minerals found in the water
will accumulate and affect operation of the unit.
Approximately every two months (this can vary
depending on use and water condition), clean
the machine with Gaggia descaler (in which
case follow the instructions on the packet).
Remove shower disc (17) and clean.
Pour solution into tank and turn on pump for
15 seconds. Allow solution to flow through
brewing head and steam nozzle for several
seconds. Wait 20 minutes, then repeat. process
until solution has been run through.
Rinse machine thoroughly by running plain cold
water through machine. Replace shower disc
(17).
NOTE: Product failure due to scale
accumulation is not covered by warranty. No
other servicing should be attempted by the user.
Use Gaggia cleaner for best results.
Problem: Check to ensure against the following:
Coffee does not flow. Water is in tank.
Filter basket clo
gg
ed because coffee is too fine or compressed
too firmly.
Shower disc re
q
uires cleaning.
Coffee flows too
q
uickly. Coffee is ground too coarsely.
Coffee is not
p
ressed down with tamper.
Pum
p
makes loud noise. No water in tank.
Pum
p
not primed.
Coffee is
g
round too coarsely.
Water leakin
g
excessivel
y
from filter holder.
Filter holder not properly inserted in brew head.
Gasket in brewin
g
head dirty or worn.
Coffee
g
rinds not cleaned off the rim of filter holder.
Es
p
resso has little cream
y
froth.
Coffee is
g
round too coarsely.
Coffee is not
p
ressed down with tamper.
Coffee is too old or dried out.
Es
p
resso is too cold. Machine is not warmed up (6 min).
Coffee is
g
round too coarsely.
Not enou
g
h milk froth. Steam nozzle and/or air intake hole clogged.
Milk is too hot.
In the event of faulty function
DEUTSCH
• 15 •
Wir gratulieren Ihnen zu Ihrer Wahl!
Dank der Maschine können Sie jetzt bequem
zu Hause einen köstlichen Espresso oder Cappuccino trinken.
Den original italienischen Espresso bereitet man
zu, indem man schnell unter Druck gesetztes und
auf die richtige Temperatur erhitztes Wasser
durch eine fein geröstete Kaffeemischung filtern
lässt.
Das Mittelteil der Espressomaschine besteht aus
einer Hochpräzisionspumpe.
Pumpen- und Wasserzufluss können über einen
Schalter eingestellt werden.
HINWEISE:
Diese Espressomaschine wurde ausschliesslich
für den Haushalt entwickelt.
Wartungseingriffe oder Reparaturen müssen
von einem befugten Kundendienst erfolgen. Das
gilt nicht für Reinigungs- oder ordentliche
Wartungsarbeiten.
1. Sicherstellen, dass die auf dem Datenschild
des Geräts angegebene Spannung mit der
Ihres Netzanschlusses übereinstimmt.
2. Nie lauwarmes oder heisses Wasser in den
Wasserbehälter füllen. Ausschliesslich kaltes
Wasser verwenden.
3. Während des Betriebs nie die heissen Teile
oder das Netzkabel der Maschine berühren.
4. Keine Schleif- oder Scheuermittel zum
Reinigen verwenden.
5. Zur Vermeidung von Kalkablagerungen
kohlesäurefreies Mineralwasser verwenden.
6. Das Gerät nicht in Wasser tauchen.
DIESE ANWEISUNGEN GUT
AUFBEWAHREN
Bei der Verwendung von Elektrogeräten
empfiehlt es sich, sich an einige
Vorsichtsmassnahmen zu halten, um die
Gefahr von Brand, elektrischen Schlägen
und Unfällen einzuschränken.
1 Alle, in diesem oder jedem anderen in der
Verpackung enthaltenen Heft, angegebenen
Anweisungen und Informationen aufmerksam
durchlesen, ehe die Espressomaschine
eingeschaltet oder benutzt wird.
2 Keine heissen Flächen berühren.
3 Netzkabel, Stecker oder den
Maschinenkörper nicht in Wasser oder andere
Flüssigkeit tauchen, um Brand, elektrische
Schläge oder Unfälle zu vermeiden.
4 Im Beisein von Kindern die Espressomaschine
mit besonderer Vorsicht handhaben.
5 Den Stecker aus der Steckdose ziehen, sobald
die Maschinen nicht mehr benutzt wird oder
während der Reinigung. Bevor Teile entnommen
oder eingesetzt werden, sowie vor der
Reinigung, die Maschine abkühlen lassen.
6 Keine kaputten, defekten oder Geräte mit
beschädigtem Netzkabel oder -Stecker
verwenden. Das schadhafte Gerät beim
nächsten Händler oder Kundendienst prüfen,
reparieren oder neu einstellen lassen.
7 Die Verwendung nicht vom Hersteller
empfohlenen Zubehörs kann Brand,
elektrische Schläge oder Unfälle verursachen.
8 Die Espressomaschine nicht im Freien
verwenden.
9 Das Kabel darf nicht vom Tisch herunterhangen
oder heisse Flächen berühren.
10 Die Espressomaschine nicht in der Nähe von
heissen Küchenherden oder Backöfen
verwenden.
11 Prüfen, ob die Espressomaschine sich in „0“
Stellung befindet, ehe man den Stecker
einsteckt. Zum Ausschalten auf „0“ stellen,
dann den Stecker aus der Steckdose ziehen.
12 Die Maschine nur im Haushalt verwenden.
13 Bei Verwendung von heissem Dampf mit
äusserster Vorsicht verfahren.
WICHTIGE
VORSICHTSMASSNAHMEN
 Loading...