


ISTRUZIONI PER L'USO OPERATING INSTRUCTIONS BEDIENUNGSANLEITUNG MODE D'EMPLOI INSTRUCCIONES DE USO INSTRUÇÕES DE USO GEBRUIKSAANWIJZING BRUKSANVISNING BRUKSANVISNING KÄYTTÖOHJEET BRUGSANVISNING ΟΔΗΓΙΕΣ ΧΡΗΣΗΣ
LEGGERE ATTENTAMENTE QUESTE ISTRUZIONI D'USO PRIMA DI UTILIZZARE LA MACCHINA.
READ THESE INSTRUCTIONS CAREFULLY BEFORE USING THE MACHINE.
DIESE BEDIENUNGSANLEITUNG IST VOR DEM GEBRAUCH DER MASCHINE AUFMERKSAM ZU LESEN.
LIRE ATTENTIVEMENT CETTE NOTICE AVANT D’UTILISER LA MACHINE.
LEER ATENTAMENTE ESTAS INSTRUCCIONES DE USO ANTES DE UTILIZAR LA MÁQUINA. LEIA ATENTAMENTE ESTAS INSTRUÇÕES DE USO ANTES DE UTILIZAR A MÁQUINA.
LEES DEZE GEBRUIKSAANWIJZING AANDACHTIG ALVORENS DE MACHINE TE GEBRUIKEN. LÄS NOGA IGENOM BRUKSANVISNINGEN INNAN DU BÖRJAR ANVÄNDA MASKINEN.
LES DENNE BRUKSANVISNINGEN NØYE FØR DU BRUKER MASKINEN.
LUE NÄMÄ KÄYTTÖOHJEET HUOLELLISESTI ENNEN KEITTIMEN KÄYTTÖÖNOTTOA. LÆS OMHYGGELIGT DISSE ANVISNINGER INDEN MASKINEN TAGES I BRUG.
ΠΡΙΝ ΧΡΗΣΙΜΟΠΟΙΗΣΕΤΕ ΤΗ ΜΗΧΑΝΗ, ΔΙΑΒΑΣΤΕ ΠΡΟΣΕΚΤΙΚΑ ΑΥΤΕΣ ΤΙΣ ΟΔΗΓΙΕΣ ΧΡΗΣΗΣ.
Ελληνικά Dansk Suomi Norsk Svenska Nederlands Português Español Français Deutsch English Italiano

1 |
|
|
2 |
|
3 |
|
|
|
4 |
|
5 |
|
6 |
||||||||||
|
|
|
|
|
|
|
|
|
|
|
|
|
|
|
|
|
|
|
|
|
|
|
|
|
|
|
|
|
|
|
|
|
|
|
|
|
|
|
|
|
|
|
|
|
|
|
|
|
|
|
|
|
|
|
|
|
|
|
|
|
|
|
|
|
|
|
|
|
|
|
|
|
|
|
|
|
|
|
|
|
|
|
|
|
|
|
|
|
|
|
|
|
|
|
|
|
|
|
|
|
|
|
|
|
|
|
|
|
|
|
|
|
|
|
|
|
|
|
|
|
|
|
|
|
|
|
|
|
|
|
|
|
|
|
|
|
|
|
|
|
|
|
|
|
|
|
|
|
|
|
|
|
|
|
|
|
|
|
|
|
|
|
|
|
|
|
|
|
|
|
|
|
|
|
|
|
|
|
|
|
|
|
|
|
|
|
|
|
|
|
|
|
|
|
|
|
|
|
|
|
|
|
|
|
|
|
|
|
|
|
|
|
|
|
|
|
|
|
|
|
|
|
|
|
|
|
|
|
|
|
|
|
|
|
|
|
|
|
|
|
|
|
|
|
|
|
|
|
|
|
|
|
|
|
|
|
|
|
|
|
|
|
|
|
|
|
|
|
|
|
|
|
|
|
|
|
|
|
|
|
|
|
|
|
|
|
|
|
|
|
|
|
|
|
|
|
|
|
|
|
|
|
|
|
|
|
|
|
|
|
|
|
|
|
|
|
|
|
|
|
|
|
|
|
|
|
|
|
|
|
|
|
|
|
|
|
|
|
|
|
|
|
|
|
|
|
|
|
|
|
|
|
|
|
|
|
|
|
|
7 |
|
8 |
|
9 |
|
10 |
13 


14 

11
15 


12
197
17


 21
21
16 18 20
40 cm 16 in
20 cm
8 in
20 cm
8 in
|
20 cm |
20 cm |
8 in |
8 in |
|
Fig. - Abb. - Afb. - Rys. - Kuva. - Εικ. (A) Fig. - Abb. - Afb. - Rys. - Kuva. - Εικ. (B)
• 2 •

Fig. - Abb. - Afb. - Rys. - Kuva. - Εικ. (1) |
Fig. - Abb. - Afb. - Rys. - Kuva. - Εικ. (4) |
Fig. - Abb. - Afb. - Rys. - Kuva. - Εικ. (7) |
Fig. - Abb. - Afb. - Rys. - Kuva. - Εικ. (10) |
Fig. - Abb. - Afb. - Rys. - Kuva. - Εικ. (2)
Fig. - Abb. - Afb. - Rys. - Kuva. - Εικ. (5) |
Fig. - Abb. - Afb. - Rys. - Kuva. - Εικ. (8) |
Fig. - Abb. - Afb. - Rys. - Kuva. - Εικ. (3) |
Fig. - Abb. - Afb. - Rys. - Kuva. - Εικ. (6) |
Fig. - Abb. - Afb. - Rys. - Kuva. - Εικ. (9)
Fig. - Abb. - Afb. - Rys. - Kuva. - Εικ. (11) |
Fig. - Abb. - Afb. - Rys. - Kuva. - Εικ. (12) |
• 3 •

Fig. - Abb. - Afb. - Rys. - Kuva. - Εικ. (13)
Fig. - Abb. - Afb. - Rys. - Kuva. - Εικ. (16) |
Fig. - Abb. - Afb. - Rys. - Kuva. - Εικ. (19) |
Fig. - Abb. - Afb. - Rys. - Kuva. - Εικ. (22) |
• 4 •
Fig. - Abb. - Afb. - Rys. - Kuva. - Εικ. (14) |
Fig. - Abb. - Afb. - Rys. - Kuva. - Εικ. (17) |
Fig. - Abb. - Afb. - Rys. - Kuva. - Εικ. (20) |
Fig. - Abb. - Afb. - Rys. - Kuva. - Εικ. (23)
Fig. - Abb. - Afb. - Rys. - Kuva. - Εικ. (15) |
Fig. - Abb. - Afb. - Rys. - Kuva. - Εικ. (18) |
Fig. - Abb. - Afb. - Rys. - Kuva. - Εικ. (21) |
Fig. - Abb. - Afb. - Rys. - Kuva. - Εικ. (24) |

Fig. - Abb. - Afb. - Rys. - Kuva. - Εικ. (25) |
Fig. - Abb. - Afb. - Rys. - Kuva. - Εικ. (28) |
Fig. - Abb. - Afb. - Rys. - Kuva. - Εικ. (31) |
Fig. - Abb. - Afb. - Rys. - Kuva. - Εικ. (34) |
Fig. - Abb. - Afb. - Rys. - Kuva. - Εικ. (26) |
Fig. - Abb. - Afb. - Rys. - Kuva. - Εικ. (29) |
Fig. - Abb. - Afb. - Rys. - Kuva. - Εικ. (32) |
Fig. - Abb. - Afb. - Rys. - Kuva. - Εικ. (35) |
Fig. - Abb. - Afb. - Rys. - Kuva. - Εικ. (27) |
Fig. - Abb. - Afb. - Rys. - Kuva. - Εικ. (30) |
Fig. - Abb. - Afb. - Rys. - Kuva. - Εικ. (33) |
Fig. - Abb. - Afb. - Rys. - Kuva. - Εικ. (36)
• 5 •

1 GENERALITÀ
La macchina per caffè è indicata per la preparazione di 1 o 2 tazze di caffè espresso ed è dotata di un tubo orientabile per l’erogazione del vapore e dell’acqua calda. I comandi sulla parte frontale dell’apparecchio sono contrassegnati con simboli di facile interpretazione.
La macchina è stata progettata per uso domestico e non è indicata per un funzionamento continuo di tipo professionale.
Attenzione. Non si assumono responsabilità per eventuali danni in caso di:
•Impiego errato e non conforme agli scopi previsti;
•Riparazioni non eseguite presso centri d’assistenza autorizzati;
•Manomissione del cavo d'alimentazione;
•Manomissione di qualsiasi componente della macchina;
•Impiego di pezzi di ricambio e accessori non originali;
•Mancata decalcificazione e stoccaggio in locali al di sotto di 0°C.
In questi casi viene a decadere la garanzia.
1.1 Per facilitare la lettura
Il triangolo d’avvertimento indica tutte le istruzioni importanti per la sicurezza dell’utente. Attenersi
scrupolosamente a tali indicazioni per evitare ferimenti gravi!
Il riferimento ad illustrazioni, parti dell’apparecchio o elementi di comando, ecc. è indicato da numeri o lettere; in questo caso si rimanda all’illustrazione.
Questo simbolo evidenzia le informazioni da tenere in maggiore considerazione, per un mi-
gliore utilizzo della macchina.
Le illustrazioni corrispondenti al testo si trovano nelle prime pagine del manuale. Consultare queste pagine durante la lettura delle istruzioni per l’uso.
1.2 Impiego di queste istruzioni per l’uso
Conservare queste istruzioni per l’uso in un luogo sicuro e allegarle alla macchina per caffè qualora un’altra persona dovesse utilizzarla.
Per ulteriori informazioni o nel caso di problemi, rivolgetevi ai centri assistenza autorizzati.
2 DATI TECNICI
Il costruttore si riserva il diritto di modificare le caratteristiche tecniche del prodotto.
Tensione nominale - Potenza nominale - Alimentazione Vedi targhetta posta sull’apparecchio
Materiale corpo
Plastica
Dimensioni (l x a x p) (cm)
210 x 300 x 280
Peso
3,9 kg
Lunghezza cavo
1,2 m
Pannello di comando
Sulla parte frontale
Portafiltro
Pressurizzato
Pannarello
Speciale per cappuccini
Serbatoio acqua
1,25 litri - Estraibile
Pressione pompa
15 bar
Caldaia
Inox
Dispositivi di sicurezza
Termostato a riarmo manuale
Termofusibile
3 NORME DI SICUREZZA
Mai mettere a contatto dell’acqua le parti sotto corrente: pericolo di cortocircuito! Il vapore surriscaldato e l’acqua calda possono provocare scottature! Mai dirigere il getto di vapore o dell’acqua calda verso parti del corpo, toccare con precauzione il beccuccio vapore / acqua calda: pericolo di scottature!
Destinazione d’uso
La macchina per caffè è prevista esclusivamente per l’impiego domestico. È vietato apportare modifiche tecniche e ogni impiego illecito, a causa dei rischi che essi comportano! L’apparecchio non è destinato ad essere utilizzato da persone (compresi i bambini) con ridotte capacità fisiche, mentali o sensoriali o con esperienza e/o competenze insufficienti, a meno che non
• 6 •

siano sotto la supervisione di una persona responsabile della loro sicurezza o non vengano da essa istruite sull’uso dell’apparecchio.
Alimentazione di corrente
Collegare la macchina per caffè soltanto ad una presa di corrente adeguata. La tensione deve corrispondere a quella indicata sulla targhetta dell’apparecchio.
Cavo d’alimentazione
Mai usare la macchina per caffè se il cavo d’alimentazione è difettoso. Se il cavo d’alimentazione è danneggiato, deve essere cambiato dal produttore o dal suo servizio assistenza clienti. Non far passare il cavo d’alimentazione per angoli e su spigoli vivi, sopra oggetti molto caldi e proteggerlo dall’olio.
Non portare o tirare la macchina per caffè tenendola per il cavo. Non estrarre la spina tirandola per il cavo oppure toccarla con le mani bagnate.
Evitare che il cavo d’alimentazione cada liberamente da tavoli o scaffali.
Protezione d’altre persone
Tenere i bambini sotto supervisione, per evitare che giochino con l’apparecchio.
I bambini non si rendono conto del pericolo connesso agli elettrodomestici.
Non lasciare alla portata dei bambini i materiali utilizzati per imballare la macchina.
Pericolo d’ustioni
Evitare di dirigere contro se stessi e/o altri il getto di vapore surriscaldato e/o d’acqua calda. Usare sempre le apposite maniglie o manopole.
Non disinserire (togliere) mai il portafiltro durante l’erogazione del caffè. Durante la fase di riscaldamento dal gruppo erogazione caffè possono uscire gocce d’acqua calda.
Non erogare caffè quando è premuto l'interruttore ( ) perchè è attiva la funzione vapore e la caldaia ha una temperatura troppo elevata.
Ubicazione
Sistemare la macchina per caffè in un posto sicuro, dove nessuno può rovesciarla o venirne ferito.
Acqua calda o vapore surriscaldato potrebbero fuoriuscire: pericolo di scottature!
Non tenere la macchina a temperatura inferiore a 0°C; c'è il pericolo che il gelo possa danneggiare la macchina.
Non usare la macchina per caffè all’aperto.
Non posare la macchina su superfici molto calde e nelle vicinanze di fiamme libere per evitare che la carcassa fonda o comunque si danneggi.
Pulizia
Prima di pulire la macchina, è indispensabile disinserire tutti i tasti e poi staccare la spina dalla presa di corrente.
Inoltre, aspettare che la macchina si raffreddi. Mai immergere la macchina nell’acqua!
È severamente vietato cercare d’intervenire all’interno della macchina.
Non utilizzare, per scopi alimentari, l’acqua rimasta nel serbatoio per alcuni giorni, lavare il serbatoio e riempirlo con acqua fresca potabile.
Spazio per l’uso e la manutenzione
Per il corretto e buon funzionamento della macchina per caffè si consiglia quanto segue:
•Scegliere un piano d’appoggio ben livellato;
•Scegliere un ambiente sufficientemente illuminato, igienico e con presa di corrente facilmente accessibile;
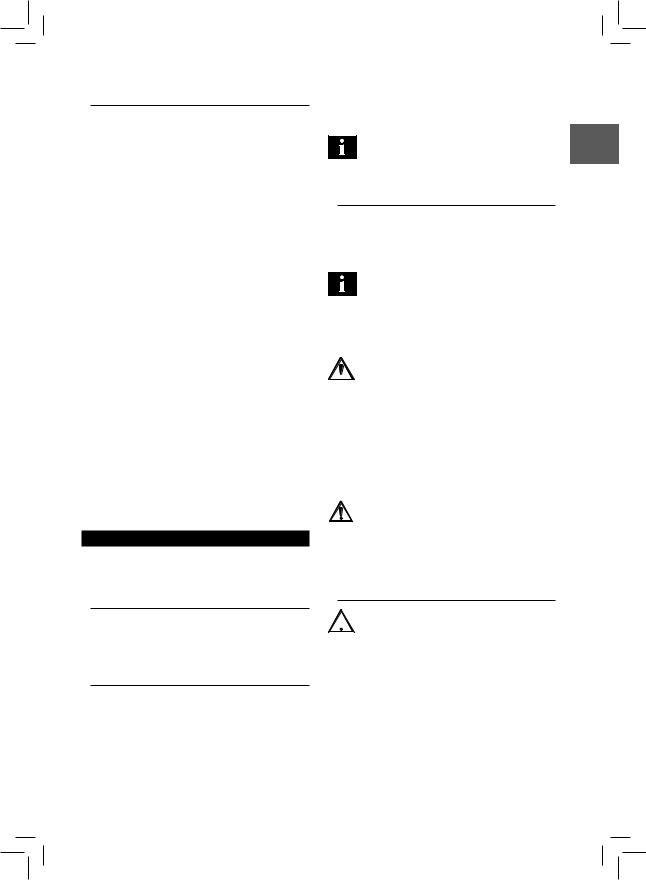
•Prevedere una distanza minima dalle pareti della macchina come indicato in figura (Fig.A).
Custodia della macchina
Quando la macchina rimane inutilizzata per un periodo prolungato, disinserire la macchina e staccare la spina dalla presa. Custodirla in luogo asciutto e non accessibile ai bambini. Proteggerla dalla polvere e dallo sporco.
Riparazioni / Manutenzione
Nel caso di guasti, difetti o sospetto di difetto dopo una caduta, staccare subito la spina dalla presa. Mai mettere in funzione una macchina difettosa. Soltanto i Centri di Assistenza Autorizzati possono effettuare interventi e riparazioni. Nel caso di interventi non eseguiti a regola d’arte, si declina ogni responsabilità per eventuali danni.
Antincendio
In caso di incendio utilizzare estintori ad anidride carbonica (CO2). Non utilizzare acqua o estintori a polvere.
Italiano
• 7 •

Legenda componenti macchina (Pag.2)
1Pannello comandi
2Coperchio serbatoio acqua
3 Pomello acqua calda / vapore
4 Sede per accessori
5Serbatoio acqua
6Supporto appoggia tazze
7 Vasca recupero acqua + griglia
8 Gruppo erogatore caffè
9 Tubo vapore (pannarello)
10Cavo alimentazione
11Portafiltro pressurizzato
12Misurino per caffè macinato
13Filtro per caffè macinato
(unico per l'erogazione di 1 o 2 caffè)
14Adattatore per filtro caffè in cialde
15Filtro per caffè in cialde
16Interruttore ON/OFF
17Spia "macchina accesa" Acceso = Macchina accesa Spento = Macchina spenta
18Interruttore erogazione caffè
19Spia caffè / acqua - "Pronto macchina"
Acceso = OK per erogazione caffè / acqua calda Spento = Temperatura bassa per caffè / acqua calda
20Interruttore vapore
21Spia "Pronto vapore"
Acceso = OK per erogazione vapore Spento = Temperatura bassa per vapore
4INSTALLAZIONE
Per la propria sicurezza e quella di terzi attenersi scrupolosamente alle “Norme di sicurezza” riportate nel cap. 3.
La macchina per caffè è ora pronta per essere collegata alla rete elettrica.
 Nota: si consigli di lavare i componenti prima
  del loro primo utilizzo e/o dopo un periodo d'i-
nutilizzo.
4.3Serbatoio acqua
•(Fig.1A) - Rimuovere il coperchio del serbatoio dell'acqua
(2) sollevandolo.
•(Fig.1B) - Estrarre il serbatoio dell’acqua (5).
 Nota: a fianco del serbatoio acqua (5) sono pre-
  senti gli accessori della macchina.
•(Fig.2) - Sciacquare il serbatoio e riempirlo con acqua fresca potabile evitando di immetterne una quantità eccessiva.
Immettere nel serbatoio sempre e soltanto ac-  qua fresca potabile non gassata. Acqua calda nonché altri liquidi possono danneggiare il serbatoio. Non mettere in funzione la macchina senza acqua: accertarsi che ve ne sia a sufficienza all’interno del serbatoio.
•(Fig.3) - Inserire il serbatoio assicurandosi di riposizionalo correttamente nella sua sede e riposizionare il coperchio (2).
Assicurarsi che il serbatoio sia ben inserito nella macchina premendolo accuratamente fino a battuta (DEVE ESSERE COMPLETAMENTE VISIBILE IL RIFERIMENTO DELLA FIG.4 ) per evitare fuoriuscite di acqua
dal fondo.
4.1 Imballaggio
L’imballaggio originale è stato progettato e realizzato per proteggere la macchina durante la spedizione. Si consiglia di conservarlo per un eventuale trasporto futuro.
4.2 Avvertenze d'installazione
Prima di installare la macchina, attenersi alle seguenti prescrizioni di sicurezza:
•sistemare la macchina in un luogo sicuro;
•accertarsi che i bambini non abbiano la possibilità di giocare con la macchina;
•evitare che la macchina venga collocata su superfici molto calde o vicino a fiamme libere.
4.4 Collegamento della macchina
La corrente elettrica può essere pericolosa! Di  conseguenza, attenersi sempre scrupolosamente alle norme di sicurezza. Non usare mai cavi difettosi! I cavi e le spine difettosi devono essere sostituiti imme-
diatamente da Centri di Assistenza Autorizzati.
La tensione dell’apparecchio è stata impostata in fabbrica. Verificare che la tensione della rete corrisponda alle indicazioni riportate sulla targhetta d’identificazione posta sul fondo dell’apparecchio.
•Verificare che l’interruttore ON/OFF (16) NON sia premuto prima di collegare la macchina alla rete elettrica.
•Inserire la spina in una presa di corrente a parete di tensione adeguata.
• 8 •

4.5 Caricamento del circuito
Al primo utilizzo, dopo aver erogato vapore o dopo aver terminato l’acqua nel serbatoio, il circuito della macchina deve essere sempre ricaricato.
•(Fig.5) - Premere l’interruttore ON/OFF (16); si accende la spia (17).
•(Fig.6) - Inserire un contenitore sotto al tubo vapore. Aprire il pomello (3) “acqua calda/vapore” ruotandolo in senso antiorario.
•(Fig.7) - Premere l'interruttore caffè (18).
•Attendere che dal tubo vapore (pannarello) fuoriesca un getto regolare d'acqua.
•(Fig.7) - Premere nuovamente l'interruttore caffè (18) per terminare l'erogazione.
•(Fig.8) - Chiudere il pomello (3)“acqua calda/vapore”ruotandolo in senso orario. Rimuovere il contenitore.
La macchina ora è pronta per l’erogazione del caffè e del vapore; si rimanda ai capitoli relativi per i dettagli di funzionamento.
4.6Primo utilizzo o dopo un periodo di inutilizzo
Questa semplice operazione vi assicura un’erogazione ottimale e deve essere eseguita:
-al primo avvio;
-o quando la macchina rimane inutilizzata per lungo tempo (per più di 2 settimane).
L’acqua erogata durate questo processo deve  essere vuotata in un apposito scarico e non può essere utilizzata per l’alimentazione. Se il contenitore si riempie, durante il ciclo, fermare l’erogazione e vuo-
tarlo prima di riprendere l’operazione.
A(Fig.2) - Risciacquare il serbatoio e riempirlo con acqua fresca potabile.
B(Fig.6) - Sistemare un contenitore sotto al tubo vapore. Aprire lentamente il pomello del rubinetto (3) ruotandolo in senso antiorario.
(Fig.7) - Premere l'interruttore caffè (18).
CErogare tutto il contenuto del serbatoio dell’acqua dal tubo vapore/acqua calda.
(Fig.7) - Per terminare l’erogazione premere nuovamente l'interruttore caffè (18).
(Fig.8) - Chiudere il pomello del rubinetto (3) ruotandolo in senso orario.
D (Fig.2) - Riempire il serbatoio con acqua fresca potabile.
E(Fig.15-16) - Inserire dal basso il portafiltro nel gruppo erogazione (8) e ruotarlo da sinistra verso destra fino al suo bloccaggio.
F Inserire un contenitore adeguato sotto al portafiltro.
G(Fig.18) - Premere l'interruttore caffè (18) ed erogare tutta l’acqua presente nel serbatoio. Terminata l’acqua, fermare l’erogazione premendo nuovamente l'interruttore caffè (18).
Al termine svuotare il contenitore.
H(Fig.20) - Rimuovere il portafiltro dal gruppo ruotandolo da destra verso sinistra e sciacquarlo con acqua fresca portabile.
IDopo la macchina è pronta per l’utilizzo.
5 EROGAZIONE DEL CAFFÈ
Attenzione! Durante l’erogazione del caffè è  vietato disinserire il portafiltro pressurizzato ruotandolo manualmente in senso orario. Pericolo d’u-
stioni.
•Durante questa operazione, la spia "pronto macchina" (19) può accendersi e spegnersi; tale funzionamento deve essere considerato normale e non un’anomalia.
•Assicurarsi, prima dell’uso, che il pomello (3) acqua calda/ vapore sia chiuso e che il serbatoio acqua della macchina contenga una quantità d'acqua sufficiente.
•(Fig.5) - Premere su l’interruttore ON/OFF (16); la spia (17) si accende.
•Attendere che la spia "pronto macchina" (19) si accenda; ora la macchina è pronta per l’erogazione del caffè.
5.1Con caffè macinato
•(Fig.9) - Inserire il filtro (13) nel portafiltro pressurizzato (11); al primo utilizzo il filtro è già inserito.
•(Fig.15) - Inserire dal basso il portafiltro pressurizzato nel gruppo erogazione (8).
•(Fig.16) - Ruotare il portafiltro da sinistra verso destra fino al suo bloccaggio. Lasciare la presa dal manico del portafiltro pressurizzato. Un sistema automatico riporta ora leggermente il manico verso sinistra.
Questo movimento garantisce il perfetto funzionamento del portafiltro pressurizzato.
•(Fig.18) - Preriscaldare il portafiltro pressurizzato premendo l'interruttore caffè (18); l’acqua comincerà ad uscire dal portafiltro pressurizzato (questa operazione si rende necessaria solo per il primo caffè).
Italiano
• 9 •

•Dopo aver fatto scorrere 150cc di acqua premere nuovamente l’interruttore caffè (18) per fermare l’erogazione d'acqua calda.
•(Fig.16) - Togliere il portafiltro dalla macchina ruotandolo da destra verso sinistra e vuotare l’acqua residua.
•(Fig.35) - Prelevare il misurino dalla macchina.
•(Fig.10) - Versare 1-1,5 misurini per il caffè singolo o 2 misurini rasi per il caffè doppio; pulire il bordo del portafiltro dai residui di caffè.
•(Fig.15) - Inserire dal basso il portafiltro (11) nel gruppo erogazione (8)
•(Fig.16) - Ruotare il portafiltro da sinistra verso destra fino al suo bloccaggio.
•(Fig.17) - Prelevare 1 o 2 tazzine preriscaldate e posizionarle sotto al portafiltro; verificare che siano correttamente sistemate sotto ai fori di uscita caffè.
•(Fig.18) - Premere l’interruttore caffè (18).
•Raggiunta la quantità di caffè desiderata, premere nuovamente l’interruttore caffè (18) per fermare l’erogazione del caffè e prelevare le tazzine con il caffè (Fig.19).
•(Fig.20) - Al termine dell’erogazione attendere qualche secondo, estrarre il portafiltro e vuotarlo dai fondi residui.
Nota: nel portafiltro rimane una piccola quantità di acqua; questo è normale ed è dovuto alle
caratteristiche del portafiltro.
Nota importante: Il filtro (13) deve essere mantenuto pulito per garantire un perfetto risulta-
to. Lavare giornalmente a fine utilizzo (Fig.21).
5.2Con caffè in cialde
•(Fig.11) - Togliere, utilizzando un cucchiaino da caffè, il filtro per caffè macinato (13) dal portafiltro pressurizzato (11).
•(Fig.12) - Inserire, nel portafiltro pressurizzato (11), l'a- dattatore per cialde (14), con la parte bombata rivolta verso il basso.
•(Fig.13) - Dopo, inserire il filtro per cialde (15) nel portafiltro pressurizzato (11).
•(Fig.15) - Inserire dal basso il portafiltro pressurizzato nel gruppo erogazione (8).
•(Fig.16) - Ruotare il portafiltro da sinistra verso destra fino al suo bloccaggio. Lasciare la presa dal manico del portafiltro pressurizzato. Un sistema automatico riporta ora leggermente il manico verso sinistra.
Questo movimento garantisce il perfetto funzionamento del portafiltro pressurizzato.
•(Fig.18) - Preriscaldare il portafiltro pressurizzato premendo l'interruttore caffè (18); l’acqua comincerà ad uscire dal portafiltro pressurizzato (questa operazione si rende necessaria solo per il primo caffè).
•Dopo aver fatto scorrere 150cc di acqua premere nuovamente l’interruttore caffè (18) per fermare l’erogazione d'acqua calda.
•(Fig.20) - Togliere il portafiltro pressurizzato dalla macchina ruotandolo da destra verso sinistra e vuotare l’acqua residua.
•(Fig.14) - Inserire la cialda nel portafiltro; assicurarsi che la carta della cialda non fuoriesca dal portafiltro.
•(Fig.15) - Inserire dal basso il portafiltro pressurizzato nel gruppo erogazione (8).
•(Fig.16) - Ruotare il portafiltro da sinistra verso destra fino al suo bloccaggio.
•Prelevare 1 tazzina preriscaldata e posizionarla sotto al portafiltro; verificare che sia correttamente sistemata sotto ai fori d'uscita caffè.
•(Fig.18) - Premere l’interruttore caffè (18).
•Raggiunta la quantità di caffè desiderata, premere nuovamente l’interruttore caffè (18) per fermare l’erogazione del caffè; prelevare la tazzina con il caffè.
•(Fig.20) - Al termine dell’erogazione attendere qualche secondo, estrarre il portafiltro e smaltire la cialda utilizzata.
 Nota importante: Il filtro (15) e l'adattatore
  (14) devono essere mantenuti puliti per garantire un perfetto risultato. Lavare giornalmente a fine
utilizzo (Fig.21).
6 SCELTA DEL TIPO DI CAFFÈ CONSIGLI
In linea di massima si possono utilizzare tutti i tipi di caffè esistenti in commercio.
Tuttavia, il caffè è un prodotto naturale ed il suo gusto cambia in funzione dell’origine e della miscela; è preferibile quindi provarne vari tipi, al fine di trovare quello che meglio si addice ai gusti personali.
Per migliori risultati si consiglia comunque di utilizzare miscele espressamente preparate per macchine espresso. Il caffè dovrebbe sempre fuoriuscire regolarmente dal portafiltro pressurizzato senza gocciolare.
La velocità di fuoriuscita del caffè può essere modificata cambiando leggermente la dose del caffè nel filtro e/o utilizzando
• 10 •
caffè con un grado di macinatura differente.
Per un miglior risultato in tazza e per facilità di pulizia e preparazione, GAGGIA consiglia l'utilizzo di caffè in cialde monodose contrassegnate dal marchio ESE.
VAPORE / CAPPUCCINO
Pericolo di scottature! All’inizio dell’erogazione possono verificarsi brevi spruzzi di acqua calda.
Il tubo d’erogazione può raggiungere temperature elevate: evitare di toccarlo direttamente con le mani.
Attenzione! Non erogare caffè quando è selezionata la funzione vapore perchè la temperatura
è troppo alta e c'è il rischio di ustioni.
Italiano
PRIMA DI ESEGUIRE QUALSIASI OPERAZIONE RE-  LATIVA ALL’EROGAZIONE DEL VAPORE O DELL’ACQUA CALDA VERIFICARE CHE IL TUBO VAPORE SIA ORIEN-
TATO SOPRA LA VASCA RECUPERO ACQUA.
7 ACQUA CALDA
Pericolo di scottature! All’inizio dell’erogazione possono verificarsi brevi spruzzi di acqua calda.
Il tubo d’erogazione può raggiungere temperature elevate: evitare di toccarlo direttamente con le mani.
•(Fig.5) - Premere su l’interruttore ON/OFF (16); la spia (17) si accende.
•Attendere che la spia (19) "pronto macchina" si accenda; ora la macchina è pronta.
•Durante questa operazione, la spia "pronto macchina" (19) può accendersi e spegnersi; tale funzionamento deve essere considerato normale e non un’anomalia.
•(Fig.22) - Inserire un contenitore sotto al tubo vapore. Aprire il pomello (3) “acqua calda/vapore” ruotandolo in senso antiorario.
•(Fig.23) - Premere l'interruttore caffè (18).
•(Fig.23) - Quando è stata prelevata la quantità desiderata di acqua calda, premere nuovamente l'interruttore caffè (18).
•(Fig.24) - Chiudere il pomello (3) “acqua calda/vapore” ruotandolo in senso orario. Rimuovere il contenitore.
•(Fig.5) - Premere su l’interruttore ON/OFF (16); la spia (17) si accende.
•Attendere che la spia (19) "pronto macchina" si accenda.
•(Fig.19) - Premere l’interruttore vapore (20) . Si spegne la spia "pronto macchina" (19).
•Attendere che la spia "pronto macchina" (19) e la spia "pronto vapore" (21) si accendano; a questo punto la macchina è pronta per l’erogazione del vapore.
•Durante questa operazione, le spie (19) e (21) possono accendersi e spegnersi; tale funzionamento deve essere considerato normale e non un’anomalia.
•(Fig.26) - Inserire un contenitore sotto al tubo vapore e aprire il pomello (3) per qualche istante, in modo da far uscire l’acqua residua dal tubo vapore; in breve tempo comincerà ad uscire solo vapore.
•(Fig.27) - Chiudere il pomello (3) e togliere il contenitore.
•Riempire con latte freddo 1/3 del contenitore che si desidera utilizzare per preparare il cappuccino.
 Per garantire un miglior risultato utilizzare latte freddo
•(Fig.28) - Immergere il tubo vapore nel latte e aprire il pomello (3) ruotandolo in senso antiorario; far ruotare lentamente il recipiente contenente il latte, dal basso verso l’alto per rendere uniforme il riscaldamento.
•(Fig.29) - Al termine, chiudere il rubinetto (3); prelevare la tazza con il latte montato.
•(Fig.25) - Premere nuovamente l’interruttore vapore (20).
•Procedere con il caricamento del circuito descritto nel par.4.5 per rendere operativa la macchina.
Non erogare caffè quando è premuto l'inter-  ruttore (
 ) oppure quando la spia 21 è accesa perchè è attiva la funzione vapore e la caldaia ha una
temperatura troppo elevata.
Attendere la condizione di pronto caffè (spia 19 accesa) prima di erogare un caffè.
• 11 •

 Nota: la macchina è operativa quando la spia
  "pronto macchina" (19) è acceso in modo fisso.
 Nota bene: se non si riesce ad erogare un cap-
  puccino come descritto, si deve ricaricare il circuito come descritto nel par. 4.5 e successivamente
ripetere le operazioni.
 Lo stesso sistema può essere utilizzato per il riscaldamento di altre bevande.
•Pulire, dopo questa operazione il tubo vapore con un panno umido.
9 PULIZIA
La manutenzione e la pulizia possono essere effettuate soltanto quando la macchina è fredda e scollegata dalla rete elettrica.
•Non immergere la macchina nell’acqua e non inserire i componenti nella lavastoviglie.
•Non utilizzare alcol etilico, solventi e/o agenti chimici aggressivi.
•Si consiglia di pulire quotidianamente il serbatoio dell’acqua e di riempirlo con acqua fresca.
•(Fig.31-33) - Giornalmente, dopo aver riscaldato il latte, smontare la parte esterna del pannarello e lavarla con acqua potabile fresca.
•(Fig.31-32-33) - Settimanalmente si deve pulire il tubo vapore. Per eseguire questa operazione, si deve:
-rimuovere la parte esterna del pannarello (per la regolare pulizia);
-sfilare la parte superiore del pannarello dal tubo vapore;
-lavare la parte superiore del pannarello con acqua fresca potabile;
-lavare il tubo vapore con un panno umido e rimuovere eventuali residui di latte;
-riposizionare la parte superiore nel tubo vapore (assicurarsi che sia completamente inserita);
-rimontare la parte esterna del pannarello.
•(Fig.34) - Giornalmente vuotare e lavare la vasca raccogli gocce.
•Per la pulizia dell’apparecchio utilizzare un panno morbido inumidito d'acqua.
•(Fig.21) - Per la pulizia del portafiltro pressurizzato procedere come segue:
-(Fig.11) - estrarre il filtro, lavarlo con cura con acqua calda.
-estrarre l'adattatore (se presente), lavarlo con cura con
acqua calda.
-lavare l’interno del portafiltro pressurizzato.
•Non asciugare la macchina e/o i suoi componenti utilizzando un forno a microonde e/o un forno convenzionale.
10 DECALCIFICAZIONE
La formazione di calcare è una conseguenza naturale dell’u- so dell’apparecchio. La decalcificazione è necessaria ogni 1-2 mesi di utilizzo della macchina e/o quando si osserva una riduzione di portata dell’acqua. Usare esclusivamente il prodotto decalcificante GAGGIA.
 Quanto indicato nel manuale di uso e manutenzione ha priorità rispetto alle indicazioni riportate su accessori e/o materiali d’uso venduti sepa-
ratamente, laddove sussista un conflitto.
Usare solamente il prodotto decalcificante GAGGIA.
E’ stato formulato specificatamente per mantenere al meglio la performance e la funzionalità della macchina per tutta la sua vita, nonchè per evitare, se correttamente usato, ogni alterazione del prodotto erogato. La soluzione decalcificante deve essere smaltita secondo quanto previsto dal costruttore e/o dalle norme vigenti nel Paese d’utilizzo.
Non bere la soluzione decalcificante e i prodotti erogati fino al completamento del ciclo. Non
utilizzare in nessun caso l’aceto come decalcificante.
1(Fig.15-16) - Inserire dal basso il portafiltro (senza caffè) nel gruppo erogazione (8) e ruotarlo da sinistra verso destra fino al suo bloccaggio.
2 (Fig.1) - Rimuovere e svuotare il serbatoio dell’acqua.
3(Fig.2) - Versare TUTTO il contenuto della bottiglia di decalcificante concentrato GAGGIA nel serbatoio dell’acqua dell’apparecchio e riempire con acqua fresca potabile fino al livello MAX.
4Rimuovere il pannarello (o cappuccinatore) eventualmente installato sul tubo vapore.
5Accendere la macchina premendo su l’interruttore ON/OFF (16); la spia (17) si accende.
Prelevare (come descritto nel capitolo “ACQUA CALDA”
• 12 •

del manuale), dal tubo vapore/acqua calda, 2 tazze (circa 150 ml. ciascuna) di acqua; dopodichè spegnere la macchina premendo su l’interruttore ON/OFF (16), la spia (17) si spegne.
6Lasciare agire il decalcificante circa 15-20 minuti con la macchina spenta.
7Accendere la macchina premendo sull’interruttore ON/OFF (16); la spia (17) si accende.
Prelevare (come descritto nel capitolo “ACQUA CALDA” del manuale) dal tubo vapore/acqua calda 2 tazze (circa 150 ml ciascuna) di acqua. Successivamente spegnere la macchina premendo sul’interruttore ON/OFF (16) e lasciarla spenta per 3 minuti.
8Ripetere le operazioni descritte al punto 7 fino al completo svuotamento del serbatoio dell’acqua.
9(Fig.2) - Risciacquare il serbatoio e riempirlo con acqua fresca potabile.
10(Fig.6) - Sistemare un contenitore sotto al tubo vapore (pannarello). Aprire lentamente il pomello del rubinetto
(3) ruotandolo in senso antiorario.
(Fig.7) - Premere l’interruttore caffè (18).
11Erogare tutto il contenuto del serbatoio dell’acqua dal tubo vapore/acqua calda.
(Fig.7) - Per terminare l’erogazione premere nuovamente l’interruttore caffè (18).
(Fig.8) - Chiudere il pomello del rubinetto (3) ruotandolo in senso orario.
12(Fig.2) - Riempire il serbatoio con acqua fresca potabile.
13(Fig.17) - Inserire un contenitore adeguato sotto al portafiltro.
14(Fig.18) - Premere l’interruttore caffè (18) ed erogare tutta l’acqua presente nel serbatoio. Terminata l’acqua, fermare l’erogazione premendo nuovamente l’interruttore caffè (18). Al termine svuotare il contenitore.
15Ripetere un’altra volta le operazioni dal punto (9) per un totale di 4 serbatoi. Dopo la macchina è pronta per l’utilizzo.
(Fig.20) - Rimuovere il portafiltro dal gruppo ruotandolo da destra verso sinistra e sciacquarlo con acqua fresca portabile.
Il ciclo di decalcificazione è cosi concluso.
(Fig.2) - Riempire nuovamente il serbatoio con acqua fresca. Se necessario effettuare il caricamento del circuito come descritto nel par. 4.5 del manuale.
Al termine, rimontare sul tubo vapore il pannarello (o cappuccinatore) che vi era installato precedentemente.
11 SMALTIMENTO
INFORMAZIONE AGLI UTENTI: ai sensi dell’art. 13 del Decreto Legislativo 25 luglio 2005, n. 151"Attuazione delle Direttive 2002/95/CE, 2002/96/CE e 2003/108/CE, relative alla riduzione dell'uso di sostanze pericolose nelle apparecchiature elettriche ed elettroniche, nonché allo smaltimento dei rifiuti"
Il simbolo del cassonetto barrato riportato sull’apparecchiatura o sulla sua confezione indica che il prodotto alla fine della propria vita utile deve essere raccolto separatamente dagli altri rifiuti.
L’utente dovrà, pertanto, conferire l’apparecchiatura giunta a fine vita agli idonei centri di raccolta differenziata dei rifiuti elettronici ed elettrotecnici, oppure riconsegnarla al rivenditore al momento dell’acquisto di una nuova apparecchiatura di tipo equivalente, in ragione di uno a uno.
L’adeguata raccolta differenziata per l’avvio successivo dell’apparecchiatura dismessa al riciclaggio, al trattamento e allo smaltimento ambientalmente compatibile contribuisce ad evitare possibili effetti negativi sull’ambiente e sulla salute e favorisce il reimpiego e/o riciclo dei materiali di cui è composta l’apparecchiatura.
Lo smaltimento abusivo del prodotto da parte dell’utente comporta l’applicazione delle sanzioni amministrative previste dalla normativa vigente.
Italiano
• 13 •

Guasto |
Cause possibili |
Rimedio |
|
La macchina non si accende. |
Macchina non collegata alla rete elettrica. |
Collegare la macchina alla rete elettrica. |
|
|
|
|
|
La pompa è molto rumorosa. |
Manca acqua nel serbatoio. |
Rabboccare con acqua.(par.4.3). |
|
|
|
|
|
|
La spia "pronto caffè" (15) era spenta |
Attendere che la spia "pronto caffè" (15) si ac- |
|
Il caffè é troppo freddo. |
quando è stato premuto l’interruttore (14). |
cenda. |
|
|
|
||
Portafiltro non inserito per il preriscalda- |
Preriscaldare il portafiltro. |
||
|
|||
|
mento (cap. 5). |
|
|
|
Tazzine fredde. |
Preriscadare le tazzine con acqua calda. |
|
|
|
|
|
|
Latte non adatto: latte in polvere, latte |
Utilizzare latte intero. |
|
Non si forma la schiuma del latte. magro. |
|
||
Non si riesce a preparare un cap- |
Tubo vapore sporco. |
Pulire il tubo vapore come descritto nel Cap.9. |
|
|
Ricaricare il circuito (par. 4.5) e ripetere le ope- |
||
puccino. |
Non è più presente vapore nella caldaia. |
||
|
razioni descritte nel Cap.8. |
||
|
|
||
|
|
|
|
Il caffè sgorga troppo velocemen- |
Troppo poco caffè nel portafiltro. |
Aggiungere il caffè (cap. 5). |
|
|
|
||
te, non si forma la crema. |
Macinatura troppo grossa. |
Usare una miscela diversa (cap.6). |
|
|
|
|
|
|
Caffè vecchio o non adatto. |
Usare una miscela diversa (cap.6). |
|
|
|
|
|
|
Mancanza di acqua. |
Rabboccare con acqua (par.4.3). |
|
|
|
|
|
|
Macinatura troppo fine. |
Usare una miscela diversa (cap.6). |
|
|
|
|
|
Il caffè non sgorga o sgorga solo |
Caffè premuto nel portafiltro. |
Smuovere il caffè macinato. |
|
|
|
||
Troppo caffè nel portafiltro. |
Ridurre la quantità di caffè nel portafiltro. |
||
a gocce. |
|
|
|
Pomello (3) aperto. |
Chiudere il pomello (3). |
||
|
|||
|
|
|
|
|
Macchina calcificata. |
Decalcificare la macchina (cap.10). |
|
|
|
|
|
|
Filtro nel portafiltro otturato. |
Pulire il filtro (cap.9). |
|
|
|
|
|
|
Portafiltro inserito male nel gruppo eroga- |
Inserire correttamente il portafiltro (cap.5). |
|
|
zione caffè. |
|
|
Il caffè sgorga dai bordi. |
Bordo superiore del portafiltro sporco. |
Pulire il bordo del portafiltro. |
|
|
|
|
|
|
Troppo caffè nel portafiltro. |
Ridurre la quantità di caffè utilizzando il misu- |
|
|
rino. |
||
|
|
||
|
|
|
|
Per i guasti non contemplati dalla suddetta tabella o in caso che i rimedi suggeriti non li risolvano, rivolgersi ad un centro assistenza.
• 14 •

1 GENERAL INFORMATION
The coffee machine is suitable for preparing 1 or 2 cups of espresso coffee and is provided with a swivel steam and hot water wand. The controls on the front side of the machine are labelled with easy-to-read symbols.
The machine has been designed for domestic use and is not suitable for professional, continuous use.
Warning. No liability is held for damage caused by:
•Incorrect use not in accordance with the intended purposes;
•Repairs not carried out in authorised service centres;
•Tampering with the power cord;
•Tampering with any part of the machine;
•Use of non-original spare parts and accessories;
•Failure to descale the machine and storage at temperatures below 0°C.
In these cases, the warranty is not valid.
1.1 To Simplify Manual Reading
The warning triangle indicates all important instructions for the user’s safety. Carefully follow the-
se instructions to avoid serious injury!
References to illustrations, parts of the appliance or controls, etc. are indicated by numbers or letters. Whenever possible, refer to the illustration.
This symbol is used to highlight information that is particularly important to ensure opti-
mal use of the machine.
The illustrations corresponding to the text can be found on the first pages of the manual. Please refer to these pages while reading the operating instructions.
1.2How to Use these Operating Instructions
Keep these operating instructions in a safe place and make them available to anyone who may use the coffee machine. For further information or in case of problems, please refer to an authorised service centre.
2 |
TECHNICAL SPECIFICATIONS |
|
|
|
The manufacturer reserves the right to make changes to the |
|
|||
technical specifications of the product. |
English |
|||
|
|
|
||
Nominal voltage - Power rating - Power supply |
||||
|
||||
|
See label on the appliance |
|
||
Housing Material |
|
|
||
|
Plastic |
|
||
Size (w x h x d) (cm) |
|
|
||
|
210 x 300 x 280 |
|
||
Weight |
|
|
||
|
3.9 kg |
|
||
Power Cord Length |
|
|
||
|
1.2 m |
|
||
Control Panel |
|
|
||
|
Front side |
|
||
Filter Holder |
|
|
||
|
Pressurized type |
|
||
Pannarello |
|
|
||
|
Special for cappuccinos |
|
||
Water Tank |
|
|
||
|
1.25 litres - Removable type |
|
||
Pump Pressure |
|
|
||
|
15 bar |
|
|
|
Boiler |
Stainless steel |
|
||
|
|
|||
Safety Devices |
|
|
||
|
Manual reset thermostat |
|
||
|
Thermal fuse |
|
||
|
|
|
|
|
3 |
SAFETY REGULATIONS |
|
||
Never allow water to come into contact with any of the electrical parts of the machine: Danger of short circuit! Overheated steam and hot water may cause scalding! Never direct the steam or hot water jet towards body parts. Handle the steam/hot water spout with care: Danger of scalding!
Intended Use
The coffee machine is intended for domestic use only. Do not make any technical changes or use the machine for unauthorised purposes since this would create serious hazards! The appliance is not to be used by persons (including children) with reduced physical, mental or sensory abilities or with scarce experience and/or expertise, unless they are supervised by a
• 15 •

person responsible for their safety, or they are instructed by this person on how to properly use the machine.
Power Supply
Connect the coffee machine only to a suitable socket. The voltage must correspond to that indicated on the appliance label.
Power Cord
Never use the coffee machine if the power cord is defective or damaged. If the power cord is damaged, it must be replaced by the manufacturer or by its authorised service centre. Do not pass the power cord around corners, over sharp edges or over hot objects and keep it away from oil.
Do not use the power cord to carry or pull the coffee machine. Do not pull out the plug by the power cord or touch it with wet hands.
Do not let the power cord hang freely from tables or shelves.
For the Safety of Others
Prevent children from playing with the machine.
Children are not aware of the risks related to electrical household appliances.
Do not leave the machine packaging materials within the reach of children.
Danger of Burns
Never direct jets of overheated steam and/or hot water towards yourself or others. Always use the handles or knobs provided. Do not disconnect (remove) the filter holder during coffee brewing. Hot water drips may spill out of the brew unit during the warm-up phase.
Never brew coffee when button ( ) is pressed because this means that the steam function is on and the temperature of the boiler is too high.
Location
Place the coffee machine in a safe place, where there will be no danger of overturning or injury.
Hot water or overheated steam may spill out of the machine:
Danger of scalding!
Do not keep the machine at a temperature below 0°C. Frost may damage it.
Do not use the coffee machine outdoors.
In order to prevent its housing from melting or being damaged, do not place the machine on very hot surfaces and close to open flames.
Cleaning
Before cleaning the machine it is necessary to turn off all buttons and then remove the plug from the socket.
Wait for the machine to cool down. Never immerse the machine in water!
It is strictly forbidden to tamper with the internal parts of the machine.
Water left in the tank for several days should not be consumed. Wash the tank and fill it with fresh drinking water.
Suitable Location for Operation and Maintenance
To ensure a correct and efficient performance of the coffee machine, we recommend following the instructions below:
•Choose a level surface;
•Choose a location that is sufficiently well-lit, clean and near an easily reachable socket;
•Allow for a minimum distance from the sides of the machine as shown in (Fig.A).
Storing the Machine
If the machine is to remain inactive for a long time, turn it off and unplug it. Store it in a dry place and out of the reach of children. Keep it protected from dust and dirt.
Repairs / Maintenance
In case of failure, problems or a suspected fault resulting from the falling of the machine, immediately remove the plug from the socket. Never attempt to operate a faulty machine. Servicing and repairs may only be carried out by Authorised Service Centres. All liability for damages resulting from work not carried out by professionals is declined.
Fire Safety Precautions
In case of fire, use carbon dioxide (CO2) extinguishers. Do not use water or dry powder extinguishers.
• 16 •
Key to Machine Parts (Page 2)
1 Control panel
2Water tank lid
3 Hot water/steam knob
4 Seat for accessories
5Water tank
6Cup holder rest
7 Water recovery tray + grill
8Brew unit
9 Steam wand (Pannarello)
10Power cord
11Pressurized filter holder
12Ground coffee measuring scoop
13Ground coffee filter
(single piece for 1 or 2 coffee(s))
14Coffee pod filter adapter
15Coffee pod filter
16ON/OFF button
17"Machine on" indicator light Light ON = the machine is on Light OFF = the machine is off
18Coffee brew button
19Coffee/water - "Machine ready" indicator light
Light ON = OK for coffee brewing / hot water dispensing Light OFF = temperature is low for coffee brewing / hot water dispensing
20Steam button
21"Steam ready" indicator light
Light ON = OK for steam dispensing
Light OFF = temperature is low for steam dispensing
4INSTALLATION
For your own and other people safety, carefully follow the "Safety Regulations" indicated in section 3.
The coffee machine is now ready to be connected to the electric network.
 Note: We recommend washing the components
  before using them for the first time and/or after they have not been used for a certain period of time.
4.3Water Tank
•(Fig.1A) - Remove the lid from the water tank (2) by lifting it.
•(Fig.1B) - Remove the water tank (5).
 Note: The machine accessories are placed on
  the water tank's (5) side.
•(Fig.2) - Rinse the tank and fill it with fresh drinking water taking care not to overfill.
Fill the tank only with fresh, non-sparkling,  drinking water. Hot water or any other liquid may damage the tank. Do not operate the machine without water. Make sure there is enough water in the
tank.
•(Fig.3) - Insert the water tank making sure that it has been properly repositioned in its former seat and then reposition the lid (2).
Make sure that the tank is fully inserted in the machine by pressing it gently up to its limit stop (THE REFERENCE MARK SHOWN IN FIG. 4 SHOULD BE
COMPLETELY VISIBLE). This is to avoid water leaks from its bottom.
English
4.1 Packaging
The original packaging has been designed and manufactured to protect the machine during transport. We recommend keeping the packaging material for possible future transport.
4.2 Installation Instructions
Before installing the machine, read the following safety instructions carefully:
•Place the machine in a safe place;
•Make sure children cannot play with the machine;
•Do not place the machine on hot surfaces or near open flames.
4.4 Machine Connection
Electric power may be very dangerous! It is  therefore necessary to strictly follow the safety regulations. Do not use faulty power cords. Faulty cords and plugs must be replaced immediately by Authorised
Service Centres.
The voltage of the appliance has been pre-set by the manufacturer. Check that the voltage matches the indication on the data plate at the bottom of the appliance.
•Make sure that the ON/OFF button (16) is NOT pressed before connecting the machine to the electric network.
•Insert the plug into a wall socket with suitable power voltage.
• 17 •

4.5 Circuit Priming
Upon first use, after dispensing steam or when the water tank is empty, the machine’s water circuit must always be primed.
•(Fig.5) - Press the ON/OFF button (16). The indicator light (17) turns on.
•(Fig.6) - Place a container under the steam wand. Open the "hot water/steam" knob (3) by turning it counterclockwise.
•(Fig.7) - Press the brew button (18).
•Wait until a steady jet of water flows out of the steam wand (Pannarello).
•(Fig.7) - Press the brew button (18) again to end the operation.
•(Fig.8) - Close the "hot water/steam" knob (3) by turning it clockwise. Remove the container.
The machine is now ready to brew coffee and dispense steam. Please see related chapters for operating details.
4.6Using the Machine for the First Time or after a Period of Inactivity
This simple operation ensures an optimum brewing and must be performed:
-At first start-up;
-When the machine remains inactive for a long time (more than 2 weeks).
Water dispensed during this process must be  emptied into an adequate drain and is not suitable for food use. If the container fills up during the cycle, stop dispensing water and empty the container
before resuming the operation.
A(Fig.2) - Rinse the tank and fill it again with fresh drinking water.
B(Fig.6) - Place a container under the steam wand. Open the knob (3) slowly by turning it counter-clockwise. (Fig.7) - Press the brew button (18).
CDispense the whole water tank content from the steam/ hot water wand.
(Fig.7) - Press the brew button (18) again to end the operation.
(Fig.8) - Close the knob (3) by turning it clockwise. D (Fig.2) - Fill the tank with fresh drinking water.
E(Fig.15-16) - Insert the filter holder into the brew unit (8) from the bottom and turn it from left to right until it locks into place.
F Place a suitable container under the filter holder.
G(Fig.18) - Press the brew button (18) and dispense all the water in the tank. Once the water tank is empty, stop dispensing by pressing the brew button (18) again.
At the end, empty the container.
H(Fig.20) - Remove the filter holder from the unit by turning it from right to left and rinse it with fresh drinking water.
IThe machine is now ready to be used.
5 COFFEE BREWING
Warning! During the coffee brewing it is forbidden to remove the pressurized filter holder by
manually turning it clockwise. Danger of burns.
•During this operation the "machine ready" indicator light
(19)may flash. This should be considered a standard operation, not a fault.
•Before using the machine, make sure that the hot water/ steam knob (3) is closed and that there is enough water in the machine tank.
•(Fig.5) - Press the ON/OFF button (16). The indicator light
(17)turns on.
•Wait until the "machine ready" indicator light (19) turns on. The machine is now ready to brew coffee.
5.1Using Ground Coffee
•(Fig.9) - Insert the filter (13) in the pressurized filter holder (11); the filter is already inserted when using the machine for the first time.
•(Fig.15) - Insert the pressurized filter holder into the brew unit (8) from the bottom.
•(Fig.16) - Turn the filter holder from left to right until it locks into place. Release the grip from the pressurized filter holder. The handle is automatically slightly turned leftwards.
This movement guarantees proper pressurized filter holder performance.
•(Fig.18) - Preheat the pressurized filter holder by pressing the brew button (18), some water will flow out of the pressurized filter holder (this operation is only necessary for the first coffee).
•After 150 cc of water has flowed out, press the brew button
(18)again to stop hot water dispensing.
•(Fig.16) - Remove the filter holder from the machine by turning it from right to left and pour out any water left.
•(Fig.35) - Remove the measuring scoop from the ma-
• 18 •

chine.
•(Fig.10) - Add 1-1.5 measuring scoop(s) for single coffee and 2 measuring scoops double coffee. Remove any coffee residues from the rim of the filter holder.
•(Fig.15) - Insert the filter holder (11) into the brew unit
(8) from the bottom.
•(Fig.16) - Turn the filter holder from left to right until it locks into place.
•(Fig.17) - Take 1 or 2 preheated cups and place them under the filter holder. Make sure that they are correctly placed under the coffee brewing nozzles.
•(Fig.18) - Press the brew button (18).
•When the desired quantity of coffee has been obtained, press the brew button (18) again to stop brewing and remove the cups of coffee (Fig.19).
•(Fig.20) - Wait a few seconds after completing the brewing. Then remove the filter holder and empty the remaining coffee grounds out.
 Note: If a small quantity of water remains in
  the filter holder, this has to be considered as absolutely normal and is due to the filter holder fea-
tures.
Important Note: The filter (13) should be kept clean to guarantee perfect results. Clean daily
after use (Fig.21).
5.2Using Coffee Pods
•(Fig.11) - Use a coffee spoon to remove the filter for ground coffee (13) from the pressurized filter holder (11).
•(Fig.12) - Insert the pod adapter (14) - with the convex part facing down - into the pressurized filter holder (11).
•(Fig.13) - Then, insert the pod filter (15) into the pressurized filter holder (11).
•(Fig.15) - Insert the pressurized filter holder into the brew unit (8) from the bottom.
•(Fig.16) - Turn the filter holder from left to right until it locks into place. Release the grip from the pressurized filter holder. The handle is automatically slightly turned leftwards.
This movement guarantees proper pressurized filter holder performance.
•(Fig.18) - Preheat the pressurized filter holder by pressing the brew button (18), some water will flow out of the pressurized filter holder (this operation is only necessary for the first coffee).
•After 150 cc of water has flowed out, press the brew button (18) again to stop hot water dispensing.
•(Fig.20) - Remove the pressurized filter holder from the machine by turning it from right to left and pour out any water left.
•(Fig.14) - Insert the pod into the filter holder and make sure that the paper of the pod does not overhang the filter holder.
•(Fig.15) - Insert the pressurized filter holder into the brew unit (8) from the bottom.
•(Fig.16) - Turn the filter holder from left to right until it locks into place.
•Take 1 preheated cup and place it under the filter holder. Check that it is correctly placed under the coffee brewing nozzles.
•(Fig.18) - Press the brew button (18).
•When the desired quantity of coffee has been obtained, press the brew button (18) again to stop brewing and remove the cup of coffee.
•(Fig.20) - Wait a few seconds after brewing, then remove the filter holder and dispose of the used pod.
Important Note: The filter (15) and the adapter (14) should be kept clean to guarantee perfect
results. Clean daily after use (Fig.21).
6 TIPS FOR CHOOSING COFFEE
As a general rule, any type of coffee available on the market can be used.
However, coffee is a natural product and its flavour changes according to its origin and blend; it is therefore a good idea to try different types of coffee in order to find the most suited to your personal taste.
For optimal results, we recommend using espresso machine blends. As a rule, coffee should always come out of the pressurized filter holder, without dripping.
The coffee brewing speed can be modified by slightly changing the amount of coffee in the filter and/or using a different coffee grind.
GAGGIA recommends using ESE single-dose coffee pods for a tasty coffee and easier cleaning and preparing.
English
• 19 •

BEFORE PERFORMING ANY OPERATIONS RELATED  TO HOT WATER/STEAM DISPENSING, MAKE SURE THAT THE STEAM WAND IS DIRECTED OVER THE WATER
RECOVERY TRAY.
7 HOT WATER
Danger of scalding! Dispensing may be preced-  ed by small jets of hot water. The steam wand may reach high temperatures: Never touch it with bare
hands.
•(Fig.5) - Press the ON/OFF button (16). The indicator light
(17)turns on.
•Wait until the "machine ready" indicator light (19) turns on. The machine is now ready.
•During this operation the "machine ready" indicator light
(19)may flash. This should be considered a standard operation, not a fault.
•(Fig.22) - Place a container under the steam wand. Open the "hot water/steam" knob (3) by turning it counterclockwise.
•(Fig.23) - Press the brew button (18).
•(Fig.23) - When the required amount of hot water has been dispensed, press the brew button (18) again.
•(Fig.24) - Close the "hot water/steam" knob (3) by turning it clockwise. Remove the container.
8 STEAM / CAPPUCCINO
Danger of scalding! Dispensing may be preced-  ed by small jets of hot water. The steam wand may reach high temperatures: Never touch it with bare
hands.
Warning! Never brew coffee when the steam function is on, as the temperature is too high
and there is a risk of burns.
•(Fig.5) - Press the ON/OFF button (16). The indicator light (17) turns on.
•Wait until the "machine ready" indicator light (19) turns on.
•(Fig.19) - Press the steam button (20). The "machine ready" indicator light (19) turns off.
•Wait until the "machine ready" indicator light (19) and the "steam ready" indicator light (21) turn on. The machine is now ready for steam dispensing.
•During this operation, the indicator lights (19) and (21)
may flash on and off; this is to be considered as standard operation and not a fault.
•(Fig.26) - Insert a container under the steam wand and open the knob (3) for a few seconds, so that remaining water can flow out of the steam wand. In a short delay only steam will come out.
•(Fig.27) - Close the knob (3) and remove the container.
•Fill 1/3 of the container you wish to use to prepare the cappuccino with cold milk.


 Use cold milk to get a better result.
•(Fig.28) - Immerse the steam wand in the milk and open the knob (3) by turning it counter-clockwise. Turn the milk container with slow upward movements so that it warms up evenly.
•(Fig.29) - At the end, close the knob (3) and take the cup with frothed milk.
•(Fig.25) - Press the steam button (20) again.
•Prime the circuit as described in Section 4.5 to make the machine ready for use.
Never brew coffee when the ( ) button is
  pressed or when the 21 indicator light is on, because this means that the steam function is on and the
temperature of the boiler is too high.
Wait for the coffee ready condition to be active (19 indicator light on) before brewing coffee.
 Note: The machine is ready when the "machine
  ready" indicator light (19) is permanently on.
 Important note: If it is not possible to brew a
  cappuccino as described, prime the circuit as
explained in Section 4.5 and then repeat the steps.
 The same procedure can be performed to heat other beverages.
•After this operation, clean the steam wand with a wet cloth.
• 20 •
9 CLEANING
Maintenance and cleaning can only be carried out when the machine is cold and disconnected from the electric network.
•Do not immerse the machine in water or place any of its parts in a dishwasher.
•Do not use spirit, solvents and/or aggressive chemical agents.
•We recommend cleaning the water tank and refilling it with fresh water daily.
•(Fig.31-33) - Every day, after heating milk, remove the external part of the Pannarello and wash it with fresh drinking water.
•(Fig.31-32-33) - Clean the steam wand weekly. In order to do this, perform the following operations:
-Remove the external part of the Pannarello (for standard cleaning);
-Remove the upper part of the Pannarello from the steam wand;
-Wash the upper part of the Pannarello with fresh drinking water;
-Wash the steam wand with a wet cloth and remove any milk residue;
-Reposition the upper part in the steam wand (make sure it is completely inserted);
-Reassemble the external part of the Pannarello.
•(Fig.34) - Empty and clean the drip tray every day.
•Use a soft, dampened cloth to clean the appliance.
•(Fig.21) - Perform the following operations to clean the pressurized filter holder:
-(Fig.11) - Remove the filter and wash it thoroughly with hot water.
-Remove the adapter (if fitted), and wash it thoroughly with hot water.
-Wash the internal part of the pressurized filter holder.
•Do not dry the machine and/or its parts using a microwave and/or standard oven.
10 DESCALING
Limescale normally builds up with the use of the appliance. The machine needs descaling every 1-2 months (if used) and/ or whenever a reduction in water flow is noticed. Use the GAGGIA descaling solution only.
 In case of conflict, priority must be given to what is indicated in the operation and maintenance manual over the instructions provided on sepa-
rately sold accessories and materials.
Use the GAGGIA descaling  solution only. Its formula has been designed to ensure better machine performance and operation for its whole operating life. If correctly used, it also avoids alterations in the brewed product. The descaling solution is to be disposed of according to the manufacturer’s instructions and/or regulations in force in the
country of use.
Never drink the descaling solution or any prod-  ucts dispensed until the cycle has been carried out to the end. Never use vinegar as a descaling solu-
tion.
1(Fig.15-16) - Insert the filter holder (without coffee) into the brew unit (8) from the bottom and turn it from left to right until it locks into place.
2 (Fig.1) - Remove and empty the water tank.
3(Fig.2) - Pour the ENTIRE content of the GAGGIA concentrated descaling solution into the water tank, then fill the tank with fresh drinking water up to the MAX level.
4Remove the Pannarello (or Cappuccinatore) installed on the steam wand, if any.
5Turn on the machine by pressing the ON/OFF button (16). The indicator light (17) turns on.
Fill up (as described in the “HOT WATER” section of the manual) 2 cups of water (about 150 ml each) from the steam / hot water wand and turn off the machine by pressing the ON/OFF button (16); the indicator light (17) turns off.
6Let the descaling solution take effect for approx.15-20 minutes with the machine turned off.
English
• 21 •

7Turn on the machine by pressing the ON/OFF button (16). The indicator light (17) turns on.
Fill up (as described in the "HOT WATER" section of the manual) 2 cups of water (about 150 ml each) from the steam / hot water wand. Then turn off the machine by pressing the ON/OFF button (16) and leave it off for 3 minutes.
8Repeat the operations described in step 7 until the water tank is completely empty.
9(Fig.2) - Rinse the tank and fill it again with fresh drinking water.
10(Fig.6) - Place a container under the steam wand (Pannarello). Open the knob (3) slowly by turning it counterclockwise.
(Fig.7) - Press the brew button (18).
11Dispense the whole water tank content through the steam/hot water wand.
(Fig.7) - Press the brew button (18) again to end the operation.
(Fig.8) - Close the knob (3) by turning it clockwise.
12(Fig.2) - Fill the water tank with fresh drinking water.
13(Fig.17) - Place a suitable container under the filter holder.
14(Fig.18) - Press the brew button (18) and dispense all the water in the tank. Once the water tank is empty, stop dispensing by pressing the brew button (18) again. At the end, empty the container.
15Repeat the operations from step (9) once again for a total of 4 tanks. The machine is now ready to be used.
(Fig.20) - Remove the filter holder from the unit by turning it from right to left and rinse it with fresh drinking water.
The descaling cycle is now complete.
(Fig.2) - Fill the tank again with fresh water. If necessary, prime the circuit as described in Section 4.5 of the manual.
Once finished, reposition the previously installed Pannarello (or Cappuccinatore) on the steam wand.
11DISPOSAL
-The packing materials can be recycled.
-Appliance: Unplug the appliance and cut the power cord.
-Deliver the appliance and power cord to a service center or public waste disposal facility.
This product |
with eu directive 2002/96/EC. |
The symbol  on the product or on its packaging indicates that this product may not be treated as household waste. Instead it shall be handed over to the applicable collection point for the recycling of electrical and electronic equipment. By ensuring this product is disposed of correctly, you will help prevent potential negative consequences for the environment and human health, which could otherwise be caused by inappropriate waste handling of this product. For more detailed information about recycling of this product, please contact your local city office, your household waste disposal service or the shop where you purchased the product.
• 22 •

Problem |
Possible Causes |
Solution |
|
The machine does not switch on. |
The machine is not connected to the elec- |
Connect the machine to the electric network. |
|
|
tric network. |
|
|
The pump is very noisy. |
No water in the tank. |
Refill with water (Section 4.3). |
|
|
|
|
|
|
The "coffee ready" indicator light (15) was |
Wait until the "coffee ready" indicator light (15) |
|
Coffee is too cold. |
off when the button was pressed (14). |
turns on. |
|
|
|
||
The filter holder is not inserted for pre- |
Preheat the filter holder. |
||
|
|||
|
heating (Section 5). |
|
|
|
The cups are cold. |
Preheat the cups with hot water. |
|
|
|
|
|
The milk does not froth. |
The milk is not suitable: powdered milk, |
Use whole milk. |
|
low-fat milk. |
|
||
It is not possible to prepare a cap- |
The steam wand is dirty. |
Clean the steam wand as described in Section 9. |
|
|
Prime the circuit (Section 4.5) and repeat the |
||
puccino. |
There is no more steam in the boiler. |
||
|
steps described in Section 8. |
||
|
|
||
|
|
|
|
The coffee is brewed too fast, |
There is too little coffee in the filter holder. |
Add coffee (Section 5). |
|
|
|
||
crema does not form. |
The grind is too coarse. |
Use a different blend (Section 6). |
|
|
|
|
|
|
Coffee is old or not suitable. |
Use a different blend (Section 6). |
|
|
|
|
|
|
No water. |
Refill with water (Section 4.3). |
|
|
|
|
|
|
The grind is too fine. |
Use a different blend (Section 6). |
|
|
|
|
|
|
Coffee tamped in the filter holder. |
Shake the ground coffee. |
|
Coffee does not come out or drips |
|
|
|
There is too much coffee in the filter holder. |
Reduce the quantity of coffee in the filter |
||
only. |
holder. |
||
|
|
|
|
|
Knob (3) is open. |
Close the knob (3). |
|
|
|
|
|
|
The machine has limescale build-up. |
Descale the machine (Section 10). |
|
|
|
|
|
|
The filter in the filter holder is clogged. |
Clean the filter (Section 9). |
|
|
|
|
|
|
The filter holder is not correctly inserted in |
Insert the filter holder correctly (Section 5). |
|
|
the brew unit. |
|
|
Coffee flows out of the edges. |
The upper rim of the filter holder is dirty. |
Clean the rim of the filter holder. |
|
|
|
|
|
|
There is too much coffee in the filter holder. |
Reduce the quantity of coffee using the meas- |
|
|
|
uring scoop. |
Please contact an authorised service centre for any problems not covered in the above table or when the suggested solutions do not solve the problem.
English
• 23 •

1 ALLGEMEINES
Die Kaffeemaschine eignet sich für die Zubereitung von 1 oder 2 Tassen Espresso und ist mit einer drehbaren Düse für die Dampfund die Heißwasserausgabe ausgestattet. Die Bedienelemente auf der Vorderseite des Geräts sind mit einfach verständlichen Symbolen gekennzeichnet.
Die Maschine wurde für den Einsatz im Haushalt entwickelt und eignet sich daher nicht für den Dauerbetrieb im gewerblichen Einsatz.
Achtung. In folgenden Fällen wird für eventuelle Schäden keine Haftung übernommen:
•Falsche und nicht den vorgesehenen Verwendungszwecken entsprechende Verwendung;
•Reparaturen, die nicht in autorisierten Kundendienststellen durchgeführt wurden;
•Veränderungen am Netzkabel;
•Veränderungen an beliebigen Bestandteilen der Maschine;
•Verwendung von anderen als originalen Ersatzund Zubehörteilen;
•Fehlende Entkalkung und Lagerung in Räumen bei Temperaturen unter 0°C.
In diesen Fällen erlischt die Garantie.
1.1 Hinweise zur einfacheren Lektüre
Das Warndreieck weist auf alle wichtigen Hinweise für die Sicherheit des Benutzers hin. Diese
Hinweise sind strikt zu beachten, um schwere Verletzungen zu vermeiden!
Der Bezug auf Abbildungen, Teile des Geräts oder Bedienelemente usw. erfolgt über Zahlen oder Buchstaben. In diesem Falle wird auf die Abbildung verwiesen.
Mit diesem Symbol werden Informationen gekennzeichnet, auf die besonders geachtet werden muss, um den Betrieb der Maschine zu optimieren.
Die dem Text entsprechenden Abbildungen befinden sich auf den ersten Seiten des Handbuchs. Diese Seiten sind beim Lesen der vorliegenden Bedienungsanleitung zu berücksichtigen.
Für weitere Informationen oder bei Problemen wenden Sie sich bitte an die autorisierten Kundendienststellen.
2 TECHNISCHE DATEN
Der Hersteller behält sich das Recht vor, technische Änderungen am Produkt vorzunehmen.
Nennspannung - Nennleistung - Versorgung
Siehe Schild auf dem Gerät
Gehäusematerial
Kunststoff
Abmessungen (L x H x T) (cm)
210 x 300 x 280
Gewicht
3,9 kg
Kabellänge
1,2 m
Bedienfeld
Auf der Vorderseite
Filterhalter
Druckverdichtet
Pannarello
Spezialzubehör für Cappuccinos
Wassertank
1,25 Liter - herausnehmbar
Pumpendruck
15 bar
Durchlauferhitzer
Rostfreier Edelstahl
Sicherheitsvorrichtungen
Thermostat mit manueller Rücksetzung
Thermosicherung
3 SICHERHEITSVORSCHRIFTEN
Die unter Strom stehenden Teile dürfen keinesfalls mit Wasser in Berührung kommen: Kurzschlussgefahr! Der heiße Dampf und das heiße Wasser können Verbrennungen verursachen! Nie den Dampfoder Heißwasserstrahl auf Körperteile richten und die Dampf-/ Heißwasserdüse immer vorsichtig anfassen: Verbrennungsgefahr!
1.2 Gebrauch dieser Bedienungsanleitung
Bewahren Sie diese Bedienungsanleitung an einem sicheren Ort auf und legen Sie sie der Kaffeemaschine immer bei, wenn diese von anderen Personen benutzt wird.
Sachgemäßer Gebrauch
Die Kaffeemaschine ist ausschließlich für den Gebrauch im Haushalt bestimmt. Technische Änderungen und unsachge-
• 24 •

mäßer Gebrauch sind wegen der damit verbundenen Risiken verboten! Die Maschine ist nicht dazu bestimmt, von Personen (einschließlich Kindern) mit eingeschränkten körperlichen oder geistigen Fähigkeiten oder einer Beeinträchtigung der Sinnesorgane und/oder von Personen ohne ausreichende Erfahrung oder Kompetenz verwendet zu werden, es sei denn, sie werden von einer Person überwacht, die für ihre Sicherheit verantwortlich ist oder sie werden im Gebrauch der Maschine geschult.
Stromversorgung
Die Kaffeemaschine darf ausschließlich an eine geeignete Steckdose angeschlossen werden. Die Spannung muss mit derjenigen übereinstimmen, die auf dem Typenschild des Geräts angegeben ist.
Netzkabel
Die Kaffeemaschine darf keinesfalls mit defektem Netzkabel betrieben werden. Bei Schäden am Netzkabel muss dieses vom Hersteller oder von dessen Kundendienst ausgetauscht werden. Das Netzkabel darf nicht in Ecken, über scharfe Kanten oder auf sehr heißen Gegenständen verlegt werden. Es sollte vor Öl geschützt werden.
Die Kaffeemaschine darf nicht am Kabel getragen oder gezogen werden. Der Stecker darf nicht durch Ziehen am Kabel herausgezogen werden. Er sollte nicht mit nassen Händen berührt werden.
Der freie Fall des Netzkabels von Tischen oder Regalen sollte vermieden werden.
Schutz anderer Personen
Kinder beaufsichtigen, damit sie nicht mit dem Gerät spielen. Kinder können die Gefahrensituationen, die durch Haushaltsgeräte entstehen können, nicht abschätzen.
Die für die Verpackung der Maschine benutzten Materialien sollten nicht in Reichweite von Kindern aufbewahrt werden.
Verbrennungsgefahr
Den Heißwasseroder Dampfstrahl keinesfalls auf sich selbst oder auf andere Personen richten. Stets die entsprechenden Griffe oder Regler benutzen.
Der Filterhalter darf keinesfalls während der Ausgabe des Kaffees herausgenommen (abgenommen) werden. Während der Aufheizphase der Brühgruppe besteht die Möglichkeit des Austritts von Tropfen heißen Wassers.
Keinen Kaffee ausgeben, wenn die Taste ( ) gedrückt ist. Die Dampffunktion ist angewählt und die Temperatur des Durchlauferhitzers ist zu hoch.
Standort
Die Kaffeemaschine sollte an einem sicheren Ort aufgestellt werden, an dem nicht die Gefahr des Umkippens oder der Ver-
letzung von Personen besteht.
Es besteht die Möglichkeit des Austritts von heißem Wasser oder Dampf: Verbrennungsgefahr!
Die Maschine sollte Temperaturen von unter 0°C nicht ausgesetzt werden. Es besteht die Gefahr, dass die Maschine durch gefrierendes Wasser beschädigt wird.
Die Kaffeemaschine darf nicht im Freien betrieben werden. Die Maschine nicht auf heißen Flächen oder in der Nähe von offenem Feuer aufstellen, da das Gehäuse schmelzen oder auf andere Art beschädigt werden könnte.
Reinigung
Bevor die Maschine gereinigt wird, müssen alle Tasten ausgeschaltet und dann der Stecker von der Steckdose abgenommen werden.
Darüber hinaus abwarten, bis die Maschine abgekühlt ist. Die Maschine keinesfalls in Wasser tauchen!
Der Versuch von Eingriffen im Inneren der Maschine ist strengstens verboten.
Wasser, das einige Tage lang im Wassertank verblieben ist, darf nicht für Lebensmittelzwecke genutzt oder getrunken werden. Den Tank reinigen und mit frischem Trinkwasser füllen.
Raumbedarf für den Betrieb und die Wartung
Für einen korrekten und einwandfreien Betrieb der Kaffeemaschine sollten folgende Empfehlungen berücksichtigt werden:
•Eine ebene Abstellfläche auswählen;
•Der Raum sollte ausreichend beleuchtet und hygienisch unbedenklich sein und die Steckdose muss leicht zugänglich sein;
•Gemäß der Angaben in der Abbildung einen Mindestabstand von den Maschinenwänden berücksichtigen (Abb. A).
Aufbewahrung der Maschine
Wird die Maschine für längere Zeit nicht benutzt, so ist sie auszuschalten und der Stecker ist aus der Steckdose zu ziehen. An einem trockenen und für Kinder unzugänglichen Ort aufbewahren. Vor Staub und Schmutz schützen.
Reparaturen / Wartungsarbeiten
Die Maschine bei Störungen, Defekten oder dem Verdacht auf Defekte nach einem Sturz nicht verwenden und unverzüglich den Netzstecker ziehen. Eine defekte Maschine keinesfalls in Betrieb setzen. Eingriffe und Reparaturen dürfen ausschließlich von autorisierten Kundendienststellen vorgenommen werden. Im Falle von nicht fachgerecht ausgeführten Eingriffen wird jede Haftung für eventuelle Schäden abgelehnt.
Brandschutz
Im Brandfall einen Kohlensäurelöscher (CO2) verwenden. Keinesfalls sind Wasseroder Pulverlöscher einzusetzen.
Deutsch
• 25 •

Legende der Maschinenbestandteile (S. 2)
1Bedienfeld
2Deckel des Wassertanks
3 Drehknopf Heißwasser / Dampf
4Aufnahme für das Zubehör
5Wassertank
6 Halterung Tassenabstellfläche
7Wasserauffangschale + Gitter
8Kaffeebrühgruppe
9 Dampfdüse (Pannarello)
10Netzkabel
11Druckfilterhalter
12Messlöffel für gemahlenen Kaffee
13Filter für gemahlenen Kaffee
(ein Filter für die Ausgabe von 1 oder 2 Tassen Kaffee)
14Filteradapter für Kaffeepads
15Filter für Kaffeepads
16Taste ON/OFF
17Kontrolllampe "Maschine ein" Leuchtet auf = Maschine ein Ausgeschaltet = Maschine aus
18Taste für die Kaffeeausgabe
19Kontrolllampe Kaffee / Wasser - "Maschine bereit" Leuchtet auf = In Ordnung für die KaffeeHeißwasserausgabe Ausgeschaltet = Niedrige Temperatur für die KaffeeHeißwasserausgabe
20Dampfschalter
21Kontrolllampe "Dampf bereit"
Leuchtet auf = In Ordnung für die Dampfausgabe Ausgeschaltet = Niedrige Temperatur für die Dampfausgabe
4AUFSTELLUNG
Für Ihre eigene Sicherheit und die der anderen müssen die “Sicherheitsvorschriften” im Kap. 3 strikt eingehalten werden.
4.1 Verpackung
Die Original-Verpackung wurde für den Schutz der Maschine während des Versands entwickelt und hergestellt. Es wird empfohlen, diese Verpackung für eventuelle zukünftige Transporte aufzubewahren.
4.2 Installationshinweise
Bevor die Maschine installiert wird, müssen die folgenden Sicherheitsvorschriften beachtet werden:
•die Maschine an einem sicheren Ort aufstellen;
•sicherstellen, dass Kinder nicht mit der Maschine spielen können;
•die Maschine nicht auf heißen Flächen oder in der Nähe von offenem Feuer aufstellen.
Nun kann die Kaffeemaschine an das Stromnetz angeschlossen werden.
 Hinweis: Es wird empfohlen, die Bestandteile
  vor deren Benutzung und/oder nach einer län-
geren Nichtbenutzung zu reinigen.
4.3Wassertank
•(Abb. 1A) - Den Deckel des Wassertanks (2) abnehmen, indem er angehoben wird.
•(Abb. 1B) - Den Wassertank (5) herausnehmen.
 Hinweis: An der Seite des Wassertanks (5) ist
  das Maschinenzubehör vorhanden.
•(Abb.2) - Den Tank ausspülen und mit frischem Trinkwasser füllen. Dabei nicht zu viel Wasser einfüllen.
In den Tank stets ausschließlich frisches Trink-  wasser ohne Kohlensäure einfüllen. Heißes Wasser oder andere Flüssigkeiten können den Tank beschädigen. Die Maschine niemals ohne Wasser betreiben: sicherstellen, dass im Tank eine ausreichende
Menge Wasser vorhanden ist.
•(Abb. 3) - Den Tank einsetzen und sicherstellen, dass dieser korrekt in seine Aufnahme positioniert wird. Dann den Deckel (2) wieder aufsetzen.
Sicherstellen, das der Tank korrekt in die Maschine eingesetzt ist, indem er sorgfältig bis zum Anschlag gedrückt wird, um Wasseraustritte aus
der Unterseite zu vermeiden (DER IN ABB. 4 ANGEGEBENE BEZUGSPUNKT MUSS VOLLSTÄNDIG SICHTBAR SEIN).
4.4 Anschluss der Maschine
Elektrischer Strom kann gefährlich sein! Aus  diesem Grunde müssen die Sicherheitsvorschriften stets strikt beachtet werden. Defekte Kabel dürfen keinesfalls benutzt werden! Beschädigte oder defekte Kabel und Stecker müssen umgehend von ei-
ner autorisierten Kundendienststelle ersetzt werden.
Die Spannung des Geräts wurde werkseitig eingestellt. Überprüfen, ob die Netzspannung den auf dem Typenschild auf der Unterseite der Maschine aufgeführten Angaben entspricht.
• 26 •

•Sicherstellen, dass die Taste ON/OFF (16) NICHT vor dem Anschluss der Maschine an das Stromnetz gedrückt wurde.
•Den Stecker in eine Wandsteckdose mit geeigneter Spannung einstecken.
4.5 Entlüftung des Systems
Bei der ersten Inbetriebnahme, nach der Dampfausgabe und wenn kein Wasser mehr im Tank vorhanden ist, muss das System der Maschine stets entlüftet werden.
•(Abb. 5) - Die Taste ON/OFF (16) drücken, die Kontrolllampe (17) leuchtet auf.
•(Abb. 6) - Einen Behälter unter die Dampfdüse stellen. Den Drehknopf (3) “Heißwasser/Dampf” öffnen, indem er im Gegenuhrzeigersinn gedreht wird.
•(Abb. 7) - Die Taste für die Kaffeeausgabe (18) drücken.
•Abwarten, bis aus der Dampfdüse (Pannarello) ein regelmäßiger Wasserstrahl austritt.
•(Abb. 7) - Die Taste für die Kaffeeausgabe (18) erneut drücken, um die Ausgabe zu beenden.
•(Abb. 8) - Den Drehknopf (3) “Heißwasser/Dampf” schließen, indem er im Uhrzeigersinn gedreht wird. Den Behälter entfernen.
Die Maschine ist nun für die Ausgabe von Kaffee und Dampf bereit. Für die Einzelheiten zum Betrieb wird auf die entsprechenden Kapitel verwiesen.
4.6Erste Inbetriebnahme oder Benutzung nach längerer Nichtbenutzung
Dieser einfache Vorgang gewährleistet eine optimale Ausgabe und muss ausgeführt werden:
-bei der ersten Inbetriebnahme;
-oder nach einem längeren Zeitraum der Nichtbenutzung der Maschine (länger als 2 Wochen).
Das während dieses Prozesses ausgegebene  Wasser muss über einen entsprechenden Abfluss entsorgt werden und darf nicht für Lebensmittelzwecke verwendet werden. Sollte der Behälter während des Zyklus voll werden, muss die Ausgabe gestoppt und der Behälter geleert werden, bevor der Vorgang fort-
gesetzt wird.
A(Abb. 2) - Den Tank ausspülen und mit frischem Trinkwasser füllen.
B(Abb. 6) - Einen Behälter unter die Dampfdüse stellen. Den Drehknopf (3) langsam öffnen, indem er im Gegen-
uhrzeigersinn gedreht wird.
(Abb. 7) - Die Taste für die Kaffeeausgabe (18) drücken.
CDen gesamten Inhalt des Wassertanks über die Heißwas- ser-/Dampfdüse abfließen lassen.
(Abb. 7) - Die Taste für die Kaffeeausgabe (18) erneut drücken, um die Ausgabe zu beenden.
(Abb. 8) - Den Drehknopf (3) schließen, indem er im Uhrzeigersinn gedreht wird.
D(Abb. 2) - Den Wassertank mit frischem Trinkwasser füllen.
E(Abb. 15-16) - Den Filterhalter von unten in die Brühgruppe (8) einsetzen und von links nach rechts drehen, bis er einrastet.
F Einen geeigneten Behälter unter den Filterhalter stellen.
G(Abb. 18) - Die Taste für die Kaffeeausgabe (18) drücken und das gesamte im Tank vorhandene Wasser ablassen. Ist kein Wasser mehr vorhanden, die Ausgabe abbrechen, indem erneut die Taste für die Kaffeeausgabe (18) gedrückt wird.
Anschließend den Behälter entleeren.
H(Abb. 20) - Den Filterhalter durch Drehung von rechts nach links aus der Brühgruppe herausnehmen und mit frischem Trinkwasser ausspülen.
IDanach ist die Maschine betriebsbereit.
5 KAFFEEAUSGABE
Achtung! Die Herausnahme des Druckfilterhal-  ters durch Drehung im Uhrzeigersinn von Hand während der Ausgabe des Kaffees ist verboten. Ver-
brennungsgefahr.
•Während dieses Vorgangs kann sich die Kontrolllampe "Maschine bereit" (19) einund ausschalten. Dieser Betrieb ist völlig normal und nicht als Störung zu betrachten.
•Vor dem Gebrauch sicherstellen, dass der Drehknopf (3) Heißwasser/Dampf geschlossen ist und der Wassertank der Maschine eine ausreichende Menge Wasser enthält.
•(Abb. 5) - Die Taste ON/OFF (16) drücken, die Kontrolllampe (17) leuchtet auf.
•Abwarten, bis die Kontrolllampe "Maschine bereit" (19) aufleuchtet. Nun ist die Maschine für die Kaffeeausgabe bereit.
5.1Betrieb mit gemahlenem Kaffee
•(Abb. 9) - Den Filter (13) in den Druckfilterhalter (11) einsetzen. Bei der ersten Benutzung ist der Filter bereits eingesetzt.
Deutsch
• 27 •

•(Abb. 15) - Den Druckfilterhalter von unten in die Brühgruppe (8) einsetzen.
•(Abb. 16) - Den Filterhalter von links nach rechts drehen, bis er einrastet. Den Griff des Druckfilterhalters loslassen. Ein automatisches System versetzt den Griff nun wieder leicht nach links.
Diese Bewegung gewährleistet die korrekte Funktion des Druckfilterhalters.
•(Abb.18) - Den Druckfilterhalter vorwärmen, indem die Taste für die Kaffeeausgabe (18) gedrückt wird. Das Wasser beginnt, aus dem Druckfilterhalter auszuströmen (dieser
Vorgang ist lediglich für den ersten Kaffee erforderlich).
•Nachdem 150 cm³ Wasser durchgelaufen sind, wird erneut die Taste für die Kaffeeausgabe (18) gedrückt, um die Ausgabe des heißen Wassers zu stoppen.
•(Abb. 16) - Den Filterhalter durch Drehung von rechts nach links aus der Maschine herausnehmen und das Restwasser ausschütten.
•(Abb. 35) - Den Messlöffel aus der Maschine entnehmen.
•(Abb. 10) - 1 oder 1,5 Messlöffel für einen einzelnen Kaffee oder 2 gestrichene Messlöffel für einen doppelten Kaffee in den Filter geben. Den Kaffeesatz vom Rand des Filterhalters entfernen.
•(Abb. 15) - Den Filterhalter (11) von unten in die Brühgruppe (8) einsetzen.
•(Abb. 16) - Den Filterhalter von links nach rechts drehen, bis er einrastet.
•(Abb. 17) - 1 oder 2 vorgewärmte Tassen unter den Filterhalter stellen. Überprüfen, ob diese korrekt unter den Kaffeeausgabeöffnungen stehen.
•(Abb. 18) - Die Taste für die Kaffeeausgabe (18) drücken.
•Nachdem die gewünschte Kaffeemenge ausgegeben wurde, erneut die Taste für die Kaffeeausgabe (18) drücken, um die Ausgabe des Kaffees zu stoppen und die Tassen mit dem Kaffee entnehmen (Abb. 19).
•(Abb. 20) - Zum Abschluss der Ausgabe einige Sekunden abwarten, dann den Filterhalter herausnehmen und den Kaffeesatz entfernen.
Hinweis: Im Filterhalter verbleibt eine geringe Menge Wasser. Dies ist normal und auf die Ei-
genschaften des Filterhalters zurückzuführen.
 Wichtiger Hinweis: Der Filter (13) muss stets
  sauber gehalten werden, um ein optimales Ergebnis zu gewährleisten. Täglich nach Gebrauch rei-
nigen (Abb. 21).
5.2Betrieb mit Kaffeepads
•(Abb. 11) - Unter Verwendung eines Kaffeelöffels den Filter für gemahlenen Kaffee (13) aus dem Druckfilterhalter (11) herausnehmen.
•(Abb. 12) - Den Adapter für Kaffeepads (14) mit der gewölbten Seite nach unten in den Druckfilterhalter (11) einsetzen.
•(Abb. 13) - Danach den Filter für Kaffeepads (15) in den Druckfilterhalter (11) einsetzen.
•(Abb. 15) - Den Druckfilterhalter von unten in die Brühgruppe (8) einsetzen.
•(Abb. 16) - Den Filterhalter von links nach rechts drehen, bis er einrastet. Den Griff des Druckfilterhalters loslassen. Ein automatisches System versetzt den Griff nun wieder leicht nach links.
Diese Bewegung gewährleistet die korrekte Funktion des Druckfilterhalters.
•(Abb.18) - Den Druckfilterhalter vorwärmen, indem die Taste für die Kaffeeausgabe (18) gedrückt wird. Das Wasser beginnt, aus dem Druckfilterhalter auszuströmen (dieser
Vorgang ist lediglich für den ersten Kaffee erforderlich).
•Nachdem 150 cm³ Wasser durchgelaufen sind, wird erneut die Taste für die Kaffeeausgabe (18) gedrückt, um die Ausgabe des heißen Wassers zu stoppen.
•(Abb. 20) - Den Druckfilterhalter durch Drehung von rechts nach links aus der Maschine herausnehmen und das Restwasser ausschütten.
•(Abb. 14) - Den Kaffeepad in den Filterhalter einlegen. Sicherstellen, dass das Papier des Kaffeepads nicht über den Filterhalter übersteht.
•(Abb. 15) - Den Druckfilterhalter von unten in die Brühgruppe (8) einsetzen.
•(Abb. 16) - Den Filterhalter von links nach rechts drehen, bis er einrastet.
•1 vorgewärmte Tasse entnehmen und unter den Filterhalter stellen. Überprüfen, ob diese korrekt unter den Kaffeeausgabeöffnungen steht.
•(Abb. 18) - Die Taste für die Kaffeeausgabe (18) drücken.
•Nachdem die gewünschte Kaffeemenge ausgegeben wurde, erneut die Taste für die Kaffeeausgabe (18) drücken, um die Ausgabe des Kaffees zu stoppen und die Tasse mit dem Kaffee entnehmen.
•(Abb. 20) - Zum Abschluss der Ausgabe einige Sekunden abwarten, dann den Filterhalter herausnehmen und den verbrauchten Kaffeepad entfernen.
• 28 •

 Wichtiger Hinweis: Der Filter (15) und der Adapter
  (14) müssen stets sauber gehalten werden, um ein optimales Ergebnis zu gewährleisten. Täglich nach
Gebrauch reinigen (Abb. 21).
6AUSWAHL DER KAFFEESORTE EMPFEHLUNGEN
Im Allgemeinen können alle handelsüblichen Kaffeesorten verwendet werden.
Dennoch handelt es sich bei Kaffee um ein Naturprodukt und sein Geschmack ist je nach Ursprungsland und Mischung unterschiedlich. Aus diesem Grunde sollten verschiedene Sorten probiert werden, um die Mischung zu ermitteln, die den persönlichen Vorlieben am besten gerecht wird.
Für optimale Ergebnisse empfehlen wir, nur ausdrücklich für die Zubereitung in Espressomaschinen zusammengestellte Mischungen zu verwenden. Der Kaffee sollte stets gleichmäßig aus dem Druckfilterhalter austreten und dabei keine Tropfen bilden.
Die Geschwindigkeit des Austritts des Kaffees kann geändert werden, indem der Umfang der Kaffeeportion im Filter leicht variiert und/oder ein Kaffee mit einem anderen Mahlgrad verwendet wird.
Um ein optimales Ergebnis in der Tasse zu gewährleisten und die Reinigung und Zubereitung zu erleichtern, empfiehlt GAGGIA die Verwendung von Einzelportionen-Kaffeepads mit dem Markenzeichen ESE.
BEVOR DAMPF ODER HEISSES WASSER AUSGEGE-  BEN WIRD, MUSS ÜBERPRÜFT WERDEN, OB DIE DAMPFDÜSE AUF DIE WASSERAUFFANGSCHALE GERICH-
TET IST.
HEISSWASSER
Verbrennungsgefahr! Am Anfang der Ausgabe können kurze Heißwasserspritzer austreten.
Die Ausgabedüse kann hohe Temperaturen erreichen: Nicht direkt mit den Händen berühren.
•(Abb. 5) - Die Taste ON/OFF (16) drücken, die Kontrolllampe (17) leuchtet auf.
•Warten, bis die Kontrolllampe (19) "Maschine bereit" leuchtet; die Maschine ist nun bereit.
•Während dieses Vorgangs kann sich die Kontrolllampe "Maschine bereit" (19) einund ausschalten. Dieser Betrieb ist völlig normal und nicht als Störung zu betrachten.
•(Abb. 22) - Einen Behälter unter die Dampfdüse stellen. Den Drehknopf (3) “Heißwasser/Dampf” öffnen, indem er im Gegenuhrzeigersinn gedreht wird.
•(Abb. 23) - Die Taste für die Kaffeeausgabe (18) drücken.
•(Abb. 23) - Nach der Entnahme der gewünschten Menge von heißem Wasser erneut die Taste für die Kaffeeausgabe (18) drücken.
•(Abb. 24) - Den Drehknopf (3) “Heißwasser/Dampf” schließen, indem er im Uhrzeigersinn gedreht wird. Den Behälter entfernen.
8 DAMPF / CAPPUCCINO
Verbrennungsgefahr! Am Anfang der Ausgabe können kurze Heißwasserspritzer austreten.
Die Ausgabedüse kann hohe Temperaturen erreichen: nicht direkt mit den Händen berühren.
Achtung! Keinen Kaffee ausgeben, wenn die  Dampffunktion angewählt ist, da die Temperatur dann zu hoch ist und die Gefahr von Verbrennungen
besteht.
•(Abb. 5) - Die Taste ON/OFF (16) drücken, die Kontrolllampe (17) leuchtet auf.
•Warten, bis die Kontrolllampe (19) "Maschine bereit" aufleuchtet.
•(Abb. 19) - Den Dampfschalter (20) drücken. Die Kontrolllampe "Maschine bereit" (19) schaltet sich aus.
•Warten, bis die Kontrolllampen "Maschine bereit" (19) und "Dampf bereit" (21) leuchten; nun ist die Maschine für die Dampfausgabe bereit.
•Während dieses Vorgangs können sich die Kontrolllampen (19) und (21) einund ausschalten. Dieser Betrieb ist völlig normal und nicht als Störung zu betrachten.
•(Abb. 26) - Einen Behälter unter die Dampfdüse stellen
Deutsch
• 29 •

und den Drehknopf (3) für kurze Zeit öffnen, um das Restwasser aus der Dampfdüse ablaufen zu lassen. Nach kurzer Zeit tritt dann nur noch Dampf aus.
•(Abb. 27) - Den Drehknopf (3) schließen und den Behälter entfernen.
•Den Behälter, der für die Cappuccinozubereitung benutzt werden soll, zu 1/3 mit kalter Milch füllen.


 Für ein gutes Ergebnis kalte Milch verwenden
•(Abb. 28) - Die Dampfdüse in die Milch tauchen und den Drehknopf (3) öffnen, indem er im Gegenuhrzeigersinn gedreht wird. Den Behälter mit der Milch langsam von unten nach oben drehen, um ein gleichmäßiges Aufheizen zu gewährleisten.
•(Abb. 29) - Abschließend den Drehknopf (3) schließen. Den Behälter mit der aufgeschäumten Milch entnehmen.
•(Abb. 25) - Den Dampfschalter (20) erneut drücken.
•Die Vorgehensweise für die Entlüftung des Systems, die im Abschn. 4.5 beschrieben wird, ausführen, um die Maschine betriebsbereit zu machen.
Keinen Kaffee ausgeben, wenn die Taste ( ) gedrückt ist oder die Kontrolllampe 21 leuchtet.
Die Dampffunktion ist angewählt und die Temperatur des Durchlauferhitzers ist zu hoch.
Vor der Ausgabe eines Kaffees abwarten, bis die "Kaffee bereit" Kondition (Kontrolllampe 19 aufleuchtet) aktiv ist.
 Hinweis: Die Maschine ist betriebsbereit, wenn
  die Kontrolllampe "Maschine bereit" (19) dau-
erhaft aufleuchtet.
 Hinweis: Wenn es nicht gelingt, den Cappuc-
  cino wie beschrieben zuzubereiten, muss das System wie im Abschn. 4.5. beschrieben gefüllt und der
Vorgang wiederholt werden.
 Auf dieselbe Weise können auch andere Getränke erhitzt werden.
•Nach diesem Vorgang die Dampfdüse mit einem feuchten Tuch reinigen.
9 REINIGUNG
Die Wartung und die Reinigung dürfen nur dann durchgeführt werden, wenn die Maschine vom Stromnetz abgenommen wurde und abgekühlt ist.
•Die Maschine darf nicht in Wasser getaucht werden. Teile der Maschine dürfen nicht in der Spülmaschine gereinigt werden.
•Für die Reinigung sollten kein Äthylalkohol, Lösungsmittel und/oder chemisch aggressive Produkte verwendet werden.
•Es wird empfohlen, den Wassertank täglich zu reinigen und mit frischem Trinkwasser zu füllen.
•(Abb. 31-33) - Den äußeren Bereich des Pannarellos täglich nach dem Erhitzen von Milch abnehmen und mit frischem Trinkwasser waschen.
•(Abb. 31-32-33) - Die Dampfdüse muss wöchentlich gereinigt werden. Dazu wie folgt vorgehen:
-Den äußeren Teil des Pannarellos (für die regelmäßige Reinigung) entfernen;
-Den oberen Teil des Pannarellos von der Dampfdüse abziehen;
-Den oberen Bereich des Pannarellos mit frischem Trinkwasser reinigen;
-Die Dampfdüse mit einem feuchten Tuch reinigen und eventuelle Milchrückstände entfernen;
-Den oberen Teil der Dampfdüse wieder anbringen (sicherstellen, dass diese vollständig eingesetzt ist);
-Den äußeren Teil des Pannarellos wieder montieren.
•(Abb. 34) - Die Abtropfschale täglich entleeren und reinigen.
•Für die Reinigung des Geräts ein weiches, leicht mit Wasser befeuchtetes Tuch verwenden.
•(Abb. 21) - Für die Reinigung des Druckfilterhalters ist wie folgt vorzugehen:
-(Abb. 11) - Den Filter herausnehmen und sorgfältig mit warmem Wasser reinigen.
-Den Adapter (sofern vorhanden) herausnehmen und sorgfältig mit warmem Wasser reinigen.
-Den Innenbereich des Druckfilterhalters reinigen.
•Die Vorrichtung und deren Bestandteile nicht unter Verwendung einer Mikrowelle oder eines herkömmlichen Backofens trocknen.
• 30 •
 Loading...