

Page 1
RADAR REMOTE DISPLAY
Back
FMD-1712
Page 2

A
(
C
9-52, Ashihara-cho,
Nishinomiya, Japan
Telephone: 0798-65-2111
Telefax: 0798-65-4200
ll rights reserved.
Printed in Japan
Your Local Agent/Dealer
FIRST EDITION : AUG. 2000
C : FEB. 5,2001
PUB. No. OME-34930
DAMI)
FMD-1712
Page 3
SAFETY INSTRUCTIONS
Safety Information for the Operator
WARNING
ELECTRICAL SHOCK HAZARD
Do not open the equipment.
Only qualified personnel
should work inside the
equipment.
Do not disassemble or modify the
equipment.
Fire, electrical shock or serious injury can
result.
Turn off the power immediately if water
leaks into the equipment or the equipment is emitting smoke or fire.
Continued use of the equipment can cause
fire or electrical shock.
Use the proper fuse.
CAUTION
A warning label is attached to the
display unit. Do not remove the label.
If the label is missing or damaged,
contact a FURUNO agent or dealer.
WARNING
To avoid electrical shock, do not
remove cover. No user-serviceable
parts inside.
Name: Warning Label (1)
Type: 86-003-1011-0
Code No.: 100-236-230
Fuse rating is shown on the equipment.
Use of a wrong fuse can result in equipment
damage.
Keep heater away from equipment.
Heat can alter equipment shape and melt
the power cord, which can cause fire or
electrical shock.
i
Page 4
Safety Information for the Installer
WARNING
Do not open the equipment
unless totally familiar with
electrical circuits and
service manual.
ELECTRICAL
SHOCK
HAZARD
Turn off the power at the mains switchboard before beginning the installation.
Fire, electrical shock or serious injury can
result if the power is left on or is applied
while the equipment is being installed.
Be sure that the power supply is
compatible with the voltage rating of
the equipment.
Connection of an incorrect power supply
can cause fire or equipment damage. The
voltage rating of the equipment appears
on the label above the power connector.
Only qualified personnel
should work inside the
equipment.
CAUTION
Ground the equipment to
prevent mutual interference.
Observe the following compass safe
distances to prevent interference to a
magnetic compass:
Standard Steering
compass compass
0.9 m 0.6 m
Use only the specified power cable.
Fire or equipment damage can result if a
different cable is used.
ii
Page 5

TABLE OF CONTENTS
FOREWORD.....................................................iv
SYSTEM CONFIGURATION.............................v
EQUIPMENT LIST............................................vi
1. OPERATION................................................1
1.1 Controls.................................................1
1.2 Turning the Remote Display On/Off......2
1.3 TX Key ..................................................2
1.4 LCD Tone and Brilliance.......................2
1.5 Operation Conventions.........................2
1.6 Indications and Markers........................3
1.7 Selecting the Range .............................4
1.8 Receiver Sensitivity ..............................4
1.9 Suppressing Sea Clutter.......................4
1.10 Suppressing Rain Clutter....................5
1.11 Range Rings .......................................6
1.12 Cursor .................................................6
1.13 Heading Line.......................................6
1.14 Measuring the Range.........................6
1.15 Measuring the Bearing........................7
1.16 Shifting the Display.............................7
1.17 Zoom...................................................7
1.18 Menu Overview...................................8
1.19 Control Panel Illumination...................8
1.20 T arget T rails ........................................9
1.21 Guard Alarm Zone ..............................9
1.22 Interference Rejector .......................10
1.23 Echo Stretch......................................11
1.24 Navigation Data ................................11
1.25 Navigation Data During Standby...... 12
1.26 Echoes in Gray or White.................. 12
1.27 Selecting Ranges to Use................. 12
2. MAINTENANCE, TRO UBLESHOOTING 13
2.1 Maintenance ...................................... 13
2.2 Replacing the Fuse............................13
2.3 Troubleshooting ................................. 14
2.4 Restoring Default Settings................. 14
3. INST ALLATION ........................................ 15
3.1 Display Unit Installation...................... 15
3.2 Wiring................................................. 16
3.3 Selecting Radar Display,
Remote Display Function.................. 20
3.4 Adjustments........................................ 20
3.5 Confirming Data Sentences............... 21
SPECIFICATIONS...................................... SP-1
PACKING LIST..............................................A-1
OUTLINE DRAWING.....................................D-1
INTERCONNECTION DIAGRAM .................S-1
INDEX ...................................................Index-1
iii
Page 6

FOREWORD
A Word to FURUNO FMD-1712 Owners
FURUNO Electric Company thanks you for
purchasing the FMD-1712 Radar Remote
Display. We are confident you will discover
why the FURUNO name has become
synonymous with quality and reliability.
For over 50 years FURUNO Electric
Company has enjoyed an enviable
reputation for quality and reliabilit y
throughout the world. This dedication to
excellence is furthered by our extensive
global network of agents and dealers.
Your remote display is designed and
constructed to meet the rigorous dem ands
of the marine environment. However, no
machine can perform its intended function
unless properly installed and maintained.
Please carefully read and follow the
operation, maintenance and installation
procedures set forth in this manual.
We would appreciate feedback from you,
the end-user, about whether we are
achieving our purposes.
Thank you for considering and purchasing
FURUNO.
Features
The FMD-1712 is a remote display
designed for use with the radar Model 1712,
Model 1622. Your remote display has a
large variety of functions, all contained in a
rugged plastic case. All controls respond
immediately to the operator’s command and
each time a key is pressed the
corresponding change can be seen on the
screen. The RANGE, GAIN and STC
controls are commonly set. All other
controls may be operated independent ly.
The main features of the FMD-1712 are
• High definition 7-inch LCD shows echoes
in four shades of gray.
• Automatic control of sensitivity and sea
clutter suppression for simplified
operation.
• Targets can be displayed in gray on white
background or vice versa, for optimal
viewing under any lighting.
• On-screen alphanumeric readout of all
operational informat ion.
• Standard features include Display Shift,
EBL, Echo Stretch, Target Trail, Guard
Alarm, Interference Rejector, VRM,
Zoom.
• Guard zone watches for targets entering
(or exiting) a guard zone.
iv
• Operates on 12 V or 24 V power and
maximum power consumption is 8 watts.
• Position in latitude and longitude, speed,
and range and bearing to a waypoint can
be shown in the bottom text area.
(Requires navigation data input in NMEA
0183 format.)
• LCD equipped with temperature sensor
which maintains excellent LCD viewability
under temperature change.
Page 7
SYSTEM CONFIGURATION
RADAR
MODEL 1712
or
MODEL 1622
External Buzzer
OP03-168
DISPLAY UNIT
RDP-137
Rectifier
PR-62
Ship's Mains
100/110/
220/230 VAC
1φ, 50/60 Hz
Navigator (GPS, etc.)/
Video Sounder
OR
Video Sounder
NMEA 0183
Navigator (GPS, etc.)
Option
Local Supply
12-24 VDC
v
Page 8
EQUIPMENT LIST
Standard Supply
Name Type Code No. Qty Remarks
Display
Unit
Spare
Parts
Installation
Materials
RDP-137 − 1 w/hanger, cover
SP03 - 09800 000-085- 441 1 set
CP03-21100 000-087-761 No signal cable
CP03-21110 000-087-762 5 m signal cable
CP03-21120 000-087-763 10 m signal cable
CP03-21130 000-087-764 20 m signal cable
CP03-21140 000-087-765
1 set
Fuse (Type: FGBO-A 5A 125 VAC,
Code No.: 000-549-064)
30 m signal cable
Installation Materials
Name Type Code No. Qty Remarks
Signal Cable (5 m) MJ-A10SPF0008-050 000-143-494
Signal Cable (10 m) MJ-A10SPF0008-100 000-143-495
Signal Cable (20 m) MJ-A10SPF0008-200 000-143-496
Signal Cable (30 m) MJ-A10SPF0008-300 000-143-497
Power Cable Assy. 03S9148 000-129-613 1
w/power cable and
installation materials
CP03-21101. See
Installation Materials
below for de tails.
Select one,
1
connector at
both ends
Connector,
fuse, 3.5 m
Installation Materials CP03-21101 (Code No. 008-507-090)
Name Type Code No. Qty Remarks
Dummy Film 03-118-1103-0 100-185-380 1 set
Ta pping Screw 5X20 000-802-081 4
Screw 3X12 000-805-905 4
MJ-XH Connector 03-2023(10-10P) 008-506-980 1
Optional Equipment
Name Type Code No. Qty Remarks
Cable
Assy.
Rectifier
External
Buzzer
MJ-A6SPF0003-050 000-117-603 1 Connector at one end, 5 m
MJ-A6SPF0009-100 000-125-236 1 Connector at one end, 10 m
PR-62 000-013-484 110 VAC ship’s mains
PR-62 000-013-485 110 VAC ship’s mains
PR-62 000-013-486 220 VAC ship’s mains
PR-62 000-013-487
OP03-168 008-462-790 1
Select
one
230 VAC ship’s mains
Connector at one en d,
1 m, MJ-XH connector
vi
Page 9
1.
OPERATION
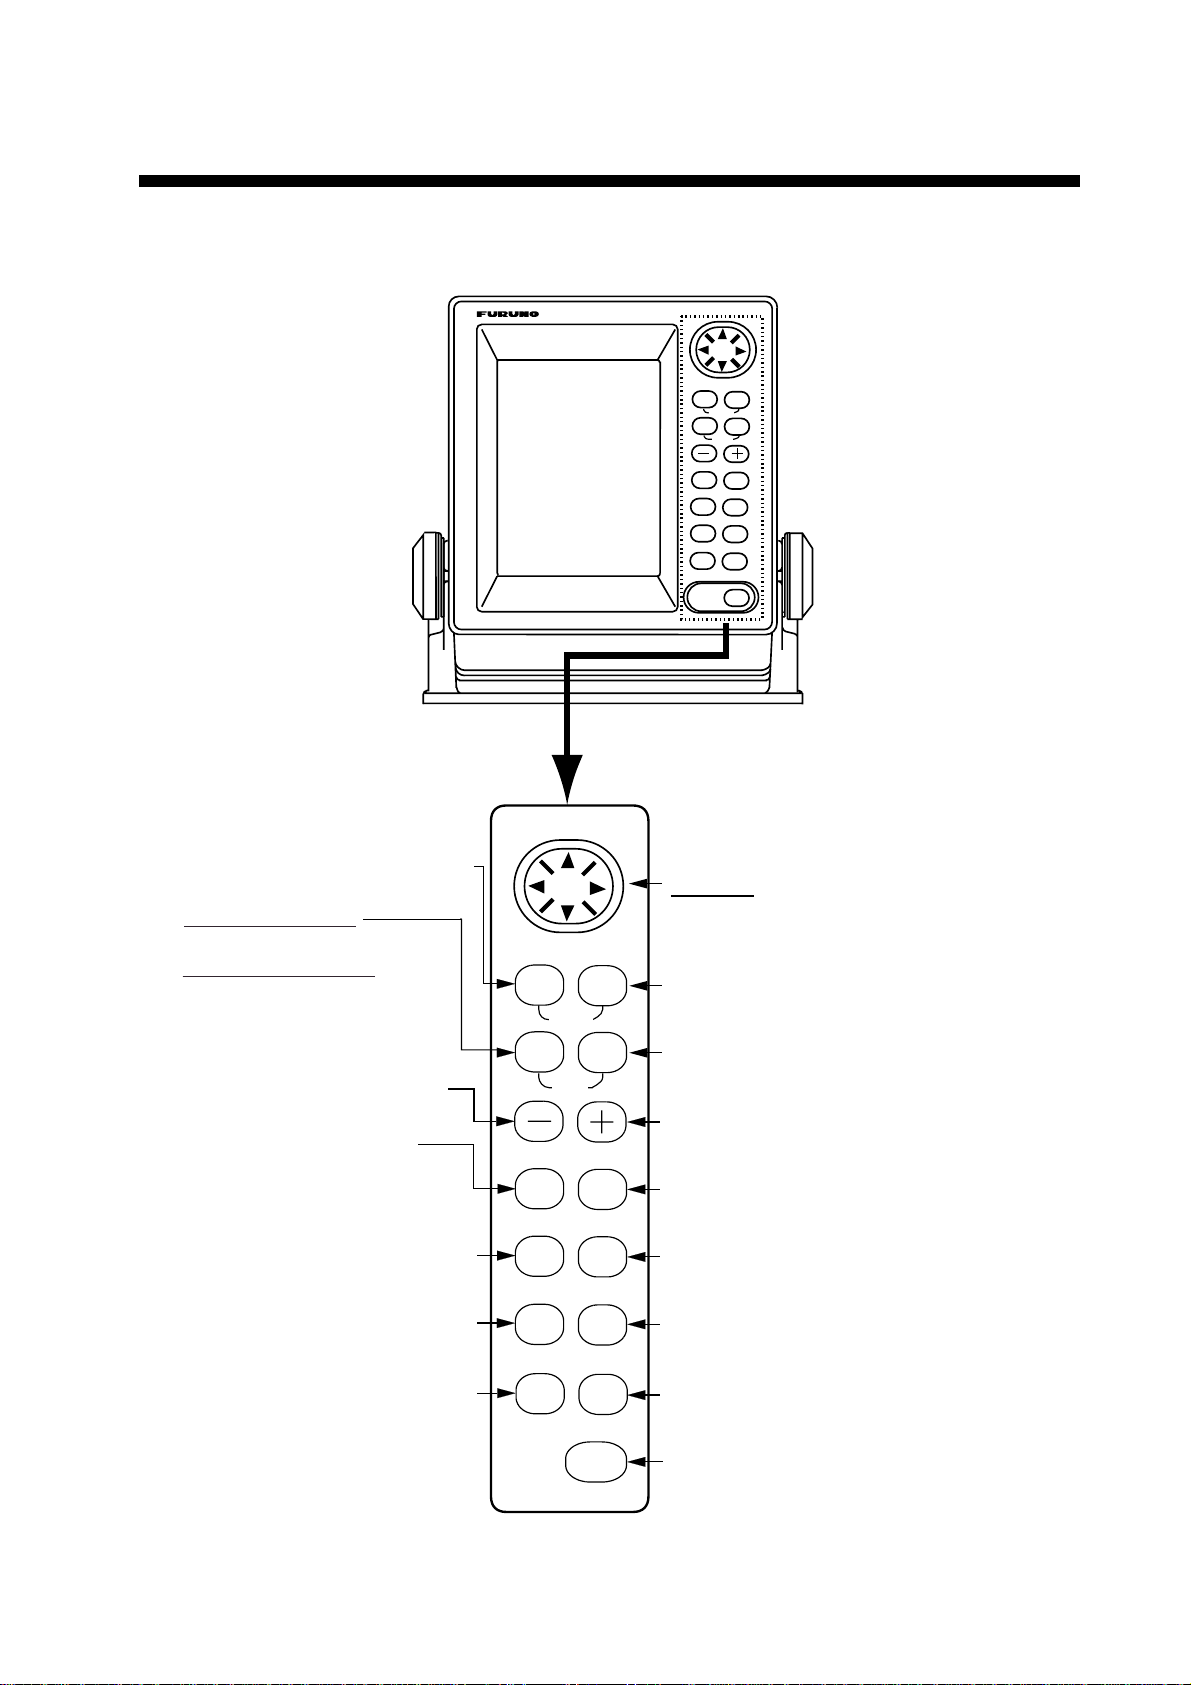
1.1 Controls
MENU
GAIN
FTC
TRAIL
TONE
GUARD
HL OFF
EBL
VRM
RINGS
RANGE
STC
SHIFT
ZOOM
TX
POWER
Opens/closes the menu.
Touch-and-release:
Turns EBL on/off.
Press and hold down:
Selects unit for depth
and water temperature
in standby nav data display.
Decreases the range.
·
Adjusts receiver sensitivity.
·
Toggles between magnetic
and true bearings on normal
and standby nav data displays.
Turns rain clutter suppressor on/off.
Turns target trails on/off.
Adjusts tone and brilliance of LCD.
MENU
GUARD
HL OFF
EBL
GAIN
FTC
TRAIL ZOOM
TONE
VRM
RINGS
RANGE
STC
SHIFT
TX
Omnipad
• Shifts cursor, VRM, EBL.
• Selects options on menus.
•Activates/disables the guard zone.
•Press with [MENU] to hide heading line.
• Turns VRM on/off.
•Press with [EBL] to turn range rings on/off.
Increases the range.
Suppresses sea clutter.
Turns shifted display on/off.
Turns zoom on/off.
Turns radar picture on/off.
POWER
Turns power on/off.
Figure 1-1 Control panel
1
Page 10
1.2 Turning the Remote Display
1.5 Operation Conventions
On/Off
The [POWER] key turns the remote display
on/off.
1.3 TX Key
The [TX] key functions to toggle the radar
picture and stand-by condition. Note that
the remote display cannot control the
transmit and standby functions of the radar.
The main radar and remote display do not
operate jointly unless a key among RANGE,
GAIN or STC is operated.
1.4 LCD Tone and Brilliance
1. Press the [TONE] key. The dialog box
shown in Figure 1-1 appears.
TONE: 12
▲
LOW HIGH
▲
The main radar (Model 1712 or 1622) must
be powered and transmitting t o display the
radar picture on the remote display. If the
main radar is off, in standby, or there is
antenna trouble, the remote display shows
the indications HD-SIG-MISS and BP-SIGMISS.
RANGE, GAIN and STC controls
• The RANGE, GAIN and STC controls are
commonly set. (Other controls may be
independently set.) That is, when one of
those controls is adjusted, the main radar
or remote display receiving the command
is automatically set accordingly. STC and
GAIN adjustment methods (automatic
and manual) are also commonly
switched.
• The last-operated control among G A IN,
RANGE and STC takes priority when the
main radar and remote display are
operated simultaneously. Therefore, if
your command was not accepted the
reason may be simultaneous operation.
BRILL: 3
LOW ▼ ▲ HIGH
Figure 1-2 Dialog box for adjustment of
brilliance and tone of LCD
2. Press
range: 0-27):
(setting range: 0-9).
Note: The dialog box for adjustment is
or to adjust tone (setting
or to adjust brilliance
automatically erased when there is no
Omnipad operation for 10 seconds.
• Range is commonly set regardless of
range setting on the menu of the main
radar and remote display. For example,
the remote display selects the 2 nm range.
The main radar also sets the 2 nm range
even if it is turned off on its menu.
2
Page 11
Watchman
The watchman feature, disabled or enabled
at the main radar, periodically transmits
pulses to check for targets in the guard
zone. For further details, see the Operator’s
Manual for the main radar.
•
The indicatio n “WATCHMAN” appears on
the remote display and main radar when
watchman is active.
•
The indication is shown in white on black
background for two seconds on the
remote display when the [RANGE] key on
the remote display is operated while
Watchman is in standby. (Range
command is not accepted in this case.)
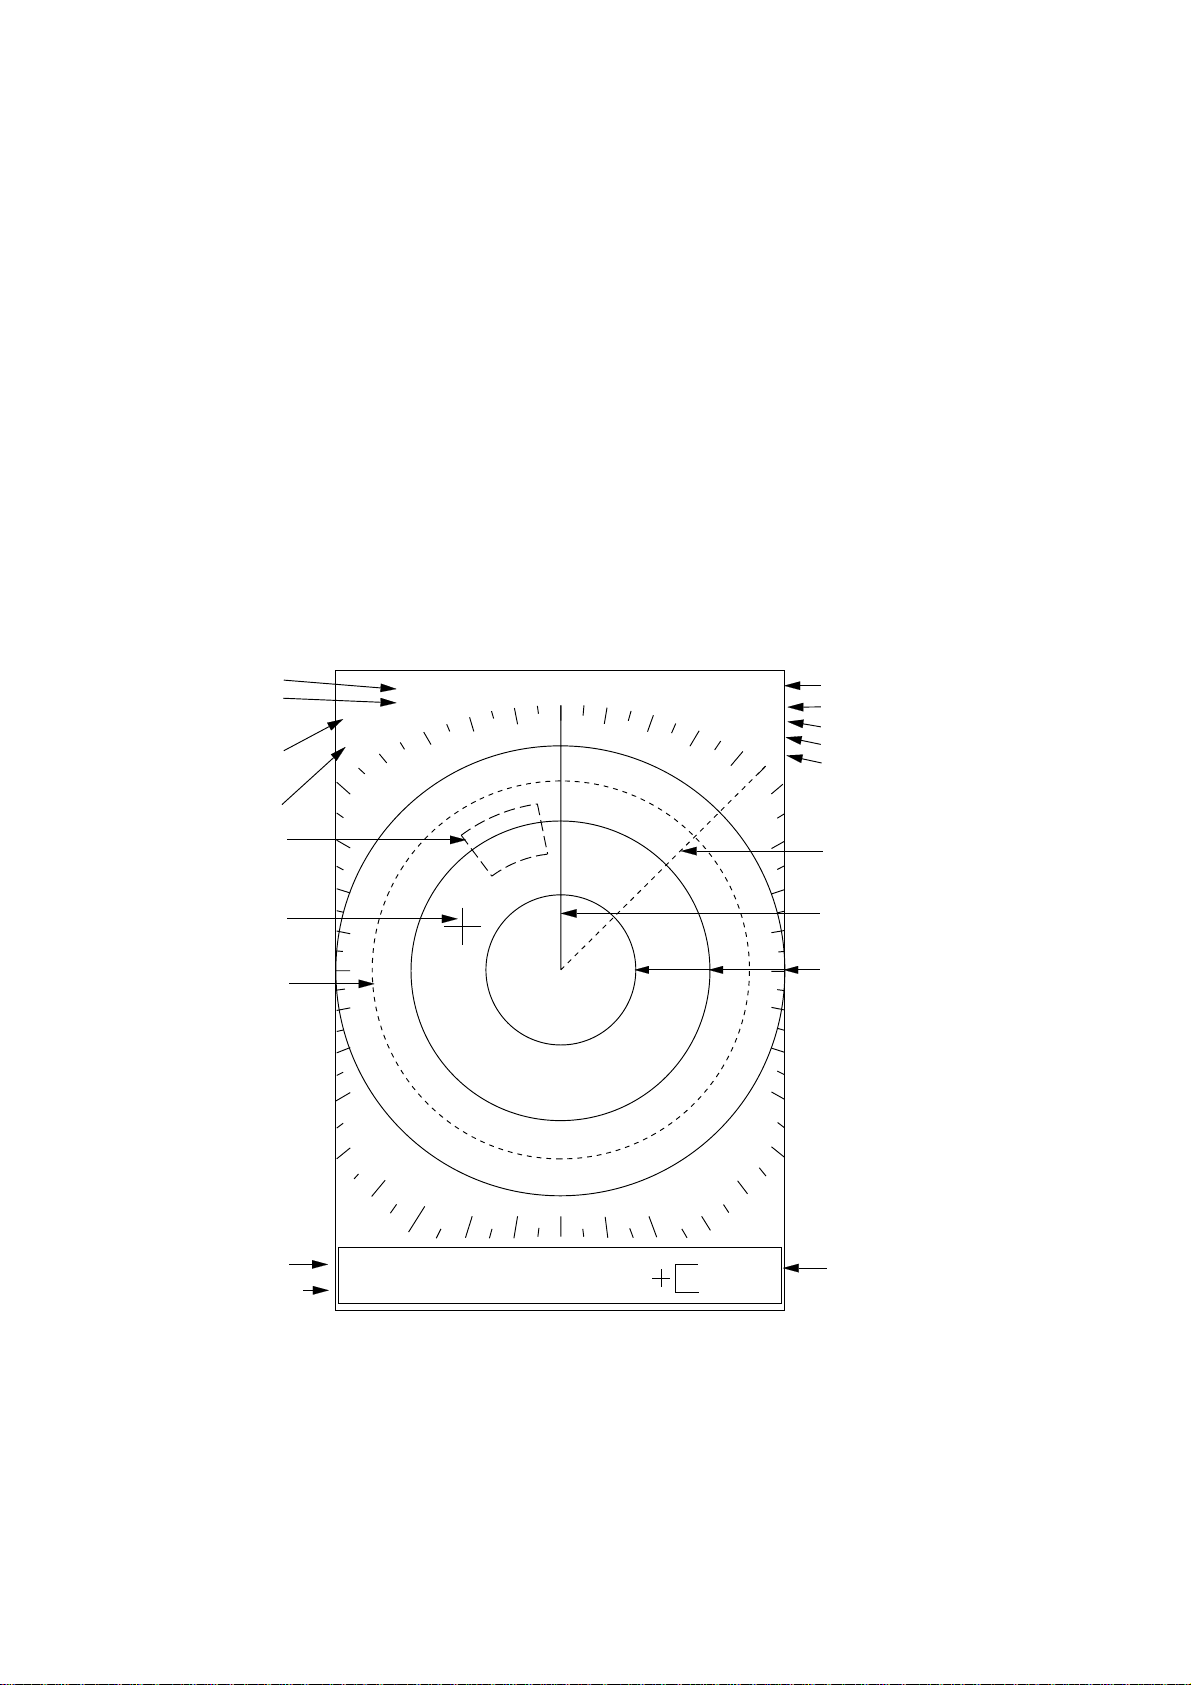
1.6 Indications and Markers
Operating any key among GAIN, RANGE
•
and STC from the remote display while
the watchman is transmit ting will
automatically cancel the watchman, and
the radar transmits continuously.
Watchman cannot be canceled from the
remote display when it is in standby.
Guard zone
The guard zone may be independently set.
Range
Range ring
interval
Zoom
(flashing)
Watchman*
Guard
zone
Cursor
VRM
1.5
0.5
ZOOM
WATCHMAN
NM
3M TRAIL
G (IN)
FTC
ES
Target trails setting
Guard alarm (IN or OUT)
Rain clutter suppressor
IR
Echo stretch
Interference rejector
EBL
Heading line
Range rings
EBL bearing
VRM range†
EBL
45.0˚
VRM
1.250
* Shown in white on black background for two seconds when
[RANGE] key is operated while Watchman is in standby, to
inform that [RANGE] key is inoperative.
NM
291.5˚
0.73
NM
Range
to cursor
†
and bearing
† Range is shown to thousandths place (X.XXX) when range is 2 nm and
under and hundredths place (XX.XX) when range is 3 nm and higher.
Figure 1-3 Indications and markers
3
Page 12

1.7 Selecting the Range
Automatic adjustment of sensitivity
The range selected automatically
determines the range ring interval, the
number of range rings and pulse repetition
rate.
Press the [+] or [-] key to select a range.
The range and range ring interval appear at
the top left-hand corner on the screen.
Range
Range ring
interval
6.0
2.0
NM
045.0°
3.35
NM
Figure 1-4 Location of range and range
ring interval indications
1. Press the [GAIN] key once or twice to
display the screen shown in Figure 1-5.
AUTO GAIN MOD
LOW HIGH
1 2 3
Figure 1-5 Dialog box for
automatic adjustment of gain
2. Press
or to set level desired: 1,
Low; 2, Normal; 3, High.
Manual adjustment of sensitivity
1. Select the highest range.
2. Press the [GAIN] key once or twice to
display the screen shown in Figure 1-6.
MAN GAIN MOD
LOW HIGH
32
1.8 Receiver Sensitivity
The [GAIN] key adjusts the sensitivity of t he
receiver. It works in precisely the same
manner as the volume control of a
broadcast receiver, amplifying the signals
received.
You can adjust the sensitivity manually, or
let the unit do it automatically. In either case
the proper setting is such that the
background noise is just visible on the
screen. For manual adjustment, adjust the
sensitivity on the highest range since the
background noise is clearer on that range.
If you set up for too little sensitivit y, weak
echoes may be missed. On the other hand
excessive sensitivity yields too much
background noise; weak targets may be
missed because of the poor contrast
between desired echoes and the
background noise on the display.
Figure 1-6 Dialog box for
manual adjustment of gain
3. Press
or to set level desired. 61
levels are available.
Note:The dialog boxes for adjustment of
sensitivity are automatically erased
when there is no Omnipad operation
for 10 seconds. To erase them
quicker, press the [GAIN] key after
completing the setting.
1.9 Suppressing Se a Clutter
In rough weather, returns from the sea
surface are received over several miles
around own ship and mask nearby targets.
This situation can be improved by properly
using the [STC] key.
If the STC setting is too lo w, targets will be
hidden in the clutter, while if it is set too high,
both sea clutter and targets will disappear
from the display. In most cases adjust the
key until clutter has disappeared to leeward,
but a little is still visible windward.
4
Page 13

A common mistake is too over-adjust the
[STC] key so that the surface clutter is
completely removed. By setting up for
maximum STC effect, you will see how
dangerous this can be; a dark zone will be
created near the center of the screen,
causing a loss of close-in targets. This dark
zone is even more dangerous if the
sensitivity has not been properly adjusted.
Always leave a little surface clutter visible
on the screen. If no clutter is observed (on
very calm waters), choose lowest STC
setting.
Manual adjustment of sea clutter
control
1. Press the [STC] key once or twice to
display the dialog box shown in Figure
1-9.
MAN STC MOD
LOW HIGH
32
Figure 1-9 Dialog box for manual
adjustment of STC
Sea clutter at
screen center
STC adjusted;
sea clutter suppressed
Figure 1-7 Appearance of sea clutter
CAUTION
STC may erase weak echoes. Set STC to
LOW when no sea surface reflections are
present.
Automatic sea clutter control
1. Press the [STC] key once or twice to
show the dialog box shown in Figure 1-
8.
2. Press
or to set level desired. 61
levels are available.
Note: The dialog boxes for adjustment of
STC are automatically erased when
there is no Omnipad operation for 10
seconds. To erase them quicker,
press the [STC] key after completing
the setting.
1.10 Suppressing Rain Clutter
In adverse weather, clouds, rain or snow
produce spray-like spurious echoes which
impair target detection over a long distance.
These echoes can be suppressed by
turning on the [FTC] (Fast Time Constant)
key. FTC appears at the top right-hand
corner on the screen when the FTC is on.
Turn off the FTC when its use is not
required so as not to miss weak targets.
FTC
AUTO STC MOD
LOW HIGH
1 2 3
Figure 1-8 Dialog box for
automatic adjustment of STC
2. Press
or to set level desired: 1,
Low; 2, Normal; 3, High.
Rain clutter
at screen center
FTC adjusted;
rain clutter suppressed
Figure 1-10 Appearance of rain clutter
5
Page 14

1.11 Range Rings
1.14 Measuring the Range
The range rings are the concentric circles
around own ship and they provide an
estimate of target range. The selected
range scale automatically determines t he
number of rings and their interval is
displayed at the upper-left-hand corner on
the screen.
To turn the range rings on or off, press the
[EBL] and [VRM] keys together.
1.12 Cursor
The cursor is always displayed and
functions to measure the range and bearing
to a target. Operate the Omnipad t o place
the cursor on the inside edge of the target
for range measurement or the center of the
target for bearing measurement. The range
and bearing to the cursor appear at the
bottom right-hand corner on the display.
6.0
NM
2.0
The bearing to a target can be measured by
the range rings, by the cursor (see
paragraph 1.12) and by the VRM (Variable
Range Marker).
Measuring range by the range rings
Count the number of rings between the
center of the display and the target. Check
the range ring interval at the top lef t-hand
corner of the screen and judge the distance
of the echo from the inner edge of the
nearest ring.
Measuring range by the VRM
1. Press the [VRM] key to turn on the VRM.
2. Within 10 seconds after turning on the
VRM, that is, while "VRM" is highlighted
at the bottom left-hand corner on the
screen, press
(increase radius) or
(decrease radius) to place the VRM on
the inside edge of the target.
3. Check the VRM readout at the bottom
left-hand corner on the screen.
Target
Cursor
045.0°
3.35
NM
Range and
bearing to
cursor
Figure 1-11 How to measure range and
bearing with the cursor
1.13 Heading Line
The heading line indicates the ship’s
heading and it is the solid line which
appears at zero degrees on the bearing
scale.
To temporarily erase the heading line to
look at targets existing dead ahead of own
ship, press the [MENU] and [GUARD] keys
together. Release the keys to display the
heading line.
Note:
The VRM becomes stationary when
the [VRM] key is pressed a second
time, or 10 seconds elapses without
pressing
or . When the VRM is
stationary "VRM" is not highlighted.
NM
6.0
2.0
Target
Cursor
VRM
VRM 2.42 NM
VRM
range
045.0°
2.42
Cursor
range
NM
Figure 1-12 How to measure range by the
cursor and VRM
To erase the VRM,
press the [VRM] key
until the VRM disappears.
6
Page 15

1.15 Measuring the Bearing
1.16 Shifting the Display
The bearing to a target can be measured by
the cursor (see paragraph 1.12) and by the
EBL (Electronic Bearing Line).
Measuring bearing by the EBL
1. Press the [EBL] key to turn on the EBL.
2. Within 10 seconds after turning on the
EBL, that is, while "EBL" is highlighted at
the bottom left-hand corner on the
screen, press
(counterclockwise) or
(clockwise) to bisect the target with EBL.
3. Check the EBL readout at the bottom
left-hand corner on the screen.
Note:
The EBL becomes stationary when
the [EBL] key is pressed a second
time, or 10 seconds elapses without
pressing
or . When the EBL is
stationary "EBL" is not highlighted.
6.0 NM
2.0
Target
Cursor
EBL
Your vessel's positi on can be shifted
backward by 1/3 of the range to increase
the forward range without changing the
range or size of targets.
Press the [SHIFT] key to turn the shifted
display on/off.
Press
[SHIFT]
Normal display Shifted display
Figure 1-14 Shifting the display
1.17 Zoom
The zoom feature allows you to double the
size of the area between your vessel and
any location within the current range to take
a closer look at an area of interest.
EBL
45.0°
EBL
bearing
045.0°
3.35
NM
Figure 1-13 Measuring bearing by
the cursor and the EBL
To erase the EBL,
press the [EBL] key until
the EBL disappears.
Cursor
bearing
1. Select location to zoom with the cursor.
2. Press the [ZOOM] key.
ZOOM on (flashing)
ZOOM
Cursor
Cursor
1) Place cursor
where desired.
Press
[ZOOM]
2) Press [ZOOM].
Figure 1-15 Zoom function
3. To turn off the zoom function, press the
[ZOOM] key again.
Note 1:
Zoom is inoperative when the
display is shifted.
Note 2:
Zoom is not available on the 0.125
(1/8) nm range.
7
Page 16

1.18 Menu Overview
Table 1-1 Menu descript ion
The menu contains ten functions which
normally do not require frequent adjustment
in everyday operation. Basic menu
operation is as below.
Operating procedure
1. Press the [MENU] key to display the
menu.
PRESS ▲
ITEM,
1
2
3
4
5
6
Press ▼ at DIMMER; ▲ at DSPL ON STBY to
change page. Default settings in highlight.
PRESS ▲
ITEM,
7
8
9
10
/
▼ TO SELECT MENU
▲
▲
/
TO CHANGE SETTING.
ECHO STRETCH
INT. REJECT
NAV DATA
VIDEO
WATCHMAN
DIMMER
▲
TO CHANGE SETTING.
DSPL ON STBY
TRAIL TIME
TRAIL BRILL
RANGE (NM)
RVS NOM
/
▼ TO SELECT MENU
▲
/
ON OFF
ON OFF
ON
OFF
SET ON M. DISP
0 1 2 3
NAV OFF
CONT 30S
1M 3M 6M
LOW HIGH
1/8 1/4 1/2 3/4 1 1.5
2 3 4 6 8 12 16 24
Figure 1-16 Menu
(default settings highlighted)
2. Press
3. Press
or to select item.
or to select option.
4. Press the [MENU] key to register your
selection and close the menu.
Menu Item Description
1 ECHO
STRETCH
2INT.
REJECT
Stretches echoes in
the range direction.
Suppresses radar
interference.
3 NAV DATA Turns the navigation
data display on/off.
4VIDEO
Displays echoes in
gray (NOM) or white
(RVS).
5 WATCHMAN Set at radar.
6 DIMMER Adjusts control panel
illumination.
7 DSPL ON
STBY
Turns navigation data
display in standby
on/off.
8TRAIL
TIME
9TRAIL
BRILL
Selects target trail
plotting time.
Selects target trail
brilliance.
10 RANGE Selects ranges to use.
1.19 Control Panel Illumination
1. Press the [MENU] key to open the
menu.
2. Select DIMMER.
3. Select level desired; 3 is the highest
level of Illumination.
4. Press the [MENU] key to register your
selection and close the menu.
8
Page 17

1.20 Target Trails
Trail brilliance
Target trails are simulat ed afterglow of
target echoes that represent their
movements relative to own ship. This
feature is useful for monitoring targets’
movement.
3M TRAIL
Trail time
(3 min)
Target trail
Figure 1-17 Target trails
Starting target trail
Press the [TRAIL] key to start the echo trail
function. "TRAIL" and the target t r ail time
appear at the top right-hand corner on the
screen, and then afterglow starts extending
from all targets. When the internal clock
counts up to the trail time selected, the
oldest portions of trails are erased so only
the latest trail, equal in length t o the trail
time selected, is shown. For continuous
trails the maximum trail time is 99 minutes
and 59 seconds, at which point all trails are
erased and then restarted.
1. Press the [MENU] key to open the
menu.
2. Select TRAIL BRILL (on page 2 of the
menu).
3. Select HIGH or LOW as appropriate.
4. Press the [MENU] key to register your
selection and close the menu.
1.21 Guard Alarm Zone
The guard alarm allows the operator t o set
the desired range and bearing for a guard
zone. When ships, islands, landmasses, etc.
violate the guard zone the offending target
flashes and an aural alarm sounds to call
the operator’s attention. The alarm is
triggered against targets entering or exiting
the guard zone depending on guard zone
type as below.
CAUTION
The alarm should not be relied upon as the
*
sole means for detecting possible collision
situations.
STC, FTC and GAIN controls should be
*
properly adjusted to be sure the alarm
system does not overlook target echoes
.
Canceling target trail
Press the [TRAIL] key to erase target trails
and target trail indications.
Trail time
1. Press the [MENU] key to open the
menu.
2. Select TRAIL TIME (on page 2 of the
menu).
3. Select target trail time desired;
continuous, 30 seconds, 1, 3 or 6 min as
appropriate.
4. Press the [MENU] key to register your
selection and close the menu.
How guard zone type is determined
After the guard zone is set, the radar starts
searching for targets inside the guard zone
for about 8 to 12 seconds. The results of the
search are shown at the top right-hand
corner of the display as “G (IN)” or “G
(OUT).”
G (IN):
This is the inward guard alarm and it
means no target was found in the guard
zone. The guard alarm will be triggered by
targets entering the guard zone.
G (OUT):
This is the outward guard alarm
and it means a target was found in the
guard zone. The guard alarm will be
triggered by targets exiting the guard zone.
9
Page 18

(a) Inward guard alarm (b) Outward guard alarm
Figure 1-18 Inward and outw ar d guar d alarms
Setting a guard zone
1. Operate the Omnipad to place the
cursor at the top left-hand corner of the
zone and press the [GUARD] key.
2. Operate the Omnipad to place the
cursor at the bottom right-hand corner of
the zone and press the [GUARD] key.
Eight to twelve seconds later the
indication G (IN) (or G (OUT)) replaces
the indication GUARD.
Asterisk blinking
Mentally create
the guard zone to set.
Guard
zone
to set
Drag cursor
here.
1) Drag cursor to
top left corner of
zone and press
[GUARD].
* GUARD
Silencing the aural alarm
When a target violates the guard zone, the
target flashes and the aural alarm sounds.
You can silence the aural alarm by pressing
the [GUARD] key. When this is done,
GUARD (highlighted) replaces G (IN) (or G
(OUT)). This means the guard alarm is
temporarily deactivated. Press the key
again to reactivate the alarm.
Canceling the guard zone and guard
alarm
Press and hold down the [GUARD] key
(about two seconds) to erase the guard
zone.
1.22 Interference Rejector
Mutual radar interference may occur in the
vicinity of another shipborne radar operating
in the same frequency band (9 GHz). It is
seen on the screen as a number of bright
spikes either in irregular patterns or in the
form of usually curved spoke-like dotted
lines extending from the cent er to the edge
of the picture. This type of interference can
be reduced by activating the interference
rejector. "IR" appears at the top right-hand
corner when the interference rejector is on.
G(IN)
Guard
zone
Drag cursor
here.
Guard zone completed.
2) Drag cursor to
bottom right corner
of zone and press
[GUARD].
Figure 1-19 How to set a guard zone
Note:
When the range is less than one half
of the guard zone range, the guard
zone disappears and the indication
"UP RNG" replaces G (IN) (or G
(OUT)). If this happens, raise the
range to redisplay the guard zone.
* GUARD
1. Press the [MENU] key to open the
menu.
2. Select INT. REJECT.
3. Select ON or OFF as appropriate.
4. Press the [MENU] key to register your
selection and close the menu.
Figure 1-20 Radar interference
10
Page 19

1.23 Echo Stretch
1.24 Navigation Data
On long ranges target echoes tend to shrink
in the range direction, making them difficult
to see. On short and medium ranges such
as 1.5, 3 and 6 nm range scales, the same
sized targets get smaller on screen as they
approach own ship. To enhance t arget
video, use the echo stretch feature.
Echo stretch
ON
ES
Echo
Echo
stretched
in range
direction
Echo stretch OFF Echo stretch ON
Figure 1-21 Echo stretch
1. Press the [MENU] key to open the
menu.
2. Select ECHO STRETCH.
3. Select ON or OFF as appropriate.
4. Press the [MENU] key to register your
selection and close the menu.
ES appears at the top right-hand corner on
the screen when the echo stretch feature is
on.
Note 1:
Echo stretch magnifies not only
small target pips but also returns
from sea surface, rain and radar
interference. For this reason, make
sure that these types of interference have been sufficiently
suppressed before activating the
echo stretch.
Note 2:
Echo stretch is not available on the
ranges between 0.125 and 0.75
nautical miles. The indication ES is
highlighted on those ranges to
show that echo stretch is
inoperative.
With navigation data input in N MEA 0183
format (IEC 61162-1), navigation data can
be displayed at the screen bottom.
Navigation data includes position, course,
speed, and range and bearing to destination
waypoint (if set on navaid). A waypoint is
shown on the remote display by a dashed
ring connected to the screen center (own
position) by a dashed line.
NM
6.0
2.0
Waypoint
mark
WP
17.0°
M
*
2.6
NM
LL
34° 38.99
135° 19.22
EBL
45.0°
VRM
2.42
Bearing and range to waypoint
*- Bearing suffixed with M
(Magnetic bearing) or T (True bearing).
Own ship position
N
E
NM
CSE
18.0°
SPD
4 .
3 KT
3.35
M
255.0°
NM
Course
*
Speed
Figure 1-22 Sample navigation data display
Note 1:
External sensor must be capable of
outputting data to show it on the
remote display.
Note 2:
A location is blank when there is no
corresponding data.
Note 3:
To receive data from m ultiple
equipment, all data must be
combined into one data line by a
data-mixing device.
Note 4:
Magnetic and true bearings may be
selected alternately by pressing
and holding down the [GAIN] key.
Turning on the navigation data display
1. Press the [MENU] key to open the
menu.
2. Select NAV DATA.
3. Select ON.
4. Press the [MENU] key to finish.
11
Page 20

1.25 Navigation Data During
1.26 Echoes in Gray or White
Standby
Navigation data may be displayed during
standby (requires external sensors) as
follows:
1. Press the [MENU] key to open the
menu.
2. Select DSPL ON STBY.
3. Select NAV.
4. Press the [MENU] key to register your
selection and close the menu.
WP
215.5°M
12.5NM
CSE SPD
210.5° 12KT
34°42.25' N
LL
135°24.12' E
36378.1
TD
59096.4
TEMP
18.5°C
DEPTH
1 2 5
M
Figure 1-23 Sample navigation data
screen shown during standby
Note 1: Nav data can be accepted from two
sources: navigator and video
sounder. When two of t he same
type of device is outputting data to
the remote display and the data is
not identical, the two sets of data
are displayed alternately.
Note 2: Magnetic and true bearings may be
selected alternately by pressing
and holding down the [GAIN] key.
The default setting displays echoes in t ones
of gray on a white background. However,
you may reverse this arrangement as follows to suit lighting conditions.
1. Press the [MENU] key to open the
menu.
2. Select VIDEO.
3. Select RVS.
4. Press the [MENU] key to register your
selection and close the menu.
1.27 Selecting Ranges to Use
The radar has 14 ranges (Model 1712) or
13 ranges (Model 1622), some you may not
require. You can select the ranges to use as
follows. Ranges currently in use are
highlighted.
1. Press the [MENU] key to open the
menu.
2. Select RANGE.
3. Select range to use (or deselect) and
press the [EBL] key.
4. Press the [MENU] key to register your
selection and close the menu.
Note 1: At least two ranges are left on
(highlighted).
Note 2: The active range is controlled by
the equipment currently setting t he
range.
Unit of measurement for depth and
water temperature
The unit of measurement for depth and
water temperature (external sensors
required) can be selected with the [EBL] key
among Meters/Centigrade, Feet/ Fahrenheit
and Fathoms/Centigrade. The unit of depth
measurement available depends on the
data sentence output by external equipment
as below.
DBT(Ver.1. 5): Meters, feet and fathoms
DPT(Ver.2.0): Meters only
12
Page 21

2.
MAINTENANCE, TROUBLESHOOTING
WARNING
Do not open the equipment.
Hazardous voltage which can
cause electrical shock exists
inside the equipment. Only
qualified personnel should
work inside the equipment.
2.1 Maintenance
Regular maintenance is important for good performance. Table 2-1 tabulates items to be
checked from time to time.
Table 2-1 Maintenance items
Period Item Check point Action
3 months
to 6
months
LCD The LCD will, in time,
accumulate a coating of dust
which tends to dim the
picture.
Wipe the LCD gently with a soft
cloth. Do not use commercial
cleaners to clean the LCD; they
can remove paint and markings.
6 months
to 1 year
Connectors,
cables, earth
terminal
Check for tight connection
and corrosion. Clean if
necessary.
If any part is corroded, contact
your dealer about replacement.
2.2 Replacing the Fuse
The fuse (5A) in the power cable protects the equipment against reverse polarity of ship’s
mains and equipment fault . If the fuse blows, find the cause before replacing it.
CAUTION
Use the proper fuse.
Use of a fuse of the wrong amperage will
damage the equipment and void the
warranty.
13
Page 22

2.3 Troubleshooting
Table 2-2 provides simple troubleshooting procedures which the user can follow to restore
normal operation.
Table 2-2 Troubleshooting
If… But… Then…
you pressed the [POWER] key
to turn on the remo te display
(and the radar is turned on)
you turned on the power “HD-SIG-MISS” and
a key is pressed nothing happens key may be faulty. Cont act your
the control panel does
not light and nothing
appears on the
display
display contrast is poor try adjusting LCD tone.
“BP-SIG-MISS” appear
on the display
check that the power cable is
•
firmly fastened.
adjust DIMMER on the menu.
•
battery may have discharged.
•
check if fuse in power cable
•
has blown.
check to see if the radar is
•
turned on and transmitting.
check that the signal cable
•
between the radar and the
remote display is tightly
fastened.
dealer.
2.4 Restoring Default Settings
All default menu settings can be restored by turning on the power while pressing and holding
down the [MENU] key and
.
14
Page 23

3.
INSTALLATION
3.1 Display Unit Installation
Mounting considerations
The display unit can be mounted on a
desktop, the overhead, or flush m ounted in
a panel. See the next page for mounting
dimensions.
When selecting a mounting location for the
display unit keep in mind the follo wing
points.
•
Make sure you allow enou gh clearance
both to get to the connectors behind the
unit and to allow you to get your hands in
on both sides to loosen or tighten the
mounting knobs.
•
Leave at least a foot or so of "service
loop" in cables behind the unit f or
servicing or easy removal of the
connectors.
Removing the cover
•
Locate the display unit in a position where
you can view and operate it convenientl y.
•
The orientat ion of the display unit should
be so that its screen is viewed while the
operator is facing in the direction of t he
bow. This makes determination of your
position much easier.
•
The display un it is designed and
constructed to be splashproof, thus it can
be installed outdoors. If it is to be installed
outdoors, we recommend installing it an
enclosed cabinet, for maximum protection
against the marine environment .
•
Even though the picture is quite legible
even in bright sunlight, keep the displa y
unit out of direct sunlight or at least
shaded because of heat that can build up
inside the cabinet.
•
The temperature and humidity of the
mounting location should be stable and
moderate. No LCD can provide adequate
contrast if the ambient temperat ure is too
low or too high.
While pressing the center of the cover with
your thumbs as illustrated, pull the cover
towards you to remove it.
Desktop, overhead mounting
procedure
1. Fix the hanger to the mounting location
with four tapping screws (supplied).
2. Attach the anti-vibration pads to the
hanger as shown in the figure on the
next page.
3. Fit the knob bolts to the display unit.
4. Cover the unused bolt holes with the
dummy films (supplied).
5. Set the display unit to the hanger.
6. Tighten the knob bolts securely.
•
The compass safe distance of 0.90
meters (standard compass) and 0.60
meters (steering compass) should be
observed to prevent deviation of the
magnetic compass.
15
Page 24

Figure 3-1 Mounting dimensions of display unit
3.2 Wiring
Connec tion of radar
1. Unfasten screws and three c onnec to r nuts (NM EA, PO WER, DJ-1) from t he re ar co ver of
the radar to detach it .
2. Place the rear co ver on a workbench, out side up.
3. Using a slotted- head screw dr iver and hammer, punch out the “hole c over” from the
locati on s hown in Figure 3-2. Remove burrs from the hole with a fine fi le or sandpaper.
4. Insert MJ connec tor side of the MJ-XH connector ( s upplied) in t he hole made at st ep 3
and fasten it wi th the c onnector nut (t orq ue: 0. 75-0. 78 N•m ). T ight en the conn ector nut by
hand until you feel slight resist anc e and t hen turn it an additional 45
Note: Be sure t he MJ-XH connector is f r ee of foreign mater ial before attaching it.
Watertight int egr ity cannot be gua ranteed if foreign materi al (dust, etc.) is on the
connector when it is assembled.
5. Plug in the XH connector of the MJ - XH connector into J7 on the DU Bo ar d.
6. Insert NMEA, POWER and DJ-1 co nnector s . Tighten connector nut by hand u nti l you feel
slight r es istance and then turn it an additional 90
with a box w r ench.
7. Close the rear cov er by using screws (
gasket is c orr ec tly posit ioned and there is no foreign material in the unit before cl os ing
the cover.)
8. Connect signal c able between c onnec tor DJ-1 on the remote display and the MJ
connector ( attached at step 4) on the rad ar.
9. Seal hole with s ilicone sealant or putty for waterproofing.
3X12) in the installation materials. (Be sure the
° (NMEA and POWER) or 45° (DJ-1)
° wit h a box wrench.
16
Page 25

Figure 3-2 Wiring
Connection of navigator, echosounder
Data sentences
The FMD-1712 can receive the following
NMEA 0183 format data sentences.
BWC: Bearing and distance to waypoint
BWR: Bearing and distance to waypoint,
Rhumb line
DBK: Depth below keel
DBS: Depth below surface
DBT: Depth below transducer
DPT: Depth
GGA: Global positioning system fix data
GLC: Geographic position, Loran-C
Connection
You will need an NMEA cable to connect a video sounder or a navigator. Connect it to the
NMEA connector at the rear of the remote display as shown below. When fastening the
power connector turn its knurled knob by hand until you feel slight resistance and then turn it
an additional 90
°.
GLL: Geographic position, Lat/Long
GTD: Geographic position, Time difference
HDG: Heading, deviation and variation
HDM: Heading, magnetic
HDT: Heading, true
MTW: Water temperature
RMA: Recommended minimum specific
Loran-C data
RMB: Recommended minimum navigation
information
RMC: Recommended minimum specific
GPS/TRANSIT data
VTG: Course over ground and ground
speed
Figure 3-3 Navigator connection
17
Page 26

To connect a video sounder and a navigator, use NMEA cable MJ-A6SPF0003-050/MJA6SPF0009-100 (optional supply) and solder it as shown below.
MJ-A6SPF0003-050
MJ-A6SPF0009-100
Navigator
Video
Sounder
MJ-A6SPF0003-050
MJ-A6SPF0009-100
WHT
BLK
Note 1
SHIELD
WHT
BLK
Note 1
SHIELD
After soldering, wrap
with self-vulcanizing tape.
WHT
BLK
YEL
GRN
SHIELD
MJ-A6SPF0003-050
MJ-A6SPF0009-100
FMD-1712
NMEA
1
RD1-H
2
RD1-C
3
RD2-H
4
RD2-C
6
GND
Figure 3-4 Connection of video sounder and navigator cables
Note 1:
Note 2:
Tape unused wires to prevent short.
Do not use a cross wiring-type NMEA cable which has connectors at both ends (for
example, MJ-A6SPF0012-050). Miswiring can result if one of the connectors is
removed to make the connection to the rem ote display.
Note 3:
You may cut an NMEA cable which has a connector at both ends. However, do not
modify a waterproof connector because watertight integrity cannot be guaranteed.
Note 4:
Data is alternately displayed when two of the same type of data is input.
To connect a navigator or echosounder whose NMEA output uses other than a FURUNO 6
pin NMEA connector, use NMEA cable type MJ-A6SPF0003-050/MJ-A6SPF0009-100 to
make the connection.
NMEA OUTPUT
Navigator
NMEA OUTPUT
Video
Sounder
TX-H
TX-C
GND
TX-H
TX-C
GND
MJ-A6SPF0003-050
MJ-A6SPF0009-100
WHT
BLK
YEL
GRN
SHIELD
After soldering, wrap
with self-vulcanizing tape.
FMD-1712
NMEA
1
RD1-H
2
RD1-C
3
RD2-H
4
RD2-C
6
GND
Figure 3-5 Connection of video sounder and navigator cables using NMEA cable type
MJ-A6SPF0003-050/MJ-A6SPF0009-100
18
Page 27

Connection of external buzzer (option)
The external buzzer provides an aural alarm
when the guard zone is violated.
60 mm
50 mm
2-φ3.5
Figure 3-6 External buzzer
External buzzer installation kit con t ents
Type: OP03-168, Code No.: 008-462-790
Name Type Code no. Qty
MJ-XH conn. 03-2022 (2-3P) 008-463-540 1
Buzzer assy. 80-0641 008-462-800 1
Procedure
1. Unfasten screws and three connector
nuts (NMEA, POWER, DJ-1) from the
rear cover to detach it.
2. Place the rear cover on a workbench,
out side up.
3. Using a slotted-head screwdriver and
hammer, punch out the “hole cover”
from the location shown in the figure
below. Remove burrs from the hole with
a fine file or sandpaper.
5. Fasten the connector with the connector
nut (torque: 0.75-0.78 N•m). Tighten the
connector nut by hand until you feel
slight resistance and then turn it an
additional 45
with a box wrench.
°
6. Plug in the XH connector at the end of
the MJ connector into J6 on the DU
Board. (See Figure 3-7 for location.)
7. Insert NMEA, POWER and DJ-1
connectors. Tighten connector nut by
hand until you feel slight resistance and
then turn it an additional 90
POWER) or
(DJ-1) with a box
45°
(NMEA and
°
wrench.
8. Reattach the cover. (Be sure the gasket
is correctly positioned and there is no
foreign material in the unit before closing
the cover.)
9. Fasten the buzzer within 1 m of the
display unit with two tapping screws
(3X15 or 3X20, local supply).
10. Attach the connect or from the external
buzzer to the MJ connector.
Connector nut
Rear cover of
display unit
Gasket
MJ connector
Remove hole cover with
slotted-head screwdriver and
hammer. Remove burrs from hole
with fine file or sandpaper.
J6 located at right
side of shield case
under the rear panel.
Figure 3-7 Display unit, rear view
4. Set the gasket to the MJ connector and
insert the connector in the hole made at
step 3.
XH connector
(to J6 on DU Board)
Figure 3-8 How to assemble
MJ-XH connector assembly
Note:
Assemble the MJ-XH connector
assembly exactly as shown in Figure
3-8, otherwise watertight integrity
cannot be guaranteed. Further,
watertight integrity cannot be
guaranteed if foreign material (dust,
etc.) is on the connector when it is
assembled.
19
Page 28

3.3 Selecting Radar Display,
Remote Display Function
display. The following adjustment will
compensate for this error, up to ±30
°.
This section shows you how to select the
radar connected to the FMD-1712 and
remote display function.
1. Press the [TX] key to set the equipment
in the stand-by mode.
2. Press and hold down and together
(about 10 seconds) to display the
maintenance menu.
PROGRAM NO
03591690XX*
1
MODEL 1712 1622
2
DISPLAY
NAV DATA (NMEA 0183)
GLL BWR BWC GLC GTD
RMA RMB RMC VTG MTW
DBT DBS DPT GGA
* XX = Program Version No.
NORM
SEL MENU
▲
BY KEY
/
▲
DEMO
Figure 3-9 Maintenance menu
3. Select 1 MODEL followed by 1712 or
1622 as appropriate.
4. Select 2 DISPLAY followed by NORM or
DEMO (shows internally generated
radar echoes on the FMD-1712) as
appropriate.
5. Press the [MENU] key to close the
menu.
1. Identify a suitable target (for example,
ship or buoy) at a range between 0.125
to 0.25 miles, preferably near the
heading line. To minim ize error, keep
echoes in the outer half of the picture by
changing the range.
2. Press and hold down
and together
(about 10 seconds) to display the
installation menu.
Total hours remote
display has been
turned on
Menu
SEL MENU
▼
/
▲
BY
1 ADJ HDG
2 ADJ TMG
3 NM /KM
ADJUST PICTURE ORIENTATION
USING KEYS SO THAT
HEADING MARK BISECTS TARGET
LOCATED DEAD AHEAD.
Instructions for item selected appear here
(shown: heading adjustment).
KEY
TOTAL ON TIME
00000 : 00
▲
/
▲
Figure 3-10 Installation menu
3. Select ADJ HDG. Your display should
now look something like the one shown
in Figure 3-11.
3.4 Adjustments
Do the following in the order shown to
adjust the remote display.
1) Adjustment of picture
1. Press the [POWER] key on the display
unit.
2. Adjust the gain referring to paragraph
1.8 on page 4.
3. Adjust the STC referring to paragraph
1.9 on page 4.
2) Heading alignment
A small but conspicuous target dead ahead
visually should appear on the heading line
(zero degrees). In practice, you will
probably observe some small error on the
20
NM
0.25
.125
SEL MENU
BY ▲/▼ KEY
1. ADJ HDG
2. ADJ TMG
3. NM /KM
3. NM /KM
ADJUST PICTURE ORIENTATION
USING KEYS SO THAT
HEADING MARK BISECTS TARGET
LOCATED DEAD AHEAD.
▲
/
30°
▲
30°
TOTAL ON TIME
00000 : 00
Figure 3-11 Display for
adjustment of heading
Page 29

4. Press or to bisect the target
selected at step 1 with the dot-dash line
and press the [MENU] key. Then, the
target shifts to 0° as below.
NM
0.25
.125
Target
5. While looking at the target selected at
step 2, straighten it by pressing
pulled inward, or
if it is pushed
if it is
outward.
4) Unit of range measurement for
VRM and cursor
Heading
line
9.4
NM
0.015
Figure 3-12 Bisecting target
5. As a final test, move the boat towards a
small buoy and confirm that the buoy
shows up dead ahead on the display
when it is visually dead ahead.
3) Sweep timing
Sweep timing depends on the length of the
signal cable between the radar and the
antenna. Adjust it so that a straight target is
not pushed or pulled as in the examples
below.
The unit of range measurement for the VRM
and the cursor may be selected to nautical
miles or kilometers as follows:
1. Select NM/KM from the installation
menu.
2. Select unit of range desired.
3. Press the [MENU] key to close the
menu.
3.5 Confirming Data Sentences
You can conf irm which NMEA data
sentences are being output from a navigator
and/or echosounder to the remote display.
Follow step 1 in paragraph 3.4 to display the
maintenance menu. NMEA data sentences
being output to the remote display are
highlighted at the bottom of the menu. (Be
sure to power navigator and/or
echosounder to confirm sentences.)
Correct
Target pushed
inward
Target pushed
outward
Figure 3-13 Examples of improper and
correct sweep timings
1. Transmit on 0.125 or 0.25 nm range and
adjust the sensitivity and STC.
2. Visually select a straight echo (harbor
wall, straight pier).
3. Press and hold down
and together
(about 10 second) to display the
installation menu.
4. Select ADJ TMG from the installation
menu.
21
Page 30

SPECIFICATIONS OF THE RADAR REMOTE DISPLAY
FMD-1712
1. GENERAL
(1) Picture Tube 7 inch rectangular monochrome LCD
240(H) x 320(V) dots, Effective radar display area: 240 x 240 dots
(2) Brightness 80 cd min
(3) Scanning method Luster scan
(4) Range, Range Ring Interval, Number of Rings
Range (NM) 0.125 0.25 0.5 0.75 1 1.5 2 3 4 6 8 12 16 24
Ring Interval (NM) 0.0625 0.125 0.125 0.25 0.25 0.5 0.5 1 1 2 2 3 4 6
Number of Rings 2 2 4 3 4 3 4 3 4 3 4 4 4 4
(4) Input data Heading data, Bearing data, Trigger signal and Video signal
2. POWER SUPPLY
(1) Main Unit 12-24 VDC: 0.6-0.3 A
3. ENVIRONMENTAL CONDITION
(1) Ambient Temperature -15°C to +55°C
(2) Relative Humidity 95% at 40°C
(3) Water proofing IPX-5
(4) Vibration IEC60945
4. COATING COLOR
(1) Main Unit Panel: N3.0, Chassis: 2.5GY5/1.5
SP - 1
Page 31

Page 32

Page 33

Page 34

Page 35

INDEX
B
Bearing measurement........................................7
Brilliance.............................................................2
C
Controls..............................................................1
Cursor ................................................................6
D
Default settings restoration..............................14
Depth unit.........................................................12
Dimmer (control panel illumination) ...................8
E
EBL (Electronic Bearing Line)............................7
EBL key..............................................................7
Echo stretch.....................................................11
Echo tone.........................................................12
F
FTC key..............................................................5
Fuse replacement ............................................13
G
GAIN key............................................................4
Guard alarm.......................................................9
GUARD key......................................................10
H
Heading line.......................................................6
N
Nav data
normal.......................................................... 11
standby........................................................12
P
POWER key....................................................... 2
R
Range
measurement................................................. 6
selecting ..................................................4, 12
RANGE keys ([+], [-])......................................... 4
Range rings .......................................................6
S
SHIFT key.......................................................... 7
STC key.............................................................4
System configuration ......................................... v
T
Target trails ........................................................9
Tone................................................................... 2
TRAIL key..........................................................9
Troubleshooting...............................................14
TX key................................................................ 2
V
VRM (Variable Range Marker) ..........................6
VRM key ............................................................ 6
I
Indications..........................................................3
Installation........................................................15
Interference rejector.........................................10
M
Maintenance ....................................................13
MENU key..........................................................8
Menu overview...................................................8
W
Water temperature unit....................................12
Z
ZOOM key .........................................................7
Index-1
 Loading...