

Page 1

fi-600F
P3PC-5712-02ENZ0
TOP
Contents
Index
Introduction
Operator's Guide
Thank you for purchasing our image scanner.
This manual explains about the basic operations and handling of the scanner.
For details about installation and connection of the scanner, refer to Quick Installation Sheet.
Explains the names and functions of parts
and basic scanner operation.
Explains how to place documents on the
scanner.
Explains how to use the Operator Panel.
Explains about various ways of scanning.
Explains how to clean the scanner.
Explains about troubleshooting.
Explains how to configure settings in the
Software Operation Panel.
Scanner
Overview
How to Scan
Documents
How to Use the
Operator Panel
Various Ways to
Scan
Daily Care
Troubleshooting
Operational
Settings
Appendix
Glossary
How to Use This Manual
Page 2

How to Use This Manual
Jumps to the first page of each
chapter.
TOP: Jumps to the cover page.
Contents: Jumps to the contents
page.
Index: Jumps to the index page.
This tab is on every page.
Jumps to this page.
Click on a blue character
string to jump to the link.
Click on a title to jump to the link.
Click on a page number to jump to the link.
TOP
Contents
How to Use This Manual
The following shows the tips for using this manual.
To display or print this manual, either Adobe® Acrobat® (7.0 or later)
®
or Adobe
In this manual, you can use the Search tool of Adobe
Adobe
For details, refer to the Adobe
Use the [Page Up] key to return to the previous page, and the [Page
Down] key to go to the next page.
Click a blue character string, tab or contents/index title (where the mouse
cursor changes into a shape such as ) to jump to the link.
- Common for all pages
Reader® (7.0 or later) is required.
®
Reader®.
®
Acrobat® or Adobe® Reader® Help.
®
Acrobat® or
- Contents page
- Index page
Index
Introduction
Scanner
Overview
How to Scan
Documents
How to Use the
Operator Panel
Various Ways to
Scan
Daily Care
Troubleshooting
Operational
Settings
Appendix
Glossary
2
Page 3

Introduction
TOP
Contents
Introduction
Thank you for purchasing our Color Image Scanner fi Series.
About This Product
This scanner is equipped with a flatbed that allows you to scan
thick documents, such as a book or plastic cards, and thin
paper.
Manuals
The following manuals are included for this product. Read
them as needed.
Manual Description
Safety Precautions
(paper, PDF)
Quick Installation Sheet
(paper)
Operator's Guide
(this manual) (PDF)
Contains important information about the
safe use of this product.
Make sure to read this manual before
using the scanner.
The PDF version is included in the Setup
DVD-ROM.
Explains how to install the scanner and
configure the settings.
Provides detailed information on how to
operate and maintain the scanner daily,
and how to troubleshoot problems.
Included in the Setup DVD-ROM.
Manual Description
Help (application) Explains how to use and configure the
settings for the application software. Read
them as needed. Can be referenced from
each application.
Trademarks
Microsoft, Windows, Windows Server, and Windows Vista are
either registered trademarks or trademarks of Microsoft
Corporation in the United States and/or other countries.
ISIS is a registered trademark of EMC Corporation in the
United States.
Adobe, Acrobat, and Reader are either registered trademarks
or trade names of Adobe Systems Incorporated in the United
States and/or other countries.
Intel, Pentium, and Intel Core are registered trademarks or
trademarks of Intel Corporation in the United States and other
countries.
PaperStream is a registered trademark of PFU Limited in
Japan.
Other company names and product names are the registered
trademarks or trademarks of the respective companies.
Index
Introduction
Scanner
Overview
How to Scan
Documents
How to Use the
Operator Panel
Various Ways to
Scan
Daily Care
Troubleshooting
Operational
Settings
Help (scanner driver) Explains how to use and configure the
settings for the scanner drivers.
Can be referenced from each scanner
driver.
Appendix
Glossary
3
Page 4

Introduction
Manufacturer
PFU Limited
YOKOHAMA i-MAKR PLACE, 4-4-5 Minatomirai, Nishi-ku,
Yokohama, Kanagawa, 220-8567, Japan
© PFU Limited 2015-2017
TOP
Contents
Index
Introduction
Scanner
Overview
How to Scan
Documents
How to Use the
Operator Panel
Various Ways to
Scan
Daily Care
Troubleshooting
Operational
Settings
Appendix
Glossary
4
Page 5

Conventions
WARNING
CAUTION
TOP
Contents
Conventions
Safety Information
The attached "Safety Precautions" manual contains important
information about the safe and correct use of this product.
Make sure that you read and understand it before using the
scanner.
Symbols Used in This Manual
The following indications are used in this manual to obviate
any chance of accident or damage to you, people near you,
and your property. Warning labels consist of a symbol
indicating the severity and a warning statement. The symbols
and their meanings are as follows.
This indication alerts operators of an operation
that, if not strictly observed, may result in severe
injury or death.
Abbreviations Used in This Manual
The operating systems and products in this manual are
indicated as follows.
Name Indication
Windows Vista
Windows Vista
Windows Vista
Windows Vista
Windows Vista
Windows Server
Windows Server
®
Home Basic (32-bit/64-bit)
®
Home Premium (32-bit/64-bit)
®
Business (32-bit/64-bit)
®
Enterprise (32-bit/64-bit)
®
Ultimate (32-bit/64-bit)
®
2008 Standard (32-bit/64-bit)
®
2008 R2 Standard (64-bit)
Windows
Vista (*1)
Windows
Server 2008
(*1)
Index
Introduction
Scanner
Overview
How to Scan
Documents
How to Use the
Operator Panel
Various Ways to
Scan
Daily Care
Troubleshooting
This indication alerts operators of an operation
that, if not strictly observed, may result in safety
hazards to personnel or damage to the product.
Windows
Windows
Windows
Windows
Windows Server
®
7 Home Premium (32-bit/64-bit)
®
7 Professional (32-bit/64-bit)
®
7 Enterprise (32-bit/64-bit)
®
7 Ultimate (32-bit/64-bit)
®
2012 Standard (64-bit)
Windows 7
(*1)
Windows
Server 2012
(*1)
Operational
Settings
Appendix
Glossary
5
Page 6

Conventions
Name Indication
Windows Server® 2012 R2 Standard (64-bit)
Windows
Windows
Windows
Windows
Windows
Windows
Windows
Windows
Windows
Windows
Windows Server
PaperStream IP (ISIS) for fi-600F PaperStream
PaperStream IP (ISIS) xx (*2)
®
8 (32-bit/64-bit)
®
8 Pro (32-bit/64-bit)
®
8 Enterprise (32-bit/64-bit)
®
8.1 (32-bit/64-bit)
®
8.1 Pro (32-bit/64-bit)
®
8.1 Enterprise (32-bit/64-bit)
®
10 Home (32-bit/64-bit)
®
10 Pro (32-bit/64-bit)
®
10 Enterprise (32-bit/64-bit)
®
10 Education (32-bit/64-bit)
®
2016 Standard (64-bit)
Windows
Server 2012
R2 (*1)
Windows 8
(*1)
Windows 8.1
(*1)
Windows 10
(*1)
Windows
Server 2016
(*1)
IP (ISIS)
*2: This indicates a driver name of a scanner that is available for linkage.
Arrow Symbols in This Manual
Right-arrow symbols () are used to separate icons or menu
options you should select in succession.
Example: Click [Start] menu [Control Panel].
Screen Examples in This Manual
Microsoft product screenshots are reprinted with permission
from Microsoft Corporation.
The screen examples in this manual are subject to change
without notice in the interest of product development.
If the actual displayed screen differs from the screen
examples in this manual, operate by following the actual
displayed screen while referring to the user's manual of the
scanner application that you are using.
The screen examples used in this manual are of the
PaperStream IP driver.
The screenshots used in this manual are of Windows 7. The
actual windows and operations may differ depending on the
operating system. Also note that with some scanner models,
the screens and operations may differ from this manual when
you update the PaperStream IP driver. In that case, refer to
the manual provided upon updating the driver.
TOP
Contents
Index
Introduction
Scanner
Overview
How to Scan
Documents
How to Use the
Operator Panel
Various Ways to
Scan
Daily Care
Troubleshooting
Operational
Settings
PaperStream IP (TWAIN) PaperStream
IP driver
PaperStream IP (TWAIN x64)
PaperStream IP (ISIS)
*1: Where there is no distinction between the different versions of the
above operating system, the general term "Windows" is used.
Appendix
Glossary
6
Page 7

Contents
TOP
Contents
Contents
How to Use This Manual ................................................................................................................................... 2
Introduction ........................................................................................................................................................ 3
Conventions ....................................................................................................................................................... 5
Chapter 1 Scanner Overview ...................................................................................................................... 11
1.1 Main Features .............................................................................................................................................................. 12
1.2 Parts and Functions .................................................................................................................................................... 13
Front ............................................................................................................................................................................... 13
Inside.............................................................................................................................................................................. 14
Back ............................................................................................................................................................................... 15
Bottom ............................................................................................................................................................................ 16
1.3 Turning the Power ON/OFF ........................................................................................................................................ 17
How to Turn the Power ON ............................................................................................................................................ 17
How to Turn the Power OFF .......................................................................................................................................... 17
1.4 Opening/Closing the Document Cover ..................................................................................................................... 18
Index
Introduction
Scanner
Overview
How to Scan
Documents
How to Use the
Operator Panel
Various Ways to
Scan
Daily Care
Troubleshooting
How to Open the Document Cover ................................................................................................................................ 18
How to Close the Document Cover ................................................................................................................................ 18
1.5 Power Saving Mode .................................................................................................................................................... 19
1.6 Bundled Software ........................................................................................................................................................ 20
Overview of Bundled Software ....................................................................................................................................... 20
Operating Environment .................................................................................................................................................. 21
Installing the Bundled Software...................................................................................................................................... 22
Chapter 2 How to Scan Documents ........................................................................................................... 24
2.1 Scanning Documents .................................................................................................................................................. 25
Operational
Settings
Appendix
Glossary
7
Page 8

Contents
Chapter 3 How to Use the Operator Panel ................................................................................................. 27
3.1 Operator Panel Overview ............................................................................................................................................ 28
Names and Functions .................................................................................................................................................... 28
TOP
Contents
Index
Introduction
Indications on [Power] Button LED Indicator.................................................................................................................. 29
Chapter 4 Various Ways to Scan ................................................................................................................ 30
4.1 Summary ...................................................................................................................................................................... 31
4.2 Scanning Documents of Different Types and Sizes ................................................................................................ 32
Scanning a Book ............................................................................................................................................................ 32
4.3 Customizing the Scanner Settings ............................................................................................................................ 33
Using a Button on the Scanner to Start Scanning.......................................................................................................... 33
Chapter 5 Daily Care .................................................................................................................................... 35
5.1 Cleaning Materials and Locations that Require Cleaning ....................................................................................... 36
Cleaning Materials.......................................................................................................................................................... 36
Location and Frequency................................................................................................................................................. 36
5.2 Cleaning the Outside .................................................................................................................................................. 37
5.3 Cleaning the Inside ..................................................................................................................................................... 38
Chapter 6 Troubleshooting ......................................................................................................................... 39
6.1 Error Indications on Operator Panel ......................................................................................................................... 40
6.2 Troubleshooting .......................................................................................................................................................... 41
Scanner
Overview
How to Scan
Documents
How to Use the
Operator Panel
Various Ways to
Scan
Daily Care
Troubleshooting
Operational
Settings
Scanner cannot be powered ON. ................................................................................................................................... 42
The [Power] button light switches off.............................................................................................................................. 43
Scanning does not start.................................................................................................................................................. 44
Scanning takes a long time. ........................................................................................................................................... 45
Image quality is poor when scanning pictures/photos.................................................................................................... 46
Quality of scanned text or lines is unsatisfactory. .......................................................................................................... 47
Images are distorted or not clear.................................................................................................................................... 48
Appendix
Glossary
8
Page 9

Contents
Vertical streaks appear on the scanned image. ............................................................................................................. 49
The [Power] button lights orange after power-on. .......................................................................................................... 50
A shadow appears at the top or the bottom of the scanned image. ............................................................................... 51
TOP
Contents
Index
Introduction
Images scanned in black & white (or in grayscale or color) are dark. ............................................................................ 52
Automatic page size detection fails. ............................................................................................................................... 53
6.3 Before You Contact the Scanner Service Provider .................................................................................................. 54
General........................................................................................................................................................................... 54
Error Status .................................................................................................................................................................... 55
6.4 Checking the Product Labels ..................................................................................................................................... 56
Location.......................................................................................................................................................................... 56
Chapter 7 Operational Settings .................................................................................................................. 57
7.1 Starting Up the Software Operation Panel ................................................................................................................ 58
7.2 Password Setting ........................................................................................................................................................ 60
Setting a Password ........................................................................................................................................................ 60
Setting [View Only mode] ............................................................................................................................................... 61
Clearing [View Only mode]............................................................................................................................................. 62
Changing the Password ................................................................................................................................................. 63
Clearing the Password ................................................................................................................................................... 64
Resetting the Password ................................................................................................................................................. 65
7.3 Configuration Items .................................................................................................................................................... 66
Scanner
Overview
How to Scan
Documents
How to Use the
Operator Panel
Various Ways to
Scan
Daily Care
Troubleshooting
Operational
Settings
Device Setting ................................................................................................................................................................ 66
7.4 Settings Related to Sheet Counters .......................................................................................................................... 68
Checking the Sheet Counters (Count) ........................................................................................................................... 68
7.5 Settings Related to Waiting Time .............................................................................................................................. 69
Waiting Time to Enter Power Saving Mode [Power saving] ........................................................................................... 69
Appendix
Glossary
9
Page 10

Contents
Appendix ....................................................................................................................................................... 70
A.1 Basic Specification ..................................................................................................................................................... 71
A.2 Installation Specification ............................................................................................................................................ 72
TOP
Contents
Index
Introduction
A.3 Outer Dimensions ....................................................................................................................................................... 73
A.4 Uninstalling the Software ........................................................................................................................................... 74
A.5 Scanners That Are Linkable ....................................................................................................................................... 75
Contact for Inquiries ..................................................................................................................................... 76
Glossary ......................................................................................................................................................... 77
Index ............................................................................................................................................................... 84
Scanner
Overview
How to Scan
Documents
How to Use the
Operator Panel
Various Ways to
Scan
Daily Care
Troubleshooting
Operational
Settings
Appendix
Glossary
10
Page 11

TOP
Contents
Index
Chapter 1 Scanner Overview
This chapter explains about the names and functions of the scanner components, as well as the methods for basic
operations.
1.1 Main Features.............................................................................................................................................12
1.2 Parts and Functions....................................................................................................................................13
1.3 Turning the Power ON/OFF........................................................................................................................17
1.4 Opening/Closing the Document Cover .......................................................................................................18
1.5 Power Saving Mode ...................................................................................................................................19
1.6 Bundled Software .......................................................................................................................................20
Introduction
Scanner
Overview
How to Scan
Documents
How to Use the
Operator Panel
Various Ways to
Scan
Daily Care
Troubleshooting
Operational
Settings
Appendix
Glossary
Page 12

Chapter 1 Scanner Overview
TOP
Contents
1.1 Main Features
This section explains about the main features of this product.
The scanner is equipped with the following features:
High speed scanning
The scanner has achieved a scanning speed of 3.5 sec./sheet (*1).
Scanner linkage
Using the PaperStream IP driver supplied with the scanner, you can link
the scanner with other models of scanner. Linking with an Automatic
Document Feeder (ADF) scanner will allow the PaperStream IP driver to
use the functions of both the flatbed and ADF.
Automatic correction of skewed images
Automatic page size detection automatically detects and corrects
skewed images. You can place a document anywhere on the documents
bed without worrying about the document becoming slightly skewed.
*1: When scanning A3 size documents at 300 dpi.
ATTENTION
Do not connect multiple scanners that are the same as this scanner to
the same computer.
Index
Introduction
Scanner
Overview
How to Scan
Documents
How to Use the
Operator Panel
Various Ways to
Scan
Daily Care
Troubleshooting
Operational
Settings
Appendix
Glossary
12
Page 13

Chapter 1 Scanner Overview
Operator Panel
Consists of the [Scan] button and the [Power] button.
Can be used to operate the scanner or check the status.
For details about the operator panel, refer to "Chapter 3 How to Use
the Operator Panel" (page 27).
Flatbed
Place a document on the glass section when you scan thick
documents such as a book or plastic cards, and thin paper.
TOP
Contents
1.2 Parts and Functions
This section shows the names of the scanner parts.
Front
Index
Introduction
Scanner
Overview
How to Scan
Documents
How to Use the
Operator Panel
Various Ways to
Scan
Daily Care
Troubleshooting
Operational
Settings
Appendix
Glossary
13
Page 14

Chapter 1 Scanner Overview
Document Bed
Place a document on the glass section.
Document Pad
Holds the document down against the document bed.
Document Cover
Close it to hold the document in place.
Inside
TOP
Contents
Index
Introduction
Scanner
Overview
How to Scan
Documents
How to Use the
Operator Panel
Various Ways to
Scan
Daily Care
Troubleshooting
Operational
Settings
Appendix
Glossary
14
Page 15

Chapter 1 Scanner Overview
USB Connector
Used to connect a USB cable.
Security Cable Slot
Used to connect an anti-theft security cable (commercially available).
Power Connector
Used to connect the power cable.
"Power cable" refers to the cable that connects the plug adapter and AC
adapter.
Back
TOP
Contents
Index
Introduction
Scanner
Overview
How to Scan
Documents
How to Use the
Operator Panel
Various Ways to
Scan
Daily Care
Troubleshooting
Operational
Settings
Appendix
Glossary
15
Page 16

Chapter 1 Scanner Overview
Transport Lock Switch
Locks the carrier unit (which is inside the flatbed) to prevent damage during
transportation.
Bottom
TOP
Contents
Index
Introduction
Scanner
Overview
How to Scan
Documents
How to Use the
Operator Panel
Various Ways to
Scan
Daily Care
Troubleshooting
Operational
Settings
Appendix
Glossary
16
Page 17

Chapter 1 Scanner Overview
[Power] Button
TOP
Contents
1.3 Turning the Power ON/OFF
This section explains how to power on/off the scanner.
How to Turn the Power ON
1 Press the [Power] button on the operator panel.
The scanner is turned on, and the [Power] button lights green.
How to Turn the Power OFF
1 Press the [Power] button on the operator panel for more
than 2 seconds.
The scanner is turned off, and the [Power] button switches off.
Index
Introduction
Scanner
Overview
How to Scan
Documents
How to Use the
Operator Panel
Various Ways to
Scan
Daily Care
Troubleshooting
Operational
Settings
Appendix
Glossary
17
Page 18

Chapter 1 Scanner Overview
Document Cover
TOP
Contents
1.4 Opening/Closing the Document Cover
This section describes how to open and close the document
cover.
How to Open the Document Cover
1 Open the document cover.
How to Close the Document Cover
1 Gently close the document cover.
Index
Introduction
Scanner
Overview
How to Scan
Documents
How to Use the
Operator Panel
Various Ways to
Scan
Daily Care
Troubleshooting
Operational
Settings
Appendix
Glossary
18
Page 19

Chapter 1 Scanner Overview
TOP
Contents
1.5 Power Saving Mode
Power saving mode keeps the power consumption low when
the scanner has not been used for a certain period of time.
If the scanner is left powered on for 15 minutes without being
used, it automatically enters power saving mode.
When the scanner enters power saving mode, the [Power]
button flashes green.
To resume from power saving mode, perform either of the
following:
Press the [Power] button on the operator panel.
Note that pressing the [Power] button for more than 2 seconds will
turn the power off.
Perform scanning from an application.
The scanner is turned off automatically if it is left on for a
certain period of time without being used, reducing the power
consumption until the next scan.
To prevent the scanner from being turned off automatically,
clear the [Power off after a certain period of time] check box in
[Device Setting] on the Software Operation Panel. For details,
refer to "Waiting Time to Enter Power Saving Mode [Power
saving]" (page 69).
To turn the power back on after turning the power off
automatically, press the [Power] button on the operator panel.
For details, refer to "1.3 Turning the Power ON/OFF" (page
ATTENTION
When this scanner enters power saving mode or resumes from
power saving mode, the scanner that is linked with this scanner also
enters or resumes from power saving mode.
When the scanner performs scanning for the first time after it
resumes from power saving mode, the scanner performs
initialization similar to that performed at power-on.
For some applications, the scanner may not be turned off even if the
[Power off after a certain period of time] check box is selected.
If the scanner is automatically turned off while you are using the
image scanning application, exit the application before turning the
power on.
HINT
By using the Software Operation Panel, the waiting time for entering
power saving mode can be changed.
For details, refer to "Waiting Time to Enter Power Saving Mode
[Power saving]" (page 69).
For details about the operator panel, refer to "Chapter 3 How to Use
the Operator Panel" (page 27).
Index
Introduction
Scanner
Overview
How to Scan
Documents
How to Use the
Operator Panel
Various Ways to
Scan
Daily Care
Troubleshooting
Operational
Settings
17).
Appendix
Glossary
19
Page 20

Chapter 1 Scanner Overview
TOP
Contents
1.6 Bundled Software
Overview of Bundled Software
The following software programs are bundled with the
scanner:
PaperStream IP driver
The PaperStream IP driver is a scanner driver that conforms to the
TWAIN/ISIS standard.
There are three types of PaperStream IP drivers.
- PaperStream IP (TWAIN)
Conforms to the TWAIN standard. Used when you operate the
scanner using TWAIN-compliant 32-bit applications.
- PaperStream IP (TWAIN x64)
Conforms to the TWAIN standard. Used when you operate the
scanner using TWAIN-compliant 64-bit applications.
Can be installed on a 64-bit operating system.
- PaperStream IP (ISIS)
Conforms to the ISIS standard. Used when you operate the
scanner using ISIS-compliant applications.
For details, refer to the PaperStream IP driver Help.
Software Operation Panel
Used to check the scanner information and configure various settings
such as the operation of the scanner.
Installed together with the PaperStream IP driver.
For details, refer to "Chapter 7 Operational Settings" (page 57).
PaperStream Capture
An image scanning application that supports both PaperStream IP
(TWAIN) and PaperStream IP (ISIS). By defining scan settings as
document profiles, you can customize the settings according to your
preference.
PaperStream Capture can be downloaded and installed by displaying
the download page from the Setup DVD-ROM.
Manuals
Safety Precautions and Operator's Guide are installed.
"Chapter 4 Various Ways to Scan" (page 30) explains how to
configure the scanner settings and scan different types of
documents with the image scanning application.
Index
Introduction
Scanner
Overview
How to Scan
Documents
How to Use the
Operator Panel
Various Ways to
Scan
Daily Care
Troubleshooting
Operational
Settings
Appendix
Glossary
20
Page 21

Chapter 1 Scanner Overview
Operating Environment
The operating environment is as follows:
Operating
system
Windows Vista
Pack 1 or later)
Windows Vista
(Service Pack 1 or later)
Windows Vista
Pack 1 or later)
Windows Vista
Pack 1 or later)
Windows Vista
Pack 1 or later)
Windows Server
Windows Server
Windows
Windows
Windows
Windows
Windows Server
Windows Server
Windows
Windows
Windows
Windows
Windows
Windows
®
Home Basic (32-bit/64-bit) (Service
®
Home Premium (32-bit/64-bit)
®
Business (32-bit/64-bit) (Service
®
Enterprise (32-bit/64-bit) (Service
®
Ultimate (32-bit/64-bit) (Service
®
2008 Standard (32-bit/64-bit)
®
2008 R2 Standard (64-bit)
®
7 Home Premium (32-bit/64-bit)
®
7 Professional (32-bit/64-bit)
®
7 Enterprise (32-bit/64-bit)
®
7 Ultimate (32-bit/64-bit)
®
2012 Standard (64-bit) (*1)
®
2012 R2 Standard (64-bit) (*1)
®
8 (32-bit/64-bit) (*1)
®
8 Pro (32-bit/64-bit) (*1)
®
8 Enterprise (32-bit/64-bit) (*1)
®
8.1 (32-bit/64-bit) (*1)
®
8.1 Pro (32-bit/64-bit) (*1)
®
8.1 Enterprise (32-bit/64-bit) (*1)
Operating
system
CPU
Memory
capacity
Hard disk
drive
Display
resolution
Disk capacity Free space of 11 GB or more required (*2)
DVD
drive
Interface USB2.0/1.1
*1: Bundled software operates as a desktop application.
*2: For scanning, disk capacity is required according to the file size to be
saved.
Windows
Windows
Windows
Windows
Windows Server
®
Intel
(Recommended: Intel
except for the CPU for mobile devices)
1 GB or more (Recommended: 4 GB or more)
5400 rpm or higher (Recommended: 7200 rpm or
higher)
1024 × 768 pixel or higher, 65536-color display
Required for installation
®
10 Home (32-bit/64-bit) (*1)
®
10 Pro (32-bit/64-bit) (*1)
®
10 Enterprise (32-bit/64-bit) (*1)
®
10 Education (32-bit/64-bit) (*1)
®
2016 Standard (64-bit) (*1)
Pentium® 4 1.8 GHz or higher
®
Core™ i5 2.5 GHz or higher,
TOP
Contents
Index
Introduction
Scanner
Overview
How to Scan
Documents
How to Use the
Operator Panel
Various Ways to
Scan
Daily Care
Troubleshooting
Operational
Settings
Appendix
Glossary
21
Page 22

Chapter 1 Scanner Overview
Installing the Bundled Software
This section explains how to install software from the "Setup
DVD-ROM" supplied with the scanner.
There are two installation modes: [Installation
(Recommended)] that installs all software required to use the
scanner with one operation and [Installation (Custom)] that
HINT
If the [fi Series Setup] window does not appear, open [Explorer] or
[Computer] and double-click [Setup.exe] in the Setup DVD-ROM.
3 Click the [Installation (Recommended)] button.
TOP
Contents
Index
Introduction
Scanner
Overview
installs only the selected software as required.
ATTENTION
When an earlier version of software is already installed, uninstall it first.
For details about how to uninstall the software, refer to "A.4 Uninstalling
the Software" (page 74).
■Installation (Recommended)
[Installation (Recommended)] installs the following software:
PaperStream IP (TWAIN)
PaperStream IP (TWAIN x64)
Software Operation Panel
Manuals
1 Turn on the computer and log onto Windows as a user
with administrator privileges.
2 Insert the Setup DVD-ROM into the DVD drive.
The [fi Series Setup] window appears.
How to Scan
Documents
How to Use the
Operator Panel
Various Ways to
Scan
Daily Care
4 Install the software following the instructions displayed on
the screen.
Troubleshooting
Operational
Settings
Appendix
Glossary
22
Page 23

Chapter 1 Scanner Overview
■Installation (Custom)
1 In the same way as in "Installation (Recommended)"
(page 22), perform step 1 to 2.
TOP
Contents
Index
Introduction
2 Click the [Installation (Custom)] button.
3 Check the displayed contents and click the [Next] button.
4 Select the check boxes for the software to be installed
and click the [Next] button.
5 Install the software following the instructions displayed on
the screen.
Scanner
Overview
How to Scan
Documents
How to Use the
Operator Panel
Various Ways to
Scan
Daily Care
Troubleshooting
Operational
Settings
Appendix
Glossary
23
Page 24

TOP
Contents
Index
Chapter 2 How to Scan Documents
This chapter explains how to scan documents with the scanner.
2.1 Scanning Documents .................................................................................................................................25
Introduction
Scanner
Overview
How to Scan
Documents
How to Use the
Operator Panel
Various Ways to
Scan
Daily Care
Troubleshooting
Operational
Settings
Appendix
Glossary
Page 25

Chapter 2 How to Scan Documents
Reference Point
TOP
Contents
2.1 Scanning Documents
This section explains about the basic flow of performing a
scan.
In order to perform a scan, you need a scanner driver and an
image scanning application that supports the scanner driver.
The following scanner drivers and image scanning application
are bundled with the scanner:
Scanner driver
- PaperStream IP (TWAIN)
- PaperStream IP (TWAIN x64)
- PaperStream IP (ISIS)
Image scanning application
- PaperStream Capture
HINT
For details about the scanner drivers and the image scanning
application, refer to "1.6 Bundled Software" (page 20).
Scanning procedures and operations slightly vary depending
on the image scanning application.
For details, refer to the image scanning application manual.
The following describes the normal procedure for scanning.
1 Turn on the scanner.
For details, refer to "1.3 Turning the Power ON/OFF" (page 17).
2 Open the document cover.
For details, refer to "1.4 Opening/Closing the Document Cover" (page
18).
3 Place a document on the document bed.
Place the document face-down to align its top left-hand corner with
the reference point.
BC
A
4 Gently close the document cover.
For details, refer to "1.4 Opening/Closing the Document Cover" (page
18).
5 Start an image scanning application.
6 Select a scanner driver.
For some image scanning applications, selection of a scanner driver
may not be needed.
Index
Introduction
Scanner
Overview
How to Scan
Documents
How to Use the
Operator Panel
Various Ways to
Scan
ABC
Daily Care
Troubleshooting
Operational
Settings
Appendix
Glossary
25
Page 26

Chapter 2 How to Scan Documents
7 Select a scanner.
Make sure to select the scanner model that is connected to the
computer.
For some image scanning applications, selection of a scanner may
not be needed.
HINT
Using the PaperStream IP driver, you can link the scanner with
another scanner model. To link the scanner with another scanner,
select a scanner for scanner linkage.
For the scanners that are linkable, refer to "A.5 Scanners That Are
Linkable" (page 75).
When scanners are linked, the color of images change according
to the linked scanner.
TOP
Contents
Index
Introduction
Scanner
Overview
How to Scan
Documents
How to Use the
Operator Panel
8 In the scanner driver's setup window, configure the scan
settings.
For some image scanning applications, the scanner driver's setup
window may not appear.
9 Scan the document with the image scanning application.
ATTENTION
When the scanner and the computer are communicating, for
instance, during scanning, note the following:
Do not unplug the USB cable.
If the USB cable is unplugged and immediately plugged back
again, it may take about two minutes until the computer
recognizes the scanner.
Do not perform an operation that causes disconnection of their
communication, such as logging off the user account.
Various Ways to
Scan
Daily Care
Troubleshooting
Operational
Settings
Appendix
Glossary
26
Page 27

TOP
Contents
Index
Chapter 3 How to Use the Operator Panel
This chapter explains how to use the operator panel.
3.1 Operator Panel Overview ...........................................................................................................................28
Introduction
Scanner
Overview
How to Scan
Documents
How to Use the
Operator Panel
Various Ways to
Scan
Daily Care
Troubleshooting
Operational
Settings
Appendix
Glossary
Page 28

Chapter 3 How to Use the Operator Panel
*1: For details about the setup method for a scan using the [Scan] button, refer to the scanner driver's Help or "Using a Button on the Scanner to Start
Scanning" (page 33).
[Scan] Button
Launches the linked application software (*1).
[Power] Button
Turns the power on/off.
Lights green when the scanner is turned on.
Flashes green during power saving mode.
Lights orange during a transport lock error.
TOP
Contents
3.1 Operator Panel Overview
The operator panel consists of the [Scan] button and the [Power] button.
Names and Functions
Index
Introduction
Scanner
Overview
How to Scan
Documents
How to Use the
Operator Panel
Various Ways to
Scan
Daily Care
Troubleshooting
Operational
Settings
Appendix
Glossary
28
Page 29

Chapter 3 How to Use the Operator Panel
Indications on [Power] Button LED Indicator
TOP
Contents
Index
[Power] Button
LED Indicator
On (green) Indicates that the initialization was successfully
completed after the scanner is turned on.
Flashing (green) Indicates that the scanner is in power saving
mode.
On (orange) Indicates a transport lock error with the scanner.
Description
Introduction
Scanner
Overview
How to Scan
Documents
How to Use the
Operator Panel
Various Ways to
Scan
Daily Care
Troubleshooting
Operational
Settings
Appendix
Glossary
29
Page 30

TOP
Contents
Index
Chapter 4 Various Ways to Scan
This chapter explains how to configure scanner settings and scan different types of documents with the image scanning
application.
4.1 Summary ....................................................................................................................................................31
4.2 Scanning Documents of Different Types and Sizes....................................................................................32
4.3 Customizing the Scanner Settings .............................................................................................................33
Introduction
Scanner
Overview
How to Scan
Documents
How to Use the
Operator Panel
Various Ways to
Scan
Daily Care
Troubleshooting
Operational
Settings
Appendix
Glossary
Page 31

Chapter 4 Various Ways to Scan
TOP
Contents
4.1 Summary
The following lists the main ways of scanning documents.
Scanning documents of different types and sizes
"Scanning a Book" (page 32)
Customizing the scanner settings
"Using a Button on the Scanner to Start Scanning" (page 33)
For information on other ways of scanning, refer to the
scanner driver's Help.
Index
Introduction
Scanner
Overview
How to Scan
Documents
How to Use the
Operator Panel
Various Ways to
Scan
Daily Care
Troubleshooting
Operational
Settings
Appendix
Glossary
31
Page 32

Chapter 4 Various Ways to Scan
Reference Point
CAUTION
TOP
Contents
4.2 Scanning Documents of Different Types and Sizes
Scanning a Book
1 Open the document cover.
For details, refer to "1.4 Opening/Closing the Document Cover" (page
18).
2 Place a document on the document bed.
Place the document face-down to align its top left-hand corner with
the reference point.
ATTENTION
Take note of the following:
A curled or folded document may create a small gap between
the document and the document bed, causing the scanned
image to be blurred.
When the document cover is open, light from external sources
such as fluorescent lamps may pass through a document and
affect the brightness of the scanned images. The effect is
stronger for thinner documents. In such cases, close the
document cover before scanning.
3 Gently close the document cover.
For details, refer to "1.4 Opening/Closing the Document Cover" (page
18).
4 In the scanner driver, configure the scan settings for using
the flatbed.
For details, refer to the scanner driver's Help.
5 Scan the document with the image scanning application.
For details, refer to the image scanning application manual.
Index
Introduction
Scanner
Overview
How to Scan
Documents
How to Use the
Operator Panel
Various Ways to
Scan
Daily Care
Troubleshooting
Do not look directly into the light source.
ATTENTION
Do not move the document during scanning.
Operational
Settings
Appendix
Glossary
32
Page 33

Chapter 4 Various Ways to Scan
TOP
Contents
4.3 Customizing the Scanner Settings
Using a Button on the Scanner to Start Scanning
The [Scan] button on the operator panel can be configured to
perform scanning by pressing the button.
To configure this setting, you first need to assign an
application to be launched from the [Scan] button.
Computer setup
1 Confirm that the scanner is connected to the computer,
then turn on the scanner.
For details about how to connect the scanner to the computer, refer to
Quick Installation Sheet.
For details about how to turn on the scanner, refer to "1.3 Turning the
Power ON/OFF" (page 17).
2 Display the [Control Panel] window.
Windows Vista/Windows Server 2008/Windows 7
Click [Start] menu [Control Panel].
Windows Server 2012/Windows 8
Right-click the Start screen, and select [All apps] on the app bar
[Control Panel] under [Windows System].
Windows Server 2012 R2/Windows 8.1
Click [] on the lower left side of the Start screen [Control
Panel] under [Windows System].
To display [], move the mouse cursor.
Windows 10/Windows Server 2016
Right-click [Start] menu, and then click [Control Panel].
4 Right-click on the scanner icon, and select [Scan
properties] from the displayed menu.
The properties window of the scanner appears.
5 Click the [Events] tab and select an event.
From the [Scanner events] menu, select an event to launch an
application.
In this function, the following events can be specified:
Scan button pressed (When the [Scan] button is pressed)
Index
Introduction
Scanner
Overview
How to Scan
Documents
How to Use the
Operator Panel
Various Ways to
Scan
Daily Care
Troubleshooting
Operational
Settings
3 Click [View devices and printers].
The [Devices and Printers] window appears.
Appendix
Glossary
33
Page 34

Chapter 4 Various Ways to Scan
[Scan] Button
6 Select an action and an application to be launched by the
scanner button event.
Click an application in [Send to this application].
Scanner setup
No special settings required.
Press the [Scan] button to launch the selected application.
HINT
For details about the operator panel, refer to "Chapter 3 How to Use the
Operator Panel" (page 27).
TOP
Contents
Index
Introduction
Scanner
Overview
How to Scan
Documents
How to Use the
Operator Panel
Various Ways to
Scan
Daily Care
7 Click the [OK] button.
The setup of the computer is completed. Proceed to configure the
scanner settings.
Troubleshooting
Operational
Settings
Appendix
Glossary
34
Page 35

TOP
WARNING
Contents
Index
Chapter 5 Daily Care
This chapter describes how to clean the scanner.
Do not use aerosol spray or spray that contains alcohol for
cleaning. Dust blown up by strong air from the spray may enter
inside the scanner which may cause the scanner to fail or
malfunction.
Also note that sparks generated by static electricity may cause a
fire.
5.1 Cleaning Materials and Locations that Require Cleaning...........................................................................36
5.2 Cleaning the Outside ..................................................................................................................................37
5.3 Cleaning the Inside.....................................................................................................................................38
Introduction
Scanner
Overview
How to Scan
Documents
How to Use the
Operator Panel
Various Ways to
Scan
Daily Care
Troubleshooting
Operational
Settings
Appendix
Glossary
Page 36

Chapter 5 Daily Care
TOP
Contents
5.1 Cleaning Materials and Locations that Require Cleaning
Cleaning Materials
Name Part No. Notes
Cleaner F1 PA03950-
0352
Cleaning Paper CA99501-
0012
Cleaning Wipe PA03950-
0419
100 ml
Moisten a cloth or Cleaning
Paper with this liquid to
wipe the scanner clean.
It may take a long time to
dry if an excessive amount
is used. Use it in small
quantity. Wipe off the
cleaner completely to leave
no residue on the cleaned
parts.
10 sheets
Use this non-woven sheet with
Cleaner F1.
24 packets
Pre-moistened with Cleaner F1.
It can be used instead of
moistening a cloth with Cleaner
F1.
Location and Frequency
Location Frequency
Flatbed Document pad Every 1,000 sheets
Document bed
Plastic frame
Index
Introduction
Scanner
Overview
How to Scan
Documents
How to Use the
Operator Panel
Various Ways to
Scan
Daily Care
Troubleshooting
Operational
Settings
Dry cloth Commercially available
ATTENTION
In order to use the cleaning materials safely and correctly, read the
precautions on each product thoroughly.
For more information about the cleaning materials, contact
your FUJITSU scanner dealer or an authorized FUJITSU
scanner service provider.
Appendix
Glossary
36
Page 37

Chapter 5 Daily Care
Thinner
Cleaner F1 or mild detergent
Cloth
Cleaning Wipe
TOP
Contents
5.2 Cleaning the Outside
The outside of the scanner should be cleaned with either a
piece of dry cloth, a cloth moistened with Cleaner F1/mild
detergent, or a sheet of Cleaning Wipe.
ATTENTION
To avoid deformation and discoloration, never use paint thinner or
any other organic solvents.
Be careful not to let any moisture or water inside the scanner during
cleaning.
It may take a long time to dry if an excessive amount of Cleaner F1/
mild detergent is used. Use it in small quantity. Wipe off the cleaner
completely to leave no residue on the cleaned parts.
Index
Introduction
Scanner
Overview
How to Scan
Documents
How to Use the
Operator Panel
Various Ways to
Scan
Daily Care
Troubleshooting
Operational
Settings
Appendix
Glossary
37
Page 38

Chapter 5 Daily Care
Plastic Frame
Document
Bed
Document Pad
TOP
Contents
5.3 Cleaning the Inside
The inside of the scanner should be cleaned with a piece of
cloth moistened with Cleaner F1, or a sheet of Cleaning Wipe.
ATTENTION
To avoid deformation and discoloration, never use paint thinner or
any other organic solvents.
Be careful not to let any moisture or water inside the scanner during
cleaning.
It may take a long time to dry if an excessive amount is used. Use it
in small quantity. Wipe off the cleaner completely to leave no residue
on the cleaned parts.
1 Open the document cover.
For details, refer to "1.4 Opening/Closing the Document Cover" (page
18).
2 Clean the following locations with a cloth moistened with
Cleaner F1 or a sheet of Cleaning Wipe.
ATTENTION
Be careful not to let the cleaner in between the document bed and
the plastic frame.
3 Wait for the cleaned parts to dry.
4 Close the document cover.
For details, refer to "1.4 Opening/Closing the Document Cover" (page
18).
Index
Introduction
Scanner
Overview
How to Scan
Documents
How to Use the
Operator Panel
Various Ways to
Scan
Daily Care
Troubleshooting
Operational
Settings
Appendix
Glossary
38
Page 39

TOP
Contents
Index
Chapter 6 Troubleshooting
This chapter explains about the countermeasures against troubles, items to check before contacting your scanner service
provider, and how to read the product labels on the scanner.
ATTENTION
For details about other errors/troubles that are not covered in this
chapter, refer to the scanner driver's Help.
6.1 Error Indications on Operator Panel ...........................................................................................................40
6.2 Troubleshooting..........................................................................................................................................41
6.3 Before You Contact the Scanner Service Provider.....................................................................................54
6.4 Checking the Product Labels......................................................................................................................56
Introduction
Scanner
Overview
How to Scan
Documents
How to Use the
Operator Panel
Various Ways to
Scan
Daily Care
Troubleshooting
Operational
Settings
Appendix
Glossary
Page 40

Chapter 6 Troubleshooting
[Power] Button
TOP
Contents
6.1 Error Indications on Operator Panel
When a transport lock error occurs, the [Power] button on the
operator panel lights orange.
Index
Introduction
Scanner
Overview
How to Scan
Documents
How to Use the
Operator Panel
Various Ways to
Scan
Daily Care
Troubleshooting
Operational
Settings
Appendix
Glossary
40
Page 41

Chapter 6 Troubleshooting
TOP
Contents
6.2 Troubleshooting
This section describes the solutions for troubles that may
occur while using the scanner. Please check the following
items before you request a repair. If the problem persists,
check each item in "6.3 Before You Contact the Scanner
Service Provider" (page 54), and then contact your FUJITSU
scanner dealer or an authorized FUJITSU scanner service
provider.
The following are some examples of troubles that you may
experience.
Symptoms
"Scanner cannot be powered ON." (page 42)
"The [Power] button light switches off." (page 43)
"Scanning does not start." (page 44)
"Scanning takes a long time." (page 45)
"Image quality is poor when scanning pictures/photos." (page 46)
Index
Introduction
Scanner
Overview
How to Scan
Documents
How to Use the
Operator Panel
Various Ways to
Scan
Daily Care
Troubleshooting
"Quality of scanned text or lines is unsatisfactory." (page 47)
"Images are distorted or not clear." (page 48)
"Vertical streaks appear on the scanned image." (page 49)
"The [Power] button lights orange after power-on." (page 50)
"A shadow appears at the top or the bottom of the scanned image."
(page 51)
"Images scanned in black & white (or in grayscale or color) are dark."
(page 52)
"Automatic page size detection fails." (page 53)
Operational
Settings
Appendix
Glossary
41
Page 42

Chapter 6 Troubleshooting
Scanner cannot be powered ON.
TOP
Contents
Index
Is the power cable connected properly?
Yes
Did you press the [Power] button on the scanner's operator
panel?
Yes
No
No
Connect the power cable properly.
Press the [Power] button on the operator panel.
If the problem persists, check the items in "6.3 Before You Contact the Scanner
Service Provider" (page 54) first, then contact your FUJITSU scanner dealer or an
authorized FUJITSU scanner service provider.
Introduction
Scanner
Overview
How to Scan
Documents
How to Use the
Operator Panel
Various Ways to
Scan
Daily Care
Troubleshooting
Operational
Settings
Appendix
Glossary
42
Page 43

Chapter 6 Troubleshooting
The [Power] button light switches off.
TOP
Contents
Index
Has the scanner been left out of operation for a long time
after being powered on?
No
Does the [Power] button light remain off even if you turn
the scanner off and then on again?
Yes
Yes
No
The scanner has entered power saving mode or has been automatically turned off.
If the scanner has entered power saving mode
The [Power] button flashes green.
Resume from power saving mode by either of the following methods:
- Press the [Power] button on the operator panel.
Note that pressing the [Power] button for more than 2 seconds will turn the
power off.
- Perform scanning from an application.
If the scanner has been automatically turned off
The [Power] button light is off.
Turn on the scanner.
For details, refer to "1.3 Turning the Power ON/OFF" (page 17).
The scanner is operating correctly.
If the problem persists, check the items in "6.3 Before You Contact the Scanner
Service Provider" (page 54) first, then contact your FUJITSU scanner dealer or an
authorized FUJITSU scanner service provider.
Introduction
Scanner
Overview
How to Scan
Documents
How to Use the
Operator Panel
Various Ways to
Scan
Daily Care
Troubleshooting
Operational
Settings
Appendix
Glossary
43
Page 44

Chapter 6 Troubleshooting
Scanning does not start.
TOP
Contents
Index
Did you unlock the transport lock switch?
Yes
Is the USB cable connected properly?
Yes
Is the connector on the USB cable broken or damaged?
No
Does scanning start after turning the scanner off then back
on?
No
No
No
Yes
Yes
Turn off the scanner, and unlock the transport lock switch.
For details about how to turn off the scanner, refer to "1.3 Turning the Power ON/
OFF" (page 17).
For details about unlocking the transport lock switch, refer to Quick Installation
Sheet.
Connect the USB cable properly.
For details, refer to Quick Installation Sheet.
Use a new cable and make sure that it is connected properly.
The scanner is operating correctly.
If the problem persists, check the items in "6.3 Before You Contact the Scanner
Service Provider" (page 54) first, then contact your FUJITSU scanner dealer or an
authorized FUJITSU scanner service provider.
Introduction
Scanner
Overview
How to Scan
Documents
How to Use the
Operator Panel
Various Ways to
Scan
Daily Care
Troubleshooting
Operational
Settings
Appendix
Glossary
44
Page 45

Chapter 6 Troubleshooting
Scanning takes a long time.
TOP
Contents
Index
Does your computer meet the recommended
requirements?
Yes
Is the USB cable connected to the USB1.1 port?
No
Did you start a scan while the computer was unstable (for
example, immediately after computer start-up or logon)?
No
No
Yes
Yes
Use a computer that meets the recommended CPU, memory, and other
requirements.
For details, refer to "Operating Environment" (page 21).
You can check the type of the USB port that the USB cable is connected to by
selecting [Interface] [Currently connected interface] in [Device Info] of the
Software Operation Panel.
Connect the USB cable to the USB2.0 port.
When you start or log onto the computer, wait a while before starting a scan.
If the problem persists, check the items in "6.3 Before You Contact the Scanner
Service Provider" (page 54) first, then contact your FUJITSU scanner dealer or an
authorized FUJITSU scanner service provider.
Introduction
Scanner
Overview
How to Scan
Documents
How to Use the
Operator Panel
Various Ways to
Scan
Daily Care
Troubleshooting
Operational
Settings
Appendix
Glossary
45
Page 46

Chapter 6 Troubleshooting
Image quality is poor when scanning pictures/ photos.
TOP
Contents
Index
Did you perform a scan with black & white specified in the
scanner driver?
Yes
No
Are the document pad and document bed clean?
No
Yes
*1: The scanned image may differ from the original image significantly if you scan a picture or a photo in black & white.
Use a scanner driver to configure the settings that do not simply "binarize" (output
in black & white), and then perform a scan. (*1)
Perform cleaning.
For details, refer to "Chapter 5 Daily Care" (page 35).
If the problem persists, check the items in "6.3 Before You Contact the Scanner
Service Provider" (page 54) first, then contact your FUJITSU scanner dealer or an
authorized FUJITSU scanner service provider.
Introduction
Scanner
Overview
How to Scan
Documents
How to Use the
Operator Panel
Various Ways to
Scan
Daily Care
Troubleshooting
Operational
Settings
Appendix
Glossary
46
Page 47

Chapter 6 Troubleshooting
Quality of scanned text or lines is unsatisfactory.
TOP
Contents
Index
Are the document pad and document bed clean?
No
Yes
Is the resolution appropriate?
Yes
Did you perform a scan with grayscale or color specified in
the scanner driver?
Yes
Is there any foreign matter (e.g. dust, paper dust) on the
document?
No
*1: When scanning in grayscale or color, the scanned image may not become sharp and clear.
No
No
Yes
Perform cleaning.
For details, refer to "Chapter 5 Daily Care" (page 35).
Specify a higher resolution in the scanner driver.
Specify black & white in the scanner driver, and then perform a scan. (*1)
Remove any foreign matter off the document.
It may be carried onto the document bed, and cause the image to become dirty.
If the problem persists, check the items in "6.3 Before You Contact the Scanner
Service Provider" (page 54) first, then contact your FUJITSU scanner dealer or an
authorized FUJITSU scanner service provider.
Introduction
Scanner
Overview
How to Scan
Documents
How to Use the
Operator Panel
Various Ways to
Scan
Daily Care
Troubleshooting
Operational
Settings
Appendix
Glossary
47
Page 48

Chapter 6 Troubleshooting
Images are distorted or not clear.
TOP
Contents
Index
Are the document pad and document bed clean?
Yes
Is a scan performed on a place that is unstable or
vibrates?
No
Is the scanner placed on a flat, level surface? Are the
rubber pads attached on the bottom of the scanner?
Yes
Is the scanned document distorted or folded?
No
No
Yes
No
Yes
Perform cleaning.
For details, refer to "Chapter 5 Daily Care" (page 35).
Perform a scan on a place that is stable and does not vibrate.
Either place the scanner on a flat and level surface, or attach the rubber pads on
the bottom of the scanner.
Place the document flatly on the document bed and hold the document gently with
the document cover.
If the problem persists, check the items in "6.3 Before You Contact the Scanner
Service Provider" (page 54) first, then contact your FUJITSU scanner dealer or an
authorized FUJITSU scanner service provider.
Introduction
Scanner
Overview
How to Scan
Documents
How to Use the
Operator Panel
Various Ways to
Scan
Daily Care
Troubleshooting
Operational
Settings
Appendix
Glossary
48
Page 49

Chapter 6 Troubleshooting
Vertical streaks appear on the scanned image.
TOP
Contents
Index
Do the streaks always appear in the same location?
No
Does the vertical streak disappear when you set a lower
resolution?
No
Is there any foreign matter (e.g. dust, paper dust) on the
document?
No
Yes
Yes
Yes
Clean the document pad and document bed.
For details, refer to "Chapter 5 Daily Care" (page 35).
Specify a lower resolution and scan the document.
Remove any foreign matter off the document.
It may be carried onto the document bed, and cause these streaks to appear on
the image.
If the problem persists, check the items in "6.3 Before You Contact the Scanner
Service Provider" (page 54) first, then contact your FUJITSU scanner dealer or an
authorized FUJITSU scanner service provider.
Introduction
Scanner
Overview
How to Scan
Documents
How to Use the
Operator Panel
Various Ways to
Scan
Daily Care
Troubleshooting
Operational
Settings
Appendix
Glossary
49
Page 50

Chapter 6 Troubleshooting
The [Power] button lights orange after power-on.
TOP
Contents
Index
Did you unlock the transport lock switch?
Yes
Does the [Power] button flash after turning the scanner off
then back on?
Yes
No
No
Turn off the scanner, and unlock the transport lock switch.
For details about how to turn off the scanner, refer to "1.3 Turning the Power ON/
OFF" (page 17).
For details about unlocking the transport lock switch, refer to Quick Installation
Sheet.
The scanner is operating correctly.
If the problem persists, check the items in "6.3 Before You Contact the Scanner
Service Provider" (page 54) first, then contact your FUJITSU scanner dealer or an
authorized FUJITSU scanner service provider.
Introduction
Scanner
Overview
How to Scan
Documents
How to Use the
Operator Panel
Various Ways to
Scan
Daily Care
Troubleshooting
Operational
Settings
Appendix
Glossary
50
Page 51

Chapter 6 Troubleshooting
A shadow appears at the top or the bottom of the scanned image.
TOP
Contents
Index
Did you use the Page Edge Filler function to fill out the
shadow around the edge?
Yes
No
In the scanner driver, use the Page Edge Filler function to fill out the shadow
around the edge.
If the problem persists, check the items in "6.3 Before You Contact the Scanner
Service Provider" (page 54) first, then contact your FUJITSU scanner dealer or an
authorized FUJITSU scanner service provider.
Introduction
Scanner
Overview
How to Scan
Documents
How to Use the
Operator Panel
Various Ways to
Scan
Daily Care
Troubleshooting
Operational
Settings
Appendix
Glossary
51
Page 52

Chapter 6 Troubleshooting
Images scanned in black & white (or in grayscale or color) are dark.
TOP
Contents
Index
Are the document pad and document bed clean?
Yes
Have you adjusted the brightness or threshold?
Yes
Are you using a thin translucent document?
No
No
No
Yes
Perform cleaning.
For details, refer to "Chapter 5 Daily Care" (page 35).
In the scanner driver, adjust the brightness or threshold.
Scan the document with a white sheet placed on the back of the document.
If the problem persists, check the items in "6.3 Before You Contact the Scanner
Service Provider" (page 54) first, then contact your FUJITSU scanner dealer or an
authorized FUJITSU scanner service provider.
Introduction
Scanner
Overview
How to Scan
Documents
How to Use the
Operator Panel
Various Ways to
Scan
Daily Care
Troubleshooting
Operational
Settings
Appendix
Glossary
52
Page 53

Chapter 6 Troubleshooting
Automatic page size detection fails.
TOP
Contents
Index
Are the document pad and document bed clean?
Yes
Did you scan with the document cover closed?
Yes
Is the shape of the document a rectangle?
Yes
Is the document folded?
No
Are you using documents with a black background or
edges?
No
No
No
No
Yes
Yes
Perform cleaning.
For details, refer to "Chapter 5 Daily Care" (page 35).
Close the document cover before scanning.
If the shape of the document is not a rectangle, automatic page size detection
does not work correctly.
Flatten the folded document.
If the document has a black background or edges, automatic page size detection
does not work correctly.
If the problem persists, check the items in "6.3 Before You Contact the Scanner
Service Provider" (page 54) first, then contact your FUJITSU scanner dealer or an
authorized FUJITSU scanner service provider.
Introduction
Scanner
Overview
How to Scan
Documents
How to Use the
Operator Panel
Various Ways to
Scan
Daily Care
Troubleshooting
Operational
Settings
Appendix
Glossary
53
Page 54

Chapter 6 Troubleshooting
TOP
Contents
6.3 Before You Contact the Scanner Service Provider
Please check the following items before contacting your
FUJITSU scanner dealer or an authorized FUJITSU scanner
service provider.
General
Item Findings
Scanner model
name Example: fi-600F
For details, refer to "6.4 Checking the Product
Labels" (page 56).
Serial No.
Example: XXXX000001
For details, refer to "6.4 Checking the Product
Labels" (page 56).
Date of manufacture
Example: 2015-05-01 (May 1, 2015)
For details, refer to "6.4 Checking the Product
Labels" (page 56).
Index
Introduction
Scanner
Overview
How to Scan
Documents
How to Use the
Operator Panel
Various Ways to
Scan
Daily Care
Troubleshooting
Date of purchase
Symptom
Frequency of
trouble
Warranty
Operational
Settings
Appendix
Glossary
54
Page 55

Chapter 6 Troubleshooting
Error Status
■Computer connection issues
Item Findings
Operating system
(Windows)
Error message
Interface
Example: USB interface
Interface controller
■Other
Item Findings
Can you send the
output image and a
photo that shows
the paper condition
by e-mail?
TOP
Contents
Index
Introduction
Scanner
Overview
How to Scan
Documents
How to Use the
Operator Panel
■Image quality issues
Item Findings
Scanner driver and
version
Interface controller
Operating system
(Windows)
Application
Example: PaperStream Capture
Resolution
Example: 600 dpi, 75 dpi
Image mode
Example: color, grayscale, black & white
Various Ways to
Scan
Daily Care
Troubleshooting
Operational
Settings
Appendix
Glossary
55
Page 56

Chapter 6 Troubleshooting
Label
TOP
Contents
6.4 Checking the Product Labels
This section explains about the product labels on the scanner.
Location
The label is located on the back of the scanner.
The location of the label is shown below.
Label (example): Shows the scanner information.
Index
Introduction
Scanner
Overview
How to Scan
Documents
How to Use the
Operator Panel
Various Ways to
Scan
Daily Care
Troubleshooting
Operational
Settings
Appendix
Glossary
56
Page 57

TOP
Contents
Index
Chapter 7 Operational Settings
This chapter explains how to use the Software Operation Panel to configure the scanner settings.
7.1 Starting Up the Software Operation Panel..................................................................................................58
7.2 Password Setting........................................................................................................................................60
7.3 Configuration Items ....................................................................................................................................66
7.4 Settings Related to Sheet Counters ...........................................................................................................68
7.5 Settings Related to Waiting Time ...............................................................................................................69
Introduction
Scanner
Overview
How to Scan
Documents
How to Use the
Operator Panel
Various Ways to
Scan
Daily Care
Troubleshooting
Operational
Settings
Appendix
Glossary
Page 58

Chapter 7 Operational Settings
TOP
Contents
7.1 Starting Up the Software Operation Panel
The Software Operation Panel is installed together with the
PaperStream IP driver.
This application allows you to check the scanner information
and configure various settings such as the operation of the
scanner.
ATTENTION
Do not start up the Software Operation Panel when the scanner is
scanning or the scanner driver's setup window is displayed.
Do not use the operator panel while the Software Operation Panel is
running.
If you start up the Software Operation Panel with multiple scanners
connected, the window to select a scanner appears.
Select a scanner to set up in the Software Operation Panel.
The Software Operation Panel can be started up with a maximum of
8 scanners connected at the same time. Note that you cannot
connect multiple scanners that are the same as this scanner.
If a large number of scanners is connected, it may take some time to
start up.
1 Confirm that the scanner is connected to the computer,
then turn on the scanner.
For details about how to turn on the scanner, refer to "1.3 Turning the
Power ON/OFF" (page 17).
2 Display the Software Operation Panel window.
Windows Vista/Windows Server 2008/Windows 7
Click [Start] menu [All Programs] [fi Series] [Software
Operation Panel].
Windows Server 2012/Windows 8
Right-click the Start screen, and select [All apps] on the app bar
[Software Operation Panel] under [fi Series].
Windows Server 2012 R2/Windows 8.1
Click [] on the lower left side of the Start screen [Software
Operation Panel] under [fi Series].
To display [], move the mouse cursor.
Windows 10/Windows Server 2016
Click [Start] menu [fi Series] [Software Operation Panel].
Index
Introduction
Scanner
Overview
How to Scan
Documents
How to Use the
Operator Panel
Various Ways to
Scan
Daily Care
Troubleshooting
Operational
Settings
Appendix
Glossary
58
Page 59

Chapter 7 Operational Settings
The Software Operation Panel icon is displayed in the menu that
appears when you click in the notification area. The notification
area is located at the far right of the taskbar.
To have the Software Operation Panel icon always displayed in the
notification area, drag the icon and drop it onto the notification area.
Procedures from here will be explained under the assumption that
the Software Operation Panel is always displayed in the notification
area.
TOP
Contents
Index
Introduction
Scanner
Overview
How to Scan
Documents
How to Use the
Operator Panel
Various Ways to
Scan
Daily Care
Troubleshooting
Operational
Settings
Appendix
Glossary
59
Page 60

Chapter 7 Operational Settings
TOP
Contents
7.2 Password Setting
By setting a password, the Software Operation Panel can run
in [View Only mode] which allows users to only view the
scanner settings.
The scanner settings can be configured if no password is set.
In order to prevent unnecessary changes to the settings, a
password can be used to restrict user operations.
Setting a Password
Set a password in the following procedure.
1 Right-click the Software Operation Panel icon in the
notification area, and select [Password Setting] from the
menu.
2 Enter a new password then again to confirm, and click the
[OK] button.
Up to 32 characters can be used for the password.
Note that only alphanumeric characters (a to z, A to Z, 0 to 9) are
allowed.
A confirmation message appears.
3 Click the [OK] button.
The password is set.
Index
Introduction
Scanner
Overview
How to Scan
Documents
How to Use the
Operator Panel
Various Ways to
Scan
Daily Care
Troubleshooting
The [Password setting] window appears.
Operational
Settings
Appendix
Glossary
60
Page 61
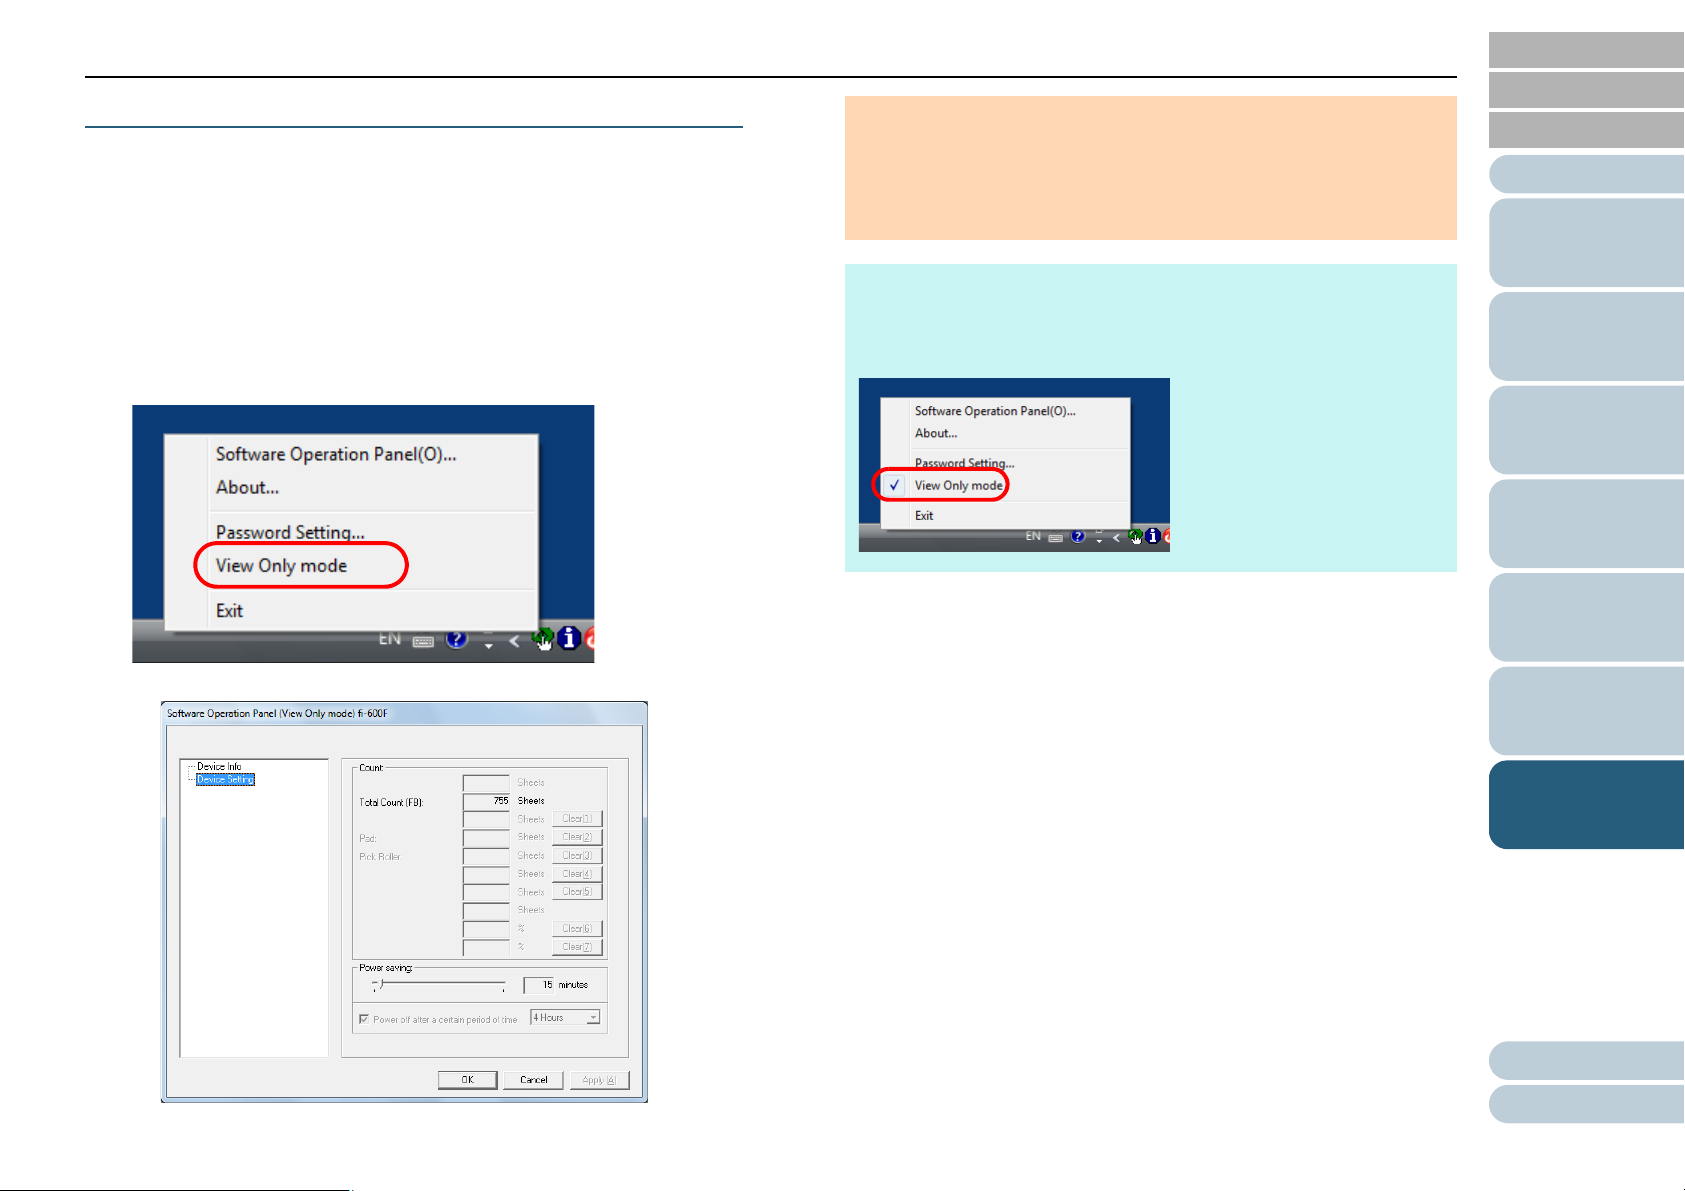
Chapter 7 Operational Settings
Setting [View Only mode]
Set the Software Operation Panel to [View Only mode] in the
following procedure.
1 Set a password.
For details, refer to "Setting a Password" (page 60).
2 Right-click the Software Operation Panel icon in the
notification area, and select [View Only mode] from the
menu.
ATTENTION
When multiple scanners are connected and when the Software
Operation Panel for one of the scanners is changed to view only
mode, the Software Operation Panel for all the scanners is
changed to view only mode.
HINT
In [View Only mode], a check mark appears next to [View Only
mode] in the menu that is displayed by right-clicking the Software
Operation Panel icon in the notification area.
TOP
Contents
Index
Introduction
Scanner
Overview
How to Scan
Documents
How to Use the
Operator Panel
Various Ways to
Scan
Daily Care
The Software Operation Panel enters [View Only mode].
Troubleshooting
Operational
Settings
Appendix
Glossary
61
Page 62

Chapter 7 Operational Settings
Clearing [View Only mode]
Clear [View Only mode] in the following procedure.
[View Only mode] is cleared, and the scanner settings can now be
changed.
TOP
Contents
Index
Introduction
1 Right-click the Software Operation Panel icon in the
notification area, and select [View Only mode] from the
menu.
The [Password setting] window appears.
2 Enter the current password and click the [OK] button.
ATTENTION
When multiple scanners are connected and when one of the
scanners exits view only mode on the Software Operation Panel,
scanner settings on the Software Operation Panel for all scanners
can be changed.
HINT
When you exit [View Only mode], the check mark next to [View
Only mode] disappears from the menu that is displayed by rightclicking the Software Operation Panel icon in the notification area.
Scanner
Overview
How to Scan
Documents
How to Use the
Operator Panel
Various Ways to
Scan
Daily Care
Troubleshooting
Operational
Settings
Appendix
Glossary
62
Page 63

Chapter 7 Operational Settings
Changing the Password
Change the password in the following procedure.
1 Right-click the Software Operation Panel icon in the
notification area, and select [Password Setting] from the
menu.
3 Enter a new password then again to confirm, and click the
[OK] button.
Up to 32 characters can be used for the password.
Note that only alphanumeric characters (a to z, A to Z, 0 to 9) are
allowed.
TOP
Contents
Index
Introduction
Scanner
Overview
How to Scan
Documents
How to Use the
Operator Panel
The [Password setting] window appears.
2 Enter the current password and click the [OK] button.
The [Password setting] window appears.
A confirmation message appears.
4 Click the [OK] button.
The password is set.
Various Ways to
Scan
Daily Care
Troubleshooting
Operational
Settings
Appendix
Glossary
63
Page 64

Chapter 7 Operational Settings
Clearing the Password
Clear the password in the following procedure.
3 Leave both fields blank and click the [OK] button.
TOP
Contents
Index
Introduction
1 Right-click the Software Operation Panel icon in the
notification area, and select [Password Setting] from the
menu.
The [Password setting] window appears.
2 Enter the current password and click the [OK] button.
A confirmation message appears.
4 Click the [OK] button.
The password is cleared.
Scanner
Overview
How to Scan
Documents
How to Use the
Operator Panel
Various Ways to
Scan
Daily Care
Troubleshooting
Operational
Settings
The [Password setting] window appears.
Appendix
Glossary
64
Page 65

Chapter 7 Operational Settings
Resetting the Password
In case you forgot your password, it can be reset in the
following procedure.
1 Right-click the Software Operation Panel icon in the
notification area, and select [Password Setting] from the
menu.
3 Enter a new password then again to confirm, and click the
[OK] button.
Up to 32 characters can be used for the password.
Note that only alphanumeric characters (a to z, A to Z, 0 to 9) are
allowed.
TOP
Contents
Index
Introduction
Scanner
Overview
How to Scan
Documents
How to Use the
Operator Panel
The [Password setting] window appears.
2 Enter the default password which is "fi-scanner", and click
the [OK] button.
The [Password setting] window appears.
A confirmation message appears.
4 Click the [OK] button.
The password is set.
Various Ways to
Scan
Daily Care
Troubleshooting
Operational
Settings
Appendix
Glossary
65
Page 66

Chapter 7 Operational Settings
TOP
Contents
7.3 Configuration Items
The Software Operation Panel allows the configuration of the
following settings for the scanner that is connected to the
computer.
Device Setting
1 Start up the Software Operation Panel.
For details, refer to "7.1 Starting Up the Software Operation Panel"
(page 58).
2 From the listing on the left, select [Device Setting].
Index
Introduction
Scanner
Overview
How to Scan
Documents
How to Use the
Operator Panel
Various Ways to
Scan
Daily Care
Troubleshooting
Items that can be configured in the above window are shown in the
next page.
Operational
Settings
Appendix
Glossary
66
Page 67

Chapter 7 Operational Settings
Item Description Parameter/Value Factory
Count
(page 68)
Power saving
(page 69)
Displays the approximate total number of sheets scanned on the
flatbed.
Specify the waiting time before entering power saving mode. Range: 5 to 235 min. (in increments of 5) 15 min.
Power off after a certain period of time: Select to set the scanner
to turn the power off automatically if the scanner is left on for a
certain period of time without being used.
Specify the timeout period for the scanner to be automatically
turned off.
Total Count (FB) 0
[Power off after a certain period of time] check
box
1 Hour/2 Hours/4 Hours/8 Hours
(when the [Power off after a certain period of
time] check box is selected)
Default
Selected
4 Hours
TOP
Contents
Index
Introduction
Scanner
Overview
How to Scan
Documents
How to Use the
Operator Panel
Various Ways to
Scan
Daily Care
Troubleshooting
Operational
Settings
Appendix
Glossary
67
Page 68

Chapter 7 Operational Settings
TOP
Contents
7.4 Settings Related to Sheet Counters
Checking the Sheet Counters (Count)
The approximate total number of sheets scanned on the
flatbed can be checked.
1 Start up the Software Operation Panel.
For details, refer to "7.1 Starting Up the Software Operation Panel"
(page 58).
2 From the listing on the left, select [Device Setting].
ATTENTION
If the scanner shuts off after disconnecting the power cable, the
total count may not have been updated.
Index
Introduction
Scanner
Overview
How to Scan
Documents
How to Use the
Operator Panel
Various Ways to
Scan
Daily Care
Troubleshooting
In this window, you can check the following items:
Item Description
Total Count (FB) Approximate total number of sheets
scanned on the flatbed
Operational
Settings
Appendix
Glossary
68
Page 69

Chapter 7 Operational Settings
TOP
Contents
7.5 Settings Related to Waiting Time
Waiting Time to Enter Power Saving Mode [Power saving]
The waiting time for the scanner to enter power saving mode
can be specified.
1 Start up the Software Operation Panel.
For details, refer to "7.1 Starting Up the Software Operation Panel"
(page 58).
2 From the listing on the left, select [Device Setting].
HINT
Selecting the [Power off after a certain period of time] check box
turns the power off automatically if the scanner is left on for a
certain period of time without being used.
You can select the timeout period for the scanner to be
automatically turned off by [1 Hour]/[2 Hours]/[4 Hours]/[8 Hours].
Index
Introduction
Scanner
Overview
How to Scan
Documents
How to Use the
Operator Panel
Various Ways to
Scan
Daily Care
Troubleshooting
3 Use the slider to specify the waiting time before entering
power saving mode.
The value can range from 5 to 235 minutes (in increments of 5).
Operational
Settings
Appendix
Glossary
69
Page 70

TOP
Contents
Index
Appendix
This appendix provides the following information.
A.1 Basic Specification .....................................................................................................................................71
A.2 Installation Specification.............................................................................................................................72
A.3 Outer Dimensions ......................................................................................................................................73
A.4 Uninstalling the Software ...........................................................................................................................74
A.5 Scanners That Are Linkable.......................................................................................................................75
Introduction
Scanner
Overview
How to Scan
Documents
How to Use the
Operator Panel
Various Ways to
Scan
Daily Care
Troubleshooting
Operational
Settings
Appendix
Glossary
Page 71

Appendix
TOP
Contents
A.1 Basic Specification
Item Specification Notes
Scanner type Flatbed -
Image sensor Color CCD -
Light source White LED array × 2 -
Scanning area Maximum 305 x 457 (mm)/12 × 18 (in.) -
Scanning speed
(*1)
Optical resolution 600 dpi -
Output resolution Binary (black & white) 50 to 600 dpi, 1200 dpi 50 to 600 dpi: configurable in 1 dpi increments
Binary (black & white) 3.5 seconds 300 dpi, A3
Grayscale
Color
A resolution other than 300 dpi and 600 dpi:
Grayscale
Color
created by the scanner driver
Index
Introduction
Scanner
Overview
How to Scan
Documents
How to Use the
Operator Panel
Various Ways to
Scan
Daily Care
Troubleshooting
Grayscale level 8-bit for each color 16-bit during internal processing
Interface USB2.0/1.1 (*2) Type B
*1: Note that this is the hardware limitation, and the software's processing time such as data transfer time is added to the actual time of scanning.
*2: Use the USB cable supplied with the scanner.
When connecting the cable to a USB hub, make sure that the USB hub is connected to a USB port of the computer.
Connection with USB2.0 requires the USB port and the hub to support USB2.0. Also note that the scanning speed slows down when using USB1.1.
Connect the USB cable with the USB mark facing upwards.
Operational
Operational
Settings
Settings
Appendix
Glossary
71
Page 72

Appendix
TOP
Contents
A.2 Installation Specification
Item Specification
Outer dimensions (W × D × H) (*1) 695 × 411 × 107 (mm)/27.36 × 16.18 × 4.21 (in.)
Installation space (W × D × H) (*2) 995 × 725 × 640 (mm)/39.17 × 28.54 × 25.20 (in.)
Weight 8.2 kg (18.08 lb) or less
Input power Voltage range AC100 to 240V ±10%
Phase Single phase
Frequency range 50/60 ±3 Hz
Power consumption Operating: 30 W or less
Power saving: 2.9 W or less
Power OFF: Less than 0.5 W
Ambient condition Temperature Operating: 15 to 35°C (59 to 95°F)
Not operating: -20 to 60°C (-4 to 140°F)
Humidity Operating: 15 to 80%
Not operating: 10 to 86%
Index
Introduction
Scanner
Overview
How to Scan
Documents
How to Use the
Operator Panel
Various Ways to
Scan
Daily Care
Troubleshooting
Calorific value Operating: 25.8 kcal/Hr or less
Power saving: 2.5 kcal/Hr or less
Power OFF: Less than 0.43 kcal/Hr
Shipping weight (*3) 11.0 kg (24.26 lb)
Durability 150,000 scans
*1: The depth and height include the protruding parts.
*2: The required installation space is a reference for opening and closing the document cover.
*3: Includes the package weight.
Operational
Operational
Settings
Settings
Appendix
Glossary
72
Page 73

Appendix
(16.18)
(27.36)
(4.21)
TOP
Contents
A.3 Outer Dimensions
The outer dimensions are as follows:
Index
Introduction
Scanner
Overview
How to Scan
Documents
How to Use the
Operator Panel
Various Ways to
Scan
Daily Care
Troubleshooting
Unit: mm (in.)
Operational
Operational
Settings
Settings
Appendix
Glossary
73
Page 74

Appendix
TOP
Contents
A.4 Uninstalling the Software
1 Turn on the computer and log onto Windows as a user
with administrator privileges.
2 Exit all running software.
3 Display the [Control Panel] window.
Windows Vista/Windows Server 2008/Windows 7
Click [Start] menu [Control Panel].
Windows Server 2012/Windows 8
Right-click the Start screen, and select [All apps] on the app bar
[Control Panel] under [Windows System].
Windows Server 2012 R2/Windows 8.1
Click [] on the lower left side of the Start screen [Control Panel]
under [Windows System].
To display [], move the mouse cursor.
Windows 10/Windows Server 2016
Right-click [Start] menu, and then click [Control Panel].
4 Select [Uninstall a Program].
The [Programs and Features] window appears with a list of the
currently installed software.
5 Select a software to uninstall.
PaperStream IP driver:
Click any of the following:
- PaperStream IP (TWAIN)
- PaperStream IP (TWAIN x64)
- PaperStream IP (ISIS) for fi-600F
- PaperStream IP (ISIS) xx (*1)
*1: This is a name of a driver for a scanner that is available for
linkage.
Software Operation Panel:
Click [Software Operation Panel].
The Software Operation Panel is installed together with the
PaperStream IP driver.
PaperStream Capture:
Click [PaperStream Capture].
Manuals:
Click [fi Series manuals for fi-600F].
6 Click the [Uninstall] button or the [Uninstall/Change]
button.
7 If a confirmation message appears, click [OK] or [Yes].
The software is uninstalled.
Index
Introduction
Scanner
Overview
How to Scan
Documents
How to Use the
Operator Panel
Various Ways to
Scan
Daily Care
Troubleshooting
Operational
Operational
Settings
Settings
Appendix
Glossary
74
Page 75

Appendix
TOP
Contents
A.5 Scanners That Are Linkable
This scanner can be linked with other scanners with the
PaperStream IP driver.
The scanners that are available for linking are the following:
Linkable scanners fi-5950/fi-6800/fi-6400/fi-6670/fi-7480/
fi-7460/fi-7180/fi-7160/fi-7140
Index
Introduction
Scanner
Overview
How to Scan
Documents
How to Use the
Operator Panel
Various Ways to
Scan
Daily Care
Troubleshooting
Operational
Operational
Settings
Settings
Appendix
Glossary
75
Page 76

Contact for Inquiries
TOP
Contents
Contact for Inquiries
Contact your FUJITSU scanner dealer or an authorized
FUJITSU scanner service provider.
If trouble occurs such as a paper jam, refer to "Chapter 6
Troubleshooting" (page 39) for the solution.
Index
Introduction
Scanner
Overview
How to Scan
Documents
How to Use the
Operator Panel
Various Ways to
Scan
Daily Care
Troubleshooting
Operational
Settings
Appendix
Contact
76
Page 77

Glossary
TOP
Contents
Glossary
A
A3 size
A4 size
A5 size
A6 size
A7 size
A8 size
Automatic size/skew detection
B
Brightness
C
CCD (Charge-Coupled Device)
Image Sensor
D
Default setting
Density
Device Error
Dither
dpi (dots per inch)
Driver
E
Edge Extract
Edge Processing
Error diffusion
F
Filter
Flatbed
G
Gamma
Grayscale
H
Halftone
I
Image processing
Interface
Inversion
ISIS
Letter size
M
Moiré patterns
N
Noise removal
O
OCR (Optical Character
Recognition)
Operating environment
Operator panel
P
Pixel
R
Resolution
S
Smoothing
T
Threshold
TWAIN
U
USB
W
White reference sheet
Index
Introduction
Scanner
Overview
How to Scan
Documents
How to Use the
Operator Panel
Various Ways to
Scan
Daily Care
Troubleshooting
Operational
Settings
Dropout color
Appendix
Glossary
77
Page 78

Glossary
TOP
Contents
A
A3 size
A standard paper size which is 297 × 420 mm (11.70 × 16.54 in.).
A4 size
A standard paper size which is 210 × 297 mm (8.27 × 11.7 in.).
A5 size
A standard paper size which is 148 × 210 mm (5.83 × 8.27 in.).
A6 size
A standard paper size which is 105 × 148 mm (4.13 × 5.83 in.).
A7 size
A standard paper size which is 74 × 105 mm (2.91 × 4.13 in.).
A8 size
A standard paper size which is 52 × 74 mm (2.05 × 2.91 in.).
Automatic size/skew detection
Automatic Page Size Detection:
Detects the paper size and outputs the image data in the same size.
Index
Introduction
Scanner
Overview
How to Scan
Documents
How to Use the
Operator Panel
Various Ways to
Scan
Daily Care
Troubleshooting
B
Brightness
Refers to the brightness of a scanned image.
C
CCD (Charge-Coupled Device) Image Sensor
A sensor which perceives the light reflected from the document and converts it into digital form. CCD technology is the basis
of high quality image acquisition in scanners, cameras and other devices.
Operational
Settings
Appendix
Glossary
78
Page 79

Glossary
D
TOP
Contents
Index
Default setting
(Hardware)
Preset values from the factory.
(Software)
Values set upon installation of software.
Density
Refers to the deepness of a color in an image.
Device Error
An error which requires troubleshooting by a service engineer.
Dither
The process by which a group of dots is arranged to reproduce the density of grayscale. Grayscale density is reproduced by
configuring preset dot patterns. This method requires less memory compared to multilevel gray.
dpi (dots per inch)
A measurement of resolution which is used for scanners and printers. Higher dpi indicates better resolution.
Driver
A program specifically designed for operating systems, which enables interaction with a hardware device.
Introduction
Scanner
Overview
How to Scan
Documents
How to Use the
Operator Panel
Various Ways to
Scan
Daily Care
Troubleshooting
Dropout color
A function which removes a specified color from a scanned image.
E
Edge Extract
A function which traces the boundaries between black and white areas, and extracts them as outlines.
Edge Processing
A function which decreases the density of bright colors (except for white) around black areas. Increasing the value for this
function removes dotted image noise and also produces "softened" images.
Operational
Settings
Appendix
Glossary
79
Page 80

Glossary
Error diffusion
Method of halftone (pseudo-grayscale) image processing which is based on black & white pixel binarization. It sums the
optical density of a pixel and its adjacent pixels, then relocates black pixels in the order of density to minimize the difference
between scanned and output images. By diffusing the errors onto other pixels, the density data of adjacent pixels can be
binarized. This function suppresses moire patterns of dotted halftone images such as newspapers, and reproduces its
grayscale gradation.
TOP
Contents
Index
Introduction
Scanner
Overview
F
Filter
A function that applies a type of filter operation process on a scanned image.
Types of filtering are as follows:
Digital Endorser:
Adds alphanumeric character strings on the scanned image data.
Page Edge Filler:
Fills in the margins of the scanned image in a specified color.
Flatbed
An input device of the scanner.
A user places sheets of documents one by one on the document bed (glass section) and scans each sheet.
Also used to scan documents such as books and magazines.
G
Gamma
A unit which indicates the changes in the brightness of an image. It is expressed as a function of the electric input power to
devices (e.g. scanner, display) and the brightness of the image. If the gamma rate is larger than 1, the brightness of an
image increases and vice versa.
How to Scan
Documents
How to Use the
Operator Panel
Various Ways to
Scan
Daily Care
Troubleshooting
Operational
Settings
Grayscale
A method which expresses the gradation (density) from black to white in 256 levels. Suitable for scanning images such as
photographs.
Appendix
Glossary
80
Page 81

Glossary
H
TOP
Contents
Index
Halftone
Reproduces the color density in black & white by using dot patterns. This method is effective for scanning images such as
photographs in black & white.
I
Image processing
Refers to processing a scanned image with specified scan parameters before outputting the image data.
Interface
The connection that allows communication between the computer and the scanner.
Inversion
A scanning method in which the black part and the white part of the image are inverted.
ISIS
ISIS (Image Scanner Interface Specification) is an API (Application Program Interface) standard for imaging devices (e.g.
scanners, digital cameras) which was developed by Captiva, a division of EMC Corporation (the former Pixel Translations)
in 1990. In order to use devices that comply with this standard, it is necessary to install a driver software that supports ISIS
standard.
Introduction
Scanner
Overview
How to Scan
Documents
How to Use the
Operator Panel
Various Ways to
Scan
Daily Care
Troubleshooting
L
Letter size
A standard paper size used in the United States and other countries (8.5 × 11 in .) .
M
Moiré patterns
Recurrent patterns on scanned images caused by incorrect settings of angles.
Operational
Settings
Appendix
Glossary
81
Page 82

Glossary
N
TOP
Contents
Index
Noise removal
A function which improves the quality of an image by removing isolated noise that appears as black dots in a white area (or
vice versa).
O
OCR (Optical Character Recognition)
A device or a technology that recognizes the text on documents and converts them into text data that can be edited. The
shape of the characters are recognized by the differences in the light reflected off the documents.
Operating environment
Conditions (e.g. temperature, humidity) required to operate or store the scanner.
Operator panel
A panel that consists of buttons and LEDs. It is used for scanner operations such as selecting functions and changing
settings.
P
Pixel
The dots that make up a scanned image.
R
Introduction
Scanner
Overview
How to Scan
Documents
How to Use the
Operator Panel
Various Ways to
Scan
Daily Care
Troubleshooting
Operational
Settings
Resolution
A measurement that shows the quality (fineness) of an image. Resolution is displayed by the number of pixels within an
inch. Since image data is a collection of small dots (pixels), if the same image contains different amount of pixels, the one
with more pixels can express greater details. Therefore, the higher the resolution, the finer the image becomes.
Appendix
Glossary
82
Page 83

Glossary
S
TOP
Contents
Index
Smoothing
Refers to the removal of irregularities on diagonal lines and curves, which is a processing method commonly used in OCR
applications.
T
Threshold
The value which is used to determine whether a certain color is black or white. Threshold value must be configured in order
to scan images with grayscale gradation. Each pixel is converted into black or white according to the specified value.
TWAIN
TWAIN (Technology Without Any Interesting Name) is an API (Application Program Interface) standard for imaging devices
(e.g. scanners, digital cameras) developed by TWAIN Working Group. In order to use devices that comply with this
standard, it is necessary to install a driver software that supports TWAIN standard.
U
USB
USB (Universal Serial Bus) is a standard for interfaces used to connect devices such as keyboards and scanners. Up to 127
devices can be connected by this interface. It can be connected and disconnected without powering off the devices.
For USB 2.0, the data transfer rate is 1.5 Mbps in Low-Speed, 12 Mbps in Full-Speed, and a maximum of 480 Mbps in HiSpeed mode.
For USB 1.1, the data transfer rate is 1.5 Mbps in Low-Speed and a maximum of 12 Mbps in Full-Speed mode.
Introduction
Scanner
Overview
How to Scan
Documents
How to Use the
Operator Panel
Various Ways to
Scan
Daily Care
Troubleshooting
Operational
Settings
W
White reference sheet
The white part which the scanner defines as white, in order to adjust the brightness of all other areas accordingly.
Appendix
Glossary
83
Page 84

Index
TOP
Contents
Index
B
before you contact the scanner service provider............ 54
bundled software ............................................................ 20
C
cleaning materials........................................................... 36
cleaning the inside.......................................................... 38
cleaning the outside........................................................ 37
conventions ...................................................................... 5
customizing the scanner settings ................................... 33
D
daily care ........................................................................ 35
E
error indications on operator panel................................. 40
I
installation specification.................................................. 72
introduction....................................................................... 3
L
loading documents ......................................................... 25
locations that require cleaning........................................ 36
M
main features.................................................................. 12
O
operational settings ........................................................ 57
operator panel ................................................................ 27
operator panel overview ................................................. 28
outer dimensions ............................................................ 73
Index
Introduction
Scanner
Overview
How to Scan
Documents
How to Use the
Operator Panel
Various Ways to
Scan
Daily Care
Troubleshooting
F
features of the scanner................................................... 12
H
how to clean the inside of the scanner ........................... 38
how to clean the outside of the scanner ......................... 37
how to close the document cover ................................... 18
how to open the document cover ................................... 18
how to scan documents.................................................. 24
how to turn the power off ................................................ 17
how to turn the power on................................................ 17
how to use this manual..................................................... 2
P
parts and functions ......................................................... 13
performing a scan........................................................... 25
power saving mode ........................................................ 19
product label................................................................... 56
S
[Scan] button ............................................................ 28, 33
scanner overview ........................................................... 11
scanners that are linkable .............................................. 75
scanning ......................................................................... 25
scanning documents of different types and sizes........... 32
Operational
Settings
Appendix
Glossary
84
Page 85

Index
sheet counters................................................................ 68
Software Operation Panel configuration items ............... 66
Software Operation Panel password .............................. 60
specifications.................................................................. 71
starting up the Software Operation Panel....................... 58
T
troubleshooting......................................................... 39, 41
U
uninstalling software....................................................... 74
V
various ways to scan ...................................................... 30
W
waiting time..................................................................... 69
ways of scanning............................................................ 31
TOP
Contents
Index
Introduction
Scanner
Overview
How to Scan
Documents
How to Use the
Operator Panel
Various Ways to
Scan
Daily Care
Troubleshooting
Operational
Settings
Appendix
Glossary
85
Page 86

TOP
Contents
Index
Introduction
Scanner
Overview
How to Scan
Documents
How to Use the
Operator Panel
Various Ways to
Scan
Daily Care
fi-600F Image Scanner
Operator's Guide
P3PC-5712-02ENZ0
Issue date: March 2017
Issued by: PFU Limited
The contents of this manual are subject to change without notice.
PFU Limited assumes no liability for incidental or consequential damages arising from the use of this product, and any
claims by a third party.
Copying of the contents of this manual, in whole or in part, as well as the scanner applications is prohibited under the
copyright law.
Troubleshooting
Operational
Settings
Appendix
Glossary
 Loading...