

Page 1
Operator's Guide
P3PC-1432-02ENZ0
fi-5900C Image Scanner
F
u
n
c
t
i
o
n
H
o
p
p
e
r
H
e
g
i
h
t
P
o
w
e
r
T
T
hi
h
n
i
c
k
n
e
s
s
T
hi
c
k
S
en
d
t
o
Sc
an
Page 2

Page 3

INTRODUCTION
Thank you for purchasing the fi-5900C Image Scanner.
The fi-5900C is an image scanner designed to scan various documents in large quantities.
The fi-5900C has the following features.
Improvement of color scanning speed (100 sheets or 200 pages
per minute) with high resolution (300dpi)
By the newly-developed high speed CCD and high speed image processing circuit,
scanning speed (A4 color, 300dpi) of 100 sheets/200 pages per minute) is improved.
Now you can scan a large amount of documents which is about 100,000 sheets a day!
Efficient pre-processing and post-processing!
This scanner is able to scan mixed documents stables of papers of different color,
density, size and thickness. This makes the scanning process even simpler and
economic, since you no not have to sort out the documents before scanning any more!
Furthermore, this scanner is equipped with an "Elevator" Stacker, moving
automatically into the appropriate height, according to the amount of loaded
documents. This will make the documents be easily and elegantly handled and also
increases your scanning efficiency!
Prevention of data loss because of improved multi feed detection
This scanner is equipped with ultrasonic multi feed detection sensors, which detect
reliably the feeding of 2 or more documents together into the scanner. Those multi
feed can also be detected surely, when scanning documents of different thickness,
size, color or density. This will help you to increase your efficiency, since the data loss
caused by multi feed is detected immediately. This gives you the opportunity to
correct the scanning without too much troubles and loss of time.
High image processing function
The automatic detection function of this scanner is able to detect if the loaded
documents are color or monochrome and according to the detection the appropriate
settings will be automatically chosen for the image creation. Since the scanner does
this automatically, you do not have to set the image settings each time before
scanning. Furthermore, The Kofax VRS image processing board is installed as
standard equipment for this scanner. This VRS board which has a good reputation for
image processing on a high level, enables you to create images of high quality and
provides advanced functions like the "Automatic direction correction" and
"Background equalization function".
Pre- and Post imprinter option can be installed
In today's document business, imprinters provide a vital tool for archiving, controlling
and verification processes. For this scanner, you can select two optional types of
imprinters, depending on your needs. The Pre-Imprinter Option prints information on
the front side of the documents prior to the scanning. When using Pre-imprinter, the
printed information will also be stored on the generated image. The Post-Imprinter on
the other hand, will print after the scanning on the back sides of your documents. So
only the originals, and not the images, will contain the imprint.
i
Page 4

About this manual
The manual provides the following information.
1. NAMES AND FUNCTIONS OF PARTS
This chapter describes names and functions of parts.
2. BASIC OPERATIONS
This chapter describes basic scanner operations and basic document scanning.
3. SCANNING VARIOUS TYPES OF DOCUMENTS
This chapter describes how to scan various types of documents.
4. DAILY CARE
This chapter describes how to clean the scanner.
5. REPLACING CONSUMABLES
This chapter describes how to replace consumables.
6. SOLVING COMMON PROBLEMS
This chapter describes how to remedy document jams, other trouble, and items to
check before contacting the agent where you bought the scanner, and how to check
device labels.
7. ADF DOCUMENT SPECIFICATIONS
This chapter describes documents that can be used with this scanner.
8. SCANNER SETTINGS
This chapter explains the how settings can be done for the scanner using the Software
Operation Panel.
9. OPTIONS
This chapter describes the options available for this product.
10. SCANNER SPECIFICATIONS
This chapter lists the scanner specifications.
The “Getting Started” is supplied to this Scanner.
This guide contains necessary information for getting started the scanner, also read the Getting
Started.
ii
Page 5

1. PREPARING THE SCANNER
This chapter describes how to prepare the scanner for use.
2. INSTALLATION OF THE SCANNER
This chapter describes how to install and connect the scanner, and how to install the
scanner application.
We hope that this manual is useful in taking full advantage of the fi-5900C Duplex Color Scanner's
features.
iii
Page 6

■ Regulatory Information
FCC Regulations
This equipment has been tested and found to comply with the limits for a Class B digital device,
pursuant to Part 15 of the FCC Rules. These limits are designed to provide reasonable protection
against harmful interference in a residential installation. This equipment generates, uses, and can
radiate radio frequency energy and, if not installed and used in accordance with the instruction
manual, may cause harmful interference to radio communications. However, there is no guarantee
that interference will not occur in a particular installation. If this equipment does cause harmful
interference to radio or television reception, which can be determined by turning the equipment off
and on, the user is encouraged to try to correct the interference by one or more of the following
measures:
•Reorient or relocate the receiving antenna.
•Increase the separation between the equipment and receiver.
•Connect the equipment into an outlet on a circuit different from that to which the receiver is
located.
•Consult your dealer or an experienced radio/TV technician.
FCC warning: Changes or modifications not expressly approved by the party responsible for
compliance could void the user’s authority to operate the equipment.
ATTENTION
•The use of a shielded interface cable is required to comply with the Class
B limits of Part 15 of FCC rules. The length of the SCSI interface cable
must be 1.5 meters (5 feet) or less.
•The length of the AC cable must be 3 meters (10 feet) or less.
Canadian DOC Regulations
This digital apparatus does not exceed the Class B limit for radio noise emissions from digital
apparatus set out in the Radio interference Regulations of the Canadian Department of
Communications.
This Class B digital apparatus complies with Canadian ICES-003.
Le présent appareil numérique n'émet pas de parasites radioélectriques dépassant les limites applicables aux appareils numériques de la classe B et prescrites dans le Règlement sur le brouillage
radioélectrique dictées par le Ministère des Communications du Canada.
Cet appareil numérique de la classe B est conforme à la norme NMB-003 du Canada.
iv
Page 7

Bescheimigung des Herstellers / Importeurs
Für den fi-5900C wid folgendes bescheinigt:
In Übereinsstimmung mit den Bestimmungen der EN45014(CE) funkentstört
Maschinenlärminformationsverordnung 3.GPSGV: Der höchste Schalldruckpegel beträgt 70 dB (A)
oder weniger, gemäß EN ISO 7779.
International ENERGY STAR® Program
As an ENERGY STAR® Partner, PFU LIMITED has determined that this
product meets the
ENERGY STAR® guidelines for energy efficiency.
The International
international program that promotes energy saving through the penetration of
energy efficient computers and other office equipment. The program backs the development and
dissemination of products with functions that effectively reduce energy consumption. It is an open
system in which business proprietors can participate voluntarily. The targeted products are office
equipment such as computers, monitors, printers, facsimiles, copiers, scanners, and multifunction
devices. Their standards and logos ( ) are uniform among participating nations.
ENERGY STAR® Office Equipment Program is an
Use in High-safety Applications
This product has been designed and manufactured on the assumption that it will be used in office,
personal, domestic, regular industrial, and general-purpose applications. It has not been designed
and manufactured for use in applications (simply called “high-safety applications” from here on)
that directly involve serious danger to life and health when an extremely high degree of safety is
required, for example, in the control of nuclear reactions at nuclear power facilities, automatic flight
control of aircraft, air traffic control, operation control in mass-transport systems, medical
equipment for sustaining life, and missile firing control in weapons systems, and when provisionally
the safety in question is not ensured. The user should use this product with adopting measures for
ensuring safety in such high-safety applications. PFU LIMITED assumes no liability whatsoever for
damages arising from use of this product by the user in high-safety applications, and for any claims
or compensation for damages by the user or a third party.
About the use of mercury
Lamp(s) inside this product contain mercury and must be recycled or
g
H
To avoid unexpected injuries;
•Do not put the substance contained in the lamp in your mouth as it has mercury.
•Do not breathe the chemical liquid contained in the scanner lamps.
•Do not incinerate, crush, or shred the lamps or scanner parts.
disposed of according to local, state, or federal laws.
v
Page 8

Illegal Copying
Reproducing bills, coins, government securities and passports, licenses issued by public author or
civilian organizations, official documents, private paper is illegal and brought to justice
Copyright
Literary works like books, paintings, wood block prints, maps, drawings, and photographs should
not be reproduced without the rightful person’s permission.
Trademarks
Microsoft, Windows and Windows NT are registered trademarks of Microsoft Corporation in the
United States and/or other countries.
ISIS, QuickScan and their respective logos are trademarks or registered trademarks of Pixel
Translations, a division of Captiva Software Corporation in the United States.
Adobe, the Adobe logo, and Acrobat are either registered trademarks of Adobe Systems
Incorporated in the United States and/or other countries.
Other product names are the trademarks or registered trademarks of the respective companies.
How Trademarks Are Indicated In This Manual
References to operating systems (OS) are indicated as follows:
®
Windows 95
Windows 98
Windows Me
WindowsNT 4.0
Windows 2000
Windows XP
Microsoft
Microsoft
Microsoft
Microsoft
Microsoft
Microsoft
Microsoft
Microsoft
Windows® 95 operating system
®
Windows® 98 operating system.
®
Windows® Millennium Edition operating system.
®
Windows NT® 4.0 Server operating system,
®
Windows NT® 4.0 Workstation operating system.
®
Windows® 2000 Professional operating system.
®
Windows® XP Professional operating system,
®
Windows® XP Home Edition operating system.
Where there is no distinction between the different versions of the above operating system, the
general term “Windows “is used.
Adobe Acrobat
Adobe
®
Acrobat®
All the descriptions in this manual assume the usage of Adobe Acrobat bundled with this product.
However, Adobe Acrobat may be upgraded without notice. If the descriptions differ from the screens
actually displayed, refer to the Acrobat’s “Help”.
vi
Page 9

Manufacturer
PFU LIMITED
International Sales Dept., Imaging Business Division, Products Group
Solid Square East Tower, 580 Horikawa-cho, Saiwai-ku, Kawasaki-shi Kanagawa 212-8563, Japan
Phone: (81-44) 540-4538
All Rights Reserved, Copyright© PFU LIMITED 2006
■ Note, Liability
READ ALL OF THIS MANUAL CAREFULLY BEFORE USING THIS PRODUCT.
IF THIS PRODUCT IS NOT USED CORRECTLY, UNEXPECTED INJURY MAY BE CAUSED
TO USERS OR BYSTANDERS.
Also, store this manual in a convenient and safe place so that it can be easily referred to during use of
this product.
While all efforts have been made to ensure the accuracy of all information in this manual, PFU
assumes no liability to any party for any damage caused by errors or omissions or by statements of
any kind in this manual, its updates or supplements, whether such errors are omissions or statements
resulting from negligence, accidents, or any other cause. PFU further assumes no liability arising
from the application or use of any product or system described herein; nor any liability for incidental
or consequential damages arising from the use of this manual. PFU disclaims all warranties
regarding the information contained herein, whether expressed, implied, or statutory.
■ Preface
Safety Precautions
This manual describes important details for ensuring the safe and correct use of this product.
Thoroughly read this manual before you start to use this product. In particular, be sure to read and
fully understand the Safety Precautions described in this manual before you use this product.
Warning Indications Used In This Manual
This manual uses the following indications to ensure safe and correct use of this product, and to
prevent possible danger and injury to the Operator and other persons.
vii
Page 10
This indication alerts operators to an operation that, if not strictly observed,
WARNING
CAUTION
may result in severe injury or death.
This indication alerts operators to an operation that, if not strictly observed,
may result in safety hazards to personnel or damage to equipment.
Symbols Used In This Manual
This manual uses the following symbols in explanations in addition to warning indications.
ATTENTION
HINT
This symbol alerts operators to particularly important information. Be sure
to read this information.
This symbol alerts operators to helpful advice regarding operation.
A TRIANGLE symbol indicates that special care and attention is required.
The drawing inside the triangle shows the specific caution.
A CIRCLE with a diagonal line inside shows action which users may not
perform.
The drawing inside or under the circle shows the specific action that is not
allowed.
viii
R
Outline characters on a colored background show instructions users should
follow.
It may also include the drawing that shows the specific instruction.
Page 11

Screen Examples In This Manual
The screen examples in this manual are subject to change without notice in the interest of product
improvement.
If the actual displayed screen differs from the screen examples in this manual, operate by following
the actual displayed screen while referring to the User's Manual of the scanner application you are
using.
Furthermore, the screenshots in this manual are for the FUJITSU TWAIN32 scanner driver,
ScandAll 21 Image Capturing Utility Software, FUJITSU ISIS scanner driver, QuickScan
capturing software and Adobe
®
Acrobat®.
About Maintenance
The user must not perform repairs on this scanner. Contact the store where you purchased the
scanner or an authorized FUJITSU Image Scanner service provider to make repairs to this product.
TM
image
ix
Page 12
■ Safety Precautions
WARNING
The following describes important warnings described in this manual.
Do not touch the Power cable with wet hands.
Do not touch the power plug with wet hands. Doing so might cause electric shock.
Do not damage the AC cable.
A damaged Power cable might cause fire or electric shock.
Do not place heavy objects on AC cables, or pull, bend, twist, heat, damage or modify AC
cables.
Also, do not use damaged AC cables or power plugs, and AC cables or power plugs
when the power outlet fitting is loose.
Use only specified AC cables and connector cables
Use only specified AC cables and connector cables. Failure to use the correct cables
might cause electric shock and equipment failure.
Please do not use the AC cable provided with this scanner for other devices, since this
might cause equipment failure and other troubles or an electric shock.
Use this scanner only at the indicated power voltage. Do not connect
to multiple-power strips.
Use this scanner only at the indicated power voltage and current. Improper power voltage
and current might cause fire or electric shock.
Also, do not connect to multiple-power strips.
Wipe any dust from the power plug.
Wipe off any dust from metal parts on the power plug or metal fittings with a soft, dry
cloth. Accumulated dust might cause fire or electric shock.
x
Page 13
Do not install the device in locations subject to oil smoke, steam,
humidity, and dust.
Do not install the scanner in locations subject to oil smoke, steam, humidity, and dust.
Doing so might cause fire or electric shock.
Do not use the scanner if you smell a strange odor coming from the
scanner.
If you detect heat coming from the device or detect other problems such as smoke,
strange smells or noises, immediately turn off the scanner and disconnect its power plug.
Make sure that the smoking has stopped, and then contact the store where you
purchased the scanner or an authorized FUJITSU scanner service provider.
Turn the scanner OFF if it is damaged.
If the scanner is damaged for any reason, turn off the scanner and unplug the AC cable
before contacting the store where you purchased the scanner.
Do not put liquids inside the scanner.
Do not insert or drop metal objects into the scanner. Do not scan wet documents or
documents with paper clips or staples. Do not splash or allow the scanner to get wet.
If foreign objects (water, small metal objects, liquids, etc.) get inside the scanner,
immediately turn off the scanner and disconnect the power plug from the power outlet,
contact the store where you purchased the scanner or the Maintenance Service Center.
Pay particular attention to this warning in households where there are small children.
xi
Page 14
Do not touch the inside of the scanner.
Do not take apart or modify the scanner. The inside of the scanner contains high-voltage
components. Touching these components might cause fire or electric shock.
CAUTION
The following describes important cautions described in this manual.
Do not install the scanner on unstable surfaces.
Install the scanner on a desk so that none of its parts protrude outside of the desktop.
Also, make sure that the scanner is installed on a flat, level surface.
Do not install the scanner on unstable surfaces. Install the scanner on a level surface that
is free of vibration to prevent it from tilting.
Install the scanner on a strong surface that will support the weight of the scanner and any
other devices on that surface.
Firmly insert the power plug.
Firmly insert the power plug into the power outlet as far it will go.
Do not block the ventilation ports.
Do not block the ventilation ports. Blocking the ventilation ports generates heat inside the
scanner, which may result in fire or scanner failure.
xii
Page 15

Do not place heavy objects or stand on top of the scanner.
Do not place heavy objects on the scanner or use the scanner's top surface for
performing other work. Improper use may cause injuries.
Before moving the scanner, disconnect the power plug from the power
outlet.
Do not move the scanner with the power and interface cables connected as this might
damage the cables, causing fire, electric shock or injuries.
Before moving the scanner, be sure to disconnect the power plug from the power outlet,
and disconnect connector cables. Also, make sure that the floor is free of obstructions.
Protect the scanner from static electricity.
Install the scanner away from strong magnetic fields and other sources of interference.
Also, protect the scanner from static electricity as this might cause the scanner to
malfunction.
Do not use aerosol sprays near the scanner.
Do not use aerosol sprays to clean the scanner. Aerosol sprays cause dirt and dust to
enter the scanner, resulting in scanner failure and malfunction.
Avoid any contact when the scanner is in use.
Avoid touching any part of the scanner mechanism or paper when scanning as this may
cause injuries.
xiii
Page 16
Disconnect the power plug from the power outlet when the scanner is
not used for a long period of time.
When the scanner is not used for a long period of time, be sure to disconnect the power
plug from the power outlet for safety.
Do not install the scanner in the direct sunlight.
Do not install the scanner in the direct sunlight or near heating apparatus. Doing so might
cause excessive heat to build up inside the scanner, causing fire or scanner trouble.
Install the scanner in a well-ventilated location.
Do not carry the scanner alone.
When transporting the scanner, never carry it alone. The scanner is heavy.
xiv
Page 17

CONTENTS
1 NAMES AND FUNCTIONS OF PARTS....... 1
2 BASIC SCANNER OPERATIONS ............... 7
INTRODUCTION .......................................... i
Regulatory Information ........................................................ iv
Note, Liability ...................................................................... vii
Preface ............................................................................... vii
Safety Precautions................................................................ x
1.1 Names and Functions of Parts ......................................2
1.2 Operator panel ...............................................................5
2.1 Turning the Scanner ON /OFF .......................................8
2.2 Opening and Closing the Hopper ................................10
2.3 Opening and Closing ADF ...........................................12
2.4 Opening and Closing Top Cover .................................14
2.5 Setting the Hopper Height ...........................................15
2.6 Loading Documents on the Hopper .............................17
2.7 Setting up the Stacker .................................................22
2.8 Using the Document smoother ....................................27
2.9 Setting the Paper Thickness ........................................29
2.10 Scanning Documents .................................................30
2.11 Starting Scanning with Button ....................................33
2.12 Feeding Documents Manually ...................................34
2.13 How to use the Scanner Driver ..................................41
2.14 Before Using [Scan] / [Send to] button ......................64
2.15 Resuming from Power Saving Mode .........................68
3 SCANNING VARIOUS TYPES OF
DOCUMENTS ............................................ 69
3.1 Double Sided Scanning ...............................................70
3.2 Scanning Documents Longer than A3 .........................71
3.3 Scanning Documents with different widths ..................73
3.4 Saving Scanned Images in PDF Format .....................76
3.5 Excluding a Color from the image (drop out color) ......82
3.6 Skipping blank Pages ..................................................85
3.7 Detecting Multifeeds ....................................................88
3.8 Correcting skewed Documents ....................................90
3.9 Multi Image Output ......................................................92
xv
Page 18

3.10 Color/monochrome Auto Detection ............................95
4 DAILY CARE.............................................. 99
4.1 Cleaning Materials and Areas Requiring Cleaning ....100
4.2 Cleaning the Pad .......................................................102
4.3 Cleaning the Rollers (using the cleaning sheet) ........103
4.4 Cleaning the Rollers (with a lint-free cloth) ................106
4.5 Cleaning the Transport path and the sensors ............110
5 REPLACEMENT OF CONSUMABLES ... 115
5.1 Consumables and Replacement Cycle ......................116
5.2 How to check and reset the
Consumables Counter ..............................................117
5.3 Replacing the Pad .....................................................121
5.4 Replacing the Pick Roller ...........................................122
5.5 Replacing the Separator Rollers ................................124
5.6 Replacing the Brake roller .........................................127
6 SOLVING COMMON PROBLEMS .......... 129
6.1 Clearing Document Jams ..........................................130
6.2 Error messages of the Operator panel ......................132
6.3 Troubleshooting .........................................................135
6.4 Before Contacting a Service Provider ........................148
6.5 Labels on the Scanner ...............................................150
7 DOCUMENT SPECIFICATIONS.............. 151
7.1 Document Size ..........................................................152
7.2 Document Quality ......................................................153
7.3 Maximum Document Loading Capacity .....................156
7.4 Hole-punching Prohibited Areas ................................157
7.5 Multifeed Detection Conditions ..................................158
7.6 Background Color Areas ............................................160
7.7 Job Separation Sheet ................................................161
7.8 Scanning Mixed Documents ......................................162
8 SCANNER SETTINGS............................. 165
xvi
8.1 Scanner Settings ......................................................166
Page 19

8.2 Power saving setting ..................................................172
8.3 Offset/Scan scale .......................................................173
8.4 Multifeed Detection ....................................................175
8.5 Page Edge Filler (ADF) ..............................................179
8.6 Dropout Color ............................................................181
8.7 Pre-Pick .....................................................................182
8.8 Page Edge Filler
(Automatic paper size detection) ...............................183
8.9 Thin Paper Mode .......................................................185
8.10 Paper Jam Detection ...............................................186
8.11 AutoCrop Boundary .................................................187
8.12 SCSI Bus Width .......................................................188
8.13 Auto Color Detection ................................................189
8.14 Alarm Setting ...........................................................190
8.15 Jam Detection Outside of Scannable Area When
Transporting... ..........................................................191
8.16 Imprinter Selection ...................................................192
8.17 Timeout for Manual Feeding ....................................193
9 OPTIONS ................................................. 195
9.1 Options ......................................................................196
9.2 fi-590PRF (Pre-imprinter) .........................................197
9.3 fi-590PRB (Post-imprinter) .........................................198
9.4 Other Options ............................................................199
10 SCANNER SPECIFICATIONS................ 201
10.1 Basic Product Specifications ...................................202
10.2 Installation Specifications ........................................204
10.3 Dimensions ..............................................................205
INDEX ............................................................................IN-1
xvii
Page 20

xviii
Page 21

1 NAMES AND
FUNCTIONS OF PARTS
This chapter describes names and functions of various parts of the scanner.
1.1 Names and Functions of Parts..............................................2
1.2 Operator panel........................................................................5
1
Page 22

1.1 Names and Functions of Parts
This section describes the names of parts.
■ Front side
1
2
7
8
9
10
4
3
6
5
11
12
13
No. Name Function
1 Stopper Prevents ejected documents from dropping off the scanner.
2 Stacker side guide For aligning ejected documents to a certain width.
3 Top cover Cover to access the consumables storage box and Post-Imprinter
option (sold separately).
4 Stacker Documents will be ejected into the Stacker after scanning.
5 Ejector For ejecting the documents after scanning.
6 Operator panel For operating the scanner.
7 Stacker extension For scanning long documents. Pull the extension out according to
the document’s length.
8 ADF cover Open the cover for cleaning the inner parts of the ADF or for
replacing consumables.
9 ADF cover open button Button used to open the ADF
10 Pre-imprinter cover For the Pre imprinter option
11 ADF
(Automatic document feeder)
12 Hopper extension Pull the Hopper extension out for loading long documents.
13 Hopper Documents to be scanned are loaded onto the Hopper.
14 Hopper side guides Sheet Guides used to make sure that the paper to be scanned is
15 Power button Switch the scanner ON&OFF.
The documents loaded onto the Hopper will be fed sheet by sheet
for scanning.
fed into the scanner straight, avoiding skew.
14
15
2
1.1 Names and Functions of Parts
Page 23
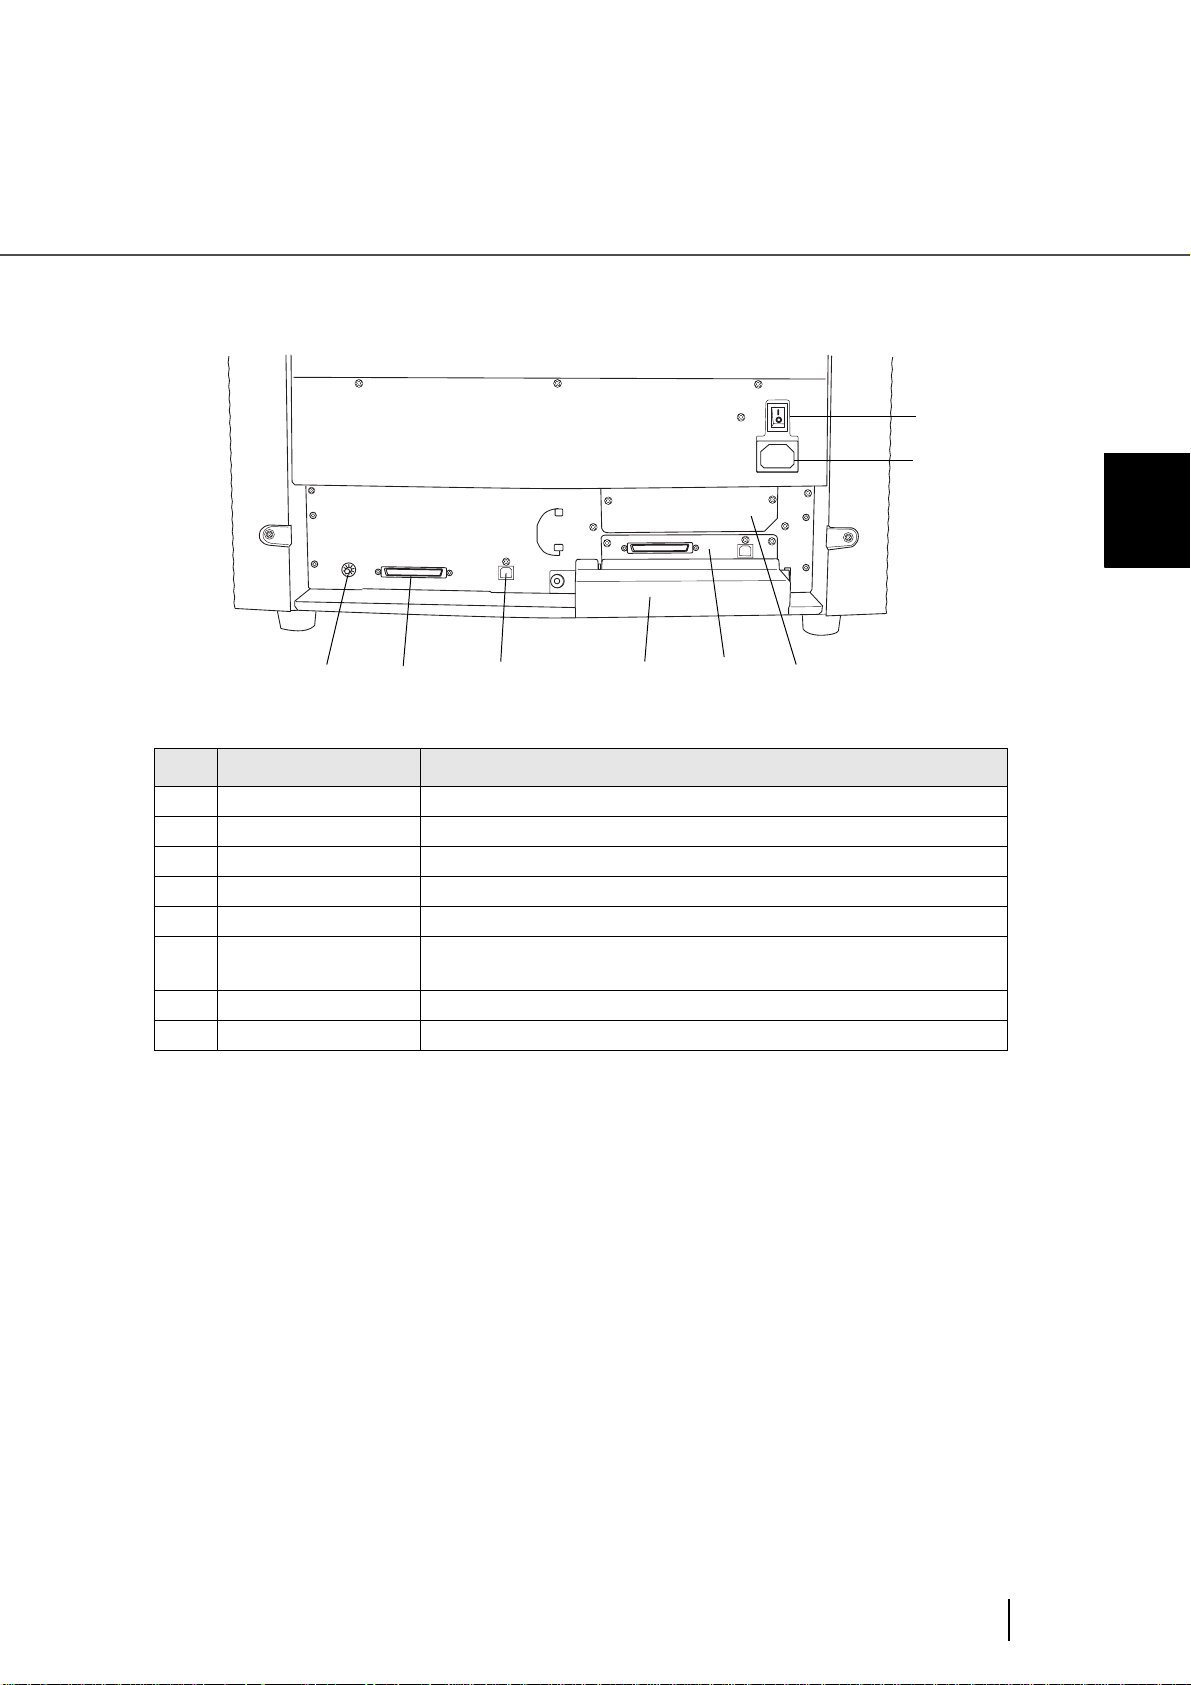
■ Rear side
1
2
1
NAMES AND FUNCTIONS OF PARTS
3
No. Name Function
1 Main power switch For switching the power supply ON/OFF.
2 Power connector For connecting the AC cable.
3 SCSI ID Switch Sets the scanner’s SCSI ID.
4 SCSI connector For connecting the SCSI cable.
5 USB connector For connecting the USB cable.
6 Extended memory
slot
7 VRS slot The VRS board has been installed in this slot.
8 Extended slot A spare slot for a third party board
4
For connecting an extension memory (sold separately). For details see
section 9.4.
5
6
7
8
1.1 Names and Functions of Parts
3
Page 24
■ Removable Parts
1
2
3
Fun
c
tio
n
H
o
p
p
e
r H
e
ig
h
t
P
ow
er
T
T
h
hic
in
kness
Th
ic
k
S
end
to
Scan
4
5
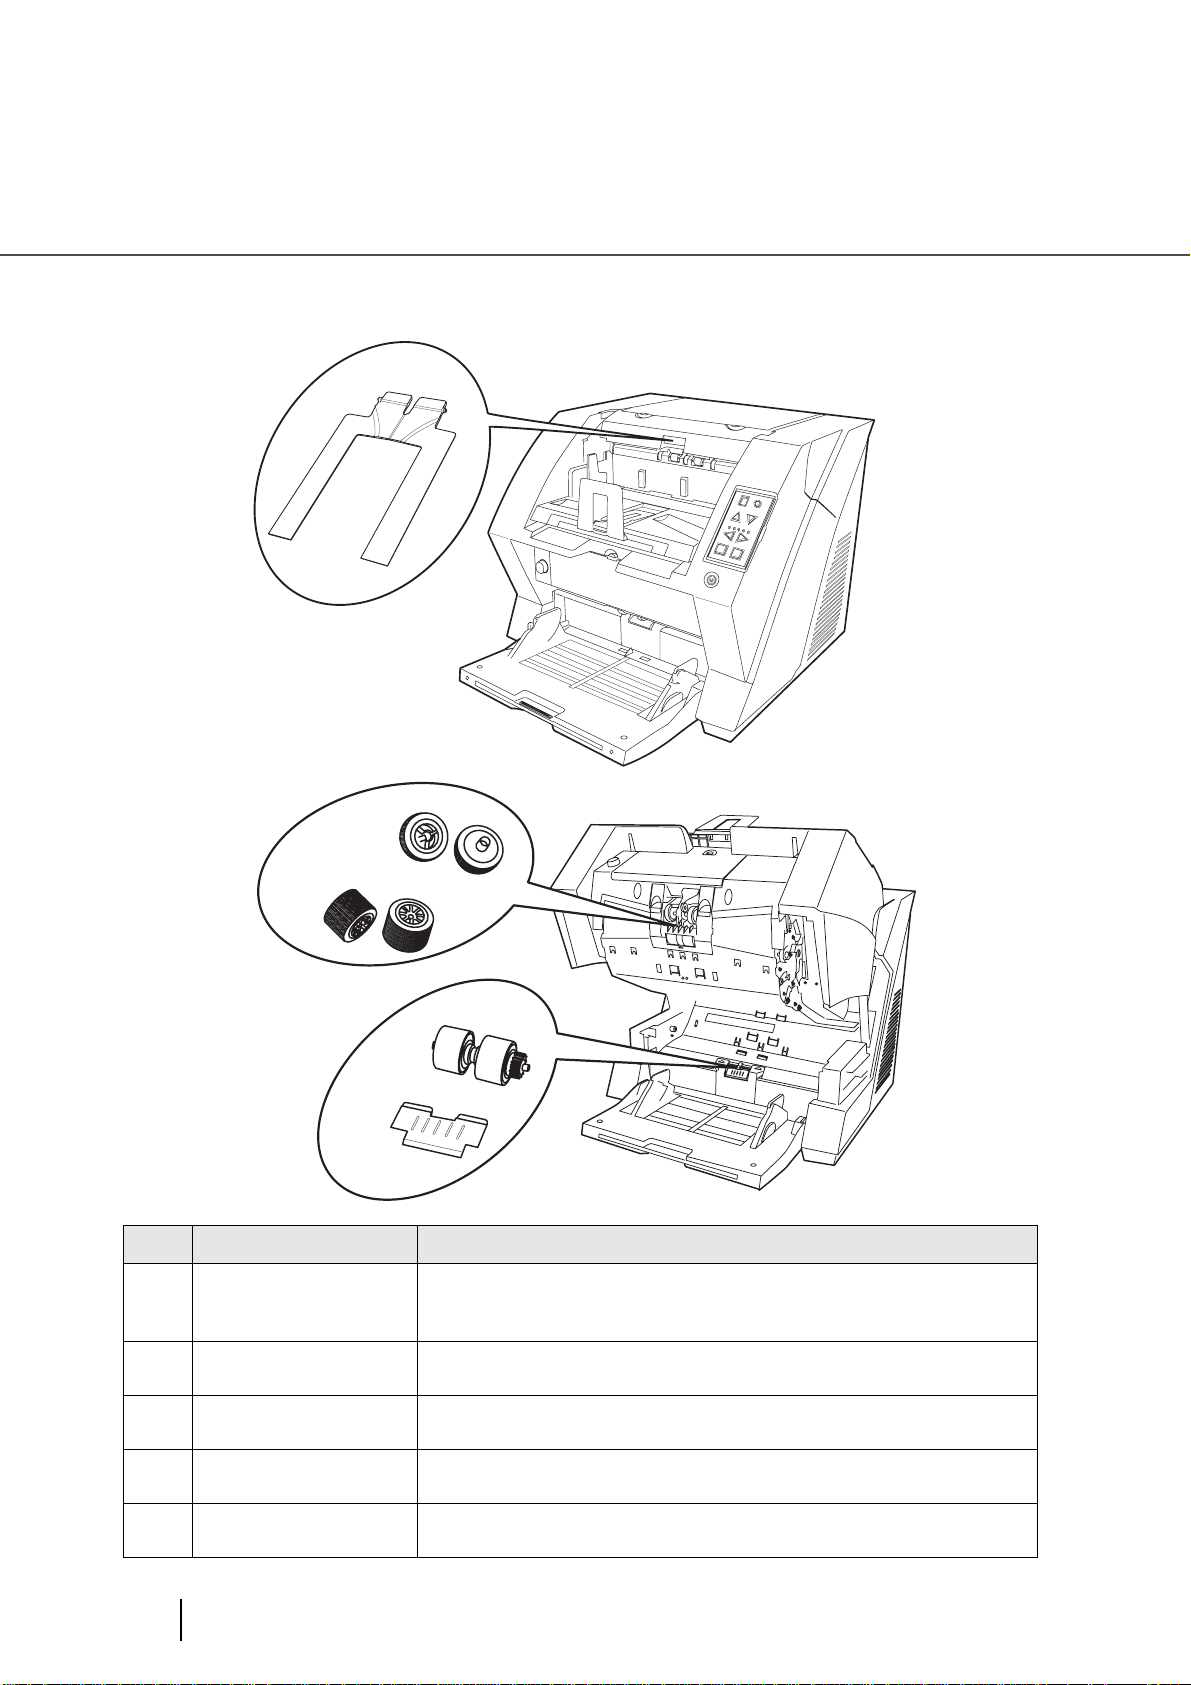
No. Name Description
1 Document smoother Attached when the stacker position is set to align the ejected document by
the leading edge (see page 24), or when scanning documents with different
widths (see page 73).
2 Pick Rollers Rollers that pick the paper from the hopper into the ADF. This is a con-
sumable item.
3 Separator rollers Roller used to help separate the paper as the feeding begins. This is a con-
sumable item.
4 Brake rollers Roller used to help separate the paper as the feeding begins. This is a con-
sumable item.
5 Pad Separation Pad used to help separate the paper as the feeding begins. This
is a consumable item.
4
1.1 Names and Functions of Parts
Page 25
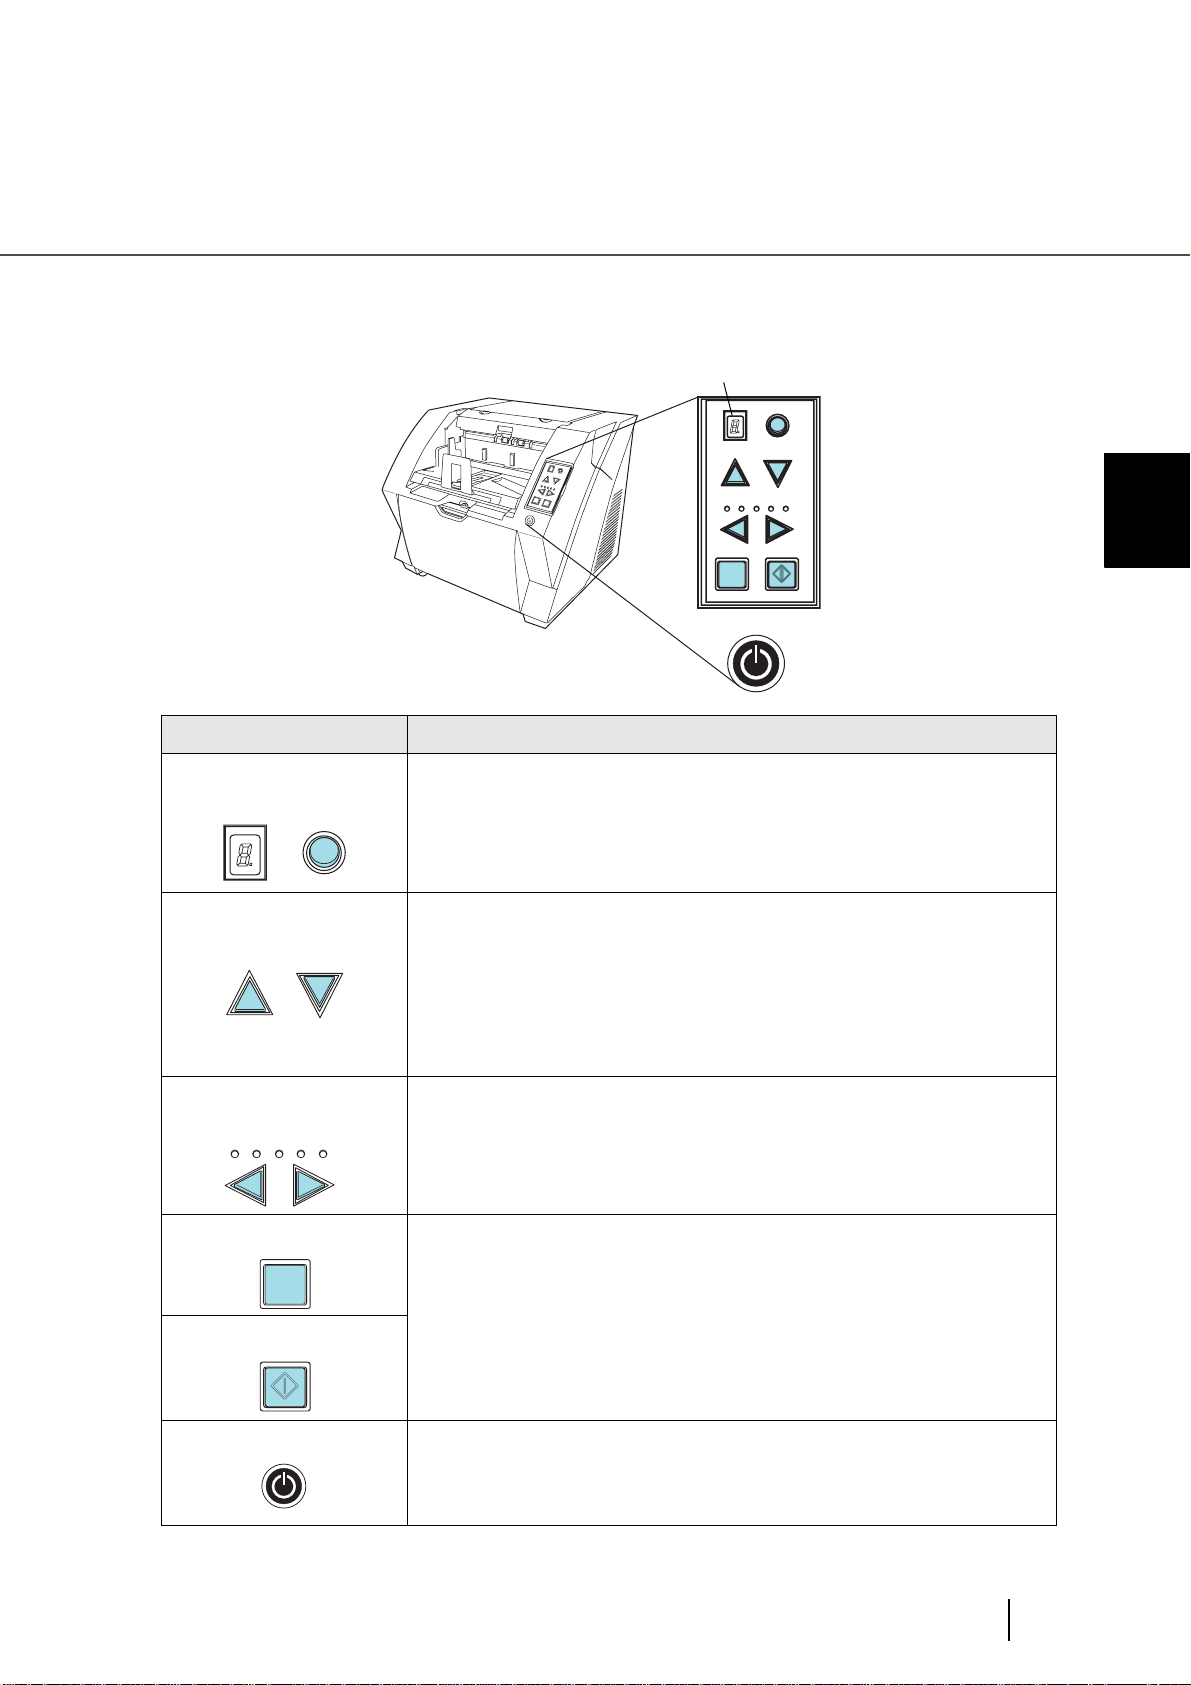
1.2 Operator panel
k
The operator panel is located on the right side of the scanner. The panel consists of a Function Number
Display, buttons and LEDs.
Function number display
Function
Name Function
Function Number display and Function button
Function
Hopper height
adjustment button
Hopper Height
Func
tio
n
H
op
p
er
He
ig
h
t
P
ow
er Thic
T
h
in
k
ness
T
h
i
c
k
S
e
n
d
to
S
ca
n
Hopper Height
Paper Thickness
Thin
Send t o S c an
Thick
.
Shows the status of the scanner.
For details, refer to "Indications on the Function Number Display" (page 6).
Use these buttons to adjust the height of the Hopper to the Upper/Middle/
Lower Positions.
The hopper moves automatically to the right position after recieving a scanning command. However, this may cause a delay before the actual scanning
starts. To avoid unnecessary waiting time, it is recommended to set the hopper height prior to scanning. For details, refer to “2.5 Setting the Hopper
Height” on page 15.
1
NAMES AND FUNCTIONS OF PARTS
Document thickness
adjustment button
Paper Thickness
Thin Thic
Use this buttons, to set the paper thickness of the documents.
(Normally no need to change from the default setting)
For details, refer to “2.9 Setting the Paper Thickness” on page 29.
[Send to] button Use this button to start linked application.
Send to
(* About the settings, refer to section “2.14 Before Using [Scan] / [Send to]
button” on page 64, or the FUJITSU TWAIN32 scanner driver help.
[Scan] button
Scan
Power button Use this button to turn the power ON/OFF.
When the power is turned on, the button is illuminated in blue.
1.2 Operator panel
5
Page 26
HINT
Thin
Send to
nese, Russian and Korean are provided with the scanner. To change the
overlay, open the plastic cover of the Operator Panel.
Operator Panel Overlays sheets in French, German, Italian, Spanish, Chi-
Scan
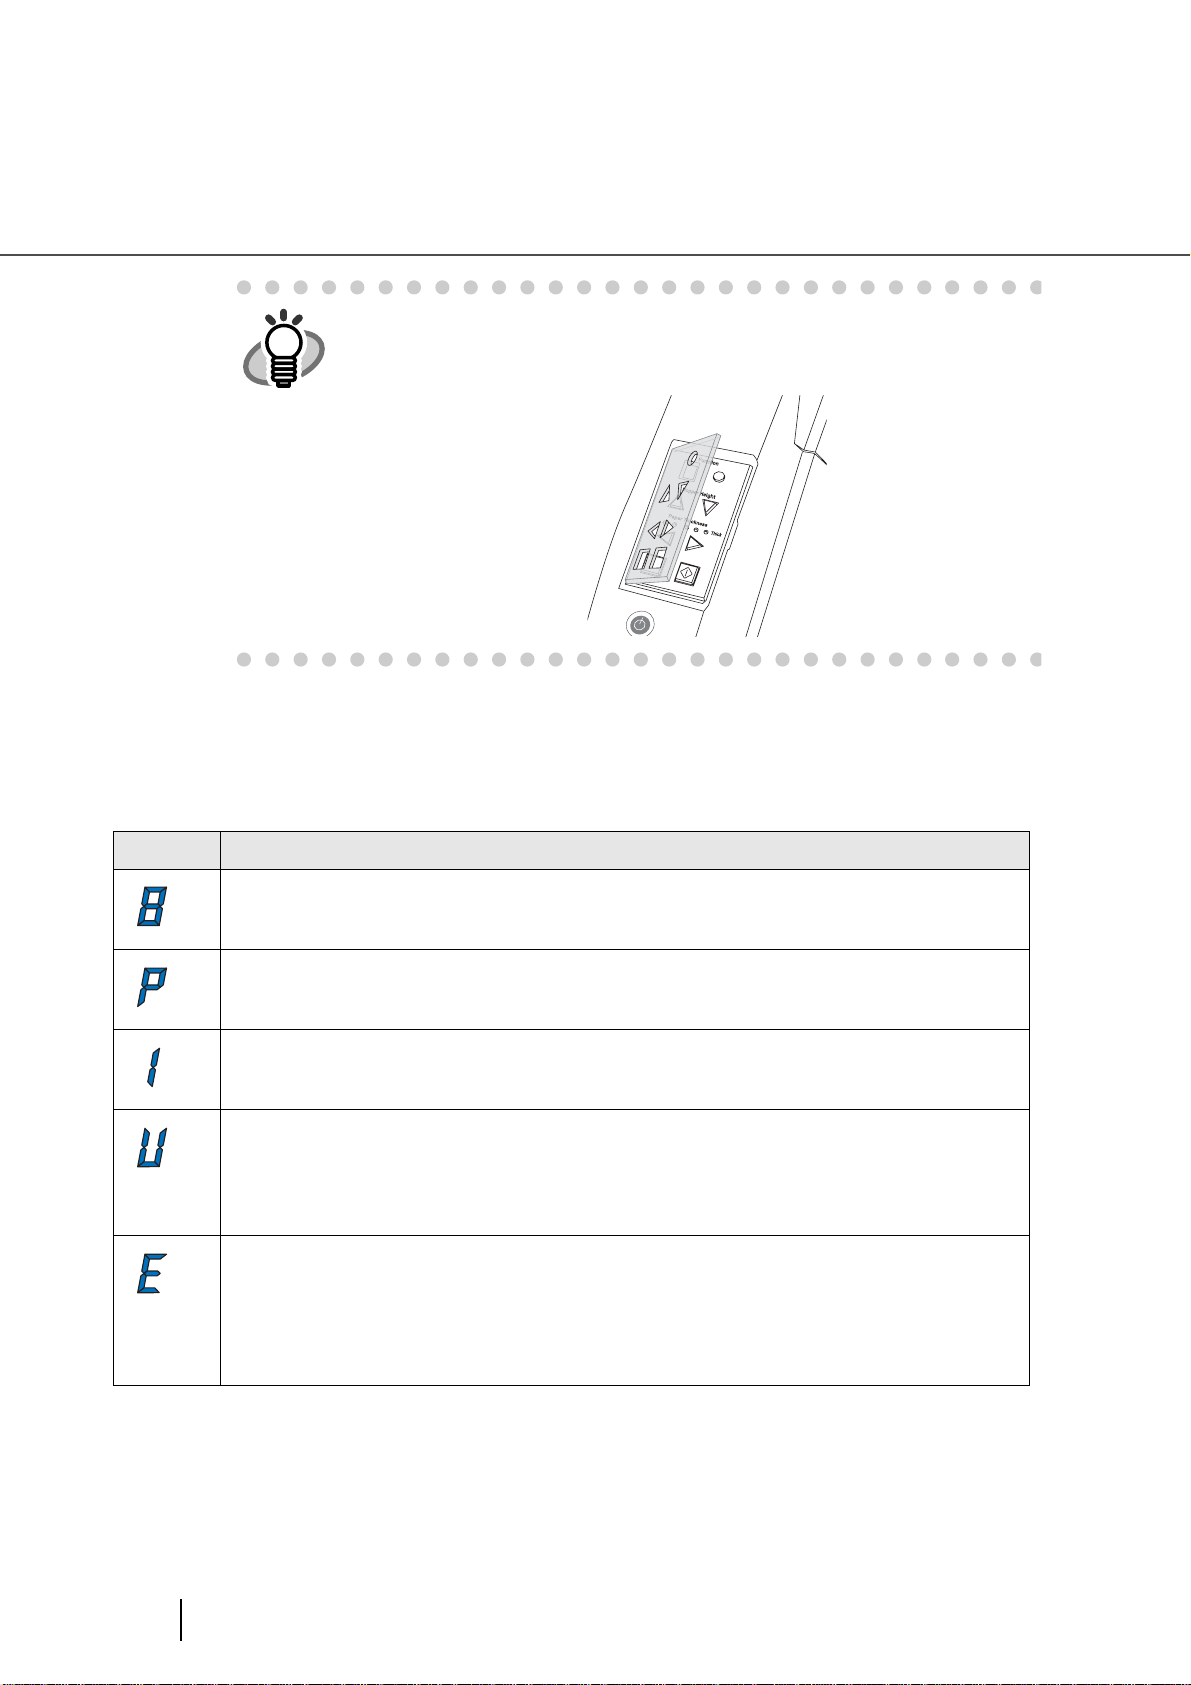
■ Indications on the Function Number Display
The following shows the indications on the Function Number Display.
No. Descriptions
Lights only one time upon turning on the scanner.
Indicates that the scanner has been turned ON and is being initialized.
Indicates that initialization has been completed successfully.
This status is called “Ready Status”.
Indicates that a temporary error (that users can solve) has occurred during the initialization or
scanning of documents.
“U” and an error number (1, 2, 6) are displayed alternately.
To return the scanner to the ready status (“1”), press the “Scan” or “Send to” button while the error
is indicated.
Indicates that a device alarm (that users can not solve) has occurred during the initialization or
scanning of documents.
“E” and an alarm number (2 to 9, and A, c, d, F) are indicated alternately.
To return the scanner to the ready status (“1”), press “Scan” or “Send to” button.
If this alarm occurs, turn the power off and then on again. If the alarm is indicated after turning on
the power again, contact your service engineer.
6
1.2 Operator panel
Page 27

2 BASIC SCANNER
OPERATIONS
This chapter describes basic scanner operations.
This chapter explains operations using the screens of Windows
Depending on your OS, your PC's screen shots and the operation may be
different from this manual. Be aware that when the FUJITSU TWAIN32
scanner driver, or the FUJITSU ISIS scanner driver is updated, the screens
and operations noted in this chapter may be changed slightly. In this case,
refer to the User's Guide provided with the update.
2.1 Turning the Scanner ON /OFF ...............................................8
2.2 Opening and Closing the Hopper .......................................10
XP.
2.3 Opening and Closing ADF ...................................................12
2.4 Opening and Closing Top Cover.........................................14
2.5 Setting the Hopper Height ...................................................15
2.6 Loading Documents on the Hopper....................................17
2.7 Setting up the Stacker..........................................................22
2.8 Using the Document smoother ...........................................27
2.9 Setting the Paper Thickness ...............................................29
2.10 Scanning Documents.........................................................30
2.11 Starting Scanning with Button ..........................................33
2.12 Feeding Documents Manually...........................................34
2.13 How to use the Scanner Driver .........................................41
2.14 Before Using [Scan] / [Send to] button ............................64
2.15 Resuming from Power Saving Mode ................................68
7
Page 28
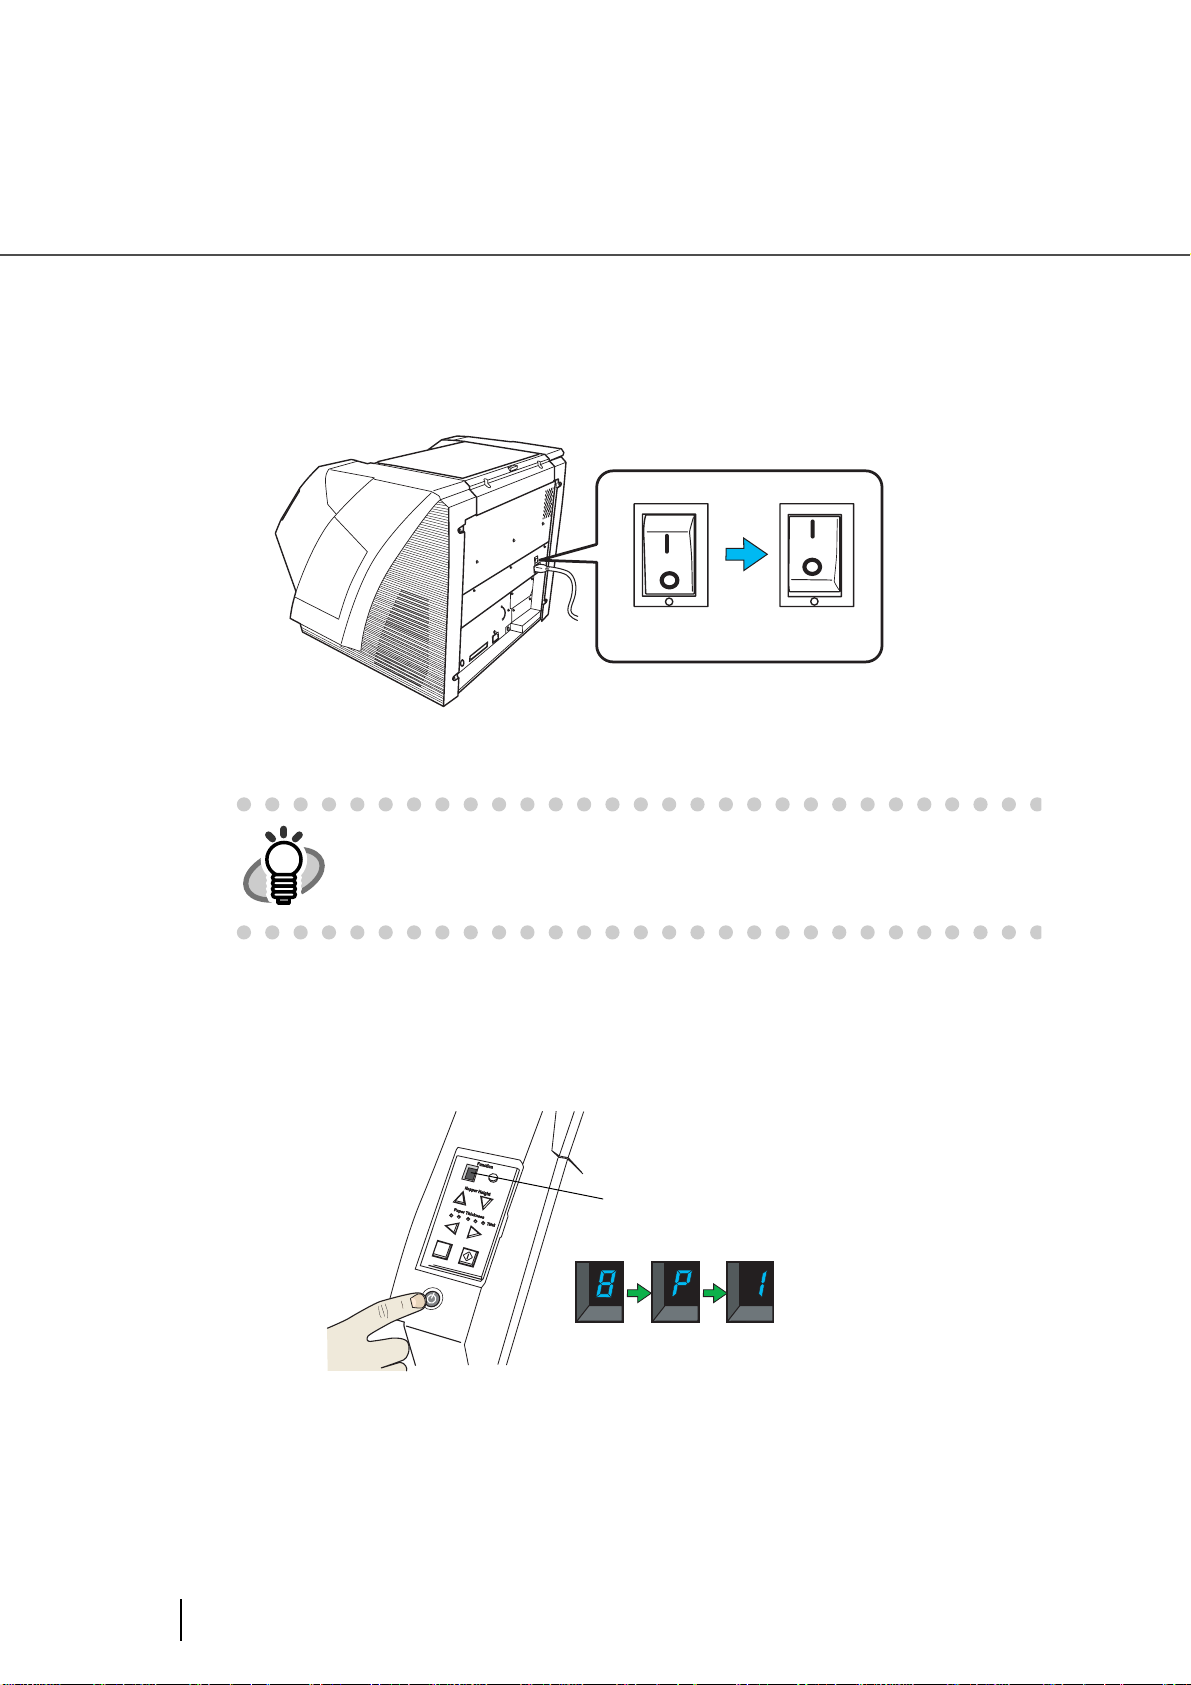
2.1 Turning the Scanner ON /OFF
T
hi
e
n
d
Scan
■ Turning the Power ON
1. Press “I” side of the main power switch located on the back of the
scanner.
ONOFF
2. Open the Hopper.
HINT
• Refer to “2.2 Opening and Closing the Hopper” on page 10 to open the
Hopper.
• Be sure to open the Hopper before turning on the scanner by the Power
button.
3. Press the Power button on the Operator panel.
The power turns on and the Power button lights up.
During initialization, the Function No. Display changes from “8” --> “P” to “1” in order. When
“1” shows, it means the scanner is ready.
T
hi
n
Se
n
d
t
o
Scan
Function number display
8
2.1 Turning the Scanner ON /OFF
Page 29
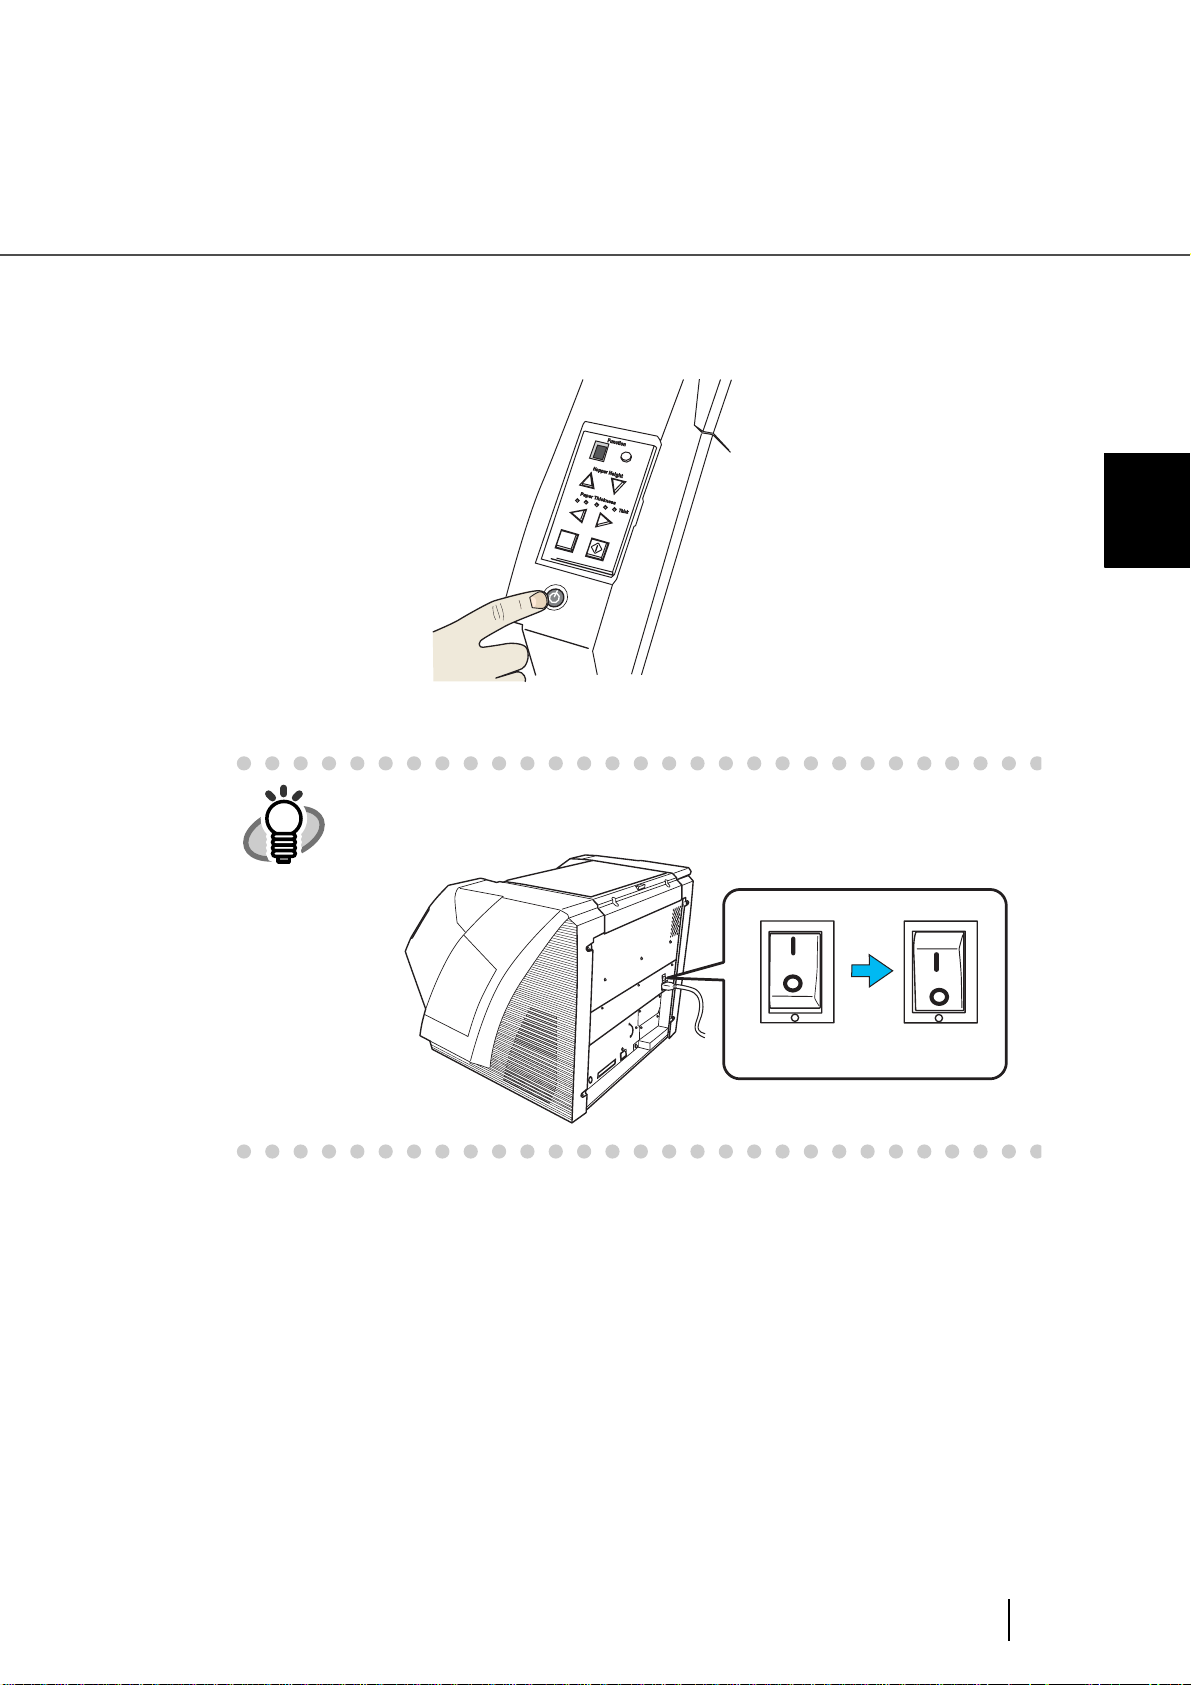
■ Turning the Power OFF
T
hi
e
n
d
Sca
n
Hold the Power button for at least two seconds.
⇒ The Power button light goes off and the scanner becomes disconnected.
T
h
i
n
Send
to
Scan
2
BASIC SCANNER OPERATIONS
HINT
If the scanner will not be used for an extended period, turn off the scanner’s
main power switch on the back and unplug the power cable.
ON OFF
2.1 Turning the Scanner ON /OFF
9
Page 30
2.2 Opening and Closing the Hopper
p
r
H
e
ig
h
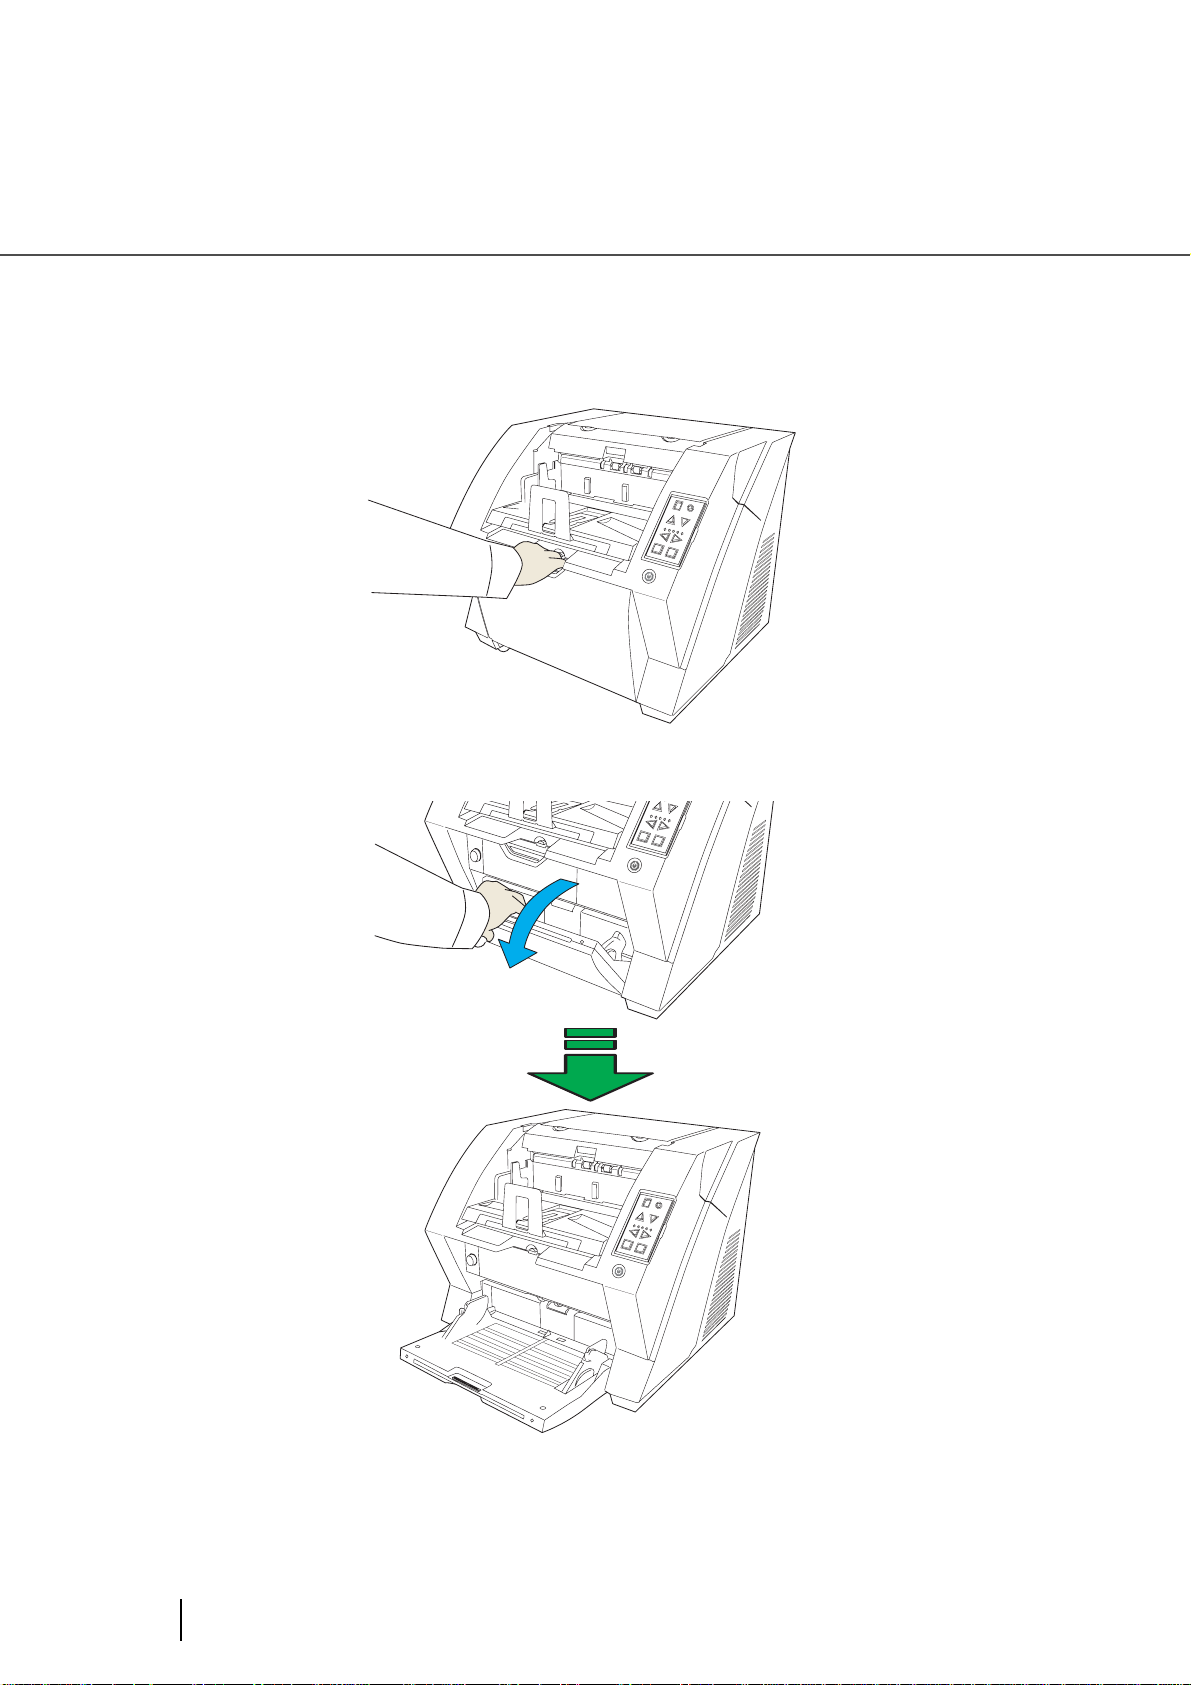
■ Opening the Hopper
1. Hold the blue part located on the center of the Hopper.
Fun
ction
Hopper H
eight
Power Thickness
Thin
Thick
Send
to
Scan
2. Flip down the Hopper gently.
t
P
o
w
e
r T
Thin
h
ic
k
n
e
s
s
Thick
Se
n
d
to
S
can
F
u
n
c
ti
o
n
H
op
per H
eigh
t
Power Thickness
T
h
in
T
h
i
c
k
Send to
Scan
10
2.2 Opening and Closing the Hopper
Page 31

■ Closing the Hopper
1. Remove the document if there is any on the Hopper.
2. Slide the extension in the Hopper.
Hopper extension
3. Restore the original position of the hopper if the height of Hopper is
adjusted.
2
BASIC SCANNER OPERATIONS
Lower the hopper to the bottom by pressing the button. (Refer to “2.5 Setting the Hopper
Height” on page 15)
4. Close the Hopper.
F
u
nc
tio
n
H
o
p
p
e
r
H
e
ig
h
ATTENTION
t
P
o
w
e
r
Th
T
h
i
n
ic
k
n
e
s
s
Thick
S
end to
Scan
Push the hopper until it’s securely locked in place.
Pow
er Thickness
Thin
Send to
F
u
n
c
tio
n
H
o
p
p
e
r
H
e
ig
h
t
Thick
Scan
2.2 Opening and Closing the Hopper
11
Page 32

2.3 Opening and Closing ADF
■ Opening ADF
1. Remove the document if there is any on the stacker.
Function
H
o
p
p
er
H
e
ig
h
t
Pow
er Thickness
Thin
Thick
Send to
Scan
2. Press the ADF cover open button.
⇒ The cover is slowly opened.
F
un
c
tio
n
Hopper Heigh
t
P
o
wer
Thin
T
h
ic
k
n
e
s
s
Thick
S
en
d
t
o
S
can
12
2.3 Opening and Closing ADF
Page 33

■ Closing ADF
1. Hold the ADF cover with both hands and press it down slowly.
Press the ADF cover until it is fixed.
2
BASIC SCANNER OPERATIONS
ATTENTION
• When closing the ADF, be sure nothing is left inside of the ADF.
• Be careful not to pinch your fingers.
2.3 Opening and Closing ADF
13
Page 34

2.4 Opening and Closing Top Cover
Under the Top cover, there are a storage tray for storing the consumables and cleaning goods and a space
for installing the Post-Imprinter. When you use the tray or access the Post-Imprinter, open the top cover as
follows.
■ Opening the Top Cover
Press the tabs of the Top cover and open the top cover.
Ta b
To p co v er
■ Closing the Top cover
Close the Top cover and press lightly until it is fixed with the tab.
Top cover
Storage tray
Space for installing
the Post-Imprinter
14
2.4 Opening and Closing Top Cover
Page 35

2.5 Setting the Hopper Height
When there is no alarm (the function number display is showing “1”), the Hopper height can be adjusted.
When the scanning load is not very heavy, setting the hopper higher will shorten the time it moves to the
feeding position.
ATTENTION
Adjustment is not possible when:
•The scanner is scanning
•The hopper is closed.
•When using Software Operation Panel (see page 166).
Three hopper heights are available and the corresponding capacities are as follows.
High: Up to 100* sheets
Middle: Up to 300* sheets
Low: Up to 500* sheets
*: Estimated using paper of 80g/m
• Do not touch the hopper when it is being adjusted. Your finger(s) may
be pinched.
• Do not load anything onto the hopper when it is moving. If something
gets into the mechanism, the scanner may be damaged.
• Do not place anything under the hopper. The hopper may collide with it
and become damaged.
• Do not press the [Hopper Height] button () when the hopper is
closed. The hopper may be damaged.
2
.
2
BASIC SCANNER OPERATIONS
HINT
High
Middle
Low
Depending on the thickness of the document, the loading capacity differs.
Refer to “7.3 Maximum Document Loading Capacity” on page 156.
2.5 Setting the Hopper Height
15
Page 36

The adjustment is done by using the Operator Panel on the scanner.
Function
When you press the
When pressing the
HINT
Thin
Hopper Height
Paper Thickness
Thick
Function
Hop
per
He
igh
t
Pow
er T
Thi
hi
n
ck
n
e
ss
Thi
ck
Send to
S
can
Send to Scan
button, the hopper is raised one step higher.(LowMiddle High)
button, the hopper is lowered one step lower.(HighMiddle Low)
Immediately after the scanner is turned on, the Hopper is initially set to Low.
16
2.5 Setting the Hopper Height
Page 37

2.6 Loading Documents on the Hopper
■ Preparing the Document
1. Align both edges of the documents.
HINT
2. Fan the documents.
1) Take a stack of documents about 15mm to 20mm thick (1/2 to 3/4 inch).
2) Hold both ends and bend the documents into an arch.
3) Firmly holding the document with both hands, bend back the document as follows
so that the bent section rises up in the middle of the document as follows.
For how to scan the document with different widths, refer to “3.3 Scanning
Documents with different widths” on page 73.
15 to 20mm
2
BASIC SCANNER OPERATIONS
4) Repeat steps 1) to 3) for a few times.
5) Rotate the document 90 degrees, and fan again.
3. Align the leading edges of the documents.
2.6 Loading Documents on the Hopper
17
Page 38

■ Setting the Document
There are 2 ways to set documents on the hopper.
(1) Set the document at the center of the hopper (mainly for document of equal size pages).
(2) Set the document by either side of the hopper (mainly for document of different size pages, or you want
to align the document by the side instead of the center line).
(1) Setting the document at the center of the hopper
1. Load the document on the hopper.
Place the document face-up on the hopper.
2. Adjust the Side guides to the document width.
Pressing the lock lever, slide the Side guides so that they contact the document sides.
If there is space between the document edges and the guides, the scanned images may be
skewed.
Side guide
Lock lever
18
2.6 Loading Documents on the Hopper
Page 39

ATTENTION
3. Start the scanner application and scan the document.
For the details on how to scan using ScandAll 21, refer to “2.10 Scanning Documents” on
page 30.
• Make sure that the document stack does not exceed the maximum
height mark on the inner side of the Side guides.
• For long documents, use the hopper extension.
height mark
Hopper extension
2
BASIC SCANNER OPERATIONS
(2)Setting the document by either Side Guide of the hopper.
For scanning documents with pages of different sizes, see section “7.8 Scanning Mixed
Documents” on page 162.
1. Move the hopper side guides to their outermost positions.
Side Guide
2.6 Loading Documents on the Hopper
19
Page 40

2. Lock the side guide not to be used.
Flip up the lock switch on the front side of the side guide to lock it.
Locked!
Lock Switch
3. Move the other side guide to the desired position while pressing down
the lock lever.
4. Set the document against the side guide.
サイドガイド
20
2.6 Loading Documents on the Hopper
Page 41

ATTENTION
Make sure that all the pages fall under the pick roller. (Otherwise they will
not be picked.).
2
5. Start the scanner application and scan the document.
For the details on how to scan using ScandAll 21, refer to “2.10 Scanning Documents” on
page 30
HINT
If you want to unlock side guides, follow the steps below:
• Release the locked side guide by flipping down the switch.
Unlocked!
Lock Switch
• Move both side guides toward the center while pressing the lock lever.
Pick roller
BASIC SCANNER OPERATIONS
Lock Lever
• Release the lever.
⇒ Now the two sides will move symmetrically as before.
2.6 Loading Documents on the Hopper
ロックスイッチ
21
Page 42

2.7 Setting up the Stacker
The document set on the hopper, once scanned, will be ejected onto the stacker.
The Stacker table is horizontal, as a default, for aligning the bottom edge of the ejected documents, You
can tilled the Stacker table forward for aligning the leading edge of the ejected documents also.
Set up the Stacker by adjusting the Stacker extension, Stopper, Side Guides and Stacker's inclination.
■ Stacking the document
1. Pull out the stacker extension in accordance with document length.
Stacker extension
ATTENTION
HINT
Stopper
F
un
c
ti
o
n
H
o
p
p
e
r
H
e
ig
h
t
P
o
w
e
r
T
T
h
h
i
n
ic
k
n
e
s
s
T
h
i
c
k
Send to
Scan
• Do not use the stopper to pull out the stacker extension. It may be damaged.
• Be sure to extend the stopper longer than the document.
For short documents, use the small stopper.
22
Small Stopper
2.7 Setting up the Stacker
Page 43

HINT
When scanning long pages (longer than A3), the document may be longer
than the stacker extension even if it’s pulled to the outermost position. In
case like this, place a thick paper about the size of A4 on the stopper and
make a slope as depicted below.
Thick Paper
2
Stopper
Stacker Extension
(The scanner can scan documents up to 863mm long.)
2. Adjust the stacker side guides to the document width.
BASIC SCANNER OPERATIONS
ATTENTION
Stacker side guide
Be sure to set the stacker side guides a little wider than the document
width.
2.7 Setting up the Stacker
23
Page 44

■ Switching the stacker’s inclination
Bottom edge alignment by
horizontal stacker setting
Leading edge alignment by
tilting forward setting of
stacker
<Switching to the tilting forward setting>
1. Slide the stacker out towards you.
2. Push down the part of the stacker which is closer to you.
ԙ
ԙ
後端揃え
Ԙ
⇒ The stacker inclines towards you.
3. Move your hands away from the stacker slowly.
24
2.7 Setting up the Stacker
先端揃え
Ԙ
Page 45

⇒ The stacker will be fixed in a position tilting forward.
HINT
ATTENTION
• When set to “Bottom edge” position, the stacker does not move up or
down and becomes immovable even during scanning operation.
• In this position, the stacker’s maximum load will be 200 sheets.
• If the pages do not stack well, use the Document Smoother. (See next
section.)
When you align the documents from the leading edge (by tilting forward
setting of stacker), the documents must meet the following conditions:
Length()Width()÷ 1.5<
<Switching back to the horizontal setting
1. Slide the stacker out towards you.
2. Push down the inner part of the stacker.
2
BASIC SCANNER OPERATIONS
ԙԙ
Ԙ
⇒The stacker goes back into its horizontal position.
3. Move your hands away from the stacker slowly.
Ԙ
2.7 Setting up the Stacker
25
Page 46

⇒ The stacker will be fixed in a horizontal position.
o
r
HINT
ATTENTION
• When set to the “bottom edge alignment” position, the stacker will automatically adjust its height according to its load.
• When set to the “Bottom edge alignment” position, the stacker’s maximum
load will be 500 sheets.
• On both sides walls of the stacker, photo sensors are installed to detect
document height on the stacker. Make sure these sensors are not
blocked.
Photo sensors
P
ow
Thin
e
S
e
n
d
t
• The stacker may move up or down when the scanner is in the ready status up or when scanning starts. Do not touch the stacker or place anything on it at those times.
26
2.7 Setting up the Stacker
Page 47

2.8 Using the Document smoother
The ejected document may not stack correctly when the stacker’s angle is adjusted to the tilting forward
setting (see previous section), or when scanning document of different size pages (see page 73). If that is
the case, install the Document Smoother as described below.
The Document Smoother will suppress the splattering of ejected pages so they will stack correctly.
1. Prepare the Document Smoother.
Ta b
2
BASIC SCANNER OPERATIONS
2. Insert one of the tabs into the slit in the scanner.
Fu
n
c
tio
n
H
o
p
p
e
r
H
e
ig
h
t
Po
w
e
r
Th
T
h
i
n
ickn
e
s
s
T
h
ick
Send to
S
c
an
Document Smoother
2.8 Using the Document smoother
27
Page 48

3. While bending the center part, insert the other tab into the scanner slit.
⇒ It will look like this when installed.
Document Smoother
F
un
ction
H
op
per H
e
ig
h
t
Power Thickness
Thin
T
h
ic
k
S
end to
Scan
28
2.8 Using the Document smoother
Page 49

2.9 Setting the Paper Thickness
When multifeeds or paper jam occurs frequently, adjust the paper thickness by using the Paper
Thickness button on the operator's panel. (Under normal circumstances, use the default setting.)
Set the paper thickness on the Operator Panel.
Function
Thin
Hopper Height
Paper Thickness
Thick
F
unctio
n
H
o
p
p
e
r
H
e
ig
h
t
P
ow
e
r
T
T
hi
h
n
ic
k
n
e
s
s
T
hic
k
S
e
n
d
t
o
S
c
a
n
S end to S ca n
When pressing the
button, the scanner is set for one level thicker document.
When pressing the button, the scanner is set for one level thinner document.
The following five (5) steps of document thickness are selectable.
Thin Thick
: Thin Prevent picking failure and paper jam
: Medium thin
:
Medium (Documents with thickness of 52 through 127g/m
2
) <Default setting>
2
BASIC SCANNER OPERATIONS
: Medium thick
: Thick Prevent multifeeding
HINT
• When multifeeds occur frequently, set the thickness level thicker.
• When picking failure or paper jams frequently occur, set the thickness
level thinner.
• Multifeeds, picking failures and paper jams can also occur due to worn-out
of the consumables and dirt of the rollers. When such problems are not
cleared, change the consumables or clean inside of the scanner.
2.9 Setting the Paper Thickness
29
Page 50

2.10 Scanning Documents
When scanning documents, normally you need to run the scanner driver using the application software.
The following shows the procedure for scanning documents using the “ScandAll 21" application (simply
called “ScandAll 21" from now on.)
The procedure differs depending on application being used. When you use an application other than ScandAll 21, refer to the manual attached to the application.
1. Load the documents on the hopper.
Refer to the section “2.6 Loading Documents on the Hopper” on page 17
2. Adjust the stacker table to the document size.
ATTENTION
• When loading long documents on the hopper, extend the stacker extension.
• When loading short documents on the hopper, adjust the stacker length
with the small stopper.
3. Start up ScandAll 21.
From the [Start] menu, select [Program] - [Scanner Utility for Microsoft Windows] - [ScandAll
21]. This starts up ScandAll 21.
4. Select the scanner to use.
Select [Select Source] from the [Scan] menu.
30
The [Select source] dialog box appears.
Select [FUJITSU Fi-5900Cd] (for TWAIN32 V8, [FUJITSU TWAIN32]).
Then click [Select].
2.10 Scanning Documents
Page 51

5. Click the [Scan to view] on the tool bar.
The [TWAIN Driver] dialog box (screen for setting scanning conditions) appears.
6. Set the scan resolution, document size and other scan conditions, and
click the [Scan] button.
For the details on settings in the [TWAIN Driver] dialog box, refer to the “Scanner Utility for
Microsoft Windows User's Guide” on the scanner driver CD-ROM.
2
BASIC SCANNER OPERATIONS
2.10 Scanning Documents
31
Page 52

The image of the scanned document appears on the ScandAll 21 screen.
For details on scanning various types of documents, refer to “3 SCANNING VARIOUS
TYPES OF DOCUMENTS” on page 69.
For details on ScandAll 21 function and operations, refer to ScandAll 21 Help.
32
2.10 Scanning Documents
Page 53

2.11 Starting Scanning with Button
Pressing the [Scan] / [Send to] button can start an application previously linked.
However, you need to set the application for [Scan] and [Send to] button referring to “2.14 Before Using
[Scan] / [Send to] button” on page 64.
1. Load the documents on the hopper.
Refer to the section “2.6 Loading Documents on the Hopper” on page 17.
2. Adjust the stacker table to the document size.
Refer to “2.7 Setting up the Stacker” on page 22.
3. Press the [Scan] or [Send to] button.
When using the [Scan] button, press the button.
When using the [Send to] button, you can set from [Send to 1 to 9] of nine (9) kinds of settings.
Each pressing the [Function] button increases the number of Function Number display as 1 2
3.... Set the number that links the application software you want to use for scanning and
press the [Send to] button.
Function Number display
Function
F
unctio
n
H
o
p
p
e
r
H
e
i
ht
g
P
ow
er Th
T
hi
n
ic
k
n
es
s
T
hic
k
S
e
n
d
t
o
S
c
a
n
Hopper Height
Paper Thickness
Thin
S end to S ca n
Thick
2
BASIC SCANNER OPERATIONS
⇒The application previously set for the number is started.
ATTENTION
If the [Send to] button is pressed when "C" is displayed in the Function
Number Display, the Software Operation Panel will start (see page 166).
2.11 Starting Scanning with Button
33
Page 54

2.12 Feeding Documents Manually
Besides the “Automatic Feed Mode” which automatically scans the document set on the hopper, the scanner can also scan documents in the “Manual Feed Mode”.
In addition, the “Manual Feed Mode” is divided into 2 types:
<1> Single Feed: Only one sheet is manually fed and scanned. This is
suitable for
•thick paper, envelopes and folded paper and other types of documents that are difficult to
scan using Automatic Feed Mode. (In case of folded paper, make the folding line as the
leading edge).
•reducing the load on the hopper.
•making sure a certain page is scanned.
<2> Continuous Feed: Multiple sheets of document are manually fed
one at a time and continuously scanned. This is suitable for
•manual feed, even if multiple sheets are mistakenly fed, the scanner will scan one at a
time.
•selectively scanning a stack of document.
•making sure certain pages are scanned.
The procedure is described below.
34
2.12 Feeding Documents Manually
Page 55

■ Single Feed
1. Lift up the Pick roller unit.
Lift up the small plate on the left side using your finger.
Pick Roller Unit
2
BASIC SCANNER OPERATIONS
Hopper
Guide Plate
⇒ The Pick roller unit will click into place.
⇒ The hopper will move up to the manual feed position.
ATTENTION
• If there is any document loaded on the Hopper, remove it before
adjusting.
• Be careful not to get your fingers or anything caught in the mechanism
when the hopper table moves up.
2. Place documents face-up at the center of the hopper table.
At this moment, do not stick the top edge of the document against the inner side of the hopper,
instead set them a bit apart.
2.12 Feeding Documents Manually
35
Page 56

3. Start the application and display the scanner driver screen.
Set the scanning condition.
For the information about how to run the scanner driver, refer to “2.10 Scanning Documents”
on page 30.
4. Start scanning.
When using the TWAIN driver, click the [Scan] button on the following screen.
5. Load the documents towards the back of the hopper.
When more than one sheet is loaded, only the one on the top of the stack will be fed.
The document is picked up and ejected onto the stacker after scanning.
36
2.12 Feeding Documents Manually
Page 57

6. Repeat the procedure 5 until all the documents are scanned.
After a certain time period of inactivity, the scanner will automatically recognize it as “no
document” and stop scanning.
HINT
7. To deactivate “Manual Feed Mode” (Single Feed), return the Pick roller
unit to its original position.
Flip down the small plate on the left using your finger.
For setting the timeout for feeding the document manually, refer to section
“8.17 Timeout for Manual Feeding” on page 193.
Pick Roller Unit
2
BASIC SCANNER OPERATIONS
2.12 Feeding Documents Manually
37
Page 58

■ Continuous Feed
1. Open the hopper if it is closed.
Refer to section “2.2 Opening and Closing the Hopper” on page 10.
2. Press down the Hopper Height Button () on the Operator Panel for more
than 3 seconds.
Function
Thin
Hopper Height
Paper Thickness
Thick
F
u
nct
io
n
H
o
p
p
e
r
H
e
ig
ht
P
o
w
e
r
T
T
hi
h
n
i
c
k
n
e
s
s
T
hic
k
S
end
t
o
Sca
n
S end to Sc an
⇒ Hopper will move up to the manual feed position.
ATTENTION
• Be careful not to get your fingers or anything caught in the mechanism
when the hopper table moves up.
• To deactivate the “Manual Feed Mode” (Continuous Feed) in the middle
of an operation, press down the Hopper Height Button () on the Operator Panel for more than 3 seconds.
3. Place documents face-up at the center of the hopper table.
At this moment, do not stick the top edge of the document against the inner side of the hopper,
instead set them a bit apart.
4. Start the application and display the scanner driver screen.
Set the scanning condition.
For the information about how to run the scanner driver, refer to “2.10 Scanning Documents”
on page 30.
38
2.12 Feeding Documents Manually
Page 59

5. Start scanning.
When using the TWAIN driver, click the [Scan] button on the following screen.
6. Load the documents towards the back of the hopper.
2
BASIC SCANNER OPERATIONS
When more than one sheet is loaded, only the one on the top of the stack will be fed.
The document is picked up and ejected onto the stacker after scanning.
HINT
In “Manual Feed Mode” (Continuous Feed), even if multiple sheets are
mistakenly fed, the scanner will scan only one sheet at a time.
2.12 Feeding Documents Manually
39
Page 60

7. Repeat the procedure 6 until all the documents are scanned.
⇒ After a certain time period of inactivity, the scanner will automatically recognize it as “no
document” and stop scanning.
HINT
For setting the timeout for feeding the document manually, refer to section
“8.17 Timeout for Manual Feeding” on page 193.
8. To deactivate the “Manual Feed Mode” (Continuous Feed), press down
the Hopper Height Button () on the Operator Panel for more than 3
seconds.
40
2.12 Feeding Documents Manually
Page 61

2.13 How to use the Scanner Driver
To scan the documents, a scanner driver and the application software that supports the driver are required.
There are two drivers; “FUJITSU TWAIN32 Scanner Driver” in compliance with the TWAIN regulation
and “FUJITSU ISIS Scanner Driver” in compliance with the ISIS regulation, come with fi-5900C.
This section explains how to use each driver using the attached application.
■ FUJITSU TWAIN32 Scanner Driver
FUJITSU TWAIN32 Scanner Driver is designed for scanning documents with FUJITSU image scanner fi
series by using application software that complies with the TWAIN standard.
The following describes the procedure with examples of ScandAll 21 for ordinary scanning by using this
driver software.
● Procedure for Basic Scanning Operation
1. Start up the application.
From the [Start] menu, select [Programs]-[Scanner Utility for Microsoft Window] and click
[ScandAll 21].
2
BASIC SCANNER OPERATIONS
2. Select your scanner on the window below.
Select [Select Source] from the [Scan] menu.
3. Select the scanner to use, then click the [Select] button.
Select
•[FUJITSU Fi-5900Cd] for FUJITSU TWAIN32 V9
or
•[FUJITSU TWAIN32] for FUJITSU TWAIN32 V8
then click the [Select] button.
4. Load the documents on the scanner.
For details on loading documents, refer to "2.6 Loading Documents on the Hopper" on page 2-
17.
2.13 How to use the Scanner Driver
41
Page 62

5. Open the TWAIN Driver window.
Select [Scan To View] from the [Scan] menu.
HINT
ScandAll 21 provides scanning methods as follows:
• [To View...]:Displays scanned images on the window.
• [To File...:]:Saves scanned images as files (*.BMP, *.TIF, *.JPG) on your
hard disk.
• [To FTP...:]:Transfers scanned images to a FTP server.
• [To Adobe PDF...:]:Saves scanned images as PDF files.
(*Adobe Acrobat must be installed beforehand.)
• [To Microsoft Share Point Portal Server...]:Transfers scanned images to
Microsoft Share Point Portal Server.
• [To Mail...]:Launches mailer software and attaches scanned images to email.
For details, refer to “ScandAll 21 Help”.
6. Configure settings for scanning and click the [Scan] button.
42
2.13 How to use the Scanner Driver
Page 63

For details about the settings on this window, refer to "Setting Window for FUJITSU
TWAIN32 Scanner Driver" on page 44.
⇒ The images of scanned documents are displayed on the [ScandAll 21] window.
2
BASIC SCANNER OPERATIONS
Depending on the settings of the application software, images may not be displayed.
For details, refer to the documentation or Help file of your application.
e.x.) When you select [To File...] from the [Scan] menu of ScandAll 21, images of scanned
documents are not displayed on the window.
7. Save the scanned images.
Select [Save As...] from the [File] menu to save the scanned images.
If you wish to start another scanning, return to procedure 4.
8. End the application.
Select [Exit] from the [File] menu.
2.13 How to use the Scanner Driver
43
Page 64

● Setting Window for FUJITSU TWAIN32 Scanner Driver
You can perform settings for the FUJITSU TWAIN32 Scanner Driver on this window.
The following describes the main setting items.
•For details on each functions, refer to “FUJITSU TWAIN32 Scanner Driver Help”
(appears by pressing [Help] or [F1] button).
Resolution
Specifies the resolution of scanning.
It can be specified by selecting a default value from the list or customizing (specifies any
resolution in 1 dpi unit, within a range of 50 ~ 600 dpi ).
By marking the [Predefine] checkbox, you can select one from three predefined settings as
[Normal], [Fine], [Super Fine] to scan documents instead of setting details by yourself.
Otherwise, you can change the details of the predefined settings on the [Resolution Setting]
window, which appears when you click on the [...] button.
Scan Type
Specifies the feeding method, the side(s) to be scanned (Front Side, Back Side, Duplex) or
details of Long page (the size of documents longer than Ledger/A3).
Paper Size
Select the size of documents to be scanned from this list.
Windows for customizing the paper size will appear when you click on [...] besides the list. You
can save any document size as a customized setting (up to three) or for changing the order of the
paper size in the list.
44
2.13 How to use the Scanner Driver
Page 65

Image Mode
Specifies the image type for the scanned documents.
Black & White Documents are scanned in binary (black and white).
Halftone Documents are scanned with halftone processing in black and white.
Gray scale Documents are scanned in gradations from black to white. For this
mode you can select 256 gradations or 4 bit (16 gradations).
Color Documents are scanned in color. For this mode, you can select 24 bit
Color, 256 bit Color or 8bit Color.
[Scan] button
Starts scanning documents with the current settings.
[Preview] button
Documents are scanned preliminarily before the actual scanning.
You can confirm the image of the documents in the preview window.
[Close] button
Saves the current settings and closes this window.
[Reset] button
Used to undo changes of settings.
[Help] button
Opens the “FUJITSU TWAIN32 Scanner Driver Help” window. The window also opens by
pushing the [F1] key.
[About...] button
Opens an information window about the FUJITSU TWAIN32 Scanner Driver's version.
2
BASIC SCANNER OPERATIONS
2.13 How to use the Scanner Driver
45
Page 66

[Option...] button
You can set up the details of optional functions on the window below.
[Rotation] tab
Select this tab when setting image rotation, detection of document size and skew, etc.
[Job/Cache] tab
Select this tab when setting cache mode, job controls, multifeed detection, blank page skipping,
etc.
[Imprinter (Endorser)] tab
Select this tab when setting printing configuration for imprinter (sold separately). Only shows
when an imprinter is installed.
[Startup] tab
Select this tab for setting the Scanner Operation Panel.
[Generic] tab
Select this tab to change the unit displayed on the Setting Window for the FUJITSU TWAIN32
Scanner Driver. (Millimeters, Inches, and Pixels are available)
[Filter] tab
Select this tab for setting the image processing filter(s).
Page Edge Filler: Fills up the margins of the scanned documents with a selected color.
Digital Endoser: A character string, such as the alphabet and numbers, can be added in the
scanned document.
[Compression] tab
Select this tab for setting the compression rate of JPEG Transfer.
[Advance...] button
Click this button for settings of the advanced image processing.
You can set Edge Extract, Gamma Pattern, White Level Follower, Dropout Color, Reverse, etc.
46
2.13 How to use the Scanner Driver
Page 67

[Config...] button
Click this button for configuring the Setting Files.
You can save the changed settings as a Setting File. From next scanning, the settings are quickly
changed by using these Setting Files.
For details of each function, refer to the “FUJITSU TWAIN32 Scanner Driver Help”.
2
BASIC SCANNER OPERATIONS
2.13 How to use the Scanner Driver
47
Page 68

■ FUJITSU ISIS Scanner Driver
FUJITSU ISIS Scanner Driver is designed for scanning documents with FUJITSU image scanner fi series
by using application software that complies with the ISIS standard.
TM
The following describes the procedure with examples of QuickScan
driver software.
The procedure may vary depending on your application. If you use an application other than Quick-
TM
Scan
, refer to its Guide or Help for further information.
● Procedure for Basic Scanning Operation
1. Start up the application.
From the [Start] menu, select [All Programs]-[QuickScan] and click [QuickScan].
2. From the menu bar, select [Scan] - [Select Scanner].
⇒The following window appears.
for ordinary scanning by using this
3. Select fi-5900C, then click the [OK] button.
4. Select [Scan] - [New Batch...] on the menu bar.
48
2.13 How to use the Scanner Driver
Page 69

5. On the following window, select the profile for scanning.
•When creating a new profile
Select one from already existing profiles and click [Add Profile...] button.
⇒ A new profile will be created based on the profile you select.
•When changing the settings of already existing profiles
Select one from already existing profiles and click [Edit Profile...] button.
⇒ The settings of the selected profile can be changed.
2
BASIC SCANNER OPERATIONS
•When using an existing profile, select one of the profiles.
⇒ Scanning will be done with the selected profile’s settings.
⇒ Go to the procedure 9.
6. Select the [Scan] tab and click the [Scanner Settings] on the [Profile
Editor] window.
⇒ The configuration window of ISIS driver appears.
2.13 How to use the Scanner Driver
49
Page 70

7. Configure settings for scanning and click the [OK] button.
For details on this dialog box, refer to "Configuration Window of FUJITSU ISIS Scanner
Driver" on page 51.
8. On the [Profile Editor] window, click the [OK] button to return to [New
batch...] dialog.
9. Load the documents on the hopper.
10. Click the [Scan] button to start scanning.
⇒ Scanned images are displayed on the window.
Refer to the “QuickScan Overview” or the “QuickScan Help” for further information on
functions and operations of QuickScan. After the installation of QuickScan, it is registered in
the [Start] menu.
50
2.13 How to use the Scanner Driver
Page 71

● Configuration Window of FUJITSU ISIS Scanner Driver
[Main] tab
Camera
Selects the document’s side (front or back) to be scanned.
The check-marked side(s) will be scanned.
By marking only the checkbox(es) of Front Image, you can scan the one side of the documents
(simplex scan), and by marking the checkboxes of both Front and Back Images, you can scan the
both sides of the documents (duplex scan).
Moreover, you can select color/gray scale scanning and black and white scanning (#1/#2) for
both the Front and Back Images so that two different types of images are output at a scan. (Multi
Image)
The settings you have made on this window are applied to the selected side(s) (Front Image #1,
Front Image #2, Back Image #1, and/or Back Image #2).
2
BASIC SCANNER OPERATIONS
HINT
If you select color or gray scale mode for a side (Front or Back) #1, you can
select only black and white mode for the same side #2. In turn, if you select
black and white mode for a side (Front or Back) #1, you can select either
color or gray scale mode for the same side #2.
2.13 How to use the Scanner Driver
51
Page 72

Mode
Select a color mode suitable for the purpose from the menu.
Image Processing Scans data in binary (black and white) using Image Processing Soft-
ware Option. When this mode is selected, the [Setup IPC...] button
below becomes available.
(Note that only when Image Processing Software Option is installed in
the computer, it is displayed.)
Black and White Scans data in binary (black and white). Distinguishes black from white
according to the fixed threshold. This scanning mode is suitable for
scanning line drawings and text documents.
16-level Gray Scans data with 16 gradations from black to white. This mode uses 4
bits per pixel.
256-level Gray Scans data with 256 gradations from black to white. This mode uses 8
bits per pixel.
24-bit Color Scans data as full-color images using 24 bits per pixel. This mode is
suitable for scanning color photographs. However, more memory space
is needed compared to gray scale scanning.
Auto Detect 16-/256level, Auto Detect
24-bit Color
Distinguishes between color data and black and white data, and outputs
documents as they are; that is, color data is output in color (or gray
scale) mode and white and black data is output in black and white
mode.
Configure settings for color documents using Front/Back Image #1, and
for black and white documents using Front/Back Image #2, under
“Camera”.
[Setup IPC] button
You can configure settings for scanning with Image Processing Software Option.
HINT
For details on how to configure settings for Image Processing Software
Option, refer to "Image Processing Software Option User's Guide".
To display the "Image Processing Software Option User's Guide", select
[Start] > [All Programs] > [Image Processing Software Option] > [User's
Guide].
Dots per inch
Specifies the number of pixels (dots) per inch.
Select a fixed resolution from the list or input a number from 50 to 600.
The higher the resolution, the more memory is required.
Dither
Select the halftone pattern for halftone scanning. This setting is available when “Black and
White” is selected in the “Mode”.
Dither Pattern 1 This setting is suitable for scanning dark photographs.
Dither Pattern 2 This setting is suitable for scanning dark-colored documents containing
both text and photographs.
Dither Pattern 3 This setting is suitable for scanning light photographs.
Dither Pattern 4 This setting is suitable for scanning light-colored documents containing
both text and photographs.
Error Diffusion This function minimizes the differences of color levels.
52
2.13 How to use the Scanner Driver
Page 73

Cropping
Select how to crop scanned documents to output.
Fixed Outputs the document in the specified size.
Detect Length Detects the rear end of the document to scan the whole length of the
document. When shorter pages are included in the document, the output
images of them are adjusted to the original size.
Automatic Automatically detects the paper size of the document and outputs in the
original size. In addition, document skews are automatically detected
and corrected to output the image data.
Deskew Corrects document skews after scanning to output correct image data.
Brightness
Sets the brightness of the entire image. Specify the brightness as a number within the range of 1
(dark) to 255 (bright). To brighten the entire image, increase the value of the setting. To darken
the entire image, decrease the value.
Contrast
Sets the contrast between light and shadow of the scanned image. Specify the contrast as a
number within the range of 1 (low [soft]) to 100 (high [sharp]). Increasing this value makes the
contrast sharper.
2
BASIC SCANNER OPERATIONS
2.13 How to use the Scanner Driver
53
Page 74

[Layout] tab
Page Orientation
Paper Size
Specifies the page orientation (Portrait or Landscape).
Selects a paper size according to the size of the document to be scanned. Select any size from the
list.
[Scan Area...] button
Opens the [Scan Area] dialog box.
You can specify the area to be scanned.
54
2.13 How to use the Scanner Driver
Page 75

[Image Processing] tab
Quick Set:
You can select a preset pattern for image enhancement. By selecting the one from the list, you
can quickly set the details of the image enhancement processing. Available patterns are as
follows:
Normal documents
(default)
Advanced DTC This option scans any kind of documents by binary processing to
Background/Foreground Enhancement
NCR forms with background removed
Cleanup noisy documents
Magazines, Brochures,
etc.
2
BASIC SCANNER OPERATIONS
This item is suitable for scanning the documents like the ones used
in offices.
produce data with good scanning quality.
Documents containing thin letters, characters with the colored
background, and colored charts cannot be scanned sufficiently
clearly by ordinary binary processing. By using this option, however, you can achieve good scanning quality.
This option makes image contours soft by disabling the Outline
Extraction, and the whole image blurs.
This option removes background of scanned images and smooths
outline, giving an effect of anti-aliasing on the images.
This option removes noise on the data.
This option is suitable for scanning documents which have texts
and photos (e.g. magazines, brochures).
Reverse Image Format
Converts colors from/to negative to/from positive.
2.13 How to use the Scanner Driver
55
Page 76

Overscan
Scans the document allowing more margins than the ones of paper size specified at [Paper
Size:]. Thus, the result of scanning is bigger than the specified paper size.
Image Emphasis
This option processes the outline of the scanned image as follows:
Low, Mid, High Emphasizes the contour of images. You can select the degree of
emphasis from low, mid, and high.
Smooth Smooths jaggy images.
White Level Follow
Use this option when the basic color of documents is not white; for example, when scanning
newspaper.
Auto Automatically switches between “On” and “Off”; when the “Mode” is
“Black and White”, this option is “On”, and when the “Mode” is
“Color/Gray scale”, it is “Off”.
On Scans the document, adjusting the white balance of its background.
(Line drawing mode)
Off Scans the document with a predetermined value for the white bal-
ance.(Photograph mode)
56
2.13 How to use the Scanner Driver
Page 77

[Paper Handling] tab
Pre-pick
With this option, you can enable or disable Pre-picking. Pre-picking is an operation that feeds
documents into the ADF (to the scanning position) before starting actual scanning operation.
Select “On” to shorten the required time for scanning.
2
BASIC SCANNER OPERATIONS
Backing
With this option you can set the background color (Black/White).
Multi-feed Detection
Multi-feed is an error that occurs when two or more sheets are fed simultaneously. You can set
conditions so that the scanner will stop its operation and display an error message when Multifeed is detected.
Multi-feed can be detected based on the “Paper Thickness” or “Paper Length”.
Skew
With this option, you can set the scanner so that it will stop its operation and display error
messages when any skewed document is detected.
Do not stop scanning upon detection
With this option, you can set the scanner so that it continues scanning even if any Multi-feed or
skew is detected.
2.13 How to use the Scanner Driver
57
Page 78

[Gamma] tab
Pattern
Side:
Specifies how to correct Gamma. Available correction patterns are: “Normal”, “Soft”, “Sharp”.
“Custom” is selectable when “Color” is selected on the Main tab.
Specifies side(s) to which you want to apply the settings made on this window.
Custom Properties
Can be specified when “Cutom” is selected in the “Pattern” list.
You can specify the numeric values of items such as “Gamma”, “Brightness”, “Contrast”,
“Shadow” and “Highlight”.
58
2.13 How to use the Scanner Driver
Page 79

[Color Dropout] tab
Red, Green, Blue (Light’s three primary colors) or any color can be selected to drop out from the documents to be scanned. For example, if you specify “Red” when scanning black letters with red outlines, only
the black part of the letters are scanned.
You can use this function when black and white or gray scale is selected.
2
BASIC SCANNER OPERATIONS
Enable Color Dropout
Color Dropout is enabled.
Dropout Red An image in which red color dropout has occurred is output.
Dropout Green An image in which green color dropout has occurred is output.
Dropout Blue An image in which blue color dropout has occurred is output.
Custom Color Dropout An image in which a selected color dropout has occurred is output.
Custom Color Dropout
Any color to drop out can be specified when “Use Custom Color Dropout” is selected.
2.13 How to use the Scanner Driver
59
Page 80

[Edit...] button
Clicking this button displays the “Select Dropout Color” window and you can specify
any color to drop out as checking Dropout Image.
Original Image
The sample color is shown. By clicking colors in Original Image, you can select the
color to drop out from the image.
Dropout Image
The image after color dropout is shown.
Dropout Color
Both the numeric values and the sample color of the specified color to drop out are
shown.
You can change the numeric values by directly inputting them or using .
Priority Black
Mark this checkbox when you want no color dropout for scanning letters.
Marking this checkbox avoids dropout of colors with low saturation such as black,
which is often used for letters.
Sensitivity
You can specify the degree of color dropout.
The range of sensitivity: 5 - 180 degree (30 degree by default)
The larger the degree, the broader the range of colors to drop out.
[File...] button
You can select an image file (*.bmp format) to display it in “Original Image”.
[Apply] button
Changes made are applied and the “Select Dropout color” window is closed.
[Cancel] button
Changes are voided and the “Select Dropout color” window is closed.
60
2.13 How to use the Scanner Driver
Page 81

[Compression] tab
You can configure compression settings for scanning images in color or gray scale on this tab.
JPEG Quality:
Specify the compression level and image quality.
2
BASIC SCANNER OPERATIONS
Sample Ratio:
Specify the sample ratio by which images are compressed. The file size of images
compressed by the ratio of YUV4:2:2 is smaller than that of images compressed by the
ratio of YUV4:4:4.
[About] tab
You can check the version number of the ISIS driver as well as hardware information of the scanner connected to the personal computer.
2.13 How to use the Scanner Driver
61
Page 82

[Imprinter...] tab
You can make settings for Pre-/Post-Imprinter Options (to be purchased separately).
Unless Imprinter Option is installed, this tab will be unshown.
Do not print Imprinter is not used.
Print before scanning
Print after scanning
Format Template:
Letters typed in this text box are printed on the document.
You can use the following characters.
Alphabet A to Z, a to z
Numeric 0, 1 to 9
Symbol ! “ $ # % & ‘ ( ) * + , - . / : ; < = > ? @ [ \ ] ^ _ ‘ { | } ~
Year/Month/Day %Y
Time %T
Counter % (You can select 5-digit or 8-digit.
The counter must be preceded by a string of characters.
Other One byte space
Up to 40 characters can be typed in. (When you select 8-digit for the counter,
the maximum number of characters is 43.)
With Pre-Imprinter, printing is done on the front face of the
document.
With Post-Imprinter, printing is done on the rear face of the
document.
62
Date
Specifies how to display the date.
Format: You can specify how to display the date.
Delimiter: You can select delimiters (grouping separators).
2.13 How to use the Scanner Driver
Page 83

Counter
Specifies the rule of display.
Initial Value: You can specify the initial vale.
Field Width: You can specify the number of digits for the counter.
Number Control: You can specify the number by which the counter is
incriminated/decremented.
Top Margin:
Specifies the location where the printed string of characters starts.
Setting range: 0.5 to 10.5 in.(1.27 to 26.7cm)
Minimum unit: 0.1 in.(0.01cm)
Units:
Selects a unit for Top Margin values i(nch, cm, or pixel).
Font:
Selects the font to use for printing (Normal, Bold, or Narrow).
Rotation:
Specifies the orientation of strings of characters.
2
BASIC SCANNER OPERATIONS
2.13 How to use the Scanner Driver
63
Page 84

2.14 Before Using [Scan] / [Send to] button
By setting the link of the application software to the [Scan] button and [Send to] button, you can launch the
linked application by simply pushing the button.
■ For Windows 98, Windows Me, Windows 2000 and
Windows XP:
1. Select [Control panel] from the [Start] menu.
2. Select [Property] from [Scanner and Cameras].
HINT
3. Display the “fi-5900C” properties.
For Windows ME and Windows XP, right-click the “fi-5900Cd” icon.
For Windows 98 and Windows 2000, double-click the “fi-5900Cd” icon.
4. Select the [Event] tab.
5. Select the event to launch the application.
For Windows XP, select event to be performed by the application from the [Select event] menu.
For Windows XP, when the control panel is displayed in “Category” mode,
select [Printer and other hardware] and then click [Scanner and camera].
64
With this function, the next events can be selected.
2.14 Before Using [Scan] / [Send to] button
Page 85

Scan button (When clicking on [Scan] button)
Send to 1~9(When clicking the [Send to] button)
6. Select the application executed by the event.
For Windows XP, select [Performing selected program] under [Performing] and then select the
application to be processed.
7. Click OK.
2
BASIC SCANNER OPERATIONS
2.14 Before Using [Scan] / [Send to] button
65
Page 86

■ For Windows 95 and Windows NT 4.0:
1. Click the “FUJITSU Scanner Control Center” icon and right-click to open
[Option].
2. Select the [Common] tab.
3. Select the application to be started by the event.
Event: Selects the event to launch the application.
- Start/Scan button (When pushing the [Scan] button)
- Send to 1-9 (When pushing the [Send to] to button)
Path: Specifies a file name of the application to be started with its absolute pathname.
A file can be also selected directly by using the […] button.
Argument: Specifies an argument to be passed when starting the specified application. (This
item can be omitted.)
Start in: Specifies a default folder for starting the application.
A default folder can be also selected by using the […] button.
(This parameter can be omitted.)
Run: Specifies the display size of the application to be started.
HINT
The argument that can be specified differs by application. Refer to the manual of the
application for details.
If an argument is not specified, the application starts up but scanning does not. To
start scanning after starting up, it is necessary to specify an argument.
For ScandAll 21, the following arguments are available.
(you can combine and use these arguments. In this case, you have to leave a space
(“”) between arguments.
The arguments are in no particular order.)
/ScanToView:
Displays scanned image on screen.
/ScanToFile:
Saves scanned image to file.
/Exit:
Exits the application after scanning.
/PROGRES:0
Hides the FUJITSU TWAIN32 progressive indicator window.
/SHOWUI:X
Displays or hides the FUJITSU TWAIN32 setting window.
X=0: To hide, X=1: To display, X=2: To follow the setting done in ScandAll 21.
/SCANDEF:XX
Specifies the setting file of FUJITSU TWAIN32 (XX=00~99).
/NOSCNERR
Hides the FUJITSU TWAIN32 error messages.
/NOAPPERR
Hides the ScandAll 21 error messages.
/AppendToView
Adds the currently scanned image to the previous one to view.
66
2.14 Before Using [Scan] / [Send to] button
Page 87

/NOOPDLG
Specifies not to show the following dialogbox that can be set from Scan-Option File
setting dialog.
FTP server setting dialog
Print setting dialog
Microsoft SharePoint Portal Server setting dialog
Mail setting dialog
4. Click [OK].
2
BASIC SCANNER OPERATIONS
2.14 Before Using [Scan] / [Send to] button
67
Page 88

2.15 Resuming from Power Saving Mode
Power saving mode saves the power consumption of the scanner while the power is turned on. When the
scanner is left without operation for 15 minutes or more (factory initial setting), it automatically enters the
power saving mode.
When the scanner entered the power saving state, the LCD indication of Operation panel becomes off and
the green LED lamps for Power button and Paper Thickness keeps lighting.
If you want to resume the scanner from the power saving mode, take any of these actions below.
•Set documents on the hopper.
•Press any button on the Operator panel (except the Power button*).
* If you press the power button for two seconds or longer, the power is turned off.
•Execute any command from the scanner driver screen in the PC.
HINT
The waiting time for entering the power saving mode can be set in a range
from 5 to 60 minutes in steps of 5 minutes. To set the power saving mode,
refer to “8.2 Power saving setting” on page 172.
68
2.15 Resuming from Power Saving Mode
Page 89

3
SCANNING VARIOUS
TYPES OF DOCUMENTS
This chapter describes how to scan various types of documents.
This chapter explains operations using the screens of Windows XP.
Depending on your OS, your PC's screen shots and the operation may be
different from this manual. Be aware that when the FUJITSU TWAIN32
scanner driver or the FUJITSU ISIS scanner driver is updated, the screens
and operations noted in this chapter may change. In that case, refer to the
User's Guide provided with the update.
3.1 Double Sided Scanning .......................................................70
3.2 Scanning Documents Longer than A3 ...............................71
3.3 Scanning Documents with different widths.......................73
3.4 Saving Scanned Images in PDF Format.............................76
3.5 Excluding a Color from the image (drop out color) ..........82
3.6 Skipping blank Pages ..........................................................85
3.7 Detecting Multifeeds ............................................................88
3.8 Correcting skewed Documents...........................................90
3.9 Multi Image Output ...............................................................92
3.10 Color/monochrome Auto Detection..................................95
69
Page 90

3.1 Double Sided Scanning
When you want both sides of a document to be scanned at the same time, set the feeding option to
“Duplex”.
Below is the procedure with TWAIN driver.
1. Set the document on the hopper.
Refer to section “2.6 Loading Documents on the Hopper” on page 17.
2. Adjust stacker in accordance with document size.
Refer to section “2.7 Setting up the Stacker” on page 22.
3. Start TWAIN driver with the application used.
Refer to section “2.13 How to use the Scanner Driver” on page 41.
4. Set the [Scan Type:] to “ADF (Duplex)”.
5. Set resolution and document size and so on, and then click [Scan] button.
70
3.1 Double Sided Scanning
Page 91

3.2 Scanning Documents Longer than
A3
When scanning documents longer than A3, set the feeding option to “Long Page”.
This scanner can scan documents up to 863mm long.
Below is the procedure with TWAIN driver.
1. Set the document on the hopper.
Refer to section “2.6 Loading Documents on the Hopper” on page 17.
2. Adjust stacker in accordance with document size.
Refer to section “2.7 Setting up the Stacker” on page 22.
HINT
When scanning long pages (longer than A3), the document may be longer
than the stacker extension even if it’s pulled to the outermost position. In
case like this, place a thick paper about the size of A4 on the stopper and
make a slope as depicted below.
Thick Paper
Stopper
Stacker Extension
3
SCANNING VARIOUS TYPES OF DOC-
(The scanner can scan documents up to 863mm long.)
3. Start TWAIN driver with the application used.
Refer to section “2.13 How to use the Scanner Driver” on page 41.
3.2 Scanning Documents Longer than A3
71
Page 92

4. Set [Scan Type:] to “Long Page (Front Side)” or “Long Page (Duplex)”.
Choose “Long Page (Front Side)” when scanning one side; “Long Page (Duplex)”, both sides.
⇒The “Set the document size” screen will appear.
5. Click [OK] after setting the document
6. Set resolution and document size and so on, and then click [Scan] button.
72
3.2 Scanning Documents Longer than A3
Page 93

3.3 Scanning Documents with different
widths
When you scan a batch of documents with different widths, follow the instruction below.
1. Align the leading edge of the documents.
Aligning the document
alongside their center line
This section describes the procedure to align the document alongside their center line.
For the procedure to align the document with its left (or right) edge, refer to “ (2)Setting the
document by either Side Guide of the hopper.” on page 19.
Aligning the document
with its left (or right) edge
3
SCANNING VARIOUS TYPES OF DOC-
2. Load the documents on the center of the hopper.
Pick roller
3.3 Scanning Documents with different widths
73
Page 94

ATTENTION
原稿 幅 異 場合
原稿の幅がほぼ同じ場合
Load the documents so that each sheet can be reached by the pick roller.
(If the documents are not placed below the Pick roller, the document feeding will not be possible.)
3. Align the side guides to the width of the widest document.
Pick roller
4. Align the stacker’s position.
Refer to “2.7 Setting up the Stacker” on page 22 for details.
74
3.3 Scanning Documents with different widths
Page 95

5. Start up the scanner driver.
Refer to “2.13 How to use the Scanner Driver” on page 41 for further information about how to
start up the scanner driver.
6. Perform the settings for the scanning on the scanner driver’s
configuration window.
For the TWAIN driver
Paper size: (Main display)
Set the width of the widest, and the length of the longest document.
Automatic size and skew detection: ([Option] Screen[Rotation] tab)
Select automatic paper size detection.
For the ISIS driver
Cropping: (on the [Main] tab)
Select [Automatic].
7. Scan
⇒ The images of each document will be generated according to their size and displayed on
the screen.
3
SCANNING VARIOUS TYPES OF DOC-
Originals
ATTENTION
Images
• When scanning mixed size document, because the hopper side guides
will not function, the scanned images are easily skewed.
We recommend you to enable “Automatic Page Size Detection”.
• Multifeed Detection by length cannot be used together with “Automatic
Page Size Detection”.
• Refer to "7.8 Scanning Mixed Documents" on page 162 for details on
scannable mixed size documents.
3.3 Scanning Documents with different widths
75
Page 96

3.4 Saving Scanned Images in PDF
Format
To save scanned images in PDF format, Adobe Acrobat must be installed on your PC.
Adobe Acrobat can be installed from the provided Adobe Acrobat CD-ROM.
There are two ways to save scanned images in PDF format.
(1) Using ScandAll 21(page 77)
This method is recommended when the image is scanned in color or grayscale mode.
The benefits are:
Reduced PDF file size
Easy creation with no special operations
(2) Using Adobe Acrobat (page 79)
This method is recommended for faster creation of PDF files and for black and white scanning.
The benefits are:
Quick Creation of PDF file with original scan resolution unchanged
The file size can be adjusted by changing the PDF compression rate
ATTENTION
Notes for using Adobe Acrobat
• Acrobat's default settings overrides the previous settings for “Resolution”, “Scan Type”
and “Image Mode”.
• The following functions cannot be used:
- “256 Color” or “8 Color”
- “Rotation Degree” selection when “End of Page Detection” is selected
- Long Page Scanning
• When scanning a paper document and converting the image to PDF using Acrobat,
unexpected images may be output when:
1. Setting “Edge Shadow Removal” in Acrobat, and setting “Digital Endorser” or
“Black Background” options in the TWAIN driver at the same time. Letter strings
embedded in the image or the background may be missed.
Solution 1: Set “Edge shadow removal” to “OFF” or set any option other than
“Adaptive” for “Color/Grayscale” and/or “Monochrome” under “Compression” by
selecting [File] - [Create PDF] - [From Scanner…] - [Image Settings…] in Acrobat.
Solution 2: Adjust the scanning density in the TWAIN driver.
2. Setting “Adaptive” for “Color/Grayscale” and/or “Monochrome” under “Compression” in Acrobat and scanning in a resolution lower than the resolution recommended for Acrobat.
Solution: Set OPTION to something other than “Adaptive” under “Compression.”
3. Scanning a document longer than the double letter (11x17) or A3 size, when setting “Overscan” in the TWAIN driver, the scan may fail.
Solution: When scanning a double letter (11x17) or A3 size of document, do not
set “Overscan” in TWAIN driver.
As for detailed usage and information of Acrobat, refer to “Create a PDF file from a
scanned document” in Acrobat Help.
76
3.4 Saving Scanned Images in PDF Format
Page 97

■ Using ScandAll 21
1. Load the documents on the hopper.
2. Start up ScandAll 21.
Select [Program]-[Scanner Utility for Microsoft Windows]-[ScandAll21] from the [Start]
menu.
3. From the [Scan] menu select [To Adobe PDF...].
⇒ The [TWAIN Driver] dialog box appears.
4. Set the scan resolution, paper size etc., and then click the [Scan] button.
3
SCANNING VARIOUS TYPES OF DOC-
5. When scanning is done, click the [Close] button.
The “Save as” window will appear.
3.4 Saving Scanned Images in PDF Format
77
Page 98

6. Enter the file name and select the destination to save the scanned image.
For details, refer to the descriptions in the [Help] menu of ScandAll 21.
78
3.4 Saving Scanned Images in PDF Format
Page 99

■ Using Adobe Acrobat
Following shows the procedure for saving scanned images in PDF format.
1. Load the documents on the hopper.
2. Start up Adobe Acrobat.
Select [Programs] - [Adobe Acrobat] from the [Start] menu. This starts up Adobe Acrobat.
3. From the [File] menu, select [Create PDF] - [From Scanner].
[Create PDF from Scanner] dialog box is displayed.
4. Select “FUJITSU Fi-5900Cd” at [Scanner] and click [Scan] button.
3
SCANNING VARIOUS TYPES OF DOC-
⇒ The [TWAIN driver] dialog box is displayed.
ATTENTION
5. Select the scan resolution, document size etc., and click the [Scan]
button.
Scanning with default settings may yield unexpected results. If that is the
case, change the settings as follows:
• Uncheck “Recognize Text Using OCR”
• Click “Image Settings” and change the following:
Color/Grayscale :None
Monochrome :JBIG2 or CCITT Group 4
Background Removal :Off
Halo Removal :Off
3.4 Saving Scanned Images in PDF Format
79
Page 100

⇒The scanning will be performed.
6. When scanning is finished, click the [Done] button.
⇒ The scanned image is displayed.
80
3.4 Saving Scanned Images in PDF Format
 Loading...