

Page 1

Fujitsu SCSI (650) VRS Scanner Installation Procedures
Windows ME\2000\XP
If you are installing the following models by means of the Kofax 650 Adrenaline SCSI
controller with/without a GSA-2 then use this document.
M4097D-VRS M4099D-VRS Fi-4860C-VRS Fi-4990C
Fi-5650C-VRS Fi-5750C-VRS
If you do not have a 650 controller and are not going to use VRS then use the SCSI
scanner installation guide. If you are going to use the optional video interface then use
the video scanner installation guide. If you have an 850S/1700S controller and a GSA-1
interface then you must use the SCSI (GSA-1) VRS scanner installation guide.
Hardware requirements.
You will need a PC system that meets both Fujitsu’s and Kofax’s recommended
specifications, a Kofax 650 Adrenaline controller and six foot (maximum) Wide SCSI 68pin cable. For recommended PC system specifications and SCSI controllers please
reference the
System Disk.
Step A: Installing the VRS drivers.
First boot your PC and install the Kofax VRS driver that shipped with the scanner.
Special note: When installing the VRS driver and any other software that contains
Kofax’s Image Controls pay close attention to the individual runtimes. It is strongly
recommended that you install the oldest/lower runtime application first.
Step B: Installing the Adrenaline 650 Adrenaline controller
1. Shut down your PC and remove the case cover.
2. Locate a free PCI slot and remove the back plate if necessary.
3. Install the SCSI controller in an open PCI slot. Make sure that the card is
Warning! Failure to secure the SCSI controller in the PC can result in damage
to the SCSI card, scanner, and/or your system.
4. Boot your PC without the scanner attached and check for errors. Make sure
Step C: Unlocking the shipping lock.
If your model scanner does not have a flatbed then proceed to Step D.
Scanner Hardware Reference page. You may also need your Operating
seated completely in the slot and secured in the frame.
that the SCSI controller is listed as a 650 Adrenaline. If no errors proceed to
the next step.
Rev052206A Page 1 of 3
Page 2
Fujitsu SCSI (650) VRS Scanner Installation Procedures
Windows ME\2000\XP
The flatbed model scanners typically include a lock on the flatbed designed to
protect the scanner during shipment. Before the scanner can be used the
shipping lock must be unlocked. To unlock it do the following:
1. Located the shipping lock slider tab or knob underneath the end of the
scanner.
2. Slide or rotate the lock to the unlock position.
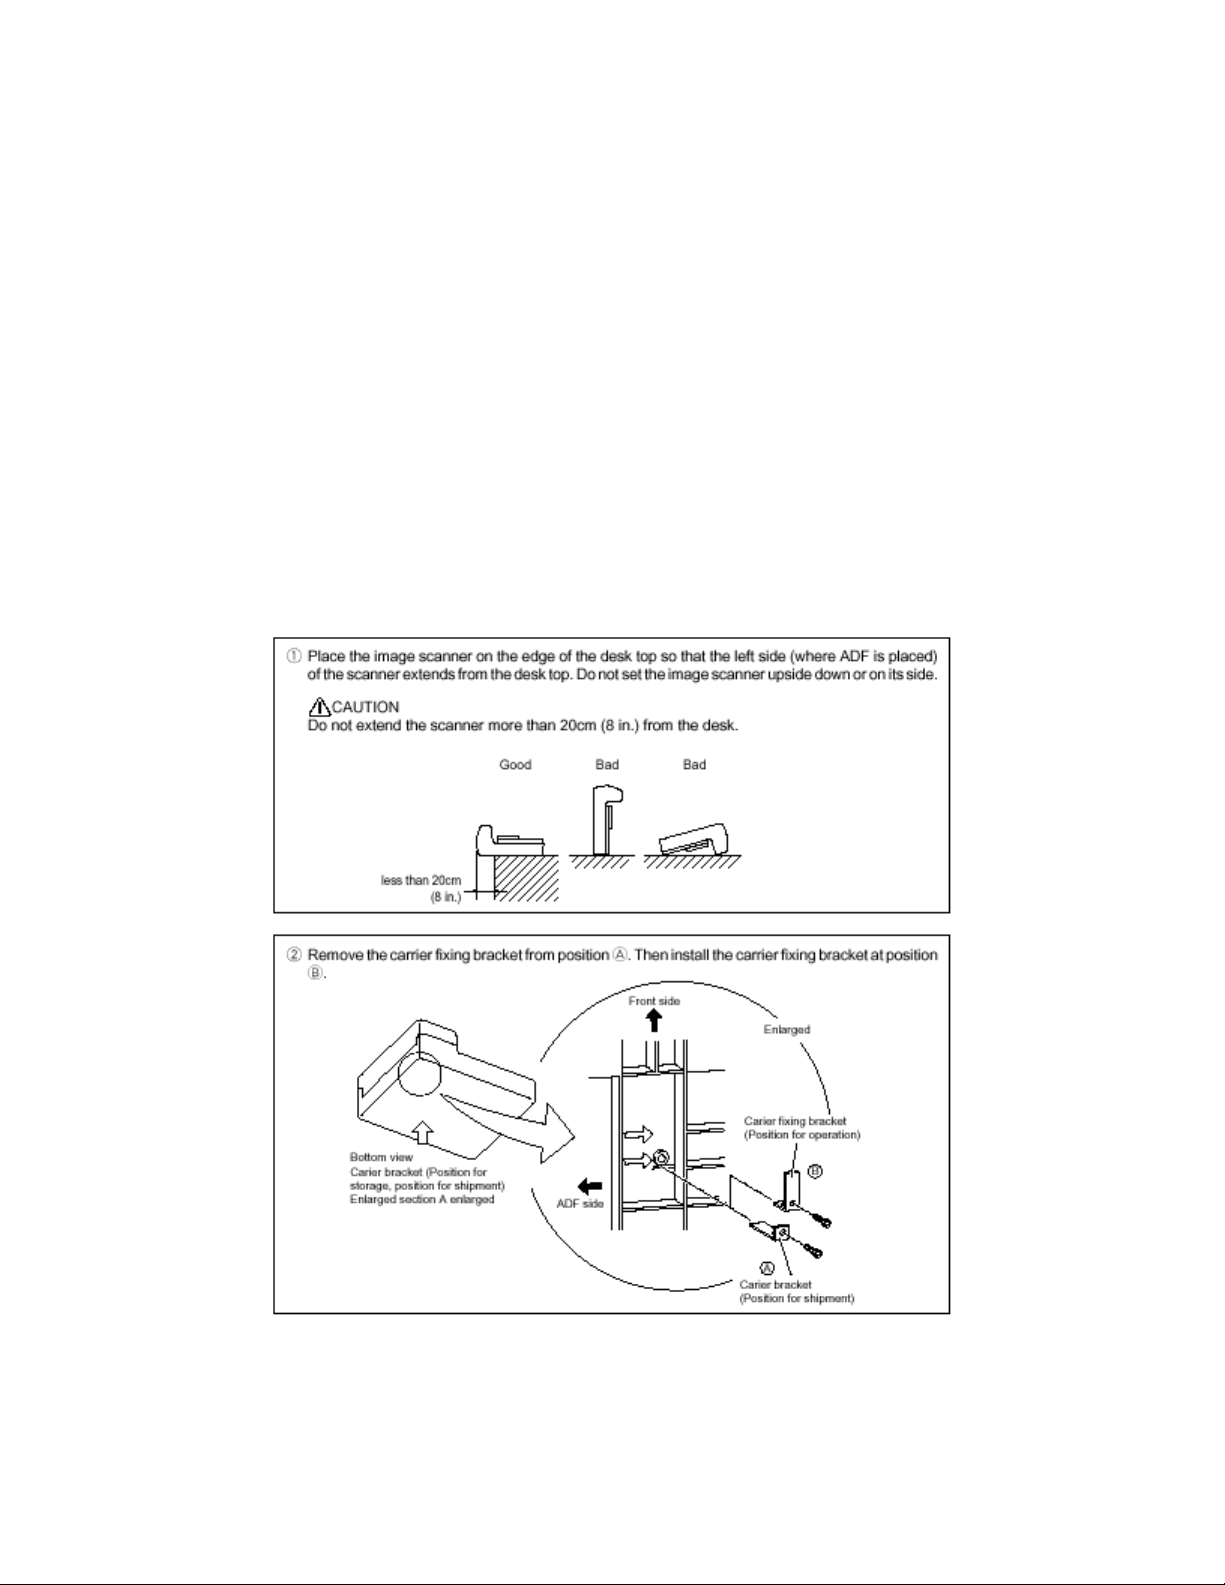
If your model has the old style “L” bracket shipping lock.
3. Slide the scanner to its side as shown in figure below.
4. Unscrew the retainer screw and remove the shipping bracket.
5. Place the shipping bracket in the “use position” slot and secure it with the
retainer screw (see figure below)
6. Place scanner back in its normal position
Rev052206A Page 2 of 3
Page 3

Fujitsu SCSI (650) VRS Scanner Installation Procedures
Windows ME\2000\XP
Step D: Connecting the Scanner.
Warning! Before proceeding ensure that the power is off when connecting or
disconnecting the SCSI cable to the scanner or workstation. Failure to follow the
procedure above could result in damage to the SCSI card, scanner, and/or your system.
Termination and the SCSI ID’s for the scanners are handled automatically.
Connect the SCSI cable to the Kofax controller and to the Wide SCSI (68-pin)
port on the scanner. Ensure all connections are securely fastened.
Connect the power cord to the scanner and a wall outlet. Turn on the scanner
first and when it reports ready boot up your PC. Complete the new hardware
found wizard and go to the next step.
Step E: Scanning with VCDEMO32P.
1. Go to Start, Programs, Kofax VRS or Kofax Image Controls, and select
VCDEMO32P.EXE.
2. Next go to Source, Scanner, and click on the drop down arrow; then
select your scanner model. I.E. Fujitsu fi-4860C with VRS with AIPE.
Wait a few seconds for the Kofax engine to load, and then place your
documents in the scanner.
3. Now go to Source, Properties and select your scanning parameters (i.e.
scan source - Flatbed or ADF, resolution, paper size).
4. You may also access the VRS configuration settings at this time by clicking
on Advance Properties. The AIPE functions are access via the Imaging
menu.
5. Afterwards go to Source, and click on Process Image for single page scans
or Process Batch for multi-page batch scans.
Congratulations! You have successfully completed and tested your VRS scanner
installation.
Step F: Installing third party software applications.
After you have successfully installed all the Fujitsu software and hardware, then it is time
to install any additional third party scanning software that you wish to use. Please follow
the software manufacturer’s instructions for installation. Remember when installing any
software that contains Kofax’s Image Controls pay close attention to the individual
runtimes. It is strongly recommended that you install the oldest/lower runtime
application first.
Rev052206A Page 3 of 3
 Loading...