


CP06G10B
0
F
Power
Mode
Timer
0
n
/0ff
Fan
Speed
Temp
CoolMoney
Saver
®
Fan
Only
Dry
hr
Auto
Swing
93011011
0
F
Power
Mode
Timer
0
n
/0ff
Fan
Speed
Temp
CoolMoney
Saver
®
Fan
Only
Dry
hr
Auto
Swing
230
CP15
CP18
CP24
115

16
18
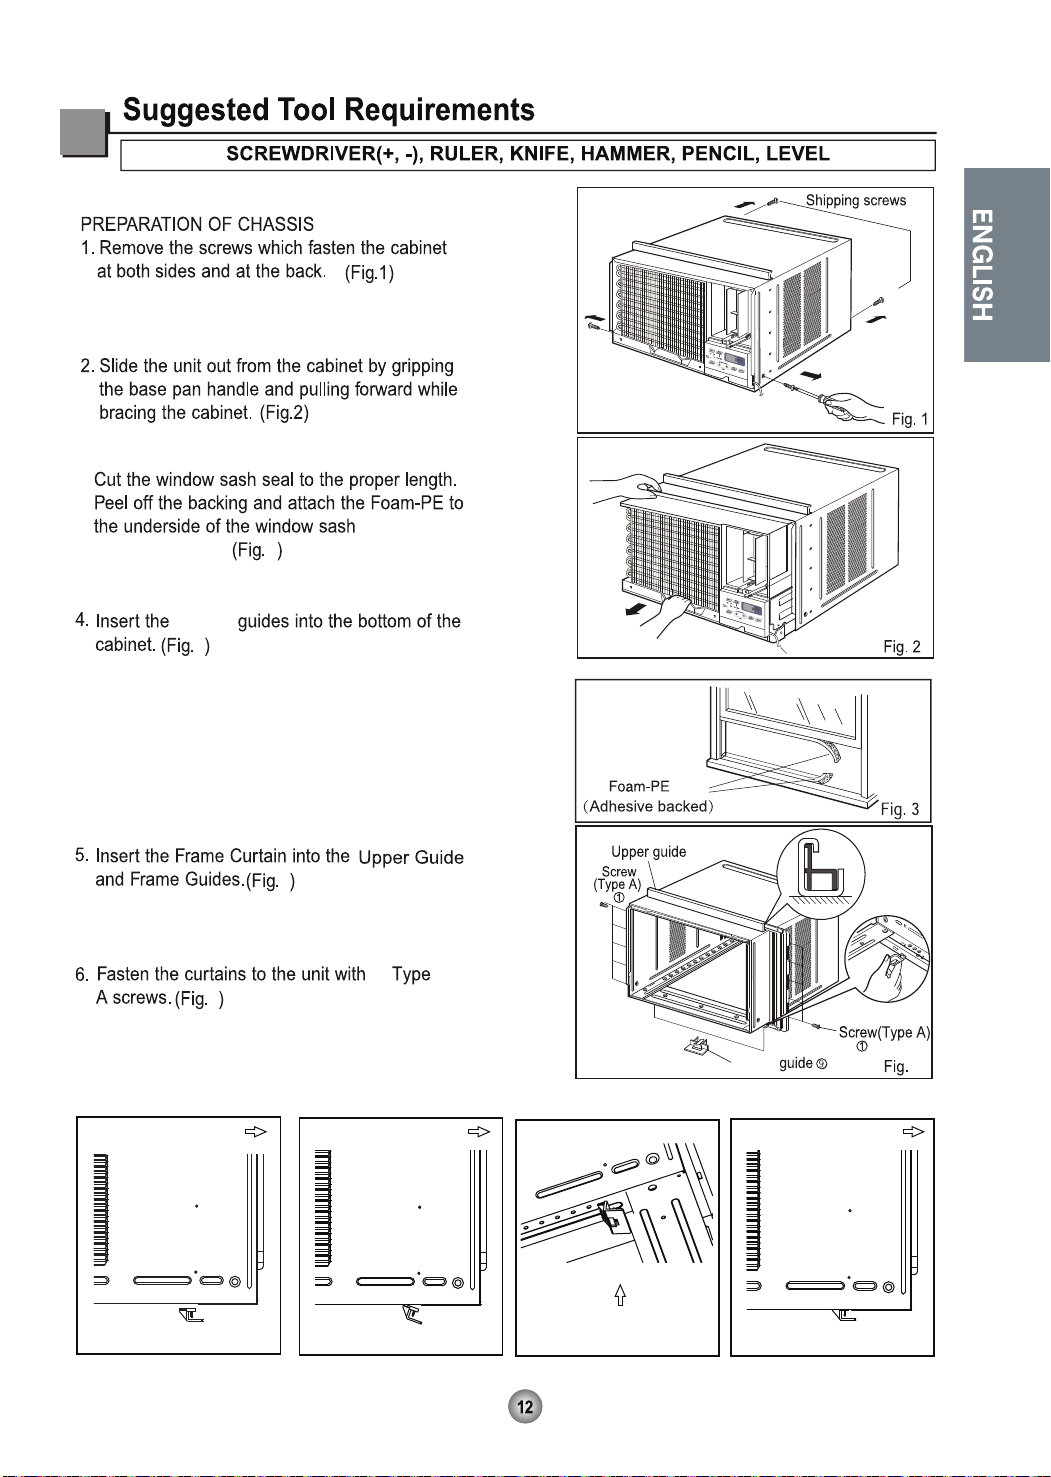
Satefy


For inner cleaning, contact an Authorized Service Center or a dealer.
Do not use harsh detergent that causes corrosion or damage on the unit.
Harsh detergent may also cause failure of product, fire, or electronic shock.

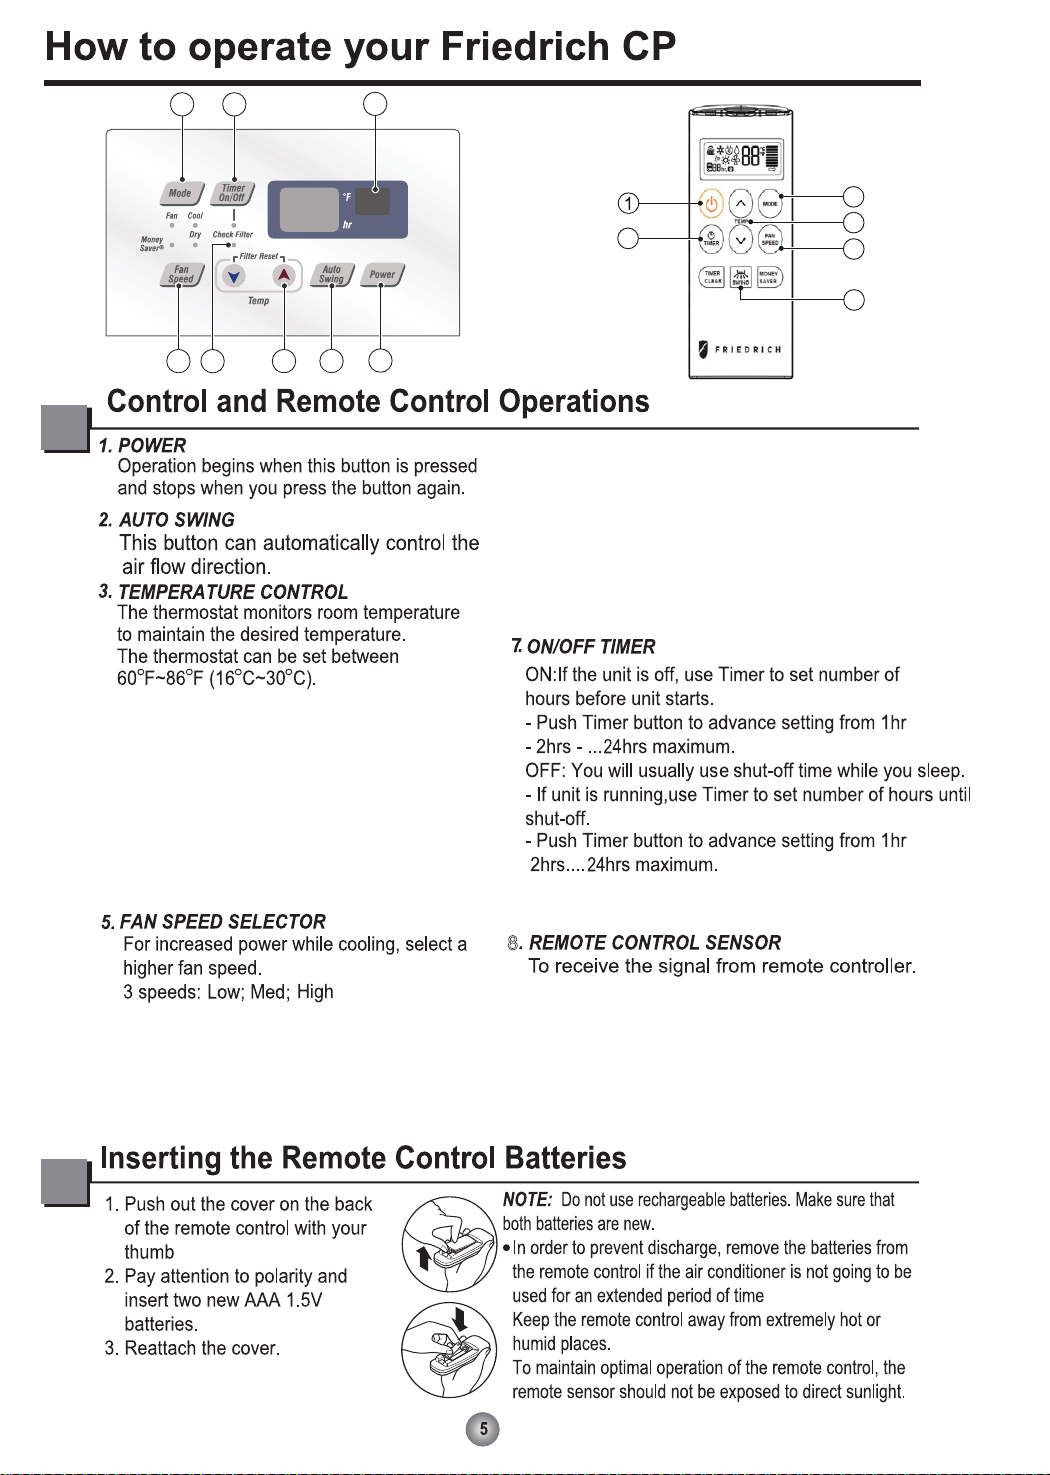
Check Filter: Your ‘Check Filter’ LED will
light up after approximately 250 hours of
operation, notifying you that your filter needs
to be cleaned.
*Timer Clear: On remote control, ‘Timer Clear’ button
will cancel the timer setting
8
2
1
3
4
5
6
7
8
3
2
5
6
7
Filter Reset: press ‘Temp ∨∧’ together to
turn off ‘Check Filter’ light.
*Filter Reset must be done from unit control
panel, not remote control
Push the ‘Mode’ button to rotate between
MoneySaver → Cool → Fan → Dry modes.
(select Dry mode for dry/dehumidifier
operation)
MoneySaver: The fan will stop when the compressor
stops cooling. The fan will turn on approximately
every 3 minutes to sample to room air and determine
if more cooling is needed.
Cool: fan runs continually for normal cooling operation
Fan Only: Fan-only operation
*MoneySaver has it’s own button on your remote
control
4. CHECK FILTER & FILTER RESET
6. OPERATION MODE SELECTOR


41
8
26
41
18

Foam-PE
(2)
(Adhesive-Backed)
Type C (5) Type D (2)
Type A (11)
Carriage Bolt (2) Lock Nut (4)
Type B (7)
Foam strip
(Plain-Back)
Right frame
curtain
Window locking
bracket
Left frame
curtain
Bottom guide(2)
Sill
bracket
(2)
FOAM-
HEATPROOF
(2)
(Adhesive-Backed)
Support bracket(2)
Drain joint pipe
4
4
4
10
3
3.
Bottom
4
Fig.4-2Fig.4-1 Fig.4-3
Bottom View
Front
Fig.4-4
Front Front
and bottom
of window frame.
Bottom
4a. Make sure the pins on the bottom frame
guide are facing the back of the unit.(Fig.4-1)
4b. Align both pins to the slotted areas under
the cabinet.(Fig.4-2,Fig.4-3)
4c. Push upward fully to insert pins into slotted
areas and secure frame guide.(Fig.4-4)

1. Open the window. Mark a line on the center of
the window stool between the side window stop
moldings.
Loosely attach the sill bracket to the support
bracket using the carriage bolt and the lock nut.
2. Attach the sill bracket to the window sill using
the screws (Type B).
Carefully place the cabinet on the window stool
and align the center mark on the bottom front
with the center line marked window stool.
3. Using the M-screw and the lock nut, attach the
support bracket to the cabinet track hole. Use
the first track hole after the sill bracket on the
outer edge of the window sill. Tighten the
carriage bolt and the lock nut. Be sure the
cabinet slants outward.
Do not drill a hole in the bottom pan. The unit is
designed to operate with approximately 1/2" of
water in bottom pan.
4. Pull the bottom window sash down behind the
Top retainer bar until they meet.
1. Do not pull the window sash down so tightly
that the movement of F
rame curtain is
restricted. Attach the cabinet to the window
stool by driving the screws (Type B) through
the cabinet into window stool.
2.The cabinet should be installed with a very
slight tilt downward toward the outside.
NOTICE
Support
Bracket
Lock nut
Sill
Bracket
Carriage
Bolt
(M-Screw)
Front angle
Window stool
Window sash
Top retainer bar
Cabinet
Foam-PE
Frame curtain
Screw(Type B)
Front Angle
Sash track
Foam-PE
Cabinet
Track hole
Support
Bracket
Carriage bolt
and lock nut
Machine screw(Type D)
and lock nut
Outer edge
of window
sill
Screw(Type B)
Sill bracket
Top
retainer
bar
Fig. 5
Fig. 6
Fig. 7
Fig. 8
Fig. 9
13

ENGLISH
5.
Pull each Frame curtain fully to each window sash
track, and pull the bottom window sash down behind
the Top retainer bar until it meets.
6.
Attach each Frame curtain the window sash by
using screws (Type C.) (See Fig. 10)
7.
Slide the unit into the cabinet.(See Fig. 11)
For security purpose, reinstall screws(Type A) at
cabinet's sides.
8.
Cut the Foam-strip to the proper length and insert
between the upper window sash and the lower
window sash.(See Fig. 12)
9.
Attach the Window locking bracket with a screw
(Type C.) (See Fig. 13)
11.
Attach the front grille to the cabinet by inserting the
tabs on the grille into the tabs on the front of the
cabinet. Push the grille in until it snaps into
place.(See Fig.14)
Lift the inlet grille and secure it with a screw (Type
A) through the front grille.(See Fig. 14)
Window installation of room air conditioner is now
completed. See ELECTRICAL DATA for attaching
power cord to electrical outlet.
10.
Cut the adhesive-backed Foam-Heatproofs
to the Guide Panel size.
Remove the backing from the Foam-Heatproofs
and attach the Foam-Heatproofs
to Guide Panel.(See Fig. 15)
Foam-Heatproof improves
the cooling capability of the unit.
Power Cord
Screw (Type A)
Screw
Window locking
bracket
Foam-Strip
Screw(Type C)
Fig. 10
Fig. 11
Fig. 12
Fig. 13
Fig. 14
Fig. 15
3.
4.
14

15

16

10001 Reunion Place, Suite 500
San Antonio, TX 78216
800.541.6645
www.friedrich.com
If any part supplied by FRIEDRICH fails because of a defect in workmanship or material within twelve months from
date of original purchase, FRIEDRICH will repair the product at no charge, provided room air conditioner is reasonably accessible
for service. Any additional labor cost for removing inaccessible units and/or charges for mileage related to travel by a Service
Agency that exceeds 25 miles one way will be the responsibility of the owner. This remedy is expressly agreed to be the exclusive
remedy within twelve months from the date of the original purchase.
If the Sealed Refrigeration System (defined for this purpose as the compressor, condenser
coil, evaporator coil, reversing valve, check valve, capillary, filter drier, and all interconnecting tubing) supplied by FRIEDRICH in
your Room Air Conditioner fails because of a defect in workmanship or material within sixty months from date of purchase,
FRIEDRICH will pay a labor allowance and parts necessary to repair the Sealed Refrigeration System;
FRIEDRICH will
not pay the cost of diagnosis of the problem, removal, freight charges, and transportation of the air conditioner to and from the
Service Agency, and the reinstallation charges associated with repair of the Sealed Refrigeration System. All such cost will be the
sole responsibility of the owner. This remedy is expressly agreed to be the exclusive remedy within sixty months from the date of the
original purchase.
This warranty is applicable only to units retained within the Fifty States of the U.S.A., District
of Columbia, and Canada. This warranty is not applicable to:
1. Air filters, fuses, batteries and the front grille removal tool.
2. Products on which the model and serial numbers have been removed.
3. Products which have defects or damage which results from improper installation, wiring, electrical current
characteristics, or maintenance; or caused by accident, misuse or abuse, fire, flood, alterations and/or misapplication
of the product and/or units installed in a corrosive atmosphere, default or delay in performance caused by war,
government restrictions or restraints, strikes, material shortages beyond the control of FRIEDRICH, or acts of God.
Service will be provided by the
in your area. They are listed in the Yellow Pages. If assistance is required in obtaining warranty performance, write
to: Friedrich Air Conditioning Co.,ATTN:Warranty Registration,10001 Reunion Place,Ste.500,San Antonio,TX 78216.
1. Repair of the unit
2. A refund to the customer for the prorated value of the unit based upon the remaining warranty period of the unit.
3. Providing a replacement unit of equal value
Some states do not allow limitations on how long an implied warranty lasts, or do not allow the limitation or exclusion of
consequential or incidental damages, so the foregoing exclusions and limitations may not apply to you.
This warranty gives you specific legal rights, and you may also have other rights which vary from state to state.
Owner must provide proof of purchase in order to receive any warranty related services.
All service calls for explaining the operation of this product will be the sole responsibility of the consumer.
All warranty service must be provided by an
, unless authorized by FRIEDRICH prior to
repairs being made.
(11-10)
17
This unit contains flammable refrigerant and has special safety precautions not normally associated
WARNING
with older units. Please follow all precautions and advisories.
1. Use caution while handling and prevent damage to unit.Do not put any holes into product for any
1.Do not use means to accelerate the defrosting process or to clean, other than those recommended by the manufacturer.
2.The appliance shall be stored in a room without continuously operating ignition sources (for example: open flames, an
operating gas appliance or an operating electric heater).
3.Do not pierce or burn. Be aware that refrigerants may not contain an odor.
reason, this can cause damage to product and prevent unit from cooling.
2. Maintenance and cleaning of unit should be performedby trained personnel. Failure to properly
clean unit can result in damage to the refrigeration system and or the electrical system.
3. Make certain that all the air circulation/ventilation openings are free from obstruction.
4. Service should only be performed by technicains properly trained and certified in the use of flammable
refrigerants. Any service performed by unauthorized servicers/individuals will void all warranties.
5. When storing the appliance, do not put in a room with any open flame appliances, such as gas water
heaters or furnaces. Also keep away from electric heaters. Damaged units should be repaired before storage.
18
 Loading...