


Fisher&Paykel IW900 Technical manual
IW900 SERIES WARMER
AND ACCESSORIES
TECHNICAL MANUAL
IW910 Baby Control Mobile Infant Warmer
IW920 Manual Control Mobile Infant Warmer
IW930 Series Baby Control CosyCot™ Infant Warmer IW950 Series Manual Control CosyCot™ Infant Warmer IW960 Baby Control Wall Mount CosyCot™ Infant Warmer IW970 Manual Control Wall Mount CosyCot™ Infant Warmer IW980 Baby Control Wall Mount Infant Warmer
IW990 Manual Control Wall Mount Infant Warmer
IW900 Series Infant Warmer Accessories
Copyright © 2006 Fisher & Paykel Healthcare Ltd,
Auckland, New Zealand.

Contact Name |
Address |
|
Telephone & Fax |
||
Equipment |
|
|
|
|
|
Supplier |
|
|
|
|
|
International |
Fisher & Paykel Healthcare Ltd |
|
Tel: |
+64 |
9 574 0100 |
|
15 Maurice Paykel Place, East Tamaki, |
|
Fax: |
+64 |
9 574 0158 |
|
Auckland 1701 |
|
Website: |
www.fphcare.com |
|
|
P O Box 14 348, Panmure, Auckland 1134 |
|
Sales info: |
info@fphcare.co.nz |
|
|
New Zealand |
|
Investor info: |
investor@fphcare.co.nz |
|
United States |
Fisher & Paykel Healthcare Inc |
|
Tel: |
1800 446 3908 or |
|
|
22982 Alcalde Drive |
|
|
+1 949 470 3900 |
|
|
Suite 101 |
|
Fax: |
+1 949 470 3933 |
|
|
Laguna Hills |
|
Email: |
information@fphcare.com |
|
|
CA 92653 |
|
|
|
|
|
USA |
|
|
|
|
Australia |
Fisher & Paykel Healthcare Pty ltd |
|
Tel: |
+61 |
3 9879 5022 |
|
36-40 New Street |
|
Fax: |
+61 |
3 9879 5232 |
|
P O Box 167, Ringwood |
|
Email: |
info@fphcare.com.au |
|
|
Melbourne, Victoria 3134 |
|
|
|
|
|
Australia |
|
|
|
|
China |
Fisher & Paykel Healthcare Ltd |
|
Tel: |
+86 |
(20) 8363 4286 |
|
Guangzhou Representative Office |
|
Fax: |
+86 |
(20) 8363 3595 |
|
Rm. 2203, 22/F Yi An Plaza |
|
Email: |
info@fphcare.cn |
|
|
33 Jianshe Liuma Lu |
|
|
|
|
|
Guangzhou 510060 |
|
|
|
|
|
China |
|
|
|
|
France/Benelux |
Fisher & Paykel Healthcare SAS |
|
Tel: |
+33 |
(0)1 64 46 52 01 |
|
10, avenue du Québec – Bâtiment F5 |
|
Fax: |
+33 |
(0)1 64 46 52 21 |
|
Silic 512 – Villebon-s/Yvette |
|
Email: |
info@fphcare.fr |
|
|
91946 Courtaboeuf Cedex |
|
|
|
|
|
France |
|
|
|
|
Germany/Austria |
Fisher & Paykel Healthcare GmbH & Co KG |
|
Tel: |
+49 |
7182 93777 0 |
|
Hundsberger Straβe 45 |
|
Fax: |
+49 |
7182 93777 99 |
|
73642 Welzheim |
|
Email: |
info@fphcare.de |
|
|
Postfach 1103 |
|
Austria: (Freephone from within Austria) |
||
|
73636 Welzheim |
|
|||
|
Germany |
|
Tel: |
0800 29 31 23 |
|
|
|
|
Fax: |
0800 29 31 22 |
|
India |
Fisher & Paykel Healthcare Ltd |
|
Tel: |
+91 |
80 5123 6041 |
|
94/I, 8th cross, 13th Main |
|
|
+91 |
80 5123 6042 |
|
1st Stage, Rajmahal Villas Extension |
|
|
+91 |
80 5123 6043 |
|
Bangalore-560080 |
|
Fax: |
+91 |
80 5123 6044 |
|
India |
|
|
|
|
Japan |
Fisher & Paykel Healthcare KK |
|
Tel: |
+81 |
(3) 3661 7205 |
|
Libera Kayaba-cho Bldg. 5th Floor |
|
Fax: |
+81 |
(3) 3661 7206 |
|
3-8-10 Nihonbashi Kayaba-cho |
|
|
|
|
|
Chuo-ku, Tokyo 103-0025 |
|
|
|
|
|
Japan |
|
|
|
|
United Kingdom |
Fisher & Paykel Healthcare Ltd |
|
Tel: |
+44 |
1628 626 136 |
/Ireland |
Unit 16, Cordwallis Park |
|
Fax: |
+44 |
1628 626 146 |
|
Clivemont Road |
|
Email: |
info@fphcare.co.uk |
|
|
Maidenhead |
|
Ireland: |
|
|
|
Berkshire SL6 7BU |
|
Republic of Ireland: |
1800 409 011 |
|
|
United Kingdom |
|
Northern Ireland: |
0800 132 189 |
|
Warmer Technical Manual
PART NUMBER |
: |
185 041 130 |
ISSUE DATE |
: |
October 2006 |
ISSUE NUMBER |
: |
G |
PAGE |
: |
2 |

Please Read
All maintenance should be undertaken by qualified service personnel.
Fisher & Paykel Healthcare has a policy of continued product improvement and reserves the right to alter specifications without notice. This manual covers IW900 Series Infant Warmers and accessories with controller software version up to and including 3.00 and controller printed circuit board revisions up to and including Rev A.
Warranty
Subject to any agreement to the contrary, the product described in this manual is warranted against defects in materials and workmanship for one year from the date of shipment. However, the warranty is void if the product is damaged as a result of mishandling, accident or misuse. In no event shall the manufacturer be liable for incidental or consequential damages (eg. loss of use) resulting from breach of warranty. All other expressed and implied warranties under law is excluded to the extent that it can be lawfully excluded.
Warmer Technical Manual
PART NUMBER |
: |
185 041 130 |
ISSUE DATE |
: |
October 2006 |
ISSUE NUMBER |
: |
G |
PAGE |
: |
3 |

CONTENTS |
|
|
PART 1: |
DEFINITIONS ................................................................................................................................... |
6 |
PART 2: |
OPERATION AND GENERAL INFORMATION .............................................................................. |
7 |
2.1 |
PRODUCT OVERVIEW.................................................................................................................................. |
7 |
2.2 |
HEATER POWER CONTROL.......................................................................................................................... |
8 |
2.3 |
CONTROL PANEL ........................................................................................................................................ |
9 |
2.4 |
ALARMS ................................................................................................................................................... |
10 |
2.5 |
INFORMATION MODE ................................................................................................................................. |
11 |
2.6 |
ERROR CODES ......................................................................................................................................... |
12 |
2.7 |
SPECIFICATION FOR IW910 AND IW920 MOBILE INFANT WARMERS ............................................................ |
13 |
2.8 |
SPECIFICATION FOR IW93X AND IW95X COSYCOT™ INFANT WARMERS ..................................................... |
15 |
SPECIFICATION FOR IW960 AND IW970 WALL MOUNT COSYCOT™ INFANT WARMERS.......................................... |
16 |
|
2.9 |
SPECIFICATION FOR IW980 AND IW990 WALL MOUNT INFANT WARMERS ................................................... |
17 |
2.10 |
ENVIRONMENTAL SPECIFICATIONS ......................................................................................................... |
18 |
2.11 |
EQUIPMENT CLASSIFICATIONS ............................................................................................................... |
18 |
2.12 STANDARDS AND APPROVALS ................................................................................................................ |
18 |
|
PART 3: |
MAINTENANCE AND SERVICING................................................................................................ |
20 |
3.1 |
MAINTENANCE SCHEDULE ......................................................................................................................... |
20 |
3.2 |
SAFETY CHECK ........................................................................................................................................ |
20 |
3.3 |
SYSTEM CHECK........................................................................................................................................ |
21 |
3.4 |
FUNCTIONAL CHECK ................................................................................................................................. |
22 |
3.5 |
SERVICE PROCEDURES- REPLACEMENT .................................................................................................... |
24 |
3.6 |
SERVICE PROCEDURES – ADJUSTMENT ..................................................................................................... |
27 |
3.7 |
RECOMMENDED MAINTENANCE CHECKLIST................................................................................................ |
30 |
PART 4: |
CLEANING – BEFORE YOU BEGIN............................................................................................. |
31 |
4.1 |
GENERAL CLEANING ................................................................................................................................. |
31 |
PART 5: |
IW900 SERIES ELECTRONICS..................................................................................................... |
33 |
5.1 |
TROUBLESHOOTING FLOW CHART ............................................................................................................. |
33 |
5.2 |
CIRCUIT OVERVIEW .................................................................................................................................. |
34 |
5.3 |
CIRCUIT DESCRIPTION .............................................................................................................................. |
35 |
5.4 |
PCB COMPONENT LOCATIONS .................................................................................................................. |
37 |
5.5 |
CIRCUIT SCHEMATICS ............................................................................................................................... |
40 |
5.5 |
CIRCUIT SCHEMATICS, CONTINUED. ........................................................................................................... |
47 |
PART 6: |
HEAD AND COLUMN .................................................................................................................... |
48 |
6.1 |
HEAD ASSEMBLY ...................................................................................................................................... |
48 |
6.2 |
IW900 CONTROLLER ASSEMBLY ............................................................................................................... |
51 |
6.3 |
IW910/920 MOBILE COLUMN ASSEMBLY ................................................................................................... |
53 |
6.4 |
IW93X/95X COSYCOT™ COLUMN ASSEMBLY............................................................................................ |
56 |
6.5 |
IW960/970 WALLMOUNT COSYCOT™ COLUMN ASSEMBLY........................................................................ |
63 |
6.6 |
IW980/990 WALL MOUNT COLUMN ASSEMBLY .......................................................................................... |
65 |
PART 7: |
COSYCOT™ BASSINET ............................................................................................................... |
67 |
7.1 |
BASSINET CHANGE HISTORY ..................................................................................................................... |
67 |
7.2 |
SIDE PANEL CHANGE HISTORY.................................................................................................................. |
68 |
7.3 |
BASSINET (3.1) ASSEMBLY (IW93X, IW95X, IW960 & IW970)................................................................... |
69 |
7.4 |
BASSINET (3) ASSEMBLY (IW93X, IW95X, IW960 & IW970) ...................................................................... |
71 |
7.5 |
BASSINET (2.5) ASSEMBLY (IW93X, IW95X, IW960 & IW970)................................................................... |
73 |
7.6 |
BASSINET (2.1) ASSEMBLY (IW93X, IW95X).............................................................................................. |
75 |
7.7 |
BASSINET (2.0) ASSEMBLY (IW93X, IW95X, IW960 & IW970)................................................................... |
77 |
7.8 |
BASSINET (1.0) ASSEMBLY (IW93X, IW95X, IW960 & IW970)................................................................... |
79 |
7.9 |
BASSINET SIDE PANEL ASSEMBLY (IW93X, IW95X, IW960 & IW970) ........................................................ |
81 |
7.10 043042190 BASSINET TRANSPORT HANDLE ASSEMBLY ......................................................................... |
94 |
|
7.11 BASSINET ARMS AND BRAKE ASSEMBLY................................................................................................. |
95 |
|
7.12 BASSINET TILT LINK ASSEMBLY ............................................................................................................. |
97 |
|
Warmer Technical Manual
PART NUMBER |
: |
185 041 130 |
ISSUE DATE |
: |
October 2006 |
ISSUE NUMBER |
: |
G |
PAGE |
: |
4 |

PART 8: |
|
IW93X/95X COSYCOT™ BASE ASSEMBLY ................................................................................ |
98 |
PART 9: |
|
GAS ACCESSORIES.................................................................................................................... |
101 |
9.2 GAS ACCESSORY SERVICE INFORMATION ................................................................................................. |
103 |
||
9.3 498040139 OXYGEN PRESET REGULATOR PARTS LIST ............................................................................ |
105 |
||
9.4 900IW101/103/105 OXYGEN GAS SUPPLY MODULES .............................................................................. |
106 |
||
9.5 900IW102/104/106 OXYGEN/AIR GAS SUPPLY MODULES........................................................................ |
110 |
||
9.6 900IW110/111/112/113 FLOWMETER MODULES ..................................................................................... |
115 |
||
9.7 |
900IW115/116/117/117G/118/118Y SINGLE FLOWMETERS.................................................................... |
117 |
|
9.8 |
900IW14X GAS CYLINDER BLOCKS (DISCONTINUED FROM 1ST MARCH 1999) ........................................... |
120 |
|
9.9 900IW15X GAS ACCESSORY BLOCKS...................................................................................................... |
121 |
||
9.10 |
|
900IW16X LOW PRESSURE GAS MODULES.......................................................................................... |
124 |
9.11 |
|
900IW171 OXYGEN REGULATOR ......................................................................................................... |
128 |
9.12 |
|
900IW181 SUCTION BLOCK DISS........................................................................................................ |
129 |
9.13 |
|
ASSOCIATED GAS ACCESSORIES .......................................................................................................... |
130 |
PART 10: |
GENERAL ACCESSORIES .......................................................................................................... |
134 |
|
10.1 |
|
900IW001 DUOSENSE™ SKIN SENSOR ............................................................................................... |
134 |
10.2 |
|
900IW204/205 X-RAY TRAY ASSEMBLY (IW93X, IW95X, IW960 & IW970).......................................... |
136 |
10.3 |
|
900IW215 SCALES MOUNTING KIT....................................................................................................... |
140 |
10.4 |
|
900IW301 SHORT MOUNTING POLE..................................................................................................... |
141 |
10.5 |
|
900IW302 LONG MOUNTING POLE....................................................................................................... |
142 |
10.6 |
|
900IW303 SHELF / MEDELA PHOTOTHERAPY MOUNTING BLOCK ........................................................... |
143 |
10.7 |
|
900IW305 HOOK CABLE / HOSE IW2G ................................................................................................ |
144 |
10.8 |
|
900IW306 ACCESSORY HOOK IW2G................................................................................................... |
145 |
10.9 |
|
900IW313 IV QUAD HOOK POLE –BENT................................................................................................. |
146 |
10.10 |
|
900IW314 NATUS PHOTOTHERAPY MOUNTING BRACKET ....................................................................... |
147 |
10.11 |
|
900IW312A/J UPS MOUNTING KIT FOR COSYCOT™ INFANT WARMERS ............................................... |
148 |
10.12 |
|
900IW401 SIDE SHELF AND SUPPORT BLOCK ...................................................................................... |
152 |
10.13 |
|
900IW408 STORAGE DRAWER SYSTEM ............................................................................................... |
153 |
10.14 |
|
900IW403/5 STORAGE BINS WITH 900IW308 BIN MOUNTING POLE ...................................................... |
154 |
PART 11: 900IW130X NEOPUFF™ MODULE .............................................................................................. |
155 |
||
11.1 |
|
PERFORMANCE CHARACTERISTICS AND SPECIFICATIONS ....................................................................... |
155 |
11.2 |
|
CLEANING OF THE NEOPUFF™ INFANT RESUSCITATOR .......................................................................... |
156 |
11.3 |
|
SERVICE INFORMATION ........................................................................................................................ |
157 |
11.4 |
|
900IW130X NEOPUFF™ MODULE ASSEMBLY - VERSION 2..................................................................... |
160 |
11.5 |
|
900IW130X NEOPUFF™ MODULE ASSEMBLY - VERSION 1 (BEFORE MAY 1999) .................................... |
162 |
PART 12: |
MEDELA PHOTOTHERAPY–900IW501XX/900IW502XX........................................................... |
164 |
|
12.1 |
|
PHOTOTHERAPY PERFORMANCE CHARACTERISTICS AND SPECIFICATIONS.............................................. |
164 |
PHOTOTHERAPY SERVICE INFORMATION ............................................................................................................. |
166 |
||
12.2 |
|
900IW501XX PHOTOTHERAPY LAMP .................................................................................................... |
170 |
12.3 |
|
900IW502AX PHOTOTHERAPY POWER MODULE – 230V ....................................................................... |
174 |
PART 13: |
WARMER IDENTIFICATION ........................................................................................................ |
178 |
|
13.1 |
|
INFANT WARMER SERIAL NUMBER EXPLANATION .................................................................................. |
178 |
Warmer Technical Manual
PART NUMBER |
: |
185 041 130 |
ISSUE DATE |
: |
October 2006 |
ISSUE NUMBER |
: |
G |
PAGE |
: |
5 |

PART 1: Definitions
Attention:
Consult Accompanying Documents
Caution: Electric Shock Hazard
Protective Earth
Alternating Current
Functional Earth
Mute (alarm silence)
Light
Power On
(connect to the mains power supply)
Power Off
(disconnect from the mains power supply)
Power On (only for part of equipment)
Power Off (only for part of equipment)
Cover the baby’s eyes while phototherapy light is on.
 Wrong and correct positioning of Phototherapy
  Lamp head in path of Infant Warmer radiation
Contact your local distributor to recycle waste electronic goods responsibly
Caution: ESD sensitive
Warning Statement |
|
WARNING |
|
25% |
25% power level |
(Prewarm or Standby Mode) |
Baby Mode (Servo mode)
Manual Model
Check Baby
High Temperature Alarm
Low Temperature Alarm
Sensor Disconnect
Power Disconnect
Temperature Sensor
Sensor Temperature ºC
Type B Equipment
Type BF Applied Part
Timer
Portable and mobile RF communications equipment can effect MEDICAL ELECTRICAL EQUIPMENT
|
A WARNING statement refers to the conditions when the possibility of |
|
injury to the patient or user exists if a procedure is not followed |
|
correctly. |
Caution Statement |
CAUTION |
|
A Caution statement indicates the possibility of damage to the |
|
equipment exists if a procedure is not followed correctly. |
Note Statement |
NOTE: |
|
A Note statement provides additional information intended to clarify |
|
points, procedures or instructions. |
Warmer Technical Manual
PART NUMBER |
: |
185 041 130 |
ISSUE DATE |
: |
October 2006 |
ISSUE NUMBER |
: |
G |
PAGE |
: |
6 |

PART 2: Operation and General Information
2.1Product Overview
INTRODUCTION |
The Fisher & Paykel range of radiant warmers are specifically |
|
designed to provide a controlled source of warmth to Neonates. |
MODELS
HEAT CONTROL
DUOSENSE™ SKIN SENSOR
OPERATING MANUAL
The IW910 Baby Control and IW920 Manual Control Mobile Infant Warmers provide truly mobile and height adjustable warming wherever needed.
The IW930 Series Baby Control and IW950 Series Manual Control CosyCot™ Infant Warmers combines an integrated bassinet with four base accessory options:
IW931 Standard Size Bassinet & Mattress – Preset Base
IW932 Standard Size Bassinet & Mattress – Electric Elevator Base IW933 Long Bassinet & Mattress – Preset Base
IW934 Long Bassinet & Mattress – Electric Elevator Base
IW951 Standard Size Bassinet & Mattress – Preset Base
IW952 Standard Size Bassinet & Mattress – Electric Elevator Base IW953 Long Bassinet & Mattress – Preset Base
IW954 Long Bassinet & Mattress – Electric Elevator Base
To these base models optional accessories can be added to suit you own particular warming needs
The IW960 Baby Control and IW970 Manual Control Wall Mount CosyCot™ Infant Warmers combine the integrated CosyCot™ bassinet with the benefits of wall mounting.
The IW980 Baby Control and IW990 Manual Control Wall Mount Infant Warmers provide discrete and convenient space saving warming.
In Baby Mode (IW910, IW93x, IW960 & IW980 only), the infant warmers provide stable control of the baby's skin temperature by automatically adjusting the heater power to compensate for varying physiological and environmental conditions. This is achieved using a microprocessor which measures and updates the baby’s temperature ten times every second.
In Manual Mode, all infant warmers provide user-adjustable heater power and the option to monitor the baby’s skin temperature using the DuoSense™ skin sensor.
In Prewarm Mode all models provide alarm and trouble-free prewarming of the heater.
Safety is further enhanced by DuoSense™ skin sensor. This sensor measures the desired skin temperature using two independent sensors. These sensors are continuously compared to ensure accurate and reliable skin temperature measurements.
This technical manual is intended to be used in conjunction with the 900 Series Operating Manual (see part numbers below) and Installation and Assembly Instruction Sheets. The operating manuals must be read thoroughly and all instructions, warnings, cautions and notes thoroughly understood by all personnel working with warmers prior to use.
185043372 English/French/Spanish
185043373 German/Swedish/Norwegian
185043374 French/Dutch/Italian/Spanish/Portuguese
Warmer Technical Manual
PART NUMBER |
: |
185 041 130 |
ISSUE DATE |
: |
October 2006 |
ISSUE NUMBER |
: |
G |
PAGE |
: |
7 |

2.2Heater Power Control
2.2.1Modes of Power Control
PREWARM MODE |
Power is fixed at 25% (total irradiance at 68 cm < 10 mW/cm2). This |
|
is sufficiently low that minimal alarms need to be active but |
|
sufficiently high that the heating element will keep warm and be |
|
ready for immediate use. |
MANUAL MODE BABY/SERVO MODE
Power is adjustable in the range 0% to 100% in 5% steps.
Power is automatically controlled according to the measured skin temperature to achieve the desired set temperature. The set temperature is adjustable from 34.5°C to 37.5°C in 0.1°C steps.
2.2.2 Description of Power Control
POWER COMPENSATION
The actual mains power delivered to the element is not equal to the power displayed on the front panel of the controller, as the device is continually monitoring the mains voltage level and compensating for any slumps and surges that may occur.
In all power delivery modes the amount of mains power delivered to the element is calculated as shown below.
= PCeiling V−2
PDelivered PDisplayed 7.5%
100 V 2
Where:
PDisplayed is the displayed power level (Power Display).
|
PCeiling |
is the power ceiling (currently 100% for all models). |
|
V−7.5% |
is the nominal line voltage less 7.5% (e.g. 213V for 230V |
|
device). |
|
|
V is the current line voltage. |
|
|
PDelivered is the actual amount of mains power delivered to the |
|
|
element. Actual power delivered should be constant for constant |
|
|
power displayed. |
|
RESOLUTION AND DUTY CYCLE |
Power to the element is controlled with a triac and switched only on |
|
|
mains zero crossings to maximise electromagnetic compatibility. |
|
When in Baby Mode, the power is controlled to a resolution of 1%. Power is delivered in an optimally smooth pattern of mains pulses which repeats every 2 seconds at 50 Hz (1.7 seconds at 60 Hz). This even power control helps to reduce ripple in the baby or patients skin temperature. The power level is automatically adjusted ten times every second.
Warmer Technical Manual
PART NUMBER |
: |
185 041 130 |
ISSUE DATE |
: |
October 2006 |
ISSUE NUMBER |
: |
G |
PAGE |
: |
8 |

2.3Control Panel
2.3.1All Infant Warmer Models
LIGHT INDICATOR AND BUTTON
The Light Button toggles the examination light off and on. The Light Indicator is lit when the light is on and extinguished when the light is off. If the light fails during use a short tone will sound and the light indicator will extinguish. If the light is turned on with a faulty bulb, the indicator will turn on, there will be a short tone and the indicator will extinguish.
PREWARM INDICATOR AND BUTTON The Prewarm Button begins Prewarm Mode. The Prewarm Indicator will be lit if the button is pushed.
MANUAL INDICATOR AND BUTTON
The Manual Button begins Manual Mode. The Manual Indicator will be lit if the button is pushed.
APGAR INDICATOR AND BUTTON
TIMER DISPLAY
The Apgar Button starts an Apgar timer with Apgar tones at 1 min, 3 min (optional), 5 min, and 10 min. The indicator lights while the Apgar timer is active to help distinguish it from a count down timer. The Apgar timer will blank at 60 minutes. Re-pressing the button will clear the timer.
Displays the current time of the Apgar timer, timer 1 and timer 2 when they are active. Also used by Information Mode.
BABY SKIN TEMPERATURE DISPLAY
POWER DISPLAY
Displays the current baby skin temperature when a skin sensor is inserted in Manual Mode or Baby Mode. Displays 'HI' if the temperature exceeds 50°C. Displays '---' in the event of a sensor disconnect alarm. Blanks when in Prewarm Mode or when no skin sensor is inserted in manual mode.
Displays the current output power level in the range 0% to 100% in 5% steps.
CONTROL KNOB
Adjusts set temperature in Baby Mode and set power level in Manual Mode. Adjusts preset start times when either the Timer 1 Button or the Timer 2 Button is held down (IW910, IW93x, IW960 & IW980 only). Also used in Information Mode (see Section 2.5).
2.3.2 IW910, IW93x, IW960 and IW980 Servo Control Models
BABY INDICATOR AND BUTTON
The Baby Button begins Baby Mode. The Baby Indicator will be lit if the button is pushed.
TIMER1 BUTTON
TIMER2 BUTTON
MUTE BUTTON
SET TEMPERATURE DISPLAY
Starts Timer 1 at the preset start time. Holding the button down allows the Timer 1 preset start time to be adjusted with the control knob. Re-pressing the button will clear the timer.
Starts Timer 2 at the preset start time. Holding the button down allows the Timer 2 preset start time to be adjusted with the control knob. Re-pressing the button will clear the timer.
Inactive unless one of the following alarms is active: Sensor Disconnect alarm, High Temperature alarm, Low Temperature alarm and Check Baby alarm. In each case pressing the Mute Button silences the audible alarm (for 10 minutes) and in the case of the Check Baby alarm it cancels the visual alarm as well (for another 15 minutes).
Displays the current set temperature when in Baby Mode. Blanks in Prewarm Mode or Manual Mode. Also used by Information Mode.
Warmer Technical Manual
PART NUMBER |
: |
185 041 130 |
ISSUE DATE |
: |
October 2006 |
ISSUE NUMBER |
: |
G |
PAGE |
: |
9 |

2.4Alarms
2.4.1IW910, IW93x, IW960 and IW980 Servo Control Models
CHECK BABY ALARM
In Baby Mode this alarm means the output power has been at 100% for at least 15 minutes indicating that the baby is slow rising to the set temperature and should be checked. In Manual Mode this alarm means the output power has been above 25% for at least 15 minutes indicating that the baby should be checked.
HIGH SKIN TEMP. ALARM
In Baby Mode this alarm means the baby skin temperature exceeds the set temperature by at least 1.0°C. In Prewarm Mode or Manual Mode this alarm means the baby skin temperature exceeds 39°C.
LOW SKIN TEMP. ALARM
SENSOR DISCONNECT ALARM
In Baby Mode this alarm means the set temperature exceeds the baby skin temperature by at least 1.0°C. This alarm is not active in Prewarm Mode and Manual Mode. This alarm is disabled for 15 minutes each time baby mode is started and re-enabled each time the skin temperature gets within 0.5°C of set temperature.
In Baby Mode this alarm means a problem has been detected with the skin temperature sensor. This may mean: (a) If '---' is flashing on the Baby Skin Temperature Display the sensor plug is not inserted fully into the socket, and/or (b) that one of the thermistor beads within the DuoSense™ skin sensor does not agree with the other so that the sensor can no longer be considered accurate. A bead mismatch alarm occurs within 25 seconds of the sensor being plugged in. Both meanings apply in Baby Mode, meaning (b) only applies in Manual Mode and neither apply in Prewarm Mode.
2.4.2 IW920, IW95x, IW970 and IW990 Manual Control Models
CHECK BABY ALARM
This alarm has three meanings:
(a) Manual Mode 15 Minutes
The infant warmer has been running in Manual Mode at over 25% power for more than 15 minutes. The baby should be checked.
(b) Skin Temperature > 39°C
This alarm is accompanied by a flashing Baby Skin Temperature Display (which is > 39°C). The baby should be checked.
(c) Skin Sensor Faulty
The DuoSense™ skin sensor feature of the infant warmer has detected a fault with the skin sensor. This alarm is accompanied by a flashing Baby Skin Temperature Display. Ensure that the skin sensor is fully plugged in. If skin sensor is faulty then discard it.
2.4.3 All Models
SEE MANUAL ALARM
POWER FAIL ALARM
If the LED is flashing then the software has detected a hazard, has shut down the heater and entered this alarm state. If the warmer is able to power up again an error code corresponding to the meaning of the alarm can be obtained with use of the Information Mode (the error code is preserved in non-volatile memory).
If the LED is on constantly and is accompanied by a rapidly pulsing two-tone alarm then the hardware watchdog circuit has detected a micro-controller failure.
If the LED is on constantly and is accompanied by a constant tone then the overheat protector in the heater has tripped.
When this alarm is flashing the power to the warmer has failed.
NOTE: that this may mean the power switch (located on the front panel) is on while the power at the supply wall outlet is switched off.
Warmer Technical Manual
PART NUMBER |
: |
185 041 130 |
ISSUE DATE |
: |
October 2006 |
ISSUE NUMBER |
: |
G |
PAGE |
: |
10 |
2.5Information Mode
Information Mode allows additional information about the warmer to be obtained by the front panel controls and displays. Information mode is intended for use by technical personnel only and should not be used while the warmer is in use. Information mode is used for calibration and diagnostics.
ENTERING INFORMATION MODE
EXITING INFORMATION MODE USE OF INFORMATION MODE
AVAILABLE INFORMATION
Depress one of the power mode buttons (Prewarm, Manual or Baby) and hold it down. Rotate the control knob in any direction for two complete revolutions. Continue rotating the control knob slowly in the same direction, the mode indicator light will extinguish at one point. If this point is passed the indicator will come back on, rotate the knob back until the point where the indicator is extinguished is reached. Then release the button.
NOTE: If the option is enabled which requires the Baby Button to be held down to change Set Temperature then the Baby Button can not be used to enter information mode.
Press one of the power mode buttons (Prewarm, Manual or Baby).
The Set Temperature Display shows the engineering information number (EIN) which indicates what information is being displayed. The control knob adjusts the Engineering Information Number (EIN). The Timer Display shows the selected item of information.
EIN Meaning of the Timer Display
CONFIGURATION NUMBERS
PRESET OPTIONS
0Device configuration (see below for a list of configurations).
1ROM software version x100 (e.g. 0230 is version 2.30).
2Present power level (%) in 1% steps.
3Patient temperature x100 (e.g. 3670 is 36.70°C).
NOTE: 0401 is displayed when the skin sensor is disconnected.
4Over Temperature reference calibration x100 (e.g. 3950 is 39.50°C).
5Line voltage as a % of the unit’s nominal voltage.
6Preset options (see below for a list of the options).
7Error code for last flashing See Manual alarm (see section 2.4 for a list of the possible error codes).
EIN #0 shows the device configuration. The possible configurations are:
Num. Model
0Used for manufacture only.
1IW910, IW93x, IW960 or IW980 Baby Control Infant Warmers.
2IW920, IW95x, IW970 or IW990 Manual Control Infant Warmers.
3PW810 Servo Control Patient Warmers
4PW820 Servo Control Surgical Warmers
EIN #6 shows which preset options are enabled using one digit of the Timer Display per option (1 means enabled and 0 means disabled). The four digits A, B, C and D, from left to right, have the following meanings:
Digit Option
AMust hold down the Baby Button to change Set Temperature.
BFull volume alarms.
C3 minute Apgar tone.
D15 minute Manual Mode alarm.
NOTE: The options are preset to distributor requirements during manufacture. Options A, B and C may be altered at a later date with use of a PC and software available from your distributor. Option D may not be altered as it is a requirement of the IEC60601-2-21 Infant Warmer standard.
Warmer Technical Manual
PART NUMBER |
: |
185 041 130 |
ISSUE DATE |
: |
October 2006 |
ISSUE NUMBER |
: |
G |
PAGE |
: |
11 |

2.6Error Codes
EIN #7 shows the error code corresponding to the last See Manual alarm. This value is kept in nonvolatile memory and is updated every time a new error code occurs.
NOTE: Error codes are retained indefinitely and may only change when a new error occurs.
See section 2.5 for access to Information Mode.
The possible error codes are:
Code |
Name |
0 |
NONE |
1-2 |
TEMPERATURE |
|
MUX |
5 |
BEADS SHORTED |
Meaning |
Actions to be taken |
No error has occurred. |
|
Temperature multiplexer is not responding |
Contact distributor. |
correctly. Temperature cannot be measured. |
|
The two thermistor beads in the DuoSense™ |
Check DuoSense™ |
skin sensor are detected to have shorted |
skin sensor |
together. The skin sensor should be checked. |
operating correctly. |
Using Figure 10.1.2, check that contact A is |
If the skin sensor is |
not shorted to contact B. If the skin sensor is |
operating correctly, |
operating correctly, then there may be a short |
contact distrubitor. |
circuit within the unit itself. |
|
7 |
STACK OVERFLOW |
11 |
BUTTON MUX |
13BAD FREQUENCY
14FAILED ADC
The microprocessor stack has overflowed |
Contact distributor. |
indicating microprocessor or memory failure. |
|
Button multiplexer is not responding correctly. |
Contact distributor. |
Buttons cannot be sensed. |
|
Bad Frequency (the device could not sense |
Change mains wall |
the frequency of the mains power supply at |
power outlet. If |
power up). |
error still detected, |
|
contact distrubitor. |
One of the regular series of ADC conversions |
Contact distributor. |
failed to complete in the normal time. This |
|
suggests that the internal hardware on the |
|
microcontroller has failed and the temperature |
|
readings along with other readings can no |
|
longer be relied on. |
|
15LED TOGGLE
16BUFFER OVERFLOW
17MISSING PULSES
Bad LED Toggle (the display driver, U1, which |
Contact distributor. |
drives the LEDs and displays and scans the |
|
buttons was detected to be faulty). |
|
Serial Buffer Overflow (the RS232 output |
Contact distributor. |
serial communications buffer was detected to |
|
have overflowed). |
|
Missing Triac Firing (the triac which controls |
Change mains wall |
power to the element was sensed as |
power outlet. If |
delivering insufficient/uncontrolled power to |
error still detected, |
the element). |
contact distrubitor. |
NOTE: This error may mean the one of the |
|
backup hardware circuits has independently |
|
detected a fault and disconnected power from |
|
the element. |
|
18SPURIOUS PULSES
19RELAY OUT
Spurious Triac Firing (the triac which controls |
Change mains wall |
power to the element was sensed as |
power outlet. If |
delivering additional/uncontrolled power to the |
error still detected, |
element). |
contact distrubitor. |
Relay Out (the relay which isolates the |
Contact distributor. |
element in the event of continuous full power |
|
to the element or hardware watchdog failure is |
|
detected to have opened). |
|
Warmer Technical Manual
PART NUMBER |
: |
185 041 130 |
ISSUE DATE |
: |
October 2006 |
ISSUE NUMBER |
: |
G |
PAGE |
: |
12 |

20-28 |
EEPROM ERROR |
30NOT CONFIGURED
31STUCK BUTTON
34LIGHT CIRCUIT FAULTY
35TEMPERATURE PROBLEM
36DEVICE UNTESTED
Non-volatile memory error (a problem was |
Turn mains power |
detected with the non-volatile memory - most |
switch off. Turn |
of these errors can be recovered from by |
warmer on again. If |
switching the device off then on again). |
error code is still |
|
present, contact |
|
distributor. |
A device configuration is not selected. The |
Contact distributor. |
device is configured during manufacture and |
|
cannot run if a particular model variant has not |
|
been set. |
|
One of the buttons is stuck down. This can be |
Turn mains power |
caused by holding one of the buttons down |
switch off. Turn |
while the device is turned on. |
warmer on again, |
|
without touching |
|
control panel. If |
|
error code is still |
|
present, contact |
The light has been detected as turned on |
distributor. |
Contact distributor. |
|
when it should be turned off. There is either a |
|
fault in the light control circuitry or the light |
|
sense circuitry. |
|
Measurement from the temperature |
Contact distributor. |
references are so far out of tolerance that |
|
auto-calibration of the skin sensor |
|
temperatures is impossible. It is likely that the |
|
temperature circuit is faulty. |
|
Contact distributor. |
Contact distributor. |
2.7Specification for IW910 and IW920 Mobile Infant Warmers
2.7.1Electrical Specifications
SUPPLY VOLTAGE AND CURRENT
SUPPLY FREQUENCY
NOMINAL POWER CONSUMPTION
230 V~ ± 20 V~ |
2.2 A~ maximum |
120 V~ |
4.2 A~ maximum |
100 V~ ± 10 V~ |
5.1 A~ maximum |
50/60 Hz |
|
230 V~ model |
510 W |
120 V~ model |
510 W |
100 V~ model |
510 W |
HEATER POWER |
450 W |
|
Mattress irradiance is 32 mW/cm² at 100% heater power and 68 cm (26.8”) heater grill |
|
to mattress distance |
LIGHT POWER |
20 W |
|
Maximum intensity is 400 lux at 68cm (26.8”) heater grill to mattress distance |
TEMPERATURE RANGE
TEMPERATURE MEASUREMENT
Set temperature from 34.5°C to 37.5°C in 0.1°C steps
Displayed range of 4.0°C to 50.0°C in 0.1°C steps Sensor accuracy of ± 0.1°C
Skin temperature control resolution of 0.01°C
TEMPERATURE SENSOR
Twin YSI 400 compatible thermistors with 100 MΩ insulation at 500V between all electrical contacts and the skin surface
2.7.2 Mechanical Specifications |
|
HEIGHT |
Adjustable from 151 cm to 191 cm (59.4" to 75.2") |
|
To suit bassinets from 71 cm to 111 cm (28" to 43.7") |
Warmer Technical Manual
PART NUMBER |
: |
185 041 130 |
ISSUE DATE |
: |
October 2006 |
ISSUE NUMBER |
: |
G |
PAGE |
: |
13 |

WIDTH
DEPTH
WEIGHT WITHOUT ACCESSORIES
MAXIMUM LOADING
HEATER HEAD ROTATION
CASTORS
65 cm (25.6”)
110 cm (43.3”)
22 kg (48.5 lb)
4 kg (8.8lb) of Accessories, 26 kg (57.3 lb) total weight -130º to +130º from centre position
5 x Ø 50 mm (2”), all locking
Warmer Technical Manual
PART NUMBER |
: |
185 041 130 |
ISSUE DATE |
: |
October 2006 |
ISSUE NUMBER |
: |
G |
PAGE |
: |
14 |

2.8Specification for IW93x and IW95x CosyCot™ Infant Warmers
2.8.1Electrical Specifications
SUPPLY VOLTAGE AND CURRENT
Voltage |
Controller only |
Including Accessories |
230 V~ ± 20 V~ |
2.2 A~ maximum |
10 A~ maximum |
120 V~ |
4.2 A~ maximum |
12 A~ maximum |
100 V~ ± 10 V~ |
5.1 A~ maximum |
12 A~ maximum |
SUPPLY FREQUENCY |
50/60 Hz |
|
|
POWER CONSUMPTION |
Including accessories (max) |
230 V~ model |
2300 W |
|
|
120 V~ model |
1440 W |
|
100 V~ model |
1200 W |
|
|
Controller and heater only |
510 W |
|
HEATER POWER |
450 W |
|
|
Mattress irradiance is 32 mW/cm² at 100% heater power and 68 cm (26.8”) heater grill to mattress distance
LIGHT POWER |
20 W |
|
Maximum intensity is 400 lux at 68cm (26.8”) heater grill to mattress distance |
TEMPERATURE RANGE TEMPERATURE MEASUREMENT
Set temperature from 34.5°C to 37.5°C in 0.1°C steps
Displayed range of 4.0°C to 50.0°C in 0.1°C steps Sensor accuracy of ± 0.1°C
Skin temperature control resolution of 0.01°C
TEMPERATURE SENSOR
Twin YSI 400 compatible thermistors with 100 MΩ insulation at 500V between all electrical contacts and the skin surface
AUXILLARY POWER OUTLET |
2A max – For medical rated devices only (IEC60601-1) |
2.8.2 Mechanical Specifications |
|
HEIGHT |
Adjustable from 170 cm to 186 cm (66.9” – 73.2”) |
|
With 900IW005x electric elevator module |
|
170.5, 180 or 184 cm (67.1”, 70.9” or 72.4”) |
|
With standard fixed height option |
WIDTH |
77 cm (30.3”) - Excluding shelves |
DEPTH |
110 cm to 129 cm (43.3” – 50.8”) |
|
Depends on accessories fitted, bassinet size and bassinet height |
WEIGHT WITHOUT ACCESSORIES |
60.8 kg (134 lb) |
|
If manufactured before February 2004, 54.5 kg (120 lb) |
MAXIMUM LOADING |
54.2 kg (119 lb) of Accessories, 115kg (253lb) total weight |
|
If manufactured before February 2004, 60.5 kg (133 lb) of Accessories |
HEATER GRILL TO MATTRESS |
68cm (26.8”) |
HEATER HEAD ROTATION |
-130º to +130º from centre position - Depends on installation |
MATTRESS HEIGHT |
87.8 cm to 103.6 cm (34.6” – 40.8”) |
|
With 900IW005x electric elevator option |
|
88.4, 97.5 or 101.9 cm (34.8”, 38.4” or 40.1”) |
|
With standard fixed height option |
BASSINET SIZE (STANDARD) |
65 cm x 65 cm (25.6” x 25.6’) |
|
Standard Mattress size 62 cm x 62 cm (24.4” x 24.4”) |
BASSINET SIZE (LONG – 900IW212) |
65cm x 75cm (25.5” x 29.5”) |
|
Long mattress size 62cm x 72cm (24.4” x 28.4”) |
BASSINET SIDE PANEL HEIGHT |
16.5cm (14cm front & rear) - Measured from the bassinet |
|
If manufactured before February 2004 15cm |
TILTING POSITIONS |
-10° to +10° in ½° increments |
|
If manufactured before February 2004 -10° to +10° continuous adjustment |
CASTORS |
4 x Ø 100 mm (4”) all locking |
Warmer Technical Manual
PART NUMBER |
: |
185 041 130 |
ISSUE DATE |
: |
October 2006 |
ISSUE NUMBER |
: |
G |
PAGE |
: |
15 |

Specification for IW960 and IW970 Wall Mount CosyCot™ Infant Warmers
2.8.3 Electrical Specifications
SUPPLY VOLTAGE AND CURRENT
Voltage |
Controller only |
Including Accessories |
230 V~ ± 20 V~ |
2.2 A~ maximum |
10 A~ maximum |
120 V~ |
4.2 A~ maximum |
12 A~ maximum |
100 V~ ± 10 V~ |
5.1 A~ maximum |
12 A~ maximum |
SUPPLY FREQUENCY |
50/60 Hz |
|
|
POWER CONSUMPTION |
Including accessories (max) |
230 V~ model |
2300 W |
|
|
120 V~ model |
1440 W |
|
100 V~ model |
1200 W |
|
|
Controller and heater only |
510 W |
|
HEATER POWER |
450 W |
|
|
Mattress irradiance is 32 mW/cm² at 100% heater power and 68 cm (26.8”) heater grill to mattress distance
LIGHT POWER |
20 W |
|
Maximum intensity is 400 lux at 68cm (26.8”) heater grill to mattress distance |
TEMPERATURE RANGE
TEMPERATURE MEASUREMENT
Set temperature from 34.5°C to 37.5°C in 0.1°C steps
Displayed range of 4.0°C to 50.0°C in 0.1°C steps Sensor accuracy of ± 0.1°C
Skin temperature control resolution of 0.01°C
TEMPERATURE SENSOR
Twin YSI 400 compatible thermistors with 100 MΩ insulation at 500V between all electrical contacts and the skin surface
AUXILLARY POWER OUTLET |
2A max – For medical rated devices only (IEC60601-1) |
2.8.4 Mechanical Specifications |
|
HEIGHT |
Adjustable from 150 cm (59.0”) |
WIDTH |
67.5 cm (26.6”) |
|
Excluding shelves |
DEPTH
WEIGHT WITHOUT ACCESSORIES HEATER GRILL TO MATTRESS HEATER HEAD ROTATION
88 -98cm (34.6” - 38.6”)
40 kg (88 lb) 68cm (26.8”)
-130º to +130º from centre position
Depends on installation
MATTRESS HEIGHT BASSINET SIZE (STANDARD)
Dependent on installation. 65 cm x 65 cm (25.5” x 25.5’)
|
Standard Mattress size 62 cm x 62 cm (24.4” x 24.4”) |
BASSINET SIZE (LONG – 900IW212) |
65cm x 75cm (25.5” x 29.5”) |
|
Long mattress size 62cm x 72cm (24.4” x 28.4”) |
BASSINET SIDE PANEL HEIGHT |
15cm - Measured from the bassinet |
TILTING POSITIONS |
-10° to +10° continuous adjustment |
Warmer Technical Manual
PART NUMBER |
: |
185 041 130 |
ISSUE DATE |
: |
October 2006 |
ISSUE NUMBER |
: |
G |
PAGE |
: |
16 |

2.9Specification for IW980 and IW990 Wall Mount Infant Warmers
2.9.1Electrical Specifications
SUPPLY VOLTAGE AND CURRENT
SUPPLY FREQUENCY
NOMINAL POWER CONSUMPTION
HEATER POWER
230 V~ ± 20 V~ |
2.2 A~ maximum |
120 V~ |
4.2 A~ maximum |
100 V~ ± 10 V~ |
5.1 A~ maximum |
50/60 Hz |
|
230 V~ model |
510 W |
120 V~ model |
510 W |
100 V~ model |
510 W |
450 W |
|
|
Mattress irradiance is 32 mW/cm² at 100% heater power and 68 cm (26.8”) heater grill |
|
to mattress distance |
LIGHT POWER |
20 W |
|
Maximum intensity is 400 lux at 68cm (26.8”) heater grill to mattress distance |
TEMPERATURE RANGE
TEMPERATURE MEASUREMENT
Set temperature from 34.5°C to 37.5°C in 0.1°C steps
Displayed range of 4.0°C to 50.0°C in 0.1°C steps Sensor accuracy of ± 0.1°C
Skin temperature control resolution of 0.01°C
TEMPERATURE SENSOR
Twin YSI 400 compatible thermistors with 100 MΩ insulation at 500V between all electrical contacts and the skin surface
2.9.2 Mechanical Specifications
HEIGHT
WIDTH
DEPTH
WEIGHT WITHOUT ACCESSORIES
HEATER HEAD ROTATION
36 cm (14.2”)
20 cm (7.9”)
76 cm (29.9”)
7.4 kg (16.3 lb)
-130º to +130º from centre position
Depends on installation
Warmer Technical Manual
PART NUMBER |
: |
185 041 130 |
ISSUE DATE |
: |
October 2006 |
ISSUE NUMBER |
: |
G |
PAGE |
: |
17 |

2.10Environmental Specifications
OPERATING |
TRANSPORT |
STORAGE |
TEMPERATURE
HUMIDITY
VIBRATION
18°C to 30°C |
-10°C to 60°C |
-10°C to 60°C |
0% to 90%RH |
0% to 90%RH |
0% to 90%RH |
Normal Nursery |
Normal Transport |
|
Handling |
Handling |
|
2.11Equipment Classifications
Class I, Type B
with Class II, Type BF applied part Continuous operation
Not classified against ingress of liquids
Not suitable for use in the presence of flammable anaesthetics
2.12Standards and Approvals
Designed to conform to the requirements of:
IEC 60601-2-21 IEC 60601-1 IEC 60601-1-2 UL 2601-1
AS 3200.1.0
CAN/CSA C22.2 No. 601.1 EN 60601-1
ISO 8382 *
*Neopuff™ Infant Resuscitators only
2.14Electromagnetic environment
2.15Material statements
The IW900 series warmer and accessories do not contain patient contacting PVC devices plasticized with DEHP.
Warmer Technical Manual
PART NUMBER |
: |
185 041 130 |
ISSUE DATE |
: |
October 2006 |
ISSUE NUMBER |
: |
G |
PAGE |
: |
18 |

Intentionally Blank
Warmer Technical Manual
PART NUMBER |
: |
185 041 130 |
ISSUE DATE |
: |
October 2006 |
ISSUE NUMBER |
: |
G |
PAGE |
: |
19 |

PART 3: Maintenance and Servicing
WARNING
All maintenance should be undertaken by qualified service personnel.
3.1Maintenance Schedule
Fisher and Paykel Healthcare recommend that the following Safety, Performance and Functional checks be performed at least annually for all models covered by this manual. It is important to follow hospital and local regulations if more frequent checks are stipulated.
NOTE: A maintenance check sheet is provided in 3.7.
Equipment
Depending on the extent of the service check and the accessories included on your warmer the following equipment may be required.
Safety Analyser: |
IEC60601-1 to class BF |
|
|
Thermometer: |
30 – 40°C |
± 0.1°C |
|
Pressure Gauge: |
0 |
– 100psi |
± 5% fsd |
Pressure Gauge: |
0 |
– 100cm H20 |
± 2% fsd |
Flowmeter: |
0 |
– 15 L/min |
± 5% fsd |
Suction gauge: |
0 |
– 200 mm Hg |
± 2.5% fsd |
Test Lung: |
500RD106 |
|
|
Calibrated Voltmeter |
|
|
|
All electronics are calibrated during manufacture. Regular calibration is not necessary. A check of calibration is included in the Performance Check.
3.2Safety Check
WARNING Connect the power cord only to a properly grounded wall receptacle that is approved for hospital use and of the correct voltage. DO NOT use extension cords or an AC receptacle box for this device.
The unit should be tested to the current medical electrical standards for in-house testing for each specific country (example, refer to UL2601-1 for USA, EN60601-1 for Europe, AS/NZS 3551 for Australia and New Zealand). This should be done prior to initial use and at least annually thereafter.
NOTE: To conduct an earth test, the test lead should be attached to a bolt located under a plastic cap at the top of the column – refer diagram 6.2.2 part 5.
NOTE: The Transport Handle is not earthed but is protected in accordance with clause 17a)3) of IEC60601-1. To verify safety conduct a Patient Leakage Current Test under normal operating conditions. The pass criterion is less than 0.01 mA DC or 0.1 mA AC.
NOTE: The Medela Phototherapy Unit is double insulated. To verify safety conduct a Patient Leakage Current Test on the metal arm under normal operating conditions. The pass criterion is less than 0.01 mA DC or 0.1 mA AC.
NOTE: For neoBLUE-mini phototherapy refer to 185043921 service manual
Warmer Technical Manual
PART NUMBER |
: |
185 041 130 |
ISSUE DATE |
: |
October 2006 |
ISSUE NUMBER |
: |
G |
PAGE |
: |
20 |
3.3System Check
This procedure is the recommended performance check for Fisher & Paykel Radiant Warmers. A check of calibration is included.
ALARMS CHECK
POWERFAIL CHECK
STUCK BUTTON
CALIBRATION CHECK
LIGHT CHECK
POWER MODE CHECK
TIMER MODE CHECK
HEATER CONTROL
1.Switch the Power Switch on. Check that the increasing pitch start up sound occurs and that the following alarm indicators, depending on the model, flash momentarily: Check Baby, High Temperature, Low Temperature, and Sensor Disconnect depending on model.
2.Unplug the power cord from the wall supply socket. Check that the Power Fail Indicator flashes and audible alarm sounds.
3.Press and hold Prewarm/Standby Button. Reconnect the power cord to the wall supply. Check that the warmer starts correctly and that the See Manual indicator flashes and audible alarm sounds. Release the Prewarm/Standby Button.
NOTE: This check causes a Stuck Button error to occur which will be logged as the last error that occurred as accessible via Information Mode.
4.Switch the Power Switch off then on again. Check that the warmer starts up normally.
5.Enter Information Mode (refer section 2.5) and select EIN #5.
6.Ensure that the light is off. Measure the mains voltage at the wall outlet supplying the warmer, using a calibrated voltmeter.
7.Calculate and record the measured voltage as a percentage of the devices nominal supply voltage which will be 100V, 120V or 230V.
8.Check that the top display reads the calculated percentage (± 5%).
9.Select EIN #4.
10.Check that the top display reads 3950 ± 20 (39.50 ± 0.2°C). Exit
Information Mode.
11.Press the Light Button, check the light turns on. Re-press the Light Button and check that the light turns off.
12.Press each power mode button (Prewarm, Manual, Baby if applicable) and check that its respective indicator is lit when the button is pressed.
13.Ensure that the Timer Display is blanked. Press the Apgar Button and check that the Apgar Indicator is lit and the time display starts counting. Press the Timer 1 Button and the Timer 2 Button in turn and check that the corresponding preset time for each appears on the Timer Display and that the time starts counting down.
14.For all models:
|
Select Manual Mode and set the output power level to 0% (all segments of |
|
the power bar are extinguished). Wait 1 minute and check that no heat is |
|
being given off by the element. Set the output power level to 100% (all |
|
segments of the power bar are lit). |
TEMPERATURE |
15. For all models: |
MEASUREMENT |
Check condition of skin sensor lead and sensor head. |
|
|
|
Connect a skin sensor to the infant warmer and immerse the sensor end in |
|
water that is warmed to a temperature in the range 35.0°C to 37.0°C. Use a |
|
calibrated thermometer to check the temperature on the Skin Temperature |
|
Display is accurate to within ± 0.2°C. |
|
To check warmer calibration only - 043042566 check probe may be used, |
|
refer to section 10.1.3 |
|
16. Switch the Power Switch off. |
Warmer Technical Manual
PART NUMBER |
: |
185 041 130 |
ISSUE DATE |
: |
October 2006 |
ISSUE NUMBER |
: |
G |
PAGE |
: |
21 |

3.4Functional Check
WARMER HEAD
Refer section 6.2.2.
MOBILE WARMERS
Refer section 6.3.2.
COSYCOTTM BASE
Refer section 8.1.4
ELECTRIC ELEVATOR (If fitted)
Refer section 8.1.4
BASSINET MOUNTING ASSEMBLY
If manufactured after February 2004 refer section 7.10
If manufactured before February 2004 refer section 7.12
TRANSPORT HANDLE
(If fitted) Refer to section 7.10
STORAGE DRAWER
(If fitted) Refer section 10.13
STORAGE BINS (If fitted)
Refer section 10.14
GAS SUPPLY MANIFOLDS (If fitted)
GAS HOSES
FLOWMETERS (If fitted)
SUCTION (If fitted)
NEOPUFF™ MODULE (If fitted)
UPS (UNINTERRUPTIBLE POWER SUPPLY)
(If fitted)
MEDELA PHOTOTHERAPY (If fitted)
1.Ensure the head is secure and that it can rotate smoothly. If required Head Pivot Nut (1) can be adjusted using a bent wire tool (171042012). If the central détente is not sufficiently positive, Washer Pivot (3) should be replaced.
2.Ensure everything is secure, in particular the stabiliser weight bolt (18) is tight and that the pole (10) is fully engaged into the warmer support bracket (1) and the stabiliser weight (13).
3.Ensure all four base to column bolts (11) are fully tightened 9-11.5Nm. Check castors roll and lock.
4.Check operation of up/down buttons (28) and safety interlock rocker switch (27). Inspect underside of base assembly for any sign of damage or wear. Grease plastic/metal interface sections. Check arm pivot actuator for signs of bending, replace using kit 043042714. Replace retention clips 625060035 as necessary on vacuum formed base.
5.Ensure that the bassinet pivot bolts (5) and arm mounting bolts (19) are tight. Check the operation of the tilt mechanism for smooth movement and no slipping. Adjust actuation cable as outlined in section 3.6.8 if required.
6.Ensure all four M10 x 30 bolts (5), all four M8 x 50 CSK bolts (4) and all six M8 grub screws (2).are tight. Check the operation of the tilt mechanism for smooth movement and no slipping. Adjust actuation cable as outlined in section 3.6.7 if required.
7.Check operation of handle and release collars (4).
8.Ensure the drawer slides smoothly. If required clean and grease the sliders with a food grade, non-drying grease.
9.Check that the bins rotate smoothly about the bin mounting pole (8) and that the pole itself remains stationary. Ensure the two bin pole bolts (3) are tight and that the bins are orientated in line with the bassinet when in the central détente position.
10.Every six months the regulator output pressure (if fitted) should be verified with an independent pressure gauge to ensure 50-60psi (344.7–413.7kPa) is maintained. The adjustment procedure is detailed in section 9.2.2. Test for leaks annually using the procedure outlined in section 9.2.1.
11.Check for any visual signs of wear, damage or deterioration to the gas hose and o-rings, and ensure there is no movement of crimped components away from the hose. Exchange gas hoses as per national or hospital regulations and guidelines.
12.Perform a visual operation check and flow test at 8LPM. For further information refer to the Precision Medical Flowmeter User Manual.
13.Refer to manufacturers manual for maintenance & servicing requirements.
14.Check the Neopuff™ in accordance with section 11.3.3.
15.Check operation, unplug from wall and check that it powers the warmer for >10 mins. Refer to the PowerVar UPS operating manual supplied with the unit for maintenance, troubleshooting, and technical support.
16.Check whether the Lamp Replacement Warning Light is lit. Refer to section 12.1.6 to test the warning light. Replace lamps if required referring to section 12.1.4. Check the cable is free from cuts and abrasions and the securing ‘P’ clip is intact. Check the grommet where
Warmer Technical Manual
PART NUMBER |
: |
185 041 130 |
ISSUE DATE |
: |
October 2006 |
ISSUE NUMBER |
: |
G |
PAGE |
: |
22 |

the cable enters arm is in good condition. Check the grille is firmly attached. Check that the head only swivels when twisted by hand and does not turn of its own accord.
Warmer Technical Manual
PART NUMBER |
: |
185 041 130 |
ISSUE DATE |
: |
October 2006 |
ISSUE NUMBER |
: |
G |
PAGE |
: |
23 |

3.5Service ProceduresReplacement
Anti-Static procedures must be observed when handling printed circuit boards (PCB’s). Qualified service technicians should carry out all servicing.
3.5.1Replacement of Halogen Lamp.
a.If the warmer has been running then allow one hour for the heater and lamp to cool.
b.Unplug the mains cable which supplies power to the unit. Turn off the UPS if installed
c.Unlatch the wire clips from the front of the head and remove the screw underneath the front of the head which secures the lower case to the upper case. The rear screw will also need to be removed on heads manufactured after August 2002.
d.Support the front of the head and pull both sides of the lower case down to open.
e.Pull the halogen lamp out. Using gloves to protect the new lamp, install by pushing into receptacle. Use only 12V 20W 50 mm halogen lamps (Fisher and Paykel part # 424040069).
f.Close the lower casing of the head and replace the securing screws and wire clips.
g.Press the lower case along both sides to ensure it is clipped firmly into place.
3.5.2Replacement of Controller Fuses.
a.Unplug the power cable from the wall supply outlet. Turn off the UPS if installed.
b.Remove the four screws that secure the front control panel to the column (located behind the column).
c.Pull the front panel away from the column until the printed circuit boards are revealed.
d.Disconnect J12 (ribbon cable) from the control PCB. Disconnect J3 (ribbon cable) from the power PCB. Disconnect J6 and J13 (power switch) from the power PCB. Remove the front panel.
e.Controller fuses F1, F2, F3, F4 and F5 are located on the power PCB. Replace as necessary.
f.Hold the control panel beside the column and reconnect connectors J12, J3, J6 and J13. .
g.Replace the front panel checking that it does not interfere with any wiring harnesses, in particular ribbon cable (7) on controller assembly diagram 6.2.2
h.Replace the four screws.
3.5.3Replacement of Supply PCB Fuses (IW93x, IW95x, IW960 and IW970 models only)
These include fuses for the Electric Elevator Module (if fitted), the Power Outlet (if fitted) and any accessories that may be fitted. Refer to the photo in section 5.4.3 for fuse positions.
a.Unplug the power cable from the wall supply outlet. Turn off the UPS if installed.
b.If 900IW403/405 Storage Bins are fitted these must be removed by unscrewing the eight M8x16 screws shown as part 5 in section 10.14.
c.Remove the four screws that secure the power inlet/outlet module to the column (located behind the column).
d.Supply PCB fuses F1, F2, F3, F4 and F5 are located on the back of the Inlet/Outlet Module. Fuse F4 is common to all of the accessories; fuse F1 is for the Electric Elevator Module, fuse F5 is for the outlet socket and fuse F2 and F3 are for other accessories.
e.Replace the power inlet/outlet module including the four retaining screws.
f.Replace 900IW403/405 Storage Bins.
3.5.4Replacement of Printed Circuit Boards.
Refer to photos in section 5.4 for PCB component identification. PCB’s are not repaired, and individual electronic components are not available. Replacement PCB’s are available – refer to section 5.4 for spare part order numbers.
a.Carry out steps a. to d. of section 3.5.2.
b.To remove the control PCB from the front panel disconnect J2 (skin sensor) then release the plastic clips beginning with the ones down the right hand side as viewed from the back.
c.To remove the power PCB from the column disconnect J8, J7, J10, J9 then remove phase and neutral from J5. Unscrew the two 4mm self-tapping screws holding the heat sink to the column.
d.When replacing the power PCBs ensure it is securely held in the column extrusion groove on the right hand side and by the two screws in the heat sink. Ensure that all of the 7 plastic clips/connectors on the control PCB are secure.
e.When replacing the control PCB into the front panel, first remove the control knob (from the front panel) so that it can be re-aligned to the rotary encoder on the control PCB afterwards.
Warmer Technical Manual
PART NUMBER |
: |
185 041 130 |
ISSUE DATE |
: |
October 2006 |
ISSUE NUMBER |
: |
G |
PAGE |
: |
24 |
3.5.5Replacement of Balance spring (IW910 and IW920 models only)
a.Unscrew plastic locking nut on adjustable pole, and remove upper pole with heater and controller.
b.Remove spring from lower pole.
c.Replace spring and refit upper pole.
3.5.6Replacement of Castors (IW910 and IW920 models only)
a.Grip castor and pull out of mobile base.
b.Push new castor home into castor hole.
3.5.7Replacement of Castors (IW93x and IW95x models only)
a.Lock castor and unscrew from leg.
b.Lock new castor and screw into leg ensuring that the circlip security plate (39) remains positioned over the circlip (14) (refer diagram 8.1.4).
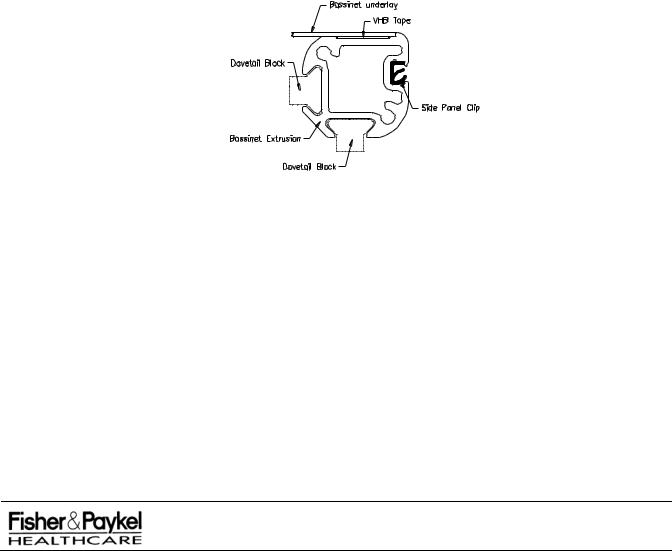
3.5.8Replacement/ Addition of Acetal Side Panel Clips (CosyCot™ models with bassinets prior to version 2.5 only)
Please refer to section 7.6 for part reference details.
a.Follow section 3.5.9 to remove the left-hand corner cap from the side of the bassinet on which changes are to be made.
b.Ensure that the Acetal Side Panel Clip(24) is the correct way up and slide the required number into the rectangular gap located on the inside of the Corner Block (3), positioning it into the groove of the bassinet extrusion.
c.Slide the Side Panel Clip along the Bassinet Extrusion (4) until in the desired location. To access all four sides, all four Corner Caps will need to be removed. Reassemble Corner Cap in reverse order.
NOTE: Too many clips may result in unnecessary force and therefore potential damage to the side panel. To meet IEC 60601-2-21 regulations at least two Acetal clips should remain on each side of the bassinet.
Correct Orientation of the Acetal Side panel Clip (693041413)
Warmer Technical Manual
PART NUMBER |
: |
185 041 130 |
ISSUE DATE |
: |
October 2006 |
ISSUE NUMBER |
: |
G |
PAGE |
: |
25 |

3.5.9Replacement of Bassinet Corner Caps (IW93x, IW95x, IW960 & IW970 models only)
Refer to Bassinet Assembly diagram 7.3.2
a.Remove all relevant side panels. Unscrew bolt (17) using a 5mm Allen key. For the front two corners the rear handle (10) should be removed from each corner prior to unscrewing bolt (17).
b.When fitting a replacement plastic corner cap (694042167), ensure the two lugs locate under the top surface of the corner block (3). Tighten bolt (17) to a torque of 3Nm.
c.Replace rear handle (10).
NOTE: For version 2.5 and version 3.0 bassinets the corner cap part number is 694042167. For version 2.1 bassinets the corner cap part number is 694042134
For version 2.0 and 1.0 bassinets the corner cap part number is 641040819
3.5.10 Upgrading of Corner Cap Dummy Axles - (CosyCot™ models with bassinets prior to version 2.5 only)
Refer to section 7.2.1 for details of the dummy axle change history. It is advised to replace the corner cap bushes (653040121) at the same time as exchanging dummy axles. The side panel sliding axle will need to be upgraded at the same time as the dummy axle to ensure correct operation. Refer to section 7.2.1 for the correct dummy axle and sliding axle combinations.
a.Follow steps a – c in section 3.5.9 to remove the corner cap.
b.Slide out the two dummy axles in each corner cap and remove the urethane bushes with a pair of pliers.
c.Push a bush halfway into the corner cap before inserting the dummy axle. A thin smear of a silicon grease should be applied to each oval axle stem prior to insertion.
3.5.11Upgrading of Side Panel Sliding Axles
Refer to section 7.2.1 for details of the sliding axle change history. The sliding axles were modified in February 2001 to accept the lengthened dummy axles. All side panels made after this date will work with all versions of dummy axle. If you have an earlier version of the side panels then the sliding axles will need to be changed if they are to be fitted to a new version dummy axle.
a.Remove each side panel from the bassinet
b.Push one of the two sliding axles back to expose the grub screw which retains it. Using a 1.5mm Allen key remove the grub screw and slowly release the sliding axle.
NOTE: The spring force could eject the sliding axle out of the extrusion if it is not securely held.
c.Repeat step b on the other sliding axle and discard both sliding axles.
d.Replace with one of the new sliding axles and use Loctite 272 to secure the grub screw back into the extrusion. Do not wind the grub screw fully in; at least 1mm should be left exposed to ensure the sliding axles are trapped in the slot.
e.Replace the spring and then carefully push the second sliding axle in place and reinstall the grub screw using Loctite 272.
Warmer Technical Manual
PART NUMBER |
: |
185 041 130 |
ISSUE DATE |
: |
October 2006 |
ISSUE NUMBER |
: |
G |
PAGE |
: |
26 |

3.6Service Procedures – Adjustment
3.6.1Infant Warmer setup procedure for base servicing
a.Disconnect all power and gas from the warmer and remove UPS modules, Side shelves, phototherapy lamps, gas cylinders and any other loose apparatus on the warmer.
b.Push the warmer from the front until the rear castors swivel round underneath the rear legs. Lock the rear castors.
c.Stand behind the column and swing the head over to one side before carefully pulling the warmer column towards you so that the entire warmer pivots on the locked rear castors. Pre-position two chairs or stools in line with the column with one stool close to the base and gently lower the column onto them so that the entire warmer rests on the back of the column and no weight is on the base. Ensure the warmer cannot tip sideways when resting on the chairs/stools.
3.6.2Pre-set Base Height Adjustment (IW93x and IW95x models with preset bases only)
For Warmers Manufactured before February 2004
Preset bases manufactured prior to Feubruary 2004 can have the bassinet height adjusted to 88.4, 97.5 or 101.9 cm (34.8”, 38.4” or 40.1”) by repositioning the lock bar. Refer to Figure 3.6.3 below. Using a 17mm spanner and 6mm Allen key remove the M10 x 30 screw and Nyloc nut (1). Pull both sets of legs together until the desired hole on the lock bar (2) lines up with the hole in the pivot arm (3). Replace the M10 screw and Nyloc nut (1) and fully tighten.
1 2
3
3.6.3 Figure of under side of preset CosyCotTM warmer base Manufactured before February 2004
For Warmers Manufactured after February 2004
Preset bases manufactured after February 2004 can have the bassinet height adjusted to 90.5 or 100.5 cm (35.6”or 39.6”). Refer to Figure 3.6.4 below. Using a 5mm Allen key remove the two M8x25 screws (2). Pull the legs together until the other set of holes on the base adjustment bar (1) line up with the holes on the legs.Replace the M8 screw and fully tighten. There are only two adjustment points for this system.
1
2
Warmer Technical Manual
PART NUMBER |
: |
185 041 130 |
ISSUE DATE |
: |
October 2006 |
ISSUE NUMBER |
: |
G |
PAGE |
: |
27 |

3.6.4Figure of underside of preset CosyCotTM Warmer Base Manufactured after February 2004
3.6.5Base Level Adjustment (IW93x and IW95x models only)
NOTE: Required on warmers with electric elevator bases and preset bases manufactured pre-February 2004. After this date a new preset system means that base level adjustment is not required.
If the base or column are not level, then adjustment of the straight tie rod is required. The straight tie rod is located underneath the base between the centre pivot and the rear legs.
a.Undo the lock nut that secures the straight tie rod to the ball joints.
b.In the middle of the rod is a flat section that should be used for adjustment. Use the 6 mm wrench (part of the tool kit) to turn the rod. One full clockwise turn of the rod (thread M8 x 1.25) will lower the column down by approximately 4 mm. Hence, one full anti-clockwise turn of the rod will lift the column end up by approximately 4 mm.
c.Adjust to level column and base.
d.Tighten the lock nut.
NOTE: When the rod is assembled, the ball joints remaining threaded portions are:
Leg side: |
10 mm (full length is 20 mm) |
Pivot side: |
10 mm (full length is 25 mm) |
CAUTION A maximum of four full clockwise turns are allowed (remaining threaded portion 5 mm).
3.6.6Castor Angle Adjustment (IW93x & IW95x models only prior to serial No. 9795AEA00436)
If the castor is not vertical to the floor, adjustment of the link arms is required. The link arms are located underneath the leg. Castor angle cannot be adjusted on warmers after the above serial number – refer to PART 13: for serial number identification.
a.Undo the lock nuts that secure the straight tie rod to the ball joints.
b.In the middle of the arm are two holes spaced at 90°. Use a 3mm Allen key or a 3mm bar to turn the arm. One full clockwise turn of the arm (thread M10 x 1.5) will move the castor outwards by approximately 3 mm. Hence, one full anti clockwise turn of the arm will move the castor inwards by approximately 3 mm.
c.Adjust the castor to the vertical position.
d.Tighten the lock nuts.
NOTE: When the arm is assembled the remaining threaded portions on both sides are 13 mm (including 8mm thick lock nuts).
CAUTION A maximum of ten full turns clockwise are allowed (thus the remaining threaded portion will be 10 mm).
Warmer Technical Manual
PART NUMBER |
: |
185 041 130 |
ISSUE DATE |
: |
October 2006 |
ISSUE NUMBER |
: |
G |
PAGE |
: |
28 |

3.6.7Bassinet Clutch Adjustment (IW93x, IW95x, IW960 & IW970 models only)
If the bassinet can be tilted without actuating the rear handle, or pulling the two handles together doesn't allow tilting of the bassinet, then the bassinet tilt clutch requires adjustment.
Adjustment is performed with the adjuster screw (for fine alterations) or by moving the cable support block (for coarse alterations).
If Bassinet Clutch is too tight (i.e. bassinet can not be tilted):
a.Loosen lock nut on adjuster screw and wind screw out. If screw is already fully wound out then cable support block will have to be moved.
b.Use a 4mm ball ended Allen key to loosen the two grub screws securing the cable support block to the bassinet frame.
NOTE: On version three bassinets (manufactured from November 2002) a single M8 cap screw has replaced the two grub screws, a 5mm Allen key is required to loosen this screw.
c.Wind the adjuster screw approximately half way out.
d.Butt the adjuster screw against the cable sheath by sliding the cable support block towards the rear of the warmer.
e.Fix the cable support block in position by tightening the two grub screws.
f.Move the bassinet tilt brake handle backwards as far as it will go and wind adjuster screw out to take up tension.
g.Tighten adjuster screw lock nut.
h.Pull the bassinet rear handle forwards and check brake release operation.
If Bassinet Clutch is too loose (i.e. bassinet can be tilted without using the bassinet handles):
a.Loosen lock nut on adjuster screw and wind screw in. If screw is already fully wound in then cable support block will have to be moved.
b.Use a 4mm ball ended Allen key to loosen the two grub screws securing the cable support block to the bassinet frame.
NOTE: On version three bassinets (manufactured from November 2002) a single M8 cap screw has replaced the two grub screws, a 5mm Allen key is required to loosen this screw.
c.Wind the adjuster screw approximately half way in.
d.Follow steps d to h above.
If the clutch is still loose the actuator spring can be tightened. Referring to diagram in section 7.12; using a ball ended 4mm Allen key on the M5 screw (part 15) and a 6mm open spanner on the brass actuator (part 12) tighten the spring by winding the screw in. The 12mm washer (part 16) should coincide with a line on the lower tilt link molding (part 7). Cleaning the tilt brake sliders (part 10) with alcohol to remove any particles can also improve the clutch performance.
3.6.8Bassinet Brake Adjustment (For CosyCotTM's manufactured after Feb. 2004 with the toothed brake system)
If the bassinet can be tilted without actuating the rear handle, or pulling the two handles together doesn't allow tilting of the bassinet, then the bassinet brake requires adjustment.
Adjustment is performed with the adjuster screw on the cable:
a.Move the bassinet so that the handle is in the lowest position
b.Loosen the lock nut on the adjuster screw.
c.Wind the screw such that there is 2mm of play in the lower handle (winding it out will reduce the play).
d.Tighten the adjuster screw lock nut.
Warmer Technical Manual
PART NUMBER |
: |
185 041 130 |
ISSUE DATE |
: |
October 2006 |
ISSUE NUMBER |
: |
G |
PAGE |
: |
29 |

3.7Recommended Maintenance Checklist
This sheet can be copied and used to keep a record of the maintenance procedures carried out on your Fisher & Paykel Healthcare 900 series Infant Warmer.
Model |
IW |
|
Serial number |
|
|
|
|
|
|
|
|
|
|
|
|
|
|
|
|
|
|
|
Checks Required |
|
|
|
Result |
Units |
Detail |
|
||
|
|
|
|
|
|
|
|
|
|
|
™s’ |
System Checks |
|
|
|
|
|
|
|
|
|
Alarm indicator check |
|
|
|
|
|
|
|
|
||
Cosycot |
Power fail alarm check |
|
|
|
|
|
|
|
|
|
Stuck button check |
|
|
|
|
|
|
|
|
||
Calibration Check EIN #5 |
|
|
|
|
3950 ± 20 |
|
||||
and |
Calibration Check EIN #4 |
|
|
|
|
value within ± 5 of calculated percentage |
||||
Light check |
|
|
|
|
|
|
|
|
||
Wallmounts |
|
|
|
|
|
|
|
|
||
Power mode check |
|
|
|
|
|
|
|
|
||
Timer mode check |
|
|
|
|
|
|
|
|
||
Heater control |
|
|
|
|
|
|
No heat |
100% heat Segments |
||
|
|
|
|
|
|
O |
|
O |
|
|
Temperature measurement check |
|
|
|
C |
± 0.2 C of test water temperature |
|||||
& |
|
|
|
|||||||
Warmer calibration test using check probe (if available) |
|
|
OC |
36.7 OC ± 0.1OC |
||||||
Mobiles |
|
|
|
|
|
|
|
|||
Functional Checks |
|
|
|
|
|
|
||||
Head pivot securing nut check |
|
|
|
|
|
|
||||
Security of stabiliser weight bolt (mobile only) |
|
|
|
|
Spring washer fully deformed |
|||||
|
|
|
|
|
||||||
|
Security of column bolts |
|
|
|
|
Nm |
9.5-11.0 Nm |
|
||
|
Electric elevator check |
|
|
|
|
|
|
|
|
|
|
Arm pivot actuator check |
|
|
|
|
No bending evident |
||||
|
Bassinet mounting check |
|
|
|
|
|
|
|||
|
Transport handle check |
(as fitted) |
|
|
|
|
|
|
||
|
Storage drawer check |
(as fitted) |
|
|
|
|
|
|
||
|
Storage bins check |
(as fitted) |
|
|
|
|
|
|
||
|
Gas Supply Module regulator output pressure OXYGEN |
|
|
psi |
50-60 psi |
|
||||
|
Gas Supply Module regulator Output AIR |
|
|
psi |
50-60 psi |
|
||||
|
Gas Supply Module leak check OXYGEN |
|
|
|
|
No cylinder gauge movement in 15 mins |
||||
s’ |
Gas Supply Module leak check AIR |
|
|
|
|
No cylinder gauge movement in 15 mins |
||||
Other low pressure gas accessories leak check |
|
|
psi |
< 4 psi in 15 minutes |
||||||
™ |
|
|
||||||||
Cosycot |
Gas Hoses |
|
|
|
|
|
|
|
|
|
Flowmeters accuracy - test flowmeter at 8 LPM |
|
|
LPM |
7.5 - 8.5 LPM |
|
|||||
Suction check |
|
|
|
|
|
|
Refer to suction device documentation |
|||
Neopuff™ manometer accuracy - test gauge at 10 cmH2O |
|
|
cmH2O |
8-12 cmH2O |
|
|||||
|
|
|
|
|||||||
|
Neopuff™ manometer accuracy - test gauge at 20 cmH2O |
|
|
cmH2O |
18-22 cmH2O |
|
||||
|
Neopuff™ manometer accuracy - test gauge at 40 cmH2O |
|
|
cmH2O |
38-42 cmH2O |
|
||||
|
Neopuff™ maximum pressure at 5 LPM |
|
|
cmH2O |
> 65 cmH2O |
|
||||
|
Neopuff™ maximum pressure at 15 LPM |
|
|
cmH2O |
< 80 cmH2O |
|
||||
|
Neopuff™ smooth needle movement on operation of |
|
|
|
|
|
|
|||
|
valves? |
|
|
|
|
|
|
|
|
|
|
UPS battery check |
|
|
|
|
|
|
Refer to UPS documentation |
||
|
UPS run time check |
|
|
|
|
mins |
> 10mins |
|
||
|
Phototherapy lamp output check |
|
|
|
|
Refer to phototherapy lamp documentation |
||||
|
Low flow microblender checks |
|
|
|
|
Refer to microblender documentation |
||||
|
Electrical Safety |
|
|
|
|
|
|
|
|
|
|
Earth resistance |
|
|
|
|
|
|
As per country standard |
||
All |
Earth leakage |
|
|
|
|
|
|
As per country standard |
||
Patient applied path |
|
|
|
|
|
|
As per country standard |
|||
|
Other tests as required |
|
|
|
|
|
|
As per country standard |
||
|
|
|
|
|
|
|
|
|
|
|
|
|
|
|
|
|
|
|
|
|
|
Technician
Technician Signature
Date
Warmer Technical Manual
PART NUMBER |
: |
185 041 130 |
ISSUE DATE |
: |
October 2006 |
ISSUE NUMBER |
: |
G |
PAGE |
: |
30 |
 Loading...