


GWL11
Clothes Washer
Installation instructions and
EN
User guide
Lave-linge
Instructions d’installation
FR
et mode d’emploi
New Zealand Australia USA Canada Europe Asia Pacific

WARNING
Electric Shock Hazard
Read and follow the IMPORTANT SAFETY INSTRUCTIONS
outlined in this User Guide before operating this appliance,
pages 11–13.
Failure to do so can result in death, electric shock, fire or injury
to persons.
Please Note: To obtain maximum efficiency, your Ecosmart washer has the ability to learn and
adapt to the local environment. This may take several wash cycles, therefore maximum energy
efficiency may not be achieved until a number of wash cycles have been completed. This
usually takes about 5 cycles.
English Page 2 – 38
Français Page 40 – 67
As an ENERGY STAR® Partner Fisher & Paykel Limited has determined
that this product meets ENERGY STAR® guidelines for energy efficiency.
2

Contents
EN
Installation Instructions
Important Safety Instructions
How to get Started
About your Ecosmart
How your Ecosmart Works 16
Lid Lock 17
Wash Cycles and Options
The Wash Progress Lights 17
The Wash Cycles, Wash Options 18
Softener Rinse, Soak, Time Saver 19
Water Levels 20
Spin Hold, Delay Start, Clothes Care Safeguards 21
Customizing the Wash Cycle, Favorite Cycle 22
Washing Bulky Items, Washing Woollens, Cold Water Washing 23
Before You Wash
Sorting and Loading 24
Bleach 25
Fabric Softener 25
Scrud 25
Changing Pre-Set Options
Option Adjustment Mode 26
Out of Balance Recovery Routine 28
Auto Water Fill Level 28
End of Cycle Beeps 29
Default Rinse Options 29
Volume of Water used in the Shower Rinse 29
Controlled Cold 29
5
11
14
Caring for your Ecosmart
Care and Cleaning 30
Products that might Damage your Ecosmart 31
Ecosmart Sounds and Beeps 31
Automatic Lint System 31
If your Ecosmart Beeps for Help
Service
33
Operating Problems
Wash Problems
Limited Warranty
35
36
32
34
3

Congratulations on purchasing a new Fisher & Paykel washing machine. We are very proud of
our washers and trust they will serve you well for many years.
At Fisher & Paykel we aim to provide innovative products that are simple to use, ergonomic and
energy efficient. Thousands of tonnes of washing and 70 years of laundry experience have been
programmed into your washing machine to help give you the best possible performance.
We hope you enjoy your new washing machine,
we have certainly enjoyed designing it.
Important!
It is important that the User Guide should be retained with the appliance for future
reference. Should the appliance be sold or transferred to another owner, always ensure
that the User Guide is left with the appliance in order that the new owner can familiarize
themselves with the appliance and the relevant warnings.
4

Installation Instructions
Before you begin – read these instructions completely and carefully.
WARNING
Electric Shock Hazard
Read and follow the IMPORTANT SAFETY INSTRUCTIONS
outlined in this User Guide before operating this appliance,
pages 11–13.
Failure to do so can result in death, electric shock, fire or injury
to persons.
Important!
Observe all governing codes and ordinances.
Installation requirements
Location
Your washer must be installed on firm flooring to minimize vibration during spin cycles.
Concrete flooring is best, but wood base is sufficient providing the floor support meets FHA
standards.
EN
Your washer should not be installed on rugs or exposed to the weather.
Plumbing
Water Temperature
Your cold water should not exceed 95˚F (35˚C) or your hot water exceed 150˚F (65˚C).
Temperatures above this may damage your washer.
Shut Off Valves
Both hot and cold shut-off valves (faucets) should be available in the laundry area.
Drain
Water may be drained into a standpipe or set tub. The standpipe must be 11/2” (38mm)
minimum interior diameter and must be open to the atmosphere.
Electrical
This appliance must be supplied with 110V – 120V, 60Hz electrical supply and connected to an
individual, properly grounded branch circuit, protected by a 15 or 20 amp circuit breaker or time
delay fuse.
5
Installation Instructions
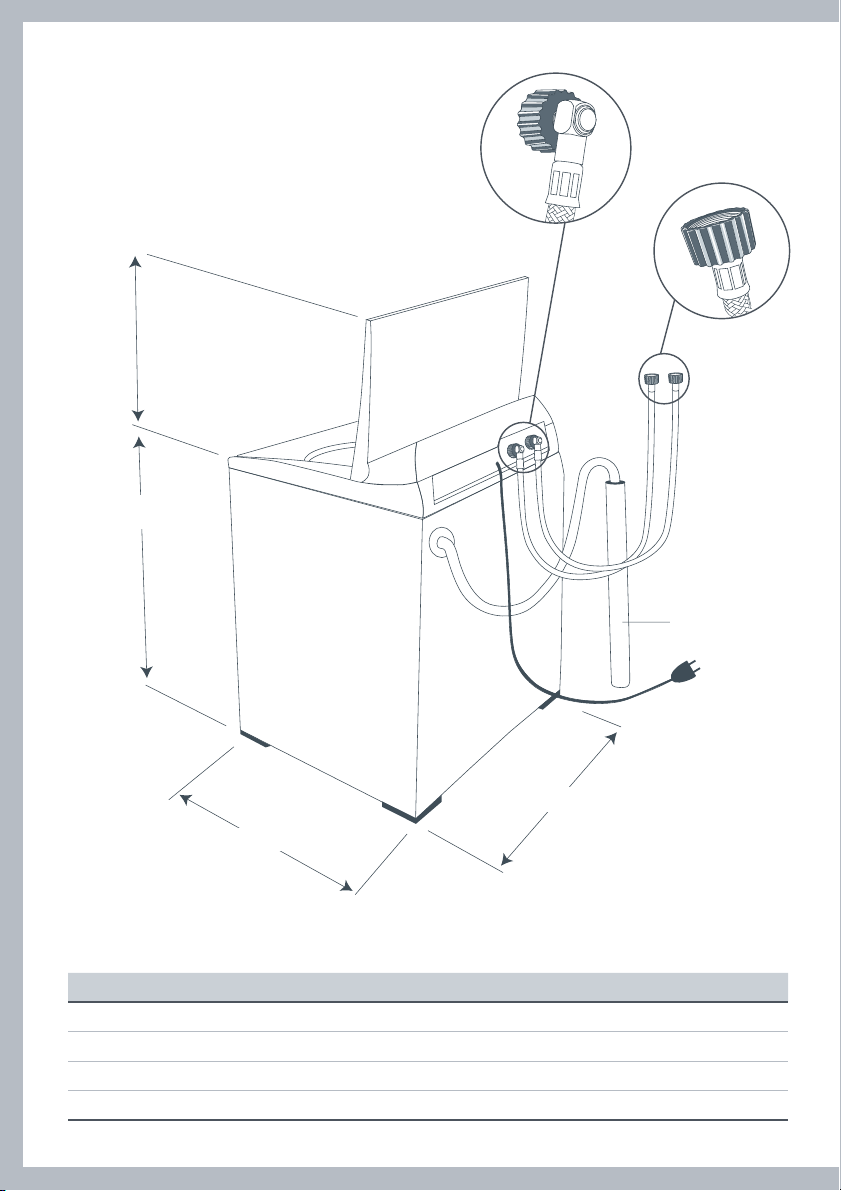
Specifications
Lid Clearance
Height
Washer end of hose
Faucet end of hose
Standpipe Height
1
33
/2” to 78”
Allow for
adjustable
feet
Depth
Dimensions
Model All models
Depth 251/2” (650mm)
1
Width 25
Height to top of console 40”- 41
Height lid open 55”- 563/4” (1400-1440mm)
6
/2” (650mm)
3
/4” (1020-1060mm)
Width
Inlet water pressure
Max 150 psi (1MPa)
Min 5 psi (34kPa )

Installation Instructions
Step 1
Remove Bottom Packer
1.
Remove outer packaging.
2.
Tilt the machine backwards and walk the machine off
the bottom packer. The plastic bottom packer can now
be removed.
CAUTION!
Operating the machine when the bottom packer is
in place can result in damage to the machine.
Step 2
Removing Basket Packer and Accessories
1.
Lift the lid and remove cardboard basket packer from
the top of the washer basket.
2.
Keep the bottom packer and basket packer in case
they are required for future transit.
3.
Remove hoses, accessories and installation pack.
The installation pack contains the following:
4 rubber inserts for the leveling feet
1 drain hose guide
EN
Basket packer
Step 3
Drain Hose
1.
Carefully pull the drain hose out from the back of
the washer by pulling the exposed part of the hose
downwards and then out.
2.
The hose guide is used to guide the drain hose over the
tub or standpipe. It MUST be fitted to the drain hose.
To prevent siphoning the drain hose should not extend
more than
If necessary, the drain hose can be trimmed to length.
3.
Place the drain hose in the laundry tub or standpipe.
Note:
In multi-storey apartments or any upper floor installation,
the machine should be installed on a drained floor.
Check that the tub or standpipe is free from lint or
other obstructions before operating the washer.
In basement installation do not exceed a standpipe
height of (78”).
3
/4” (20mm) from the end of the guide.
Pull hose
through guide
3
/4”
(20mm)
7

Installation Instructions
Step 4
Inlet Hoses
1.
Install hoses with the straight end (with filters)
fitted to the faucets.
2.
Install elbow ends onto washing machine (inlet
valves are marked on the back of the machine
H=hot, C=cold)
Note: If there is a cold water supply only, an inlet
valve cap (available from Fisher & Paykel) MUST
be connected to the hot valve. The cap prevents
water leaking from the hot valve.
Step 5
Leveling the Washer
1.
Insert the four rubber leveling feet inserts into the
feet on the base of the washer. (See diagram 1).
2.
Move the washer into its final position. We suggest
a minimum clearance of 1” (25mm) on each side for
ease of installation. (See diagram 2).
1.
Faucet
end of
hose
Adjustable feet
Rubber insert
1” (25mm) 1” (25mm)
Diagram 1
2.
Washer
end of
hose
3.
Turn on water and check hose connections for leaks.
Check that there are no kinks in the hoses.
4.
It is IMPORTANT to level the washer to ensure
proper performance during spin.
Adjust the feet by unscrewing/screwing to make
sure the washer is level and cannot rock.
5.
Use the walls and adjacent counter tops as a sight
guide to check to see if washer appears level.
Readjust the feet if necessary.
6.
Open the lid and check the washer basket to see
that it sits slightly forward of centre. (See diagram 3).
8
Incorrect
adjustment
Diagram 2
Correct
adjustment
Diagram 3

Installation Instructions
8.
Close the lid. Visually check that the lid and topdeck are aligned. If not aligned, adjust the feet
again until the lid and topdeck match.
Lid Alignment
Lid
Wind left foot down
(out) to correct
EN
Topdeck
Topdeck
Wind right foot down
(out) to correct
Topdeck
Lid
Lid
Step 6
Operation
1.
Turn faucets on. Check for leaks, noise, vibration, correct water temperatures and proper
operation in spin. Check that the lid locks during spin.
2.
Turn hot and cold water faucets off when washer is not in use.
Special Instructions
1.
The washer may give warning signals when low water pressure, or drain problems are
encountered. See ‘If your Ecosmart beeps for help’ (page 32).
If further help is needed concerning this appliance, refer to Service, page 33.
9

Installation Instructions
Special Requirements for Alcove or Closet Installation
The minimum ventilation clearance between the washer and adjacent walls or other surfaces is:
1” (25mm) minimum either side and front
3” (75mm) minimum rear
Consideration must be given to providing
adequate clearance for installation and servicing.
The minimum vertical space required from floor
to overhead shelves, cabinets, ceilings etc is 59”
(1500mm).
Closet doors must be louvered or otherwise
ventilated and have at least 60 square inches open
area for a washer only, or if the closet contains both
a washer and dryer, doors must contain at least 120
square inches of open area equally distributed.
Louvered door
Washer & Dryer
60 Sq. In
(388 Sq. cm)
60 Sq. In
(388 Sq. cm)
CAUTION!
Do not install this appliance in a closet with a solid door.
Mobile Home Installation
Installation must conform to the STANDARD FOR MOBILE HOMES, ANSI A119.1 and NATIONAL
MOBILE HOME CONSTRUCTION & SAFETY STANDARDS ACT OF 1974 (PL93-383).
Grounding Instructions
This appliance must be grounded. In the event of malfunction or break down, grounding will
reduce the risk of electric shock by providing a path of least resistance for electric current. This
appliance is equipped with a cord that has an equipment-grounding conductor and a grounding
plug. The plug must be plugged into an appropriate outlet that is properly installed and
grounded in accordance with all local codes and ordinances.
WARNING!
Improper connection of an equipment-grounding conductor can result in a risk of electric shock.
Check with a qualified electrician or serviceman if you are in doubt as to whether the appliance is
properly grounded.
Do not modify the plug provided with the appliance – if it will not fit the outlet, have a proper
outlet installed by a qualified electrician.
Specification subject to change without notice.
10

Important Safety Instructions
Read all safety information before using
Many washers are located near a gas dryer or a water heater in the home.
WARNING
Fire Hazard
For your safety the information in this manual must be
followed to minimize the risk of fire or explosion or to prevent
property damage, personal injury or loss of life.
Do not store or use gasoline or other flammable vapors and
liquids in the vicinity of this or any other appliance.
Installation and service must be performed by a qualified
installer, service agency or the gas supplier.
What to do if you smell gas
DO NOT try to light any appliance.
DO NOT touch an electrical switch; do not use any phone in your building.
Clear the room, building or area of all occupants.
Immediately call your gas supplier from your neighbor’s phone.
Follow the gas suppliers instructions.
If you cannot reach your gas supplier, call the fire department.
EN
Water Heater Safety
Under certain conditions Hydrogen gas may be produced in a water heater that has not been
used for two weeks or more.
HYDROGEN GAS CAN BE EXPLOSIVE UNDER THESE CIRCUMSTANCES.
If the hot water has not been used for two weeks or more, prevent the possibility of damage or
injury by turning on all hot water faucets and allowing them to run for several minutes before
using any electrical appliance which is connected to the hot water system. This will allow any
hydrogen gas to escape. Since the gas is flammable, do not smoke or use an open flame or
appliance during this process.
11

Important Safety Instructions
WARNING
Electric Shock Hazard
Follow the safety precautions outlined in this User Guide.
Failure to do so can result in death, electric shock, fire or injury
to persons.
Safety Precautions:
Read all instructions before using the appliance.
Use this appliance only for its intended purpose as described in this User Guide.
This washer must be properly installed and located in accordance with the Installation
Instructions before it is used.
Properly ground to conform with all governing codes and ordinances.
Follow details in the Installation Instructions.
Do not install or store washer where it will be exposed to temperatures below freezing or
exposed to the weather.
Connect to a properly rated, protected and sized power supply circuit to avoid electrical
overload.
Connect to adequate plumbing and drain facilities as described in the Installation Instructions.
Turn off water faucets when the washer is not in use to relieve pressure on hoses and valves and
to minimize leakages if a hose or valve should break or rupture.
Do not repair or replace any part of the appliance or attempt any servicing unless specifically
recommended in this User Guide or in published user repair instructions that you understand,
and have skills to carry out.
When disconnecting the appliance pull by the plug rather than the cord or junction of cord to
avoid damage to the cord or junction of the cord and plug.
Make sure that the cord is located so that it will not be stepped on, tripped over or otherwise
subject to damage or stress.
Keep all laundry aids (such as detergents, bleach, fabric softener, etc.) out of the reach of
children, preferably in a locked cabinet. Observe all warnings on container labels to avoid
personal injury.
Do not tamper with the controls.
Keep the area around/underneath your appliance free from the accumulation of combustible
materials, such as lint, paper, rags, chemicals, etc.
Keep the floor around your appliance clean and dry to reduce the possibility of slipping.
Never reach into the washer if the basket or agitator is moving.
12

Important Safety Instructions
Before loading, unloading or adding clothes, press START/PAUSE and wait until the machine has
completely stopped before opening the lid.
Close supervision is necessary if this appliance is used by or near children. Do not allow children
to play inside, or with this appliance or any discarded appliance.
Dispose of discarded appliances and shipping/packing materials properly. Before discarding a
washer, or removing from service, remove the washer lid.
Do not leave the washer lid up during the cycle. This will stop the spin action and prevent
completion of the cycle. To restart, close lid and press START/PAUSE.
Do not wash or dry articles that have been cleaned in, washed in, soaked in, or spotted with
combustible or explosive substances (such as wax, oil, paint, gasoline, degreasers, dry-cleaning
solvents, kerosene, etc.) which may ignite or explode. Do not add these substances to the wash
water. Do not use these substances around your washer and/or dryer during operation, as they
give off vapors that could ignite or explode.
The laundry process can reduce the flame retardancy of fabrics. To avoid such a result, the
garment manufacturer’s care instructions should be followed very carefully.
Do not mix chlorine bleach with ammonia or acid such as vinegar and/or rust remover. Mixing
can produce a toxic gas which may cause death.
Never climb on or stand on the washer top or lid.
Do not wash fibreglass articles in your washer. Skin irritation could result from the remaining
particles that may be picked up by clothing during subsequent washer use.
To minimize the possibility of electric shock, unplug this appliance from the power supply or
disconnect the washer at the household distribution panel by removing the fuse or switching
off the circuit breaker before attempting any maintenance or cleaning.
Note: Pressing the POWER button does NOT disconnect the appliance from the power supply,
even though the lights are out.
Do not operate this appliance if it is damaged, malfunctioning, partially disassembled or has
missing or broken parts, including a damaged cord or plug.
Do not operate this appliance if the lid has been incorrectly fitted.
If you are using an extension cord or a portable electrical outlet device (eg mulit-socket outlet
box), ensure that it is positioned so that it does not come into contact with water or moisture.
EN
SAVE THESE INSTRUCTIONS
13

How To Get Started
Remove the fabric softener dispenser.
Place load evenly around the agitator.
A. Detergent
Follow the instructions on the detergent package.
Use the mark on the agitator, nearest to the top of
the clothes, as a guide to the correct amount of
detergent to use.
Pour the detergent down the center of the
agitator stem.
Replace the fabric softener dispenser, as this stops
articles falling down the center of the agitator.
D
B. Bleach
If you wish to use bleach:
Use half the recommended dose of bleach.
Dilute bleach and pour carefully down the
inner surface of the agitator stem, in-line with
the fins. (Refer to Bleach page 25).
Select the Softener Rinse Option. This will
ensure that any residual bleach is well cleared
out of your washer.
14
E

C. Fabric Softener
If you wish to use fabric softener, place it
in the dispenser on the top of the agitator.
Select the Softener Rinse option so that
the softener will be dispensed correctly
into the final rinse. (Refer to fabric
softener page 19 and 25).
D. Power
Turn your Ecosmart on by pressing the POWER button.
E. Wash Cycle
Close the lid and press your chosen wash cycle.
F. W ash Options
Select the wash temperature and other wash options. (Refer to pages 18– 23).
EN
G
F
G. Start
Press START/PAUSE to start the machine.
If you wish to stop your Ecosmart
Press START/PAUSE.
Wait until the machine has fully stopped, and the lid lock light is off, before opening the lid.
For best fabric and color care remove your clothes as soon as the cycle has finished
15

About Your Ecosmart
How Ecosmart Works
The Fisher & Paykel Ecosmart’s ‘2 in 1’ wash system gives you the best of both worlds. Using a
combination of front loader and top loader wash systems, the Ecosmart gives exceptional wash
results while using up to 50% less hot water*, and, at the same time, taking better care of your
clothes than a conventional top load washer.
Phase 1 – Eco Active Wash
Front Loader Type Wash
The Ecosmart fills the bowl, at the selected
temperature, with just enough water so that the
clothes are 100% saturated.
This small amount of sudsy water is circulated through
the clothes, up the specially designed portal and back
onto the clothes with a waterfall effect.
The chemical action provided by a small amount of water,
combined with detergent, rapidly targets soil and stains
at fiber level, boosting soil removal and accelerating the
wash process.
Phase 2 – Top Loader Type Wash
After 4 minutes, your Ecosmart will fill with just enough
cooler water to suspend the soil in solution. Agitation
will then begin, moving soil away from the clothes.
Because of its head-start, the wash requires less
agitation than a conventional top loader wash.
Unique Fisher & Paykel Shower Rinse
*CEE, March 2002
16

About your Ecosmart
Lid Lock
Your Ecosmart has a lid lock. This ensures the lid cannot be
opened during hazardous parts of the cycle, providing added
safety for you and your family.
The lid lock light (above the start/pause button) comes on
when the lid is locked to tell you when you cannot open the lid.
If the lid lock light is flashing the lid lock is in the process of locking or unlocking (i.e. while the
machine coasts down or start/pause has been pressed). During this stage the lid still cannot
be lifted.
Keep children away from the machine during the fill and agitate stage of the cycle, especially
when using hot water, as the lid can be opened and the machine will not stop.
If the lid is left open, the machine will be unable to lock and the cycle will be halted. The
machine will beep and the lid lock light will flash until the lid is closed and the
START/PAUSE button is pressed
Do not put anything down the slot in the top deck of your machine.
Do not try to disable the lid lock..
EN
Wash Cycles and Options
The Wash Progress Lights
The wash progress lights show all the tasks your Ecosmart will complete during the wash cycle.
As each task is completed a light goes out, so you can tell at a glance how far the cycle has to go.
Advancing the Wash Cycle
To shorten the wash time, to rinse and spin only, or to spin only:
1.
Select the wash cycle.
2.
Press ADVANCE repeatedly until only the right
number of lights remain on.
3.
Press START/PAUSE.
Note: The wash consists of two parts. The first
amber light is essential for all washes except
Permanent Press, therefore, you can only advance
through the green lights, not the amber.
17

Wash Cycles and Options
Eco Active Wash*
Agitate Time*
Wash Action
Wash Temp
Rinse
Spin Speed
Spin Time
Heavy Duty Regular Delicate
4 min 4 min 4 min 4 min -
12 min 9 min 6 min 3 min 9 min
Heavy Duty Regular Delicate Delicate Regular
warm warm warm/cold warm/cold warm/cold
cold
shower
rinse
Fast Fast Slow Medium Slow
6 min 6 min 4 min 6 min 2 min
cold
shower
rinse
spray rinse
+
cold
deep rinse
Wool
Washables
spray rinse
+
warm/cold
deep rinse
Permanent
Press
spray rinse
+
cold
deep rinse
* Does not include fill times.
The Wash Cycles
HEAVY DUTY For heavily soiled and heavy duty fabrics.
REGULAR For medium to lightly soiled cottons, linens, work and play clothes.
DELICATE For lingerie and special-care fabrics with light soil.
WOOL WASHABLES Specially designed for normally soiled knits and machine washable woollens.
PERMANENT PRESS
A more traditional wash for synthetics, blends, and/or delicate fabrics with
normal soil and clothes which wrinkle easily.
Wash Options
When you press POWER to turn on your Ecosmart, it wil automatically select a:
REGULAR wash cycle
WARM wash temperature
AUTO water level
FAST spin speed
Each of these wash options can be altered to suit
your wash needs. The following pages explain each
of the wash options and how to use them.
In the following diagrams:
(
) = light is on
(
) = light is off
To select Wash Options
1.
Select wash cycle.
2.
Use the up or down arrows, or the options button,
to select the wash options you want to use.
3.
Press START/PAUSE.
18
Note: Two lights are used to
show warm/hot and warm/cold
wash temperatures.

Wash Cycles and Options
Softener Rinse
We recommend the use of softener dryer sheets because
liquid fabric softener has been known to cause an unpleasant
build-up inside washing machines. (Refer to Scrud page 25).
Use the SOFTENER RINSE option:
If you use liquid fabric softener
If you use bleach
This option changes the rinse to include a spray and deep
rinse, so that the fabric softener will be dispensed correctly,
and the machine sump will be thoroughly cleaned of bleach.
Some wash loads are better washed using a cycle with a
deep rinse. For instance, garments that have a lot of sand or
sawdust in them, or garments where the color still runs. For
these loads select the SOFTENER RINSE option, as this will
change the rinse to include a deep rinse.
Soak
When you select SOAK your Ecosmart will stop at the end of
wash and soak for 2 hours before completing the rinse and
spin. During soak your washer will agitate for a few seconds
every minute.
EN
Time Saver
TIME SAVER allows you to shorten the wash cycle for lightly
soiled clothes. Selecting this option reduces the wash and
spin times.
Time Saver can be turned on or off at any time during the
cycle.
19

Wash Cycles and Options
Water Levels
Auto Water Level
Your Ecosmart can automatically select the appropriate
water level for the load.
1.
Place your clothes in the machine, and press Power.
2.
Select wash cycle (select Auto water level if not
automatically selected)
3.
Press START/PAUSE
During fill the machine will pause occasionally to sense
the water level. The machine will check if the water
level is correct by using a series of two different agitate
strokes. (This may take over a minute). If it detects that
the water level is not enough, it will fill with more water
and re-check the level.
When washing an unusual load eg. large bulky
garments, pillows, we recommend you manually
select the water level and select the Delicate cycle.
Manually select the water level if there is already water
in the machine.
For a large bulky load, or large single item (eg.
comforter) push the load down after the first fill.
Manual Water Level Selection
The agitator has five levels marked on its stem that can
be used to help you select the correct water levels.
Select the correct water level by using the mark nearest
to the top of the clothes.
The levels marked on the agitator do not correspond
exactly to the level of water. They indicate the level of
dry clothes suitable for the water level.
Your Ecosmart may occasionally add water during
agitation. This is to maintain the water level due to the
release of air trapped in the garments.
Out of balance loads, tangling or splashover can be
caused by selecting a water level that is too high.
20

Wash Cycles and Options
Spin Hold
Use the SPIN HOLD option to:
Remove drip dry garments from a mixed load before the
wash goes into spin.
Minimize wrinkling that is caused when clothes are left
sitting in the machine at the end of the cycle.
When SPIN HOLD is selected, your Ecosmart will pause at
the end of rinse, beep and the spin light will flash to tell
you that it is waiting for another instruction. Press START/
PAUSE to begin the spin.
Delay Start
Delay Start will delay the start of the wash cycle for
1, 3 or 9 hours.
Press DELAY START once for a delay of 1 hour. Press again
for 3 hours, a third time for 9 hours (and again to return to
normal).
EN
Once you press Delay Start your Ecosmart will begin the
delay period, you do not have to press Start/Pause.
Be careful if using Delay Start for non-colorfast clothes as
dyes may run if the clothes are damp.
Your Ecosmart will not beep at the end of the cycle if
Delay Start is selected.
Clothes Care Safeguards
To avoid accidentally damaging your clothes, there are a few options that your Ecosmart will not
accept. For example, you cannot select a hot wash on Delicate, Permanent Press or Wool cycles.
21

Wash Cycles and Options
Customizing the Wash Cycles
You can program your Ecosmart to remember the wash options you prefer for each wash cycle. For
instance, you may want to set the Regular cycle to cold wash or set Heavy Duty to include a soak.
To C ustomize a Cycle
1.
Press the Power Button.
2.
Press selected wash cycle button. Hold down
for 4 seconds. You will hear two quick beeps
and the wash cycle light will flash.
3.
Select your wash options, (eg cold wash, soak).
4.
Press the wash cycle button again to store your
customized cycle.
When you are customizing a wash cycle, you can
shorten or lengthen the agitation time.
To shorten the agitation time, press ADVANCE to
reduce the number of green lights.
To increase the agitation time keep pressing ADVANCE
until all the green lights are on. (On Heavy Duty you
can only decrease the wash time)
Note: Unlike the Favorite cycle you cannot customize a
wash cycle to start at the rinse or spin stage.
Favorite Cycle
Favorite cycle lets you design your own wash cycle. Favorite can be any wash cycle with any of
its wash options, and it can start from any point in the cycle.
To set your Favorite Cycle
1.
Press the POWER Button.
2.
Press the FAVORITE cycle button. Hold down for 4
seconds until you hear two quick beeps and the
Favorite light flashes.
3.
Select your favorite cycle (eg Regular or Delicate).
4.
Select the wash options (eg soak, time saver). Use
Advance if you want part of a cycle (eg spin only).
5.
Press FAVORITE again to store your favorite cycle.
Note: Your Ecosmart will remember your favorite cycle, or any other cycle that has been
customized, even when unplugged from the wall. It is not possible to program a delayed start
into the Favorite cycle.
22

Wash Cycles and Options
Washing Bulky Items
Make sure there is enough room in the machine for items to move when being washed. Forcing
large items into the machine may result in them being damaged during washing.
Some items float up during the wash (eg comforters
and pillows). If they sit too high they may touch
stationary parts of the machine during agitate or spin.
To minimize the chance of this happening, bulky items
should be pushed down below the water level after
fill and pushed to sit below the medium high water
level mark on the agitator before spinning. Select the
correct water level manually. Select a slow spin.
EN
To prevent an out of balance load we recommend
washing these items on the Delicate cycle. If you wish
to re-spin the load at a faster speed make sure the load
is sitting below the medium high mark before spinning.
Bulky items should sit below the
medium high water level mark.
Washing Woollens
The Wool cycle has been designed for products carrying a MACHINE WASHABLE care claim. The
fibers of these woollens have been treated to prevent felting when they are machine washed.
Most handknitted garments are not made of machine washable wool and we recommend that
you hand wash them.
Check the care label.
Use a wool detergent
Use the WOOL WASHABLES cycle.
Hand washed woollens may be spun in your Ecosmart.
To dry woollens lay them flat on a towel and pat into
shape. Dry out of direct sunlight.
Some wool underlays and sheepskin products can
be washed in a washing machine but may produce
excessive amounts of lint that may cause pump
blockages.
Cold Water Washing
If you always use cold water, we recommend that you run a warm Permanent Press wash at
regular intervals, eg every 5th wash.
23

Before You Wash
Sorting
To get the best wash results sort your clothes
before washing.
Color
Sort white fabrics from colored fabrics.
Care Labels
The care label will tell you about the fabric of
the garment and how it should be washed.
Hand Wash
Do not bleach
Do not tumble dry
Medium iron
Soil
Sort clothes according to the type and amount
of soil. Some soils suit warmer washes eg oily
soils, while others are best washed in cold
water eg mud, blood.
Lint
Wash lint givers and lint collectors separately.
Where possible, turn lint collectors inside out.
Lint givers Lint collectors
Terry cloth Synthetics
Chenille Corduroy
Towels Permanent Press
Dryclean
Socks
Loading
Check Pockets
Loose items can damage both your autowasher and your clothes.
Close Zippers, Hooks and Eyes
This is to make sure that these items do not snag on other clothes.
Mend any Torn Garments or Loose Buttons
Tears or holes may become larger during washing. Remove any loose bra wires as they can
damage your washing machine and/or dryer.
Pretreat any Stains
Make sure the Water Level suits the Load Size
Ensure that the load does not extend above the fabric softener dispenser as splashing may occur.
For a Balanced Load:
A mixture of small and large items will wash the best.
Place unfolded clothes firmly and evenly around the agitator.
Do not wrap large items, such as sheets, around the agitator.
24

Before You Wash
Bleach
Check clothing care labels for special instructions.
Liquid Bleach:
1.
Use half the recommended dose of bleach and dilute with water.
2.
Remove the fabric softener dispenser and pour down the inside edge
of the agitator stem, in line with the fins. Select the SOFTENER RINSE
button. This changes the rinse to thoroughly remove bleach residue.
3.
Add detergent and replace the fabric softener dispenser.
4.
For best results, add liquid bleach after the first amber wash light is
no longer visible.
Powdered Bleach:
Pour half the recommended dose of powdered bleach into the agitator with your detergent.
Note: Never pour undiluted, liquid chlorine bleach directly onto clothes, into the wash
basket, or into the center of the agitator.
Fabric Softener
The fabric softener goes into the dispenser on the top of the agitator.
The ring on the dispenser cup is a guide for the amount of fabric
softener to add for a full load. Smaller loads require less fabric softener.
EN
Softener Rinse
If you wish to use fabric softener when using the Regular or Heavy
Duty cycles you must select the SOFTENER RINSE option. This
changes the rinse option to include a deep rinse so the fabric softener
will be dispensed correctly.
Scrud
Scrud is the name given to the waxy build-up that can occur within any washer when fabric
softener comes into contact with detergent. This build-up is not brought about by a fault in the
machine. If scrud is allowed to build-up in the machine it can result in stains on your clothes or
an unpleasant smell in your washer.
If you wish to use fabric softener we recommend:
Using fabric softener sparingly.
When filling the dispenser, do not splash or overfill.
Clean the dispenser as soon as the cycle is finished, (refer page 30).
Clean your machine regularly (refer page 30).
Cold water washing increases the chance of the build-up occurring.
We recommend that a warm permanent press wash be used at regular
intervals, eg every 5th wash should be warm.
Fabric softener of a thinner consistency is less likely to leave residue on
the dispenser and contribute to a build-up.
25

Changing Pre-Set Options
Option Adjustment Mode
After using your Ecosmart you may want to fine tune some of the options to suit your wash
needs.
You can change the following pre-set options:
the default rinse option
the amount of water used in the Shower Rinse
the number of beeps at the end of the cycle
the Out of Balance recovery routine
the fill level selected by auto water level
the controlled cold
To make these changes it is necessary to enter the “Option Adjustment Mode”.
To enter Option Adjustment Mode
1.
Plug the machine in, but do not press POWER.
Press START / PAUSE and hold down, then press POWER.
2.
You will hear three quick beeps and the machine will
show an unusual pattern of lights. In this mode the
lights are used to indicate the different options available.
The diagram on page 27 shows how the lights relate
to the options you can change.
Pages 28–29 explain the different options in more detail.
3.
Use the buttons on the panel to make your changes to
the pre-set options.
4.
Press POWER to return to normal mode.
5.
Your Ecosmart will automatically remember
your changes.
6.
To make further changes, repeat the above steps.
26

Changing Pre-Set Options
1.
Press START / PAUSE and hold down. Press POWER.
2.
The diagram below shows how the lights relate to the options you can change. It also shows
which lights will be on when you first enter the Option Adjustment Mode.
Controlled Cold
EN
Less Water
Automatic W ater Lev el Adjustment
3.
Use the buttons on the panel to
change the pre-set options.
More Water
Out of
Balance
Recover y
More
More
Standard
Shower
Rinse
Vol ume
15
5
None
Beeps
2 Deep
–
Spra y & Deep
Rinse
Options
More
More
Standard
Shower
Rinse
Vol ume
2 Deep
Spra y & Deep
Rinse
Options
27

Changing Pre-Set Options
Out of Balance Recovery Routine
When your Ecosmart is spinning it can sense if the wash load is out of balance and will stop
and re-try spinning up to 3 times. If the machine still senses an unbalanced load there are two
options the machine offers.
Automatic Recovery Option:
Your Ecosmart will try to automatically
correct the out of balance load. It will fill with
water and agitate to redistribute the load
before trying to spin up again.
Machine Stops Option:
Your Ecosmart will stop, giving a short burst
of beeps every five seconds and the RINSE
or SPIN light will flash. You must redistribute
the load more evenly yourself. (Use this
option if you wish to conserve water.)
1.
Enter the Option Adjustment Mode.
2.
Use the REGULAR button to select the Out
of Balance Recovery Option you prefer.
3.
Press Power to store your selection.
Auto Water Fill Level
If you are not satisfied with the level that your
Ecosmart fills to on AUTO WATER LEVEL, you
can alter the fill level that Auto will select.
If you feel there is too much water, you can
decrease the fill level that will be selected.
1.
Enter the Option Adjustment Mode.
2.
Use the CYCLE buttons to decrease the
amount of water selected.
3.
Press POWER to store your selection.
Out of Balance Recovery Options
Regular
Light on = automatic recovery
Light off = machine stops
Auto Water Level Adjustment
Light on
FAVOURITE = less water
PERM. PRESS = less water
WOOL = less water
DELICATE = less water
HEAVY DUTY = factory setting
If you feel that there is not enough water for the load, we recommend that you check by
pausing the machine and pushing the clothes down to see how much spare water is at the
bottom of the wash basket. Clothes often float and your Ecosmart can sense the water under
the clothes. Failing this, you might like to select a higher water level manually.
28

Changing Pre-Set Options
EN
End of Cycle Beeps
The beeps signaling the end of the cycle can be
increased or decreased.
1.
Enter the Option Adjustment Mode.
2.
Use the WASH OPTION button to select the number
of beeps you prefer.
3.
Press POWER to store your selection.
Default Rinse Option
The normal rinse on the Regular and Heavy Duty
cycles is a Shower Rinse. When you select Softener
Rinse on these cycles the rinse changes to the
default rinse. The default rinse is the rinse option
used on the Wool, Delicate and Permanent Press
cycles. The default rinse is a spray rinse followed by
a deep rinse. However you can change the default
rinse to two deep rinses.
1.
Enter the Option Adjustment Mode.
2.
Use the SPIN SPEED buttons to select the rinse option you prefer.
3.
Press POWER to store your selection.
Volume of Water used in the Shower Rinse
(Regular cycle)
You can increase or decrease the volume of water
added during the shower rinse on the Regular cycle.
1.
Enter the Option Adjustment Mode.
2.
Use the WATER LEVEL buttons to select the volume of
water you wish to be used in the shower rinse.
3.
Press POWER to store your selection.
Number of Beeps
Light on
TIME SAVER =15 beeps
SOAK =5 beeps
SOFTENER RINSE = no beeps
Rinse Option
Light on 1st rinse 2nd rinse
MED spin deep
SLOW spin – –
HOLD spray
Shower Rinse Volume
Light on
HIGH = more water
MED = more water
LOW = FA CT OR Y SETTING
rinse
rinse
deep
rinse
deep
rinse
Controlled Cold
Ecosmart is designed for installations that have both
hot and cold water. To ensure optimum performance
even in very cold weather, the cold water temperature
is controlled to 60˚F. However if for some reason you
do not have hot water available you may need to
change to uncontrolled cold in very cold weather.
Ecosmart leaves the factory with the Controlled Cold Option set. You can change this by
entering the Option Adjustment mode and by pressing the ADVANCE button once.
Controlled Cold Options
Light color
green =controlled cold
amber = uncontrolled cold
29

Caring For Your Ecosmart
Care and Cleaning
When you have finished
Turn off the faucets to prevent any chance of
flooding should a hose burst.
Unplug the machine from the wall socket.
Cleaning your Ecosmart
Clean with a soft damp cloth and wipe dry.
Do not use chemical or scouring cleaners as they can
damage the paint and plastic surfaces.
You can remove the lid for cleaning. Open the lid fully,
hold one side with one hand and gently tap the other
side with an upward motion.
To replace the lid, hold the lid vertically and align
both hinges before pushing down firmly.
To remove the agitator for cleaning, unscrew the nut down
the center of the agitator by turning counter-clockwise.
CAUTION!
The agitator must be fully pushed on to the shaft when refitting.
Tighten the plastic nut firmly by hand. Ensure the agitator is not loose.
Cleaning the Fabric Softener Dispenser
When using fabric softener, rinse your dispenser at
the end of each wash, using warm soapy water.
Separate the cup from the dispenser body by
pushing downwards on the base of the cup.
Cleaning the Inside of your Ecosmart
You can program a hot wash into your Favorite cycle
to thoroughly clean your machine.
1.
Press POWER button.
2.
Press and hold the Favorite cycle button until you
hear two quick beeps and the Favorite light flashes.
3.
Select the Permanent Press cycle.
4.
Select a hot wash.
5.
Press Favorite again to store the selection.
6.
The Ecosmart will then fill with hot water and do a hot wash. It’s a good idea to clean the machine
using this cycle without clothes and a couple of cups of powered detergent, every few weeks.
30
Push cup through
dispenser with thumb

Caring For Your Ecosmart
Products that Might Damage your Ecosmart Autowasher
Concentrated bleaches, diaper sanitizers and hydrocarbon solvents (eg gasoline and paint
thinners) can cause damage to the paintwork and components of your autowasher. (Do not
wash or dry garments stained with these solvents as they are flammable).
Do not use pre-treatment sprays or liquids on or near your autowasher as they can damage your
machine’s control panel.
Use of dyes in your autowasher may cause staining of the plastic components. The dye will not
damage the machine but we suggest you thoroughly clean your autowasher afterwards. We do
not recommend the use of dye strippers in your autowasher.
Ecosmart Sounds and Beeps
Your Ecosmart will make sounds that you will not have
heard from other autowashers.
During drain you will hear the pump of your machine
turn on and off quickly about every 10 seconds. This is
part of your Ecosmart’s automatic lint removal system.
While draining your machine may give several low thuds.
Your machine is checking that the water has drained
before spinning.
Your Ecosmart will beep at the end of the cycle or if you
have used Spin Hold or Soak.
If your machine is beeping continuously or giving a
musical series of beeps refer to page 32.
EN
Automatic Lint System
Your Ecosmart has a self cleaning lint system. It automatically separates the lint from the wash
water, trapping the lint between the inner basket and outer tub and flushing it out at the end of
the wash.
31

Before You Call For Service
Please read the following pages before calling for service.
You can correct many of your machine’s problems using the checklists on the following pages.
Your machine is capable of diagnosing its own problems. If it has a problem it will beep and
display a message telling you what is wrong.
If Your Ecosmart Beeps For Help
Musical series of beeps* every 5 seconds and...
* The beeps are the same sound your washer makes when you plug your machine in.
HOT water temperature light is flashing.
Hot faucet has not been turned on.
Inlet hose screens may be blocked.
Hot water supply is not hot enough to maintain the wash temperature you have selected. Select a
lower wash temperature.
Inlet hoses connected the wrong way around.
COLD water temperature light is flashing.
Cold faucet has not been turned on.
Inlet hose screens may be blocked.
Inlet hoses connected the wrong way around.
Cold water temperature exceeds recommended limits.
HOT and COLD water temperature lights are flashing.
The faucets have not been turned on.
Inlet hose screens may be blocked.
The drain hose is too low and the water is siphoning out of the machine.
The flow rate of the supply water is too slow.
HIGH water level light is flashing.
The machine is overloaded and can not agitate. Ensure the machine is stationary. Remove items
until the remaining ones can move freely.
Select a higher water level.
First RINSE light or SPIN light is flashing.
The machine has a suds build-up. (Too much detergent may have been used for the amount of soil
in the load). Wait for suds to dissolve. Rinse clothes using a deep rinse.
32

If your Ecosmart Beeps For Help
First RINSE or SPIN light is flashing as well as the SPIN SPEED light.
Wash load is out of balance. Ensure the machine is stationary. Manually redistribute the load. Check
machine is level. (Refer to Installation Instructions pages 8– 9).
Lid Lock light is flashing.
Make sure the lid is closed.
Press START/PAUSE (refer to page 17).
Single beep every second and...
The pattern of lights is unfamiliar.
1.
Unplug machine from the wall. Wait 60 seconds, plug back in and operate machine.
2.
If the fault re-occurs repeat step 1.
3.
If the machine still will not work, look below for service contacts.
If the problem persists refer to the service contacts below.
(Before calling for help please locate the serial number of your washer on its back top left
corner).
EN
Service
For your local Fisher & Paykel Authorized Service Agent please call TOLL FREE
888 9FNP USA (888 936 7872) Canada also, or contact us through our web site:
www.fisherpaykel.com
Note: Proof of purchase is required for any warranty claim. For your records we suggest you
attach your proof of purchase here.
33

Operating Problems
Pressing POWER does not turn the machine on.
Is the power switched on?
Unplug machine from the wall. Wait 60 seconds, plug back in and operate the machine.
Could your household power supply be at fault? Try plugging in another electrical appliance.
Pressing START / PAUSE does not start the fill.
Are both hot and cold faucets turned on?
Are the inlet hose screens blocked?
Is Delay Start on?
FILLING continuously.
Check that the machine is not siphoning.
Check the black hose guide is installed.
NOT SPINNING properly.
Is the load out of balance? (refer pages 23 and 28).
Check the machine is level and does not rock.
It may have suds build-up (refer spin light flashing, page 32).
SPIN SPEED sounds slower than it should.
The clothes are unevenly distributed in the wash basket, your Ecosmart has compensated by
lowering the spin speed.
Machine is continually going OUT OF BALANCE.
Check the machine is level and does not rock, and has rubber feet fitted.
Too much water for load (page 20).
Too much or too little water when filling on AUTO WATER LEVEL.
It may still be in the process of sensing the water level. (Refer to page 20).
Some loads do not suit Auto water level eg pillows, bedding, large bulky items. Manually select the
water level.
Refer to pages 26 to 28 to adjust the Auto fill level.
NOISES.
Banging – The load is out of balance (refer page 23).
Other noises – refer page 31.
SMALL PUDDLE of water coming from under the machine.
The water level is too high for the amount of clothes. This has caused excessive splashing. Use a
lower water level.
Large bulky garments (eg pillows, comforters) can cause splashing. (Wash on Delicate cycle.)
If the problem persists refer to the service contacts on page 33.
(Before calling for help please locate the serial number of your washer on its back top left
corner).
34

Wash Problems
WRINKLING.
Overloading the washer or dryer.
Choose a Permanent Press or Delicate cycle as these cycles have been designed to minimize
wrinkles.
Try selecting a slower spin speed.
Do not leave wet clothes to sit in the washer or laundry basket.
POOR SOIL REMOVAL.
Not enough detergent for load size or amount of soil.
White clothes are better washed separately. Separate light and heavily soiled items, as clothes can
pick up soil from dirty wash water.
Select the wash temperature according to soil type. For example, blood and mud are better washed
in cold water, while oily soils wash better in warmer water.
Overloading the washer.
Loads made up of articles of varying sizes will wash better (eg full loads of sheets may not wash
as well).
Hard water requires more detergent than soft water.
LINTING.
Wash lint givers eg towels, flannel sheets, separately from lint collectors eg synthetic fabrics.
Overloading the washer.
Not enough detergent to hold the lint in suspension.
Overdrying in a dryer can cause a build-up of static electricity in synthetic fabrics and cause them to
attract lint.
RESIDUE DETERGENT.
Overloading the washer.
Try using less detergent.
Some detergents need to be pre-dissolved, check the detergent instructions.
Cold ambient temperatures, cold washes or short agitation times may not let the detergent dissolve
properly. Try pre-dissolving the detergent.
BLACK MARKS on clothes.
A build-up caused by the interaction of fabric softener and detergent can flake off and mark clothes.
(Refer to Scrud page 25).
Insufficient detergent, for the amount of soil on the clothes, can result in black marks on clothes.
DYE TRANSFER.
Wash and dry non-colorfast clothes separately.
Non-colorfast clothes left sitting in a washer or laundry basket can transfer dye to other clothes.
TANGLING.
Washing with too much water (ie underloading) can cause the clothes to tangle around one
another.
Do not load the washer by wrapping clothes around the agitator.
EN
35

Limited Warranty
When you purchase any new Fisher & Paykel Whiteware Product for personal or consumer use
you automatically receive a two year Limited Warranty covering parts and labor for servicing
within the 48 mainland United States, Hawaii, Washington D.C and Canada. In Alaska the
Limited Warranty is the same except that you must pay to ship the Product to the service shop
or the service technician’s travel to your home. Products for use in Canada must be purchased
through the Canadian distribution channel to ensure regulatory compliance.
If the Product is installed in a motor vehicle, boat or similar mobile facility, you receive the same
two year Limited Warranty, but you must bring the vehicle, boat or mobile facility containing the
Product to the service shop at your expense or pay the service technician’s travel to the location
of the Product.
Fisher & Paykel undertakes to:
Repair without cost to the owner either for material or labor any part of the Product, the serial
number of which appears on the Product, which is found to be defective. In Alaska, you must
pay to ship the Product to the service shop or for the service technician’s travel to your home.
If the Product is installed in a motor vehicle, boat or similar mobile facility, you must bring it to
the service shop at your expense or pay for the service technician’s travel to the location of the
Product. If we are unable to repair a defective part of the Product after a reasonable number of
attempts, at our option we may replace the part or the Product, or we may provide you a full
refund of the purchase price of the Product (not including installation or other charges).
This warranty extends to the original purchaser and any succeeding owner of the Product for
products purchased for ordinary single-family home use.
All service under this Limited Warranty shall be provided by Fisher & Paykel or its Authorized
Service Agent during normal business hours.
How long does this Limited Warranty last?
Our liability under this Limited Warranty expires TWO YEARS from the date of purchase of the
Product by the first consumer.
Our liability under any implied warranties, including the implied warranty of merchantability (an
unwritten warranty that the Product is fit for ordinary use) also expires ONE YEAR (or such longer
period as required by applicable law) from the date of purchase of the Product by the first
consumer. Some states do not allow limitations on how long an implied warranty lasts, so this
limit on implied warranties may not apply to you.
36

Limited Warranty
This Warranty does not cover:
A
Service calls that are not related to any defect in the Product. The cost of a service call will be
charged if the problem is not found to be a defect of the Product. For example:
1. Correct faulty installation of the Product.
2. Instruct you how to use the Product.
3. Replace house fuses, reset circuit breakers, correct house wiring or plumbing, or replace
light bulbs.
4. Correct fault(s) caused by the user.
5. Change the set-up of the Product.
6. Unauthorized modifications of the Product.
7. Noise and vibration that is considered normal eg drain sounds, regeneration noises and
user warning beeps.
8. Correcting damage caused by pests eg. rats, cockroaches etc.
B
Defects caused by factors other than:
1. Normal domestic use or
2. Use in accordance with the Product’s User Guide.
C
Defects to the Product caused by accident, neglect, misuse, fire, flood or Act of God.
D
The cost of repairs carried out by non-authorized repairers or the cost of correcting such
unauthorized repairs.
E
Travel Fees and associated charges incurred when the product is installed in a location with
limited or restricted access. (i.e. airplane flights, ferry charges, isolated geographic areas).
F
Normal recommended maintenance as set forth in the Product’s User Guide.
EN
If you have an installation problem contact your dealer or installer. You are responsible for
providing adequate electrical, exhausting and other connection facilities.
We are not responsible for consequential or incidental damages (the cost of repairing or
replacing other property damaged if the Product is defective or any of your expenses caused if
the Product is defective). Some states do not allow the exclusion or limitation of incidental or
consequential damages, so the above limitation or exclusion may not apply to you.
How to get Service
Please read your User Guide. If you then have any questions about operating the Product,
need the name of your local Fisher & Paykel Authorized Service Agent, or believe the Product is
defective and wish service under this Limited Warranty, please contact your dealer or call us at:
TOLL FREE
or contact us through our web site: www.usa.fisherpaykel.com
You may be required to provide reasonable proof of the date of purchase of the Product before
the Product will be serviced under this Limited Warranty.
1-888-9-FNP-USA (1-888-9-367-872) Canada also
37

Limited Warranty
Commercial use
If you are using the Product in a commercial setting (any use other than a single family dwelling),
we agree to repair or replace, without cost to you for parts only, any defective parts, the serial
number of which appears on the Product. Our liability for these repairs expires ONE YEAR from
the date of original purchase.
At our option we may replace the part or the Product, or we may provide you a full refund of
the purchase price of the Product (not including installation or other charges). All service under
this Limited Warranty shall be provided by Fisher & Paykel or its Authorized Service Agent during
normal business hours.
No other Warranties
This Limited Warranty is the complete and exclusive agreement between you and Fisher & Paykel
regarding any defect in the Product. None of our employees (or our Authorized Service Agents)
are authorized to make any addition or modification to this Limited Warranty.
Warrantor: Fisher & Paykel Appliances, Inc.
If you need further help concerning this Limited Warranty, please call us at the above number,
or write to:
Fisher & Paykel Appliances, Inc.
27 Hubble, Irvine, CA 92618
This Limited Warranty gives you specific legal rights, and you may also have other rights which
vary from State to State.
38


Table des matières
Instructions d’installation
Importantes consignes de sécurité
Démarrage
A propos de votre Ecosmart
Verrouillage du couvercle 52
Cycles et options de lavage
Les Cycles de lavage 53
Rinçage avec adoucissant, Tremper, Gain de temps 54
Niveaux d’eau 55
En attente, Départ différé, Recommandations de lavage 56
Avant le lavage
Triage et chargement du lave-linge 57
Eau de Javel 58
Adoucissant 58
Dépôt collant 58
Entretien de votre Ecosmart
Entretien et nettoyage 59
Produits susceptibles d’endommager votre machine Ecosmart 60
Signaux et bips sonores du lave-linge Ecosmart 60
Système anti-peluche automatique 60
En cas de signal sonore d’appel à l’aide
Service à la clientèle
Problèmes de fonctionnement
Problèmes de lavage
Garantie limitée
41
47
50
61
62
63
64
65
FR
40

Instructions d’installation
Avant de commencer, lisez ces instructions attentivement et dans leur
intégralité.
DANGER
Risque d’électrocution
Suivez les CONSIGNES DE SÉCURITÉ décrites dans le mode
d’emploi pages 47 à 49 avant d’utiliser cet appareil.
Le manquement à ces consignes peut provoquer des incidents
graves tel que: électrocution.incendie.blessures.décès.
Important!
Respectez tous les codes et règlements en vigueur.
Conditions d’installation
Lieu d’installation
La laveuse doit être installée sur un sol ferme afin de minimiser les vibrations pendant les cycles
d’essorage. Un sol en béton est préférable, mais une base en bois est suffisante tant que le
support du sol est conforme aux normes nationales.
Il est recommandé de ne pas installer la laveuse sur un tapis et de la mettre à l’abris des
intempéries.
FR
Plomberie
Te mpérature de l’eau
Il est recommandé de conserver votre eau froide à une température inférieure à 35°C (95°F) et
votre eau chaude à une température inférieure à 65°C (150°F).
Des températures au-delà de ces marges pourraient endommager votre laveuse.
Robinets de contrôle
Votre buanderie devrait disposer de robinets de contrôle d’entrée d’eau tant pour l’eau chaude
que pour l’eau froide.
Tuy au d’écoulement
L’eau peut être écoulée par un tuyau vertical ou dans une cuve de lavage. Le diamètre interne
du tuyau vertical doit être de 38mm minimum et doit être ouvert à l’air.
Électricité
Cet appareil doit être branché sur une prise électrique de 110 - 120V, 60Hz, et reliée à un circuit
individuel de mise à terre et protégé par un circuit de 15 -20 ampères ou encore un dispositif de
surcharge.
41

Instructions d’installation
Spécifications
Espace de dégagement
du couvercle
Hauteur
Extrémité du tuyau
du côté laveuse
Extrémité du tuyau
du côté robinet
Hauteur du
tuyau vertical
850mm-1980mm
1
/2” - 78”)
(33
Laisser de
l’espace pour
pieds
ajustables
Profondeur
Dimensions
Modèle Tous les modèles
Profondeur 251/2” (650mm)
1
Largeur 25
Hauteur totale 40”- 41
Hauteur avec dégagement du couvercle 55”- 563/4” (1400-1440mm)
42
/2” (650mm)
3
/4” (1020-1060mm)
Largeur
Pression d’arrivée d’eau
max 150 psi,
minimum 5 psi

Instructions d’installation
Étape 1
Enlever l’emballage du bas
1.
Enlever l’emballage extérieur.
2.
Basculez la machine vers l’arrière et faites-la pivoter sur
un coin pour la dégager de l’emballage plastique du bas.
Celui-ci peut alors être enlever.
AT TENTION!
Mettre la machine en marche sans avoir enlever
l’emballage du bas risque d’endommager la machine.
Étape 2
Enlever l’emballage du tambour et les
accessoires
1.
Soulevez le couvercle et enlever l’emballage en carton
situé sous le couvercle.
2.
Conservez l’emballage du bas et du tambour au cas où
vous en auriez besoin pour un déplacement futur.
3.
Enlever les tuyaux, les accessoires et le kit d’installation.
Le kit d’installation contient :
4 lames de caoutchouc pour les cales à poser sous la
machine
1 guide de tuyau d’écoulement
Étape 3
Tuy au d’écoulement
1.
Tirez de l’arrière de la laveuse la partie exposée du tuyau
vers le bas, puis dégagez-le avec précaution.
2.
Le guide du tuyau est utilisé pour guider le tuyau
d’écoulement dans la cuve de lavage ou le tuyau vertical.
Il est impératif que vous le fixiez au tuyau d’écoulement.
Pour prévenir tout siphonnement, le tuyau d’écoulement
ne doit pas dépasser de l’extrémité du guide de plus de
20mm. Si nécessaire, le tuyau d’écoulement peut être
raccourci.
3.
Installez le tuyau d’écoulement dans la cuve de lavage
ou introduisez-le dans le tuyau vertical.
Emballage du
tambour
Faites glisser le
tuyau le long
du guide
20mm
3
(
/4”)
FR
Note:
Dans les apartements à plusieurs niveaux ou à étages, la
machine pourra être installée à tout niveau où se trouve
un système d’évacuation des eaux.
Vérifiez que la cuve ou le tuyau vertical ne soient pas
obstrués par la charpie ou tout autre élément.
Pour les installations au sous-sol, la hauteur du tuyau ne
doit pas excéder 78”; 1980mm. (1980mm; 78”)
43

Instructions d’installation
Étape 4
Tuy aux d’arrivée d’eau
1.
Installez l’extrémité à bout droit des tuyaux (avec
filtres) sur les robinets.
2.
Installez les extrémités en coude sur la laveuse (les
valves d’arrivée sont indiquées au dos de la machine
H=chaud, C=froid).
Note: S’il n’y a qu’un robinet d’eau froide, un
bouchon de valve d’arrivée (disponible auprès de
Fisher & Paykel) DOIT être fixé à la valve d’arrivée
d’eau chaude. Le bouchon empêche les fuites de la
valve d’eau chaude. Une connexion à l’eau froide est
nécessaire.
Étape 5
Mettre la laveuse de niveau
1.
Insérez les quatres cales sur les pieds à la base de la
laveuse (voir diagramme 1).
2.
Placez la laveuse dans sa position finale. Nous
suggérons un espace de dégagement minimal de
25mm de chaque côté pour faciliter l’installation
(voir diagramme 2).
3.
Ouvrez les robinets et vérifiez que les tuyaux ne
fuient pas. Vérifiez également que les tuyaux ne
sont pas entortillés.
4.
Il est IMPORTANT de niveler la laveuse pour garantir
un essorage optimal.
1. Extrémité du
tuyau côté
robinet
Pieds ajustables
Cales en caoutchouc
Diagramme 1
25mm 25mm
2. Extrémité du
tuyau côté
laveuse
Veillez à ce que les cales en caoutchouc soient
insérées dans les pieds ajustables à la base de la
laveuse. Ajustez les pieds en les dévissant/revissant
pour vous assurer que la laveuse soit niveler et ne se
balance pas.
5.
Guidez-vous sur les murs de la pièce , ainsi qu’avec
les plans de travail adjacents pour vous assurer
que la laveuse soit droite. Réajustez les pieds si
nécessaire.
6.
Veuillez tester la machine en cycle.
7.
Ouvrez le couvercle et vérifiez le tambour de la
laveuse pour vous assurer qu’il est bien centré et
légèrement vers l’avant (Voir diagramme 3).
44
Ajustement
incorrect
Diagramme 2
Ajustement
correct
Diagramme 3

Instructions d’installation
8.
Fermez le couvercle. Vérifiez de vue que le couvercle et le haut de la machine s’alignent.
Si le couvercle et le haut de la machine ne sont pas alignés comme l’indique le diagramme
coché, réajustez l’un des pieds jusqu’à ce qu’ils le soient.
Alignement du
couvercle
Dévisser le pied
gauche pour
l’ajuster
Couvercle
Haut de la
machine
Haut de la
machine
Dévisser le pied
droit pour
l’ajuster
Haut de la
machine
Couvercle
Couvercle
Étape 6
Mise en marche
1.
Ouvrez les robinets. Vérifiez qu’il n’y ait pas de fuite et que le bruit, la vibration et les
températures de l’eau soient correctes. Vérifiez également que l’essorage fonctionne
correctement. Vérifiez que le couvercle se bloque pendant l’essorage.
2.
Fermez les robinets d’eau chaude et d’eau froide et lorsque la laveuse n’est pas en fonction.
Instructions particulières
1.
Il est possible que la laveuse émette des signaux d’avertissement lorsque la pression de l’eau est
trop basse ou que l’eau n’est pas évacuée convenablement. Consultez ‘En cas de signal d’appel à
l’aide’ (page 61).
FR
Pour toute aide supplémentaire concernant cet appareil, référez-vous au paragraphe Service,
page 62.
45

Instructions d’installation
Conditions spéciales pour les installations en alcôve ou placard
L’espace de dégagement minimal de ventilation entre la laveuse et les murs ou autres surfaces
adjacents est de :
25mm (1”) de chaque côté et devant
75mm (3”) à l’arrière
Note: les espaces de dégagement mentionnés ici
sont minimum. Veuillez considérer qu’un plus grand
espace pourra être nécessaire pour l’installation et
l’entretien.
L’espace vertical minimal du sol au plafond, ou
étagères, cabinets etc. situés au-dessus de la machine,
est de 15cm (59”).
388 cm
2
Le placard doit être équipé de portes persiennes
ou d’un autre système de ventilation. L’espace de
ventilation des portes doit être d’au moins 388 cm
pour une laveuse, et d’au moins 776 cm
distribué, pour une laveuse et une sécheuse.
2
, également
2
Portes à persiennes pour une
laveuse et une sécheuse
388 cm
2
AT TENTION!
N’installez pas cet appareil dans un placard équipé d’une porte sans ventilation.
Installation dans des maisons mobiles
L’ installation doit être conforme aux NORMES POUR LES MAISONS MOBILES, ANSI A119.1 et à la
LOI NATIONALE SUR LES NORMES DE CONSTRUCTION ET DE SÉCURITÉ DES MAISONS MOBILES DE
1974 (PL93-383).
Instructions de mise à la terre
Cet appareil doit être branché à une prise de terre. En cas de disfonctionnement ou de panne,
la mise à la terre réduira le risque d’électrocution en déviant le courant électrique vers un trajet
de moindre résistance. Cet appareil est équipé d’un cordon avec un conducteur de protection et
une prise mâle de mise à la terre. Cette prise doit être branchée dans une prise femelle adéquate
correctement installée et mise à la terre conformément aux codes et règlements locaux.
DANGER!
Le branchement inadéquat d’un conducteur de protection peut créer un risque d’électrocution.
Vérifiez auprès d’un électricien certifié que l’appareil est indubitablement mis à la terre.
Ne modifiez pas la prise fournie avec l’appareil. Si celle-ci n’est pas compatible avec la prise
femelle, faites-en installer une adéquate par un électricien certifié.
Ces spécifications sont susceptibles de changer sans pré-avis.
46

Importantes consignes de sécurité
Veuillez lire toutes les informations sur la sécurité avant l’utilisation
De nombreux lave-linge sont installés dans les maisons à proximité d’un sèche-linge ou d’un
chauffe-eau au gaz.
DANGER
Risque d’incendie
Pour votre sécurité, les informations contenues dans ce manuel
doivent être respectées afin de minimiser les risques d’incendie
ou d’explosion et d’éviter tout dommage matériel, toute
blessure corporelle ou décès.
Ne pas conserver ou utiliser d’essence ou d’autres liquides et
vapeurs inflammables à proximité du lave-linge ou de tout
autre appareil.
L’installation et l’entretien devront être confiés à un
installateur, une agence de maintenance ou une compagnie de
gaz certifié.
Si vous sentez le gaz :
NE PA S essayer d’allumer un quelconque appareil.
NE PA S toucher d’interrupteur électrique ; ne pas utiliser le téléphone du domicile.
Evacuer toutes les personnes de la pièce, du bâtiment.
Prendre immédiatement contact avec la compagnie de gaz en utilisant le téléphone d’un voisin.
Suivre les instructions de la compagnie de gaz.
Si vous ne pouvez pas contacter la compagnie de gaz, appeler les pompiers.
FR
Sécurité - chauffe-eau
Il est possible dans certaines conditions que de l’hydrogène soit produit dans un chauffe-eau
non utilisé pendant deux semaines ou plus.
LE GAZ HYDROGENE EST UN GAZ EXPLOSIF EN PRESENCE DE CES CIRCONSTANCES
Si l’eau chaude n’a pas été utilisée pour deux semaines ou plus, nous vous recommandons
vivement d’ouvrir tous les robinets d’eau chaude et de les laisser couler pendant plusieurs
minutes avant d’utiliser tout appareil électrique raccordé au système d’eau chaude afin d’éviter
tout dommage matériel ou blessure corporelle. Cela permettra à tout gaz hydrogène de
s’échapper. Dans la mesure où le gaz est inflammable, ne pas fumer ou utiliser de flamme nue
ou d’appareil pendant ce processus.
.
47

Importantes consignes de sécurité
DANGER
Risque d’électrocution
Suivez les consignes de sécurité décrites dans le mode d’emploi.
Le manquement à ces consignes peut provoquer des incidents
tel que: électrocution, des blessures corporelles, ou le décès.
Précautions de sécurité :
Lire toutes les instructions avant d’utiliser l’appareil.
Utiliser uniquement cet appareil conformément à son utilisation prévue comme décrit dans ce
manuel d’utilisation et d’entretien.
Il est impératif que ce lave-linge soit correctement installé et positionné en conformité avec les
instructions d’utilisation avant son utilisation.
Relier correctement l’appareil à la terre conformément à tous les codes et réglementations.
Suivre les conseils donnés dans les instructions d’utilisation.
Ne pas installer ou entreposer le lave-linge dans un endroit où il sera exposé à des températures
en-dessous de zéro ou aux conditions climatiques.
Le raccorder à un circuit électrique de puissance nominale correcte, bien protégé et de capacité
appropriée pour éviter toute surcharge électrique.
Le raccorder à des installations d’évacuation et de plomberie adéquates comme décrit dans les
instructions d’utilisation.
Fermer les robinets d’eau lorsque le lave-linge n’est pas utilisé pour limiter la pression sur les
tuyaux et valves et minimiser les fuites dans le cas où une valve ou un tuyau viendrait à casser
ou rompre.
Ne pas réparer ou remplacer une quelconque pièce de l’appareil ni entreprendre une
quelconque tâche de maintenance à moins que cela ne soit spécifiquement recommandé dans
ce manuel d’utilisation et d’entretien ou dans les instructions de réparations publiées destinées à
l’utilisateur que vous comprenez et pour lesquelles vous êtes qualifié.
Lors du débranchement de l’appareil, tirer depuis la prise et non sur le cordon ou le point de
raccordement du cordon pour éviter d’endommager le cordon ou le point de raccordement de
la prise du cordon.
Vérifier que le cordon soit positionné de manière à ce que personne ne marche dessus, trébuche
dessus et vérifier qu’il ne risque pas d’être soumis à tout endommagement ou charge.
Garder tous les produits de blanchisserie (comme les détergents, l’eau de Javel, les adoucissants,
etc.) hors de la portée des enfants, de préférence dans un placard fermant à clé. Respecter tous
les avertissements sur les étiquettes des emballages pour éviter toute blessure corporelle.
Ne pas trafiquer les boutons et touches de commande.
Garder la zone autour et sous votre appareil dégagée de toute accumulation de matériaux
inflammables, tels que les peluches, le papier, les chiffons, les produits chimiques, etc.
Garder le sol autour de l’appareil propre et sec pour éviter de glisser.
48

Importantes consignes de sécurité
Ne jamais essayer d’attraper quelque chose dans le lave-linge si le tambour ou l’agitateur sont
en mouvement.
Avant d’ouvrir le couvercle, de décharger ou d’ajouter des vêtements, appuyer sur la touche
MARCHE/PAUSE et attendre que la machine soit complètement arrêtée avant de soulever le
couvercle.
Une étroite surveillance est recommandée si cet appareil est utilisé par ou à proximité d’enfants.
Ne pas laisser les enfants jouer à l’intérieur de cet appareil, ni jouer avec cet appareil ou tout
autre appareil remisé.
Vous séparer de manière appropriée de tout appareil mis de côté pour le rebut et des matériaux
d’emballage/d’expédition. Avant de mettre au rebut un lave-linge ou de le mettre hors service,
retirer le couvercle du lave-linge.
Ne pas laisser le couvercle relevé pendant le cycle. Cela arrêtera le remplissage et l’essorage et
empêchera de terminer le cycle. Pour redémarrer l’appareil, rabaisser le couvercle et appuyer sur
MARCHE/PAUSE.
Ne pas laver ou sécher des articles ayant été nettoyés avec, lavés dans, mis à tremper dans ou
tachés de substances explosives ou inflammables (comme la cire, l’huile, la peinture, l’essence,
les produits dégraissant, les solvants de nettoyage à sec , le kérosène, etc.) pouvant s’enflammer
ou exploser. Ne pas ajouter ces substances à l’eau de lavage. Ne pas utiliser ces substances
autour de votre lave-linge et/ou sèche-linge pendant l’utilisation, car ils dégagent des vapeurs
pouvant s’enflammer ou exploser.
Le processus de blanchisserie peut réduire le degré ignifuge des tissus. Pour éviter un tel résultat,
les instructions de nettoyage du fabriquant du vêtement devront être suivies attentivement.
Ne pas mélanger d’eau de Javel à base de chlorure avec de l’ammoniaque ou des acides tels
que le vinaigre et/ou des agents antirouille. Le mélange peut dégager un gaz toxique pouvant
entraîner la mort.
Ne jamais grimper sur ou vous tenir debout sur le dessus du lave-linge ou le couvercle du lavelinge.
Ne pas laver d’articles en fibre de verre dans votre lave-linge. Vous risquez de provoquer une
irritation cutanée à partir des particules restantes qui pourront être récupérées par les vêtements
au cours des prochaines utilisations du lave-linge.
Pour minimiser les risques d’électrocution, débrancher l’appareil de la prise électrique et
déconnecter le lave-linge du panneau de distribution de la maison en retirant les fusibles
ou en déconnectant le disjoncteur avant d’entreprendre tout travaux de maintenance ou de
nettoyage.
REMARQUE : En appuyant sur le bouton PUISSANCE, vous ne coupez PAS l’appareil de
l’alimentation électrique, même si tous les témoins sont éteints.
Ne pas utiliser cet appareil s’il a été endommagé, en cas de mauvais fonctionnement, s’il est
partiellement démonté ou en cas de pièces manquantes ou cassées, y compris une prise ou un
cordon endommagé(e).
Ne pas utiliser cet appareil si le couvercle n’a pas été correctement remis en place.
Si vous utilisez une rallonge ou un dispositif de prise électrique portable (comme par exemple
une boîtes à prises de courant multiples), vérifier qu’il soit positionné de manière à ne pas entrer
en contact avec de l’eau ou l’humidité.
FR
VEUILLEZ CONSERVER CES INSTRUCTIONS
49

Démarrage
Retirer le dispensateur à adoucissant.
Repartir de manière égale la charge autour de l’agitateur.
A. Detergent
Suivre les instructions sur la charge de lessive.
Utiliser le repère sur l’agitateur, se rapprochant
le plus du haut du niveau de la charge, comme
guide pour déterminer et verser la quantité de
détergent à utiliser.
Verser le détergent au centre de la tige de
l’agitateur.
Ne pas oublier de remettre en place le
dispensateur à adoucissant car il empêche
les articles de tomber au centre de l’agitateur.
D
B. Eau de javel
Si vous voulez utiliser de l’eau de Javel :
Utiliser la moitié de la dose recommandée
d’eau de Javel.
Diluer l’eau de Javel et la verser doucement
dans le tube intérieur de la tige du tambour,
aligné avec les ailettes (vous référer à la section
Eau de Javel à la page 58).
Sélectionner l’option Rinçage avec adoucissant.
Cela permet à tout résidu d’eau de Javel d’être
évacué de votre lave-linge.
50
E

C. Adoucissant
Si vous voulez utiliser un adoucissant, le verser
dans le dispensateur à adoucissant en haut de
l’agitateur.
Sélectionner l’option Rinçage avec adoucissant
de manière à ce que l’adoucissant soit
correctement déversé dans l’eau du rinçage final
(vous référer à la section Adoucissant aux pages
54 et 58).
D. Puissance
Démarer votre lave-linge Ecosmart en appuyant sur la touche PUISSANCE.
E. Cycle de lavage
Refermer le couvercle et sélectionner votre cycle de lavage.
F. Options de lavage
Sélectionner la température de lavage et les autres options de lavage (vous référer aux
pages 53 à 56).
FR
G
F
G. Mise en marche
Appuyer sur la touche MARCHE/PAUSE pour mettre en marche la machine.
Si vous voulez arrêter votre lave-linge Ecosmart
Appuyer sur la touche MARCHE/PAUSE.
Attendre que la machine soit complètement arrêtée et que le témoin de sécurité du
couvercle soit éteint avant d’ouvrir le couvercle.
Nous vous recommandons de retirer vos vêtements dès la fin du cycle pour respecter la
couleur et éviter d’endommager les tissus
51

A propos de votre Ecosmart
Verrouillage du couvercle
Votre lave-linge Ecosmart est équipé d’un système de sécurité
avec verrouillage du couvercle. Grâce à cette fonction, le
couvercle ne pourra pas être ouvert pendant les phases
dangereuses du cycle d’où une sécurité accrue pour vous et les
membres de votre famille.
Le témoin de sécurité du couvercle (situé au-dessus de la
touche Marche/Pause s’allume lorsque le couvercle est verrouillé pour vous indiquer que vous
ne pouvez pas ouvrir le couvercle.
Si le témoin de sécurité du couvercle clignote, cela signifie que le verrouillage du couvercle est
en phase de verrouillage ou de déverrouillage. Pendant cette phase, vous ne pouvez toujours
pas soulever le couvercle.
Garder les enfants à l’écart du lave-linge pendant la phase de remplissage et d’agitation du
cycle, notamment lorsque vous utilisez de l’eau chaude, car le couvercle peut être soulevé
sans que cela ne provoque l’arrêt du lave-linge.
Si le couvercle est laissé ouvert, le lave-linge ne pourra pas se verrouiller et le cycle sera arrêté.
La machine émettra un bip sonore et le témoin de sécurité du couvercle clignotera jusqu’à ce
que le couvercle soit rabattu et que vous appuyiez sur la touche MARCHE/PAUSE.
NE RIEN insérer dans la fente sur le plateau supérieur de votre
lave-linge. NE PAS essayer de désactiver le verrouillage du couvercle.
52

Cycles et options de lavage
Lavage Eco Actif
Durée d’agitation
Mouvement de lavage
Temp de lavage
Rinçage
Vitesse d’essorage
Durée de l’essorage
Rinçage par
jet d’eau froide
Rapide
Les Cycles de lavage
SALES
REGULIERS
FRAGILES
LAINE LAVABLE
SYNTHETIQUES
Sélectionner ce cycle de lavage pour les articles très sales et les tissus
résistants.
Sélectionner ce cycle de lavage pour les articles en coton légèrement à
moyennement sales, les vêtements de lin, les tenues de travail et tenues de
jeux.
Sélectionner ce cycle de lavage pour la lingerie et les tissus fragiles
nécessitant un nettoyage spécial et légèrement sales.
Cycle spécialement adapté aux articles de laine normalement sales et aux
vêtements de laine lavables en machine.
Cycle de lavage plus traditionnel pour les synthétiques, les mélanges et/ou
les tissus fragiles normalement sales et les vêtements se froissant facilement.
Sales
4 min
12 min
For t
Tiède
6 min
Réguliers
4 min
9 min
Régulier
Tiède
Rinçage par jet
d’eau froide
Rapide
6 min
Fragiles
4 min
6 min
Fragile
Tiède/froide
Rinçage par
vaporisation
+ rinçage en
profondeur à eau
froide
Lent
4 min
Laine Lavable
4 min
3 min
Fragile
Tiède/froide
Rinçage par
vaporisation
+ rinçage en
profondeur à eau
tiède/froide
Moyen
6 min
Synthétiques
-
9 min
Régulier
Tiède/froide
Rinçage par
vaporisation
+ rinçage en
profondeur à eau
froide
Lent
2 min
FR
53

Cycles et options de lavage
Rinçage avec adoucissant
Nous vous recommandons d’utiliser de préférence des
feuilles adoucissants pour sèche-linge dans la mesure où
les adoucissants liquides sont réputés pour provoquer une
accumulation désagréable à l’intérieur des lave-linge (vous
référer à la section Dépôt collant à la page 58).
Utiliser l’option RINÇAGE AVEC ADOUCISSANT :
Si vous utilisez un adoucissant liquide
Si vous utilisez de l’eau de Javel
Cette option change le rinçage pour inclure un rinçage en
profondeur et par vaporisation de manière à ce que l’adoucissant
soit réparti correctement et à ce que le carter de la machine soit
complètement nettoyé de toute eau de Javel restante.
Certaines charges sont mieux lavées en utilisant un cycle avec
rinçage en profondeur comme par exemple, les vêtements
fortement imprégnés de sable ou de sciure de bois ou les
vêtements qui déteignent. Nous vous recommandons de
sélectionner l’option RINÇAGE AVEC ADOUCISSANT pour ces
charges, car cette sélection changera le rinçage pour inclure un
rinçage en profondeur.
Tremper
Lorsque vous sélectionnez l’option TREMPER, votre lave-linge
Ecosmart s’arrêtera à la fin du lavage et laissera tremper le linge
pendant 2 heures avant de terminer le rinçage et l’essorage.
Pendant que le linge est laissé à tremper, votre lave-linge
déclenchera un mouvement d’agitation de quelques secondes
toutes les minutes.
Gain de temps
L’option GAIN DE TEMPS vous permet d’écourter le cycle de
lavage pour les vêtements légèrement sales. En sélectionnant
cette option, vous pouvez réduire le temps de lavage et la durée
de l’essorage.
L’option Gain de temps peut être activée ou désactivée à tout
moment pendant le cycle.
54

Cycles et options de lavage
Niveaux d’eau
Niveau d’eau automatique
Votre lave-linge Ecosmart peut sélectionner
automatiquement le niveau d’eau approprié à la charge de
linge.
1.
Mettre les vêtements dans le lave-linge et appuyer sur la
touche Puissance.
2.
Sélectionner le cycle de lavage (sélectionner le niveau d’eau
Auto si la sélection n’est pas automatique).
3.
Appuyer sur MARCHE/PAUSE.
Pendant le remplissage, la machine se mettra de temps à
autre en pause pour déterminer le niveau d’eau. La machine
vérifiera si le niveau d’eau est correct via une série de deux
temps d’agitation différents (cela prendra un peu plus d’une
minute). Si elle détecte un niveau d’eau insuffisant, elle
poursuivra le remplissage et vérifiera à nouveau le niveau.
Lors du lavage d’une charge inhabituelle comme par
exemple des vêtements volumineux, des oreillers, nous
vous recommandons de sélectionner manuellement le
niveau d’eau et de sélectionner le cycle Fragiles.
Sélectionner manuellement le niveau d’eau s’il y a déjà de
l’eau dans la machine.
Lors du lavage d’une charge volumineuse ou d’un seul
article volumineux (comme par exemple un édredon), tasser
la charge après le premier remplissage.
FR
Sélection manuelle du niveau d’eau
L’ agitateur se caractérise par cinq niveaux indiqués sur sa
tige et pouvant être utilisés pour vous aider à sélectionner
les niveaux d’eau appropriés. Sélectionner le niveau d’eau
approprié en utilisant le repère se rapprochant le plus du
haut du niveau des vêtements.
Les niveaux indiqués sur l’agitateur ne correspondent pas
exactement au niveau d’eau. Ils indiquent le niveau des
vêtements secs approprié au niveau d’eau.
Votre lave-linge Ecosmart pourra de temps à autre rajouter
de l’eau pendant la phase d’agitation afin de maintenir le
niveau d’eau à cause de la libération de l’air coincé dans les
vêtements.
Les charges non équilibrées, les vêtements entortillés et les
éclaboussures peuvent résulter de la sélection d’un niveau
d’eau trop élevé.
55

Cycles et options de lavage
En attente
Utiliser l’option EN ATTENTE pour :
Retirer des vêtements devant être étendus mouillés,
lesquels ont été lavés avec une charge mixte, avant la
phase d’essorage.
Minimiser le chiffonnage résultant des vêtements laissés
en attente dans la machine à la fin du cycle.
Lorsque l’option EN ATTENTE est sélectionnée, votre lave-
linge Ecosmart fera une pause à la fin du rinçage, émettra
un bip sonore et le témoin d’essorage clignotera pour
vous indiquer qu’il attend d’autres instructions. Appuyer
sur la touche MARCHE/PAUSE pour démarrer l’essorage.
Départ différé
L’option Départ différé vous permet de retarder le
démarrage du cycle de lavage de 1, 3 ou 9 heures.
Appuyer une fois sur la touche DÉPART DIFFÉRÉ pour
retarder le démarrage d’une heure, appuyer à nouveau
pour 3 heures et appuyer une troisième fois pour retarder
le démarrage de 9 heures (et appuyer une fois de plus
pour retourner à l’option normale).
Une fois que vous appuyez sur Départ différé, votre lavelinge Ecosmart commence la période de retardement et
vous n’avez pas à appuyer sur Marche/Pause.
Faire attention lorsque vous utilisez l’option Départ
différé pour les articles n’étant pas de bon teint car ils pourront déteindre si les vêtements sont
humides.
Votre lave-linge Ecosmart n’émettra pas de bip sonore à la fin du cycle si l’option Départ différé a
été sélectionnée.
Recommandations de lavage
Pour éviter d’abîmer accidentellement vos vêtements, certaines options ne seront pas acceptées
par votre lave-linge Ecosmart. Vous ne pouvez pas par exemple sélectionner un lavage à l’eau
chaude sur des cycles de lavage d’articles de laine, articles synthétiques ou articles fragiles.
56

Avant le lavage
Triage
Pour obtenir d’excellents résultats au lavage,
trier vos vêtements avant le lavage.
Couleur
Faire le tri entre les couleurs et le blanc.
Étiquettes d’entretien
L’étiquette d’entretien vous décrit le tissu du
vêtement et comment le laver.
Saleté
Trier les vêtements selon le type et le niveau de
saleté. Suivant le type de saleté, il est préférable
de laver à l’eau tiède comme par exemple
la saleté grasse tandis que d’autres se lavent
parfaitement bien à l’eau froide comme par
exemple le sang ou la boue.
Peluche
Laver séparément les vêtements ayant
tendance à faire des peluches des vêtements
ayant à l’inverse tendance à attirer les peluches.
Dans la mesure du possible, laver a l’envers
les vêtements ayant tendance à attirer les
peluches.
Producteurs de
peluches
Tissu éponge Synthétiques
Chenille Velours côtelé
Serviettes de
toilette
Lavage
à la main
Javel interdite
Sèche-linge
déconseillé
Repassage à fer
moyen
Nettoyage à sec
Ramasseurs de
peluches
Articles
synthétiques
Chaussettes
Chargement
Vérifier que les poches sont vides
Les choses laissées dans les poches peuvent endommager votre lave-linge et vos vêtements.
FR
Fermer les fermetures éclair, les crochets et œillets
prendront pas dans d’autres vêtements.
pour vous assurer qu’ils ne se
Réparer tout vêtement déchirés et recoudre les boutons lâches
Les trous et les déchirures pourront s’agrandir pendant le lavage. Retirer tous les supports lâches
dans les soutiens-gorge car ils risquent d’endommager votre lave-linge et/ou le sèche-linge.
Détacher au préalable toute tache
Vérifier que le niveau d’eau est approprie a la charge
Vérifier que la charge ne recouvre pas le dispensateur à adoucissant pour éviter toute
éclaboussure.
Pour un charge équilibrée :
Un mélange de petits articles et d’articles plus volumineux vous donnera de meilleurs résultats
au lavage.
Répartir fermement et de manière uniforme les vêtements dépliés autour de l’agitateur.
Ne pas envelopper les articles volumineux comme les draps autour de l’agitateur.
57

Avant le lavage
Eau de Javel
Vérifier l’étiquette d’entretien pour toute recommandation spéciale.
Eau de Javel liquide :
1.
Utiliser la moitié de la dose d’eau de Javel recommandée et la diluer
dans de l’eau.
2.
Retirer le dispensateur à adoucissant et verser l’eau de Javel dans
la tige de l’agitateur contre la paroi, alignée avec les ailettes.
Sélectionner la touche RINÇAGE AVEC ADOUCISSANT. Cela modifie
le rinçage pour retirer complètement tous les résidus d’eau de Javel.
3.
Ajouter le détergent et remettre en place le dispensateur à adoucissant.
4.
Pour un résultat optimum, ajouter le liquide javellisant après que les
deux premiers voyants lumineux de lavage ambres soient éteints.
Eau de Javel en poudre :
Verser la moitié de la dose d’eau de Javel en poudre recommandée dans l’agitateur avec votre
détergent.
Remarque : Ne jamais verser de solution de chlorure non diluée liquide directement sur les
vêtements, dans le panier à linge ou au centre de l’agitateur.
Adoucissant
L’ adoucissant se verse dans le dispensateur à adoucissant située en
haut de l’agitateur. La ligne tracée sur le dispensateur à adoucissant
sert de guide pour déterminer la quantité d’adoucissant à ajouter à
une machine pleine. Les charges plus petites nécessiteront moins
d’adoucissant.
Rinçage avec adoucissant
Si vous voulez utiliser de l’adoucissant lorsque vous utilisez les cycles
Réguliers ou Sales, vous devez impérativement sélectionner l’option
RINÇAGE AVEC ADOUCISSANT. Cela modifie l’option de rinçage pour
inclure un rinçage en profondeur de manière à ce que l’adoucissant
soit bien réparti.
Dépôt collant
Le dépôt collant correspond à l’accumulation paraffineuse provoquée par le mélange du
détergent et de l’adoucissant comme régulièrement observé dans les lave-linge. Cette
accumulation ne résulte pas d’une défaillance du lave-linge. Dans le cas où le dépôt collant ne
serait pas régulièrement retiré du lave-linge, cela risque de tacher vos vêtements ou de diffuser
une odeur désagréable dans votre lave-linge.
Si vous voulez utiliser de l’adoucissant, suivre nos recommandations :
Utiliser une petite quantité d’adoucissant.
Lorsque vous remplissez le dispensateur à adoucissant, éviter les éclaboussures et ne pas le
remplir jusqu’au rebord.
Nettoyer le dispensateur à adoucissant dès la fin du cycle.
Nettoyer votre lave-linge régulièrement (vous référer à la page 59).
Le lavage à l’eau froide augmente les risques d’accumulation. Nous vous recommandons
d’utiliser un cycle de lavage Synthétiques à intervalles réguliers, comme par exemple 1 fois tous
les 5 cycles de lavage.
Les adoucissants moins épais laissent moins de résidus dans le dispensateur à adoucissant et ne
58
contribuent donc pas à la création de l’accumulation du dépôt collant.

Entretien de votre Ecosmart
Entretien et nettoyage
Une fois que vous avez terminé
Fermer les robinets pour éviter tout risque d’inondation
dans le cas où un tuyau viendrait à éclater.
Débrancher le lave-linge de la prise murale.
Nettoyage du lave-linge Ecosmart
Le nettoyer avec un chiffon doux humide et l’essuyer
à sec. Ne pas utiliser de produits chimiques ni de
nettoyants à récurer au risque d’endommager les
surfaces en plastique et la peinture.
Vous pouvez retirer le couvercle pour le nettoyage. Ouvrir
complètement le couvercle, tenir un côté d’une main
tandis que de l’autre main vous retirez l’autre côté dans un
mouvement vers le haut.
Pour remettre en place le couvercle, tenir le couvercle à la
verticale et aligner les deux charnières avant de pousser
fermement pour l’enclencher.
Pour retirer l’agitateur pour le nettoyer, dévisser l’écrou en
bas au centre de l’agitateur en le tournant dans le sens
inverse des aiguilles d’une montre.
AT TENTION!
L’ agitateur doit être totalement poussé sur l’arbre lorsque vous le remettez en place.
Serrer fermement à la main l’écrou. Vérifier que l’agitateur n’est pas lâche.
Nettoyage du dispensateur à adoucissant
Lorsque vous utiliser de l’adoucissant, rincer le dispensateur
à adoucissant à la fin de chaque cycle de lavage avec
de l’eau tiède savonneuse.
Séparer la coupelle du dispensateur en poussant à la
base de la coupelle.
FR
Nettoyer l’intérieur du lave-linge Ecosmart
Vous pouvez programmer un cycle de lavage à l’eau
chaude à votre cycle de lavage préféré pour nettoyer
complètement votre machine.
1.
Appuyer sur la touche PUISSANCE.
2.
Appuyer et maintenir enfoncée la touche du cycle Préféré
jusqu’à ce que vous entendiez deux courts bips sonores et
que le témoin Préféré clignote.
3.
Sélectionner le cycle Synthétiques.
4.
Sélectionner un lavage à l’eau chaude.
5.
Appuyer à nouveau sur la touche Préféré pour sauvegarder la sélection.
6.
Le lave-linge Ecosmart se remplira ensuite d’eau chaude et fera un cycle de lavage à l’eau
chaude. Nous vous recommandons vivement de nettoyer le lave-linge en utilisant ce cycle à
vide et deux mesures de lessive en poudre de temps à autre.
pousser la coupelle avec
votre pouce pour la faire
ressortir le dispensateur.
59

Entretien de votre Ecosmart
Produits susceptibles d’endommager votre machine Ecosmart
Les solutions javellisées concentrées, les produits désinfectants de couches pour enfants et les
solvants à base d’hydrocarbure (comme par ex l’essence et les diluants de peinture) peuvent
endommager la peinture et les composantes de votre lave-linge. (Ne pas laver ou faire sécher
des vêtements tachés avec ces solvants car ils sont inflammables).
Ne pas utiliser des aérosols ou liquides de détachage sur ou à proximité de votre lave-linge car ils
risquent d’endommager le panneau de commande du lave-linge.
L’utilisation de produits de teinture dans votre lave-linge risque de tacher les composants en
plastique. La teinture n’endommagera pas la machine mais nous vous suggérons de nettoyer
complètement votre machine lorsque vous avez terminé.
Nous vous déconseillons l’utilisation de décapants de
teinture dans votre lave-linge.
Signaux et bips sonores du lave-linge
Ecosmart
Votre lave-linge Ecosmart émettra des bips sonores que
vous n’aurez jamais entendu auprès d’autres lave-linge.
Pendant l’évacuation de l’eau vous entendrez la
pompe de la machine se mettre en marche et s’arrêter
rapidement toutes les 10 secondes environ. Cela fait
partie du système de retrait automatique des peluches
du lave-linge Ecosmart.
Pendant l’évacuation de l’eau votre machine émettra
plusieurs courts bruits sourds. Votre machine vérifie tout
simplement que l’eau a été évacuée avant de procéder à
l’essorage.
Votre lave-linge Ecosmart émettra un bip sonore à la fin du cycle ou si vous avez utilisé l’option
Tremper ou En attente.
Si votre machine continue d’émettre des bips sonores ou une série musicale de bips, vous référer
à la page 61.
Système anti-peluche automatique
Votre lave-linge Ecosmart se caractérise par un système anti-peluche autonettoyant. Il sépare
automatiquement les peluches de l’eau du lavage en piégeant les peluches entre les bacs
intérieurs et extérieurs et en les évacuant à la fin du cycle de lavage.
60

Avant d’appeler le service d’entretien
Veuillez lire les pages suivantes avant d’appeler le service d’entretien.
Vous pouvez remédier à un grand nombre de problèmes par vous-même en suivant les
instructions décrites dans les pages suivantes.
Votre machine est capable de diagnostiquer ses propres problèmes. En cas de problème, elle
émettra un signal sonore et affichera un message vous indiquant ce qui ne fonctionne pas.
En cas de signal sonore d’appel à l’aide
Série de plusieurs signaux sonores* toutes les 5 secondes et…
* Note : Cette série de signaux sonores est la même que celle que votre laveuse émet lorsque
vous la branchez à la prise électrique.
Le témoin de température d’eau CHAUDE clignote.
Le robinet d’eau chaude n’a pas été ouvert.
Il est possible que les tamis du tuyau d’arrivée soient bloqués.
L’eau chaude tirée n’est pas suffisamment chaude pour maintenir la température de lavage
sélectionnée. Sélectionner une température de lavage inférieure.
Tuyaux d’arrivée raccordés à l’envers.
Le témoin de température d’eau FROIDE clignote.
Le robinet d’eau chaude n’a pas été ouvert.
Il est possible que les tamis du tuyau d’arrivée soient bloqués.
Tuyaux d’arrivée raccordés à l’envers.
La température de l’eau froide excède les limites recommandées.
Les témoins d’eau FROIDE et d’eau CHAUDE clignotent.
Les robinets n’ont pas été ouverts.
Il est possible que les tamis du tuyau d’arrivée soient bloqués.
Le tuyau d’évacuation est trop bas et l’eau sort en siphon de la machine.
Le débit d’arrivée d’eau est trop faible.
Le témoin de niveau d’eau ELEVÉ clignote.
La machine est surchargée et ne peut pas être agitée. Vérifier que la machine ne bouge pas. Retirer
des articles jusqu’à ce que les articles restants puissent bouger librement.
Sélectionner un niveau d’eau supérieur.
Le témoin de premier RINÇAGE ou le témoin ESSORAGE clignote.
Accumulation de lessive de savon dans la machine (trop de détergent a été utilisé par rapport au
niveau de saleté de la charge). Attendre la dissolution de l’accumulation. Rincer les vêtements en
utilisant un rinçage en profondeur.
FR
61

En cas de signal sonore d’appel à l’aide
Le témoin de premier RINÇAGE ou le témoin ESSORAGE clignote ainsi que le témoin
VITESSE ESSORAGE.
Charge déséquilibrée. Vérifier que la machine ne bouge pas. Répartir manuellement la charge.
Vérifier que la machine est bien en équilibre.
Le témoin de sécurité du couvercle clignote.
Vérifier que le couvercle est fermé.
Appuyer sur MARCHE/PAUSE (vous référer à la page 52).
Un seul bip émis toutes les secondes et ...
Les témoins clignotent d’une manière inhabituelle.
1.
Débrancher la machine de la prise murale. Attendre 60 secondes et la rebrancher avant de faire
fonctionner la machine.
2.
Si le problème se reproduit, répétez l’étape 1.
3.
Si la machine ne fonctionne toujours pas, contactez votre service clientèle le plus proche (voir
liste ci-dessous).
Si le problème persiste, contactez votre service d’entretien le plus proche (voir ci-dessous).
(Avant d’appeler, veuillez identifier le numéro de série de votre laveuse situé au coin arrière
gauche de la machine).
Service à la clientèle
Pour contacter votre plus proche agent agréé de service à la clientèle Fisher & Paykel, appelez
LE NUMERO GRATUIT 888 9FNP USA (888 936 7872), depuis le Canada également, ou contacteznous par le biais de notre site internet :
www.fisherpaykel.com
Note : une preuve d’achat vous sera demandée pour toute demande de remboursement ou
réparation. Nous vous recommandons d’agrafer votre preuve d’achat à cette page pour ne pas
l’égarer.
62

Problèmes de fonctionnement
La machine ne se met pas en marche après avoir appuyé sur PUISSANCE
Vérifier que l’alimentation est sous tension.
Débrancher la machine de la prise murale. Attendre 60 secondes avant de la rebrancher et de faire
fonctionner la machine.
Vérifier que l’alimentation électrique de la maison n’est pas défaillante. Essayer de brancher un autre
appareil électroménager.
Le remplissage ne se fait pas après avoir appuyé sur MARCHE/PAUSE
Vérifier que les robinets d’eau froide et d’eau chaude sont ouverts.
Vérifier que les tamis du tuyau d’arrivée ne sont pas bloqués.
Vérifier que l’option DÉPART DIFFÉRÉ n’a pas été enclenchée.
REMPLISSAGE en continu
Vérifier que la machine ne siphonne pas.
Vérifier que le guide du tuyau noir est installé.
Mauvais ESSORAGE
Charge déséquilibrée.
Vérifier si la machine est en équilibre et qu’elle ne bascule pas.
Accumulation de lessive de savon possible (vous référer à la section Témoin d’essorage clignotant à la
page 61).
VITESSE D’ESSORAGE plus lente que d’habitude
Répartition inégale des vêtements dans le panier de lavage, votre lave-linge Ecosmart compense en
réduisant la vitesse d’essorage.
La machine est en permanence DÉSÉQUILIBRÉE
Vérifier l’équilibrage de la machine et vérifier qu’elle ne bascule pas et que les patins en caoutchouc ont
été installés.
Trop d’eau pour la charge (page 55).
Niveau d’eau insuffisant ou trop élevé lors du REMPLISSAGE EN AUTOMATIQUE
La machine est en train de déterminer le niveau d’eau (vous référer à la page 55).
Certaines charges ne conviennent pas à la fonction du niveau d’eau en automatique comme les oreillers, le
linge de couchage, les articles très volumineux. Sélectionner manuellement le niveau d’eau.
BRUITS
Claquement – la charge est déséquilibrée.
Autres bruits – vous référer à la page 60.
Petite FLAQUE D’EAU venant de dessous la machine
Le niveau d’eau est trop élevé pour la charge résultant en des éclaboussures excessives. Utiliser un niveau
d’eau inférieur.
Les articles très volumineux (comme les oreillers et les édredons) peuvent provoquer des éclaboussures
(les laver sur le cycle Fragiles).
Si le problème persiste, contactez votre service d’entretien le plus proche (voir page 62).
(Avant d’appeler, veuillez identifier le numéro de série de votre laveuse situé au coin arrière
gauche de la machine).
FR
63

Problèmes de lavage
Linge FROISSÉ
Machine ou sèche-linge trop chargé.
Sélectionner un cycle Fragiles ou Synthétiques dans la mesure où ces cycles ont été conçus pour limiter au
minimum le problème du linge froissé.
Sélectionner une vitesse d’essorage plus lente.
Ne pas laisser le linge mouillé en attente dans le lave-linge ou le panier à linge.
Retrait médiocre de la SALETÉ
Quantité de détergent insuffisante pour la charge ou le niveau de saleté.
Le blanc est mieux lavé séparément. Faire le tri entre les articles légèrement sales et les articles très sales
car les vêtements peuvent récupérer la saleté de l’eau de lavage sale.
Sélectionner la température de lavage en fonction du type de saleté. Le sang et la boue partent mieux par
exemple à l’eau froide tandis que la saleté grasse requiert un lavage à l’eau tiède.
Lave-linge surchargé.
Les charges se composant d’articles de différentes tailles se lavent mieux (par ex des charges de draps
uniquement pourront ne pas donner un excellent résultat).
L’eau dure requiert plus de détergent que l’eau douce.
PELUCHE
Laver séparément les articles ayant tendance à pelucher comme les serviettes de toilette, les draps en
flanelle des articles ayant tendance à attirer les peluches comme les tissus synthétiques.
Lave-linge surchargé.
Quantité de détergent insuffisante pour maintenir les peluches en suspension.
Le séchage excessif en sèche-linge peut provoquer une accumulation d’électricité statique dans les tissus
synthétiques et faire qu’ils attirent les peluches.
RÉSIDUS DE DÉTERGENT
Lave-linge surchargé.
Essayer d’utiliser moins de détergent.
Certains détergents doivent être dissous au préalable, vérifier le mode d’emploi sur le paquet de détergent.
Il est possible que les températures ambiantes froides, les lavages à l’eau froide et les temps d’agitation
réduits ne permettent pas au détergent de se dissoudre complètement. Essayer de dissoudre le détergent
au préalable.
MARQUES NOIRES sur les vêtements
Une accumulation causée par l’interaction de l’adoucissant et du détergent peut s’émietter et tacher les
vêtements (vous référer à la section Dépôt collant à la page 58).
Une quantité de détergent insuffisante pour le niveau de saleté sur les vêtements peut laisser des taches
noires sur les vêtements.
TRANSFERT DE TEINTURE
Laver et sécher séparément les vêtements n’étant pas de bon teint.
Les vêtements n’étant pas de bon teint qui sont laissés en attente dans le lave-linge ou le panier à linge
peuvent déteindre sur d’autres vêtements.
Linge ENTORTILLÉ
Le lavage avec trop d’eau (c’est-à-dire en sous charge) peut faire entortiller les vêtements les uns avec les autres.
64
Ne pas charger le lave-linge en enroulant les vêtements autour de l’agitateur.

Garantie limitee
Lorsque vous achetez un nouvel appareil électroménager Fisher & Paykel pour une utilisation
ménagère, vous recevez automatiquement une Garantie limitée de deux ans couvrant les pièces
de rechange et la main d’œuvre pour le service dans les 48 états du continent américain, Hawaï,
Washington D.C. et au Canada. Eu égard à l’Alaska, la Garantie limitée est identique sauf que vous
devez prendre en charge les frais d’expédition du Produit jusqu’au service clientèle ou prendre
en charge les frais de déplacement du technicien de maintenance jusqu’à votre domicile. Les
Produits destinés à être utilisés au Canada doivent être achetés par l’intermédiaire de la chaîne
de distribution canadienne pour garantir la conformité avec la réglementation en vigueur.
Si le Produit est installé dans un véhicule automobile, sur un bateau ou sur une unité mobile
similaire, vous bénéficiez de la même Garantie limitée de deux ans, mais il relève de votre
responsabilité d’amener le véhicule, bateau ou l’unité mobile dans laquelle est installé le
Produit au service après-vente à vos frais ou de prendre en charge les frais de déplacement du
technicien de maintenance jusqu’au lieu où se trouve le Produit.
Fisher & Paykel s’engage à :
Réparer sans frais encourus sur le propriétaire en termes de main d’œuvre ou de matériau
une quelconque partie du Produit, dont le numéro de série se trouve sur le Produit, s’avérant
défectueuse. Eu égard à l’Alaska, vous devez prendre en charge les frais d’expédition du Produit
jusqu’au service clientèle ou prendre en charge les frais de déplacement du technicien de
maintenance jusqu’à votre domicile. Si le Produit est installé dans un véhicule automobile, sur un
bateau ou sur une unité mobile similaire, il relève de votre responsabilité d’amener le véhicule,
bateau ou l’unité mobile dans laquelle est installé le Produit au service après-vente à vos frais ou
de prendre en charge les frais de déplacement du technicien de maintenance jusqu’au lieu où
se trouve le Produit. Si nous ne pouvons pas réparer une pièce défectueuse du Produit après un
nombre raisonnable de tentatives, nous procéderons au remplacement de la pièce ou du Produit
ou nous vous proposerons de vous rembourser intégralement le prix d’achat du Produit (frais
d’installation et autres frais étant exclus), selon notre choix.
Cette garantie s’étend à l’acheteur original et à tout propriétaire successeur du Produit pour les
Produits achetés pour toute utilisation ménagère par une seule famille.
Le service en vertu de cette Garantie limitée devra être assuré par Fisher & Paykel ou par son
agent agréé pendant les heures normales de bureau.
FR
Durée de cette Garantie limitée
Notre responsabilité en vertu de cette Garantie limitée expire DEUX ANS après la date d’achat
du Produit par le premier consommateur. Notre responsabilité en vertu de toutes garanties
implicites, y compris la garantie implicite de qualité marchande (une garantie implicite selon
laquelle le Produit est adapté à toute utilisation ordinaire) expire également UN AN (ou durée
supérieure comme requis par la loi en vigueur) à compter de la date d’achat du Produit par le
premier consommateur. Certains états n’autorisent pas les limitations sur la durée de la garantie
implicite, il est donc possible que les limitations sur les garanties implicites ne vous concernent
pas.
65

Garantie limitee
Cette garantie ne couvre pas les points suivants :
A
Les déplacements d’un technicien de maintenance jusqu’à votre domicile pour tout problème
non lié à un défaut dans le Produit. Les frais du déplacement vous seront facturés si le problème
s’avère ne pas être un défaut du Produit. Par exemple :
1. Rectifier une mauvaise installation du Produit.
2. Vous expliquer comment utiliser le Produit.
3. Remplacer les fusibles de la maison ou procéder au réglage des disjoncteurs, refaire le
câblage ou la plomberie de la maison ou remplacer les ampoules.
4. Rectifier les défaillances provoquées par l’utilisateur.
5. Rectifier le réglage du Produit.
6. Modifications non autorisées du Produit.
7. Bruit ou vibrations considérés comme normaux, par exemple, bruits de tuyauterie, bruits de
régénération ou sonneries d’avertissement destinées à l’utilisateur.
8. Réparations des dommages provoqués par des animaux nuisibles comme les rats ou les
cafards, etc.
B
Défauts causés par des facteurs autres que :
1. L’utilisation ménagère normale ou
2. L’utilisation en conformité avec le manuel d’utilisation du Produit.
C
Les défaillances du Produit causées par accident, la négligence, une mauvaise utilisation,
l’incendie, l’inondation ou une catastrophe naturelle.
D
Les frais des réparations effectuées par des réparateurs non agréés ou les frais associés à la
correction de telles réparations non autorisées.
E
Les frais de déplacement et frais associés encourus lorsque le Produit est installé dans un
endroit disposant d’un accès limité ou restreint (par ex frais d’avions, frais de ferry et zones
géographiques isolées).
F
La maintenance recommandée normale comme énoncée dans le manuel d’utilisation du
Produit.
En cas de problème avec l’installation, prenez contact avec votre revendeur ou installateur.
Les raccordements électriques et d’évacuation et autres raccordements relèvent de votre
responsabilité.
Nous ne sommes pas responsable des dommages indirects (les frais des réparations ou les
frais de remplacement d’autres propriétés endommagées si le Produit est défectueux ou vos
dépenses encourues si le Produit est défectueux). Certains états n’autorisent pas l’exclusion ou la
limitation des dommages indirects, il est donc possible que la limitation ou l’exclusion ci-dessus
ne s’applique pas à votre situation.
66

Garantie limitee
Comment solliciter le service clientèle ?
Veuillez lire le manuel d’utilisation. Si après la lecture du manuel, vous avez toujours des
questions sur le fonctionnement du Produit, ou si vous avez besoin de connaître le nom de votre
représentant Fisher & Paykel agréé local ou si vous pensez que le Produit est défectueux et que
vous souhaitez contacter le service clientèle dans le cadre de cette Garantie limitée, veuillez
prendre contact avec votre revendeur ou nous appeler au numéro suivant :
1-888-9-FNP-USA (1-888-9-367-872) – Canada également – ou nous contacter sur notre site
Internet : www.usa.fisherpaykel.com
Il est possible qu’il vous soit demandé de fournir une preuve valable de la date d’achat du
Produit avant que le Produit puisse être accepté par le service clientèle en vertu de cette
Garantie limitée.
Utilisation commerciale
Si vous utilisez le Produit dans un environnement commercial (toute autre utilisation que
l’utilisation par une unité familiale simple), nous nous engageons à réparer ou remplacer, sans
frais de pièces uniquement, les pièces défectueuses dont le numéro de série figure su le Produit.
Notre responsabilité eu égard à ces réparations expire UN AN à compter de la date d’achat
originale.
Selon notre choix, nous procéderons au remplacement de la pièce ou du Produit ou nous vous
proposerons de vous rembourser intégralement le prix d’achat du Produit (frais d’installation et
autres frais étant exclus). Le service en vertu de cette Garantie limitée devra être assuré par Fisher
& Paykel ou par son agent agréé pendant les heures normales de bureau.
Aucune autre garantie
Cette Garantie limitée constitue l’intégralité de l’accord exclusif passé entre l’acheteur et Fisher
& Paykel eu égard à toute défaillance du Produit. Aucun de nos employés (ou de nos agents
agréés) n’est autorisé à procéder à un quelconque ajout ou à une quelconque modification de
cette Garantie limitée.
Garant : Fisher & Paykel Appliances, Inc.
Si vous avez besoin d’assistance eu égard à cette Garantie limitée, veuillez nous contacter au
numéro ci-dessus ou nous écrire à l’adresse ci-dessous :
Fisher & Paykel Appliances, Inc.
27 Hubble, Irvine, CA 92618
FR
Cette Garantie limitée vous donne des droits juridiques spécifiques et il est également possible
que vous bénéficiez d’autres droits pouvant varier d’un état à un autre.
67

Copyright Reserved © Fisher & Paykel 2004.
The product specifications in this booklet apply to
the specific products and models described at the
date of issue. Under our policy of continuous product
improvement, these specifications may change at any
time. You should therefore check with your Customer
Care Center to ensure this booklet correctly describes
the product currently available.
Tous droits réservés © Fisher & Paykel 2004.
Les spécifications du produit présenté dans ce livret
s’appliquent aux produits et modèles spécifiquement
décrits à la date de publication. En accord avec notre
politique d’amélioration continue de nos produits,
ces spécifications sont susceptibles de changer à
tout moment. Veuillez donc vérifier auprès de votre
centre de service à la clientèle que ce livret décrit
correctement le produit disponible actuellement.
www.fisherpaykel.com
English/French
User Guide
Published: 07/2004
Translated: 07/2004
Part No. 420653
68
 Loading...