


TECHNICAL MANUAL
RESPIRATORY HUMIDIFIERS
MODELS:
MR730
MR720
MR700
MR480
Revision F
Issued March 2001
Fisher & Paykel Healthcare Ltd
Auckland, New Zealand

ii
National Office:
Fisher & Paykel Healthcare Ltd
P.O. Box 14348, Panmure
Auckland, New Zealand
Telephone: +64-9-574 0100
Facsimile: +64-9-574 0158
Technical Manual for Respiratory Humidifier
MR730 Dual Servo
MR720 Dual Servo (anaesthesia)
MR700 Dual Servo
MR480 Single Servo
Fisher & Paykel Healthcare have a policy of continued product improvement and reserve the right to alter specifications
without notice.
Revision F changes,
Section Description of Change
6.0 Routine Performance test shortened (Dynamic test removed).
7.33 Software Compatability Updated
8.10 Spares list additions
9.0 Change history updated
Appendix B Maintenance Schedule Changed for Temperature Probes
Appendix D Cleaning Procedures Rewritten
Appendix E Dynamic performance check made an optional extra
Ref. 185040646 *MR730/720/700/480 Technical Manual ¯ Revision F ¯ Issued March 2001

iii
CONTENTS PAGE
1.0 MR700 SERIES GENERAL SPECIFICATIONS................................................................................1
1.1 Electrical Specifications ................................................................................................................................................................1
1.1.1 Models MR730/720/700...................................................................................................................................................1
1.1.2 Model MR480....................................................................................................................................................................1
1.1.3 Common Electrical Specifications (All Models) ...........................................................................................................1
1.2 Standards and Approvals................................................................................................................................................................1
1.3 Temperature Control......................................................................................................................................................................1
1.4 Temperature Sensing.....................................................................................................................................................................1
1.5 Temperature Display......................................................................................................................................................................2
1.6 Glossary of Abbreviations..............................................................................................................................................................2
2.0 OPERATING CONTROLS AND MODES ..........................................................................................3
2.1 Adjustable Controls ........................................................................................................................................................................3
2.1.1 Airway Temperature Control..........................................................................................................................................3
2.1.2 Chamber Control (Heater Wire On Mode Only)..........................................................................................................3
2.2 Push Switches..................................................................................................................................................................................3
2.2.1 Mute Button......................................................................................................................................................................3
2.2.2 Chamber Temp Button.....................................................................................................................................................3
2.2.3 Standby Button (MR700/720/730 only) .........................................................................................................................4
2.2.4 Heater Wire Switch (MR720, MR730 only) ...................................................................................................................4
2.3 Power Up Sequences .......................................................................................................................................................................4
2.3.1 Version 1.0 Software.........................................................................................................................................................4
2.3.2 Version 2.0 and Version 3.0 Software ............................................................................................................................4
2.4 Heater Wire On Mode (All models except MR480)..................................................................................................................4
2.5 MR730/720 in Heater Wire Off Mode and MR480..................................................................................................................4
2.6 Warm Up Mode.................................................................................................................................................................................5
2.6.1 Warm up mode exiting conditions (low temperature alarm enabled):.......................................................................5
2.6.2 MR720 (Version 2.0, 3.0 Software).................................................................................................................................5
2.7 Standby Mode....................................................................................................................................................................................5
2.7.1 MR700/MR730 (All software versions), MR720 (Version 1.0 Only).........................................................................5
2.7.2 MR720 Standby Mode (Version 2.0 and 3.0 software only)......................................................................................5
3.0 ALARMS AND INDICATORS.............................................................................................................6
3.1 Temperature Probe Alarm .............................................................................................................................................................6
3.2 Alarms In Heater Wire Mode (MR700/720/730 only).............................................................................................................6
3.2.1 Heater Wire Alarm............................................................................................................................................................6
3.2.2 Airway temperature High Alarm .....................................................................................................................................6
3.2.3 Airway temperature Low Alarm ......................................................................................................................................6
3.2.4 Chamber Temp High Alarm.............................................................................................................................................7
3.2.5 Chamber Temp Low Alarm activation...........................................................................................................................7
3.2.6 Set Low Warning..............................................................................................................................................................7
3.3 Temperature Alarms in Non Heater Wire Mode (includes MR480).....................................................................................7
3.3.1 Heater Wire Alarm............................................................................................................................................................7
3.3.2 Airway Temperature High Alarm...................................................................................................................................7
3.3.3 Airway Temperature Low Alarm....................................................................................................................................7
3.4 Audio Alarm.....................................................................................................................................................................................8
3.5 Safety Protection (All Models)......................................................................................................................................................8
3.5.1 Temperature Deviations..................................................................................................................................................8
3.5.2 Microprocessor Watch Dog...........................................................................................................................................8
Ref. 185040646 *MR730/720/700/480 Technical Manual ¯ Revision F ¯ Issued March 2001

iv
4.0 CIRCUIT OPERATION.........................................................................................................................9
4.1 Introduction......................................................................................................................................................................................9
4.2 Control Board..................................................................................................................................................................................9
4.2.1 Control Thermistors.........................................................................................................................................................9
4.2.2 Input Analog Switches U8 and U9................................................................................................................................9
4.2.3 Analog to Digital Converter U10 b,d,e..........................................................................................................................9
4.2.4 Processor Control U3.......................................................................................................................................................9
4.2.5 Power Line Interrupt (Revisions D/F PCBs) ...............................................................................................................10
4.2.6 Power Line Interrupt (Revision H PCB and later)......................................................................................................10
4.2.7 41 °C Comparator ............................................................................................................................................................10
4.2.8 Heaterplate Overtemperature........................................................................................................................................10
4.2.9 Watch Dog......................................................................................................................................................................10
4.3 Power Board...................................................................................................................................................................................11
4.3.1 Revision D/F PCBs.........................................................................................................................................................11
4.3.2 Revision H AND J PCBs ...............................................................................................................................................11
4.4 Probe Temperature versus Thermistor Resistance...............................................................................................................11
5.0 CALIBRATION ....................................................................................................................................12
5.1 Introduction....................................................................................................................................................................................12
5.2 Equipment Required ......................................................................................................................................................................12
5.3 Calibration Procedure for Models with Revision D PCBs or earlier..................................................................................12
5.4 Calibration Procedure for Models with Revision F PCBs or later......................................................................................12
6.0 PERFORMANCE CHECK..................................................................................................................14
6.1 Introduction....................................................................................................................................................................................14
6.2 Performance Check MR730/720/700......................................................................................................................................14
6.2.1 Equipment Setup Notes:................................................................................................................................................14
6.2.2 Setup................................................................................................................................................................................14
6.2.3 Temperature Control Check MR700/720/730..............................................................................................................14
6.2.4 Alarms check MR700/720/730......................................................................................................................................15
6.3 Performance Check (MR480)....................................................................................................................................................15
6.3.1 Equipment Required.......................................................................................................................................................15
6.3.2 Setup................................................................................................................................................................................15
6.3.3 Temperature Control Check (MR480)..........................................................................................................................15
6.3.4 Alarms check - MR480...................................................................................................................................................16
6.4 Dual Probe Temperature Test....................................................................................................................................................16
6.4.1 Equipment Required.......................................................................................................................................................16
6.4.2 Test Procedure................................................................................................................................................................16
7.0 SERVICING INFORMATION............................................................................................................17
7.1 Introduction....................................................................................................................................................................................17
7.2 Printed Circuit Board Removal..................................................................................................................................................17
7.2.1 Control PCB.....................................................................................................................................................................17
7.2.2 Power PCB.......................................................................................................................................................................17
7.3 COMPATABILITY.......................................................................................................................................................................17
7.3.1 Hardware compatability.................................................................................................................................................17
7.3.2 MR480 Transformers .....................................................................................................................................................18
7.3.3 Software compatability..................................................................................................................................................18
7.4 Heaterplate .....................................................................................................................................................................................18
7.4.1 Heaterplates with screw-in standoffs..........................................................................................................................19
7.5 Fault Location................................................................................................................................................................................19
7.6 Screw Torque Settings.................................................................................................................................................................19
Ref. 185040646 *MR730/720/700/480 Technical Manual ¯ Revision F ¯ Issued March 2001

v
8.0 SCHEMATICS, PART LISTS AND MECHANICAL DRAWINGS................................................20
8.1 MR700 Series Circuit Layout Block Diagram......................................................................................................................20
8.2 Component Layout - Revision H and J PCB.............................................................................................................................21
8.3 Component Layout - Revision F PCB........................................................................................................................................22
8.4 Link Pad Locations for Programming Control Options - Revision H and J PCB............................................................23
8.5 Circuit Diagrams - Revision H and J PCB Control PCB ...................................................................................................25
8.6 Circuit Diagrams - Revision H and J PCB Power PCB......................................................................................................26
8.7 Circuit Diagrams - Revision F PCB Control PCB..............................................................................................................27
8.8 Circuit Diagrams - Revision F PCB Power PCB ................................................................................................................28
8.9 Electrical Parts List .....................................................................................................................................................................29
8.9.1 Control Board Components: (Revision h and later PCBs) ........................................................................................29
8.9.2 Power Board Components: (Revision h and later PCBs)..........................................................................................31
8.10 Mechanical Parts List.................................................................................................................................................................32
8.10.1 MR480 Mechanical Parts...............................................................................................................................................32
8.10.2 Exploded Diagrams: MR480..........................................................................................................................................33
8.10.3 MR730/720/700 Mechanical Parts................................................................................................................................34
8.10.4 Exploded Diagrams: MR730/720/700............................................................................................................................36
8.10.5 Heaterplate Assembly Parts (MR730/720/700/480)...................................................................................................37
8.10.6 Exploded Diagrams:Heaterplate Assembly MR730/720/700/480 (Inverted View).................................................38
8.11 PCB Identification Diagram.......................................................................................................................................................39
8.12 Power PCB Harness Connection Diagram..............................................................................................................................40
9.0 PRODUCT CHANGE HISTORY........................................................................................................41
9.1 Model Number Explanation.........................................................................................................................................................42
9.2 Serial Number Explanation.........................................................................................................................................................42
APPENDIX A................................................................................................................................................43
A1 Calibration Mode ..........................................................................................................................................................................43
A2 Engineering Menu........................................................................................................................................................................43
A2.1 Engineering display functions: Heater Wire Mode...................................................................................................43
A2.2 Engineering Functions: Non Heater Wire Mode.......................................................................................................44
A2.3 Integral Display...............................................................................................................................................................44
A3 Programming Control Options..................................................................................................................................................44
A4 Error Codes ...................................................................................................................................................................................44
A5 MR700 Series Humidifier Serial Data Interface...................................................................................................................45
A5.1 Serial Data Format...........................................................................................................................................................45
A5.2 Status Information..........................................................................................................................................................45
A5.3 Remote Standby..............................................................................................................................................................46
A5.4 Serial Data Interface Connector ....................................................................................................................................47
APPENDIX B................................................................................................................................................48
B1 Maintenance Schedule.................................................................................................................................................................48
B1.1 Monthly ...........................................................................................................................................................................48
B1.2 Three Monthly................................................................................................................................................................48
B1.3 Annually ..........................................................................................................................................................................48
B1.4 Annually Or In Accordance With Relevant Country Regulations.........................................................................48
B2 Maintenance Schedule Checklist ..............................................................................................................................................49
APPENDIX C................................................................................................................................................50
C1 Troubleshooting Guide For The MR700 Series Respiratory Humidifiers .......................................................................50
C1.1 Low Temperature............................................................................................................................................................50
Ref. 185040646 *MR730/720/700/480 Technical Manual ¯ Revision F ¯ Issued March 2001

vi
C.1.2 High Temperature...........................................................................................................................................................51
C.1.3 Temperature Fluctuating...............................................................................................................................................51
C.1.4 Excessive Water In Circuit............................................................................................................................................51
C1.5 Low humidity..................................................................................................................................................................52
C1.6 Alarms ..............................................................................................................................................................................52
C1.7 Temperature display......................................................................................................................................................53
C1.8 Breathing circuit leak.....................................................................................................................................................53
C1.9 External water leak..........................................................................................................................................................53
C1.10 LED on.............................................................................................................................................................................53
C2 MR700 Series Fault Flow Chart For No Go Condition..........................................................................................................54
APPENDIX D...............................................................................................................................................55
D1 Cleaning of Humidifier Heater Bases.......................................................................................................................................55
D2 Cleaning of Airway Temperature Probes.................................................................................................................................55
APPENDIX E................................................................................................................................................56
e1 Additional Dynamic Performance Check of Humidifiers......................................................................................................56
E2 Performance Check MR730/720/700......................................................................................................................................56
E2.1 Equipment Setup............................................................................................................................................................56
E.2.2 Setup................................................................................................................................................................................56
E.2.3 Dynamic Test Sequence (MR730/720/700).................................................................................................................57
E.3 Performance Check (MR480)....................................................................................................................................................57
E.3.1 Equipment Setup............................................................................................................................................................57
E.3.2 Setup................................................................................................................................................................................58
E.3.3 Dynamic Test Procedure (MR480)...............................................................................................................................58
Ref. 185040646 *MR730/720/700/480 Technical Manual ¯ Revision F ¯ Issued March 2001

1
1.0 MR700 SERIES GENERAL SPECIFICATIONS_________________________
This documentation defines the technical specifications of the MR730, MR720, MR700 and MR480 respiratory
humidifiers, it also includes maintenance and repair procedures.
The MR730/720 models are Heated Wire humidifiers with the option of disabling the Heater Wire.
The MR720 has a lower alarm limit and an extended warmup mode for use in Anaesthesia.
The MR700 model is exclusively a Heated Wire humidifier.
The MR480 model is a non Heated Wire humidifier.
1.1 ELECTRICAL SPECIFICATIONS
1.1.1 MODELS MR730/720/700
Supply Voltage 230 ± 25 V
127 ± 12 V
115 V
100 ± 10 V
Supply Frequency 50 or 60 Hz
Supply Current 1.0 A maximum at 230 V
1.9 A maximum at 127 V
2.0 A maximum at 115 V
2.4 A maximum at 100 V
Heater Wire Capacity 60 W
1.1.2 MODEL MR480
Supply Voltage: 230 ± 25 V
115 V
100 ±10 V
Supply Frequency 50 or 60 Hz
Supply Current 0.7 A maximum at 230 V
1.4 A maximum at 115 V
1.6 A maximum at 100 V
1.1.3 COMMON ELECTRICAL SPECIFICATIONS (ALL MODELS )
Heaterplate Power 150 W
Heaterplate Overheat Protector Operates at 118 ± 6 °C
1.2 STANDARDS AND APPROVALS
Classification under: CSA-C22.2 No.125 , UL2601
IEC601-1, AS3200.1, EN60601-1
Class 1
Type B
Drip Proof
Continuous Operation
Not to be used in the presence of flammable anaesthetics.
1.3 TEMPERATURE CONTROL
PID (Proportional Integral Derivative) control of Heater Wire (in Heated Wire mode operation only) and heaterplate.
1.4 TEMPERATURE SENSING
Temperature measurement using standard characteristic thermistors (YSI 400 compatible) mounted in fast response
temperature probes, located at the patient end of the delivery tube and at the humidifying chamber outlet.
Ref. 185040646 MR730/720/700/480 Technical Manual ¯ Revision F ¯ Issued March 2001

1.5 TEMPERATURE DISPLAY
Three digit 14mm 7 segment LED (Light Emitting Diode) display.
Range 5.0 to 80.0 °C. Below 5.0 °C displays ‘Lo’. Above 80.0 °C displays ‘Hi’.
Accuracy 25.0 ± 0.3 °C to 45.0 ± 0.3 °C.
1.6 GLOSSARY OF ABBREVIATIONS
EOH The End Of Hose temperature.
OFFSET The temperature difference of the TOP from the SET.
SET The temperature Set potentiometer. Sets the controlling temperature of the EOH.
TOP The temperature at the Top of the humidification chamber.
RSD Remote Shut Down.
2
Ref. 185040646 MR730/720/700/480 Technical Manual ¯ Revision F ¯ Issued March 2001

3
2.0 OPERATING CONTROLS AND M ODES _____________________________
2.1 ADJUSTABLE CONTROLS
2.1.1 AIRWAY TEMPERATURE CONTROL
Selects the airway controlling temperature. The range of adjustment is from 31 to 40 °C over a linear scale marked in
degrees on the front panel.
The temperature can be set with a resolution of 0.1 °C. The set temperature is flashed on the display when the control
knob is rotated and continues to be flashed for five seconds after the last adjustment.
2.1.2 CHAMBER CONTROL (HEATER WIRE ON MODE ONLY)
The temperature of the gas leaving the chamber is regulated by the Chamber Control knob, it sets the difference between
the chamber outlet temperature and the airway temperature delivered to the patient. The setting of the Chamber Control,
when added to the setting of the Temperature Control, determines the chamber outlet set temperature. This Chamber
Control has a linear range of adjustment from -5 to +2 °C marked in one degree steps and can be set with a resolution of
0.5 °C. The value is flashed on the Airway display as the control knob is rotated and continues to be flashed for five
seconds after the last adjustment.
Every humidifier is also supplied with a fixed chamber control knob. This prevents inadvertent adjustment of the
chamber control by preadjusting the existing knob to the desired setting and then replacing the normal knob with the
fixed knob.
2.2 PUSH SWITCHES
2.2.1 MUTE BUTTON
A momentary push will disable an audible alarm for 3 minutes (except low temperature alarm in non heater wire mode
which is 10 minutes).
A secondary function is that in conjunction with the Chamber Temp switch enables entry to the engineering menu (refer
Appendix A2).
On every initial push of the mute button a momentary audio beep indicates function operation.
2.2.2 CHAMBER TEMP BUTTON
MR700 Series Humidifiers with Version 1.0 Software:
Operation of this switch causes the airway temperature display to momentarily blank then show the chamber outlet
temperature. A green LED adjacent to the switch is enabled to indicate that this function is active. On release of this
switch the display reverts immediately to show the airway temperature.
This button is used in conjunction with the mute to enter the engineering menu (refer Appendix A2).
MR700 Series Humidifiers with Version 2.0 and Version 3.0 Software:
Operation of this switch causes the airway temperature display to momentarily blank then show the chamber outlet
temperature. A green LED adjacent to the switch is enabled to indicate that this function is active. On release of this
switch the display continues to show the chamber outlet temperature for 2 seconds before blanking momentarily and
reverting to show the airway temperature.
This button is used in conjunction with the mute to enter the engineering menu (refer Appendix A2).
Ref. 185040646 MR730/720/700/480 Technical Manual ¯ Revision F ¯ Issued March 2001

2.2.3 STANDBY BUTTON (MR700/720/730 ONLY )
This button has to be depressed for one second to enter or exit the standby mode. When the adjacent amber LED starts
to flash (100/minute) the button can then be released and the Humidifier remains in the standby mode.
To exit Standby mode press the Standby button for 1 second, the amber LED will then turn off. An audio beep accompanies a change in the Standby mode state.
2.2.4 HEATER WIRE SWITCH (MR720, MR730 ONLY )
This is a latching, push operated, switch which selects between the heater wire mode and non-heater wire mode. The
adjacent green LED, if on, indicates that the humidifier is operating in the heater wire mode. Pressing this switch will
cause an audible beep and the LED changes to indicate the new state. A heater wire alarm will commence if switching to
the heater wire mode with heater wire disconnected or if switching to the non heater wire mode if a heater wire is
connected.
2.3 POWER UP SEQUENCES
2.3.1 VERSION 1.0 SOFTWARE
After switch on the humidifier goes through the following sequence. Note that each displayed information is flashed for
2 seconds.
4
• Watchdog circuit test If successful the ‘SEE MANUAL’ LED lights briefly.
• Display Test All indicator LEDs are illuminated and ‘8.8.8.’ is displayed on the Airway
• Temperature Control Setting eg ‘37.0’ is displayed
• Chamber Control setting If heater wire mode is selected then the chamber control setting is displayed
• Software Version Number ‘1.0’
• Maximum Heaterplate setting eg ‘110’
• Audio Beep
2.3.2 VERSION 2.0 AND VERSION 3.0 SOFTWARE
After switch on the humidifier goes through the following sequence. Note that each information is displayed for 2
seconds, then the display is momentarily blanked.
• Watchdog circuit test If successful the ‘SEE MANUAL’ LED lights briefly.
• Display Test All indicator LEDs are illuminated and ‘8.8.8.’ is displayed on the Airway
• Model Number eg ‘730’
• Software Version Number eg ‘2.0’
• Temperature Control Setting eg ‘37.0’ is displayed
• Chamber Control setting If heater wire mode is selected then the chamber control setting is displayed
• Maximum Heaterplate setting eg ‘110’
• Audio Beep
Temperature display
eg ‘-1.0’. Not applicable for MR480
Temperature display
eg ‘-1.0’. Not applicable for MR480
2.4 HEATER W IRE ON MODE (ALL MODELS EXCEPT MR480)
In the Heater Wire On Mode (heater wire switch green LED on) the heaterplate and heater wire are regulated to maintain
the desired temperature and humidity, within close limits. To minimise rainout or maximise humidification, the chamber
outlet temperature can be adjusted to control at a fixed offset from the set airway temperature. The front panel Chamber
Control knob is used for this purpose, see § 2.1.2 above.
2.5 MR730/720 IN HEATER W IRE OFF MODE AND MR480
In the non Heater Wire mode of the MR730/720 (heater wire switch green LED off) the delivery temperature is maintained
by heaterplate control only. The sensor at the delivery hose end controls the heaterplate to deliver the selected
temperature. The sensor at the chamber outlet is employed in a backup safety mode, to limit the chamber outlet
temperature to a maximum of 66 °C. In this way safety at low flow rates (below 5 l/minute) is enhanced at the sacrifice of
some low flow performance.
Ref. 185040646 MR730/720/700/480 Technical Manual ¯ Revision F ¯ Issued March 2001

5
2.6 W ARM UP MODE
After initial turn on, warm up mode is entered. In this mode the Low temperature alarm is disabled. The Low temperature alarm is
enabled when warm up mode is exited.
2.6.1 WARM UP MODE EXITING CONDITIONS (LOW TEMPERATURE ALARM ENABLED):
• (MR700/MR730(All versions) and MR720(version 1.0) in Heater Wire Mode)
Warm Up mode continues until the Software Detects-
Either: The airway temperature reaches within 0.8 °C of the Temperature Control set point.
Or: The airway temperature has not increased by 2 °C for at least 4 minutes (2 minutes for version 3.0 software).
Or: The airway temperature has not got within 2 °C of the set point after ten minutes from switch on.
• (MR700/MR730(all versions) and MR720(version 1.0) in Non Heater Wire Mode and MR480)
Warm Up mode continues until the Software Detects-
Either: The airway temperature gets above 30 °C.
Or: The airway temperature has not increased by 2 °C within 15 minutes.
Or: The airway temperature has increased by 2 °C within 15 minutes but still has not reached 30 °C after a further 15
minutes.
Note:In this mode the audio alarm is not enabled until 30 seconds after the Airway Temp Low LED switches on.
At this time the heaterplate circuit switches off, pressing mute will silence the alarm for 10 minutes, during
which time the heaterplate power is enabled
2.6.2 MR720 (V ERSION 2.0, 3.0 SOFTWARE)
If the above warm up exiting conditions are not initially met the MR720 will automatically enter the standby mode for 20
minutes for version 2.0 software and 30 minutes for version 3.0 software (refer § 2.7.2).
2.7 STANDBY MODE
2.7.1 MR700/MR730 (ALL SOFTWARE VERSIONS), MR720 (V ERSION 1.0 ONLY)
The standby mode can be entered or exited by depressing the standby button for 1 second. A beep will be emitted once
successful entered or exited standby mode (refer § 2.2.3).
In the standby mode all Low Temperature alarms are inhibited, the heaterplate is controlled to a nominal 40.0 °C and the
heater wire is on a 15 % duty cycle.
Standby mode is automatically exited after 20 minutes (30 minutes for version 3.0 software) and the warm up mode is
entered (the low temperature alarms remain disabled - refer § 2.6).
A Remote Standby request (see Appendix A5.3) enables the standby mode and turns the standby amber LED permanently on.
2.7.2 MR720 STANDBY MODE (VERSION 2.0 AND 3.0 SOFTWARE ONLY)
The MR720 has a special feature where it will go into a standby mode automatically after turn on if the warm up exiting
conditions are not met. This standby mode time is 20 minutes for version 2.0 and 30 minutes for version 3.0 software.
While in standby mode, if the airway temperature increases by 2 °C at any time, the MR720 will exit stand by mode and
enter warm up mode. The unit then monitors the warm-up exiting conditions(see § 2.6.1 and 2.6.2), and if these are not
met, then the unit re-enters Standby mode.
Ref. 185040646 MR730/720/700/480 Technical Manual ¯ Revision F ¯ Issued March 2001

6
3.0 ALARMS AND INDICATORS _____________________________________
3.1 TEMPERATURE PROBE ALARM
If the airway temperature probe is disconnected or develops a low or high resistance the Temperature Probe alarm will be
enabled. Indication is by a ‘- - -' message on the airway temperature display plus a flashing Temperature Probe red LED
and an audio alarm.
Five specific fault types can be diagnosed and are displayed by the sequence of ‘decimal points’ in the display, as
shown below:
a
b
c
d
e
The faults (a to d) above are checked for at a rate of about twice per second. The final fault (e) which does not
immediately cause any apparent operating anomaly is checked twice a minute.
A Temperature Probe Alarm immediately shuts down both heater wire and heaterplate.
Once the alarm condition has been removed the humidifier will enter warm up mode (refer § 2.6).
3.2 ALARMS IN HEATER W IRE MODE (MR700/720/730 ONLY)
3.2.1 HEATER WIRE ALARM
If the heater wire is disconnected or there is a fault with the heater wire circuit, then the Heater Wire alarm LED will start
flashing and the audio alarm will be enabled. Both heater wire and heaterplate circuits will be shutdown. The display will
continue to indicate the temperature sensor reading (unless the heater wire fuse is open circuit).
- - -
- - -.
- -.-
- -.-.
-.- -
Temperature Probe not plugged in.Low temperature (~ 0 °C)
Open circuit chamber outlet probe
Open circuit in common lead in probe cable.
Open circuit patient airway probe
Very low temperature (~ 0 °C)
Short circuit chamber outlet probe
Very high temperature (~ 100 °C)
Short circuit patient airway probe
Very high temperature (~ 100 °C)
Short in probe cable between patient airway probe and chamber outlet probe
An open circuit heater wire fuse is indicated by ‘F-2’ appearing on the Airway Temperature display.
On MR720/730 if the Heater Wire is connected but switched off, the alarm will sound (refer § 2.2.4).
Note: If ‘F-2’ is displayed and the F2 fuse is intact then check the calibration of the 41 °C overheat (refer § 5).
3.2.2 AIRWAY TEMPERATURE HIGH ALARM
The red Airway Temp High LED will flash and an audible alarm will sound if the gas temperature being delivered to the
patient is 2 °C higher than the Temperature Control setting. A high temperature alarm instantly disables both heater
circuits.
3.2.3 AIRWAY TEMPERATURE LOW ALARM
The red Airway Temp Low LED will flash and an audible alarm will sound if the gas temperature being delivered to the
patient is 2 °C lower (4 °C for MR720 model) than the Temperature Control setting. If Airway Temperature Low alarm
condition persists for more than 100 seconds the heaterplate and heater wire circuits will switch off. Pressing the mute
button will silence the Audio alarm and resume heat for a further 100 seconds, the Airway Temperature Low LED will
continue to flash. This alarm is disabled during warm-up. See § 2.6.1.
If the airway temperature drops below 5°C the display will show ‘LO’ and an audible alarm will sound.
Ref. 185040646 MR730/720/700/480 Technical Manual ¯ Revision F ¯ Issued March 2001

3.2.4 CHAMBER TEMP HIGH ALARM
This alarm will activate if:
• The temperature of gas leaving the humidification chamber outlet is more than 4 °C higher than the chamber set
temperature for more than 20 minutes. (The chamber set temperature is the sum of the Temperature Control
setting and the Chamber Control setting).
• The temperature of the gas leaving the humidification chamber outlet exceeds the chamber set temperature by
10 °C or more.
This alarm causes the heater circuits to switch off and the ‘Chamber Temp High’ amber LED indicator to start flashing.
The audio alarm (which can be muted) is also enabled. This alarm remains active until the high temperature condition is
cleared.
3.2.5 CHAMBER TEMP LOW ALARM ACTIVATION
For Chamber Set Temperature < 35 °C For Chamber Set Temperature ≥≥ 35 °C
The temperature of gas leaving the humidification
chamber outlet is less than 4 °C lower than the
chamber set temperature for more than 20 minutes.
The Chamber Temp Low alarm amber LED will begin to flash and the audio alarm is enabled. This alarm remains active
until the low temperature condition is cleared. Pushing the mute button will silence the Audio alarm.
7
The temperature of gas leaving the humidification
chamber outlet is less than 31 °C for more than 20
minutes.
3.2.6 SET LOW WARNING
Version 1.0 and Version 2.0 Software
This alarm will activate if the chamber set temperature is below 31.0 °C. In this case the Set Low amber LED will
immediately be enabled and remain on, until such time as the chamber set temperature is adjusted above 31.0 °C. There is
no audible alarm.
Version 3.0 Software
This alarm will activate if either the chamber set temperature or Temperature Control setting is below 34.0 °C.
In these cases the Set Low amber LED will immediately be enabled and remain on, until such time as the set airway or
chamber set temperature is adjusted above 34.0 °C. There is no audible alarm.
3.3 TEMPERATURE ALARMS IN NON HEATER W IRE MODE (INCLUDES MR480)
3.3.1 HEATER WIRE ALARM
This indicates that a heater wire has been connected when the non heater wire mode has been selected (Heater Wire
‘On’ LED is off). In this case the Heater Wire alarm LED will be flashing, the audio alarm begins and the heaterplate is
switched off.
3.3.2 AIRWAY TEMPERATURE HIGH ALARM
The red Airway Temp High LED will flash and an audible alarm will sound if the gas temperature being delivered to the
patient is 41 °C or higher. Power to the heaterplate is immediately shut off.
3.3.3 AIRWAY TEMPERATURE LOW ALARM
The red Airway Temp Low LED will flash and an audible alarm will sound if the gas temperature being delivered to the
patient is 29.5 °C or less.
The audio alarm is not enabled for 30 seconds after the low temperature LED begins flashing.
Ref. 185040646 MR730/720/700/480 Technical Manual ¯ Revision F ¯ Issued March 2001

Pushing the mute button mutes the audio alarm for ten minutes and restores power to the heaterplate during this time.
The Airway Temp Low LED will continue to flash. This alarm is disabled during warmup. See § 2.6.2.
If the airway temperature drops below 5°C the display will show ‘LO’ and an audible alarm will sound.
3.4 AUDIO ALARM
A choice of the ISO draft standard audio alarm or a gliding tone can be selected by the programming control link (L1).
Refer Appendix A3.
A momentary depression of the mute button will silence the audio alarm for about 3 minutes (except for a low
temperature alarm in no heater wire mode. See § 3.3.3. The relevant LED indicators remain flashing until the alarm
condition clears. Any new alarm condition occurring within a mute delay will cause the audio alarm to be re-enabled.
3.5 SAFETY PROTECTION (ALL MODELS)
3.5.1 TEMPERATURE DEVIATIONS
An over temperature alarm condition causes an immediate shut down of both heater circuits. In the case of a Low
Temperature alarm, pressing Mute causes heating to recommence, the Low Temperature LED however remains on until
the fault has cleared. There are two independent backup over temperature protection circuits.
8
Firstly, an over temperature protection circuit independent of the microprocessor control continuously monitors the
airway thermistor sensor. This backup protection is preset to disconnect the heating circuits at 41.0 °C.Secondly, a
bimetallic thermostat fixed to the heaterplate operates if the heaterplate temperature exceeds 118 ± 6 °C and cuts out the
mains active supply. On cooling, this protector can only be reset by gaining access to the under surface of the
heaterplate and manually depressing the red reset button.
Heaterplate temperature is limited to 110 °C max during normal operation (80 °C for MR720). Optional heaterplate limits of
50, 80 and 90 °C can be selected. (Refer Appendix A3).
3.5.2 MICROPROCESSOR WATCH DOG
A control loop in the operating software continuously monitors for correct operation. Should a fault be detected a
hardware reset circuit attempts to reinitialise the microprocessor. If this is not successful additional hardware disables
the heating circuit, blanks the display and turns the Humidifier Fault red LED on.
The watch dog circuit is tested at turn on by deliberately halting the processor and forcing initialisation.
Ref. 185040646 MR730/720/700/480 Technical Manual ¯ Revision F ¯ Issued March 2001

9
4.0 CIRCUIT OPERATION_________________________________________
4.1 INTRODUCTION
This section describes briefly the operation of each of the circuit sections. Refer to the circuit diagrams in § 8.5 to 8.8.
4.2 CONTROL BOARD
The one basic control board, with various discreet hardware changes, provides the controlling functions for the
MR730/720/700/480 range of humidifiers. Each model however is controlled by a unique software version.
4.2.1 CONTROL THERMISTORS
Three standard characteristic thermistors control all temperature functions:
• One thermistor is mounted in a probe at the end of the delivery hose to measure delivered airway temperature
(connector J4-1,3). This temperature is indicated by the digital display on the humidifier front panel.
• A second thermistor mounted in a probe measures the chamber tem perature at the top of the humidifying
chamber (connector J4-2,3). In heater wire mode this thermistor is used to monitor and control the chamber
outlet temperature.
• A third thermistor is permanently mounted in intimate contact with the heaterplate (HP) (connector J3-1,3). This
prevents excessive heaterplate temperatures during a warm up cycle.
4.2.2 INPUT ANALOG SWITCHES U8 AND U9
The 1 by 8 analog switch (U8) selects under processor control (PB0-3) various input signals and reference potentials.
Selected sequentially are potentials giving; (0-3): the position of the temperature set potentiometer VR3, and offset
potentiometer VR2. (4-6): calibration temperatures of 9, 34.5 and 60 °C across resistors R18, R17 and R16, and from (7):
the heaterplate (HP) thermistor.
From the 3 by 2 analog switch (U9) under processor control (PB4-6) the airway temperature and the chamber outlet
temperatures from the dual probe temperature sensor are also read.
4.2.3 ANALOG TO DIGITAL CONVERTER U10 B,D,E
The temperature probe inputs are filtered by the C30, C31, R28, R26, C19, C20 network for EMI suppression. The selected
output of the analog switch network U8, U9 is fed to pin 10 of U10d, a low pass operational amplifier with a gain of 11.
This stage is filtered with C23 to give protection from any voltage transients appearing at its input. The integrating stage
U10b rests for most of the time (50 to 60ms) with R35 connected (through an analog switch in U9) across the integrating
capacitor C22 holding it in a discharged state. With VR5 and R34 connected to the non-inverting input of U10b the stage
has a ‘static' gain of about 0.5 giving a resting level of about -2.5 to -3 V at the output pin 1.
Under processor control (PB6) when the switch section of U9 across C22 is opened the output of U10b ramps up (0.1-5
ms). This rising ramp voltage is fed via R36 to the comparator stage U10e where it is referenced via R41 to the output
voltage level of U10d. When the ramp voltage exceeds the threshold level of U10d the output of the comparator stage
U10e switches high. This fast rising edge, assisted by the speed up capacitor C24, is fed to the RST 6.5 interrupt input of
U3.
4.2.4 PROCESSOR CONTROL U3
After selecting one of the 10 input signals through the switch network of U8, U9 there is a 50 to 60ms pause to allow
U10d to settle. At this point the switch across the integrator U10b is opened initiating a linear ramp output and the 14 bit
counter in U4 is started. Within a time period of 100 ns to 5 ms the ramp will cause a RST6.5 interrupt to occur. The
processor on responding to the interrupt, first stops the counter, then closes the switch across the integrator readying it
for the next cycle. The input switch network U8, U9 can now be stepped to the next input. The 14 bit counter can now be
read and its value equated to the input signal. In this way all 10 input channels are continuously scanned. VR5 is set
Ref. 185040646 MR730/720/700/480 Technical Manual ¯ Revision F ¯ Issued March 2001

during calibration to give the desired ramp rate. Thus all points are scanned once every 500 to 600 ms, self calibration
performed, and the digital display updated.
4.2.5 POWER LINE INTERRUPT (REVISIONS D/F PCBS)
A sample of the power supply frequency is derived from the power transformer 22 Vac secondary via R56 and Q1,
buffered by Schmitt trigger U5f and fed to the RST7.5 interrupt of U3. The operating software determines the supply
frequency facilitating the generation of a real time clock and also enabling a zero crossing detector for triac switching.
The ADC is also phase synchronised with the line frequency thus eliminating any common error from this source.
4.2.6 POWER LINE INTERRUPT (REVISION H PCB AND LATER)
The zero crossing is derived from the 10 Vac secondary. Resistor R61 ensures that the secondary is ground referenced
when the diodes D13 to D16 are not conducting. Network R1, R69, and C2 removes any unwanted noise from the zero
crossing circuit. The operating software determines the supply frequency facilitating the generation of a real time clock
and also enabling a zero crossing detector for triac switching. The ADC is also phase synchronised with the line
frequency thus eliminating any common error from this source.
4.2.7 41 °C COMPARATOR
10
Operational amplifier U10c is a protection circuit to sense excessive delivery temperature rise. The non inverting input
pin 5 is connected directly (via connector J4-1) to the patient airway thermistor. The inverting input goes to an
adjustable divider network R32, VR4, R33. VR4 is set during calibration to ensure that the output pin 7 of U10c is low
above an input temperature of 41 °C. This low output (OVHT) is fed via the isolating diode resistor networks D19, R55
and D20, R61 to clamp the bases of switching transistors Q10 and Q12. In this way, a patient airway temperature greater
than 41 °C causes both heaters to be shut down.
A watch dog failure, which is a high output from U5g, is communicated via isolating diode D11 and resistor R31 to the
inverting input of U10c. This also ensures that both heater control circuits are clamped off in the event of a processor
crash.
4.2.8 HEATERPLATE OVERTEMPERATURE
Thermistor HP senses the heaterplate temperature. Should the heaterplate exceed the maximum heaterplate limit (default
110 °C) during normal operation, power to the heaterplate is discontinued until it cools below this limiting temperature.
Under certain operating conditions, for increased safety, lower maximum heaterplate temperatures can be selected. (See
Appendix A3: Programming Control Options.) Also mounted on the heaterplate is a mechanical 118 °C cut out which will
give protection should the electronic control system fail. This mechanical cut out is connected in series with the power
transformer primary and thus causes complete shut down of the humidifier should a serious fault develop. See § 3.5.1.
4.2.9 WATCH DOG
During operation the processor is continually monitored for correct function. This is done by changing the state of
output port PB7 of U4 every 16.6 or 20 ms (power line frequency interrupt). This square wave, buffered by U5b, is fed to
the charge pump circuitry C16, D4, D5 and C15 which ensures that pin 13 of U5g is held hard up. Should this square
wave be interrupted for any reason, C15 will discharge through R3 giving a high output from pin 12, which drives the
trap interrupt input of U3. This high trap input forces re-initialisation of the processor which may or may not be
successful depending on the nature of the fault. The purpose of this is to ensure that if the processor should fail, and is
unable to re-initialise, it fails in a safe mode. The watch dog circuit is tested every time the humidifier is turned on by
deliberately halting program execution and waiting for initialisation via the watch dog. To indicate that the processor has
failed the high output of U5g also turns on Q3 which lights the ‘see manual’ LED10 and also turns off the display I.C. U7
to blank the digital display.
Ref. 185040646 MR730/720/700/480 Technical Manual ¯ Revision F ¯ Issued March 2001

4.3 POWER BOARD
4.3.1 REVISION D/F PCBS
A bridge rectifier (D13 to D16) supplies power to the 5 V regulator Q7 mounted on the heat sink. This circuit is protected
by a 1 A fuse (F1) mounted on the circuit board. The 5 V negative supply stabilized by Q8, is derived from the voltage
doubling network D17, D18.
The Heater Wire (HHC) is controlled by triac Q9 which is mounted on the heat sink. Q9 is switched by the optoisolator
U11 which in turn is driven by Q10. Q10 is controlled directly from an output port of U4 on the control board.
The resistor R52 connected to the anode of Q9 provides a signal through (HHS) to U5d and U4. This signal, with
processor interpretation, provides the information to determine if the Heater Wire is connected or open circuit and also
the integrity of fuse F2, the 4 A fuse supplying power to the Heater Wire.
Triac Q11 (mounted on the heatsink) is controlled by optoisolator U12, which in turn is controlled by Q12, and HPC.
Transistors Q5 and Q6 are a RS232 level driver for the serial data interface.
4.3.2 REVISION H AND J PCBS
A bridge rectifier (D13 to D16) supplies power to the 5 V regulator Q7 mounted on the heat sink. This circuit is protected
by a 1 A fuse (F1) mounted on the circuit board. The 5 V negative supply stabilized by Q8, is derived from the voltage
doubling network D17, D18.
11
The Heater Wire (HHC) is controlled by triac Q9 which is mounted on the heat sink. Q9 is switched by the optoisolator,
U11, which in turn is driven by Q10. Q10 is controlled directly from an output port of U4 on the control board (HHC).
Resistor R9, C6 form a snubber on the triac. Capacitors C8, C32 balance the heater wire with respect to ground.
Heater wire sensing is accomplished through the optoisolator U13 and associated components R51, R52, D21, R66 and
R67. R51 and R52 limit the current through the LED when the triac is on or off. With the triac off and a heater wire
connected then the optoisolator will remain off. Otherwise if a heater wire is not connected then the optoisolator will be
turned on and off in synchronisation with the secondary cycle. The output of the optoisolator feeds U4 on the control
board. This signal, with processor interpretation, provides the information to determine if the Heater Wire is connected
or open circuit and also the integrity of fuse F2, the 4 A fuse supplying power to the Heater Wire.
Q11 controls power to the heaterplate and is under control of optoisolator U12 and transistor Q12 via an output port
(HPC) on U4 on the control board. Resistors R64, R57 limit the gate current to the triac and with C33 form a snubber for
the triac and the optoisolator.
Transistors Q5 and Q6 are an RS232 level driver for the serial data interface.
4.4 PROBE TEMPERATURE VERSUS THERMISTOR RESISTANCE
TEMP (± 0.2 °C) RESISTANCE (Ω) TEMP (± 0.2 °C) RESISTANCE (Ω)
0 7352.8 36 1411.3
9 4702.2 37 1355.0
28 1976.6 38 1301.0
29 1893.3 39 1249.2
30 1814.4 40 1199.6
31 1739.2 41 1152.3
32 1667.2 42 1107.3
33 1598.2 43 1064.5
34 1532.9 44 1023.1
35 1470.6 60 560.3
Ref. 185040646 MR730/720/700/480 Technical Manual ¯ Revision F ¯ Issued March 2001

12
5.0 CALIBRATION______________________________________________
5.1 INTRODUCTION
Calibration should be performed after any servicing involving the printed circuit boards. After calibration, perform a
performance check as outlined in § 6.0.
Note: For instructions on disassembly of the unit, refer to § 7.0.
Calibration is facilitated by entering a special Calibration mode. See Appendix A1.
There are only two adjustments VR4 (the 41 °C comparator stage) and VR5 ( setting of the span of the A to D converter).
This calibration procedure may be carried out if the unit is thought to be out of calibration (E0x to E7x error messages in
the display) or if any of the circuit boards have been replaced or repaired. In particular any repair that may have altered
the potential of the ± 5 V rails or component change associated with the A to D converter would require a calibration
check.
Calibration should be checked and performed after the unit has been running for at least twenty minutes; ie after the unit
has warmed up.
5.2 EQUIPMENT REQUIRED
♦ 41 °C calibration probe, available in MR700 series calibration kit (Fisher & Paykel part no. 900MR548).
For models with Revision D PCB and earlier:
♦ Heater Wire module.
♦ For MR480 only - jumper connector cable, which consists of two easy hooks connected in series with a 100mm
length of cable and a 22 kΩ resistor.
5.3 CALIBRATION PROCEDURE FOR MODELS WITH REVISION D PCBS OR EARLIER
(Before Serial Number 92XXAAA05495) (See § 9.0 for change history).
1 With models MR730/720/700 ensure that a Heater Wire module is connected, and that the Heater Wire switch is
on (Heater Wire On LED should be on).
2 Plug in the 41 °C calibration probe.
3 Gain access to the adjustment potentiometers VR4 and VR5, by removing the control board from the humidifier
front panel.
4 With model MR480 only connect the jumper cable from pin 7 of U10 to the cathode end of D7 on the control
board.
5 With the Chamber Temp button held down turn on the power switch. Display should show -16 Using the Chamber Temp button step through to number -47 Adjust VR4 slowly so the display just changes from vertical to horizontal bars (|||||| to ===). Back off VR4 and
recheck that VR4 is not rotated past this display transition point.
8 Using the Chamber Temp button step to number -59 Remove the 41 °C calibration probe.
10 Adjust VR5 for a display reading of zero. ( 0)
(This value may drift over time. A deviation of up to ± 2.0 will not affect circuit performance.)
11 Calibration is complete; do performance check (§ 6.0).
5.4 CALIBRATION PROCEDURE FOR MODELS WITH REVISION F PCBS OR LATER
(See § 9.0 for serial number details)
Ref. 185040646 MR730/720/700/480 Technical Manual ¯ Revision F ¯ Issued March 2001

13
1 Plug in the 41 °C calibration probe.
2 Gain access to the adjustment potentiometers VR4 and VR5, by removing the control board from the humidifier
front panel.
3 With the Chamber Temp button held down turn on the power switch. Display should show -14 Using the Chamber Temp button step through to number -45 Starting with a vertical bar display adjust VR4 so the display changes to an all 8 display. If VR4 is rotated too
far the display becomes all horizontal bars (||.||.||. thru 8.8.8. to ===). The correct point is where all the
segments of the all 8 display are of equal brightness.
6 Using the Chamber Temp button step to number -57 Remove the 41 °C calibration probe.
8 Adjust VR5 for a display reading of zero. (0)
(This value may drift over time. A deviation of up to ± 2.0 will not affect circuit performance.)
9 Calibration is complete; do performance check (§ 6.0)
Ref. 185040646 MR730/720/700/480 Technical Manual ¯ Revision F ¯ Issued March 2001

14
6.0 PERFORMANCE CHECK_______________________________________
6.1 INTRODUCTION
This procedure should be used to check the operation and calibration of the MR730/720/700/480. This performance
check should be performed after any servicing, and annually as part of the routine maintenance procedure (see
Appendix B).
Performance can be monitored during the test by using the functions of the Engineering Menu. See Appendix A2.
If there is a desire to confirm the full dynamic operation of the Humidifier, such as after servicing, a full test of the
temperature control of the Humidifier may be performed, see tests detailed in Addendix E.
6.2 PERFORMANCE CHECK MR730/720/700
6.2.1 EQUIPMENT SETUP NOTES:
♦ 34.5 °C and 41°C test probes, available in MR700 series calibration kit (Fisher & Paykel part no. 900MR548).
♦ Α heated wire breathing circuit of any length, single use or reusable.( If a single use circuit is used, ensure there is a
gas flow through it of at least 2 l/minute to prevent overheating of the circuit.)
♦ Heater wire adaptor for connection to a MR700 series humidifier
♦ A Humidification Chamber filled with water to recommended level (water at room temperature.)
♦ A temperature probe is not used in the circuit in this test.
6.2.2 SETUP
1 Connect the heated circuit to the humidifier , ensure the circuit is not covered to prevent overheating of the
tubing. Remember there must be an airflow of at least 2 l/min for single use circuits.
2 Plug in the 34.5 °C test probe to the humidifier.
3 Slide the humidification chamber on to the humidifier.
4 Plug in the humidifier and turn the power on. For the MR720 and MR730, ensure the heater wire switch is ‘on’
(heater wire LED will light).
6.2.3 TEMPERATURE CONTROL CHECK MR700/720/730
1 Turn the Temperature Control knob to 33.0 ± 0.2 °C and Chamber Control to 0. (Note the Temperature Control
and Chamber Control settings will be displayed as the control knobs are adjusted.
2 Check the display reads 34.5 ± 0.2 °C and that the ‘Set Low’ warning light is on (units with version 3 software
only).
3 Push the Chamber temp. button and check for a 34.5 ± 0.2 °C reading on the temperature display.
4 Run for 5 minutes without interruption.
5 After 5 minutes Check:
Heaterplate is warm or cold.(Less than 60 °C , see ‘hP’ in the engineering menu).
Heater Wire cold (feel the wire or circuit, should be cold to touch).
6 Turn the Temperature Control knob to 36.0 ± 0.2 °C and leave Chamber Control set at 0.
7 Run for at least 20 minutes without interruption.
8 After 20 minutes Check:
Heaterplate hot (Greater than 80 °C, see ‘hP’ in the engineering menu.
Heater Wire hot (feel the wire or circuit, should be warm to touch).
CAUTION: THE WATER IN THE CHAMBER MAY BE NEAR BOILING AT THIS STAGE
Ref. 185040646 MR730/720/700/480 Technical Manual ¯ Revision F ¯ Issued March 2001

6.2.4 ALARMS CHECK MR700/720/730
1 Rotate Temperature Control knob to 37 and check for an Airway Temperature Low alarm. (For an MR720 set to
40 °C and check for an Airway Temperature Low alarm).
2 Rotate Temperature Control knob to 32 and check for an Airway Temperature High alarm.
3 If ‘set low’ light is not already on, rotate the chamber control to -1.5 and check that the ‘set low’ light comes on
(all software versions).
4 Rotate the Temperature Control knob back to 36 and check that alarms cease and set low LED is off..
5 Disconnect the Heater Wire plug and check for audio alarm and Heater Wire alarm light.
6 Reconnect the heater wire. For MR720/730 models, turn the Heater Wire off and check for audio alarm and
Heater Wire alarm light.
7 Disconnect the 34.5°C temperature probe and check that the Temperature Probe LED flashes and gives an
audio alarm.
8 Insert the 41°C temperature probe into the humidifier and check that the Airway Temperature High LED flashes
and the audio alarm sounds.
9 Push the Mute button and check that the audio alarm is silenced
10 Go to the engineering menu and check that the heaterplate duty cycle (Cdc) and heater wire duty cycle (Edc)
are starting to decrease, this may take a few seconds.
15
11 Turn off the humidifier.
12 Humidi fier is now ready for service.
6.3 PERFORMANCE CHECK (MR480)
6.3.1 EQUIPMENT REQUIRED
♦ 34.5 °C and 41 °C test probes, available in MR700 series calibration kit (Fisher & Paykel part no. 900MR548).
♦ A Full Humidification Chamber
6.3.2 SETUP
1 Slide the humidification chamber on to the heaterbase.
6.3.3 TEMPERATURE CONTROL CHECK (MR480)
1 Plug in the 34.5 °C test probe.
2 Turn the Temperature Control knob to 32.0 °C.
3 Turn on the humidifier main power switch.
4 Check that 32.0 ± 0.2 °C flashes on the display during initialisation.
5 Check for a display reading of 34.5 ± 0.2 °C after initialisation.
6 Push the Chamber Temp. button and check for a reading of 34.5 ± 0.2 °C.
7 Run for 5 minutes without interuption. If mains power is interupted test will have to be restarted.
8 After 5 minutes check the following in ‘Engineering mode’ (see Appendix A2):
Set 32
hp ≤ 60
9 Turn off the humidifier.
10 Turn the Temperature Control knob to 36.0 ± 0.2 °C (check correct setting is displayed when the control is
adjusted).
11 Run for 25 minutes.
12 After 25 minutes check the engineering menu (appendix A2.2):
Set 36
hp ≥ 70
Ref. 185040646 MR730/720/700/480 Technical Manual ¯ Revision F ¯ Issued March 2001

6.3.4 ALARMS CHECK - MR480
1 Disconnect the 34.5°C temperature probe and check that the Temperatur e Probe LED flashes and gives an
audio alarm.
2 Insert the 41°C temperature probe into the humidifier and check that the Airway Temperature High LED flashes
and the audio alarm sounds.
3 Push the Mute button and check that the audio alarm is silenced
4 Go to the engineering menu and check that the heaterplate duty cycle (dc) is starting to decrease, this may take
a few seconds.
5 Turn off the humidifier.
6 Humidifier is now ready for use.
6.4 DUAL PROBE TEMPERATURE TEST
This test is recommended to be performed on all temperature probes every three months or if there is any doubt as to the
accuracy of the temperature probe. This test allows the operator to compare the temperature readings of both probes
(chamber and airway) firstly to one another, and secondly to a glass thermometer for absolute verification of temperature
if so desired. (Using a water bath and thermometer is the most reliable method to check the temperature probe accuracy.)
6.4.1 EQUIPMENT REQUIRED
16
♦ Dual Temperature probe to be tested.
♦ Glass thermometer accurate to ±1°C.
♦ Cup of warm water (Ambient to 40 °C).
♦ Heater wire if using humidifier in heater wire mode.
6.4.2 TEST PROCEDURE
1 Plug the dual probe plug into the Humidifier, if in Heater Wire mode ensure a heater wire assembly is
connected.
2 Turn on the mains power.
3 Insert both temperature probes into a container filled with water at a temperature between ambient and 40 °C.
As temperature gradients can be quite large it is recommended that the two probes be held together with a
rubber band during this test and the water constantly stirred.
4 Place the thermometer in the water alongside the probes and allow two minutes for the temperatures to
stabilise. It is recommended that the water be constantly stirred during this test.
5 Enter the Engineering menu (refer Appendix A2) and select ‘CP’ (compare probes) option. The display will
alternate between the airway and chamber temperatures (chamber temperature is displayed with all decimal
points turned on).
6 Check the temperature difference between chamber and airway probes as indicated by the display, it should not
exceed 1.5 °C.
7 Ensure that the temperature reading of the chamber and airway probes are both within 1.5 °C of the
thermometer reading.
Ref. 185040646 MR730/720/700/480 Technical Manual ¯ Revision F ¯ Issued March 2001

17
7.0 SERVICING INFORMATION _____________________________________
7.1 INTRODUCTION
This section provides information for servicing the MR730/720/700/480 Humidifier. The electronic circuitry is contained
on two separate circuit boards, the power board and control board.
Please note the following:
• Follow ESD precautions when handling circuit boards.
• After replacing or modifying a circuit board, go through the calibration and performance tests outlined in § 5
and 6.
• After any repair involving opening of the humidifier, go through the electrical safety tests outlined in Appendix
B2.
• When replacing any screws, refer to torque settings in § 7.6.
7.2 PRINTED CIRCUIT BOARD REMOVAL
7.2.1 CONTROL PCB
The front panel and heaterplate assembly is separated from the humidifier body by removing the 4 fixing screws from the
rear of the humidifier body. The front panel assembly can now be moved aside and the two ribbon cable connectors (J1
and J2) disconnected from the rear of the control board. If the front panel is now positioned face down the three plastic
retaining latches protruding through the board can be moved in the appropriate direction to release the board. This is
facilitated if a slight upward finger pressure is maintained on either edge of the board, when the latches release, the
board will pop up leaving the push on control knobs behind in the front panel.
7.2.2 POWER PCB
Separate the case front from the humidifier body and disconnect the two ribbon cable connectors joining the Power PCB
and Control PCB (J1 and J2). Cut the cable tie holding the heaterplate and chassis wires together.
The power board and heat sink assembly can now be removed by flexing the case sides away from the top edge of the
board and moving the board forward slightly to disengage from the case. The board should now be lifted slightly to
clear the lower retaining guides and moved further forward to gain access to the various wiring harness connectors
which can now be detached. Before removing the PCB, unscrew the mains cord connections and cut the cable tie
holding the mains cord in place.
7.3 COMPATABILITY
7.3.1 HARDWARE COMPATABILITY
• If a revision D or earlier power or control PCB needs to be replaced, then both PCBs need to be upgraded together
to ensure correct performance. Revision F and later PCBs can be replaced individually.
• To upgrade both PCBs and the software use a PCB service upgrade kit. The part numbers to order are as follows:
Model Part number Model Part number
MR480 043040791 MR720 043040793
MR700 043040792 MR730 043040794
• For humidifiers with Rev F or later PCBs, you will only be required to purchase individual boards for repairs (as detailed in sect. 8.9).
• If a revision H or later power PCB needs replacing, the replacement power PCB must also be revision H or later.
Replacing revision F or earlier power PCB MR700/720/730
Ref. 185040646 MR730/720/700/480 Technical Manual ¯ Revision F ¯ Issued March 2001

18
If you are fitting a Revision H or later power PCB to a Humidifier that has a revision F or earlier control PCB , you
will have to ensure correct phase polarity on the transformer secondary wires. To check for correct polarity, turn the
humidifier on, if the humidifier displays F-2, then the polarity of one of the transformer secondaries needs to be changed.
This is accomplished as follows:
i. Unplug the power supply and then unplug the transformer secondary connector (Connector J9) from the power
PCB.
ii. Then carefully remove the two yellow wires from the connector housing by depressing the locking tabs on the
back of the connector terminals and pulling the wires out of the housing.
iii. Insert the yellow wires in to the connector housing in reverse order to what they were before. See below .
YELLOW
YELLOW
WHITE
WHITE
Replacing revision F or earlier power PCB MR480
If the existing power PCB is Rev. F or earlier, there will be an earth wire from the secondary harness of the transformer to
the chassis. Unclip this wire from the transformer connector and unscrew it from the chassis. The Rev. J replacement
power PCB will have an earth wire attached to the PCB. Fit the end of this earth wire to the earth stud on the chassis.
7.3.2 MR480 TRANSFORMERS
For MR480’s , the transformer secondary wiring changed when Rev. J PCB started. When replacing the transformer,
follow the instructions supplied in the transformer replacement kits to ensure compatability.
7.3.3 SOFTWARE COMPATABILITY
Software versions 1.0 and 2.0 can be upgraded to version 3.0 in their existing PCBs.
YELLOW
YELLOW
WHITE
WHITE
SECONDARY
EXISTING WIRING
J9
SECONDARY
NEW WIRING AFTER
POLARITY SWAPPED
J9
Software version 1.0 should be replaced with version 3.0 if the PCB’s are upgraded. Software versions 2.0 and 3.0 are
compatable with all PCB revisions.
7.4 HEATERPLATE
To reset the 118 °C over temperature cutout, separate the case front from the case body, then push the reset button
(through a small hole under the heaterplate in the front panel case assembly).
To replace the heaterplate:
1 Separate the case front from the humidifier body.
2 Unclip the Power PCB from the case body (see § 7.2.2 above).
3 Unplug the heaterplate wires from the Power PCB (connectors J3 and J7).
4 Unscrew the earth screw on the chassis for the heaterplate earth wire.
5 Unplug the ribbon cables from the Power PCB to the Control PCB (connectors J1 and J2). The front case
assembly is now separate from the case body.
6 Detach the heaterplate from the case front by unscrewing the three screws which secure it to the case front.
7 Assembly is the reverse of the above procedure.
Ref. 185040646 MR730/720/700/480 Technical Manual ¯ Revision F ¯ Issued March 2001

7.4.1 HEATERPLATES WITH SCREW-IN STANDOFFS
For products after S/N:9773XXX19731, the heaterplate standoffs were changed to shoulder bolts that screwed directly
into the heaterplate.
When fitting these heaterplates,‘click’ the heaterplate springs into the recesses on the heaterplate (by rotating them
while pushing down), then align the springs with the holes in the case front and screw in the self tapping standoffs into
the heaterplate.
7.5 FAULT LOCATION
If neither the digital display nor any of the front panel LED’s are on and no power appears to be reaching the
transformer primary, check that the mechanical overheat protector on the heaterplate has not cut out. This may be
checked by depressing the red reset button. (See § 7.4).
Determine if all power supplies are operational and all fuses are intact. If the power supplies are OK but the display is
blank, check the watch dog output (pin 12, U5g). A high output here will blank the display, turn on the humidifier fault
LED indicator and isolate the heater circuits but not necessarily stop the processor. Check for the presence of a 33 to 40
ms period square wave at PB7 (pin 1 U5b). If the watch dog output is high and the 33 to 40 ms clock is present a fault in
the watch dog circuitry is indicated but if port PB7 is not changing state there is a fault elsewhere.
7.6 SCREW TORQUE SETTINGS
19
Below is a guide to screw torques used on the humidifier, use this as a guide for tightening of screws on the humidifier
(exact torques are not required).
Ref Screw Application Driver Torque(in/oz) Torque
(Nm)
CHASSIS
14 Screw #8 x ½" Pan Phil TY25 S/S Case Front/Body Phillips 85-113 0.6 to
0.8
18 Screw M4 x 8 Pan Phil Taptite Chassis Earth Screws Phillips 240-270 1.7 to
1.9
21 Screw M6 x 25 Csk Allen S/S Mounting Bracket Allen 248-276 1.75 to
1.95
22 Screw M4 x 14 Pan Pozi Taptite Mains Cord Clamp Pozidrive198-240 1.4 to
1.7
26 Screw M6 x 16 Allen S/S Button
Head
27 Screw M3 x 5 Pan Phil Taptite Heaterplate Standoffs Phillips 99-113 0.7 to
HEATERPLATE
2 Screw M4 x 8 Pan Phil Taptite Heaterplate
5 Screw M3 x 5 Pan Phil Taptite Thermistor/Thermostat
Chassis Earth Screw Allen 248-276 1.75 to
1.95
0.8
Phillips 212-254 1.5 to
Earth/Element
Phillips 99-113 0.7to 0.8
Heaterplate
1.8
Ref. 185040646 MR730/720/700/480 Technical Manual ¯ Revision F ¯ Issued March 2001

20
8.0 SCHEMATICS, PART LISTS AND M ECHANICAL DRAWINGS________________
8.1 MR700 SERIES CIRCUIT LAYOUT BLOCK DIAGRAM
Ref. 185040646 MR730/720/700/480 Technical Manual ¯ Revision F ¯ Issued March 2001

8.2 COMPONENT LAYOUT - REVISION H AND J PCB
21
Power Board
Control Board
Ref. 185040646 MR730/720/700/480 Technical Manual ¯ Revision F ¯ Issued March 2001

8.3 COMPONENT LAYOUT - REVISION F PCB
22
Power Board
Control Board
Ref. 185040646 MR730/720/700/480 Technical Manual ¯ Revision F ¯ Issued March 2001

23
8.4 LINK PAD LOCATIONS FOR PROGRAMMING CONTROL OPTIONS - REVISION H AND J PCB
Link Pads
Control Board(viewed from solder side)
Location of Link Pads for Programming Control Options (see Appendix A3)
Ref. 185040646 MR730/720/700/480 Technical Manual ¯ Revision F ¯ Issued March 2001

24
THIS PAGE LEFT BLANK
Ref. 185040646 MR730/720/700/480 Technical Manual ¯ Revision F ¯ Issued March 2001

25
8.5 CIRCUIT DIAGRAMS - REVISION H AND J PCB CONTROL PCB
Ref. 185040646 MR730/720/700/480 Technical Manual ¯ Revision F ¯ Issued March 2001

26
8.6 CIRCUIT DIAGRAMS - REVISION H AND J PCB POWER PCB
Ref. 185040646 MR730/720/700/480 Technical Manual ¯ Revision F ¯ Issued March 2001

27
8.7 CIRCUIT DIAGRAMS - REVISION F PCB CONTROL PCB
Ref. 185040646 MR730/720/700/480 Technical Manual ¯ Revision F ¯ Issued March 2001

28
8.8 CIRCUIT DIAGRAMS - REVISION F PCB POWER PCB
Ref. 185040646 MR730/720/700/480 Technical Manual ¯ Revision F ¯ Issued March 2001

29
8.9 ELECTRICAL PARTS LIST
The electrical components listed below are referenced in accordance with the component layout and the circuit diagrams
(see § 8.2 to 8.8).
Note: The Control and Power PCB Assemblies listed below are replacement parts for Revision F & later PCBs. For
replacement of Revision D PCBs refer to § 7.3 for details of upgrade kits.
8.9.1 CONTROL BOARD COMPONENTS : (REVISION H AND LATER PCBS)
Ref Description Part No.
Control PCB Assembly MR480 (No Eprom) ............................................ 043040679
Control PCB Assembly MR700 (No Eprom) ............................................ 043040633
Control PCB Assembly MR720 (No Eprom) ............................................ 043040677
Control PCB Assembly MR730 (No Eprom) ............................................ 043040675
Eprom Programmed MR480 Ver 3.0........................................................... 362040076
Eprom Programmed MR700 Ver 3.0........................................................... 362040077
Eprom Programmed MR720 Ver 3.0........................................................... 362040078
Eprom Programmed MR730 Ver 3.0........................................................... 362040079
C1, C3,
C4, C5, C9, C10, C11 Cap. Ceramic 100 nF 50 V............................................................................ 312040153
C2 Cap. Mylar 100 nF 50 V............................................................................... 316040085
C12, C13 Cap. Ceramic 22 pF 50 V.............................................................................. 312040130
C14, C15, C16 Cap. Elec. 10 µF 25 V .................................................................................... 311040663
C17 Cap. Ceramic 1 nF 50 V................................................................................ 312040107
C18, C19, C20 Cap. Ceramic 22 nF 50 V.............................................................................. 312040116
C22, C23 Cap. Mylar 10 nF 50 V................................................................................. 316040084
C21, C24 Cap. Ceramic 470 pF 50 V............................................................................ 312040118
D1, D2, D3,
D4, D5, D6, D7, D8,
D9, D10, D11, D12 Diode 1N4148................................................................................................ 361040155
DSP1, DSP2, DSP3 Display LED (HDSP5301 or LA6760)........................................................ 999860001
J1A, J2A 14 pin ribbon connector socket................................................................. 341040357
LED1, LED3 LED green...................................................................................................... 361040329
LED2,LED4, LED5,LED11 LED amber/yellow........................................................................................ 361040328
LED6,LED7,
LED8,LED9,LED10 LED red.......................................................................................................... 361040327
Q1, Q2, Q3, Q4, Q13 Transistor BC547B....................................................................................... 361040159
R1, R2, R3, R5, R6,
R14, R26, R28, R31,
R36, R39, R41, R43 Resistor 10k 0.25 W 5%............................................................................... 325040284
R4 Resistor DIL Resistor pack 7/27k 5%........................................................ 325046010
R7, R13 Resistor 4k7 0.25 W 5%............................................................................... 325040287
R8 Resistor 27k 0.25 W 5%............................................................................... 325040319
R10, R33, R65, R70 Resistor 22k 0.25 W 5%............................................................................... 325040318
R11 Resistor 180E 0.25 W 5% ............................................................................ 325040309
R12 Resistor 6k8 0.25 W 5%............................................................................... 325040335
R15 Resistor 9k09 0.25 W 1% Metal Film......................................................... 325040145
R16 Resistor 560E 0.25 W 0.5% Metal Film ...................................................... 325040135
R17 Resistor 1k5 0.25 W 0.5% Metal Film........................................................ 325040137
R18 Resistor 4k7 0.25 W 0.5% Metal Film........................................................ 325040138
R19, R24, R69 Resistor 2k2 0.25 W 5%............................................................................... 325040282
Ref. 185040646 MR730/720/700/480 Technical Manual ¯ Revision F ¯ Issued March 2001

30
R20 Resistor 412E 0.25 W 0.5% Metal Film..................................................... 325040152
R21,
R22, R23, R27, R29 Resistor 820E 0.25 W 0.5% Metal Film..................................................... 325040136
R25, R35, R40 Resistor 100k 0.25 W 1% Metal Film ......................................................... 325040139
R30 Resistor 220E 0.25 W 1% Metal Film........................................................ 325040134
R32, R63 Resistor 15k 0.25 W 5% .............................................................................. 325040317
R34 Resistor 180k 0.25 W 1% Metal Film ......................................................... 325040125
R37, R38 Resistor 22E 0.25 W 1% Metal Film.......................................................... 325040133
R42 Resistor 2k7 0.25 W 5% .............................................................................. 999012720
SW2, SW3, SW4 Push Switch.................................................................................................. 349040094
SW5 Heater Wire Switch...................................................................................... 349040099
SPK1 Audio Transducer CB-12KP...................................................................... 426040015
U2 IC Octal Latch 74LS373............................................................................... 999610004
U3 IC Micro-Processor 8085............................................................................ 999630012
U4 IC Ram I/O Timer 8156................................................................................. 999630003
or IC Ram I/O Timer 81C55......................................................................... 363040415
U5 IC Hex Inverter 74HC14............................................................................... 363040232
U6, U8 IC 8 Channel Mux. CD4051B...................................................................... 363040125
U7 IC Display Driver MM5451N..................................................................... 363040126
U9 IC 3×2 Channel Mux. CD4053B.................................................................. 999610003
U10 IC Quad Operation Amplifier TL074......................................................... 363040124
VR1 10k Preset...................................................................................................... 327041591
VR2, VR3 5k Potentiometer.......................................................................................... 327041562
VR4 10k Preset Multiturn.................................................................................... 327041565
VR5 50k Preset...................................................................................................... 327041590
XTAL1 Crystal 6.14 Mhz.......................................................................................... 999820001
Spacer Heater Wire Switch......................................................................... 693040522
Ref. 185040646 MR730/720/700/480 Technical Manual ¯ Revision F ¯ Issued March 2001

31
8.9.2 POWER BOARD COMPONENTS : (REVISION H AND LATER PCBS)
Reference Description Part Number
Power PCB Assembly MR480 Complete.................................................. 043040678
Power PCB Assembly MR700/720/730 Complete................................... 043040637
C6, C8, C32 Cap. MKT. 100 nF 100 V............................................................................. 311040028
C7, C33 Cap. Poly 100 nF 250 V ................................................................................ 316040073
C25, C27 Cap. Elec. 470 µF 25 V................................................................................. 999234710
C26 Cap. Elec. 2200 µF 25 V............................................................................... 311040695
C28, C29 Cap. Elec. 10 µF 25 V................................................................................... 311040663
C30, C31 Cap. Ceramic 22 nF 50 V .............................................................................. 312040116
D13, D14,
D15, D16, D17, D18 Diode 1N4002............................................................................................... 361040163
D19, D20, D21 Diode 1N4148............................................................................................... 361040155
F1 Fuse fast acting 1 A (20 × 5 mm) ............................................................... 999830001
F2 Fuse fast acting 4 A (20 × 5 mm) ............................................................... 999830017
F3, F4 (MR700/720/730) Fuse fast acting 2 A (20 × 5 mm) for 230 V ............................................... 999830009
F3, F4 (MR700/720/730) Fuse fast acting 3 A (20 × 5 mm) for 115 V ............................................... 999830012
F3, F4 (MR480) Fuse fast acting 1.5 A (20 × 5 mm) for 230 V ............................................ 999830008
F3, F4 (MR480) Fuse fast acting 2 A (20 × 5 mm) for 115 V ............................................... 999830009
Q6, Q10, Q12 Transistor BC547B....................................................................................... 361040159
Q5 Transistor BC557B....................................................................................... 361040156
Q7 IC 5 V Regulator 7805.................................................................................. 999600003
Q8 IC 5 V negative Regulator 79L05............................................................... 363040146
Q9, Q11 Triac BTA 08-600......................................................................................... 999550011
U11, U12 IC Optocoupler MOC3021 or MOC3022................................................... 367060001
U13 IC Optocoupler CNY17-2............................................................................ 363040045
R9 Resistor 18E 0.25 W 5%.............................................................................. 325040366
R44, R46, R48, R50,
R54, R58, R60, R66 Resistor 10k 0.25 W 5% .............................................................................. 325040284
R45, R55, R61 Resistor 2k7 0.25 W 5% .............................................................................. 999012720
R47 Resistor 22k 0.25 W 5% .............................................................................. 325040318
R49 Resistor 120E 0.25 W 5%............................................................................ 325046034
R51, R52 Resistor 3k3 0.25 W 5% .............................................................................. 325040303
R53, R59 Resistor 270E 0.25 W 5%............................................................................ 325040294
R56 Resistor 12k 0.25 W 5% .............................................................................. 325040289
R57 Resistor 180E 0.25 W 5%............................................................................ 325040309
R64 Resistor 220E 0.25 W 5%............................................................................ 325040296
R67 Resistor 1M 0.25 W 5% .............................................................................. 325052305
R68 Resistor 100k 0.25 W 5% ............................................................................ 325040139
Fuse Clips..................................................................................................... 999840001
Ref. 185040646 MR730/720/700/480 Technical Manual ¯ Revision F ¯ Issued March 2001

32
8.10 MECHANICAL PARTS LIST
The mechanical components listed below are referenced in accordance with the appropriate exploded diagrams following.
8.10.1 MR480 MECHANICAL PARTS
Reference Description Part Number
1 Heaterplate Assembly 150 W 100 V ................................................................................. 043040701
Heaterplate Assembly 150 W 115 V ................................................................................. 043040700
Heaterplate Assembly 150 W 230 V ................................................................................. 043040695
2 Clamp Chamber Kit Blank (includes Gasket Ref. 5)....................................................... 043040829
Clamp Chamber Kit French (includes Gasket Ref. 5)..................................................... 043040830
Clamp Chamber Kit German (includes Gasket Ref. 5).................................................... 043040831
Clamp Chamber Kit English (includes Gasket Ref. 5).................................................... 043040834
3 Spring Mounting................................................................................................................ 662040040
4 Guard Chamber Kit ............................................................................................................. 043040709
5 Gasket Clamp ....................................................................................................................... 336060126
6 PCB Assembly MR480 Control No Eprom...................................................................... 043040679
7 Case Front Kit MR480 English......................................................................................... 043040713
NOTE, for other Case Front Kits - Specify Model Number eg "Case Front Kit
MR480AGM"
8 Knob Control ....................................................................................................................... 281150393
9 Case Door Right.................................................................................................................. 693040473
10 Switch Harness Assembly ................................................................................................ 043040697
11 PCB Assembly MR480 Power Complete......................................................................... 043040678
12 Case Foot............................................................................................................................. 693040478
13 Case Door Left .................................................................................................................... 693040472
14 Mains Cord MR700 USA Hosp Grade 3.3m UL............................................................. 095428157
Mains Cord MR700 Australian Clear Plug 3.3 m ............................................................ 095428159
Mains Cord MR700 No Plug 3.3 m................................................................................... 095428160
Mains Cord MR700 French 230 V No Plug 3.3 m........................................................... 095428203
Mains Cord MR700 Danish Plug 230 V 2.9 m................................................................. 095428204
Mains Cord MR700 USA Hosp Grade 2 ft 90° Plug UL................................................ 095428205
Mains Cord MR700 UK Plug 230 V Fused 3.3 m ............................................................ 095428214
Mains Cord MR700 Schuko Plug 230 V 3.3 m................................................................ 095428217
Mains Cord MR700 Schuko Plug 230 V 3.3 m Earth Lug.............................................. 095428226
15 Screw #8 × 1/2" Pan Phil TY25 S/S ................................................................................... 614040120
16 Case Body kit MR480AEA English - Australasia.......................................................... 043041063
Case Body kit MR480JHB English/Spanish................................................................... 043041027
NOTE: For other Case Body Kits, - Specify Model Number eg "Case Body Kit
MR480AGM"
17 Washer M6 Wavey............................................................................................................ 622040140
18 Nut M6 Nyloc ZPS............................................................................................................. 621040524
19 Bracket Transformer........................................................................................................... 641040706
20 Screw M4 × 8 Pan Phil ZP Taptite.................................................................................... 614040117
21 Bracket Mounting 30mm × 5mm Tongue........................................................................ 693040491
22 Screw M6 × 25 Csk Allen S/S ............................................................................................ 614040208
23 Transformer Assembly MR480 230 V.............................................................................. 043040551
Transformer Assembly MR480 115 V.............................................................................. 043040850
24 Screw M4 × 14 Pan Phil Taptite Ychr ............................................................................... 614040223
25 Clamp Cord Small................................................................................................................ 693040476
Clamp Cord Large............................................................................................................... 693040477
26 Spacer Hose Heater Cord .................................................................................................. 336060064
27 Washer M6 Ext Fan Disk Lock Zn/St .............................................................................. 622041013
28 Screw M6 × 16 Allen S/S Button Head............................................................................ 614040230
Lug Earth.............................................................................................................................. 345060096
29 Probe Socket Harness Assembly..................................................................................... 043040698
30 Screw M3 × 5 Taptite Pan Phil Ychr ................................................................................. 614040116
31 Washer Lock M4 Int Zn/Pl................................................................................................ 622040130
Ref. 185040646 MR730/720/700/480 Technical Manual ¯ Revision F ¯ Issued March 2001
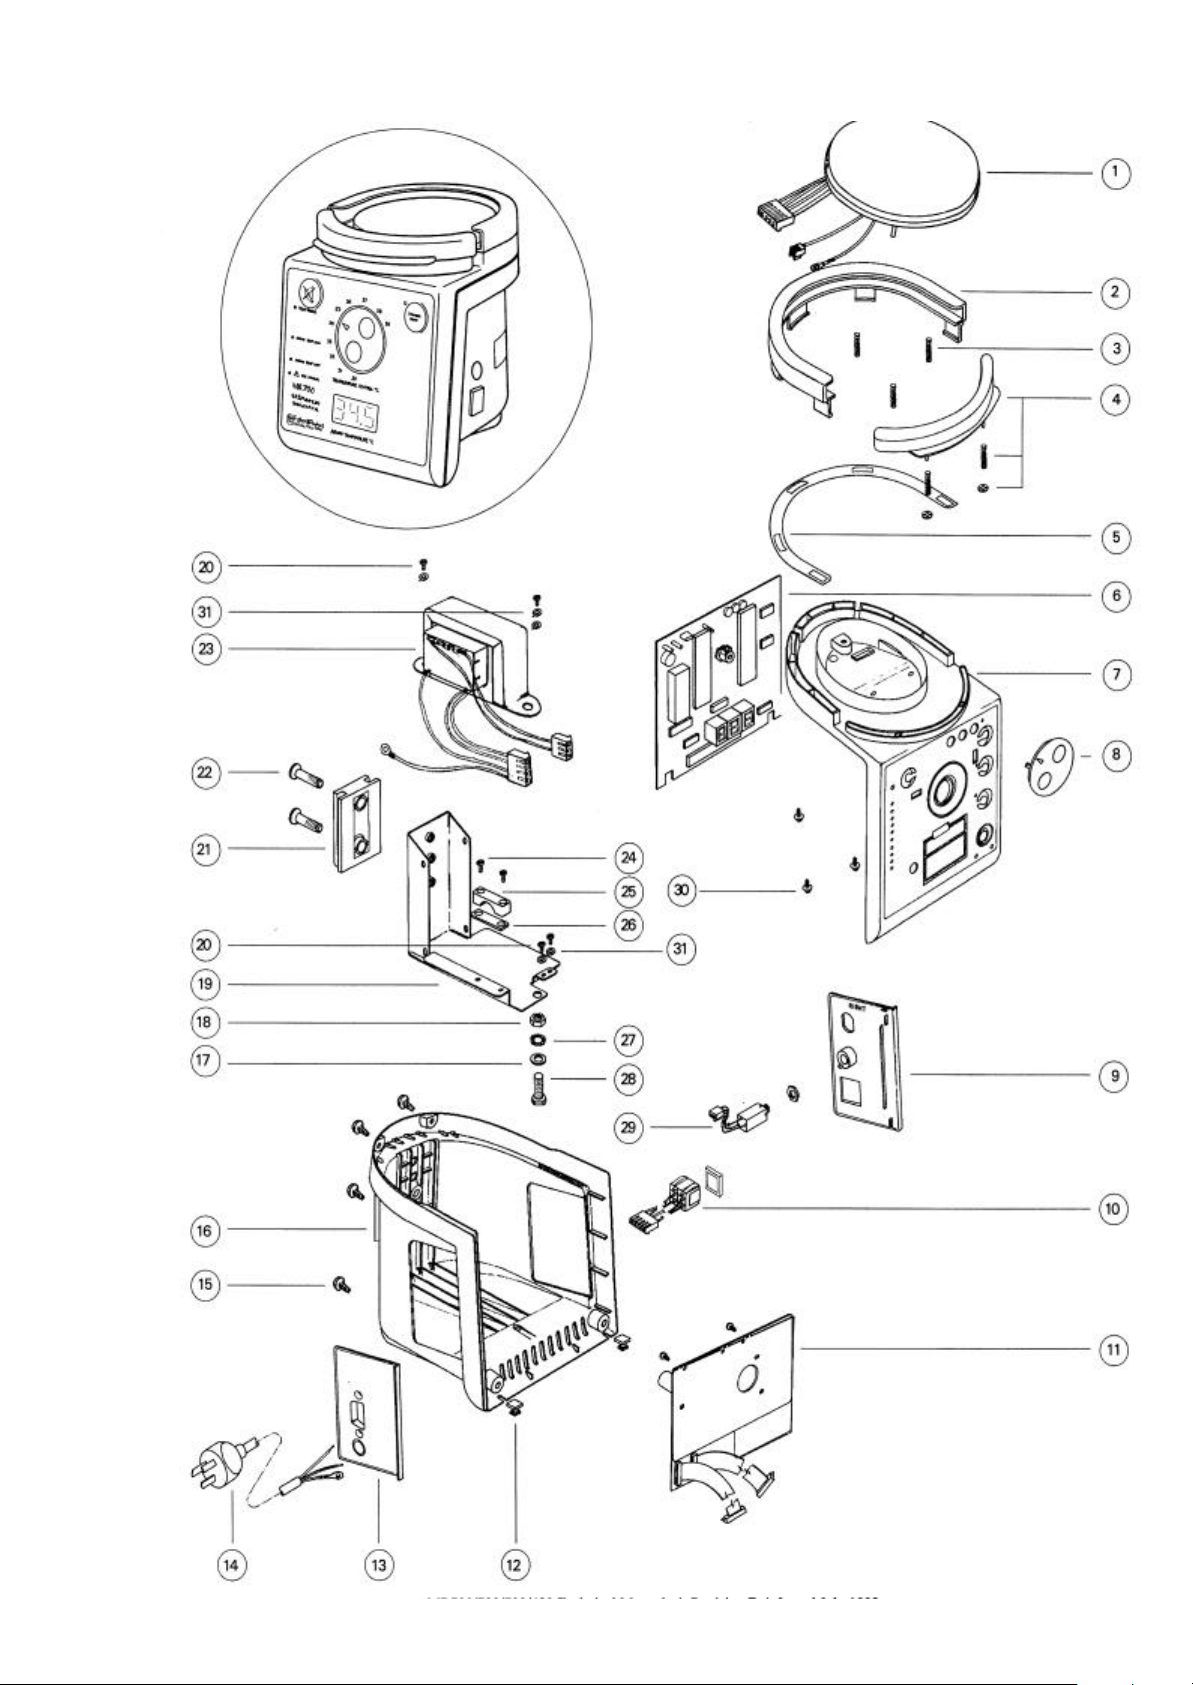
8.10.2 EXPLODED DIAGRAMS: MR480
33
Ref. 185040646 MR730/720/700/480 Technical Manual ¯ Revision F ¯ Issued March 2001

8.10.3 MR730/720/700 MECHANICAL PARTS
Reference Description Part Number
1 Heaterplate Assembly 150 W 100 V................................................................................... 043040701
Heaterplate Assembly 150 W 115 V................................................................................... 043040700
Heaterplate Assembly 150 W 127 V................................................................................... 043040839
Heaterplate Assembly 150 W 230 V................................................................................... 043040695
Heaterplate reflector upgrade kit (includes new front case and reflector) 043042054
2 Clamp Chamber Kit Blank ( includes Gasket Ref. 5)......................................................... 043040829
Clamp Chamber Kit French (includes Gasket Ref. 5)........................................................ 043040830
Clamp Chamber Kit German (includes Gasket Ref. 5)....................................................... 043040831
Clamp Chamber Kit English (includes Gasket Ref. 5)....................................................... 043040834
3 Spring Mounting................................................................................................................... 662040040
4 Guard Chamber Kit................................................................................................................ 043040709
5 Gasket Clamp.......................................................................................................................... 336060126
6 PCB Assembly MR700 Control No Eprom........................................................................ 043040633
PCB Assembly MR720 Control No Eprom........................................................................ 043040677
PCB Assembly MR730 Control No Eprom........................................................................ 043040675
7 Case Front Kit MR700 English............................................................................................ 043040710
Case Front Kit MR700 French/Dutch................................................................................. 043041132
Case Front Kit MR700 German/French.............................................................................. 043041128
Case Front Kit MR720 English............................................................................................ 043040711
Case Front Kit MR720 French/Dutch................................................................................. 043040803
Case Front Kit MR730 English............................................................................................ 043040712
Case Front Kit MR730 French/Dutch................................................................................. 043040804
Case Front Kit MR730 German/French.............................................................................. 043040774
Case Front Kit MR730 Italian.............................................................................................. 043041243
NOTE: For other Case Front languages Specify Model Number eg "Case Front
Kit for MR720ASU"
8 Knob Control......................................................................................................................... 281150393
9 Knob Offset............................................................................................................................ 693040475
Knob Fixed Offset................................................................................................................. 693040483
10 Case Door Right.................................................................................................................... 693040473
11 Switch Harness Assembly................................................................................................... 043040697
12 PCB Assembly (MR730/720/700) Power Complete.......................................................... 043040637
13 Case Foot................................................................................................................................ 693040478
14 Harness Assembly DB9 (RS232)......................................................................................... 043040699
15 Case Door Left....................................................................................................................... 693040472
16 Mains Cord MR700 USA Hosp Grade 3.3 m UL............................................................... 095428157
Mains Cord MR700 Australian Clear Plug 3.3 m 095428159
Mains Cord MR700 No Plug 3.3 m 095428160
16 Mains Cord MR700 French 230 V No Plug 3.3 m .............................................................. 095428203
Mains Cord MR700 Danish Plug 230 V 2.9 m .................................................................... 095428204
Mains Cord MR700 UK Plug 230 V Fused 3.3 m.............................................................. 095428214
Mains Cord MR700 Schuko Plug 230 V 3.3 m................................................................... 095428217
Mains Cord MR700 Japanese - Right Angle Plug 3.3m 095428308
Mains Cord MR700 Schuko Plug 230 V 3.3 m Earth Lug................................................. 095428226
17 Screw #8 × 1/2" Pan Phil TY25 S/S..................................................................................... 614040120
18 Case Body Kit MR700AFU French/Dutch........................................................................ 043041133
Case Body Kit MR700ALU Italian/English....................................................................... 043041244
Case Body Kit MR700AEA Australasia Models ............................................................. 043040989
Case Body Kit MR700AGM/AGU German Models 043042058
Case Body Kit MR700GEU English - Japanese Models.................................................. 043040775
Case Body Kit MR720AEA Australasia Models ............................................................. 043040990
Case Body Kit MR720AFU French/Dutch........................................................................ 043040807
Case Body Kit MR720JHB English/Spanish Baxter......................................................... 043040714
Case Body Kit MR730AFU French/Dutch........................................................................ 043041134
Case Body Kit MR730AEU English/French...................................................................... 043040800
Case Body Kit MR730AEA Australasia Models ............................................................. 043040991
Case Body Kit MR730AND/ADU Norway/Denmark 043042055
Case Body Kit MR730GEU English Japan......................................................................... 043040776
Case Body Kit MR730AGU German/French..................................................................... 043040977
Case Body Kit MR730JEB English/French Baxter ............................................................ 043040921
34
Ref. 185040646 MR730/720/700/480 Technical Manual ¯ Revision F ¯ Issued March 2001

35
Case Body Kit MR730JEU English/French Canadian 043041335
Case Body Kit MR730JHB English/Spanish Baxter........................................................ 043040715
NOTE: For other Case Body types Specify Model Number eg "Case Front Kit
MR720ASU"
19 Washer M6 Wavey.............................................................................................................. 622040140
20 Nut M6 Nyloc ZPS............................................................................................................... 621040524
21 Bracket Transformer............................................................................................................. 641040706
22 Screw M4 × 8 Pan Phil ZP Taptite...................................................................................... 614040117
23 Screw M4 × 50 Pan Phil ZP.................................................................................................. 614040214
24 Nut M4 Nyloc ZPS............................................................................................................... 621040517
25 Bracket Mounting 30 mm × 5 mm Tongue........................................................................ 693040491
26 Screw M6 × 25 Csk Allen S/S .............................................................................................. 614040208
27 Insulator Transformer.......................................................................................................... 331040158
28 Transformer Assembly (MR700 Series) 100 V .................................................................. 043041289
Transformer Assembly (MR700 Series) 115 V .................................................................. 043041288
Transformer Assembly (MR700 Series) 127 V .................................................................. 043040931
Transformer Assembly (MR700 Series) 230 V (double insulated)................................ 043041287
29 Tape Foam Adhesive 3 mm × 10 mm × 60 mm.................................................................. 254040059
30 Screw M4 × 14 Pan Phil Taptite Ychr ................................................................................. 614040223
31 Clamp Cord Small.................................................................................................................. 693040476
Clamp Cord Large................................................................................................................. 693040477
32 Spacer Hose Heater Cord .................................................................................................... 336060064
33 Washer M6 Ext Fan Disk Lock Zn/St ................................................................................ 622041013
34 Screw M6 × 16 Allen S/S Button Head.............................................................................. 614040230
Lug Earth................................................................................................................................ 345060096
35 Screw M3 × 5 Taptite Pan Phil Ychr ................................................................................... 614040116
36 Washer Lock M4 Int Zn/Pl.................................................................................................. 622040130
37 Harness J10-Hose & Socket Heater Wire Kit................................................................... 043040961
38 Probe Socket Harness Assembly....................................................................................... 043040698
38 Cap for probe socket 693041379
Instruction swing tag English 185041088
Instruction swing tag French 185041147
Instruction swing tag German 185041144
Instruction swing tag Italian 185041145
Instruction swing tag Dutch 185041324
Instruction swing tag Spanish 185041146
Instruction swing tag Portugese 185041334
Instruction swing tag Swedish 185041331
Instruction swing tag Finnish 185041333
Instruction swing tag Norwegian 185041332
Instruction swing tag Japanese 185041148
Instruction swing tag Danish 185041335
Ref. 185040646 MR730/720/700/480 Technical Manual ¯ Revision F ¯ Issued March 2001

8.10.4 EXPLODED DIAGRAMS: MR730/720/700
36
Ref. 185040646 MR730/720/700/480 Technical Manual ¯ Revision F ¯ Issued March 2001

37
8.10.5 HEATERPLATE ASSEMBLY PARTS (MR730/720/700/480)
Reference Description Part Number
1 Reflector (added after 01/01/99)....................................................................................... 641040829
2 Screw M4 × 8 Pan Phil Taptite......................................................................................... 614040117
3 Cover Element Plate........................................................................................................... 641040707
4 Element Assembly 230 V 150 W ...................................................................................... 043040893
Element Assembly 127 V 150 W ...................................................................................... 043040833
Element Assembly 115 V 150 W ...................................................................................... 043040894
Element Assembly 100 V 150 W ...................................................................................... 043040895
5 Screw M3 × 5 Taptite Pan Phil Ychr................................................................................ 614040116
6 Insulator Element............................................................................................................... 331040114
7 Thermistor and Harness Assembly................................................................................. 095428156
8 Plate Heater......................................................................................................................... 043040875
9 Harness Heaterplate - Earth.............................................................................................. 095428154
10 Washer Lock M4 Int Zn/Pl............................................................................................... 622040130
11 Thermostat 118 Degree Centigrade................................................................................. 349040052
12 Harness J7 - Heaterplate................................................................................................... 095428279
NS Screw in style standoffs 336060143
NS Reflector upgrade kit (includes new front case) 043042054
Ref. 185040646 MR730/720/700/480 Technical Manual ¯ Revision F ¯ Issued March 2001

38
8.10.6 EXPLODED DIAGRAMS:HEATERPLATE ASSEMBLY MR730/720/700/480 (I NVERTED VIEW)
Ref. 185040646 MR730/720/700/480 Technical Manual ¯ Revision F ¯ Issued March 2001

8.11 PCB IDENTIFICATION DIAGRAM
39
Ref. 185040646 MR730/720/700/480 Technical Manual ¯ Revision F ¯ Issued March 2001

8.12 POWER PCB HARNESS CONNECTION DIAGRAM
40
Ref. 185040646 MR730/720/700/480 Technical Manual ¯ Revision F ¯ Issued March 2001

41
9.0 PRODUCT CHANGE HISTORY ___________________________________
This change history details changes which may have significance for servicing. It does not include changes that are
insignificant to users or service technicians. Refer also to change panel on circuit diagrams.
DATE CHANGE
NUMBER
FIRST SERIAL
NUMBER
COMMENTS
AFFECTED
29/06/92 1056 92XXAAA02786 Introduction of Version 2.0 Software.
• Changes from Version 1.0 are:
• Delay on chamber temperature display.
• Sensitivity of control knobs increased.
• Auto standby mode for MR720.
(Note: this change not introduced on AF- and AG- models
until serial number 93XXAAA01818, excluding AGM models).
03/08/92 1019 92XXAAA05495 Enhanced 41 °C calibration - with introduction of Rev F PCB.
Note: this change not introduced on AF- and AG- models until serial
number 93XXAAA01818).
22/01/93 1363 93XXAAA01818 Introduction of Version 2.0 Software on AF- and AG- models.
Note: this change not introduced on AGM models.
25/01/93 1100 93XXAAA02582 C7 added, R57 changed to 390E from 1k2.
7/06/94 1992 9473JES08020 (1) Version 3.0 software started.(All countries except Japan and German)
Changes from version 2.0 are:
• Standby mode times out after 30 minutes (was 20).
• Low temperature alarm in warm up mode activated sooner.
• Set low indicator alarm changed.
• Display during A to D calibration improved.
12/10/94 2088 9473AGU17549 AGU AND AGT Models to version 3 software.
22/08/94 2079 9473AGM14257 MR730AGM to version 3 software.
15/12/94 2161 9473GES22496 MR730GES to version 3 software .
17/02/95 2313 9573GEU03084 MR730GEU to version 3 software.
3/07/95 2469 9541JHB10757 Electroless nickel plating on heaterplate started.
9/08/95 2433 9573JHB12155 Changed recommended settings on front fascia panel to 39, -2.
1/10/95 2443 9573AEA15923 Introduction of Rev H PCB on MR700/720/730. Change Molex
connectors style on power PCB.
01/4/97 3212 9773XXX08041 Introduction of Revision J PCB on MR700/720/730.
23/5/97 3303 9748XXX10692 MR480: Introduce Revision J PCB. Transformer secondary wiring
changed (earth wire removed). Earth wire added to PCB.
30/5/97 3308 9773XXX19731 Heaterplate standoff style changed to shoulder bolts.
01/01/98 3934 9973XXX00001 Heaterplate surface changed to Anodised
01/01/99 4371 2000-73XXX00001 Reflector added to underside of heaterplate
For software and hardware compatability see § 7.3.
Ref. 185040646 MR730/720/700/480 Technical Manual ¯ Revision F ¯ Issued March 2001

9.1 MODEL NUMBER EXPLANATION
eg MR730AEU (model type MR730, with specific variations as below).
The table below lists variations in models that are for general sale, there are some models which are sold to specific
customers that are not shown here.
42
First Letter Voltage Second
A 230 ± 25 V D English English/German
P 127 ± 10 V E English English/French
J 115 V F French/Dutch French/Dutch
G 100 ± 10 V G German/French English/German
9.2 SERIAL NUMBER EXPLANATION
92 XX AAA XXXXX
YEAR MODEL CODE SERIAL NUMBER
41 MR410
48 MR480
70 MR700
72 MR720
73 MR730
Third
Letter
H English English/Spanish
J Japanese English/Japanese
L Italian English/Italian
S Spanish/Portugese Spanish/Portugese
W M Swedish Swedish/Finnish
D N Danish Danish/Norwegian
D U Danish Danish/English
N U Swedish/Finnish/Norwegian Swedish/Finnish/Norwegian
P U Polish Polish/English
R U Russian Russian/English
letter
Three letter code is as per above specification.
Front Panel Language Side Panels Language
Ref. 185040646 MR730/720/700/480 Technical Manual ¯ Revision F ¯ Issued March 2001

43
APPENDIX A___________________________________________________
A1 CALIBRATION MODE
Entry to the calibration mode is made by holding down the ‘Chamber Temp’ button and turning on the Mains Power
switch.
After a two second delay the display should show ‘-1-’.
On releasing the ‘Chamber Temp’ button the display will show the humidifier model number (730/720/700 or 480).
The ‘Chamber Temp’ button is now used to step between functions as shown below.
1 Model number display.
2 Software version display.
3 Traceability number.
4 41.0 °C comparator calibrate. VR4.
5 ADC zero calibrate. VR5.
On pushing the ‘Chamber Temp’ button the display will show the present function number then after a one second
delay step to the next higher function number, where if the ‘Chamber Temp’ button is then released then that function is
entered
The calibration mode will time out (to normal operating mode) 5 minutes after the last ‘Chamber Temp’ button push. The
normal exit mode is to turn the humidifier mains power switch off then on again.
For details on 41.0 °C and ADC zero calibration procedures refer § 5.3.
A2 ENGINEERING MENU
To enter the engineering menu push the Mute and ‘Chamber Temp’ buttons simultaneously and hold for at least 1.5
seconds. At this time the display will show SET (for set temperature display) as a pointer to that function and on release
of the ‘Chamber Temp’ button the display will show the set Temperature Control temperature setting to one decimal
place. To maintain this display, the Mute button should be kept depressed. If the Mute is released, the display will
revert to normal operation in about 6 seconds.
The display can be stepped through the engineering menu in two ways.
• If the Mute is held down constantly the functions can be selected sequentially by pressing the ‘Chamber
Temp’ until the display changes to the next function pointer, where if the ‘Chamber Temp’ button is then
released the display will show that function.
• Releasing the mute button the humidifier will automatically step through the menu until either the mute button
is pressed whereupon the display will show that function or if 6 seconds has elapsed and the humidifier will
display ‘End’.
If ‘End’ appears on the display and the Mute button is momentarily pushed the time out will be inhibited and the
stepping through the function pointers continued.
A2.1 ENGINEERING DISPLAY FUNCTIONS: HEATER WIRE MODE
SET Set temperature display (°C).
OFF Offset temperature display (Chamber Control) (°C).
Edc Heater wire duty cycle (%).
Cdc Heaterplate duty cycle (%).
hP Heaterplate temperature (°C).
L Programming link status.(L1, L2, ... L6).
CP Compare probes (Probe test).
Ei Heater wire integral.
Ti Heaterplate integral.
Ref. 185040646 MR730/720/700/480 Technical Manual ¯ Revision F ¯ Issued March 2001

A2.2 ENGINEERING FUNCTIONS: NON HEATER WIRE MODE
SET Set temperature display (°C)
dc Heaterplate duty cycle (%)
hP Heaterplate temperature (°C)
L Programming link status
CP Compare probes (Probe test)
i Heaterplate Integral
A2.3 INTEGRAL DISPLAY
The integral is an error offset signal which constantly accrues to compensate for the temperature difference between the set control and probe. It is displayed in the ‘Ei’ and ‘Ti’
engineering functions in hexadecimal notation, ie. the count progresses from 0 to 9 then continues through A b c d E F before cycling back to 0. A negative integral is indicated by
the three ‘decimal points’ in the display being lit. The magnitude of the integral is ± EFF (± 3839 in decimal notation).
A3 PROGRAMMING CONTROL OPTIONS
The following options can be enabled by joining the pads on the control PCB as shown.
x = don’t care.
1 = link .
0 = no link.
L1 L2 L3
x x 0 ISO draft standard audio alarm.
x x 1 Gliding tone audio alarm.
1 0 x 50 °C maximum temperature Heaterplate.
1 1 x 80 °C maximum temperature Heaterplate.
0 1 x 90 °C maximum temperature Heaterplate.
0 0 x 110 °C maximum temperature Heaterplate.
The state of the above links can be displayed in the engineering menu (‘L’).
44
The factory default settings are for the ISO alarm and 110 °C heaterplate, except MR720 which has an 80 °C heaterplate.
A4 ERROR CODES
During operation, if the microprocessor U3 does not receive an expected interrupt within a given time window an error
condition will be flagged. In particular the RST6.5 interrupt which marks the termination of the integration ramp from
U10-E and also controls the counter in U4 will, in the event of the count exceeding certain limits, generate an error
message.
Some of the error indications which can be displayed on the MR700 Series digital display are listed below, with an
explanation of the possible cause.
Error Messages
Ec Checksum error (possible failure of U1 EPROM).
En Memory test error (possible failure of U4 RAM).
EXx Where X = 0 through 7, indicating multiplexer stage where error occurred.
Where x = o or u, indicating ADC overflow error or underflow error, at the indicated multiplexer stage. (ADC
counts outside the expected range will generate either an under or overflow error).
b-1 The Mute button is on at turn on or has been on for > 5 minutes.
b-2 The Standby button is on (see b-1 above).
F-2 The Heater Wire fuse, F2 is open circuited.
--- Temperature sensor probe fault (see Sect.3.1).
The following errors may occur during the software-driven shorted probe cable test. If the errors do not persist they do
not necessarily indicate a faulty probe assembly. It is because of conflicting results during the test that a definite
conclusion cannot immediately be made.
Ref. 185040646 MR730/720/700/480 Technical Manual ¯ Revision F ¯ Issued March 2001

45
Errors EP2 to EP4 can be caused for example by abnormal high differential temperatures on the two thermistors or by
rapidly changing input temperatures.
EP1 Hardware fault; Q13 short not effective.
EP2 Low probe temperature (~0 °C).
EP3 High probe temperature (~70 °C).
EP4 Partial short between the active probe cable conductors.
A5 MR700 SERIES HUMIDIFIER SERIAL DATA INTERFACE
A5.1 SERIAL DATA FORMAT
1 byte : (semi colon) Marks beginning of data record.
4 bytes ASCII Temperature Control setting.
4 bytes ASCII Airway temperature.
4 bytes ASCII Chamber temperature.
4 bytes ASCII Heaterplate temperature.
4 bytes ASCII Heater wire duty cycle.
4 bytes ASCII Heaterplate duty cycle.
4 bytes ASCII Chamber Control setting .
4 bytes * Status information. (1*ASCII 3*binary bytes).
2 bytes CR, LF (Marks end of data record).
Between each of the above lines there is approximately a 50 ms pause before the next line is transmitted. The complete
data record is repeated every 500 to 600 ms (500 ms on a 60 Hz supply, 600 ms with 50 Hz).
Data format is RS232 levels, no handshaking, 9600 baud, 8 bits, no parity, with one stop bit.
Between the semi colon and the line feed there are eight, 4-byte packets of information as shown above.
In each case the first byte of the packet contains an identification letter from ‘a’ through ‘h’ in ASCII.
The format of the 3 bytes following the ASCII I.D. is as shown below.
I.D. a - SET temperature.
I.D. b - Airway temperature.
I.D. c - Chamber temperature.
Range 5.0 to 80.0 °C, decimal point is assumed between 1st and 2nd digits.
I.D. d - Heaterplate temperature.
Range 14.0 to 99.9 °C decimal point assumed, 100 to 135°C no decimal point.
I.D. e - Heater Wire duty cycle.
I.D. f - Heaterplate duty cycle.
Range 0 to 100 %.
I.D. g - Chamber Control Setting.
Range -5.0 to +2.0 decimal point assumed. Plus or minus sign in leading ASCII byte.
I.D. h - Status information.
A5.2 STATUS INFORMATION
The ASCII I.D. is followed by three binary bytes giving alarms and error information, see list below:
Ref. 185040646 MR730/720/700/480 Technical Manual ¯ Revision F ¯ Issued March 2001

46
The data record as received should start with an ‘:’ and end with an ‘LF’. Under abnormal operating conditions however
(when there are ‘E’ messages in the display) some or all of the above packets ‘a’ to ‘g’ can be missing. The status
information packet ‘h’ will always be present (as long as the micro is running) and will show the error condition.
When there are error messages in the display, bit 6 of the last status byte will be set high indicating a fatal error
condition.
First Byte
Bit0 Probe disconnect LED
Bit1 Heater Wire disconnect LED
Bit2 Airway Temp Low LED
Bit3 Airway Temp High LED
Bit4 Chamber Temp Low LED
Bit5 Chamber Temp High LED
Bit6 Chamber Temp Button LED
Bit7 Always set high
Second Byte
Bit0 Standby button LED
Bit1 Heater Wire operation LED
Bit2 Remote Shut Down request acknowledge
Bit3 Set Low LED
Bit4 Audio alarm muted
Bit5 External request acknowledge Heater Wire operation
Bit6 External request ack nowledge No Heater Wire operation
Bit7 Always set high
Third Byte
Bit0 Heaterplate ON
Bit1 Heater Wire ON
Bit2 Always low
Bit3 Always low Bit4 Bit5 Model
Bit4 See table 0 0 MR480
Bit5 See table 1 0 MR700
Bit6 Fatal error 0 1 MR720
Bit7 Always set high 1 1 MR730
A5.3 REMOTE STANDBY
A constant high input (pin 2 DB9 connector >1.5 V) shuts down the humidifier. Low or open circuit input enables the humidifier. An RSD request signal puts the humidifier into
the standby mode; i.e. No low alarms active, controlled 40.0 °C heaterplate and 15% Heater Wire duty cycle. On removal of an RSD request the humidifier enters the warm up
mode. On the MR730/720 models the standby LED is also turned on (not flashing).
Ref. 185040646 MR730/720/700/480 Technical Manual ¯ Revision F ¯ Issued March 2001

A5.4 SERIAL DATA INTERFACE CONNECTOR
A DB9 connector on the side of the humidifier provides the interface connections.
pin 2 Remote shut down input (Serial in).
pin 3 Serial Data output.
pin 5 Humidifier Earth.
pin 7 +5 V (30 mA max)
47
Ref. 185040646 MR730/720/700/480 Technical Manual ¯ Revision F ¯ Issued March 2001

48
APPENDIX B __________________________________________________
B1 MAINTENANCE SCHEDULE
The MR700 series humidifiers operating software continually monitors the performance characteristics of the humidifier reporting any errors and in the event of a fatal error
terminates operation in a fail safe mode. For this reason preventative maintenance of the humidifier need only be performed at extended intervals.
The following list of routine checks are recommended to be performed at the intervals stated.
For each maintenance check fill out a checklist, as given in Appendix B2.
B1.1 MONTHLY
Perform the following:
1 Check temperature probe for damage to sensor tips, abrasion of the cable or tarnishing of electrical contacts.
Clean with alcohol on a swab or replace as necessary.
2 Remove and check the reusable hose heater wire (if fitted) for kinks and abrasions. Replace if necessary.
3 Check heater wire connector for damage to cable and both end plugs. Check for correct coupling of the plugs
with their respective sockets on the heater base and heater wire assembly.
4 Check humidifier power cable for damage and replace as necessary.
5 Plug probe and heater wire (if fitted) into heater base and switch on. Observe correct operation of power up
procedure. Check for no immediate alarms and correct display of ambient temperature. Continue to run for at
least 30 seconds by which time all the relevant internal tests will have been completed. Switch off.
B1.2 THREE MONTHLY
Perform a temperature probe test as outlined in § 6.4.
B1.3 ANNUALLY
Execute a performance check appropriate to the humidifier model as detailed in § 6.0.
Carry out Electrical Safety checks as per Appendix B2.
B1.4 ANNUALLY OR IN ACCORDANCE WITH RELEVANT COUNTRY REGULATIONS
Carry out Electrical Safety checks, see Appendix B2.
Ref. 185040646 MR730/720/700/480 Technical Manual ¯ Revision F ¯ Issued March 2001

B2 MAINTENANCE SCHEDULE CHECKLIST
(PHOTOCOPY AND FILE IN MAINTENANCE RECORDS)
49
Type of service check:
Humidifier Serial Number:___________________________ Date: ______________
Step Method Pass Fail
Monthly Check Temperature Probe Refer Appendix B1.1
Check Reusable Heater Wire Refer Appendix B1.1
Check Heater Wire Connections Refer Appendix B1.1
Check Power Cable Refer Appendix B1.1
Perform Self-Test Refer Appendix B1.1
Three Monthly Perform Temperature Probe Test and Check
Temperature Probe
Annually Performance Check see § 6
Electrical Safety Checks - as required
q monthly q 3 monthly q 6 monthly q yearly
see § 4.3 and Appendix B
Method Pass Fail
q q
q q
q q
q q
q q
q q
q q
Earth resistance test Measure the resistance from the earth pin on the mains plug to:
i The heaterplate.(0.2 Ω maximum) (To get a good contact on the
anodised heaterplate, clip under the front edge of it.)
ii The earth stud on the base of the humidifier(0.2 Ω maximum).
Insulation resistance test Use a 500V DC tester to measure the resistance from the phase pin
on the mains plug to:
i The heaterplate (10 MΩ minimum).
ii The earth stud on the base of the humidifier (10 MΩ minimum).
Earth Leakage test Has to be measured using an electrical safety tester as per IEC601.
Measure earth leakage with the earth probe of the tester on the
heaterplate. Earth leakage current is measured at normal operating
voltage and frequency of supply.
Should be 0.5 mA maximum in no fault condition.
Signature:______________________
q q
q q
q q
q q
q q
Ref. 185040646 MR730/720/700/480 Technical Manual ¯ Revision F ¯ Issued March 2001

50
APPENDIX C __________________________________________________
C1 TROUBLESHOOTING GUIDE FOR THE MR700 SERIES RESPIRATORY HUMIDIFIERS
This is a guide to possible corrective action in the case of an humidifier alarm condition or malfunction. It is primarily
written for humidifiers using heated wire mode. So parts of this guide would not be applicable for the MR480 and MR730
and MR720 in the heater wire off mode.
Unless the cause and immediate effects of an alarm condition are understood and assessed to be of no hazard to the
patient, the humidifier should be immediately switched off and removed from the patient circuit.
C1.1 LOW TEMPERATURE
Condition detected Possible cause F Action to take
Temperature less than desired,
no alarm.
Airway temperature low alarm
activated.
Humidifier warming up. Wait for a few minutes.
Standby mode switched on. Push mode button for 1 second to
disable standby. Wait 20 minutes (30
minutes for v3.0 software).
Temperature probe not in position. Check position of temperature probe in
the circuit.
Gas flow stopped or interrupted. Enter standby mode or turn humidifier
off until gas flow resumed. (Gas flow
must be resumed before coming out of
standby mode).
Set temperature increased by more than
2 °C.
Temperature probe not in probe
housing.
Gas flow rate too low. Increase gas flow to more than 2 litres
Too much distance between end of
heater wire and temperature probe.
Wait for temperature to rise.
Fit temperature probe.
per minute.
Use longer heater wire or shorten
inspiratory hose so that distance is
between 25 (1") and 100 mm (4"), ideally
30 mm.
Chamber temperature low alarm
activated.
Ref. 185040646 MR730/720/700/480 Technical Manual ¯ Revision F ¯ Issued March 2001
Poor thermal contact between base of
chamber and heaterplate.
Temperature probe not inserted at
chamber outlet.
Heater element needs replacement. Send for repair.
Gas flow rate too high for chamber Use correct chamber. Refer to the
Check that chamber base and heaterplate
are clean, smooth and flat. If necessary
clean or replace. Humidification
chambers which are not manufactured by
Fisher & Paykel may not be suitable.
Fit temperature probe correctly.
operating instructions for the type of
chamber used.

C.1.2 HIGH TEMPERATURE
Condition detected Possible cause F Action to take
51
Airway temperature high alarm
activated.
Chamber temperature high alarm
activated.
C.1.3 TEMPERATURE FLUCTUATING
Condition detected Possible cause FAction to take
High and low temperature
alarms.
Sudden spurious increase in gas flow. Wait for temperature to fall below
threshold.
Heater wire too close to temperature
probe.
Use shorter heater wire or lengthen
inspiratory hose so that distance is
between 25 (1”) and 100 mm (4”), ideally
30 mm.
Possibly faulty EOH sensor on
Check probe, see § 6.4.
temperature probe (low resistance).
No water in chamber. Refill humidification chamber.
Possibly faulty TOP sensor on
Check probe, see § 6.4.
temperature probe (low resistance).
Ventilation rate too low or too erratic
for proper humidifier temperature
control.
Humidifier temperature control
influenced by external heating or
Ventilation rates below about 6 bpm or of
a highly erratic nature may affect the
stability of the temperature control.
Shield breathing circuit from external
influence.
cooling such as air conditioner.
C.1.4 EXCESSIVE WATER IN CIRCUIT
Condition detected Possible cause FAction to take
Excessive water in inspiratory
circuit due to rainout.
Temperature probes incorrectly
positioned.
Possibly faulty temperature probe
(Could be intermittent short or open
circuit).
If in non-heated wire mode, water trap
Check temperature probe position in the
circuit.
Check probe, see Section 6.4.
(Wriggle probe to pick up intermittent
faults).
Reposition water trap.
not at the lowest point of the circuit.
If in heated wire mode, heater wire too
close to temperature probe.
Increase distance from heater wire to
temperature probe so that the distance is
between 25 (1”) and 100mm (4”), ideally
30mm.
Inspiratory circuit being cooled by air
conditioner.
Shield circuit from air conditioner or use
heater wire circuits.
Chamber control set too high Reduce setting.
Maximum permissible peak flow rate of
humidification chamber has been
exceeded.
Use correct chamber. Refer to the
operating instructions for the type of
chamber used.
Humidifier chamber tilted. Ensure chamber is level.
Possibly faulty temperature probe (low
Check probe, see § 6.4
resistance).
Inspiratory heater wire not connected
Connect inspiratory heater wire.
in a parallel wired dual circuit.
Ref. 185040646 MR730/720/700/480 Technical Manual ¯ Revision F ¯ Issued March 2001

52
Excessive water in expiratory
circuit due to rainout.
Water ejected from
humidification chamber into
circuit.
C1.5 LOW HUMIDITY
Condition detected Possible cause FAction to take
Low humidity. Chamber control set to low. Increase setting.
Condensation due to cooling in
Use dual heated circuit.
Expiratory line.
Humidification chamber filled beyond
Rduce water level
maximum water level line.
Maximum permissible peak flow rate of
humidification chamber has been
exceeded.
Ue correct chamber. Refer to the
operating instructions for the type of
chamber used.
Humidifier chamber tilted. Chamber should be level.
No water in humidification chamber. Fill chamber.
Chamber temperature low. Check heaterplate temperature setting on
diaplay when humidifier is switched on,
Chamber base and heaterplate are smooth
and flat and in good contact. (Chambers
not made by Fisher & Paykel may not be
suitable).
C1.6 ALARMS
Condition detected Possible cause FAction to take
Temperature probe alarm (‘---’
appears on display).
Heater wire alarm while
temperature still displayed.
Heater wire alarm while ‘F2’
displayed.
Gas flow rate too high for chamber. Check maximum flow rate in to chamber
operating instructions.
Temperature probe unplugged. Check connetion.
Temperature probe plug dirty. Clean plug.
Temperature probe faulty Replace probe.
Heater wire unplugged. Check connection.
Heater wire broken. Replace heater wire.
Heater wire switch turned off but
Turn heater wire on.
heater wire connected.
Heater wire switch turned on but heater
Turn heater wire off.
wire not connected.
Internal fuse blown. Send for repair.
41 °C Overheat calibration outside
limits.
Ref. 185040646 MR730/720/700/480 Technical Manual ¯ Revision F ¯ Issued March 2001
Check calibration of the 41 °C
comparator.

C1.7 TEMPERATURE DISPLAY
Condition detected Possible cause FAction to take
53
No temperature display, no alarm
lights.
No temperature display, ‘see
manual’ indicator light on.
Error code. Humdifier failed self test. Check control PCB for water damage or
C1.8 BREATHING CIRCUIT LEAK
Condition detected Possible cause FAction to take
Breathing circuit leak. Faulty circuit connections. Check all circuit connections.
Humidifier voltage rating incorrect. Select correct voltage rated unit.
Heaterplate overheat protector
Reset overheat protector.
operated.
Transformer over heat protector
Replace transformer.
operated.
Control PCB fault. Check control PCB for water damage.or
contamination.
contamination.
Check thermistor conection to control
PCB.
If new PCB fitted, check correct polarity
of transformer secondary harness.
No water bag. Connect water bag
C1.9 EXTERNAL WATER LEAK
Condition detected Possible cause FAction to take
Water leak with reusable
chamber.
Water leak with disposable
chamber.
C1.10 LED ON
Condition detected Possible cause FAction to take
An alarm LED is flashing. No audible sound - mute switch has
Standby LED is flashing. Humidifier is in standby mode. Puch button for 1 second to disable.
‘Set Low’ LED is on. Chamber control or airway temperature
Temperature probes incorrectly fitted. Check connections.
Chamber filler stopper missing. Put stopper in place.
Chamber O-ring faulty. O-ring should be clean and properly
fitted. Replace if damaged.
Chamber used beyond lifespan. Replace with new chamber.
Wait three minutes.
been pressed.
Wait 20 minutes (30 minutes for v3.0
software).
Re-adjust. Refer to humidifier operating
control setting too low.
manual.
Ref. 185040646 MR730/720/700/480 Technical Manual ¯ Revision F ¯ Issued March 2001
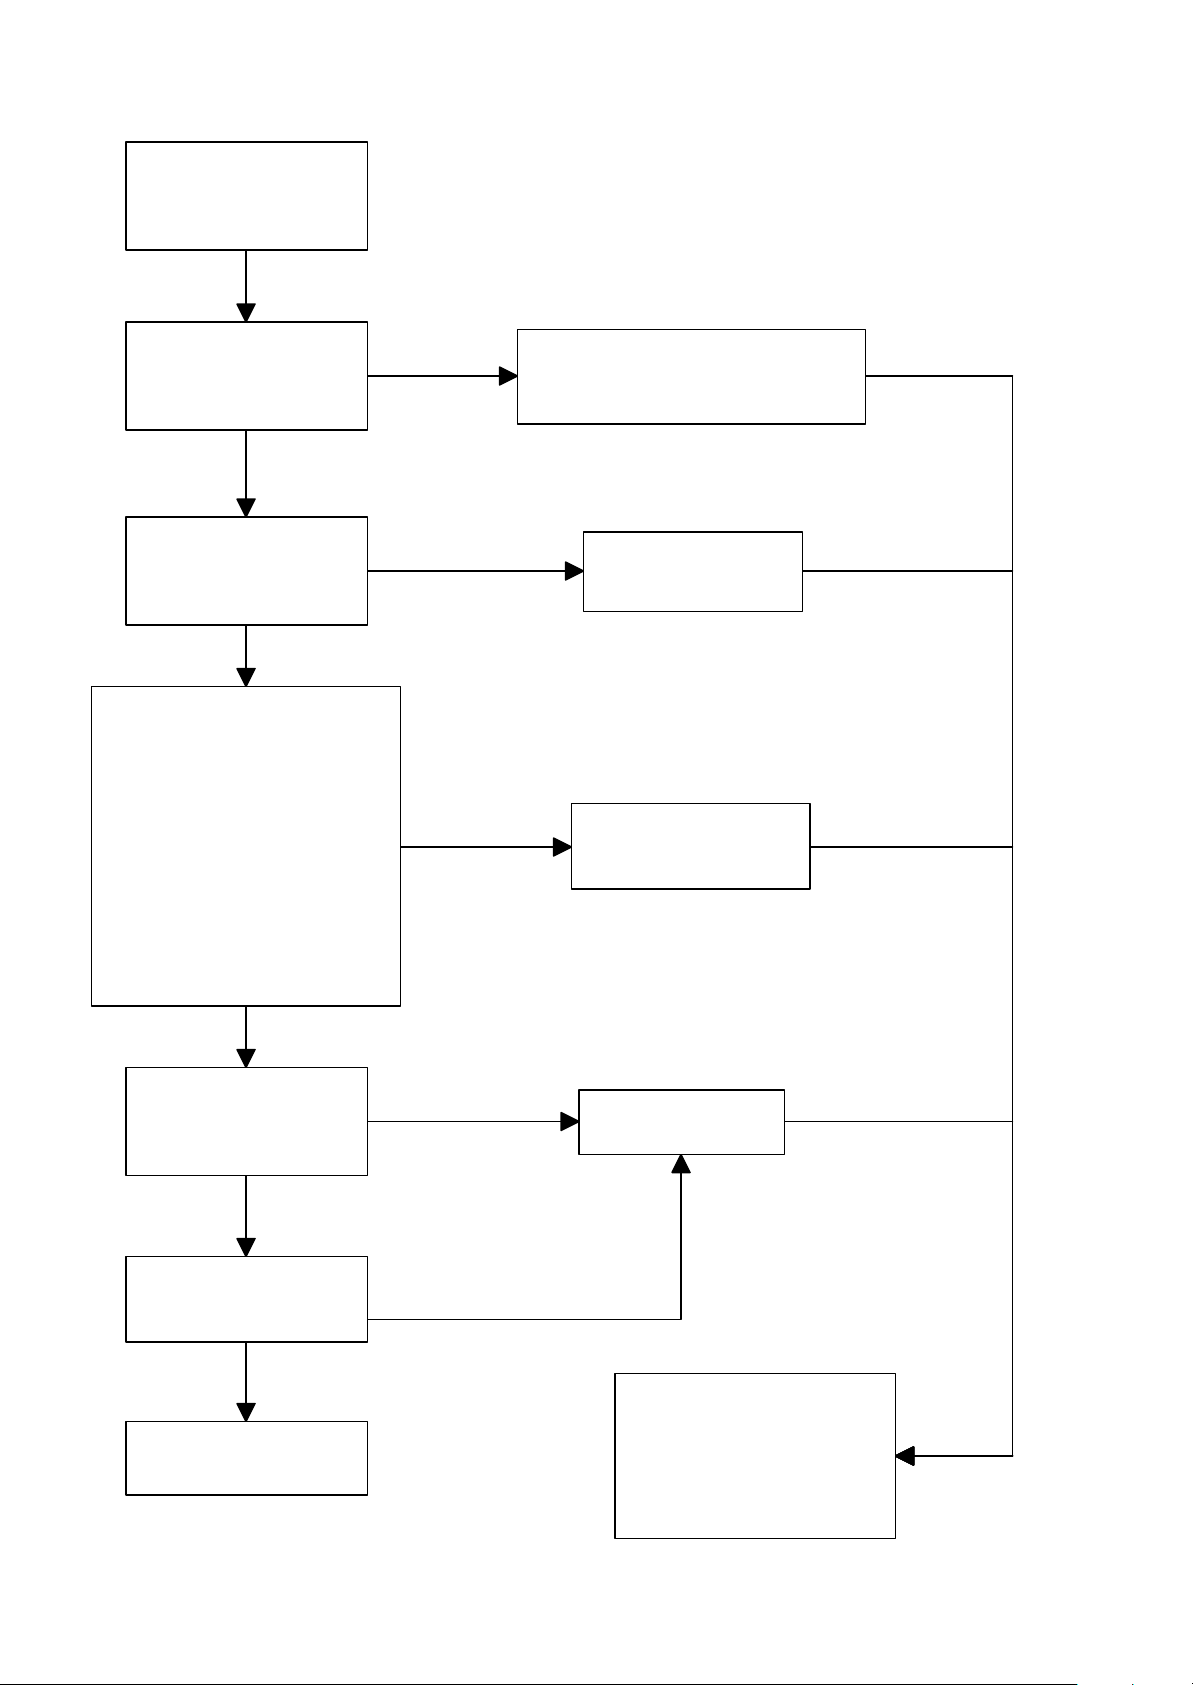
54
Reset thermal cut out and find reason
at Connector J5 on power
board are in correct locations and
NO
C2 MR700 SERIES FAULT FLOW CHART FOR NO GO CONDITION
Check Voltage
Rating Of Unit
YES
Open Unit and check if
thermal cut out under
heaterplate has tripped
NO
Check for mains voltage
board
YES
Check connectors on power
secure, check fuses (F1 - F4),
check voltage on connector J7of
power PCB, mains switch on,
connectors on rear of control
board and continuity of
transformer, connector J8-1& 3
(Primary) and connector J9-1 & 2
+ 3 & 4 (Secondaries).Check
voltage on transformer
secondary J9.
YES
for fault
NO
Check mains lead and
plug
BAD
Repair faulty component
and test
GOOD
Replace power board
and test
Replace control board
and test
NO
Return unit for repair
YES
Assemble and test
YES
Perform calibration and
performance checks as
outlined in Sections 3.0 and
4.0 of the Technical Manual
before re-instatement of unit
Ref. 185040646 MR730/720/700/480 Technical Manual ¯ Revision F ¯ Issued March 2001

55
APPENDIX D _________________________________________________
D1 CLEANING OF HUMIDIFIER HEATER BASES
These are the recommended cleaners for use with Fisher and Paykel heaterbases as of the time of revision of this technical
manual. The disinfectants in the list below have been tested to ensure no damage to the outer plastic or metal components of the
humidifier. If you wish to use a chemical other than these, please contact your local Fisher and Paykel Healthcare supplier.
Cleaning instructions
1. Disconnect the humidifier from any electrical outlet.
2. Clean the humidifier with one of the following recommended disinfectants using a damp cloth:
Isopropyl Alcohol
Dy-Gest I
2% w/v Glutaraldehyde (Cidex)
Sporicidin
Normal dishwashing detergent.
Follow the manufacturers instructions carefully. Use the correct dilution of the disinfectant.
DO NOT immerse the humidifier in any liquid.
3. Wipe the humidifier clear of any cleaning residues before use.
D2 CLEANING OF AIRWAY TEMPERATURE PROBES
(900MR560, 900MR561, 900MR563, 900MR565, 900MR568, 900MR569 & 900MR571)
Several chemical disinfectants have been tested with the temperature probe types listed above. The chemicals listed below have
been found to not affect the integrity or performance of these temperature probes: If you wish to use a chemical or sterilization
procedure other than these, please contact your local Fisher and Paykel Healthcare supplier.
Cleaning instructions
1. Physically clean the airway temperature probes, removing all vi sible contaminants.
2. Disinfect the airway temperature probes with one of the following solutions:
Isopropyl alcohol Medizyme Sporicidin
Control 3 Pyroneg
2% w/v Glutaraldehyde(Cidex) Solution 2
OR use one of the following sterilization pr ocedures:
Ethylene oxide sterilization at 55°C (131°F), 80kPa, or
Hydrogen peroxide gas plasma (Sterrad) sterilization at 10-40°C (50-104°F).
DO NOT immerse gold-plated electrical connector plug in disinfectant. DO NOT autoclave. DO NOT use
dishwater detergents or solvents.
3. Wipe the airway temperature probes clear of any cleaning residues before use. Store in a clean manner.
Cidex is a registered trademark of Johnson & Johnson Medical Pty. Ltd. North Ryde, NSW, Australia.
Dy-Gest I is a registered trademark of EcoLab Ltd. Hamilton, New Zealand.
Sporicidin is a registered trademark of Sporicidin International Ltd, Rockville, MD 20852, USA.
Ref. 185040646 MR730/720/700/480 Technical Manual ¯ Revision F ¯ Issued March 2001

56
APPENDIX E _________________________________________________
E1 ADDITIONAL DYNAMIC PERFORMANCE CHECK OF HUMIDIFIERS
This procedure is optional and may be used to check the dynamic operation of MR730/720/700 and MR480 humidifiers.
This performance check can be performed if there is any doubt about the operation of the humidifier, such as after any
servicing involving the printed circuit boards.
For normal routine maintenance checks only the tests detailed in Section 6 are required.
For the Dynamic Tests, the humidifier is controlled from an airway temperature probe to achieve a set temperature.The
purpose of this test is to show that the humidifier control systems are working to maintain delivered air temperature to
the set temperature.
E2 PERFORMANCE CHECK MR730/720/700
E2.1 EQUIPMENT SETUP
Set up a heated breathing circuit, see typical setup below:
Setup Notes:
♦ Patient delivery tubing can be single use or reusable.
♦ A gas supply of 2 – 10 l/minute to the chamber is recommended, if no gas supply is used, then the breathing tube
must be 22mm diameter to allow adequate airflow.
♦ Η eater wire assembly can be single use or reusable, dual heated or single limb. Total power less than 60 Watts. If a
single use circuit is used then an air flow of at least 2 litres/min is necessary.
♦ Use a dual airway temperature sensor, such as 900MR560.
♦♦ Use any Fisher and Paykel humidification chamber, filled with cold water to maximum level.
E.2.2 SETUP
1 Slide the full humidification chamber on to the heaterbase.
2 Insert the middle sensor of the temperature probe into the heater wire module, and the end sensor of the
temperature probe into the connector at the end of the delivery tube, plug the temperature probe plug in to the
humidifier .
Ref. 185040646 MR730/720/700/480 Technical Manual ¯ Revision F ¯ Issued March 2001

3 Connect the Heater Wire cable to the humidifier.
4 If a gas supply is used, set to 5- 10 l/minute, if no gas supply used, the breathing tube should be supported
from the patient end so that it drops vertically over its entire length to the top of the chamber.
E.2.3 DYNAMIC TEST SEQUENCE (MR730/720/700)
1 Turn the humidifier on, ensure the heater wire LED is on for a MR720 or MR730.
2 Adjust set temperature to 36.0 ± 0.1 °C and Chamber Control to 0.
3 NOTE: At low ambient temperatures (below 22 °C) a low temperature alarm may occur, if this occurs, press mute
and restart the test , the breathing circuit will eventually warm up and the humidifier will start controlling.
4 Check after 30 minutes:
Digital display is 36.0 ± 0.3 °C
Chamber outlet temperature is 36.0 ± 2.0 °C
If the unit is alarming or has not reached 36 ± 0.3 °C, press the mute button if necessary and leave for a further
15 minutes.
5 Then check the following in ‘Engineering Mode’ (see appendix A2):
set 36 ± 0.1 °C
offset 0
Edc ≥ 0
Cdc ≥ 0
hp ≥ 36 °C
57
5 If unit passes this test it is controlling correctly and can be put back in use.
6
E.3 PERFORMANCE CHECK (MR480)
E.3.1 EQUIPMENT SETUP
Set up a non heated breathing circuit, see typical setup below:
Setup Notes:
♦ Patient delivery tubing can be single use or reusable.
♦ A gas supply of 2 – 10 l/minute to the chamber is recommended, if no gas supply is used, then the breathing circuit
♦ Use a dual airway temperature sensor, such as 900MR560.
♦ Use a Fisher and Paykel humidification chamber, such as a MR200 series, filled with cold water to maximum level (not
must be 22mm diameter to ensure adequate airflow.
a MR290).
Ref. 185040646 MR730/720/700/480 Technical Manual ¯ Revision F ¯ Issued March 2001

E.3.2 SETUP
1 Fill the humidification chamber with water and slide on to the heaterbase.
2 If a gas supply is used, set to 2- 10 l/minute, if no gas supply used, the breathing tube should be supported
from the patient end so that it drops vertically over its entire length to the top of the chamber.
3 Insert the middle sensor of the temperature probe into the connector on top of the chamber , and the end
sensor of the temperature probe into the connector at the end of the breathing tube, plug the temperature probe
plug in to the humidifier.
E.3.3 DYNAMIC TEST PROCEDURE (MR480)
1 Turn the humidifier on.
2 Turn Temperature Set control to 31.0 ± 0.1 °C, check that correct setting flashes on display after adjustment.
The airway circuit under the low flow conditions of the test will warm up only slowly and may give a low
temperature alarm. If this is muted the circuit will eventually warm up and start controlling.
3 Check after one hour that digital display is 31.0 ± 1.0 °C.
If temperature is still outside these limits leave the test going for a further 15 minutes.
4 If displayed temperature is within 31.0 ± 1.0 °C, press chamber temp button and check chamber temperature is
35 to 66 °C.
58
5 In Engineering menu (appendix A2) check:
hp (heaterplate temperature) > 36 °C
Set = 31.0 ± 0.1°C
6 Check that disconnecting the temperature probe gives an audio alarm and Temp Probe LED flashes.
7 Press Mute button and check the alarm is silenced.
8 If the Humidifier passes these tests it is controlling correctly and can be returned to use.
Ref. 185040646 MR730/720/700/480 Technical Manual ¯ Revision F ¯ Issued March 2001
 Loading...