


A Perfect Web Solution For Time & Attendance
User Guide

CONTENTS
5-17 1 • INTRODUCING & INSTALLING THE TIMETEC
TimeTec – An Introduction
Installing The System
1824 2 • MANAGING TERMINALS
Adding Terminals to TimeTec
Updating Terminals Information in TimeTec
Deleting Terminals from TimeTec
Adding A Terminal Group
Editing A Terminal Group
Deleting A Terminal Group
Displaying The Data Audit List
Viewing The Data
Managing Terminals
Uploading User
Installing FingerTec TimeTec
2531 3 • MANAGING USERS
Enrolling Users Into FingerTec Terminals
Downloading User Information from Terminals
Adding User Information
Purging User information
Importing User
Finding User
Suspending User
Editing User
Inserting User Photos
Sorting User
Viewing All Users
Viewing Users by Branch/Department/Section
Setting Privileges
Adding User Names
Creating Password
Inserting Card Number
Selecting Terminals
Erasing User Identities
Finding Biometrics Information
Sign In User Names
Creating A Mobile Account
Suspending Users From Using TimeTec
Accessing TimeTec
Viewing Attendance Records

32-37 4 • CONFIGURING TIMETEC
Creating Company Profile
Creating A Username Account
Editing A Username Account
Changing Sign In Password of Username Account
Deleting Username Account
Suspending A Username Account
Setting Up System Settings
Configuring Day Type
Editing Default Day Type
Configuring Work/Overtime/Different Overtime Work Wages
Configuring Leave Type
Adding Leave Types
Editing Leave Types
Deleting Leave Types
Setting Up A Departments
Editing A Department
Deleting A Department
Setting Up A Section
Editing A Section
Deleting A Section
Adding Remarks
Editing Remarks
Deleting A Remark
3844 5 • SETTING UP CLOCKING SCHEDULES
Understanding Clocking Schedules
Type of Clocking Schedules
Clocking Columns
Adding Clocking Schedule
Editing Clocking Schedule
Inputting Clocking Time
Setting Grace Period for Clocking Time
Setting Flexible Break Time
Deducting Break Time From Total Working Hours
Include Early Time Into Total Working Hours
Arranging Clocking Time in Correct Slots
Setting Clocking Range
Replacing Attendance Data with The Latest Clocking Time
Setting Tolerance Time Before Shifts Starts in Daily Schedule
Setting Shifts in Daily Schedules
Setting Clocking Rules in Overtime Hour

4548 6 • SETTING UP GROUP DUTY ROSTER, DUTY PLANNER AND
COMPANY HOLIDAYS & LEAVES
Understanding Group Duty Roster
Type of Shift in Working Calendar
Description of Columns in Duty Roster
Adding A New Group Duty Roster
Editing Group Duty Roster
Understanding The Group Duty Calendar
Editing Work Calendar
Resetting Work Calendar To Default
Viewing Group Duty Roster List
Setting Up Duty Planner
Listing Users in User Duty Planner
Setting Up Company Holidays and Leaves
4952 7 • MANAGING USERS
Understanding Attendance Sheet
Sorting Attendance Sheet
Editing Attendance Sheet
Purging Attendance Sheet
Generating Attendance Sheet
Viewing Attendance Records
5355 8 • ATTENDANCE REPORTS
Understanding TimeTec Attendance Reports
Generating Reports
Reports Under Attendance Listing Category
Reports Under Attendance Analysis Category
Reports Under Terminal Analysis Category
Reports Under Duty Schedule Listing Category
Reports Under Table Listing Category
5665 9 • INTRODUCING TIMETEC MOBILE
Introducing TimeTec Mobile
The Importance of Internet Connectivity
Checking In Without Internet Connectivity
Group Check In Using A Single Device
Understanding Authorization Level
Downloading and Installing TimeTec Mobile
Setting Up Your TimeTec Mobile
Possible Error Screens During Setup
Using TimeTec Mobile
66 10 • INDEX
67 11 • OTHER RESOURCES

1
Introducing & Installing the TimeTec
•
TimeTec – An Introduction
THE BASIC UNDERSTANDING OF TIMETEC
TimeTec is a web based FingerTec application for managing employee data and
attendance records. Administrators can manage employees easily as they are able
to transfer user data within the terminals with TimeTec. Attendance data from FingerTec terminals are downloaded into TimeTec to provide an overview of the staff’s
attendance. TimeTec works with a MySQL database to maximize the capacity storage and minimize housekeeping efforts.
Managing and using the TimeTec is easy. FingerTec terminals automatically upload
new user information (user ID, fingerprint templates, card information and password) to TimeTec whenever a new employee is registered at the terminal.
For companies with multiple branches or outlets, employees are often relocated.
With TimeTec, an administrator can upload the information of the employee concerned to relevant terminals in the new branch within seconds. The employee can
then start to report his/her attendance at the new branch immediately. If an employee resigns, the administrator will be able to delete the employee details from
the system easily as well.
TimeTec provides a complete hierarchy to fit most companies’ structure. It is divided into Company > Branch > Department > Section. An administrator can assign
employees into the appropriate level in a company to ease management and data
viewing. The system administrator can also assign new administrators/operators to
run TimeTec, manage attendance data, and generate reports. It comes with a multilevel login authorization where the system administrator can assign the operating
levels of each user, for example an administrator of the Accounts department will
only be able to view records within the Accounts department – records and transactions from other departments /branches / companies will not be viewable to the
Accounts administrator.
With the TimeTec, FingerTec terminals are utilized as attendance capturing stations.
Employees report their attendance by verifying their fingerprint, card or password,
and the attendance records will be uploaded to TimeTec immediately for the system administrator to view in the attendance sheet. This ensures that the attendance
records in TimeTec will always be up to date. TimeTec provides a total of 999 working scenarios, each with 7 pairs of clocking status:
In | Tea break in-out | Lunch break in-out | Tea break in-out | dinner break in-out |
supper break in-out | OT in-out | Out
CONTENTS
5

TimeTec allows administrators to setup working schedules to fit a specific working
environment, for example normal working hours, overnight working hours, factory
shifts working patterns and flexi working hours. The First in and last Out are the MUST
have columns under the working schedules; the others are optional. The 7-pairs (14)
of columns maximize the slots for attendance capturing and also provide detailed
check points of all employees.
An administrator can prepare 26 types of reports to understand and analyze employees’ working behavior and efficiency. With multiple levels of access, system operators can view reports with restriction (branch/department/section), without having
to interrupt each other. Individual employees can also login to TimeTec to view and
print their personal attendance records. Furthermore, each report can be saved into
different digital formats (PDF, DOC or XLS).
WHAT WILL YOU NEED TO SETUP TIMETEC?
You will need the following components to set up the TimeTec successfully:
a. Server: (tech spec)
MINIMUM SERVER REQUIREMENTS
• Speed: 1GHz
• Operating System: Windows XP Professional (32-Bit)/Windows Server 2003 (32-Bit)/Windows Vista
(32-Bit or 64-Bit) Home Premium, Business, Enterprise and Ultimate/Windows 7 (32-Bit or 64-Bit) /Windows
8 (32-Bit r 64-Bit), Home Premium, Professional and Ultimate/Windows Server 2008 (32-Bit & 64-Bit)
• Memory: 2GB RAM
• Storage: 10GB free disk space
• Framework: .Net Framework 4.0
• Supported Browser: Web Browser IE7/Chrome 9/FireFox 3/Safari 5
b. Static IP
The TimeTec server requires a static IP to link up to the FingerTec terminals. The
terminals respond to this static IP to upload user data and attendance.
c. Internet connectivity
TimeTec must be connected to the terminals all the time to be able to retrieve data
for user management and attendance processing. Make sure the Internet connectivity in between TimeTec and the terminals is stable and reliable. Check the connection to prevent any interrupted data connection.
d. FingerTec terminals (Webster supported)
FingerTec terminals are installed as attendance-reporting machines. The FingerTec
terminals must be updated with a special firmware to add the Webster function for
it to be able to work with TimeTec. Only selected FingerTec models can support
Webster; consult your local reseller or support@fingertec.com for more informa-
CONTENTS
6
tion on your terminal’s compatibility .
You’ll need to configure the following in the FingerTec terminal:
• IP, Gateway and Subnet mask of the terminal
• Webserver IP (static IP of the TimeTec server)
• Port number (recommended to use 80)
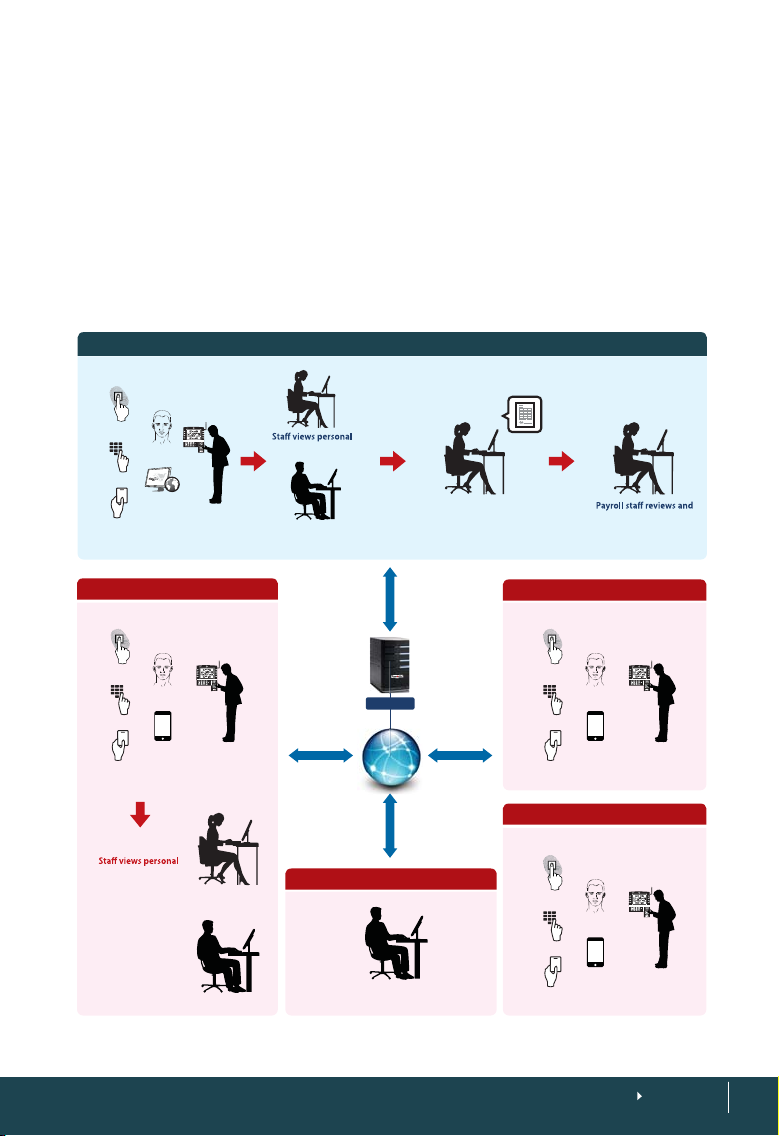
THE SYSTEM OVERVIEW
HEADQUARTERS
Collecting Time Data Viewing & Scheduling Processing, Reporting & Editing Payroll Interfacing
Fingerprint
Face
Password
Web check-in
Card
Branch
Collecting Time Data
Fingerprint
Face
Password
Mobile Web
check-in
Card
attendance records
Manager monitors,
schedules and edits
attendance records
attendance records
rules automatically
Manager monitors, schedules
and edits attendance records
Internet
Broadband
Manager monitors, schedules
and edits attendance records
Time attendan ce
applies
Broadband/LAN
Server
(Wide Area Network)
Broadband
Home
Supervisor edits
and approves the reports
• Data Collection
• TimeTec Application
• Server located at
HQ/Data Center
GPRS
Reports
Interface with
third party system
Fingerprint
Password
Fingerprint
Password
Remote Site A
Collecting Time Data
Face
Mobile Web
check-in
Card
Remote Site B
Collecting Time Data
Face
Mobile Web
check-in
Card
processes paychecks
CONTENTS
7
Installing The System
For TimeTec to function properly, these components need to be installed first:
1. Internet Information Service (IIS)
2. Microsoft .Net framework 4.0
3. MySQL database version 5.0
4. MySQL Connector ODBC 3.51
5. TimeTec
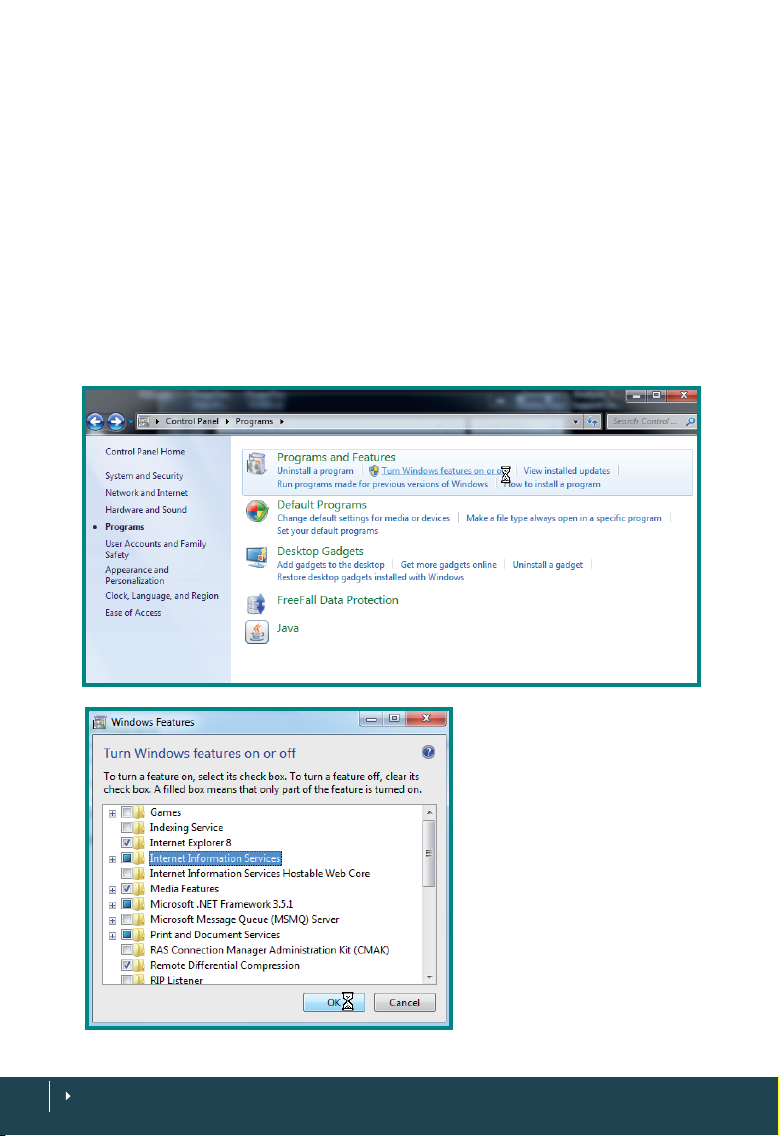
INSTALLING THE INTERNET INFORMATION SERVICE IIS
The IIS comes with the Windows Operating System and should be installed by the
administrator. To install it, follow the steps below.
CONTENTS
8
Go to Control Panel > Pro-
gram & Features > Turn Windows feature on or off > Check
Internet Information Service
checkbox to install IIS > Follow
the on-screen instructions to
finish the installation of IIS.
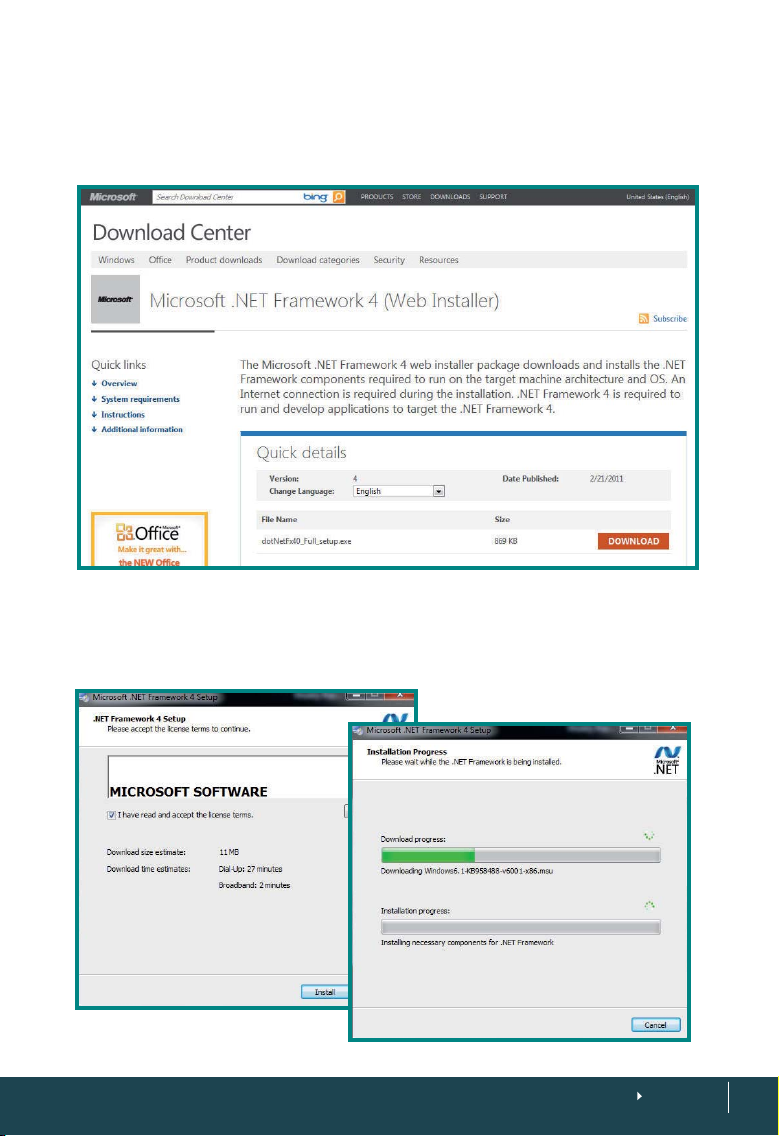
INSTALLING MICROSOFT .NET FRAMEWORK 4.0
Download the installation file at http://www.microsoft.com/download/en/details.
aspx?id=17851 > Run the installation file and follow the instructions to start to install
Microsoft .Net Framework 4.0
Read and accept the license agreement > The installation requires an Internet connection to download and install the component into the server. Make sure an Internet connection is available. > Follow the on-screen instructions to complete the
installation.
CONTENTS
9

INSTALLING THE MYSQL SERVER V5.5
TimeTec requires the MySQL server version 5.5 to run smoothly. Download the installation file at http://www.mysql.com/downloads > Run the installation file to begin
installation.
Click Next > Read and accept the License Agreement > Click Next to proceed.
CONTENTS
10

Select Typical > Click Install to begin the installation process.
Wait for the installation of the MySQL to be complete > Check the checkbox to
Launch the MySQL Instance Configuration Wizard > Finish > Start to configure the
MySQL server.
CONTENTS
11
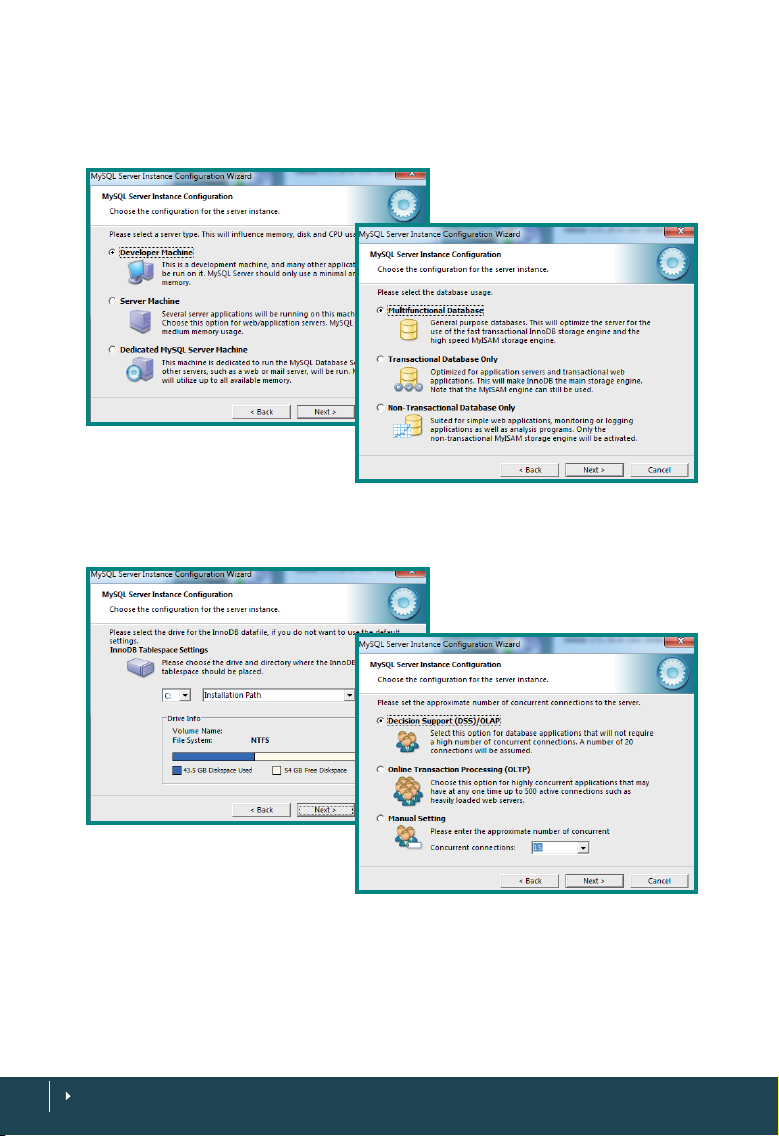
If the server is installed with an older version of MySQL server, the system will advise
the administrator > Select to use the latest version, v5.5.8 > Next > Select Details
Configuration and Click Next
Select Developer Machine > Click Next > Select Multifunctional Database > Click
Next
12
CONTENTS
Select Database Support (DSS)/OLAP > Click Next
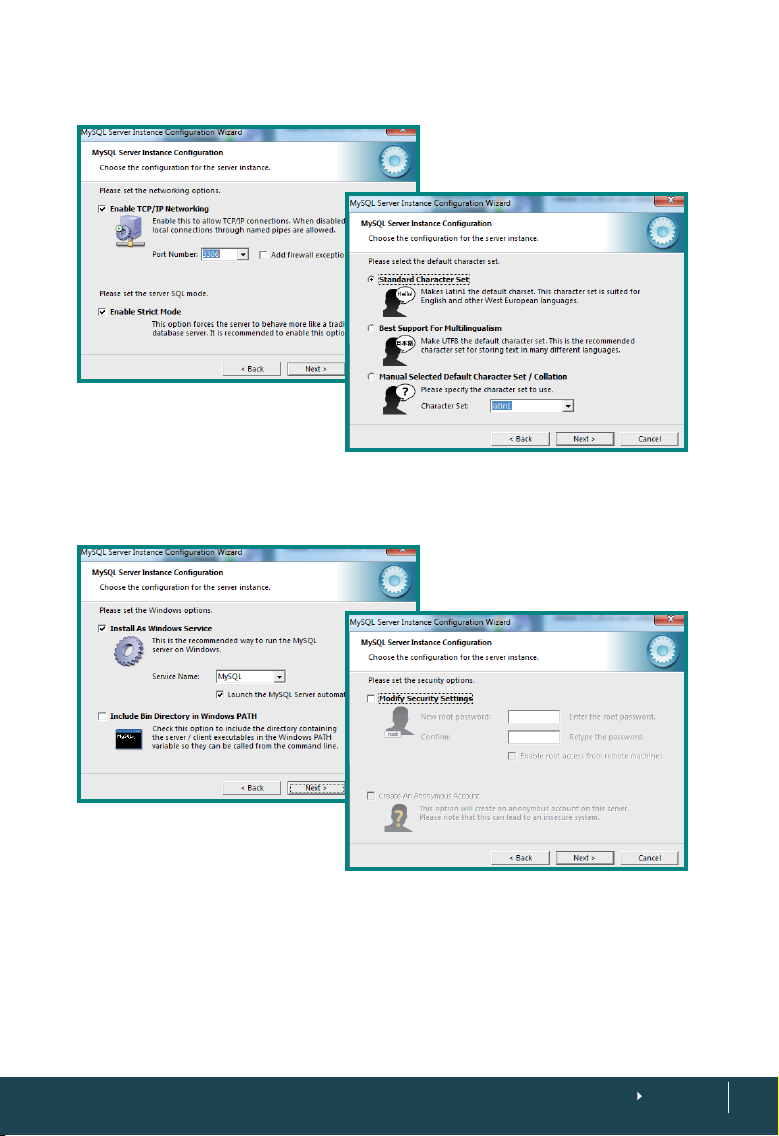
Select Standard Character Set > Click Next
Uncheck Modify Security Settings if the administrator does not want to change the
default login name and password of the MySQL server (default login name = root,
password = <blank>) > CLick Next
If the Administrator would like to change the login name and password, check Modify
Security Settings and Insert Login password to proceed.
CONTENTS
13
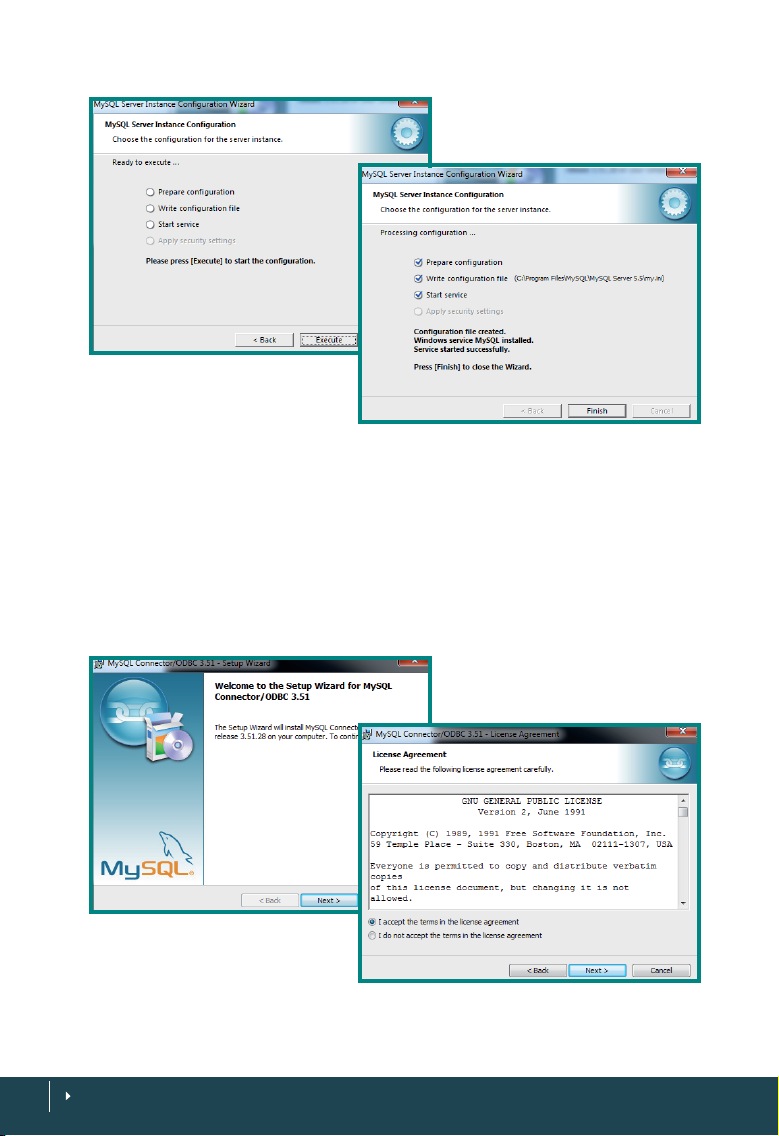
Click Execute > Wait for the system to complete the configuration > Click Finish to
end the process.
INSTALLING THE MYSQL CONNECTOR ODBC 3.5.1
TimeTec requires the MySQL Connector ODBC 3.51 to work with the MySQL database. Download the installation file at http://www.mysql.com/downloads/connec-
tor/odbc/3.51.html
Run the installation file > Click Next > Read and accept the License Agreement >
Click Next
14
CONTENTS
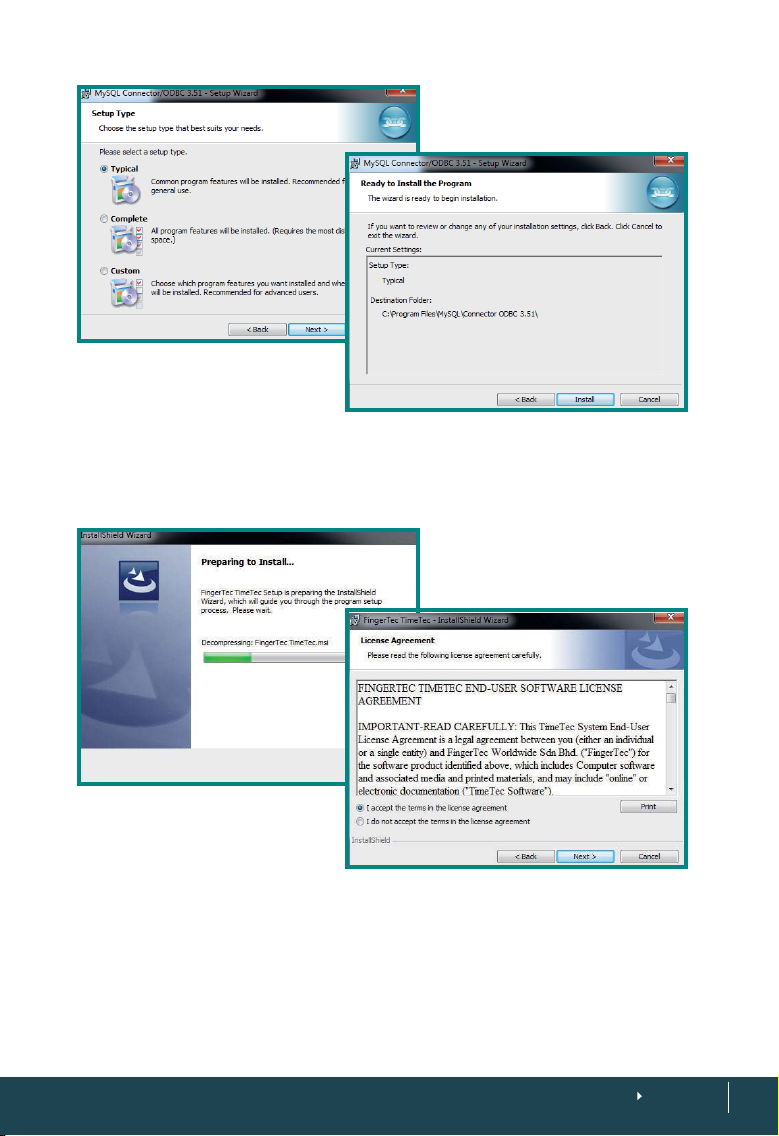
Select Typical > Click Next > Click Install > Click Finish
INSTALLING TIMETEC
Run the installation and follow the on-screen instructions. Read and accept the software license agreement to proceed.
CONTENTS
15
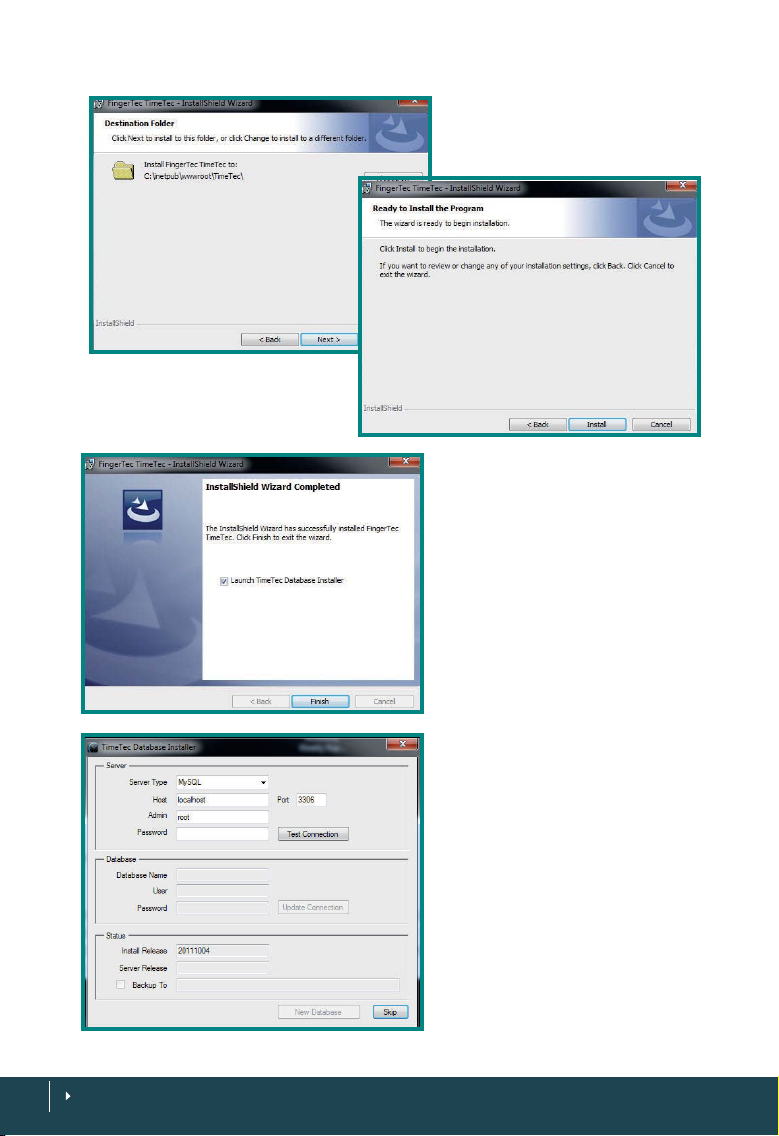
The installer will set a default installation path for the software. It
is recommended to use the default
location for installation.
Click Finish and launch the
TimeTec Database Installer.
Configuring the TimeTec Database
Installer is an important step. The
administrator must ensure that
they configure it correctly. Any
mistakes or improper settings in
this page can disrupt TimeTec
from working with the MySQL database.
The first section requires you to insert details of the MySQL database
server (the physical server that the
MySQL database is installed in).
16
CONTENTS
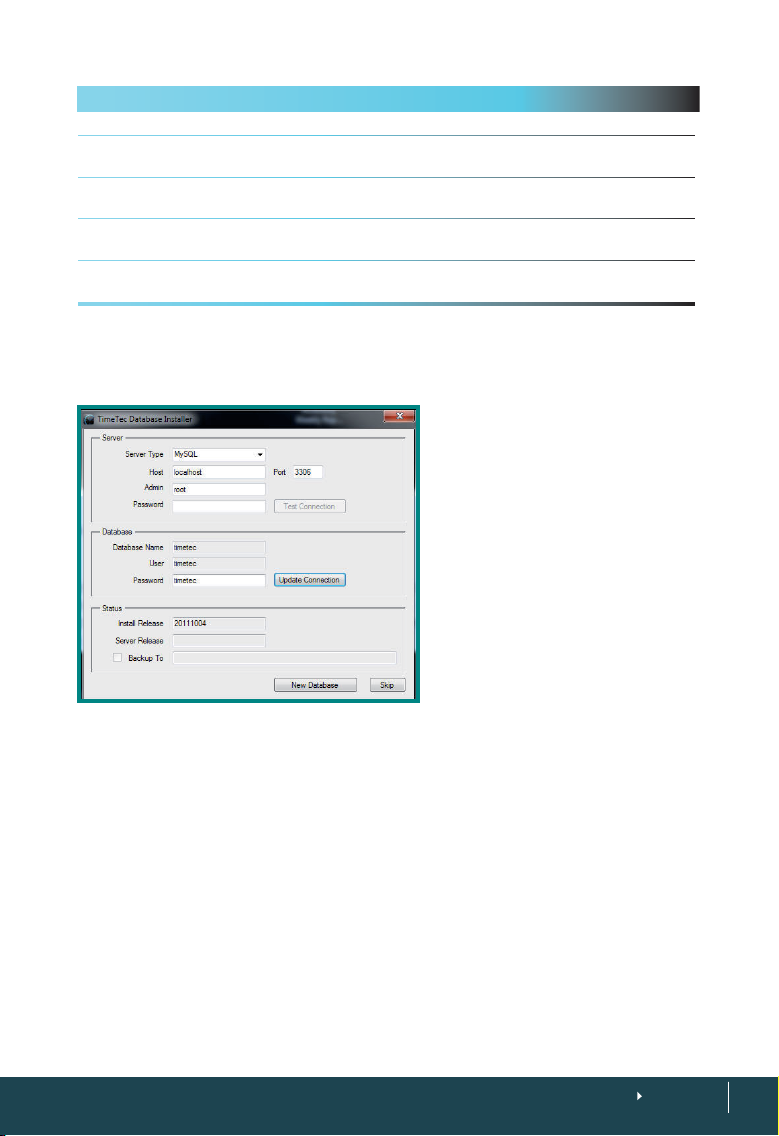
Field Description
Server Type The type of database. The default is set to MySQL. Do not change this.
Host The IP address of the server that the MySQL database is installed in. Insert “local-
Admin The login username to access the MySQL database. The default is “root” which can
Password The login password to access the MySQL database. The default is blank (nothing
Port Port number of the server, to allow linkage to the MySQL database. The default is
host” if the MySQL database is installed in the same server as the TimeTec.
be changed during the MySQL database installation process.
insert) which can be changed during the MySQL database installation process.
3306. Do not change this.
Click Test Connection after configuring the settings. The section labeled “Database”
will be activated if the connection to the MySQL database is correctly established.
The second section requires you to
set the login details of the TimeTec
MySQL database. The Database
name and username is preset as
“timetec”. It is recommended that
you change the password from the
current default “timetec”.
Click Update Connection to save
the changes done.
Click New Database to create the
TimeTec My SQL database.
CONTENTS
17
2
Managing Terminals
•
This chapter guides you on how to add, define and identify all FingerTec
terminals to TimeTec in a connected environment for a complete management of employees and their attendance data.
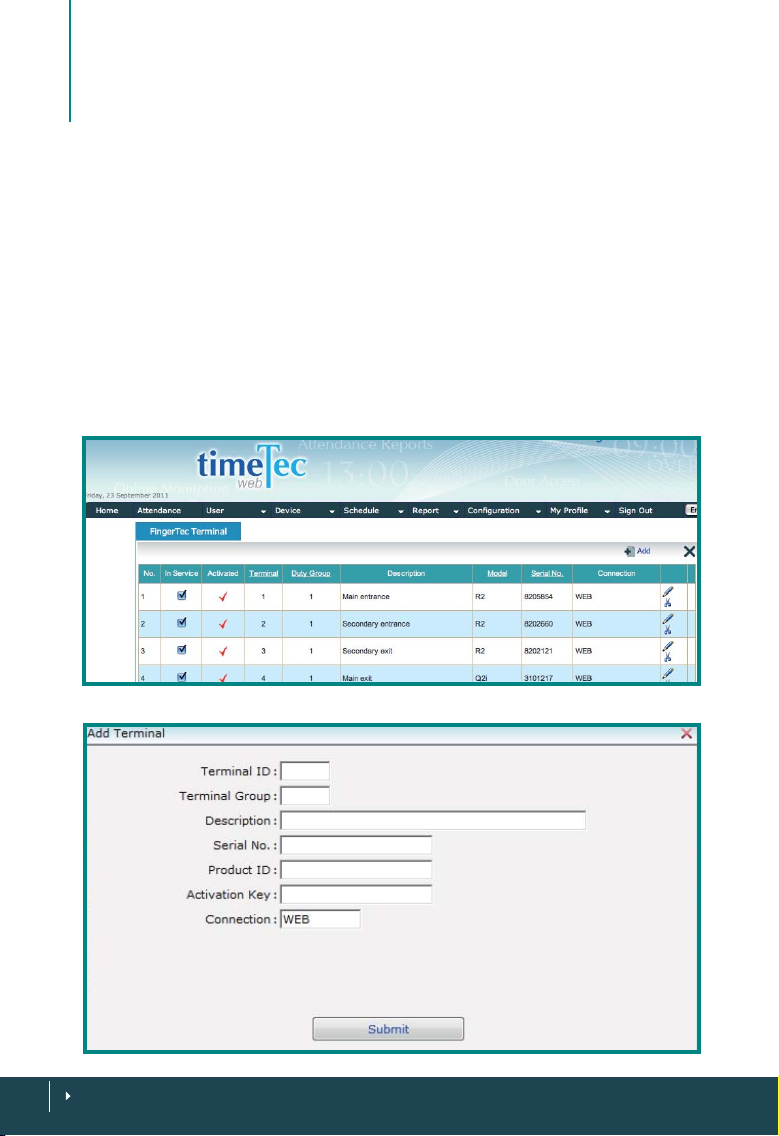
Adding Terminals to TimeTec
To track employees’ attendance records, you must add the terminals that are being used to report attendance. Connecting the terminals to TimeTec enables you to
download all attendance data contained in the terminals via the web, upload and
update relevant information to the terminals and monitor the activities of the terminals effectively. TimeTec cannot update any information to terminals that are not
connected to it.
Choose Device > Add > Fill out the details > Submit
CONTENTS
18
Field Description
Terminal ID Identify terminals that are being connected
Terminal Group Define which group that a particular terminal
Description Describe the location of the terminal for easy
Model
State the model of the terminal (e.g. AC100,
Serial No
Connect Choose to connect the terminal via web to list
to TimeTec with a unique ID for example 110,
111, 112, etc.
belongs to i.e Terminal 111 belongs to Group
1, normal hours workers., Terminal 110 is being used by Group 2 who has shifts.
reference and identification for, example
main entrance, biology building entrance,
laboratory 1 entrance, etc.
TA100, R2) for easier tracing and tracking.
Each terminal comes with a unique serial
number; input the serial number of the terminal here for identification.
the terminals in TimeTec.
Note: It is important to
make sure that all terminals
are loaded with Webster before you attempt to connect
the terminals to TimeTec.
Webster is an online web
based platform, similar to
an SDK, that is used to consolidate and centralize the
database for time and attendance. With the Webster
platform, you can access raw
time attendance data anytime and everywhere using
internet browser.
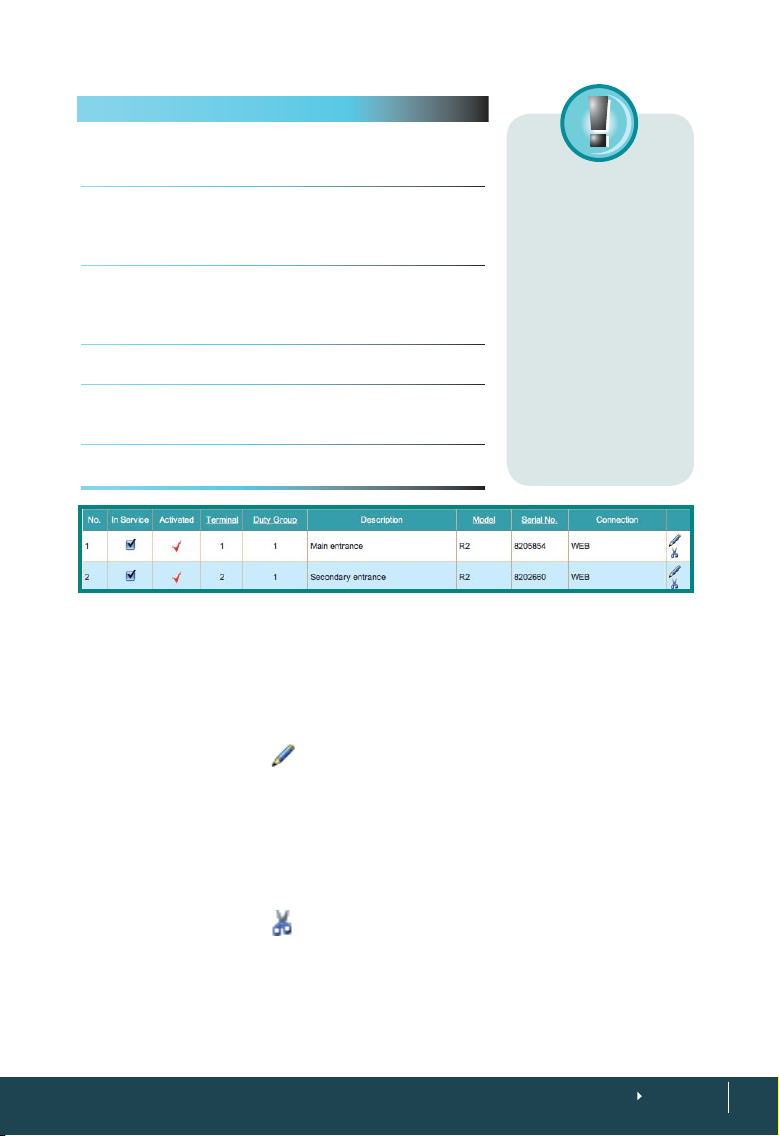
Updating Terminals Information in TimeTec
From time to time, you might want to update the terminal(s) information TimeTec
provides you with an option to update the information of every terminal that you
have added into TimeTec.
Choose Device > Click on
the right of a row and edit accordingly
Deleting Terminal from TimeTec
You can delete any terminal from the list of devices once the terminals are no longer
used for recording attendance or the company has made changes that affect any
listed terminals in TimeTec.
Choose Device > Click on
You can add the terminal(s) back to TimeTec as and when necessary. Refer to Chap-
ter 3, Page 11 for instructions.
the far right of a row > Confirm the deletion.
CONTENTS
19
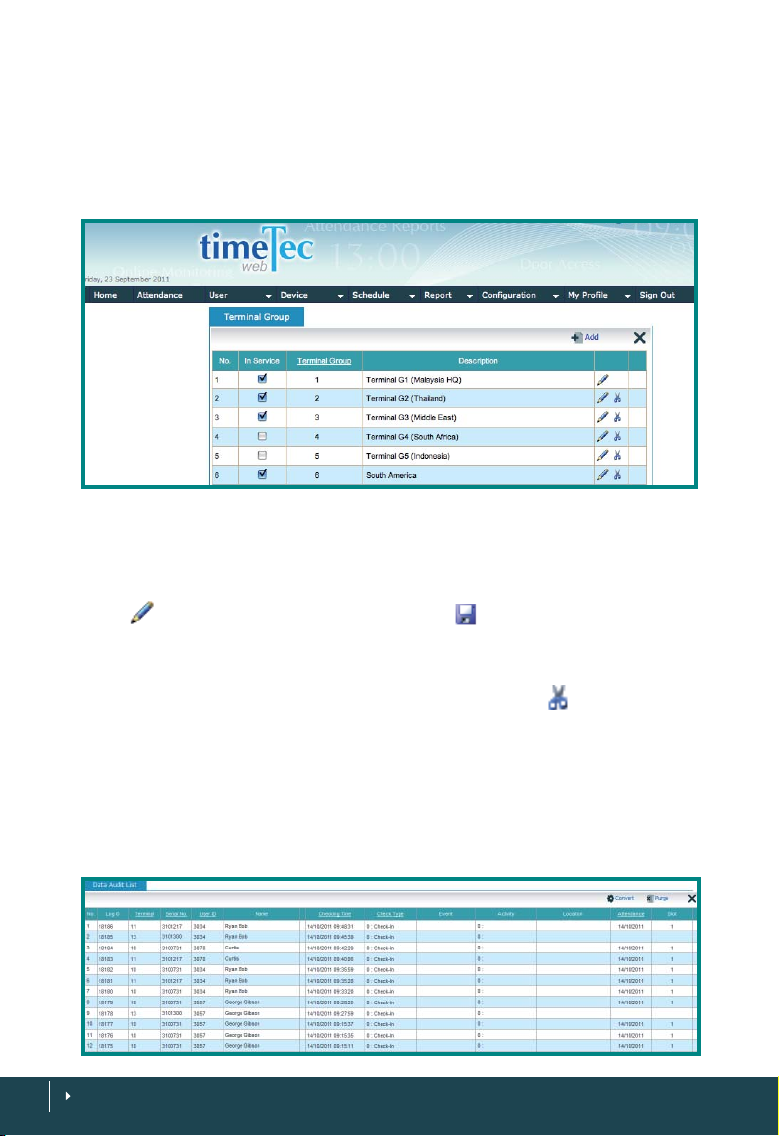
Adding a Terminal Group
TimeTec allows you to add terminal(s) into the same Duty Group for staff management.
Choose Device > Terminal Group > Add > Enter Group Number and its description
> Submit.
The newly added Terminal Group will appear on the list
Editing a Terminal Group
Any information that you have keyed in for the terminal group can be edited by clicking on
. Once the editing is confirmed, click on to save the changes.
Deleting a Terminal Group
You have the option to delete the terminal group by clicking on at the end of row
of the terminal group you choose to delete. Confirm the deletion and the terminal
group will no longer be listed on the page.
Displaying the Data Audit List
Data Audit List contains all the information available for each transaction log of each
terminal as an audit trail. Fields available on Data Audit List are explained in the next
page:
CONTENTS
20
Field Description
Log ID Log ID is a unique ID for each transaction in TimeTec, displayed in a descending
Terminal The terminal ID as described when you add a terminal into TimeTec.
Serial Number This is the serial number of the terminal that the user used to report attendance
User ID User ID of the user is displayed here for identification
Name The Name of the user is displayed here for identification and verification
Check Time This contains the recorded date and time of the attendance activity from the
Check Type Check Type describes the purpose of the attendance for example 0 for check In
Activity This contains work code information that is inputted by users when they report
Attendance This contains the date of the attendance record
Slot Slot is the information about the location of this record in the attendance sheet
order, the later the time, the higher the Log ID number.
terminal.
and 1 for check out.
their attendance for example 13 for meeting clients, 14 for a visit to a clinic.
column, for example In, Break, Resume etc
Viewing the Data Audit List
To view data audit list based on what you are looking for specifically, choose any
field header and select your preference. For example, you want to view the Data
Audit List by the Check Type, move your cursor to the Check Type header and you’ll
be presented with a drop down selection. Choose one and TimeTec will search the
data you want.
Click the arrow at the bottom of the page to view the next pages’ information or to
go back to the previous pages’ information.
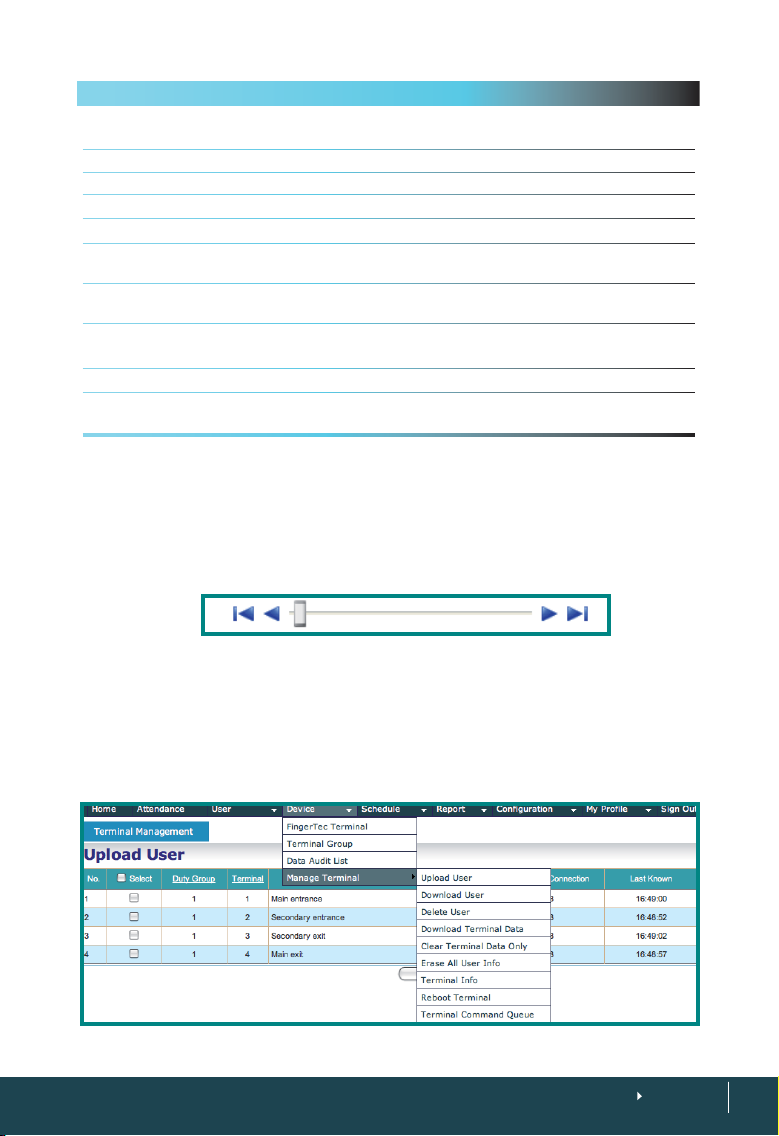
Managing Terminals
There are 9 commands you can perform to manage your list of connected terminals
in TimeTec.
Choose Device > Manage Terminals > Select your command
CONTENTS
21

UPLOADING USERS
Managing users from TimeTec has been made easy. Click on Upload User > Select
Terminals > Upload Users. TimeTec will upload users from TimeTec to the terminals
in no time. You can check the information of the terminals by checking Terminal
Info.
DOWNLOADING USERS
To download users from a terminal to TimeTec, click on Download User > Select Ter-
minals > Download Users. TimeTec will download users from the terminals to Tim-
eTec in no time. You can check the information of the terminals by checking Terminal
Info.
DELETING USERS
Deleting Users from the terminals via TimeTec is easy even though the location of the
terminals are far from the software. You need to choose Delete User > Select termi-
nals > Delete User > Select users you want to delete > Submit
These users will be deleted from the terminals you choose.
DOWNLOADING TERMINAL DATA
To retrieve all attendance data from all the terminals or from selected terminals, you
need to download terminal data. Choose Download Terminal Data > Select Termi-
nal > Download Data
CLEARING TERMINAL DATA ONLY
To clear attendance data from the terminal after you have downloaded the data, click
on Clear Terminal Data Only > Select Terminal > Clear Data. By doing this, all data
in the terminal will be deleted. You should make sure that you have downloaded all
the data into your computer before attempting this command.
CONTENTS
22

ERASING ALL USER INFO
This command will erase all user information in the selected terminals so please be
very sure before attempting this command. Choose Erase All User Info > Select Ter-
minal > Erase User Info. You can check the information of the terminals by checking
Terminal Info. If you have mistakenly erased all user info, you can always upload
them back to the terminal.
DISPLAYING TERMINAL INFO
This command will return the terminal information in detail for your reference. The
details available include Duty Group, Description, Firmware detail, User count quantity, Fingerprint count, etc. Choose Terminal Info > The page will display all terminals
information in a table format for your reference.
REBOOTING TERMINAL
There are cases when a terminal or some terminals hang or face some technical problems that require rebooting. You can perform this task remotely via TimeTec. Choose
Reboot Terminal > Select terminal > Reboot.
DISPLAYING TERMINAL COMMAND QUEUE
To know the commands that have been executed in TimeTec, choose > Terminal
Command Queue. A list of commands complete with information about the reques-
tee, response time and its completion time will be available in this table.
CONTENTS
23

ATTENDANCE CAPTURE TIMER
This feature lets you set an automatic download interval to download transaction
logs/attendance records from the database. The logs are always uploaded to the
TimeTec database after a verification process. However, you’ll need TimeTec to retrieve the records from the database and proceed to process the attendance logs.
To configure the Attendance Capture Timer: Press Manage Terminal > Attendance
Capture Timer > a new window will pop up > Set the value into the relevant column
> Press SUBMIT to save settings
24
CONTENTS

3
Managing Users
•
This chapter explains how to manage and control user information and
their biometrics data in TimeTec effectively for an improved attendance
system.
Enrolling Users into FingerTec Terminals
TimeTec can only pull user data once the biometrics data e.g. fingerprint is available
and the users have been enrolled into FingerTec terminals. To learn how to enroll
users into the terminals, please refer to user.fingertec.com/manual.
Downloading User Information from Terminals
The maximum number of terminals to be connected to TimeTec is 999 units. To
download all the user information, go to Chapter 3: Managing Terminals – Down-
loading Users.
Adding User Information
To add a user into TimeTec, click on User > User Profile > Add – Fill up important
information and click
to save settings.
CONTENTS
25

Field Description
User ID Enter User ID - maximum of 9 digits. If the ID is less than 9 digits, prefix zeros will
be automatically added i.e. for ID 3061 will be 000003061. The User ID must be
similar to the ID used during enrollment at the terminal. Any mismatched of the
user ID could cause failure of data transfer, improper reporting and creation of
irrelevant new user to the system.
Issued Fill in the correct enrollment date in this field, failure to do so could cause the
Expired Enter the expiry date for particular users. This field is relevant for contract/tempo-
Name Full name of user as printed on the identification card.
Address Latest address of the user into this field for an updated record.
Email Corporate email address.
Phone Current telephone number or mobile number.
Employee ID Insert the employee ID.
Rate/Hour This is applicable to temporary/contract workers who are working on an hourly
Social Security No: Social Security is applicable only for the United States users.
ID No: ID No refers to Identification Number issued by the government for identity card
Group
Every user belongs to a dedicated group duty roster and the information must be
Branch A company with multiple branches must select branch location for the user.
Department Every branch with different departments could select the relevant department
system to produce errors in reports.
rary workers.
rate.
or NRIC.
inserted correctly to avoid improper download of attendance data.
for the user.
Note: It is advisable to use the Enrollment Form to record detailed and
correct information during registration. Download the enrollment form
sample from user.fingertec.com/user-guide.html > User Enrolment Form.
Purging User Information
A user could leave a company for various reasons and
once he/she left the company, the information should
be removed from the system.
Choose User > User Profile >
Purge, select the user that you
wish to delete from TimeTec,
click Purge button. Please
make sure that the user is
carefully selected from the list
before you finalized the purging process.
26
CONTENTS

A click on User > User Profile will present you with a list of users available in TimeTec.
To delete any of the users; you need to click on
will prompt you to confirm that you want to delete the selected user. Click Yes or No
to confirm.
Choose User > User Identity > Click on
that you want to delete the selected user. Click Yes or No to confirm.
at the far left of each row. A popup
and a popup will prompt you to confirm
Importing Users
TimeTec allows a user list to be imported into the system for easier management of
user information. Choose User > User Profile > Import > Upload. Upload file .xls or
.txt format to import users to TimeTec.
Finding Users
To make it easier to find a specific user in TimeTec, choose User > User Profile > Find.
You can choose to a enter keyword search from 5 different fields e.g. User ID, Name,
Employee ID, Social Security No or ID No. You can also search users by clicking on the
column headers which are underlined e.g. User ID, Name, Employee ID, etc.
Suspending Users
An employee could be suspended for a variety of reasons and for different durations.
Choose User > User Profile > Check on the boxes under Suspended column to suspend users. Click Yes or No to confirm the operation.
CONTENTS
27

Editing Users
After users have been added into the terminal, the information could be edited accordingly. Choose User > User Profile > Click on
Edit information as necessary and save the setting.
Alternatively, you could go to User > User Identity > Click on
information.
at the far right of each row.
and edit necessary
Inserting User Photos
TimeTec allows attachment of user photo for every user. Choose User > User Profile
> Check on the box of the fourth column after Name. You will be prompted with a
window to choose a picture from a file. Upload the photo accordingly.
Sorting Users
Choose User > User Profile > Users can be sorted ascending or descending by clicking on the column header.
User sorting can also be done via User > User Identity > Users can be sorted in an
ascending or descending order by clicking on the column header.
Viewing All Users
To view the list of users available in TimeTec, click on User > User Profile. To view
more, at the bottom of the page, there is a forward arrow that leads to the next page,
and a back arrow that returns to the previous pages. You could also choose User >
User Identity > Roll over mouse to Branch and select all in the dropdown menu.
Viewing Users by Branch/ Department /Section
TimeTec makes it easy to view all users available in a branch, department or a section. When a user profile is added into the system, his information is added into the
system. To view users in a specific branch, choose User > User Identity > Branch >
The drop down menu will present you with all branches available in TimeTec. Select
the branch you require.
CONTENTS
28

Setting Privileges
TimeTec is a web-based application, which can be accessed by various users. It is
important to set up privileges of each user to prevent unauthorized access to information. Choose User > User Identity > Click on
for each user and click Submit.
Privilege Access Level
User Only report attendance at the terminal and gain access.
Enroller Only enroll “User” into the system. Enroller cannot enroll other privileges level i.e
Admin or Supervisor.
Admin Access all operations except reset settings and delete data in terminals.
Supervisor Access all operations in the terminals.
. Select the preferred privilege
Adding User Name
User Name is the name that will appear on the terminal’s LCD when a user verifies his
fingerprint. The maximum characters allowed for a User Name is 9-digits. For example, User Name for David Richardson is R. David. To create a User Name, choose User
> User Profile > Click on
at the far right of the table and insert the User Name.
Creating Password
Password is an optional verification method that a user could use in case they encounter some problems with biometrics verification, for example a badly injured finger. To create a password, choose User > User Profile > Click on
password of choice. The password should not be more than 5-digits.
and insert the
Inserting Card Number
Card is another option for users to use at the FingerTec terminals. Register the card
at the FingerTec terminals and insert the card number at User > User Profile > Click
and insert the card number.
on
Selecting Terminals
Every user may use more than one terminal, for example David is allowed to access
terminal at the front entrance and the one that is installed in the laboratory. To select
terminals that are accessible to a user, choose User > User Identity > Click on
check on the boxes of the terminals and click Submit.
and
CONTENTS
29

Erasing User Identities
Choose User > User Identity > Erase. Select users that you wish to erase from TimeTec
and click Erase. However, the data of the users who are deleted using Erase will be
deleted from TimeTec only and not from the terminals.
Finding the Biometrics Information
When each user registers for biometrics identification such as fingerprint, the data
will be recorded in TimeTec. Find out the biometrics identification data in User > User
Identity > Look under Fingerprint columns
Sign In User names
Sign In Username is a feature allowing employees to access TimeTec and check their
attendance records. These users will not be permitted to perform any other operations except viewing of attendance records. Choose User > Sign In Username > Click
to input username and password. Insert email address in the username field
on
and create a temporary password in the new password column. Click
information.
Additional info: TimeTec will request each employee to change his/her password at
the first login.
to save the
Creating a Mobile Account
Once you have created a username for TimeTec for your employees, you can provide a
mobile account for them to access TimeTec from the TimeTec Mobile application.
Employees can download and install the TimeTec Mobile into their smartphones (supporting platform: iOS and Andriod) and use the applications to carry out operation
below:
• Attendance reporting
• Attendance viewing & checking
• Download reports
For more details on how to install/setup/use TimeTec Mobile, please refer to the manual page 56: Chapter 9 Introducing TimeTec Mobile.
Once the employee uses their username and password to login into TimeTec mobile,
TimeTec will receive a unique ID from the mobile communication devices. The unique
ID is treated as a Mobile ID under his/her account. The administrator will be able to
see the 7-digit unique ID display in the column Mobile ID for employees who are using TimeTec mobile, in example 9887496.
You may send the mobile ID to your local resellers or FingerTec Technical Support
Department (support@fingertec.com) to generate the corresponding Product ID and
activation ID. Example:
Product ID: G4YN-B5SZ-LELB (12-digit alphanumeric)
Activation key: ETA72RWPAT (10-digit alphanumeric)
30
CONTENTS

These key numbers are important as it is used to activate the connection of TimeTec
mobile of the employee. Without the activation process, employees can only report
attendance via TimeTec mobile, but unable to view attendance and reports. The administrator can only see the transaction records reported by TimeTec mobile in Terminal Data Audit List, but not in the Attendance Sheet or reports.
To activate TimeTec mobile: Retrieve the TimeTec mobile product ID and activation
key from local resellers or FingerTec > Login to TimeTec server > User > Sign-In Username > Click
Enabled checkbox to activate the TimeTec mobile account.
Any mobile: Only check this if you want to allow the TimeTec Mobile user to use
his/her smartphones as Manager Device (for more details please refer to Setting Up
a Manager Device at page 64).
and insert the product ID and activation key > click > Check the
Suspending Users from Using TimeTec
You can suspend users from using TimeTec by choosing User > Sign In Username >
Click on
The suspended users cannot get access to TimeTec online anymore.
, check on the checkbox under Suspension column. Save the settings.
Accessing TimeTec
Once you have created an account for each user to access TimeTec, they can go to
TimeTec server to check their personal data and view their attendance records. A
user will be prompted to change his/her password during the first time he/she logs
in using the assigned username and password from the administrator. When the
password has been changed to a new password, the user will need to use the new
password in the next login.
Viewing Attendance Records
Sign in access to TimeTec provides user their rights to view his/her attendance
records. Choose Attendance and you will be presented with a table of attendance
sheet. Options to view are as listed in the table below:
View Option Description
Branch By clicking on the Branch, you can select to view users from a particular Branch or
Department You can select to view attendance of select Department
Section You can select to view attendance of select Section in the company
Duty Roster Duty Roster select duty roster you intend to view.
Schedule Should your company establish different schedules for different employee
all branches.
groups, select the schedule you would like to view.
CONTENTS
31

4
Configuring TimeTec
•
This chapter guides you on how to configure your company’s information
and attendance settings in TimeTec for you to optimize your attendance
data for improved productivity.
Creating Company Pro le
Choose Configuration > Company Profile and fill up the details of your company.
You are allowed to enter various company profiles but one company can only use
one unique name. Click Submit to save settings
CONTENTS
32

Creating a Username Account
Username Accounts are accounts for administrators who are given the rights to carry
out various operations in TimeTec for example adding, deleting, editing or assigning
privilege levels.
Choose Configuration > Username Account > Add > Enter revelant information and
click Submit.
Field Description
Username A login username Email address is preferable for easy reference
Description Remark of the person’s task in TimeTec or his/her designation
New Password Enter the password to login into TimeTec
Account Type Choose between operator or administrator
Branch Limit user’s access only to a specific branch
Department Limit user’s access only to a specific department
Section Limit user’s access only to a specific section
Attendance Rights
User Rights
Device Rights Limit user’s access to certain rights only
Schedule Rights
Report RIghts
Editing a Username Account
If you wish to change some information on username account to keep it updated,
click on Configuration > Username Account > Click on
mation. Click Submit to save settings.
and edit relevant infor-
Changing Sign In Password of Username Account
For security reasons, FingerTec recommends you to change the password regularly.
You can do this by choosing My Profile > Change Sign in Password > Enter all the
information required and click Submit. Use the new password to sign in the next time
you access TimeTec.
Deleting Username Account
In case you need to remove some accounts from accessing TimeTec’s administration,
Click on Configuration > Username Account > Click on
you want to delete.
and confirm the account
CONTENTS
33

Suspending a Username Account
Suspension of username account will remove the TimeTec’s access rights of the user
instantly and the user will no longer have access to edit or manage data in TimeTec.
Go to Configuration > Username Account > Under the Suspended column, select
the checkbox of the user and confirm.
Setting up System Settings
Configure system settings from this page to manipulate the display on your TimeTec. Choose Configuration > System Settings
Field Description
Date Format Select the date format preferred. D refers to Day, M is month and Y
Time Format Select 24-hr format or AM/PM format
First Day of the Week Determine the first day of the week in your country for example,
Number of Grid Rows per page This determines how your table is going to be displayed onscreen.
Currency Symbol Enter the symbol of your local currency i.e RM for Malaysia, USD for
Sign on Time Out in Minutes TimeTec will logout once you left it idle for more than the duration
is year.
Monday for countries in the West and Friday for most of the Middle Eastern countries.
Choose the number of grid row per page you require.
America, Pounds for United Kingdom, etc.
of time specified. You need to login again to access TimeTec.
Click Submit to save settings.
Con guring Day Type
Day type is the type of day commonly used in attendance reporting. In TimeTec, the
day types are color coded. Choose Configuration > Day Type
CONTENTS
34

Default Day Type Color Description
Workday Black Workdays of the company
Holiday Blue Holidays of the company
Rest day Red Rest day of the company i.e. Saturday and Sunday
Offday Gray Offday of the company
Editing Default Day Type
You can change the day type for your company based on your preference. Choose
Configuration > Day Type > Click on
given. For example: Workday to Weekday, or Rest day to Weekend. Click the disk icon
to save the changes.
> Write the day type you prefer in the field
Con guring Work/Overtime/Di erent Overtime
Work Wages
In each day type you have the option to determine the work wages to be paid for
example, during work days, the work wages is set at 100%, overtime wages at 150%
and the different overtime wages at 100%. Weekends will apply different work wages
than the workdays in some countries.
Con guring
Leave Type
TimeTec offers 9 default
leave types. Read the descriptions in the table below:
Default Leave Type Description
Absent Leave that is taken without any permissions from the company
Emergency Leave that is taken due to emergency cases i.e. accident of family member
Hospital Leave related to hospitalization i.e. warded
Marriage Leave taken for marriage
Maternity Leave due to child birth and confinement period
Paternity Leave taken by fathers for his new born
Sick Leave because not medically fit to work
Study Leave to study for an exam
Annual Default leave allocated to each staff per year
CONTENTS
35

Adding Leave Types
TimeTec allows a company to add a leave type on top of the readily available default
leave type provided. Choose Configuration > Leave Type > Add > Enter the leave
type > Submit. The newly submitted leave type will appear in the Leave Type list.
Editing Leave Types
You can also edit the leave type by clicking on Configuration > Leave Type > Click
> Edit the name field > Submit. The newly defined name will replace the previ-
ously given leave name.
Deleting Leave Types
You can also opt to delete the leave type if it its not relevant to your company. Con-
figuration > Leave Type > Click on
not appear in the Leave Type list after the deletion.
> Submit. The leave type that you deleted will
Setting Up A Department
In each company, there are multiple departments such as finance, administration,
human resources, sales and etc. To identify these departments, you can submit the
name to Configuration > Department > Add > Enter information of the department
> Submit. The newly submitted name will be listed in the list of Department.
Editing A Department
To edit the name of a department Configuration > Department > Click on > Edit
accordingly > Submit. The edited information will appear in the list of department
CONTENTS
36

Deleting A Department
You can opt to delete a department from your company, choose Configuration >
Department > Click on
the list once the deletion is confirmed.
> Confirm to delete. The department will disappear from
Setting Up A Section
Section is a categorization of a particular department, for example, sections under
Sales department could be defined as “Domestic” or “International”. To add sections
in your TimeTec, choose Configuration > Section > Add > Enter name of the section
> Submit. The newly submitted section name will be listed in the list.
Editing A Section
To edit the name of a section, go to Configuration > Section > Click on > Edit accordingly > Submit. The edited information will appear shortly after.
Deleting A Section
Configuration > Section > Click on > Confirm to delete. The section you deleted
will disappear from the list once it is confirmed.
Adding A Remark
Remark is related to workcode, a term to indicate the reason for staff’s absence in the
office. During reporting attendance, the workcode has to be keyed in before inputting fingerprint template into the system.
Choose Configuration > Remark > Add > Fill up remark name in the column and
submit. The newly added remark will appear in the list.
Editing A Remark
To edit a remark, go to Configuration > Remark > Click on > Edit accordingly >
Submit. The edited information will appear on the remark column.
Deleting A Remark
Configuration > Remark > Click on > Confirm to delete. The section you deleted
will disappear from the list once it is confirmed.
CONTENTS
37

5
Setting Up Clocking Schedules
•
This chapter guides you on how to set up clocking timetables for clocking
activities to produce accurate attendance reports that match your company’s rules and policies.
Scheduling configuration is crucial for your company’s attendance records. Understanding how to do scheduling will help you create an efficient attendance system
and failure to do so could cause loss of attendance display onscreen and on the
reports. Once the configuration is completed, users are not required to define their
clocking statuses e.g. check-in, check-out, lunch break, etc at the terminal(s). When
a user verifies his fingerprint at the terminal, the software automatically gets all the
clocking data from the terminals and checks it against the predefined schedules and
group duty rosters. If any of the data is mismatched with the schedules and rosters,
you would observe errors in the reports.
Understanding Clocking Schedules
Different clocking schedules are suitable for different groups of people working at
different times with different rules for the same company. Normal working hours are
usually from 8am-5pm or 9am-6pm, Day Shift is usually set at 8am-4pm, Night Shift
is from 4pm-12am, and Flexi Hours provide flexibility in setting work time. TimeTec
allows configuration of a maximum 999 types of clocking schedules for one environment.
Type of Clocking Schedules
There are 3 default types of clocking schedules available in TimeTec.
Type Description
Weekly Schedule This schedule applies for one week starting Mondays to Sundays and most regu-
Daily Schedule This schedule applies for one day and it is suitable for shifts e.g. multiple shifts,
Flexi Schedule This schedule is a weekly working schedule that follows flexible hours; mostly
CONTENTS
38
lar offices use this schedule, as their work schedule for every day routine is repetitious.
overnight shifts, open shifts, rotational shifts, etc, and mostly applicable to factories.
suitable for employees or work that is charged by the hour and reporting to a job
at irregular times.

Clocking Columns
Each schedule supports a maximum of 14 columns as stated below but TimeTec allows renaming of each column based on your company’s requirements:
Column Description
IN The first time stamp that the terminal captures when you come to
Morning Tea Break IN Time when staff are out for morning break approximately at 1030am
Morning Tea Break OUT Time when staff return from morning break approximately 1045am
Lunch Break IN The start of lunch break at around 1230am
Lunch Break OUT Time when staff return from a lunch break at around 130pm
Evening Tea Break IN Time when the evening tea break at approximately 400pm
Evening Tea Break OUT Time when the evening tea break finishes at around 415pm
Dinner Break IN This is important for companies who work until night, and the time is
Dinner Break OUT Dinner finishes an hour later at about 900pm
Supper Break IN Supper for night staff starts at about 1030pm
Supper Break OUT Supper finishes at about 1045pm
Overtime IN This time could be applied for staff who are taking overtime from their
Overtime OUT This is the time when they finish their overtime work.
OUT This is the last time a staff report time at the end of the day.
The uses of all these columns are based on your company’s requirements. You can
opt to use all or some of the pairs.
work in the morning i.e 8am or 9am
approximately 800pm
regular hours
Adding Clocking Schedule
To add a clocking schedule to your TimeTec, choose Schedule > Clocking Schedule
> Add > Enter the Schedule Number, Description and select the Schedule Type >
Submit. The newly added clocking schedule will appear in the list of schedules.
Editing Clocking Schedule
Once you have added a new clocking schedule into the list, you need to set the
schedule, determining the clocking time, clocking range and other settings. Choose
Schedule > Clocking Schedule > Click on
ingly
and start the setup or edit accord-
CONTENTS
39

Note: Only Weekly Schedule will display weekdays and weekends in the Weekday column
and you can select the Day Type. Please see the di erences of the Clocking Time for di erent
schedules.
Inputting Clocking Time
You need to configure a specific clocking time for every clocking schedule. Click on
the Clocking Time tab and you’ll be presented with 7 days of clocking schedule that
you need to setup. Determine the type of day for every day of the week for example,
Monday is a weekday, Tuesday is a weekday, Saturday is a restday, etc.
For each day, enter the clocking schedules applicable and as mentioned in Clocking
Columns, there are 14 time slots you need to input the time based on your company’s requirement. Only two slots are compulsory which are IN and OUT, the rest are
optional.
Setting Grace Period for Clocking Time
There is an option where you could allow discretion period in late-IN or early-OUT.
When an employee who supposed to check in at 9:00am checks in at 9:16am, or
checks out at 5:50pm when the time of check out is 6:00pm, the short in time is not
considered as lateness in the overall report, if you put its Grace period at 30 minutes.
If the grace period is 15 minute, the check in time at 9:16am will be considered as
1 minute late.
Choose Schedule > Clocking Schedule > Edit > At the footer of Clocking Time tab,
you will find “Allow grace period in minutes:” > Enter the number to represent the
minutes allowed to check in late or checkout early.
Setting Flexible Break Time
A flexible break time refers to break times taken by an employee outside the allocated break periods. For example, lunch time is set between 1230am and 130pm but an
CONTENTS
40

employee takes a 10-min break to do something at 1130am. This is considered “flexible break time”. A company can set the duration of time allowed for each employee
to take “flexible break time” and an employee’s accumulated flexible break time
should not be more than the permitted duration. Once an employee exceeds the
given time, the extra time will be deducted from the total work hours.
Choose Schedule > Clocking Schedule > Edit > At the footer of Clocking Time tab,
you will find “Flexible break time in minutes:” > Enter the number to represent the
minutes allowed to take breaks outside of the allotted break times.
Deducting Break Time From Total Working Hours
TimeTec provides an option to deduct break times from the total working hour depending on the company’s attendance policy. If the total work hours is 8 hours and
in between the hours, total accumulated break time is 1 hour and 30 minutes, you
have an option to deduct this from the total working hours, making the total hours
6 hours 30 minutes.
Choose Schedule > Clocking Schedule > Edit > At the footer of Clocking Time tab,
you will find “Exclude break time from working hours:” > Check the box if it is preferred by your company. Leaving the box unchecked will not deduct break time from
the total working hours.
Include Early Time Into Total Working Hours
There are some early birds in the office and some companies want the time to be
accumulated as their total working hours. You can do so by choosing Schedule >
Clocking Schedule > Edit > At the footer of Clocking Time tab, you will find “Early
time for work before in time:” > Check the box if it is preferred by your company and
the time will be included in the total working hours, leaving the box unchecked will
not include the early hours to the total working hours.
Arranging Clocking Time in Correct Slots
Check this “Clocking In-Out Pairs in Use”
if you want the clocking times to be reported
in pairs in Flexi Schedule.
Note:
Applicable to Flexi Schedule
only.
Setting Clocking Range
The clocking range is for you to set the maximum timing to allocate for each clocking
column for example if you set 11:00am in the IN time, the cut off time for check IN is
11:00am and whoever clocks in at 11:02am, the time will fall in AM Tea slot. This rule
is only applicable for Weekly and Daily Schedules.
CONTENTS
41

This rule is to allow TimeTec to arrange attendance data accordingly. Clocking
Range option is not compulsory and if it’s not predefined, TimeTec will arrange the
attendance data based on the default settings, where the allocation of the data will
be done based on the midpoint of the IN time or the current OUT time.
For example: If IN time is predefined as 8:00 am and AM Tea is predefined at 10:00am,
the midpoint between the IN time and the AM Tea time is 9:00am. Therefore, if a
user checks in to work at 9:05am, the time will be placed under the AM Time column.
If he checks in to work at 8:55am, his time will be under the IN time column.
Replacing Attendance Data with The Latest
Clocking Time
There are circumstances where employee clocks in a few times in a close period
interval and the question is, which one of the recorded times will be recorded in
the slots?
Choose Schedule > Clocking Schedule > Edit > Clocking Range: At the bottom of
Clocking Range tab, you will find “Replace with latest clocking” and a check on the
box will instruct TimeTec to choose the latest clocking time for the record.
For example: The OUT time is predefined at 6:00pm and during the interval, an em-
ployee checks out a few times at 5:55pm, 6:05pm and 6:15pm. If you checked the
box under the “Replace with latest clocking” row, TimeTec will choose 6:15pm to
record because that is the time that last recorded by the terminal. If you did not
check the box, TimeTec will capture 5:55pm for the record.
The boxes are available at every attendance column and you are free to determine
your own set of attendance rules. However, FingerTec recommends you to check
under OUT column only for easy reference.
42
CONTENTS

Setting Tolerance Time Before Shift Starts in
Daily Schedule
Insert a value in the box after “Quantity Min-
Note:
This option is available for
rotational shift working shift
only.
utes Before Shifts Start for Rotational Shift
Only” and that will be the time of tolerance
given for rotational working shift staff. Choose
Schedule > Clocking Schedule > Edit > Clocking Range:
For example:
Shift A clock IN time is at 8:00am and clock OUT time is at 5:00pm.
Shift B clock IN time is at 5:00pm and clock OUT time is at 12:00am.
Quantity Minutes Before Shifts Start for Rotational Shift Only is set at 10 minutes.
Therefore, if an employee for Shift A checks out at 5:10pm, the 10 mins will be calculated as overtime.
And if an employee for Shift B reports to work between 5:01 and 5:10pm, he will not
be considered late in attendance records.
Setting Shifts in Daily Schedules
Choose Schedule > Clocking Schedule > Add New Daily Schedule > Edit and configure > Submit
Shift Description
Day Shift Morning Shift is from 8:00am to 4:00pm. Therefore,
IN: 8:00
Lunch Starts: 12:00
Lunch Ends: 13:00
Out: 16:00
* Configure the rest of the values accordingly.
Night Shift Night Shift is from 4:00pm to 12:00am. Therefore,
IN:
Starts: 20:30
Dinner Ends: 21:30
Out: 00:00
* Configure the rest of the values accordingly.
Overnight Shift Overnight Shift is from 12:00am to 8:00am. Therefore,
IN:
Lunch Starts: 04:00
Lunch Ends: 05:00Out: 8:00
* Configure the rest of the values accordingly.
16:00Dinner
00:00
After setting up these shifts, you need to setup Group Duty Roster in page 35 to define the working calendar where you could set multiple working shifts, rotational
working shifts and open shifts.
CONTENTS
43

Setting Clocking Rules for Overtime Hour
This setting page is applicable to Weekly, Daily and Flexi Schedules. It provides an
option for you to determine the rules for overtime work hour.
Choose Schedule > Clocking Schedule > Edit > Setting tab
Column Description
Minimum minutes
must work to quality for overtime
Maximum no. of
hours allowed to
claim for overtime
Work hour is either
round-up or rounddown(-ve) in minutes of:
Overtime hour is
either round-up or
round-down (-ve)
in minutes of:
Overtime if total
flexi-work hours exceed work hour of:
An employee must work more than the value of minutes defined here to qualify to entitle for overtime. For example, if the time is predefined at 60, the staff
must work more than 60 minutes to be qualified for overtime.
Employees are allowed a maximum number of hours to claim for overtime in
a day based on the value input in this column. For example 12 hours, and if an
employee worked 13 hours, he is only entitled to claim for 12 hours only.
For easy viewing of attendance records, it is recommended that you set to
round up or round down the attendance time. Round up:Choosing this option will add the time to the attendance data. For example, if you checks in
at 9:05am, the time stamp will be at 9:15am.0-15min: 15, 16-30min=30, 3145min=45, 46-59min = 1 hourRound down: Choosing this option will reduce
the time at the attendance data. For example, if you check in at 9:05am, the
time stamp will be at 9:00am.0-15min: 15, 16-30min=30, 31-45min=45, 4659min = 1 hour
You can round up or round down every overtime (OT) records for easy viewing
in TimeTec.Round up:Choosing this option will add the time to the attendance data. For example, if you checks in at 9:05am, the time stamp will be at
9:15am.0-15min: 15, 16-30min=30, 31-45min=45, 46-59min = 1 hourRound
down: Choosing this option will reduce the time at the attendance data.For
example, if you check in at 9:05am, the time stamp will be at 9:00am.0-15min:
15, 16-30min=30, 31-45min=45, 46-59min = 1 hour
Note: This is applicable in Flexi Schedule only
Input a value here to represent the number of hour that an employee needs
to work before his extra hours could be considered as overtime.For example:
Value 8 is equivalent to 8 hours of normal working hours and the 9th hour will
be calculated as overtime.
44
Note: It is crucial that you set the Clocking Time, Clocking Range and Settings properly
to match your company’s attendance rules and policies. Failure to do so would cause the
attendance data to be displayed in-properly on Attendance Sheet.
CONTENTS

6
Setting Up Group Duty Roster, Duty
•
Planner and Company Holidays & Leave
This chapter guides you on how to set up your company’s Duty Roster,
Duty Planner, Holidays and Leaves for the whole year of each staff.
Understanding Group Duty Roster
Group Duty Roster is an annual working calendar applicable to all employees of the
Company based on the clocking schedules that you have set up earlier in Clocking
Schedules, Chapter 6.
Type of Shift in Working Calendar
Type of Shift in Description
Working Calendar
Multiple Working Shifts Employees are allowed to continue working in another shift after he or
Rotational Working Shift Employees are provided with a preset working pattern for example:
1. 2 days of morning shift (Mondays and Tuesdays)
2. 2 days of evening shift (Wednesdays and Thursdays)
3. 2 days of overnight shift (Friday and Saturday)
4. 1 rest day (Sunday) and the cycle repeats.
Open Shifts
Employees are given options to be present in any of the 3 working
Description of Columns in Duty Roster
Column Description
Duty Group Reference number of Group Duty Roster from 1-999
Description The name of Group Duty Roster
Roster The type of clocking schedules; daily, weekly or flexi
Shift/Day This column applies to multiple working shift showing how many working
Overtime Only After Enabling this option will prompt TimeTec to calculate overtime for this
Group Duty Calendar Showing yearly working calendar, allowing administrator to configure and
she has just finished with the recent shift. Maximum shifts allowed are
3 shifts daily.
shifts as and when demanded by the Company. TimeTec will automatically locate the attendance time, however the IN and OUT time of all
working shifts cannot overlap with one another.
shifts schedule per day
Group only if their total working hours exceed a predefined limit for example 40 hours a week or 200 hours per month
edit the information in the calendar.
CONTENTS
45

Adding A New Group Duty Roster
Choose Schedule > Group Duty Roster > Add > Enter Duty Group, Description of the
Duty Roster, Select Type of Roster > Submit. The newly added Group Duty Roster will
appear on the list.
Editing Group Duty Roster
Choose Schedule > Group Duty Roster > Click on and edit accordingly > Save by
clicking on the
.
Understanding The Group Duty Calendar
A click on any year under the Group Duty Calendar, you will be presented with a
yearly calendar. The clocking schedule information in the calendar is not editable
here. There are three colors presented in the calendar and each represents the day
type and the number inside the box represents the Clocking Schedule number
Day Type Description
White Workday on Clocking Schedule No. 1
Grey Off Day on Clocking Schedule No. 1
Pink Rest Day on Clocking Schedule No. 1
46
CONTENTS

Editing Work Calendar
Setting Up Weekly or Flexi Working Calendar
Choose Schedule > Group Duty Roster > Click on the year of the calendar you want
to edit > Click Auto Schedule >
In the Auto Schedule, change the schedule number for each day of the week and
choose the dates that these changes would apply for. You also can provide options
for alternative schedules > Apply
Setting Up Daily Working Schedule
Click Auto Schedule > Define the time period of the cycle for example 4-day working
calendar and the calendar will repeat its cycle for every 10 days, define the day type,
select the dates to initiate the schedule > Apply
Resetting Work Calendar to Default
Once you have edited the calendar and you wish to reset the work calendar to default
settings, choose Schedule > Group Duty Roster > Click on the year of the calendar
you want to edit > Click Reset to Default. The work calendar details will return to its
default settings.
After you have made the relevant changes, click Submit to confirm the changes.
Viewing Group Duty Roster List
Choose Schedule > Group Duty Roster > Click on column you want to view.
Duty Group – You can opt to view the duty group either ascending or descending by
clicking on the Column and select your choice
Roster – You can select to view the Roster by type or you can view all. Click on the
column Roster, and from the drop down menu choose the type of Roster you like to
view.
Setting Up User Duty Planner
Choose Schedule > User Duty Planner
User Duty Planner is intended to allow customization of Duty Rosters on individual staff. In Group Duty Roster, everybody in a group would have the same working
schedule but you can change some staff’s duty rosters to suit to their working schedules. This feature is applicable to staff such as head of department, part timers or staff
who are following different working schedules.
By having User Duty Planner option, an Administrator can customize their working
schedules under the same group duty roster. Employees in Multiple Working Shifts
could be changing and replacing shifts quite often between employees and to manage the shifts, the administrator can conveniently use this feature.
In the working calendar, select employee that you want to edit the working schedule,
click the current year > Point to the date and click > Select the working shift applicable to this particular staff >
Administrators can also change Day Type and apply leave using User Duty Planner.
Submit to save the changes
CONTENTS
47

Listing Users in User Duty Planner
Choose Schedule > User Duty Planner > Column Header > Point your cursor for the
selection > Click on your selection
Column Description
User ID You can select to view user ascending or descending, or you can search a particu-
Duty Group Choose one Duty Group to view or you can view them ascending or descending.
Branch You can select individual branch, you can view them ascending or descending,
Department Choose an individual department, you can view them ascending or descending,
Section You can select any section, you can view them ascending or descending, and you
lar User ID by pointing to the User ID column header and select on a choice.
Select all if you want to choose all.
and you can select all to view all branches.
and you can select all to view all available departments
can select all to view all sections.
Setting Up Company Holidays and Leaves
Administrator accesses this page to configure the annual holidays and leaves applicable to a company.
Setting Holidays
Choose Schedule > Company Holiday/Leave > Click on the current year > Click on
the date you want to set up the holiday, name the holiday > Submit to confirm and
save settings.
Setting Leaves
Choose Schedule > Company Holiday/Leave > Click on the current year > Click on
the date you want to set the leave, select the leave > Submit to confirm and save
settings.
48
CONTENTS

7
Managing and Viewing Attendance
•
This chapter guides you on how to read, view, edit and generate Attendance Sheet.
Understanding Attendance Sheet
Attendance Sheet displays all attendance data and detailed information of users
available in TimeTec for easy viewing. Given acceptable circumstances, attendance
data is editable but the changes, which are done manually will be recorded for future reference and audit. The Attendance Sheet contains 15 columns, which are explained in the table below:
Column Description
Date The date of the attendance sheet’s data
User ID The user ID of all users of TimeTec
Name Name associated with the user ID; it’s recommended to input full name as print-
ed in the ID card
Photo Photo of the user
Edit TimeTec allows editing of attendance data in attendance sheet but the changes
display in different color indicating that the data has been changed.
Day Type There is a list of Day Types available for you to choose
Schedule No Working Schedules associated with the User ID
IN The time stamp when user checks in the office for the first time in a day.
AM Tea The time stamp when user checks out for a morning tea break and comes back to
work
Lunch The time stamp when user checks out for a lunch break and comes back to work
CONTENTS
49

Column Description
PM Tea The time stamp when user checks out for an afternoon tea and comes back to
Dinner The time stamp when user checks out for a dinner and comes back to work
Supper The time stamp when user checks out for an evening supper and comes back to
OUT The time stamp when user checks out from the office
Overtime The time stamp when user checks in and out for an overtime session
Work Showing calculated work time for a day/shift
Overtime Showing calculated overtime for a day/shift
Short Showing short of time in a day/shift
Leave Type Choose this option if the staff is taking leave that day.
Total Hour This is only applicable when you checked the column “Overtime Only After”option
Total Overtime This is only applicable when you checked the column “Overtime Only After”option
Total Short This is only applicable when you checked the column “Overtime Only After”option
Leave Type Showing the leave taken for a day/shift
Remark Showing reasons or remark for the irregular attendance
work
work
(Chapter 5), showing the number of total work hours for a specific period
(Chapter 5), showing the number of OT hours done during a specified period
(Chapter 5), showing the number of shortage work hours for a specified period
Note: Even though there are 7 pairs or 14 clocking columns in TimeTec, a company needs
not use all of them. TimeTec will sort the clocking times accordingly based on the rules and
settings done earlier in Chapter 6 and 7.
For example, an employee work schedule just has 3 activities; check-IN and OUT,
lunch and tea break, and he needs only 6 clocking columns. Therefore, TimeTec will
abide by the settings and it will position the clocking times into their corresponding
columns and it will leave those irrelevant columns empty in Attendance Sheet.
Sorting Attendance Sheet
You can sort or selectively view the Attendance Sheet of employees according to
their Branch, Department, Section, Group, Schedule, Date or User ID. Click on Attendance Sheet, move the cursor to the table column header and select your choice.
There is also an option to view attendance data by their clocking situation e.g. Absent, On Leave, Late In, Early Out, Extended Break, Miss Punch, Overtime etc. Refer to
Chapter 9: Attendance Reports for descriptions.
The flexibility in sorting attendance sheet provides the administrator convenience to
check and analyze employee’s attendance data.
CONTENTS
50

Editing Attendance Sheet
Under exceptional circumstances, an administrator is given permission to edit employee’s attendance to suit his work flexibility for example, always meeting clients
outside of the office, coming late to the office due to permissible reasons. By giving
reasons to such peculiarity in attendance data, it gives an administrator flexibility to
present the attendance sheet as close to what’s been happening as possible.
TimeTec considers the manually inserted data as real data and the data will be calculated for those particular users. While editing is allowed in given circumstances, you
need to be careful to not input incorrect information to avoid errors in calculations.
Choose Attendance > Click on
change Work Type, edit the time stamps, change Leave Type and leave Remark >
Click on
to save the changes.
on the particular user you want to edit, you can
Purging Attendance Data
You can choose to delete or purge the irrelevant or incorrect attendance data from
the records. Choose Attendance > Purge > Check to select the User ID you want to
purge and determine the date range > Click Purge. The system will request that you
confirm the purge, click Yes to confirm
Generating Attendance Sheet
The generate Attendance Sheet process tells TimeTec to rearrange attendance data
in the Attendance Sheet according to the most updated attendance data.To get the
updated data that complies to the new settings, the TimeTec requires you to perform
Generate process to refresh details in Attendance Sheet. Without performing this
step, the new settings or changes will not take effect.
CONTENTS
51

Note: It is crucial that you generate attendance data in the Attendance Sheet if you have
done one of the following activities.
1. Change any settings in clocking schedules and/or group duty roster
2. Assign new users into Group Duty Roster
3. Change users into different Group Duty Roster
It is also crucial for you to generate attendance sheet towards the end of the year to
prepare for the next year’s sheet.
Choose Attendance > Generate > Select User ID or select All, define the date range,
select options given accordingly > Click Generate.
CAUTION: This process will erase any of the manually inserted information/attendance
data from the records. Hence, you need to include all relevant user IDs and date range to
generate accurate attendance data.
Viewing Attendance Records
In Attendance, you are allowed to view attendance records based on activities as shown in
the picture above. A click on Absent will list
down the details of employees who are absent
for today. On Leave is for employees who are
taking permitted leaves. There are 11 Attendance records which could be viewed instantly
by authorized personnel via TimeTec Attendance.
52
CONTENTS

8
Attendance Reports
•
This chapter explains in detail type of attendance reports available in TimeTec and how to generate the relevant reports for your company needs.
Understanding TimeTec Attendance Reports
In total TimeTec provides 26 different types of reports under 5 major categories.
Different type of report is intended for various purpose in human resource management.
Generating Report
Choose Reports > Attendance Listing > Choose the type of leave you want to view
> Input the necessary details > Submit
The particular report you choose will be displayed onscreen with details that you
inputted in TimeTec.
Icon Description
Saving Reports TimeTec provides options for you to save your reports in various format. At
Printing Reports Find printer icon at the top of the report and choose the select pages you
Searching Pages Depending on the information that you input, TimeTec will return multiple
Redoing Reports TimeTec gives option to redo the report. A click on the icon will reset all the
Viewing Reports Default viewing percentage is 100% and it is adjustable
Onscreen from 25% to 400% depending on your viewing preference.
the top of your report, find a diskette icon and click on the icon to view the
dropdown menu of the format you can save the report into. Choose between
Acrobat, MS Word 97, MS Excel 97-2000, MS Excel 97-2000 data or Rich Text
format. Locate the file to save the report into and click to save.
wish to print
a printer before you attempt to print any documents from TimeTec.
pages of report. There is an option to select the page you want to view by
keying in the page number and click on the paper sheet icon on the page.
TimeTec will display the page you require in an instant
settings, and you need to input new settings for a new report.
or you can print all but make sure that your PC is connected to
Reports Under Attendance Listing Category
Reports that fall under Attendance Listing focus on all important attendance information of all employees which include clocking activities, work time, overtime, tardiness, on leave and etc; providing an overview of employees’ clocking behavior and
attendance pattern.
CONTENTS
53

Column Description
Electronic Time Card The most general attendance record of employee comprises of de-
Daily Attendance Listing
Weekly Attendance Listing Generate employee’s weekly attendance into a page with its sum-
Attendance Sheet This report is a comprehensive report detailing activities of all em-
Correction Report
Tardiness Report
On Leave Report
Overtime Approval Worksheet This is an overtime worksheet report showing the list of employee
This report is showing employees that have irregular clocking activi-
This report is showing employees with tardiness i.e late in, early out
This report shows the list of employees who take leave and the par-
tailed clocking activities of an employee in a month including calculated work time, overtime and short time. The summary of attendance, tardiness and leave taken are available in this report.
This report lists employee’s daily attendance into one page, where
administrator is able to check daily attendance on all or selected employees along with its summary of attendance at the bottom of the
report.
mary of attendance at the bottom of the report.
ployees in a month including their leave taken, absent, tardiness and
it also provides option to show first IN time and the last OUT time of
every employee.
ties for example extended break time, early out, come in late, and etc.
Administrator can choose to correct these irregular clocking activities
to match the activities of affected staff, if necessary.
and etc. This report shows the time of tardiness in red and the total
short minutes.
ticulars of their leaves for reference.
who is taking overtime and the quantity of hours that he is entitled
for. This report is important for a superior to check the details of overtime actually taken before approving the claims.
Reports Under Attendance Analysis Category
Reports that fall under Attendance Analysis Category analyze employees’ attendance from various aspects to provide employer with detailed understanding of the
working/clocking pattern of the staff.
Column Description
Attendance Summary This report details out the work rate, tardiness, total work time, OT
Attendance Analysis This report looks the same like attendance summary while missing
Day by Day Analysis This report details out the work rate, tardiness, total work time, OT
CONTENTS
54
and short for workdays/rest day and off day for each employee. Analysis of each employee’s working performance could be viewed using
this report.
work rate, work time, OT and short hours. With this report, employer
can have overview of how many times staff is late to work or take
early out.
and short for workdays/rest day and off day for each employee
daily.

Column Description
Month by Month Analysis This report details out the work rate, tardiness, total work time, OT
and short for workdays/rest day and off day for each employee
monthly.
Gross Wages Report This report is useful for companies that pay their employees by hour.
The report shows total work time and OT for different day types with
different pay rates for wages calculation. Determine the rate/hour >
user profile > Select User > Edit > Rate/hour > Insert value > Submit
to save settings
Reports Under Terminal Analysis Category
These reports record all verifications done at the terminal(s) and details of employees’ whereabouts during working hours are recorded.
Column Description
Staff Movement Analysis This report lists the details of attendance by user ID
Terminal Activity Report This report details the transaction record of staff by terminal ID.
Terminal Transaction Listing This report records all transaction data downloaded from every ter-
minal
Reports Under Duty Schedule Listing Category
Column Description
Clocking Schedule This is a checklist showing detailed settings of clocking schedules.
Duty Calendar This is a checklist showing annual working calendar of a particular
working group
Weekly Staff Duty Roster This is a checklist of weekly working calendar of a particular working
group
Monthly Staff Duty Roster This is a checklist of monthly working calendar of a particular work-
ing group
Reports Under Table Listing Category
Column Description
Name List A list of all or selected employees’ names
Branch List A list of all branch names
Department List A list of all department names
Section List A list of all section names
Remark List A list of all remark names
For more detailed explanations on every report, please go to www.fingertec.com/
timetec/report.pdf
CONTENTS
55

9
Introducing TimeTec Mobile
•
This chapter guides you on how to use TimeTec Mobile for iPhone and
iPad.
Introducing TimeTec Mobile
TimeTec Mobile is an application developed by FingerTec for iPhone and iPad users, to report and check attendance on mobile devices. The application pairs your
iPhone or iPad unique device ID, TimeTec username and password that are issued
by TimeTec server and current location during time attendance reporting. The pair-
ing of the mobile ID along with the TimeTec username and password results in the
limitation of one (1) user per device. This restriction is to eliminate the possibility of
“buddy punching” occurring at the iPhone/iPad. Therefore after downloading and
installing the application, ensure that you perform the initial login to TimeTec.
Although restricted to 1 user per device, the app allows other users with a valid
TimeTec username and password to login from the same device, but only to check
his/her attendance and to print his/her attendance report. A license key will have to
be purchased from you reseller before being able to use the app. Contact your reseller or support@fingertec.com
The Importance of Internet Connectivity
The app communicates with the Internet network to get information on the current location of users. During attendance reporting, the current location is tagged
along with the attendance record. Hence, the administrator will know your location
by reading your record, eliminating the possibility of users being dishonest when
reporting their attendance during working hours. The attendance reporting from
the iPhone/iPad requires Internet connection to be translated into an attendance
report.
for more information.
Checking In Without Internet Connectivity
Under certain circumstances where Internet connectivity is unavailable, the application will still capture the information of the attendance reporting and store it into its
offline mode internal memory. Whenever an Internet connection is established, the
app will upload all previous attendance records to the TimeTec server. So, you may
be at that business trip overseas, but you’ll still be able to report your attendance.
CONTENTS
56

Group Check In Using A Single Device
It is possible to use a single device to allow many users to report their attendance,
however this mode is only granted to those with the authorization level of Manager
/ Supervisor. The manager/supervisor can turn the device into an attendance-capturing machine for users, after the administrator assigns his user ID to a “Manager”
or “Supervisor” authorization level. Now every user can login via the manager’s/supervisor’s device to report their attendance.
Understanding Authorization Level
The highest authority in TimeTec’s server is known as “Administrator”. Administrators have an additional option to view and print attendance records of any user.
However administrators are not able to use his/her administrator login account to
report attendance. The administrator will still need to use his/her normal user login
to report attendance via the apps.
Downloading and Installing TimeTec Mobile
Once done, open the app to do the settings. Download TimeTec mobile from App
store or Andriod market > install it.
Creating a TimeTec Mobile Account
Once you have created a username for TimeTec for your employees, you can provide
a mobile account for them to access TimeTec from the TimeTec Mobile application.
Employees can download and install the TimeTec Mobile into their smartphones
(supporting platform: iOS and Andriod) and use the applications to carry out operation below:
1. Attendance reporting
2. Attendance viewing & checking
3. Download reports
For more details on how to install/setup/use TimeTec Mobile, please refer to the
manual page 56: Chapter 9 Introducing TimeTec Mobile.
Once the employee uses their username and password to login into TimeTec mobile, TimeTec will receive a unique ID from the mobile communication devices. The
unique ID is treated as a Mobile ID under his/her account. The administrator will be
able to see the 7-digit unique ID display in the column Mobile ID for employees who
are using TimeTec mobile, in example 9887496.
You may send the mobile ID to your local resellers or FingerTec Technical Support
Department (support@fingertec.com) to generate the corresponding Product ID
and activation ID. Example:
Product ID: G4YN-B5SZ-LELB (12-digit alphanumeric)
Activation key: ETA72RWPAT (10-digit alphanumeric)
CONTENTS
57

These key numbers are important as it is used to activate the connection of TimeTec
mobile of the employee. Without the activation process, employees can only report attendance via TimeTec mobile, but unable to view attendance and reports. The administrator can only see the transaction records reported by TimeTec mobile in Terminal
Data Audit List, but not in the Attendance Sheet or reports.
To activate TimeTec mobile: Retrieve the TimeTec mobile product ID and activation
key from local resellers or FingerTec > Login to TimeTec server > User > Sign-In Username > Click
Enabled checkbox to activate the TimeTec mobile account.
Any mobile: Only check this if you want to allow the TimeTec Mobile user to use his/
her smartphones as Manager Device (for more details please refer to Setting Up a Manager Device at page 64).
and insert the product ID and activation key > click > Check the
Setting Up Your TimeTec Mobile
Note: Before you start to use TimeTec Mobile, refer to the TimeTec system administrator to
obtain the static IP or DNS (Domain Name Server) IP of TimeTec server. Without Static IP or
DNS information, your device will not be able to locate the TimeTec server to download your
attendance information. A license key will have to be purchased from you reseller before being
able to use the app. Contact your reseller or support@ ngertec.com for more information.
CONNECTING TIMETEC MOBILE VIA DNS
DNS: Insert the Static IP for example 219.93.242.4 or
DNS: fingertec.no-ip.biz
Port: Insert port number in this field, for example
8080.
After you have entered DNS and Port information, click
Connect to get a link to TimeTec server
58
CONTENTS

CONNECTING TIMETEC MOBILE VIA
IP ADDRESS
In the event that you are connecting directly to the
TimeTec server via LAN (Local Area Network), you
must insert the IP address of the TimeTec server to
connect.
IP Address: Please insert IP Address of TimeTec Server
Port: Insert port number in this field, for example
8080.
Tap Connect after you have inserted all the information.
SIGNING IN TIMETEC MOBILE
If all the information you inputted is correct, you will
see this login screen. Enter the username and password that you are using to access TimeTec to start reporting and checking attendance. You could choose
to let the device remember your password by turning
the Remember Me tab to ON. Click Sign In to Login to
TimeTec Mobile. TimeTec will request each employee
to change his/her password at the first login.
Possible Error Scenes During
Setup
DNS OR STATIC IP INFO ERROR
This could occur when the user forgets to insert static
IP or DNS of TimeTec Server. It could also occur if the
static IP or DNS is incorrect.
Check static IP or DNS.
CONTENTS
59

IMPROPER DNS
Improper DNS inserted. If the DNS is correct, check with system administrator. It could be due to offline server, or weak
connection.
NO CONNECTION ESTABLISHED
There is no Internet connection established, check
your iPhone/iPad settings, or WiFi settings to establish a connection before you could access to TimeTec Server.
Using TimeTec Mobile
The first user to login into the TimeTec Mobile in the iPhone or iPad is the default
user. The user will be able to report attendance and view and print attendance
records.
REPORTING ATTENDANCE
60
Look at the icons at the
bottom on the screen
and tap on Check In, now
tap the scanner area in
green to report attendance. The TimeTec server
will receive the attendance record and display
a message of acknowledgement.
CONTENTS

CHECKING HISTORY ATTENDANCE
VIEWING CURRENT LOCATION
Tap History to view the
history attendance. You
can search the history
attendance by date and
time. Tap Search by Date
and Time > Insert date
and time to search.
Tap Location to view
your current location.
It is advisable to check
your location before you
report your attendance
to avoid misunderstood
attendance data. This is
to make sure you’ve already reached the working place.
CONTENTS
61

CHECKING PERSONAL ATTENDANCE RECORDS
A tap on Attendance icon will
bring you to the Attendance
Sheet. Tap Filter to define
the preferred display screen.
Choose between Today, This
Week, This Month or you can
Select Date Range. Tap a column to see the details of that
particular attendance record.
CHECKING DEPARTMENT/EMPLOYEE’S
ATTENDANCE RECORDS
The System Administrator can check the attendance record of
other employees or the entire department.
Tap to select and view attendance by date, branch, department or section.
CONTENTS
62

VIEWING AND PRINTING REPORTS
Tap Report to view the electronic time card. The display format changes according to
your preference. For example you choose This Week in Attendance tap, the report will
be displayed by week. Tap Print to print the report.
VIEWING AND PRINTING REPORTS
For system administrator, TimeTec will download all the reports from server during
the viewing session. To speed up the process, it is recommended to define the date
range before downloading the reports.
Settings to Personalize TimeTec Mobile
Server Connection - You can re-configure the TimeTec Mobile by changing the DNS
or IP address of the TimeTec server. You need to only do this if you want to connect
to another TimeTec server.
CONTENTS
63

Time Format – You may change the time format either 12-
hour or 24-hour based on your preference
Date Format - You may change the date format either
MM/DD/YYYY or YYYY/MM/DD based on your preference.
Search Options - Change the searching option from
searching by Day, Type or Date
Sound – You can enable/disable the notification sounds
during verification.
Contact Us - Send us feedback to help to improve the
product or visit our website to see more details.
About - See the details information of TimeTec Mobile
Reviewing Attendance Reports for Secondary Users
Other users can login to Mobile TimeTec via another iPhone or iPad. However, if the
user is not the first one to be registered on the device, then he/she is considered a
secondary user who can only log in to view and print attendance records.
After logging in, a secondary user will see this message to notify he/she cannot report attendance via this device. However secondary users can proceed to view and
print his/her attendance records.
CONTENTS
64

Setting Up a Manager Device
If you want to be assigned a higher authority level such as “Manager” or “Supervisor”, you can request the System Administrator to update your device to become
a Manager level device. The administrator will configure the TimeTec server to upgrade the mobile ID of your iPhone/iPad to that of a higher authority, referred to
as a Manager Device. Now your staff can use your iPhone/iPad to login with their
personal username and password to report their attendance. The operation is exactly like a normal user login to report attendance. Your iPhone/iPad is now an attendance-reporting device.
O ine Attendance Reporting
In case you are traveling to a few locations or countries for business duties, you
might have to report attendance when you reach each location. However Internet
connection might be restricted or unavailable at your location. In that case, you will
need to use Offline attendance reporting method. Before going outstation for your
duties, ensure that you report your attendance at least once when there is available
Internet or WiFi connection. The first attendance reporting is very important, as it
is a tag to the system to enable the offline attendance reporting. When you reach
the location without Internet or WiFi connection, login to Mobile TimeTec and you
will see this screen:
The Mobile TimeTec displays the words Offline
Mode on top. Tap the
scanner area to report
your attendance.
The system acknowledges that you are reporting
your attendance, and it
saves your attendance
into its internal memory.
When an Internet or WiFi
connection is established, it will upload the
attendance previously
stored into the TimeTec
server.
NOTE: Before using the offline mode, you must perform a first-time attend-
ance-reporting while and Internet or WiFi connection is available. This is a tag to
pair Mobile TimeTec to the TimeTec Server, so that it recognizes future attendance offline recordings.
CONTENTS
65

10
Index
•
A
19 Access Rights
39 AM Tea
43 Attendance Record
43 Attendance Sheet
B
21 Branch
C
29 Clocking Columns
51 Clocking Schedule
32 Clocking Time
31 Clocking Range
14 Command Queue
23 Company Profile
23 Configuration
D
24 Day Type
27 Department
29 Dinner
E
31 Early Check In
15 Enroll Users
13 • Upload
• Download
15
17 • Delete
14 • Erase All Info
F
6 FingerTec Terminals
31 Flexible Break Time
G
37 Group Duty Calendar
37 Group Duty Rosters
H
35 Holidays
I
7 Installation
6 Internet Connectivity
7 ISS
L
26 Leave
26 Leave Type
Login to TimeTec
39 Lunch
M
7 Microsoft .NET Framework 4.0
20 Mobile Account
8 MySQL
O
40 Overtime
P
23 Password
40 PM Tea
19 Privileges
R
45 Reports
43 • Save
43 • Print
43 • Search
43 • Redo
• View
43
S
27 Sections
7 Server
7 Server 2008
7 Setting Up TimeTec
33 Shifts
• Multiple Working Shifts
33 • Rotational Shifts
33 • Open Shifts
29 Supper
Static IP
6
System Settings
24
T
11 Terminal
11 • Add
13 • Delete
14 • Reboot
• Display Info
TimeTec License
6
10 Terminal Group
10 Terminal ID
33
Tolerance Time
U
10 Update Terminal Info
12 User
11 • Add
• Purge
16
17 • Import
17 • Find
17
• Suspend
18 • Edit
18 • Sort
18 • View
37 User Duty Planner
User Name
19
20 • Accounts
• Create
20
Edit
23 •
23 • Delete
20
• Suspend
V
7 Vista
W
Webster
7 Win7
7 WinXP
66
CONTENTS

11
Other Resources
•
Information About FingerTec
TO LEARN ABOUT GO TO?
Company and the products www.fingertec.com
The latest updates Facebook Fan Page: FingerTec Worldwide
Twitter: FingerTec Worldwide
To subscribe for FingerTec Newsletter:
info.fingertec.com/subscribenewsletter
Technical Tips and Latest user.fingertec.com
Product Updates and
Upgrades
Email info@fingertec.com
support@fingertec.com (Technical)
Register for Warranty info.fingertec.com/productwarranty
FingerTec Accessory accessory.fingertec.com
(Sales)
Copyright Notice & Disclaimer
COPYRIGHT NOTICE
All rights reserved. No part of this book may be reproduced or transmitted in any form
or by any means, electronic or mechanical, including photocopying, recording, or by any
information storage and retrieval system, without written permission from FingerTec
Worldwide Sdn Bhd. Every precaution has been made to supply complete and accurate
information. Information in this document is subject to change without prior notice.
DISCLAIMER
No person should rely on the contents of this publication without first obtaining advice
from a qualified professional person. The company expressly disclaims all and any liability and responsibility to any terminal or user of this book, in respect of anything, and of
the consequences of anything, done by any such person in reliance, whether wholly or
partially, upon the whole or any part of the contents of this book.
FINGERTEC WORLDWIDE SDN BHD
CONTENTS
67

© 2012 FingerTec Worldwide Sdn. Bhd. All rights reserved. • 012012
 Loading...