


User's Guide
Vane Thermo-Anemometer /
Datalogger
Model SDL300
Introduction
Congratulations on your purchase of the Extech SDL300 Thermo-Anemometer Datalogger. This meter displays and stores air velocity and temperature readings. Temperature readings from the thermometer built into the vane probe or from an externally connected type K or J thermocouple temperature probe can be displayed and recorded. Data is stored on an SD card for transfer to a PC. In addition, an RS232 port allows data streaming to a PC. This meter is shipped fully tested and calibrated and, with proper use, will provide years of reliable service.
Safety
International Safety Symbols
This symbol, adjacent to another symbol or terminal, indicates the user must refer to the manual for further information.
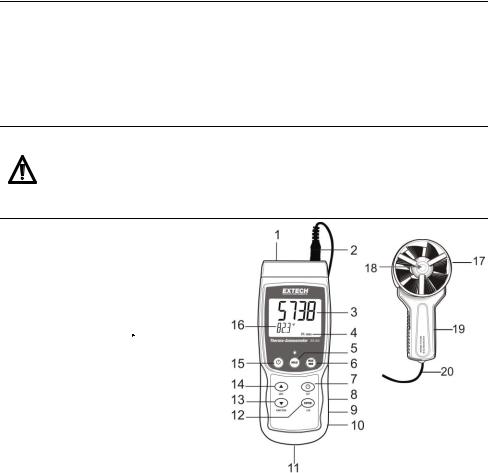
Meter Description
1.Thermocouple input
2.Vane input plug
3.Air velocity reading
4.Units of measure
5.HOLD / Backlight  key
key
6.MAX-MIN key
7.SET and Clock  key
key
8.PC interface jack
9.Reset key
10.Power Adaptor jack
11.SD card slot
12.ENTER and LOG key
13.Down ▼arrow and FUNCTION key
14.Up ▲ arrow and UNITS key
15.Power ON-OFF key
key
16.Temperature reading with units of measure
17.Anemometer vane
18.Vane icon faces the air flow
19.Vane handle
20.Vane connecting cable
Notes:
Battery compartment, tilt stand, and tripod mount are located on the rear of the instrument.
Items 8, 9, and 10 are located behind the snap-off compartment cover on right side of meter.
2 |
SDL300-EN-V1.3 -10/11 |

Operation
Power ON-OFF
Power the meter by pressing and holding the power key for at least 1.5 seconds.
Press and hold the power key for at least 1.5 seconds to power OFF the meter.
Meter Functions
This meter has two modes of operation. Press and hold the FUNCTION key for at least 1.5 seconds to switch from one mode to the other.
Air Velocity plus Temperature mode (meter briefly displays An icon)
Type K or J thermocouple temperature mode (meter briefly displays tP icon)
Air Velocity plus Temperature Mode
1.Select the Air Velocity and Temperature mode.
2.Connect the vane probe to the meter’s probe jack (top right of meter) via the probe plug.
3.Hold the probe by its handle and allow the air flow to enter the vane. Note that the air flow must face the vane icon.
4.The meter will display the air velocity measurement (upper display area) and the air temperature (lower display area)
Changing the Air Velocity Unit of Measure
This meter offers five (5) units of measure selections for air velocity: m/s (meters per second), FPM (feet per minute), Km/h (kilometers per hour), knots, and mph (miles per hour).
1.Press and hold the UNIT key for at least 1.5 seconds to switch from one unit of measure to another.
2.Note that pressing and holding the UNIT key continuously allows for quicker scrolling. Release the key when the desired unit of measure is displayed.
Thermcouple (Type J or K) Temperature Mode
1.Select the Thermocouple Temperature mode using the FUNCTION button.
2.The meter will display a ‘J’ or a ‘K’; on the left side of the display indicating the current setting. To change the thermocouple type, refer to the Setup Mode section.
3.Connect a Type J or Type K thermocouple to the meter’s sub-miniature thermocouple jack (top of meter on the left).
4.Hold the thermocouple in the air in the area to be tested.
5.The meter will display the thermocouple temperature in the main display area.
6.To change the temperature unit of measure (°C and °F) refer to the Setup Mode section.
Data Hold
To freeze a measurement on the display, press the HOLD key momentarily. The meter will emit a beep, the reading will hold, and the HOLD display icon will switch on. Press the HOLD key again to release the display and exit the Data Hold mode returning the meter to the normal operating mode.
3 |
SDL300-EN-V1.3 -10/11 |
MAX-MIN Readings
For a given measurement session, this meter can record the highest (MAX) and the lowest (MIN) readings for later recall.
1.Press the MAX-MIN key momentarily to access this mode of operation (REC icon appears)
2.The meter is now recording the MAX and MIN readings.
3.Press the MAX-MIN key again to view the current MAX reading (MAX icon appears). The reading on the display is now the highest reading encountered since the REC icon was switched on (when the MAX-MIN key was first pressed).
4.Press the MAX-MIN key again to view the current MIN reading (MIN icon appears). The reading on the display is now the lowest reading encountered since the REC icon was switched on (when the MAX-MIN key was first pressed).
5.To exit the MAX-MIN mode, press and hold the MAX-MIN key for at least 1.5 seconds. The meter will beep, the REC-MAX-MIN icons will switch off, the memory will clear, and the meter will return to the normal operating mode.
Display Backlight
To turn the display backlight ON or OFF, press and hold the backlight  key for at least 1.5 seconds. The meter will beep when switching the backlight ON or OFF unless the beeper is disabled as described in the Setup Mode section of this user guide.
System Reset
If the meter’s keys become inoperable or if the display freezes, the Reset button can be used to reset the instrument.
1.Use a paper clip or similar item to momentarily press the reset button located on the lower right side of the instrument under the snap-off compartment cover.
2.After pressing the Reset button, switch the instrument ON by pressing and holding the POWER key for at least 1.5 seconds. If using the power adaptor, unplug the adaptor and then plug it back in again to power the meter.
AC Power Adaptor
This meter is normally powered by six (6) 1.5V ‘AA’ batteries. However, an optional AC 9V power adaptor is available. To use the adaptor, insert the power adaptor plug into the jack on the bottom right side of the meter (under the snap-off compartment cover); plug the other end of the adaptor into an AC power source. The meter will now be permanently powered (as long as the adaptor is used) and the power key will be disabled.
4 |
SDL300-EN-V1.3 -10/11 |
 Loading...