


User's Guide
Digital Psychrometer + IR Thermometer
Models RH401 and RH405 (kit)
|
C |
DP |
|
Wb |
|
Humi |
% |
Introduction
Congratulations on your purchase of the Extech RH401 Digital Psychrometer + InfraRed Thermometer. This device measures Humidity, Air Temperature, Dew Point and Wet Bulb. Advanced features include Infrared Non-Contact Surface Temperature Measurement, Data Hold and programmable Auto Power Off, and an RS-232 interface for capturing readings to a PC using optional 407752 software. The retractable probe protects the sensors when the meter is not in use. Careful use of this meter will provide years of reliable service.
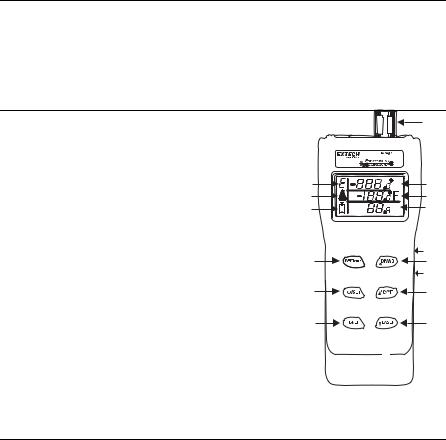
Meter Description
1. |
Emissivity adjust indicator |
13 |
2. Laser pointer on indicator
3. Low Battery indicator
4.IR Surface Temperature button
5.ON/OFF/Setup button
6.Back Light button
7.Laser/Down button
1 |
|
C |
12 |
2 |
DP |
|
11 |
Wb |
|
||
3 |
Humi |
% |
10 |
8. |
°F/°C/Up button |
|
15 |
9. |
Dew Point/Wet Bulb button |
|
|
4 |
9 |
||
10. |
% Humidity display |
|
14 |
|
|
||
11. |
Air Temperature, Dew Point or Wet Bulb display |
5 |
8 |
12. |
IR Surface Temperature display |
|
|
13. |
Extended probe with Humidity & |
6 |
7 |
Air Temperature Sensors
14.PC interface port
15.AC adaptor jack
Note: The battery compartment is located on the rear of the instrument
Warranty
EXTECH INSTRUMENTS CORPORATION (A FLIR COMPANY) warrants this instrument to be free of defects in parts and workmanship for one year from date of shipment (a six month limited warranty applies to sensors and cables). If it should become necessary to return the instrument for service during or beyond the warranty period, contact the Customer Service Department at (781) 890-7440 ext. 210 for authorization or visit our website www.extech.com for contact information. A Return Authorization (RA) number must be issued before any product is returned to Extech. The sender is responsible for shipping charges, freight, insurance and proper packaging to prevent damage in transit. This warranty does not apply to defects resulting from action of the user such as misuse, improper wiring, operation outside of specification, improper maintenance or repair, or unauthorized modification. Extech specifically disclaims any implied warranties or merchantability or fitness for a specific purpose and will not be liable for any direct, indirect, incidental or consequential damages. Extech's total liability is limited to repair or replacement of the product. The warranty set forth above is inclusive and no other warranty, whether written or oral, is expressed or implied.
2 |
RH401 |
V1.5 |
8/08 |
Operation
Retractable Humidity and Air Temperature Sensor
Press down on the sensor, located at the top of the meter, to release it. Humidity and air temperature will not be displayed if the sensor is not extended.
After use, press the sensor into the stored (protected) position.
Power ON/OFF
Press the  (or the
  button) to turn power on. The meter will perform a short self-test when turned on.
Press and hold the  button for three seconds to turn power off.
Humidity and Air Temperature measurements
Press Here
Sensor
Extended
Sensor
Stored
1.Hold the meter in the area to be tested.
2.Allow adequate time for readings to stabilize.
3.View the Relative Humidity measurement in the lower display.
4.View the Air (probe)Temperature measurement in the middle display
Wet Bulb and Dew Point measurements |
|
1. To display the Dew Point measurement, press and hold the |
button until the |
symbol DP appears in the middle display. |
|
2. Dew Point temperature is now displayed.
3. To display the Wet Bulb measurement, press and hold the |
button until the |
symbol Wb appears in the middle display . |
|
4.Wet Bulb temperature is now displayed.
5.To display IR temp –DP temp (IR surface temperature-Dew Point), press and hold the


 button for more than 2 seconds then press the IR Temp button. The reading can now be viewed in the top display.
6. Press and hold the |
button for more than 2 seconds to toggle the display back |
to IR temperature. |
|
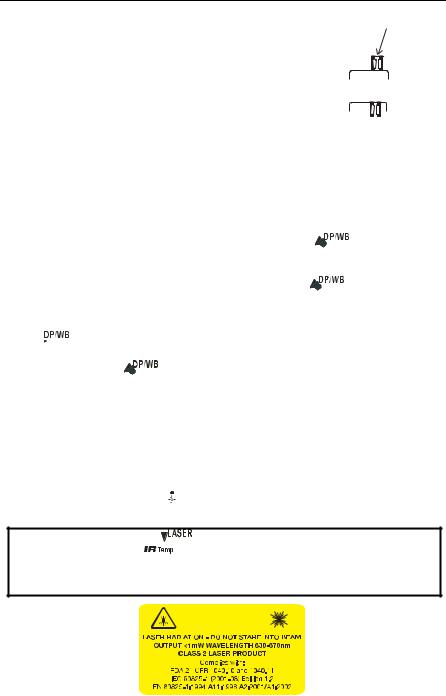
Non-Contact InfraRed Surface Temperature measurements
1.Point the meter toward the surface to be measured.
2.Press and hold the  button.
3.View the temperature measurement in the upper display
4.Release the  nd the reading will be held on the display until a new reading is taken.
5.While holding down the  button, press the
 button to toggle the laser targeting pointer on/off. The

 symbol will appear in the middle left of the display indicating that surface temperature measurement is active and the laser pointer is on.
WARNING! The Laser button |
enables/disables the Laser pointer. When |
enabled, each press of the |
button turns on the Laser beam. Avoid looking directly |
into the path of the Laser or pointing the Laser toward anyone’s eyes. Mirrored surfaces near a measurement object can redirect the Laser, use extreme caution. Do not allow the Laser beam to be directed toward explosive gases.
|
|
|
|
|
|
|
RH401 |
V1.5 |
8/08 |
|
|
|
|
|
|
|
|||
|
|
|
|
|
|
|
|||
|
|
|
|
|
|
|
|||
|
|
|
|
|
|
|
|||
|
|
|
|
|
|
|
|||
3 |
|
|
|
|
|||||
 Loading...