


 Loading...
User Guide
FastReporter 2
Post Processing Software

Copyright © 2007–2015 EXFO Inc. All rights reserved. No part of this publication may be reproduced, stored in a retrieval system or transmitted in any form, be it electronically, mechanically, or by any other means such as photocopying, recording or otherwise, without the prior written permission of EXFO Inc. (EXFO).
Information provided by EXFO is believed to be accurate and reliable. However, no responsibility is assumed by EXFO for its use nor for any infringements of patents or other rights of third parties that may result from its use. No license is granted by implication or otherwise under any patent rights of EXFO.
EXFO’s Commerce And Government Entities (CAGE) code under the North Atlantic Treaty Organization (NATO) is 0L8C3.
The information contained in this publication is subject to change without notice.
Trademarks
EXFO’s trademarks have been identified as such. However, the presence or absence of such identification does not affect the legal status of any trademark.
Units of Measurement
Units of measurement in this publication conform to SI standards and practices.
Version: 11.0.1.1
ii |
FastReporter 2 |

Licence Agreement and Warranty
IMPORTANT: CAREFULLY READ THE FOLLOWING LICENSE AGREEMENT BEFORE OPENING THIS INSTALLATION PACKAGE. BY OPENING THIS PACKAGE AND USING THE SOFTWARE WHETHER INCORPORATED OR NOT IN AN EXFO INC. ("EXFO") PRODUCT, YOU INDICATE YOUR ACCEPTANCE TO BE BOUND BY THE TERMS AND CONDITIONS OF THIS AGREEMENT. IF YOU DO NOT ACCEPT THE TERMS AND CONDITIONS OF THIS LICENSE AGREEMENT, DO NOT OPEN THIS PACKAGE AND PROMPTLY RETURN THE PRODUCT OR SOFTWARE WITH YOUR PROOF OF PAYMENT, WHEREUPON YOUR MONEY WILL BE REFUNDED.
THE PRODUCT OR SOFTWARE YOU ORDERED MIGHT INCLUDE SOURCE CODE AND/OR SOFTWARE COMPONENTS, IT IS PROVIDED FOR YOUR CONVENIENCE IN MODIFYING THE PRODUCT OR SOFTWARE TO SUIT YOUR SPECIFIC NEEDS, OR TO CREATE DERIVATIVE WORKS INCLUDING SOURCE AND LIBRARY FILES IF APPLICABLE.
THE PRODUCT AND THE SOFTWARE MUST BE USED ONLY FOR YOUR INTERNAL BUSINESS OPERATION AND ITS INTENDED APPLICATION. YOU MAY NOT COPY OR USE THE SOURCE CODE OR THE SOFTWARE COMPONENTS TO PRODUCE OTHER SOFTWARE DEVELOPMENT TOOLS FOR DISTRIBUTION AND RESALE WITHOUT EXPRESS WRITTEN PERMISSION FROM EXFO. EXFO RETAINS ALL RIGHTS TO THE SOURCE CODE, THE SOFTWARE COMPONENTS AND ALL MODIFICATIONS THEREOF. YOU SHALL RESPECT AND COMPLY WITH ANY OF THE PROVISIONS LISTED BELOW WHICH MAY ALSO BENEFIT ANY GIVEN THIRD PARTY BENEFICIARY AS DEFINED HEREIN.
1. DEFINITIONS: The following definitions apply to the terms in the Agreement.
"Documentation" means the user’s manual and other printed materials accompanying the Software. "Product" means the EXFO instrument designed for use with the Software, as the case may be.
"Software" means the computer programs, source code and software components contained therein and all updates and upgrades thereto. The term also includes all copies of any part of the computer program, source code or software components.
2. GRANT OF LICENSE: EXFO grants to you, the purchaser of the enclosed Software, a limited, restricted, non-exclusive license. You shall use the Software only in conjunction with its purpose or in conjunction with the Product, subject to the limitations on use and disclosure contained herein and in the Documentation. You may:
Use the Software on a network, file service or virtual disk; provided that access is limited to one user at a time and that you have the original copy of the Documentation and Software media.
Make one (1) copy of the Software for backup or modification purposes in support of the use of the Software on a single computer.
Merge the Software or incorporate the same into another program provided that such a program will, for so long as the Software is included therein, be subject to all of the terms and conditions of this Agreement.
You may not:
Make copies of the Documentation.
Assign, give or transfer the Software, any services or interests in the Software, to another individual or entity. Sublicense, lease, time-share, service bureau, lend, use for subscription service or rental use any portion of the Product, the Software, or your rights under this Agreement.
Reverse engineering, disassemble or decompile in whole or in part the Software or the Product.
Publish any result of benchmark tests run on the Software or the Product.
YOU RECOGNIZE THAT THE SOURCE CODE AND THE SOFTWARE COMPONENTS COMPRISING THE SOFTWARE ARE HIGHLY VALUABLE TRADE SECRETS OF EXFO OR ANY GIVEN THIRD PARTY BENEFICIARY AND THAT EXFO WISHES TO PREVENT THEIR DISCLOSURE TO YOU, OR ANY THIRD PARTY.
3.SOFTWARE OWNERSHIP: The Software is licensed, not sold. Title to the Software shall not be passed to you or to any other party. All applicable rights to patents, copyrights, trademarks and trade secrets in the Software, or any modifications made at your request, are and shall remain the property of EXFO.
4.AUDITS: EXFO reserves its right to audit, at its convenience, your use of the Software.
5.TERMS OF TERMINATION: This Agreement shall remain in full force and effect until you discontinue use of the Software or the Product, until the end of the life of the Product or Software or until this Agreement is terminated, whichever occurs earlier. Without prejudice to its other rights, EXFO may terminate this Agreement if you fail to comply with the terms thereof. In such event, you must destroy or return all copies of the Software and Documentation as requested in writing by EXFO. You shall be liable for all damages to EXFO as a result of the breach whether or not you were notify of the likelihood of such damages.
EXFO retains all rights to the Software not expressly granted hereunder. Nothing in this Agreement constitutes a waiver of the rights of EXFO or any Third Party Beneficiary.
Post Processing Software |
iii |

6.LIMITED WARRANTY: EXFO warrants the media on which the Software is distributed to be free from defects in material and workmanship and that the Software will perform substantially in accordance with the Documentation. EXFO will replace defective media or Documentation at no charge, provided you return the item with dated proof of payment to EXFO within (60) days of the date of delivery. THESE ARE YOUR SOLE REMEDIES FOR BREACH OF WARRANTY. EXCEPT AS SPECIFICALLY PROVIDED ABOVE, EXFO MAKES NO WARRANTY OR REPRESENTATION, EITHER EXPRESS OR IMPLIED WITH RESPECT TO THE SOFTWARE OR DOCUMENTATION INCLUDING THEIR QUALITY, PERFORMANCE, MERCHANTABILITY, OR FITNESS FOR A PARTICULAR PURPOSE.
7.LIMITATIONS OF LIABILITY: Because software is inherently complex and may not be completely free of errors, you are advised to verify your work. IN NO EVENT WILL EXFO, ITS DEALERS, DISTRIBUTORS, RESELLERS, OR THIRD PARTY BENEFICIARY, BE LIABLE FOR DIRECT, INDIRECT, SPECIAL, INCIDENTAL, OR CONSEQUENTIAL DAMAGES, INCLUDING LOST PROFITS, DOWNTIME OR DAMAGES TO PROPERTY ARISING OUT OF THE USE OF OR INABILITY TO USE THE SOFTWARE OR DOCUMENTATION, even if advised of the possibility of such damages. THE WARRANTY AND REMEDIES SET FORTH ABOVE ARE EXCLUSIVE AND IN LIEU OF ALL OTHERS, ORAL OR WRITTEN, EXPRESS OR IMPLIED. No dealer, distributor, agent or employee is authorized to make any modification or addition to this warranty. Some US States or applicable local legislation do not allow the exclusion or limitation of implied warranties or limitation of liability for incidental or consequential damages, so the above limitation or exclusion may not apply to you.
8.U.S. GOVERNMENT RESTRICTED RIGHTS: The Software and Documentation are provided with RESTRICTED RIGHTS. Use, duplication, or disclosure by the Government is subject to restrictions as set forth in subparagraph (c) (1) (ii) of The Rights in Technical Data and Computer Software clause at 52.227-7013. EXFO headquarters are located at 400 Godin Avenue, Quebec, Quebec, G1M 2K2, Canada.
9.EXPORT AND IMPORT LAWS: You must comply fully with all applicable export and import laws including, but not limited to, export laws and regulations of the United States of America. No Programs, Products or Software shall be exported, directly or indirectly, in violation of laws.
10.THIRD PARTY BENEFICIARY: EXFO may designate, from time to time, any Third Party Beneficiary, with respect to any Product or Software, which has duly executed a prior writing agreement with EXFO. Third Party Beneficiaries may include, but are not limited to, namely ORACLE, Business Objects, Advance Fiber Optics, and MapInfo. The terms of this Agreement also governs any source code that may be provided in some programs by Third Party Beneficiary, such as the one mentioned above. This Agreement is not intended to be for the benefit of and shall not be enforceable by any given Third Party Beneficiary without a prior written agreement duly executed with EXFO.
11.GENERAL: This Agreement constitutes the entire agreement between you and EXFO as concerns the subject matter hereof and supersedes any prior agreement as to such subject matter. If any provision of this Agreement shall be deemed to be invalid, illegal or unenforceable, the validity, legality and enforceability of the remaining portions of this Agreement shall not be affected or impaired thereby. This Agreement shall be governed by and construed in accordance with the laws applicable in the province of Quebec, Canada without regards to its conflict of laws provisions.
BY USING THE SOFTWARE, YOU ACKNOWLEDGE THAT YOU HAVE READ THIS AGREEMENT, THAT YOU UNDERSTAND IT, AND YOU AGREE TO BE BOUND BY ITS TERMS AND CONDITIONS.
If you have any questions regarding this Agreement, you may contact the Legal Department at EXFO at (418) 683-0211.
iv |
FastReporter 2 |

|
Contents |
Contents |
|
1 Introducing FastReporter 2 ......................................................................... |
1 |
Available Features ................................................................................................................... |
1 |
Conventions ............................................................................................................................ |
6 |
2 Getting Started with FastReporter 2 .......................................................... |
7 |
Installing and Uninstalling FastReporter 2 on a Computer ...................................................... |
8 |
Installing FastReporter 2 on an EXFO Platform ....................................................................... |
9 |
Starting FastReporter 2 ........................................................................................................... |
9 |
Activating the FastReporter 2 Software Options ................................................................... |
12 |
Customizing the Main Window ............................................................................................ |
16 |
Selecting Items From Lists and Menus .................................................................................. |
20 |
Using the Software Customization Wizard ........................................................................... |
20 |
Working with Two Monitors (PC Version) ............................................................................. |
24 |
Changing FastReporter 2 Options ......................................................................................... |
25 |
Exiting FastReporter 2 ........................................................................................................... |
33 |
3 Working with Projects (FR2-FC Mode) ...................................................... |
35 |
Managing Projects ................................................................................................................ |
35 |
Managing Project Templates ................................................................................................. |
44 |
Changing File Direction ......................................................................................................... |
47 |
Matching Files ...................................................................................................................... |
48 |
Setting Auto Refresh in a Specific Folder .............................................................................. |
56 |
Working in Loopback Mode .................................................................................................. |
57 |
4 Using EXFO Connect with FastReporter 2 (FR2-FC Mode, PC Only) |
......... 83 |
Setting Up the Connection to the Server .............................................................................. |
83 |
Using the EXFO Connect Browser ......................................................................................... |
84 |
Post Processing Software |
v |

Contents |
|
5 Working with OTDR Files .......................................................................... |
107 |
Changing OTDR Settings ..................................................................................................... |
110 |
Managing the OTDR Event Table View ................................................................................ |
125 |
Changing the Main Measurement ...................................................................................... |
130 |
Setting the OTDR Graphic Display Options ......................................................................... |
132 |
Viewing Section Length for the Linear View ....................................................................... |
132 |
Using the Zoom Functions .................................................................................................. |
133 |
Managing Markers ............................................................................................................. |
136 |
Setting and Applying OTDR/OTDR Bidir Reference as Template (FR2-FC Mode) ................... |
148 |
Analyzing Measurements .................................................................................................... |
152 |
Using the Failed Items Filter ................................................................................................ |
153 |
Displaying Statistics for Measurements .............................................................................. |
154 |
Setting Span Positions with Absolute Lengths .................................................................... |
155 |
Setting the IOR Value by Distance ....................................................................................... |
157 |
Changing Fiber Core Size (FR2-FC Mode) ............................................................................ |
158 |
Reverting to File Test Settings ............................................................................................. |
159 |
Managing Bidirectional OTDR Files (FR2-FC Mode) ............................................................. |
160 |
Creating Batch Documentation ........................................................................................... |
167 |
Saving an OTDR File in a New File Format ........................................................................... |
168 |
Generating Text Files From OTDR Measurements (FR2-FC Mode) ........................................ |
169 |
Modifying Space Between Traces on the Graph .................................................................. |
170 |
6 Working with OLTS Files ........................................................................... |
171 |
Accepted File Formats ......................................................................................................... |
171 |
Changing OLTS Settings ...................................................................................................... |
171 |
7 Working with CD Files .............................................................................. |
175 |
Accepted File Formats ......................................................................................................... |
175 |
Changing CD Settings ......................................................................................................... |
176 |
Changing CD Fiber Type ...................................................................................................... |
180 |
Changing Analysis Range .................................................................................................... |
182 |
Changing the Fiber Length ................................................................................................. |
183 |
Switching Between Curve Types .......................................................................................... |
184 |
8 Working with PMD Files ........................................................................... |
185 |
Accepted File Formats ......................................................................................................... |
185 |
Changing PMD Settings ...................................................................................................... |
186 |
Changing Fiber Length ....................................................................................................... |
189 |
Working with PMD Statistic Measurements ........................................................................ |
190 |
vi |
FastReporter 2 |

|
Contents |
9 Working with OPM/PPM Measurements ................................................. |
193 |
Accepted File Formats ......................................................................................................... |
193 |
Selecting the Absolute Power Unit ...................................................................................... |
194 |
Changing OPM/PPM Settings .............................................................................................. |
195 |
Viewing Power Meter Results ............................................................................................. |
197 |
Changing the Correction Factor (FR2-FC Mode) .................................................................. |
198 |
10 Working with Fiber Inspection Probe (FIP) files ..................................... |
199 |
Accepted File Formats ......................................................................................................... |
199 |
Modifying Unit Model and Unit Serial Number ................................................................... |
200 |
Showing or Hiding Threshold and Result Information ........................................................ |
202 |
Applying a Configuration File to Selected FIP Files .............................................................. |
203 |
FIP Graphic Display Options ................................................................................................ |
204 |
Using Custom Identifiers ..................................................................................................... |
206 |
Saving Legacy FIP Files in .cmax2 File Format ...................................................................... |
207 |
Viewing Power Meter and OLTS Results .............................................................................. |
208 |
11 Working with iOLM files .......................................................................... |
209 |
Accepted File Formats ......................................................................................................... |
209 |
Understanding the Link View .............................................................................................. |
209 |
Managing Multiple Measurements ..................................................................................... |
213 |
Modifying Tolerance and Bidirectional Settings .................................................................. |
215 |
Modifying iOLM Thresholds ................................................................................................ |
217 |
Modifying iOLM Settings (FR2-FC Mode) ............................................................................ |
219 |
Modifying the Splitter Ratio Information ............................................................................ |
221 |
Modifying Identifier Labels (FR2-FC Mode) ......................................................................... |
222 |
Changing Fiber Core Size (FR2-FC Mode) ............................................................................ |
224 |
Managing Elements ............................................................................................................ |
225 |
Customizing the Elements Table Tab ................................................................................... |
228 |
Analyzing Measurements (FR2-FC Mode) ............................................................................ |
248 |
Using the Failed Element Filter ............................................................................................ |
249 |
Generating a .sor File From iOLM Measurements (FR2-FC Mode) ........................................ |
249 |
Managing Configuration Files (FR2-FC Mode) ..................................................................... |
252 |
Understanding Diagnostics ................................................................................................. |
254 |
Viewing Power Meter Results ............................................................................................. |
255 |
Managing Bidirectional iOLM Files ...................................................................................... |
255 |
Viewing Section Length for Multiple Measurements .......................................................... |
263 |
Matching Link Elements with a Reference .......................................................................... |
264 |
Matching Link Elements Without a Reference ..................................................................... |
265 |
Displaying Statistics for Matched Measurements ................................................................ |
266 |
Post Processing Software |
vii |

Contents |
|
12 Viewing and Editing Measurements ........................................................ |
267 |
Editing Measurement Identification Information ................................................................ |
267 |
Modifying Summary Information (FR2-FC Mode) ............................................................... |
273 |
Viewing and Sorting Files or Measurements ....................................................................... |
274 |
Saving Measurement Files .................................................................................................. |
276 |
13 Generating, Previewing and Printing Reports ........................................ |
277 |
Generating Reports (FR2-FC Mode) ..................................................................................... |
278 |
Previewing Reports ............................................................................................................. |
283 |
Printing Reports .................................................................................................................. |
284 |
Using the Clipboard (FR2-FC Mode) .................................................................................... |
285 |
Importing and Exporting Templates .................................................................................... |
286 |
Creating and Modifying Report Templates .......................................................................... |
290 |
Using Crystal Report Templates ........................................................................................... |
291 |
Using Excel Report Templates ............................................................................................. |
293 |
14 Using FastReporter 2 Tools ....................................................................... |
309 |
Setting a Reference File or Measurement (FR2-FC Mode) .................................................... |
311 |
Automatically Documenting Measurement Files (FR2-FC Mode) ......................................... |
313 |
Using the Duplicated Measurements Tool (FR2-FC Mode) ................................................... |
318 |
15 Exporting Data for Postprocessing (FR2-FC Mode) ................................ |
321 |
16 FastReporter 2 Examples .......................................................................... |
325 |
Creating an OTDR Bidirectional Project ............................................................................... |
326 |
Creating a Fiber Characterization Report ............................................................................ |
327 |
Creating a Project Template ................................................................................................ |
333 |
17 Troubleshooting ........................................................................................ |
337 |
Consulting the Online Help ................................................................................................. |
337 |
Contacting the Technical Support Group ............................................................................ |
337 |
viii |
FastReporter 2 |

|
|
Contents |
A Description of Event Types ...................................................................... |
339 |
|
|
Span Start .......................................................................................................................... |
340 |
|
Span End ........................................................................................................................... |
340 |
|
Short Fibers ....................................................................................................................... |
340 |
|
Continuous Fiber ............................................................................................................... |
341 |
|
End of Analysis .................................................................................................................. |
342 |
|
Non-Reflective Event .......................................................................................................... |
343 |
|
Reflective Event ................................................................................................................. |
344 |
|
Positive Event ..................................................................................................................... |
345 |
|
Launch Level ...................................................................................................................... |
346 |
|
Fiber Section ...................................................................................................................... |
347 |
|
Merged Event .................................................................................................................... |
348 |
|
Echo .................................................................................................................................. |
354 |
|
Reflective Event (Possible Echo) ......................................................................................... |
355 |
B |
Measuring Chromatic Dispersion: Theory .............................................. |
357 |
|
Method behind the Chromatic Dispersion Analyzer ............................................................ |
357 |
|
Using Data Fits to Obtain Dispersion .................................................................................. |
358 |
|
Helping You Manage Chromatic Dispersion ........................................................................ |
360 |
C |
Measuring Polarization Mode Dispersion: Theory ................................. |
361 |
D |
Report Samples ........................................................................................ |
365 |
|
Bidirectional OTDR .............................................................................................................. |
366 |
|
OTDR .................................................................................................................................. |
367 |
|
Fiber Characterization ......................................................................................................... |
368 |
|
Fiber Inspection Probe ........................................................................................................ |
369 |
|
iOLM ................................................................................................................................... |
370 |
|
OTDR Advanced Cable (Excel Template) .............................................................................. |
371 |
|
iOLM + FIP (Excel Template) ............................................................................................... |
372 |
|
iOLM Bidirectional (Excel Template) .................................................................................... |
373 |
|
iOLM Advanced Cable Report (Excel Report) ....................................................................... |
374 |
Index .............................................................................................................. |
375 |
|
Post Processing Software |
ix |
1 Introducing FastReporter 2
FastReporter 2 is an advanced management, analysis, and reporting tool for many types of optical tests, including the following:
optical loss
optical return loss (ORL)
optical time-domain reflectometry (OTDR)
polarization mode dispersion (PMD)
chromatic dispersion (CD)
optical and PON power meters (OPM/PPM)
fiber inspection probe (FIP)
intelligent optical link mapper (iOLM)
Note: Depending on the platform you are using, some test modes may not be available.
Available Features
There are two application levels: Basic and the advanced version, which includes the fiber characterization option (FR2-FC) and the loopback option (FR2-LB). Depending on which version you are using, the features in the table below are available or not.
Note: A feature with an “*” mark indicates that the modification is allowed for single measurements.
Feature |
Basic |
FR2-FC |
|
|
|
|
|
|
Viewing and sorting files or measurements |
X |
X |
|
|
|
Apply sorting to other windows |
X |
X |
|
|
|
Saving measurement files* |
X |
X |
|
|
|
Viewing measurement summary information |
X |
X |
|
|
|
Post Processing Software |
1 |

Introducing FastReporter 2
Available Features
Feature |
Basic |
FR2-FC |
|
|
|
|
|
|
Managing reports and report templates |
|
X |
|
|
|
Using the clipboard |
|
X |
|
|
|
Adding and removing measurement files* |
|
X |
|
|
|
Managing projects and project templates |
|
X |
|
|
|
Editing measurement identification and summary |
X |
X |
information* |
|
|
|
|
|
Generating reports |
|
X |
|
|
|
Setting a reference file or measurement |
|
X |
|
|
|
Automatically documenting measurement files |
|
X |
|
|
|
Using the duplicated measurements tool |
|
X |
|
|
|
Exporting data for postprocessing |
|
X |
|
|
|
Setting auto refresh in a specific folder |
|
X |
|
|
|
Managing files using EXFO Connect |
|
X |
|
|
|
OTDR |
|
|
|
|
|
Changing OTDR settings* |
X |
X |
|
|
|
Setting OTDR event table options |
X |
X |
|
|
|
Editing OTDR event properties |
X |
X |
|
|
|
Adding OTDR event with one marker position |
X |
X |
|
|
|
Adding OTDR event with manually positioned |
X |
X |
markers |
|
|
|
|
|
Modifying event markers position on existing events |
X |
X |
|
|
|
Retrieving marker position from file |
X |
X |
|
|
|
OTDR graphic display options |
X |
X |
|
|
|
Using the zoom functions |
X |
X |
|
|
|
Applying an OTDR reference as a template |
|
X |
|
|
|
2 |
FastReporter 2 |

Introducing FastReporter 2
Available Features
Feature |
Basic |
FR2-FC |
|
|
|
|
|
|
Changing the main measurements |
|
X |
|
|
|
Analyzing or reanalyze measurements* |
X |
X |
|
|
|
Viewing failed measurements only |
X |
X |
|
|
|
Setting spans position with absolute length* |
X |
X |
|
|
|
Setting the spans position to modify the IOR value* |
X |
X |
|
|
|
Changing fiber core size* |
|
X |
|
|
|
Matching files |
|
X |
|
|
|
Creating bidirectional OTDR files |
|
X |
|
|
|
Saving an OTDR file in a new file format* |
X |
X |
|
|
|
Generate text file from OTDR measurement |
|
X |
|
|
|
Performing unidirectional and bidirectional |
|
X |
loopback tests (with the FR2-LB option). |
|
|
|
|
|
Creating unidirectional files from a bidirectional file |
|
X |
|
|
|
OLTS (not available for FTB-1, not compatible with 64-bit version) |
||
|
|
|
Changing OLTS settings |
X |
X |
|
|
|
CD (not available for FTB-1, not compatible with 64-bit version) |
||
|
|
|
Changing CD settings |
X |
X |
|
|
|
Changing CD fiber type |
X |
X |
|
|
|
Changing analysis range |
X |
X |
|
|
|
Changing the fiber length |
X |
X |
|
|
|
Toggling between curve types |
X |
X |
|
|
|
PMD (not available for FTB-1, not compatible with 64-bit version) |
||
|
|
|
Changing PMD settings |
X |
X |
|
|
|
Changing fiber length |
X |
X |
|
|
|
Working with PMD statistic measurements |
X |
X |
|
|
|
Post Processing Software |
3 |

Introducing FastReporter 2
Available Features
Feature |
Basic |
FR2-FC |
|
|
|
|
|
|
FIP |
|
|
|
|
|
Setting FIP thresholds table options |
X |
X |
|
|
|
Setting FIP results table options |
X |
X |
|
|
|
FIP graphic display options |
X |
X |
|
|
|
OPM/PPM |
|
|
|
|
|
Managing power meter results |
X |
X |
|
|
|
Changing correction factor |
|
X |
|
|
|
iOLM |
|
|
|
|
|
Viewing iOLM thresholds |
X |
X |
|
|
|
Modifying iOLM thresholds |
|
X |
|
|
|
Viewing iOLM settings |
|
X |
|
|
|
Modifying iOLM settings |
|
X |
|
|
|
Modifying identifier labels |
|
X |
|
|
|
Adding element |
|
X |
|
|
|
Modifying Element Types |
|
X |
|
|
|
Deleting Elements |
|
X |
|
|
|
Set Launch Fiber and Receive Fiber on new or |
|
X |
existing Element* |
|
|
|
|
|
Analyzing measurements |
|
X |
|
|
|
Viewing failed measurements only |
X |
X |
|
|
|
Generate SOR file from iOLM measurement |
|
X |
|
|
|
Creating configuration files |
|
X |
|
|
|
Managing power meter results |
X |
X |
|
|
|
Viewing measurement identification information |
X |
X |
|
|
|
Creating a bidirectional iOLM file |
X |
X |
|
|
|
4 |
FastReporter 2 |

Introducing FastReporter 2
Available Features
Feature |
Basic |
FR2-FC |
|
|
|
|
|
|
Working with multimode fibers |
X |
X |
|
|
|
Matching link elements with and without a |
X |
X |
reference |
|
|
|
|
|
Changing core size |
|
X |
|
|
|
Performing unidirectional and bidirectional |
|
X |
loopback tests (with the FR2-LB option). |
|
|
|
|
|
Post Processing Software |
5 |

Introducing FastReporter 2
Conventions
Conventions
Before using the product described in this guide, you should understand the following conventions:
WARNING
Indicates a potentially hazardous situation which, if not avoided, could result in death or serious injury. Do not proceed unless you understand and meet the required conditions.
CAUTION
Indicates a potentially hazardous situation which, if not avoided, may result in minor or moderate injury. Do not proceed unless you understand and meet the required conditions.
CAUTION
Indicates a potentially hazardous situation which, if not avoided, may result in component damage. Do not proceed unless you understand and meet the required conditions.
IMPORTANT
Refers to information about this product you should not overlook.
6 |
FastReporter 2 |

2 Getting Started with FastReporter 2
If you are using FastReporter 2 on a platform, it is usually pre-installed on your unit. If it is not already installed, you can install it yourself through Update Manager. Refer to the Update Manager documentation for details.
If you are using FastReporter 2 on a computer, the latter needs to meet minimum requirements, depending on which operation system you are using:
System |
Windows XP |
Windows Vista - |
Windows 7 |
Windows 8.x |
|
Element |
32 and 64 bit |
||||
|
|
|
|||
|
|
|
|
|
|
|
|
|
|
|
|
Processor |
Pentium |
Pentium |
Pentium |
Pentium |
|
|
(1.6 GHz or |
(1.6 GHz or |
(1.6 GHz or |
(1 GHz with |
|
|
higher) |
higher) |
higher) |
support for |
|
|
|
|
|
PAN, NX, and |
|
|
|
|
|
SSE2) |
|
|
|
|
|
|
|
RAM |
256 MB, 1 GB |
512 MB, 2 GB |
1 GB (32-bit) or |
1 GB (32-bit) or |
|
|
recommended |
recommended |
2 GB (64-bit), |
2GB (64-bit), |
|
|
|
|
4 GB |
4 GB |
|
|
|
|
recommended |
recommended |
|
|
|
|
|
|
|
Disk Space |
400 MB |
8 GB |
16 GB (32-bit) |
||
|
|
|
|
or 20 GB |
|
|
|
|
|
(64-bit) |
|
|
|
|
|
||
Monitor |
One super VGA (800 X 600) monitor |
Microsoft |
|||
|
(two 1024 X 768 monitors recommended) |
DirectX 9 |
|||
|
|
|
|
graphics |
|
|
|
|
|
device with |
|
|
|
|
|
WDDM driver |
|
|
|
|
|
||
Other |
Network adapter |
|
|
||
requirements |
Microsoft Internet Explorer version 8.0 or later |
|
|||
|
Microsoft Office 2007 or later to open .xls files |
|
|||
|
|
|
|
|
|
Post Processing Software |
7 |

Getting Started with FastReporter 2
Installing and Uninstalling FastReporter 2 on a Computer
Installing and Uninstalling FastReporter 2 on a Computer
The installation wizard will guide you through the installation step by step. The application is available in two versions:
32-bit: Contains all test modes and file formats.
64-bit: Allows you to process more measurements and reports, but older files formats, such as CD and PMD (FTB-5500, FTB-5700 and FTB-5800) are not supported.
To install FastReporter 2:
1.Insert the installation DVD in the DVD drive. The installation should start automatically. If the installation does not start automatically after inserting the DVD, locate the setup.exe application and double-click on it to start the process.
2.Click Next to start the installation and follow the on-screen instructions.
To uninstall FastReporter 2:
Use the Add/Remove Programs utility in Windows’ Control Panel as you would for any other application.
8 |
FastReporter 2 |
Getting Started with FastReporter 2
Installing FastReporter 2 on an EXFO Platform
Installing FastReporter 2 on an EXFO Platform
To install your application on any platform other than a standard computer, use Update Manager.
Note: FastReporter 2 cannot be installed on the FTB-400 platform.
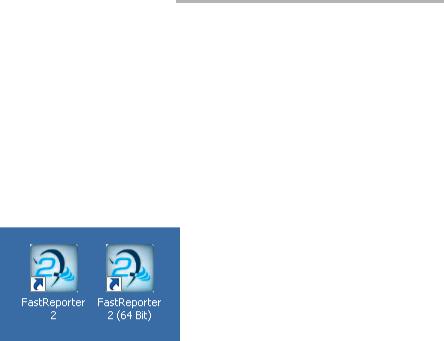
Starting FastReporter 2
Once installed, all you need to do is double-click the FastReporter 2 shortcut corresponding to the version you want to use.
Note: You can also access FastReporter 2 through the start menu of Windows, under the EXFO folder. The access path differs depending on the operating system you are using.
Post Processing Software |
9 |

Getting Started with FastReporter 2
Starting FastReporter 2
When you run the application for the first time, the application allows you to activate the trial version of the application or basic options of the application.
To activate the trial version, click Start Trial.
To activate the basic options of the application, click Start FastReporter 2.
To activate the options you have purchased, click Activate Option Keys.
Note: For more information to activate the option keys, see Activating the FastReporter 2 Software Options on page 12.
10 |
FastReporter 2 |
Getting Started with FastReporter 2
Starting FastReporter 2
Once the trial period is over, you will have the possibility to renew it for 10 additional days.
To extend the trial period:
1.On the window that appears when the trial period is over, click Renew Trial.
2. Enter your My EXFO account information, then click OK.
Post Processing Software |
11 |

Getting Started with FastReporter 2
Activating the FastReporter 2 Software Options
Activating the FastReporter 2 Software
Options
Some features of the application are grouped and named as FastReporter 2 Fiber Characterization (FR2-FC) and FastReporter 2 Loopback (FR2-LB). They are available only in the complete version of the product, but you can use them during the 30-day trial period of the product.
If you wish to continue using the features after the trial period, you must activate them using the activation wizard.
Note: To view the options, you have to activate them from the trial window or from the Help menu. If the trial period is over, you can also activate the options by clicking the required option.
Note: You can view which options are activated for your products in the About window of the Help menu.
There are two types of licenses you can obtain for your application:
Fixed (all versions): You have one license for one computer.
Floating (PC version only): You have one license that you can use on several computers, but on only one at a time. Such a license is contained on a USB dongle key. The dongle key also features some storage space for your data.
In the case of a floating license, FastReporter 2, it will verify if a valid dongle key is connected, and if so, will continue to validate the presence of said key every 10 minutes. If no dongle key is installed, you can only use what is available on your unit (for example, no options are enabled, or you revert to the trial mode).
12 |
FastReporter 2 |

Getting Started with FastReporter 2
Activating the FastReporter 2 Software Options
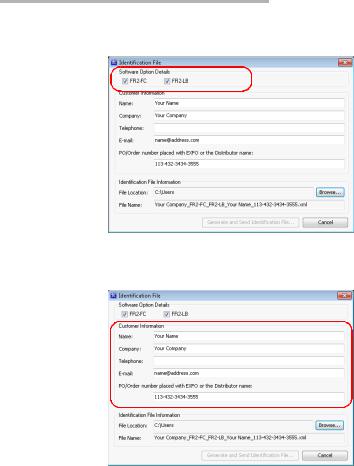
To generate and send the Identification file for a fixed license: 1. From the trial window, click Activate Option Keys.
OR
From the main window, select the Help menu, then Activate Options.
2.Click the Generate and Send Identification File button to generate the identification file.
Post Processing Software |
13 |
Getting Started with FastReporter 2
Activating the FastReporter 2 Software Options
3. Select which option or options you want to activate.
4. Under Customer Information, enter the required details.
Note: All fields are mandatory.
5. Click Browse to save the file in the desired location.
Note: The identification file name is automatically generated and is not editable.
14 |
FastReporter 2 |

Getting Started with FastReporter 2
Activating the FastReporter 2 Software Options
6.Click Generate and Send Identification Information. A new e-mail window is displayed with the identification information file as an attachment. The e-mail displays the information entered in the Identification File window and the recipient e-mail address is softwarekeys@exfo.com.
Note: If the e-mail software is not configured in your computer, an error message is displayed to configure an e-mail option. You can send identification file from any other e-mail address with the required details.
To apply the Identification file:
Note: This step is not necessary if you are using floating licenses.
1.From the Product Activation window, click Apply Software Options Key.
2.Select the Software key file from the required location and click Open.
3.Your option is now installed. Click Exit to close the window.
Post Processing Software |
15 |

Getting Started with FastReporter 2
Customizing the Main Window
Customizing the Main Window
When you start FastReporter 2, the main window appears. In the graphics area of the main window, the application displays the EXFO Web page with information related to FastReporter 2.
You can access any other Web page by entering the URL in the address bar; you can also select any other website as the default opening page.
For more information, see Changing FastReporter 2 Options on page 25.
Note: FastReporter 2 was meant to be operated to its full potential using a mouse and keyboard. Therefore the instructions herein imply that both peripherals are connected to your unit.
Note: The appearance of your application may differ from the illustrations in this user documentation depending on the resolution you are using.
Menu bar
Toolbars
Data graph (available for some
measurements
only)
Selection tabs
Results
This window can be customized. You can add or remove toolbars, resize the panes as needed and move them around, or even auto-hide panes when they are not in use and reopen them later for as needed.
16 |
FastReporter 2 |

Getting Started with FastReporter 2
Customizing the Main Window
To display the various toolbars and panes:
1.In the main window, select the View menu.
2.Point to Toolbars and select or clear options according to what you want to display.
To resize a pane:
Use the split bars enclosing the pane you want to resize.
Split bars
To close a pane:
Click the X button in the upper right corner.
Note: If you hide a toolbar, you can access the same commands on the menu bar.
Post Processing Software |
17 |

Getting Started with FastReporter 2
Customizing the Main Window
To move a toolbar:
1.Select the toolbar handle.
2.Click and drag the toolbar to the new location.
To auto-hide a pane or tab:
Click the vertical pushpin (  ) in the upper right corner of the pane.
To show the pane again, move the mouse pointer over the desired hidden pane or tab. Select the tab containing its name.
To turn off the auto-hide feature, click the horizontal pushpin (

 ).
).
18 |
FastReporter 2 |

Getting Started with FastReporter 2
Customizing the Main Window
To move a pane or tab:
1.Click and hold the selected pane title bar or tab to select it.
Anchor points indicate where the selected item can be moved. The purple area represents the item you are currently moving.
2.Drag the item from its current location to the desired anchor point, then release the mouse button.
Post Processing Software |
19 |

Getting Started with FastReporter 2
Selecting Items From Lists and Menus
Selecting Items From Lists and Menus
When selecting items in a list or menu, you can in many cases use the Ctrl and Shift keys on your keyboard to make multiple selections, as you would in other Windows-based applications.
Also, the same command can often be performed from the Toolbar, the menus on top of the window, or by right-clicking into the pane where you want to perform an action. For readability reasons the menu method is privileged in the explanations in this user documentation.
Using the Software Customization Wizard
The Software Customization Wizard helps you to set the application according to your needs. For each user, you can change the following settings:
Language
Field of application
Supported measurement types
Distance units
Additional product information
Note: The Software Customization Wizard is displayed only once when the application is started by the current Windows user for the first time.
Note: At any time while configuring the application using the Software Customization Wizard, you can apply the default settings by clicking Cancel. To apply the changes you have made, click Finish. To return to the previous page, click Back.
20 |
FastReporter 2 |
Loading...