

Page 1
Epson NPD4937-00 EN
Hardware Setup Guide
Hardware Setup Guide
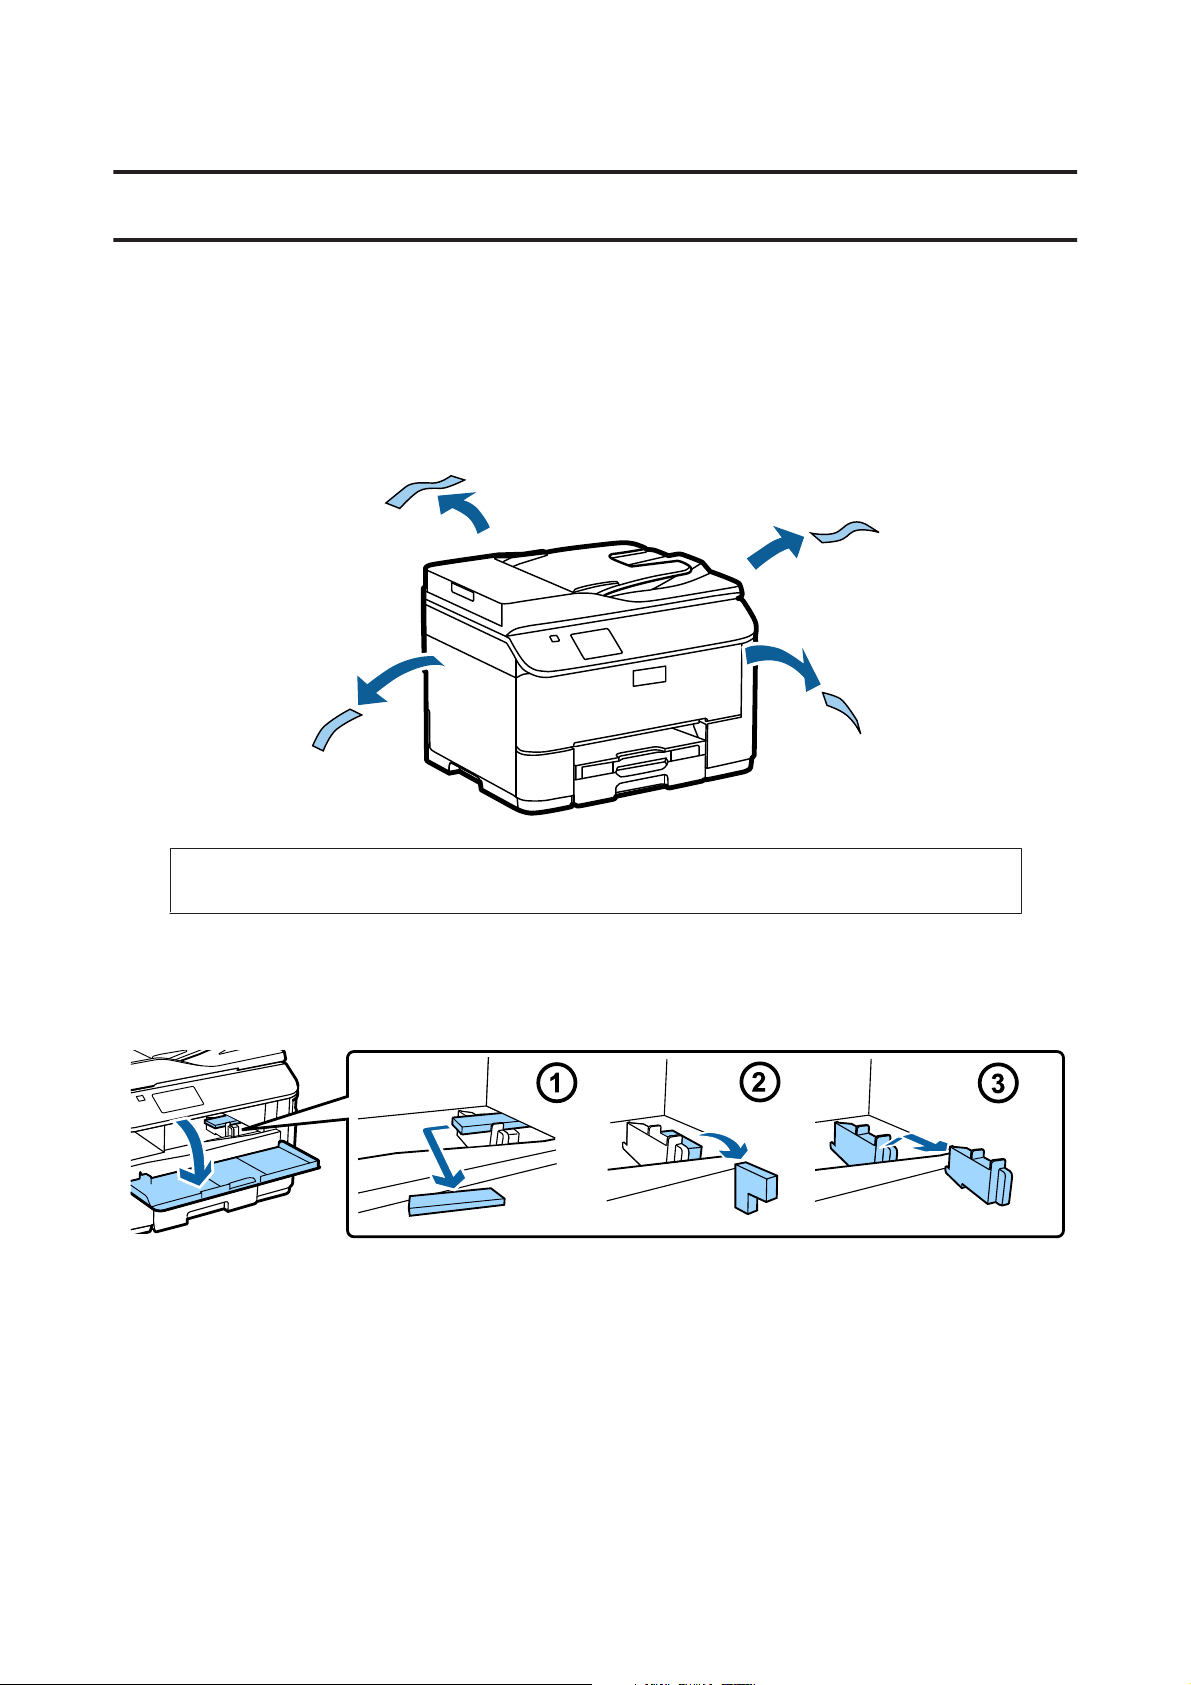
Unpacking
Step. 1
Remove all protective materials.
The illustrations in this manual are for a similar model. Although they may differ from your actual model, the
method of operation is the same.
Step. 2
Remove all protective materials.
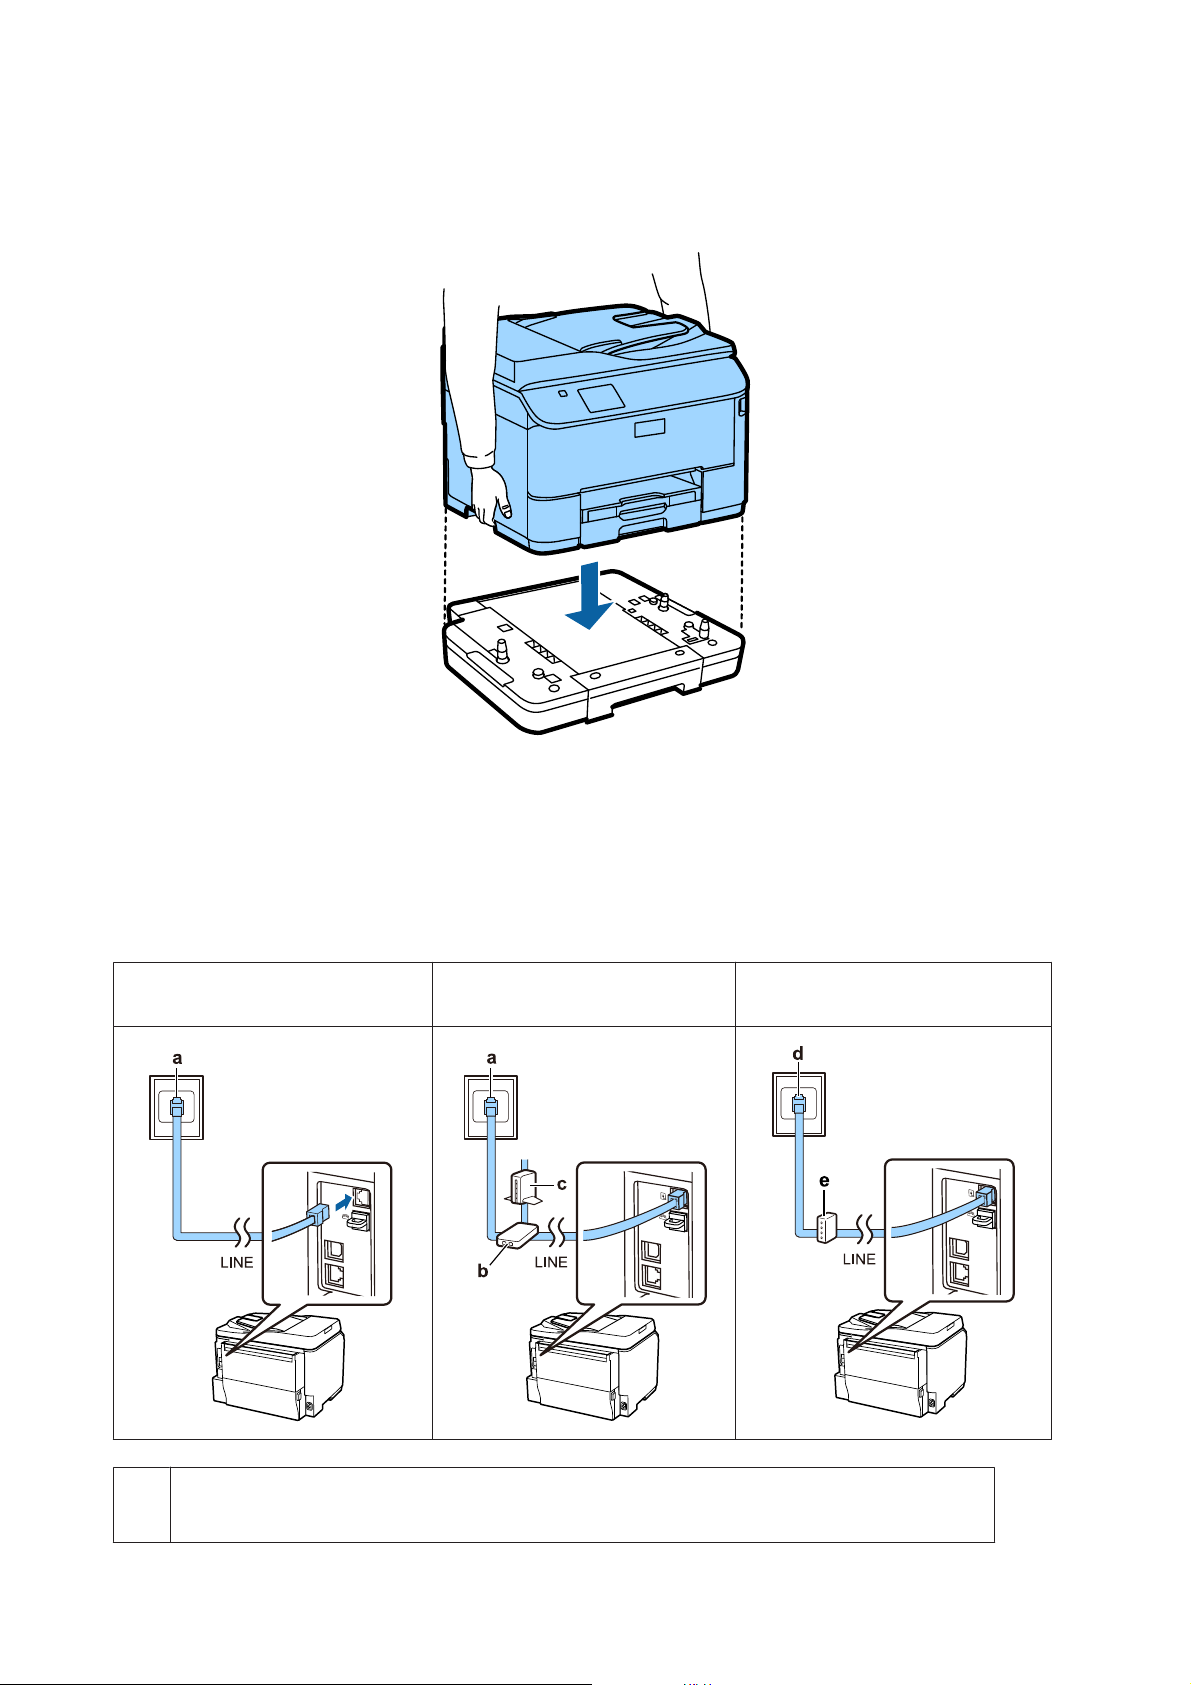
Installing the Optional Cassette Unit
For the WF-4630/5620/5690 series, an optional cassette unit is sold separately. If you do not have this unit, skip this
step.
1
Page 2
Epson NPD4937-00 EN
Hardware Setup Guide
Lower the product gently onto the unit so that the connector and t wo pins on the top of the unit fit into the terminal and
the holes on the bottom of the product respectively.
Connecting the Product to a Phone Line
Connect a phone cable to the LINE port on the back of the product. Choose one of the following.
If you do not want to use the fax function, skip this step.
Connecting to PSTN (standard phone
line ) or PBX
Connecting to DSL Connecting to ISDN
a Telephone wall jack or PBX port
If you have a PBX console in the room, connect the telephone cable from the console to the LINE port.
2
Page 3
Epson NPD4937-00 EN
Hardware Setup Guide
bDSL filter
If your DSL modem is equipped with a built-in DSL filter, you do not need a separate DSL filter.
cDSL modem
dISDN wall jack
e Terminal adapter or ISDN router
Depending on the area, a phone cable may be included with the product. If so, use that cable. You may need to
connect the phone cable to an adapter provided for your country or region.
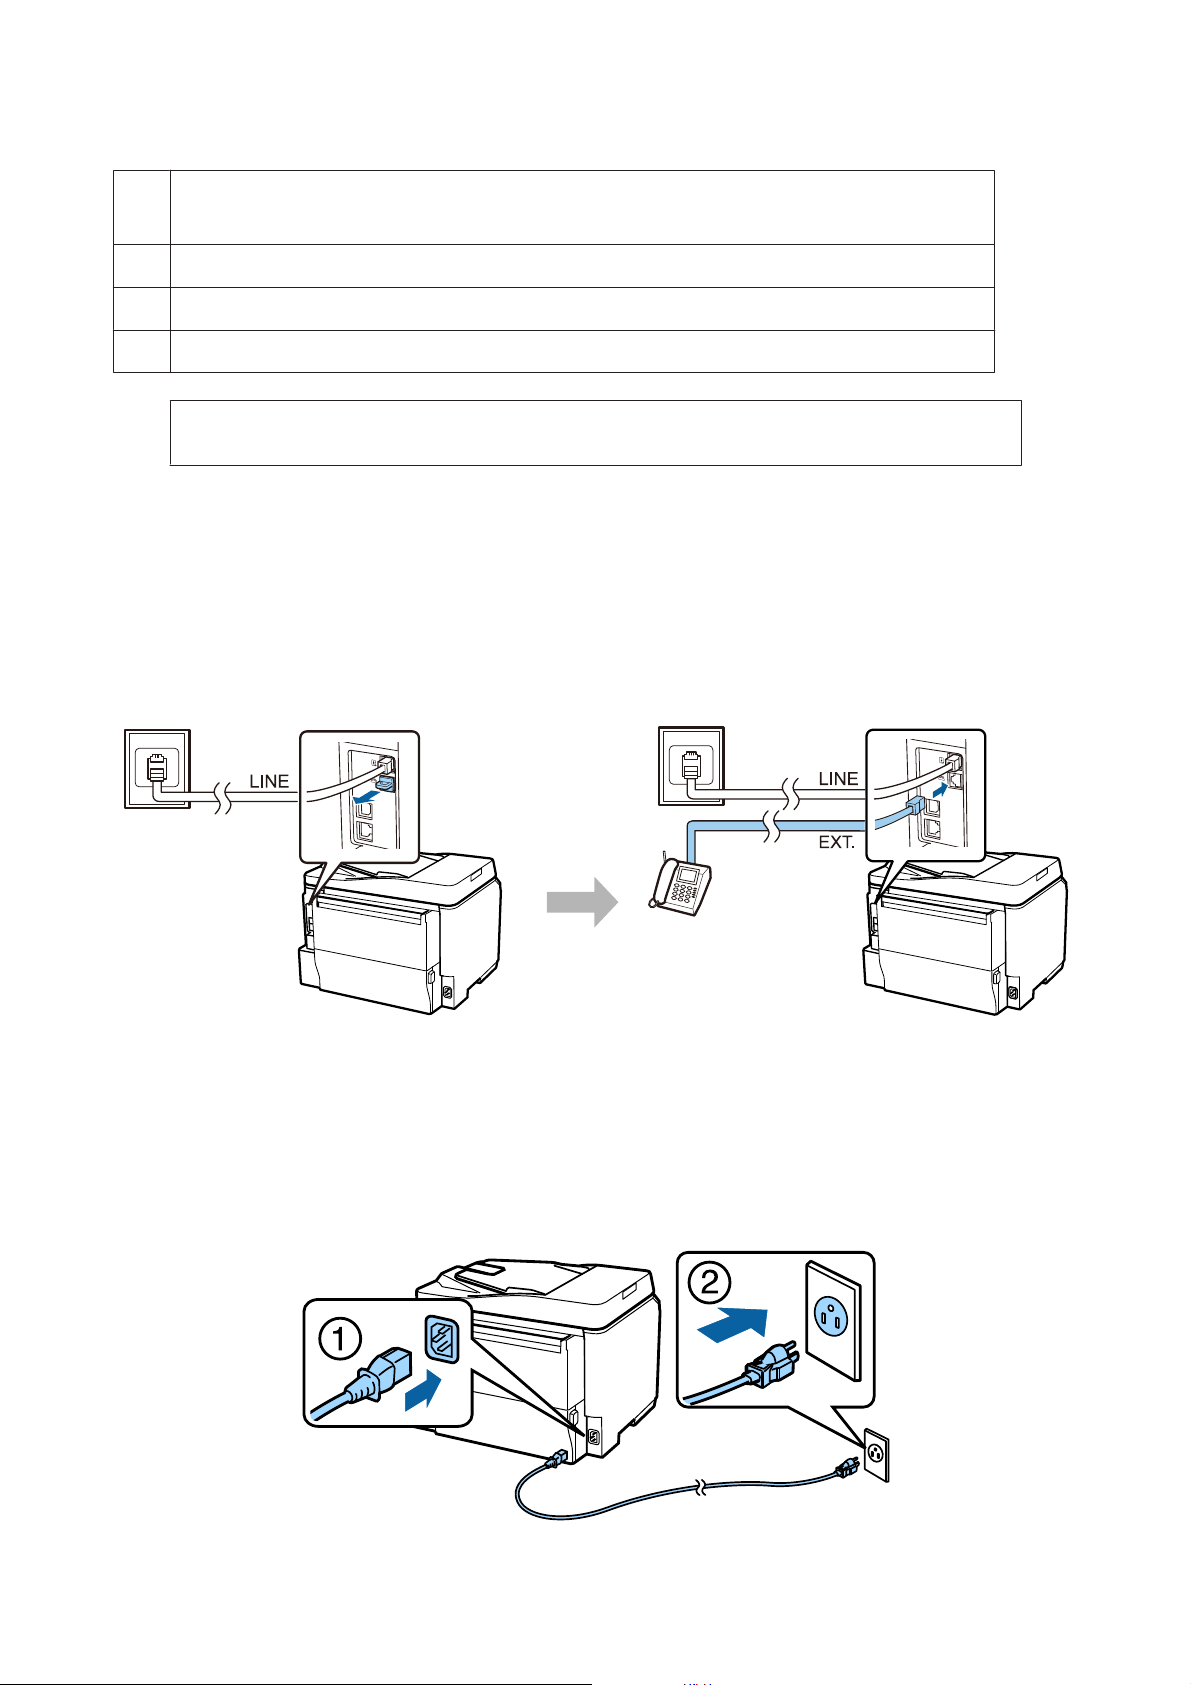
Connecting a Phone Device
If you want to share the same phone line with your telephone or answering machine, remove the cap from the EXT
port on the back of the product. Then connect a second phone cable to the phone device and to the EXT port.
If you do not want to use the fax function, skip this step.
Turning on the Printer
Step. 1
Connect the power cable and plug it in.
3
Page 4

Epson NPD4937-00 EN
Step. 2
Turn on the printer.
If an error occurs, check that no protective material has been left inside the printer.
Hardware Setup Guide
Selecting a Language, Country, and Time
Go to the printer, and then follow the instructions to select your language, country/region, and time.
4
Page 5

Epson NPD4937-00 EN
Hardware Setup Guide
Installing Ink Cartridges
Step. 1
Open the front cover.
Step. 2
Remove all ink cartridges from their packaging. Shake the ink cartridge for 5 seconds 15 times horizontally in
approximately 10 cm movements.
❏ For the initial setup, make sure you use the ink cartridges that came with this printer. These cartridges cannot
be saved for later use.
❏ Do not touch the green chip on the side of the cartridge.
Step. 3
Insert all four cartridges. Press each one until it clicks.
5
Page 6

Epson NPD4937-00 EN
Hardware Setup Guide
Step. 4
Close the front cover. Ink charging starts. Wait until the charging is finished.
The initial ink cartridges will be partly used to charge the print head. These cartridges may print fewer pages
compared to subsequent ink cartridges.
Loading Paper
Step. 1
Pull the paper cassette all the way out.
6
Page 7

Epson NPD4937-00 EN
Hardware Setup Guide
Step. 2
Pinch and slide the side edge guides to the sides of the paper cassette, and then slide the front edge guide to adjust to the
paper size.
Step. 3
Load A4 paper toward the front edge guide with the printable side face down, and check that the paper is not sticking
out from the end of the cassette.
Slide the side edge guides until they are flush with the edges of the paper.
7
Page 8

Epson NPD4937-00 EN
Hardware Setup Guide
Step. 4
Keep the cassette flat and slowly and carefully reinsert it all the way into the product. Slide out the output tray and raise
the stopper.
Selecting Paper Source Settings
Step. 1
Go to the printer. Select the paper source, and then select the paper size and paper type.
Step. 2
Set the paper size and paper type for the other sources. If you intend to load paper in these sources later, use the default
settings for now.
You can change these settings later.
8
Page 9

Epson NPD4937-00 EN
Hardware Setup Guide
Selecting Fax Settings
When the fax setting wizard screen is displayed on your printer’s control panel, tap start to configure the minimum
settings required for using the fax features. When setup is complete, the home screen is displayed.
To configure the fax settings later or if you do not want to use the fax function, close the fax setting screen. The home
screen is displayed and the printer is ready for printing.
Information
Do you know that you can influence the impact you have on the environment when printing?
1. The type of paper you use has an influence on the environmental impact of your printer. Choosing paper certified
under environmental stewardship initiatives, such as EN 12281:2002, or carrying recognised ecolabels, can help
reduce your impact on the environment through the initiatives the manufacturers implement. For specific
applications, lighter paper, such as 64 g/m² paper, can be used.
2. You can reduce your power consumption by purchasing Energy Star compliant products.
3. You can reduce your paper consumption and the impact on the environment by automatically printing on both
sides of the page.
4. As standard, your printer has a power management function that powers down your product when not in use, which
is a great energy saving feature.
9
 Loading...