

Page 1
User’s Manual
Important Safety Information. . . . . . . . . . . . . . . . . . .page 2
Part Names and Functions. . . . . . . . . . . . . . . . . . . . . .page 5
Setup. . . . . . . . . . . . . . . . . . . . . . . . . . . . . . . . . . . . . . . . . .page 8
Basic Operations . . . . . . . . . . . . . . . . . . . . . . . . . . . . . page 15
Installing/Replacing the Roll Paper . . . . . . . . . . . page 17
Cleaning. . . . . . . . . . . . . . . . . . . . . . . . . . . . . . . . . . . . . page 18
Troubleshooting . . . . . . . . . . . . . . . . . . . . . . . . . . . . . page 19
Specifications . . . . . . . . . . . . . . . . . . . . . . . . . . . . . . . . page 20
Appendix . . . . . . . . . . . . . . . . . . . . . . . . . . . . . . . . . . . . page 21
M00112300EN
Page 2

English
Important Safety Information
This manual presents important information intended to ensure safe and effective use of this
product. Read this manual carefully and store it in an accessible location.
For information on development of a system with this product and setup, see also Technical
Reference Guide. You can access Technical Reference Guide from the included Manual CD.
If Windows Embedded POSReady7 or Windows Embedded POSReady 2009 is installed on your
model, be sure to read “MICROSOFT SOFTWARE LICENSE TERMS” at the end of this manual before you
start using the product. If you do not accept any one of the terms, do not use the product.
Key to Symbols
The symbols in this manual are identified by their level of importance, as defined below. Read the
following carefully before handling the product.
!WARNING:
Warnings must be observed carefully to avoid serious bodily injury.
!CAUTION:
Cautions must be observed to avoid minor injury to yourself, damage to your equipment, or loss of
data.
QNote:
Notes have important information and useful tips on the operation of your product.
Safety Precautions
!WARNING:
❏
If this product produces smoke, a strange odor, or unusual noise, immediately unplug the
AC cable, and contact qualified service personnel. Continued use may lead to fire or
electric shock.
❏
Do not use this product with any voltage other than the specified one. Doing so may lead
to fire or electric shock.
❏
Be sure to use the specified AC adapter. Connection to an improper power source may
cause fire.
❏
Use only the power cable supplied with this product. In addition, use the supplied power
cable only for this product. Other use may cause electric shock or fire.
❏
Do not connect the cables in ways other than those specified in the manuals. Different
connections may cause equipment damage or fire.
❏
Do not block the openings of this product. This may cause overheating inside the product
and lead to fire.
• Do not place the product in an unventilated narrow location, such as a bookshelf.
• Do not place the product on carpet.
• Do not cover the product with any fabric.
2
Page 3

English
❏
Do not use this product where inflammable fumes of gasoline, benzine, thinner, or other
inflammable liquids may be in the air. Doing so may cause an explosion or fire.
❏
Do not use aerosol sprayers containing flammable gas inside or around this product.
Doing so may cause fire.
❏
If water or other liquid spills into this product, immediately unplug the AC cable, and
contact qualified service personnel. Continued use may lead to fire or shock.
❏
Do not allow foreign objects to fall into this product. Penetration by foreign objects may
lead to fire or electric shock.
❏
Never attempt to repair this product yourself. Improper repair work can be dangerous.
❏
Never disassemble or modify this product. Tampering with this product may result in
injury, fire, or electric shock.
❏
Do not attempt to open or disassemble the internal lithium battery. This could result in
burns or release of hazardous chemicals.
❏
Do not leave the internal lithium battery in a hot place such as near a fire or a heater
because it could overheat and ignite.
!CAUTION:
❏
Do not use this product in locations subject to high humidity or dust levels. Excessive humidity
and dust may cause paper jams and other problems, such as fire, or electric shock.
❏
Be sure to set this product on a firm, stable, horizontal surface. The product may break or cause
injury if it falls.
❏
Do not stand on or place heavy objects on top of this product. Equipment may fall or collapse,
causing breakage and possible injury.
❏
Be sure to use this product with the connector cover attached. If it is not attached, foreign objects
may enter this product, causing fire or equipment damage.
❏
When you move this product, be sure to hold the main body. If you hold only the connector cover,
it may come off and the main body may break or cause injury if it falls.
❏
The print head can be very hot during and immediately after printing. If you need to touch it, such
as for cleaning, wait until it cools down. Touching it before that may cause burns.
❏
Be careful of the cutter blades of the printer.
❏
Make sure that the total power requirements of all devices receiving power from this product do
not exceed the power supplying capability of the product. Otherwise, the devices may be
damaged.
❏
Connecting an outdoor overhead LAN cable directly to this product may lead to lightning
damage. If you need to connect such a cable to the product, the cable must be protected against
an electrical surge between the cable and the product. You should avoid connecting the product
to a non-surge protected outdoor overhead LAN cable.
❏
Do not connect a telephone line to the drawer-kick connector of this product. The telephone line
or product may become damaged.
❏
To ensure safety, unplug this product before leaving it for an extended period.
❏
Confirm the rated current of the external devices by checking the descriptions on the devices or
manuals. Do not use a device whose rated current is unclear.
3
Page 4

English
❏
Connect the external devices only when those total rated current is less than 4.2 A.
❏
To power off the product, use the application or OS function. Do not use the operations shown
below unless the product cannot be turned off due to an application or OS problem. Doing so
may cause loss of unsaved data, require OS recovery, or damage the SSD or other hardware.
• Forced termination by holding down the power button for approx.4 sec.
• Power shutdown by turning off the circuit breaker on the distribution board or by disconnecting the AC
cable/DC cable
The same phenomenon may also occur due to power shutdown caused by power failure/
temporary power failure.
Caution Labels
The caution label on the product indicates the following precautions.
!KCAUTION:
Do not touch the thermal head because it can be very hot after printing.
Caution about Warranty
This product assumes that the customer uses the software provided by Epson. If the customer
modifies the software, any repairs for malfunctions that occur may be charged, even if they occur
during the warranty period, and we may not be able to respond to product inquiries. If installing
any software, be sure to thoroughly evaluate it and use it at your own discretion.
4
Page 5
English
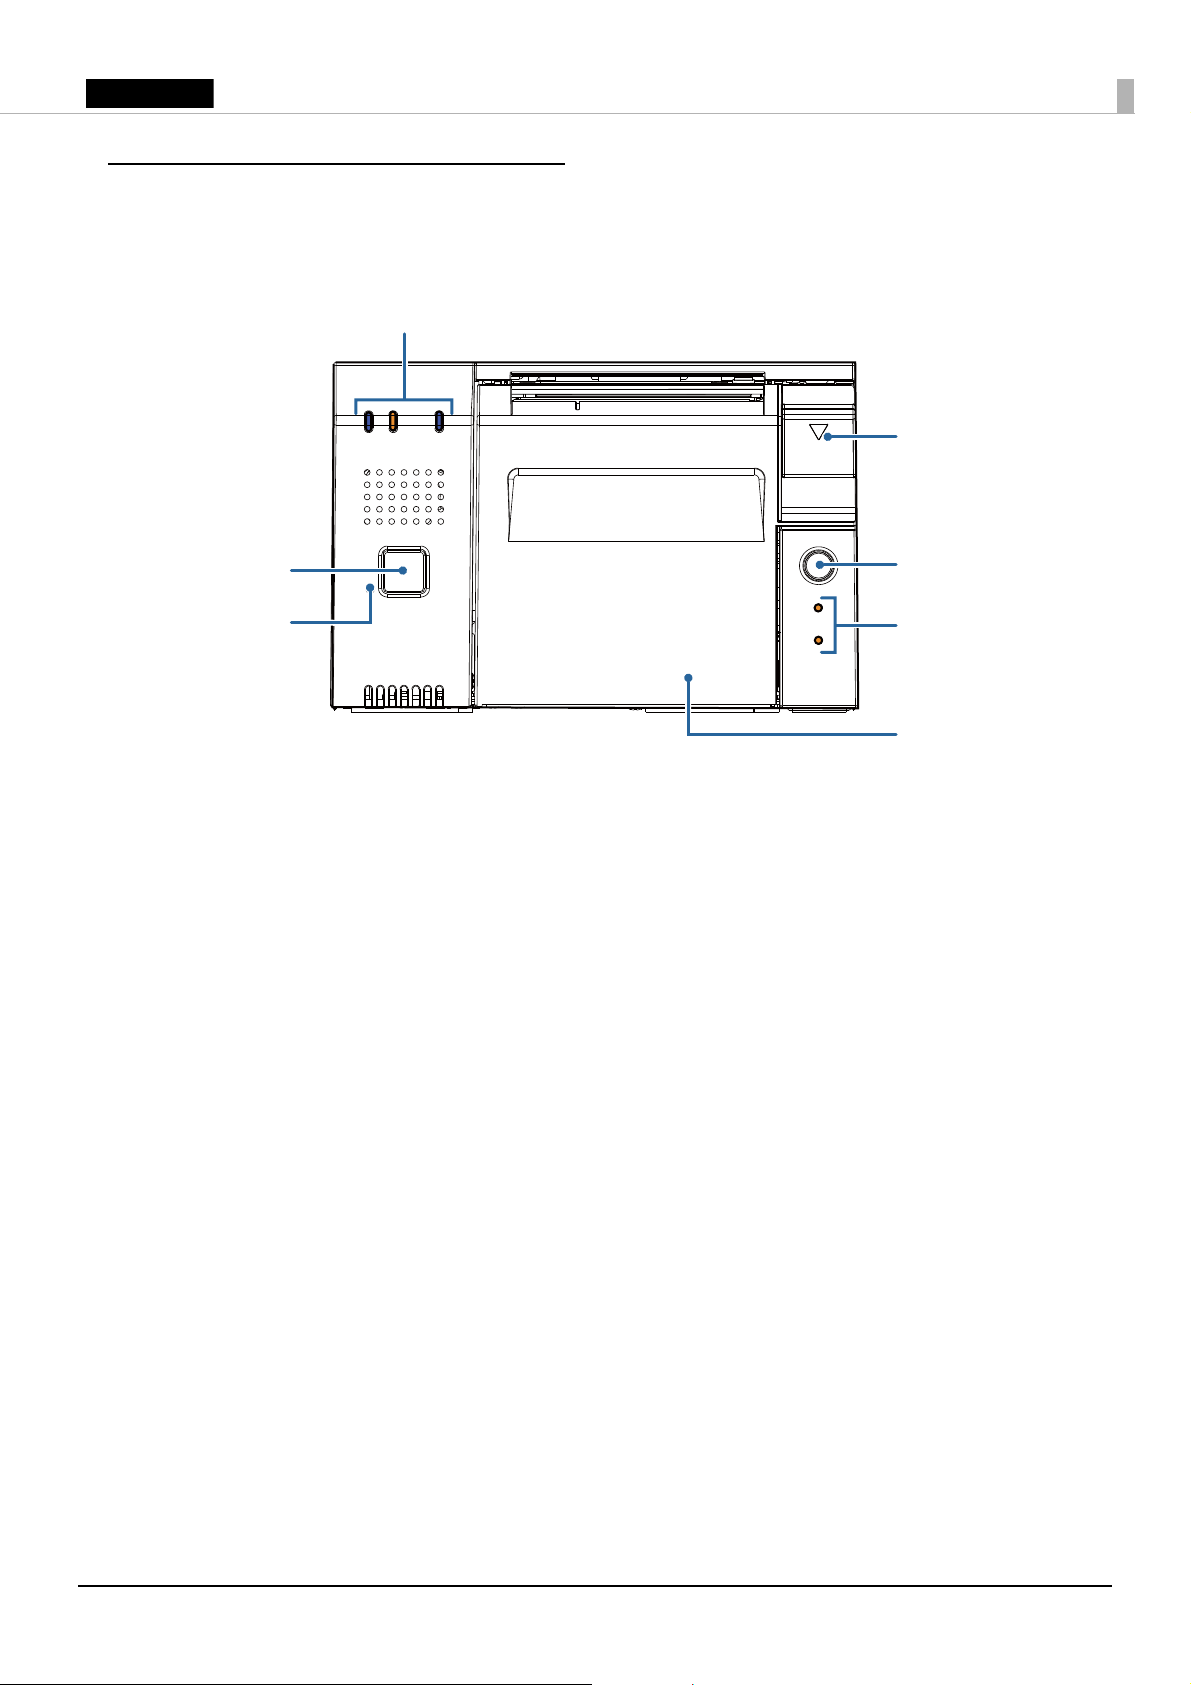
Part Names and Functions
Power button
Controller LEDs
Cover open lever
Roll paper cover
Printer reset
button
Feed button
Printer LEDs
Front Section
Power button
Press this button to turn on or shut down the product. Keep pressing the button to turn off the
product forcibly. (U “Forced Termination” on page 16)
QNote:
If the power button is disabled by settings on the operating system, the product will not shut down
even if you press the power button.
Printer reset button
Remove the roll paper from the printer and then keep pressing this button with a pointed object
(such as a paper clip) until the printer LED goes off to reset the printer.
Roll paper cover
Open this cover to install/replace the roll paper.
Feed button
Press this button to feed the roll paper.
Cover open lever
Press down this lever to open the roll paper cover.
5
Page 6
English
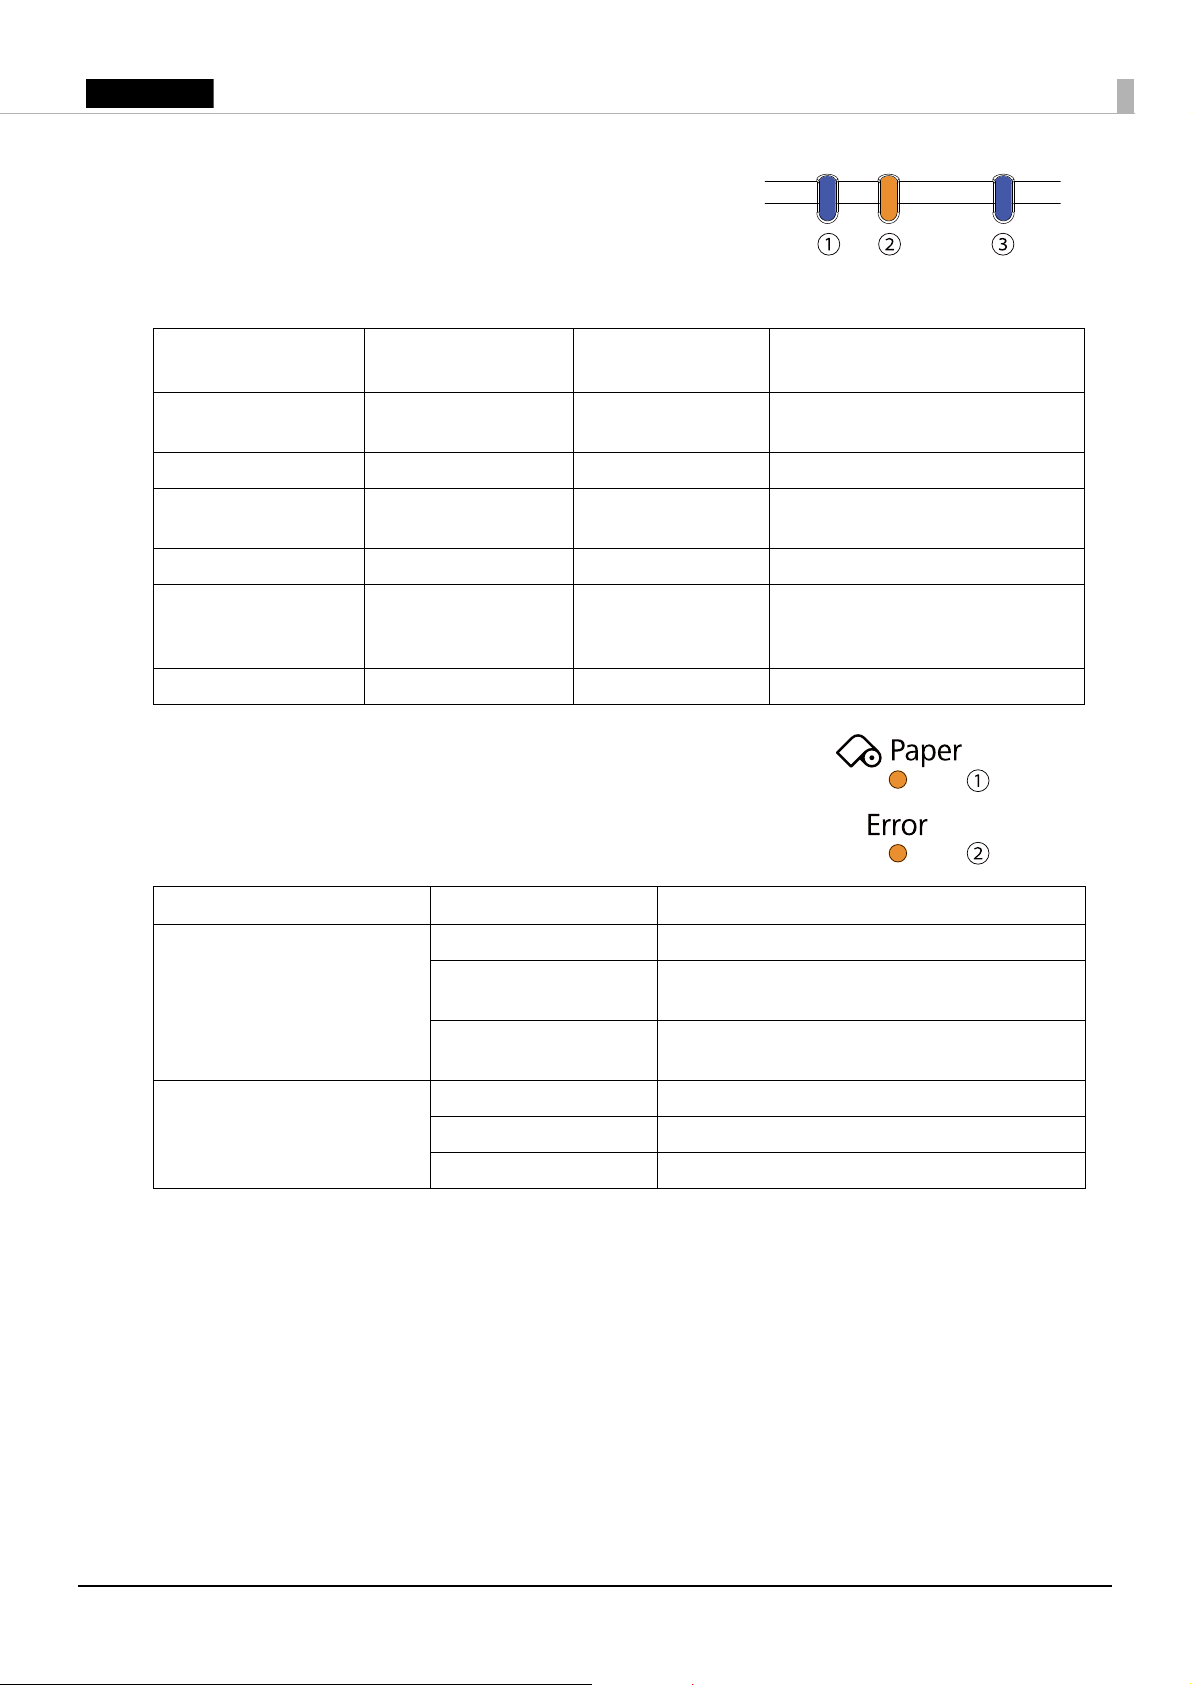
Controller LEDs
The status LEDs (➀ and ➁) indicate the product status with a
combination of turning on and flashing.
The storage access LED (➂) turns on during storage access.
➀ Status LED
(Blue)
On Flashing (with approx.
On
Flashing (with approx.
1 sec. intervals)
Off Off - Power is off.
On
- - On Accessing storage.
➁ Status LED
(Orange)
1 sec. intervals)
Off - Power is on. (Normal status)
Off - Standby.
Flashing (with approx.
600 msec. intervals)
➂ Storage access
Product status
LED (Blue)
-Booting
Updating software
- CPU overheating (95°C or higher)
USB overcurrent detected
Backup battery error
Printer LEDs
Indicates the printer status.
LED LED status Meaning
➀ Paper LED (Orange) On Roll paper near-end.
Flashing Waiting for the self-test printing to be
continued.
Off There is a sufficient amount of roll paper
remaining.
➁ Error LED (Orange) On Offline
Flashing An error has occurred.
Off In normal status.
6
Page 7
English
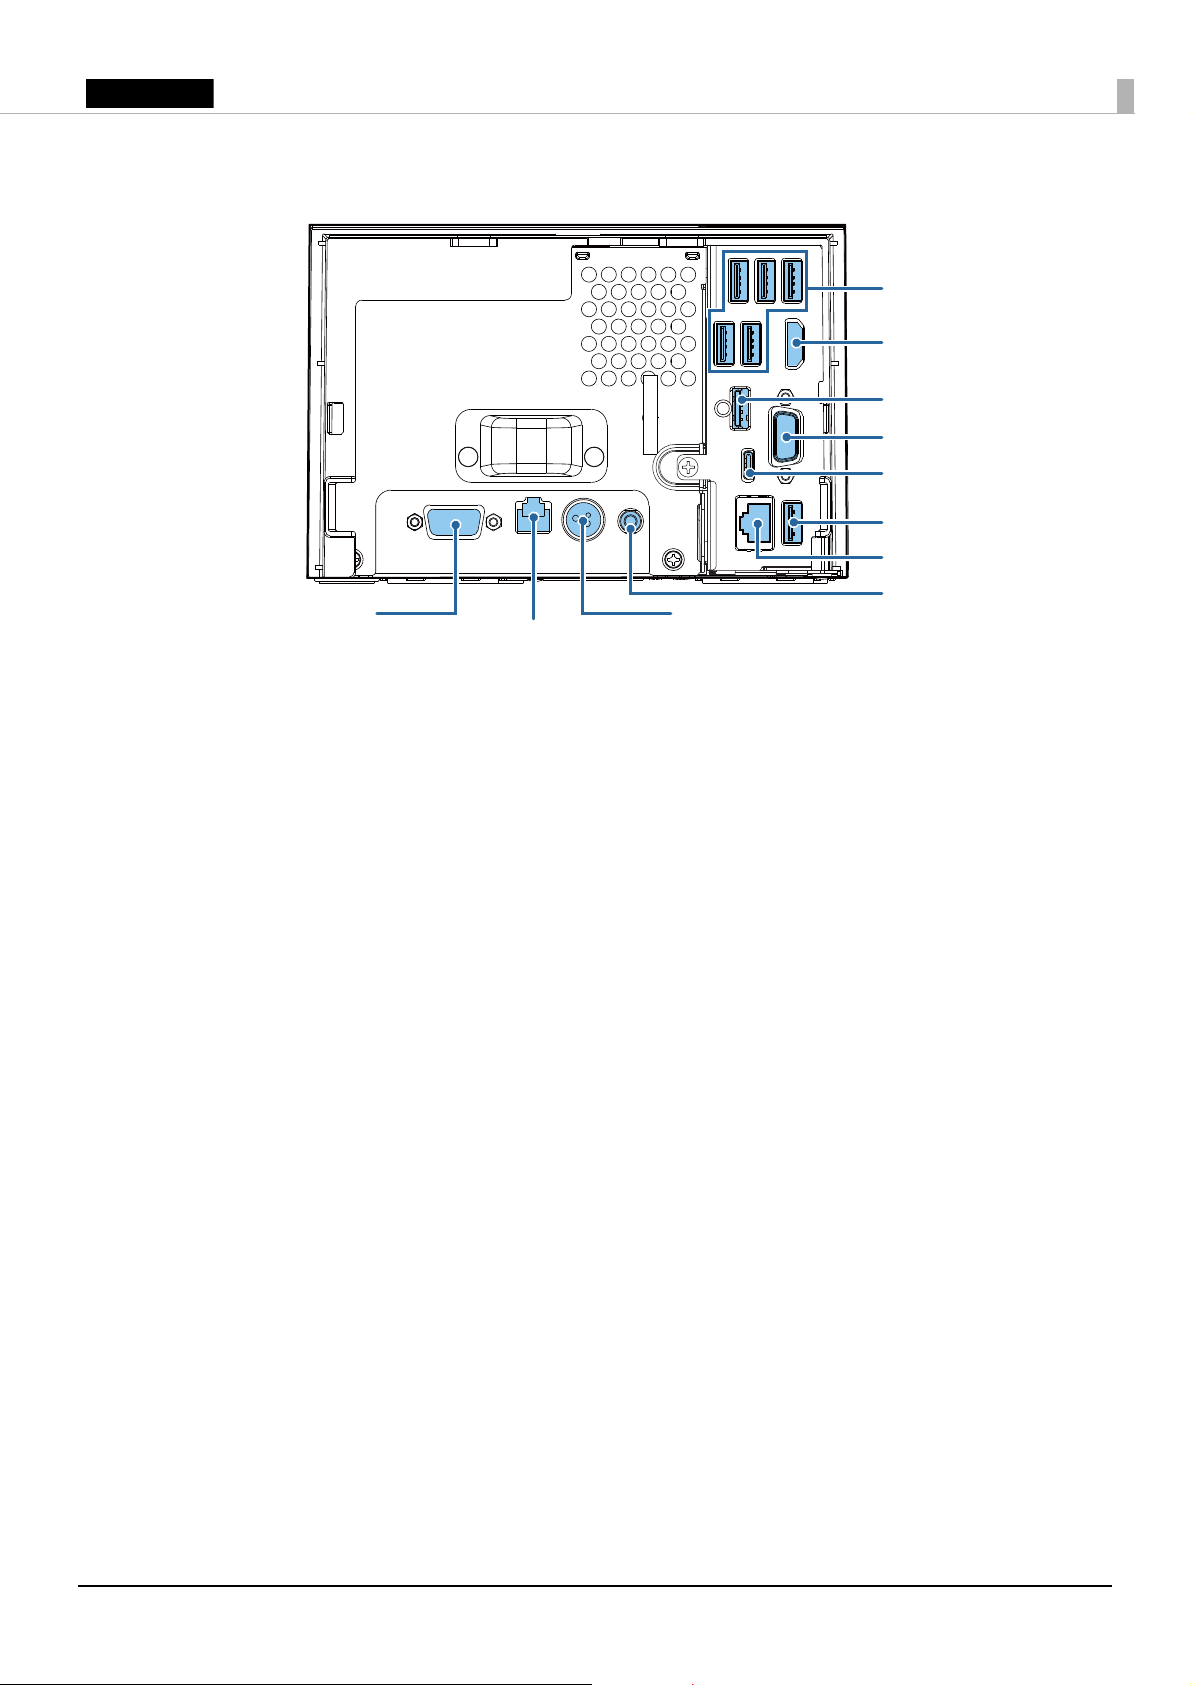
Rear Section
USB 3.0 ports (× 5)
VGA port
USB 2.0
Type C port
USB 3.0 port
DC-in connector
Drawer kick connector
Serial port
HDMI Port
USB 2.0 Port
Line-out port
Ethernet port
7
Page 8
English
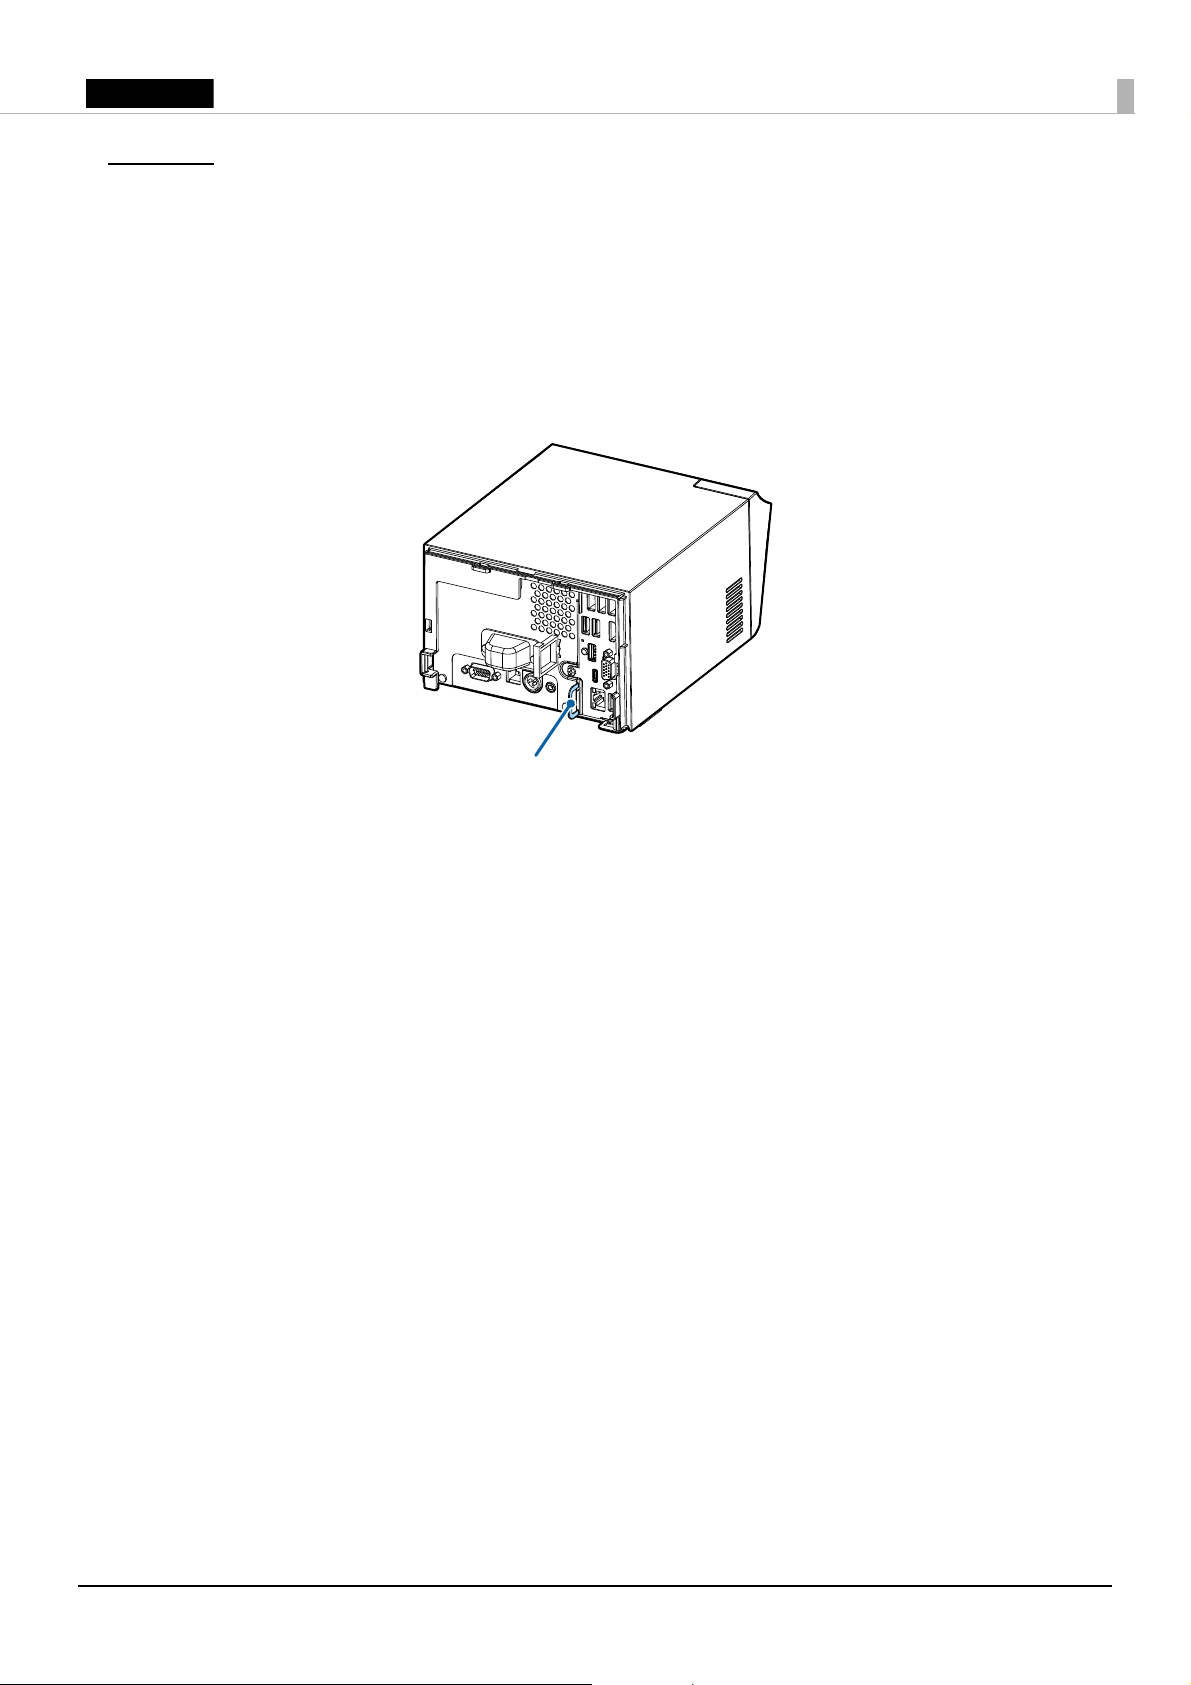
Setup
Security hook
Installing the Product
Install the product horizontally on a firm, stable surface.
QNote:
❏ The security hook on the back of the product allows you to attach a commercially available
antitheft wire.
❏ A tape for fixing the product (DF-10) is available as an option. (U “Securing the Product” on
page 14
)
8
Page 9
English
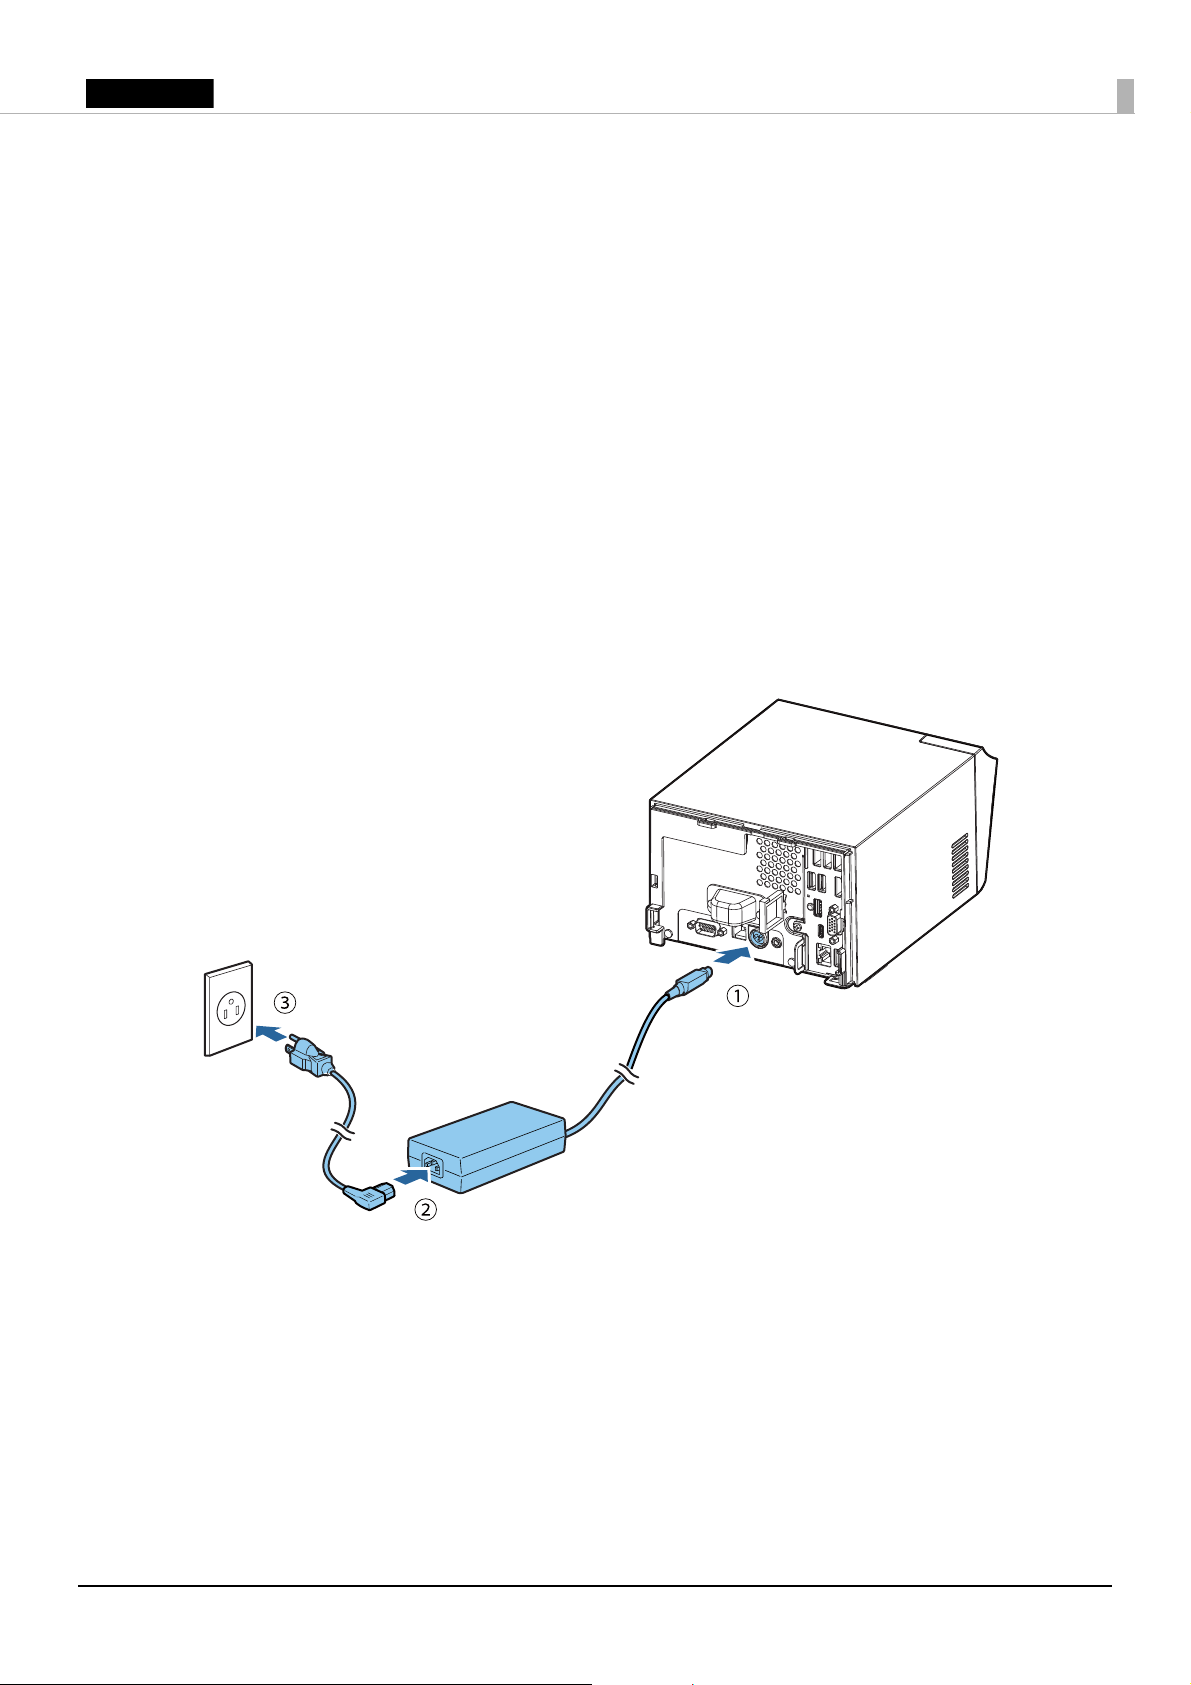
Connecting the AC Adapter
Follow the steps below to connect the AC adapter.
!WARNING:
Be sure to use the specified AC adapter [AC Adapter, T1(Model: M284B)] only.
!CAUTION:
Be sure to leave a space between the AC adapter and the main unit.
1. Firmly insert the DC connector of the AC adapter all the way into the DC-in connector on the
product. (➀ in the illustration)
2. Firmly insert the connector of the AC cable all the way into the AC inlet on the AC adapter. (➁
in the illustration)
3. Firmly insert the plug all the way into the grounded wall outlet. (➂ in the illustration)
4. Set the AC adapter so that its label side is facing down.
9
Page 10

English
Connecting External Devices
Wire saddle
If you connect external devices, turn off the product and then connect each cable to the port/
connector on the back of the product. (U “Rear Section” on page 7)
QNote:
When connecting the cables whose connectors do not lock themselves (USB cables and line-out cable,
etc.), you can pass the cables through the wire saddle to prevent them from coming off.
10
Page 11

English
Attaching/Removing the Connector Cover
Attaching the connector cover
Follow the steps below to attach the connector cover to protect cables.
1. Align the tab on the connector cover with the dent on the main body.
2. Push the connector cover to click onto the main body.
3. Make sure the cables are not pinched.
QNote:
You can also attach bottom cover to hide connectors.
11
Page 12

English
Removing the connector cover
Lift up the lower part of the connector cover while pushing down the center of the connector cover
to detach it from the main body.
QNote:
If the connector cover (bottom) is attached, first remove the connector cover (bottom).
12
Page 13

English
Attaching the Power Switch Cover
Align the inside edge of the
power button cover with the
left edge of the printer reset
button.
Align the inside edge of the
po
wer button cover with the
upper edge of the power
button.
Printer reset button
Power button
Attaching the power button cover that comes with the product onto the power button prevents
accidental operation of the power button. Follow the steps below to attach the power button cover.
QNote:
It is recommended to clean any dirt around the power button before you attach the cover.
1. Open the power button cover.
2. Peel off the backing paper.
3. Attach the power button cover as shown in the illustration.
13
Page 14

English
Securing the Product
Positioning lines
Using the optional affixing tape (Model: DF-10) secures the product to the installation surface.
Follow the steps below to use the affixing tape.
1. Turn over the product so that you can see its bottom.
2. With two pieces of the affixing tape combined, peel off the backing paper of a pair on one side,
and paste it to one of the specified positions on the bottom of the product.
3. In the same way, paste other three pairs of tape in the specified positions.
4. Peel off the backing paper of each pair on the other side of the affixing tape, turn over the
product back on its bottom, and place and secure it firmly to the installation surface.
14
Page 15

English
Basic Operations
Turning Power On/Off
!CAUTION:
❏ If you turn the product off, wait more than 10 seconds before you turn it on again.
❏ When the product is turned off or when it is in the standby mode, do not hold down the power
button longer than 4 seconds.
Press the power button to turn on/off the product.
Opening the Roll Paper Cover
Press down the cover open lever to open the roll paper cover.
Controlling the Speaker Volume
You can control the speaker volume through the product's operating system.
15
Page 16

English
Forced Termination
!CAUTION:
When forced termination is executed, all unsaved data is lost and recovery of the operating system
may be required.
If you cannot turn the product off using applications or the operating system, you can execute
forced termination as a last resort by pressing the power button for approximately 4 seconds.
16
Page 17

English
Installing/Replacing the Roll Paper
Follow the steps below to install/replace the roll paper.
1. Open the roll paper cover. (U “Opening the Roll Paper Cover” on page 15)
2. Remove the used roll paper core if there is one.
3. Insert the roll paper in the correct direction.
4. Pull out some paper, and close the roll paper cover.
5. Tear off the paper.
17
Page 18

English
Cleaning
Thermal head
Cleaning the Product Case
Be sure to turn off the product, and wipe the dirt off the product case with a dry cloth or a damp
cloth. For persistent dirt, use a cloth slightly moistened with mild neutral detergent.
!CAUTION:
Never clean the product with alcohol, benzine, thinner, or other such solvents. Doing so may
damage or break the parts made of plastic and rubber.
Cleaning the Thermal Head
To maintain print quality, Epson recommends cleaning the thermal head periodically (generally
every 3 months) by following the steps below.
!KCAUTION:
❏ The thermal head can be very hot after printing. Be careful not to touch it and to let it cool before
you clean it.
❏ Do not damage the thermal head by touching it with your fingers or any hard object.
1. Turn off the product. (U “Turning Power On/Off” on page 15)
2. Open the roll paper cover. (U “Opening the Roll Paper Cover” on page 15)
3. Clean the thermal elements of the thermal head with a cotton swab moistened with an alcohol
solvent (ethanol or IPA).
18
Page 19

English
Troubleshooting
Thermal head
The power does not turn on
Check whether the AC adapter is correctly connected. (U “Connecting the AC Adapter” on page 9)
Error LED is on
❏ Check whether the roll paper cover is correctly closed.
❏ If the Paper LED is on, check whether the roll paper is correctly installed and any roll paper
remains. (U “Installing/Replacing the Roll Paper” on page 17)
Error LED is flashing
❏ Check whether paper is jammed. If it is jammed, remove it. (U “Paper is jammed” on page 19)
❏ Printing stops if the thermal head overheats and resumes automatically when it cools.
❏ For other cases, turn the product off, and after 10 seconds, turn it back on.
Paper is jammed
!KCAUTION:
Do not touch the thermal head because it can be very hot after printing.
When paper is jammed, never pull out the paper forcibly. Open the roll paper cover (U
the Roll Paper Cover” on page 15
), and then remove the jammed paper.
“Opening
19
Page 20

English
Specifications
Item Specification
CPU
Main memory
Backing storage
Interface
Ethernet 10BASE-T/100BASE-TX/1000BASE-T
USB 3.0 (× 6)*
USB 2.0 (× 2)*
Serial D-sub 9 pin male
VGA D-sub 15 pin female
HDMI Standard HDMI connector type A 19 pin, female
Drawer kick RJ12 6 pin
Line-out φ 3.5 mm Mini-jack
2
2
RTC/CMOS Backup battery
Sound function
Print method
Maximum print speed
Roll paper
Software
Te mp e ra t u re
Humidity
Paper width 79.5 mm ± 0.5 mm {3.13" ± 0.02"}
Diameter 83 mm {3.27"} at maximum
Roll paper core Inside diameter: 12 mm {0.47"}
OS Windows10 IoT Enterprise LTSB 2016
Device control
software
Operating 5 to 40°C {41 to 104°F}
Storage –10 to 50°C {14 to 122°F}
Operating 10 to 90 %RH (No condensation)
Storage 10 to 90 %RH (No condensation)
Elevation
Overall dimensions
(including connector cover)
Mass (excluding roll paper)
*1: The capacity differs depending on the model.
*2: The maximum current capacity that can be supplied is 4.2 A as a total for all USB ports.
• Celeron model
Intel® Celeron 3965U 2.20 GHz (2 MB SmartCache)
•Core™ i3 model
Intel® Core™ i3-7100U 2.40 GHz (3 MB SmartCache)
•Core™ i5 model
Intel® Core™ i5-7300U 2.60 GHz, 3.50 GHz during burst (3 MB
SmartCache)
4 GB, DDR4-2133, SO-DIMM slot
SATA SSD*
USB 3.0 (Type A)
Power supply: DC 5V, 900 mA
• USB 2.0 (Type A) ×1
Power supply: DC 5V, 500 mA
• USB 2.0 (Type C) ×1
Power supply: DC 5 V, 3 A
Power supply: DC 24 V, 1 A
Lithium battery for RTC/CMOS backup
Built-in monaural speaker
Thermal line printing
250 mm/s
Outside diameter: 18 mm {0.71"}
ePOS-Device
0 to 3000 m {0 to 9842.52 ft.} above sea level
W × D × H: 172 mm × 290 mm × 114 mm {6.77"× 11.42" × 4.49"}
Approx. 2.8 kg {6.17 lb}
1
20
Page 21

English
Appendix
Restriction of Use
When this product is used for applications requiring high reliability/safety, such as transportation
devices related to aviation, rail, marine, automotive, etc.; disaster prevention devices; various safety
devices, etc.; or functional/precision devices, etc.; you should use this product only after giving
consideration to including fail-safes and redundancies into your design to maintain safety and total
system reliability. Because this product was not intended for use in applications requiring
extremely high reliability/safety, such as aerospace equipment, main communication equipment,
nuclear power control equipment, or medical equipment related to direct medical care, etc., please
make your own judgment on this product’s suitability after a full evaluation.
Trademarks
Intel, Celeron, Intel Core are trademarks of Intel Corporation or its subsidiaries in the U.S. and
other countries.
Windows is a registered trademark of Microsoft Corporation in the United States and/or other
countries.
EPSON is a registered trademark of Seiko Epson Corporation. Exceed Your Vision is a registered
trademark or trademark of Seiko Epson Corporation.
All other trademarks are the property of their respective owners and used for identification
purpose only.
Caution
No part of this publication may be reproduced, stored in a retrieval system, or transmitted in any
form or by any means, electronic, mechanical, photocopying, recording, or otherwise, without the
prior written permission of Seiko Epson Corporation. No patent liability is assumed with respect to
the use of the information contained herein. While every precaution has been taken in the
preparation of this book, Seiko Epson Corporation assumes no responsibility for errors or
omissions. Neither is any liability assumed for damages resulting from the use of the information
contained herein.
Neither Seiko Epson Corporation nor its affiliates shall be liable to the purchaser of this product or
third parties for damages, losses, costs, or expenses incurred by purchaser or third parties as a
result of: accident, misuse, or abuse of this product or unauthorized modifications, repairs, or
alterations to this product, or (excluding the U.S.) failure to strictly comply with Seiko Epson
Corporation’s operating and maintenance instructions.
Seiko Epson Corporation shall not be liable against any damages or problems arising from the use
of any options or any consumable products other than those designated as Original Epson
Products or Epson Approved Products by Seiko Epson Corporation.
NOTICE: The contents of this manual are subject to change without notice.
©Seiko Epson Corporation 2018. All rights reserved.
21
Page 22

English
Open Source Software License
1 ) This printer product includes open source software programs listed in Section 5) according
to the license terms of each open source software program.
2 ) We provide the source code of the GPL Programs and LGPL Programs until five (5) years
after the discontinuation of same model of this printer product. If you desire to receive the
source code above, please contact the customer support for your region. You shall comply
with the license terms of each open source software program.
3 ) The open source software programs are WITHOUT ANY WARRANTY; without even the
implied warranty of MERCHANTABILITY AND FITNESS FOR A PARTICULAR
PURPOSE. See the license agreements of each open source software program for more
details.
4 ) OpenSSL toolkit
This printer product includes software developed by the OpenSSL project for use in the
OpenSSL Toolkit (http://www.openssl.org/).
This product includes cryptographic software written by Eric Young (eay@cryptsoft.com).
5 ) The list of open source software programs included with this printer product and the whole
license agreements of each license can be found in the following URL.
http://xxx.xxx.xxx.xxx/licenses/
* For the underlined part in the above URL, input each printer’s IP address.
22
Page 23

English
MICROSOFT SOFTWARE LICENSE TERMS
WINDOWS 10 IOT ENTERPRISE & MOBILE (ALL EDITIONS)
IF YOU LIVE IN (OR IF YOUR PRINCIPAL PLACE OF BUSINESS IS IN) THE UNITED STATES, PLEASE READ THE
BINDING ARBITRATION CLAUSE AND CLASS ACTION WAIVER IN SECTION 9. IT AFFECTS HOW DISPUTES ARE
RESOLVED.
Thank you for choosing Microsoft!
Depending on how you obtained the Windows software, this is a license agreement between (i) you and the device
manufacturer or software installer that distributes the software with your device; or (ii) you and Microsoft Corporation
(or, based on where you live or if a business where your principal place of business is located, one of its affiliates) if you
acquired the software from a retailer. Microsoft is the device manufacturer for devices produced by Microsoft or one of
its affiliates, and Microsoft is the retailer if you acquired the software directly from Microsoft.
This agreement describes your rights and the conditions upon which you may use the Windows software. You should
review the entire agreement, including any supplemental license terms that accompany the software and any linked
terms, because all of the terms are important and together create this agreement that applies to you. You can review
linked terms by pasting the (aka.ms/) link into a browser window.
By accepting this agreement or using the software, you agree to all of these terms, and consent to the
transmission of certain information during activation and during your use of the software as per the privacy
statement described in Section 3. If you do not accept and comply with these terms, you may not use the
software or its features. You may contact the device manufacturer or installer, or your retailer if you purchased the
software directly, to determine its return policy and return the software or device for a refund or credit under that
policy. You must comply with that policy, which might require you to return the software with the entire device on
which the software is installed for a refund or credit, if any.
1. Overview.
a. Applicability. This agreement applies to the Windows software that is preinstalled on your device, or
acquired from a retailer and installed by you, the media on which you received the software (if any), any fonts,
icons, images or sound files included with the software, and also any Microsoft updates, upgrades,
supplements or services for the software, unless other terms come with them. It also applies to Windows apps
developed by Microsoft that provide functionality such as mail, calendar, contacts, music and news that are
included with and are a part of Windows. If this agreement contains terms regarding a feature or service not
available on your device, then those terms do not apply.
b. Additional terms. Depending on your device’s capabilities, how it is configured, and how you use it,
additional Microsoft and third party terms may apply to your use of certain features, services and apps.
(i) Some Windows apps provide an access point to, or rely on, online services, and the use of those services
is sometimes governed by separate terms and privacy policies, such as the Microsoft Services
Agreement at (aka.ms/msa). You can view these terms and policies by looking at the service terms of
use or the app’s settings, as applicable; please read them. The services may not be available in all
regions.
(ii) The manufacturer or installer may also preinstall apps, which will be subject to separate license terms.
(iii) The software may include third party software such as Adobe Flash Player that is licensed under its own
terms. You agree that your use of Adobe Flash Player is governed by the license terms for Adobe
Systems Incorporated at (aka.ms/adobeflash). Adobe and Flash are either registered trademarks or
trademarks of Adobe Systems Incorporated in the United States and/or other countries.
(iv) The software may include third party programs that are licensed to you under this agreement, or under
their own terms. License terms, notices and acknowledgements, if any, for the third party program can
be view at (aka.ms/thirdpartynotices).
2. Installation and Use Rights.
a. License. The software license is permanently assigned to the device with which you acquired the software.
You many only use the software on that device.
b. Device. In this agreement, “device” means a physical hardware system) with an internal storage device
capable of running the software. A hardware partition or blade is considered to be a device.
c. Restrictions. The manufacturer or installer and Microsoft reserve all rights (such as rights under intellectual
property laws) not expressly granted in this agreement. For example, this license does not give you any right
to, and you may not:
(i) use or virtualize features of the software separately;
(ii) publish, copy (other than the permitted backup copy), rent, lease, or lend the software;
(iii) transfer the software (except as permitted by this agreement);
(iv) work around any technical restrictions or limitations in the software;
(v) use the software as server software, for commercial hosting, make the software available for
simultaneous use by multiple users over a network, install the software on a server and allow users to
access it remotely, or install the software on a device for use only by remote users;
23
Page 24

English
(vi) reverse engineer, decompile, or disassemble the software, or attempt to do so, except and only to the
extent that the foregoing restriction is (a) permitted by applicable law; (b) permitted by licensing terms
governing the use of open source components that may be included with the software; or (c) required
to debug changes to any libraries licensed under the GNU Lesser General Public License which are
included with and linked to by the software; and
(vii) when using Internet-based features you may not use those features in any way that could interfere with
anyone else’s use of them, or to try to gain access to or use any service, data, account, or network, in an
unauthorized manner.
d. Multi use scenarios.
(i) Multiple versions. If when acquiring the software, you were provided with multiple versions (such as
32-bit and 64-bit versions), you may install and activate only one of those versions at a time.
(ii) Multiple or pooled connections. Hardware or software you use to multiplex or pool connections, or
reduce the number of devices or users that access or use the software, does not reduce the number of
licenses you need. You may only use such hardware or software if you have a license for each instance of
the software you are using.
(iii) Device connections. You may allow up to 20 other devices to access the software installed on the
licensed device for the purpose of using the following software features: file services, print services,
Internet information services, and Internet connection sharing and telephony services on the licensed
device. The 20 connection limit applies to devices that access the software indirectly through
“multiplexing” or other software or hardware that pools connections. You may allow any number of
devices to access the software on the licensed device to synchronize data between devices. This section
does not mean, however, that you have the right to install the software, or use the primary function of
the software (other than the features listed in this section), on any of these other devices.
(iv) Remote access. Users may access the licensed device from another device using remote access
technologies, but only on devices separately licensed to run the same or higher edition of this software.
(v) Remote assistance. You may use remote assistance technologies to share an active session without
obtaining any additional licenses for the software. Remote assistance allows one user to connect
directly to another user’s computer, usually to correct problems.
(vi) POS application. If the software is installed on a retail point of service device, you may use the software
with a point of service application (“POS Application”). A POS Application is a software application
which provides only the following functions: (i) process sales and service transactions, scan and track
inventory, record and/or transmit customer information, and perform related management functions,
and/or (ii) provide information directly and indirectly to customers about available products and
services. You may use other programs with the software as long as the other programs: (i) directly
support the manufacturer’s specific use for the device, or (ii) provide system utilities, resource
management, or anti-virus or similar protection. For clarification purposes, an automated teller machine
(“ATM”) is not a retail point of service device.
(vii) Cloud Computing Devices. If your device uses Internet browsing functionality to connect to and
access cloud hosted applications: (i) no desktop functions may run locally on the device, and (ii) any files
that result from the use of the desktop functions may not be permanently stored on the system.
“Desktop functions,” as used in this agreement, means a consumer or business task or process
performed by a computer or computing device. This includes but is not limited to email, word
processing, spreadsheets, database, scheduling, network or internet browsing and personal finance.
(viii)Desktop Functions. If your system performs desktop functions, then you must ensure that they: (i) are
only used to support the application, and (ii) operate only when used with the application.
e. Specific Use. The manufacturer designed the licensed device for a specific use. You may only use the software
for that use.
f. Backup copy. You may make a single copy of the software for backup purposes, and may also use that
backup copy to transfer the software if it was acquired as stand-alone software, as described below.
3. Privacy; Consent to Use of Data. Your privacy is important to us. Some of the software features send or receive
information when using those features. Many of these features can be switched off in the user interface, or you
can choose not to use them. By accepting this ag
collect, use, and disclose the information as described in the Microsoft Privacy Statement available at (aka.ms/
privacy), and as may be described in the user interface associated with the software features.
4. Transfer
a. Software preinstalled on device. If you acquired the software preinstalled on a device, you may transfer the
license to use the software directly to another user, only with the licensed device. The transfer must include
the software and, if provided with the device, an authentic Windows label including the product key. Before
any permitted transfer, the other party must agree that this agreement applies to the transfer and use of the
software.
b. Stand-alone software. If you acquired the software as stand-alone software, you may transfer the software to
another device that belongs to you. You may also transfer the software to a device owned by someone else if
(i) you are the first licensed user of the software and (ii) the new user agrees to the terms of this agreement.
You may use the backup copy we allow you to make or the media that the software came on to transfer the
reement and using the software you agree that Microsoft may
24
Page 25

English
software. Every time you transfer the software to a new device, you must remove the software from the prior
device. You may not transfer the software to share licenses between devices.
5. Authorized Software and Activation. You are authorized to use this software only if you are properly licensed
and the software has been properly activated with a genuine product key or by other authorized method. When
you connect to the Internet while using the software, the software will automatically contact Microsoft or its
affiliate to confirm the software is genuine and the license is associated with the licensed device. You can also
activate the software manually by Internet or telephone. In either case, transmission of certain information will
occur, and Internet, telephone and SMS service charges may apply. During activation (or reactivation that may be
triggered by changes to your device’s components), the software may determine that the installed instance of the
software is counterfeit, improperly licensed or includes unauthorized changes. If activation fails the software will
attempt to repair itself by replacing any tampered Microsoft software with genuine Microsoft software. You may
also receive reminders to obtain a proper license for the software. Successful activation does not confirm that the
software is genuine or properly licensed. You may not bypass or circumvent activation. To help determine if your
software is genuine and whether you are properly licensed, see (aka.ms/genuine). Certain updates, support, and
other services might only be offered to users of genuine Microsoft software.
6. Updates. You may obtain updates only from Microsoft or authorized sources, and Microsoft may need to update
your system to provide you with those updates. The software periodically checks for system and app updates, and
may download and install them for you. To the extent automatic updates are enabled on your device, by
accepting this agreement, you agree to receive these types of automatic updates without any additional notice.
7. Geographic and Export Restrictions. If your software is restricted for use in a particular geographic region, then
you may activate the software only in that region. You must also comply with all domestic and international
export laws and regulations that apply to the software, which include restrictions on destinations, end users, and
end use. For further information on geographic and export restrictions, visit (aka.ms/georestrict) and (aka.ms/
exporting).
8. Support and Refund Procedures. For the software generally, contact the device manufacturer or installer for
support options. Refer to the support number provided with the software. For updates and supplements
obtained directly from Microsoft, Microsoft may provide limited support services for properly licensed software as
described at (aka.ms/mssupport). If you are seeking a refund, contact the manufacturer or installer to determine
its refund policies. You must comply with those policies, which might require you to return the software with the
entire device on which the software is installed for a refund.
9. Binding Arbitration and Class Action Waiver if You Live in (or if a Business Your Principal Place of Business
is in) the United States.
We hope we never have a dispute, but if we do, you and we agree to try for 60 days to resolve it informally. If we
can't, you and we agree to binding individual arbitration before the American Arbitration Association
("AAA") under the Federal Arbitration Act ("FAA"), and not to sue in court in front of a judge or jury. Instead,
a neutral arbitrator will decide and the arbitrator's decision will be final except for a limited right of appeal under
the FAA. Class action lawsuits, class-wide arbitrations, private attorney-general actions, and any other
proceeding where someone acts in a representative capacity aren't allowed. Nor is combining individual
proceedings without the consent of all parties. "We," "our," and "us" includes Microsoft, the device
manufacturer, and software installer.
a. Disputes covered—everything except IP. The term “dispute” is as broad as it can be. It includes any claim or
controversy between you and the manufacturer or installer, or you and Microsoft, concerning the software, its
price, or this agreement, under any legal theory including contract, warranty, tort, statute, or regulation,
except disputes relating to the enforcement or validity of your, your licensors’, our, or our licensors’
intellectual property rights.
b.
Mail a Notice of Dispute first. If you have a dispute and our customer service representatives can’t resolve it,
send a Notice of Dispute by U.S. Mail to the manufacturer or installer, ATTN: LEGAL DEPARTMENT. If your
dispute is with Microsoft, mail it to Microsoft Corporation, ATTN: LCA ARBITRATION, One Microsoft Way,
Redmond, WA 98052-6399. Tell us your name, address, how to contact you, what the problem is, and what
you want. A form is available at (aka.ms/disputeform). We’ll do the same if we have a dispute with you. After
60 days, you or we may start an arbitration if the dispute is unresolved.
c. Small claims court option. Instead of mailing a Notice of Dispute, and if you meet the court’s requirements,
you may sue us in small claims court in your county of residence (or if a business your principal place of
business) or our principal place of business–King County, Washington USA if your dispute is with Microsoft.
We hope you’ll mail a Notice of Dispute and give us 60 days to try to work it out, but you don’t have to before
going to small claims court.
d. Arbitration procedure. The AAA will conduct any arbitration under its Commercial Arbitration Rules (or if
you are an individual and use the software for personal or household use, or if the value of the dispute is
$75,000 USD or less whether or not you are an individual or how you use the software, its Consumer
Arbitration Rules). For more information, see (aka.ms/adr) or call 1-800-778-7879. To start an arbitration,
submit the form available at (aka.ms/arbitration) to the AAA; mail a copy to the manufacturer or installer (or to
Microsoft if your dispute is with Microsoft). In a dispute involving $25,000 USD or less, any hearing will be
telephonic unless the arbitrator finds good cause to hold an in-person hearing instead. Any in-person hearing
will take place in your county of residence (of if a business your principal place of business) or our principal
place of business—King County, Washington if your dispute is with Microsoft. You choose. The arbitrator may
25
Page 26

English
award the same damages to you individually as a court could. The arbitrator may award declaratory or
injunctive relief only to you individually to satisfy your individual claim.
e. Arbitration fees and payments.
(i) Disputes involving $75,000 USD or less. The manufacturer or installer (or Microsoft if your dispute is
with Microsoft) will promptly reimburse your filing fees and pay the AAA’s and arbitrator’s fees and
expenses. If you reject our last written settlement offer made before the arbitrator was appointed, your
dispute goes all the way to an arbitrator’s decision (called an “award”), and the arbitrator awards you
more than this last written offer, the manufacturer or installer (or Microsoft if your dispute is with
Microsoft) will: (1) pay the greater of the award or $1,000 USD; (2) pay your reasonable attorney’s fees, if
any; and (3) reimburse any expenses (including expert witness fees and costs) that your attorney
reasonably accrues for investigating, preparing, and pursuing your claim in arbitration. The arbitrator
will determine the amounts unless you and we agree on them.
(ii) Disputes involving more than $75,000 USD. The AAA rules will govern payment of filing fees and the
AAA’s and arbitrator’s fees and expenses.
(iii) Disputes involving any amount. If you start an arbitration we won’t seek our AAA or arbitrator’s fees
and expenses, or your filing fees we reimbursed, unless the arbitrator finds the arbitration frivolous or
brought for an improper purpose. If we start an arbitration we will pay all filing, AAA, and arbitrator’s
fees and expenses. We won’t seek our attorney’s fees or expenses from you in any arbitration. Fees and
expenses are not counted in determining how much a dispute involves.
f. Must file within one year. You and we must file in small claims court or arbitration any claim or dispute
(except intellectual property disputes — see Section 9.a.) within one year from when it first could be filed.
Otherwise, it’s permanently barred.
g. Severability. If the class action waiver is found to be illegal or unenforceable as to all or some parts of a
dispute, those parts won’t be arbitrated but will proceed in court, with the rest proceeding in arbitration. If
any other provision of Section 9 is found to be illegal or unenforceable, that provision will be severed but the
rest of Section 9 still applies.
h. Conflict with AAA rules. This agreement governs if it conflicts with the AAA’s Commercial Arbitration Rules
or Consumer Arbitration Rules.
i. Microsoft as party or third-party beneficiary. If Microsoft is the device manufacturer or if you acquired the
software from a retailer, Microsoft is a party to this agreement. Otherwise, Microsoft is not a party but is a
third-party beneficiary of your agreement with the manufacturer or installer to resolve disputes through
informal negotiation and arbitration.
10. Governing Law. The laws of the state or country where you live (or if a business where your principal place of
business is located) govern all claims and disputes concerning the software, its price, or this agreement, including
breach of contract claims and claims under state consumer protection laws, unfair competition laws, implied
warranty laws, for unjust enrichment, and in tort, regardless of conflict of law principles. In the United States, the
FAA governs all provisions relating to arbitration.
11. Consumer Rights, Regional Variations. This agreement describes certain legal rights. You may have other
rights, including consumer rights, under the laws of your state or country. You may also have rights with respect
to the party from which you acquired the software. This agreement does not change those other rights if the laws
of your state or country do not permit it to do so. For example, if you acquired the software in one of the below
regions, or mandatory country law applies, then the following provisions apply to you:
a. Australia. References to “Limited Warranty” are references to the express warranty provided by Microsoft or
the manufacturer or installer. This warranty is given in addition to other rights and remedies you may have
under law, including your rights and remedies in accordance with the statutory guarantees under the
Australian Consumer Law.
In this section, “goods” refers to the software for which Microsoft or the manufacturer or installer provides the
express warranty. Our goods come with guarantees that cannot be excluded under the Australian Consumer
Law. You are entitled to a replacement or refund for a major failure and compensation for any other
reasonably foreseeable loss or damage. You are also entitled to have the goods repaired or replaced if the
goods fail to be of acceptable quality and the failure does not amount to a major failure.
b. Canada. You may stop receiving updates on your device by turning off Internet access. If and when you re-
connect to the Internet, the software will resume checking for and installing updates.
c.
European Union. The academic use restriction in Section 12.d(i) below does not apply in the jurisdictions
listed on this site: (aka.ms/academicuse).
d. Germany and Austria.
(i) Warrant y. The properly licensed software will perform substantially as described in any Microsoft
materials that accompany the software. However, the manufacturer or installer, and Microsoft, give no
contractual guarantee in relation to the licensed software.
(ii) Limitation of Liability. In case of intentional conduct, gross negligence, claims based on the Product
Liability Act, as well as, in case of death or personal or physical injury, the manufacturer or installer, or
Microsoft is liable according to the statutory law.
Subject to the preceding sentence, the manufacturer or installer, or Microsoft will only be liable for slight
negligence if the manufacturer or installer or Microsoft is in breach of such material contractual obligations,
26
Page 27

English
the fulfillment of which facilitate the due performance of this agreement, the breach of which would
endanger the purpose of this agreement and the compliance with which a party may constantly trust in (socalled "cardinal obligations"). In other cases of slight negligence, the manufacturer or installer or Microsoft
will not be liable for slight negligence.
e. Other regions. See (aka.ms/variations) for a current list of regional variations
12. Additional Notices.
a. Networks, data and Internet usage. Some features of the software and services accessed through the
software may require your device to access the Internet. Your access and usage (including charges) may be
subject to the terms of your cellular or internet provider agreement. Certain features of the software may help
you access the Internet more efficiently, but the software’s usage calculations may be different from your
service provider’s measurements. You are always responsible for (i) understanding and complying with the
terms of your own plans and agreements, and (ii) any issues arising from using or accessing networks,
including public/open networks. You may use the software to connect to networks, and to share access
information about those networks, only if you have permission to do so.
b. H.264/AVC and MPEG-4 visual standards and VC-1 video standards. The software may include H.264/
MPEG-4 AVC and/or VC-1 decoding technology. MPEG LA, L.L.C. requires this notice:
THIS PRODUCT IS LICENSED UNDER THE AVC, THE VC-1, AND THE MPEG-4 PART 2 VISUAL PATENT PORTFOLIO
LICENSES FOR THE PERSONAL AND NON-COMMERCIAL USE OF A CONSUMER TO (i) ENCODE VIDEO IN
COMPLIANCE WITH THE ABOVE STANDARDS (“VIDEO STANDARDS”) AND/OR (ii) DECODE AVC, VC-1, AND
MPEG-4 PART 2 VIDEO THAT WAS ENCODED BY A CONSUMER ENGAGED IN A PERSONAL AND NONCOMMERCIAL ACTIVITY AND/OR WAS OBTAINED FROM A VIDEO PROVIDER LICENSED TO PROVIDE SUCH
VIDEO. NO LICENSE IS GRANTED OR SHALL BE IMPLIED FOR ANY OTHER USE. ADDITIONAL INFORMATION
MAY BE OBTAINED FROM MPEG LA, L.L.C. SEE WWW.MPEGLA.COM
c. Malware protection. Microsoft cares about protecting your device from malware. The software will turn on
malware protection if other protection is not installed or has expired. To do so, other antimalware software
will be disabled or may have to be removed.
d. Limited rights versions. If the software version you acquired is marked or otherwise intended for a specific or
limited use, then you may only use it as specified. You may use other programs with the software as long as
the other programs directly support the manufacturer’s specific use for the device, or provide system utilities,
resource management, or anti-virus or similar protection.
(i) Academic. For academic use, you must be a student, faculty or staff of an educational institution at the
time of purchase.
(ii) Evaluation. For evaluation (or test or demonstration) use, you may not sell the software, use it in a live
operating environment, or use it after the evaluation period. Notwithstanding anything to the contrary
in this Agreement, evaluation software is provided “AS IS”.
(iii) NFR. You may not sell software marked as “NFR” or “Not for Resale”.
13. Entire Agreement. This agreement (together with the printed paper license terms or other terms accompanying
any software supplements, updates, and services that are provided by the manufacturer or installer, or Microsoft,
and that you use), and the terms contained in web links listed in this agreement, are the entire agreement for the
software and any such supplements, updates, and services (unless the manufacturer or installer, or Microsoft,
provides other terms with such supplements, updates, or services). You can review this agreement after your
software is running by going to (aka.ms/useterms) or going to Settings - System - About within the software. You
can also review the terms at any of the links in this agreement by typing the URLs into a browser address bar, and
you agree to do so. You agree that you will read the terms before using the software or services, including any
linked terms. You understand that by using the software and services, you ratify this agreement and the linked
terms. There are also informational lin
• Windows 10 Privacy Statement (aka.ms/privacy)
• Microsoft Services Agreement (aka.ms/msa)
• Adobe Flash Player License Terms (aka.ms/adobeflash)
ks in this agreement. The links containing notices and binding terms are:
27
Page 28

English
NO WARRANTY
THE SOFTWARE ON YOUR DEVICE (INCLUDING THE APPS) IS LICENSED "AS IS." TO THE MAXIMUM EXTENT PERMITTED
BY YOUR LOCAL LAWS, YOU BEAR THE ENTIRE RISK AS TO THE SOFTWARE'S QUALITY AND PERFORMANCE. SHOULD IT
PROVE DEFECTIVE, YOU ASSUME THE ENTIRE COST OF ALL SERVICING OR REPAIR. NEITHER THE DEVICE
MANUFACTURER NOR MICROSOFT GIVES ANY EXPRESS WARRANTIES, GUARANTEES, OR CONDITIONS FOR THE
SOFTWARE. TO THE EXTENT PERMITTED UNDER YOUR LOCAL LAWS, THE MANUFACTURER AND MICROSOFT EXCLUDE
ALL IMPLIED WARRANTIES AND CONDITIONS, INCLUDING THOSE OF MERCHANTABILITY, QUALITY, FITNESS FOR A
PARTICULAR PURPOSE, AND NON-INFRINGEMENT. YOU MAY HAVE ADDITIONAL CONSUMER RIGHTS OR STATUTORY
GUARANTEES UNDER LOCAL LAWS THAT THESE TERMS CANNOT CHANGE.
IF YOUR LOCAL LAWS IMPOSE A WARRANTY, GUARANTEE, OR CONDITION EVEN THOUGH THIS AGREEMENT DOES
NOT, ITS TERM IS LIMITED TO 90 DAYS FROM WHEN THE FIRST USER ACQUIRES THE SOFTWARE. IF THE
MANUFACTURER OR MICROSOFT BREACHES SUCH A WARRANTY, GUARANTEE, OR CONDITION, YOUR SOLE REMEDY,
AT THE MANUFACTURER'S OR MICROSOFT'S ELECTION, IS (I) REPAIR OR REPLACEMENT OF THE SOFTWARE AT NO
CHARGE, OR (II) RETURN OF THE SOFTWARE (OR AT ITS ELECTION THE DEVICE ON WHICH THE SOFTWARE WAS
INSTALLED) FOR A REFUND OF THE AMOUNT PAID, IF ANY. THESE ARE YOUR ONLY REMEDIES FOR BREACH OF A
WARRANTY, GUARANTEE, OR CONDITION YOUR LOCAL LAWS IMPOSE.
TO THE EXTENT NOT PROHIBITED BY YOUR LOCAL LAWS, IF YOU HAVE ANY BASIS FOR RECOVERING DAMAGES, YOU
CAN RECOVER FROM THE MANUFACTURER OR MICROSOFT ONLY DIRECT DAMAGES UP TO THE AMOUNT YOU PAID
FOR THE SOFTWARE (OR UP TO $50 USD IF YOU ACQUIRED THE SOFTWARE FOR NO CHARGE). YOU WILL NOT, AND
WAIVE ANY RIGHT TO, SEEK TO RECOVER ANY OTHER DAMAGES OR REMEDY, INCLUDING LOST PROFITS AND DIRECT,
CONSEQUENTIAL, SPECIAL, INDIRECT, OR INCIDENTAL DAMAGES, UNDER ANY PART OF THIS AGREEMENT OR UNDER
ANY THEORY. THIS LIMITATION APPLIES TO (I) ANYTHING RELATED TO THIS AGREEMENT, THE SOFTWARE (INCLUDING
THE APPS), THE DEVICE, SERVICES, CORRUPTION OR LOSS OF DATA, FAILURE TO TRANSMIT OR RECEIVE DATA,
CONTENT (INCLUDING CODE) ON THIRD PARTY INTERNET SITES OR THIRD PARTY PROGRAMS, AND (II) CLAIMS FOR
BREACH OF CONTRACT, WARRANTY, GUARANTEE, OR CONDITION; STRICT LIABILITY, NEGLIGENCE, OR OTHER TORT;
VIOLATION OF A STATUTE OR REGULATION; UNJUST ENRICHMENT; OR UNDER ANY OTHER THEORY.
THE DAMAGE EXCLUSIONS AND REMEDY LIMITATIONS IN THIS AGREEMENT APPLY EVEN IF YOU HAVE NO REMEDY
(THE SOFTWARE IS LICENSED "AS IS"), IF REPAIR, REPLACEMENT, OR A REFUND (IF REQUIRED BY YOUR LOCAL LAW)
DOES NOT FULLY COMPENSATE YOU FOR ANY LOSSES, IF THE MANUFACTURER OR MICROSOFT KNEW OR SHOULD
HAVE KNOWN ABOUT THE POSSIBILITY OF THE DAMAGES, OR IF THE REMEDY FAILS OF ITS ESSENTIAL PURPOSE.
Check with your device manufacturer to determine if your device is covered by a warranty.
28
 Loading...