

Page 1

iOS Bluetooth® TM Printer
Technical Reference Guide
Describes the buttons and LEDs of interface board.
Describes how to connect iOS devices.
Describes the development and distribution of iOS application.
Describes the precautions on using this printer and iOS devices.
Describes the specications on transmission.
Part Names and Functions
Connecting to iOS Devices
Application Development Information
Notes on Usage
Transmission Specifications
M00078202
Rev. C
Page 2

Cautions
No part of this document may be reproduced, stored in a retrieval system, or transmitted in any form or by
any means, electronic, mechanical, photocopying, recording, or otherwise, without the prior written permission of Seiko Epson Corporation.
The contents of this document are subject to change without notice. Please contact us for the latest informa-
tion.
While every precaution has been taken in the preparation of this document, Seiko Epson Corporation
assumes no responsibility for errors or omissions.
Neither is any liability assumed for damages resulting from the use of the information contained herein.
Neither Seiko Epson Corporation nor its affiliates shall be liable to the purchaser of this product or third par-
ties for damages, losses, costs, or expenses incurred by the purchaser or third parties as a result of: accident,
misuse, or abuse of this product or unauthorized modifications, repairs, or alterations to this product, or
(excluding the U.S.) failure to strictly comply with Seiko Epson Corporation's operating and maintenance
instructions.
Seiko Epson Corporation shall not be liable against any damages or problems arising from the use of any
options or any consumable products other than those designated as Original Epson Products or Epson
Approved Products by Seiko Epson Corporation.
Trademarks
EPSON is a registered trademark of Seiko Epson Corporation.
Exceed Your Vision and ESC/POS are registered trademarks or trademarks of Seiko Epson Corporation.
The Bluetooth® word mark and logos are registered trademarks owned by Bluetooth SIG, Inc. and any use of
such marks by Seiko Epson Corporation is under license.
AirPlay, iPad, iPhone, iPod, iPod classic, iPod nano, iPod touch, and Retina are trademarks of Apple Inc., registered in the U.S. and other countries. iPad Air, iPad mini, and Lightning are trademarks of Apple Inc.
IOS is a trademark or registered trademark of Cisco in the U.S. and other countries and is used under license.
All other trademarks are the property of their respective owners and used for identification purpose only.
© Seiko Epson Corporation 2014-2016. All rights reserved.
2
Page 3

Restriction of Use
When this product is used for applications requiring high reliability/safety, such as transportation devices
related to aviation, rail, marine, automotive; disaster prevention devices; various safety devices; or functional/
precision devices, etc., you should use this product only after giving consideration to including fail-safes and
redundancies into your design to maintain safety and total system reliability. Because this product was not
intended for use in applications requiring extremely high reliability/safety, such as aerospace equipment, main
communication equipment, nuclear power control equipment, or medical equipment related to direct medical
care, etc., please make your own judgement on this product's suitability after a full evaluation.
Note about interference
The Radio Frequency module that can be installed in this product generates, uses, and can radiate radio fre-
quency energy and, if not installed and used in accordance with the instruction manual, may cause harmful
interference to radio communications.
If this equipment does cause harmful interference to radio or television reception, which can be determined
by turning the equipment off and on, the user is encouraged to try to correct the interference by one or more
of the following measures:
Reorient or relocate the receiving antenna.
Increase the separation between the equipment and receiver.
Connect the equipment into an outlet on a circuit different from that to which the receiver is connected.
Consult your dealer or an experienced radio/TV technician for help.
Never disassemble or modify this product or the installed Radio Frequency module.
Seiko Epson Corporation shall not be liable for interference to radio/TV resulting from changes or modifica-
tions to this product or the installed Radio Frequency module not expressly approved by Seiko Epson Corporation.
3
Page 4

About this Manual
Aim of the Manual
This manual aims to provide information for developers about Bluetooth® interface functions, and operations
for iOS devices.
As this focuses on specific iOS functionality, be sure to use it in conjunction with the manual for the TM
printer.
When this manual contains the same contents as the manual for the TM printer, priority is given to the
descriptions in this manual.
This manual applies to the following TM printers with a built-in Bluetooth interface that support iOS.
Target device:
TM-T88V iOS Bluetooth model
TM-T70II iOS Bluetooth model
TM-T20II-m iOS Bluetooth model
Manual Contents
The manual is made up of the following sections.
Chapter 1 Part Names and Functions
Chapter 2 Connecting to iOS Devices
Chapter 3 Application Development Information
Chapter 4 Notes on Usage
Chapter 5 Transmission Specifications
4
Page 5

Contents
■ Restriction of Use ....................................................................................................................3
■ Note about interference ........................................................................................................3
■ About this Manual ..................................................................................................................4
Aim of the Manual ............................................................................................................................................................. 4
Manual Contents ................................................................................................................................................................4
■ Contents....................................................................................................................................5
Part Names and Functions .............................................................................7
Connecting to iOS Devices..............................................................................9
■ Connecting from iOS Devices ...............................................................................................9
Bluetooth connection from iOS "Settings" menu .................................................................................................. 9
Bluetooth connection from Epson TM Utility for iOS..........................................................................................10
■ Auto Reconnect .................................................................................................................... 12
What is the Auto Reconnect Feature?.......................................................................................................................12
■ Wireless Module Setup Mode ............................................................................................ 13
Setting the Auto Reconnect Feature.........................................................................................................................13
iAP2 Protocol Settings....................................................................................................................................................14
Bluetooth Security Settings..........................................................................................................................................15
■ Dynamic Status Sheet Print Mode .................................................................................... 17
■ Initial Bluetooth Settings.................................................................................................... 18
Application Development Information.......................................................19
■ About Epson ePOS SDK....................................................................................................... 19
■ Application Development and Distribution ................................................................... 19
Notes on Usage ..............................................................................................21
■ Printer Settings..................................................................................................................... 21
■ Disconnection Timing ......................................................................................................... 21
■ Notes on Using the Printer with an iOS Device .............................................................. 21
Print data deletion and Bluetooth disconnections occur..................................................................................21
The iOS application receives the same data from the printer multiple times............................................22
The iOS application cannot receive the data sent from the printer ..............................................................23
5
Page 6

Transmission Specifications......................................................................... 25
■ General Specification .......................................................................................................... 25
6
Page 7
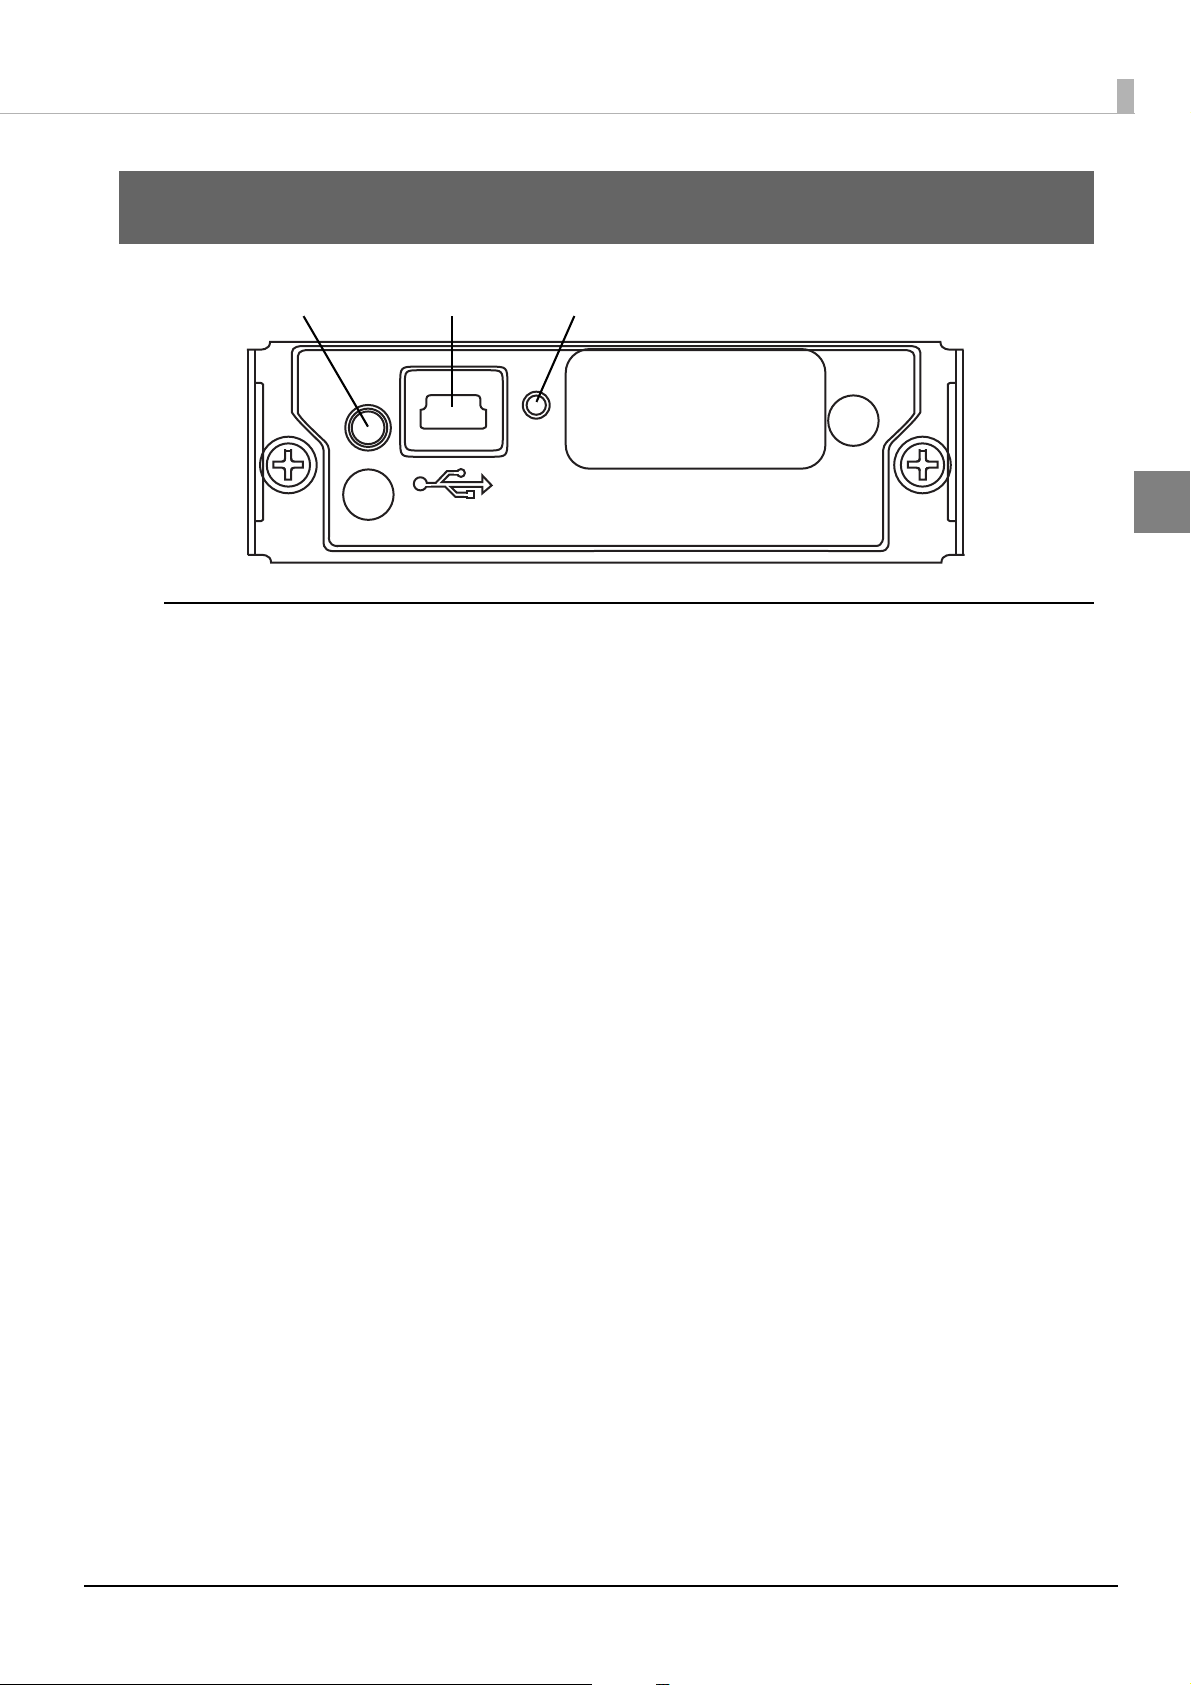
Part Names and Functions
Push button USB port for setup LED for operation check
Push button
The push button provides the following functions.
Chapter 1 Part Names and Functions
1
Print status sheet
Initialize settings
Setup auto reconnect (refer to
Print status sheet
Turn on the printer and wait for about seven seconds.
1
Hold down the push button for at least three seconds.
2
The setting content and software version information for the interface board is printed.
You can use this status sheet to check all of the information (BD_ADDR, PassKey, DeviceName) necessary to
setup a Bluetooth connection.
Initialize settings
Turn off the printer.
1
Turn on the printer while holding down the push button.
2
Hold down the button until the printer starts printing the wireless communication setup sheet.
"Setting the Auto Reconnect Feature" on page 13)
Press the push button once.
3
Press the push button again.
4
Hold down the button until the printer starts printing.
The printer resets and initializing the wireless communication settings is complete.
7
Page 8
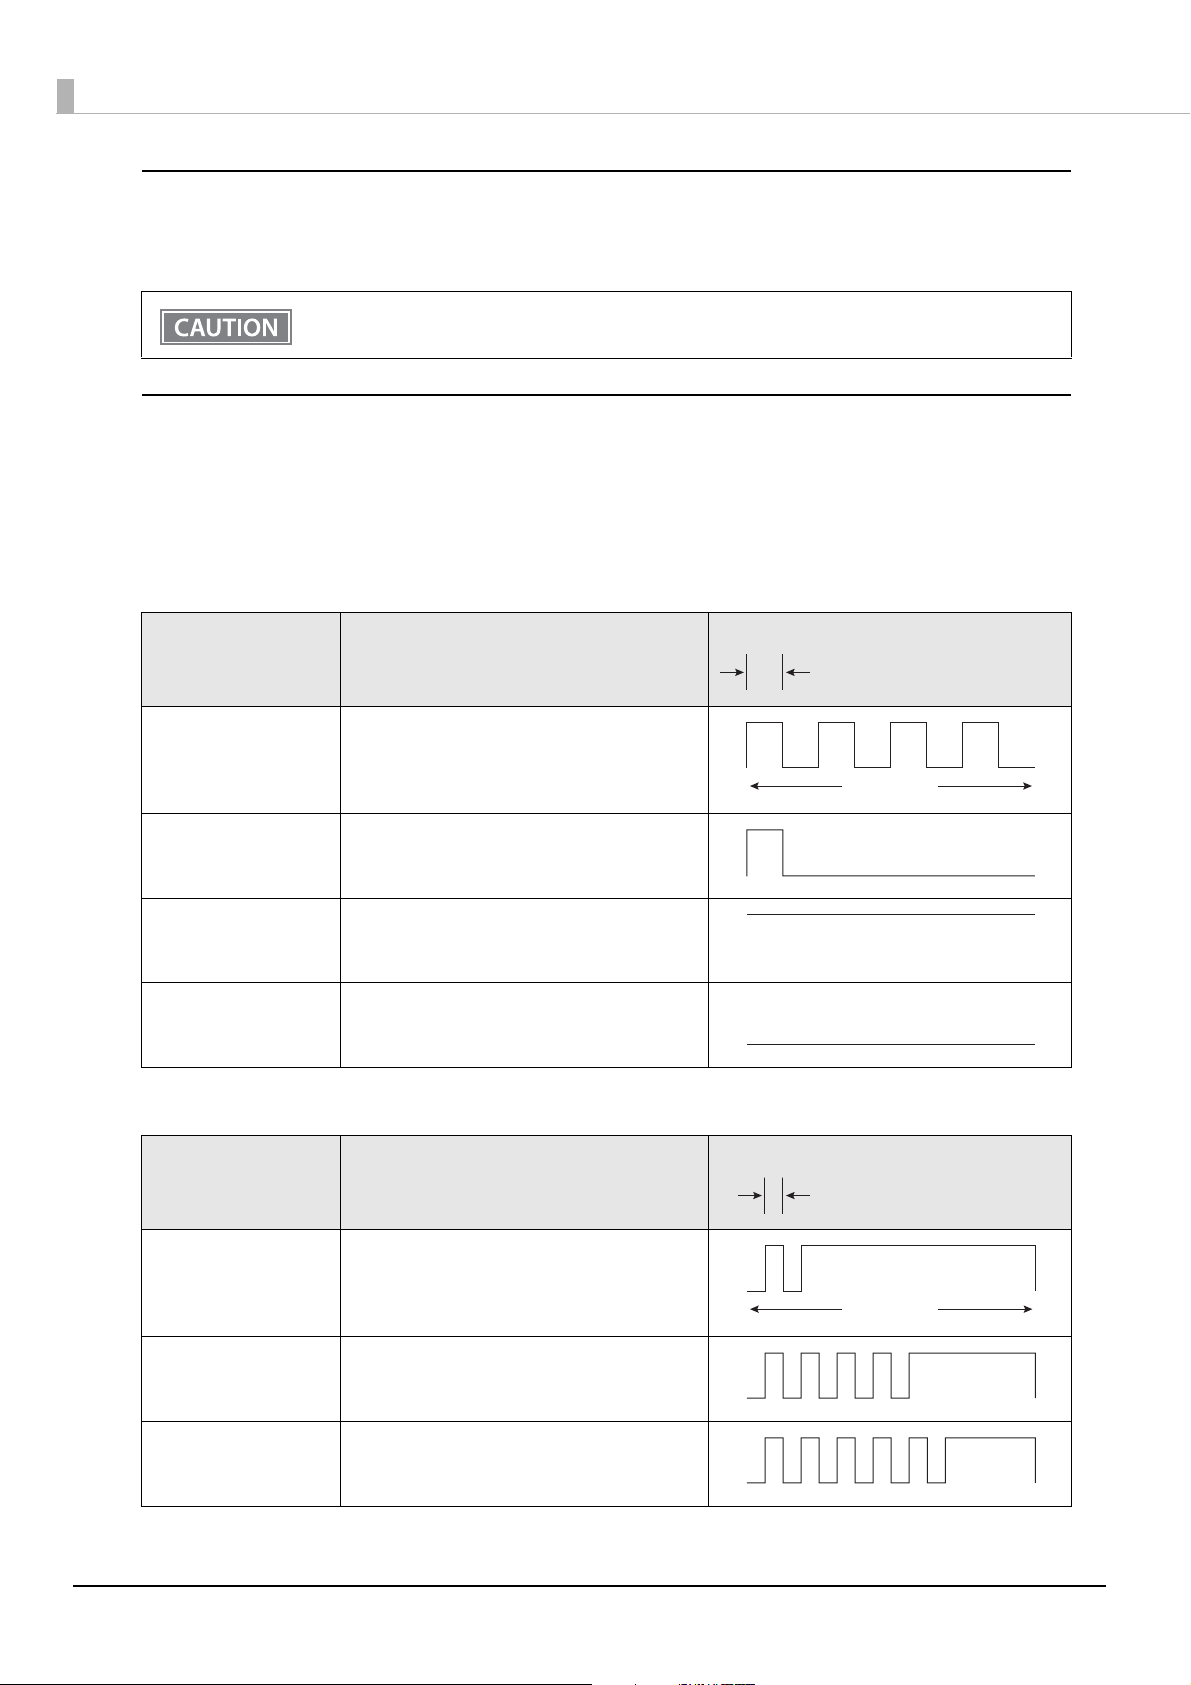
USB port for setup
Approx. 640 ms
Approx. 5.12 s
On
Off
Approx. 320 ms
Approx. 5.12 s
The USB port for setup can only be used in the following situations.
Updating the internal firmware for the interface board
Do not connect a USB cable during normal usage.
This cannot be used for printing.
LED for operation check
You can check the following status using the LED.
Wireless communication status
Error status
Wireless communication status
Status Details
Reconnecting Connecting to the iOS device to which it was
last connected.
Flashing pattern
Waiting to connect Waiting for connection from a device
Connected Connected to a device
Disconnecting Not connected to a device
Error status (cannot clear)
Status Details
Memory error After performing an R/W, the printer does not
work correctly.
CPU error The CPU is executing an incorrect address.
Flashing pattern
Interface board error Ca nnot communicate with the interface
board.
8
Page 9

Connecting to iOS Devices
Connecting from iOS Devices
Bluetooth connection from iOS "Settings" menu
Follow the steps below to establish a Bluetooth connection from "Settings" menu.
On the "Settings" screen, tap [Bluetooth].
1
Chapter 2 Connecting to iOS Devices
2
Turn on the printer, and then on the iOS device, set Bluetooth to [On].
2
The printer is displayed in the list of devices.
If the printer is connected to other computers, smart devices, and so on, it may not be displayed in
the list of devices. When the LED for operation check is on, disconnect the printer from the operating system of the device that is currently connected, and then try again.
9
Page 10

Tap the printer you want to use from the list of devices.
3
Check that the printer is connected to the iOS device.
4
10
Bluetooth connection from Epson TM Utility for iOS
Epson TM Utility for iOS is an application to connect smart devices, and you can download from
App Store.
Run the Epson TM Utility for iOS.
1
Page 11

Chapter 2 Connecting to iOS Devices
Select "Bluetooth® Setup Wizard" from the menu, and see the instructions on the
2
screen to make settings.
2
Setup and Operation Work flow
Select the printer you want to connect to.
Enter the passkey.
Perform a test print.
11
Page 12

Auto Reconnect
What is the Auto Reconnect Feature?
The auto reconnect feature allows the printer to automatically restore a connection in the following situations if
the Bluetooth connection to the iOS device is lost.
When the printer is turned on
When the signal is dropped and then restored
The following shows the printer operations and connection methods when the auto reconnect feature is enabled
or disabled.
Auto Reconnect
Feature
Printer operations
when Bluetooth is disconnected
Reconnecting to iOS
Devices
Switch to connection
from other device
Enabled Disabled
Perform the following reconnection
sequence.
[Reconnection sequence]
1. The printer tries to connect to the iOS
device to which it was last connected.
2. When step 1 fails, the printer waits for connections from other devices.
3. If connection is not established in step 2,
the printer tries again to connect to the iOS
device to which it last connected.
Steps 1 and 2 are repeated until a connection is established.
Reconnect automatically. Make settings on the Bluetooth settings screen
Method 1:
After disabling the Bluetooth feature of the connected iOS device, make connection settings
on the Bluetooth device that you want to connect.
(When the auto reconnect feature is enabled, it may take some time to connect.)
Wait for a connection from the Bluetooth
device.
on the iOS device.
Method 2:
(Only when the firmware version for interface board is 1.05 or later)
After disconnecting from the connected iOS device using applications with the TM Utility or
ePOS-Print SDK disconnection feature, make settings on the Bluetooth device you want to
connect.
In the following situations, even if the feature is enabled, the same operations are performed as when it is disabled.
- When pairing is canceled from the connected iOS device.
- When the last Bluetooth device connected was not an iOS device.
- When wireless communication settings are initialized from the printer.
Disable this feature when using the printer from devices that are not running iOS. Otherwise, it may take some time to connect.
See
"Setting the Auto Reconnect Feature" on page 13 for settings for the auto reconnect feature.
12
Page 13

Wireless Module Setup Mode
You can change settings or reset the wireless communication settings.
Setting the Auto Reconnect Feature
Load the roll paper.
1
Close the roll paper cover.
2
Turn on the printer while holding down the interface board push button. (Do not
3
release the push button until printing starts.)
The printer starts printing Wireless Module Setup instructions.
Chapter 2 Connecting to iOS Devices
Briefly press the push button twice.
4
Press the push button again. (Do not release the push button until printing starts.)
5
The printer starts printing Bluetooth Setting instructions.
Briefly press the push button once.
6
Press the push button again. (Do not release the push button until printing starts.)
7
The printer starts printing Auto Re-Connect iOS instructions.
<To enable> Press the push button once.
8
<To disable> Press the push button twice.
When the software version for the interface board is 1.01 or later:
Press the push button again. (Do not release the push button until printing starts.)
9
The selected setting value (Enable/Disable) is printed.
The printer starts printing Wireless Module Setup instructions.
10
Changing the settings is complete. You can turn off the printer.
2
When the software version for the interface board is 1.00 or earlier:
Press the push button again. (Do not release the push button until the following mes-
9
sage is printed.)
"Please release the Push button."
The printer restarts.
10
13
Page 14

iAP2 Protocol Settings
When the firmware version for interface board is 1.05 or later, you can change the accessory protocol (iAP2)
settings used to connect with the device.
Follow the steps below.
Load the roll paper.
1
Close the roll paper cover.
2
Turn on the printer while holding down the interface board push button. (Do not
3
release the push button until printing starts.)
The printer starts printing Wireless Module Setup instructions.
Briefly press the push button twice.
4
Press the push button again. (Do not release the push button until printing starts.)
5
The printer starts printing Bluetooth Setting instructions.
Briefly press the push button twice.
6
The printer starts printing (iAP2) instructions.
Setting Explanation
Enable (default) iAP2 is used to connect to the device. This setting should normally be used.
Disable iAP1 is used to connect to the device. Use when there is a problem connecting
to the device using iAP2.
14
Page 15

Chapter 2 Connecting to iOS Devices
Approx. 640 ms
5,120 ms
Bluetooth Security Settings
When the firmware version for interface board is 1.05 or later, you can change the Bluetooth security settings.
When the security settings are changed, the link key (pairing information) is removed.
You can also change the settings with TM Utility for iOS/Android.
Follow the steps below.
Load the roll paper.
1
Close the roll paper cover.
2
Turn on the printer while holding down the interface board push button. (Do not
3
release the push button until printing starts.)
The printer starts printing Wireless Module Setup instructions.
2
Briefly press the push button twice.
4
Press the push button again. (Do not release the push button until printing starts.)
5
The printer starts printing Bluetooth Setting instructions.
Briefly press the push button three times.
6
The printer starts printing Security instructions.
Security Pairing Mode Pairing Method
Low Pairing is always possible Just Works
Middle Pairing is possible for one minute after
printing the status sheet
High Pairing is possible for one minute after
printing the status sheet
* When Middle or High is selected, the power LED flashes in the following pattern while pairing is
possible.
Just Works
Numeric Comparison/Passkey Entry
15
Page 16

Pairing method when the security is set to Middle/High (from the printer)
When the security is set to Middle or High and the printer is ready to be paired, perform the following procedure.
Turn on the printer and wait for about seven seconds.
1
Hold down the push button for at least three seconds.
2
A status sheet is printed, and the LED on the interface board flashes a pattern indicat-
3
ing that pairing is now possible.
Pairing is possible for one minute after printing the status sheet.
Pairing method when the security is set to High (from the host)
When the security is set to High and the printer is ready to be paired, perform the following procedure.
Search for the printer on the Bluetooth settings screen on the host device.
1
Select the printer you want to pair with.
2
The printer prints the Passkey.
Check that the printed Passkey and the Passkey displayed on the host device match,
3
and then select "Pairing" on the host device.
16
Page 17

Chapter 2 Connecting to iOS Devices
Dynamic Status Sheet Print Mode
In the dynamic status sheet print mode, the printer prints the dynamic status sheet indicating the Bluetooth settings.
Dynamic Status Sheet printing is available when the firmware version for interface board is 1.05 or
later.
Make sure the printer is turned on.
1
Open the roll paper cover.
2
Install the roll paper.
3
With the roll paper cover open, keep pressing the Feed button until the buzzer
4
sounds.
2
Close the roll paper cover.
5
The printer starts printing the status sheet.
Firmware Version xx.xx ESC/POS
Bluetooth Interface
BD_ADDR : xx:xx:xx:xx:xx:xx
Passkey : 0000
Device Name : TM-Txx xxxxxx
Soft Ver : 1.05
Module Ver : 1.03
Mode : Auto re-connect disable
Security : LOW
After printing, the printer returns to the normal mode.
BT:00037A0CB082
DN:TM-TXX
17
Page 18

Initial Bluetooth Settings
Setting Contents Setting Items Initial Settings
Bluetooth communication
settings
Bluetooth passkey "0000"
Bluetooth device name "TM-yyyy_xxxxxx"
(Where yyyy is the model name, and xxxxxx is the last
six digits in the serial number)
Bundle Seed ID "TXAEAV5RN4"
Enable/Disable auto reconnect to
iOS device
Depends on the models.
The settings can be confirmed by status sheet printing.
18
Page 19

Chapter 3 Application Development Information
Application Development Information
About Epson ePOS SDK
The Epson ePOS SDK is a newer version of ePOS-Print SDK. The Epson ePOS SDK for iOS is provided for
application development. Please contact us for the necessary kit.
Application Development and Distribution
If registering an application that uses Bluetooth in the App Store, Epson must submit an application to Apple in
advance. Please apply for each application you want to register in the App Store from the URL below.
https://c4b.epson-biz.com/ais/E/
3
19
Page 20

20
Page 21

Chapter 4 Notes on Usage
Notes on Usage
Printer Settings
Make sure this is set to "Apply" in models that allow you to select a #25 pin reset signal.
The initial factory setting for the handshake operation (BUSY condition) is ON.
Disconnection Timing
Even when data communication has been completed from the host computer’s application, data may remain in
the Bluetooth module's buffer. Since data in the buffer may be lost when a connection is disconnected, use a status check and so on to confirm that transmitted data has definitely been printed before disconnecting.
Notes on Using the Printer with an iOS Device
Print data deletion and Bluetooth disconnections occur
Situation
Depending on the specifications of the iOS device, print data sent to the printer may be deleted. When this
occurs, the Bluetooth connection between the printer and the iOS device is disconnected.
Conditions
This occurs when the printer is not ready to print, and 64 KB or more of print data is sent to the printer.
<Status in which the printer cannot print>
When the roll paper cover is open
When the paper is out
Solution
Do not send data to the printer if the printer is not ready to print.
For developers using the SDK from Epson, refer to the User's Manual - Chapter 3 Programming Guide - "Printing After Checking the Printer Status".
Since Bluetooth is disconnected when this occurs, if the auto reconnect feature is not enabled, you need to
reconnect from the Bluetooth settings screen on the iOS device.
When using the SDK from Epson, this connection process is not necessary.
4
21
Page 22

The iOS application receives the same data from the printer multiple times
Situation
Although the printer sends data (such as the status) to the iOS device only once, the application on the iOS
device may receive the data multiple times.
Conditions
If no data is sent between the printer and the iOS device for at least 30 seconds during Bluetooth connection, the
iOS device switches to power-saving mode. This problem occurs if the printer sends data to the iOS device
while it is in power-saving mode.
The following are examples of when this occurs.
When the printer performs status communication with a command (DLE EOT, GS I, and so on)
When the printer sends an ASB
In the following situations, this does not occur.
When the iOS device sends data to the printer
When data is sent to the iOS device before it switches to power-saving mode (less than approx. 30 seconds)
after the printer has received data from the iOS device
When using the SDK from Epson (however, this may occur when receiving data from a printer using a com-
mand transmission/reception API)
Solution
If no data is sent between the printer and the iOS device for at least 30 seconds, use the following steps to send
data.
1) Before sending data, send 100 bytes of dummy data to the printer. As long as it is not related to printing or
commands, anything can be used as the dummy data, however we recommend using 00h.
2) Set a waiting time of 100 milliseconds.
3) Send the data.
22
Page 23

Chapter 4 Notes on Usage
Firmware Version xx.xx ESC/POS
Bluetooth Interface
BD_ADDR : xx:xx:xx:xx:xx:xx
Passkey : 0000
Device Name : TM-Txx xxxxxx
Soft Ver : 1.01
Module Ver : 1.03
Mode : Auto re-connect disable
Buer Capacity
4K bytes
The iOS application cannot receive the data sent from the printer
Situation
Although the printer sends data to the iOS device and the data is received by the iOS device, depending on the
combination of the iOS version and the iOS device, the iOS application may not be able to receive the data.
Conditions
This may occur in combinations of the following conditions.
iOS version: 7.1, 7.1.1
iOS Devices: iPhone 5s, iPhone 5c, iPhone 5, iPad Air, iPad mini 2, iPad (4th generation), iPad mini, iPod
touch (5th generation), iPhone 4s, iPhone 4, iPad (3rd generation), iPad 2
Interface board software version: 1.00 or earlier
Application processing: If the Bluetooth port is closed and then reopened while the application is running.
Solution
The solution differs depending on the iOS device being used. See the following table.
iOS Device Solution
iPhone 5s
iPhone 5c
iPhone 5
iPad Air
iPad mini 2
iPad (4th generation)
iPad mini
iPod touch (5th generation)
This situation can be avoided by using one of the following methods.
Use a product with an interface board using software version 1.01
or later.
Use the ePOS-Print SDK for iOS which is included in the ePOS-Print
SDK Release 14.06.30E or later package.
You can use a self test or print a status sheet to check the software
version for the interface board.
Example of self test print out
4
23
Page 24

iOS Device Solution
iPhone 4s
iPhone 4
iPad (3rd generation)
iPad 2
This situation can be avoided by using the ePOS-Print SDK for iOS
which is included in the ePOS-Print SDK Release 14.06.30E or later
package.
24
Page 25

Transmission Specifications
General Specification
Bluetooth 2.1 (EDR supported)
Built-in Serial Port Profile (SPP)
Built-in iAP protocol
Bluetooth Power Class 2 specifications
Built-in antenna
Chapter 5 Transmission Specifications
25
5
Page 26

26
 Loading...