

Page 1
User’s Manual
M00100501EN
Page 2

Specifications for the TM-S9000MJ
This product differs in function and equipment depending on the combinations of the following specifications.
❏ Document processing speed: 110 dpm/200 dpm [dpm: documents per minute]
❏ Number of document exit pockets: One-pocket/Two-pocket
❏ Whether or not the product is equipped with an MSR (Magnetic Stripe Reader)
❏ Whether or not the product is equipped with a USB (Type A) connector
Purpose of This Manual
This manual provides information describing basic operations to operators of the TM-S9000MJ to enable safe and correct
use of the product. Read this manual carefully before using this product and store it in an accessible location.
Restriction of Use
When this product is used for applications requiring high reliability/safety, such as transportation devices related to aviation, rail,
marine, automotive, etc.; disaster prevention devices; various safety devices, etc.; or functional/precision devices, etc.; you should
use this product only after giving consideration to including fail-safes and redundancies into your design to maintain safety and
total system reliability. Because this product was not intended for use in applications requiring extremely high reliability/safety,
such as aerospace equipment, main communication equipment, nuclear power control equipment, or medical equipment related
to direct medical care, etc., please make your own judgment on this product’s suitability after a full evaluation.
Caution
All rights reserved. No part of this publication may be reproduced, stored in a retrieval system, or transmitted in any form or by
any means, electronic, mechanical, photocopying, recording, or otherwise, without the prior written permission of Seiko Epson
Corporation. No patent liability is assumed with respect to the use of the information contained herein. While every precaution
has been taken in the preparation of this book, Seiko Epson Corporation assumes no responsibility for errors or omissions.
Neither is any liability assumed for damages resulting from the use of the information contained herein.
Neither Seiko Epson Corporation nor its affiliates shall be liable to the purchaser of this product or third parties for damages,
losses, costs, or expenses incurred by purchaser or third parties as a result of: accident, misuse, or abuse of this product or
unauthorized modifications, repairs, or alterations to this product, or (excluding the U.S.) failure to strictly comply with Seiko
Epson Corporation’s operating and maintenance instructions.
Seiko Epson Corporation shall not be liable against any damages or problems arising from the use of any options or any
consumable products other than those designated as Original Epson Products or Epson Approved Products by Seiko Epson
Corporation.
EPSON is a registered trademark of Seiko Epson Corporation. Exceed Your Vision is a registered trademark or trademark of Seiko
Epson Corporation. All other trademarks are the property of their respective owners and used for identification purpose only.
NOTICE: The contents of this manual are subject to change without notice.
©Seiko Epson Corporation 2011-2018. All rights reserved.
2
Page 3

Important Safety Information
Key to Symbols
The symbols in this manual are identified by their level of importance, as defined below. Read
the following carefully before handling the product.
WARNING:
Warnings must be followed carefully to avoid serious bodily injury.
CAUTION:
Cautions must be observed to avoid minor injury to yourself, damage to your equipment, or loss of
data.
Note:
Notes have important information and useful tips on the operation of your equipment.
Safety Precautions
WARNING:
Shut down your equipment immediately if it produces smoke, a strange odor, or unusual noise.
Continued use may lead to fire. Immediately unplug the equipment and contact your dealer or a
Seiko Epson service center for advice.
Never attempt to repair this product yourself. Improper repair work can be dangerous.
Never disassemble or modify this product. Tampering with this product may result in injury or fire.
Be sure to use the specified power source. Connection to an improper power source may cause fire.
Do not allow foreign matter to fall into the equipment. Penetration by foreign objects may lead to
fire.
If water or other liquid spills into this equipment, unplug the power cord immediately, and then
contact your dealer or a Seiko Epson service center for advice. Continued usage may lead to fire.
Do not use aerosol sprayers containing flammable gas inside or around this product. Doing so may
cause fire.
CAUTION:
Do not connect cables in ways other than those mentioned in this manual. Different connections may
cause equipment damage and burning.
Be sure to set this equipment on a firm, stable, horizontal surface. Product may break or cause injury if
it falls.
Do not use in locations subject to high humidity or dust levels. Excessive humidity and dust may cause
equipment damage or fire.
Do not place heavy objects on top of this product. Never stand or lean on this product. Equipment
may fall or collapse, causing breakage and possible injury.
Take care not to injure your fingers on the manual cutter
• When you remove printed paper
• When you perform other operations, such as loading/replacing roll paper
Before leaving the product unused for an extended period, make sure the ink cartridge is installed,
turn the product off using the power button, and unplug the product to ensure safety.
Do not connect a telephone line to the drawer kick-out connector; otherwise the product and the
telephone line may be damaged.
3
Page 4

Caution Label
The caution label on the product indicates the following precaution.
Do not touch the thermal head because it can be very hot after printing.
CAUTION:
Notes on Usage
❏ Do not open the covers during operation.
❏ Make sure that the product is not subjected to any impact or vibration.
❏ Do not put any food or drink on the product case.
❏ To prevent a paper jam, do not prevent paper from being ejected from the paper exit, and
do not pull the paper being ejected.
Notes on Transportation
❏ Transport the product with an ink cartridge installed.
❏ Transport the product with the ASF guide and the pocket guide tucked in.
❏ Be sure to use the power button to turn off the product before transportation.
❏ Keep the product upright and horizontal during transportation.
Downloading Drivers, Utilities, and Manuals
Further product information is written in the TM-S9000MJ Technical Reference Guide.
Drivers, utilities, and manuals can be downloaded from one of the following URLs.
For customers in North America, go to the following web site:
http://www.epson.com/support/
For customers in other countries, go to the following web site:
https://download.epson-biz.com/?service=pos
4
Page 5
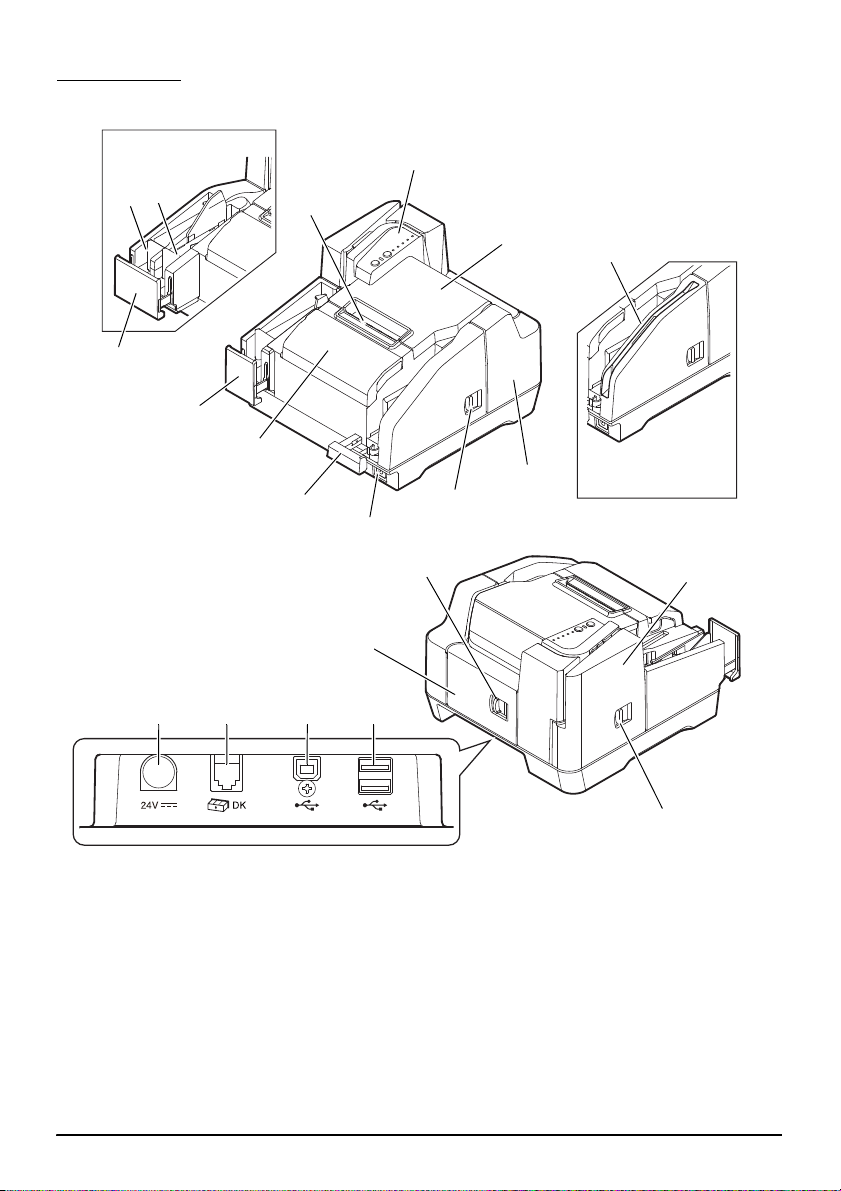
Part Names
1. Control panel 11. Roll paper cover
2. Manual cutter 12. MSR (factory option)
3. Sub pocket 13. Rear cover open lever
4. Main pocket 14. Rear cover
5. Pocket guide 15. Power supply connector
6. Ink cartridge cover 16. Drawer kick-out connector
7. ASF guide 17. USB connector (Type B)
8. Power button 18. USB connector (Type A) (factory option)
9. MICR cover open lever 19. Scanner cover open lever
10. MICR cover 20. Scanner cover
Two-pocket model
MSR-equipped model
(factory option)
11
10
9
8
7
1
6
5
12
19
20
15
13
5
2
16 17 18
14
4
3
5
Page 6
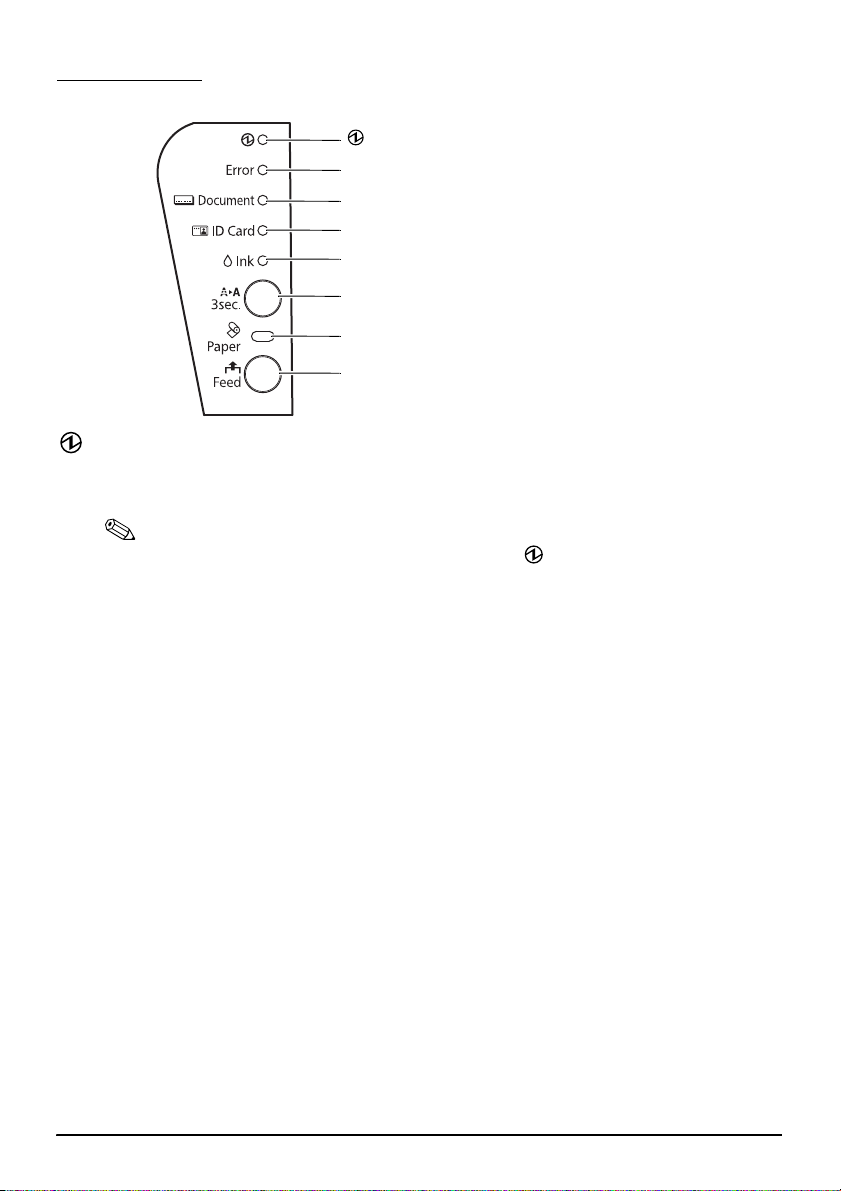
Control Panel
(Power) LED
Error LED
Document LED
ID Card LED
Ink LED
Cleaning button
Paper LED
Feed button
(Power) LED
Comes on when the product is on.
Flashes while some operations such as turning power on/off, ink charging, or cleaning, are
executed.
Note:
Be sure not to turn off the product or open the covers while
Error LED
Comes on when the product is offline (except during roll paper feeding using the Feed button,
during self-test, and cleaning).
Flashes when an error occurs. (See “Troubleshooting” on page 19.)
Document LED
Comes on when the product is ready to process cut sheet paper in the ASF or while the product
is processing cut sheet paper.
Flashes when the product is waiting for cut sheet paper insertion.
ID Card LED
Comes on when ID card is set and the product is ready to process it.
Flashes when the product is waiting for ID card insertion or removal.
Ink LED
Comes on when no ink cartridge is installed or it is time to replace the ink cartridge.
Flashes when ink is low.
Cleaning button
Pressing this button for three seconds or more starts the print head cleaning. (See “Cleaning
the Print Head” on page 16.)
Paper LED
Comes on when the roll paper is out or almost out.
Flashes when the product is waiting for test printing on the roll paper.
Feed button
Pressing this button feeds the roll paper.
(Power) LED is flashing.
6
Page 7

Setting up the Product
To set up the product, follow the steps below.
1. Installing the product (See “Installing the Product” on page 7.)
2. Connecting the USB cable (See “Connecting the USB Cable” on page 8.)
3. Connecting the AC adapter (See “Connecting the AC Adapter” on page 8.)
4. Turning on the product (See “Tuning on/off the Product” on page 9.)
5. Installing the roll paper (See “Installing and Replacing the Roll Paper” on page 9.)
6. Installing the ink cartridge (See “Installing and Replacing the Ink Cartridge” on page 10.)
7. Operation check with test print (See “Test Printing” on page 12.)
Installing the Product
When installing the product, make sure of the following:
❏ When carrying the product, lift the product holding the indents on both lower sides of the
product.
❏ Leave enough space around the product to open the covers, the ASF tray, and the pocket
guide.
❏ Do not place the product near any magnetic fields to avoid decreasing the MICR
recognition rate. Especially, when you install the product near a display device, check the
recognition rate of the MICR reader.
❏ Install the product horizontally.
❏ Make sure cords and foreign objects are not caught in the product.
❏ Remove the shock-absorbing materials in the product and fixing tape before use.
7
Page 8
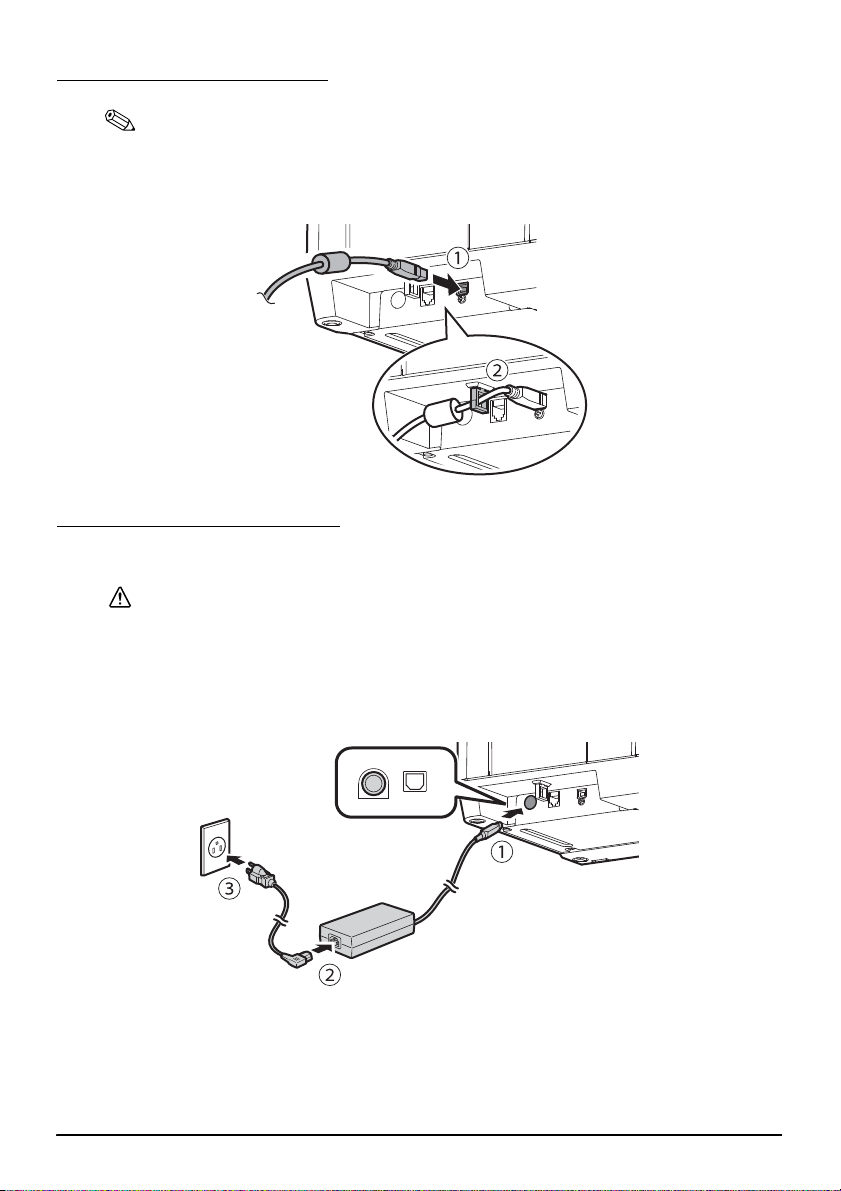
Connecting the USB Cable
Note:
Do not turn on the product before installing the necessary drivers.
1. Connect the USB cable to the USB (Type B) connector.
2. Fix the USB cable with the cable hook to prevent the USB cable from falling off.
3. Connect the USB cable to the host computer.
Connecting the AC Adapter
Follow the steps below to connect the AC adapter.
CAUTION:
Be sure to use the specified AC adapter [PS-180 (Model: M159D/M159E)]. Connection to an improper
power source may cause fire or shock.
1. Connect the AC cable to the AC adapter.
2. Connect the DC cable of the AC adapter to the power supply connector on the product.
3. Insert the AC cable plug into a socket.
8
Page 9

Tuning on/off the Product
To turn on the product, press the power button on the front side of the product.
To turn off the product, press the power button for 3 seconds or more until
goes off.
CAUTION:
When turning off the product, make sure the AC cable is connected to the product and a wall socket,
and always use the power button.
Installing and Replacing the Roll Paper
Note:
Be sure to use the specified roll paper.
1. Put your finger under the left side of the roll paper cover and pull it up to open it.
2. Remove the used roll paper core, if there is one, and insert the roll paper in the correct
direction.
(Power) LED
9
Page 10
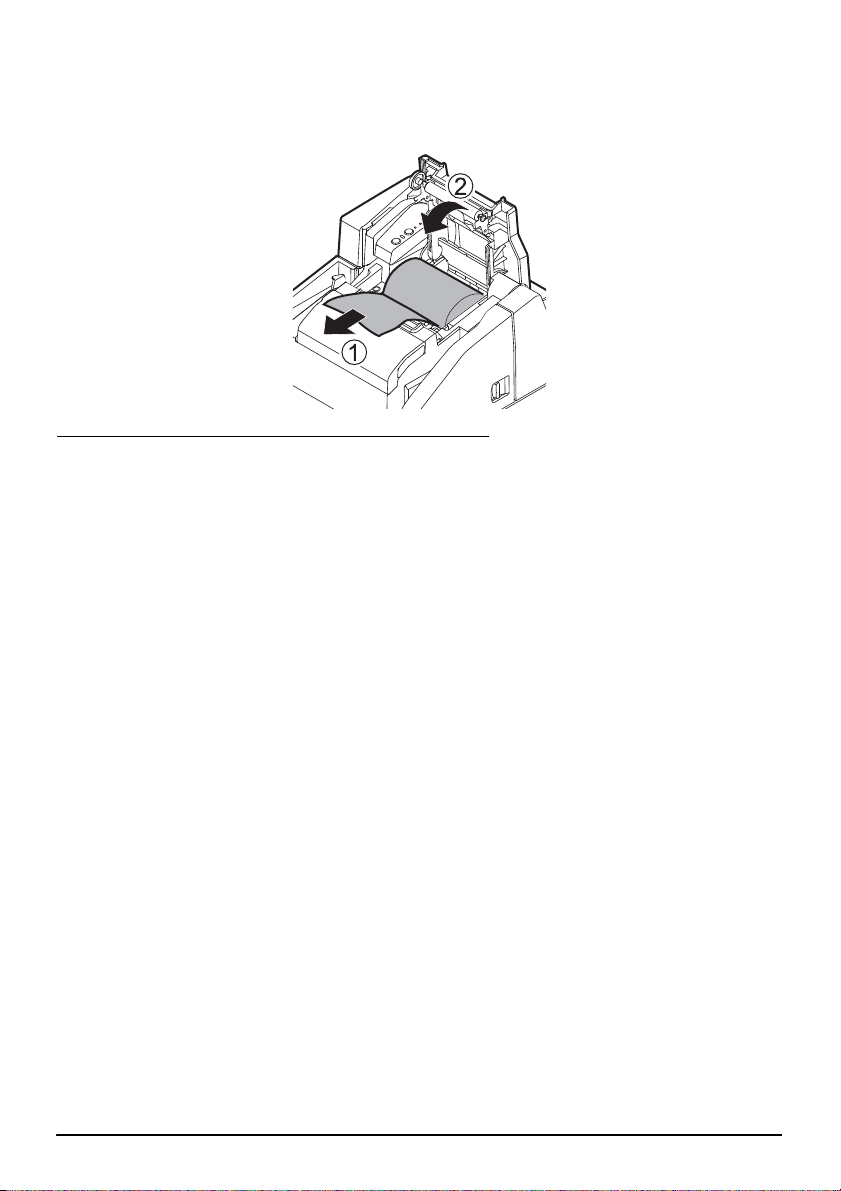
3. Pull out some paper, and close the roll paper cover.
When the power is on, the roll paper is automatically cut.
Installing and Replacing the Ink Cartridge
Notes on Using the Ink Cartridge
❏ Read the manual included with the ink cartridge before use.
❏ When the ink cartridge is installed for the first time, the product uses ink to prepare for
printing (ink charging).
❏ Cartridge yields vary based on such usage environment and conditions.
❏ To insure print quality, some ink remains in the cartridge after the Ink LED comes on.
❏ Epson recommends the use of genuine Epson ink cartridges. The use of non-genuine ink
may cause damage that is not covered by Epson's warranties, and under certain
circumstances, may cause erratic product behavior.
❏ Do not touch the IC chip on the side of the ink cartridge.
❏ Do not remove the ink cartridge except when replacing it with a new one.
❏ Do not open the ink cartridge until you are ready to install it.
❏ After installing an ink cartridge, use it up within 6 months.
❏ Use the ink cartridge before the expiration date printed on its package and on the ink
cartridge itself.
❏ Do not puncture the convex part of the bottom of the ink cartridge or remove the
transparent film on the bottom of the ink cartridge.
❏ A used cartridge may have some ink on the convex part of the bottom of the cartridge.
Avoid touching that part to keep your hands clean.
❏ Dispose of the used ink cartridges according to the laws or regulations in your country
and region.
❏ To transport or store this product for a long period after once using this product, make
sure the ink cartridge is installed in the product.
❏ This product may automatically run maintenance operations at night or when the power
is turned on to maintain print quality. As a result of these maintenance operations, you
may need to replace the ink cartridge. In this case, replace the ink cartridge with a new
one.
10
Page 11

Installing and Replacing the Ink Cartridge
When ink is low in the ink cartridge, the Ink LED flashes. When the Ink LED as well as the
Error LED come on, printing stops and it is time to change the ink cartridge.
Follow the steps below to install the ink cartridge into the product for the first time or replace
it with a new one.
1. Turn on the product.
2. Put your finger under the left side of the ink cartridge cover and pull it up to open it.
3. If there is a used ink cartridge, remove the ink cartridge by pulling up the tab on the top of
the cartridge while holding the product.
4. Remove a new ink cartridge from its package.
Note:
Be sure to use a new ink cartridge. Do not install a used ink cartridge.
5. Install the ink cartridge in the correct direction, and push it until it clicks in place.
6. Close the ink cartridge cover.
Note:
• When you first use the product, installing an ink cartridge begins charging the ink
supply. Ink charging takes approximately four minutes and (Power) LED flashes
during that time.
• When the ink cartridge cover is closed, print head cleaning starts automatically to
ensure consistent print quality. During the cleaning, (Power) LED flashes.
11
Page 12

CAUTION:
Never take the following actions during (Power) LED flashes.
• Tilting the product
• Opening the covers
• Turning off the power
Doing so will cause a significant amount of ink to be consumed.
7. Make sure (Power) LED turns on after flashing.
Test Printing
After the product setup or when the product is not operating correctly, you can check the
product operation with test printing. If the product performs pattern printing when you follow
the steps below, the product is operating normally.
Test Printing on Roll Paper
Make sure all the covers are closed, and while pressing the Feed button, turn on the product.
After the product prints its status and the Paper LED flashes, turn off the product to exit the
test printing or press the Feed button again to restart the test printing.
If you restart the test printing, test printing is completed when
"*** completed***” is printed after a certain amount of printing.
Test Printing on Cut Sheet Paper
Note:
• For test printing on cut sheet paper, use the included cut sheet paper (normal paper of 70
mm {2.76"} width and 152 mm {5.98"} long or larger).
• Do not use thermal roll paper.
• If the check doesn’t feed correctly, perform the self-test using 3 of the provided new cut
sheets. If the printer has not been used for three months or more, please perform this self-test
print procedure, and repeat until the unit feeds correctly.
Make sure all the covers are closed, and while pressing the cleaning button, turn on the
product. After the Document LED flashes, set 3 pieces of cut sheet paper in the ASF. (For how
to set the cut sheet paper, see “Inserting Cut Sheet Paper” on page 13.)
Test printing is completed when "*** completed***” is printed after a certain amount of
printing.
When printout is faint
When printout of "Nozzle Check Pattern" is faint or uneven as the illustration below, the print
head may need to be cleaned.
A B C
Nozzle Check Pattern
See “Cleaning the Print Head” on page 16 to clean the print head.
12
Page 13

Processing Cut Sheet Paper
1
2
3
4
5
Flow of Processing Cut Sheet Paper
From cut sheet paper is inserted until ejected, the product processes it in the following order.
1. Auto sheet feeder (ASF) section: feeds the cut sheet paper.
2. MICR reader section: reads magnetic ink characters on the cut sheet paper.
3. Printer section: prints on the cut sheet paper.
4. Scanner section: scans both sides of the cut sheet paper.
5. Pocket section: ejects the processed cut sheet paper.
Inserting Cut Sheet Paper
You can put up to 100 sheets of cut sheet paper in the ASF.
Note:
Use cut sheet paper (single-ply) that meets the specifications. (See “Specifications” on page 23.)
Do not insert any paper that has clips or staples.
Make sure the cut sheet paper is flat, without curls, folds, or wrinkles.
1. Pull out the ASF guide and the pocket guide appropriately for the size of the cut sheet
paper to be set.
CAUTION:
To avoid a paper jam, always pull out the pocket guide before processing cut sheet paper.
13
Page 14

2. Make sure the Document LED is flashing.
1234780 1234567890
1234780 1234567890
3. Set the cut sheet paper in the ASF with the edges aligned to the paper setting mark on
the right side of the roll paper cover.
Follow the precautions below.
• Set the sheets with the face on which you want to print facing inside.
• To scan checks or read the magnetic ink characters with MICR, set the sheets with
the part of the magnetic ink characters facing outside and down.
• To set multiple sheets, align them neatly on the bottom-right (insertion side) corner.
CAUTION:
If the documents are inserted without being aligned, they may not be fed at all, or a paper jam
or incorrect feeding of multiple sheets may result.
4. After setting the cut sheet paper, release it immediately.
CAUTION:
Do not open the covers while processing is in progress.
Do not insert an ID card into the ID card insertion slot while processing cut sheet paper.
Ejecting Cut Sheet Paper
Remove the cut sheet paper when it is ejected.
For two-pocket models, paper may be ejected separately into the main pocket and the sub
pocket depending on your application.
CAUTION:
To prevent a paper jam, do not leave more than 100 sheets in the pocket (for two-pocket models, 100
sheets in the main pocket and 50 sheets in the sub pocket) while processing cut sheet paper.
1234780 1234567890
14
Page 15

Scanning ID Cards
Follow the steps below to scan both side of an ID card.
Note:
Use an ID card which meets the specifications. (See “Specifications” on page 23.)
Make sure that the ID card is flat and does not have excessive bending, cracks, folds, or
embossing.
Do not touch the external terminal when using an IC card.
1. Make sure the ID Card LED is flashing.
2. Put the ID card in the insertion slot on the right side of the pocket with its photo side
facing the pocket, and slide it along the bottom of the slot.
3. When the card starts feeding, release it immediately.
CAUTION:
When the ID card is feeding, a part of it comes out of the card carrier slit at the back of the
product. Be sure not to block this slit.
Do not touch the ID card when it is being ejected. Doing so may cause distortion and other
problems with the scanned data.
Do not open the covers while processing is in progress.
4. When the ID card is ejected and the ID Card LED flashes, remove the ID card from the
slot.
15
Page 16

Reading Magnetic Stripe Cards
If your product is equipped with a MSR unit, you can read the magnetic stripe on the card.
Note:
Use a magnetic stripe card which meets the specifications. (See “Specifications” on page 23.)
To read the magnetic stripe card, check the insertion direction with the arrow on the card, and
swipe it through the slit downward or upward with the magnetic stripe on the card facing
inside and down.
The buzzer beeps once when reading succeeds and beeps three times when it fails.
Cleaning
Cleaning the Product Case
Be sure to turn off the product, and wipe the dirt off the product case with a dry cloth or a
damp cloth.
CAUTION:
Never clean the product with alcohol, benzine, thinner, or other such solvents. Doing so may damage
or break the parts made of plastic and rubber.
Cleaning the Print Head
When printing becomes faint or uneven although the Ink LED is not on or flashing, the print
head may need to be cleaned.
In this case, press the cleaning button on the control panel for 3 seconds or more to start the
print head cleaning. During the cleaning,
When
Never take the following actions during (Power) LED flashes.
•Tilting the product
• Opening the covers
• Turning off the power
Doing so will cause a significant amount of ink to be consumed.
The cleaning process uses some ink. Do not run cleaning when it is unnecessary.
(Power) LED comes on after flashing, the print head cleaning is completed.
CAUTION:
Note:
(Power) LED flashes.
16
Page 17

Cleaning the Thermal Head
Epson recommends cleaning the thermal head periodically (generally every 3 months) to
maintain thermal printing quality.
The thermal head can be very hot after printing. Be careful not to touch it, and let it cool before you
clean it.
Do not damage the thermal head by touching it with your fingers or any hard object.
Turn off the product, open the roll paper cover, and clean the thermal elements of the thermal
head with a cotton swab moistened with an alcohol solvent (ethanol or IPA).
CAUTION:
Cleaning the MICR Head
When the MICR head becomes dirty, the product cannot read the magnetic ink characters
normally.
Clean the MICR head every 6 months or every 100,000 passes by setting the following cleaning
sheet in the same way as cut sheet paper. (See “Inserting Cut Sheet Paper” on page 13.)
KIC Team, Inc.
• Waffletechnology
• Epson Check Scanner Cleaning Kit (model:KWEPS-KCS2)
Note:
Use a cleaning sheet only one time; then discard it.
It is recommended to clean the MICR head once per week or once every 2,000 sheets for good
reading results.
It is recommended to clean the scanner after cleaning the MICR head.
®
MICR cleaning card (model:CS1B15WS)
Cleaning the Scanner
If the glass of the scanner gets soiled from ink or paper dust, the quality of scanned data may
deteriorate. Clean the glass every 6 months or every 100,000 passes by following the steps
below.
Note:
It is recommended to clean the scanner once per week or once every 2,000 sheets for good reading
results.
17
Page 18

1. Pull the scanner cover open lever and open the scanner cover by pulling it outward.
2. Lightly wipe 2 parts of glass areas with a soft, dry cloth.
CAUTION:
Do not use synthetic detergent, benzine, water, or other liquid for cleaning. Doing so may result
in a stain.
When the glass of the scanner is smeared with oil, grease or other unremovable substance, wipe
it with a cloth lightly dipped in alcohol. However, never apply any liquid directly to the glass of
the scanner.
3. Close the scanner cover firmly until it clicks in place.
18
Page 19

Troubleshooting
Error LED is on or flashing
❏ Make sure that all the covers are properly closed.
❏ Make sure the roll paper is properly set.
❏ When the Ink LED is on, see “Installing and Replacing the Ink Cartridge” on page 11 to
replace the ink cartridge with a new one.
❏ When the roll paper cover will not open, the autocutter blade may be locked. For a minor
lock, the autocutter blade automatically returns to the correct position. Otherwise, move
it to the correct position referring to “The roll paper cover will not open (the autocutter
blade is locked).”
❏ When paper or an ID card is jammed, remove the jammed paper referring to “Paper or
ID card is jammed.”
❏ Printing stops if the thermal head or the surroundings of the print head overheats, and
resumes automatically when it cools.
❏ Turn off the product, and after 10 seconds, back on. If the Error LED is still flashing, the
product may require servicing.
Printout is faint
❏ When printing on cut sheet paper is faint, the print head may be dirty. See “Cleaning the
Print Head” on page 16 to clean the print head.
❏ When printing on roll paper is faint, the thermal head may be dirty. See “Cleaning the
Thermal Head” on page 17 to clean the thermal head.
Scanned data or reading result of the magnetic ink characters is not normal
❏ When the scanned data is not normal, the glass of scanner may be dirty. See “Cleaning the
Scanner” on page 17 to cleaning the glass of scanner.
❏ When the magnetic ink characters cannot be read normally, the MICR head may be dirty.
See “Cleaning the MICR Head” on page 17 to clean the MICR head.
The roll paper cover will not open (the autocutter blade is locked)
Follow the steps below to return the autocutter blade to the correct position.
1. Turn off the product.
2. Put your finger under the left side of the ink cartridge cover and pull it up to open it.
19
Page 20

3. Turn the knob of the autocutter blade in the direction of the arrow until you see a pin in
the opening of the frame.
4. Close the ink cartridge cover.
Paper or ID card is jammed
When the roll paper is jammed
CAUTION:
Do not touch the thermal head, because it can be very hot after printing. Let it cool before you remove
the jammed paper.
1. Turn off the product.
2. Put your finger under the left side of the roll paper cover and pull it up to open it.
If the roll paper cover will not open, see “The roll paper cover will not open (the
autocutter blade is locked).”
3. Remove the jammed paper.
4. Close the roll paper cover.
When cut sheet paper is jammed
Depending on where the paper is jammed, open the MICR cover, rear cover, or scanner cover,
and remove the jammed paper.
20
Page 21

To open the MICR cover, pull the MICR cover open lever and open the MICR cover by pulling
it outward.
To open the rear cover, pull the rear cover open lever and open the rear cover by pulling it
outward.
21
Page 22

To open the scanner cover, pull the scanner cover open lever and open the scanner cover by
pulling it outward.
When an ID card is jammed
1. Pull the scanner cover open lever and open the scanner cover by pulling it outward.
2. Remove the jammed ID card.
3. Close the scanner cover firmly until it clicks in place.
22
Page 23

Specifications
One-pocket model Two-pocket model
Operating
environment
Processing speed max. 110 dpm / max. 200 dpm
Roll paper
unit
Cut sheet
paper unit
Scanner unit Scanning method Contact image sensor (CIS)
MICR recognition method Magnetic bias
MSR unit
(factory
option)
Auto sheet feeding capacity 100 sheets or fewer
Pocket storage 100 sheets or fewer
Ink cartridge Exclusive ink cartridge: SJIC18(K), Color of ink: Black
Interface USB (Type A/Type B*3) [compliance: USB 2.0, communication speed: Hi-
Power supply Specified AC adapter PS-180 (Model: M159D/M159E),
CPU Minimum Specification: At least a Pentium4 2.0 GHz or the equivalent
Recommended Specification: At least IntelCore2Duo 1.8GHz or the equivalent
Memory Minimum Specification: At least 512 MB or above the minimum operating
system requirement
Recommended Specification: At least 1 GB or above the minimum operating
system requirement
HDD Free space of more than 30 MB (Before installing the driver)
Interface USB2.0 Hi-speed
Printing method Thermal line
Paper dimensions Roll paper diameter: 83 mm {3.27"} max.
Paper width: 79.5 ± 0.5 mm {3.13" ± 0.02"}
Specified paper NTP-080-80
Printing method Line ink jet with ink jet head (360 nozzles in 2 lines)
Paper dimensions Size: 60 to 120 mm (H) × 120 to 235 mm (L)
{2.36" to 4.72" (H) × 4.72" to 9.25" (L)}
Thickness: 0.075 to 0.2 mm {0.003" to 0.008"}
(only single-ply can be used)
Paper dimensions Same as above cut sheet paper
ID card
specifications
Reading media: ISO/IEC7810 compliant (without embossed effect)
Size: 53.92 to 54.18 mm (H) × 85.47 to 85.90 mm (L)
{2.12" to 2.13" (H) × 3.36" to 3.38" (L)}
Thickness: 0.5 + 0.84 mm {0.02" + 0.03"}
Recognition
Two-frequency coherent phase (F2F)
method
Card specifications Reading media: ISO/IEC7810 compliant
Size: 53.92 to 54.18 mm (H) × 85.47 to 85.90 mm (L)
{2.12" to 2.13" (H) × 3.36" to 3.38" (L)}
Thickness: 0.76 + 0.08 mm {0.02" + 0.003"}
Supported
ISO 7811-6, AAMVA, previous California driver’s license
magnetic format
(when paper thickness is 0.13 mm {0.005"} or less)
*1
Main pocket: 100 sheets or fewer
(when paper thickness is 0.13 mm
{0.005"} or less)
(when paper thickness is
0.13 mm {0.005"} or less)
*1
Sub pocket: 50 sheets or fewer
Speed (480 Mbps)/Full-Speed (12 Mbps)
(when paper thickness is
0.13 mm {0.005"} or less)
*4
]
*2
Supply voltage: DC + 24 V ± 7%
23
Page 24

One-pocket model Two-pocket model
Temperature Operating 10 to 35°C {50 to 95°F}
Storage When packed for shipping (ink not charged):
–20 to 60°C {-4 to 140°F}
When ink is charged: –20 to 40°C {-4 to 104°F}
Humidity Operating 20 to 80% RH
Storage When packed for shipping (ink not charged): 5 to 85% RH
When ink is charged: 25 to 85% RH
Overall dimensions (H × W × D) 177 × 250 × 263.8 (374.8) mm
{6.97" × 9.84" × 10.39" (14.76")}
177 × 275 × 298.8 (409.8) mm
*5
{6.97" × 10.83" × 11.76" (16.13")}
Weight (mass) Approx. 5.0 kg {11 lb} Approx. 5.0 kg {11 lb}
dpm: documents per minute, Mbps: megabits per second
*1: The total thickness of the stacked sheets must be 13 mm {0.51"} or less (including uneven sheets due to folds, etc.)
*2: The total thickness of the stacked sheets must be 6.5 mm {0.26"} or less (including uneven sheets due to folds, etc.)
*3: USB (Type A) connector is a factory option.
*4: When using a Full-Speed USB interface, the product performance declines.
*5: The values in the brackets are when the pocket guide is fully pulled out.
*5
24
 Loading...