

Start Here
Start Here
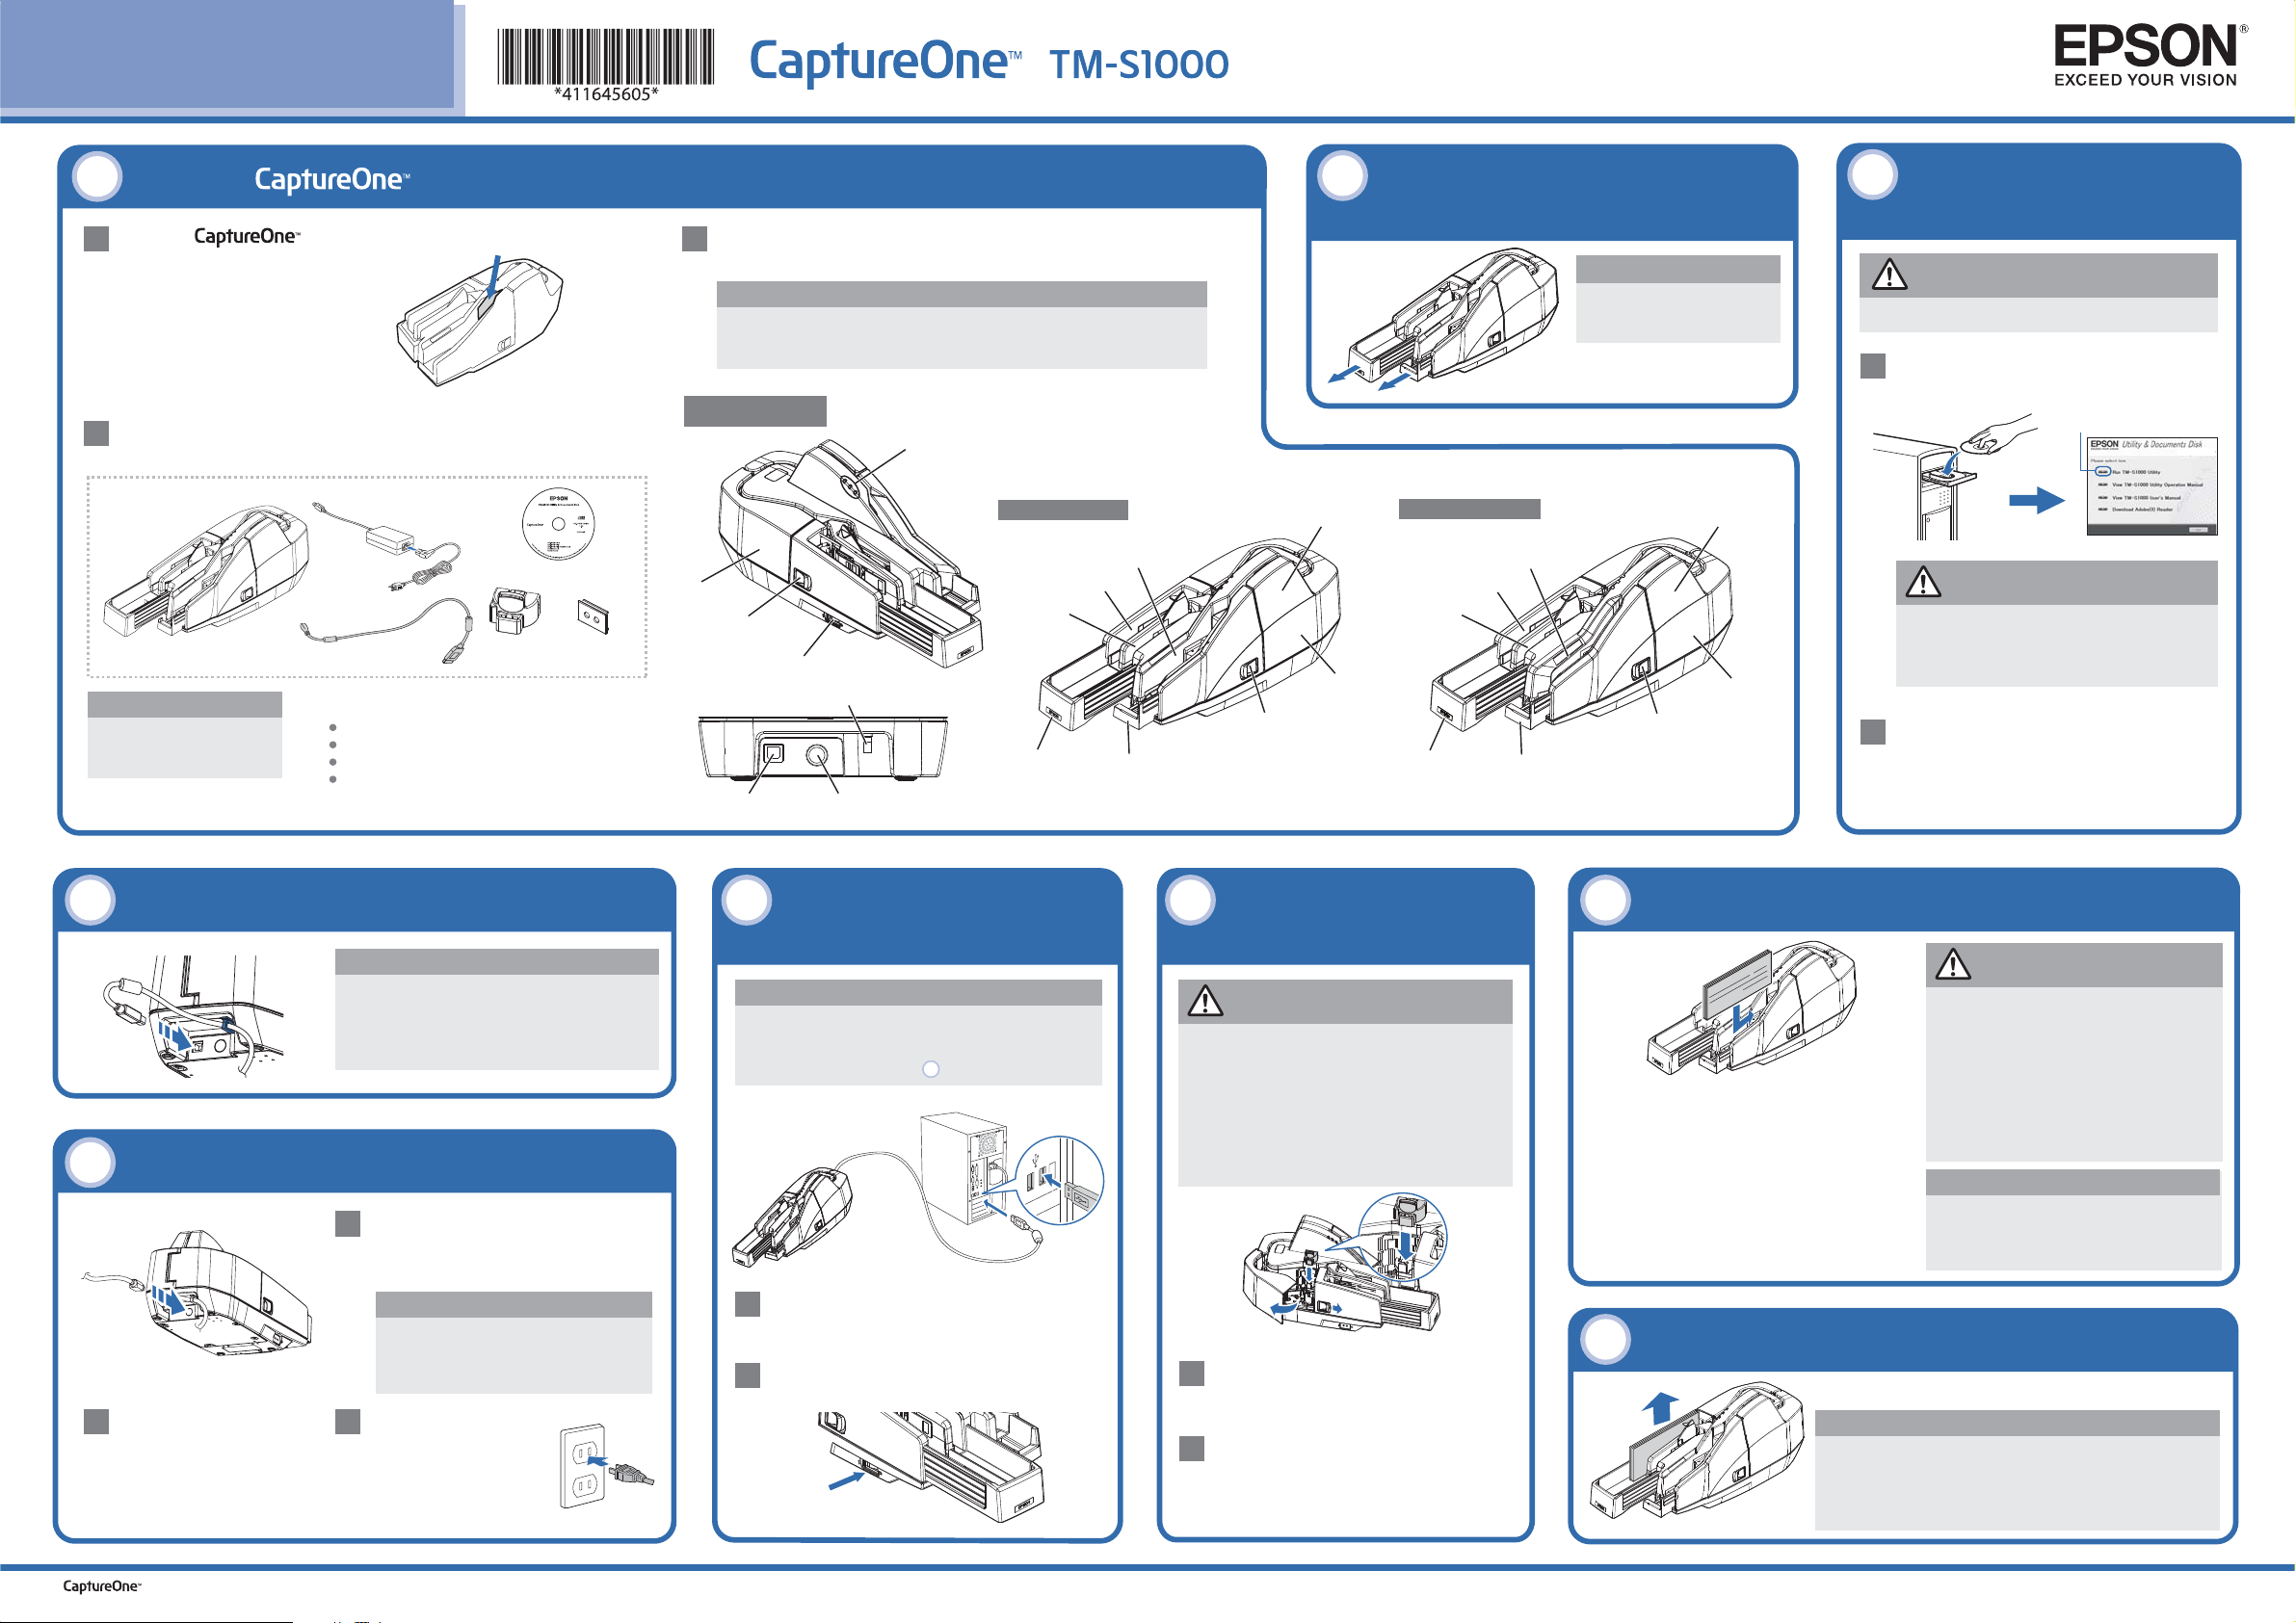
Unpack .
1
Unpack .
1
For the multi feed models,
Remove plastic insert.
(only for the multi feed models)
remove the plastic insert.
Make sure you have all the parts shown here.
2
If any parts are missing, contact your reseller.
1
USB cable
CaptureOne (Scanner)
Note:
Do not open franking
cartridge package until you
are ready to install.
AC adapter *
*1: AC cable may not be included with the scanner.
*2: The following items are included on the CD:
TM-S1000 Driver
TM-S1000 Utility
TM-S1000 Utility User's Manual
User's Manual
(PDF in 4 lan gua ges: English, French,
Portuguese, and Spanish)
Utility & Documents CD *
Franking
cartridge
Power switch
cover
3
Part Names
2
Franker cover
Franker cover open lever
USB connector Power supply connector
Place on a stable, flat surface that extends beyond the
scanner (with guides fully extended) in all directions.
Note:
Do not install scanner in a dusty environment. Do not install scanner
where it can be subject to bumps or jolts during operation.
These may cause defective readings.
LED indicators
Multi feed models
Auto sheet feeder (ASF)
Main pocket
Sub pocket
Power switch
USB cable securing hook
Pocket guide
ASF guide
Document scanner
Scanner cover
open lever
2
Scanner cover
Pull out both pocket guide
and ASF/SF guide.
Note:
Be sure that the guides are
extended completely before
using.
Single feed models
Sheet feeder (SF)
Main pocket
Sub pocket*
Pocket guide
SF guide
* The one pocket model does not have a Sub pocket.
Document scanner
Scanner cover
Scanner cover
open lever
Install the USB
3
driver.
CAUTION:
Make sure that the power is not supplied to the scanner.
Start the TM-S1000 Utility included
1
on the Utilities & Documents CD.
Click
Insert
CAUTION:
Starting the TM-S1000 Utility causes the USB
driver to be installed.
Do not start the TM-S1000 Utility with the
scanner connected to a host computer.
When the next screen is displayed,
2
finish the TM-S1000 Utility.
Connect the USB cable to the scanner.
4
Note:
Use only the USB cable included with the
scanner.
Hook the USB cable on the USB cable securing
hook (colored blue in the illustration) to prevent
the cable from falling off.
Connect the DC cable to the scanner.
5
Make sure the power switch is
1
turned off and the AC cable is
not connected to the AC outlet.
Note:
Always disconnect the AC cable from
the AC power outlet before
connecting/disconnecting the DC cable
to/from the scanner.
Insert the connector
2
of the DС cable into
Plug the AC cable
3
into the AC outlet.
the power supply
connector (stamped
24V).
Connect the scanner to the
6
computer via the USB cable.
Note:
If the scanner is connected to a host computer before
installing the USB driver, the Found New Hardware
Wizard will be displayed. In that case, cancel the
wizard and go back to Step to install the USB driver.
Connect the USB cable to the
1
computer’s USB port.
Turn on the scanner power switch.
2
Power switch
3
Install the franking
7
cartridge.
CAUTION:
Keep franking cartridges out of reach of children.
Use carefully because ink can permanently stain
clothing.
It is recommended to use genuine Epson
cartridges. Others may have poor quality or
damage the scanner. Use up the cartridge before
the expiration date printed on the box.
used cartridges in
regulations.
Pull the franker cover open lever
1
accordance with local
to open the franker cover.
Hold the top of the cartridge, and
2
carefully push it until it clicks into
place.
Dispose of
Insert checks.
8
te
a
D
$
90
8
7
6
5
4
23
1
:
C
0
8
7
4
23
1
:
C
Insert checks straight down with the
side on which magnetic characters
are printed facing outside.
For the multi feed models: Align the
checks neatly on the bottom-right
before inserting.
For the single feed models: Insert
checks one by one after each check
is ejected to a pocket.
Remove ejected checks.
9
When checks are ejected, remove them.
Note:
Do not eject more than the maximum number of checks to the
pockets. (Main Pocket: 100 sheets. Sub Pocket: 50 sheets.)
Otherwise, a paper jam may occur.
Depending on your application, some checks may be
delivered to the sub pocket. (except for the one pocket model)
CAUTION:
For the multi feed models, if the checks are
inserted without being aligned, they may not
be fed at all, or a paper jam or incorrect
feeding of multiple checks may occur.
For the single feed models, if more than one
check is inserted, a paper jam or incorrect
feeding of multiple checks may occur.
Be sure to let go of the check(s) before the
scanner starts feeding.
Do not open covers during processing.
Note:
Checks should not be wrinkled, torn, stapled,
clipped or multi-sheet.
For the multi feed models, up to 100 checks
can be inserted in the ASF guide.
is a trademark of Epson America, Inc. Copyright © 2009 Printed in XXXXXX
LED Indiсators
POWER LED
Comes on when the
scanner power is on.
ERROR LED
Comes on when the
scanner is off line (and
when the scanner cover or franker cover is open.)
Flashes when an error occurs or when waiting for document removal.
(See "Troubleshooting" for more information.)
DOCUMENT LED
Comes on when the scanner is ready to process documents in the ASF
/SF or while the scanner is processing documents.
Flashes when the scanner is waiting for document insertion.
POWER LED
ERROR LED
DOCUMENT LED
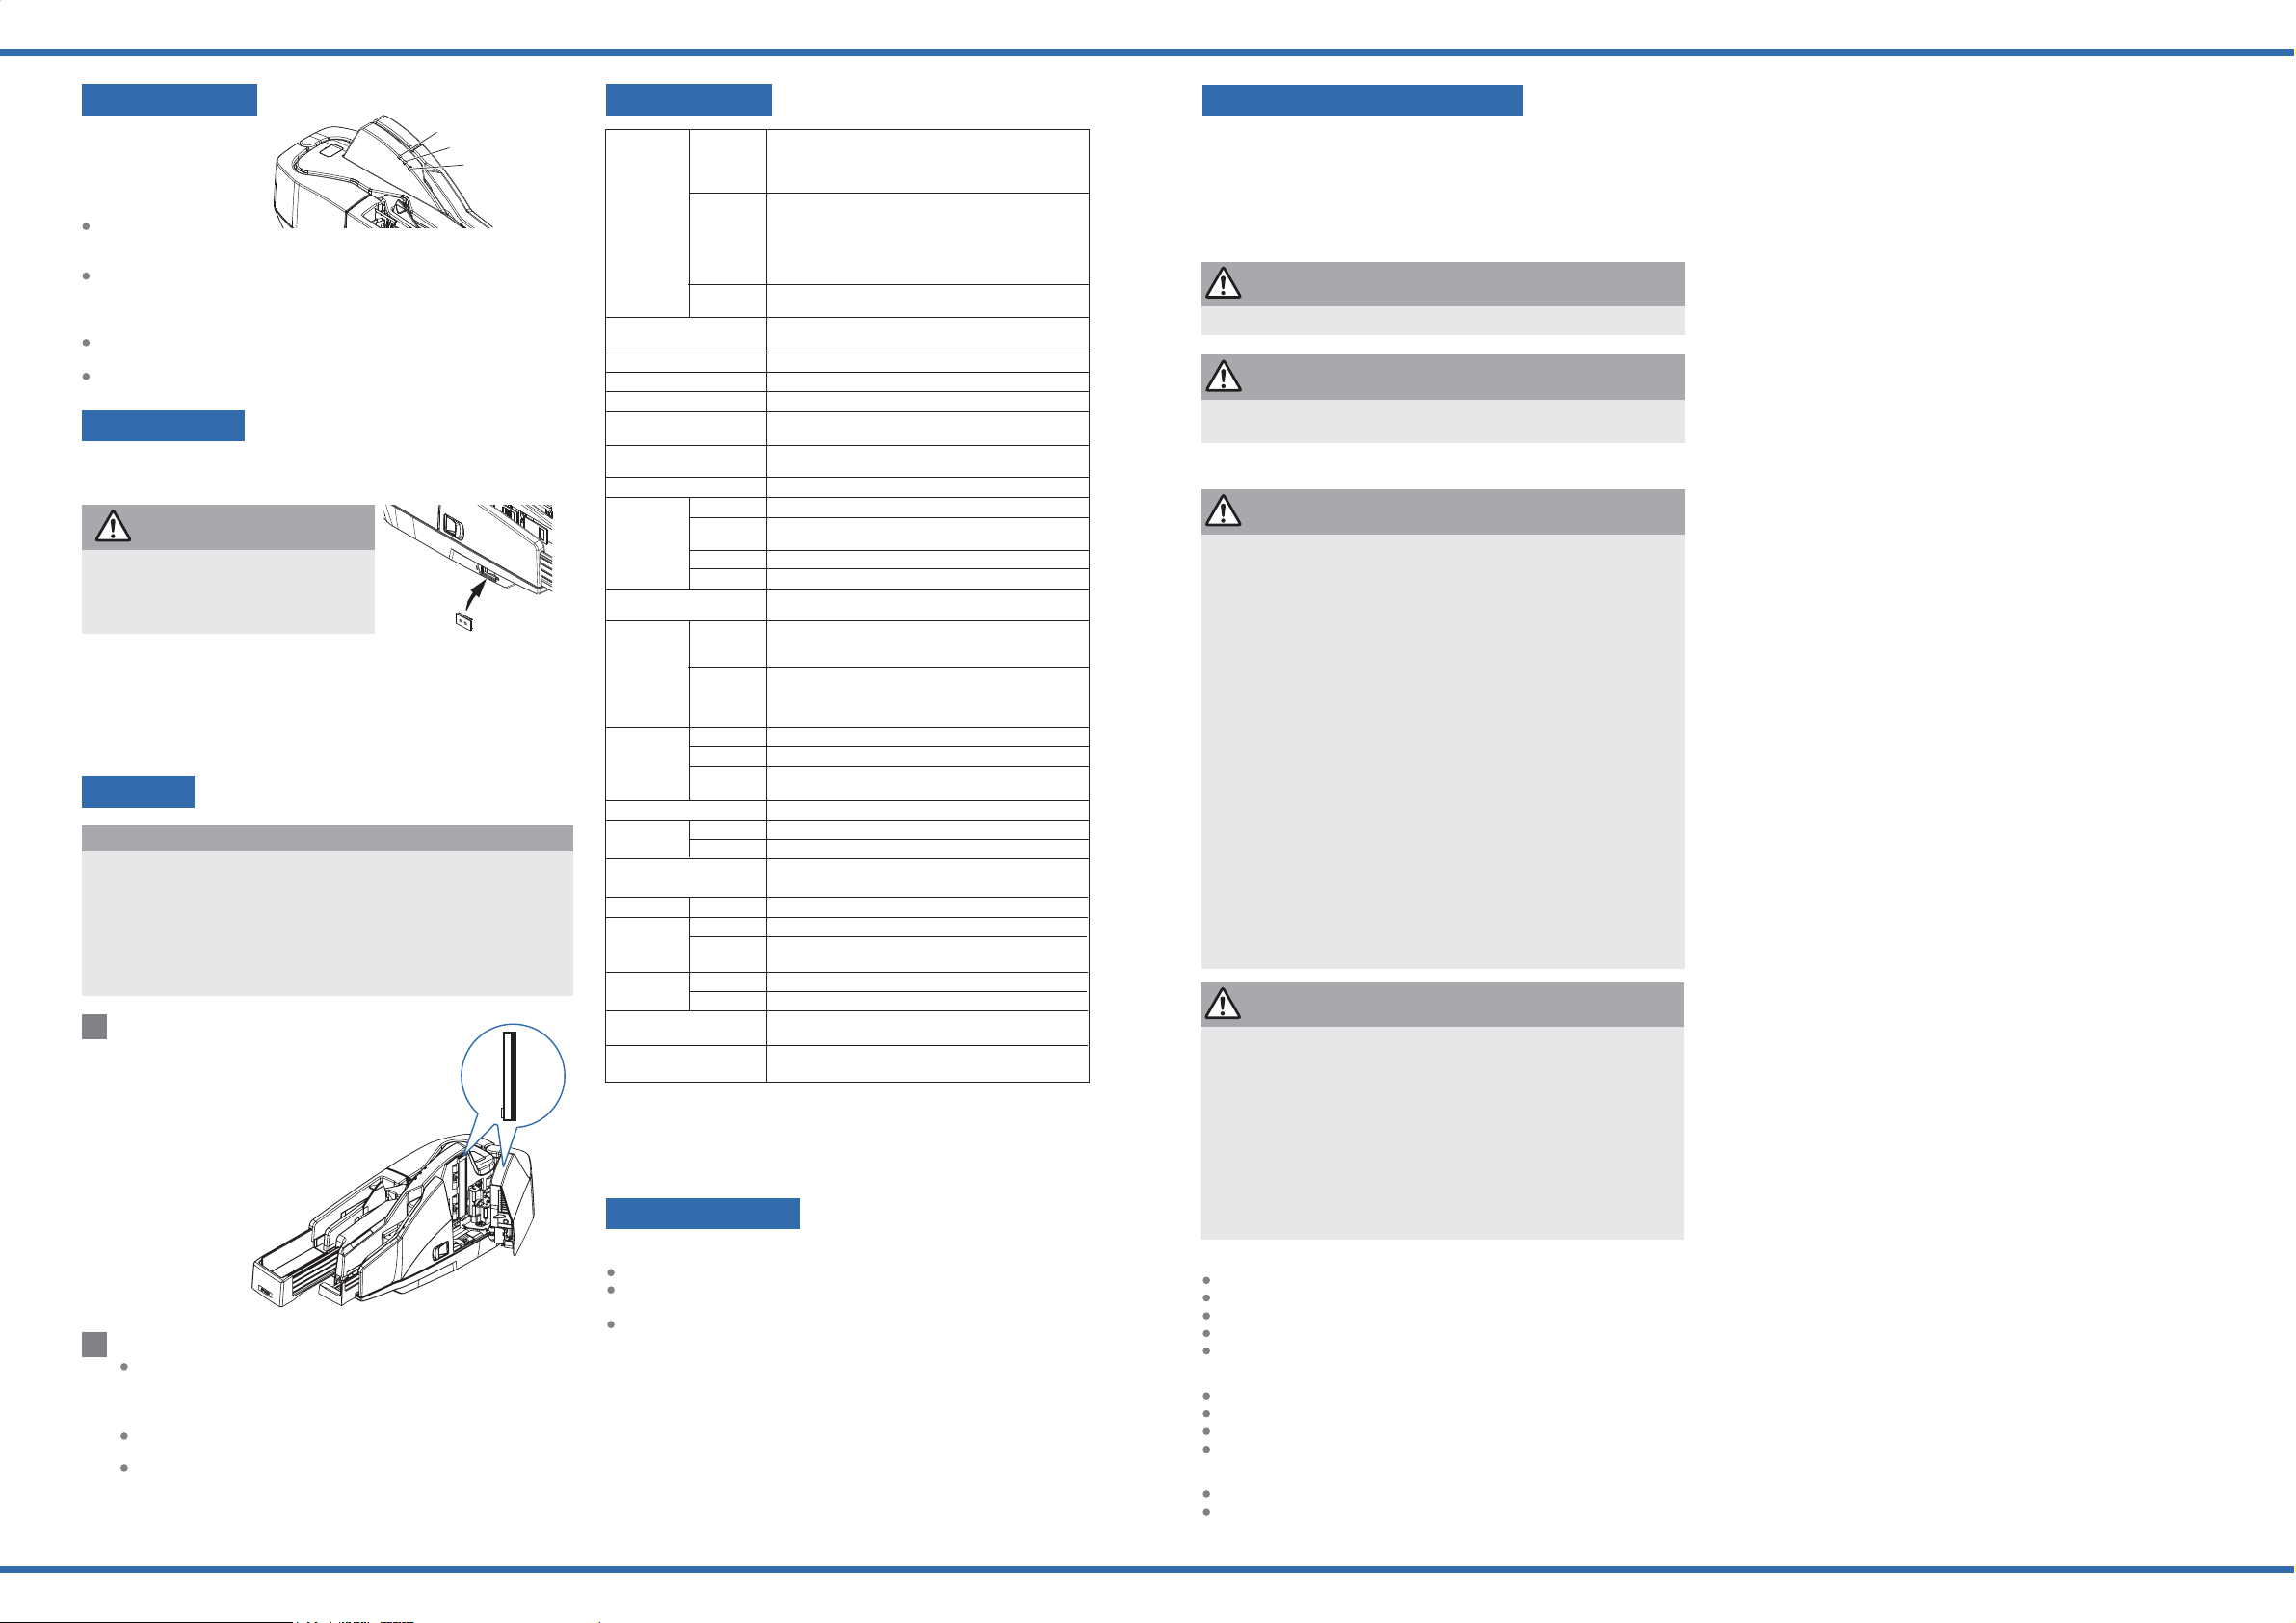
Power Switch
Press the power switch to turn on or off the scanner.
Power Switch Cover
WARNING:
If a machine failure has occurred while the
included power switch cover is attached,
unplug the power cable immediately.
Continued use may result in a fire hazard.
The power switch cover is intended to prevent the power switch from being
pressed accidentally. To use the cover, place it over the power switch.
When turning on or off of the switch is required, insert a pointed object into
one of the holes of the cover, and press the switch.
When the scanner is stored or not in use for an extended period, turn off
the power switch and disconnect the power cord.
Cleaning
Note:
Clean scanner and MICR unit every six months or 100,000 passes. It is
recommended to clean them once per week or once every 2,000 checks
for good reading results.
Do not clean scanner with detergent, benzine, water, or other liquid.
Never apply liquid directly to the scanner glass.
Be careful not to spill liquid into the scanner mechanism or electronic
components. This could permanently damage the mechanism and circuitry.
Never use sticky cleaning sheets to clean MICR unit.
Cleaning the Image Scanner
1
Open scanner cover and lightly wipe the areas
shown above with a soft, dry cloth.
If lens is smeared with grease, wipe it with a cloth
lightly dipped in alcohol. After that, wipe off all
remaining alcohol.
Then, close scanner cover until
it clicks into place.
Specifications
Operating
environment
Processing speed
(only for the multi feed models)
Image Scanner
Resolution
Gradation
Data format
Scanning area (W × L)
Scanning speed
Paper
ASF/SF paper supply
Pocket
storage
Franking
cartridge
Power supply
Current
consumption
Interface
Reliability
Temperature
Humidity
Overall dimension
(W × H × D)
Mass (approx.)
dpm: documents per minute, dpi: dots per inch (25.4 mm)
Mbps: megabits per second
IQA (Image Quality Assurance): Conforms to the recommendations of FSTC
(Financial Services Technology Consortium).
*1: When using a Full-Speed USB interface,the product performance declines.
CPU
Memory
HDD
Type
Size (H × L)
Thickness
Weight
Main
pocket
Sub pocket
(except for
the one
pocket model)
Type
Ink color
Life of ink
Operating
Standby
Life
Operating
Storage
Operating
Storage
30/60 dpm models without using IQA or single feed
models: Pentium 4 1.2 GHz or more
Multi feed models using IQA or 90 dpm model without
using IQA: Pentium 4 2.0 GHz or more
30/60 dpm models without using IQA or single feed
models: 256 MB or more above the minimum OS
system requirements
Multi feed models using IQA or 90 dpm model without
using IQA: 512 MB or more above the minimum OS
system requirements
Free space of more than 30 MB (with the driver
installed)
30 dpm, 60 dpm, or 90 dpm depending on the model.
CIS (Contact Image Sensor)
200 × 200 dpi, 120 × 120 dpi, 100 × 100 dpi
256-level gray scale, 2 values (Black and White)
Gray scale: TIFF, JPEG, BMP, Raster
Black and White: TIFF (CCITT Group4), BMP
100* (*fixed) × max. 235 mm {3.94* (*fixed) × max.
9.25 in}
500 mm/s {19.69 in/s}
Normal paper (single-ply only)
68 ~ 120 mm {2.68 ~ 4.72 in} × 120 ~ 235 mm {4.72 ~
9.25 in}
0.075 ~ 0.2 mm {0.003 ~ 0.008 in} (single-ply only)
60 ~ 120 g/m
ASF (for multi feed models): 100 sheets or fewer
SF (for single feed models): one sheet
100 sheets or fewer (when the paper thickness is 0.13
mm or less.) However, the total thickness must be 13
mm or less including warps.
50 sheets or fewer (when the paper thickness is 0.13
mm or less.) However, the total thickness must be 6.5
mm or less including warps.
Exclusive franking cartridge (EFC-01)
Red
18,000 times (based on Epson's standard pattern
used for printing.)
+24 V ± 10%
1.0 A
0.2 A
USB [compliance: USB 2.0, communication speed:
Hi-Speed (480 Mbps)/Full-Speed (12 Mbps)]*
1,000,000 sheets
10 ~ 40°C {50 to 104°F}
When packed: -20 ~ 60°C {-4 to 140°F}
(within 120 hours at -20°C {-4°F} or 60°C {140°F})
20 ~ 80% (non-condensing)
5 ~ 85%
355 × 176 × 160 mm {14.0 × 6.93 × 6.30 in}
Multi feed models: 4.0 kg {8.8 lb}
Single feed models: 3.9 kg {8.6 lb}
2
{16 ~ 32 lb}
1
Troubleshooting
Important Safety Information
This section presents important information intended to ensure safe and
effective use of this product. Read this section carefully and store it in an
accessible location.
Key to Symbols
The symbols in this manual are identified by their level of importance, as
defined below. Read the following carefully before handling the product.
WARNING:
Warnings must be followed carefully to avoid serious bodily injury.
CAUTION:
Cautions must be observed to avoid minor injury to yourself or damage
to your equipment.
Safety Precautions
WARNING:
Shut down your equipment immediately if it produces smoke, a strange
odor, or unusual noise. Continued use may lead to fire. Immediately
unplug the equipment and contact qualified service personnel.
Never attempt to repair this product yourself. Improper repair work can
be dangerous.
Never disassemble or modify this product. Tampering with this product
may result in injury or fire.
Use the specified AC Adapter [AC adapter, C (Model: M235A) or AC
adapter, C1 (Model: M235B)] only. Connection to an improper power
source may cause fire. Be sure your power cable meets the relevant
safety standards and includes a power-system ground terminal (PE
terminal). Otherwise shock may result.
Do not allow foreign matter to fall into the equipment. Penetration by
foreign objects may lead to fire.
If water or other liquid spills into this equipment, do not continue to use
it. Continued use may lead to fire. Unplug the power cord immediately
and contact qualified service personnel.
Before moving the product, unplug it and unplug all cables connected to it.
Do not use aerosol sprayers containing flammable gas inside or around
this product. Doing so may cause fire.
LED RADIATION
CLASS 1 LED PRODUCT
Maximum output: 320 μW
Emitted wavelength: 515-540 nm (Green)
Test Specification: IEC 60825-1 (2001)
CAUTION:
Do not connect cables in ways other than those mentioned in this
manual. Different connections may cause equipment damage and
burning.
Be sure to set this equipment on a firm, stable, horizontal surface.
Product may break or cause injury if it falls.
Do not use in locations subject to high humidity or dust levels.
Excessive humidity and dust may cause equipment damage or fire.
Do not place heavy objects on top of this product. Never stand or lean
on this product. Equipment may fall or collapse, causing breakage and
possible injury.
To ensure safety, unplug this product before leaving it unused for an
extended period.
All rights reserved. No part of this publication may be reproduced, stored in
a retrieval system, or transmitted in any form or by any means, electronic,
mechanical, photocopying, recording, or otherwise, without the prior written
permission of Seiko Epson Corporation. No patent liability is assumed with
respect to the use of the information contained herein. While every
precaution has been taken in the preparation of this publication, Seiko
Epson Corporation assumes no responsibility for errors or omissions.
Neither is any liability assumed for damages resulting from the use of the
information contained herein.
Neither Seiko Epson Corporation nor its affiliates shall be liable to the
purchaser of this product or third parties for damages, losses, costs, or
expenses incurred by purchaser or third parties as a result of: accident,
misuse, or abuse of this product or unauthorized modifications, repairs, or
alterations to this product, or (excluding the U.S.) failure to strictly comply
with Seiko Epson Corporation's operating and maintenance instructions.
Seiko Epson Corporation shall not be liable against any damages or
problems arising from the use of any options or any consumable products
other than those designated as Original Epson Products or Epson
Approved Products by Seiko Epson Corporation.
Depending on the area, the interface cable may be included with the product.
If so, use that cable.
Seiko Epson Corporation shall not be held liable for any damage resulting from
electromagnetic interference that occurs from the use of any interface cables other
than those designated as Epson approved products by Seiko Epson Corporation.
EPSON is a registered trademark of Seiko Epson Corporation. Exceed Your Vision is
a registered trademark or trademark of Seiko Epson Corporation. All other trademarks
are the property of their respective owners and used for identification purpose only.
Microsoft, Windows, Windows Vista, and Windows Server are registered
trademarks of Microsoft Corporation in the United States and/or other countries.
NOTICE: The contents of this manual are subject to change without notice.
©Seiko Epson Corporation 2009-2020. All rights reserved.
Cleaning the MICR Unit
2
Use an approved Epson MICR cleaner card.
KIC Team, Inc.
• Waffletechnology (R) MICR cleaning card (model:CS1B15WS)
• Epson Check Scanner Cleaning Kit (model:KWEPS-KCS2)
Use TM-S1000 Utility & Documents CD or your application for MICR
cleaning.
It is recommended to clean the image scanner after cleaning the
MICR unit.
ERROR LED is Flashing or Lit
Make sure that the covers are properly closed.
If a paper jam has occurred, remove the jammed paper, referring to the
next section "Paper Jams."
Turn off the scanner, and then turn it on after a while. If the error persists,
consult a qualified service person for repair.
Paper Jams
Open the scanner cover or franker cover to remove the jammed paper.
Notes on Usage
When using the scanner, do not open the covers.
Protect the scanner from impact.
Do not apply excessive force to the scanner case.
Do not place food or beverages such as coffee on the scanner case.
Do not change the settings of the DIP switch under the bottom cover.
Notes on Installation
Be sure that the scanner is installed horizontally.
Do not install the scanner in a dusty place.
Install the scanner away from magnetic devices.
Cables or other foreign objects must not be caught on the scanner.
Notes on Transportation
Keep the scanner upright and horizontal during transportation.
Ensure that the ASF/SF and pocket guides are fully inserted during
transportation.
 Loading...