

Page 1
User’s Manual / Manuel de l’utilisateur
Page 2

Standards and Approvals
The following standards are applied only to the products that are so labeled. (EMC is tested using
the Epson power supplies.)
North America: FCC Class A, CAN ICES-3 (A)/NMB-3 (A)
WARNING
The connection of a non-shielded interface cable to this device will invalidate the EMC standards
of this device. You are cautioned that changes or modifications not expressly approved by Seiko
Epson Corporation could void your authority to operate the equipment.
FCC Compliance Statement for American Users
This equipment has been tested and found to comply with the limits for a Class A digital device,
pursuant to Part 15 of the FCC Rules. These limits are designed to provide reasonable protection
against harmful interference when the equipment is operated in a commercial environment.
This equipment generates, uses, and can radiate radio frequency energy and, if not installed and
used in accordance with the instruction manual, may cause harmful interference to radio
communications. Operation of this equipment in a residential area is likely to cause harmful
interference, in which case the user will be required to correct the interference at his own expense.
For California Customers Only
The lithium batteries in this product contain Perchlorate Material special handling may apply.
See www.dtsc.ca.gov/hazardouswaste/perchlorate.
2
Page 3

Page 4

English
Important Safety Information
This manual presents important information intended to ensure safe and effective use of this
product. Read this manual carefully and store it in an accessible location.
Key to Symbols
The symbols in this manual are identified by their level of importance, as defined below. Read the
following carefully before handling the product.
!WARNING:
Warnings must be observed carefully to avoid serious bodily injury.
!CAUTION:
Cautions must be observed to avoid minor injury to yourself, damage to your equipment, or loss of
data.
QNote:
Notes have important information and useful tips on the operation of your product.
Safety Precautions
!WARNING:
❏
If this product produces smoke, a strange odor, or unusual noise, immediately unplug the
AC cable, and then contact your dealer or an Epson service center for advice. Continued
use may lead to fire or electric shock.
❏
Do not use this product with any voltage other than the specified one. Doing so may lead
to fire or electric shock.
❏
Do not connect the cables in ways other than those specified in the manuals. Different
connections may cause equipment damage or fire.
❏
Do not use this product where inflammable fumes of gasoline, benzine, thinner, or other
inflammable liquids may be in the air. Doing so may cause an explosion or fire.
❏
Do not use aerosol sprayers containing flammable gas inside or around this product.
Doing so may cause fire.
❏
If water or other liquid spills into this product, immediately unplug the AC cable, and then
contact your dealer or an Epson service center for advice. Continued use may lead to fire
or shock.
❏
Do not allow foreign objects to fall into this product. Penetration by foreign objects may
lead to fire or electric shock.
❏
Never attempt to repair this product yourself. Improper repair work can be dangerous.
❏
Never disassemble or modify this product. Tampering with this product may result in
injury, fire, or electric shock.
4
Page 5

English
!CAUTION:
❏
Do not use this product in locations subject to high humidity or dust levels. Excessive humidity
and dust may cause paper jams and other problems, such as fire, or electric shock.
❏
Be sure to set this product on a firm, stable, horizontal surface. The product may break or cause
injury if it falls.
❏
Do not stand on or place heavy objects on top of this product. Equipment may fall or collapse,
causing breakage and possible injury.
❏
The print head can be very hot during and immediately after printing. If you need to touch it, such
as for cleaning, wait until it cools down. Touching it before that may cause burns.
❏
Do not connect a telephone line to the drawer kick connector. There is a risk of the telephone line
or product being damaged.
❏
To ensure safety, unplug this product before leaving it for an extended period.
❏
Take care not to injure your fingers on the manual cutter
• When you remove printed paper
• When you perform other operations such as loading/replacing roll paper
Caution Labels
The caution labels on the product indicate the following precautions.
!KCAUTION:
The thermal head can be very hot during printing and immediately after printing. Touching it may
cause burns.
!CAUTION:
When connecting external devices to the USB ports, follow the precautions below.
❏
Confirm the rated current of the external devices by checking the descriptions on the devices or
manuals. Connect the external devices only when those total rated current is less than 600 mA.
Do not use a device whose rated current is unclear.
❏
Use UL-approved external devices (only for North American users).
5
Page 6
English
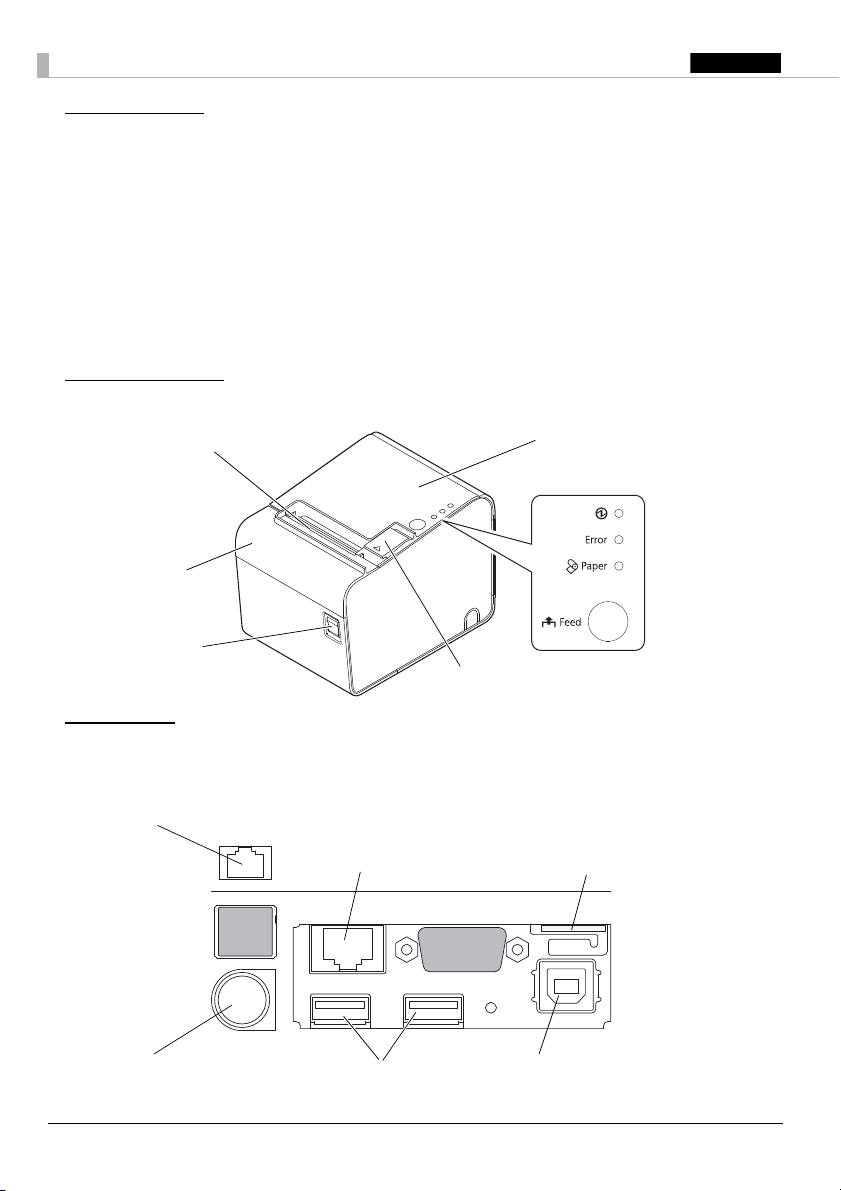
Unpacking
Cutter cover
Control panel
Roll paper cover
Power switch
Manual cutter
Cover open lever
Ethernet port
microSD card slot
DC-in connector
Drawer kick connector
USB host portsr
USB device port
The following items are included with the standard specification printer. If any item is damaged,
contact your dealer.
❏ Printer
❏ AC adapter
❏ Control panel label for vertical installation
❏ Roll paper spacer
❏ Power switch softcover
❏ User’s Manual (this manual)
Printer Parts
Interface
All the ports and connectors are located on the back of the printer.
6
Page 7
English
Control Panel
(Power) LED
Lights when the power is on, and is off when the power is off.
Error LED
Off when the printer is online, lights when the printer is offline, and flashes when an error occurs.
Paper LED
Lights when roll paper is out.
Feed button
Feeds the roll paper.
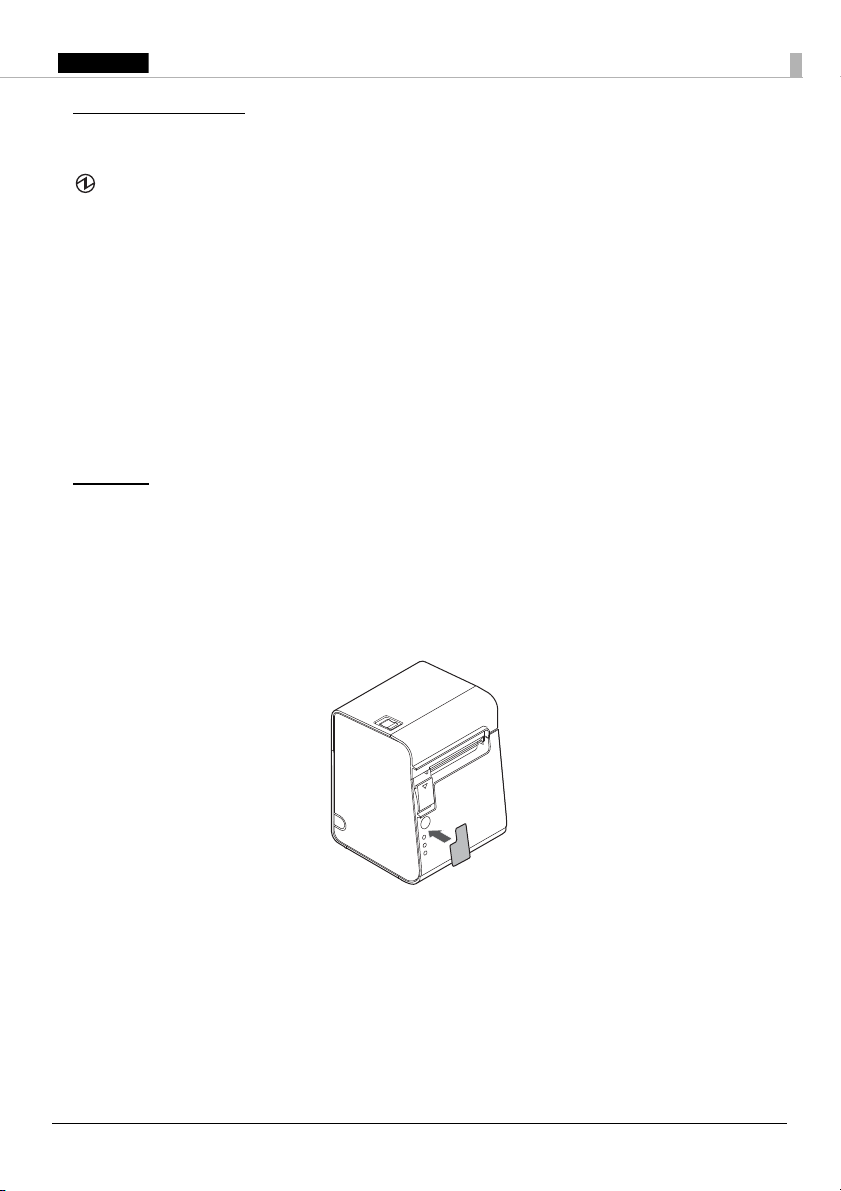
Setup
Installing the Printer Horizontally or Vertically
You can install the printer horizontally (with the paper exit on top) or vertically (with the paper
exit at the front).
When installing the printer vertically, attach the included control panel label to the printer case,
and install it on a flat surface.
Removing or Installing the Paper Guide
Install or remove the paper guide to match the width of the roll paper in use.
A 58 mm paper guide is installed.
• When using a roll paper that is 58 mm wide, use the printer as it is.
• When using a roll paper that is 80 mm wide, remove the installed guide.
• When using a roll paper that is 40 mm wide, remove the installed guide, and install the included 40 mm
paper guide.
7
Page 8

English
!CAUTION:
Changing to a roll paper that is wider than the roll paper in use can cause decreased print quality.
Removing the Paper Guide
1. Open the roll paper cover using the cover open lever.
2. Pull the paper guide in the direction of the arrow in illustration while pulling the lever of the paper guide
to remove it.
Installing the Paper Guide
!CAUTION:
Installation position of the paper guide varies depending on the width of the paper guide. Do not
install the 58 mm paper guide in the position for the 40 mm paper guide.
8
Page 9
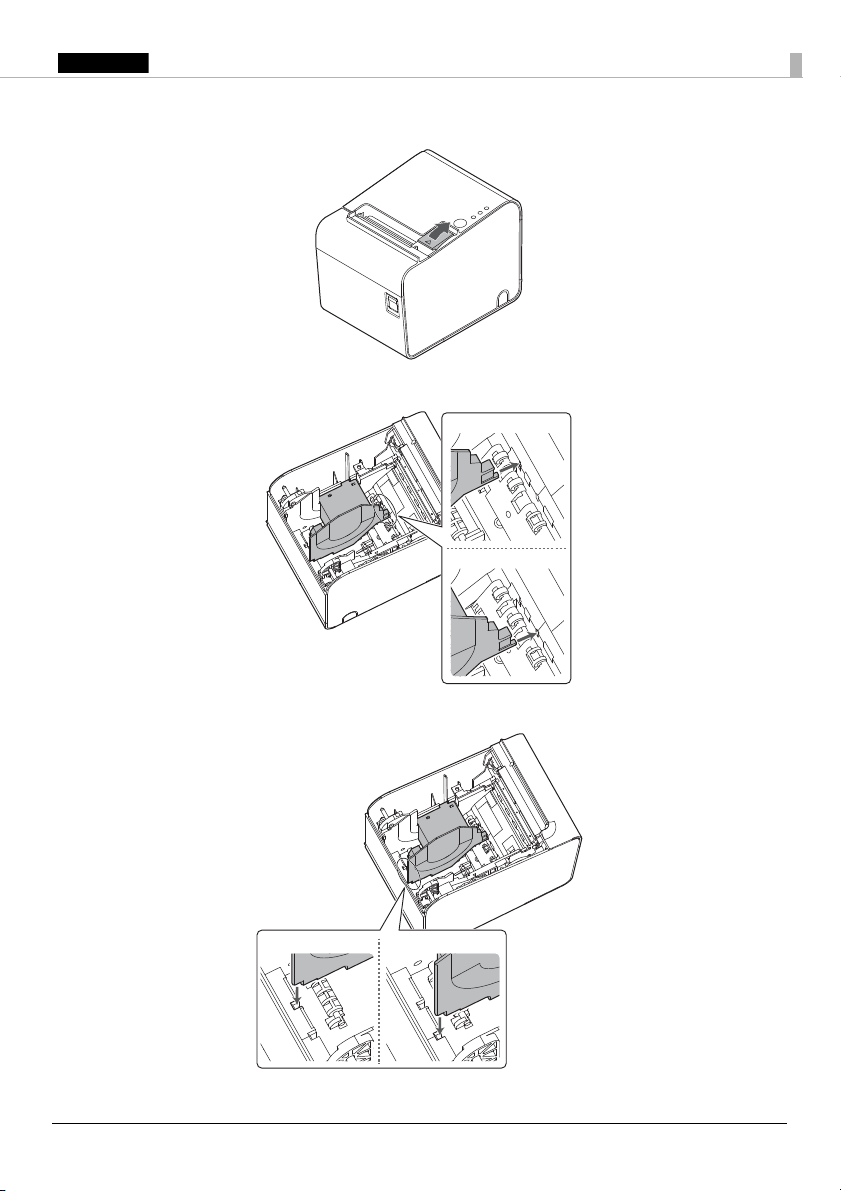
English
1. Open the roll paper cover using the cover open lever.
58 mm
40 mm
40 mm
58 mm
2. Align the projection of the paper guide with the hole in the roll paper holder.
3. Align the corner of the paper guide with the notch in the roll paper holder.
9
Page 10
English
4. Align 2 holes in the paper guide with 2 projections of the roll paper holder.
5. Push the lever of the paper guide down until the paper guide clicks into place.
Connecting Cables
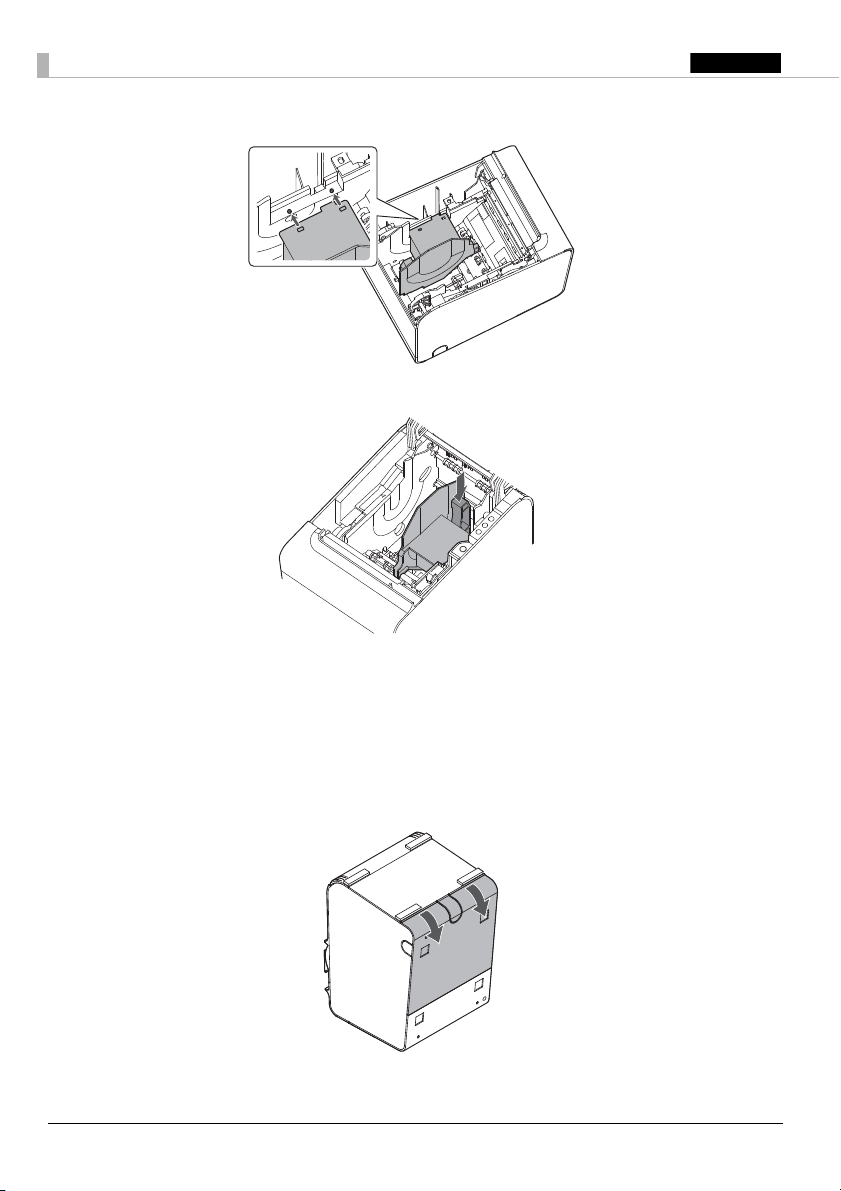
Remove the printer cover to connect the cable.
Removing the Cover
1. Place the printer as shown in illustration, and pull the cover in the direction of the arrow in the
illustration to remove the cover.
10
Page 11

English
2. Break off by hand any of the three portions indicated by circles in illustration to pass the cables
through.
3. Connect the cables to the printer.
4. Attach the cover while passing the cables through the holes.
Connecting the AC Adapter
Follow the steps below to connect the AC adapter.
1. Firmly insert the DC connector of the AC adapter all the way into the DC-in connector on the
printer.
2. Firmly insert the connector of the AC cable all the way into the AC inlet on the AC adapter.
3. Firmly insert the plug all the way into the grounded wall outlet.
4. Set the AC adapter so that its label side is facing down.
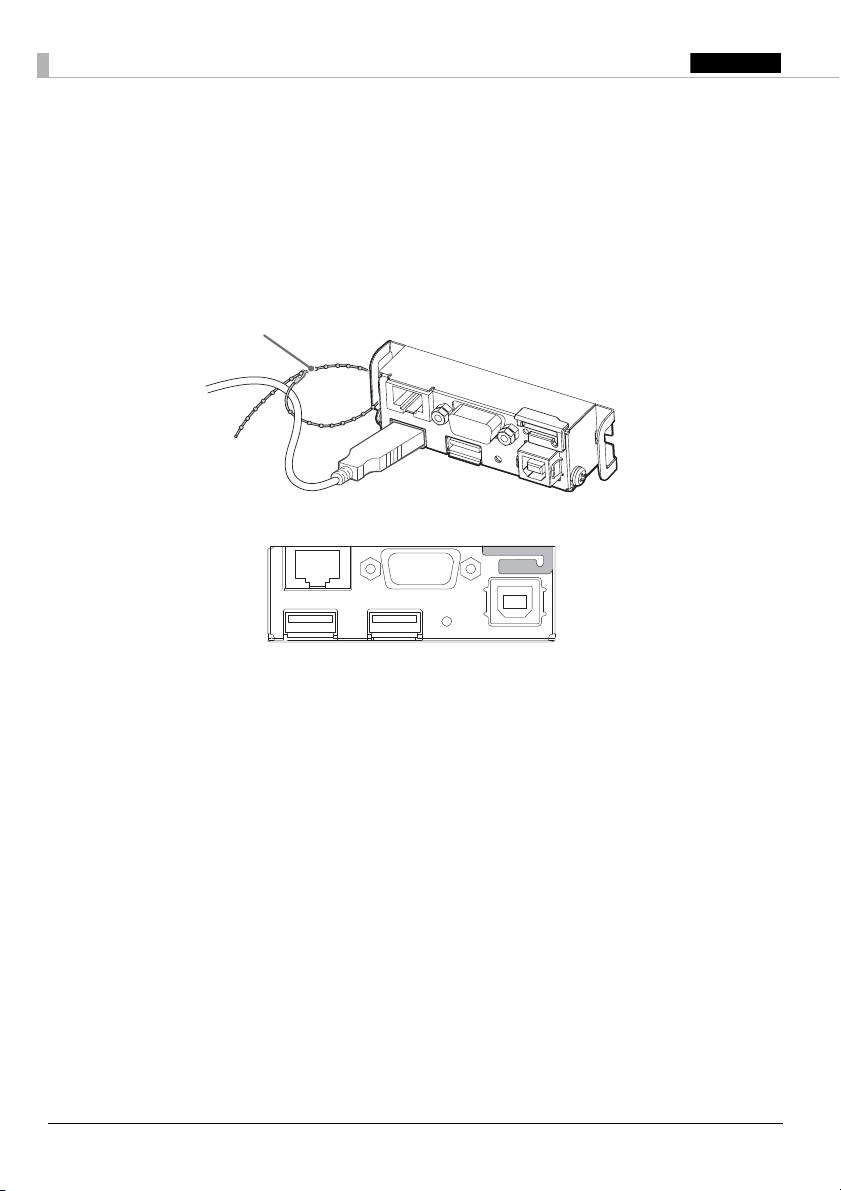
Connecting External Devices
If you connect external devices, connect each cable to the port/connector on the back of the
printer. (U
“Interface” on page 6)
11
Page 12
English
!CAUTION:
Cable band
❏
When connecting external devices to the USB ports, follow the precautions below.
• Confirm the rated current of the external devices by checking the descriptions on the devices or manuals.
Connect the external devices only when those total rated current is less than 600 mA. Do not use a device
whose rated current is unclear.
• Use UL-approved external devices (only for North American users).
❏
When connecting the USB cables, pass the cables through the cable band to prevent them from
coming off.
❏
When using the printer, make sure the protective cover fits firmly into place.
❏
When Ethernet cables are installed outdoors, make sure devices without proper surge protection
are cushioned by being connected through devices that do have surge protection. Otherwise, the
devices can be damaged by lightning.
QNote:
Connecting the optional Wireless LAN Cable Set (OT-WL Series) to the USB port enables the wireless
LAN connection. While connecting via wireless LAN, keep the Ethernet cable unconnected to the
printer.
12
Page 13
English
Basic Operations
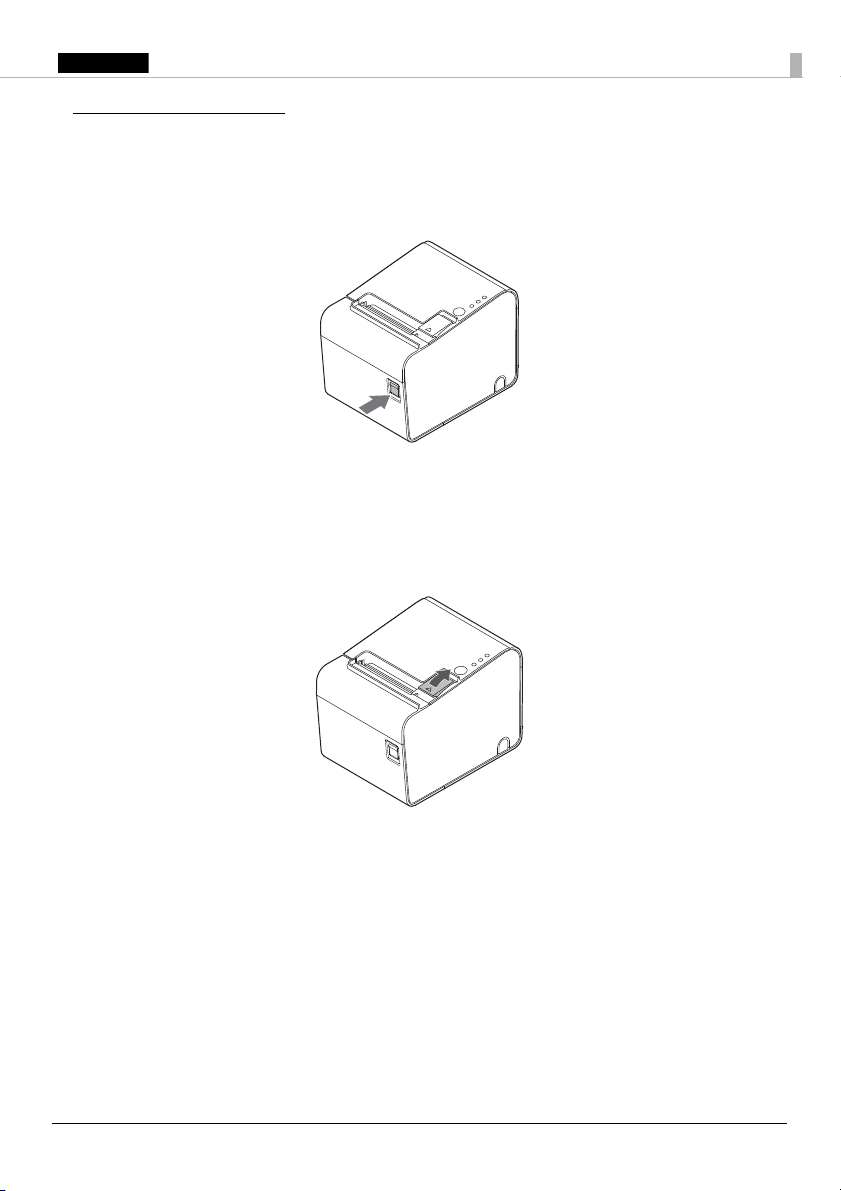
Turning Power On/Off
Press the power switch to turn on or off the power.
QNote:
It takes approximately 30 seconds after the printer is turned on until it is ready for printing.
Opening the roll paper cover
Pull the cover open lever to open the roll paper cover.
!CAUTION:
Do not open the roll paper cover during printing. Doing so may cause an injury or the product to no
longer work properly.
13
Page 14
English
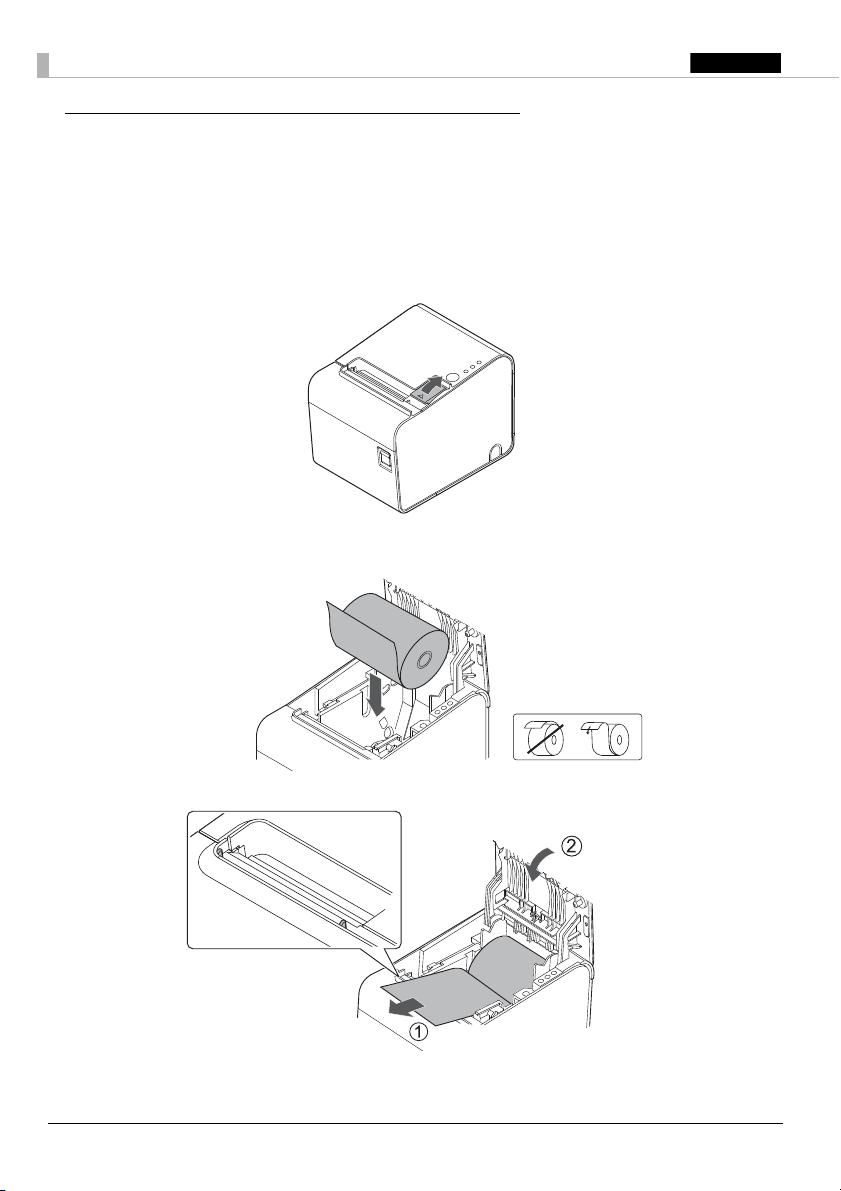
Installing or Replacing the Roll Paper
!CAUTION:
❏
Be sure to use the specified roll paper. (U “TM-L90-i Specifications” on page 20)
❏
If you change the paper type from linerless label paper to thermal roll paper, cleaning around the
paper path is recommended. (U
1. Open the roll paper cover using the cover open lever.
2. Remove the used roll paper core if there is one.
3. Insert a roll of paper in the correct direction.
“Cleaning Inside the Printer” on page 15.)
4. Pull out a small amount of paper, aligning the paper with the paper guides on both sides.
5. Be sure to close the roll paper cover completely by pushing on the middle of the cover.
When the printer is powered on, the paper will feed and cut automatically.
14
Page 15

English
Cleaning
Cleaning the Printer Case
When cleaning the printer case, be sure to turn off the printer, and wipe the dirt off the printer case
with a dry or damp cloth.
!CAUTION:
Never clean the product with alcohol, benzine, thinner, or other such solvents. Doing so may
damage or break the parts made of plastic and rubber.
Cleaning Inside the Printer
When print quality is deteriorated, clean the paper path (such as the autocutter blade, platen roller,
thermal head, and the roll paper holder).
To clean these parts, turn off the printer, unplug the AC cable, open the roll paper cover, and
remove the paper dust, adherent glue, or other foreign substance with a cotton swab or cloth
moistened with an alcohol solvent (ethanol or IPA).
If paper dust adheres around the black mark sensor, blow or wipe it off to keep the operation of the
printer normal.
For the locations of each part, see the illustration.
!CAUTION:
❏
If adherent glue is attached, be sure to wipe it all off.
❏
Take care not to injure your fingers on the manual cutter when cleaning.
❏
Before turning on the printer after cleaning, allow alcohol on the printer to dry completely.
!KCAUTION:
The thermal head can be very hot after printing. Be careful not to touch it and to let it cool before you
clean it. Do not damage the thermal head by touching it with your fingers or any hard object.
15
Page 16

English
Platen roller
Paper path
Autocutter blade
Wipe off all glue on
these edge and ribs.
<Locations for the autocutter blade, platen roller, and paper path>
Wipe off all glue in the touchable
area of the autocutter and the platen
roller.
Blow or wipe off the paper
dust around the black mark
sensor.
Thermal head
Roll paper holder
<Locations for the thermal head and roll paper holder>
16
Page 17

English
Running a Self-test
In self-test mode the printer will perform a series of internal diagnostics, and then provide a listing
of printer settings.
Having a printed self-test in hand when calling for technical support can help speed the
troubleshooting process.
Use the following procedure to start a self-test.
1. Close the roll paper cover.
2. While pressing the Feed button on the control panel, turn on the printer. (Keep pressing the
Feed button until the printer starts printing.)
The printer prints out the various printer states.
3. When all printer states have been printed, make sure that the following message is displayed and
the Paper LED flashes.
"If you want to continue SELF-TEST printing, please press Feed button."
The printer is now in the self test wait mode.
4. To start a test print, press the Feed button when the printer is in the self test wait mode.
5. Check that the following has been printed.
"*** completed ***"
This indicates that the printer has been initialized and made the transition to the normal mode.
Resetting the Printer
Certain error conditions can be reset by turning the printer off then back on.
Not all error conditions can be reset using this method. (U
“Troubleshooting” on page 18)
17
Page 18

English
Troubleshooting
Power LED does not light
Check whether the AC adapter is correctly connected. (U
Error LED on or flashing
❏ Check to see that the roll paper cover is closed and check the Paper LED. Close the cover or
replace the roll paper if necessary.
❏ If the Paper LED is on, check whether the roll paper is correctly installed and any roll paper
remains. (U
“Installing or Replacing the Roll Paper” on page 14)
❏ If the printer has been printing a lot, the thermal head may be hot. Wait for the head to cool.
Printing will resume automatically.
❏ Open the roll paper cover, and check to see if the paper is jammed. If a paper jam occurs or if the
roll paper cover will not open, see the section below.
❏ Turn the printer off and back on. If the LED is still flashing, notify your manager. The printer
may require servicing.
Printout is faint
When printout is faint, adhesive glue or another foreign substance may be present on the thermal
head, platen roller, or paper path of the printer.
In such case, first clean the thermal head by following the instructions described in
the Printer” on page 15
.
If the print quality does not improve, clean the platen roller and paper path of the printer by
following the instructions described in
“Cleaning Inside the Printer” on page 15.
Printed character size is not appropriate for 40 mm/58 mm width paper
When using 40 mm/58 mm width roll paper, if the printed character size is not appropriate or if
the printout does not fit within the paper width, the paper guide may not be installed correctly.
“Installing the Paper Guide” on page 8)
(U
“Connecting the AC Adapter” on page 11)
“Cleaning Inside
Paper jam
Turn off the power and open the roll paper cover to remove the jammed paper. After that, install
the roll paper correctly. If the roll paper cover will not open, see the section below.
If glue or another foreign substance is present on the autocutter blade, platen roller, or the paper
path, a paper jam is likely to occur. (U
“Cleaning Inside the Printer” on page 15)
18
Page 19

English
The roll paper cover will not open
Follow the steps below when the roll paper cover will not open.
1. Turn off the printer.
2. Insert a tool such as a screwdriver into the slots on both sides of the printer, and lift the cover in
the direction of the arrow to remove it.
3. Turn the knob in the direction of the arrow, by using a ballpoint pen or tweezers, until you see a
triangle mark in the opening.
19
Page 20

English
TM-L90-i Specifications
.
Print method Thermal line printing
Dot density 203 dpi × 203 dpi [dots per 25.4 mm {1”}]
Print widt h
Paper dimensions
Normal /
LFC Full Coated
Paper type
LFC Lane Coated
Ethernet
VGA do not use
Interface
USB (host)
USB (device)
micro SD card × 1
Drawer kick × 1
Power su pply*
2
Current consumption Approximately 1.8 A
Normal /
Tem p er at ur e
LFC Full Coated
LFC Lane Coated
Normal /
Humidity
LFC Full Coated
LFC Lane Coated 20 to 80%
Overall dimensions 140 × 203 × 148 mm {5.51 × 7.99 × 5.83 "} (W × D × H)
Weig ht (ma ss) Approximately 1.9 kg {4.19 lb}
dpi: dots per 25.4 mm (dots per inch)
*1: 500 mA at maximum for one port. 600 mA at maximum for total of the two ports.
*2: Be sure to use a safety-standards-applied power source that meets the following specifications.
Rated output: 24 V, 2.0 to 10.0 A
Maximum output: 240 VA or less
80 mm paper width 58 mm paper width 40 mm paper width
72 mm {2.84"}, 576 dot
positions
79.5 ± 0.5 × max. Ф102
mm
{3.13 ± 0.02 × 4"}
Thermal paper:
NTP080-80
52.5 mm {2.07"}, 420 dot
positions
57.5 ± 0.5 × max. Ф102
mm
{2.26 ± 0.02 × 4"}
Thermal paper:
NTP058-80
Linerless label paper:
9023 - 0839 (12 roles)
Linerless label paper:
9023 –1274 (6 roles)
9023 –1253 (12 roles)
Linerless label paper:
9023 –1823 (12 roles)
9023 –1397 (30 roles)
× 1
10BASE-T/100BASE-TX
× 2
USB 2.0, Type A
5 V, 500 mA*
1
× 1
USB 2.0 High speed, Type B
DC+24 V ± 7%
Operating: 5 to 45°C {41 to 113°F}
Storage: –10 to 50°C {14 to 122°F} (except for paper)
Operating: 5 to 35°C {41 to 95°F}
Storage: –10 to 50°C {14 to 122°F} (except for paper)
10 to 90%
35 mm {1.38"}, 280 dot
positions
40.0 ± 0.5 × max. Ф102
mm
{1.57 ± 0.02 × 4"}
Linerless label paper:
9023-1055 (12 roles)
Linerless label paper:
9023 –1275 (6 roles)
9023 –1257 (12 roles)
20
Page 21

English
Memory switch settings
Memory switches can be set with the memory switch setting utility.
Paper width 40mm 58mm 80mm
Characters per line
Auto scaling
function
80mm cpl settings
Select of
40mm or 58mm
Font A 40 23 42 30 42 44 48
Font B 40 31 60 40 55 57 64
MSW 6-2
MSW 6-4 - (Do not care) ON ON OFF
MSW 6-5 - (Do not care) ON OFF OFF
MSW 6-8
ON OFF ON OFF - (Do not care)
OFF ON - (Do not care)
Appendix
Downloading Drivers, Utilities, and Manuals
The latest versions of drivers, utilities, and manuals can be downloaded from one of the following
URLs.
For customers in North America, go to the following web site:
http://www.epson.com/support/
For customers in other countries, go to the following web site:
https://download.epson-biz.com/?service=pos
Open Source Software License
This product uses open source software in addition to Epson proprietary software.
For information of the open source software used in this product, see the following URL.
http://xxx.xxx.xxx.xxx/licenses.htm
For “xxx.xxx.xxx.xxx” in the above URL, input your printer’s IP address.
Restriction of Use
When this product is used for applications requiring high reliability/safety, such as transportation
devices related to aviation, rail, marine, automotive, etc.; disaster prevention devices; various safety
devices, etc.; or functional/precision devices, etc.; you should use this product only after giving
consideration to including fail-safes and redundancies into your design to maintain safety and total
system reliability. Because this product was not intended for use in applications requiring
extremely high reliability/safety, such as aerospace equipment, main communication equipment,
nuclear power control equipment, or medical equipment related to direct medical care, etc., please
make your own judgment on this product’s suitability after a full evaluation.
21
Page 22

English
Caution
No part of this publication may be reproduced, stored in a retrieval system, or transmitted in any
form or by any means, electronic, mechanical, photocopying, recording, or otherwise, without the
prior written permission of Seiko Epson Corporation. No patent liability is assumed with respect to
the use of the information contained herein. While every precaution has been taken in the
preparation of this book, Seiko Epson Corporation assumes no responsibility for errors or
omissions. Neither is any liability assumed for damages resulting from the use of the information
contained herein.
Neither Seiko Epson Corporation nor its affiliates shall be liable to the purchaser of this product or
third parties for damages, losses, costs, or expenses incurred by purchaser or third parties as a
result of: accident, misuse, or abuse of this product or unauthorized modifications, repairs, or
alterations to this product, or (excluding the U.S.) failure to strictly comply with Seiko Epson
Corporation’s operating and maintenance instructions.
Seiko Epson Corporation shall not be liable against any damages or problems arising from the use
of any options or any consumable products other than those designated as Original Epson
Products or Epson Approved Products by Seiko Epson Corporation.
EPSON is a registered trademark of Seiko Epson Corporation.
Exceed Your Vision is a registered trademark or trademark of Seiko Epson Corporation.
All other trademarks are the property of their respective owners and used for identification
purpose only. Product information is subject to change without due notice.
NOTICE: The contents of this manual are subject to change without notice.
© Seiko Epson Corporation 2016. All rights reserved.
22
Page 23

Page 24

Français
Informations importantes concernant la sécurité
D’importantes informations destinées à assurer un emploi sans danger et efficace de ce produit
sont présentées dans ce manuel. Lisez-le attentivement et rangez-le dans un endroit facile d’accès.
Signification des symboles
Dans ce manuel, les symboles sont identifiés par ordre d’importance de la manière indiquée
ciaprès. Lisez attentivement ce qui suit avant de manipuler le produit.
!AVERTISSEMENT :
Les avertissements doivent être strictement respectés afin d’éviter tout risque de blessure
corporelle.
!ATTENTION :
Les mises en garde doivent être respectées afin d’éviter les risques de blessure légère de l’utilisateur,
d’endommagement du matériel ou de perte de données.
QRemarque :
Les remarques fournissent des informations importantes et des conseils utiles concernant
l’exploitation de votre produit.
Précautions de sécurité
!AVERTISSEMENT :
❏
Si ce produit génère de la fumée, une odeur étrange ou un bruit inhabituel, débranchez
immédiatement le câble d’alimentation et contactez votre revendeur ou un centre après
vente Epson. Il existe sinon un danger d’incendie ou de choc électrique.
❏
N’utilisez jamais ce produit sur une tension autre que la tension spécifiée. Cela peut
provoquer un risque d’incendie ou d’électrocution.
❏
Ne branchez jamais les câbles d’une manière autre que celle spécifiée dans les manuels.
Un branchement incorrect risque d’endommager le matériel et pose des risques
d’incendie.
❏
N’utilisez pas l’appareil dans des endroits où des vapeurs inflammables d’essence, de
benzène, de diluant ou d’autre liquide inflammable risquent d’être présentes dans
l’atmosphère. Il existe sinon un danger d’explosion ou d’incendie.
❏
N’utilisez pas de bombes à aérosol contenant un gaz inflammable à l’intérieur ou à
proximité de ce produit. Cela pourrait entraîner un incendie.
❏
En cas de pénétration d’eau ou d’autre liquide dans ce produit, débranchez
immédiatement le câble d’alimentation et contactez votre revendeur ou un centre après
vente Epson. Une utilisation continue peut provoquer un risque d’incendie ou
d’électrocution.
24
Page 25

França is
❏
Ne laissez pas tomber de corps étrangers dans ce produit. La pénétration de corps
étrangers peut provoquer un incendie ou un choc électrique.
❏
N’essayez jamais de réparer ce produit vous-même. Toute réparation erronée peut être
dangereuse.
❏
Ne démontez et ne modifiez jamais ce produit. Les interventions intempestives peuvent
provoquer des blessures, un incendie ou un choc électrique.
!ATTENTION :
❏
Évitez les endroits sujets à une humidité ou à une poussière élevée, car ces conditions risquent de
provoquer des bourrages de papier et d’autres problèmes tels qu’incendie ou choc électrique.
❏
Veillez à poser cet équipement sur une surface horizontale ferme et stable. Toute chute du produit
peut casser celui-ci ou occasionner des blessures.
❏
Ne montez pas et ne placez pas d’objets lourds sur ce produit. L’équipement pourrait tomber ou
s’affaisser, et se casser ou causer des blessures.
❏
La tête d’impression peut être très chaude pendant et immédiatement après l’impression. Si vous
avez besoin de la toucher, par exemple à des fins de nettoyage, attendez qu’elle refroidisse, sous
peine de vous brûler.
❏
Ne raccordez pas de ligne téléphonique au connecteur du tiroir-caisse. Cela risquerait
d’endommager la ligne téléphonique ou le produit.
❏
Pour plus de sécurité, débranchez ce produit lorsqu’il ne doit pas servir pendant une période
prolongée.
❏
Prenez garde à ne pas vous couper les doigts avec le coupe-papier manuel
• En retirant le papier imprimé
• Lors d’autres opérations comme le chargement/remplacement du rouleau de papier
Étiquettes de mise en garde
Les étiquettes de mise en garde sur le produit indiquent les précautions suivantes.
!KATTENTION :
La tête thermique peut devenir très chaude durant et immédiatement après l’impression. Tout
contact peut causer des brûlures.
!ATTENTION :
Lors du raccordement de périphériques externes aux ports USB, suivez les précautions suivantes.
❏
Contrôlez le courant nominal des périphériques externes en consultant leurs descriptifs ou leurs
manuels. Ne raccordez les périphériques externes que sile courant nominal total est inférieur à
600mA. N’utilisez aucun périphérique dont la valeur du courant nominal n’est pas claire.
❏
Utilisez des périphériques externes homologués UL (uniquement pour les utilisateurs en
Amérique du Nord).
25
Page 26

França is
Déballage
Couvercle du
coupe-papier
Panneau de commande
Couvercle du rouleau de papier
Interrupteur marche-arrêt
Coupe-papier manuel
Levier d’ouverture du couvercle
Port Ethernet
Logement de carte micro SD
Connecteur d’alimentation
Connecteur tiroir-caisse
Ports hôtes USB
Port périphérique USB
Les éléments suivants sont fournis avec l’imprimante aux caractéristiques standard. Si l’un des
éléments est endommagé, contactez votre revendeur.
❏ Imprimante
❏ Adaptateur secteur
❏ Étiquette du panneau de commande pour une installation à la verticale.
❏ Entretoise pour le rouleau de papier
❏ Cache souple de l’interrupteur marche-arrêt
❏ Manuel d’utilisation (ce manuel)
Pièces de l’imprimante
Interface
Tous les ports et les connecteurs sont situés à l’arrière de l’imprimante.
26
Page 27

França is
Panneau de commande
Voyant marche-arrêt (Alimentation)
S’allume lorsque l’appareil est sous tension et s’éteint lorsque l’appareil est hors tension.
Voyant d’erreur (Error)
Éteint lorsque l’imprimante est en ligne, s’allume lorsque l’imprimante est hors ligne et clignote
lorsqu’une erreur se produit.
Voyant papier (Paper)
S’allume lorsque le rouleau de papier est épuisé.
Bouton d’avance papier (Feed)
Fait avancer le rouleau de papier.
Installation
Installation horizontale ou verticale de l’imprimante
Vous pouvez installer l’imprimante horizontalement (avec la sortie du papier en haut) ou
verticalement (avec la sortie du papier sur l’avant).
Lors de l’installation de l’imprimante verticalement, fixez l’étiquette du panneau de commande
incluse sur le boîtier de l’imprimante et installez-la sur une surface plane.
27
Page 28

França is
Retrait ou installation du guide de papier
Installez ou retirer le guide de papier pour faire correspondre à la largeur du rouleau de papier
utilisé.
Un guide de papier de 58 mm est installé.
• Lors de l’utilisation d’un rouleau de papier d’une largeur de 58 mm, utilisez l’imprimante telle quelle.
• Lors de l’utilisation d’un rouleau de papier d’une largeur de 80 mm, retirez le guide installé.
• Lors de l’utilisation d’un rouleau de papier d’une largeur de 40 mm, retirez le guide installé et installez le
guide de papier de 40 mm fourni.
!ATTENTION :
Le passage à un rouleau de papier plus largeur que le rouleau de papier utilisé peut causer une
diminution de la qualité d’impression.
Retrait du guide de papier
1. Ouvrez le couvercle du rouleau de papier en utilisant le levier d’ouverture.
2. Tirez le guide de papier dans le sens de la flèche indiquée sur l’illustration tout en tirant le levier du guide
de papier pour le retirer.
Installation du guide de papier
!ATTENTION :
La position d’installation du guide de papier varie en fonction de la largeur du guide de papier.
N’installez pas le guide de papier de 58 mm sur la position pour le guide de papier de 40 mm.
28
Page 29

França is
1. Ouvrez le couvercle du rouleau de papier en utilisant le levier d’ouverture.
58 mm
40 mm
40 mm
58 mm
2. Alignez la projection du guide de papier avec le trou dans le support de rouleau de papier.
3. Alignez le coin du guide de papier avec l’encoche dans le support de rouleau de papier.
29
Page 30

França is
4. Alignez les 2 trous du guide de papier avec 2 projections du support de rouleau de papier.
5. Poussez le levier du guide de papier jusqu’à ce que le guide de papier s’enclenche en position.
Connexion des câbles
Retirez le couvercle de l’imprimante pour raccorder le câble.
Retrait du couvercle
1. Placez l’imprimante comme indiqué sur l’illustration, puis tirez le couvercle dans le sens de la
flèche sur l’illustration pour le retirer.
30
Page 31

França is
2. Cassez à la main l’une des trois portions indiquées par des cercles sur l’illustration pour y passer
les câbles à travers.
3. Reliez les câbles à l’imprimante.
4. Attachez le couvercle en passant les câbles à travers les trous.
Raccordement de l’adaptateur secteur
Suivez les étapes ci-dessous pour raccorder l’adaptateur secteur.
1. Insérez solidement le connecteur d’alimentation de l’adaptateur secteur dans le connecteur
d’alimentation sur l’imprimante.
2. Insérez solidement le connecteur du câble d’alimentation dans la prise d’alimentation sur
l’adaptateur secteur.
3. Insérez solidement la fiche dans la prise murale raccordée à la terre.
4. Placez l’adaptateur secteur de sorte que le côté avec l’étiquette soit vers le bas.
Raccordement de périphériques externes
Si vous raccordez des périphériques externes, raccordez chaque câble au port/connecteur à l’arrière
de l’imprimante. (U
“Interface” à la page 26)
31
Page 32

França is
!ATTENTION :
Collier
❏
Lors du raccordement de périphériques externes aux ports USB, suivez les précautions suivantes.
• Contrôlez le courant nominal des périphériques externes en consultant leurs descriptifs ou leurs
manuels. Ne raccordez les périphériques externes que sile courant nominal total est inférieur à 600mA.
N’utilisez aucun périphérique dont la valeur du courant nominal n’est pas claire.
• Utilisez des périphériques externes homologués UL (uniquement pour les utilisateurs en Amérique du
Nord).
❏
Lors du branchement des câbles USB, passez les câbles à travers le collier pour éviter qu’ils se
détachent.
❏
Lors de l’utilisation de l’imprimante, assurez-vous que le couvercle de protection est solidement
installé.
❏
Lorsque des câbles Ethernet sont installés à l’extérieur, assurez-vous que les périphériques sans
protection appropriée contre les pics de courant sont protégés en les raccordant par le biais de
dispositifs disposant d’une telle protection. Les périphériques risquent sinon d’être endommagés
par la foudre.
QRemarque :
Le raccordement du jeu de câble pour réseau local sans fil en option (OT-WL Séries) au port USB
permet la connexion au réseau local sans fil. En cas de connexion via réseau sans fil, laissez le câble
Ethernet débranché de l’imprimante.
32
Page 33

França is
Fonctionnement de base
Mise sous/hors tension
Appuyez sur l’interrupteur marche-arrêt pour mettre l’imprimante sous ou hors tension.
QRemarque :
Après la mise sous tension, l’imprimante sera prête à imprimer au bout de 30 secondes environ.
Ouverture du couvercle du rouleau de papier
Tirez le levier d’ouverture du couvercle du rouleau de papier pour l’ouvrir.
!ATTENTION :
N’ouvrez pas le couvercle du rouleau de papier pendant l’impression. Cela peut provoquer une
blessure ou un dysfonctionnement du produit.
33
Page 34

França is
Installation ou remplacement du rouleau de papier
!ATTENTION :
❏
Assurez-vous d’utiliser la cassette à ruban spécifiée. (U “Spécifications de la TM-L90-i” à la page 40)
❏
Si vous passez d’un rouleau de papier étiquette linerless à un rouleau de papier thermique, il est
recommandé de nettoyer le parcours du papier. (U
.)
page 35
1. Ouvrez le couvercle du rouleau de papier en utilisant le levier d’ouverture.
2. Retirez le noyau du rouleau de papier utilisé s’il est présent.
3. Introduisez un rouleau de papier dans le bon sens.
“Nettoyage de l’intérieur de l’imprimante” à la
4. Placez une petite quantité de papier en alignant le papier avec les guides de papier sur les deux
côtés.
34
Page 35

França is
5. Assurez-vous de refermer complètement le couvercle du rouleau de papier en appuyant sur le
milieu du couvercle.
Lorsque l’imprimante est sous tension, le papier est alimenté et coupé automatiquement.
Nettoyage
Nettoyage du boîtier de l’imprimante
Lors du nettoyage du boîtier de l’imprimante, assurez-vous de mettre l’imprimante hors tension,
puis essuyez la saleté du boîtier de l’imprimante avec un chiffon sec ou humide.
!ATTENTION :
Ne nettoyez jamais le produit avec de l’alcool, du benzène, du diluant ou tout autre solvant de ce
type. Cela pourrait endommager ou casser les éléments composés de plastique ou de caoutchouc.
Nettoyage de l’intérieur de l’imprimante
Lorsque la qualité est détériorée, nettoyez le parcours du papier (lame du coupe-papier
automatique, rouleau de la glace d’exposition, tête thermique et support de rouleau du papier).
Pour nettoyer ces pièces, mettez l’imprimante hors tension, débranchez le câble d’alimentation,
ouvrez le couvercle du rouleau de papier et retirez la poussière de papier, la colle et les autres
substances étrangères avec un cotontige ou un chiffon humecté d’un solvant à l’alcool (éthanol ou
alcool isopropylique).
Si la poussière de papier adhère autour du capteur de marque noir, soufflez ou essuyez-la pour
maintenir un fonctionnement normal de l’imprimante.
Pour connaître l’emplacement de chaque pièce, reportez-vous à l’illustration.
!ATTENTION :
❏
Si de la colle reste attachée, assurez-vous de la retirer.
❏
Prenez garde à ne pas vous couper les doigts avec le coupe-papier manuel lors du nettoyage.
❏
Avant de remettre l’imprimante sous tension après le nettoyage, laissez l’alcool sur l’imprimante
sécher complètement.
!KATTENTION :
La tête thermique peut être très chaude après l’impression. Veillez à ne pas la toucher et à la laisser
refroidir avant de la nettoyer. Évitez de la manipuler avec vos doigts ou un objet dur afin de ne pas
l’endommager.
35
Page 36

França is
Rouleau de la
glace d’exposition
Parcours de papier
Lame du
coupe-papier automatique
Essayez toute la colle
sur ces bords et
nervures.
<Emplacements de la lame du coupe-papier automatique, du rouleau de glace d’exposition
et du parcours de papier>
Essuyez toute la colle dans la zone
pouvant être touchée du coupepapier
automatique et du rouleau de glace
d’exposition.
Soufflez ou essuyez la
poussière de papier autour
du capteur de marque noir.
Tête thermique
Support de rouleau de
papier
<Emplacements de la tête thermique et du support de rouleau de papier>
36
Page 37

França is
Exécution d’un test automatique
En mode de test automatique, l’imprimante effectuera une série de diagnostics internes, puit
fournira une liste de ses paramètres.
Lorsque vous appelez l’assistance technique, veuillez imprimer auparavant un test automatique
pour accélérer l’opération de dépannage.
Utilisez la procédure suivante pour lancer un test automatique.
1. Refermez le couvercle du rouleau de papier
2. Maintenez enfoncé le bouton d’avance papier (Feed) sur le panneau de commande et mettez
l’imprimante sous tension. (maintenez enfoncé le bouton d’avance papier (Feed) jusqu’à ce que
l’imprimante commence à imprimer).
L’imprimante imprime ses différents états.
3. Lorsque tous les états de l’imprimante ont été imprimé, assurez-vous que le message suivant soit
affiché et que le voyant papier (Paper) clignote.
«If you want to continue SELF-TEST printing, please press Feed button.»
L’imprimante est maintenant en mode d’attente du test automatique.
4. Pour démarrer une impression de test, appuyez sur le bouton d’avance papier (Feed) lorsque
l’imprimante est en mode d’attente du test automatique.
5. Vérifiez que les éléments suivants ont été imprimés.
«*** completed ***»
Cela indique que l’imprimante a été initialisée et qu’elle est passée au mode normal.
Réinitialisation de l’imprimante
Certaines conditions d’erreur peuvent être réinitialisées en mettant l’imprimante hors tension, puis
à nouveau sous tension.
Cette méthode ne permet pas de réinitialiser toutes les conditions d’erreur. (U
)
page 38
“Dépannage” à la
37
Page 38

França is
Dépannage
Le voyant marche-arrêt (Alimentation) ne s’allume pas
Vérifiez que l’adaptateur secteur est correctement raccordé. (U
secteur” à la page 31
)
Voyant d’erreur (Error) allumé ou clignotant
❏ Vérifiez si le couvercle du rouleau de papier et fermé et vérifiez le voyant papier (Paper).
Fermez le couvercle ou remplacez le rouleau de papier si nécessaire.
❏ Si le voyant papier (Paper) est allumé, vérifiez que le rouleau de papier est placé correctement
et qu’il reste du papier. (U
“Installation ou remplacement du rouleau de papier” à la page 34)
❏ Si l’imprimante a beaucoup imprimé, la tête thermique peut être chaude. Attendez que la tête
refroidisse. L’impression reprendra automatiquement.
❏ Ouvrez le couvercle du rouleau de papier et vérifiez si le papier est coincé. Si un bourrage se
produit ou si le couvercle du rouleau de papier ne s’ouvre pas, consultez la section ci-dessous.
❏ Mettez l’imprimante hors tension, puis remettez-la sous tension. Si le VOYANT clignote
encore, avertissez votre responsable. L’imprimante peut nécessiter une révision.
L’impression est terne
Lorsque l’impression est terne, de la colle ou une autre substance étrangère peuvent être présente
sur la tête thermique, le rouleau de la glace d’exposition ou le parcours du papier de l’imprimante.
Dans ce cas, nettoyez d’abord la tête thermique en suivant les instructions décrites dans
de l’intérieur de l’imprimante” à la page 35
.
Si la qualité d’impression ne s’améliore pas, nettoyez le rouleau de la glace d’exposition et le
parcours du papier de l’imprimante en suivant les instructions décrites dans
de l’imprimante” à la page 35
.
“Raccordement de l’adaptateur
“Nettoyage
“Nettoyage de l’intérieur
La taille de caractère imprimée n’est pas appropriée pour du papier de 40 mm/58 mm de
large.
Lors de l’utilisation de rouleau de papier d’une largeur de 40 mm/58 mm, si la taille de caractère
imprimée n’est pas appropriée ou si l’impression ne tient pas sur la largeur du papier, le guide de
papier peut ne pas être installé correctement.
“Installation du guide de papier” à la page 28)
(U
Bourrage papier
Mettrez l’imprimante hors tension et ouvrez le couvercle du rouleau de papier pour retirer le
papier à l’origine du bourrage. Installez ensuite correctement le rouleau de papier. Si le couvercle
du rouleau de papier ne s’ouvre pas, consultez la section ci-dessous.
Si de la colle ou une autre substance étrangère est présente sur la lame du coupe-papier
automatique, le rouleau de la glace d’exposition ou le parcours du papier, un bourrage s’est
probablement produit. (U
“Nettoyage de l’intérieur de l’imprimante” à la page 35)
38
Page 39

França is
Le couvercle du rouleau de papier ne s’ouvre pas
Suivez les étapes ci-dessous si le couvercle du rouleau de papier ne s’ouvre pas.
1. Mettez l’imprimante hors tension.
2. Insérez un outil (par ex. tournevis) dans les fentes sur les deux côtés de l’imprimante et soulevez
le couvercle dans le sens de la flèche pour le retirer.
3. Tournez le bouton dans le sens de la flèche en utilisant un stylo ou des pinces, jusqu’à voir un
repère triangulaire dans l’ouverture.
39
Page 40

França is
Spécifications de la TM-L90-i
.
Méthode d’impression Impression thermique en ligne
Densité de points 203 dpi × 203 dpi [points par 25,4 mm {1”}]
Largeur d’impression
Dimensions du papier
Normal /
Papier couché LFC
Full coated
Type de papier
Papier couché LFC
Lane Coated
Ethernet
VGA non utilisé
Largeur de papier
80 mm
72 mm {2,84"}, 576
positions de points
79,5 ± 0,5 × max.
Ф102 mm
{3,13 ± 0,02 × 4"}
Papier thermique :
NTP080-80
Papier étiquette sans
film de protection :
9023 - 0839 (12
rouleaux)
Papier étiquette sans
film de protection :
9023 -1274 (6 rouleaux)
9023 -1253 (12 rouleaux)
1
10BASE-T/100BASE-TX
Largeur de papier
58 mm
52,5 mm {2,07"}, 420
positions de points
57,5 ± 0,5 × max.
Ф102 mm
{2,26 ± 0,02 × 4"}
Papier thermique :
NTP058-80
Papier étiquette sans
film de protection :
9023 -1823 (12 rouleaux)
9023 -1397 (30 rouleaux)
Largeur de papier
40 mm
35 mm {1,38"}, 280
positions de points
40,0 ± 0,5 × max.
Ф102 mm
{1,57 ± 0,02 × 4"}
Papier étiquette sans
film de protection :
9023-1055 (12 rouleaux)
Papier étiquette sans
film de protection :
9023 -1275 (6 rouleaux)
9023 -1257 (12 rouleaux)
Interface
USB (hôte)2USB 2.0, Type A
5 V, 500 mA*
USB (périphérique)
1
USB 2.0 haute vitesse, Type B
1
Carte micro SD 1
Tiroir caisse 1
Alimentation*
2
+24 V CC ± 7 %
Consommation de courant Environ 1,8 A
Tem p ér at ur e
Normal /
Papier couché LFC
Full coated
Papier couché LFC
Lane Coated
Normal /
Fonctionnement : 5 à 45 °C {41 à 113 °F}
Stockage : –10 à 50 °C {14 à 122 °F} (sans papier)
Fonctionnement : 5 à 35 °C {41 à 95 °F}
Stockage : –10 à 50 °C {14 à 122 °F} (sans papier)
10 à 90 %
Papier couché LFC
Humidité
Full coated
Papier couché LFC
20 à 80 %
Lane Coated
Dimensions hors tout 140 × 203 × 148 mm {5,51 × 7,99 × 5,83"} (L × P × H)
Masse Environ 1,9 kg {4,19 lb}
dpi : points par 25,4 mm (points par pouce)
*1 : 500 mA au maximum pour un port. 600 mA maximum pour le total des deux ports.
*2 : Assurez-vous d’utiliser une source d’alimentation conforme aux normes de sécurité et qui répond aux spécifications suivantes.
Puissance nominale : 24 V, 2,0 à 10,0 A
Sortie maximale : 240 VA ou moins
40
Page 41

França is
Paramètres du commutateur de mémoire
Les commutateurs de mémoire peuvent être paramétrés grâce à l’utilitaire de paramétrage de
commutateur de mémoire.
Largeur du papier 40 mm 58 mm 80 mm
Caractères par
lignes
Fonction de mise à
l’échelle
automatique
Paramètres cpl
80 mm
Sélection de
40 mm ou 58 mm
Police A 40 23 42 30 42 44 48
Police B 40 31 60 40 55 57 64
MSW 6-2
MSW 6-4 - (sans importance) ACTIF ACTIF INACTIF
MSW 6-5 - (sans importance) ACTIF INACTIF INACTIF
MSW 6-8
ACTIF INACTIF ACTIF INACTIF - (sans importance)
INACTIF ACTIF - (sans importance)
Annexe
Téléchargement des pilotes, utilitaires et manuels
Il est possible de télécharger les dernières versions des pilotes, utilitaires et manuels à partir de l’une
des URL suivantes.
En Amérique du Nord, accédez au site web suivant :
http://www.epson.com/support/
Dans les autres pays, accédez au site web suivant :
https://download.epson-biz.com/?service=pos
Licence logiciel en Open Source
Ce produit utilise un logiciel open source en plus du logiciel propriétaire Epson.
Pour les informations sur le logiciel open source utilisé dans ce produit, consultez les URL
suivantes.
http://xxx.xxx.xxx.xxx/licenses.htm
Saisissez l’adresse IP de votre imprimante à la place de « xxx.xxx.xxx.xxx » dans l’URL ci-dessus.
Restrictions d’emploi
En cas d’utilisation de ce produit pour des applications exigeant une grande fiabilité/sécurité, telles
que des appareils employés en transport aérien, ferroviaire, maritime, automobile, etc., des
appareils de prévention des catastrophes, divers appareils de sécurité, etc., ou des appareils de
fonction/ précision, vous devrez, avant d’utiliser ce produit, considérer l’incorporation à votre
système de dispositifs de sécurité positive et de moyens redondan ts assurant la sécurité et la fiabilité
de l’ensemble du système. Étant donné que ce produit n’est pas destiné aux applications exigeant
une fiabilité/sécurité extrême, telles que du matériel aérospatial, du matériel de communications
principal, du matériel de commande nucléaire ou du matériel de soins médicaux directs, etc., vous
devrez, après une évaluation complète, décider si ce produit convient.
41
Page 42

França is
Attention
Sauf autorisation écrite préalable de Seiko Epson Corporation, la reproduction, le stockage dans un
système de rappel de données et la transmission sous quelque forme ou par quelque moyen que ce
soit (électronique, mécanique, par photocopie, enregistrement, etc.) d’une partie quelconque de la
présente publication sont interdits. La société décline toute responsabilité relative à l’exploitation
des informations contenues dans le présent document. Cet ouvrage a été rédigé avec le plus grand
soin ; toutefois, Seiko Epson Corporation décline toute responsabilité pour les erreurs et omissions
qu’il pourrait contenir, ainsi que pour tous dommages résultant de l’exploitation des informations
qu’il contient.
La responsabilité de Seiko Epson Corporation ou de ses filiales ne saurait être engagée envers
l’acheteur de ce produit ou envers des tiers pour dommages, pertes, frais ou débours encourus par
ceux-ci par suite d’accident ou d’utilisation erronée ou abusive de ce produit, de modification,
réparation ou transformation non autorisée de celui-ci, ou (à l’exclusion des États-Unis), de toute
utilisation du produit qui n’est pas strictement conforme aux instructions d’utilisation et de
maintenance de Seiko Epson Corporation.
Seiko Epson Corporation décline toute responsabilité pour dommages ou problèmes découlant de
l’utilisation de tous articles en option ou de toutes fournitures consommables autres que celles
désignées produit d’origine Epson ou produit approuvé Epson par Seiko Epson Corporation.
EPSON est une marque déposée de Seiko Epson Corporation.
Exceed Your Vision est une marque commerciale ou déposée de Seiko Epson Corporation.
Toutes les autres marques appartiennent à leurs propriétaires respectifs et sont utilisées
uniquement à des fins d’identification. Les informations sur le produit peuvent faire l'objet de
modifications sans préavis.
REMARQUE : Le contenu du présent manuel est sujet à modification sans préavis.
© Seiko Epson Corporation 2016. Tous droits réservés.
42
Page 43

Page 44

Printed in XXXXXX
 Loading...