

Epson STYLUS PRO 7880, STYLUS PRO 11880, STYLUS PRO 4880, STYLUS PRO 9880, STYLUS PRO 11880C User Manual
...Page 1
Mac OS X Leopard
Printer Driver Guide
NPD3699-00
Page 2

Mac OS X Leopard Printer Driver Guide
Copyrights and Trademarks
No part of this publication may be reproduced, stored in a retrieval system, or transmitted in any form or by any means, electronic,
mechanical, photocopying, recording, or otherwise, without the prior written permission of Seiko Epson Corporation. The information
contained herein is designed only for use with this Epson printer. Epson is not responsible for any use of this information as applied to
other printers.
Neither Seiko Epson Corporation nor its affiliates shall be liable to the purchaser of this product or third parties for damages, losses, costs,
or expenses incurred by the purchaser or third parties as a result of accident, misuse, or abuse of this product or unauthorized
modifications, repairs, or alterations to this product, or (excluding the U.S.) failure to strictly comply with Seiko Epson Corporation’s
operating and maintenance instructions.
Seiko Epson Corporation shall not be liable for any damages or problems arising from the use of any options or any consumable products
other than those designated as Original Epson Products or Epson Approved Products by Seiko Epson Corporation.
Seiko Epson Corporation shall not be held liable for any damage resulting from electromagnetic interference that occurs from the use of
any interface cables other than those designated as Epson Approved Products by Seiko Epson Corporation.
®
EPSON
Microsoft
Apple
Adobe
is a registered trademark, and EPSON STYLUS™ and Exceed Your Vision are trademarks of Seiko Epson Corporation.
®
and Windows® are registered trademarks of Microsoft Corporation.
®
and Macintosh® are registered trademarks of Apple Inc.
®
, Photoshop®, Elements®, Lightroom® and Adobe® RGB are registered trademarks of Adobe Systems Incorporated.
General Notice: Other product names used herein are for identification purposes only and may be trademarks of their respective owners. Epson disclaims
any and all rights in those marks.
Copyright© 2008 Seiko Epson Corporation. All rights reserved.
Copyrights and Trademarks 2
Page 3

Mac OS X Leopard Printer Driver Guide
Contents
Copyrights and Trademarks
Using the Printer Software
Printer Software Introduction. . . . . . . . . . . . . . . . .4
Adding the printer. . . . . . . . . . . . . . . . . . . . . . . .4
Printer driver . . . . . . . . . . . . . . . . . . . . . . . . . . . .5
EPSON Printer Utility3 . . . . . . . . . . . . . . . . . . . .5
EPSON StatusMonitor. . . . . . . . . . . . . . . . . . . . .6
Accessing the Printer Driver. . . . . . . . . . . . . . . . . .6
Accessing the Page Setup dialog . . . . . . . . . . . .6
Accessing the Print dialog . . . . . . . . . . . . . . . . .7
Getting Information Through Online Help . . . . .7
Basic Settings. . . . . . . . . . . . . . . . . . . . . . . . . . . . . . .8
Setting the printer driver . . . . . . . . . . . . . . . . . .8
Checking the printer status. . . . . . . . . . . . . . . . .8
Canceling printing . . . . . . . . . . . . . . . . . . . . . . . .9
When problem occurs during printing. . . . . . .9
Using Printer Utilities . . . . . . . . . . . . . . . . . . . . . .10
Accessing EPSON Printer Utility3. . . . . . . . . .11
Using EPSON StatusMonitor . . . . . . . . . . . . . .11
Uninstalling the Printer Software . . . . . . . . . . . .12
Uninstalling the printer driver. . . . . . . . . . . . .12
Uninstalling EPSON LFP Remote Panel. . . . .13
Variety of Printings
Using Color Management . . . . . . . . . . . . . . . . . . .14
Color management. . . . . . . . . . . . . . . . . . . . . . .14
Color adjustment by the printer driver. . . . . .18
Black-and-White Photo Printing . . . . . . . . . . . . .19
Borderless Printing. . . . . . . . . . . . . . . . . . . . . . . . .21
Supported media type. . . . . . . . . . . . . . . . . . . .21
Application settings. . . . . . . . . . . . . . . . . . . . . .21
Printer driver settings . . . . . . . . . . . . . . . . . . . .22
Roll paper cut for borderless printing. . . . . . .23
Enlarge or Reduce Size Printing. . . . . . . . . . . . . .24
Custom. . . . . . . . . . . . . . . . . . . . . . . . . . . . . . . . .24
Pages Per Sheet Printing . . . . . . . . . . . . . . . . . . . .25
Printing on Custom Paper. . . . . . . . . . . . . . . . . . .25
Banner Printing on Roll Paper . . . . . . . . . . . . . . .27
Application settings. . . . . . . . . . . . . . . . . . . . . .27
Printer driver settings . . . . . . . . . . . . . . . . . . . .27
3
Page 4
Mac OS X Leopard Printer Driver Guide
Using the Printer Software
Printer Software Introduction
Note:
The screen may differ depending on the printer you
use.
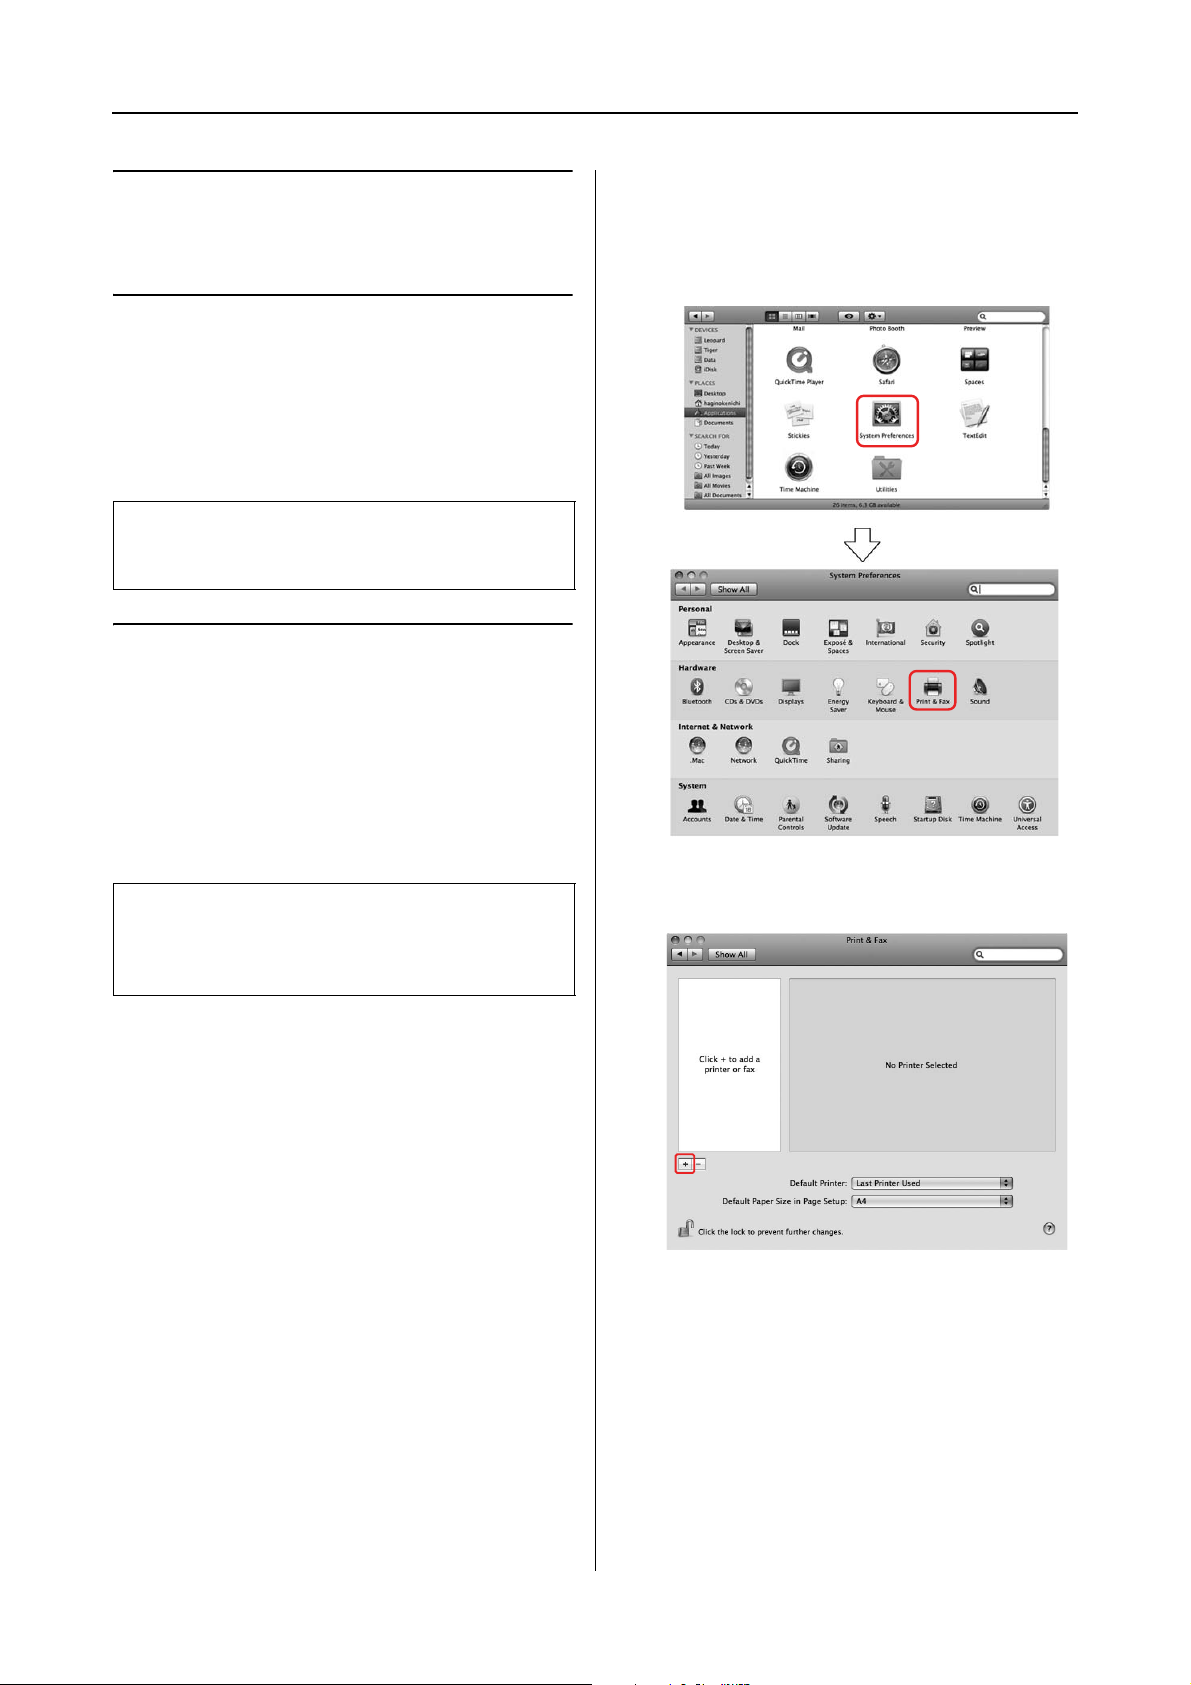
Adding the printer
Double-click the Applications folder, and
B
then double-click the System Preferences
folder. Then double-click the Print & Fax
folder.
After you have installed the printer software on
your computer, you need to select your printer.
You must select a printer the first time you use it
or whenever you want to switch to another
printer. Your computer will always print using
the last printer selected.
Note:
When you use the printer via a network, assign an IP
address to the printer using the printer's control panel
or EpsonNet Config, before adding the printer.
Turn on the printer.
A
Click +.
C
Using the Printer Software 4
Page 5
Mac OS X Leopard Printer Driver Guide
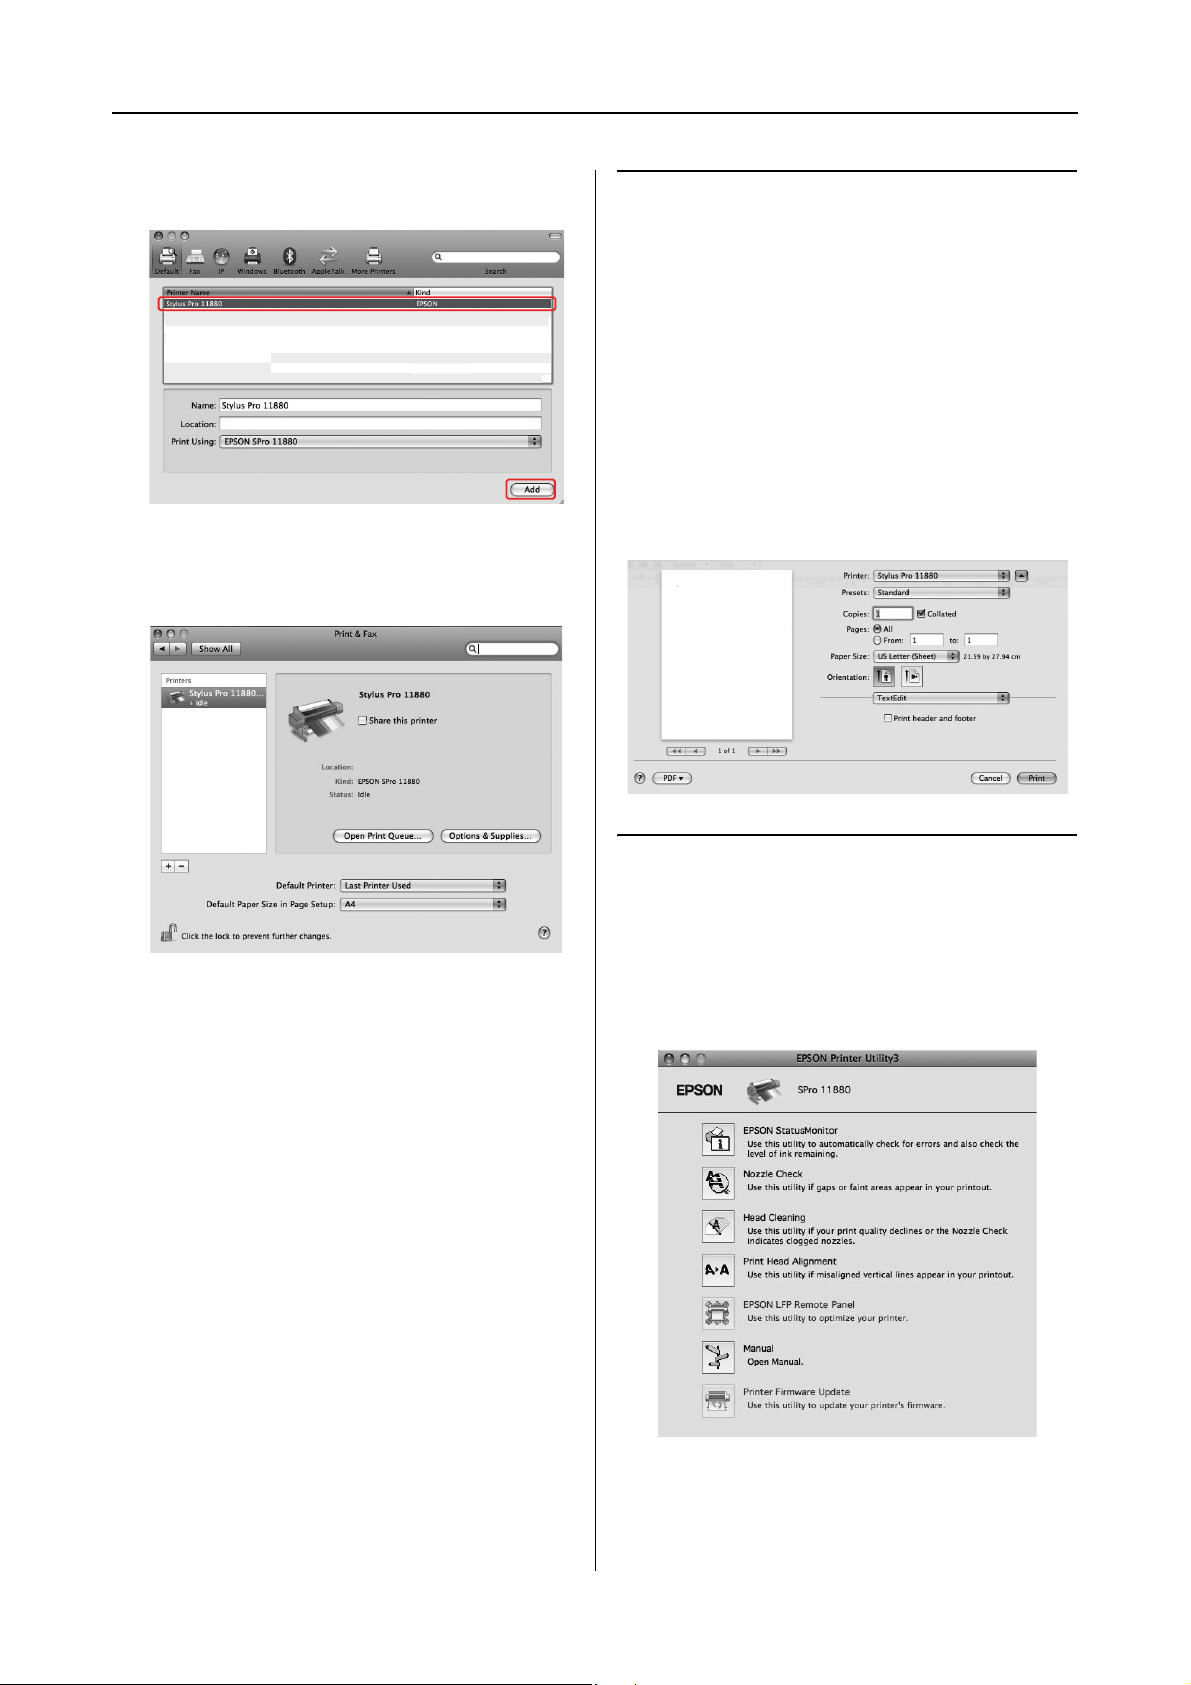
Select your printer, and then click Add.
D
Make sure the printer you just added is
E
listed. Then, close the Print & Fax dialog.
Printer driver
The printer driver lets you print documents from
applications to the printer.
The following are main functions of the printer
driver:
❏ Sends the print data to the printer.
❏ Makes the printer settings, such as the media
type, paper size. You can register these
settings, and you can also easily import or
export these registered settings.
EPSON Printer Utility3
You can execute the printer maintenance
functions, such as Nozzle Check, Head Cleaning.
EPSON Printer Utility3 is installed with the
printer driver automatically.
Using the Printer Software 5
Page 6
Mac OS X Leopard Printer Driver Guide
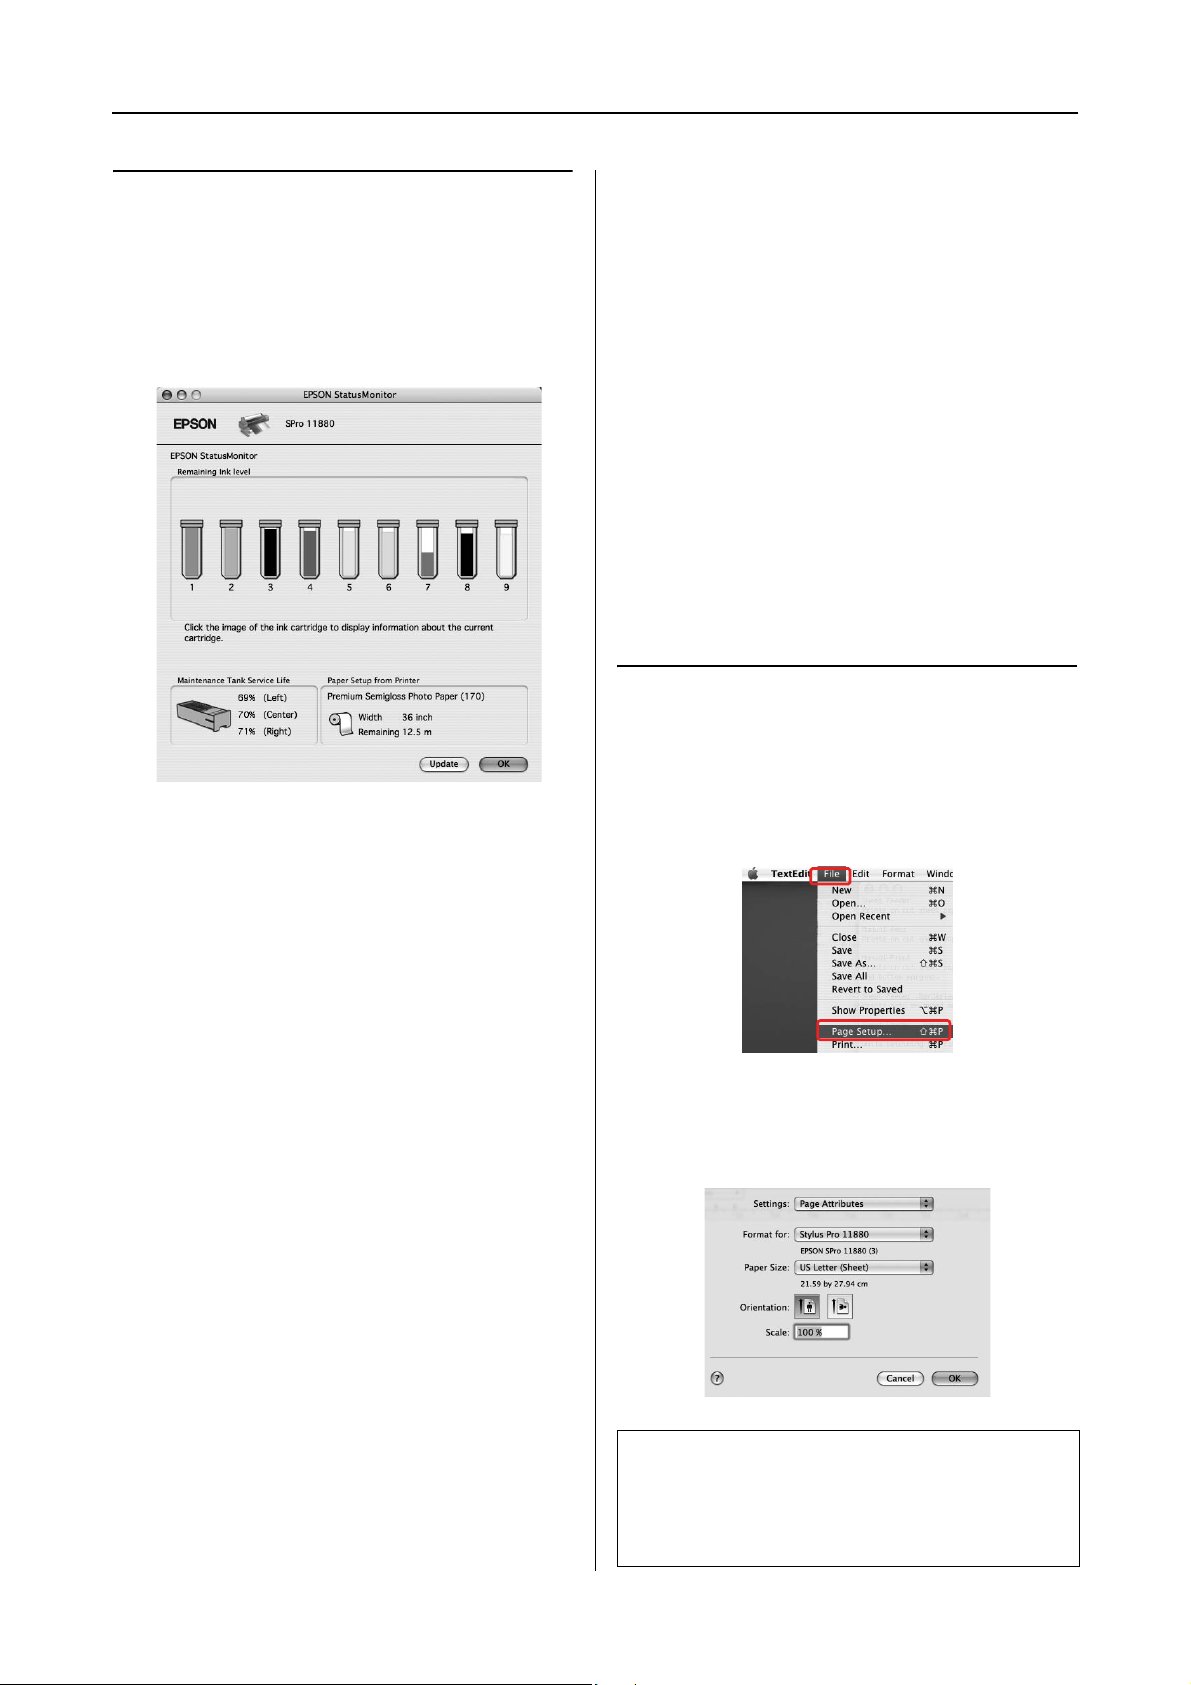
EPSON StatusMonitor
This utility provides you with printer status
information, such as the ink cartridge status, the
free space of the maintenance tank, and a printer
error.
Accessing the Printer Driver
To access the printer driver, follow the steps
below. The following procedures may differ
depending on the application you use.
❏ Page Setup dialog
You can make the paper settings, such as
media type, paper size.
❏ Print dialog
You can make the settings related to print
quality.
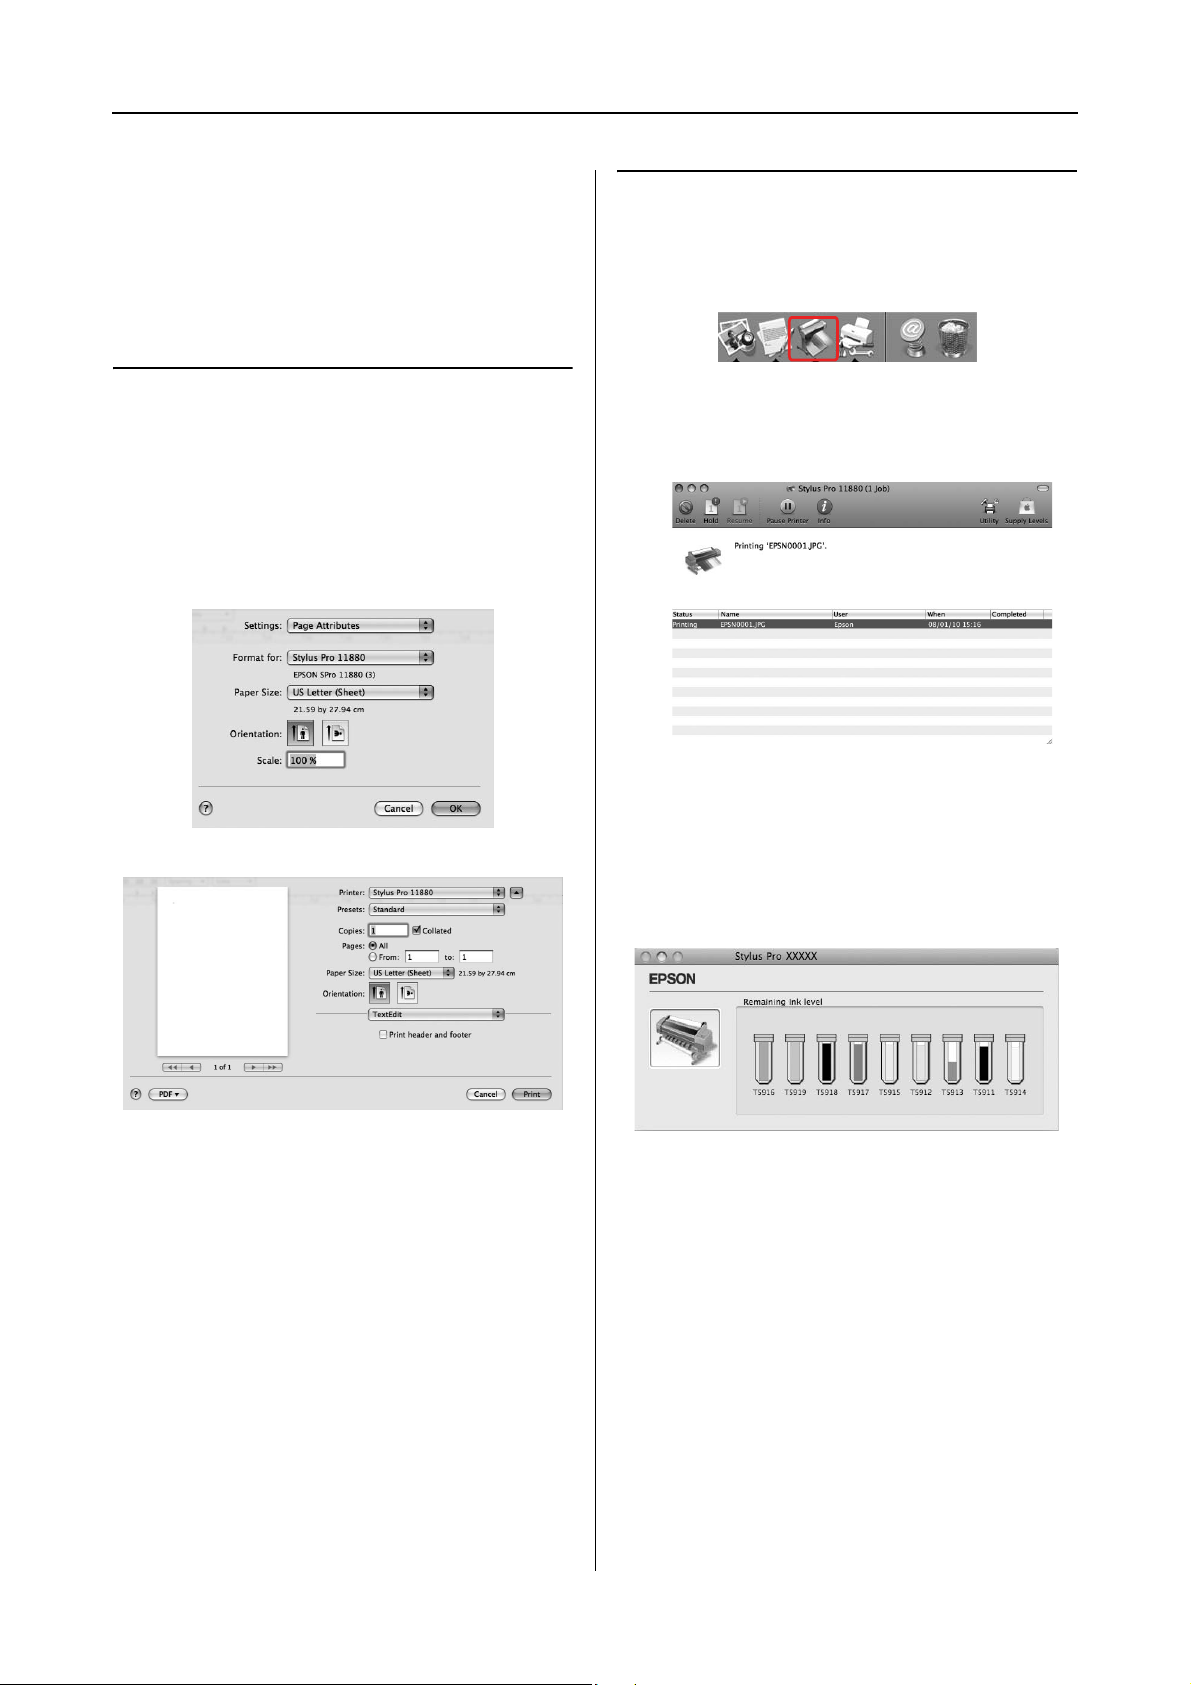
Accessing the Page Setup dialog
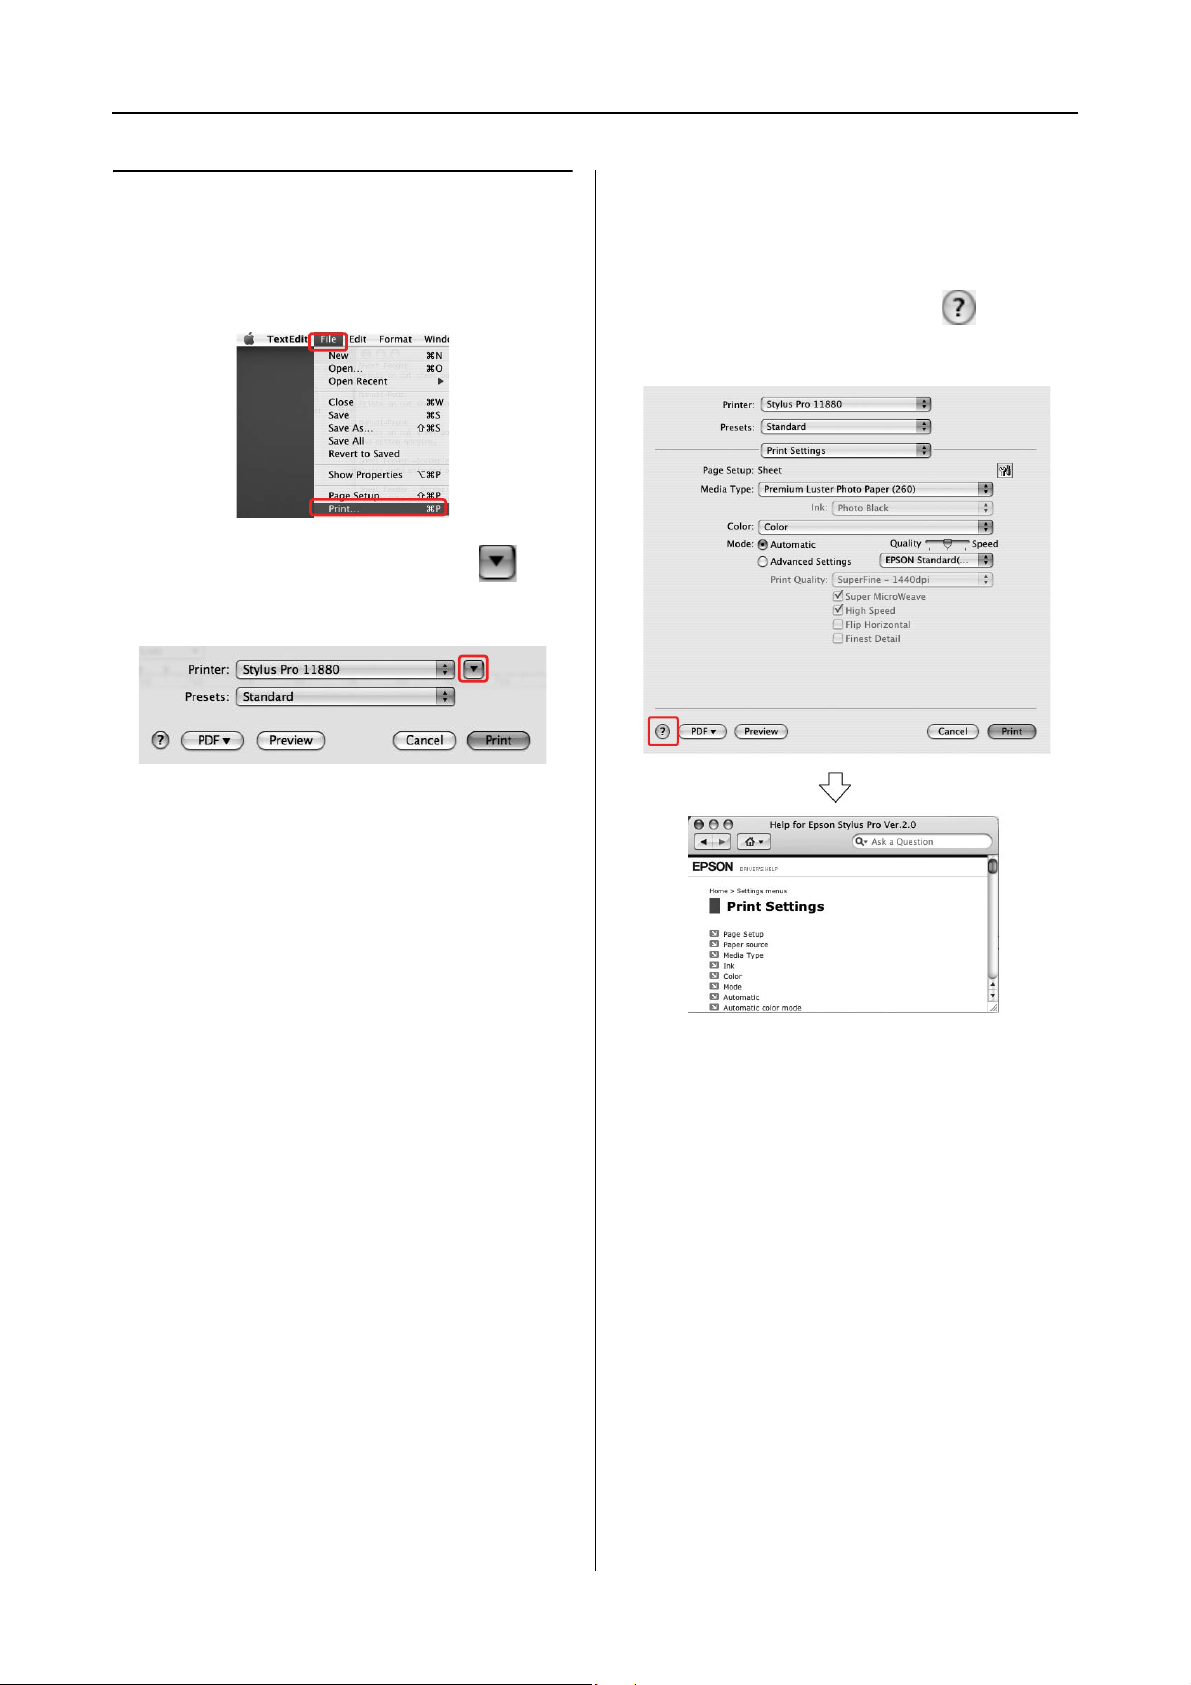
To access the Page Setup dialog, click Page Setup
on the File menu of your application.
The Page Setup dialog is displayed. You can select
a paper size, borderless printing, a paper source,
and a print area in the Paper Size setting.
Note:
Depending on your application, the Page Setup menu
may not appear on the File menu. If so, click Print on
the File menu of your application, select the
appropriate settings.
Using the Printer Software 6
Page 7
Mac OS X Leopard Printer Driver Guide
Accessing the Print dialog
To access the Print dialog, click Print on the File
menu of your application.
The Print dialog is displayed. Click the
button.
Getting Information Through Online Help
To access the online help, click the button in
the dialog of the printer driver.
Make the settings as necessary, and then start
printing.
Using the Printer Software 7
Page 8
Mac OS X Leopard Printer Driver Guide
Basic Settings
This section describes how to print your data
from an application using the Epson printer
driver.
Setting the printer driver
First, make the print data using the application
software.
Before printing, open the printer driver window,
and confirm the print settings such as the media
type, paper size.
Checking the printer status
Click the Printer icon in the Dock.
A
You can check the jobs waiting and their
B
information, and also cancel the printing.
EPSON Printer Monitor
The EPSON Printer Monitor appears on your
display when you start printing, depending on
the printer type.
Using the Printer Software 8
Page 9
Mac OS X Leopard Printer Driver Guide
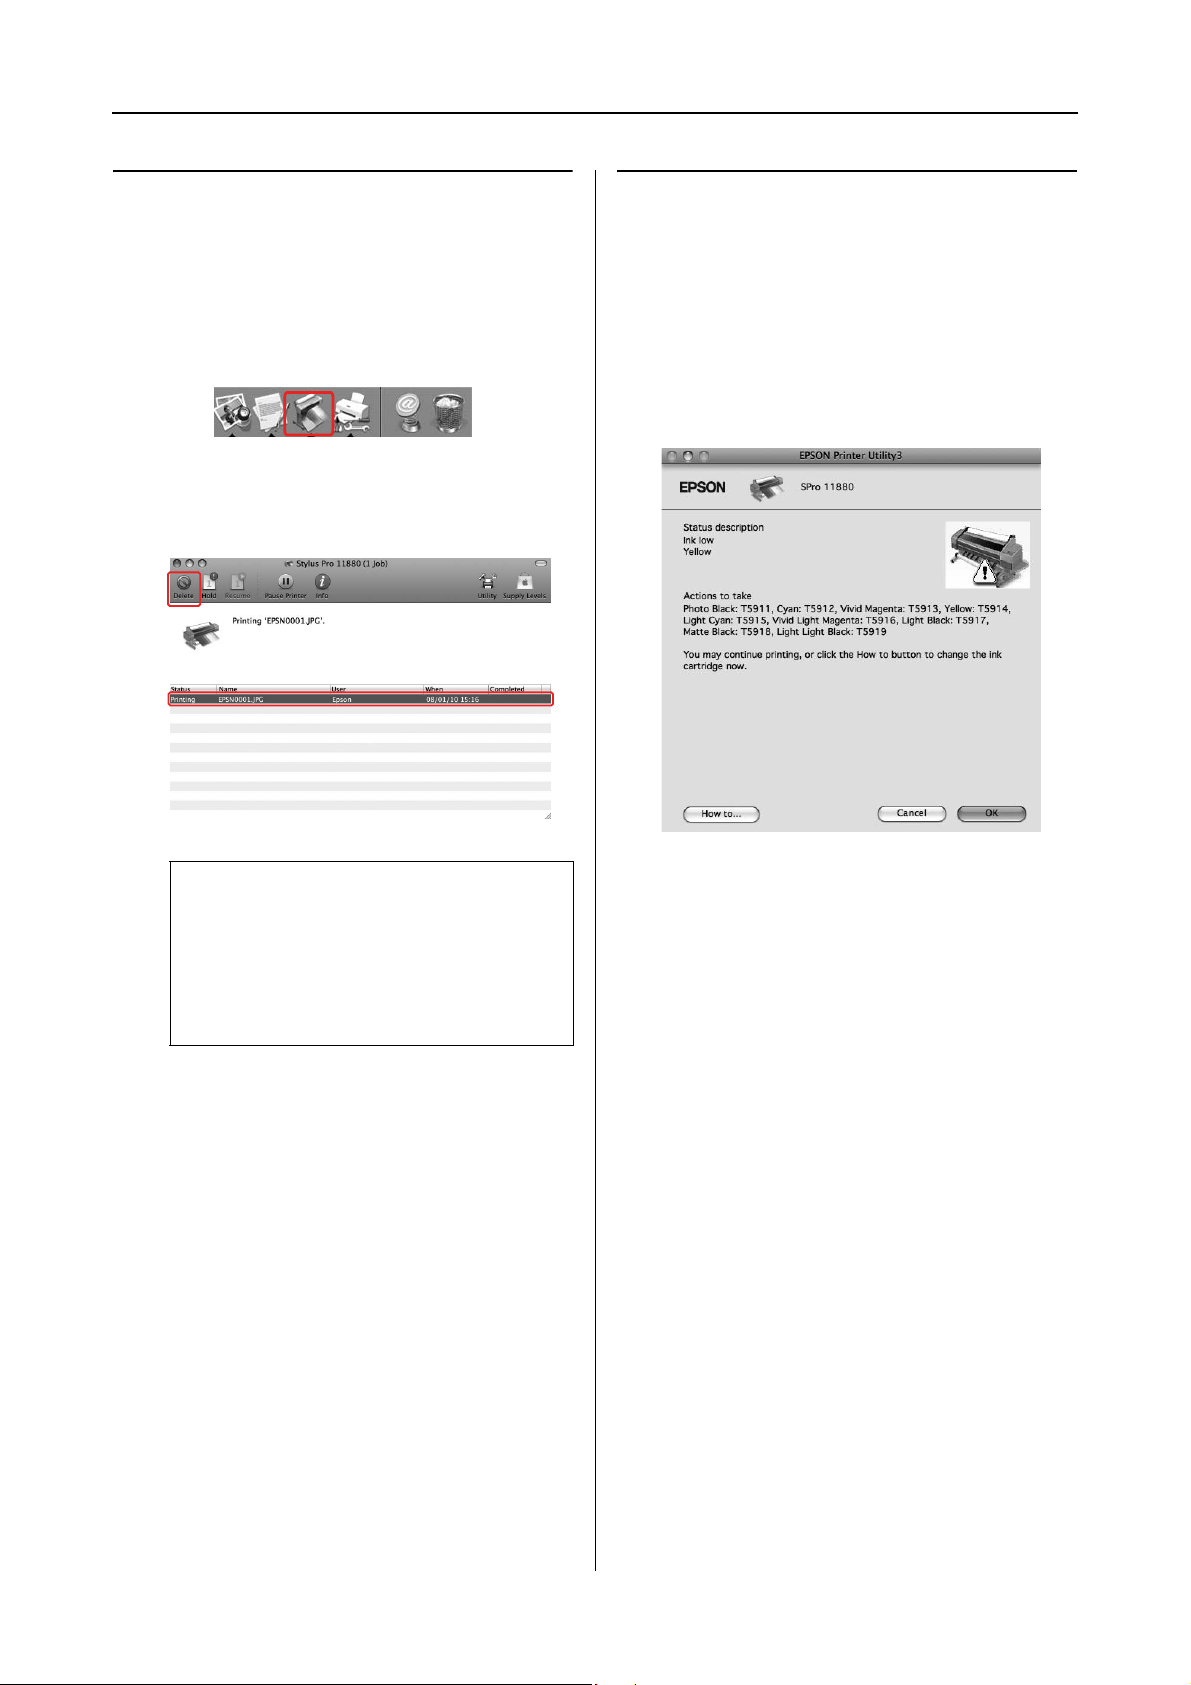
Canceling printing
You can cancel a print job waiting from the
computer.
Click the Printer icon in the Dock.
A
Click the job you want to delete, and then
B
click Delete.
When problem occurs during printing
If a problem occurs during printing, an error
message appears. If you are not sure how to solve
the problem, cancel printing, and then start
EPSON StatusMonitor that leads you step by step
through a procedure to solve a problem.
Note:
❏ You can delete a job waiting with the same
procedures above.
❏ You cannot cancel a print job that has been
sent to the printer. In this case, cancel the
print job by the printer.
Using the Printer Software 9
Page 10

Mac OS X Leopard Printer Driver Guide
Using Printer Utilities
Note:
The buttons appearing on the printer utilities dialog
may differ depending on the printer you use.
The Epson printer utilities let you check the
current printer status and perform printer
maintenance from your screen.
Printer Head Alignment
This utility can be used to improve the print
quality of your printed data. The alignment of the
print head may need to be adjusted if vertical
lines appear out of alignment or if white or black
banding noise appear in your printed data. Use
this utility to realign the print head.
EPSON LFP Remote Panel
This utility lets you optimize your printer. You
can start this utility only if it is installed. See the
EPSON LFP Remote Panel online help for
detailed information.
Manual/Print Assist
You can access the User’s Guide. If the User’s Guide
is not installed, it will access a technical support
Web site.
Print Firmware Update
EPSON LFP Remote Panel is started and updates
the printer firmware. To use this function, you
need to download the latest firmware from the
Epson Web site beforehand.
EPSON StatusMonitor
This utility provides you with printer status
information, such as the ink cartridge status, the
free space of the maintenance tank, and a printer
error.
Nozzle Check
This utility checks the print head nozzles to see if
they are clogged and need to be cleaned. Check
the nozzles when you notice the print quality has
declined and after cleaning to confirm that the
print head nozzles have been cleaned. If the print
head nozzles are clogged, perform head cleaning.
Head Cleaning
This utility cleans the color and black print heads.
You may need to clean the print head if you notice
the print quality has declined.
Using the Printer Software 10
Page 11

Mac OS X Leopard Printer Driver Guide
Accessing EPSON Printer Utility3
You can access the EPSON Printer Utility3 using
the following ways.
❏ Double-click the Applications folder, and
then double-click the EPSON Printer Utility3
icon.
❏ In the Print dialog, select Print Settings, and
then click the icon.
Note:
There is no the icon in the Print dialog,
depending on the printer you use.
Using EPSON StatusMonitor
EPSON StatusMonitor provides you with
detailed printer status information, a graphic
display of the ink cartridge status and the free
space of the maintenance tank, and status
messages.
Note:
The printer error message appears automatically on
your screen even if EPSON StatusMonitor is not
opened.
Accessing EPSON StatusMonitor
Open the EPSON Printer Utility3 window, and
then click EPSON StatusMonitor.
Using the Printer Software 11
Page 12

Mac OS X Leopard Printer Driver Guide
Viewing information in EPSON
StatusMonitor
EPSON StatusMonitor provides you with
detailed printer status information, a graphic
display of the ink cartridge status and the free
space of the maintenance tank, and status
messages. If a problem occurs during printing, an
error message appears. Check the message and
solve the problem accordingly.
Uninstalling the Printer Software
To uninstall the printer software, follow the steps
below.
Uninstalling the printer driver
To uninstall the printer driver and EPSON Printer
Utility3, follow the steps below.
Turn off the printer, and unplug the
A
interface cable connected with the
computer and printer.
Close the all application software.
B
Double-click the Applications folder, and
C
then double-click the System Preferences
folder. Then double-click the Print & Fax
folder.
Using the Printer Software 12
Page 13

Mac OS X Leopard Printer Driver Guide
Select the printer, and then click -.
D
After clicking -, close the dialog.
Insert the printer software CD-ROM into
E
the CD-ROM drive.
Double-click the Printer Driver folder.
F
If the Authenticate dialog appears, enter the
H
password or phrase and then click OK.
To uninstall the printer driver, you must
log in as a user with administrator rights.
Click Continue, and then click Accept.
I
Select Uninstall from the pull-down menu,
J
and then click the Uninstall button.
Note:
If the folder does not appear, double-click the
EPSON icon on the desk top.
Double-click the EPSON_IJ_Printer icon.
G
Follow the on-screen instructions to
K
uninstall the printer driver.
Uninstalling EPSON LFP Remote Panel
Drag the EPSON LFP Remote Panel folder to the
Trash. See the EPSON LFP Remote Panel online
help for more information.
Using the Printer Software 13
Page 14

Mac OS X Leopard Printer Driver Guide
Variety of Printings
Using Color Management
The printer driver provides a setting for
performing color management to printing data
and a color adjustment that produces better
looking prints by using only the printer driver.
Color adjustment is performed without adjusting
the color of the original data.
See “Methods for color management” on page
15.
Color management
Note:
When you print an image taken by a digital camera or
scanner, usually the printing result looks different
from what you see on the display. This variance
occurs because each device such as a digital camera,
scanner, monitor, or printer, produces colors
differently. In order to reduce the differences in color
between each device, please perform color
management between each device.
About color management system
(CMS)
Since devices such as a digital camera, scanner,
monitor, or printer produce color differently, the
printing result looks different from the image you
see on the display. To adjust the color between
devices, use the color management system. Both
Windows and Mac OS X have a color
management system as their standard feature.
Also, some image editing software support the
color management system.
Each operating system supports the color
management system, such as ICM for Windows
and ColorSync for Mac OS. When performing
color management using the printer driver, the
color management system of the operating
system is also used. In this color management
system, a color definition file called the ICC
profile is used for performing color matching
between devices. The ICC profile is prepared for
each printer model and each media type. For a
digital camera, the color domain of sRGB,
AdobeRGB, etc., may be specified as the profile.
In color management, the profile of an input
device is called an input profile (or source
profile), and an output device, such as a printer, is
called a printer profile (or output profile).
Variety of Printings 14
Page 15

Mac OS X Leopard Printer Driver Guide
Methods for color management
Color management by application
Application Printer driver Printer
Color
management by
application
Specify the input
profile.
Specify the printer
profile.
The color management is performed by specifying the input profile and the printer profile by the
application. You can select this method when an application supports its own color management function.
Color compensation should be turned off (no color adjustment) in the printer driver.
See “Color management by application” on page 16.
Color management by printer driver
Application Printer driver Printer
Color
management by
ColorSync
Specify the input
profile.
Specify the printer profile.
You need to perform color matching with the printer driver before printing. An application needs to support
ColorSync color management.
See “Color management by ColorSync” on page 17.
Variety of Printings 15
Page 16

Mac OS X Leopard Printer Driver Guide
Color management by
application
The following procedures are for Adobe
Photoshop CS3.
Refer to the application’s user manual for details
of the settings.
From the File menu, select Print.
A
Select Color management, and then select
B
Document for the Print. Select Photoshop
Manages Colors for the Color Handling.
Next, select the Print Profile and the
Rendering Intent, then click Done.
In Adobe Photoshop CS2, select Color
Management, and select Document for the
Print. Select Let Photoshop Determine
Colors for the Color Handling. Select the
Printer Profile and the Rendering Intent.
Then click Done.
Intent Explanation
Saturation Performs conversion,
Perceptual Performs conversion so
Relative
Colorimetric
Absolute
Colorimetric
Open the Print dialog.
C
See “Accessing the Printer Driver” on
page 6.
keeping the current
saturation unchanged.
that a more visually
natural image is
produced. This feature is
used when a wider gamut
of color is used for image
data.
Performs conversion so
that a set of color gamut
coordinates and white
point (or color
temperature)
coordinates in original
data match their
corresponding print
coordinates. This feature is
used for many types of
color matching.
Assigns absolute color
gamut coordinates to
both of original and print
data and performs
conversion. Therefore,
color tone adjustment is
not performed on any
white point (or color
temperature) for the
original or print data. This
feature is used for special
purposes such as logo
color printing.
Variety of Printings 16
Page 17

Mac OS X Leopard Printer Driver Guide
Select Print Settings and select Off (No
D
Color Adjustment) for the Color Settings in
the dialog.
Color management by ColorSync
The following procedures are for Adobe
Photoshop Elements 4.0.
Note:
❏ Use image data in which an input profile has
been embedded.
❏ The application needs to support ColorSync.
❏ If you use the specific Adobe applications (Adobe
Photoshop CS2/CS3 and Adobe Photoshop
Lightroom), you cannot use the following
procedures. Use other color management
methods.
From the File menu, select Print.
A
Check other settings, and then start
E
printing.
Select the Show More Options check box to
B
display Color Management. Select Printer
Color Management for the Printer Profile.
Then click Print.
Variety of Printings 17
Page 18

Mac OS X Leopard Printer Driver Guide
Select Color Matching and select
C
ColorSync in the dialog.
Select Print Settings and select Off (No
D
Color Adjustment) for the Color Settings in
the dialog.
Color adjustment by the printer driver
You can perform color management by the
printer driver only. Also, you can use the Photo
Enhance function to adjust the color of the image
data automatically.
Color adjustment by the Color
Controls
You can perform color management by the
printer driver. Use this function if the application
does not support color management or if you
want to manually perform color management.
Note:
If you use the color management of the printer driver
from an application such as Adobe Photoshop CS3,
turn off the color management function of the
application.
Note:
When you select Color Controls in the Print
Settings dialog, you cannot perform color
management.
Check other settings, and then start
E
printing.
Open the Print dialog.
A
See “Accessing the Printer Driver” on
page 6.
Variety of Printings 18
Page 19

Mac OS X Leopard Printer Driver Guide
Select Print Settings, and select Color for
B
the Color, and change Color Settings if
necessary, then click Advanced Color
Settings.
Black-and-White Photo Printing
Note:
This function can be used for the printers that support
Epson UltraChrome K3 ink.
Advanced black-and-white photo printing is
available by making the settings in the Color
Controls dialog box, without using the
application software. The print image is adjusted
without affecting the original data.
Note:
If you use the color management of the printer driver
from an application such as Adobe Photoshop CS3,
turn off the color management function of the
application.
Make the necessary settings.
C
See the online help of the printer driver for
detailed information.
Open the Print dialog.
A
See “Accessing the Printer Driver” on
page 6.
Check other settings, and then start
D
printing.
Variety of Printings 19
Page 20

Mac OS X Leopard Printer Driver Guide
Select Print Settings.
B
Click Advanced Color Settings.
D
Select Advanced B&W Photo for the Color.
C
Make the necessary settings, and then start
E
printing.
For more detailed information, see the
online help of the printer driver.
Variety of Printings 20
Page 21

Mac OS X Leopard Printer Driver Guide
Borderless Printing
You can print your data without margins on
paper. There are two types of borderless printing.
Note:
If you are using roll paper, all four sides can be
borderless, and if you are using a sheet of paper, only
left and right sides can be borderless.
❏ Auto Expand
Enlarge the size of print data automatically
and print without margins. Enlarged areas
that exceed the paper size will not be printed
on the paper.
❏ Retain Size
Using an application, enlarge your image data
to exceed the paper width and height, to avoid
unprinted areas appearing along the left and
right edges. The printer driver does not
enlarge the image data. Enlarge 3 mm in both
the left and right directions (total of 6 mm) is
recommended by using the application that
created the data.
Select this setting if you do not want to change
the ratio of your print data by the printer
driver.
Supported media type
See the same section in User's Guide for the details.
Application settings
Set the size of the image data using the Page
Setting dialog box of the application software.
For Auto Expand
❏ Set the same paper size as used for printing.
❏ If your application has margin settings, set the
margin to 0 mm.
❏ Make the image data as large as the paper
size.
Variety of Printings 21
Page 22

Mac OS X Leopard Printer Driver Guide
For Retain Size
❏ Enlarge 3 mm in both the left and right
directions (total of 6 mm), using the
application that created the data.
❏ If your application has margin settings, set the
margin to 0 mm.
❏ Make the image data as large as the paper
size.
Printer driver settings
To print your data with this feature, follow the
steps below.
Open the Page Setup dialog.
A
See “Accessing the Printer Driver” on
page 6.
Select the paper size and borderless
B
printing such as Auto Expand or Retain
Size, and then click OK.
If Auto Expand is selected, set the amount
D
of the enlargement in the Page Layout
Settings dialog.
Note:
Moving the slider towards Min decreases the
amount of the image enlargement; however, as
this amount decreases, margins may appear on
one or more sides of the paper.
In the Print Settings dialog, select the media
E
type.
Open the Print dialog.
C
See “Accessing the Printer Driver” on
page 6.
If you print on roll paper, select the Auto
F
Cut setting in the Page Layout Settings.
See “Roll paper cut for borderless
printing” on page 23.
Check the other settings, and then start
G
printing.
Variety of Printings 22
Page 23

Mac OS X Leopard Printer Driver Guide
Roll paper cut for borderless printing
When you use roll paper for borderless printing, the paper cut operation is different according to the
Borderless and Auto Cut settings of the printer driver.
No margins for left and
right
Printer
driver
setting
Printer
operations
Explanation Normal Cut is default
Borderless: Enable Borderless: Enable Borderless: Enable
Auto Cut: Normal Cut Auto Cut: Single Cut Auto Cut: Double Cut
setting.
No margins for all directions
(single cut)
❏ The top area may smear
because the top area of
the roll paper is cut while
the print operation is
stopped.
❏ If the cut position is slightly
shifted, the image on the
continuous page remains
on the top or bottom
area; however, the
printing time gets shorter.
❏ If you select Single Cut
and print only a piece of
paper, the operation will
be the same as Double
Cut. If you print more than
one paper continuously,
cut 1 mm along the inside
of each picture to avoid
creating a margin
between pictures.
No margins for all directions
(double cut)
❏ The top area may smear
because the top area of
the roll paper is cut while
the print operation is
stopped.
❏ Because the inside of
each picture is cut in
order to not leave a
white area in the top
and bottom areas, the
length of the paper
becomes 2 mm shorter.
❏ After cutting the bottom
area of the previous
page, the printer feeds
the paper and then cuts
the top area of the next
page. Because of that,
80 to 130 mm of scrap of
paper is produced. Take
care to cut the paper
precisely.
Note:
When you want to cut prints manually, select Off.
Variety of Printings 23
Page 24

Mac OS X Leopard Printer Driver Guide
Enlarge or Reduce Size Printing
You can fit the size of your data to the size of
paper you print on.
Custom
Lets you define the percentage you want to
reduce or enlarge.
Set the value for Scale between 1 to 10000%.
C
Check the other settings, and then start
D
printing.
Note:
Use the standard feature of the operating system for
layout printing.
Open the Page Setup dialog.
A
See “Accessing the Printer Driver” on
page 6.
Select the printer and paper size.
B
Select the paper size that is loaded in the
printer.
Variety of Printings 24
Page 25

Mac OS X Leopard Printer Driver Guide
Pages Per Sheet Printing
You can print two or four pages of your
document on one sheet of paper.
If you print continuous layout data prepared at
A4 size, it will be printed as shown below.
Note:
Use the standard feature of the operating system for
layout printing.
Open the Print dialog.
A
See “Accessing the Printer Driver” on
page 6.
Select a target printer, and then select
B
Layout from the list to specify the order in
which the pages will be printed.
Printing on Custom Paper
You can also print on a custom paper, using the
steps below.
✽ The maximum length of the paper roll can be
longer than the paper height if using application
software that supports banner printing. However,
the actual print size is dependent on the
application, the paper size set in the printer, or the
computer environment.
Note:
❏ You can set a larger size in the Custom Paper
Size than the size that you can set in the printer;
however, it does not print correctly.
❏ The available output size may be limited
depending on the application software.
Note:
If you select other than None for Border, the
frames around the pages are printed on each
sheet.
Check the other settings, and then start
C
printing.
Open the Page Setup dialog.
A
See “Accessing the Printer Driver” on
page 6.
Select Manage Custom Sizes in Paper Size.
B
Variety of Printings 25
Page 26

Mac OS X Leopard Printer Driver Guide
Click +, and enter the paper size name.
C
Enter the paper width, paper height, and
D
margins, and then click OK.
The paper size and printer margin you can
set is as follow.
Page setup Paper size Margins
Sheet Supported
paper size
Note:
❏ To change the setting you have registered,
click the paper size name from the list.
❏ To duplicate the paper size you have
registered, click the paper size name from
the list, and then click Duplicate.
❏ To delete the paper size you have
registered, click the paper size name from
the list, and then click -.
❏ The custom paper size setting is different
depending on the version of the operating
system. See your operating system’s
documentation for details.
Click OK.
E
The custom paper size is registered in the
Paper Size pop-up menu. Now, you can
print by taking the same steps as usual.
Top, Left,
Right: 3 mm
Bottom:
14.2 mm
Roll Paper Supported
paper size
Roll Paper
(Banner)
Roll Paper
(Borderless,
Auto
Expand)
Roll Paper
(Borderless,
Retain Size)
Roll Paper
(Borderless,
Banner)
Supported
paper size
The paper
width that
supports
borderless
printing.
The paper
width that
supports
borderless
printing and
plus 6 mm.
Top, Bottom,
Left, Right:
3mm
Top, Bottom:
0mm
Left, Right:
3mm
Top, Bottom,
Left, Right:
0mm
Top, Bottom,
Left, Right:
0mm
Variety of Printings 26
Page 27

Mac OS X Leopard Printer Driver Guide
Banner Printing on Roll Paper
This section explains how to print a banner and
panorama pictures.
There are two ways to print a banner.
Printer driver settings
Open the Page Setup dialog.
A
See “Accessing the Printer Driver” on
page 6.
Make sure your printer is selected, and
B
select the document size created using the
application.
You can also customize the paper size by
selecting Manage Custom Sizes.
Paper source Application
Roll Paper Document preparation
tool, image and editing
software
Roll Paper (Banner) Software that supports
banner printing
Application settings
You need to make the data for printing a banner
using an application.
If the paper size you want to print is equal to or
smaller than the maximum setting size the
application can set, select the paper size you
prefer.
Input a scale to reduce or enlarge the size of
C
your data.
Check the other settings, and then start
D
printing.
Variety of Printings 27
 Loading...