

Page 1

®
Network Guide
Page 2

Copyright and Trademarks
No part of this publication may be reproduced, stored in a retrieval system, or transmitted in any form or by any means,
mechanical, photocopying, recording, or otherwise, without the prior written permission of Seiko Epson Corporation. No
patent liability is assumed with respect to the use of the information contained herein. Neither is any liability assumed for
damages resulting from the use of the information contained herein.
Neither Seiko Epson Corporation nor its affiliates shall be liable to the purchaser of this product or third parties for damages,
losses, costs, or expenses incurred by purchaser or third parties as a result of: accident, misuse, or abuse of this product or
unauthorized modifications, repairs, or alterations to this product, or (excluding the U.S.) failure to strictly comply with
Seiko Epson Corporation’s operating and maintenance instructions.
Seiko Epson Corporation and its affiliates shall not be liable against any damages or problems arising from the use of any
options or any consumable products other than those designated as Original Epson Products or Epson Approved Products
by Seiko Epson Corporation. This publication and the features described herein are subject to change without notice.
Epson is a registered trademark and Epson Exceed Your Vision is a trademark of Seiko Epson Corporation.
EpsonNet Config incorporates compression code from the Info-ZIP group. There are no extra charges or costs due to the use
of this code, and the original compression sources are freely available from http://www.info-zip.org on the Internet.
General Notice: Other product names used herein are for identification purposes only and may be trademarks of their respective owners.
Epson disclaims any and all rights in those marks.
© 2007 Epson America, Inc. All rights reserved. 9/07
2 Copyright and Trademarks
Page 3

Contents
Chapter 1 Introduction 5
About Your Printer . . . . . . . . . . . . . . . . . . . . . . . . . . . . . . . . . . . . . . . . . . . . . . . . . . . . . . . . . . . . . . . 5
About This Guide . . . . . . . . . . . . . . . . . . . . . . . . . . . . . . . . . . . . . . . . . . . . . . . . . . . . . . . . . . . . . . . . 5
Warnings, Cautions, and Notes . . . . . . . . . . . . . . . . . . . . . . . . . . . . . . . . . . . . . . . . . . . . . . . . . . . . 6
Operating Environment . . . . . . . . . . . . . . . . . . . . . . . . . . . . . . . . . . . . . . . . . . . . . . . . . . . . . . . . . . . 6
Features of the Network Interface . . . . . . . . . . . . . . . . . . . . . . . . . . . . . . . . . . . . . . . . . . . . . . . . . . 6
Network Interface Operation . . . . . . . . . . . . . . . . . . . . . . . . . . . . . . . . . . . . . . . . . . . . . . . . . . . . . . 7
Status lights . . . . . . . . . . . . . . . . . . . . . . . . . . . . . . . . . . . . . . . . . . . . . . . . . . . . . . . . . . . . . . . . 7
Network connector . . . . . . . . . . . . . . . . . . . . . . . . . . . . . . . . . . . . . . . . . . . . . . . . . . . . . . . . . . 7
About the Software . . . . . . . . . . . . . . . . . . . . . . . . . . . . . . . . . . . . . . . . . . . . . . . . . . . . . . . . . . . . . . . 8
Terms and Concepts . . . . . . . . . . . . . . . . . . . . . . . . . . . . . . . . . . . . . . . . . . . . . . . . . . . . . . . . . . . . . . 8
Chapter 2
Overview . . . . . . . . . . . . . . . . . . . . . . . . . . . . . . . . . . . . . . . . . . . . . . . . . . . . . . . . . . . . . . . . . . . . . . . 9
Selecting a Printing Method . . . . . . . . . . . . . . . . . . . . . . . . . . . . . . . . . . . . . . . . . . . . . . . . . . . . . . 10
Printing from Windows . . . . . . . . . . . . . . . . . . . . . . . . . . . . . . . . . . . . . . . . . . . . . . . . . . . . . 10
Printing from Macintosh . . . . . . . . . . . . . . . . . . . . . . . . . . . . . . . . . . . . . . . . . . . . . . . . . . . . 10
Installing Network Components on Your Computer . . . . . . . . . . . . . . . . . . . . . . . . . . . . . . . . . 11
Windows Vista . . . . . . . . . . . . . . . . . . . . . . . . . . . . . . . . . . . . . . . . . . . . . . . . . . . . . . . . . . . . . 11
Windows XP . . . . . . . . . . . . . . . . . . . . . . . . . . . . . . . . . . . . . . . . . . . . . . . . . . . . . . . . . . . . . . . 12
Macintosh . . . . . . . . . . . . . . . . . . . . . . . . . . . . . . . . . . . . . . . . . . . . . . . . . . . . . . . . . . . . . . . . . 13
Setting Up the Network Interface . . . . . . . . . . . . . . . . . . . . . . . . . . . . . . . . . . . . . . . . . . . . . . . . . 14
Connecting the Network Interface to the Network . . . . . . . . . . . . . . . . . . . . . . . . . . . . . . 14
Configuring the Network Interface . . . . . . . . . . . . . . . . . . . . . . . . . . . . . . . . . . . . . . . . . . . 14
Printing a Network Status Sheet . . . . . . . . . . . . . . . . . . . . . . . . . . . . . . . . . . . . . . . . . . . . . . 16
Installing the Printer Driver . . . . . . . . . . . . . . . . . . . . . . . . . . . . . . . . . . . . . . . . . . . . . . . . . . . . . . 16
Windows Vista . . . . . . . . . . . . . . . . . . . . . . . . . . . . . . . . . . . . . . . . . . . . . . . . . . . . . . . . . . . . . 16
Windows XP . . . . . . . . . . . . . . . . . . . . . . . . . . . . . . . . . . . . . . . . . . . . . . . . . . . . . . . . . . . . . . 19
Macintosh . . . . . . . . . . . . . . . . . . . . . . . . . . . . . . . . . . . . . . . . . . . . . . . . . . . . . . . . . . . . . . . . . 24
Chapter 3
EpsonNet Config for Windows . . . . . . . . . . . . . . . . . . . . . . . . . . . . . . . . . . . . . . . . . . . . . . . . . . .25
About EpsonNet Config . . . . . . . . . . . . . . . . . . . . . . . . . . . . . . . . . . . . . . . . . . . . . . . . . . . . . 25
Accessing the EpsonNet Config User’s Guide . . . . . . . . . . . . . . . . . . . . . . . . . . . . . . . . . . 25
EpsonNet Config for Macintosh . . . . . . . . . . . . . . . . . . . . . . . . . . . . . . . . . . . . . . . . . . . . . . . . . . . 26
About EpsonNet Config . . . . . . . . . . . . . . . . . . . . . . . . . . . . . . . . . . . . . . . . . . . . . . . . . . . . . 26
Accessing the EpsonNet Config User’s Guide . . . . . . . . . . . . . . . . . . . . . . . . . . . . . . . . . . 26
Setting Up Your System for Network Printing 9
Network Software 25
3
Page 4

EpsonNet Config with Web Browser . . . . . . . . . . . . . . . . . . . . . . . . . . . . . . . . . . . . . . . . . . . . . . . 27
About EpsonNet Config with Web Browser . . . . . . . . . . . . . . . . . . . . . . . . . . . . . . . . . . . . 27
Configuring the Network Interface Using EpsonNet Config with Web Browser . . . . . 28
Opening Screen . . . . . . . . . . . . . . . . . . . . . . . . . . . . . . . . . . . . . . . . . . . . . . . . . . . . . . . . . . . . 30
Information - Network Screens . . . . . . . . . . . . . . . . . . . . . . . . . . . . . . . . . . . . . . . . . . . . . . . 31
Configuration - Network Screens . . . . . . . . . . . . . . . . . . . . . . . . . . . . . . . . . . . . . . . . . . . . . 32
Optional Screens . . . . . . . . . . . . . . . . . . . . . . . . . . . . . . . . . . . . . . . . . . . . . . . . . . . . . . . . . . . 37
Chapter 4
General Problems . . . . . . . . . . . . . . . . . . . . . . . . . . . . . . . . . . . . . . . . . . . . . . . . . . . . . . . . . . . . . . . 39
Cannot configure the network interface or cannot print from the network. . . . . . . . . . 39
Cannot print even if you have assigned the IP address
Unable to start EpsonNet Config. . . . . . . . . . . . . . . . . . . . . . . . . . . . . . . . . . . . . . . . . . . . . . 39
The message “EpsonNet Config cannot be used because no network is installed”
The message “Could not complete communicating configuration data”
Unable to start EpsonNet Config with Web Browser. . . . . . . . . . . . . . . . . . . . . . . . . . . . . 40
Unable to set the IP address using the arp/ping commands. . . . . . . . . . . . . . . . . . . . . . . 40
The Model Name and IP Address do not appear in the EpsonNet Config dialog box. 40
Chapter 5
Network Setup Menu . . . . . . . . . . . . . . . . . . . . . . . . . . . . . . . . . . . . . . . . . . . . . . . . . . . . . . . . . . . . 41
Setting an IP Address Using the arp/ping Command . . . . . . . . . . . . . . . . . . . . . . . . . . . . . . . . 41
Checking the LAN . . . . . . . . . . . . . . . . . . . . . . . . . . . . . . . . . . . . . . . . . . . . . . . . . . . . . . . . . . 42
Setting and checking the new IP address . . . . . . . . . . . . . . . . . . . . . . . . . . . . . . . . . . . . . . . 42
Uninstalling Software . . . . . . . . . . . . . . . . . . . . . . . . . . . . . . . . . . . . . . . . . . . . . . . . . . . . . . . . . . . 43
Windows Vista . . . . . . . . . . . . . . . . . . . . . . . . . . . . . . . . . . . . . . . . . . . . . . . . . . . . . . . . . . . . . 43
Windows XP . . . . . . . . . . . . . . . . . . . . . . . . . . . . . . . . . . . . . . . . . . . . . . . . . . . . . . . . . . . . . . . 43
Macintosh . . . . . . . . . . . . . . . . . . . . . . . . . . . . . . . . . . . . . . . . . . . . . . . . . . . . . . . . . . . . . . . . . 44
Troubleshooting 39
to the computer and the printer. . . . . . . . . . . . . . . . . . . . . . . . . . . . . . . . . . . . . . . . . . . . . 39
appears when you start EpsonNet Config. . . . . . . . . . . . . . . . . . . . . . . . . . . . . . . . . . . . 39
appears when you send settings to the network interface. . . . . . . . . . . . . . . . . . . . . . . 40
Tips for Administrator 41
Index 45
4
Page 5

Chapter 1
Introduction
About Your Printer
Your printer has a built-in Ethernet interface and can connect anywhere on your network
using 10Base-T or 100Base-TX. The built-in Ethernet interface, which is called the network
interface in this manual, automatically selects the correct standard when it connects to a
network. In addition, it supports and automatically selects the IEEE 802.2, IEEE 802.3,
Ethernet II, and Ethernet SNAP network protocols.
Because the network interface supports multiple protocols and automatically detects
protocols on your network, you can print from Windows
Use EpsonNet Config, included on the printer software CD-ROM, to configure the
network interface for use on a TCP/IP network.
If you want to configure the network interface for protocols such as TCP/IP, AppleTalk
IPP, and SNMP, use EpsonNet Config to quickly and easily configure the network
interface to use those protocols.
Note:
The EpsonNet Config utility configures the network interface to work only with protocols that exist
on your network. This does not imply that you can use all of the above-mentioned protocols on your
network or operating system. The protocols that the network interface can use may vary depending
on the operating system and the network configuration.
®
and Mac OS® X applications.
About This Guide
This Network Guide contains information about using the network interface on a network.
It includes how to set up the network interface, install the configuration software, and
modify network settings of your printer and computers.
®
,
For information about your printer, see your User’s Guide or Printer Guide.
Note:
❏ This guide is written for network administrators, and many of the steps included here require
detailed network knowledge and administrator rights.
❏ The term “network administrator” refers to the person responsible for maintaining the
network. “Administrator” is synonymous with “Supervisor” in this guide.
❏ The term “network interface” refers to the built-in Ethernet interface of the printer in this
guide.
Introduction 5
Page 6

Warnings, Cautions, and Notes
Warnings
must be followed carefully to avoid bodily injury.
w
Cautions
must be observed to avoid damage to your equipment.
c
Notes
contain important information and useful tips on the operation of your printer.
Operating Environment
The network interface supports the following environments.
OS Protocol
™
Windows Vista
Professional, Business, or Ultimate
version); Windows XP (Home,
Professional, or Professional x64)
Macintosh
or OS X 10.5 and above
or Vista x64 (Home,
®
OS X 10.4.9 and above
TCP/IP (using LPR or Standard TCP/IP
Port)
IPP
Bonjour
TCP/IP
AppleTalk
Features of the Network Interface
❏ Connects your Epson printer using a built-in Ethernet interface, which is called the
network interface in this manual, to the network.
❏ Supports multiple protocols, such as TCP/IP, AppleTalk, and IPP.
❏ Supports both 10Base-T and 100Base-TX.
❏ Supports DHCP.
❏ Supports Automatic Private IP Addressing (APIPA) that assigns an IP address
automatically to the network interface even if there is no DHCP server on the network.
❏ Supports the Dynamic DNS function.
❏ Supports SNMP and MIB.
❏ Supports SNTP (Simple Network Time Protocol).
6 Introduction
Page 7
❏ Supports Bonjour on Mac 10.4.x and above.
Network Interface Operation
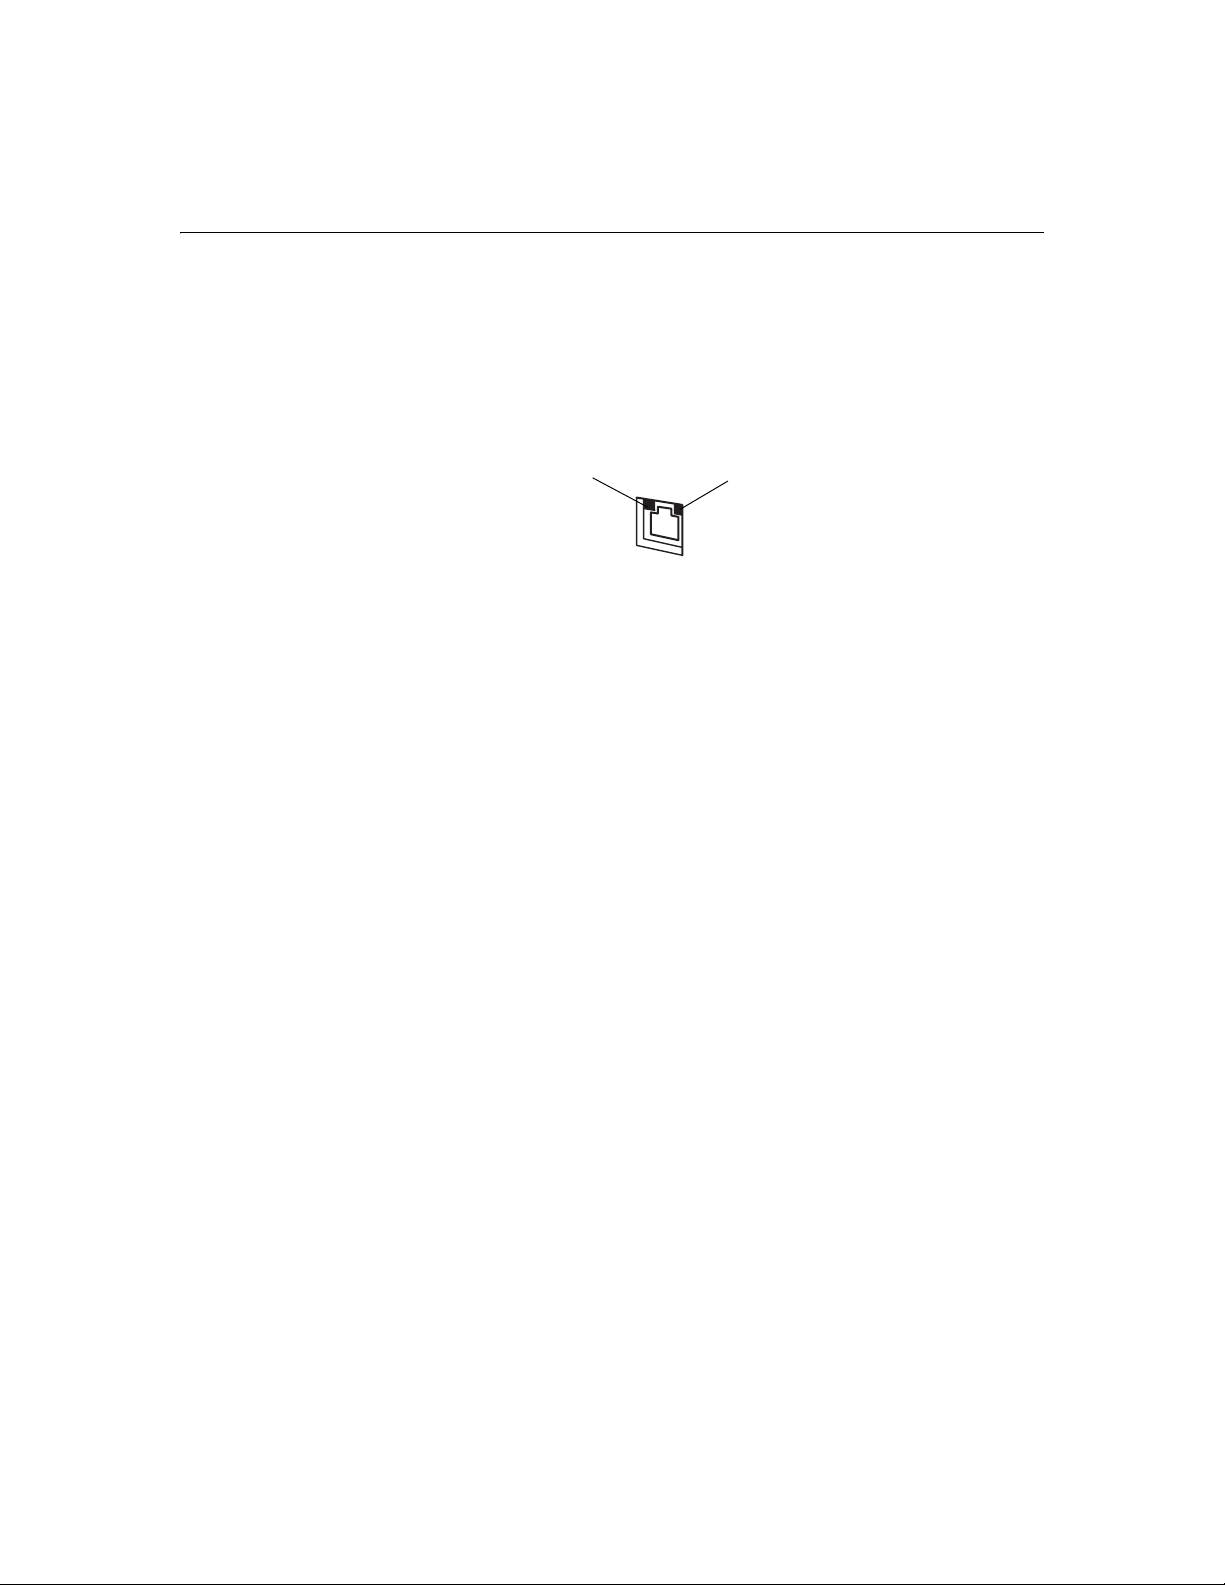
Status lights
The indicator lights on the network interface provide you with important information on
the operation of the network interface.
Orange light indicates100Base-TX
connection
The light on the left side indicates whether the network interface is connected to 10Base-T
or 100Base-TX. The light is orange when the connection is 100Base-TX, green when the
connection is 10Base-T.
The light on the right side is a data transmission light that flashes when the host interface
receives data.
If the light on the left side is solid green and the light on the right side is off, the connection
is disconnected.
Flashes green when
data is received
Network connector
RJ-45 connector: This connector is used to connect an Ethernet cable to a network. You
can use this cable for both 10Base-T and 100Base-TX.
Caution:
You must use a Category-6 shielded twisted-pair cable to connect the network interface to
c
a network to prevent malfunctions.
Introduction 7
Page 8

About the Software
The software CD-ROM provided with your printer includes the following network
software.
❏ EpsonNet Config for Windows is a Windows-based configuration utility for
administrators that allows you to configure the network interface for various
protocols such as TCP/IP, MS Network, IPP, and SNMP. See “EpsonNet Config for
Windows” on page 25.
❏ EpsonNet Config for Macintosh is a Macintosh-based configuration utility for
administrators that allows you to configure the network interface for TCP/IP,
AppleTalk, and IPP. See “EpsonNet Config for Windows” on page 25.
❏ EpsonNet Config with Web Browser is a Web-based configuration utility that allows
you to configure the network interface for TCP/IP, MS Network, AppleTalk, IPP, and
SNMP. See “EpsonNet Config with Web Browser” on page 27.
Terms and Concepts
Configuration—a prepared set of conditions for proper operation of a device. Configuring
the network interface is to prepare it to work with protocols available on a network.
DHCP—a dynamic host configuration protocol. It is a protocol that assigns dynamic IP
addresses to devices on a network.
EtherTalk—the communication protocol of AppleTalk governing Ethernet transmissions.
Protocol—a rule that controls how data or information is exchanged through a network.
Computers and software cannot communicate with each other using different protocols.
TCP/IP—Transmission Control Protocol/Internet Protocol, a layer of protocols that
provides communication between nodes on a network.
8 Introduction
Page 9

Chapter 2
Setting Up Your System for Network Printing
Overview
This section describes the general procedure on how to set up the network interface.
1. Check the network interface operation.
Check the functions and operations of the network interface, such as status lights and
RJ-45 connector. See “Network Interface Operation” on page 7 for details.
2. Select a printing method.
Select a printing method appropriate for your network environment and operating
system. If you are not sure, see “Printing from Windows” on page 10 or “Printing
from Macintosh” on page 10 for details.
3. Install the necessary components on your computer.
Make sure the necessary components (such as TCP/IP) are installed on the computer,
and network settings (such as IP address, subnet mask, etc.) of the computer is set.
4. Connect the network interface to the network.
Connect the network interface to the network. See “Connecting the Network Interface
to the Network” on page 14 for details.
5. Configure the network interface and install the printer driver.
See “Configuring the Network Interface” on page 14 for details.
6. If necessary, configure the network settings of the network interface using EpsonNet
Config.
Configure the network interface for TCP/IP, AppleTalk, MS Network, etc. using
EpsonNet Config. For Windows users, see “EpsonNet Config for Windows” on page
25. For Macintosh users, see “EpsonNet Config for Macintosh” on page 26.
Setting Up Your System for Network Printing 9
Page 10

Selecting a Printing Method
Printing from Windows
Check if there is a Windows Vista or XP print server on your network, and then use the
suggestions below.
Note:
Only the recommended printing methods are introduced here.
If no Windows Vista or XP print server exists
Use TCP/IP printing via LPR. See “Installing Network Components on Your Computer”
on page 11.
If a Windows Vista or XP print server exists
On the server, set the printer to connect with LPR and turn it into a shared printer. Your
clients can then print to this shared printer.
Printing from Macintosh
❏ Bonjour
❏ Epson TCP/IP
❏ Epson AppleTalk
10 Setting Up Your System for Network Printing
Page 11
Installing Network Components on Your Computer
Before configuring the network interface and printing from the computer, you need to
install the necessary components (such as TCP/IP) and assign an IP address and subnet
mask for your computer, depending on the printing method you want to use. See the
section in this chapter appropriate for your operating system.
Windows Vista
For Windows Vista, use the following procedure to install the necessary components.
1. Click Start, click Control Panel, and then click View network status and tasks or
double-click Network and Sharing Center.
2. Click View Status, and then click the Properties button.
Note:
If the User Account Control screen appears, click the Continue button.
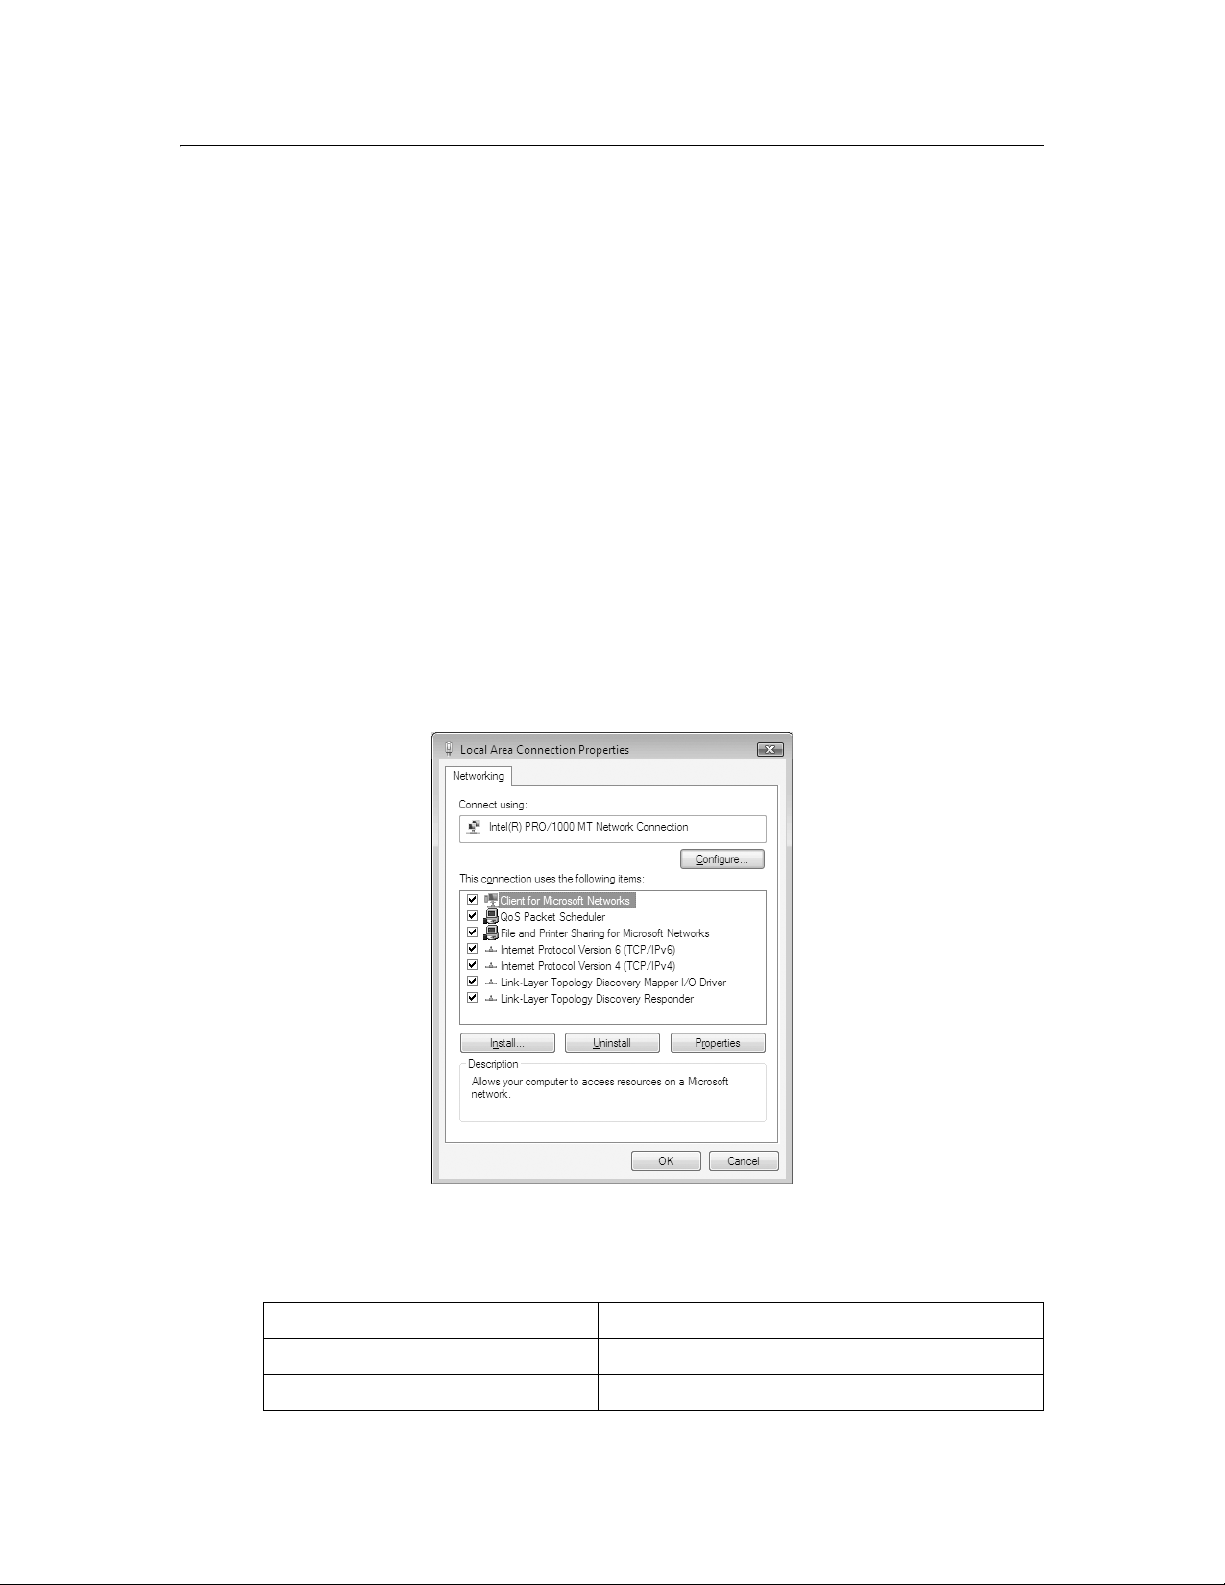
3. Check if the following necessary components are in the list.
The following table lists the components required for configuring the network
interface with EpsonNet Config.
EpsonNet Config’s setting screens Necessary components
TCP/IP, IPP, SNMP (IP trap) Internet Protocol (TCP/IP)
MS Network Internet Protocol (TCP/IP)
Setting Up Your System for Network Printing 11
Page 12

4. If the necessary components are not in the list, click Install to install them.
5. For LPR or Internet printing:
Double-click Internet Protocol Version 4 (TCP/IPv4) on the Local Area Connection
Properties dialog box to open the Internet Protocols Version 4 (TCP/IPv4) Properties
dialog box. Set the IP address, the subnet mask, etc. and then click OK.
6. Restart the computer.
The necessary components are now installed. Go to the section “Connecting the Network
Interface to the Network” on page 14.
Windows XP
For Windows XP, use the following procedure to install the necessary components.
Note:
❏ The Windows XP CD-ROM may be required during the installation.
❏ When using TCP/IP or IPP for printing, you need to set the IP address, the subnet mask, and
the default gateway of the computer.
1. Click Start, highlight Control Panel, and then click Network and Internet
Connections. Select Network Connections.
2. Under LAN or High-Speed Internet, click the Local Area Connection icon.
3. Under Network Tasks, click Change settings of this connection.
4. Check if the following necessary components are in the list.
12 Setting Up Your System for Network Printing
Page 13

The following table lists the components required for configuring the network
interface with EpsonNet Config.
EpsonNet Config’s setting screens Necessary components
TCP/IP, IPP, SNMP (IP trap) Internet Protocol (TCP/IP)
MS Network Internet Protocol (TCP/IP)
The following table lists the components required for network printing.
Printing method Necessary components
LPR or Internet printing Internet Protocol (TCP/IP)
Microsoft
®
Network Shared printing TCP/IP or NetBEUI
Client for Microsoft Networks
5. If the necessary components are not in the list, click Install to install them.
For LPR or Internet printing:
Internet Protocol (TCP/IP) is installed by default. You cannot add or delete it.
For Microsoft Network Shared printing:
Select Client, then click Add. Select Client for Microsoft Networks and then click OK.
6. For LPR, Internet, Microsoft Network Shared printing:
Double-click Internet Protocol (TCP/IP) on the Local Area Connection Properties
dialog box to open the Internet Protocols (TCP/IP) Properties dialog box. Set the IP
address, the subnet mask, etc. and then click OK.
7. Restart the computer.
The necessary components are now installed. Go to the section “Connecting the Network
Interface to the Network” on page 14.
Macintosh
To assign an IP address, subnet mask, etc. to your Macintosh, follow the steps below.
1. From the Apple menu, select System Preferences.
2. Open the Network control panel. Click the TCP/IP tab.
3. Select Built-in Ethernet from the Show pull down menu.
4. Assign an IP address and other settings if necessary.
5. Click the Apply Now button to save any changes.
Go to the section “Connecting the Network Interface to the Network” on page 14.
Setting Up Your System for Network Printing 13
Page 14

Setting Up the Network Interface
Connecting the Network Interface to the Network
Follow the instructions below to connect the network interface to the network.
1. Make sure that your printer is turned off.
2. Connect one end of the network cable to the RJ-45 connector on the network interface,
and the other end to the network.
Caution:
❏ You must use a Category 6 shielded twisted-pair cable to connect the network
c
interface to prevent malfunction.
❏ Do not connect or disconnect the network cable when the printer is on.
Note:
You can use both 10Base-T and 100Base-TX. When you print a lot of data, we recommend
you use a high-speed 100Base-TX network with light network traffic.
3. Turn on your printer.
Caution:
After turning off the printer, wait until the network interface status lights go off before
c
turning it back on; otherwise the network interface may not work correctly.
Note for Mac OS X:
Since the printer supports Bonjour and is enabled by default, you can use the printer on a
network just by connecting it to the network. If you want to disable the Bonjour setting, use
the printer’s control panel. See the next section for details.
Now, you can configure the network interface for use on a TCP/IP network and install
the printer driver.
Configuring the Network Interface
Configure the network interface for use on a TCP/IP network.
1. Make sure the printer is turned on, and the LCD displays READY.
2. Press the Menu r button on the printer to enter the printer’s menu system.
3. Press d to highlight NETWORK SETUP, and then press r.
4. Press r, then d to highlight ENABLE.
5. Press Enter. An asterisk appears next to ENABLE to show that it’s selected.
14 Setting Up Your System for Network Printing
Page 15

6. Press l, then d to highlight IP ADDRESS SETTING (or GET IP ADDRESS).
7. Press r, then press u or d to choose one of the following IP configuration settings:
❏ Choose AUTO if your network uses a DHCP server to configure your network
devices’ IP settings automatically.
❏ Choose PANEL if you would like to configure the printer’s IP settings manually.
8. Press Enter. An asterisk appears next to the setting you selected.
9. Press l to go back. Then do one of the following:
❏ If you selected AUTO as the IP address setting, press the Pause button to exit the
printer menu. Then continue with step 14.
❏ If you selected PANEL as the IP address setting, continue with step 10.
10. Press d to highlight IP, SM, DG SETTING, (or IP), then press r. The LCD displays the
IP address.
11. Press u or d to change each octet value, then press r to select the next octet. When
you have changed the value of the last octet, press r. The LCD displays the subnet
mask.
If you don’t see the subnet mask, press d, then press r.
12. Press u or d to change each octet value, then press r to select the next octet. When
you have changed the value of the last octet, press r. The LCD displays the default
gateway.
If you don’t see the default gateway (GW) press d, then press r.
13. Press u or d to change each octet value, then press r to select the next octet. When
you have changed the value of the last octet, press the Pause button to exit the printer
menu.
14. Turn the printer off then back on again.
See “Printing a Network Status Sheet” on page 16 to print a network status sheet and
confirm the new IP address.
Note:
❏ You must first set the IP address before using EpsonNet with Web Browser.
❏ See the User's Guide for more information about settings on the printer’s control panel.
Now you can use the printer on the TCP/IP network.
Setting Up Your System for Network Printing 15
Page 16

Printing a Network Status Sheet
1. Make sure that the printer is not printing and the LCD displays READY.
2. Press the Menu r button on the printer’s control panel to enter the printer’s menu
system.
3. Press d to highlight TEST PRINT, and then press r.
4. Press d to highlight NETWORK STATUS SHEET or NETWORK, then press r.
5. Press Enter to print the Network Status sheet.
Installing the Printer Driver
To print to the network printer, you need to install the printer driver on each computer
that will print over the network. See the section appropriate for your operating system.
Windows Vista
Adding the network port
1. Click Start, Control Panel, and then Printer.
2. Click Add a printer to start the Add Printer wizard.
3. Click Add a local printer.
16 Setting Up Your System for Network Printing
Page 17

4. Select the Create a new port radio button, and then select Standard TCP/IP Port
from the list. Then click Next.
5. Enter the IP address of the network interface and then click Next.
Setting Up Your System for Network Printing 17
Page 18

6. If an error occurs, the following dialog box appears. Select the Standard radio button
and then select EPSON Network Printer. Click Next.
7. Click Finish.
Installing the printer driver
1. Insert the printer software CD-ROM in your CD-ROM or DVD drive.
2. Follow the on-screen instructions to install the printer driver.
3. When you see a screen like this one, click the Manual button.
4. Select the port you created for the printer, then click OK.
5. Follow the instructions to finish installing the printer driver.
18 Setting Up Your System for Network Printing
Page 19

Windows XP
Adding the network port
1. Click Start, click Control Panel, click Printers and Other Hardware, and then click
Printers and Faxes.
2. From the File menu, select Server Properties. You see a window like this one.
3. Click the Ports tab, then click Add Port.
Setting Up Your System for Network Printing 19
Page 20

4. Select Standard TCP/IP Port, then click the New Port button.
5. Click Next.
20 Setting Up Your System for Network Printing
Page 21

6. Do one of the following:
❏ If you are using DHCP to assign an IP address to the printer, enter the printer’s
Host Name or IP address, shown on the network status sheet, in the Printer Name
or IP Address text box. Then click Next.
❏ If you manually assigned an IP address to the printer using the control panel or
arp/ping method, enter the printer’s IP address, shown on the network status
sheet, in the Printer Name or IP Address text box. Then click Next.
7. Make sure that the Standard and Generic Network Card are selected, and then click
Next.
Setting Up Your System for Network Printing 21
Page 22

8. Make sure that the Device matches the Host Name or IP address shown on the network
status sheet, then click Finish.
9. Click the Close button to return to the Server Properties window.
22 Setting Up Your System for Network Printing
Page 23

10. Click the Close button to return to the Printers and Faxes window.
Installing the printer driver
1. Insert the printer software CD-ROM in your CD-ROM or DVD drive.
2. Follow the on-screen instructions to install the printer driver.
3. When you see a screen like this one, click the Manual button.
4. Select the port you created for the printer, then click OK.
5. Follow the instructions to finish installing the printer driver.
Setting Up Your System for Network Printing 23
Page 24

Macintosh
1. Insert the printer software CD-ROM in your CD-ROM or DVD drive.
2. Follow the on-screen instructions to install the printer driver.
Note:
Make sure that the printer driver is installed on your Macintosh before following the steps below.
See the manual shipped with your printer for instruction on how to install the printer driver.
Bonjour printing
1. Open the Applications folder.
2. Open the Utilities folder.
3. Open Printer Setup Utility, and then click Add.
4. Select the printer model that is connected with Bonjour.
Note:
If your printer is not displayed with Bonjour, click More Printers, select Bonjour from the
drop-down list, and then select the printer model.
5. Click Add.
TCP/IP printing
1. Open the Applications folder.
2. Open the Utilities folder.
3. Open Printer Setup Utility, and then click Add.
4. Select the printer model that is connected with TCP/IP.
Note:
If your printer is not displayed with TCP/IP, click More Printers, select EPSON TCP/IP
from the drop-down list, and then select the printer model.
5. Click Add.
24 Setting Up Your System for Network Printing
Page 25

Chapter 3
Network Software
This chapter explains how to use the network software provided with your printer.
EpsonNet Config for Windows
About EpsonNet Config
EpsonNet Config is a Windows-based configuration software for administrators to
configure the network interface for TCP/IP, NetWare, MS Network, AppleTalk, IPP, and
SNMP.
Note:
❏ Be sure to use EpsonNet Config included on the printer software CD-ROM shipped with this
product.
❏ EpsonNet Config installed on Windows Vista does not support NetBEUI and IPX as a search
protocol.
❏ EpsonNet Config installed on Windows XP does not support NetBEUI as a search protocol
because officially the NetBEUI protocol is not supported on Windows XP.
Accessing the EpsonNet Config User’s Guide
The EpsonNet Config User’s Guide contains detailed information on EpsonNet Config.
Follow the steps below to access the EpsonNet Config User’s Guide.
1. Click Start, point to Programs or All Programs, select EpsonNet, and then select
EpsonNet Config. Click EpsonNet Config to start it.
Network Software 25
Page 26

2. From the Help menu, select EpsonNet Config Help.
The EpsonNet Config User’s Guide appears. By clicking the links on the left side of the
screen, you can get information on using EpsonNet Config.
EpsonNet Config for Macintosh
About EpsonNet Config
EpsonNet Config for Macintosh is a Macintosh-based configuration software for
administrators that allows you to configure the network interface for TCP/IP, AppleTalk,
and IPP.
Note:
Be sure to use EpsonNet Config included on the printer software CD-ROM shipped with this
product.
Accessing the EpsonNet Config User’s Guide
The EpsonNet Config User’s Guide contains detailed information on EpsonNet Config.
Follow the steps below to access the EpsonNet Config User’s Guide.
1. Double-click the Macintosh HD icon. In the Applications folder, double-click the
EpsonNet folder, and then double-click the EpsonNet Config folder. Finally,
double-click the EpsonNet Config icon.
2. From the Help menu, select EpsonNet Config Help.
The EpsonNet Config User’s Guide appears. By clicking the links on the left side of the
screen, you can get information on using EpsonNet Config.
26 Network Software
Page 27

EpsonNet Config with Web Browser
About EpsonNet Config with Web Browser
EpsonNet Config with Web Browser is a Web-based utility designed to configure the
printer for use on a network.
By typing the IP address of the network interface for the URL in your browser, you can
start EpsonNet Config to allow you to configure the network interface for TCP/IP, MS
Network, AppleTalk, IPP, and SNMP.
Supported Web browsers
Windows:
❏ Microsoft Internet Explorer version 4.01 or later
❏ Netscape™ Navigator™ version 4.05 or later
Mac OS X:
❏ Microsoft Internet Explorer version 4.01 or later
❏ Netscape Navigator version 7.0 or later
❏ Safari™
About Web browser settings
When running EpsonNet Config with Web Browser, be sure not to use a proxy server to
access the Internet. If the Access the Internet using a proxy server checkbox is selected,
you cannot use EpsonNet Config with Web Browser. Use the following steps to clear the
Access the Internet using a proxy server checkbox.
1. Right-click the Internet Explorer icon on the desktop, and then select Properties.
2. Click the Connection tab.
3. Clear the Access the Internet using a proxy server checkbox.
Network Software 27
Page 28

Configuring the Network Interface Using EpsonNet Config with Web Browser
After you have assigned an IP address to the network interface using the printer’s Control
panel, EpsonNet Config for Windows or Macintosh, a DHCP server, or the arp/ping
command, you can configure the network interface using EpsonNet Config with Web
Browser.
Note:
❏ A Web browser must be installed on your computer.
❏ TCP/IP must be correctly set for the computer and the network interface.
Follow the steps below to change the IP address using EpsonNet Config.
1. Turn on your printer.
2. Run EpsonNet Config in one of the following ways.
❏ Run EpsonNet Config for Windows or Macintosh. Select the printer you want to
configure from the list and then click Launch Browser.
❏ Open your browser, and then type in the IP address of the network interface
directly. Do not run EpsonNet Config for Windows or Macintosh.
http://IP address of network interface/
Example: http://192.168.100.201/
Note:
To check the IP address of the network interface, use EpsonNet Config. For details, see
“EpsonNet Config for Windows” on page 25 or “EpsonNet Config for Macintosh” on page 26.
3. Click TCP/IP under Network on the Configuration menu to display the TCP/IP setting
screen.
4. Select a method for acquiring the IP address. When you select Auto, DHCP becomes
available and assigns an IP address automatically. If you want to set the IP address
manually, select Manual.
Note:
❏ The network administrator must check any changes made to the IP address settings.
❏ When Auto is selected, DHCP becomes available. To use the DHCP server, make sure it
is installed on your computer and correctly configured. See your operating system’s online
help for detailed instructions.
❏ If Set Using Automatic Private IP Addressing (APIPA) is enabled, a private IP
address is automatically assigned to the network interface even when there are no DHCP
servers on your system or your network.
28 Network Software
Page 29

❏ If the Dynamic DNS function is not supported, we recommend that you select Manual
and then enter an IP address. This is because if you select Auto, the IP address of the
network interface changes every time you turn on the printer so that you need to change
the printer port setting accordingly.
5. To assign an IP address manually, enter the IP address, the subnet mask, and the
default gateway. Be sure the IP address does not conflict with any other devices on
the network.
Note:
If there is a server or a router functioning as a gateway, enter the IP address of the server or
the router for the gateway address. If there is no gateway, leave the default values there.
6. If you want to get a private address between 169.254.1.1 and 169.254.254.254
automatically when an IP address cannot be obtained by the DHCP server, leave it at
Enable for Set Using Automatic Private IP Addressing (APIPA); otherwise, select
Disable.
7. When setting an IP address using the ping command, select Enable for Set Using
PING. Select Disable when setti ng an IP add ress with EpsonNet Config; this prevents
any unexpected change of the IP address.
8. Select Enable for Acquire DNS Server Address Automatically i f y o u w a nt t o ac q ui r e
the DNS server address using the DHCP server.
If you want to enter the DNS server address manually, select Disable and then enter
the IP address of the DNS server.
9. Select Enable for Acquire Host Name and Domain Name Automatically if you
want to acquire the host name and the domain name using the DHCP server.
If you want to specify manually, enter the host name and the domain name in the text
boxes.
10. Select Enable for Register Network Interface Address to DNS Server if you want
to register the host name and domain name to the DNS server through the DHCP
server that supports Dynamic DNS.
If you want to register the host name and the domain name directly to the DNS server,
select Enable for Register Network Interface Address Directly to DNS Server.
11. Select Enable or Disable for Use Universal Plug and Play. Select Enable if you want
to use the Universal Plug and Play function.
12. Change the default Universal Plug and Play device name, if desired. This device name
is used for Windows systems that support the Universal Plug and Play function.
13. Mac OS X only:
Select Enable or Disable
Name and the Bonjour Printer Name. If your network environment supports DHCP,
you can use the printer on the network just by enabling this setting.
for Use Bonjour. If you select Enable, enter the Bonjour
Network Software 29
Page 30

14. Click Submit and then enter the password to update the settings. See “Password” on
page 37 for more information on setting the password.
Note:
If you have set the Administrator Name on the Administrator screen, enter the administrator
name for the user name.
15. If the message “Configuration change is complete!” appears on your screen, the
update is complete. Do not exit the Web browser and do not send a job to the printer
until this message appears. Follow the on-screen instructions to reset the printer.
Note:
❏ Since the new IP address becomes available after the printer is reset, you need to restart
EpsonNet Config by entering the new IP address.
❏ Only changes on the page where you press the Submit button take effect.
Opening Screen
Any user can access the main screen by typing the IP address of the network interface for
the URL in your browser.
Top Menu Bar
Home Links to the opening screen.
Favorite Links to a Web site previously defined by the administrator.
Help Links to Help.
About Links to the copyright and version information for EpsonNet Config.
Epson Logo Links to the Epson Web site (http://www.epson.com).
Menu
Information - Network
General Displays the network interface information.
Ethernet Displays information about Ethernet.
TCP/IP Displays information about TCP/IP.
AppleTalk Displays information about AppleTalk.
MS Network Displays information about Microsoft Network.
IPP Displays information about IPP.
SNMP Displays information about SNMP.
Printing Control Displays information about Printing Control.
Timeout Displays information about Timeout.
Time Displays information about Time.
30 Network Software
Page 31

Configuration - Network
Ethernet Configure the applicable settings for Ethernet.
TCP/IP Configure the desired settings/method for TCP/IP.
AppleTalk Configure the desired settings for AppleTalk.
MS Network Configure the desired settings for Microsoft Network.
IPP Configure the desired settings for IPP.
SNMP Configure the desired settings for SNMP.
Printing Control Configure the desired settings for Printing Control.
Timeout Configure the desired settings for Timeout.
Time Configure the desired settings for Time.
Configuration - Optional
Administrator Type the name of the administrator and a link to a favorite Web site.
Reset Resets the printer and returns to the default settings.
Password Set the password to protect settings.
Information - Network Screens
General information
Items Descriptions
Administrator Name Administrator name of the printer
Location Location of the printer
Interface Card Model Name Model of the network interface
MAC Address Unique hardware address of the network interface. You can
Hardware Version Hardware version of the network interface
Software Version Software version of the network interface
Model Name Product name of the printer attached to the network interface
Network Status Displays the current Ethernet speed and duplex setting.
Port Type Displays the port type setting, either Auto, MDI, or MDI-X
Printer Status The background color of the text box indicates the printer's status.
Current Time Displays the current time.
distinguish the network interface by its MAC address.
Green indicates that the printer is idle or printing. Yellow indicates that
either the paper or ink is low. Red indicates that either the paper or
ink is completely out, the printer is offline, there is a paper jam, the
cover is open, or an error has occurred.
Refresh button Refreshes the printer status. The printer status is not updated
automatically. Press Refresh to display the latest printer information.
Network Software 31
Page 32

Configuration - Network Screens
Ethernet
Ethernet Settings
Items Descriptions
Ethernet Speed/Duplex Select the appropriate Ethernet speed and duplex setting. Normally,
Port Type Select the port type:
TCP/IP
IP Address Settings
Items Descriptions
Method for Acquiring the IP
Address
IP Address Enter an IP address for the network interface. Be sure the IP address
Auto can be selected. If you select a setting other than Auto, make
sure the setting matches the type of hub or switch you are using.
Auto
MDI
MDI-X
Normally, Auto can be selected. If you are connecting the printer
directly to a PC with a straight-through cable, select MDI-X. If you
are connecting the printer to a hub or switch, select MDI.
Select a method for acquiring IP addresses. If Auto is selected, DHCP
becomes available. To use the DHCP server, make sure it is installed
on your computer and correctly configured. See your operating
system’s online help for detailed instructions.
To set the IP address manually, select Manual.
does not conflict with any other devices on the network.
Subnet Mask Set the subnet mask.
Default Gateway Set the gateway address if needed.
Set Using Automatic Private IP
Addressing (APIPA)
Set Using PING Enables or disables IP address setting using the ping command.
DNS Server Address Settings
Items Descriptions
Acquire DNS Server Address
Automatically
DNS Server Address Enter the DNS server address. When the DHCP server does not
32 Network Software
Select Enable to get a private address between 169.254.1.1 and
169.254.254.254 automatically when an IP address cannot be
obtained by the DHCP server; otherwise, select Disable.
Select either Enable or Disable to acquire the DNS server address
from the DHCP server.
respond even when Enable is selected for Acquire DNS server
address automatically, the DNS server address set here is used.
Page 33

Host Name and Domain Name Settings
Items Descriptions
Acquire Host Name and Domain
Name Automatically
Host Name Enter the host name supported by Dynamic DNS (between 2 and
Domain Name Leave it blank or enter two or more characters of the domain
Register Network Interface
Address to DNS Server
Register Network Interface
Address Directly to DNS Server
Universal Plug and Play Settings
Items Descriptions
Use Universal Plug and Play Enables or disables Universal Plug and Play.
Device Name Enter the device name (between 2 and 63 characters).
Select either Enable or Disable to acquire the host name and
domain name from the DHCP server.
63 characters). The total number of characters of the host name
and the domain name must not exceed 251.
name. The total number of characters of the host name and the
domain name must not exceed 251.
Select Enable if you want to send the host name and the domain
name to the DHCP server that supports Dynamic DNS update to
request for DNS dynamic updates.
Select Enable if you want to directly send the host name and the
domain name to the DNS server that supports Dynamic DNS
update to request for DNS dynamic updates.When Register the
network interface's address to DNS server is Disable, then this
setting is the same as Disable.
Bonjour Settings
Items Descriptions
Use Bonjour Select either Enable or Disable to use Bonjour.
Bonjour Name Enter the Bonjour name.
Bonjour Printer Name Enter the printer name for Bonjour.
Network Software 33
Page 34

AppleTalk
Items Descriptions
Use AppleTalk Enable or Disable AppleTalk.
Printer Name Enter the name of the printer attached to the network interface
Zone Name Enter the network zone name (up to 32 characters). To have the
Entity Type Displays the printer’s entity type. Do not change the entity type
Network Number Set Select Auto or Manual. Usually Auto is recommended.
(up to 32 characters).
zone selected automatically, select Auto for the Network
Number Set and enter an asterisk (*) in this text box.
unless “epson” appears. If “epson” appears, enter an entity type
to match your printer.
Network Number for Manual Mode Enter the network number when you select to set the Network
Number manually.
MS Network
Items Descriptions
Use Microsoft Network Shared
Printing
Print Server Name Enter the print server name, which is the name of a computer on
Workgroup Name Enter the workgroup name or domain name (up to 15
Share Name Enter the printer’s shared name (up to 12 characters). LPT1, LPT2,
Enable or Disable Microsoft network.
the network (up to 15 characters). Be sure to give a name that
is unique on the network.
characters).
or LPT3, or COM cannot be used.
IPP
You must make the following settings before setting up the printer for Internet Printing
in Windows.
Items Descriptions
IPP URL Displays the printer’s URL for Internet Printing.
Printer Name Enter the name of a printer to use for Internet Printing (up to 127
Location Enter the name of the printer’s physical location (up to 64
34 Network Software
Format:
http://IP address of printer:631/printer name set below
Example:
http://192.168.100.201:631/EPSON_IPP_Printer
characters).
Example:
EPSON_IPP_Printer
characters).
Page 35

SNMP
Community
Items Descriptions
Community Displays the community name.
Read Only The word “public” always appears.
Read/Write Enter the Read/Write community name (up to 32 characters).
IP Trap
Items Descriptions
Trap Enable or Disable trap.
Address Enter the IP address of the server to which the trap is transmitted.
Community Enter the community name (up to 32 characters).
Port Number Enter the Port Number of the receive host, in decimal (0-65535).
IPX Trap
Items Descriptions
Trap Enable or Disable trap.
Address Enter Network Address and Node Number (MAC Address) of
Community Enter the community name (up to 32 characters).
Socket Number Enter the Socket Number of the receive host, in hexadecimal
Printing Control
Items Descriptions
Printing Control Enable or Disable printing control.
Printer Access Control Select Allow or Deny. Selecting Allow permits the network
Printer Access Control List Enter the IP address ranges by which the network access is
the server to which the trap is transmitted.
Format:
Network Address: Node Number
Suppose Network Address is A7E00BB0 (hexadecimal) and
Node Number is 000048930000 (hexadecimal). In this case, the
address is A7E00BB0:000048930000.
(0-FFFF).
access from the IP addresses registered on the printer access
control list. On the other hand, selecting Deny blocks the
network access from the IP addresses registered on the printer
access control list.
restricted.
Network Software 35
Page 36

Timeout
Printing
Items Descriptions
Change Timeout Value Select this checkbox when you set the values before a timeout
occurs.
LPR Set the length of time for LPR before a timeout occurs (between 0
RAW (Port9100) Set the length of time for RAW (Port9100) before a timeout occurs
IPP Set the length of time for IPP before a timeout occurs (between 0
and 3600 seconds). Enter 0 not to apply the timeout.
(between 0 and 3600 seconds). Enter 0 not to apply the timeout.
and 3600 seconds). Enter 0 not to apply the timeout.
Time
Items Descriptions
Time Displays the time. Click the Get Time button to reload the display.
When Time Server is Enable, time is acquired from the time server.
Manual Settings
If the network interface has RTC (Real Time Clock), you can set the time manually.
Items Descriptions
Date Enter the year, month, and day.
Time Enter the hour, minutes, and seconds.
Time Difference Enter the difference between time at the present location and
Greenwich Mean Time (GMT).
Apply button Applies the settings.
Time Server Settings
Items Descriptions
Time Server Select either Enable or Disable to time synchronize from the time
Time Server Address Enter the address of the time server.
Synchronize Interval Enter the time interval in minutes for automatic time synchronization.
Time Difference Enter the difference between time at the present location and
Time Server Status Displays a connection status with the time server.
Apply button Applies the settings.
36 Network Software
server.
Greenwich Mean Time (GMT).
Page 37

EDM
Items Descriptions
EDM Displays EDM information.
Optional Screens
Administrator
You can link to the Web site specified on this screen when you click Favorite (the name
is changeable) in Index.
Items Descriptions
Administrator Name Enter the name of the administrator (up to 255 characters).
Location Enter the location of the network interface (up to 255 characters).
Favorite Name Enter the link item name (up to 20 characters) which will be
displayed in the Index menu.
Favorite URL Enter a URL (up to 64 characters).
Description Enter any comments concerning the URL above (up to 64
characters).
Note:
Links to ftp are not supported.
Reset
You can reset the network interface or return the settings to the default values.
Items Descriptions
Reset button Functions like turning the power off and on again. Click this
Return to Default button Returns the network interface to the default settings.
button to make the changes take effect.
Password
The password set here protects the settings. You will be asked for the password when you
update or change the settings on each setting screen. Passwords are case sensitive. No
password is set by default.
Items Descriptions
Old Password Input the old password.
New Password Input the new password (up to 20 characters).
New Password (again) Re-input the new password.
Network Software 37
Page 38

Note:
❏ The same password is used for EpsonNet Config for Windows and Macintosh, and EpsonNet
Config with Web Browser.
❏ If you forget your password, you need to initialize the network interface.
38 Network Software
Page 39

Chapter 4
Troubleshooting
General Problems
Cannot configure the network interface or cannot print from the network.
Cause What to do
The printer settings or network settings may be
wrong.
First, check to see if you can print a status sheet, as
described in “Printing a Network Status Sheet” on page
16. If you can print a status sheet, check the network
settings.
Cannot print even if you have assigned the IP address to the computer and the printer.
Cause What to do
You have assigned an IP address to the
computer manually, but you assigned the IP
address to the printer by Automatic Private IP
Addressing (APIPA).
Assign the printer’s IP address so that it belongs to the
same segment of the computer. Use EpsonNet Config
and the printer’s control panel.
Unable to start EpsonNet Config.
Cause What to do
You have added or deleted protocols after
installing EpsonNet Config.
Uninstall EpsonNet Config and then reinstall it. See
“Uninstalling Software” on page 43.
The message “EpsonNet Config cannot be used because no network is installed” appears when you start EpsonNet Config.
Cause What to do
TCP/IP is not installed on the computer. Install the TCP/IP protocol.
TCP/IP is installed on the computer, but its IP
address is not set correctly.
Set a correct IP address for the computer.
Troubleshooting 39
Page 40

The message “Could not complete communicating configuration data” appears when you send settings to the network interface.
Cause What to do
This may happen when using a dial-up
router.
Run Command Prompt from the computer on which
EpsonNet Config is installed, and then enter the following
command:
Format: >ROUTE_ADD_the IP address of the network
interface_ the IP address of the computer (the under bar
represents one space)
Example: >ROUTE ADD 192.168.192.168 22.33.44.55.
Unable to start EpsonNet Config with Web Browser.
Cause What to do
You have not set an IP address for the
network interface.
Set an IP address for the network interface using EpsonNet
Config for Windows or Macintosh, the printer’s control panel,
or the arp/ping commands. You can check the IP address
on a status sheet. See the EpsonNet Config User’s Guide.
Unable to set the IP address using the arp/ping commands.
Cause What to do
The network interface is not connected
to the network.
Connect the network interface to the network, and check
the network environment.
The printer is located beyond the router. The printer and the computer must be in the same segment.
The Model Name and IP Address do not appear in the EpsonNet Config dialog box.
Cause What to do
If the valid IP address is not set, the items
indicated in the dialog box mentioned
above may not appear.
40 Troubleshooting
Set a valid IP address.
Refresh the status by selecting Refresh from the View menu.
Increase the length of time before a timeout. To do this,
select Options from the Tool menu, and then select
Timeout. Note that doing so can cause EpsonNet Config
to run more slowly.
Page 41

Chapter 5
Tips for Administrator
Network Setup Menu
These items are used to make network settings on the printer’s control panel.
Item Settings (default in bold)
NETWORK SETUP Disable, Enable
IP ADDRESS SETTING* Auto, Panel
IP* 0.0.0.0 to 255.255.255.255
SM* 0.0.0.0 to 255.255.255.255
DG or GW* 0.0.0.0 to 255.255.255.255
Bonjour* On, Off
INIT NETWORK
SETTING*
* Available only when Enable is selected for NETWORK SETUP.
EXECUTE
Setting an IP Address Using the arp/ping Command
Follow the steps below to set the IP address using the arp/ping command.
Note:
❏ Make sure that the Set using PING function is enabled on the TCP/IP menu in EpsonNet
Config. If this function is disabled, you cannot set the IP address using the arp/ping command.
❏ Make sure the network interface and the computer are in the same segment.
Before you start, you need the following information:
❏ A valid IP address for the network interface. Ask your network administrator for an
IP address which does not cause conflicts with any other device on the network. If
you are the network administrator, choose an address within your subnet which does
not conflict with any other device.
❏ The MAC (Ethernet hardware) address of the network interface. You can find out the
MAC address on a status sheet.
Tips for Administrator 41
Page 42

Checking the LAN
First, you need to check that the computer can reach to other computers in the same
segment, as follows:
1. Set the default gateway to the host on which you are setting up the network interface.
If there is a server or a router which acts as a gateway, enter the address of the server
or the router. If there is no gateway, enter the IP address of your computer as a gateway
address.
2. Assume that you want to reach to the computer having the IP address
“192.168.100.101”. Check that the computer is reachable by “pinging” it from the
command line:
ping 192.168.100.101
3. If the computer is reachable, you can see the following result (the exact form of the
message depends on your operating system, and the time may vary):
64 bytes from 192:168:100:101:icmp_seq=0. Time=34.ms
4. If the computer is unreachable, you may see something like this:
PING 192:168:100:101:56 data bytes
If you press Ctrl-C, you may see something like this:
192:168:100:101 PING Statistics
3 packets transmitted, 0 packets received,
100% packet loss
Again, the exact wording of the message you see may differ from this, depending on
your operating system. If you cannot “ping” the computer, check the following:
❏ The address in the ping command is correct.
❏ The Ethernet connection to the computer has been made correctly, and all hubs,
routers, etc. are switched on.
Setting and checking the new IP address
To set the new IP address of the network interface which you have obtained from your
network administrator, use the ping command and arp command with the -s flag (create
an ARP entry).
Note:
In the following procedure, we assume that the MAC address of your network interface is
00:00:48:93:00:00 (hexadecimal), and that the IP address which you will be assigning is
192.168.100.201 (decimal). Substitute your values for these addresses when you type in the
commands.
42 Tips for Administrator
Page 43

1. From the command line, type:
Example: arp -s 192.168.100.201 00-00-48-93-00-00
2. Execute the ping command to set the IP address by pinging it: Example:
ping 192.168.100.201
3. The network interface should now respond to the ping. If it does not, you may have
incorrectly typed the MAC address or the IP address in the arp -s command.
Double-check and try again. If none of these actions are effective, re-initialize the
network interface and try again.
4. Print a status sheet to check whether the new IP address has been assigned to the
network interface.
Note:
When the IP address is set by the ping command, the subnet mask is automatically changed
by the class of the IP address. To change the subnet mask and the default gateway according
to your network environment, use EpsonNet Config for Windows or Macintosh.
Uninstalling Software
Follow the steps below to uninstall the network software.
Windows Vista
1. Click Start, click Control Panel, and then click Uninstall a program.
2. Select the utility you want to uninstall, and then click the Uninstall/Change button.
3. Follow the on-screen instructions to complete uninstallation.
Windows XP
1. Click Start, click Control Panel, and then click Add or Remove Programs.
2. Click the Change or Remove Programs icon.
3. Select the utility you want to uninstall, and then click the Change/Remove button.
4. Follow the on-screen instructions to complete uninstallation.
Tips for Administrator 43
Page 44

Macintosh
1. Double-click the EpsonNet Config Installer icon.
2. Click the Continue button.
3. In the License dialog box, read the License Agreement, and then click the Accept
button.
4. Select Uninstall from the pull down menu.
5. Click the Uninstall button.
6. Follow the on-screen instructions to complete uninstallation.
Note:
You can also uninstall the software by dragging the target folder to the Trash.
44 Tips for Administrator
Page 45

Index
A
Administrator tips, 41 to 44
arp, 42
Automatic Private IP Addressing (APIPA), 29
B
Bonjour printing, 24
C
Cable, network, 7
Configuring network interface
control panel, 14 to 15
EpsonNet Config with Web Browser, 28 to 30
Connector, network, 7
Control panel, configuring network interface,
14 to 15
D
Default gateway, 15, 29
DHCP, 8
Dynamic DNS, 29
E
EDM setting, 37
EpsonNet Config
Macintosh, 26
Windows, 25
EpsonNet Config with Web Browser
password, 37
settings, 30 to 38
using, 27 to 30
I
Installing printer driver
Macintosh, 24
Windows Vista, 16 to 18
Windows XP, 19 to 23
IP address
arp/ping command, 41 to 43
control panel, 14 to 15
EpsonNet Config with Web Browser, 28 to 29
L
LAN, checking, 42
Lights, status, 7
M
MAC address, 31
Macintosh
Bonjour printing, 24
installing printer driver, 24
network settings, 13
selecting a printing method, 10
TCP/IP printing, 24
Microsoft network, 34
N
Network
cable, 7
connector, 7
printing status sheet, 16
protocols, 6
Network interface
configuring, 14 to 15
connecting to network, 14
Network software, uninstalling, 43
O
Operating environment, 6
P
Password, EpsonNet Config with Web Browser, 37
ping, 42
Printer driver
installing in Windows Vista, 16 to 18
installing in Windows XP, 19 to 23
installing on Macintosh, 24
Problems, solving, 39 to 40
Protocols, 6
R
Resetting network interface, 31, 37
Return to default button, 37
RJ-45 connector, 7
Router, 29
S
Software, uninstalling, 43
Status lights, 7
Status sheet, printing, 16
Subnet mask, 15, 29
Index 45
Page 46

T
TCP/IP
definition, 8
setting up in Windows, 11 to 13
setting up on Macintosh, 24
Troubleshooting, 39 to 40
U
Uninstalling network software, 43
Universal Plug and Play, 29
W
Windows
selecting a printing method, 10
Vista, 11 to 12, 16 to 18
XP, 12 to 13, 19 to 23
46 Index
 Loading...