

Page 1

Epson Stylus® Pro 4880
User’s Guide
Page 2

2
Page 3

Copyrights and Trademarks
All rights reserved. No part of this publication may be reproduced, stored in a retrieval system, or
transmitted in any form or by any means, electronic, mechanical, photocopying, recording, or
otherwise, without the prior written permission of Seiko Epson Corporation. No patent liability is
assumed with respect to the use of the information contained herein. Neither is any liability
assumed for damages resulting from the use of the information contained herein.
Neither Seiko Epson Corporation nor its affiliates shall be liable to the purchase of this product or
third parties for damages, losses, costs, or expenses incurred by purchase or third parties as a
result of: accident, misuse, or abuse of this product or unauthorized modifications, repairs, or
alterations to this product, or (excluding the U.S.) failure to strictly comply with Seiko Epson
Corporation’s operating and maintenance instructions.
Seiko Epson Corporation shall not be liable against any damages or problems arising from the use
of any options or any consumable products other than those designated as Original Epson
Products or Epson Approved Products by Seiko Epson Corporation.
Epson, Epson Stylus, and Micro Weave are registered trademarks and Epson Exceed Your Vision
is a trademark of Seiko Epson Corporation.
UltraSmooth and Piezo Pro are registered trademarks, PhotoEnhance and Epson UltraChrome K3
are trademarks, and Epson Preferred is a service mark of Epson America, Inc.
Microsoft, Windows, and Windows Vista are registered trademarks of Microsoft Corporation.
Adobe and Photoshop are registered trademarks of Adobe Systems Incorporated.
Apple, ColorSync, and Macintosh are registered trademarks of Apple Inc.
Intel and Pentium are registered trademarks of Intel Corporation.
PowerPC is a registered trademark of International Business Machines Corporation.
PremierArt is a trademark of Premier Imaging Products, Inc.
General Notice: Other product names used herein are for identification purposes only and may be
trademarks of their respective owners. Epson disclaims any and all rights in those marks.
The contents of this manual are subject to change without notice.
© 2007 Epson America, Inc. All rights reserved.
Copyrights and Trademarks 3
Page 4

4 Copyrights and Trademarks
Page 5

Contents
Copyrights and Trademarks 3
Chapter 1 Printing with Mac OS X 11
Page Setup Window Settings. . . . . . . . . . . . . . . . . . . . . . . . . . . . . . . . . . . . . . . 11
Settings . . . . . . . . . . . . . . . . . . . . . . . . . . . . . . . . . . . . . . . . . . . . . . . . . . . . 11
Format for . . . . . . . . . . . . . . . . . . . . . . . . . . . . . . . . . . . . . . . . . . . . . . . . . . 11
Paper Size. . . . . . . . . . . . . . . . . . . . . . . . . . . . . . . . . . . . . . . . . . . . . . . . . . 12
Orientation. . . . . . . . . . . . . . . . . . . . . . . . . . . . . . . . . . . . . . . . . . . . . . . . . . 13
Scale . . . . . . . . . . . . . . . . . . . . . . . . . . . . . . . . . . . . . . . . . . . . . . . . . . . . . . 13
Print Window Settings . . . . . . . . . . . . . . . . . . . . . . . . . . . . . . . . . . . . . . . . . . . . 13
Printer . . . . . . . . . . . . . . . . . . . . . . . . . . . . . . . . . . . . . . . . . . . . . . . . . . . . . 13
Presets . . . . . . . . . . . . . . . . . . . . . . . . . . . . . . . . . . . . . . . . . . . . . . . . . . . . 13
Copies & Pages. . . . . . . . . . . . . . . . . . . . . . . . . . . . . . . . . . . . . . . . . . . . . . 14
Layout . . . . . . . . . . . . . . . . . . . . . . . . . . . . . . . . . . . . . . . . . . . . . . . . . . . . . 15
Output Options . . . . . . . . . . . . . . . . . . . . . . . . . . . . . . . . . . . . . . . . . . . . . . 16
Scheduler . . . . . . . . . . . . . . . . . . . . . . . . . . . . . . . . . . . . . . . . . . . . . . . . . . 16
Paper Handling . . . . . . . . . . . . . . . . . . . . . . . . . . . . . . . . . . . . . . . . . . . . . . 17
ColorSync . . . . . . . . . . . . . . . . . . . . . . . . . . . . . . . . . . . . . . . . . . . . . . . . . . 17
Cover Page . . . . . . . . . . . . . . . . . . . . . . . . . . . . . . . . . . . . . . . . . . . . . . . . . 18
Print Settings. . . . . . . . . . . . . . . . . . . . . . . . . . . . . . . . . . . . . . . . . . . . . . . . 18
Printer Color Management . . . . . . . . . . . . . . . . . . . . . . . . . . . . . . . . . . . . . 23
Paper Configuration . . . . . . . . . . . . . . . . . . . . . . . . . . . . . . . . . . . . . . . . . . 27
Roll Paper Option . . . . . . . . . . . . . . . . . . . . . . . . . . . . . . . . . . . . . . . . . . . . 29
Expansion . . . . . . . . . . . . . . . . . . . . . . . . . . . . . . . . . . . . . . . . . . . . . . . . . . 32
Summary. . . . . . . . . . . . . . . . . . . . . . . . . . . . . . . . . . . . . . . . . . . . . . . . . . . 33
Saving your settings in the Print window. . . . . . . . . . . . . . . . . . . . . . . . . . . 33
Using your saved settings in the Print window . . . . . . . . . . . . . . . . . . . . . . 34
Preview . . . . . . . . . . . . . . . . . . . . . . . . . . . . . . . . . . . . . . . . . . . . . . . . . . . . 34
Selecting Borderless Print Settings . . . . . . . . . . . . . . . . . . . . . . . . . . . . . . . . . . 34
Canceling Printing . . . . . . . . . . . . . . . . . . . . . . . . . . . . . . . . . . . . . . . . . . . . . . . 35
Printer Utility Window . . . . . . . . . . . . . . . . . . . . . . . . . . . . . . . . . . . . . . . . . . . . . 36
Accessing the Epson Printer Utility2 . . . . . . . . . . . . . . . . . . . . . . . . . . . . . . 36
Using the Printer Utilities . . . . . . . . . . . . . . . . . . . . . . . . . . . . . . . . . . . . . . . 37
Checking the print head nozzles . . . . . . . . . . . . . . . . . . . . . . . . . . . . . . . . . 39
Cleaning the print head . . . . . . . . . . . . . . . . . . . . . . . . . . . . . . . . . . . . . . . . 40
Aligning the print head. . . . . . . . . . . . . . . . . . . . . . . . . . . . . . . . . . . . . . . . . 41
Starting Epson LFP Remote Panel . . . . . . . . . . . . . . . . . . . . . . . . . . . . . . . 42
5
Page 6

Getting Information Through On-screen Help . . . . . . . . . . . . . . . . . . . . . . . . . . 42
Uninstalling the Printer Software . . . . . . . . . . . . . . . . . . . . . . . . . . . . . . . . . . . . 42
Chapter 2 Printing with Windows 45
Basic Settings. . . . . . . . . . . . . . . . . . . . . . . . . . . . . . . . . . . . . . . . . . . . . . . . . . . 45
Selecting printer driver settings. . . . . . . . . . . . . . . . . . . . . . . . . . . . . . . . . . 45
Canceling printing . . . . . . . . . . . . . . . . . . . . . . . . . . . . . . . . . . . . . . . . . . . . 48
Selecting Settings on the Main Tab . . . . . . . . . . . . . . . . . . . . . . . . . . . . . . . . . . 49
Selecting the Media Type setting . . . . . . . . . . . . . . . . . . . . . . . . . . . . . . . . 49
Selecting the Color setting . . . . . . . . . . . . . . . . . . . . . . . . . . . . . . . . . . . . . 51
Selecting the Print Quality setting . . . . . . . . . . . . . . . . . . . . . . . . . . . . . . . . 51
Selecting the Mode setting . . . . . . . . . . . . . . . . . . . . . . . . . . . . . . . . . . . . . 52
Selecting the Advanced settings . . . . . . . . . . . . . . . . . . . . . . . . . . . . . . . . . 54
Paper Configuration . . . . . . . . . . . . . . . . . . . . . . . . . . . . . . . . . . . . . . . . . . 59
Saving settings . . . . . . . . . . . . . . . . . . . . . . . . . . . . . . . . . . . . . . . . . . . . . . 61
Deleting settings . . . . . . . . . . . . . . . . . . . . . . . . . . . . . . . . . . . . . . . . . . . . . 62
Exporting and importing settings . . . . . . . . . . . . . . . . . . . . . . . . . . . . . . . . . 62
Selecting the Paper Source setting . . . . . . . . . . . . . . . . . . . . . . . . . . . . . . . 63
Selecting the Borderless setting . . . . . . . . . . . . . . . . . . . . . . . . . . . . . . . . . 63
Selecting the Paper Size setting . . . . . . . . . . . . . . . . . . . . . . . . . . . . . . . . . 66
Selecting the Printable Area setting . . . . . . . . . . . . . . . . . . . . . . . . . . . . . . 67
Selecting the Roll Paper Option settings. . . . . . . . . . . . . . . . . . . . . . . . . . . 68
Selecting the Save Roll Paper setting . . . . . . . . . . . . . . . . . . . . . . . . . . . . . 71
Checking Ink Levels . . . . . . . . . . . . . . . . . . . . . . . . . . . . . . . . . . . . . . . . . . 72
Previewing your printout . . . . . . . . . . . . . . . . . . . . . . . . . . . . . . . . . . . . . . . 72
Using the Manual function. . . . . . . . . . . . . . . . . . . . . . . . . . . . . . . . . . . . . . 74
Selecting Settings on the Page Layout Tab . . . . . . . . . . . . . . . . . . . . . . . . . . . . 74
Selecting the Orientation settings . . . . . . . . . . . . . . . . . . . . . . . . . . . . . . . . 75
Selecting the Copies setting . . . . . . . . . . . . . . . . . . . . . . . . . . . . . . . . . . . . 76
Selecting the Reduce/Enlarge settings . . . . . . . . . . . . . . . . . . . . . . . . . . . . 77
Selecting Double-Sided Printing setting . . . . . . . . . . . . . . . . . . . . . . . . . . . 77
Selecting Multi-Page settings . . . . . . . . . . . . . . . . . . . . . . . . . . . . . . . . . . . 83
Selecting the Optimize Enlargement setting . . . . . . . . . . . . . . . . . . . . . . . . 85
Selecting the Print Background Color setting . . . . . . . . . . . . . . . . . . . . . . . 85
Selecting the Job Settings. . . . . . . . . . . . . . . . . . . . . . . . . . . . . . . . . . . . . . 85
Using the Printer Utilities . . . . . . . . . . . . . . . . . . . . . . . . . . . . . . . . . . . . . . . . . . 86
Checking the print head nozzles . . . . . . . . . . . . . . . . . . . . . . . . . . . . . . . . . 88
Cleaning the print head . . . . . . . . . . . . . . . . . . . . . . . . . . . . . . . . . . . . . . . . 89
Aligning the print head. . . . . . . . . . . . . . . . . . . . . . . . . . . . . . . . . . . . . . . . . 90
Selecting Monitoring Preferences . . . . . . . . . . . . . . . . . . . . . . . . . . . . . . . . 91
Selecting Speed and Progress settings . . . . . . . . . . . . . . . . . . . . . . . . . . . 92
Selecting Menu Arrangement settings . . . . . . . . . . . . . . . . . . . . . . . . . . . . 94
Starting Epson LFP Remote Panel . . . . . . . . . . . . . . . . . . . . . . . . . . . . . . . 94
6
Page 7

Getting Information Through On-screen Help . . . . . . . . . . . . . . . . . . . . . . . . . . 95
Checking Printer Status and Managing Print Jobs . . . . . . . . . . . . . . . . . . . . . . 96
Using the Progress Meter . . . . . . . . . . . . . . . . . . . . . . . . . . . . . . . . . . . . . . 96
Using Epson Status Monitor 3. . . . . . . . . . . . . . . . . . . . . . . . . . . . . . . . . . . 97
Increasing the Print Speed . . . . . . . . . . . . . . . . . . . . . . . . . . . . . . . . . . . . . . . . . 98
General tips. . . . . . . . . . . . . . . . . . . . . . . . . . . . . . . . . . . . . . . . . . . . . . . . . 98
Using Speed and Progress . . . . . . . . . . . . . . . . . . . . . . . . . . . . . . . . . . . . . 99
Sharing Your Printer. . . . . . . . . . . . . . . . . . . . . . . . . . . . . . . . . . . . . . . . . . . . . . 99
For Windows Vista . . . . . . . . . . . . . . . . . . . . . . . . . . . . . . . . . . . . . . . . . . . 99
For Windows XP . . . . . . . . . . . . . . . . . . . . . . . . . . . . . . . . . . . . . . . . . . . . 101
Updating and Uninstalling the Printer Software . . . . . . . . . . . . . . . . . . . . . . . . 103
Updating the driver in Windows Vista or XP . . . . . . . . . . . . . . . . . . . . . . . 103
Uninstalling the printer driver. . . . . . . . . . . . . . . . . . . . . . . . . . . . . . . . . . . 103
Chapter 3 The Control Panel 107
Buttons, Lights, Messages, and Icons . . . . . . . . . . . . . . . . . . . . . . . . . . . . . . . 107
Buttons . . . . . . . . . . . . . . . . . . . . . . . . . . . . . . . . . . . . . . . . . . . . . . . . . . . 107
Lights. . . . . . . . . . . . . . . . . . . . . . . . . . . . . . . . . . . . . . . . . . . . . . . . . . . . . 109
Messages . . . . . . . . . . . . . . . . . . . . . . . . . . . . . . . . . . . . . . . . . . . . . . . . . 110
Menu Settings. . . . . . . . . . . . . . . . . . . . . . . . . . . . . . . . . . . . . . . . . . . . . . . . . . 110
When to use Menu mode . . . . . . . . . . . . . . . . . . . . . . . . . . . . . . . . . . . . . 110
Basic Menu setting procedure. . . . . . . . . . . . . . . . . . . . . . . . . . . . . . . . . . 111
Menu list . . . . . . . . . . . . . . . . . . . . . . . . . . . . . . . . . . . . . . . . . . . . . . . . . . 112
Details of Menu mode . . . . . . . . . . . . . . . . . . . . . . . . . . . . . . . . . . . . . . . . 117
Checking the print head nozzles . . . . . . . . . . . . . . . . . . . . . . . . . . . . . . . . 130
Aligning the print head. . . . . . . . . . . . . . . . . . . . . . . . . . . . . . . . . . . . . . . . 131
Selecting paper settings . . . . . . . . . . . . . . . . . . . . . . . . . . . . . . . . . . . . . . 134
Printing a status sheet. . . . . . . . . . . . . . . . . . . . . . . . . . . . . . . . . . . . . . . . 136
Setting the alert value for paper . . . . . . . . . . . . . . . . . . . . . . . . . . . . . . . . 137
Maintenance Mode. . . . . . . . . . . . . . . . . . . . . . . . . . . . . . . . . . . . . . . . . . . . . . 137
Maintenance mode setting procedure . . . . . . . . . . . . . . . . . . . . . . . . . . . . 137
Maintenance mode list . . . . . . . . . . . . . . . . . . . . . . . . . . . . . . . . . . . . . . . 138
Details of Maintenance mode items . . . . . . . . . . . . . . . . . . . . . . . . . . . . . 139
Chapter 4 Paper Handling 143
Notes on Epson Media and Other Media . . . . . . . . . . . . . . . . . . . . . . . . . . . . . 143
Using Epson media . . . . . . . . . . . . . . . . . . . . . . . . . . . . . . . . . . . . . . . . . . 143
Using paper other than Epson media . . . . . . . . . . . . . . . . . . . . . . . . . . . . 144
Using Roll Paper. . . . . . . . . . . . . . . . . . . . . . . . . . . . . . . . . . . . . . . . . . . . . . . . 144
Attaching the roll paper to the spindle. . . . . . . . . . . . . . . . . . . . . . . . . . . . 144
Removing the roll paper from the spindle . . . . . . . . . . . . . . . . . . . . . . . . . 145
7
Page 8

Loading roll paper . . . . . . . . . . . . . . . . . . . . . . . . . . . . . . . . . . . . . . . . . . . 146
Cutting the roll paper or printing page lines. . . . . . . . . . . . . . . . . . . . . . . . 149
Using Cut Sheet Media. . . . . . . . . . . . . . . . . . . . . . . . . . . . . . . . . . . . . . . . . . . 151
Checking the paper path . . . . . . . . . . . . . . . . . . . . . . . . . . . . . . . . . . . . . . 151
Loading cut sheet media . . . . . . . . . . . . . . . . . . . . . . . . . . . . . . . . . . . . . . 153
Chapter 5 Maintenance and Transportation 169
Replacing Ink Cartridges . . . . . . . . . . . . . . . . . . . . . . . . . . . . . . . . . . . . . . . . . 169
Changing the Black Ink Cartridge. . . . . . . . . . . . . . . . . . . . . . . . . . . . . . . . . . . 173
Updating the printer driver information . . . . . . . . . . . . . . . . . . . . . . . . . . . 178
Replacing the Maintenance Tank. . . . . . . . . . . . . . . . . . . . . . . . . . . . . . . . . . . 178
Replacing the Paper Cutter Blade . . . . . . . . . . . . . . . . . . . . . . . . . . . . . . . . . . 180
Cleaning the Printer . . . . . . . . . . . . . . . . . . . . . . . . . . . . . . . . . . . . . . . . . . . . . 182
If you have not used your printer for a long time. . . . . . . . . . . . . . . . . . . . 185
Transporting the Printer . . . . . . . . . . . . . . . . . . . . . . . . . . . . . . . . . . . . . . . . . . 186
Preparing the printer for shipment. . . . . . . . . . . . . . . . . . . . . . . . . . . . . . . 186
Setting up the printer after transportation . . . . . . . . . . . . . . . . . . . . . . . . . 188
Chapter 6 Problem Solver 191
Troubleshooting . . . . . . . . . . . . . . . . . . . . . . . . . . . . . . . . . . . . . . . . . . . . . . . . 191
Printer stops printing unexpectedly . . . . . . . . . . . . . . . . . . . . . . . . . . . . . . 191
The printer does not turn on or stay on . . . . . . . . . . . . . . . . . . . . . . . . . . . 198
The printer prints nothing . . . . . . . . . . . . . . . . . . . . . . . . . . . . . . . . . . . . . 198
Printouts are not what you expected . . . . . . . . . . . . . . . . . . . . . . . . . . . . . 201
Print quality could be better. . . . . . . . . . . . . . . . . . . . . . . . . . . . . . . . . . . . 203
Color documents print in black ink only. . . . . . . . . . . . . . . . . . . . . . . . . . . 206
Printing could be faster . . . . . . . . . . . . . . . . . . . . . . . . . . . . . . . . . . . . . . . 206
Roll paper cannot be cut . . . . . . . . . . . . . . . . . . . . . . . . . . . . . . . . . . . . . . 207
Paper feed or paper jam problems occur frequently . . . . . . . . . . . . . . . . . 207
Roll paper does not eject properly. . . . . . . . . . . . . . . . . . . . . . . . . . . . . . . 208
Clearing paper jams . . . . . . . . . . . . . . . . . . . . . . . . . . . . . . . . . . . . . . . . . 209
Managing Color with Profiles . . . . . . . . . . . . . . . . . . . . . . . . . . . . . . . . . . . . . . 218
Macintosh Printing with a Color Profile . . . . . . . . . . . . . . . . . . . . . . . . . . . 219
Windows Printing with a Color Profile . . . . . . . . . . . . . . . . . . . . . . . . . . . . 222
Paper Information. . . . . . . . . . . . . . . . . . . . . . . . . . . . . . . . . . . . . . . . . . . . . . . 226
Paper settings . . . . . . . . . . . . . . . . . . . . . . . . . . . . . . . . . . . . . . . . . . . . . . 226
Where To Get Help. . . . . . . . . . . . . . . . . . . . . . . . . . . . . . . . . . . . . . . . . . . . . . 229
Purchase Supplies and Accessories . . . . . . . . . . . . . . . . . . . . . . . . . . . . . 229
8
Page 9

Chapter 7 Product Information 231
Printer Specifications . . . . . . . . . . . . . . . . . . . . . . . . . . . . . . . . . . . . . . . . . . . . 231
Printing . . . . . . . . . . . . . . . . . . . . . . . . . . . . . . . . . . . . . . . . . . . . . . . . . . . 231
Printable area . . . . . . . . . . . . . . . . . . . . . . . . . . . . . . . . . . . . . . . . . . . . . . 231
Mechanical . . . . . . . . . . . . . . . . . . . . . . . . . . . . . . . . . . . . . . . . . . . . . . . . 232
Electrical . . . . . . . . . . . . . . . . . . . . . . . . . . . . . . . . . . . . . . . . . . . . . . . . . . 233
Environmental . . . . . . . . . . . . . . . . . . . . . . . . . . . . . . . . . . . . . . . . . . . . . . 233
Standards and Approvals . . . . . . . . . . . . . . . . . . . . . . . . . . . . . . . . . . . . . 234
Paper. . . . . . . . . . . . . . . . . . . . . . . . . . . . . . . . . . . . . . . . . . . . . . . . . . . . . 234
Ink cartridges. . . . . . . . . . . . . . . . . . . . . . . . . . . . . . . . . . . . . . . . . . . . . . . 236
System Requirements . . . . . . . . . . . . . . . . . . . . . . . . . . . . . . . . . . . . . . . . . . . 237
Macintosh . . . . . . . . . . . . . . . . . . . . . . . . . . . . . . . . . . . . . . . . . . . . . . . . . 237
Windows . . . . . . . . . . . . . . . . . . . . . . . . . . . . . . . . . . . . . . . . . . . . . . . . . . 238
Interface Specifications . . . . . . . . . . . . . . . . . . . . . . . . . . . . . . . . . . . . . . . . . . 238
USB interface . . . . . . . . . . . . . . . . . . . . . . . . . . . . . . . . . . . . . . . . . . . . . . 238
Ethernet interface . . . . . . . . . . . . . . . . . . . . . . . . . . . . . . . . . . . . . . . . . . . 239
Chapter 8 Options and Consumable Products 241
Options . . . . . . . . . . . . . . . . . . . . . . . . . . . . . . . . . . . . . . . . . . . . . . . . . . . . . . . 241
Roll paper spindle . . . . . . . . . . . . . . . . . . . . . . . . . . . . . . . . . . . . . . . . . . . 241
Consumable Products . . . . . . . . . . . . . . . . . . . . . . . . . . . . . . . . . . . . . . . . . . . 241
Paper cutter blade. . . . . . . . . . . . . . . . . . . . . . . . . . . . . . . . . . . . . . . . . . . 241
Maintenance tank . . . . . . . . . . . . . . . . . . . . . . . . . . . . . . . . . . . . . . . . . . . 242
Ink cartridges. . . . . . . . . . . . . . . . . . . . . . . . . . . . . . . . . . . . . . . . . . . . . . . 242
Epson media . . . . . . . . . . . . . . . . . . . . . . . . . . . . . . . . . . . . . . . . . . . . . . . 243
Safety Instructions 247
Important Safety Instructions . . . . . . . . . . . . . . . . . . . . . . . . . . . . . . . . . . . . . . 247
When choosing a place for this product . . . . . . . . . . . . . . . . . . . . . . . . . . 247
When setting up this product. . . . . . . . . . . . . . . . . . . . . . . . . . . . . . . . . . . 247
When using this product . . . . . . . . . . . . . . . . . . . . . . . . . . . . . . . . . . . . . . 249
When handling the ink cartridges . . . . . . . . . . . . . . . . . . . . . . . . . . . . . . . 249
When transporting this product . . . . . . . . . . . . . . . . . . . . . . . . . . . . . . . . . 250
Warning, Cautions, and Notes . . . . . . . . . . . . . . . . . . . . . . . . . . . . . . . . . 250
Index 251
9
Page 10

10
Page 11
Chapter 1
Printing with Mac OS X
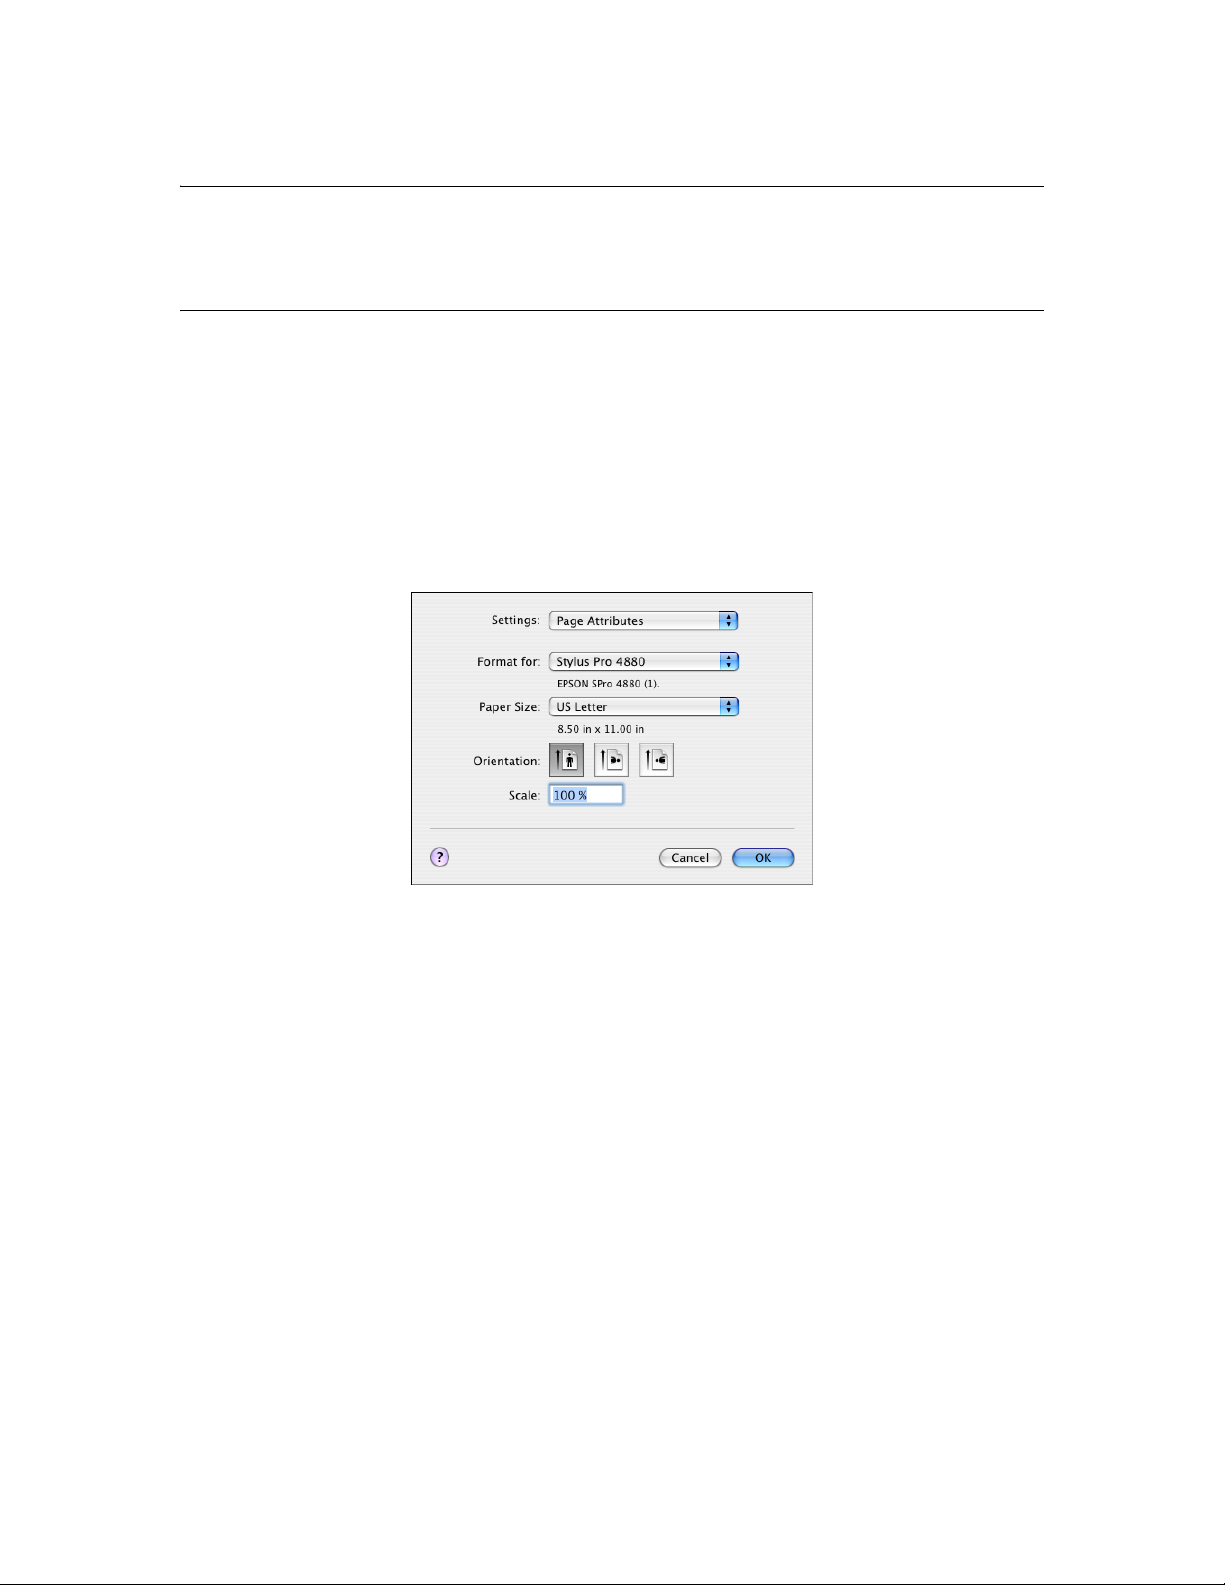
Page Setup Window Settings
You can select Format for, Paper Size, Orientation, and Scale settings for
printing from the Page Setup window.
Note:
The Page Setup dialog is a standard feature of Mac OS X. See your operating
system’s documentation for details.
Settings
Page Attributes
Displays the page setup settings.
Format for
Select Stylus Pro 4880 in the Format for drop-down menu.
Note:
Always select the same printer in the Format for drop-down menu (in the Page Setup
window) and the Printer drop-down menu (in the Print window); otherwise, your
images may not be printed correctly.
Printing with Mac OS X 11
Page 12

Paper Size
Select a paper size and a print area that you want to use.
The print area is listed when you click the arrow mark next to the Paper Size
you have selected.
The following table lists the print areas you can select.
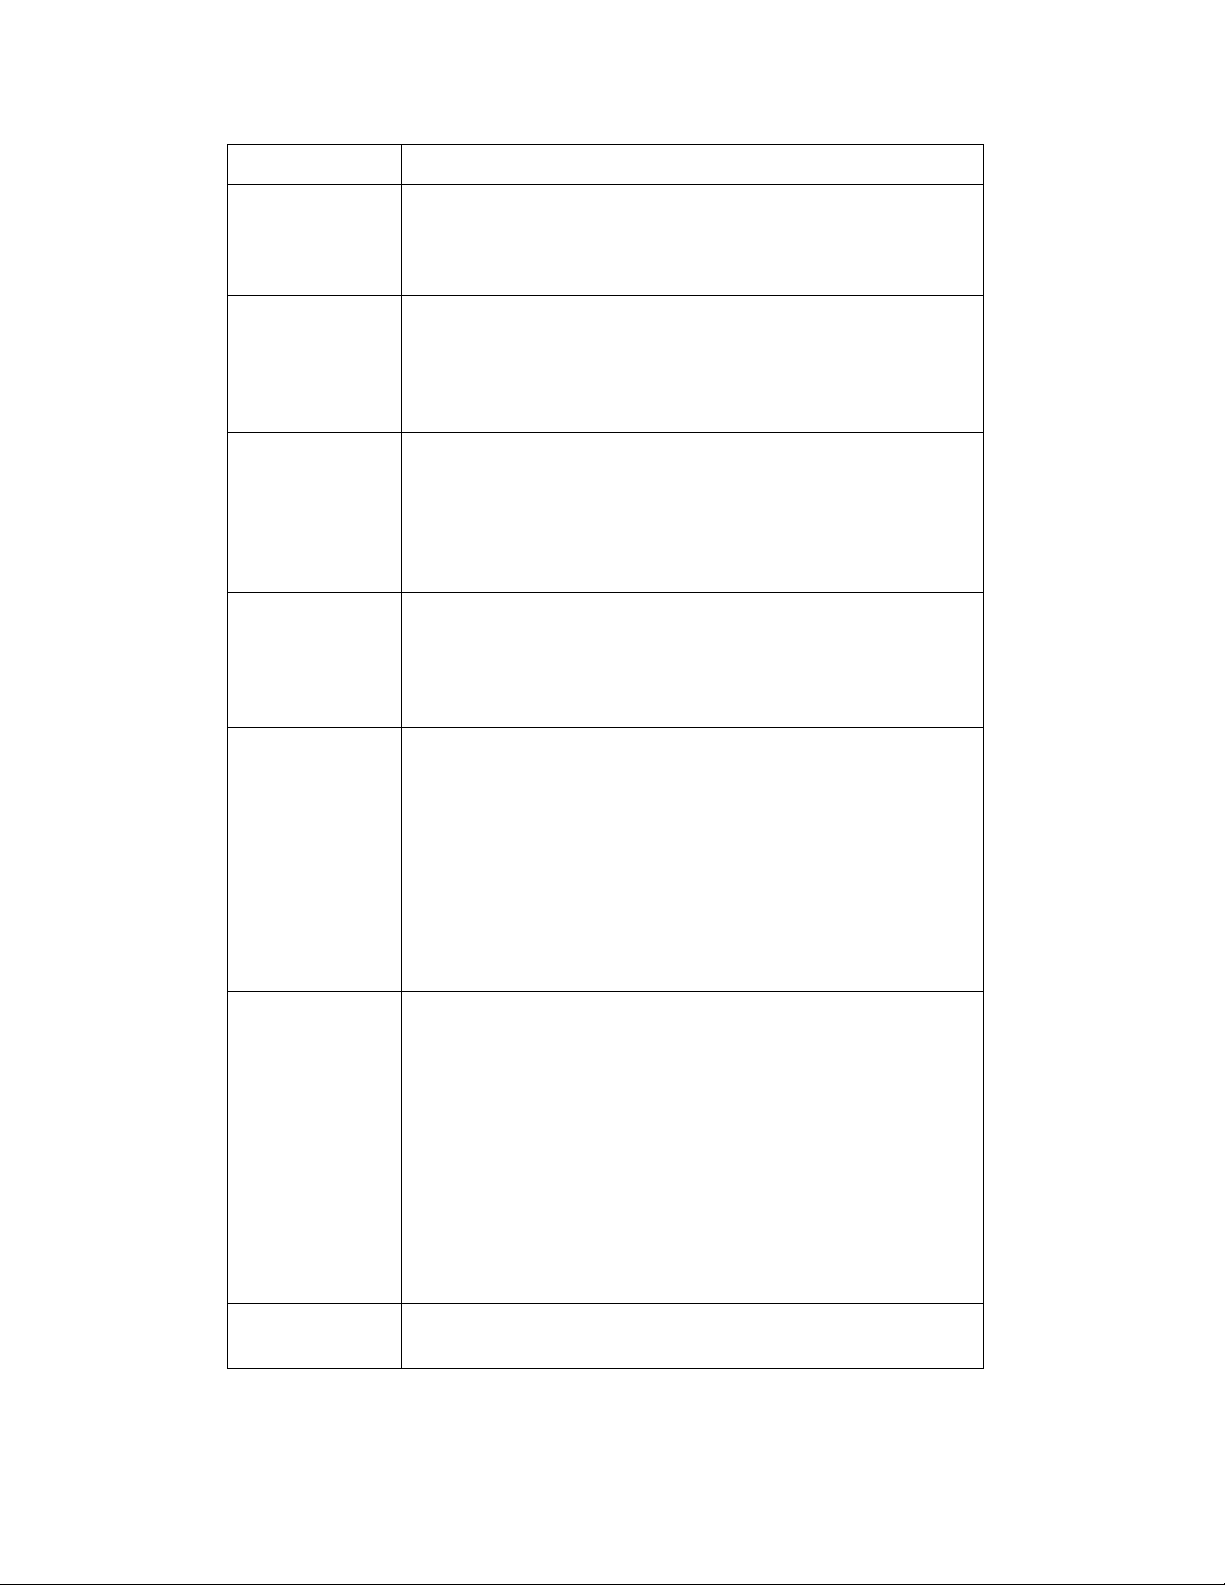
Printer Description
Standard Prints on cut-sheet paper with 14-mm
bottom, and 3-mm top, left, and right
margins.
Maximum Prints on cut-sheet paper with 3-mm margins
in four directions.
Borderless (Auto Expand) Enlarges prints on cut-sheet paper with 3-mm
top, 14-mm bottom, and 0-mm left and right
margins.
Borderless (Auto Expand,
Maximum)
Roll Paper Prints on roll paper with 3-mm margins on all
Roll Paper - Borderless (Auto
Expand)
Roll Paper - Banner Prints multiple pages on roll paper
Borderless (Retain Size) Prints on cut-sheet paper with 3-mm top,
Borderless (Retain Size,
Maximum)
Roll Paper - Borderless
(Retain Size)
Prints data enlarged on cut-sheet paper with
3-mm top and bottom margins, and 0-mm
left and right margins.
four sides.
Enlarges prints on roll paper without margins.
continuously with 3-mm left and right margins
and 0-mm top and bottom margins.
14-mm bottom, and 0-mm left and right
margins, while retaining the ratio of the
original size.
Prints on cut-sheet paper with 3-mm top and
bottom margins and 0-mm left and right
margins, while retaining the ratio of the
original size.
Prints on roll paper without margins, while
retaining the ratio of the original size.
Roll Paper - Borderless
Banner
12 Printing with Mac OS X
Prints multiple pages on roll paper
continuously without margins.
Page 13

Orientation
Select the Orientation setting that matches the orientation of your image.
Scale
Select a scale to reduce or enlarge the size of your printed image.
Print Window Settings
You can select Printer and Presets settings used for printing.
Note:
The Print window is a standard feature of Mac OS X. See your operating system’s
documentation for details.
Printer
Select Stylus Pro 4880 in the Printer drop-down menu.
Note:
Always select the same printer in the Format for drop-down menu (in the Page Setup
window) and the Printer drop-down menu (in the Print window); otherwise, your
images may not be printed correctly.
Presets
Select Standard or Save As.
Printing with Mac OS X 13
Page 14

Standard
Prints with the current settings.
Save as
Prints with custom saved settings.
Copies & Pages
Select the Copies, Collated, and Pages settings that you want to use for
printing.
Copies
Enter the number of copies that you want to print in the Copies text box.
Collated
Select Collated to print one complete document set at a time when printing
multiple copies.
Pages
Select either All or From and to. If you select From and to, enter the first
page of the range of pages in the From text box and the last page in the to
text box.
14 Printing with Mac OS X
Page 15

Layout
Select the Pages per Sheet, Layout Direction, and Border settings that you
want to use for printing.
Note:
Layout is a standard feature of Mac OS X. See your operating system’s
documentation for details.
Pages per Sheet
You can print multiple pages of your document on a single piece of paper.
Select from 1, 2, 4, 6, 9, or 16.
Layout Direction
You can specify the order in which the pages will be printed on the sheet of
paper.
Border
You can print a border around the pages printed on each sheet. You can
select from None, Single Hairline, Single Thin Line, Double Hairline, or
Double Thin Line.
Printing with Mac OS X 15
Page 16

Output Options
You can print your image to a file if you click the Save as File checkbox, and
select a format from the Format drop-down menu.
If you want to print your image on paper, uncheck the Save as File checkbox.
Note:
❏ Output Options is a standard feature of Mac OS X. See your operating system’s
documentation for details.
❏ Output Options does not appear when you are using Mac OS X 10.4.x. In Mac OS
X 10.4.x, click the PDF button instead.
Scheduler
Select the Print Document (time) and Priority settings that you want to use
for printing.
Note:
Scheduler is a standard feature of Mac OS X. See your operating system’s
documentation for details.
16 Printing with Mac OS X
Page 17

Paper Handling
Select the Page Order, Print (pages), and Destination Paper Size settings
that you want to use for printing.
Note:
Paper Handling is a standard feature of Mac OS X. See your operating system’s
documentation for details.
ColorSync
Select the Color Conversion and Quartz Filter settings that you want to use
for printing.
Note:
ColorSync is a standard feature of Mac OS X. See your operating system’s
documentation for details.
Printing with Mac OS X 17
Page 18
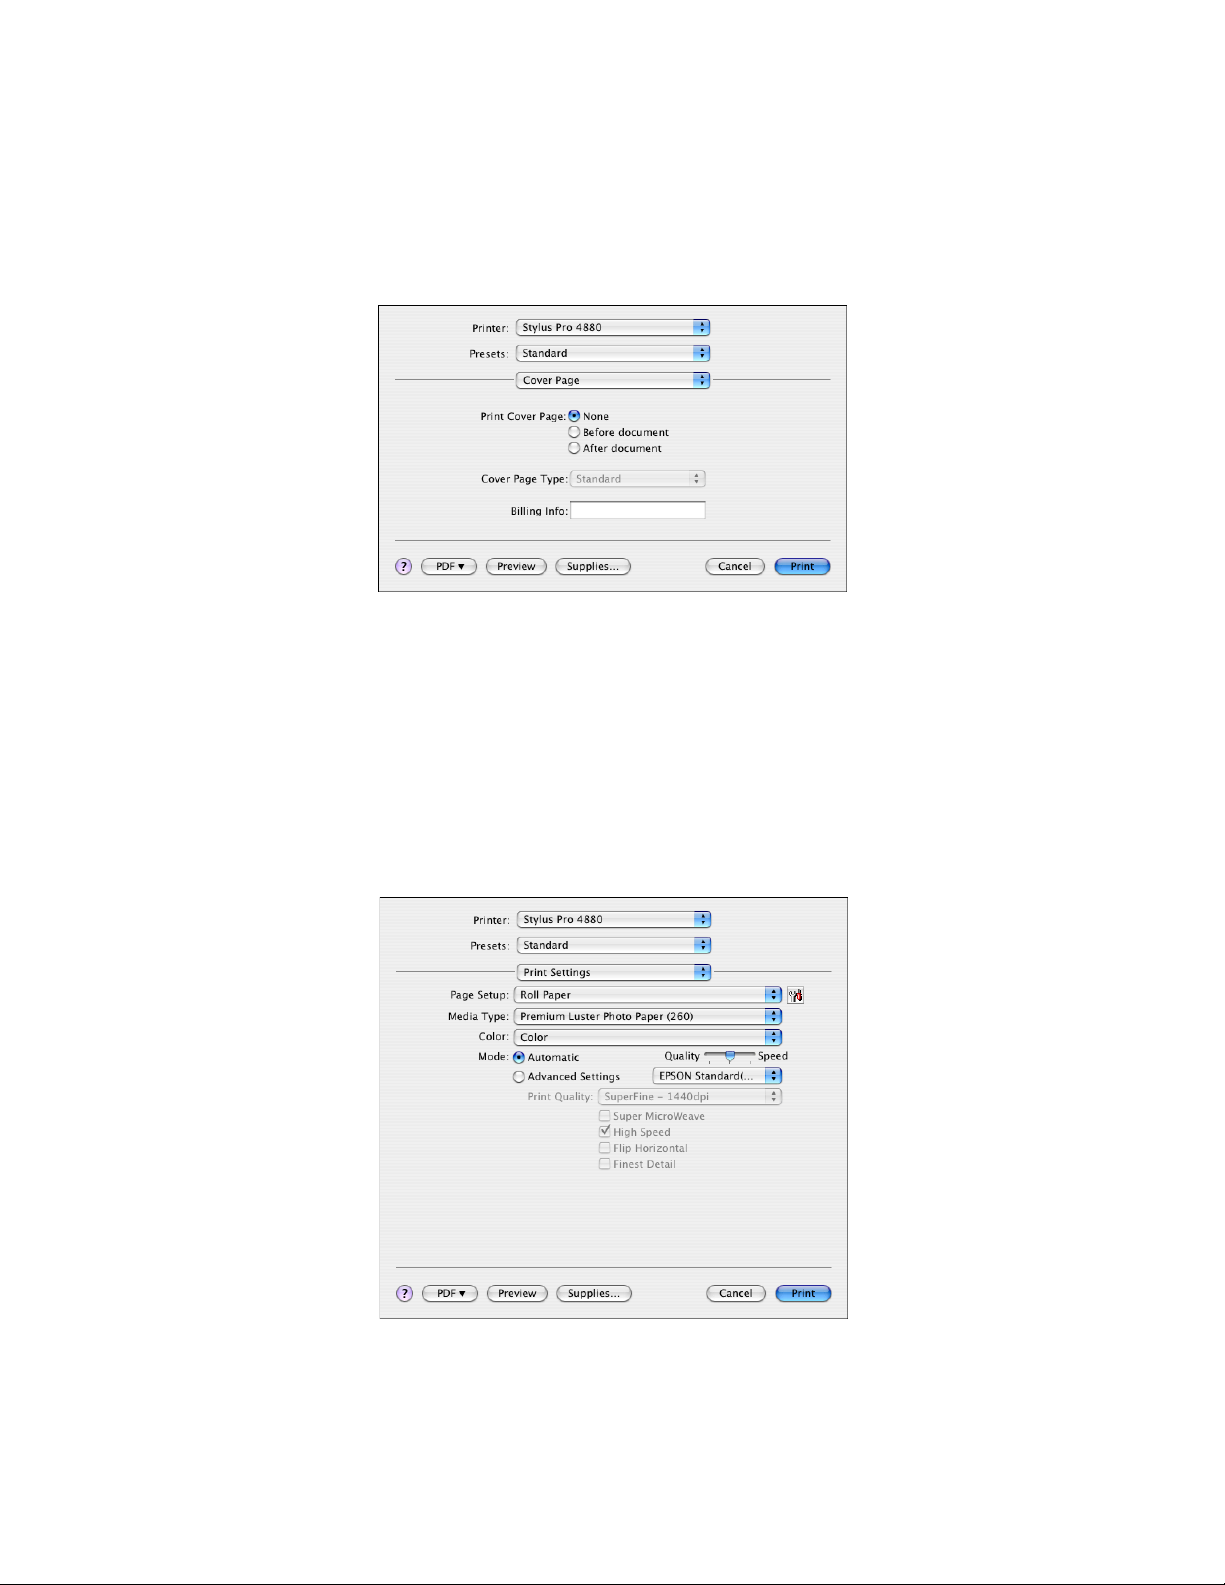
Cover Page
Select the Print Cover Page, Cover Page Type, and Billing Info settings
that you want to use for printing.
Note:
Cover Page is a standard feature of Mac OS X. See your operating system’s
documentation for details.
Print Settings
Select Page Setup, Media Type, Color, and Mode settings.
18 Printing with Mac OS X
Page 19

Page Setup
Shows the print area that was selected from the Paper Size list in the Page
Setup window.
When you print on cut sheet paper, select Paper Tray if you are using the
paper tray or select Manual Feed if you are using the front or rear manual
feed slot.
Media Type
The Media Type setting determines what other settings are available in the
printer driver, so make sure you always select this setting first.
Select the Media Type setting that matches the paper you loaded in the
printer. See the table below for a list of settings.
Note:
❏ The availability of Epson media varies by region.
❏ When you are using non-Epson papers, see "Notes on Epson Media and Other
Media" on page 143.
❏ For the latest information on the Epson media available in your area, see "Where
To Get Help" on page 229.
Media Type setting list
Media Type Setting Epson Media Name
Premium Luster Photo Paper (260) Premium Luster Photo Paper (260)
Premium Glossy Photo Paper (250) Premium Glossy Photo Paper (250)
Premium Semigloss Photo Paper (250) Premium Semi-gloss Photo Paper (250)
Premium Semimatte Photo Paper (260) Premium Semimatte Photo Paper (260)
Premium Glossy Photo Paper (170) Premium Glossy Photo Paper (170)
Premium Semigloss Photo Paper (170) Premium Semi-gloss Photo Paper (170)
Premium Glossy Photo Paper Premium Photo Paper Glossy
Premium Glossy Photo Paper
Premium Semigloss Photo Paper Premium Photo Paper Semi-gloss
Premium Semigloss Photo Paper
Printing with Mac OS X 19
Page 20

Media Type Setting Epson Media Name
Premium Luster Photo Paper Ultra Premium Photo Paper Luster
Premium Luster Photo Paper
Epson Proofing Paper White Semimatte Proofing Paper White Semimatte
Epson Proofing Paper Publication Proofing Paper Publication
Epson Proofing Paper Commercial Proofing Paper Commercial
Proofing Paper Commercial Semimatte
Velvet Fine Art Paper Velvet Fine Art Paper
Watercolor Paper - Radiant White Watercolor Paper - Radiant White
PremierArt Water Resistant Canvas for
Epson
Piezo Pro Matte Canvas
Textured Fine Art Paper Textured Fine Art Paper
UltraSmooth Fine Art Paper UltraSmooth Fine Art Paper
Singleweight Matte Paper Singleweight Matte Paper
Photo Quality Ink Jet Paper Presentation Paper Matte
Photo Quality Ink Jet Paper
Enhanced Matte Paper Ultra Premium Presentation Paper Matte
Enhanced Matte Paper
Plain Paper —
Plain Paper (line drawing) —
Tracing Paper —
Singleweight Matte Paper (line
drawing)
Singleweight Matte Paper
Color
Select Color to print color or monochrome photos, or Black to print a draft or
black text only. If you want to fine-tune your monochrome prints, select
Advanced B&W Photo.
Mode
You can select the Automatic or Advanced Settings.
20 Printing with Mac OS X
Page 21

Automatic
Automatic is the quickest and easiest way to start printing. When Automatic
is selected, the printer selects all of the detailed settings based on the Media
Type and Color settings you choose.
Quality and Speed slider
Depending on the Media Type, Color, and Mode setting you selected, a
Quality or Speed slider appears in the Mode box. Select Quality when print
quality is more important than print speed. Select Speed when print speed is
more important than print quality.
Color Control mode
When Color is selected as the Color setting in Automatic mode, the Color
Control drop-down menu appears.
You can select from the following settings.
Charts and
Graphs
EPSON
Standard
(sRGB)
Adobe RGB Matches your image’s color to the Adobe RGB color space.
Enhances colors and lightens the midtones and highlights of
an image. Select this setting when printing presentation
graphics, such as charts and graphs.
Increases the contrast in your printouts. Select this setting
when printing color photographs.
Printing with Mac OS X 21
Page 22
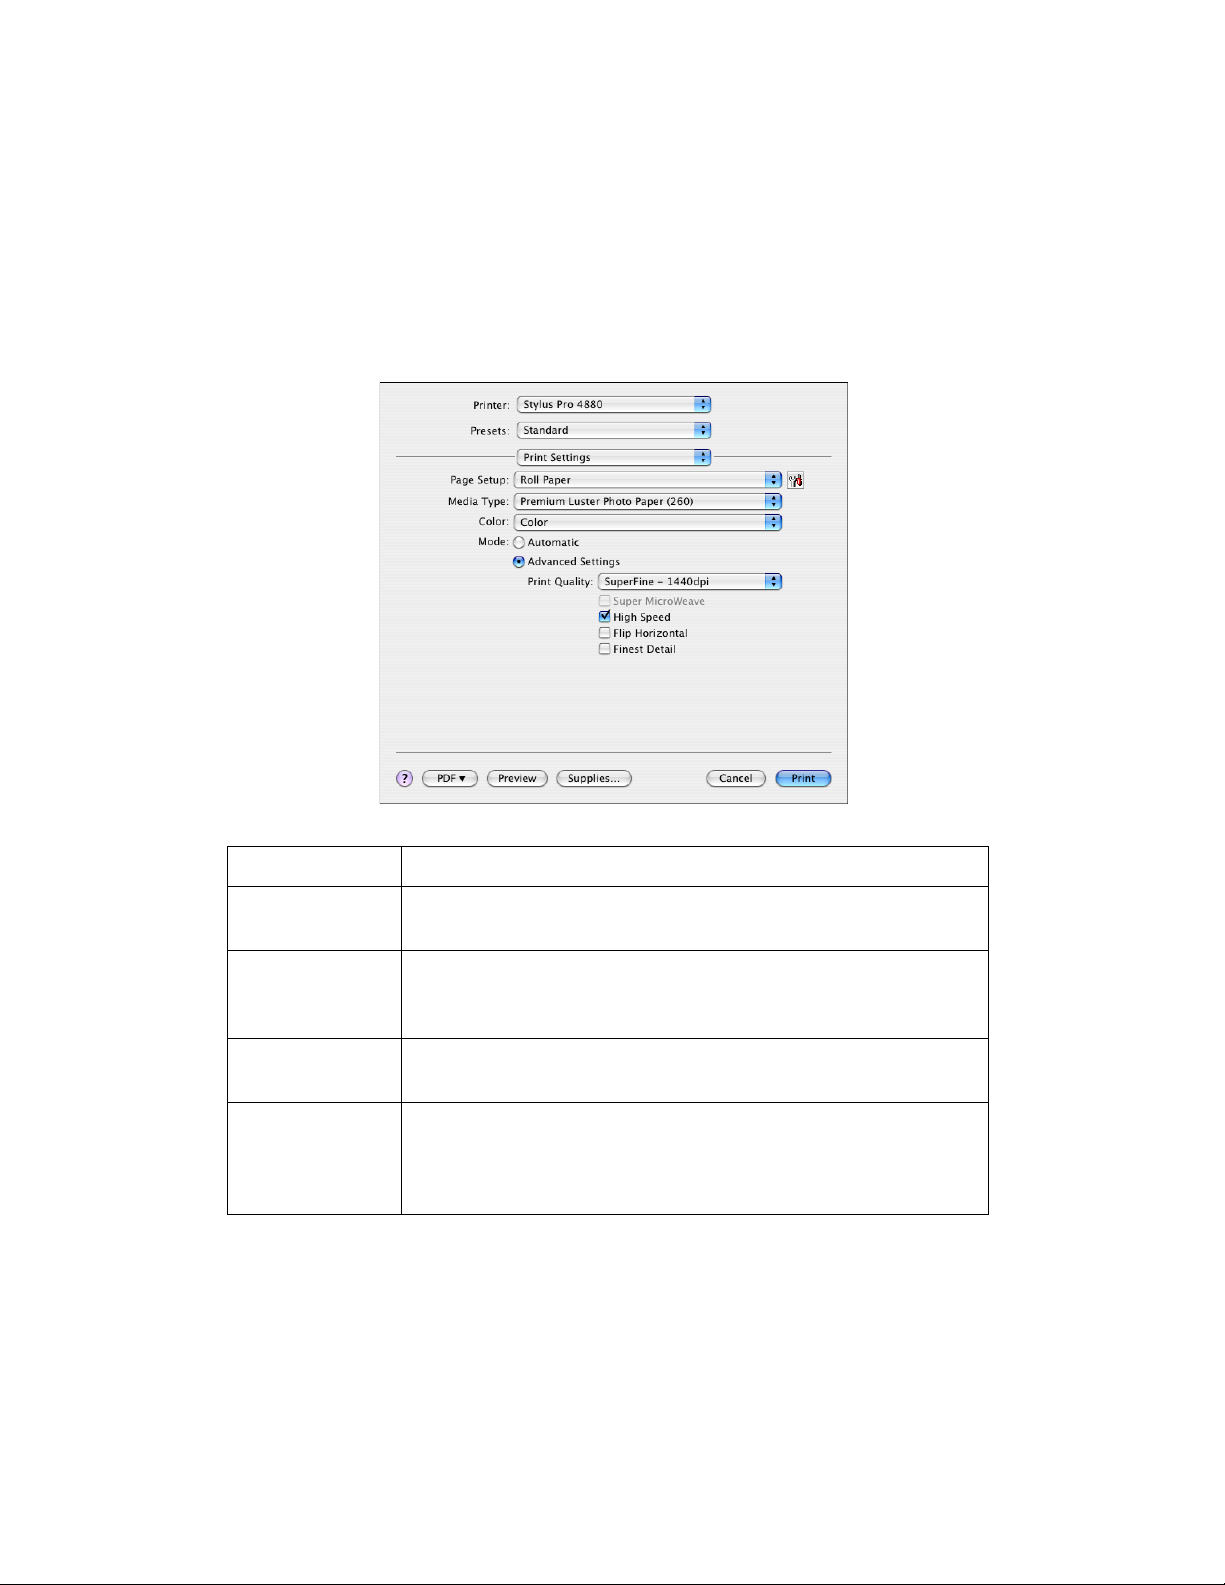
Advanced Settings
The Advanced Settings give you complete control over the printing
environment. Use these settings to experiment with new printing ideas, or to
fine-tune a range of print settings to meet your individual needs. Once you are
satisfied with your new settings, you can give them a name and add them to
the Custom Settings list.
Print Quality Select the print quality that you want to use for printing.
Super
MicroWeave
High Speed Activates bidirectional printing so your printer prints in both
Flip Horizontal Prints your image as it would appear in a mirror. Text and
Finest Detail Depending on the Print Quality setting you selected, you
Gives you slightly more detail, but the print time will be
longer.
left-to-right and right-to-left directions. This setting speeds
up printing, but may decrease print quality.
graphics appear reversed.
can turn on Finest Detail to print text, solid graphics, and
line art with very sharp edges. This setting is not
recommended when you are printing photographs.
22 Printing with Mac OS X
Page 23

Color Toning When you select Advanced B&W Photo as the Color
setting, the Color Toning drop-down menu appears.
Neutral:
Provides standard image correction for most photos. Try
this first.
Cool:
Gives a cool tone to your printouts.
Warm:
Gives a warm tone to your printouts.
Sepia:
Applies a sepia tone to your printouts.
Fine Adjustment:
Appears when you change the Tone, adjust the settings
using the slide bars or the color circle, or select the
Highlight Point Shift checkbox in the Printer Color
Management window. See "Color Controls (for Advanced
B&W Photo)" on page 25.
Printer Color Management
This option gives you control over the color matching and adjustment methods
provided by the printer driver.
Use these settings to experiment with new printing ideas or to fine-tune a
range of printer settings to meet your individual needs. Once you are satisfied
with your new settings, you can add them to the Custom Setting list in the Print
window.
Printing with Mac OS X 23
Page 24
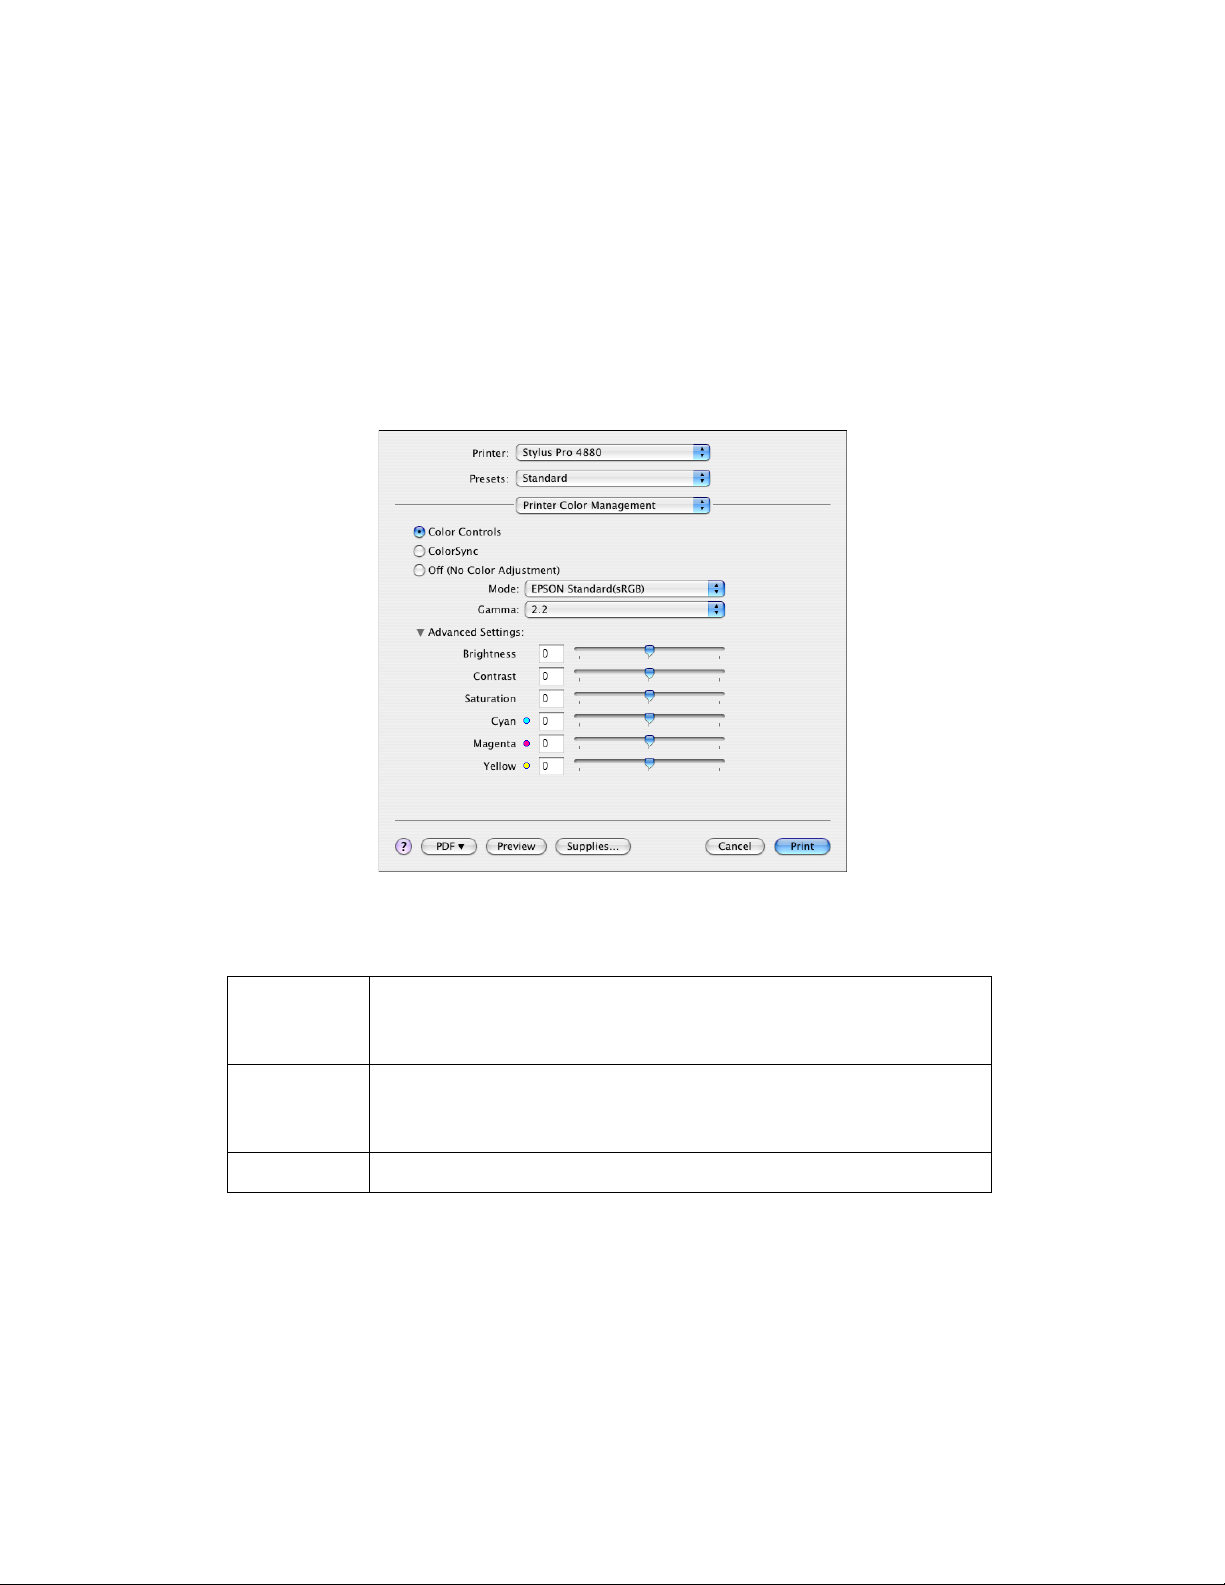
Color Controls
Select this setting to use the color matching and adjustment methods provided
with the printer. Click the triangle next to Advanced Settings. You see a
window like this one.
Note:
When Black is selected as the Color setting, you see a similar window, but you can
only adjust the Gamma, Brightness, and Contrast settings.
Mode
Charts and
Graphs
EPSON
Standard
(sRGB)
Adobe RGB Matches your image’s color to the Adobe RGB color space.
Enhances colors and lightens the midtones and highlights of
an image. Select this setting when printing presentation
graphics, such as charts and graphs.
Increases the contrast in your printouts. Select this setting
when printing color photographs.
Gamma
Controls image contrast by modifying the midtones and mid-level grays.
24 Printing with Mac OS X
Page 25

Advanced Settings
The color enhancement sliders adjust the indicated options in a range of
–25% to +25%.
Drag the slider to the right or left with your mouse to adjust the settings. You
can also type a value from –25% to +25% in the boxes next to the sliders.
Color Controls (for Advanced B&W Photo)
When Advanced B&W Photo is selected as the Color setting, you see a
window like this one. You can adjust the advanced monochrome settings. For
more information on the settings, see the on-screen help.
Printing with Mac OS X 25
Page 26

ColorSync
This setting automatically adjusts printout colors to match colors on your
screen.
Note:
Ambient light and the age, quality, and settings of your monitor can affect the quality
of color matching.
Off (No Color Adjustment)
This setting does not allow the printer driver to enhance or adjust the color in
any way. Use this setting only when you create a new color profile or if the
other Mode settings do not produce satisfactory results. See "Managing Color
with Profiles" on page 218 for detailed information on applying color
management in your application.
26 Printing with Mac OS X
Page 27

Paper Configuration
If you are using non-Epson paper and are experiencing problems with print
quality when using Epson Media Type settings, adjust the following settings,
as necessary.
Mode Description
Color Density Adjusts the saturation of Colors. Select a value between
–50% and +50%. Drag the slider to the right (+) to deepen
the color saturation of your printout or left (–) to lighten the
color saturation. You can also type a number (–50 to +50)
in the text box next to the slider.
Use this setting when you print on non-Epson papers.
Set the slider to the 0 position when you print on Epson
media.
Note:
Adjusting the color saturation of a printout may not be
possible, depending on the printing mode.
Drying Time
per Print Head
Pass
Pauses the print head for a specified period of time
between passes.
Set this value using the slider or text box. To improve print
quality by using slow ink absorption on the media, set a
higher value.
The drying time per print head pass can be set from 0 to 5
seconds, in 0.1 second increments.
Note:
If you use this setting, printing will take longer.
Printing with Mac OS X 27
Page 28
Mode Description
Paper Feed
Adjustment
Paper
Thickness
Paper Suction Adjusts the Paper Suction value. Decreasing the air
Cut Method Determines the best cutting method according to the
Platen Gap The platen gap is the distance from the media loaded in
Controls the paper feeding value, in 0.01% increments. If
the paper feeding value is too large, white horizontal
micro banding may appear. If the paper feeding value is
too small, dark horizontal micro banding may appear.
This value is set automatically according to the Media
Type setting. If you use non-Epson media, modify this
value for your media. Refer to the paper specifications, or
see "THICKNESS PAT" on page 126 to print a Thickness
Pattern to determine the paper thickness.
suction at the platen is useful to avoid wrinkling or waving
of thin or saturated media, or eliminating vertical
banding. You can select Standard (100% suction), -1 (50%
suction), -2 (30% suction), -3 (10% suction), or -4 (6%
suction).
paper thickness. You can select Standard (normal speed
and normal cut pressure), Thin Paper (low cut pressure),
Thick Paper, Fast (high speed and high cut pressure), or
Thick Paper, Slow (low speed and high cut pressure)
the printer to the print head. By adjusting this setting, you
can increase the print quality. This is set automatically
according to the Paper Thickness setting specified.
Note:
Setting Platen Gap to Narrow may produce better print
quality, but make sure the media does not wrinkle or
touch the print head; otherwise, the printout or the print
head may be damaged. If this happens, select the Wider
or Wide setting.
Eject Roller
Type
Default button Click this button to return the settings to their factory
Select the Eject Roller Type that best fits your media.
Auto: The printer selects the most appropriate setting
automatically. When you use Epson special media,
usually select this setting.
Starwheel-Sheet: If you want to print on cut-sheet paper
that is non-Epson media, select this setting.
Starwheel-Roll Curled: If you want to print on strongly
curled roll paper that is non-Epson media, select this
setting.
No Roller-Roll Normal: If you want to print on roll paper
that is non-Epson media, select this setting.
default values.
28 Printing with Mac OS X
Page 29

Roll Paper Option
You can select Auto Cut, Print Page Line, and Save Roll Paper settings.
Auto Cut
You can select the following cutting methods.
Single Cut
Select this setting if you want to save paper.
If you select this setting, the boundary of a picture or the boundary of a page
is cut. However, the cut position may shift slightly.
Note:
When you print on Premium Glossy Photo Paper (250) roll paper or Premium
Semigloss Photo Paper (250) roll paper, do not select this setting; otherwise, print
quality may decline.
Printing with Mac OS X 29
Page 30

Double Cut
Select this setting to avoid the slight gap that occurs with the Single Cut
setting. A margin is created between the pictures, and 1 mm along the inside
of each picture is cut.
Normal Cut
Select this setting to keep margins at the top and bottom of the printed data.
30 Printing with Mac OS X
Page 31

Off
Select this setting to cut the printouts manually. To cut the printouts manually,
follow the steps below.
1. Press the paper feed or paper feed button to match the cutting
position on the paper with the cutting position on the left side of the print
head.
2. Press the paper source button to select roll auto cut on.
3. Press and hold the paper source button for 3 seconds. The printer cuts
the printout at the cutting position.
Print Page Line
You can specify whether to print a page line on the right side and also below
the printed data for manual cutting.
When you have checked the Print Page Line checkbox, the print page line
feature functions differently depending on the Auto Cut setting, as described
below.
Auto Cut setting Printer’s function
Single Cut
Double Cut
Normal Cut
Off Prints page lines on the right side and below
Prints a page line on the right side only, and
cuts paper automatically after the print job.
the data, but does not cut paper
automatically after the print job.
Printing with Mac OS X 31
Page 32

Save Roll Paper
This function is effective if you wish to save roll paper, because a blank portion
of the last page of your printed data is not fed through the printer.
Expansion
You can print your images without margins. The expansion feature is available
when you select a paper size with Borderless (Auto Expand),
Borderless (Auto Expand, Maximum), or
Roll Paper - Borderless (Auto Expand) as the print area in the Page Setup
window.
Using the slider, you can control how much of the image extends beyond the
edges of paper during borderless printing. For most print jobs, Max is
recommended to eliminate margins on all sides of the paper. Moving the slider
towards Min decreases the amount of the image enlargement; however, as
this amount decreases, margins may appear on one or more sides of the print.
32 Printing with Mac OS X
Page 33

Summary
Use the Summary option to view the current settings.
Note:
The Summary option is a standard feature of Mac OS X. See your operating system’s
documentation for details.
Saving your settings in the Print window
Follow the steps below to save your settings in the Print window.
1. Select Save as from the Presets drop-down menu.
2. Enter the name of the custom setting in the Save Preset As text box.
3. Make sure that the name you entered in step 2 is saved in the Presets
drop-down menu.
Printing with Mac OS X 33
Page 34

Using your saved settings in the Print window
To use your saved settings, select the name of your custom setting from the
Presets pull-down menu.
If you change the Media Type or Color settings while your customized setting
is selected in the Saved Settings list, your saved setting is not affected by the
change. To return to your saved setting, simply reselect it in the list.
Preview
You can see how your data will look before actually printing it.
Note:
❏ Preview is a standard feature of Mac OS X.
❏ Preview may not display accurate color.
1. Select printer driver settings.
2. Click Preview in the Print window. The Preview window appears and
displays a preview of your image.
Selecting Borderless Print Settings
Note:
❏ If your application has margin settings, make sure they are set to zero before
printing.
❏ When you print on cut sheet media, only the left and right margins are set to zero.
Full borderless printing is available on roll paper only.
❏ Ink may spray on the platen of the printer. If this happens, wipe the ink away using
a cloth.
❏ Printing with this feature takes longer than normal printing.
❏ Smearing may occur at the top and bottom edges of the printout depending on
the media.
34 Printing with Mac OS X
Page 35

❏ When you use Premium Glossy Photo Paper (250) roll paper or Premium
Semigloss Photo Paper (250) roll paper, the top margin is always 20 mm.
❏ Borderless printing is not available when the PPR SIZE CHK setting is turned off.
Make sure that ON is selected for PPR SIZE CHK on the printer’s control panel.
Follow the steps below to print borderless photos.
Note:
Always select the same printer in the Format for drop-down menu (in the Page Setup
window) and the Printer drop-down menu (in the Print window); otherwise, your
images may not be printed correctly.
1. Select a paper size with Borderless (Auto Expand), Borderless (Auto
Expand, Maximum), Roll Paper - Borderless (Auto Expand),
Borderless (Retain Size), Borderless (Retain Size, Maximum), Roll
Paper - Borderless (Retain Size), or Roll Paper - Borderless Banner as
the print area setting in the Page Setup window.
2. Select your roll paper options. See "Roll Paper Option" on page 29.
3. Click OK.
4. Start printing your image from your application.
Canceling Printing
Follow the steps below to cancel printing.
1. Click the printer icon in the dock. You see a screen like this:
Printing with Mac OS X 35
Page 36

2. Click the job you want to delete, then click Delete to cancel printing.
Note:
You cannot cancel a print job from the computer once it has been sent to the
printer. Instead, you must press and hold the pause button on the printer for 3
seconds.
Caution:
If you stop a print job while it’s in progress, you may notice misalignment or
c
banding in the printed image.
Printer Utility Window
Accessing the Epson Printer Utility2
You can access the Epson Printer Utility2 window by clicking the icon in
the Print Settings window.
You can also access the Epson Printer Utility2 window by following the steps
below.
1. Double-click Macintosh HD (the default installation folder).
2. Double-click the Applications folder.
3. Double-click the EPSON Printer Utility2 icon.
4. Select SPro 4880, then click OK.
36 Printing with Mac OS X
Page 37

Using the Printer Utilities
The Epson printer utilities let you check the current printer status and perform
printer maintenance from your computer. You can also access the User’s
Guide by clicking the Manual button.
Note:
Do not use the Nozzle Check, Head Cleaning, or Print Head Alignment utilities while
printing is in progress; otherwise, your printout may be marred.
Printing with Mac OS X 37
Page 38

EPSON StatusMonitor
This utility provides information about the ink cartridges and the maintenance
tank, as well as the printer’s status.
Nozzle Check
This utility checks the print head nozzles for clogging. Check the nozzles
when you notice that print quality has declined and after cleaning the print
head to confirm that the nozzles have been cleared. See "Checking the print
head nozzles" on page 39.
If you click Auto in the Nozzle Check dialog, or select ON as the AUTO
CLEANING setting of the printer’s control panel, this utility not only checks the
clogging nozzles, but also cleans the print head automatically.
Head Cleaning
Use this utility to clean the print head. You may need to clean the print head if
you notice that print quality has declined. See "Cleaning the print head" on
page 40.
Print Head Alignment
Use this utility to improve the quality of your printed images. For example, if
vertical lines appear out of alignment or if white or black vertical banding
appears in your printed images, you can use this utility to realign the print
head. See "Aligning the print head" on page 41.
38 Printing with Mac OS X
Page 39

EPSON LFP Remote Panel
Use this utility to optimize your printer. See "Starting Epson LFP Remote
Panel" on page 42.
Manual
You can access the User’s Guide by clicking the Manual button.
Checking the print head nozzles
If you find that your printed image is unexpectedly faint or dots in the printed
image are missing, you may be able to identify the problem using the Nozzle
Check utility.
Note:
Do not start the Nozzle Check utility while printing is in progress; otherwise, your
printout may be marred.
1. Make sure that several sheets of A4/Letter size or larger paper are loaded
in the printer’s auto sheet feeder.
2. Click Nozzle Check.
Printing with Mac OS X 39
Page 40

3. Click Print if you want to visually check to see if any print head nozzles are
clogged. Click Auto if you want to perform an automatic nozzle check, and
if the nozzle check indicates it is necessary, perform an automatic head
cleaning.
4. Follow the on-screen instructions to print a nozzle check pattern.
If the nozzle check shows missing dots, clean the print head as described
below.
Cleaning the print head
If you find that your printed image is unexpectedly faint or dots in the printed
image are missing, you may be able to solve the problem by using the Head
Cleaning utility to clean the print head, which ensures that the nozzles are
delivering ink properly.
Note:
❏ Do not start the Head Cleaning utility while printing is in progress; otherwise, your
printout may be marred.
❏ To save ink, use the Nozzle Check utility first to confirm that the print head needs
to be cleaned.
❏ When the ink status light is flashing or on, you cannot clean the print head.
Replace the appropriate ink cartridge first. See "Replacing Ink Cartridges" on
page 169.
40 Printing with Mac OS X
Page 41

1. Make sure the printer is turned on and the ink status light is off, and that a
few sheets of A4/Letter size or larger paper are loaded in the printer’s auto
sheet feeder.
2. Click Head Cleaning.
3. Follow the on-screen instructions.
4. Click Confirmation in the Head Cleaning dialog to confirm that the head is
cleaned and to reset the cleaning cycle.
If dots are still missing after cleaning, try the following:
❏ Repeat this procedure three or four times, turn the printer off and let it sit
overnight, and then try the print head cleaning again.
❏ Select POWER CLEANING from the control panel on the printer. See "PWR
CLEANING" on page 128. This consumes ink, so only use this cleaning
when necessary. You can also use the LFP Remote Panel to run a power
cleaning.
❏ Replace any ink cartridge that is old or damaged.
If the print quality remains a problem after you have tried these solutions, see
"Where To Get Help" on page 229.
Aligning the print head
If you see misaligned lines or black or white vertical banding on your printed
image, you may be able to solve the problem by using the Print Head
Alignment utility to align the print head.
1. Make sure that the printer is turned on, it’s in the READY state, and that a
few sheets of A4/Letter size or larger Epson media are loaded in the
printer’s auto sheet feeder.
2. Click Print Head Alignment.
3. Follow the on-screen instructions to align the print head.
Printing with Mac OS X 41
Page 42

Starting Epson LFP Remote Panel
You can optimize your printer by using this utility.
1. Make sure the printer is turned on.
2. Click EPSON LFP Remote Panel.
Note:
If the Epson LFP Remote Panel does not launch when you click EPSON LFP
Remote Panel in the printer utility window, your software CD may not have
included this utility. You can download the LFP Remote Panel from
epson.com/support.
3. Follow the on-screen instructions. See the Epson LFP Remote Panel
on-screen help for details.
Getting Information Through On-screen Help
Your printer software has extensive on-screen help, which provides
instructions for printing, selecting printer driver settings, and using the printer
utilities.
1. Select Print from the File menu of your application.
2. Select the window for which you want to see the on-screen help.
3. Click the ? button.
Uninstalling the Printer Software
Follow the steps below to uninstall the printer software.
1. Quit all running applications.
2. Insert the Epson printer software CD-ROM into your Macintosh.
3. Open the Epson CD-ROM desktop icon, if necessary.
42 Printing with Mac OS X
Page 43

4. Double-click the English folder, then double-click the OS X folder.
Note:
You may have to scroll down to see these folders.
5. Double-click the Installer icon.
Note:
If the Authenticate dialog box appears, enter your password or phrase and click
OK.
6. Read the software license agreement and click Continue, then click
Agree.
7. When the EPSON_IJ_Printer window appears, select Uninstall from the
drop-down menu at the top and click the Uninstall button at the bottom
right.
8. Follow the on-screen instructions to uninstall the printer software.
Note:
If the name of your printer remains in the Print Center or Printer Setup Utility,
select it from the Printer List and click Delete.
9. Drag the following items into the Trash, if you see them:
❏ The EPSON LFP Remote Panel folder in the Applications folder
❏ The EPSON LFP Remote Panel icon on the desktop
10. To reinstall your printer software, restart your Macintosh. Then follow the
instructions on your Start Here sheet to install the software.
Printing with Mac OS X 43
Page 44

44 Printing with Mac OS X
Page 45

Chapter 2
Printing with Windows
Basic Settings
Selecting printer driver settings
Follow these steps to select basic printer driver settings:
1. Select Print from the File menu of your application. The Print window
appears.
2. Make sure the EPSON Stylus Pro 4880 is selected, and then click
Preferences, Properties, or Options. You may need to click a
combination of these buttons. The driver settings window appears.
Printing with Windows 45
Page 46

3. Select the Media Type setting that matches the paper loaded in the printer.
See "Media Type setting list" on page 50.
Note:
❏ Check the media type and its paper path. See "Paper path list" on page 152.
❏ The Media Type setting determines what other settings are available in the
printer driver, so make sure you select this setting first.
❏ Some media types are not available depending on the Source setting you’ve
selected (see step 8, below).
4. Select Color (to print color or monochrome photos) or Black (to print a
draft or black text only) as the Color setting.
If you want to fine-tune your monochrome prints, select Advanced B&W
Photo.
5. Select a Print Quality setting. For additional options, select Quality
Options from the drop-down list.
6. Select Automatic as the Mode setting.
If you selected Color as the Color setting, select a Color Control Mode
setting from the Mode drop-down list. For more information, see "Color
Control mode" on page 52.
If you selected Advanced B&W Photo as the Color setting, select a Color
Toning setting from the Mode drop-down list. For more information, see
"Color Toning" on page 53.
7. Select a paper source from the Source drop-down list.
Note:
Some paper sources may not be available for the media type setting you
selected.
8. Select Borderless to print without margins. See "Selecting the Borderless
setting" on page 63.
Note:
The Borderless feature is only available for select media types and paper paths.
46 Printing with Windows
Page 47

9. Select the size of paper you loaded in the printer from the Size drop-down
list.
Note:
Most Windows applications feature paper size settings that override similar
settings in the printer driver. If you don’t see the paper size you loaded in the
printer, see "Selecting the Paper Size setting" on page 66 to create a custom
paper size.
10.If you selected Paper Tray or Manual Feed as your Source setting, click
the Printable Area button and select your printable area setting. See
"Selecting the Printable Area setting" on page 67.
If you selected Roll Paper or Roll Paper (Banner) as your Source setting,
click the Roll Paper Option button and select your roll paper options. See
"Selecting the Roll Paper Option settings" on page 68.
11. Click the Page Layout tab. You see a window like this one.
Note:
The Double-Sided Printing feature is available only when Paper Tray is
selected as the Source setting.
12.Select Orientation and Copies settings, as necessary.
13.Select Reduce/Enlarge, to adjust the size of your print, if necessary. See
"Selecting the Reduce/Enlarge settings" on page 77.
14.Select Multi-Page, and then select settings as needed. See "Selecting
Multi-Page settings" on page 83.
Printing with Windows 47
Page 48

15.Select Double-Sided Printing, and then select settings as needed. See
"Selecting Double-Sided Printing setting" on page 77.
16. Click OK to return to the Print window in your application.
17. Click OK or Print to start printing.
During printing, the Epson Progress Meter appears, showing the progress
of your print and the status of your printer.
Canceling printing
To cancel printing, click Stop on the Epson Progress Meter.
You can also pause or restart printing. To pause printing, click Pause. To
resume printing, click the button again.
Note:
You cannot cancel a print job from the computer once it has been sent to the printer.
Instead, you must press and hold the pause button on the printer for 3 seconds.
Caution:
If you stop a print job while it’s in progress, you may notice misalignment or
c
banding in the printed image.
48 Printing with Windows
Page 49

Selecting Settings on the Main Tab
The Main tab allows you to select the Media Type, Color, Print Quality, Mode,
Paper Source, Paper Size, and Borderless settings, and also check the ink
cartridge status. You can also access the User’s Guide by clicking the Manual
button.
Note:
Most Windows applications feature paper size settings that override similar settings
in the printer driver. If your application does not have these features, verify the
settings on the printer driver’s Main tab.
Selecting the Media Type setting
The Media Type setting determines what other settings are available in the
printer driver, so make sure you always select this setting first.
Select the Media Type setting that matches the paper you loaded in the
printer. See "Media Type setting list" on page 50 for a list of settings.
Note:
❏ The availability of Epson media varies by region.
❏ When using non-Epson papers, see "Notes on Epson Media and Other Media" on
page 143.
❏ For the latest information on the Epson media available in your area, see "Where
To Get Help" on page 229.
Printing with Windows 49
Page 50

Media Type setting list
Media Type Setting Epson Media Name
Premium Luster Photo Paper (260) Premium Luster Photo Paper (260)
Premium Glossy Photo Paper (250) Premium Glossy Photo Paper (250)
Premium Semigloss Photo Paper (250) Premium Semi-gloss Photo Paper (250)
Premium Semimatte Photo Paper (260) Premium Semimatte Photo Paper (260)
Premium Glossy Photo Paper (170) Premium Glossy Photo Paper (170)
Premium Semigloss Photo Paper (170) Premium Semi-gloss Photo Paper (170)
Premium Glossy Photo Paper Premium Photo Paper Glossy
Premium Semigloss Photo Paper Premium Photo Paper Semi-gloss
Premium Luster Photo Paper Ultra Premium Photo Paper Luster
Epson Proofing Paper White Semimatte Proofing Paper White Semimatte
Premium Glossy Photo Paper
Premium Semigloss Photo Paper
Premium Luster Photo Paper
Epson Proofing Paper Publication Proofing Paper Publication
Epson Proofing Paper Commercial Proofing Paper Commercial
Proofing Paper Commercial Semimatte
Velvet Fine Art Paper Velvet Fine Art Paper
Watercolor Paper - Radiant White Watercolor Paper - Radiant White
PremierArt Water Resistant Canvas for
Epson
Piezo Pro Matte Canvas
Textured Fine Art Paper Textured Fine Art Paper
UltraSmooth Fine Art Paper UltraSmooth Fine Art Paper
Singleweight Matte Paper Singleweight Matte Paper
Photo Quality Ink Jet Paper Presentation Paper Matte
Photo Quality Ink Jet Paper
Enhanced Matte Paper Ultra Premium Presentation Paper Matte
Enhanced Matte Paper
Plain Paper —
Plain Paper (line drawing) —
50 Printing with Windows
Page 51

Media Type Setting Epson Media Name
Tracing Paper —
Singleweight Matte Paper (line
drawing)
Singleweight Matte Paper
Selecting the Color setting
Select Color to print color or monochrome photos, or Black to print a draft or
black text only. If you want to fine-tune your monochrome prints, select
Advanced B&W Photo.
Selecting the Print Quality setting
Select a Quality option when print quality is more important than print speed,
or select Speed (if available) when print speed is more important than print
quality. For additional options, select Quality Options from the drop-down
list.
Printing with Windows 51
Page 52

Selecting the Mode setting
Select Automatic or Custom for the Mode setting.
Automatic mode
Automatic mode is the quickest and easiest way to start printing. When
Automatic is selected, the printer driver selects all of the detailed settings
based on the Media Type and Color settings you select.
Color Control mode
When you select Color as the Color setting in Automatic Mode, the Color
Control drop-down list appears in the Mode box.
You can select from the following settings.
Charts and
Graphs
EPSON
Standard
(sRGB)
Adobe RGB Matches the color in your image to the Adobe RGB color
52 Printing with Windows
Enhances colors and lightens the midtones and highlights of
an image. Select this setting when printing presentation
graphics, such as charts and graphs.
Increases the contrast in your printouts. Select this setting
when printing color photographs.
space.
Page 53

Color Toning
When you select Advanced B&W Photo as the Color setting in Automatic
Mode, the Color Toning drop-down menu appears in the Mode box.
You can select from the following settings.
Neutral Provides standard image correction for most photos. Try this
first.
Cool Gives a cool tone to your printouts.
Warm Gives a warm tone to your printouts.
Sepia Applies a sepia tone to your printouts.
Custom mode
The Custom mode lets you select a wide range of settings with a single mouse
click.
Note:
The preset custom settings may not appear, depending on the Media Type and Color
setting you select.
Printing with Windows 53
Page 54

The Custom drop-down list includes the following default custom settings.
Color Controls This setting lets you select color matching and
image-enhancement features. See the next section below
for detailed information.
PhotoEnhance This setting lets you select image-correction settings
specially designed for scanned or digitally captured
photos. See the next section below for detailed
information.
No Color
Adjustment
ICM This setting uses Windows color matching to automatically
This setting turns off the printer driver color management,
which is useful if you are using a color management suite
to print with ICC profiles. See "Managing Color with Profiles"
on page 218 for detailed information.
adjust your printout’s colors to match the colors on your
screen. Select this setting when printing scanned
photographs or computer graphics. See the next section
below for detailed information.
Selecting the Advanced settings
The Advanced settings give you complete control over your printing
environment. Use these settings to experiment with new printing ideas, or to
fine-tune a range of print settings to meet your individual needs. Once you are
satisfied with your new settings, you can give them a name and add them to
the Custom Settings drop-down list.
To access the advanced settings, select Custom from the Main tab, and then
click Advanced. The window you see will depend on the Color and Custom
settings you have selected.
54 Printing with Windows
Page 55

Color Controls
When Color Controls is selected as your Custom setting, the window you
see will depend on your Color setting.
If you select Color as your Color setting, you see a window like this one. You
can then adjust the color settings. For details on the settings, see the
on-screen help.
Note:
When Black is selected as the Color setting, you see a similar window, but you can
only adjust the Gamma, Brightness, and Contrast settings.
Printing with Windows 55
Page 56

When Advanced B&W Photo is selected as the Color setting, you see a
window like this one. You can then adjust the advanced monochrome
settings. For details on the settings, see the on-screen help.
PhotoEnhance
This setting provides a variety of image-correction settings that you can apply
to your printed image before printing. PhotoEnhance does not affect your
original image files. When you select this setting, you should select the Digital
Camera Correction setting.
56 Printing with Windows
Page 57

Note:
❏ This mode is available only with 16-, 24-, or 32-bit color image files.
❏ Printing with PhotoEnhance selected may increase the print time, depending on
your computer system and the amount of the data contained in your image file.
Digital Camera
Correction
If you are printing photos taken with a digital
camera, select this checkbox to give your printed
photos a smooth and natural appearance like that
of photos taken with a film camera.
Adjust the slider to the Smooth Skin setting to make
skin color smooth in your images.
ICM
This setting uses Windows color matching to automatically adjust your
printout’s colors to match the colors on your screen.
Note:
Ambient light and the age, quality, and settings of your monitor can affect the quality
of color matching.
Printing with Windows 57
Page 58

ICM Mode Select Driver ICM (Basic), Driver ICM (Advanced)
or Host ICM.
Image, Graphics, and
Text checkboxes
Input Profile Select an input profile.
Intent Select a rendering intent or color mapping
These checkboxes are available only when Driver
ICM (Advanced) is selected as the ICM Mode.
Select the checkbox you want to set.
This setting is not available when Host ICM is
selected as the ICM Mode setting.
preference:
Saturation:
Select this option when printing presentation
graphics to accurately reproduce vivid colors. Use
of this setting is not recommended when printing
photos.
Perceptual:
Select this option when you want an image’s color
to appear natural, or when rendering a wide color
range of an image. Use this setting when printing
photos.
Relative Colorimetric:
Select this setting to render an image by
maintaining a relative color range, or when most of
the color range before conversion is found in the
image after conversion. Use this setting when
printing photos.
Absolute Colorimetric:
Select this setting to render an image by
maintaining an absolute color range so that there
is a 1-to-1 ratio of absolute lab coordinates. This
setting is not recommended when printing photos
or normal conversions.
Printer Profile Select a printer profile.
Printer Profile
Description
Show all profiles Shows all profiles in the Input Profile and the Printer
58 Printing with Windows
Shows the description of the selected printer
profile.
Profile pull-down menu.
Page 59

Paper Configuration
If you are using non-Epson paper and are experiencing problems with print
quality when using Epson Media Type settings, click the Paper Config button,
and then select settings as necessary.
The following settings in the Paper Configuration window let you select
detailed paper settings.
Mode Description
Color Density Adjusts the saturation of Colors. Use a value between –50%
and +50%. Drag the slider to the right (+) to deepen the
color saturation of your printout or left (–) to lighten the
color saturation. You can also type a number (–50 to +50)
in the text box next to the slider.
Use this setting when you print on non-Epson papers.
Set the slider to the 0 position when you print on Epson
media.
Note:
Adjusting the color saturation of a printout may not be
possible, depending on the printing mode.
Drying Time
per Print Head
Pass
Pauses the print head for a specified period of time
between passes.
Set this value using the slider or text box. To improve print
quality by using slow ink absorption on the media, set a
higher value.
The drying time per print head pass can be set from 0 to 5
seconds, in 0.1 second increments.
Note:
If you use this setting, printing will take longer.
Printing with Windows 59
Page 60

Mode Description
Paper Feed
Adjustment
Paper Suction Adjusts the Paper Suction value. Decreasing the air suction
Paper
Thickness
Cut Method Determines the best cutting method according to the
Platen Gap The platen gap is the distance from the media loaded in
Controls the paper feeding value, in 0.01% increments. If
the paper feeding value is too large, white horizontal
micro banding may appear. If the paper feeding value is
too small, dark horizontal micro banding may appear.
at the platen i s useful to a v oid wrinkling or waving of thin or
saturated media, or eliminating vertical banding. You can
select Standard (100% suction), -1 (50% suction), -2 (30%
suction), -3 (10% suction), or -4 (6% suction).
This value is set automatically according to the Media
Type setting. If you use non-Epson media, modify this value
for your media. Refer to the paper specifications, or see
"THICKNESS PAT" on page 126 to print a Thickness Pattern to
determine the paper thickness.
paper thickness. You can select Standard (normal speed
and normal cut pressure), Thin Paper (low cut pressure),
Thick Paper, Fast (high speed and high cut pressure), or
Thick Paper, Slow (low speed and high cut pressure).
the printer to the print head. By adjusting this setting, you
can increase the print quality. This is set automatically
according to the Paper Thickness setting specified.
Note:
Setting Platen Gap to Narrow may produce better print
quality, but make sure the media does not wrinkle or touch
the print head; otherwise, the printout or the print head
may be damaged. If this happens, select the Wider or
Wide setting.
Eject Roller
Type
Default button Click this button to return the settings to their factory
Select the Eject Roller Type that best fits your media.
Auto: The printer selects the most appropriate setting
automatically. When you use Epson special media, usually
select this setting.
Starwheel-Sheet: If you want to print on cut-sheet paper
that is non-Epson media, select this setting.
Starwheel-Roll Curled: If you want to print on strongly
curled roll paper that is non-Epson media, select this
setting.
No Roller-Roll Normal: If you want to print on roll paper that
is non-Epson media, select this setting.
default values.
60 Printing with Windows
Page 61

Saving settings
Follow these steps to save your settings.
1. Click Save/Del. You see a window like this one.
2. Type a unique name, up to 31 characters, for your settings in the Name
text box.
3. Click Save. Your setting will be added to the Select Setting List.
You can save up to 100 custom settings (including the preset custom
settings). You can select your saved settings from the Select Setting
pull-down menu on the Main tab.
When you select your saved settings in the Select Setting list, remember that
selecting new settings, for example, Media Type and Color settings, may
change your custom settings. This may produce unexpected results in your
printouts. If this happens, reselect your saved settings and try printing again.
Note:
The names of the included preset custom settings cannot be used for your new
custom settings.
Printing with Windows 61
Page 62

Deleting settings
Follow the steps below to delete your settings.
Note:
You cannot delete the included preset custom settings from the Select Setting list.
1. Click Save/Del. You see the Saves or Deletes Select Settings window.
2. Select the name of custom settings you want to delete.
3. Click Delete. The setting will be deleted from the Select Setting list.
Exporting and importing settings
You can export the custom settings you saved, or import from a custom
setting file created in another environment.
Exporting the settings
To export your custom settings, follow these steps:
1. Click Save/Del. You see the Saves or Deletes Select Settings window.
2. Select the custom setting you want to export.
3. Click Export.
4. Select the location where you want to save the file to, and then enter a file
name.
62 Printing with Windows
Page 63

5. Click Save.
6. When the message “Processing complete.” appears, click OK.
Importing settings
Follow the steps below to import custom settings.
1. Click Save/Del. You see the Saves or Deletes Select Settings window.
2. Click Import.
3. Browse to the folder that contains the file you want to import, and then
select the file.
4. Click Open.
5. When the message “Processing complete.” appears, click OK.
Selecting the Paper Source setting
You can select Paper Tray, Roll Paper, or Roll Paper (Banner), or Manual
Feed from the Source drop-down list. Select the setting that matches the path
you loaded paper in.
Selecting the Borderless setting
Note:
❏ If your application has margin settings, make sure they are set to zero before
printing.
❏ When you print on cut sheet media, only the left and right margins are set to zero.
Full borderless printing is available on roll paper only.
❏ Ink may spray on the printer’s platen. If this happens, wipe the ink away using a
cloth.
❏ Printing with this feature takes longer than normal printing.
❏ Smearing may occur at the top and bottom edges of the printout depending on
the media.
Printing with Windows 63
Page 64

❏ When you use Premium Glossy Photo Paper (250) roll paper or Premium
Semigloss Photo Paper (250) roll paper, the top margin is always 20 mm.
❏ Borderless printing is not available when the PPR SIZE CHK setting is turned off.
Make sure that ON is selected for PPR SIZE CHK on the printer’s control panel.
Follow these steps to select borderless print settings:
1. Click the Borderless checkbox.
2. Click the Expansion button. You see a window like this one.
64 Printing with Windows
Page 65

3. Choose Auto Expand or Retain Size, and the amount of enlargement.
Auto Expand Select this setting if you want to enlarge the size of
print data automatically and print without margins.
You can choose the amount of enlargement by
moving the slider.
Note:
Enlarged areas that exceed the paper size will not
be printed on the paper.
Retain Size Select this setting if you do not want to change the
ratio of your print data.
When you select this setting, you need to enlarge
your image data to exceed the paper width, to
avoid unprinted areas appearing along all four
edges. Using your application, increase your image
width by 0.25 in. (6.35 mm) and your image height
by 0.1 inch (2.54 mm).
Amount of
Enlargement
When you select Auto Expand, the slider becomes
available, so you can control the amount of the
image that extends beyond the edges of the paper
during borderless printing.
For most print jobs, Max is recommended in order to
eliminate margins on all sides of the paper.
Moving the slider towards Min decreases the
amount of the image enlargement; however, as this
amount decreases, a white border may appear on
one or more sides of the print.
4. Select your roll paper options. See "Selecting the Roll Paper Option
settings" on page 68.
5. Click OK.
6. Start printing your image from your application.
Printing with Windows 65
Page 66

Selecting the Paper Size setting
Select the paper size that matches the paper you loaded in the printer from the
Size drop-down list.
You can also add a custom paper size. Follow the steps below.
1. Click User Defined. You see a window like this one.
Note:
You cannot click User Defined when Borderless is selected if you’ve selected
Paper Tray or Manual Feed as your Source setting.
2. Select a Unit setting, then enter a Paper Size Name, Paper Width, and
Paper Height.
3. Click OK to save the custom paper size.
Note:
❏ You can save up to 100 custom paper sizes.
❏ To delete a custom paper size, select the name of the paper size you want to
delete and then click Delete.
❏ You can enter up to 24 characters for the Paper Size Name.
66 Printing with Windows
Page 67

Selecting the Printable Area setting
Printable area settings are available when you select Paper Tray or Manual
Feed as the Source setting. Click Printable Area. You see a window like this
one.
Standard
Select this setting to use the standard printable area.
Note:
This setting is only available for select media types.
Maximum
Select this setting to increase the printable area at the bottom edge.
Note:
❏ This setting is recommended for plain paper only, and it is only available for select
media types.
❏ The print quality may decline at the edges of printouts when this setting is
selected. Before printing large jobs using this setting, print a single sheet to check
the quality. When this setting is selected, make sure that paper loaded in the
paper tray is not curled.
Centered
Select this setting to center printouts.
Printing with Windows 67
Page 68

Selecting the Roll Paper Option settings
Roll Paper Option settings are available when you select Roll Paper or
Roll Paper (Banner) as the Source setting. Click Roll Paper Option. You
see a window like this one.
Auto Cut
You can select the following cutting methods.
Single Cut
Select this setting if you want to save paper.
If you select this setting, the boundary of a picture or the boundary of a page
is cut. However, the cut position may shift slightly.
Note:
When you print on Premium Glossy Photo Paper (250) roll paper or Premium
Semigloss Photo Paper (250) roll paper, do not select this setting; otherwise, print
quality may decline.
68 Printing with Windows
Page 69

Double Cut
Select this setting to avoid the slight gap that occurs with the Single Cut
setting. A margin is created between the pictures, and 1 mm along the inside
of each picture is cut.
Normal Cut
Select this setting to keep margins at the top and bottom of the printed data.
Printing with Windows 69
Page 70

Off
Select this setting to cut the printouts manually. To cut the printouts manually,
follow the steps below.
1. Press the paper feed or paper feed button to match the cutting
position on the paper with the cutting position on the left side of the print
head.
2. Press the paper source button to select roll auto cut on.
3. Press and hold the paper source button for 3 seconds. The printer cuts
the printout at the cutting position.
Auto Rotate
This function is effective only when the image length is shorter than the
printable width of the roll paper. The image will automatically be turned 90
degrees, saving roll paper.
Note:
This function is available only when Roll Paper is selected as the Source setting.
To enable this function, follow the steps below.
1. Click Auto Rotate, then click Roll Width.
2. In the Roll Paper Width window, select your roll paper width from the
pull-down menu, then click OK.
70 Printing with Windows
Page 71

Print Page Line
You can specify whether to print a page line on the right side and also below
the printed data for manual cutting.
When you have checked the Print Page Line checkbox, the print page line
feature functions differently depending on the Auto Cut setting, as described
below.
Auto Cut setting Printer’s function
Single Cut
Double Cut
Normal Cut
Off Prints page lines on the right side and below
Prints a page line on the right side only, and
cuts paper automatically after the print job.
the data, but does not cut paper
automatically after the print job.
Selecting the Save Roll Paper setting
This function is effective if you wish to save roll paper, because blank portion
of the last page of your printed data is not fed through the printer. To enable
this function, click Save Roll Paper.
Note:
This function is available only when Roll Paper (Banner) is selected as the Source
setting.
Printing with Windows 71
Page 72

Checking Ink Levels
You can check the status of each ink cartridge.
Note:
If your printer is not connected properly or Epson Status Monitor 3 is not installed, all
of the Ink Levels will be grayed out.
Previewing your printout
If you select the Print Preview checkbox on the Main tab, you can see how
your printout will look before you print it. When you send a print job to the
printer, the Epson Print Preview window appears, allowing you to make
changes before printing.
72 Printing with Windows
Page 73

Note:
The Print Preview window is not color accurate.
The Epson Print Preview toolbar contains several buttons you can use to
perform the following functions.
Zoom Click this button to reduce or enlarge the size of
the previewed image.
Fit to Screen Click this button to scale the previewed image so
that it fits the current window size. This is
convenient when you want to see the entire
image at one time.
Maximum
Zoom
Printable Area
On/Off
Color Controls Click this button to open the Color Controls
Previous Page Click this button to display the previous page. If
Next Page Click this button to display the next page. If there
Click this button to display the previewed image
at the maximum possible zoom ratio.
Click this button to display a rectangle indicating
the printable area on the previewed image. The
printer cannot print anything outside of this
rectangle. Click this button again to turn the
printable area indicator off.
window.
there is no previous page, this button is not
available.
is no next page, this button is not available.
You can also modify the previewed print job in the following ways:
❏ Select and preview individual pages.
❏ Reduce or enlarge the size of preview.
❏ Select and print any or all pages.
Printing with Windows 73
Page 74

❏ Magnify the previewed document: Click View and then select Magnify to
open the Magnify window, which magnifies the area of the previewed
document outlined by the red box. Drag the red box to view other parts of
the image.
❏ Specify which pages in the document you want to print: Click Print Option,
and then select Remove Page or Add Page.
After you preview the print job, click Print to print it, or click Cancel to cancel
the print job.
Using the Manual function
You can access the User’s Guide by clicking the Manual button.
Selecting Settings on the Page Layout Tab
You can select Orientation, Copies, Reduce/Enlarge, Multi-Page,
Double-Sided Printing, Optimize Enlargement, Job Settings, and Print
Background Color settings on this tab.
74 Printing with Windows
Page 75

Note:
❏ Most Windows applications feature page layout settings that override similar
settings in the printer driver. If your application does not have these features,
verify the settings on the printer driver’s Page Layout tab.
❏ Some of the functions are not available depending on the paper source you
choose.
Selecting the Orientation settings
You can specify the direction of printing on the page using the settings in the
table below.
Portrait Print direction is short edge first, like most magazines.
Landscape Print direction is long edge first, like many spreadsheets.
Rotate 180° Prints your document upside down.
Mirror Image Prints your image as it would appear in a mirror. Text and
graphics appear reversed.
Printing with Windows 75
Page 76

Selecting the Copies setting
Enter a number in the Copies box, or click the arrow next to the box to specify
the number of copies you want to print. You can enter any number from 1 to
9999. When printing multiple copies of your document, select Collate to print
one complete document set at a time. Select Reverse Order to print your
documents in reverse order, starting with the last page.
76 Printing with Windows
Page 77

Selecting the Reduce/Enlarge settings
You can fit your image to the size of paper you want to print on. To enable this
feature, click the Reduce/Enlarge checkbox. When this feature is enabled,
you can select the following settings.
Fit to Page Proportionally enlarges or reduces the size of your image to
make it fit the paper size you have selected as the Output
Paper setting.
Fit to Roll
Paper Width
Custom Lets you define the percentage you want to reduce or
Proportionally enlarges or reduces the size of your image to
make it fit the paper size you have selected as the Roll
Width setting (only available when you select Roll Paper as
your Source setting on the Main tab).
enlarge your image. Click the arrows next to the Scale box
to select a proportion from 10 to 650%.
Selecting Double-Sided Printing setting
There are two types of double-sided printing available. Standard double-sided
printing allows you to print the odd-numbered pages first. Once these pages
are printed, the paper can be reloaded for printing the even-numbered pages
onto the opposite side of the paper.
Printing with Windows 77
Page 78

You can also select Folded Booklet double-sided printing to make single-fold
booklets.
Note:
❏ The double-sided printing feature is not available when the printer is accessed
over a network or used as a shared printer, Status Monitor 3 is not installed, or
your system is not configured to support bi-directional communication.
❏ Only use media types that are suitable for double-sided printing; otherwise, the
print quality may deteriorate.
❏ Depending on the type of paper and the amount of ink used to print text and
images, ink may bleed through to the other side of the paper.
❏ The surface of the paper may be smeared during double-sided printing.
❏ This function is available only when Paper Tray is selected as the Paper Source
setting.
Standard double-sided printing
Follow the steps below to print odd and even numbered pages on the opposite
sides of a sheet.
1. Click the Double-Sided Printing checkbox.
78 Printing with Windows
Page 79

2. Click Margins. You see a window like this one.
3. Select the edge of the paper where binding will be placed. You can choose
Left, Top, or Right.
4. Specify the width of the binding margin in the Binding Margin text box. You
can specify any width from 0.12 to 1.18 in. (3.0 to 30.0 mm).
Note:
The actual binding margin may vary depending on the settings specified in your
application. We recommend that you print a test print before printing an entire job.
5. Click OK to return to the Page Layout tab, and then click OK to save your
settings.
6. Make sure paper is loaded, and then send a print job from your application.
Instructions for printing the even-numbered pages will be displayed while
the odd-numbered pages are being printed.
7. Follow the on-screen instructions to reload the paper and print the even
numbered pages.
Note:
❏ The paper may curl during printing due to the amount of ink used. If this
happens, slightly curl the sheets in the opposite direction prior to reloading
them into the printer.
❏ Align the stack of sheets by tapping them against a hard, flat surface prior to
reloading them into the printer.
❏ Follow the on-screen instructions provided when reloading the printed pages.
Paper jams or improperly placed binding margins may occur if the pages are
not reloaded correctly.
❏ In the event of a paper jam, see "Clearing paper jams" on page 209.
8. Once the paper is reloaded, click Resume to print the even-numbered
pages.
Printing with Windows 79
Page 80

Folded Booklet double-sided printing
You can make single-fold booklets using the double-sided printing feature.
When you create a single-fold booklet, the pages that appear on the outside
(after the booklet is folded) are printed first. The pages that will appear inside
the booklet can then be printed after the paper is reloaded into the printer.
8
24
6
10
12
1
3
7
5
11
9
✽ Binding Edge
A booklet can be created by printing pages 1 and 4 on the first sheet of paper,
pages 5 and 8 on the second sheet of paper, and pages 9 and 12 on the third
sheet of paper. After these sheets are reloaded into the sheet feeder, you can
then print pages 2 and 3 on the back of the first sheet of paper, pages 6 and
7 on the back of the second sheet of paper, and pages 10 and 11 on the back
of the third sheet of paper. The resulting pages can then be folded and bound
together into a booklet.
80 Printing with Windows
Page 81

Follow the steps below to create a booklet.
1. Click the Double-Sided Printing checkbox, and then click the Folded
Booklet checkbox.
2. Click Margins. You see a window like this one.
3. Select the edge of the paper where binding will be placed. You can choose
Left, Top, or Right.
Note:
When Portrait is selected as the Orientation setting on the Paper tab, Left or
Right binding positions are available. The Top binding position is available when
Landscape is selected as the Orientation setting.
Printing with Windows 81
Page 82

4. Specify the width of the binding margin in the Binding Margin text box. You
can specify any width from 0.12 to 1.18 in. (3.0 to 30.0 mm). The specified
margin width will be used on both sides of the fold. For example, if you
specify a 0.39-in (1-cm) margin, the printer will leave a 0.79-inch (2-cm)
margin in the center (0.39 in. [1.0 cm] will be placed on each side of the
fold).
✽ Folding Edge
✽✽ Margin
5. Click OK to return to the Page Layout tab, and then click OK to save your
settings.
6. Make sure paper is loaded, and then send a print job from your application.
7. You will see instructions for printing the inside pages while the outside
pages are being printed. Follow the on-screen instructions to reload the
paper.
Note:
❏ The paper may curl during printing due to the amount of ink used. If this
happens, slightly curl the sheets in the opposite direction prior to reloading
them into the printer.
❏ Align the stack of sheets by tapping them against a hard, flat surface prior to
reloading them into the printer.
❏ Follow the on-screen instructions provided when reloading the printed pages.
Paper jams or improperly placed binding margins may occur if the pages are
not reloaded correctly.
82 Printing with Windows
Page 83

8. Once the paper is reloaded, click Resume to print the inside pages.
9. Once printing is complete, fold the sheets and bind them together using a
stapler or other binding method.
Selecting Multi-Page settings
Selecting Multi-Page lets you choose between the N-up and Poster settings.
Note:
You cannot use the Multi-Page feature when you are printing borderless.
Printing with Windows 83
Page 84

Selecting N-up settings
Select N-up as the Multi-Page setting to print two or four pages of your
document on one sheet of paper.
When N-up is selected, you can click the Settings button and then select the
following settings in the Print Layout window.
Number of
pages per
sheet
Page Order Selects the order in which the pages will be printed. Some
Print page
frames
Prints two or four pages of your printout on a single sheet
of paper.
settings may be unavailable, depending on the
Orientation setting you selected on the Page Layout tab.
Prints frames around the pages printed on each sheet.
84 Printing with Windows
Page 85

Selecting the Optimize Enlargement setting
Click the Optimize Enlargement checkbox to print a long poster or panorama
without using a special application.
Note:
When using the Optimize Enlargement feature, text and graphics may be distorted.
Selecting the Print Background Color setting
Click the Print Bckg Color checkbox. Then click Color Settings, select your
background color, and click OK.
Selecting the Job Settings
Click the Job Settings checkbox to print job settings on your printout. To
select which settings to include, click Details, select the settings you’d like to
print, then click OK.
Printing with Windows 85
Page 86

Using the Printer Utilities
The Epson printer utilities let you check the printer’s status and perform printer
maintenance from your computer.
Note:
❏ The letter in parentheses after the utility name indicates the shortcut key for that
utility. Press ALT and the letter on the keyboard to open that utility.
❏ Do not use the Nozzle Check, Head Cleaning, or Print Head Alignment utilities
while printing is in progress; otherwise, your printout may be marred.
Nozzle Check
This utility checks the print head nozzles for clogging. Check the nozzles
when you notice the print quality has declined, when you are experiencing
horizontal banding, and after cleaning the print head to confirm that the print
head nozzles have been cleaned. See "Checking the print head nozzles" on
page 88.
If you click Auto in the Nozzle Check dialog, or select ON as the AUTO
CLEANING setting of the printer’s control panel, this utility not only checks the
clogging nozzles, but also cleans the print head automatically.
86 Printing with Windows
Page 87

Head Cleaning
This utility cleans the print head. You may need to clean the print head if you
notice the print quality has declined. See "Cleaning the print head" on page
89.
Print Head Alignment
Use this utility to improve the quality of your printed images. For example, if
vertical lines appear out of alignment or if white or black banding appears in
your printed image. You can use this utility to realign the print head. See
"Aligning the print head" on page 90.
EPSON Status Monitor 3
This utility provides information about the ink cartridges and maintenance
tank. Epson Status Monitor 3 also checks for printer errors. See "Using Epson
Status Monitor 3" on page 97.
Note:
Epson Status Monitor 3 is available when your system is configured to support
bi-directional communication. This utility may not be available when the printer is
being accessed over a network.
Monitoring Preferences
Use this utility to specify the monitoring features or Epson Status Monitor 3.
See "Selecting Monitoring Preferences" on page 91.
Printer and Option Information
Use this utility to check or select the blank ink set in the printer.
Print Queue
Use this utility to display the list of pending print jobs. You can also cancel or
restart print jobs.
Speed and Progress
Use this utility to adjust settings related to print speed and progress. See
"Selecting Speed and Progress settings" on page 92.
Printing with Windows 87
Page 88

Menu Arrangement
Use this utility to determine the arrangement of the Select Setting, Media
Type, and Size drop-down lists on the Main tab. See "Selecting Menu
Arrangement settings" on page 94.
Export or Import
Use this utility to export or import all of your custom settings to a file. This is
useful if you want to distribute the same sets of custom settings to multiple
computers.
EPSON LFP Remote Panel
This utility lets you optimize your printer. See "Starting Epson LFP Remote
Panel" on page 94.
Printer Firmware Update
Use this utility to start Epson LFP Remote Panel and update the printer
firmware. To use this function, you must first download the latest firmware
from epson.com/support.
Checking the print head nozzles
If you find that your printed image is unexpectedly faint or dots in your printed
image are missing, you may be able to identify the problem using the Nozzle
Check utility.
Note:
Do not start the Nozzle Check utility while printing is in progress; otherwise, your
printout may be marred.
1. Make sure that several sheets of A4/Letter size or larger paper are loaded
in the printer’s auto sheet feeder.
2. Click Nozzle Check.
88 Printing with Windows
Page 89

3. Click Print if you want to visually check if any print head nozzles are
clogged. Click Auto if you want to perform an automatic nozzle check, and
if the nozzle check indicates it is necessary, perform an automatic head
cleaning.
4. Follow the on-screen instructions to print a nozzle check pattern.
If the nozzle check shows missing dots, clean the print head as described
below.
Cleaning the print head
If you find that your printed image is unexpectedly faint or dots in the printed
image are missing, you may be able to solve these problems by using the
Head Cleaning utility to clean the print head. This ensures that the nozzles are
delivering ink properly.
Note:
❏ Do not start the Head Cleaning utility while printing is in progress; otherwise, your
printout may be marred.
❏ To save ink, use the Nozzle Check utility first to confirm that the print head needs
to be cleaned.
❏ When the ink status light is flashing or on, you cannot clean the print head.
Replace the appropriate ink cartridge first. See "Replacing Ink Cartridges" on
page 169.
Printing with Windows 89
Page 90

1. Make sure the printer is turned on and the ink status light is off, and that a
few sheets of A4/Letter size or larger paper is loaded in the printer’s auto
sheet feeder.
2. Click Head Cleaning.
3. Follow the on-screen instructions.
4. Click Print Nozzle Check Pattern in the Head Cleaning dialog box to
confirm that the head is clean and to reset the cleaning cycle.
If dots are still missing after cleaning, try the following:
❏ Repeat this procedure three or four times, turn the printer off and let it sit
overnight, and then try head cleaning again.
❏ Select POWER CLEANING from the control panel on the printer. See "PWR
CLEANING" on page 128. This consumes ink, so only use this cleaning
when necessary. You can also use the LFP Remote Panel to run a power
cleaning.
❏ Replace any ink cartridge that is old or damaged.
If the print quality remains a problem after you have tried these solutions. See
"Where To Get Help" on page 229.
Aligning the print head
If you see misaligned lines or black or white vertical banding in your printed
image, you may be able to solve the problem using the Print Head Alignment
utility to align the print head.
1. Make sure that the printer is turned on, it’s in the READY state, and that a
few sheets of A4/Letter size or larger Epson media are loaded in the
printer’s auto sheet feeder.
2. Click Print Head Alignment.
3. Follow the on-screen instructions to align the print head.
90 Printing with Windows
Page 91

Selecting Monitoring Preferences
This function lets you specify the monitoring features of Epson Status Monitor
3.
1. Click Monitoring Preferences. You see a window like this one.
2. You can select the following settings.
Select
Notification
Select Shortcut
Icon
Allow
monitoring of
shared printers
Displays the current error item notification settings.
Select the checkboxes to specify the error types
you want to receive notification for.
Select the Shortcut Icon checkbox to display a
shortcut icon in your Windows taskbar. Clicking the
shortcut icon in the taskbar will open Epson Status
Monitor 3. Click the icon you prefer as shortcut
icon, and you can preview the icon at the right.
Allows you to monitor the status of a shared printer.
3. Click OK.
Printing with Windows 91
Page 92

Selecting Speed and Progress settings
Use the speed and progress settings for greater control over the printer’s
operation. Click Speed and Progress on the Utility tab. You see a window like
this one.
High Speed Copies
To print multiple copies of your images faster, click the High Speed Copies
checkbox. This speeds up printing by using your hard disk space as a cache
when printing multiple copies of an image.
Show Progress Meter
To display the Progress Meter every time you print, click the Show Progress
Meter checkbox. Then, you can monitor the progress of your print job.
Disable EPSON Status Monitor 3
If you don’t want to monitor your printer’s status with Epson Status Monitor 3,
click the Disable EPSON Status Monitor 3 checkbox. Disabling is not
recommended since monitoring is necessary to use other features such as
Printer Firmware Update.
Always spool RAW datatype
To enable NT-based clients spool documents to use the RAW format instead
of the EMF (metafile) format, click the Always Spool Raw datatype checkbox
(Windows NT-based applications use the EMF format by default).
Try using this option if documents spooled in the EMF format do not print
correctly.
92 Printing with Windows
Page 93

Depending on the type of image you are printing, spooling RAW datatype
requires fewer resources than EMF. You may be able to solve problems, such
as “Insufficient Memory/Disk Space to Print”, “Slow print speed”, etc.
Note:
When you spool RAW datatype, the print progress displayed by the Progress Meter
may be inaccurate.
Page Rendering Mode
Use this function when the print speed is extremely slow or when the print
head stops for a few minutes while printing. When this checkbox is selected,
the print speed may improve by rendering the job as a page.
Note:
❏ When you use Page Rendering Mode, the print progress displayed in the
Progress Meter may be inaccurate.
❏ Printing may take longer to start.
Coarse Rendering
Use this function if the output length (number of pixels) is limited by your
application. Longer print output is made possible by reducing the resolution to
restrict the number of pixels to stay within the application’s limit.
Print as Bitmap
Use this function when the print speed is extremely slow or when the print
head stops for a few minutes while printing. Try this option if selecting the
Always spool RAW datatype and Page Rendering Mode settings does not
solve the problem.
Show Mouse Over Help
Use this function to show help when you move the mouse pointer over an
item.
Printing with Windows 93
Page 94

Selecting Menu Arrangement settings
Use this utility to arrange the Select Setting, Media Type, and Paper Size
items. Click Menu Arrangement on the Utility tab. You see a window like this
one.
1. Select the item you want to edit. You can do the following:
❏ Drag and drop the items to rearrange them
❏ Add or delete groups
❏ Move unused items into the Not Display group
2. When you’re finished, click Save.
Starting Epson LFP Remote Panel
Use this utility to optimize your printer.
1. Make sure the printer is turned on.
2. Click EPSON LFP Remote Panel.
94 Printing with Windows
Page 95

3. Follow the on-screen instructions. (See the Epson LFP Remote Panel
on-screen help for details.)
Getting Information Through On-screen Help
Your printer software has extensive on-screen help, which provides
instructions for printing, selecting printer driver settings, and using printer
utilities.
1. Select Print or Page Setup from the File menu.
2. Click Printer, Setup, Options, or Properties. Depending on your
application, you may need to click a combination of these buttons. You can
also access the printer software.
3. You can view a detailed explanation of a setting by:
❏ Clicking the (?) button on the top right of the printer driver window, and
then clicking an item.
❏ Right-clicking the item, and then clicking the Help button.
❏ Clicking Help on the Main, Paper, Layout, or Utility tabs for help related
to the item on that tab.
Printing with Windows 95
Page 96

Checking Printer Status and Managing Print Jobs
Using the Progress Meter
When you send a print job to the printer, the Progress Meter window opens.
It indicates the progress of the current print job and provides printer status
information when bi-directional communication between the printer and your
computer is established. This meter also displays helpful tips for better
printing and error messages.
Note:
The Progress Meter window does not appear when the Show Progress Meter
checkbox is turned off in the Speed and Progress window. See "Selecting Speed and
Progress settings" on page 92 for more information.
Error messages
If a problem occurs during printing, an error message appears in the text box
at the top of the Progress Meter window.
96 Printing with Windows
Page 97

Using Epson Status Monitor 3
Epson Status Monitor 3 displays detailed information on the printer status.
Accessing Status Monitor 3 from the Windows taskbar
To access Status Monitor 3, double-click the printer icon on the Windows
taskbar.
Note:
If the icon is missing from the Windows taskbar, see "Selecting Monitoring
Preferences" on page 91.
Accessing Status Monitor 3 from the printer driver
1. Open the printer driver.
2. Click the Utility tab.
3. Click EPSON Status Monitor 3.
Printing with Windows 97
Page 98

Viewing information in Status Monitor 3
Status Monitor 3 provides the following information.
Current Status
Epson Status Monitor 3 displays detailed information about the printer, as well
as its ink cartridges and maintenance tank. If the ink is low or expended, or the
maintenance tank becomes full, the How to button appears in the Epson
Status Monitor 3 window. Click How to to display instructions on how to
replace the cartridge.
Increasing the Print Speed
General tips
Printing color images using higher print quality settings takes longer than
printing black-and-white images using standard print quality settings. For this
reason, it is important to be selective in your use of color and print quality
settings if you also require faster print speeds.
Even if your images require the highest print quality and extensive use of
color, it may still be possible to optimize the print speed by adjusting other
printing settings.
98 Printing with Windows
Page 99

Using Speed and Progress
You can select certain print speed settings in the Speed and Progress
window. To access this window, click Speed and Progress on the Utility tab.
For details, see "Selecting Speed and Progress settings" on page 92.
Sharing Your Printer
This section describes how to share your printer so that other computers on a
network can use it.
Any computer on the network can share the printer if it is directly connected to
it. The computer that is directly connected to the printer is the printer server,
and the other computers are the clients which need permission to print to it.
The clients share the printer via the printer server.
Note:
To connect your printer directly to a network without setting it up as a shared printer,
consult your network administrator.
For Windows Vista
Setting up your printer as a shared printer
Follow the steps below to share a printer that is connected directly to your
computer with others on a network.
1. Click , click Control Panel, and click Printer under Hardware and
Sound.
2. Right-click your printer icon and click Sharing. Click Change sharing
options and click Continue.
Printing with Windows 99
Page 100

3. Select Share this printer, and type a name for the printer in the Share
name text box.
4. Click OK.
Note:
Do not choose any drivers from the Additional Drivers list.
Accessing the shared printer
Follow the steps below to access the shared printer from another computer on
a network.
Note:
Your printer must be set up as a shared resource on the computer it is directly
connected to before you can access it from another computer.
1. Install the printer driver on the client computer from the software CD-ROM.
2. Click , click Control Panel, and click Printer under Hardware and
Sound. Then right-click your printer’s icon and then select Properties.
3. Click the Ports tab and click Add Port.
4. Select Local Port and click New Port.
100 Printing with Windows
 Loading...