

Page 1
User’s Guide
NPD4043-00 EN
Page 2

Epson Stylus Pro 3880 User’s Guide
Copyrights and Trademarks
No part of this publication may be reproduced, stored in a retrieval system, or transmitted in any form or by any means,
electronic, mechanical, photocopying, recording, or otherwise, without the prior written permission of Seiko Epson
Corporation. The information contained herein is designed only for use with this Epson printer. Epson is not responsible for
any use of this information as applied to other printers.
Neither Seiko Epson Corporation nor its affiliates shall be liable to the purchaser of this product or third parties for
damages, losses, costs, or expenses incurred by the purchaser or third parties as a result of accident, misuse, or abuse of this
product or unauthorized modifications, repairs, or alterations to this product, or (excluding the U.S.) failure to strictly
comply with Seiko Epson Corporation's operating and maintenance instructions.
Seiko Epson Corporation shall not be liable for any damages or problems arising from the use of any options or any
consumable products other than those designated as Original Epson Products or Epson Approved Products by Seiko Epson
Corporation.
Seiko Epson Corporation shall not be held liable for any damage resulting from electromagnetic interference that occurs
from the use of any interface cables other than those designated as Epson Approved Products by Seiko Epson Corporation.
EPSON
Microsoft
Apple
Intel
PowerPC
Adobe
General Notice: Other product names used herein are for identification purposes only and may be trademarks of their
respective owners. Epson disclaims any and all rights in those marks.
Copyright© 2009 Seiko Epson Corporation. All rights reserved.
and EPSON STYLUS® are registered trademarks, and Exceed Your Vision is a trademark of Seiko Epson Corporation.
®
, Windows®, and Windows Vista® are registered trademarks of Microsoft Corporation.
®
and Macintosh® are registered trademarks of Apple Inc.
®
is a registered trademark of Intel Corporation.
®
is a registered trademark of International Business Machines Corporation.
®
, Photoshop®, Elements®, Lightroom® and Adobe® RGB are registered trademarks of Adobe Systems Incorporated.
®
Copyrights and Trademarks 2
Page 3

Epson Stylus Pro 3880 User’s Guide
Contents
Chapter 1 Using the Printer Software (Windows)
Printer Software Introduction............................................................. 9
Printer driver....................................................................... 9
EPSON Status Monitor 3............................................................ 10
EPSON LFP Remote Panel. .......................................................... 11
Accessing the Printer Driver............................................................. 11
From Windows applications. . ....................................................... 11
From the Printer icon............................................................... 13
Getting Information Through Online Help. ................................................ 15
Basic Settings.......................................................................... 16
Setting the printer driver............................................................ 17
Checking the printer status.......................................................... 17
Canceling printing................................................................. 18
When problem occurs during printing................................................. 20
Using the Printer Utilities................................................................ 21
Using EPSON Status Monitor 3...................................................... 23
Uninstalling the Printer Software......................................................... 26
Uninstalling the printer driver........................................................ 26
Uninstalling EPSON LFP Remote Panel. . . . . . . ......................................... 27
Chapter 2 Using the Printer Software (Mac OS X)
Printer Software Introduction............................................................ 28
Printer driver...................................................................... 28
EPSON Printer Utility3............................................................. 29
EPSON StatusMonitor.............................................................. 29
EPSON LFP Remote Panel. .......................................................... 30
Accessing the Printer Driver............................................................. 30
Accessing the Page Setup dialog...................................................... 31
Accessing the Print dialog........................................................... 31
Getting Information Through Online Help. ................................................ 33
Basic Settings.......................................................................... 33
Setting the printer driver............................................................ 34
Checking the printer status.......................................................... 34
Contents 3
Page 4

Epson Stylus Pro 3880 User’s Guide
Canceling printing................................................................. 35
When problem occurs during printing................................................. 36
Using Printer Utilities................................................................... 37
Accessing EPSON Printer Utility3.................................................... 38
Using EPSON StatusMonitor........................................................ 38
Uninstalling the Printer Software......................................................... 40
Uninstalling the printer driver........................................................ 41
Uninstalling EPSON LFP Remote Panel. . . . . . . ......................................... 45
Chapter 3 Variety of Printings
Auto Color Adjustment by PhotoEnhance (Windows only)................................... 46
Color Adjustment by the Printer Driver.................................................... 48
For Windows...................................................................... 49
For Mac OS X..................................................................... 52
Black-and-White Photo Printing.......................................................... 56
For Windows...................................................................... 56
For Mac OS X..................................................................... 60
Borderless Printing..................................................................... 65
Supported media type. . . . ........................................................... 66
Application settings................................................................ 67
Printer driver settings............................................................... 68
Enlarge or Reduce Size Printing........................................................... 72
Fit to Page (Windows only).......................................................... 73
Custom........................................................................... 75
Pages Per Sheet Printing................................................................. 76
For Windows...................................................................... 77
For Mac OS X..................................................................... 78
Poster Printing (Windows only).......................................................... 79
Joining the sheets together along the guide............................................. 81
Double-Sided Printing.................................................................. 86
Standard double-sided printing....................................................... 86
Folded Booklet double-sided printing................................................. 88
Printing on Custom Paper............................................................... 91
For Windows...................................................................... 91
For Mac OS X..................................................................... 93
Customize the Items of the Printer Driver. . . . .............................................. 95
Saving the printer driver settings...................................................... 95
Menu arrangement................................................................. 98
Contents 4
Page 5

Epson Stylus Pro 3880 User’s Guide
Exporting or Importing............................................................ 100
Using Color Management.............................................................. 102
Color management by Driver ICM (Windows only).................................... 104
Color management by Host ICM (Windows).......................................... 107
Color management by ColorSync (Mac OS X)......................................... 110
Color management by application................................................... 112
Changing the Black Ink................................................................ 116
Chapter 4 The Control Panel
Buttons, Lights, and Messages........................................................... 119
Buttons ......................................................................... 119
Lights........................................................................... 120
Combination of buttons............................................................ 121
Messages........................................................................ 121
Icons............................................................................ 122
Menu Settings........................................................................ 124
When to use Menu mode........................................................... 124
Menu list........................................................................ 124
Basic Menu setting procedure. ...................................................... 127
Details of Menu mode............................................................. 128
Checking the print head nozzles. . . . . . . . . ............................................ 134
Aligning the print head............................................................ 135
Making the paper settings.......................................................... 137
Printing a status sheet.............................................................. 141
Maintenance Mode.................................................................... 141
Maintenance mode setting procedure................................................. 141
Maintenance mode list............................................................. 142
Details of Maintenance mode items.................................................. 142
Chapter 5 Paper Handling
Notes on Epson Special Media and Other Media............................................ 144
Using Epson special media. . . . . ..................................................... 144
Using paper other than Epson special media........................................... 144
Using Cut Sheet Media................................................................. 145
Checking the paper path........................................................... 145
Loading cut-sheet media........................................................... 145
Contents 5
Page 6

Epson Stylus Pro 3880 User’s Guide
Chapter 6 Maintenance and Transportation
Replacing Ink Cartridges............................................................... 162
Replacing the Maintenance Cartridge..................................................... 166
Cleaning the Printer................................................................... 170
If you have not used your printer for a long time....................................... 174
Transporting the Printer................................................................ 174
Over a long distance............................................................... 174
Over a short distance.............................................................. 175
Setting up the printer after transporting it............................................. 175
Chapter 7 Problem Solver
Troubleshooting...................................................................... 177
Printer stops printing unexpectedly.................................................. 177
The printer does not turn on or stay on............................................... 182
The printer prints nothing.......................................................... 183
Printouts are not what you expected.................................................. 185
Print Quality Could be Better....................................................... 187
Color documents print in black only................................................. 189
Printing could be faster............................................................ 190
Paper skew occurs when printing on A3 or larger plain paper............................. 190
Paper feed or paper jam problems occur frequently..................................... 191
Clearing paper jams............................................................... 191
Paper Information..................................................................... 194
Cut sheet........................................................................ 195
Technical Support Web Site............................................................. 200
Contacting Customer Support........................................................... 201
Before Contacting Epson. . . . . ...................................................... 201
Help for Users in North America.................................................... 201
Help for Users in Europe. . . . ....................................................... 202
Help for Users in Australia......................................................... 203
Help for Users in Singapore. ........................................................ 203
Help for Users in Thailand.......................................................... 204
Help for Users in Vietnam.......................................................... 204
Help for Users in Indonesia......................................................... 205
Help for Users in Hong Kong....................................................... 206
Help for Users in Malaysia.......................................................... 207
Help for Users in India............................................................. 207
Contents 6
Page 7

Epson Stylus Pro 3880 User’s Guide
Help for Users in the Philippines.................................................... 208
Chapter 8 Product Information
Printer Specifications.................................................................. 210
Printing......................................................................... 210
Printable area.................................................................... 211
Mechanical...................................................................... 211
Electrical........................................................................ 212
Environmental................................................................... 212
Initialization..................................................................... 213
Standards and Approvals........................................................... 213
Paper........................................................................... 215
Ink cartridges.................................................................... 216
System Requirements.................................................................. 217
To use your printer with Windows................................................... 217
To use your printer with Mac OS X.................................................. 218
Interface Specifications................................................................. 218
USB interface..................................................................... 218
Ethernet interface................................................................. 219
Chapter 9 Options and Consumable Products
Consumable Products.................................................................. 220
Maintenance cartridge............................................................. 220
Ink cartridges.................................................................... 220
Epson Special Media................................................................... 221
Safety Instructions
Important Safety Instructions........................................................... 222
When choosing a place for this product............................................... 222
When setting up this product....................................................... 222
When using this product........................................................... 223
When handling the ink cartridges.................................................... 223
When transporting this product. .................................................... 224
Warning, Cautions, and Notes...................................................... 225
Contents 7
Page 8

Index
Epson Stylus Pro 3880 User’s Guide
Contents 8
Page 9
Epson Stylus Pro 3880 User’s Guide
Chapter 1
Using the Printer Software (Windows)
Printer Software Introduction
The printer software CD-ROM includes the following software. See the Start Here for installing
the software, and see its online help for detailed information for each software.
❏ Printer driver
❏ EPSON Status Monitor 3
❏ EPSON LFP Remote Panel
Printer driver
The printer driver lets you print documents from applications to the printer.
The following are the main functions of the printer driver:
❏ Sends the print data to the printer.
❏ Makes the printer settings, such as the media type, paper size. You can register these settings,
and you can also easily import or export these registered settings.
Using the Printer Software (Windows) 9
Page 10
Epson Stylus Pro 3880 User’s Guide
❏ Executes the printer maintenance functions and sets the operation of the printer driver in the
Utility tab. You can also import or export printer settings.
EPSON Status Monitor 3
This utility provides you with printer status information, such as the ink cartridge status, the free
space of the maintenance cartridge, and it also checks for printer error. EPSON Status Monitor 3 is
installed with the printer driver automatically.
Using the Printer Software (Windows) 10
Page 11
Epson Stylus Pro 3880 User’s Guide
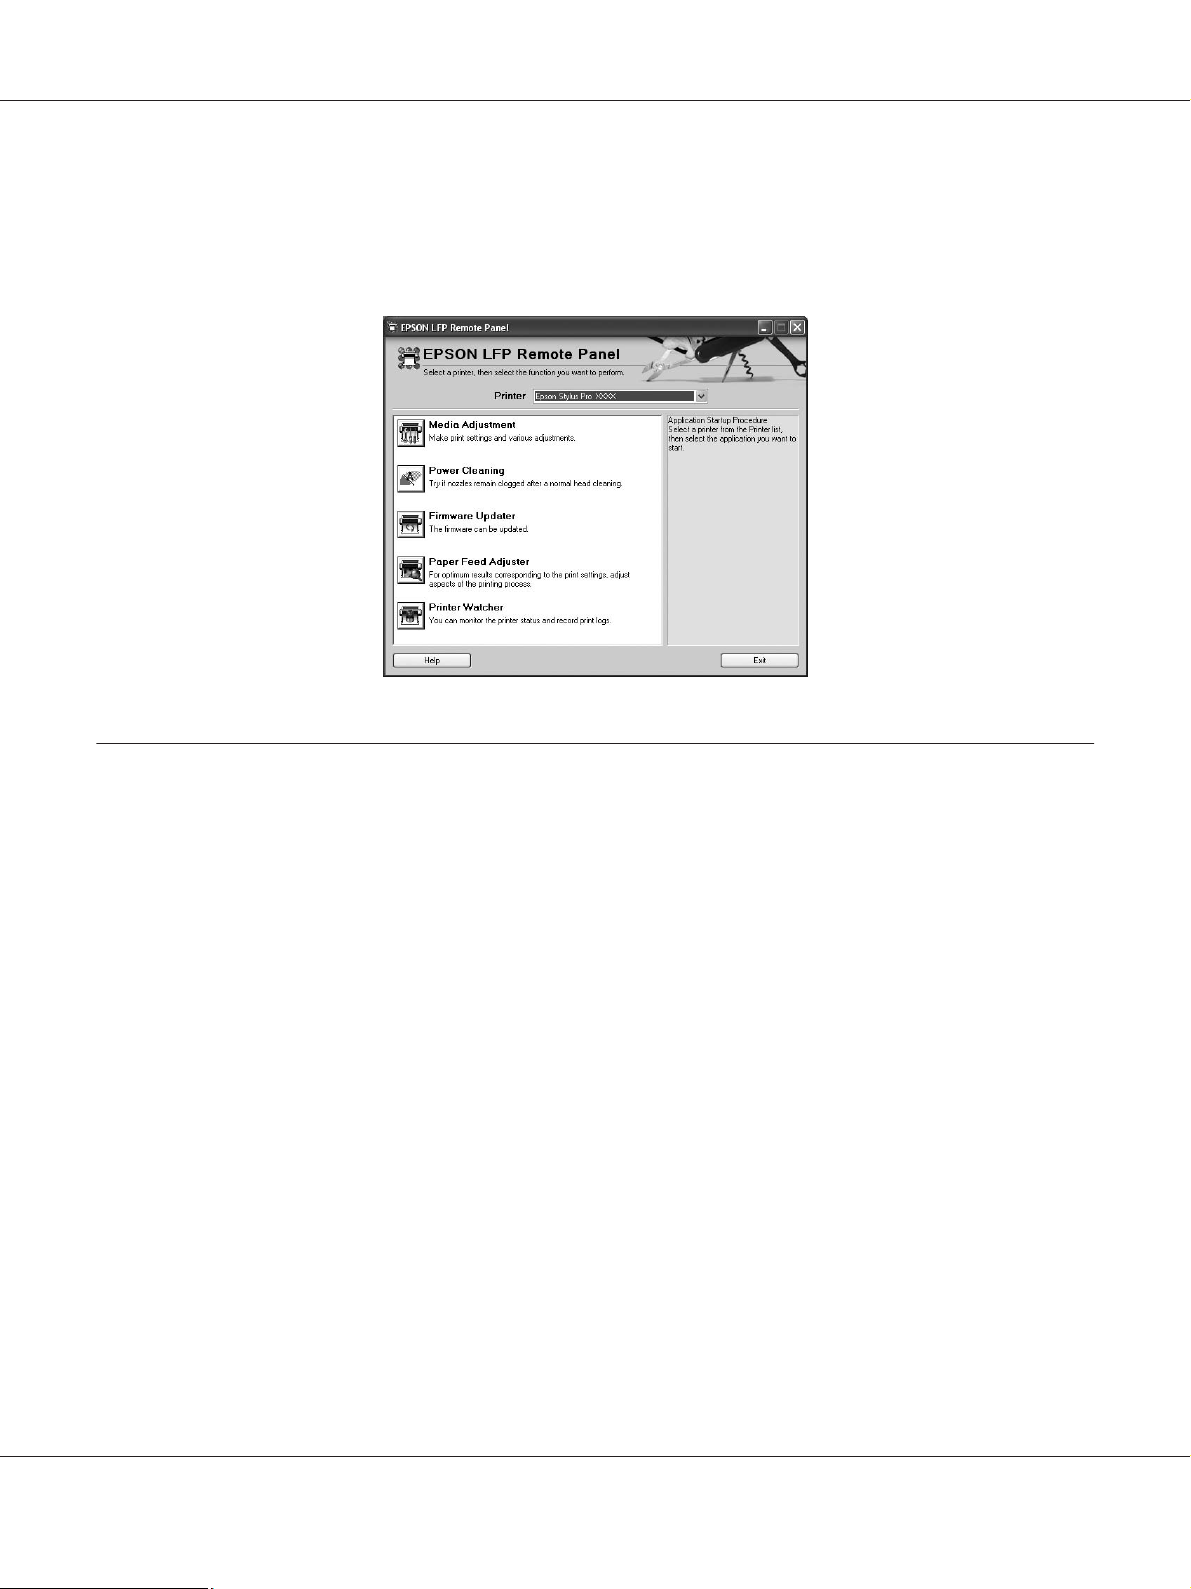
EPSON LFP Remote Panel
EPSON LFP Remote Panel gives the user a broad range of control over the printer, to obtain better
print quality in printing on various media.
Accessing the Printer Driver
You can access the printer driver in the following ways:
❏ From Windows applications
❏ From the Printer icon
From Windows applications
Access the printer driver from your application when you make the print settings.
The following procedures may differ depending on the application you use.
Using the Printer Software (Windows) 11
Page 12

Epson Stylus Pro 3880 User’s Guide
1. From the File menu, select Print or Page Setup.
2. Make sure your printer is selected, and click Printer, Setup, Options, Properties, or
Preferences.
Example:
Example:
Using the Printer Software (Windows) 12
Page 13
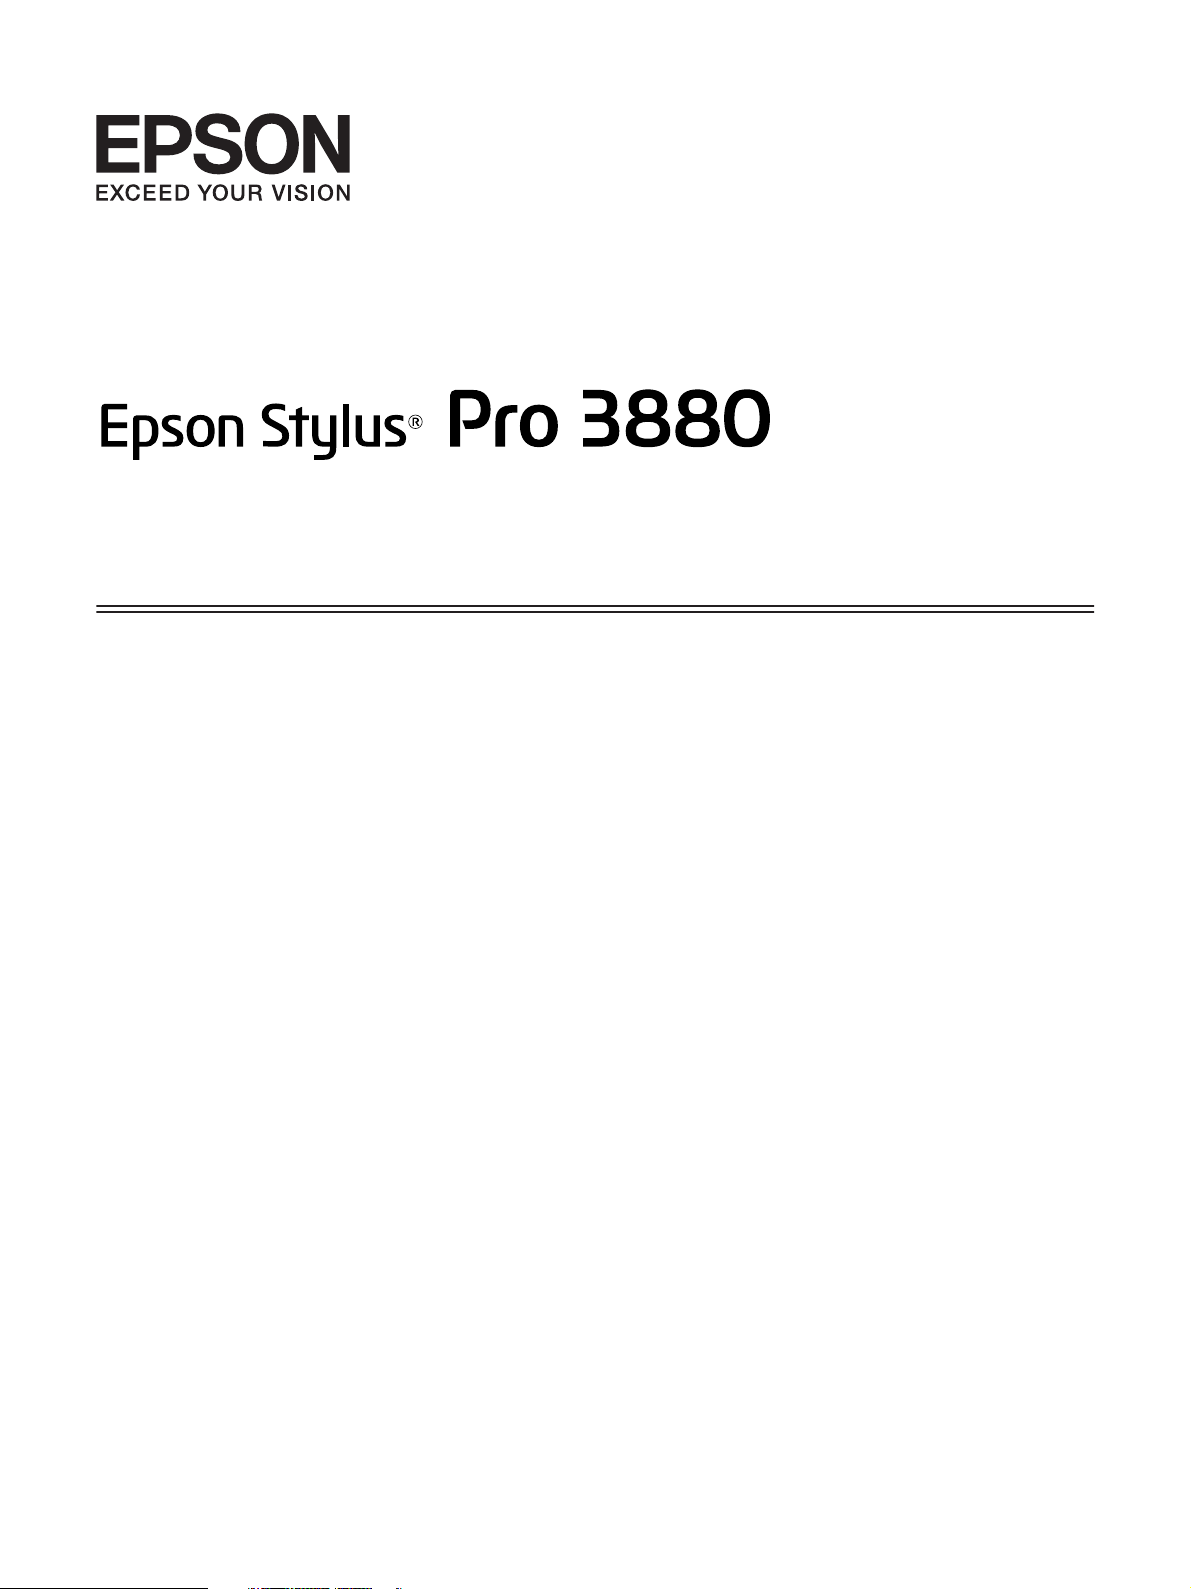
The printer driver window appears.
Epson Stylus Pro 3880 User’s Guide
Make the settings as necessary, and then start printing.
From the Printer icon
When you make common settings or perform printer maintenance, such as Nozzle Check, Head
Cleaning, access the printer driver from the Printer icon.
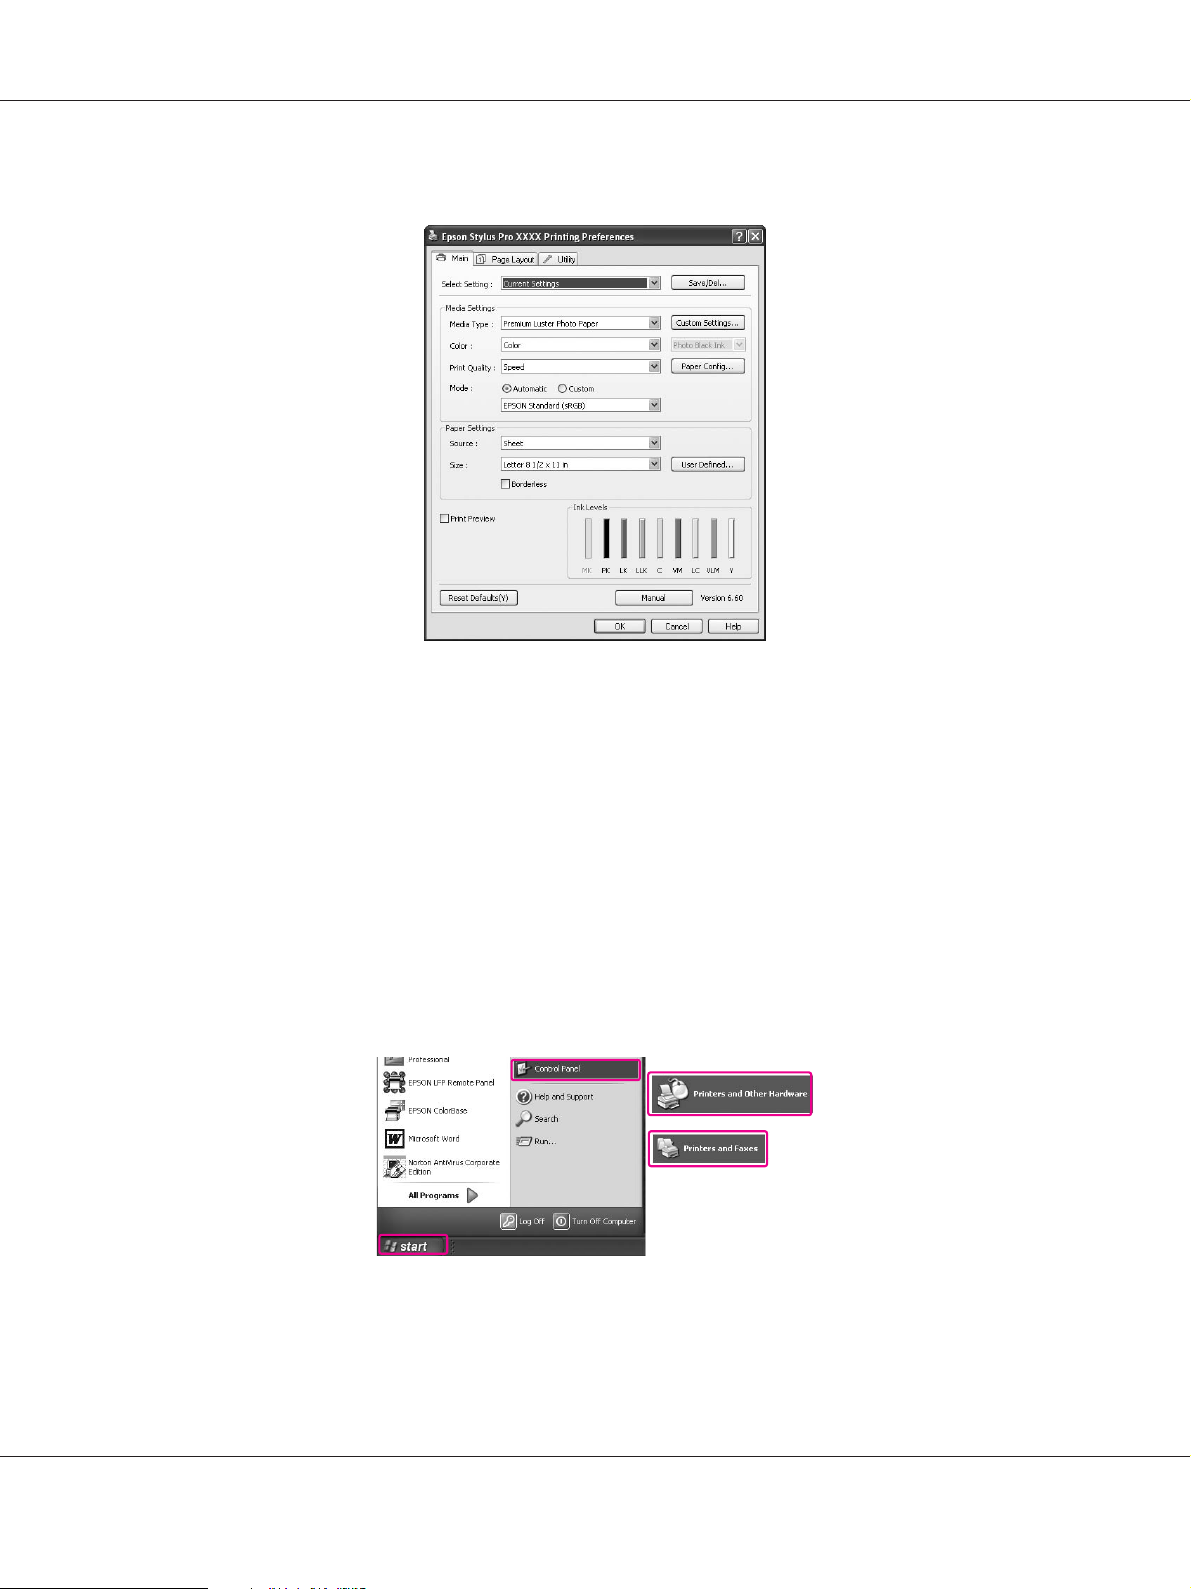
1. Open the Printers and Faxes or Printers folder.
For Windows XP:
Click Start, click Control Panel, and then click Printers and Faxes.
Note:
If your Control Panel is in the Classic View, click Start, click Control Panel, and then click
Printers and Faxes.
Using the Printer Software (Windows) 13
Page 14
For Windows Vista:
Click
, click Control Panel, click Hardware and Sound, and then click Printers.
For Windows 2000:
Click Start, point to Settings, and then select Printers.
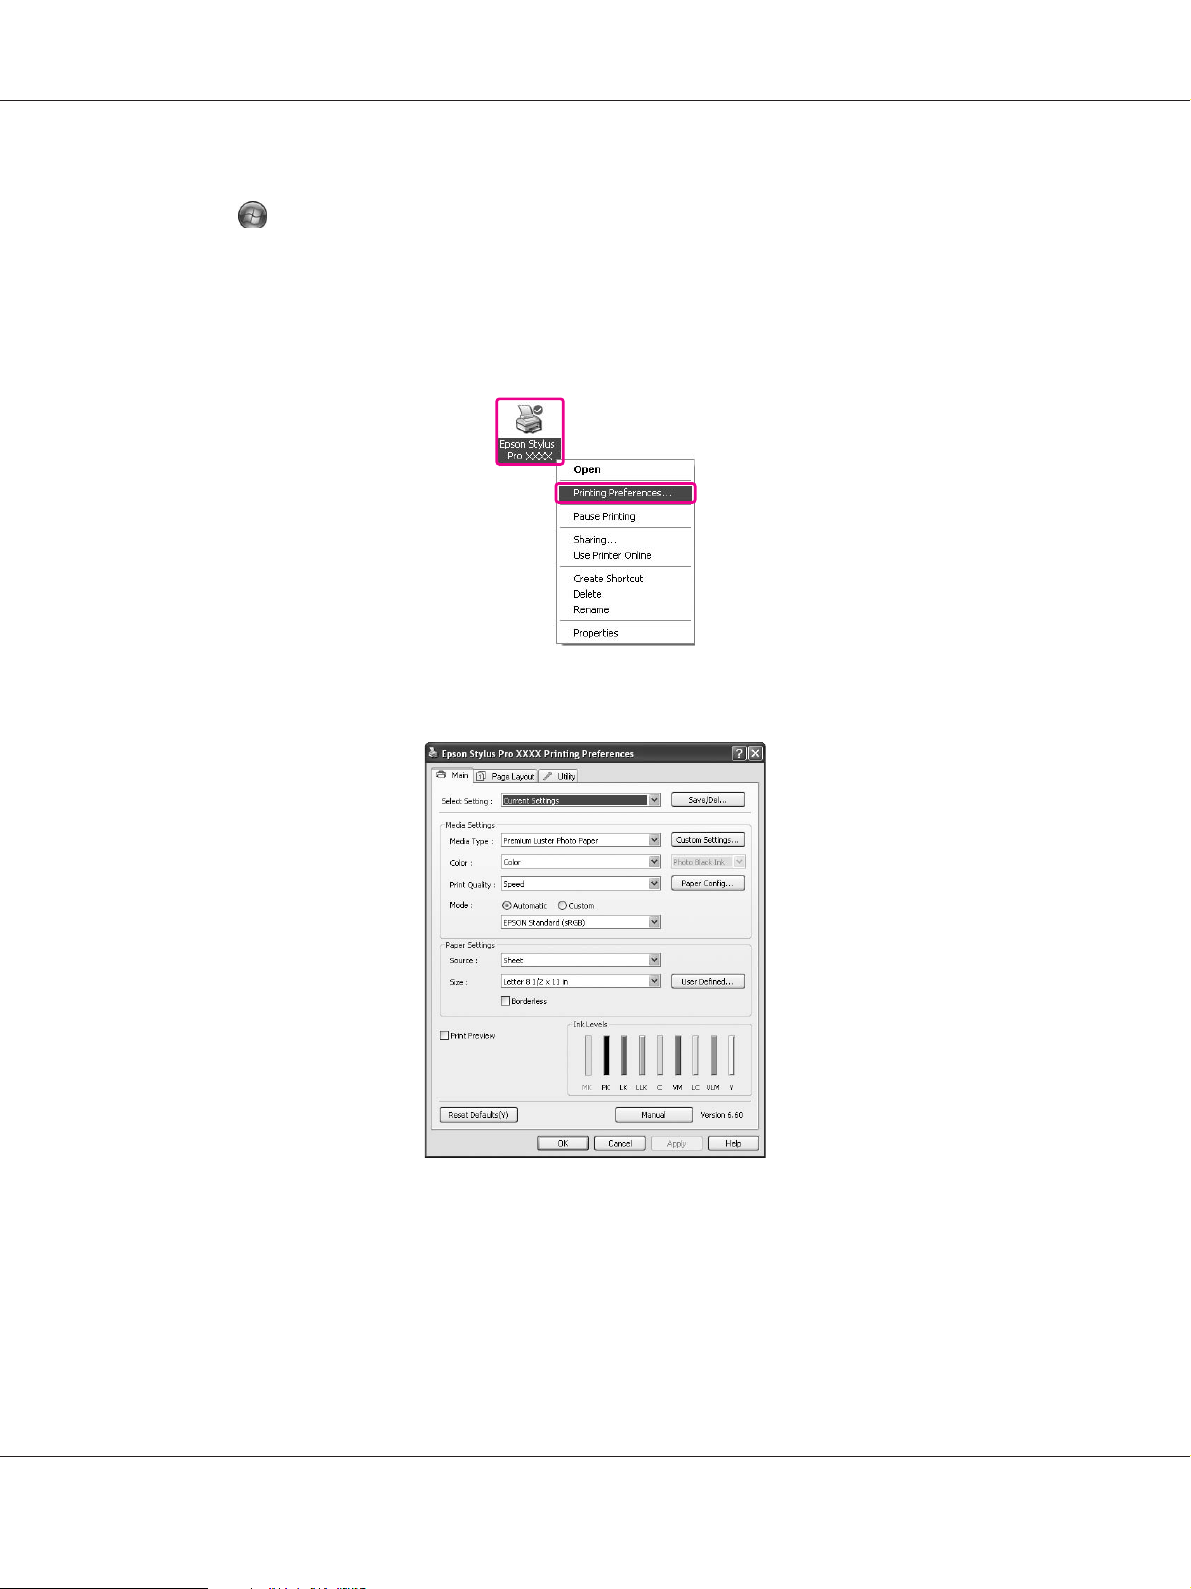
2. Right-click your printer icon, and click Printing Preferences.
Epson Stylus Pro 3880 User’s Guide
The printer driver window appears.
The settings you make here become the default settings of the printer driver.
Using the Printer Software (Windows) 14
Page 15
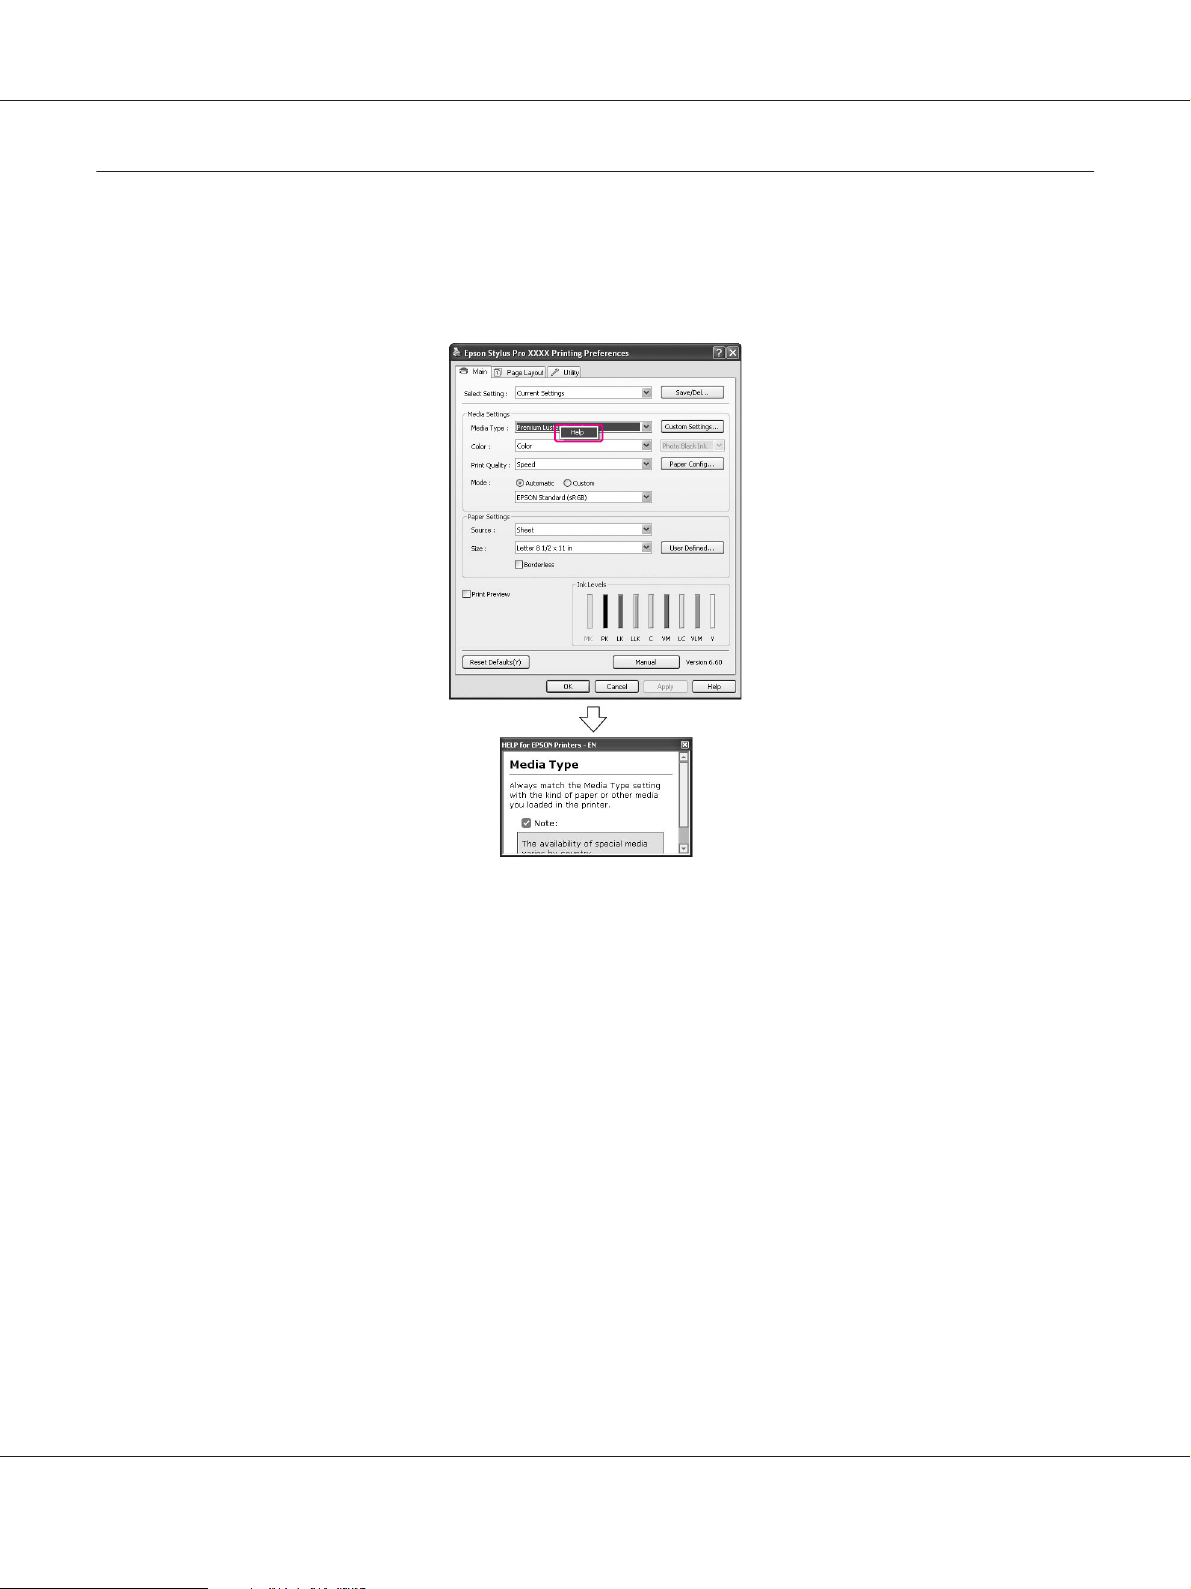
Getting Information Through Online Help
You can view a detailed explanation using the following ways.
❏ Right-click the item, and then click Help.
Epson Stylus Pro 3880 User’s Guide
Using the Printer Software (Windows) 15
Page 16

Epson Stylus Pro 3880 User’s Guide
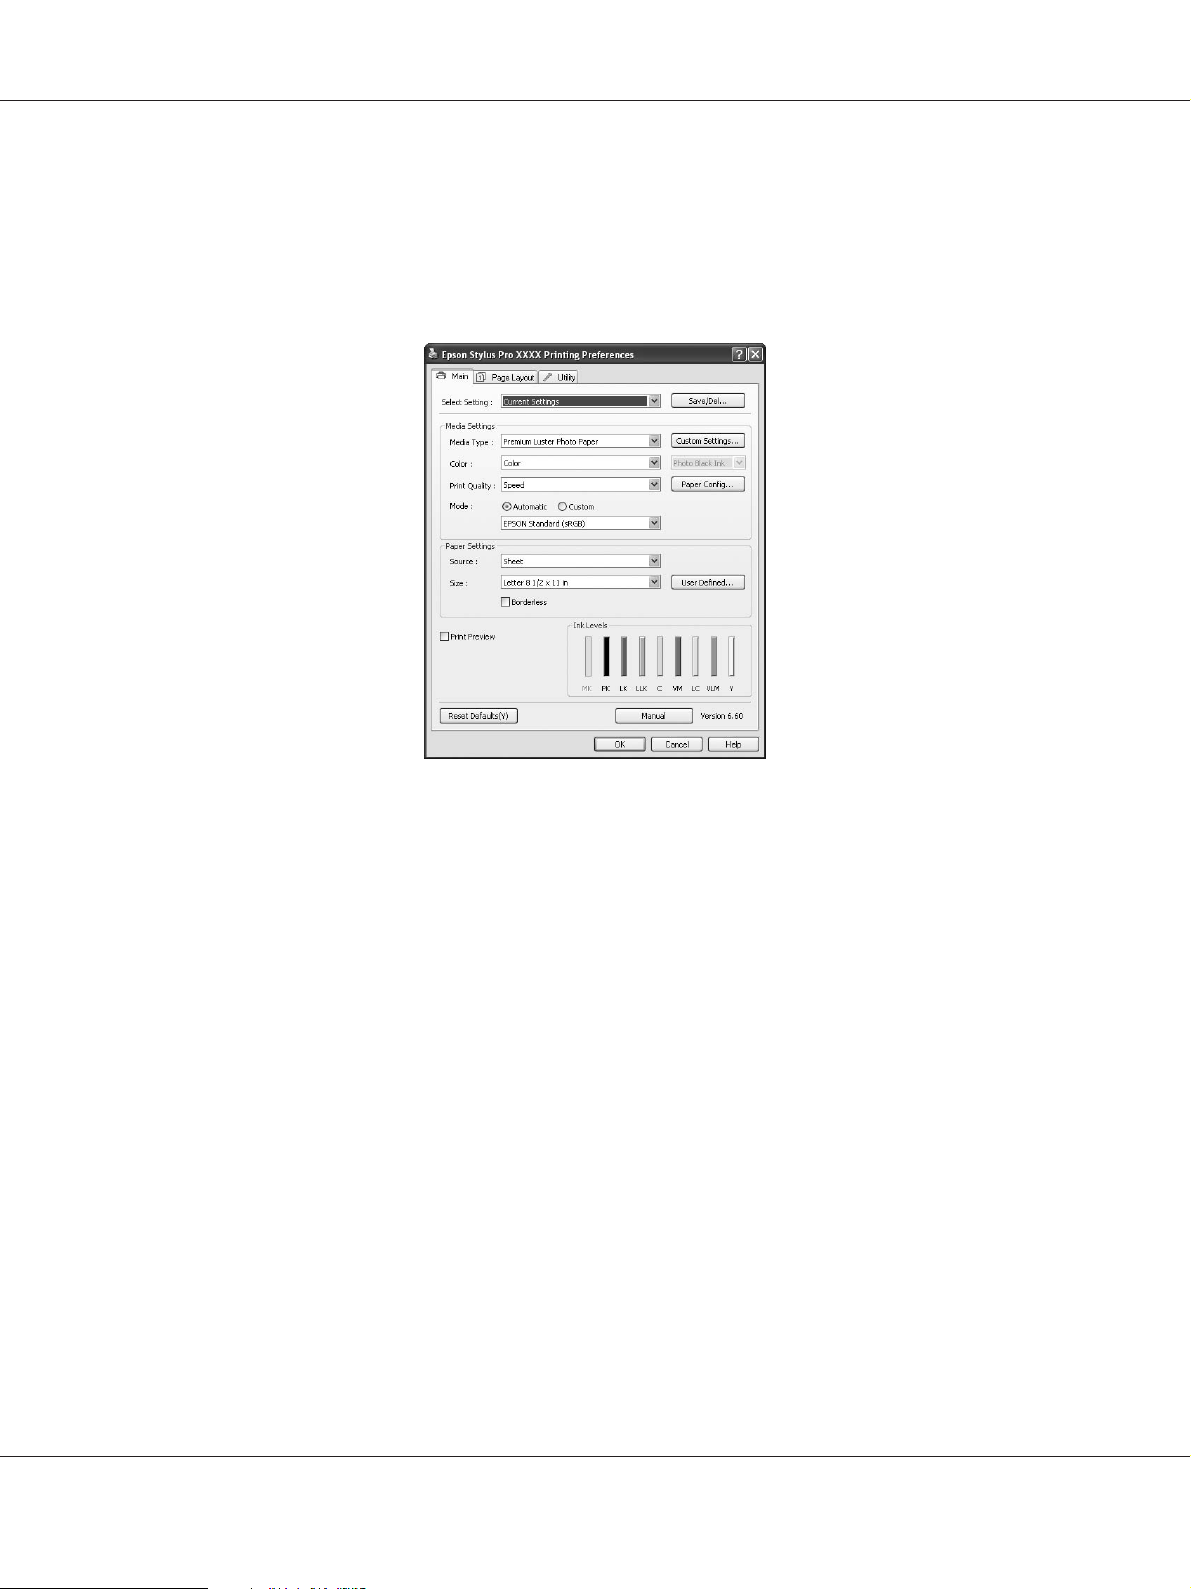
❏ For Windows XP/2000, click the button on the top right of the printer driver window, and
then click the item.
Basic Settings
This section describes how to print your data from an application using the Epson printer driver.
Using the Printer Software (Windows) 16
Page 17
Epson Stylus Pro 3880 User’s Guide
Setting the printer driver
First, make the print data using the application software.
Before printing, open the printer driver window, and confirm the print settings such as the media
type, paper size.
Checking the printer status
When you send a print job to the printer, you can monitor the printer status in the following windows.
Using the Printer Software (Windows) 17
Page 18
Epson Stylus Pro 3880 User’s Guide
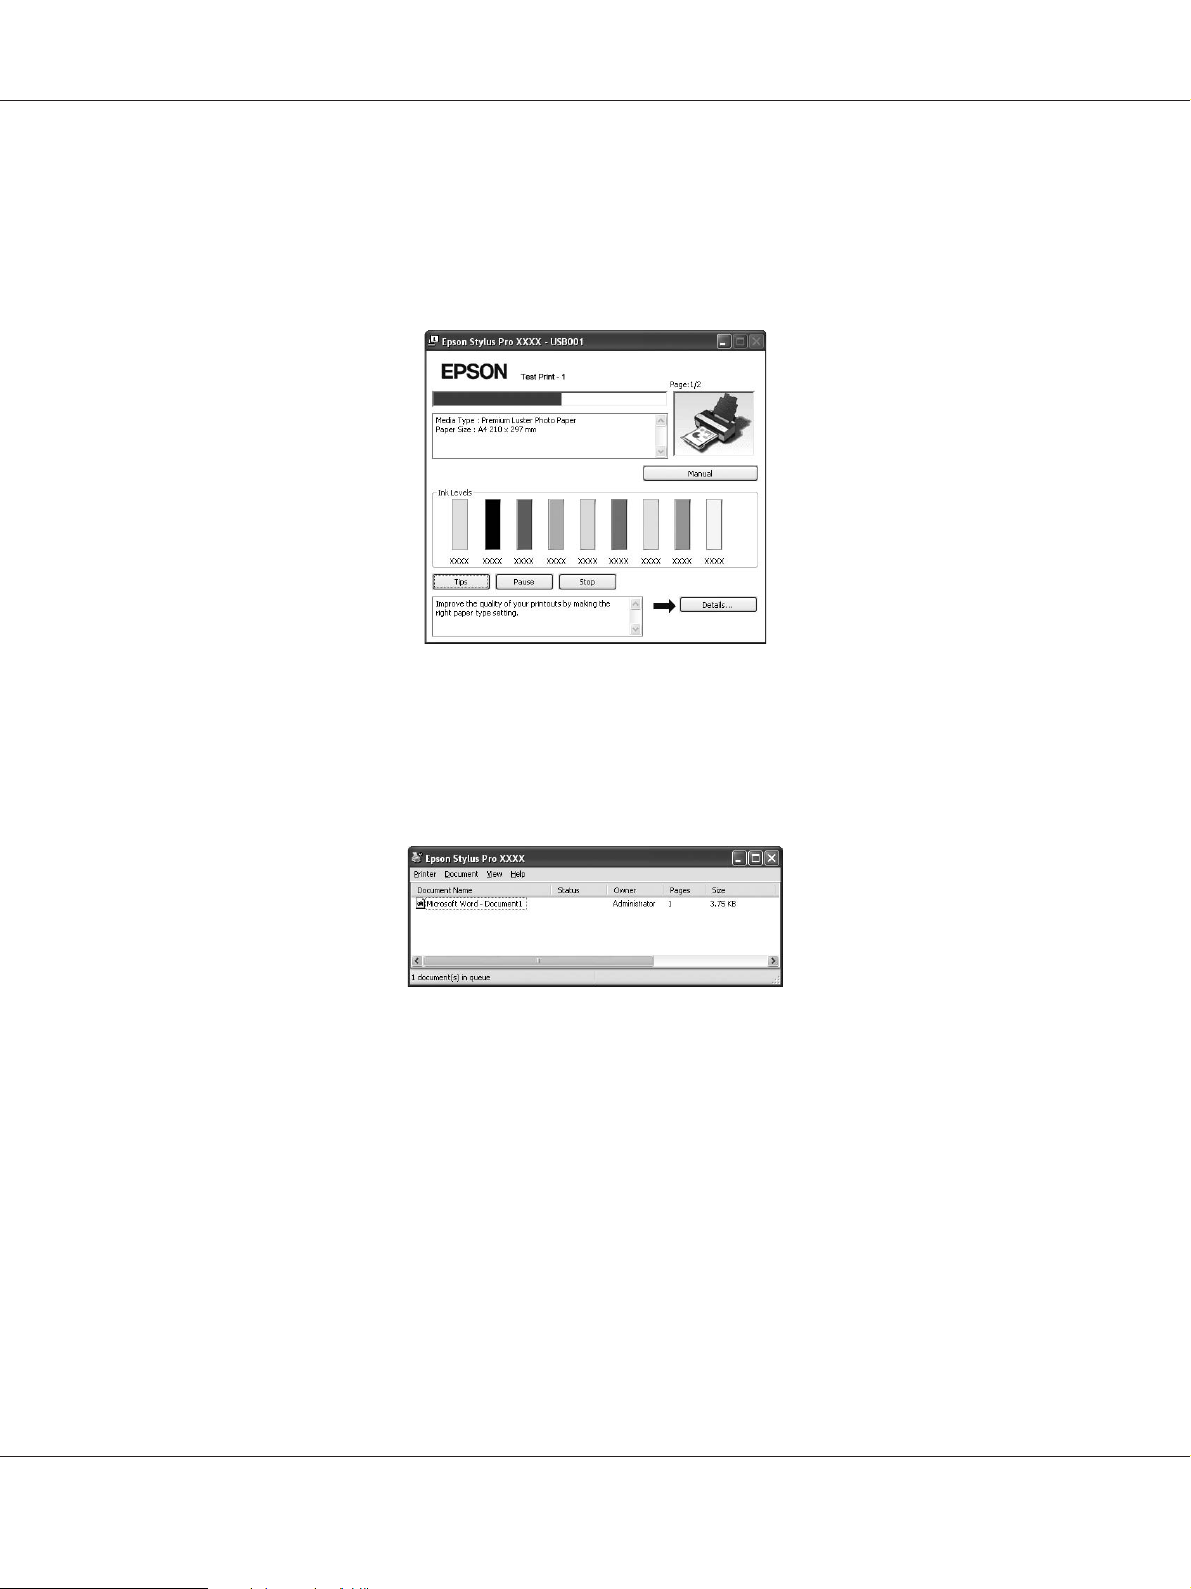
Progress Meter
The Progress Meter appears on your display when you start printing. It indicates the progress of
the current print job and provides printer status information such as ink remaining and product
number of the ink cartridges. Also, you can cancel a print job using Progress Meter.
Print queue window
You can check a list of all jobs waiting and its information, and also you can cancel print jobs. The
print queue window appears when you double-click the printer icon on the task bar. This is a
function of the Windows operating system.
Canceling printing
You can cancel a print job waiting from the computer. If the printing is already started, you need
to cancel printing by the printer.
Canceling printing by the printer
Press and hold the Cancel/Reset + button for 3 seconds to reset the printer.
Even when it is printing a job, the printer is reset. After resetting, it takes a while before the printer
is in the ready state.
Using the Printer Software (Windows) 18
Page 19
Epson Stylus Pro 3880 User’s Guide
Note:
You cannot cancel a job waiting in the computer. To cancel a job waiting in the computer, see the
next section “Canceling printing by the computer” on page 19.
Canceling printing by the computer
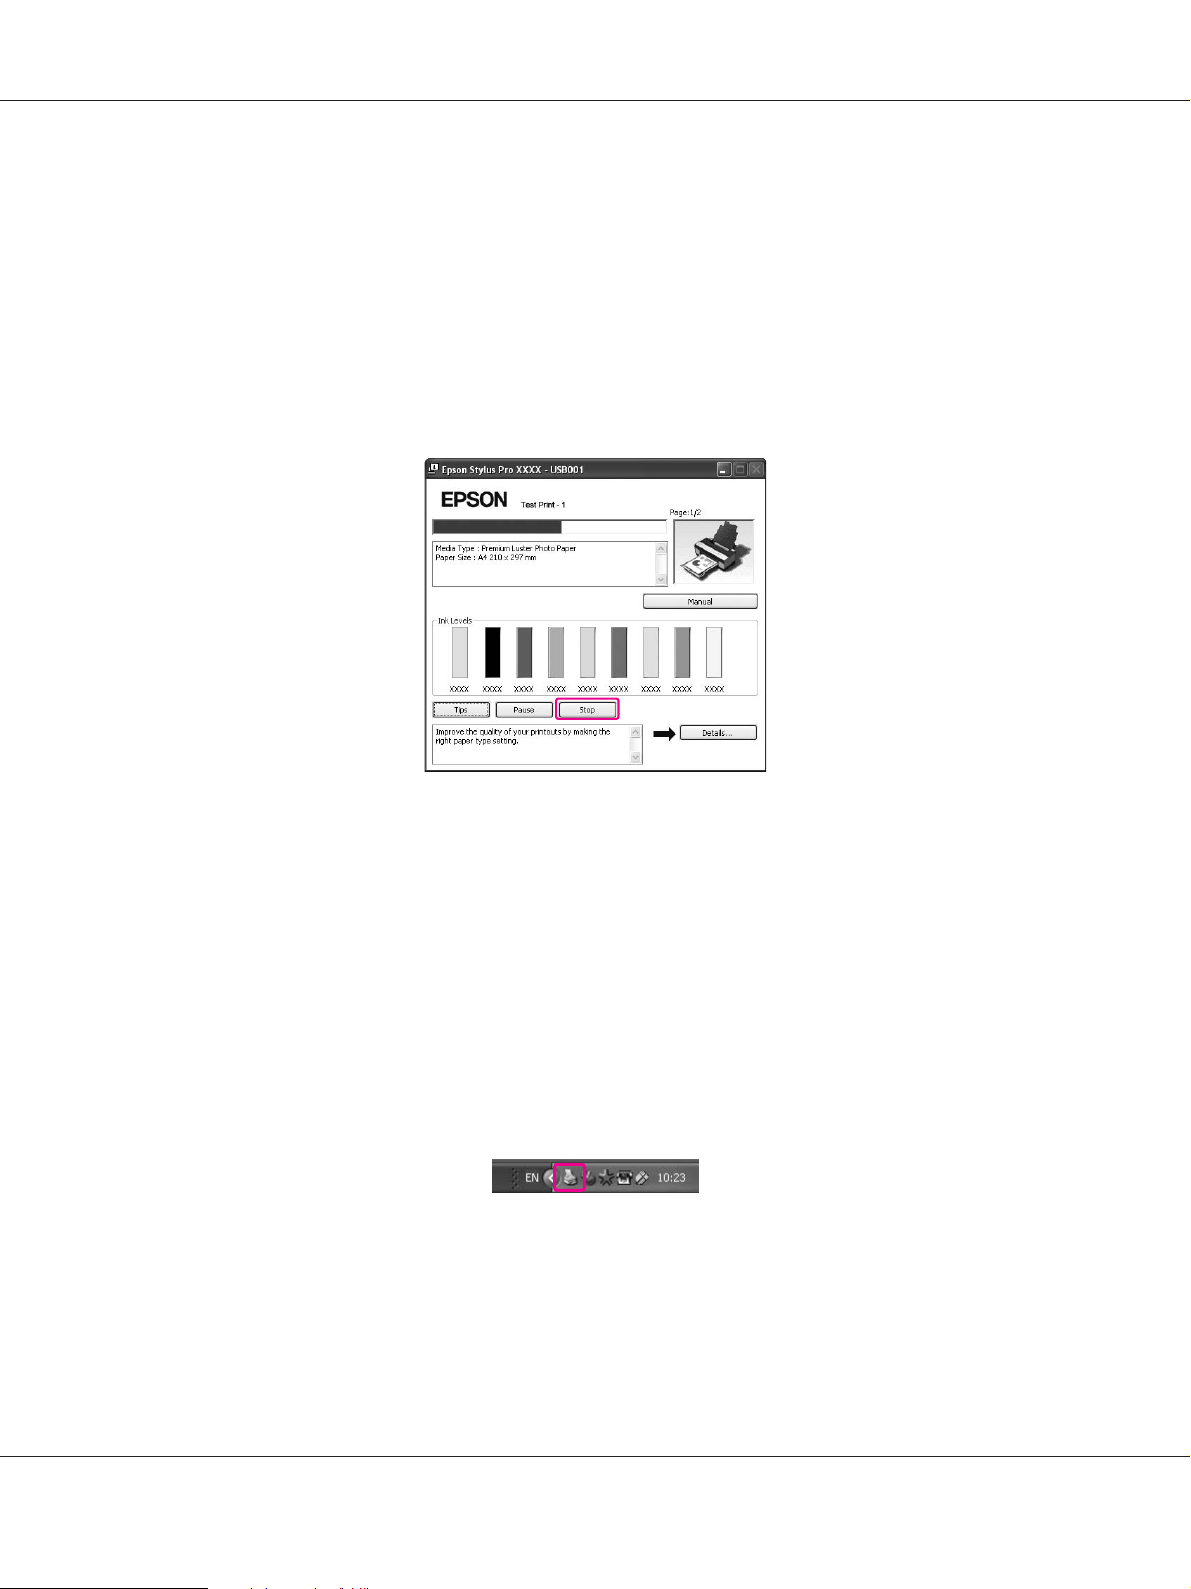
Canceling printing
Click Stop on the EPSON Progress Meter dialog box.
Note:
❏ The Progress Meter shows the progress of the current print job. It disappears when the job has
been sent to the printer.
❏ You cannot cancel a print job that has been sent to the printer. In this case, cancel the print job
by the printer.
Deleting a print job waiting
You can delete the jobs waiting stored in the computer.
1. Double-click the printer icon on the task bar.
2. From the Printer menu, select Cancel all documents.
Using the Printer Software (Windows) 19
Page 20

Epson Stylus Pro 3880 User’s Guide
If you want to delete a specific job, select the job and select Cancel from the Document menu.
Note:
❏ The print queue window shows the progress of each print job. Print job disappears when the
job has been sent to the printer.
❏ You cannot cancel a print job that has been sent to the printer. In this case, cancel the print
job by the printer.
When problem occurs during printing
If a problem occurs during printing, an error message appears in the EPSON Status Monitor 3
window.
Click How to, and EPSON Status Monitor 3 will lead you step by step through a procedure to
solve a problem.
Using the Printer Software (Windows) 20
Page 21
Epson Stylus Pro 3880 User’s Guide
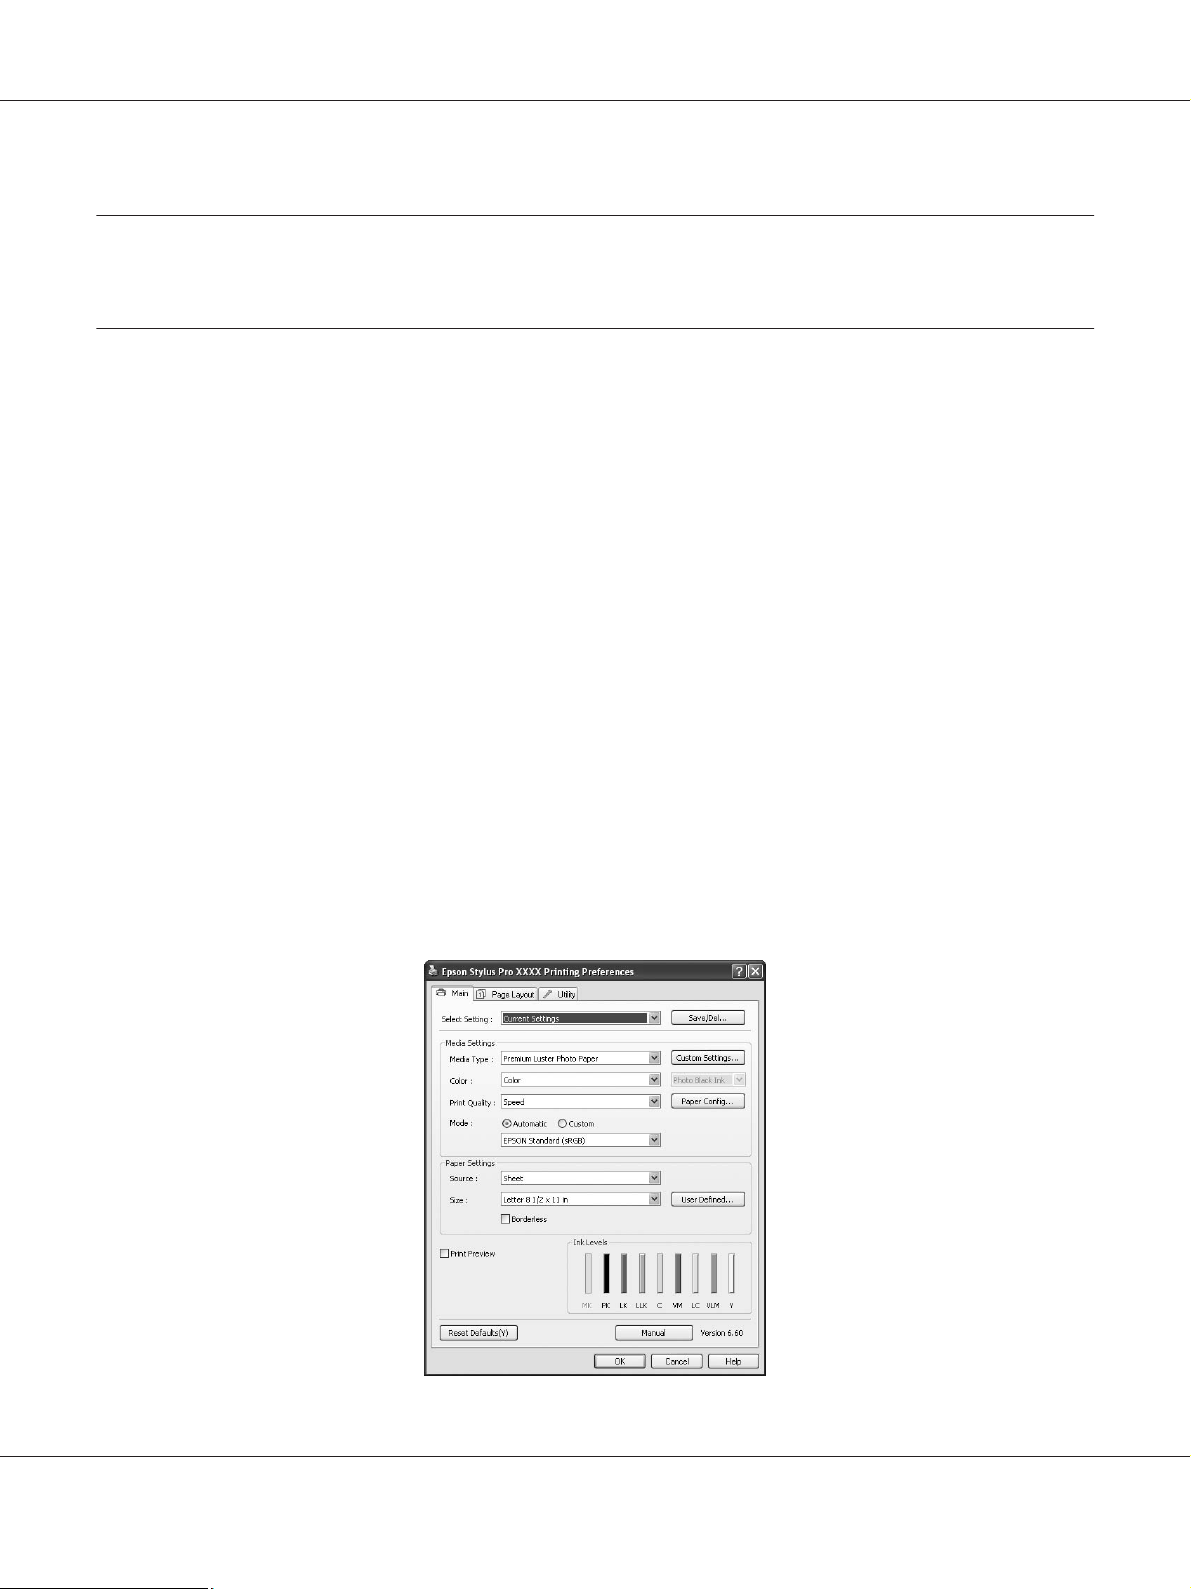
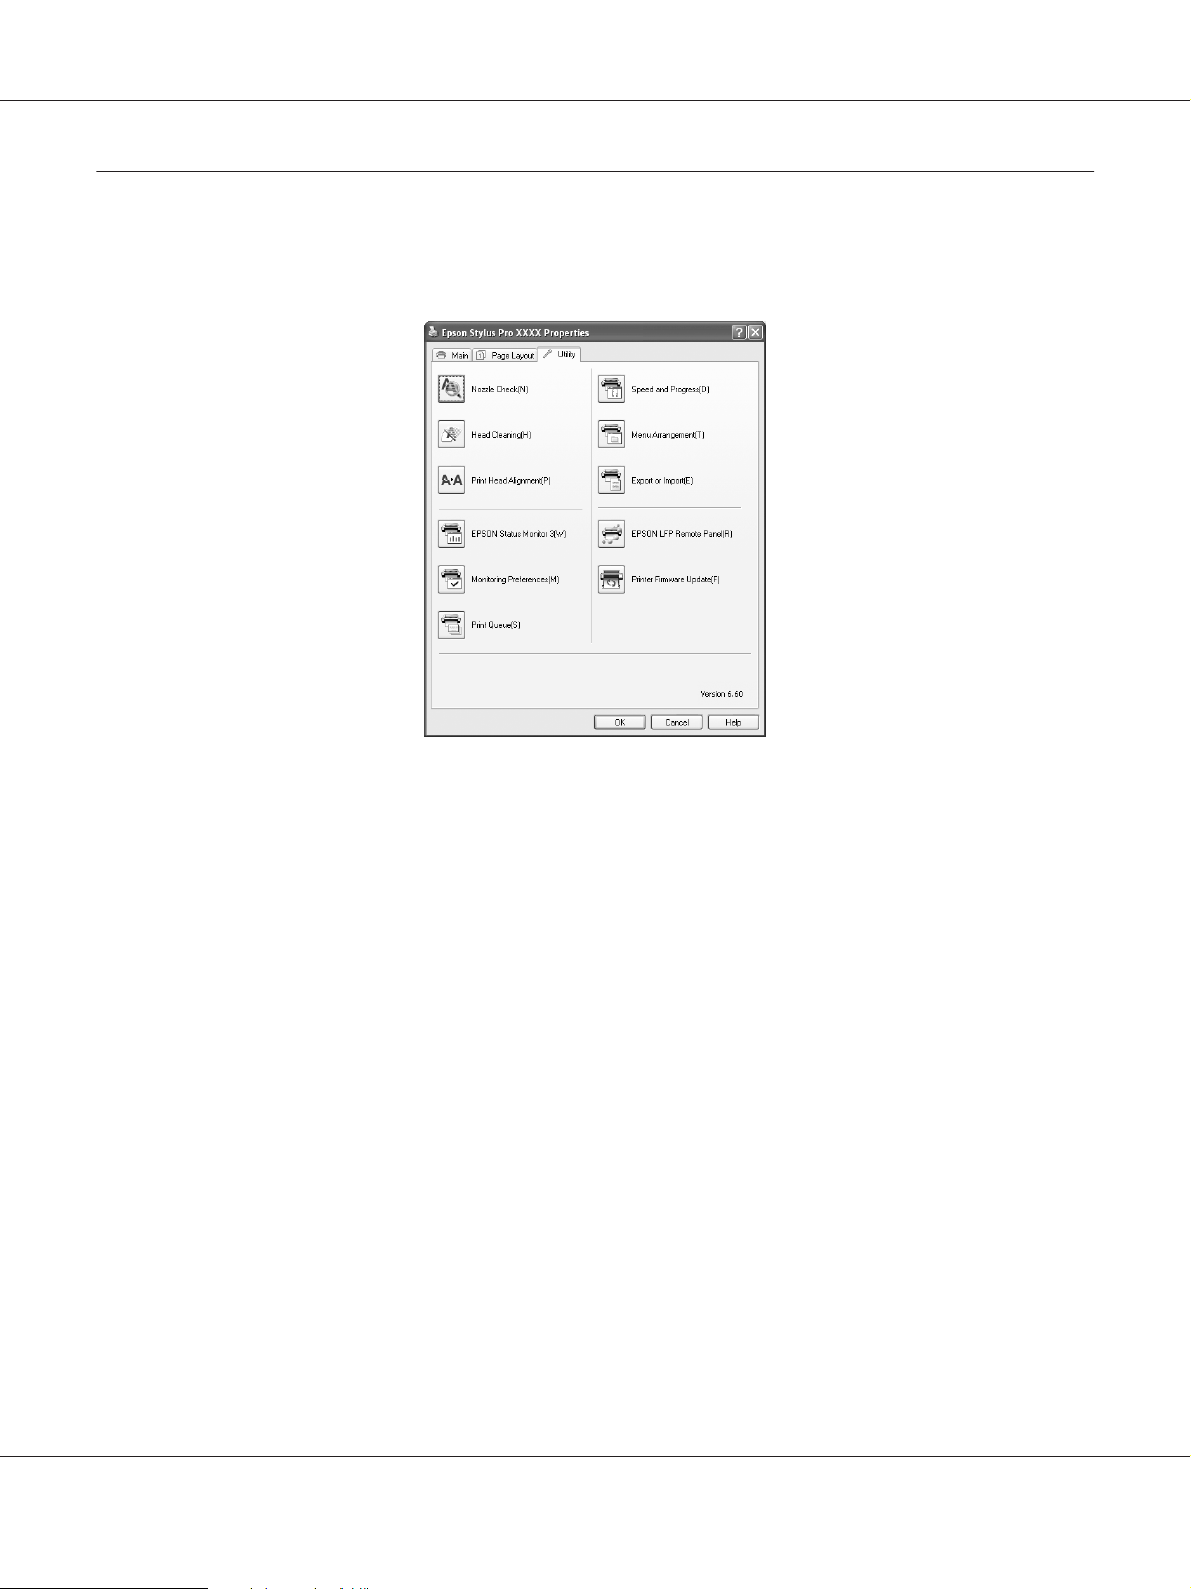
Using the Printer Utilities
The Epson printer utilities let you check the current printer status and perform printer
maintenance from your screen.
Nozzle Check
This utility checks the print head nozzles to see if they are clogged and need to be cleaned. Check
the nozzles when you notice the print quality has declined and after cleaning to confirm that the
print head nozzles have been cleaned. If the print head nozzles are clogged, perform head cleaning.
Head Cleaning
This utility cleans the color and black print heads. You may need to clean the print head if you
notice the print quality has declined.
Note:
The cleaning process consumes ink of all ink cartridges at the same time. Even if you are using only
black inks, the head cleaning also consumes color inks.
Print Head Alignment
This utility can be used to improve the print quality of your printed data. The alignment of the
print head may need to be adjusted if vertical lines appear out of alignment or if white or black
banding noise appear in your printed data. Use this utility to realign the print head.
Using the Printer Software (Windows) 21
Page 22

Epson Stylus Pro 3880 User’s Guide
EPSON Status Monitor 3
This utility provides you with printer status information, such as the ink cartridge status, the free
space of the maintenance cartridge, and it also checks for printer error. See “Using EPSON Status
Monitor 3” on page 23.
Monitoring Preferences
This function lets you specify the monitoring feature of EPSON Status Monitor 3. See “Using
Monitoring Preferences” on page 24.
Print Queue
This function displays the job waiting list.
You can check the list of all jobs waiting and their information, and also cancel or restart print jobs.
Speed and Progress
You can make settings related to print speed and progress.
Menu Arrangement
You can arrange the Select Setting, Media Type, and Paper Size list items. Arrange the items as you
prefer, or classify the items into groups. You can also hide the items you are not using.
Export or Import
You can export or import the printer driver settings. It is convenient to use this function when you
want to make the same printer driver settings to multiple computers.
EPSON LFP Remote Panel
This utility lets you optimize your printer. You can start this utility only if it is installed. See the
EPSON LFP Remote Panel online help for detailed information.
Printer Firmware Update
EPSON LFP Remote Panel is started and updates the printer firmware.
To use this function, you need to download the latest firmware from the Epson Web site beforehand.
Using the Printer Software (Windows) 22
Page 23
Epson Stylus Pro 3880 User’s Guide
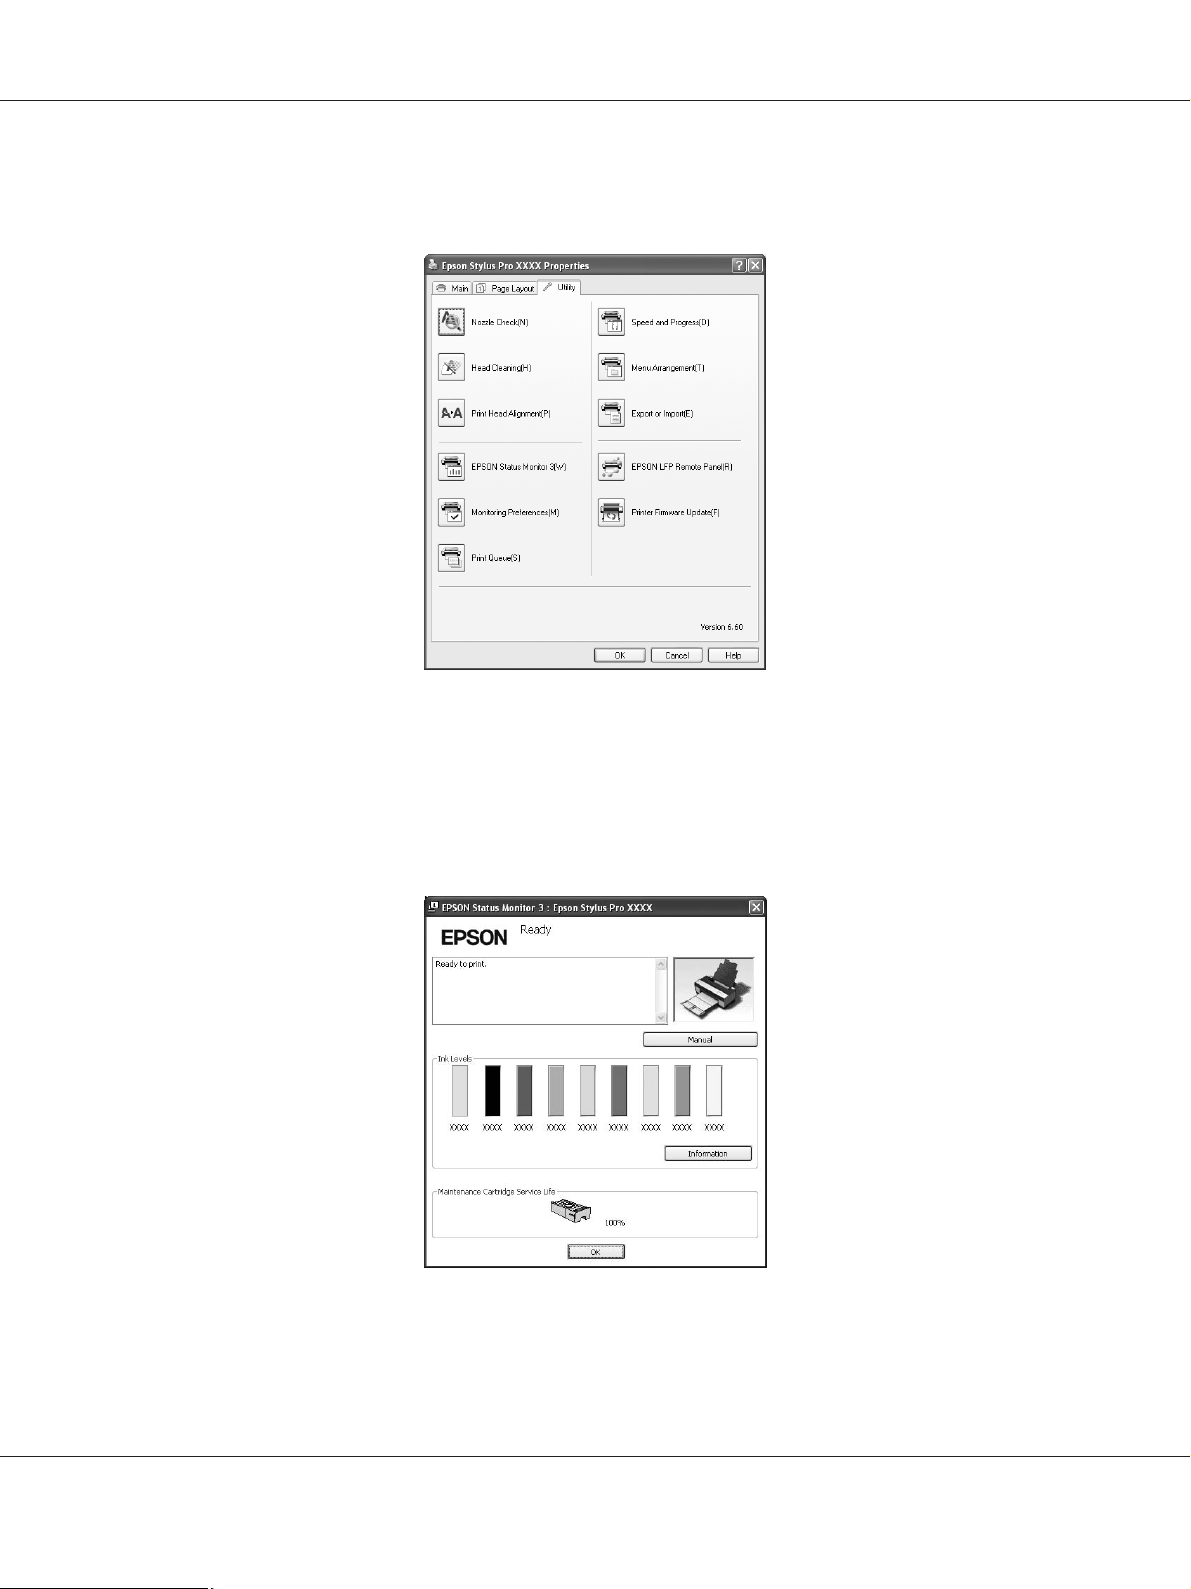
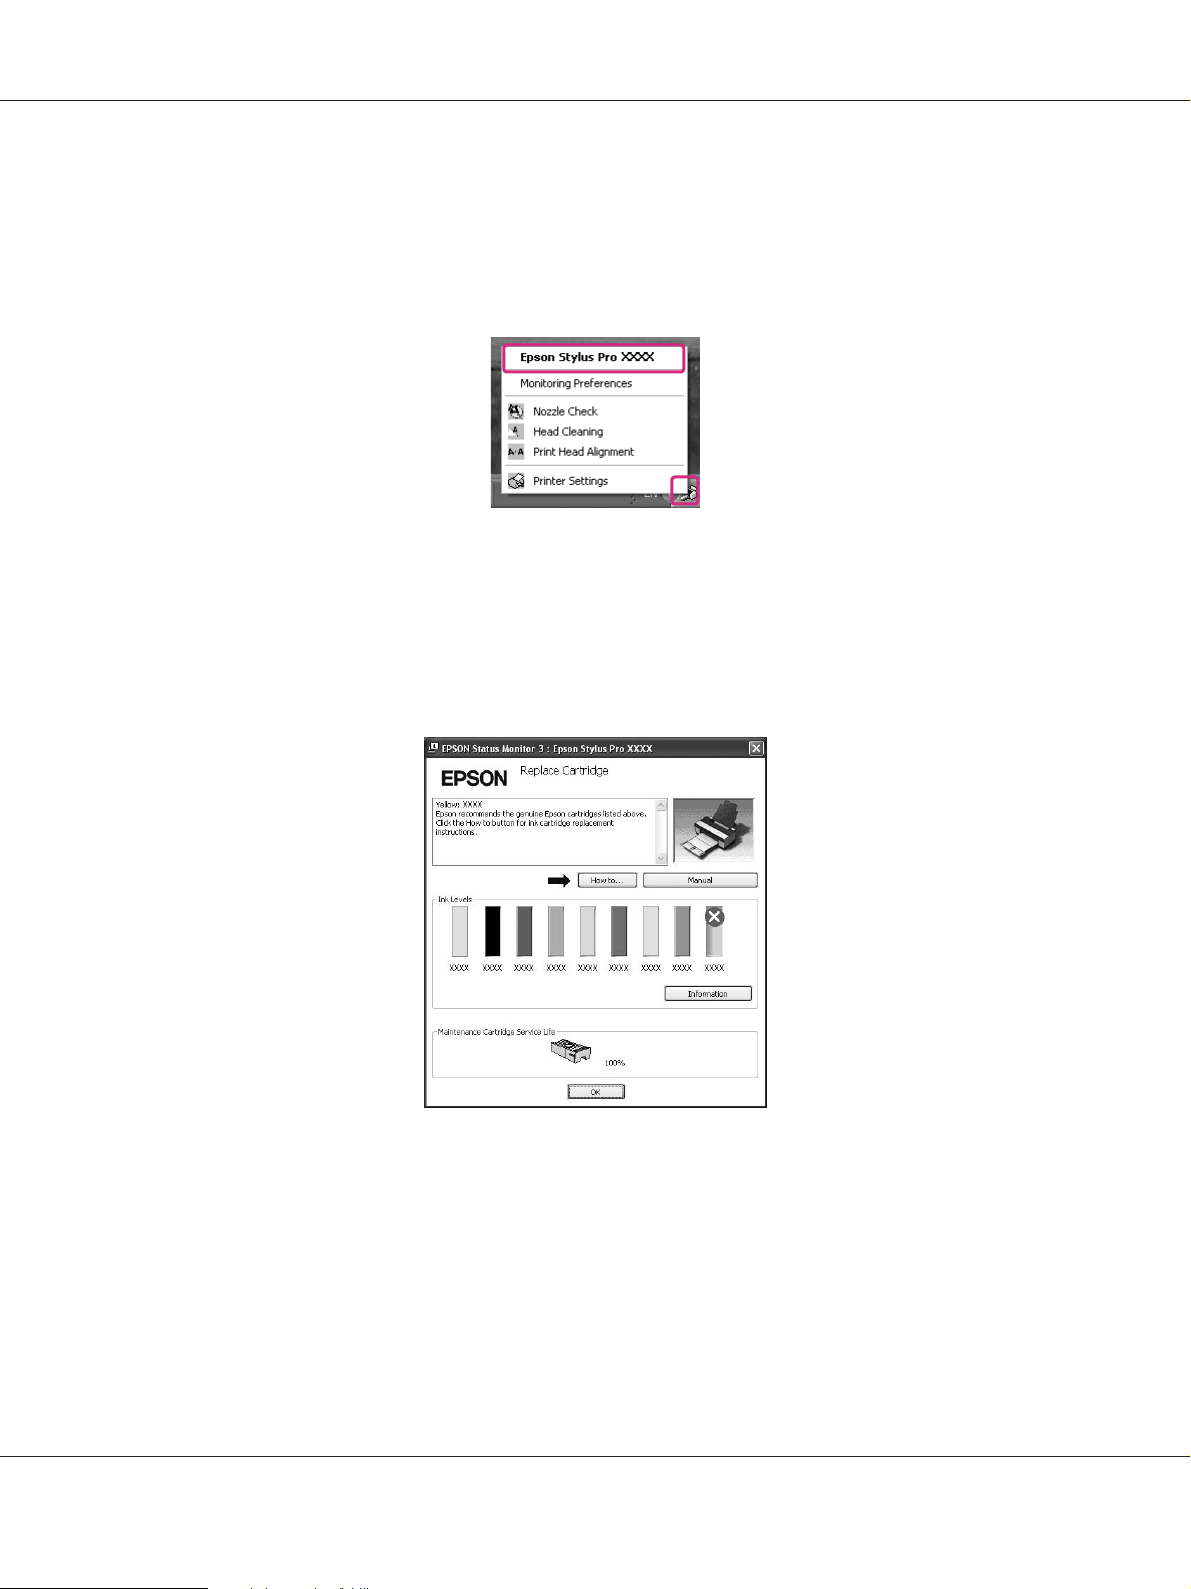
Using EPSON Status Monitor 3
EPSON Status Monitor 3 provides you with detailed printer status information, a graphic display
of the ink cartridge status and the free space of the maintenance cartridge, and status messages. To
know the detailed status of the printer, open the printer detailed window. EPSON Status
Monitor 3 starts to monitor the printer status when the printing begins, and if there are any
problems, it shows an error message and its solutions. You can also access EPSON Status
Monitor 3 from the printer driver or the shortcut icon by double-clicking the printer-shaped icon
on the Windows taskbar to check the status of the printer.
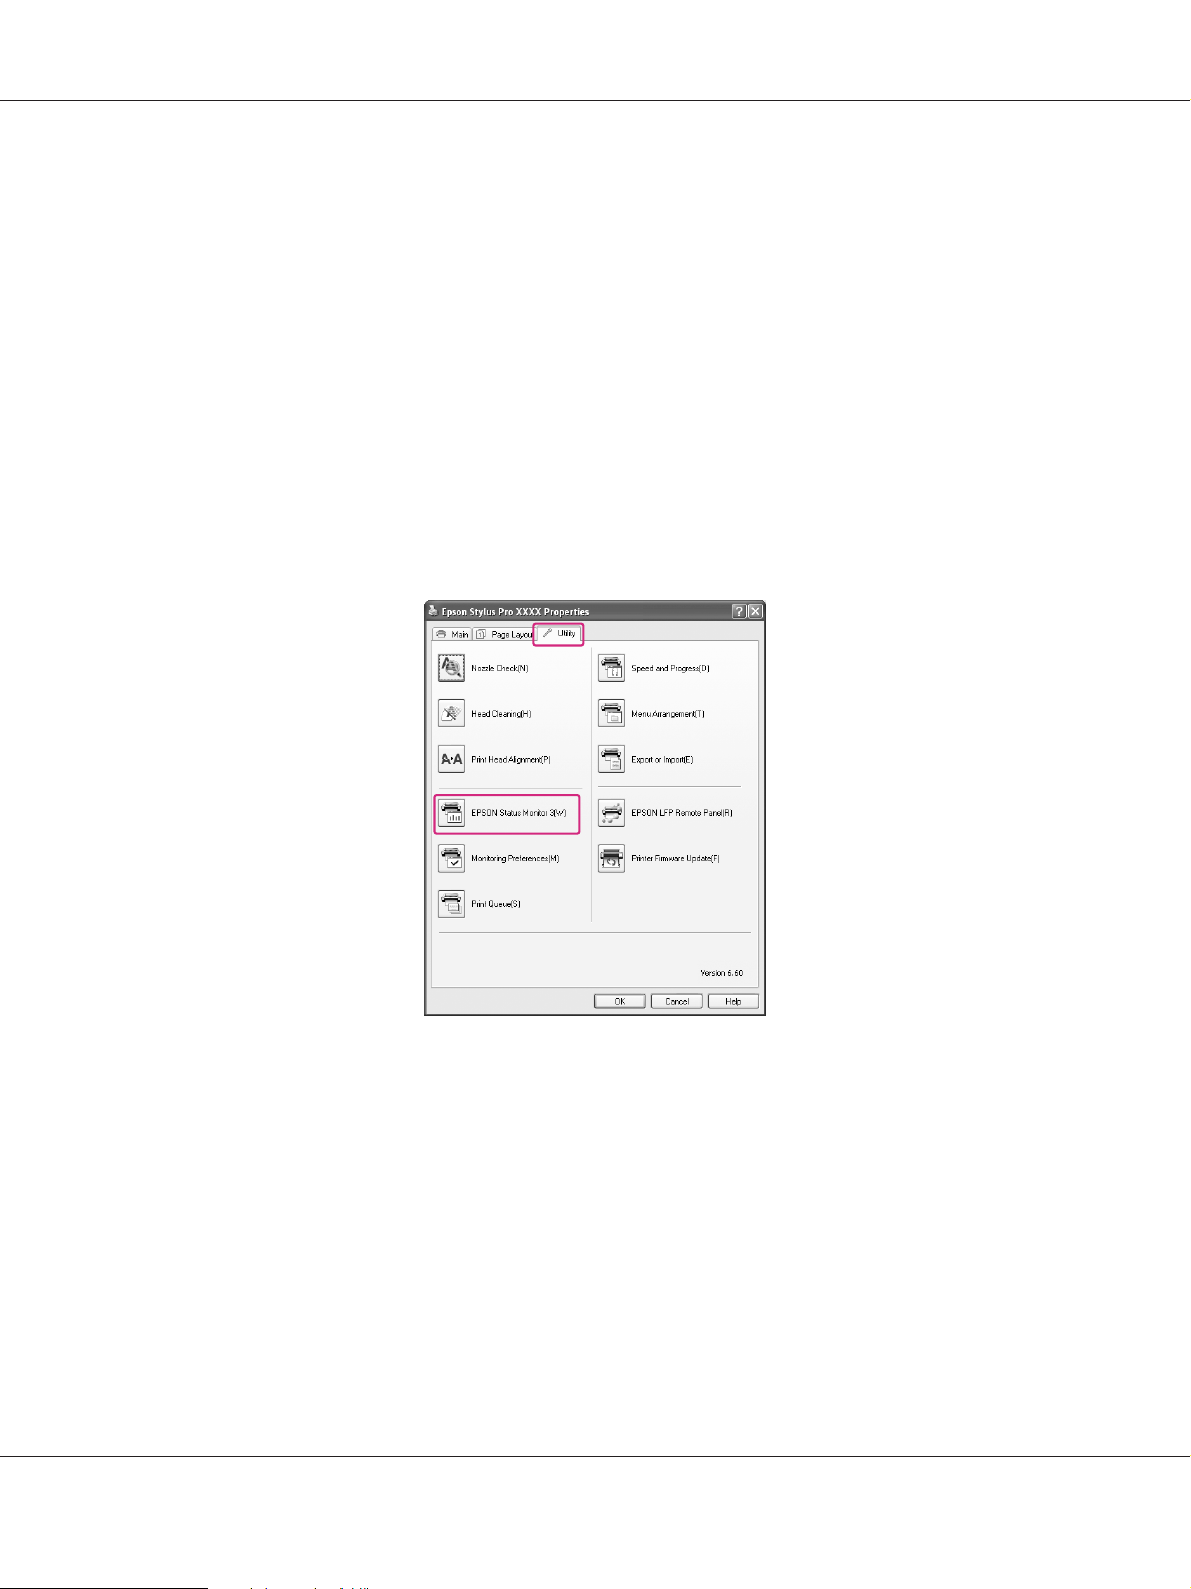
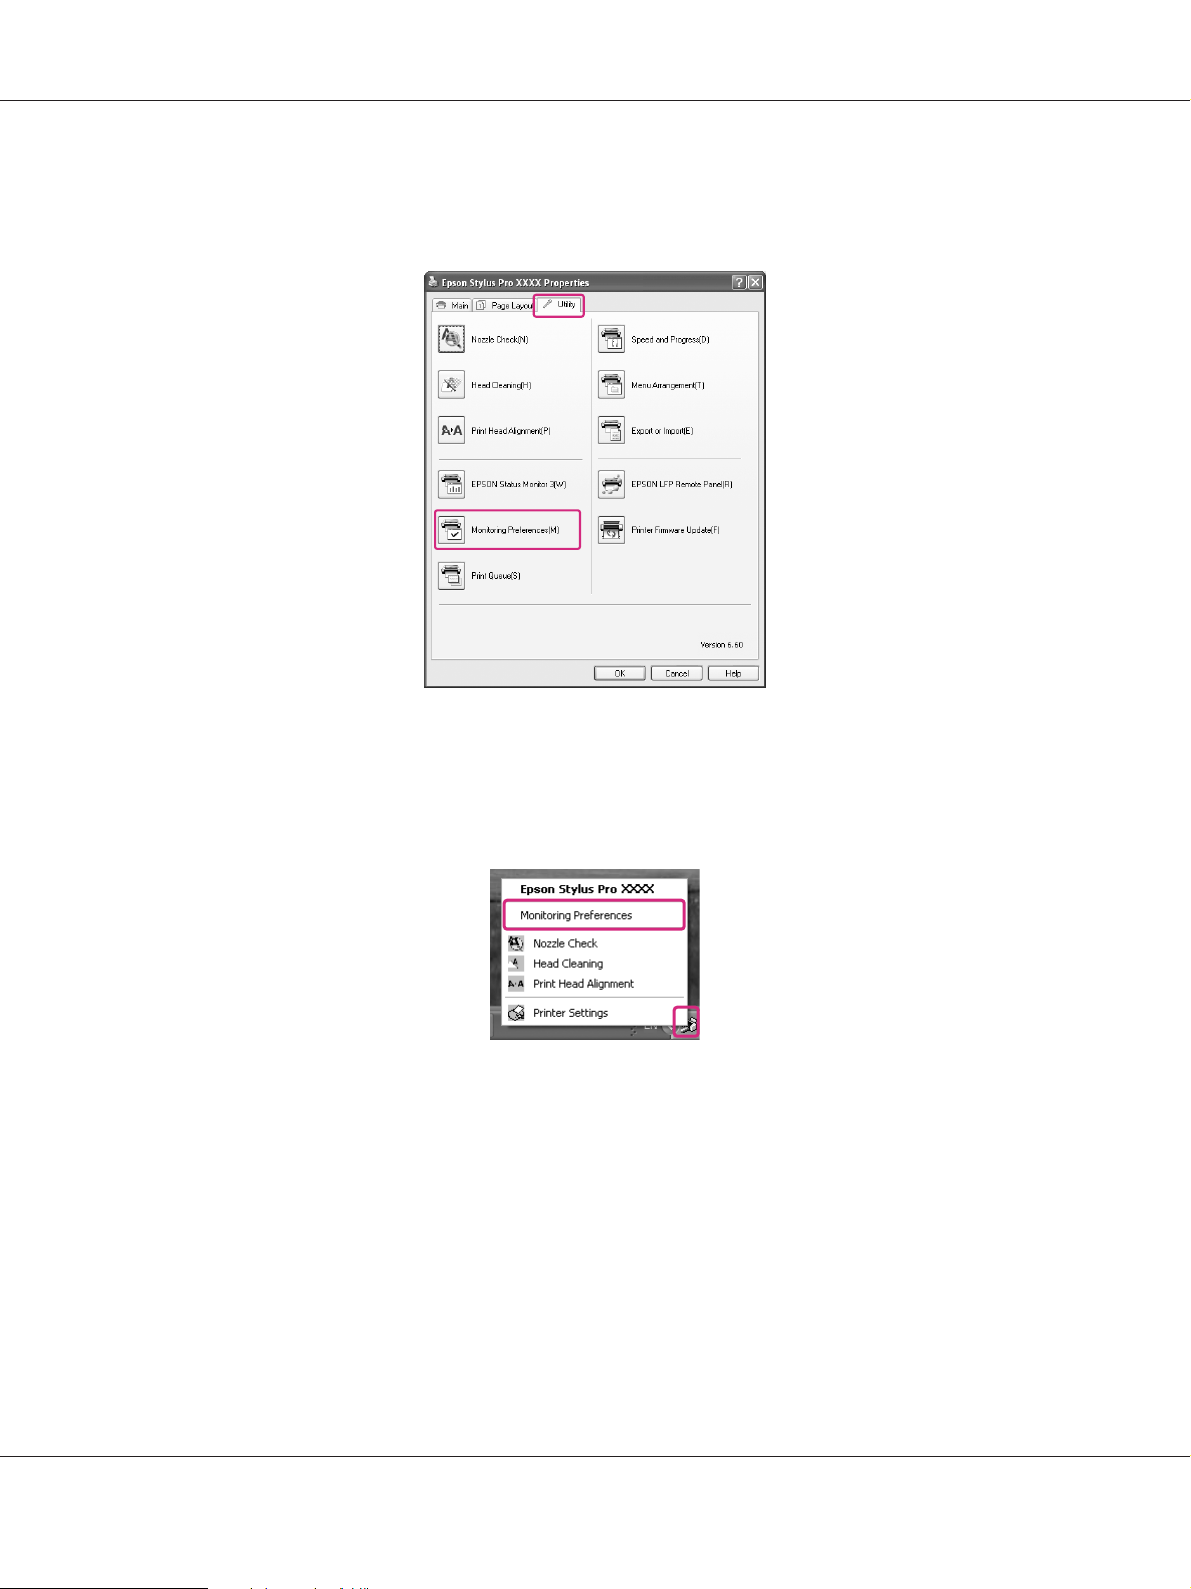
Accessing EPSON Status Monitor 3
Open the printer driver window, and click the Utility tab, and then click EPSON Status
Monitor 3.
Using the Printer Software (Windows) 23
Page 24
Epson Stylus Pro 3880 User’s Guide
Note:
In the Monitoring Preferences dialog box, select the Shortcut Icon check box to display a shortcut
icon on your Windows taskbar. Right-click the shortcut icon, and select the printer name to display
the EPSON Status Monitor 3 dialog box. See “Viewing information in Monitoring Preferences” on
page 26.
Viewing information in EPSON Status Monitor 3
EPSON Status Monitor 3 provides you with detailed printer status information, a graphic display
of the ink cartridge status and the free space of the maintenance cartridge, and status messages. If a
problem occurs during printing, an error message appears. Check the message and solve the
problem accordingly.
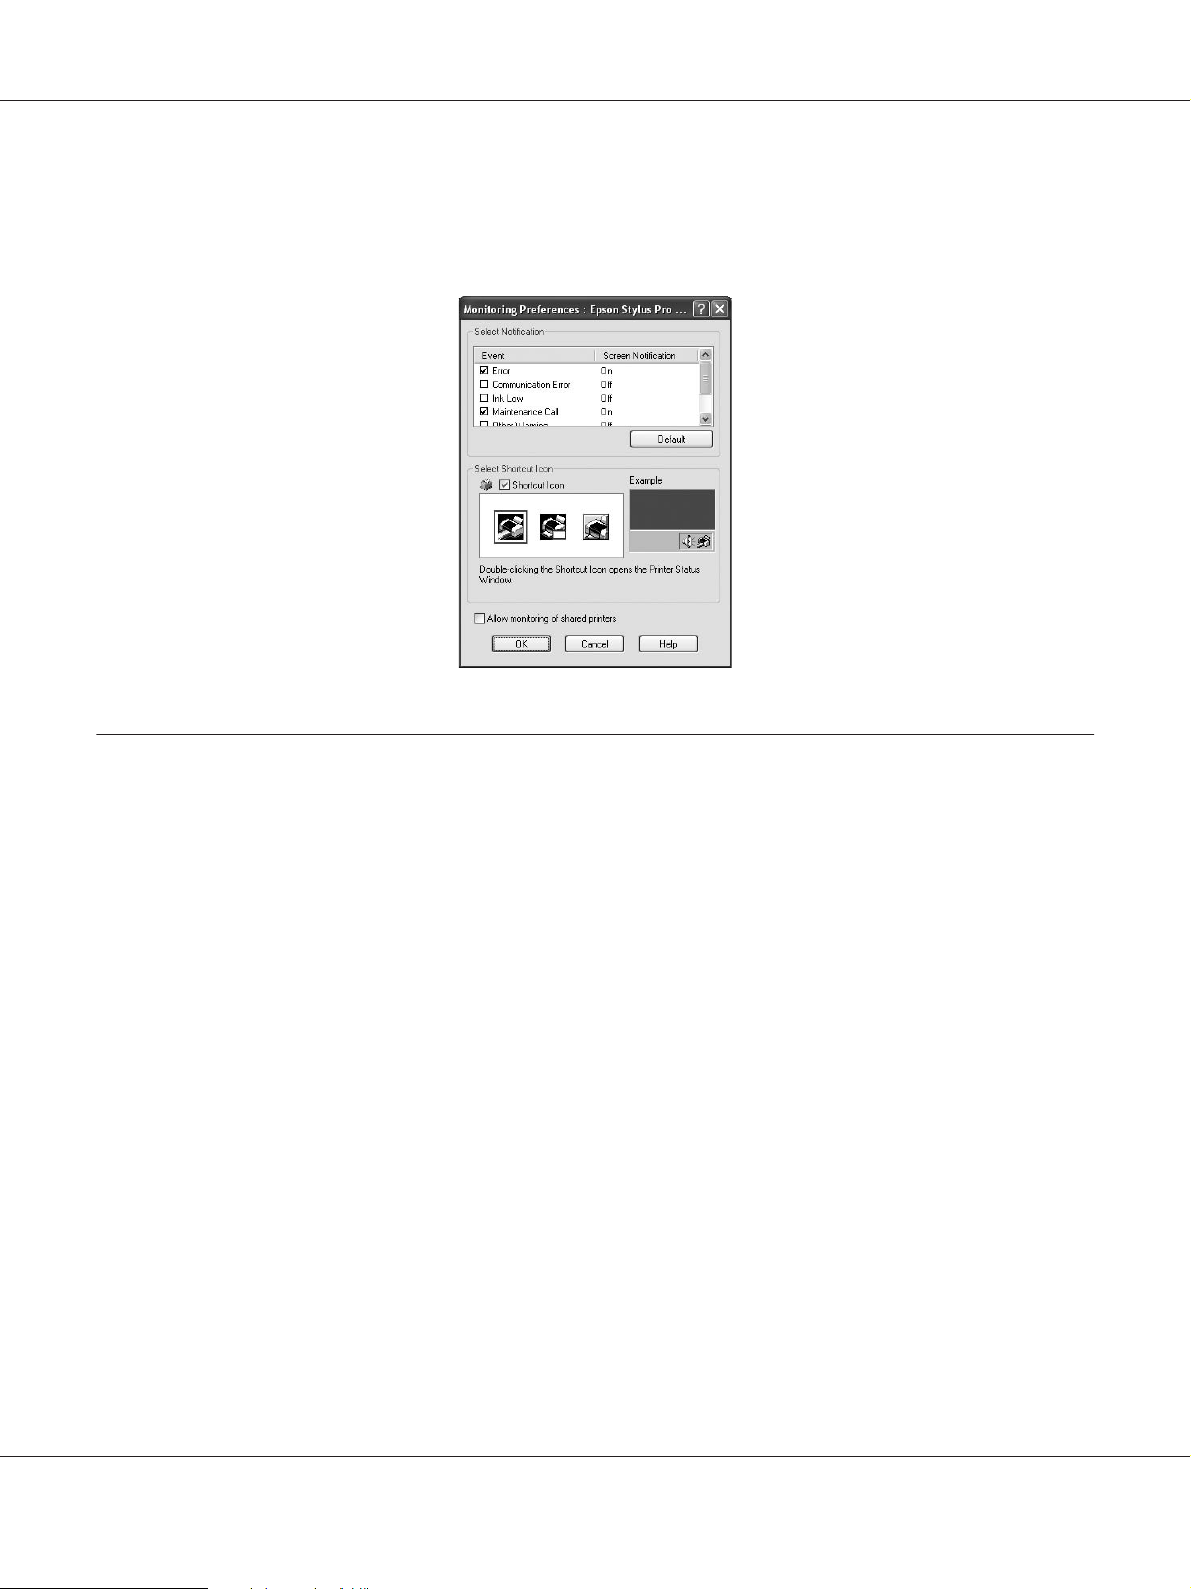
Using Monitoring Preferences
This function lets you specify the monitoring feature of EPSON Status Monitor 3.
Using the Printer Software (Windows) 24
Page 25
Epson Stylus Pro 3880 User’s Guide
Accessing Monitoring Preferences
Open the printer driver window, click the Utility tab, and then click Monitoring Preferences.
Note:
In the Monitoring Preferences dialog box, select the Shortcut Icon check box to display a shortcut
icon on your Windows taskbar. Right-click the shortcut icon, and select Monitoring Preferences to
open the Monitoring Preferences dialog box.
Using the Printer Software (Windows) 25
Page 26
Epson Stylus Pro 3880 User’s Guide
Viewing information in Monitoring Preferences
In the Monitoring Preferences dialog box, you can select error types for which you wish to receive
notification, and you can make the shortcut icon setting and monitoring of shared printers setting.
Uninstalling the Printer Software
This section describes how to uninstall the printer software from your computer.
Note:
❏ For Windows XP/Vista, you must log in as a user with an Administrator account. When you
uninstall the printer software from Windows Vista, the password may be required. If you are
asked for the password, enter it and continue the operation.
❏ For Windows 2000, you must log in as a user with administrator rights (a user belonging to the
Administrators group).
Uninstalling the printer driver
To uninstall the printer driver, follow the steps below.
1. Turn off the printer, and unplug the interface cable connected with the computer and printer.
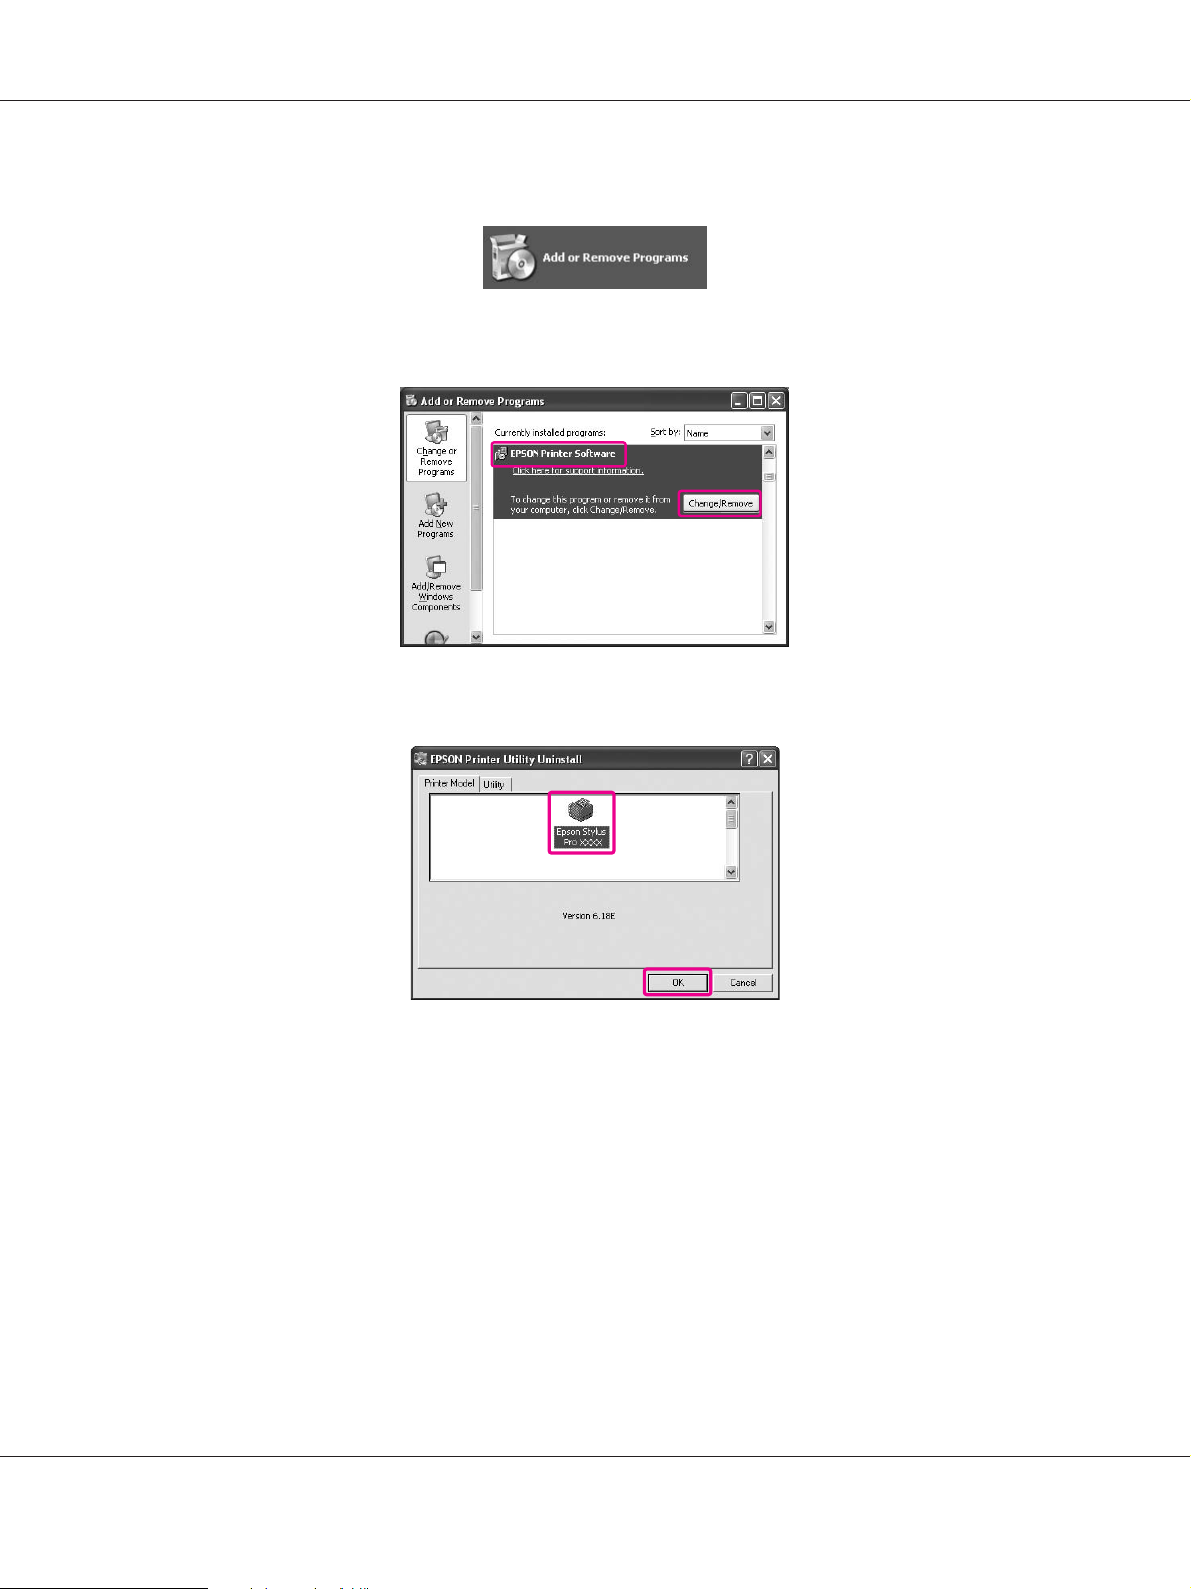
2. Click Add or Remove Programs (or Add/Remove Programs) in the Control Panel.
Using the Printer Software (Windows) 26
Page 27
Epson Stylus Pro 3880 User’s Guide
For Windows Vista, click Programs, and then Programs and Features in the Control Panel.
3. Select EPSON Printer Software, and then click Change/Remove (or Uninstall/Change).
4. Select the target printer icon, and then click OK.
5. Follow the on-screen instructions to complete uninstallation.
When the confirmation message appears, click Yes.
Restart the computer when you reinstall the printer driver.
Uninstalling EPSON LFP Remote Panel
EPSON LFP Remote Panel can be uninstalled from Add or Remove Programs (or Add/Remove
Programs) in the Control Panel. For detailed information, see the EPSON LFP Remote Panel
online help.
Using the Printer Software (Windows) 27
Page 28
Epson Stylus Pro 3880 User’s Guide
Chapter 2
Using the Printer Software (Mac OS X)
Printer Software Introduction
The printer software CD-ROM includes the following software. See the Start Here for installing
the software and its online help for detailed information for each software.
❏ Printer driver
❏ EPSON Printer Utility3
❏ EPSON StatusMonitor
❏ EPSON LFP Remote Panel
Printer driver
The printer driver lets you print documents from applications to the printer.
The following are main functions of the printer driver:
❏ Sends the print data to the printer.
❏ Makes the printer settings, such as the media type, paper size. You can register these settings,
and you can also easily import or export these registered settings.
Using the Printer Software (Mac OS X) 28
Page 29

Epson Stylus Pro 3880 User’s Guide
EPSON Printer Utility3
You can execute the printer maintenance functions, such as Nozzle Check, Head Cleaning.
EPSON Printer Utility3 is installed with the printer driver automatically.
EPSON StatusMonitor
This utility provides you with printer status information, such as the ink cartridge status, the free
space of the maintenance cartridge, and a printer error.
Using the Printer Software (Mac OS X) 29
Page 30
Epson Stylus Pro 3880 User’s Guide
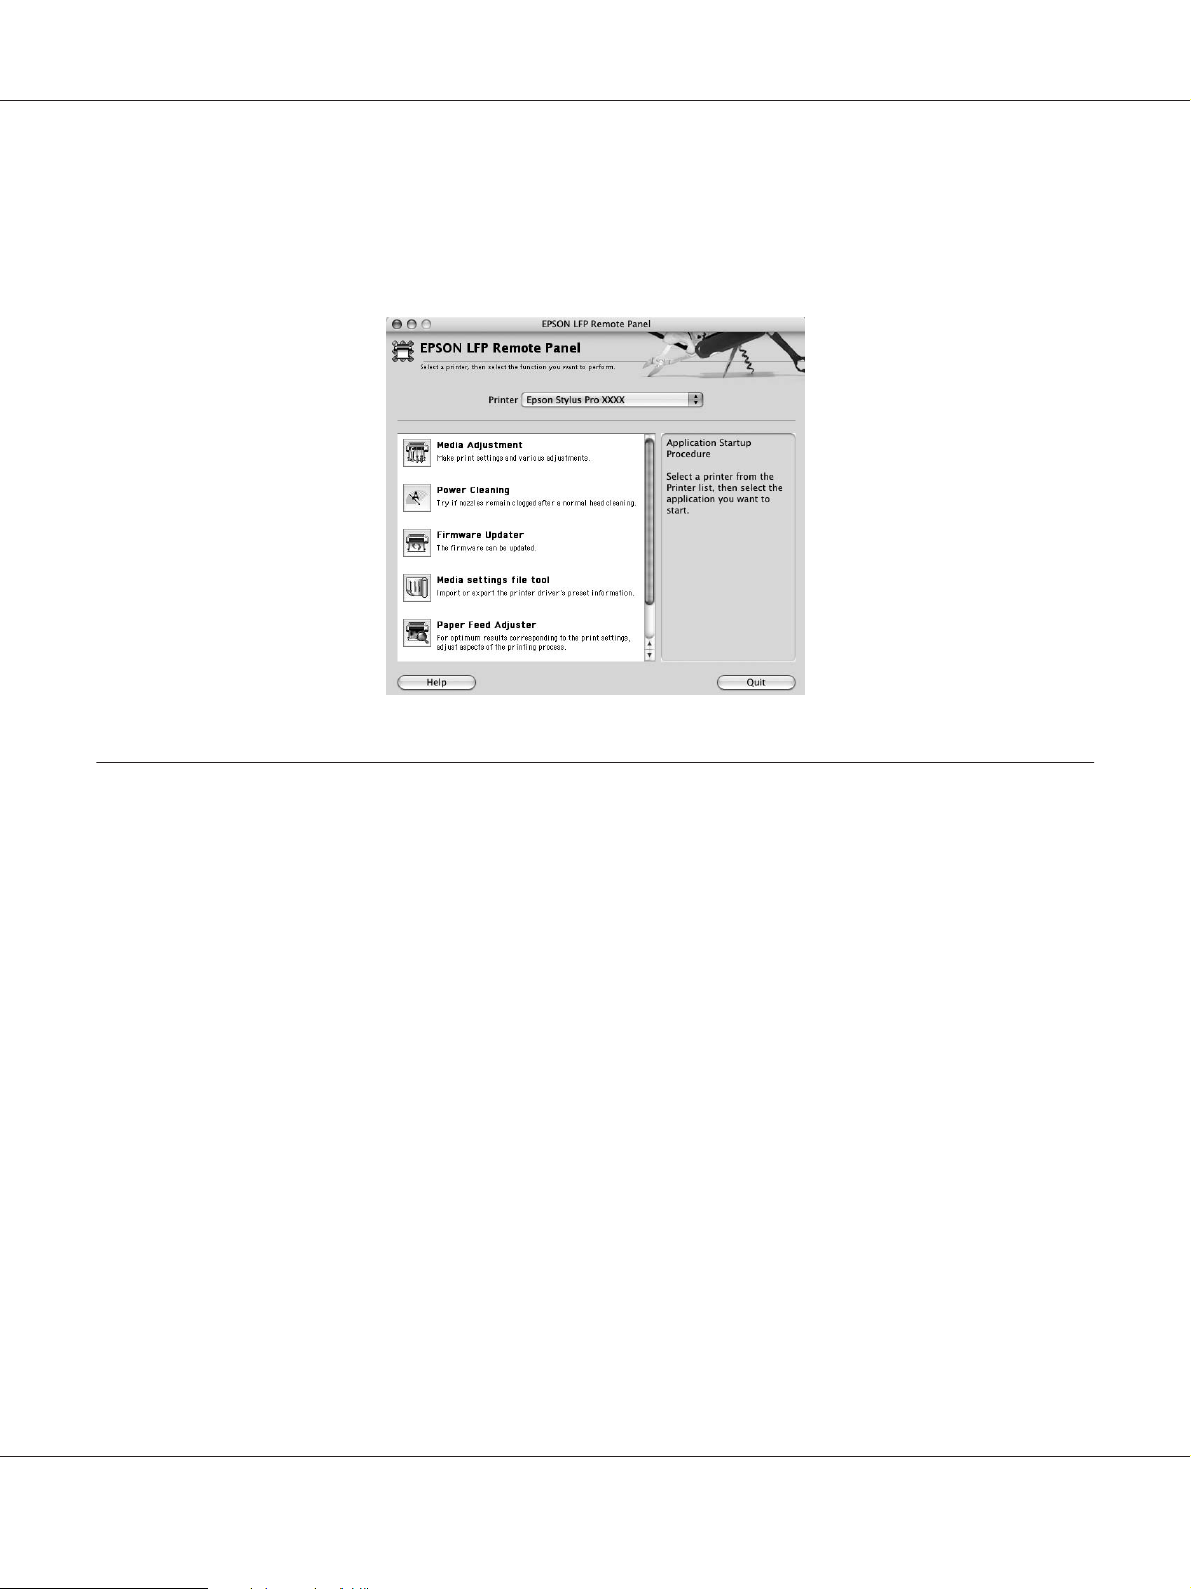
EPSON LFP Remote Panel
EPSON LFP Remote Panel gives the user a broad range of control over the printer, to obtain better
print quality in printing on various media.
Accessing the Printer Driver
To access the printer driver, follow the steps below. The following procedures may differ
depending on the application you use.
❏ Page Setup dialog
You can make the paper settings, such as media type, paper size.
❏ Print dialog
You can make the settings related to print quality.
Using the Printer Software (Mac OS X) 30
Page 31

Epson Stylus Pro 3880 User’s Guide
Accessing the Page Setup dialog
To access the Page Setup dialog, click Page Setup on the File menu of your application.
The Page Setup dialog is displayed.
You can select a paper size, borderless printing, a paper source, and a print area in the Paper Size
setting.
Note for Mac OS X 10.5 or later:
Depending on your application, the Page Setup menu may not appear on the File menu. If so, click
Print on the File menu of your application, select the appropriate settings.
Accessing the Print dialog
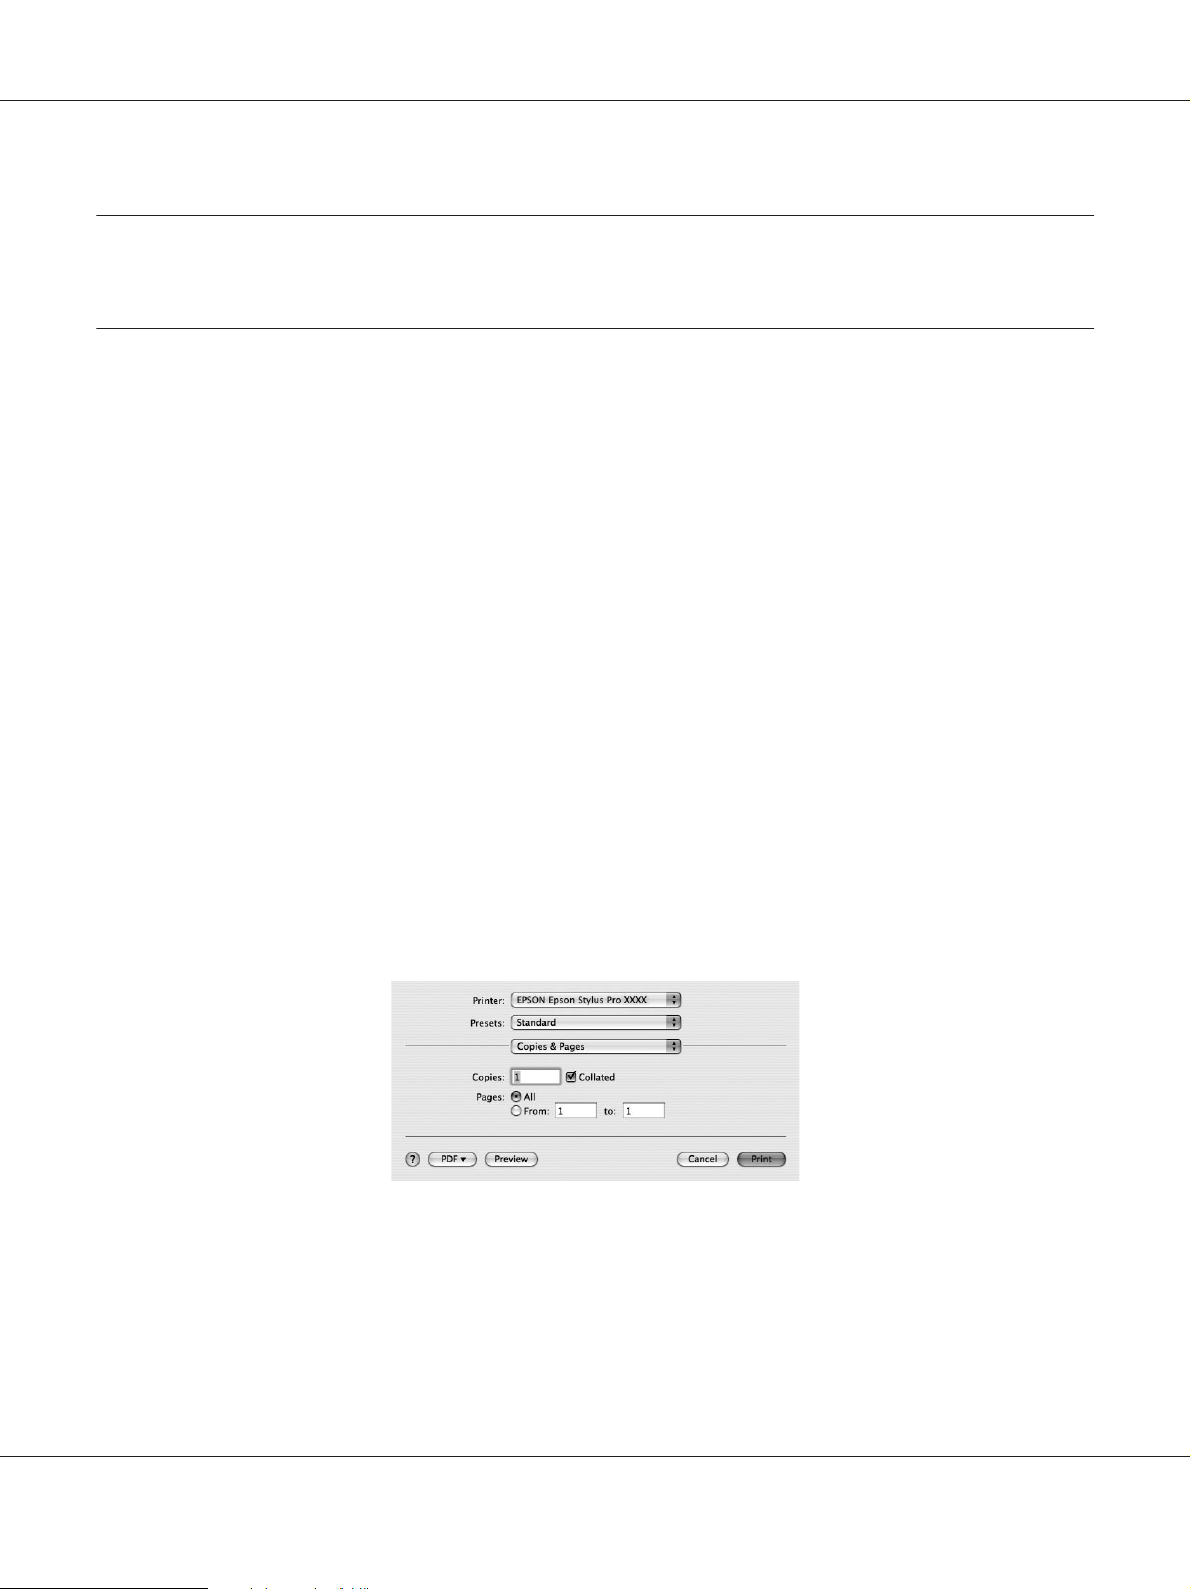
To access the Print dialog, click Print on the File menu of your application.
Using the Printer Software (Mac OS X) 31
Page 32

The Print dialog is displayed.
For Mac OS X (10.5 or later), click the button.
Epson Stylus Pro 3880 User’s Guide
Make the settings as necessary, and then start printing.
Note for Mac OS X 10.5 or later:
Depending on your application, you may have some of the same setting items as the Page Setup dialog.
Using the Printer Software (Mac OS X) 32
Page 33

Epson Stylus Pro 3880 User’s Guide
Getting Information Through Online Help
To access the online help, click the button in the dialog of the printer driver.
Basic Settings
This section describes how to print your data from an application using the Epson printer driver.
Using the Printer Software (Mac OS X) 33
Page 34

Epson Stylus Pro 3880 User’s Guide
Setting the printer driver
First, make the print data using the application software.
Before printing, open the printer driver window, and confirm the print settings such as the media
type, paper size.
Checking the printer status
1. Click the Printer icon in the Dock.
Using the Printer Software (Mac OS X) 34
Page 35

Epson Stylus Pro 3880 User’s Guide
2. You can check the jobs waiting and their information, and also cancel the printing.
Canceling printing
You can cancel a print job waiting from the computer. If the printing is already started, you can
cancel printing by the printer.
Canceling printing by the printer
Press and hold the Cancel/Reset + button for 3 seconds to reset the printer.
Even when it is printing a job, the printer is reset. After resetting, it takes a while before the printer
is in the ready state.
Note:
You cannot cancel a job waiting in the computer. To cancel a job waiting in the computer, see the
next section “Canceling printing by the computer” on page 35.
Canceling printing by the computer
1. Click the Printer icon in the Dock.
Using the Printer Software (Mac OS X) 35
Page 36

2. Click the job you want to delete, and then click Delete.
Note:
❏ You can delete a job waiting with the same procedures above.
Epson Stylus Pro 3880 User’s Guide
❏ You cannot cancel a print job that has been sent to the printer. In this case, cancel the print
job by the printer.
When problem occurs during printing
If a problem occurs during printing, an error message appears. If you are not sure how to solve the
problem, cancel printing, and then start EPSON StatusMonitor that leads you step by step through
a procedure to solve a problem.
Using the Printer Software (Mac OS X) 36
Page 37
Epson Stylus Pro 3880 User’s Guide
Using Printer Utilities
The Epson printer utilities let you check the current printer status and perform printer
maintenance from your screen.
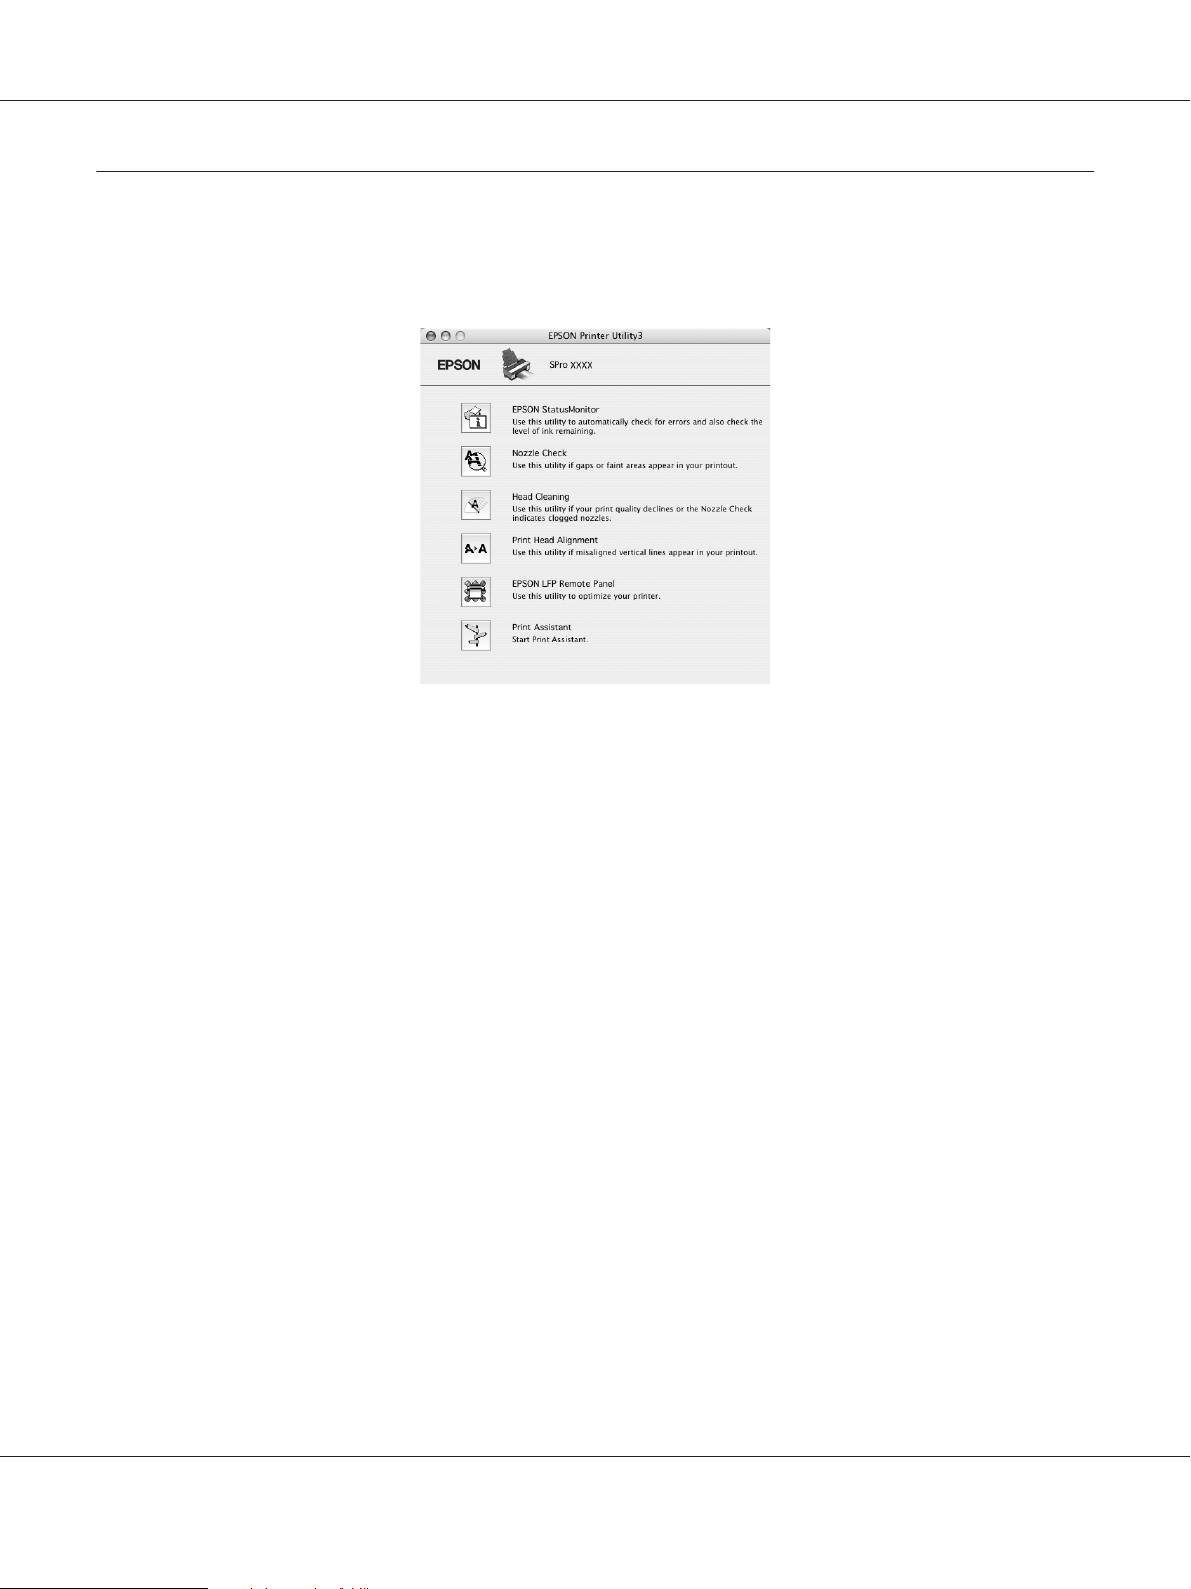
EPSON StatusMonitor
This utility provides you with printer status information, such as the ink cartridge status, the free
space of the maintenance cartridge, and a printer error.
Nozzle Check
This utility checks the print head nozzles to see if they are clogged and need to be cleaned. Check
the nozzles when you notice the print quality has declined and after cleaning to confirm that the
print head nozzles have been cleaned. If the print head nozzles are clogged, perform head cleaning.
Head Cleaning
This utility cleans the color and black print heads. You may need to clean the print head if you
notice the print quality has declined.
Note:
The cleaning process consumes ink of all ink cartridges at the same time. Even if you are using only
black inks, the head cleaning also consumes color inks.
Print Head Alignment
Using the Printer Software (Mac OS X) 37
Page 38

Epson Stylus Pro 3880 User’s Guide
This utility can be used to improve the print quality of your printed data. The alignment of the
print head may need to be adjusted if vertical lines appear out of alignment or if white or black
banding noise appear in your printed data. Use this utility to realign the print head.
EPSON LFP Remote Panel
This utility lets you optimize your printer. You can start this utility only if it is installed. See the
EPSON LFP Remote Panel online help for detailed information.
Print Assistant
You can access the User’s Guide. If the User’s Guide is not installed, it will access a technical
support Web site.
Accessing EPSON Printer Utility3
You can access the EPSON Printer Utility3 using the following way.
❏ Double-click the Applications folder, and then double-click the EPSON Printer Utility3 icon.
Using EPSON StatusMonitor
EPSON StatusMonitor provides you with detailed printer status information, a graphic display of
the ink cartridge status and the free space of the maintenance cartridge, and status messages.
Note:
The printer error message appears automatically on your screen even if EPSON StatusMonitor is not
opened.
Using the Printer Software (Mac OS X) 38
Page 39

Epson Stylus Pro 3880 User’s Guide
Accessing EPSON StatusMonitor
Open the EPSON Printer Utility3 window, and then click EPSON StatusMonitor.
Using the Printer Software (Mac OS X) 39
Page 40

Epson Stylus Pro 3880 User’s Guide
Viewing information in EPSON StatusMonitor
EPSON StatusMonitor provides you with detailed printer status information, a graphic display of
the ink cartridge status and the free space of the maintenance cartridge, and status messages. If a
problem occurs during printing, an error message appears. Check the message and solve the
problem accordingly.
Uninstalling the Printer Software
To uninstall the printer software, follow the steps below.
Using the Printer Software (Mac OS X) 40
Page 41

Epson Stylus Pro 3880 User’s Guide
Uninstalling the printer driver
To uninstall the printer driver and EPSON Printer Utility3, follow the steps below.
1. Turn off the printer, and unplug the interface cable connected with the computer and printer.
2. Close the all application software.
3. For Mac OS X (10.3.9 to 10.4):
Double-click the Applications folder, and then double-click the Utilities folder. Double-click
Printer Setup Utility icon.
Using the Printer Software (Mac OS X) 41
Page 42

Epson Stylus Pro 3880 User’s Guide
For Mac OS X (10.5 or later):
Double-click the Applications folder, and then double-click the System Preferences folder.
Then double-click the Print & Fax folder.
4. For Mac OS X (10.3.9 to 10.4):
Select the printer, and then click Delete.
Using the Printer Software (Mac OS X) 42
Page 43

For Mac OS X (10.5 or later):
Select the printer, and then click -.
Epson Stylus Pro 3880 User’s Guide
After clicking Delete, close the dialog.
5. Insert the printer software CD-ROM into the CD-ROM drive.
6. Double-click the Printer Driver folder.
Note:
If the folder does not appear, double-click the EPSON icon on the desk top.
Using the Printer Software (Mac OS X) 43
Page 44

Epson Stylus Pro 3880 User’s Guide
7. Double-click the EPSON_IJ_Printer icon.
8. If the Authenticate dialog appears, enter the password or phrase and then click OK.
To uninstall the printer driver, you must log in as a user with administrator rights.
9. Click Continue, and then click Agree.
10. Select Uninstall from the pull-down menu, and then click the Uninstall button.
11. Follow the on-screen instructions to uninstall the printer driver.
Using the Printer Software (Mac OS X) 44
Page 45

Epson Stylus Pro 3880 User’s Guide
Uninstalling EPSON LFP Remote Panel
Drag the EPSON LFP Remote Panel folder to the Trash. See the EPSON LFP Remote Panel
online help for more information.
Using the Printer Software (Mac OS X) 45
Page 46

Epson Stylus Pro 3880 User’s Guide
Chapter 3
Variety of Printings
Auto Color Adjustment by PhotoEnhance (Windows only)
When using PhotoEnhance, you can adjust the color of the prints depending on the types of
subject, such as people, landscape, or night scene. It can also convert color data to gray print or
sepia print. The printer driver performs color adjustment automatically when selecting your
desired mode. PhotoEnhance is Epson's proprietary technology that uses the color reproduction
range of the printer effectively to ensure the image data is output with beautiful balanced color.
1. If the application supports color management, refer to the table below to adjust color
management settings in the application.
Application Setting of Color management
Adobe Photoshop CS3/CS4
Adobe Photoshop Lightroom
Adobe Photoshop Elements 6/7
Other Applications No Color Management
Printer Manages Colors
Using Adobe Photoshop CS3
2. Open the File menu and select Print.
Variety of Printings 46
Page 47

Epson Stylus Pro 3880 User’s Guide
3. Select Color Management. In the Print section, select Document and choose Printer
Manages Colors for Color Handling. Click Print.
When using this function with an application which does not support a color management
function, you need to perform the color matching process from step 4.
4. Open the printer driver window.
See “From Windows applications” on page 11
Variety of Printings 47
Page 48

Epson Stylus Pro 3880 User’s Guide
5. Click Custom for the Mode in the Main menu, and select PhotoEnhance, and then click
Advanced.
6. In the PhotoEnhance dialog box, select the effect settings.
See the online help of the printer driver for detailed information.
7. Check other settings, and then start printing.
Color Adjustment by the Printer Driver
You can adjust colors using the printer driver during printing by setting one of the following two
color systems.
❏ EPSON Standard (sRGB)
❏ Adobe RGB
Variety of Printings 48
Page 49

Epson Stylus Pro 3880 User’s Guide
Furthermore, when you set manual color adjustment (by selecting Custom for Windows or
Advanced Settings for Mac OS X), you can perform fine tuning of the color and brightness. Use
this function if the application does not support color management.
For Windows
1. If the application supports color management, refer to the table below to adjust color
management settings in the application.
Application Setting of Color management
Adobe Photoshop CS3/CS4
Adobe Photoshop Lightroom
Adobe Photoshop Elements 6/7
Other Applications No Color Management
Printer Manages Colors
Using Adobe Photoshop CS3
2. Open the File menu and select Print.
Variety of Printings 49
Page 50

Epson Stylus Pro 3880 User’s Guide
3. Select Color Management. In the Print section, select Document and choose Printer
Manages Colors for Color Handling. Click Print.
When using this function with an application which does not support a color management
function, you need to perform the color matching process from step 4.
4. Open the printer driver window.
See “From Windows applications” on page 11
5. In the Main menu, select Automatic or Custom.
6. Select the method for the color adjustment.
Variety of Printings 50
Page 51

Epson Stylus Pro 3880 User’s Guide
If you select Custom for the Mode to set manually, select Color Controls, and then click
Advanced.
7. Make the necessary settings.
See the online help of the printer driver for detailed information.
Note:
You can perform the color adjustment by checking the sample image on the left side of the
window. You can also use the color circle for the fine color adjustment.
8. Check other settings, and then start printing.
Variety of Printings 51
Page 52

Epson Stylus Pro 3880 User’s Guide
For Mac OS X
1. If the application supports color management, refer to the table below to adjust color
management settings in the application.
Application Setting of Color management
Mac OS X v10.5 Mac OS X v10.3.9 to v10.4
Adobe Photoshop CS3/CS4
Adobe Photoshop Lightroom
Adobe Photoshop Elements 6
Other Applications No Color Management No Color Management
Printer Manages Colors No Color Management
Using Adobe Photoshop CS3
2. Open the File menu and select Print.
Variety of Printings 52
Page 53

Epson Stylus Pro 3880 User’s Guide
3. Select Color Management. In the Print section, select Document and choose Printer
Manages Colors for Color Handling. Click Print.
When using this function with an application which does not support a color management
function, you need to perform the color matching process from step 4.
4. Open the Print dialog.
See “Accessing the Print dialog” on page 31
5. For Mac OS X 10.5, select Color Matching, and then select EPSON Color Controls.
Variety of Printings 53
Page 54

Epson Stylus Pro 3880 User’s Guide
Note:
When using Adobe Photoshop CS3/CS4, Adobe Photoshop Lightroom and Adobe Photoshop
Elements 6 in Mac OS X 10.5, select EPSON Color Controls in Step 1.
6. Open the advanced settings dialog.
For Mac OS X 10.5:
Select Print Settings, and change Color Settings if necessary. If you adjust the color manually,
click Advanced Color Settings.
Note:
If you use Adobe Photoshop CS3/CS4, Adobe Photoshop Lightroom and Adobe Photoshop
Elements 6 for Mac OS X 10.5, clear the Use Generic RGB checkbox. When you use another
application, select the checkbox.
Variety of Printings 54
Page 55

Epson Stylus Pro 3880 User’s Guide
For Mac OS X 10.3.9 to 10.4:
Select Printer Color Management, and click Color Controls, and then click Advanced
Settings.
7. Make the necessary settings.
See the online help of the printer driver for detailed information.
For Mac OS X 10.5:
Variety of Printings 55
Page 56

For Mac OS X 10.3.9 to 10.4:
Epson Stylus Pro 3880 User’s Guide
8. Check other settings, and then start printing.
Black-and-White Photo Printing
Advanced black-and-white photo printing is available in the Color Controls dialog, allowing color
images to be printed in black-and-white without first converting them to monochrome in the
imaging application. The print image is adjusted without affecting the original data.
Note:
Even in Advanced B&W Photo and Black modes, ink from all cartridges is used to keep the print
heads in good condition.
You need to use the media that is suitable for black-and-white photo printing.
See “Paper Information” on page 194 for detailed information.
For Windows
1. If the application supports color management, refer to the table below to adjust color
management settings in the application.
Variety of Printings 56
Page 57

Application Setting of Color management
Epson Stylus Pro 3880 User’s Guide
Adobe Photoshop CS3/CS4
Adobe Photoshop Lightroom
Adobe Photoshop Elements 6/7
Other Applications No Color Management
Printer Manages Colors
Using Adobe Photoshop CS3
2. Open the File menu and select Print.
Variety of Printings 57
Page 58

Epson Stylus Pro 3880 User’s Guide
3. Select Color Management. In the Print section, select Document and choose Printer
Manages Colors for Color Handling. Click Print.
When using this function with an application which does not support a color management
function, you need to perform the color matching process from step 4.
4. Open the printer driver window.
See “From Windows applications” on page 11
Variety of Printings 58
Page 59

5. Select Advanced B&W Photo for the Color.
Epson Stylus Pro 3880 User’s Guide
6. Click Custom for the Mode in the Main menu, and select Color Controls, and then click
Advanced.
7. Make the necessary settings, and then start printing.
Variety of Printings 59
Page 60

For more detailed information, see the online help of the printer driver.
8. Check other settings, and then start printing.
Epson Stylus Pro 3880 User’s Guide
For Mac OS X
1. If the application supports color management, refer to the table below to adjust color
management settings in the application.
Application Setting of Color management
Mac OS X v10.5 Mac OS X v10.3.9 to v10.4
Adobe Photoshop CS3/CS4
Adobe Photoshop Lightroom
Adobe Photoshop Elements 6
Other Applications No Color Management No Color Management
Using Adobe Photoshop CS3
Printer Manages Colors No Color Management
Variety of Printings 60
Page 61

2. Open the File menu and select Print.
Epson Stylus Pro 3880 User’s Guide
3. Select Color Management. In the Print section, select Document and choose Printer
Manages Colors for Color Handling. Click Print.
When using this function with an application which does not support a color management
function, you need to perform the color matching process from step 4.
4. Open the Print dialog.
Variety of Printings 61
Page 62

Epson Stylus Pro 3880 User’s Guide
See “Accessing the Print dialog” on page 31
5. Select Print Settings, and select Advanced B&W Photo for the Color.
For Mac OS X 10.5:
Note:
If you use Adobe Photoshop CS3/CS4, Adobe Photoshop Lightroom and Adobe Photoshop
Elements 6 for Mac OS X 10.5, clear the Use Generic RGB checkbox. When you use another
application, select the checkbox.
Variety of Printings 62
Page 63

For Mac OS X 10.3.9 to 10.4:
6. Open the advanced settings dialog.
Epson Stylus Pro 3880 User’s Guide
For Mac OS X 10.5:
Click Advanced Color Settings.
Variety of Printings 63
Page 64

For Mac OS X 10.3.9 to 10.4:
Select Printer Color Management.
Epson Stylus Pro 3880 User’s Guide
7. Make the necessary settings.
For more detailed information, see the online help of the printer driver.
For Mac OS X 10.5:
Variety of Printings 64
Page 65

For Mac OS X 10.3.9 to 10.4:
Epson Stylus Pro 3880 User’s Guide
8. Check other settings, and then start printing.
Borderless Printing
You can print your data without margins on paper. There are two types of borderless printing.
Note:
All four sides can be borderless on a sheet of paper.
❏ Auto Expand
Enlarge the size of print data automatically and print without margins. Enlarged areas that
exceed the paper size will not be printed on the paper.
Variety of Printings 65
Page 66

Epson Stylus Pro 3880 User’s Guide
❏ Retain Size
Using an application, enlarge your image data to exceed the paper width and height, to avoid
unprinted areas appearing along the four edges. The printer driver does not enlarge the image
data.
Select this setting if you do not want to change the ratio of your print data by the printer driver.
Supported media type
The following media sizes are supported for borderless printing.
Paper width
Letter (8.5 × 11 in)
US B (11 × 17 in)
US C (17 × 22 in)
A4 (210 × 297 mm)
A3 (297 × 420 mm)
Super A3 (329 × 483 mm)
A2 (420 × 594 mm)
89 × 127 mm (3.5 × 5 in)
102 × 152 mm (4 × 6 in)
127 × 178 mm (5 × 7 in)
16:9 wide size (102 × 181 mm)
Variety of Printings 66
Page 67

Epson Stylus Pro 3880 User’s Guide
Paper width
203 × 254 mm (8 × 10 in)
254 × 305 mm (10 × 12 in)
279 × 356 mm (11 × 14 in)
406 × 508 mm (16 × 20 in)
Note:
❏ If your application has margin settings, make sure they are set to zero before printing.
❏ The ink may contaminate the platen of the printer. In this case, wipe the ink away using a cloth.
❏ Printing with this feature takes longer time than normal printing.
❏ Smear may result in the top and bottom areas depending on the media.
❏ If you select Manual-Front for the Paper Source, the Borderless check box does not appear.
❏ Borderless printing is not supported when the PAPER SIZE CHECK setting is off. Make sure that
ON is selected for PAPER SIZE CHECK on the printer’ s control panel.
Depending on the media type, the print quality may decline or the borderless printing is not
supported. See “Paper Information” on page 194 for detailed information.
Application settings
Set the size of the image data using the Page Setting dialog box of the application software.
For Auto Expand
❏ Set the same paper size as used for printing.
❏ If your application has margin settings, set the margin to 0 mm.
❏ Make the image data as large as the paper size.
For Retain Size
❏ Set the Image size 5 mm wider in all four directions using the application that created the data.
❏ If your application has margin settings, set the margin to 0 mm.
❏ Make the image data as large as the paper size.
Variety of Printings 67
Page 68

Epson Stylus Pro 3880 User’s Guide
Printer driver settings
To print your data with this feature, follow the steps below.
For Windows
1. Open the printer driver window.
See “Accessing the Printer Driver” on page 11.
2. In the Main menu, select the media type, paper source, page size, or paper size.
Variety of Printings 68
Page 69

3. Select Borderless, and then click Expansion.
Epson Stylus Pro 3880 User’s Guide
4. Select Auto Expand or Retain Size. If you select Auto Expand, you can change the amount
of enlargement.
Max In the case of A2 size, about 5 mm for bottom, 3.3 mm for top, and 4.5 mm for left and right
Mid Half of Max
Min 0 mm
Note:
Moving the slider towards Min decreases the amount of the image enlargement; however, as this
amount decreases, margins may appear on one or more sides of the paper.
5. Check the other settings, and then start printing.
Variety of Printings 69
Page 70

Epson Stylus Pro 3880 User’s Guide
For Mac OS X
1. Open the Page Setup dialog.
See “Accessing the Printer Driver” on page 30.
2. Select the paper size and borderless printing such as Auto Expand or Retain Size, and then
click OK.
3. Open the Print dialog.
See “Accessing the Printer Driver” on page 30.
4. If Auto Expand is selected, you can change the amount of the enlargement in the Print Layout
Settings dialog (10.5 or later) or Expansion dialog (10.3.9 to 10.4).
Max In the case of A2 size, about 5 mm for bottom, 3.3 mm for top, and 4.5 mm for left and right
Mid Half of Max
Min 0 mm
Variety of Printings 70
Page 71

Epson Stylus Pro 3880 User’s Guide
Mac OS X (10.5 or later)
Note:
Moving the slider towards Min decreases the amount of the image enlargement; however, as this
amount decreases, margins may appear on one or more sides of the paper.
Mac OS X (10.3.9 to 10.4)
Variety of Printings 71
Page 72

5. In the Print Settings dialog, select the media type.
Epson Stylus Pro 3880 User’s Guide
6. Check the other settings, and then start printing.
Enlarge or Reduce Size Printing
You can fit the size of your data to the size of paper you print on. There are two ways to enlarge or
reduce the size of your data.
Variety of Printings 72
Page 73

Epson Stylus Pro 3880 User’s Guide
❏ Fit to Page (Windows only)
Proportionally enlarges or reduces the size of your data to make it fit the paper size you have
selected in the Output Paper list.
❏ Custom
Lets you define the percentage you want to enlarge or reduce a data.
Fit to Page (Windows only)
You can fit the size of your data to the size of paper you to print on.
1. Open the printer driver window.
See “Accessing the Printer Driver” on page 11.
Variety of Printings 73
Page 74

Epson Stylus Pro 3880 User’s Guide
2. Click the Page Layout tab, and then select the same paper size as the paper size of the data.
3. Select the paper size that is loaded in the printer from the Output Paper list.
Proportionally enlarges or reduces the size of your data to make it fit the paper size you have
selected for the Output Paper.
4. Check the other settings, and then start printing.
Variety of Printings 74
Page 75

Epson Stylus Pro 3880 User’s Guide
Custom
Lets you define the percentage you want to reduce or enlarge.
For Windows
1. Open the printer driver window.
See “Accessing the Printer Driver” on page 11.
2. Click the Page Layout tab, and then select the same paper size as the paper size of the data.
3. Select the paper size that is loaded in the printer from Output Paper.
4. Select Reduce/Enlarge, and then click Custom.
Click the arrows next to the Scale box to select a proportion from 10 to 650%.
5. Check the other settings, and then start printing.
For Mac OS X
1. Open the Page Setup dialog.
See “Accessing the Printer Driver” on page 30.
Variety of Printings 75
Page 76

2. Select the printer and paper size that is loaded in the printer.
3. Set the value for Scale.
For Mac OS X 10.5: 1 to 10000%
For Mac OS X 10.3.9 to 10.4: 1 to 400%
Epson Stylus Pro 3880 User’s Guide
4. Check the other settings, and then start printing.
Pages Per Sheet Printing
You can print two or four pages of your document on one sheet of paper.
If you print continuous layout data prepared at A4 size, it will be printed as shown below.
Variety of Printings 76
Page 77

Epson Stylus Pro 3880 User’s Guide
Note:
❏ For Windows users, use the printer driver’s function for layout printing. For Mac OS X, use the
standard feature of the operating system for layout printing.
❏ You cannot use the Multi-Page function of Windows printer driver if you are using borderless
printing.
❏ For Windows users, using the Fit to Page function, you can print the data on different sizes of
paper.
See “Enlarge or Reduce Size Printing” on page 72.
For Windows
1. Open the printer driver window.
See “Accessing the Printer Driver” on page 11.
2. Click the Page Layout tab, select the Multi-Page check box, select N-up, and then click
Settings.
Variety of Printings 77
Page 78

Epson Stylus Pro 3880 User’s Guide
3. In the Print Layout dialog box, specify the order in which the pages will be printed.
To print frames around the pages printed on each sheet, check the Print page frames check
box.
4. Check the other settings, and then start printing.
For Mac OS X
1. Open the Print dialog.
See “Accessing the Printer Driver” on page 30.
2. Select Layout from the list to specify the order in which the pages will be printed.
Note:
If you select other than None for Border, the frames around the pages are printed on each sheet.
3. Check the other settings, and then start printing.
Variety of Printings 78
Page 79

Epson Stylus Pro 3880 User’s Guide
Poster Printing (Windows only)
The poster printing function allows you to print poster-size images by enlarging one page to cover
several sheets of paper. This function is supported by Windows only. You can make a poster or a
calendar by joining the several printed sheets of paper together. Poster printing is available up to
16-fold of the normal printing (four sheets by four sheets.) The poster printing supports following
two types.
❏ Borderless poster printing
You can print a borderless poster-size image by automatically enlarging one page to cover
several sheets of paper. You can make a poster just by joining the several printed sheets of
paper together.
❏ Poster printing with margins
You can print a poster-size image by automatically enlarging one page to cover several sheets
of paper. You need to cut the margins and then join the several sheets of paper together to
make a poster.
1. Prepare the print data by using an application.
The printer driver automatically enlarges the image data during printing.
2. Open the printer driver window.
Variety of Printings 79
Page 80

Epson Stylus Pro 3880 User’s Guide
See “Accessing the Printer Driver” on page 11.
3. Click the Page Layout tab, select the Multi-Page check box, select Poster, and then click
Settings.
4. In the Poster Settings dialog box, select the number of printed pages you want the poster to cover.
Note:
You can make a larger poster if you select a greater number for division.
Variety of Printings 80
Page 81

Epson Stylus Pro 3880 User’s Guide
5. When you want to print a borderless poster, select the Borderless Poster Print check box,
and select the panels that you do not want to print, and then click OK. Then go to step 6.
6. If you want margins around the poster, make sure the Borderless Poster Print check box is
cleared, and make the other settings as necessary.
Note:
Regarding the size when the parts are joined together:
The finished size whether Trim Lines is selected or not is the same. However, if Print Cutting
Guides is selected, the finished size is smaller by the amount of the overlap.
7. Check the other settings, and then start printing.
Joining the sheets together along the guide
The steps to join the sheets together are different whether the printed sheets are borderless or not.
Variety of Printings 81
Page 82

Epson Stylus Pro 3880 User’s Guide
For borderless poster printing
This section explains how to join the four printed pages together. Join the printed pages together
appropriately, and stick them on the back of sheets using the cellophane tape.
Join them by the following order indicated in the illustration below.
Borderless poster printing may not produce a set of complete partial images which can be used to
assemble a poster. If you want a more complete poster, try the Poster printing with margins feature.
For poster printing with margins
When you select Overlapping Alignment Marks, the following marks are printed on the paper.
See the procedures below to join the four printed pages together using the alignment marks.
Variety of Printings 82
Page 83

Epson Stylus Pro 3880 User’s Guide
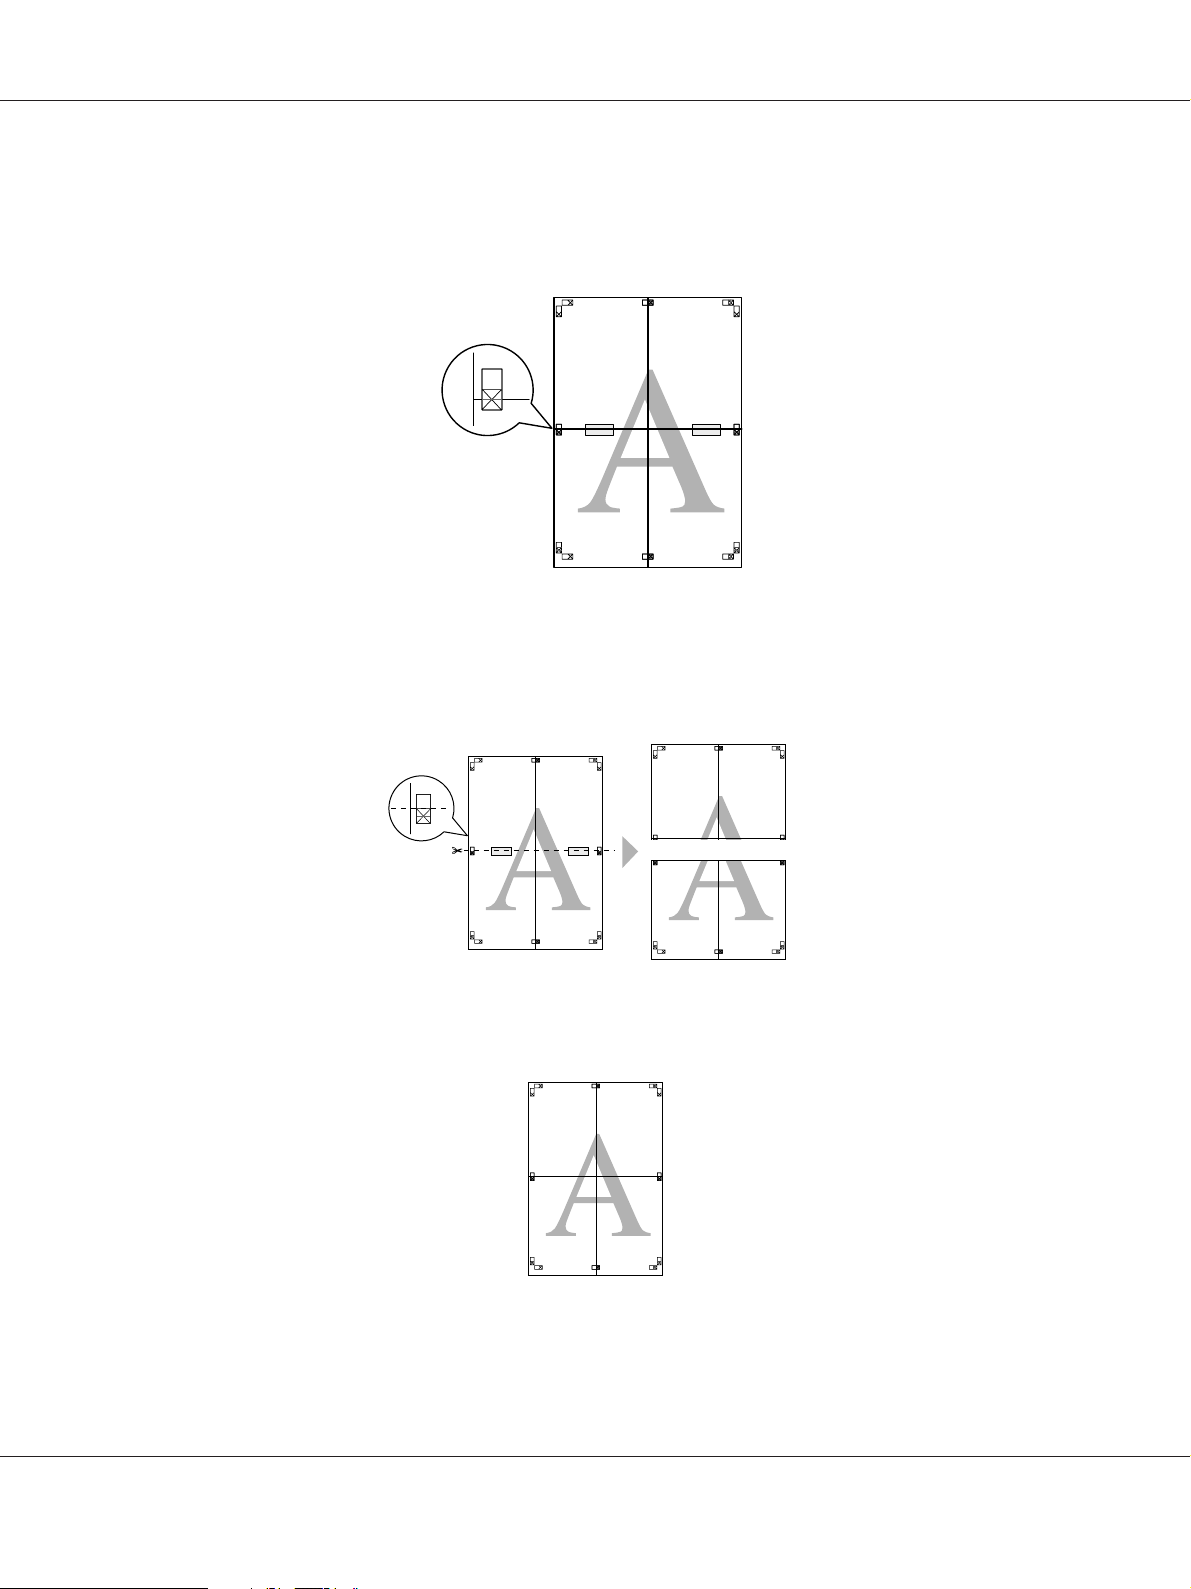
The four sheets are joined together by the following order.
1. Cut the upper left sheet along the alignment mark (vertical blue line).
The guide is black for the black-and-white printing.
2. Lay the upper left sheet on top of the upper right sheet. The X marks should be matched as in
the illustration below, and join the upper left sheet to the upper right sheet with cellophane
tape temporarily.
3. Cut the upper sheets along the alignment mark (vertical red line).
Variety of Printings 83
Page 84

Epson Stylus Pro 3880 User’s Guide
The guide is black for the black-and-white printing.
4. Join the upper left and right sheets together with cellophane tape on the back of the sheets.
5. Try step 1 to 4 for the lower sheets.
6. Cut the bottom of upper sheets along the alignment mark (horizontal blue line).
The guide is black for the black-and-white printing.
Variety of Printings 84
Page 85
Epson Stylus Pro 3880 User’s Guide
7. Lay the upper sheets on top of the lower sheets. The X marks should be matched as in the
illustration below, and join the upper sheets and lower sheets together with cellophane tape
temporarily.
8. Cut the sheets along the alignment mark (horizontal red line).
The guide is black for black-and-white printing.
9. Join the upper sheets and lower sheets together with cellophane tape on the back of the sheets.
Variety of Printings 85
Page 86

Epson Stylus Pro 3880 User’s Guide
10. After joining all the sheets together, cut the margins along the outer guide.
Double-Sided Printing
You can perform double-sided printing. There are two types of double-sided printing available.
Standard double-sided printing allows you to print the odd-numbered pages first. Once these
pages are printed, the paper can be reloaded for printing the even-numbered pages onto the
opposite side of the paper.
You can also perform Folded Booklet double-sided printing. It lets you make single-fold booklets.
Note:
❏ The double-sided printing feature is not available when the printer is accessed over a network or
used as a shared printer or your system is not configured to support bi-directional communication.
❏ Only use media types that are suitable for double-sided printing; otherwise, the print quality may
deteriorate.
❏ Depending on the type of paper and the amount of ink used to print text and images, ink may
bleed through to the other side of the paper.
❏ The surface of the paper may be smeared during double-sided printing.
❏ This function is available only when Sheet is selected as the Paper Source setting.
Standard double-sided printing
To print odd and even numbered pages on the opposite sides of a sheet, follow the steps below.
1. Open the printer driver window.
Variety of Printings 86
Page 87

Epson Stylus Pro 3880 User’s Guide
See “Accessing the Printer Driver” on page 11.
2. Click the Page Layout tab, select the Double-Sided Printing check box, and then click
Margins.
3. Specify the edge of the paper where binding will be placed. You can choose Left, Top, or
Right. Then, specify the width of the binding margin, using the Binding Margin text box. You
can specify any width from 3 to 30 mm (0.12 to 1.18 inches).
Note:
The actual binding margin may vary depending on the settings specified in your application. We
recommend that you test the print quality before printing the entire job.
4. Click OK to return to the Page Layout menu, and then click OK to save your settings.
5. Make sure paper is loaded, and then send a print job from your application. Instructions for
generating the even-numbered pages will be displayed while the odd-numbered pages are output.
Variety of Printings 87
Page 88

Epson Stylus Pro 3880 User’s Guide
6. Follow the on-screen instructions and reload the paper.
Note:
❏ The paper may curl during printing due to the amount of ink used. If this problem occurs,
slightly curl the sheets in the opposite direction prior to reloading them into the printer.
❏ Align the sheet stack by tapping its edges against a hard, flat surface prior to reloading the
stack into the printer.
❏ Follow the instructions provided when reloading the printouts. Paper jams or improperly
placed binding margins may occur if the printouts are not reloaded correctly.
❏ In the event of a paper jam, see “Clearing paper jams” on page 191.
7. Once the paper is reloaded, click Resume to print the even-numbered pages.
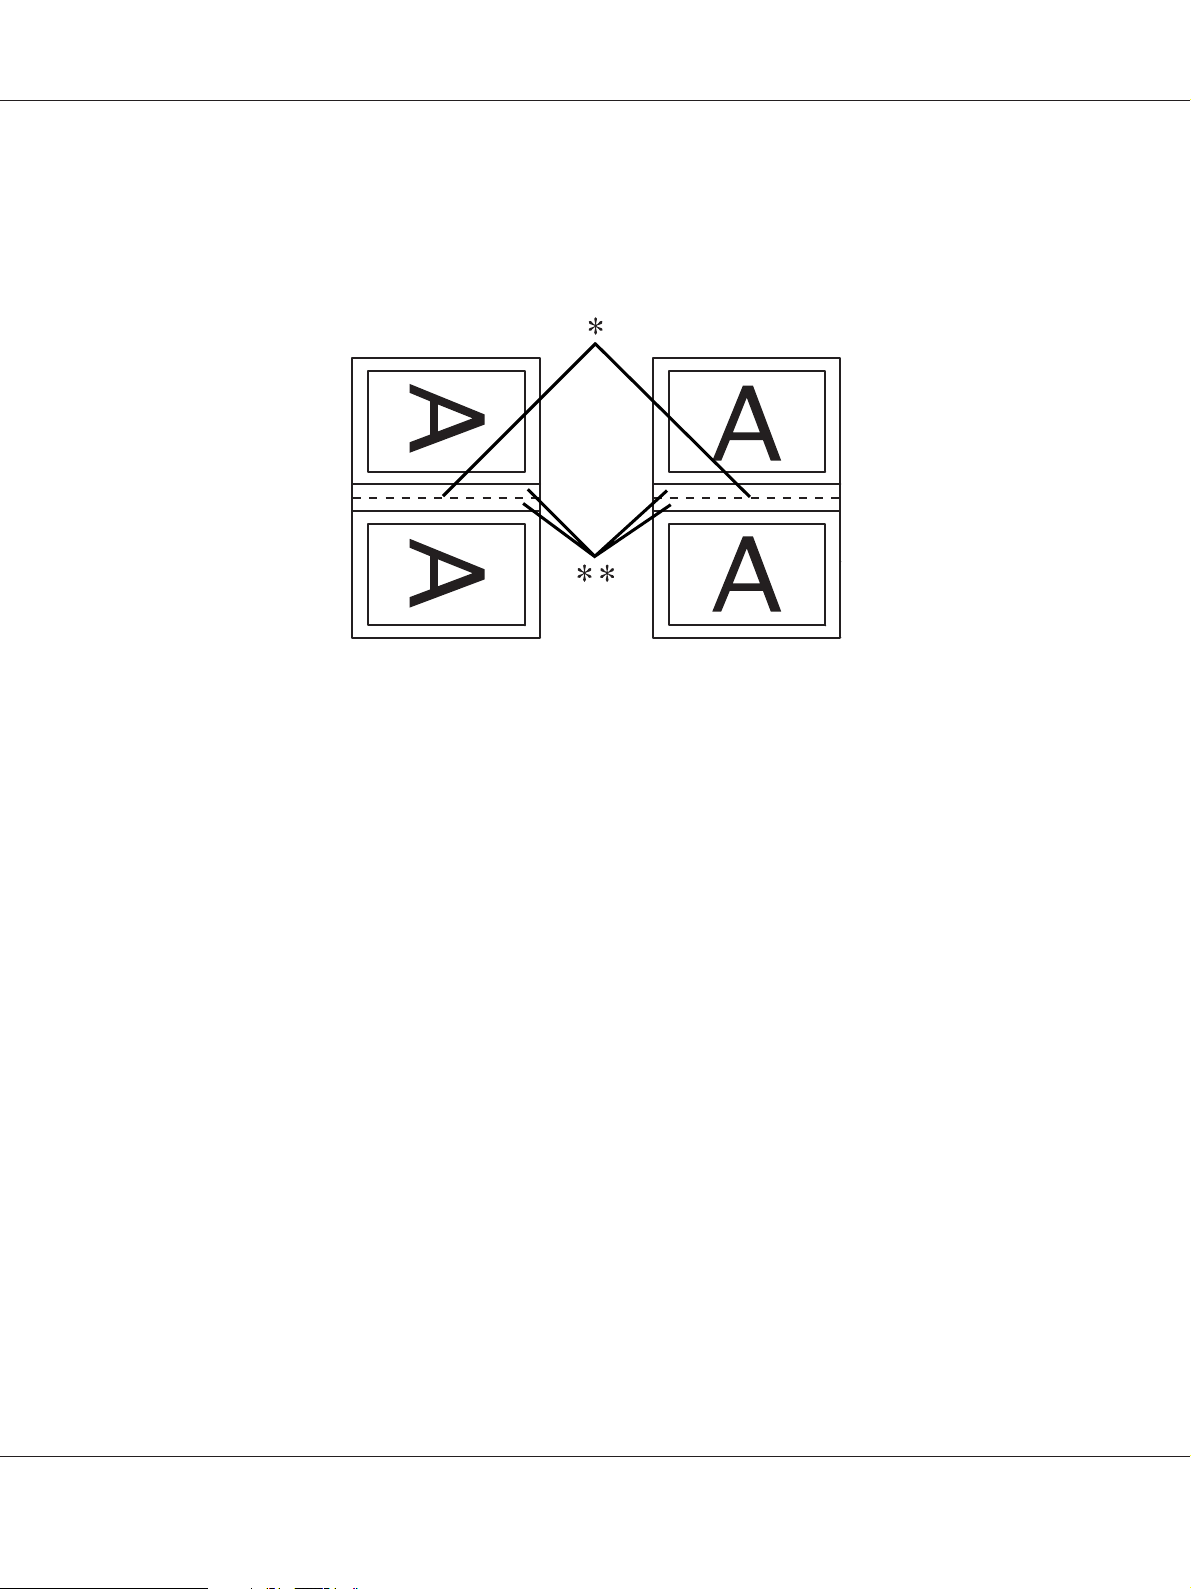
Folded Booklet double-sided printing
You can also make single-fold booklets using the double-sided printing feature. When you create a
single-fold booklet, the pages that appear on the outside (after the booklet is folded) are printed
first. The pages that will appear inside the booklet can then be printed after the paper is reloaded
into the printer.
8
✽ Binding Edge
1
24
3
6
7
5
9
11
10
12
Variety of Printings 88
Page 89

Epson Stylus Pro 3880 User’s Guide
A booklet can be created by printing pages 1 and 4 on the first sheet of paper, pages 5 and 8 on the
second sheet of paper, and pages 9 and 12 on the third sheet of paper. After these sheets are
reloaded into the sheet feeder, you can then print pages 2 and 3 on the back of the first sheet of
paper, pages 6 and 7 on the back of the second sheet of paper, and pages 10 and 11 on the back of
the third sheet of paper. The resulting pages can then be folded and bound together into a booklet.
To create the booklet, follow the steps below.
1. Select Double-Sided Printing, and then select Folded Booklet, and then click Margins.
2. Specify the edge of the paper where binding will be placed. You can choose Left, Top, or Right.
Note:
When Portrait is selected as the Orientation setting on the Paper menu, Left or Right binding
positions are available. The Top binding position is supported when Landscape is selected as the
Orientation setting.
Variety of Printings 89
Page 90
Epson Stylus Pro 3880 User’s Guide
3. Specify the width of the binding margin, using the Binding Margin text box. You can specify
any width from 3 to 30 mm. The specified margin width will be used on both sides of the fold.
For example, if a 10-mm margin is specified, a 20-mm margin will be inserted. (A margin of
10 mm will be placed on each side of the fold.)
✽ Folding Edge
✽✽ Margin
4. Click OK to return to the Layout menu, and then click OK to save your settings.
5. Make sure paper is loaded, and then send a print job from your application.
6. Instructions for printing the inside pages will be displayed while the outside pages are output.
Follow the on-screen instructions to reload the paper.
Note:
❏ The paper may curl during printing due to the amount of ink used. If this problem occurs,
slightly curl the sheets in the opposite direction prior to reloading them into the printer.
❏ Align the sheet stack by tapping its edges against a hard, flat surface prior to reloading the
stack into the printer.
❏ Follow the instructions provided when reloading the printouts. Paper jams or improperly
placed binding margins may occur if the printouts are not reloaded correctly.
7. Once the paper is reloaded, click Resume to print the inside pages.
Variety of Printings 90
Page 91

Epson Stylus Pro 3880 User’s Guide
8. Once printing is complete, fold the sheets and bind them together using a stapler or other
binding method.
Printing on Custom Paper
You can also print on a custom paper, using the steps below. The sizes available depend on the
sheet feeder used.
Sheet Feeder Manual-Rear Manual-Front
Paper width
Paper height
89 to 432 mm 204 to 432 mm 210 to 420 mm
127 to 950 mm 254 to 950 mm 279 to 594 mm
Note:
❏ For Mac OS X, you can set a larger size in the Custom Paper Size than the size that you can set in
the printer; however, it does not print correctly.
❏ The available output size may be limited depending on the application software.
For Windows
1. Open the printer driver window.
See “Accessing the Printer Driver” on page 11.
Variety of Printings 91
Page 92

2. Click User Defined in the Main menu.
Epson Stylus Pro 3880 User’s Guide
Note:
You cannot select User Defined if Borderless is selected for Paper Settings.
3. Set the custom paper size you want to use, and then click Save.
❏ You can enter up to 24 characters for the Paper Size Name.
❏ You can easily change the size by selecting the paper size close to the size you want to set in
the Base Paper Size.
❏ If the ratio is same as the defined paper size, select the ratio from the Fix Aspect Ratio and
select either Landscape or Portrait for the Base. In this case, you can only adjust either
the Paper Width or Paper Height.
Variety of Printings 92
Page 93

Note:
❏ To change the paper size you have registered, select the paper size name in the list, and then
change the size.
❏ To delete the user-defined size you have registered, select the paper size name in the list, and
then click Delete.
❏ You can register up to 100 paper sizes.
4. Click OK to save the custom paper size.
The custom paper size is registered in the Paper Size.
Now, you can print by taking the same steps as usual.
For Mac OS X
Epson Stylus Pro 3880 User’s Guide
1. Open the Page Setup dialog.
See “Accessing the Printer Driver” on page 30.
2. Select Manage Custom Sizes in Paper Size.
Variety of Printings 93
Page 94

Epson Stylus Pro 3880 User’s Guide
3. Click +, and enter the paper size name.
4. Enter the paper width, paper height, and margins, and then click OK.
The paper size and printer margin you can set is as follow.
Printer Description
Sheet Feeder - Borderless
(Auto Expand)
Sheet Feeder - Borderless
(Retain Size)
Manual-Rear - Borderless
(Auto Expand)
Manual-Rear - Borderless
(Retain Size)
Prints data enlarged on cut-sheet paper without margins in four
directions.
Prints data on cut-sheet paper without margins in four directions,
while retaining the ratio of the original size.
Prints data enlarged on cut-sheet paper without margins in four
directions; paper is fed through the rear manual feed slot.
Prints data on cut-sheet paper without margins in four directions,
while retaining the ratio of the original size; paper is fed through the
rear manual feed slot.
Note:
❏ To change the setting you have registered, click the paper size name from the list.
Variety of Printings 94
Page 95

❏ To duplicate the paper size you have registered, click the paper size name from the list, and
then click Duplicate.
❏ To delete the paper size you have registered, click the paper size name from the list, and then
click -.
❏ The custom paper size setting is different depending on the version of the operating system.
See your operating system’s documentation for details.
5. Click OK.
The custom paper size is registered in the Paper Size pop-up menu. Now, you can print by
taking the same steps as usual.
Customize the Items of the Printer Driver
Epson Stylus Pro 3880 User’s Guide
You can save the settings or change the display items as you prefer. You can also export the
settings as a file and make the same printer driver settings to multiple computers.
Saving the printer driver settings
You can save up to 100 settings.
Saving as a favorite
You can save all the setting items of the printer driver.
1. Change the settings in the Main and Page Layout menu.
Variety of Printings 95
Page 96

2. Click Save/Del... in the Main or Page Layout menu.
Epson Stylus Pro 3880 User’s Guide
3. Enter the name in the Name box, and then click Save.
You can choose a setting you have registered from the Select Setting list box.
Saving as a custom media
You can save the items of the Media Settings in the Main menu.
Variety of Printings 96
Page 97

1. Change the Media Settings items in the Main menu.
Epson Stylus Pro 3880 User’s Guide
2. Click Custom Settings.
Variety of Printings 97
Page 98

Epson Stylus Pro 3880 User’s Guide
3. Enter the name in the Name box, and then click Save.
You can choose a setting you have registered from the Media Type list box.
Menu arrangement
You can arrange the Select Setting, Media Type, and Paper Size items.
1. Click the Utility tab, and then click Menu Arrangement.
Variety of Printings 98
Page 99

Epson Stylus Pro 3880 User’s Guide
2. Select the edit item.
3. In the List box, arrange the items as you prefer, or classify the items into groups.
❏ You can arrange the list items by drag-and-drop operation.
❏ To add a new group, click Add Group.
❏ To delete the group, click Delete Group.
❏ Move the unused items into the Not Display group.
Note:
You cannot delete the default items.
Variety of Printings 99
Page 100

Epson Stylus Pro 3880 User’s Guide
4. Click Save.
Exporting or Importing
You can export or import the settings you have registered as a file.
Exporting the settings
1. Open the Save or Deletes Select Settings dialog box or the Saves or deletes Custom Media
dialog box.
2. Select the setting in the List box, and click Export.
3. Select the location, and enter the file name, and then click Save.
Importing the settings
1. Open the Save or Deletes Select Settings dialog box or the Saves or deletes Custom Media
dialog box.
Variety of Printings 100
 Loading...