

Page 1
Color Ink Jet Printer
Startup Guide
4013587-00
C01
Page 2

All rights reserved. No part of this publication may be reproduced, stored in a retrieval
system, or transmitted in any form or by any means, electronic, mechanical, photocopying,
recording, or otherwise, without the prior written permission of SEIKO EPSON
CORPORATION. The information contained herein is designed only for use with this EPSON
printer. EPSON is not responsible for any use of this information as applied to other printers.
Neither SEIKO EPSON CORPORATION nor its affiliates shall be liable to the purchaser of
this product or third parties for damages, losses, costs, or expenses incurred by the purchaser
or third parties as a result of: accident, misuse, or abuse of this product or unauthorized
modifications, repairs, or alterations to this product, or (excluding the U.S.) failure to strictly
comply with SEIKO EPSON CORPORATION's operating and maintenance instructions.
SEIKO EPSON CO RPORATION shall not be liable for any damages or problems arisin g from
the use of any options or any consumable products other than those designated as Original
EPSON Products or EPSON Approved Products by SEIKO EPSON CORPORATION.
SEIKO EPSON CORPORATION shall not be held liable for any damage resulting from
electromagnetic interference that occurs from the use of any interface cables other than those
designated as EPSON Approved Products by SEIKO EPSON CORPORATION.
EPSON is a registered trademark and ESC/P Raster and EPSON STYLUS are trademarks of
SEIKO EPSON CORPORATION.
Microsoft and Windows are registered trademarks of Microsoft Corporation.
General Notice: Other product names used herein are for identification purposes only and may be
trademarks of their respective owners. EPSON disclaims any and all rights in those marks.
Copyright © 2001 by SEIKO EPSON CORPORATION, Nagano, Japan.
Page 3
Where to Find Information
This Startup Guide
Provides you with the basic information you need to start using
your EPSON STYLUS PRO 10000/10000CF and its optional and
consumable products.
Reference Guide included on the CD-ROM
Provides you with detailed information about printing on roll
paper or cut sheet media, the control panel, the printer software,
and tips that will help you get the results you want.
Opening the Reference Guide
Insert the printer software CD in the CD-ROM drive. Double-click
EPSON STYLUS PRO 10000 or EPSON STYLUS PRO 10000CF.
Double-click Online Guide in the Installer dialog box (Windows)
or double-click the Online Guide folder in the EPSON STYLUS
PRO 10000 or EPSON STYLUS PRO 10000CF window, then
EPSON STYLUS PRO 10000 or EPSON STYLUS PRO 10000CF in
the Online Guide folder (Macintosh). The dialog box shown
below appears.
i
Page 4

Click View Reference Guide to open the guide.
To install the Reference Guide on your hard disk, click Install
Reference Guide and follow the on-screen instructions. When
installation is complete, the ESPR10000/10000CF (Windows) or
a View Reference Guide (Macintosh) icon appears in the
EPSON folder. Double-click the icon to open the guide.
Note:
If your hard disk does not have enough space to install the Reference
Guide, view it directly from the CD.
Online Help
Provides you with detailed information and instructions on the
printer software that controls your printer. (Online help will be
automatically installed when you install the printer software.)
See your Online Guide for information on accessing online help.
ii
Page 5
System Requirements
To use your printer with a PC
To use your printer, you need Microsoft® Windows® Millennium
®
Edition, 98, 95, 2000, and NT
4.0; and a shielded, twisted-pair
parallel cable. If you want to connect your printer to a USB port,
you need a Windows Me, 98, or 2000 pre-installed PC equipped
with a USB port; and a shielded USB cable.
Minimum system Recommended
Pentium for Windows 98, 95, and NT 4.0
Pentium 133 MHz for Windows 2000
Pentium 150 MHz for Windows Me
32 MB RAM for Windows Me, 98, 95, NT 4.0
64 MB RAM for Windows 2000
100 MB hard disk space for Windows Me, 98,
95, 2000, and NT 4.0
VGA monitor VGA or bette r monitor
*1 is for graphic data use
*2 is for line data use
system
Pentium II 400 MHz or
higher processor
128 MB RAM or more
500 MB*
more free disk space
(B0)
1
/300 MB*2 or
Your computer dealer can help you update your system if it does
not meet these requirements.
iii
Page 6
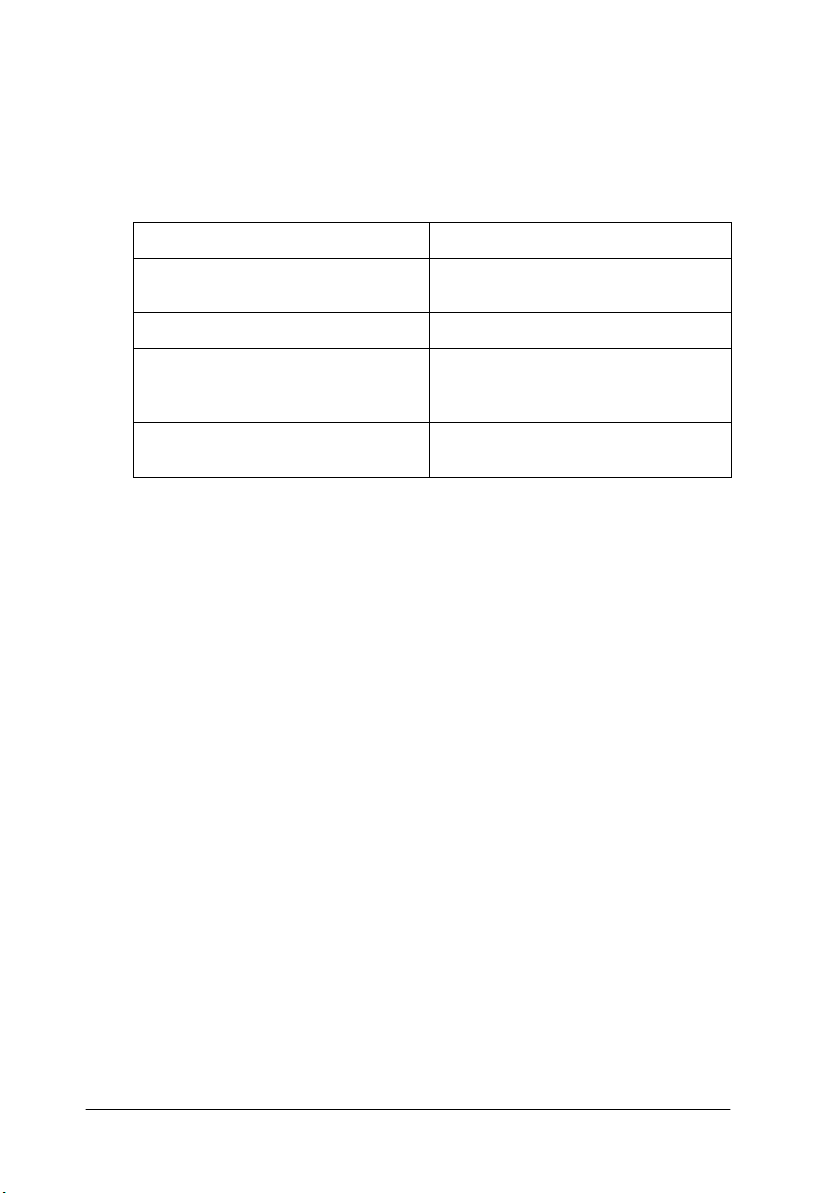
To use your printer with a Macintosh
To use this printer, your Apple® Macintosh® must meet the
following system requirements. You also need a USB cable to
connect this printer to Apple Macintosh computers.
Minimum system Recommended system
PowerPC PowerPC G4 400 MHz or higher
System 7.6.1 Mac OS 8.1 or later
11 MB of available memory
14 MB of available memory when
background printing is turned on.
- 500 MB*
*1 is for graphic data use
*2 is for line data use
processor
33 MB or more of avai lable memory
56 MB of available memory when
background printing is turned on.
1
disk space (B0)
/300 MB*2 or more free
Note:
❏ The amount of available memory varies according to the number and
kind of applications that are open. To see how much memory is
available, choose About This Macintosh
from the Apple menu and
refer to the memory size (listed in kilobytes) under “Largest Unused
Block” (1,024 K = 1 MB).
❏ The memory requirements above are for printing on B0 (1030 ×
1456 mm) size paper. These requirements may vary depending on
the size of the paper, the type of application you are using, and the
complexity of the document you want to print.
❏ The available interface varies according to Macintosh system
version as follows.
Network interface: 7.6.1 to 9.x
USB interface: 8.1 to 9.x
IEEE 1394 interface: 8.6.x to 9.x
In addition to these system and memory requirements, you also
need 15 MB of free hard disk space to install your printer software.
iv
Page 7
To use the Online Guide with a PC
System Microsoft Windows 98, 95, 2000, or NT 4.0
CPU i486/25 MHz (for Windows 95/NT 4.0)
Memory 16 MB (32 MB or more recommended)
Hard disk space 2 MB free to install the Reference Guide
CD-ROM drive Double-speed
Display 640 × 480 pixel or 800 × 600 pixel resolution,
Browser Web browser
i486/66 MHz (for Windows 98)
(Pentium or better recommended)
(Pentium 133 MHz (for Windows 2000))
(Quad-speed or better recommended)
with High Color (16 bit) or True Color
(32 bit) setting
(Microsoft Internet Explorer 4.0 or later
recommended)
To use the Online Guide with a Macintosh
System System 7.5.1 or later recommended
Memory 16 MB (32 MB or more recommended)
Hard disk space 2 MB free to install the Reference Guide
CD-ROM drive Double-speed
(System 7.6 or later recommended)
(Quad-speed or better recommended)
Display Color monitor with 640 × 480 pixel
resolution or greater
(Thousands of colors recommended)
Browser Web browser
Microsoft Internet Explorer 4.0 or later
recommended)
v
Page 8

vi
Page 9

Contents
Safety Instructions
Important Safety Instructions . . . . . . . . . . . . . . . . . . . . . . . . . . . . .1
A Few Precautions. . . . . . . . . . . . . . . . . . . . . . . . . . . . . . . . . . . . . . . 2
For United Kingdom Users . . . . . . . . . . . . . . . . . . . . . . . . . . . . . . . 8
Use of options . . . . . . . . . . . . . . . . . . . . . . . . . . . . . . . . . . . . . .8
Safety information . . . . . . . . . . . . . . . . . . . . . . . . . . . . . . . . . . 9
Warnings, Cautions, and Notes. . . . . . . . . . . . . . . . . . . . . . . . . . . . 10
Taking a Look at Your Printer
Front view . . . . . . . . . . . . . . . . . . . . . . . . . . . . . . . . . . . . . . . . . 10
Rear view . . . . . . . . . . . . . . . . . . . . . . . . . . . . . . . . . . . . . . . . . . 11
Chapter 1 Installing the Ink Cartridges and Loading Paper
Installing the ink cartridges . . . . . . . . . . . . . . . . . . . . . . . . . . . . . . .1-2
Loading Paper . . . . . . . . . . . . . . . . . . . . . . . . . . . . . . . . . . . . . . . . . . 1-5
Loading roll paper . . . . . . . . . . . . . . . . . . . . . . . . . . . . . . . . . . 1-5
Loading cut sheet media . . . . . . . . . . . . . . . . . . . . . . . . . . . . .1-10
Loading cut sheet media longer than 279 mm
(long edge of letter size) . . . . . . . . . . . . . . . . . . . . . . . . . . . 1-11
Loading cut sheet with a length of
A4/Letter, A3/US B, and Super A3/B. . . . . . . . . . . . . . . 1-13
vii
Page 10

Chapter 2 Setting up the Printer with Your PC
Connecting the Printer to Your PC . . . . . . . . . . . . . . . . . . . . . . . . 2-2
Using the built-in parallel interface . . . . . . . . . . . . . . . . . . . 2-2
Using a USB connection
(For Windows Me, 98, and 2000) . . . . . . . . . . . . . . . . . . . 2-3
Installing the Printer Software on Your PC . . . . . . . . . . . . . . . . . 2-4
Printer software components. . . . . . . . . . . . . . . . . . . . . . . . . 2-5
Installing on Windows Me, 98, 95, 2000, and NT 4.0 . . . . . 2-6
Setting Up Your Printer on a Network . . . . . . . . . . . . . . . . . . . . . 2-9
For Windows Me, 98, and 95 . . . . . . . . . . . . . . . . . . . . . . . . . 2-10
For Windows 2000 and NT 4.0 . . . . . . . . . . . . . . . . . . . . . . . 2-13
Chapter 3 Setting up the Printer with Your Macintosh
Connecting the Printer to Your Macintosh. . . . . . . . . . . . . . . . . . 3-2
Using the built-in USB interface . . . . . . . . . . . . . . . . . . . . . . 3-2
Installing the Printer Software on Macintosh. . . . . . . . . . . . . . . . 3-3
Printer software components. . . . . . . . . . . . . . . . . . . . . . . . . 3-4
Installing on Macintosh . . . . . . . . . . . . . . . . . . . . . . . . . . . . . 3-5
Using the Chooser to select your printer . . . . . . . . . . . . . . . 3-6
Setting up Your Printer on a Network. . . . . . . . . . . . . . . . . 3-7
Chapter 4 Printing and Printer Management
Printing From Your PC . . . . . . . . . . . . . . . . . . . . . . . . . . . . . . . . . . 4-2
Making the printer driver settings . . . . . . . . . . . . . . . . . . . . 4-2
Cancelling printing from your PC . . . . . . . . . . . . . . . . . . . . 4-7
Printing From Your Macintosh . . . . . . . . . . . . . . . . . . . . . . . . . . . 4-8
Making the printer driver settings . . . . . . . . . . . . . . . . . . . . 4-8
Cancelling printing from your Macintosh. . . . . . . . . . . . . . 4-11
viii
Page 11

Chapter 5 Checking the Printer’s Condition
Using Printer Utilities . . . . . . . . . . . . . . . . . . . . . . . . . . . . . . . . . . . . 5-2
Accessing the printer utilities . . . . . . . . . . . . . . . . . . . . . . . . . 5-2
Printing the Nozzle Check Pattern . . . . . . . . . . . . . . . . . . . . . . . . .5-3
Cleaning the Print Heads . . . . . . . . . . . . . . . . . . . . . . . . . . . . . . . . .5-4
Aligning the Print Heads . . . . . . . . . . . . . . . . . . . . . . . . . . . . . . . . . 5-6
Chapter 6 Using an Optional Interface Card
Available Optional Interface Cards . . . . . . . . . . . . . . . . . . . . . . . . 6-2
Installing the Optional Interface Card . . . . . . . . . . . . . . . . . . . . . . 6-2
ix
Page 12

x
Page 13

Safety Instructions
Important Safety Instructions
Read all of these instructions before using your printer. Also be
sure to follow all warnings and instructions marked on the
printer.
❏ Do not block or cover the openings in the printer’s cabinet.
❏ Do not insert objects through the slots. Take care not to spill
liquid on the printer.
❏ Use only the type of power source indicated on the printer’s
label.
❏ Connect all equipment to properly grounded power outlets.
Avoid using outlets on the same circuit as photocopiers or air
control systems that regularly switch on and off.
❏ Avoid electrical outlets controlled by wall switches or
automatic timers.
❏ Keep the entire computer system away from potential sources
of electromagnetic interference, such as loudspeakers or the
base units of cordless telephones.
❏ Do not use a damaged or frayed power cord.
❏ If you use an extension cord with the printer, make sure the
total ampere rating of the devices plugged into the extension
cord does not exceed the cord’s ampere rating. Also, make
sure the total ampere rating of all devices plugged into the
wall outlet does not exceed the wall outlet’s ampere rating.
Safety Instructions
1
Page 14

❏ Do not attempt to service the printer yourself.
❏ Unplug the printer and refer servicing to qualified service
personnel under the following conditions:
The power cord or plug is damaged; liquid has entered the
printer; the printer has been dropped or the cabinet damaged;
the printer does not operate normally or exhibits a distinct
change in performance.
❏ The interface connectors (including Type B interface card) and
the connector for optional Auto Take-up Reel Unit are NonLPS (non-limited power source).
❏ If you plan to use the printer in Germany, observe the
following:
To provide adequate short-circuit protection and overcurrent protection for this printer, the building installation
must be protected by a 10 or 16 amp circuit breaker.
Bei Anschluss des Druckers an die Stromversorgung muss
sichergestellt werden, dass die Gebäudeinstallation mit einer
10 A-oder 16 A-Sicherung abgesichert ist.
A Few Precautions
When using the printer
❏ Do not put your hand inside the printer or touch the ink
cartridges during printing.
❏ Do not move the print heads by hand; otherwise you may
damage the printer.
2
Safety Instructions
Page 15
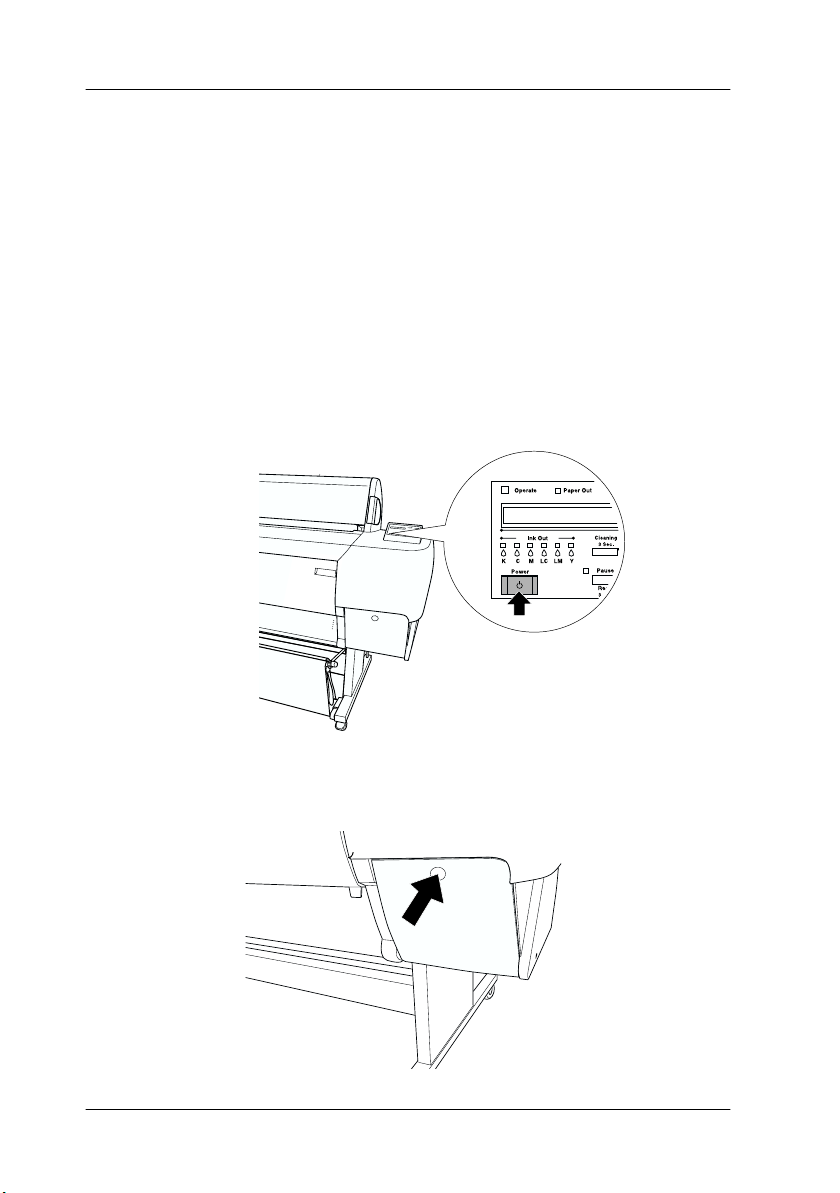
❏ Always turn the printer off using the Power button on the
control panel. When this button is pressed, the Operate light
flashes briefly then goes off. Do not unplug the printer or turn
off the power to the outlet until the Operate light stops
flashing.
❏ Before transporting the printer, make sure the print heads are
in the home (far right) position.
When handling the ink cartridges
❏ Keep ink cartridges out of the reach of children and do not
drink.
❏ If ink gets on your skin, wash it off with soap and water. If it
gets in your eyes, flush them immediately with water.
❏ If you use ColorFast type ink cartridges, shake the ink
cartridge gently before installing it for best results.
Caution
c
❏ If you use dye type ink cartridges, do not use an ink cartridge
❏ If you use ColorFast type ink cartridges, use up the ink
Do not shake cartridges that have been installed previously.
beyond the date printed on the cartridge carton.
cartridge within six months of installation for best results.
Safety Instructions
3
Page 16

❏ Do not dismantle the ink cartridges or try to refill them. This
could damage the print heads.
❏ Store ink cartridges in a cool, dark place.
❏ After bringing an ink cartridge inside from a cold storage site,
allow it to warm up at room temperature for at least three
hours before using it.
❏ Do not touch the green IC chip on the side of the cartridge.
This may affect normal operation and printing.
❏ In this ink cartridge, the IC chip retains a variety of cartridge
related-information, such as the amount of ink remaining, so
that a cartridge may be removed and reinserted freely.
However, each time the cartridge is inserted, some ink is
consumed because the printer automatically performs a
reliability check.
❏ If you remove an ink cartridge for later use, protect the ink
supply area from dirt and dust, and store it in the same
environment as the printer. Note that there is a valve in the
ink supply port, making covers or plugs unnecessary, but care
is needed to prevent the ink from staining items that the
cartridge touches. Do not touch the ink cartridge ink supply
port or surrounding area.
When choosing a place for the printer
❏ Place the printer on a flat, stable surface that is larger than the
printer. The printer will not operate properly if it is tilted or
at an angle.
❏ Avoid places subject to rapid changes in temperature and
humidity. Also keep it away from direct sunlight, strong light,
or heat sources.
❏ Avoid places subject to shocks and vibrations.
4
Safety Instructions
Page 17

❏ Keep the printer away from the dusty areas.
❏ Place the printer near a wall outlet where the plug can be
easily unplugged.
Note for French-speaking users:
Placez l’imprimante près d’une prise de contacte où la fiche peut être
débranchée facilement.
E
NERGY STAR® Compliance
As an ENERGY STAR® Partner, EPSON has
determined that these products meet the
TAR® guidelines for energy efficiency.
S
NERGY
E
The International
a voluntary partnership with the computer and office equipment
industry to promote the introduction of energy-efficient personal
computers, monitors, printers, fax machines, copiers, and
scanners in an effort to reduce air pollution caused by power
generation.
NERGY STAR® Office Equipment Program is
E
Laser safety
This printer is certified as a Class 1 laser product under the U.S.
Department of Health and Human Services (DHHS) Radiation
Performance Standard according to the Radiation Control for
Health and Safety Act of 1968. This means that the printer does
not produce hazardous laser radiation.
Since radiation emitted by the laser is completely confined within
protective housings and external covers, the laser beam cannot
escape from the machine during any phase of user operation.
The EPSON STYLUS PRO 10000/10000CF is a large format
printer which utilizes a semiconductor laser.
Safety Instructions
5
Page 18

There is no possibility of danger from the laser, provided that the
printer is operated according to the instructions in the guides
provided.
Since radiation emitted by the laser is completely confined within
protective housings and external covers, the laser beam cannot
escape from the machine during any phase of user operation.
Warning:
w
This is a semiconductor laser. The maximum power of the laser
diode is 7 mW
CDRH regulations
The Center for Devices and Radiological Health (CDRH) of the
U.S. Food and Drug Administration implemented regulations for
laser products on August 2, 1976. Compliance is mandatory for
products marketed in the United States. The label shown below
indicates compliance with the CDRH regulations and must be
attached to laser products marketed in the United States.
The use of controls, or the performance of procedures and
adjustments other than those specified in this guide may result
in hazardous radiation exposure.
and the wavelength is 640 to 670 nm.
6
Safety Instructions
Page 19

Laser safety labels
Your printer is a Class 1 laser product as defined in the IEC 60825
specifications. The label shown below is attached in countries
where required.
Internal laser radiation
Maximum Radiation Power: 120 µW at laser aperture of the
Auto Print Head Optimization
System Unit
Wavelength: 640 to 670 nm
This product employs a Class IIIb Laser Diode that emits an
visible laser beam. The Laser Diode is incorporated in the Auto
Print Head Optimization System Unit. The unit is NOT A FIELD
SERVICE ITEM and should not be opened under any
circumstances.
Safety Instructions
7
Page 20
An additional laser warning label is affixed to the inside of the
printer, as shown below.
For United Kingdom Users
Use of options
EPSON (UK) Limited shall not be liable against any damages or
problems arising from the use of any options or consumable
products other than those designated as Original EPSON
Pr od uc ts or EP SON Ap pr ov ed Pr odu ct s b y E PS ON (U K) Li mit ed .
8
Safety Instructions
Page 21

Safety information
Warning:
w
Important:
The wires in the mains lead fitted to this appliance are coloured in
accordance with the following code:
Green and yellow — Earth
Blue — Neutral
Brown — Live
If you have to fit a plug:
As the colours of the mains lead of this appliance may not match
coloured markings used to identify the terminals in a plug, please
proceed as follows:
The green and yellow wire must be connected to the terminal in
the plug which is marked with the letter E or the earth symbol (
The blue wire must be connected to the terminal in the plug
marked with the letter N.
This appliance must be earthed. Refer to rating plate for voltage
and check that the appliance voltage corresponds to the supply
voltage.
G).
The brown wire must be connected to the terminal in the plug
marked with the letter L.
If damage occurs to the plug, replace the cord set or consult a
qualified electrician.
Replace fuses only with a fuse of the correct size and rating.
Safety Instructions
9
Page 22
Warnings, Cautions, and Notes
Warnings
must be followed carefully to avoid bodily injury.
w
Cautions
must be observed to avoid damage to your equipment.
c
contain important information and useful tips on the operation
Notes
of your printer.
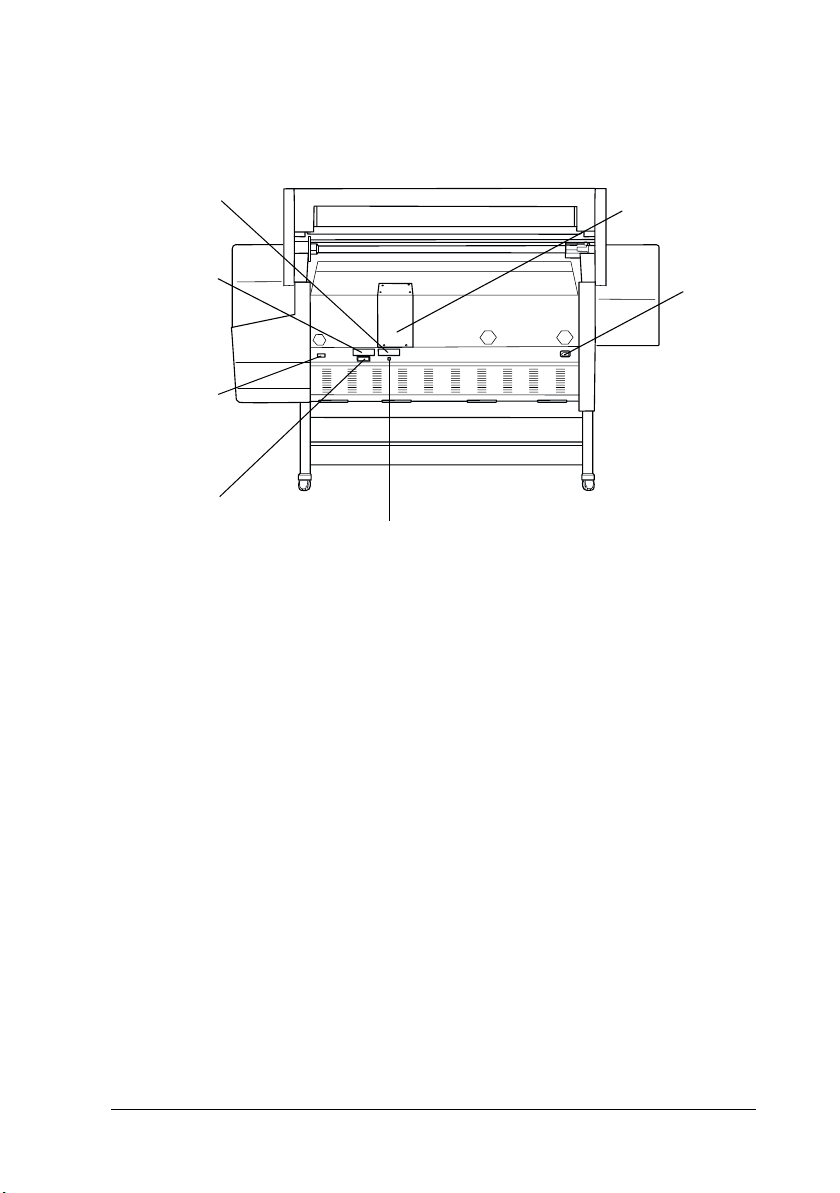
Taking a Look at Your Printer
Front view
roll paper spindles
mounting
brackets
roll paper cover
paper set lever
control panel
paper basket
10
Taking a Look at Your Printer
ink cartridge
compartment
lower cover
Page 23
Rear view
Optional
interface card
slot cover 2
Optional
interface card
slot cover 1
Optional
connector for
Auto Take -up
Reel Unit
parallel interface
connector
Photo Printing
Accelerator slot
AC inlet
USB interface connector
Taking a Look at Your Printer
11
Page 24

12
Taking a Look at Your Printer
Page 25

Chapter 1
Installing the Ink Cartridges and Loading Paper
Installing the ink cartridges . . . . . . . . . . . . . . . . . . . . . . . . . . . . . . .1-2
Loading Paper . . . . . . . . . . . . . . . . . . . . . . . . . . . . . . . . . . . . . . . . . . 1-5
Loading roll paper . . . . . . . . . . . . . . . . . . . . . . . . . . . . . . . . . . 1-5
Loading cut sheet media . . . . . . . . . . . . . . . . . . . . . . . . . . . . .1-10
Loading cut sheet media longer than 279 mm
(long edge of letter size) . . . . . . . . . . . . . . . . . . . . . . . . . . . 1-11
Loading cut sheet with a length of
A4/Letter, A3/US B, and Super A3/B. . . . . . . . . . . . . . . 1-13
1
Installing the Ink Cartridges and Loading Paper
1-1
Page 26
Installing the ink cartridges
To install the ink cartridges, follow the instructions below.
Warning:
The ink cartridges are self-contained units. Under ordinary use,
w
ink will not leak from the cartridges. If ink does get on your hands,
wash them thoroughly with soap and water. If ink gets into your
eyes, flush them immediately with water.
1. Turn on the printer by pressing the Power button. After a
short time NO IN K CAR T RID GE is displayed on the LCD panel.
2. Push the ink compartment cover to open it.
1-2
Installing the Ink Cartridges and Loading Paper
Page 27
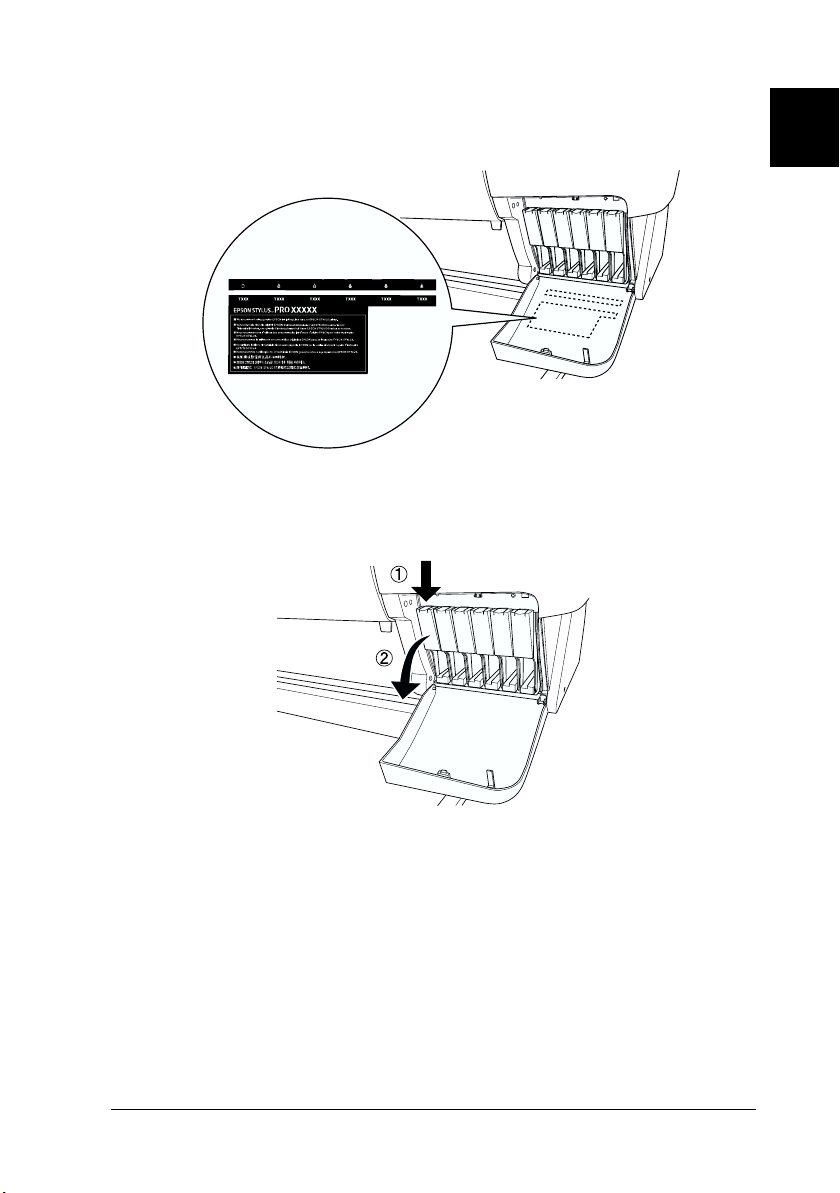
3. Put the attached label on the back of the ink compartment
cover.
4. Push the top of the clamp, and pull it forward.
1
5. Remove the package from an ink cartridge.
Note:
If you use the ColorFast type ink cartridge, shake the cartridge gently
before installing it.
Installing the Ink Cartridges and Loading Paper
1-3
Page 28
6. Hold the ink cartridge with arrow mark on the left side and
pointing to the rear of the printer, and insert it into the slot.
Be sure to match the colors of the seal of compartment and the
cartridge you are replacing.
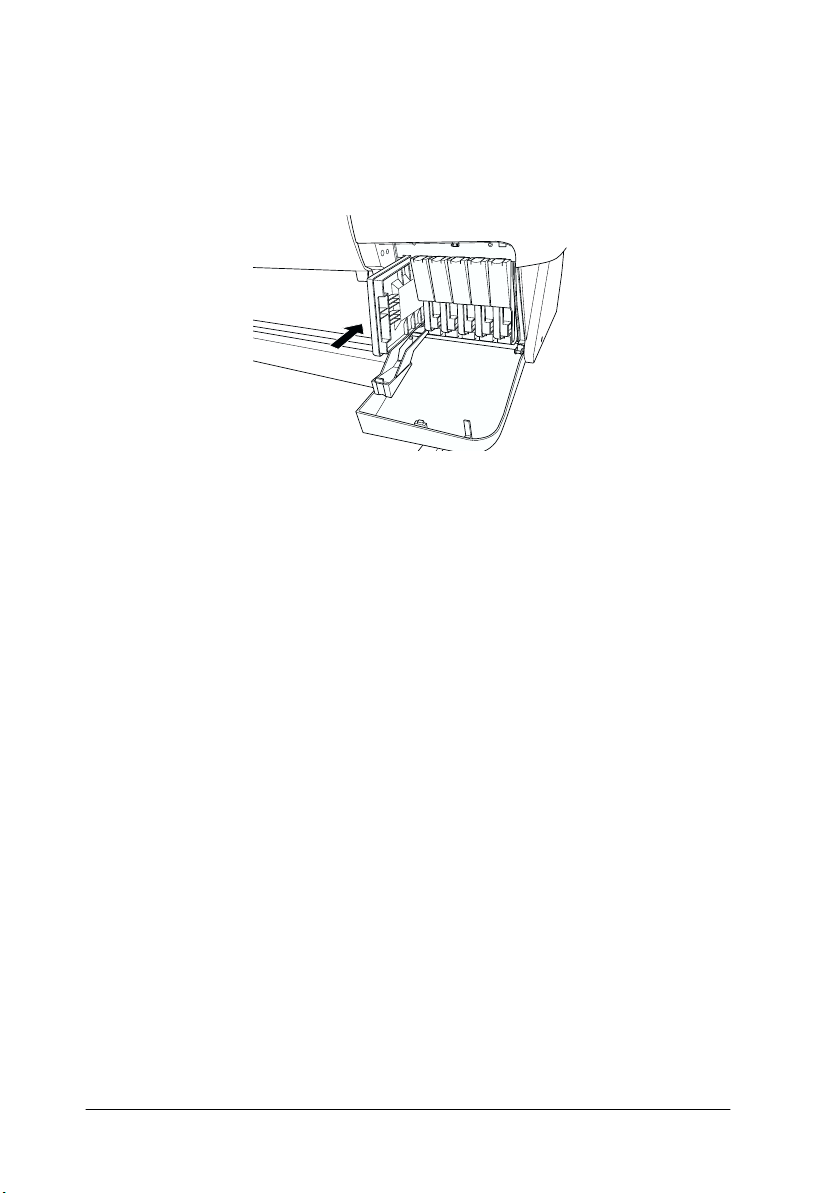
7. Close the cartridge clamp backwards. Make sure the
corresponding Ink Out light goes off. Repeat step 5 to 6 for
the other five color ink cartridges.
8. Close the Ink compartment cover.
After installing all six ink cartridges, the printer begins
charging the ink delivery system and the Pause light flashes
(for about 4 minutes). When the ink delivery system is
charged, the Pause light stops flashing.
1-4
Caution:
c
Never do the following while the Pause light is flashing;
otherwise damage may occur:
❏ Turn off the printer
❏ Open the lower cover
❏ Open the ink compartment cover
❏ Move the paper set lever to the released position
❏ Unplug the power cord
Installing the Ink Cartridges and Loading Paper
Page 29

Loading Paper
Loading roll paper
To load the roll paper onto the printer, follow the instructions
below.
1. Slide the movable flange off the end of the spindle.
2. Place the roll paper on a flat surface so that it unwinds in the
direction shown. Slide the roll paper onto the spindle and
fully onto the fixed flange.
1
3. Slide the movable flange back onto the spindle until it fixes
into place in the end of the roll paper.
Installing the Ink Cartridges and Loading Paper
1-5
Page 30

4. Open the roll paper cover. Holding the spindle, fit the right
end of the spindle into the mounting bracket inside the
printer.
Note:
The spindle and mounting brackets are color-coded. Mount the
spindle into the mounting bracket that is the same color as the end
of the spindle.
5. Fit the left end of the spindle into the left mounting bracket
inside the printer.
1-6
Installing the Ink Cartridges and Loading Paper
Page 31

6. Make sure that the printer is turned on, then repeatedly press
the Paper Source button until the Roll Auto Cut light comes
on.
7. Set the paper set lever to the released position.
Note:
For the position names of the paper set lever, see the attached
instruction seal on the lever shown below.
1
Installing the Ink Cartridges and Loading Paper
1-7
Page 32

8. Insert the paper into the paper insertion slot.
9. Pull the paper down through the paper insertion slot so that
it comes out below.
1-8
Installing the Ink Cartridges and Loading Paper
Page 33

10. Holding the bottom edge of the paper, turn the roll paper to
remove slack. Make sure that the bottom edge of the paper is
straight, and that it is aligned with the rows of holes in the
metal plate below the lower cover.
11. Set the paper set lever to the secured position, and close the
roll paper cover.
1
Installing the Ink Cartridges and Loading Paper
1-9
Page 34

12. Press the Pause button. The print heads move and the paper
automatically feeds into the printing position. READY appears
on the LCD panel.
Note:
Even if you do not press the Pause button, the print heads move
and paper feeds into the printing position automatically. READY
appears on the LCD panel.
Now you are ready to print on roll paper. Make the printer driver
settings, then send the print job. See “Printing From Your PC” on
page 4-2 or “Printing From Your Macintosh” on page 4-8.
Note:
❏ Allow time for the ink to dry thoroughly after printing to ensure the
printout quality.
❏ If you do not use the paper set above, remove it from the printer.
When you use roll paper, set the paper set lever to the released
position, and wind it up. When you use cut sheets, remove the paper
from the printer and store it separately.
Loading cut sheet media
To load cut sheet media longer than 279 mm (long edge of letter
size), see the next section. To load paper with a length of A4/letter,
A3/US B, Super A3/B, see “Loading cut sheet with a length of
A4/Letter, A3/US B, and Super A3/B” on page 1-13.
If you are printing on thick paper (0.5 to 1.6 mm), see your Online
Guide.
1-10
Installing the Ink Cartridges and Loading Paper
Page 35

Loading cut sheet media longer than 279 mm (long edge of letter size)
To load cut sheet media longer than 279 mm, follow the steps
below.
Caution:
c
1. Make sure that the printer is on and the roll paper cover is
2. Press the Paper Source button repeatedly until the Sheet
3. Make sure the Operate light and Pause light is not flashing,
As much as possible, keep your fingers off the printable surface
of the media, as fingerprints may reduce printout quality.
closed.
light comes on.
then set the paper set lever to the released position. The Paper
Out light turns on and LOAD PAPER appears on the LCD panel.
1
c
Caution:
Do not move the paper set lever while the Operate light or
Pause light is flashing. Doing so may damage the printer.
Installing the Ink Cartridges and Loading Paper
1-11
Page 36

4. Load the sheet into the paper insertion so that it comes out
below. Make sure that the right and bottom edges of the paper
are straight and in line with the rows of punch holes. Set the
paper set lever to the released position. PRESS PAUSE BUTTON
appears.
5. Set the paper set lever to the secured position. PRESS PAUSE
BUTTON appears on the LCD panel.
1-12
Installing the Ink Cartridges and Loading Paper
Page 37

6. Press the Pause button.
The print heads move and the sheet feeds automatically into
the printing position. READY appears on the LCD panel.
Note:
Even if you do not press the Pause button, the print heads move
and paper feeds into the printing position automatically. READY
appears on the LCD panel.
Now you are ready to print on cut sheet media. Make the printer
driver settings, then send the print job. See “Printing From Your
PC” on page 4-2 or “Printing From Your Macintosh” on page 4-8.
Note:
Allow time for the ink to dry thoroughly after printing to ensure the
printout quality.
Loading cut sheet with a length of A4/Letter,
A3/US B, and Super A3/B
To load cut sheet media with a length of A4/Letter, A3/US B, and
Super A3/B, follow the steps below.
1
Caution:
c
1. Make sure that the printer is on and the roll paper cover is
2. Press the Paper Source button repeatedly until the Sheet
As much as possible, keep your fingers off the printable surface
of the media, as fingerprints may reduce printout quality.
closed.
light comes on.
Installing the Ink Cartridges and Loading Paper
1-13
Page 38

3. Make sure that the paper set lever is in the secured position.
Then load the sheet into the paper insertion slot until it meets
resistance. Make sure that the right edge of the paper is
straight and in line with the right edge of the scale on the roll
paper cover. PRESS PAUSE BUTTON appears on the LCD panel.
4. Press the Pause button.
The print heads move and the sheet automatically feeds into
the printing position. READY appears on the LCD panel.
Now you are ready to print on the cut sheet media. Make the
printer driver settings, then send a print job. See “Printing From
Your PC” on page 4-2 or “Printing From Your Macintosh” on page
4-8.
When printing is complete, the printer supports the printed
media, and PAPER OUT is displayed on the LCD panel. To remove
the paper, hold it while pressing the Paper Feed button. The
paper can be removed from the printer.
1-14
Installing the Ink Cartridges and Loading Paper
Page 39

Chapter 2
Setting up the Printer with Your PC
Connecting the Printer to Your PC . . . . . . . . . . . . . . . . . . . . . . . . .2-2
Using the built-in parallel interface . . . . . . . . . . . . . . . . . . . . 2-2
Using a USB connection
(For Windows Me, 98, and 2000) . . . . . . . . . . . . . . . . . . . .2-3
Installing the Printer Software on Your PC . . . . . . . . . . . . . . . . . .2-4
Printer software components . . . . . . . . . . . . . . . . . . . . . . . . .2-5
Installing on Windows Me, 98, 95, 2000, and NT 4.0 . . . . . 2-6
Setting Up Your Printer on a Network. . . . . . . . . . . . . . . . . . . . . . 2-9
For Windows Me, 98, and 95 . . . . . . . . . . . . . . . . . . . . . . . . .2-10
For Windows 2000 and NT 4.0 . . . . . . . . . . . . . . . . . . . . . . . . 2-13
2
Setting up the Printer with Your PC
2-1
Page 40

Connecting the Printer to Your PC
The method you use to connect the printer to your PC depends
on how you want to send print jobs. If you want to send them
directly, use the printer’s built-in parallel interface or the USB
interface. If you want to send them over a network, use an
optional interface card.
For information of using the USB interface, see “Using a USB
connection (For Windows Me, 98, and 2000)” on page 2-3. For
information on using optional interface cards, see Chapter 6,
“Using an Optional Interface Card.”
To connect the printer to a Macintosh, see Chapter 3, “Setting up
the Printer with Your Macintosh.”
Using the built-in parallel interface
To use the printer’s built-in parallel interface, you will need a
shielded, twisted-pair cable. Then follow the steps below to
connect the printer to your computer.
Note:
Before you connect the parallel interface cable, disconnect the USB cable
from the printer, if installed.
1. Make sure both the printer and computer are turned off.
2. Plug the cable connector securely into the printer’s interface.
Then squeeze the wire clips together until they lock into place
on both sides. If your cable has a ground wire, connect it to
the ground connector below the interface connector.
2-2
Setting up the Printer with Your PC
Page 41

3. Plug the other end of the cable into the computer’s parallel
port.
See “Installing the Printer Software on Your PC” on page 2-4 for
instructions on installing the printer software. You must install
the printer software before using your printer.
Using a USB connection (For Windows Me, 98,
and 2000)
To connect the printer to a USB port, you need a standard shielded
USB cable. Follow the steps below to connect the printer to your
computer.
2
Note:
The EPSON Printer Port and DMA transfer features (For Windows 98
and 95 only) of the EPSON printer driver you install are not available
with USB connections. They are available only with the parallel interface
connection. For information on the EPSON Printer Port and DMA
transfer, see your Reference Guide in the Online Guide.
Setting up the Printer with Your PC
2-3
Page 42

1. Make sure both the printer and computer are turned off.
2. Plug the appropriate end of the cable into the USB port on the
back of the printer. (The end that fits the printer has a different
shape than the end that fits the computer.)
3. Connect the other end of the cable to the computer’s USB port.
See the next section for instructions on installing the printer
software. You must install the printer software before using your
printer.
Installing the Printer Software on Your PC
After connecting the printer to your computer, you need to install
the software included on the “Printer Software for EPSON Stylus
PRO 10000/10000CF” CD-ROM shipped with your printer.
2-4
Setting up the Printer with Your PC
Page 43

Printer software components
Your printer software includes the following items:
❏ Printer driver and utilities
The printer driver runs, or “drives,” your printer; use it to
make settings such as print quality, speed, media type, and
paper size. The Nozzle Check, Head Cleaning, and Print Head
Alignment utilities help you keep your printer in top
operating condition. EPSON Status Monitor 3 (for Windows)
or EPSON StatusMonitor (for Macintosh) notifies you of
printer errors and displays printer status information such as
the amount of ink remaining.
❏ Printer Status Page utility (for Windows 2000 only)
The Printer Status Page utility (for Windows 2000 only)
enables you to monitor the printer status and network settings
over the Internet when using the Windows 2000 Internet
Printing feature. To use this utility, you must obtain an
optional network interface. See your network manual for
more information.
❏ Online guide
The online Reference Guide helps you learn more about your
printer.
2
If you are using the floppy disk version of the software, make a
backup copy of the EPSON printer software disk before you begin
installation. If you wish to make a floppy disk version of the
printer software on your CD-ROM, you can use the driver disk
creation utility included on the CD-ROM.
Setting up the Printer with Your PC
2-5
Page 44

Installing on Windows Me, 98, 95, 2000, and
NT 4.0
Follow these steps to install your printer software:
Note:
If you wish to make a floppy disk version of the printer software included
on your CD-ROM, insert the printer software CD-ROM, then doubleclick Create Floppy based printer driver/utility disks and follow
the on-screen instructions.
1. Make sure that your printer is off.
2. Turn on your computer and start Windows. If the New
Hardware Found screen or any other Wizard appears, click
Cancel.
3. Insert the printer software CD-ROM shipped with your
printer in the CD-ROM drive. The Installer dialog box
appears.
4. Choose your printer from the window, then click the right
arrow.
2-6
Setting up the Printer with Your PC
Page 45

5. Click Install Printer Driver/Utility, then the right arrow, and
then OK in the dialog box that appears to start the printer
software installation.
6. Windows 95 and NT users should proceed to step 6.
For Windows 98 users, follow the on-screen instructions to
turn on your printer. The printer port configuration starts
automatically.
2
For printers connected via USB cable, the USB device driver
installation starts automatically at this point.
7. When a message appears informing you that installation is
complete, click OK.
Note:
If an error message appears, either the printer driver or the EPSON
USB printer device driver is not installed correctly. See
“Troubleshooting” in the Online Guide.Note:
Setting up the Printer with Your PC
2-7
Page 46

For information on opening and using the printer software, see
“Printing From Your PC” on page 4-2. See also “Printer Software”
in your Online Guide. If you use your printer on a network, see
“Setting Up Your Printer on a Network” on page 2-9.
Ensuring that the USB driver is installed correctly in Windows (for Windows Me, 98, and 2000 only)
After the printer software installation is complete, confirm that
the USB driver is installed correctly.
1. Click the Start button, point to Settings, and click Printers.
Make sure that the icon for your printer appears in the Printers
window.
2. Click the icon for your printer, then click Properties on the
File menu.
2-8
Setting up the Printer with Your PC
Page 47

3. Click the Details tab and make sure that EPUSBx: (EPSON
Stylus Pro 10000/10000CF) is displayed in the Print to the
following port list box.
2
Note:
If the correct port is not displayed, refer to the “Troubleshooting”
section of the Online Guide.
Setting Up Your Printer on a Network
For Windows Me, 98, and 95, see below. For Windows 2000 and
NT 4.0, see “For Windows 2000 and NT 4.0” on page 2-13.
Setting up the Printer with Your PC
2-9
Page 48

For Windows Me, 98, and 95
This section tells you how to set up your printer so that other
computers on a network can use it.
First, you need to set up the printer as a shared printer on the
computer to which the printer is connected. Then, you must
signify the network path to the printer from each computer to use
the printer, and install the printer software on those computers.
Note:
This section describes how to use your printer as a shared printer on a
network. To connect your printer directly to a network without setting
it up as a shared printer, consult your network administrator.
Setting up your printer as a shared printer
Follow these steps to share a printer connected directly to your
computer with other computers on a network:
1. Click Start, point to Settings, then click Control Panel.
2. Double-click Network.
3. Click File and Print Sharing button.
4. Click the I want to be able to allow others to print to my
printer(s) check box and click OK.
2-10
Setting up the Printer with Your PC
Page 49

5. In the Network window, click OK.
6. In the Control Panel, double-click Printers.
Note:
❏ If a dialog box requesting the Windows Me, 98, or 95 CD-ROM
appears, insert the CD-ROM in the CD-ROM drive, then
follow the messages on the screen.
❏ If a dialog box appears requesting you to restart your computer,
do so. Then open the Printer folder, and continue from step 7.
7. Select your printer, and choose Sharing from the File menu.
8. Click Shared As, enter the printer information as needed,
then click OK.
2
Setting up the Printer with Your PC
2-11
Page 50

Accessing the printer through a network
To access your printer from another computer on a network,
follow these steps.
Note:
Your printer must be set up as a shared resource on the computer to
which it is directly connected before you can access it from another
computer. For instructions, see “Setting up your printer as a shared
printer” on page 2-10.
1. On the computer you want to access the printer from, click
Start, point to Settings, and click Printers.
2. Double-click the Add Printer icon.
3. The Add Printer Wizard screen appears. Click Next.
4. Click Network printer, then click Next.
5. Click Browse.
2-12
Setting up the Printer with Your PC
Page 51

6. Double-click the icon of the computer that is directly
connected to the printer. Then click the printer’s icon.
7. Click OK and follow the messages on the screen.
For Windows 2000 and NT 4.0
2
Note:
This section is written for small network users only. If you are on a large
network and would like to share your printer, consult your network
administrator.
This section tells you how to set up your printer so that other
computers on the network can use it.
First, you need to set up the printer as a shared printer on the
computer to which the printer is connected. Then, you must
signify the network path to the printer from each computer to use
the printer, and install the printer software on those computers.
Setting up the Printer with Your PC
2-13
Page 52

Setting up your printer as a shared printer
Follow these steps to share a printer that is connected directly to
your computer with others on a network.
1. Click Start, point to Settings, and click Printers.
2. Select your printer, then click Sharing on the File menu.
3. Click the Shared radio button and enter the Share Name.
4. Click OK.
2-14
Note:
Do not choose any drivers from the Alternate Drivers list.
Setting up the Printer with Your PC
Page 53

Accessing the printer through a network
To access your printer from another computer on a network,
follow these steps.
Note:
Your printer must be set up as a shared resource on the computer to
which it is directly connected before you can access it from another
computer. For instructions, see “Setting up your printer as a shared
printer” on page 2-14.
1. Install the printer driver to the client computer from the
software CD-ROM.
2. Open the Printer folder from the Control Panel, right-click
your printer’s icon, then open the Properties for your printer.
2
Setting up the Printer with Your PC
2-15
Page 54

3. Click the Ports tab, then click Add Port.
4. The following dialog appears. Select Local Port, then click
New Port.
2-16
Setting up the Printer with Your PC
Page 55

5. The following dialog appears. In the text box, type the
following information:
\\name of computer that is connected to the printer\name of
the shared printer
Then click OK.
6. In the Printer Ports dialog box, click Close to return to the
Ports menu.
2
Setting up the Printer with Your PC
2-17
Page 56

7. On the Ports menu, make sure that the new port is added and
the check box is selected. Click OK to close the printer driver.
2-18
Setting up the Printer with Your PC
Page 57

Chapter 3
Setting up the Printer with Your Macintosh
Connecting the Printer to Your Macintosh . . . . . . . . . . . . . . . . . . 3-2
Using the built-in USB interface. . . . . . . . . . . . . . . . . . . . . . . 3-2
Installing the Printer Software on Macintosh . . . . . . . . . . . . . . . . 3-3
Printer software components . . . . . . . . . . . . . . . . . . . . . . . . .3-4
Installing on Macintosh . . . . . . . . . . . . . . . . . . . . . . . . . . . . . . 3-5
Using the Chooser to select your printer . . . . . . . . . . . . . . . 3-6
Setting up Your Printer on a Network . . . . . . . . . . . . . . . . . 3-7
3
Setting up the Printer with Your Macintosh
3-1
Page 58

Connecting the Printer to Your Macintosh
The method you use to connect the printer to your Macintosh
depends on whether you want to send print jobs directly to the
printer using the printer’s built-in USB interface, or send print jobs
to the printer over a network using an optional interface card. For
information on using an optional interface card, see Chapter 6,
“Using an Optional Interface Card.”
Using the built-in USB interface
To use the printer’s built-in USB interface, you will need a USB
interface cable. Then follow the steps below to connect the printer
to your computer.
1. Make sure both the printer and computer are turned off.
2. Plug the cable connector securely into the printer’s USB port.
3-2
Setting up the Printer with Your Macintosh
Page 59

3. Plug the other end of the cable into the computer’s USB port
on the back of the Macintosh.
Now see “Installing the Printer Software on Macintosh” on page
3-3. You must install the printer software before using your
printer.
3
Installing the Printer Software on Macintosh
After connecting the printer to your Macintosh, you are ready to
install the printer software included in the “Printer Software for
EPSON Stylus PRO 10000/10000CF” CD-ROM shipped with
your printer.
Setting up the Printer with Your Macintosh
3-3
Page 60

Printer software components
Your printer software includes the following items.
EPSON Printer Driver Package
❏ SPro 10000/10000CF
This is the printer driver software that runs your printer. With
it, you can make settings such as Media Type, Print Quality,
and Paper Size.
❏ EPSON Monitor3
Monitors and manages background printing jobs. You must
turn on background printing in the Chooser to use this utility.
❏ EPSON StatusMonitor
Keeps track of the current status of your printer, and alerts
you when printer errors occur.
❏ Nozzle Check
Checks for clogged nozzles.
❏ Head Cleaning
Cleans the print heads to maintain the best print quality.
❏ Print Head Alignment
Adjusts the print heads so that vertical and horizontal lines
are aligned.
❏ Printer and Option Information
Enables you to make ON/OFF settings for the photo printing
accelerator.
3-4
Setting up the Printer with Your Macintosh
Page 61

Installing on Macintosh
Caution:
c
Follow these steps to install your printer software.
Turn off all virus protection programs before you install your
printer software.
1. Insert the software CD-ROM shipped with your printer in the
CD-ROM drive. The EPSON printer software disk opens
automatically.
2. Double-click EPSON STYLUS PRO 10000 or EPSON STYLUS
PRO 10000CF, then the Install Printer Driver/Utility folder.
3. If a single Installer icon appears, double-click the icon. If
separate folders containing installer icons for several
languages appear, double-click the folder for your preferred
language, then double-click the Installer icon inside it.
4. At the initial screen, click Continue. The following dialog box
appears.
3
Setting up the Printer with Your Macintosh
3-5
Page 62

5. To install the printer software included on your printer
software CD-ROM, make sure the Install Location box
displays the correct disk drive, then click Install.
6. When a message appears informing you that the installation
is complete, click Restart to restart your computer.
Using the Chooser to select your printer
After you have installed the printer software on your Macintosh,
you need to open the Chooser and select your printer. You must
select a printer the first time you use it or whenever you want to
switch to another printer. Your Macintosh will always print using
the last printer selected.
1. Select Chooser from the Apple menu. Then click your
printer's icon and the port your printer is connected to.
3-6
Setting up the Printer with Your Macintosh
Page 63

2. Select the appropriate Background Printing radio button to
turn background printing on or off.
With background printing on, you can use your Macintosh
while it is preparing a document for printing. In order to use
the EPSON Monitor3 utility to manage print jobs, background
printing must be turned on.
3. Close the Chooser.
For information on opening and using the printer software, see
“Printing From Your Macintosh” on page 4-8. If you use your
printer on a network, see “Setting up Your Printer on a Network”
on page 3-7.
Setting up Your Printer on a Network
This section tells you how to set up the printer for use on an
AppleTalk network. By setting up your local printer as a shared
printer, it becomes connected to the network and can be used by
other computers.
First, you need to setup the printer as a shared printer on the
computer to which it is connected. Then, you must specify the
network path to the printer from each computer that will use it,
and install the printer software on those computers.
3
Setting up the Printer with Your Macintosh
3-7
Page 64

Setting up your printer as a shared printer
Follow these steps to share a printer connected directly to your
computer with other computers on an AppleTalk network.
1. Turn on the printer.
2. Select Chooser from the Apple menu and click the printer’s
icon. Then select the port to which the printer is connected.
3. Click the Setup button. The following dialog box appears.
3-8
Setting up the Printer with Your Macintosh
Page 65

4. Select the Share this Printer check box, then type the printer
name and password information as needed.
5. Click OK. The name of the shared printer appears in the port
list in the Chooser.
6. Close the Chooser.
Accessing the printer through a network
To access your printer from another computer on the network,
follow these steps.
1. Turn on your printer.
2. On each computer from which you want to access the printer,
select Chooser from the Apple menu. Then click your
printer’s icon and select the printer port you want to use from
the Select a printer port box on the right. You can only select
from the printers connected to your current AppleTalk zone.
3
Setting up the Printer with Your Macintosh
3-9
Page 66

3. If the following dialog box appears, enter the password for
the printer, then click OK.
4. Select the appropriate Background Printing option button to
turn background printing on or off.
5. Close the Chooser.
3-10
Setting up the Printer with Your Macintosh
Page 67

Chapter 4
Printing and Printer Management
Printing From Your PC. . . . . . . . . . . . . . . . . . . . . . . . . . . . . . . . . . . 4-2
Making the printer driver settings. . . . . . . . . . . . . . . . . . . . . 4-2
Cancelling printing from your PC . . . . . . . . . . . . . . . . . . . . .4-7
Printing From Your Macintosh . . . . . . . . . . . . . . . . . . . . . . . . . . . . 4-8
Making the printer driver settings. . . . . . . . . . . . . . . . . . . . . 4-8
Cancelling printing from your Macintosh . . . . . . . . . . . . . . 4-11
4
Printing and Printer Management
4-1
Page 68

Printing From Your PC
After loading the paper, you are ready to print your document
from your PC.
Note:
To ensure the print quality, you may need to check the printer’s condition
before you start printing. See Chapter 5, “Checking the Printer’s
Condition.”
Making the printer driver settings
To make the basic settings to print your documents, access the
Main menu and Paper menu in the printer driver. In the Paper
menu, you can set particular settings for printing on roll paper;
Auto Rotate, Auto Cut, and Print Page Line.
For details about the printer software, see online help by pressing
the Help button in the driver settings window.
1. Click Print on the File menu. The Print dialog box appears.
4-2
Printing and Printer Management
Page 69

2. Make sure your printer is selected and then click Properties,
or Options. You may need to click a combination of these
buttons. The driver settings window appears.
3. Click the Main tab to display the Main menu.
4
4. Select the media you loaded in the printer from the Media
Type list.
Note:
❏ The Media Type setting determines what other settings are
available, so you should always make this setting first.
❏ There are some differences in the selectable media between
Stylus Pro 10000 and 10000CF.
5. In the Ink box, select Color to print in color, or Black to print
in black and white.
Printing and Printer Management
4-3
Page 70

6. Make sure the Automatic radio button in the Mode box is
selected.
Note:
When Automatic is selected, the printer driver takes control of all
detailed settings based on the current Media Type setting and Ink
setting.
7. Adjust Speed and Quality in the Mode box if a slider appears.
Drag the slider left or right depending on which is more
important. This setting is usually automatically decided in
accordance with your Media Type setting.
Note:
Depending on the Media Type you choose, a slider appears in the
Mode box.
8. Select Photo Printing Accelerator if it is available.
9. Click the Paper tab to display the Paper menu.
4-4
Printing and Printer Management
Page 71

10. Select the type of paper you loaded in the printer from the
Paper Source list.
11. Select the paper size you loaded in the printer from the Paper
Size list.
Note:
Most Windows applications feature paper size settings that override
similar settings in the printer driver.
12. When roll paper is used, set the Roll Paper Option as required.
Auto Rotate (unavailable for Roll Paper [Banner])
If your document length is shorter than the printable width
of the roll paper, the document will be turned automatically
by 90 degrees and printed crosswise when you select Auto
Rotate. You can save paper by using this function.
Auto Cut
Roll paper will be cut automatically after printing one page
when you select Auto Cut.
Print Page Line
Page lines will be printed on the right side and below the
document for manual cutting when you select Print Page
Line.
4
Save Roll Paper (available only for Roll Paper [Banner])
Select this check box when you wish to save roll paper. The
blank portion of the last page of your document is not fed
through the printer.
13. Make settings for Orientation, Copies, and Printable Area.
Printing and Printer Management
4-5
Page 72

14. Click the Layout tab to display the Layout menu.
15. Select Reduce/Enlarge and adjust the print image size if
necessary.
16. Click the OK button at the bottom of the window. The screen
returns to the Print Setup dialog (or a similar dialog) of your
application.
17. Click Print to print the document.
4-6
Printing and Printer Management
Page 73

While printing, the EPSON Progress Meter will appear, showing
the printing progress and the status of your printer.
For details, see “Printer Software” in your Online Guide.
Cancelling printing from your PC
To cancel the printing in progress, press the Stop button on the
EPSON Progress Meter.
4
You can also pause or restart printing. To pause printing, press
the Pause button. To resume printing, press this button again.
Caution:
c
When you stop printing in progress, you may need to start
printing again from the beginning for best result. Otherwise
misalignment or banding may appear on the printed image.
Printing and Printer Management
4-7
Page 74

Printing From Your Macintosh
After loading the paper, you are ready to print your document
from your Macintosh.
Note:
To ensure the print quality, you may need to check the printer’s condition
before you start printing. See Chapter 5, “Checking the Printer’s
Condition.”
Making the printer driver settings
To make the printer driver settings, follow the steps below.
For details about the printer software, see online help by pressing
the Help (marked with “?“) icon button in the driver setting dialog
boxes.
Note:
While many Macintosh applications override the settings made in the
printer driver, some do not, so you must verify the settings to get the
results you expect.
1. Choose PAGE SETUP from the File menu. This brings up the
Page Setup dialog box shown below.
4-8
Printing and Printer Management
Page 75

2. Select the paper size you loaded in the printer from the Paper
Size list.
3. Select the type of paper you loaded in the printer from the
Paper Source list.
4. Make settings for Orientation and Reduce or Enlarge as
required.
5. When roll paper is used, set the Roll Paper Option as required.
Auto Rotate (unavailable for Roll Paper [Banner])
If your document length is shorter than the printable width
of the roll paper, the document will be turned automatically
by 90 degrees and printed crosswise when you select Auto
Rotate. You can save paper by using this function.
Auto Cut
Roll paper will be cut automatically after a document is
printed when you select Auto Cut.
Print Page Line
Page lines will be printed on the right side and below the
document for manual cutting when you select Print Page
Line.
Save Roll Paper (available only for Roll Paper [Banner])
Select this check box when you wish to save roll paper. The
blank portion of the last page of your document is not fed
through the printer.
6. After making your settings, click the OK button to close the
Page Setup dialog box.
Note:
You cannot print from the Page Setup dialog box. You can only print
from the Print dialog box.
4
Printing and Printer Management
4-9
Page 76

7. Choose Print from the File menu. The Print dialog box appears
as shown below.
Note:
You can also open the Print dialog box by pressing the Options
button in the Page Setup dialog box.
8. Make the settings for Copies and Pages
9. Select the media you loaded in the printer from the Media
Type list.
Note:
The Media Type setting determines what other settings are
available, so you should always make this setting first.
10. In the Ink box, select Color to print in color, or Black to print
in black and white.
11. Make sure the photo printing accelerator is selected.
12. Make sure the Mode option is set to Automatic.
Note:
When Automatic is selected, the printer driver takes control of all
detailed settings based on the current Media Type setting and Ink
settings.
4-10
Printing and Printer Management
Page 77

13. Adjust Speed and Quality in the Mode box if a slider appears.
Drag the slider left or right depending on which is more
important. This setting is usually automatically decided in
accordance with your Media Type setting.
Note:
Depending on the Media Type you choose, a slider appears in the
Mode box.
14. Click the Print button to start printing.
Cancelling printing from your Macintosh
To cancel the printing in progress, follow the instructions below.
Caution:
c
When background printing is on
When you stop printing in progress, you may need to start
printing again from the beginning for best result. Otherwise
misalignment or banding may appear on the printed image.
4
1. Press the Power button to turn off the printer.
2. Select EPSON Monitor3 from the application menu.
Printing and Printer Management
4-11
Page 78

3. Click the button, then click the stop button to cancel the
print job.
When background printing is off
1. Press the Power button to turn off the printer.
2. Hold down the
period key to cancel the print job.
4-12
Printing and Printer Management
J key on your keyboard and press the [.]
Page 79

Chapter 5
Checking the Printer’s Condition
Using Printer Utilities . . . . . . . . . . . . . . . . . . . . . . . . . . . . . . . . . . . . 5-2
Accessing the printer utilities . . . . . . . . . . . . . . . . . . . . . . . . . 5-2
Printing the Nozzle Check Pattern . . . . . . . . . . . . . . . . . . . . . . . . .5-3
Cleaning the Print Heads . . . . . . . . . . . . . . . . . . . . . . . . . . . . . . . . .5-4
Aligning the Print Heads . . . . . . . . . . . . . . . . . . . . . . . . . . . . . . . . . 5-6
5
Checking the Printer’s Condition
5-1
Page 80

Using Printer Utilities
To ensure the print quality, you may need to check the printer’s
condition using the following utilities from the printer software.
Note:
You can also check from the printer’s control panel. See “The Control
Panel“ in your Online Guide.
❏ Nozzle Check
❏ Print Head Cleaning
❏ Print Head Alignment
Accessing the printer utilities
To access the printer utilities, follow the steps below.
For Windows
1. Double-click the My Computer icon, then double-click the
Printers folder.
2. For Windows Me, 98, and 95, right-click your Printer icon,
then click Properties. For Windows 2000, right-click your
printer icon, then click Printing Preferences. For Windows
NT 4.0, right-click your Printer icon, then click Document
Defaults. The printer software window appears. Then click
the Utility tab.
For Macintosh
Click Print on the File menu of your application. Then click the
utility icon in the Print dialog box.
5-2
Checking the Printer’s Condition
Page 81

Printing the Nozzle Check Pattern
You can check the print head nozzles from your computer with
the Nozzle Check utility in the printer software.
Note:
Do not start the Nozzle Check utility while printing is in progress;
otherwise, your printout may be marred.
Follow the steps below:
1. Make sure the printer is turned on and paper is loaded in the
printer. (A4 or wider paper)
2. Access the printer software. See “Accessing the printer
utilities” on page 5-2.
3. Click the Nozzle Check button.
4. Follow the messages on your screen.
The printer prints an operational check page including firmware
(ROM) version information and a nozzle check pattern. The
nozzle check pattern will resemble one of the two samples shown
below:
Good condition: Print heads do not require cleaning.
Poor condition: Print heads require cleaning.
Note:
Actual tests are printed in color.
5
Checking the Printer’s Condition
5-3
Page 82

If any segments of printed lines are missing in your nozzle check
pattern, ink nozzles are clogged and the print heads require
cleaning.
Caution:
Make sure that the nozzle check pattern printing is complete
c
before you start printing. Otherwise, print quality may decline.
Cleaning the Print Heads
You can execute the head clean from your computer using the
Head Cleaning utility in the printer software, as explained in the
following steps.
Note:
❏ Print head cleaning uses ink. To avoid wasting ink, clean the print
heads only if print quality declines.
❏ Use the Nozzle Check utility to confirm that the print heads need to
be cleaned, as this uses only a little ink.
❏ When an Ink Out light is flashing (ink low) or on (ink out) in the
printer, you cannot clean the print heads before replacing the
appropriate ink cartridge first.
❏ Do not start the Head Cleaning or Nozzle Check utilities while
printing is in progress; otherwise, your printout may be marred.
5-4
Checking the Printer’s Condition
Page 83

1. Make sure the lights on the control panel do not indicate that
ink is low or ink is out.
2. Access the printer software. See “Accessing the printer
utilities” on page 5-2.
3. Click the Head Cleaning button.
4. Follow the messages on your screen.
The Pause light of the printer flashes during the cleaning
cycle, which takes about one minute to complete.
Caution:
c
5. When the Pause light is on, click Print nozzle check pattern
(Windows) or the Confirmation button (Macintosh) in the
Head Cleaning dialog box, or print a few lines from a
document, to confirm that the heads are clean.
In the check pattern, if you find that segments are still missing
from the test lines, you may need to repeat head cleaning and
print the nozzle check pattern again.
Never turn off the printer until the cleaning cycle is finished
and the Pause light has stopped flashing. Doing so may
damage the printer.
5
If print quality does not improve even after repeating this
procedure several times, turn the printer off leave it alone
overnight. Then, clean the head again.
If print quality remains a problem after replacing the ink
cartridges, contact your dealer.
Checking the Printer’s Condition
5-5
Page 84

Aligning the Print Heads
You can align the print heads using the Print Head Alignment
utility in the printer software.
Note:
❏ Do not start the Print Head Alignment utility while printing is in
progress; otherwise, your printout may be marred.
❏ Alignment pattern printing requires 0.5 m roll paper.
Follow the steps below:
1. Make sure the printer is turned on, and the EPSON special
roll paper you plan to use is loaded in the printer.
Note:
If you plan to use paper other than EPSON special paper, you may
need to align the print heads using the SelecType settings. See
“Paper Handling“ in your Online Guide.
2. Access the printer software. See “Accessing the printer
utilities” on page 5-2, depending on your system.
3. Click the Utility tab in the printer software window (Windows)
or the utility icon in the Print or Page Setup dialog box
(Macintosh), then click the Print Head Alignment button.
4. Follow the messages on your screen. The printer prints the
head alignment patterns.
5-6
Checking the Printer’s Condition
Page 85

5. Choose the set number that has the smallest gap in each
alignment pattern. In the example below, set number 8 has
the smallest gaps.
6. Select the number you chose in step 5 (for example,
number 8), then click Finish.
Note:
If the set with the smallest gap is unclear and cannot be selected,
click the Realignment button and repeat from step 5.
5
Checking the Printer’s Condition
5-7
Page 86

5-8
Checking the Printer’s Condition
Page 87

Chapter 6
Using an Optional Interface Card
Available Optional Interface Cards . . . . . . . . . . . . . . . . . . . . . . . . 6-2
Installing the Optional Interface Card . . . . . . . . . . . . . . . . . . . . . . 6-2
6
Using an Optional Interface Card
6-1
Page 88

Available Optional Interface Cards
The optional Ethernet Interface Cards shown below let you use
your printer on a network. The Ethernet card automatically
detects the protocols on your network, so you can print from
Windows Me, 98, 95, 2000, NT 4.0, and Macintosh on an
AppleTalk network.
EPSONNet 10/100 BASE TX Int. Printer Server
IEEE 1394 I/F card
Note:
The asterisk in the product number is a substitute for the last digit which
varies by country.
Installing the Optional Interface Card
To install an optional interface card, follow these steps:
Note:
Before you install the optional interface card, see the documentation that
comes with the card for setup information.
1. Make sure the printer is turned off.
2. Make sure that the power cord is unplugged from the
electrical outlet.
Warning:
w
Do not install the interface card when the printer is
connected to an electrical outlet, as damage may occur.
C82384✽
C82372✽
3. Disconnect the existing interface cable, if necessary.
6-2
Using an Optional Interface Card
Page 89

4. Use a cross-head screwdriver to remove the two screws
securing the shield plate to the optional interface slot; then lift
off the plate. Be sure to keep the screws; you may need to use
them again when you re-install the shield plate.
5. Set any DIP switches and jumper on the card, if necessary. See
the interface card’s documentation for details.
6. Slide the interface card along the slots on both sides of the
interface compartment. Push it in firmly to fully insert the
connector at the rear of the interface card into the printer’s
internal socket.
6
Using an Optional Interface Card
6-3
Page 90

7. Secure the interface card in the slot with the two screws
included with the interface card.
8. Connect a compatible interface cable to the interface card and
to your computer. If the cable has a ground wire, secure it with
one of the screws.
Also, if you are using more than one computer, reconnect the
other interface cable.
9. Make sure the printer is turned off. Then plug in the power
cord.
To remove an interface card, follow the above steps in reverse
order.
6-4
Using an Optional Interface Card
Page 91

EPSON OVERSEAS MARKETING LOCATIONS
Epson America, Inc.
3840 Kilroy Airport Way
Long Beach, CA 90806
Phone: (562) 981-3840
Fax: (562) 290-5220
EPSON DEUTSCHLAND GmbH
Z lpicher Stra e 6,
40549 D sseldorf Germany
Phone: (0211) 56030
Fax: (0211) 5047787
EPSON AUSTRALIA PTY. LTD.
70 GIBBES STREET,
CHATSWOOD 2067 NSW.
Phone: 2-9903-9000
Fax: 2-9903-9177
EPSON HONG KONG LTD.
Rooms 4706-10, 47/F,
China Resources Bldg.,
26 Harbour Road, Wanchai, Hong Kong
Phone: 2585-4300
Fax: 2827-7083
EPSON ITALIA S.p.A.
V.le F.lli Casiraghi 427
20099 Sesto S.Giovanni
MI, Italy
Phone: +3902262331
Fax: +39022440750
EPSON UK LTD.
Campus 100, Maylands Avenue,
Hemel Hempstead, Herts,
HP2 7TJ, U.K.
Phone: (+44) 01442 261144
Fax: (+44) 01442 227227
EPSON FRANCE S.A.
68 bis, rue Marjolin
92300, Levallois-Perret, France
Phone: 33.1.41.86.26.56
Telex: 610657
EPSON SINGAPORE PTE. LTD.
No. 1 Temasek Avenue #36-00
Millenia Tower, Singapore 039192
Phone: (065) 33 77 911
Fax: (065) 33 41 185
EPSON TAIWAN TECHNOLOGY &
TRADING LTD.
10F, No. 287 Nanking E. Road, Sec. 3,
Taipei, Taiwan, R.O.C.
Phone: (02) 717-7360
Fax: (02) 712-9164
EPSON IBERICA S.A.
Av. de Roma, 18-26
08290 Cerdanyola del Valles
Barcelona, Spain
Phone: 582. 15.00
Fax: 582. 15.55
SEIKO EPSON CORPORATION
(Hirooka Office)
80 Harashinden, Hirooka
Shiojiri-shi, Nagano-ken
399-0785 Japan
EPSON PORTUGAL, S.A.
R. do Progresso, 471, 1 Perafita
4460 Matosinhos, Portugal
Phone: (02) 996 14 02
Fax: (02) 996 14 11
2001 January
Page 92

Color Ink Jet Printer
Startup Guide
Printed in Japan
XX.XX-XX
 Loading...