

Page 1
Unpacking
and Assembly Guide
Copyright ©2001 by SEIKO EPSON CORPORATION, Nagano, Japan
XXXXXXX-XX
XXX-00
Page 2

Page 3

Contents
Choosing a Place for the Printer. . . . . . . . . . . . . . . . . . . . . . . . . . . . . . . . . . . . . . . 2
Deciding Where to Unpack the Printer . . . . . . . . . . . . . . . . . . . . . . . . . . . . . . . . . 2
Unpacking and Assembling the Base Unit . . . . . . . . . . . . . . . . . . . . . . . . . . . . . . 2
Unpacking the base unit . . . . . . . . . . . . . . . . . . . . . . . . . . . . . . . . . . . . . . . . . . . . . . . . . . 2
Assembling the base unit . . . . . . . . . . . . . . . . . . . . . . . . . . . . . . . . . . . . . . . . . . . . . . . . . . 3
Assembling the Printer . . . . . . . . . . . . . . . . . . . . . . . . . . . . . . . . . . . . . . . . . . . . . . . 4
Unpacking the printer unit . . . . . . . . . . . . . . . . . . . . . . . . . . . . . . . . . . . . . . . . . . . . . . . . . 4
Checking the printer unit box contents . . . . . . . . . . . . . . . . . . . . . . . . . . . . . . . . . . . . . . 5
Mounting the printer unit on the base unit. . . . . . . . . . . . . . . . . . . . . . . . . . . . . . . . . . . . 5
Attaching the paper basket . . . . . . . . . . . . . . . . . . . . . . . . . . . . . . . . . . . . . . . . . . . . . . . 7
Connecting the power cord . . . . . . . . . . . . . . . . . . . . . . . . . . . . . . . . . . . . . . . . . . . . . . . 9
Reusing the Packaging . . . . . . . . . . . . . . . . . . . . . . . . . . . . . . . . . . . . . . . . . . . . . .9
i
Page 4
English
Important:
To avoid damage to the unit, read this
manual and follow the instructions
carefully.
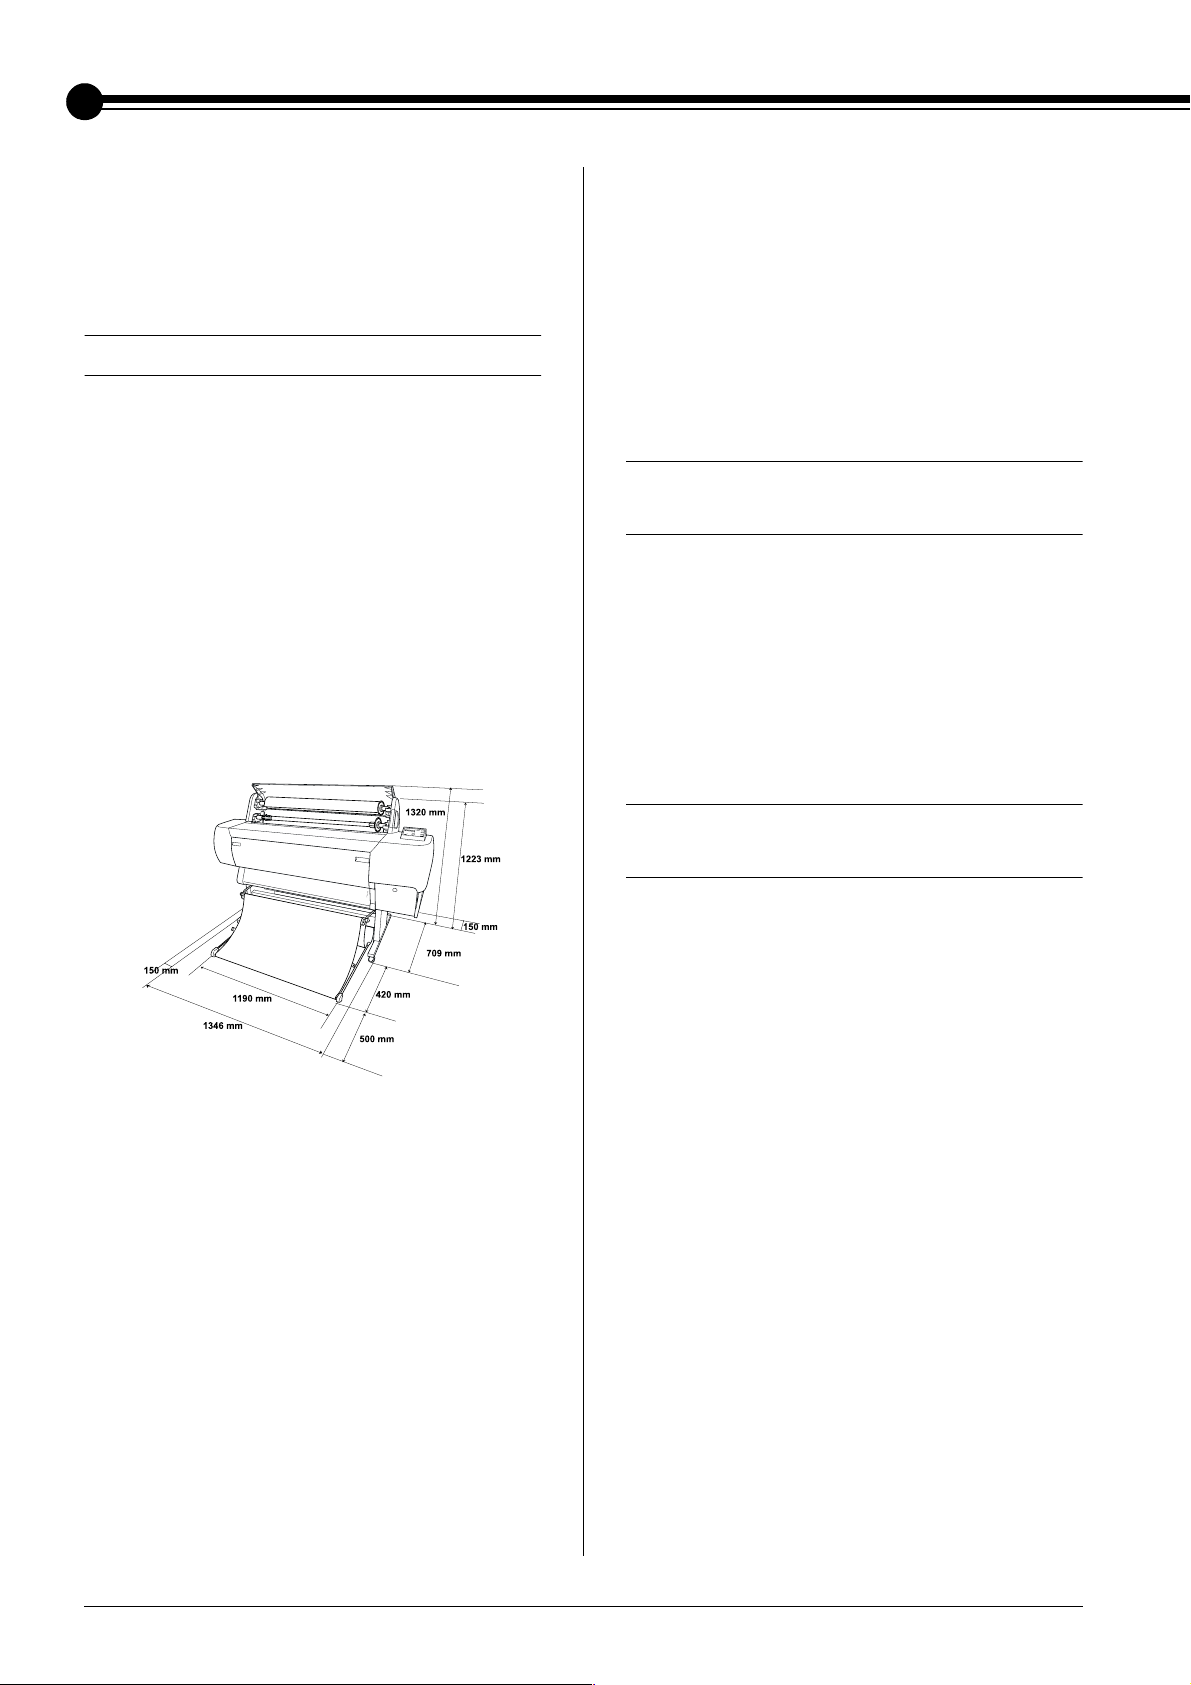
Choosing a Place for the Printer
❏ Leave adequate room for easy operation,
maintenance and ventilation.
❏ Choose a location that can hold the printer
weight (about 132 kg with stand).
❏ Make sure the surface is flat and stable.
❏ Use a grounded power outlet; do not use a
damaged or frayed power cord. Avoid using
an outlet that is shared with other appliances.
❏ Use only an outlet that meets the power
requirements of this printer.
❏ Avoid locations near TVs, radios, air
conditioners, or humidifiers.
❏ Avoid locations that are subject to shocks or
vibrations.
❏ Keep the printer away from combustible
substances.
❏ Keep the printer away from dusty areas.
Deciding Where to Unpack the Printer
❏ Setup and assemble the printer near to the
chosen place of use, as moving the printer may
result in damage.
❏ Allow floor space of 4 × 4 m approx., and
height of at least two times that of the larger
box containing the printer unit.
❏ Operate the printer under the following
conditions:
Temperature: 10 to 35ºC
Humidity 20 to 80% without condensation
❏ Avoid locations that are subject to direct
sunlight, excessive heat, moisture, or dust.
❏ Do not block the ventilation openings.
Unpacking and Assembling the Base Unit
Unpacking the base unit
Open and check the contents of the smaller box
containing the base unit.
❏ Avoid locations near potential sources of
interference such as loud speakers or cordless
phones.
1
Page 5

Parts: Tools:
AB
C
D
E
H
I
J
H: Hex wrench
I: Hex socket head bolt, M6 × 30 (8)
J: Wing nuts (2)
F
A: Base upright, left
B: Base upright, right
C: Horizontal struts (2)
D: Basket hooks, long (2)
E: Basket hooks, short (2)
F: Stanchion pins (2)
G: Paper basket
G
J is for connecting the printer unit to the base unit.
2
Page 6

Assembling the base unit
c
1. Hold base upright left (A) and a horizontal
Caution:
Have two people working on either side to
assemble the base unit (26 kg).
strut as shown. Then fix the strut to the base
using the two M6 × 30 hex socket head bolts
(B) with the hex wrench.
Note:
❏ An instruction sticker about the setting paper
basket is attached to the side of a horizontal
strut. Attach the strut front so that you can
read the instructions.
❏ Do not fasten the screws too tight. Leave a
room to adjust the position when you fasten
the screw on the other base upright.
B
Assembling the Printer
Unpacking the printer unit
c
1. Open the box containing the printer unit and
Caution:
The printer unit is heavy and unwieldy. Have
two people unpack the printer unit, and four
people place the printer unit on top of the base
unit.
remove the accessory box (E), the polystyrene
foam (F), and roll paper spindles (G).
E
G
F
F
A
2. Referring the Step 1, fix the other strut to the
base.
3. Hold the base upright left (C) as shown below,
fix the two struts to the base using the four M6
× 30 hex socket head bolts (D) with the hex
wrench.
C
D
4. Fasten eight screws on the both sides of the
base upright securely.
2. Lift the box up and away from the printer unit,
then fold it and set aside. Also remove the
document box (H) and ink accessory kit (I).
I
H
This completes assembly of the base unit. Before
attaching the paper basket, mount the printer on
the base unit.
3
Page 7

3. Take out the cardboard panels from around
the printer.
Checking the printer unit box contents
Make sure that all of the items shown below are
included, and are not damaged.
J
J: Printer unit
K: Roll paper spindles
L: Roll paper
(EPSON Semigloss Photo Paper; 5 m)
M: Roll paper belts
(for keeping roll paper wound up)
N: Ink cartridges (Yellow, Cyan, Magenta, Light
Cyan, Light Magenta, Black)
O: Power cord
(In the document box)
Note:
❏ The shape of the AC plug varies by country; be sure
the plug included is the right shape for your
location.
❏ The power cord location varies form country to
country. If you can not find the power cord in the
document box, see the polystyrene foam (F)
mentioned in “Unpacking the printer unit” on
page 3.
Mounting the printer unit on the base unit
1. Position the base unit in front of the printer
unit as shown.
K
L
N
M
O
4
Page 8

2. Lock the two casters (A) and extend the two
stabilizer knobs (B) underneath the base unit.
top view
A
3. Lift the printer unit by the eight hand grips
shown below. Then insert the printer unit into
the guide pins on the base unit.
c
Note:
When you place the printer on the base unit, match
the right end square of the printer (shown as 4 inthe
illustration below) to the square of the same part of
the base unit.
Caution:
Do not attempt to lift the printer unit with
fewer than four people.
B
4. Screw the two wing nuts (C) into the left and
right joint holes at the side-inner of the base
unit, and tighten them.
C
5. Release the front casters and the stabilizer
knobs and move the printer to the place of use
(a short distance away). Lock the casters and
extend the stabilizer knobs after moving.
6. Remove the protective materials:
C
D
E
D: from the lower cover (tapes).
E: from the platen (tapes).
F: from the side of the print head compartment
(fixing metal plate inside the lower cover).
7. Close the lower cover.
Caution:
c
Watch your fingers when opening and
closing the lower cover.
F
5
Page 9

Attaching the paper basket
1. Insert the stanchion pins (G) to the hole on the
the base uprights backward.
G
2. Fully insert and attach the short basket hooks
to the upper guides of base upright left and
right.
4. Turning the stitch side downward, spread the
paper basket on the floor.
5. Holding the rear side shaft, pass it under the
horizontal struts and insert the both joint
sockets (H) on the stanchion pins.
3. Likewise, fully insert and attach the long
basket hooks to the lower guides.
H
6. Slide out the upper basket hooks to their full
length.
6
Page 10

7. Hook the both ends of the center shafts (I) on
the upper basket hooks.
I
8. Hold the front side shafts (J) and turn it one
revolution as shown below.
J
Connecting the power cord
1. Connect the power cord to the AC inlet on the
back of the printer.
2. Attach the three clamps packed with your
printer, then route the power cord through the
clamps at the rear of the printer.
9. Slide out the lower basket hooks to their full
length, then attach the L shape ends to the joint
sockets (K) on the front side.
K
10. Slide the upper and lower basket hooks back.
11. Hook the basket rings in the direction shown
below to take up the slack.
3. Check the label on the back of the printer to
make sure the voltage required by the printer
matches that of the electrical outlet you are
using.
4. Plug the power cord into a properly grounded
electrical outlet.
Caution:
c
Do not use an outlet that is controlled by an
automatic timer or wall switch. Otherwise,
accidental shut down or damage to your
printer may occur.
Reusing the Packaging
If you need to transport your printer a long
distance, the printer should be repacked using the
original boxes and packing materials. Contact
your dealer for assistance.
7
Page 11

8
Page 12

Printed in Japan 00.xx-xx
 Loading...